

Page 1
DIRECTV
®
Big Button Remote
USER GUIDE
Page 2

2
TABLE OF CONTENTS
Installing Batteries . . . . . . . . . . . . . . . . . . . . . . . . . . . . . . . . . . . . . . . 3
To Install Batteries: . . . . . . . . . . . . . . . . . . . . . . . . . . . . . . . . . 3
Battery Use And Safety . . . . . . . . . . . . . . . . . . . . . . . . . . . . . . . 3
Features and Functions . . . . . . . . . . . . . . . . . . . . . . . . . . . . . . . . . . .4
Programming a Device. . . . . . . . . . . . . . . . . . . . . . . . . . . . . . . . . . . . 5
Searching for Your Code . . . . . . . . . . . . . . . . . . . . . . . . . . . . . . . . . .6
Checking the Codes . . . . . . . . . . . . . . . . . . . . . . . . . . . . . . . . . . . . . . 7
Changing Volume Lock . . . . . . . . . . . . . . . . . . . . . . . . . . . . . . . . . . . .7
Unlocking Volume Control for a Single Device (Individual
Volume Unlock) . . . . . . . . . . . . . . . . . . . . . . . . . . . . . . . . . .8
Locking Volume Control to One Mode (Global Volume Lock). .8
Unlocking All Volume Control. . . . . . . . . . . . . . . . . . . . . . . . . . 8
Changing Channel Lock . . . . . . . . . . . . . . . . . . . . . . . . . . . . . . . . . . . 8
Locking Channels . . . . . . . . . . . . . . . . . . . . . . . . . . . . . . . . . . . 8
Unlocking Channels . . . . . . . . . . . . . . . . . . . . . . . . . . . . . . . . . 8
Clearing Custom Programming . . . . . . . . . . . . . . . . . . . . . . . . . . . . .8
Troubleshooting . . . . . . . . . . . . . . . . . . . . . . . . . . . . . . . . . . . . . . . . .9
Care. . . . . . . . . . . . . . . . . . . . . . . . . . . . . . . . . . . . . . . . . . . . . . . . . . . 9
Specifications . . . . . . . . . . . . . . . . . . . . . . . . . . . . . . . . . . . . . . . . . . 10
FCC Notice . . . . . . . . . . . . . . . . . . . . . . . . . . . . . . . . . . . . . . . . . . . . 10
DIRECTV Setup Codes . . . . . . . . . . . . . . . . . . . . . . . . . . . . . . . . . . . .11
Setup Codes for DIRECTV Receivers . . . . . . . . . . . . . . . . . . . 11
Setup Codes for DIRECTV HD Receivers. . . . . . . . . . . . . . . . . 11
Setup Codes for DIRECTV DVRs . . . . . . . . . . . . . . . . . . . . . . .12
Manufacturer’s Codes . . . . . . . . . . . . . . . . . . . . . . . . . . . . . . . . . . .13
Setup Codes for TVs . . . . . . . . . . . . . . . . . . . . . . . . . . . . . . . .13
Setup Codes for VCRs. . . . . . . . . . . . . . . . . . . . . . . . . . . . . . . 19
Setup Codes for DVD Players . . . . . . . . . . . . . . . . . . . . . . . . . 24
Setup Codes for Audio Amplifiers/Tuners. . . . . . . . . . . . . . . .27
Setup Codes for Audio Amplifiers. . . . . . . . . . . . . . . . . . . . . . 30
Page 3

3
INSTALLING BATTERIES
Your DIRECTV® Big Button Remote requires two AA
alkaline batteries (included).
To Install Batteries:
1. Open the battery compartment cover (located on
the back of the remote).
2. Place the AA batteries in the compartment and
match the + and - polarity symbols inside.
3. Replace the cover.
Battery Use And Safety
• Use only fresh batteries of the required size and
reco mmended type.
• Do not mix old and new batteries, different types of
batteries (th at is, standar d , alkaline, or rec har geab le),
or rechargeable batteries of different capacities.
Made in China
Made in China
Made in China
1
2
3
Page 4

4
• If you do not plan to use the remote for an extended
period, remo ve the batt eries. They can leak c hemical s
that can destroy electronic parts.
WARNING: Dispose of old batteries promptly and prop-
erly. Do not burn or bury them.
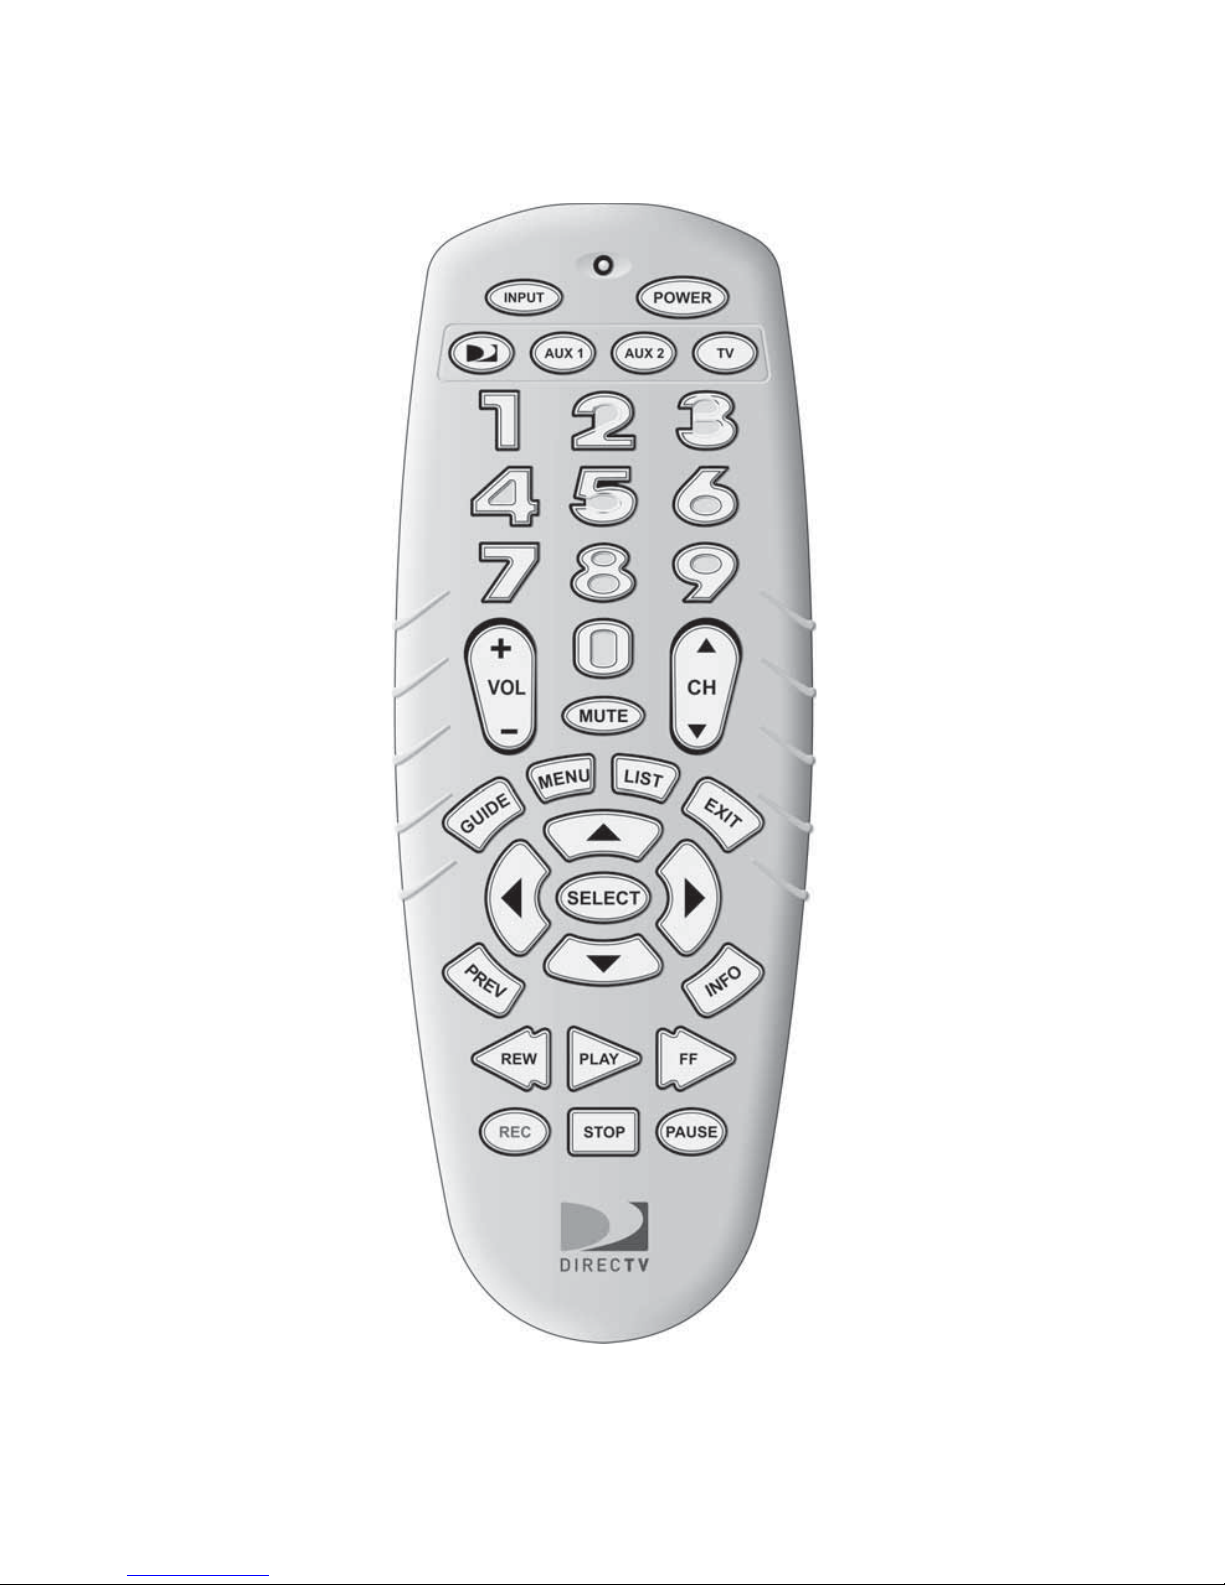
FEATURES AND FUNCTIONS
NOTE: The DIRECTV Big Button Remote does not
support some DIRECTV Interactive Applications.
NOTE: If you are using your DIRECTV Big Button
Remote with an HD receiver, you cannot
change the HD format with the remote. To
adjust HD display settings, use your receiv er’s
front-panel RES butt on and the Display option
under System Settings in the Quick Menu.
Press this key… To…
Select a device to control.
puts the remote into DIRECTV
mode. This is the mode you use to
watch TV with your DIRECTV
Receiver.
Turn on or off the select ed device.
Switch the TV's input to view TV or
video programs.
Use these keys to control your
DIRECTV DVR, or your VCR, DVD
or CD/DVD player.
On a DIRECTV Plus DVR, pressing
REC enables one-touch record for
any selected program.
Display the DIRECTV program
Guide.
Display your TO DO list of programs.
(Not available on all DIRECTV
Receivers.)
Exits any menu and returns to the
last channel viewed in DIRECTV
mode; exits the menu for another
selected device.
Page 5

5
PROGRAMMING A DEVICE
The DIRECTV Big Button Remote comes preprogrammed to operate a DTV Receiver or DVR. To
control devices other than default brands, follow these
steps; otherwise, skip this section.
Before proceeding, find the codes for the devices you
want to program in Manufacturer's Codes and write
them down or highlight them. (See “Manufacturer’s
Codes” on page13.)
NOTE: To program a TV/DVD, TV/VCR/DVD, or TV/
VCR Combo, use the AUX 1 or AUX 2 key.
1. Turn on the device (for example, TV) and, if
needed, load media (for example, DVD).
Use the arrows to m
ove the cursor in
the progra
m Guide and menu
screens. Press SELECT to choose
options from the selected device's
menu or Guide.
Display the Quick Menu in
DIRECTV mode, or other menu for
another selected device.
View the current channel and
program information.
Raise or lower the sound level.
Turn the sound off or on.
Select the next or previous channel.
Select next or previous chapter on
some models of DVD players.
When in the DIRECTV Guide or
other menu, CH+ (or CH- ) allows
you to page up (or down) through a
list of items.
Recall the last-viewed channel.
Directly enter channels (for
example, 09 or 31).
Press this key… To…
Page 6

6
2. On the remote, press and release the appropriate
mode key for the device you want to program (that
is, DIRECTV, TV, AUX 1, or AUX 2).
3. Press and hold the mode key until the green LED
flashes twice. Release the key.
4. Enter the first five-digit code for your device. The
LED blinks once as each digit is entered. If the code
is correct, the LED blinks twice.
NOTE: If the LED doe s n ot blink twice, repeat steps 2
to 5 and try entering the code again.
5. Aim the remote at the device and press POWER (or
PLAY, if it does not have a POWER key). The device
should turn off. If it does not, repeat steps 2 to 6,
trying each code for your brand until you find one
that works. If you cannot find a code that works,
see Searching for Your Code.
6. Repeat steps 1 to 5 for each device. For future
reference, write down each working device code in
a safe place.
SEARCHING FOR YOUR CODE
If your device does not respond to the remote after
trying all codes listed for your brand, or if your brand is
not listed, try searching for your code. For example, to
search for a code for your TV:
1. Pr e ss an d h o ld TV until the green LED blinks twice.
2. Enter 9 9 1. The LED blinks twice.
3. Enter the device ID code, accord ing to the
following table:
4. Aim the remote at the TV and press POWER. The
remote sends IR codes from its library to the
selected device, starting with the most popular
code first.
NOTE: This process may take up to 30 minutes.
5. If the TV responds, go to step 6. If the TV does not
respond, press CHS. The remote tries the next
code. Continue until the TV responds.
NOTE: Press CHT to try the previous code.
6. To lock in the code, press SELECT once. The LED
blinks twice.
Device Type Device ID Code
DIRECTV Receivers 0
TVs 1
VCRs, DVD players, or PVRs 2
Audio Amplifiers or Audio
Amp/Tuners
3
Page 7

7
7. To search fo r other device c odes, r epea t step s 1 to 6,
substituting the appropriate key for the device.
CHECKING THE CODES
If you have set up the remote using the procedure in
Searching for Your Code, yo u may need to find out whic h
four-digit code is operating your equipment.
For example, to find out which code is assigned to your
TV:
1. Pr ess and ho ld TV un til the gr een LED blinks twice .
2. Enter 9 9 0. The LED blinks twice.
3. To view the code for the first digit, press 1. Count
the LED blinks (for ex amp le, thr ee blinks = 3), and
write down the number.
NOTE: If a code digit is 0, the LED does not blink.
4. Repeat step 4 for the four remaining digits, using 2
for the second digit, 3 for the third digit, 4 for the
fourth digit, and 5 for the fifth digit.
5. To check for othe r d evice codes, repeat steps 1 to 4,
substituting the appropriate key for each device
you are checking.
CHANGING VOLUME LOCK
CAUTION: Changing the volume lock settings could
negatively affect your DIRECTV Receiver’s operation.
Please read these instructions thoroughly before making
any changes. For example, changing the volume lock
settings can cause your DIRECTV Receiver not to
control your TV’s volume when in DIRECTV mode. This
could cause you not to be able to control the volume if
your amplifier is turned off and your TV is muted.
Your DIRECTV Big Button Remote is preset so the
volume keys always control the volume on the TV you've
set up on the remote when the remote is in DIRECTV
mode. However, you can change this setting so the
remote controls another device, such as a home theater
amplifier. To enable this feature, perform the following
steps:
NOTE: You cannot lock the volume to DIRECTV mode,
or to AUX 1/AUX 2 modes if those modes are
set up for a DIRECTV Receiver.
Unlocking Volume Control for a Single Device
(Individual Volume Unlock)
1. Select and hold the mode key for the device to
unlock for volume control until the green LED
blinks twice.
2. Enter 9 9 3 and then press VOL-. The LED blinks
four times.
Page 8

8
3. Repeat steps 1 to 2 for any other device that you
want to have independent volume control.
Locking Volume Control to One Mode (Global Volume
Lock)
1. Select and hold the mode key for a device (for
example, TV) until the green LED blinks twice.
2. Enter 9 9 3 and then press the key for a second
device (for example, AUX 1 to control the volume of
an audio amplifier). The LED blinks twice. Now
when you press VOL+, VOL-, or Mute, the selected
device (for example, AUX 1) controls the volume
regardless of the current mode.
Unlocking All Volume Control
1. Select and hold the mode key for a device (for
example, TV) until the green LED blinks twice.
2. Enter 9 9 3 and then press VOL+. The LED blinks
four times. Volume is independently controlled for
all programmed devices.
CHANGING CHANNEL LOCK
CAUTION: Changing the channel lock settings could
negatively affect your DIRECTV Receiver’s operation.
Please read these instructions thoroughly before making
any changes.
The DIRECTV Big Button R emote comes preset to allow
independent channel control of each selected device.
However, you may change the Channel Lock setting so
that the DIRECTV Receiver’s (DIRECTV mode
only) channel keys control the channels in all other
modes.
Locking Channels
1. Press and hold the DIRECTV key until the green
LED flashes twice.
2. Enter 9 7 3 and then press CHS The LED blinks
twice. Now when you press CHS or CHT, the
satellite receiver controls the channels regardless of
the current mode.
Unlocking Channels
1. Press and hold the DIRECTV key until the green
LED flashes twice.
2. Enter 9 7 3 and then press CHT The LED blinks
four times. N o w when y o u press CHS or CHT, the
individual devices control the channels.
CLEARING CUSTOM PROGRAMMING
Your DIRECTV Big Button Remote includes a Custom
Programming Reset feature. You can use it t o remove all
custom programming.
Page 9

9
IMPORTANT: Executing this program erases all custom
settings for Volume Lock and Channel Lock.
1. Press and hold a device key (for example,
DIRECTV).
2. Enter 9 8 1. The last-selected device key blinks
twice, pauses, and blinks twice again to confirm
that all custom programming is cleared.
TROUBLESHOOTING
PROBLEM: Light at the top of the remote blinks when
you press a key, but the component does not respond.
SOLUTION 1: Try repl acin g the batteries. (See “In stallin g
Batteries” on page3.)
SOLUTION 2: Make sure you are aiming the DIRECTV
Big Button Remote at your home entertainment
component and that you are within 15 feet of the
component you are trying to control.
PROBLEM: The DIRECTV Big Button Remote does not
control component or commands are not recognized
properly .
SOLUTION: Try all listed c odes f or th e device b rand being
set up. Make sure all components can be operated with
an infrared remote control.
PROBLEM: TV/VCR combo does not respond properly.
SOLUTION: Use the VCR codes for your brand. Some
combo units may require both a TV code and a VCR
code for full opera tion. (See “P r ogramming a Device ” o n
page5.)
PROBLEM: CH+, CH-, and PREV do not work for your
RCA TV.
SOLUTION: Due to RCA design for certain models (1983-
1987), only the original remote control operates these
functions.
PROBLEM: Changing channels does not work properly.
PROBLEM: Remote control does not turn on Sony or
Sharp TV/VCR Combo.
SOLUTION: For po wer on, these pr od ucts r eq uire setting
up TV codes on the remote control. For Sony, use TV
code 0000 and VCR code 0032. For Sharp, use TV code
0093 and V CR c ode 0048. (See “P rogramming a Device ”
on page5.)
CARE
• Keep the remote dry. If it gets wet, wipe it dry
immediately.
• Use and store the unit only in normal temperature
environments.
Page 10

10
• Handle the remote gently and carefully. Don’t drop it.
• Wipe the remote with a damp cloth to keep it looking
like new.
Modifying or tampering with the internal parts can
cause damage and invalidate the warranty.
SPECIFICATIONS
Power(2) AA Alkaline Batteries
Size (H x W x D)7.67 x 2.44 x 1.42 in.
(195 x 72.5 x 34 mm)
Weight (w/o batteries)4.76 oz. (136 g)
Specifications are typical; individual units mi ght vary.
Specifications are subject to change and improvement
without any notice.
FCC NOTICE
This equipment has been tested and found to comply
with the limits for a class B digital device, pursuant to
part 15 of the FCC Rules. These limits are designed to
provide reasonable protection against harmful
interf er enc e in a r es ide n tial inst allatio n. Thi s equi p men t
generates, uses and can radiate radio frequency energy
and if not installed and used in accordance with the
instructions, may cause harmful interference to radio
communications. However, there is no guarantee that
interference will not occur in a particular installation. If
this equipmen t d oes ca use ha rmful int erf er enc e t o radio
or television reception, which can be determined by
turning the equipment off and on, the user is
encouraged to try to correct the interference by one or
more of the following measures:
• Increase or decrease the separation between the
equipment and the receiver.
• Consult the dealer or an experienced remote control/
TV technician for help.
Page 11

11
DIRECTV SETUP CODES
Setup Codes for DIRECTV Receivers
Setup Codes for DIRECTV HD Receivers
DIRECTV all models 00001, 00002
Hughes Network Systems
(most models)
00749
Hughes Network Systems
models GAEB0, GAEB0A,
GCB0, GCEB0A, HBH-SA,
HAH-SA
01749
GE models GRD33G2A and
GRD33G3A, GRD122GW
00566
Philips models DSX5500
and DSX5400
00099
Proscan models P RD8630A
and PRD8650B
00566
RCA models DRD102RW,
DRD203RW, DRD301RA,
DRD302RA, DRD303RA,
DRD403RA, DRD703RA,
DRD502RB, DRD 503RB,
DRD505RB, DRD515RB,
DRD523RB, and
DRD705RB
00566
DRD440RE, DRD460RE,
DRD480RE,DRD430RG,
DRD431RG, DRD450RG,
DRD451RG,
DRD485RG,DRD486RG,
DRD430RGA,
DRD450RGA,
DRD485RGA, DRD435RH,
DRD455RH, and
DRD486RH
00392
Samsung model SIR-S60W 01109
Samsung models SIR-S70,
SIR-S75, SIR-S300W, and
SIR-S310W
01108
Sony models (All models
except TiVo and Ultimate
TV)
01639
DIRECTV all models 00001, 00002
Hitachi model 61HDX98B 00819
HNS models HIRD-E8,
HTL-HD
01750
LG model LSS-3200A,
HTL-HD
01750
Mitsubishi model SR-HD5 01749, 00749
Page 12

12
Setup Codes for DIRECTV DVRs
Philips model DSHD800R 01749
Proscan model PSHD105 00392
RCA models DTC-100,
DTC-210
00392
Samsung model SIR-TS360 01609
Samsung models SIR-
TS160
01276
Sony models SAT-HD100,
200, 300
01639
Toshiba models DST-3000,
DST-3100, DW65X91
01749, 01285
Zenith models DTV1080,
HD-SAT520
01856
DIRECTV all models 00001, 00002
HNS models SD-DVR80,
SD-DV40, SD-DVR120,
HDVR2, GXCEBOT,
GXCEBOTD
01442
Philips models DSR704,
DSR708, DSR6000,
DSR600R, DRS700/17
01142, 01442
RCA models DWD490RE,
DWD496RG
01392
RCA models D VR39, 40, 80,
120
01442
Sony model SAT-T60 00639
Sony model SAT-W60 01640
Samsung models SIR-
S4040R, SIR-S4080R, SIRS4120R
01442
Page 13

13
MANUFACTURER’S CODES
Setup Codes for TVs
A-Mark 10003
Abex 10032
Admiral 1093, 10463
Advent 10761, 10783, 10815,
10817, 10842
Adventura 10046
Aiko 1092
Akai 10030, 10060, 10672,
10702, 10812
Alaron 10179
Albatron 10700, 10843
Ambassador 10177
America Action 10180
Ampro 10751
Anam 10180
Anam National 10055
AOC 10003, 10019, 10030,
10052, 10185
Apex Digital 10156, 10748, 10765,
10767, 10879
Archer 10003
Audiovox 10003, 1092, 10180, 10451,
10623, 10802, 10875, 11284
Aventura 10171
Belcor 10019
Bell & Howell 10016, 10154
BenQ 11032, 11315
Boxlight 10893
Bradford 10180
Brockwood 10019
Broksonic 10003, 10180, 10236, 10463
Cadia 11283
Candle 10030, 10046, 10056, 10186
Carnivale 10030
Carver 10054
CCE 10217
Celebrity 10000
Celera 10765
Changhong 10765
Page 14

14
Citizen 10030, 10039, 10046,
10056, 10060, 1092, 10186,
10280
Clairtone 10185
Clarion 10180
Commercial Solutions 10047, 11447
Concerto 10056
Contec 10157, 10180, 10185
Craig 10180
Crosley 10054
Crown 10039, 10180
Curtis Mathes 10016, 10030, 10039,
10047, 10054, 10056,
10060, 1093, 1145, 10154,
10166, 10451, 10466,
10702, 11147, 11347
CXC 10180
Daewoo 10019, 10039, 1092, 10451,
10623, 10661, 10672, 11661
Daytron 10019
Dell 11080, 11178, 11264, 11454
Denon 1145, 10511
Denstar 10628
Dumont 10017, 10019
Durabrand 10003, 10171, 10178,
10180, 10463, 11034
Dwin 1093, 10720, 10774
Electroband 10000, 10185
Electrograph 11755
Electrohome 10381
Emerson 10019, 10038, 10039,
10154, 10171, 10177,
10178, 10179, 10180,
10185, 10236, 10280,
10282, 10451, 10463, 10623
Envision 10030, 10813
Epson 10833, 10840
ESA 10171, 10812
Fisher 10154, 10159
Fujitsu 10179, 10186, 10683,
10809, 10853
Funai 10171, 10179, 10180
Futuretech 10180
Gateway 11755, 11756
Page 15

15
GE 10021, 10027, 10047,
10051, 10055, 1135, 10178,
10282, 10451, 11347, 11447
Gibralter 10017, 10019, 10030
Go Video 10886
GoldStar 10001, 10019, 10030,
10032, 10178
Goodmans 10360
Grundig 10683
Grunpy 10179, 10180
Haier 10768, 11034
Hallmark 10178
Hannspree 11348, 11351, 11352
Harley Davidson 10179
Harman/Kardon 10054
Harvard 10180
Havermy 1093
Helios 10865
Hello Kitty 10451
Hewlett Packard 11502
Hisense 10748
Hitachi 10016, 10032, 10038,
10056, 1145, 10151, 11145
HP 11502
Hyundai 10849
Infinity 10054
Inteq 10017
Janeil 10046
JBL 10054
JCB 10000
Jensen 10761, 10815, 10817
JVC 10053, 10731, 11253, 11352
Kaypani 10052
KEC 10180
Kenwood 10019, 10030
KLH 10765, 10767
Kloss 10024, 10046
Konka 10628, 10632, 10638,
10703, 10707
KTV 10030, 10039, 10180,
10185, 10217, 10280
LG 10178, 10442, 10700,
10856, 11178, 11265
Page 16

16
Loewe 1136
Logik 10016
Luxman 10056
LXI 10047, 10054, 10154,
10156, 10178
Magnavox 10020, 10024, 10030,
10054, 1096, 10179, 10186,
10187, 10386, 10706,
10802, 11254, 11454
Majestic 10016
Marantz 10030, 10054, 10704,
10855, 11154, 11454
Matsushita 10250, 10650
Maxent 11755
Megapower 10700
Megatron 10003, 1145, 10178
MEI 10185
Memorex 10016, 1150, 10154, 10178,
10179, 10463
MGA 10019, 10030, 1150, 10178
Midland 10017, 10032, 10039,
10047, 10051, 1135
Minutz 10021
Mitsubishi 10019, 1093, 1150, 10178,
10836, 10868, 11250
Monivision 10700, 10843
Motorola 10055, 1093
MTC 10019, 10030, 10056,
10060, 10185
Multitech 10180, 10217
NAD 10156, 10178, 10866
NEC 10019, 10030, 10056,
10497, 10882, 11704
NetTV 11755
Nikko 10030, 1092, 10178
Norcent 10748, 10824
Noshi 10018
NTC 1092
Olevia 11331
Onwa 10180
Optimus 10154, 10166, 10250, 10650
Optoma 10887, 11348
Optonica 1093, 10165
Orion 10179, 10236, 10463, 11463
Page 17

17
Panasonic 10051, 10055, 10250,
10650, 11410
Penney 10003, 10018, 10019,
10021, 10027, 10030,
10032, 10039, 10047,
10051, 10060, 1135, 10156,
10178, 11347
Philco 10019, 10020, 10030,
10054, 1096
Philips 10054, 10690, 11154, 11454
Pilot 10019, 10030, 10039
Pioneer 10038, 10166, 10679, 10866
Polaroid 10765, 10865, 11276,
11314, 11316, 11326,
11327, 11328
Portland 10019, 10039, 1092
Prima 10761, 10783, 10815, 10817
Princeton 10700, 10717
Prism 10051
Proscan 10047, 10466, 11347, 11447
Proton 10003, 10052, 10178, 10466
Pulsar 10017, 10019
Quasar 10051, 10055, 10165,
10250, 10650
RadioShack 10019, 10030, 10032,
10039, 10047, 10056,
10154, 10165, 10178, 10180
RCA 10018, 10019, 10038,
10047, 1090, 1135, 10679,
11047, 11147, 11247,
11347, 11447, 11547
Realistic 10019, 10030, 10032,
10039, 10056, 10154,
10165, 10178, 10180
Rhapsody 10185
Runco 10017, 10030, 10497, 10603
Sampo 10030, 10032, 10039,
10052, 11755
Samsung 10019, 10030, 10032,
10056, 10060, 10178,
10217, 10587, 10702,
10766, 10812, 10814,
11060, 11312
Samsux 10039
Sansui 10463
Sanyo 10088, 1146, 10154, 10159,
10799, 10893
Page 18

18
Sceptre 11360
Scimitsu 10019
Scotch 10178
Scott 10019, 10178, 10179,
10180, 10236
Sears 10047, 10054, 10056, 1146,
10154, 10156, 10159,
10171, 10178, 10179
Seleco 11351
Sharp 10039, 1093, 10157, 10165,
10386, 10491, 10688,
10689, 10851
Sheng Chia 1093
Shogun 10019
Signature 10016
Simpson 10186, 10187
Sole 10813
Sony 10000, 10080, 1111, 10834,
11100
Soundesign 10178, 10179, 10180, 10186
Spectricon 10003
Squareview 10171
SSS 10019, 10180
Starlite 10180
Studio Experience 10843
Superscan 1093, 10864
Supre-Macy 10046
Supreme 10000
SVA 10587, 10748, 10768,
10865, 10870, 10871, 10872
Sylvania 10020, 10030, 10054, 1096,
10171, 10381
Symphonic 10171, 10180
Syntax 11331
Tandy 1093
Tatung 10003, 10055, 11285, 11756
Technics 10051, 10250
Technol Ace 10179
Techview 10847
Techwood 10003, 10051, 10056
Teknika 10016, 10019, 10039,
10054, 10056, 10060, 1092,
1150, 10179, 10180, 10186
Telefunken 10056, 10702
Page 19

19
Setup Codes for VCRs
TMK 10056, 10177, 10178
TNCi 10017
Toshiba 10060, 10154, 10156,
10650, 10832, 10845,
11156, 11256, 11265,
11343, 11356, 11360,
11656, 11704
Tosonic 10185
Totevision 10039
Trical 10157
TVS 10463
U niversal 10027
Vector Research 10030
Victor 10053
Vidikron 10054
Vidtech 10019, 10178
Viewsonic 10857, 10864, 10885,
11330, 11342, 11755
Viking 10046
Vizio 10864, 10885, 11756
Wards 10016, 10019, 10020,
10021, 10027, 10030,
10054, 10056, 10080, 1096,
1111, 10165, 10178, 10179,
10866, 11156
Waycon 10156
Westinghouse 10000, 10451, 10885,
10889, 11282
White Westinghouse 10463, 10623
Yamaha 10019, 10030, 10769,
10833, 10839
Zenith 10016, 10017, 1092, 10178,
10463, 11145, 11265
Zonda 10003
ABS 219 72
Admiral 20048, 20209, 20479
Adventura 20000
Aiko 20278
Aiwa 20000, 20037, 20124, 20307
Akai 20041, 20061, 20106, 20175
Alienware 21972
America Action 20278
American High 20035
Asha 20240
Page 20

20
Audiovox 20037, 20278
Beaumark 20240
Bell & Howell 20104
Brokso nic 20002, 20121, 20184, 20209,
20479, 21479
Calix 20037
Canon 20035
Carver 20081
CCE 20072, 20278
Citizen 20037, 20278, 21278
Colt 20072
Craig 20037, 20047, 20072, 20240
Curtis Mathes 20035, 20041, 20060, 20162,
21035
Cybernex 20240
CyberPower 21972
Daewoo 20045, 20278, 20561, 21278
Dell 21972
Denon 20042
DirecTV 20739
Durabrand 20038, 20039
Dynatech 20000
Electrohome 20037, 20043
Electrophonic 20037
Emerex 20032
Emerson 20000, 20002, 20037, 20043,
20061, 20121, 20184, 20209,
20212, 20278, 20479, 20561,
20593, 21278, 21479, 21593
Fisher 20047, 20104
Fuji 20033, 20035
Funai 20000, 20593, 21593
Garrard 20000
Gateway 21972
GE 20035, 20060, 20065, 20202,
20240, 20761, 20807, 21035,
21060
Go Video 20240, 20432, 20526
GoldStar 20037, 20038, 21237
Gradiente 20000
Harley Davidson 20000
Harman/Kardon 20038, 20075, 20081
Harwood 20072
Page 21

21
Headquarter 20046
Hewlett Packard 21972
HI-Q 20047
Hitachi 20000, 20041, 20042, 20065,
20089, 20105
Howard Computers 21972
HP 21972
Hughes Network Systems 20042, 20739
Humax 20739
Hush 21972
iBUYPOWER 21972
Jensen 20041
JVC 20008, 20041, 20067
KEC 20037, 20278
Kenwood 20038, 20041, 20067
KLH 20072
Kodak 20035, 20037
LG 21037
Linksys 21972
Lloyd's 20000
Logik 20072
LXI 20037
Magnasonic 20593, 21278
Magnav ox 20000, 20035, 20039, 20081,
20149, 20563, 20593, 21781
Magnin 20240
Marantz 20035, 20081
Marta 20037
Matsushita 20035, 20162
Media Center PC 21972
MEI 20035
Memor ex 20000, 20035, 20037, 20039,
20046, 20047, 20048, 20104,
20162, 20209, 20240, 20307,
20479, 21037, 21237
MGA 20043, 20061, 20240
MGN Technology 20240
Microsoft 21972
Mind 21972
Minolta 20042, 20105
Mitsubishi 20043, 20061, 20067, 20075,
20173, 20807
Motorola 20035, 20048
Page 22

22
MTC 20000, 20240
Multitech 20000, 20072
NEC 20038, 20040, 20041, 20067,
20104
Nikko 20037
Nikon 20034
Niveus Media 21972
Noblex 20240
Northgate 21972
Olympus 20035, 20226
Onkyo 20222
Optimus 20037, 20048, 20104, 20162,
20432, 20593, 21048, 21062
Orion 20002, 20184, 20209, 20479,
21479
Panaso nic 20035, 20077, 20162, 20225,
20226, 20616, 21035, 21062
Penney 20035, 20037, 20038, 20040,
20042, 20240, 21035, 21237
Pentax 20042, 20065, 20105
Philco 20035
Philips 20035, 20081, 20618, 20739,
21081, 21181
Pilot 20037
Pioneer 20067
Polk Audio 20081
Presidian 21593
Profitronic 20240
Proscan 20060, 20202, 20761, 21060
Protec 20072
Pulsar 20039
Quarter 20046
Quartz 20046
Quasar 20035, 20077, 20162, 21035
RadioShack 20000, 21037
Radix 20037
Randex 20037
RCA 20042, 20060, 20065, 20077,
20105, 20106, 20149, 20202,
20240, 20761, 20807, 20880,
21035, 21060
Realistic 20000, 20035, 20037, 20046,
20047, 20048, 20104
ReplayTV 20614, 20616
Page 23

23
Ricavision 21972
Ricoh 20034
Runco 20039
Salora 20075
Samsung 200 45, 20240, 20739
Sanky 20039, 20048
Sansui 20000, 20041, 20067, 20209,
20479, 21479
Sany o 20046, 20047, 20104, 20159,
20240
Scott 20043, 20045, 20121, 20184,
20210, 20212
Sears 20000, 20035, 20037, 20042,
20046, 20047, 20104, 20105,
21237
Sharp 20048, 20807, 20848
Shintom 20072
Shogun 20240
Singer 20072
Sonic Blue 20614, 20616
Sony 20000, 20032, 20033, 20034,
20035, 20636, 21032, 21232,
21972
Stack 9 21972
STS 20042
Sylva nia 20000, 20035, 20043, 20081,
20593, 21593, 21781
Symphonic 20000, 20593, 21593
Systemax 21972
Tagar Systems 21972
Tatung 20041
Teac 20000, 20041
Technics 20035, 20162
Teknika 20000, 20 035, 20037
Thomas 20000
Tivo 20618, 20636, 20739, 21996
TMK 20240
Toshiba 20043, 20045, 20209, 20210,
20212, 20366, 20845, 21008,
21145, 21972, 21996
Totevision 20037, 20240
Touch 21972
Unitech 20240
Vector 20045
Page 24

24
Setup Codes for DVD Players
Vector Research 20038, 20040
Video Concepts 20040, 20045, 20061
Videomagic 20037
Videosonic 20240
Viewsonic 21972
Villain 20000
Voodoo 21972
Wards 20000, 20035, 20042, 20047,
20048, 20060, 20072, 20081,
20149, 20212, 20240
White Westinghouse 20072, 20209
XR-1000 20000, 20035, 20072
Yamaha 20038
Zenith 20000, 20033, 20034, 20039,
20209, 20479, 21139, 21479
ZT Group 21972
Aiwa 20641
Akai 20695, 20770, 21089
Alco 20790
Allegro 20869
Amphion Media Works 20872
AMW 20872
Apex Digital 20672, 20717, 20755, 20794,
20796, 20797, 21004, 21020,
21056, 21061, 21100
Aspire Digital 21168, 21407
Audiovox 20790, 21041, 21072
Axion 21072
B & K 20655, 20662
Blaupunkt 20717
Blue Parade 20571
Broksonic 20695
California Audio Labs 20490
Cinea 20831
CineVision 20833, 20869, 20876
Citizen 21277
Coby 20778, 20852, 21086, 21107,
21177, 21351
Craig 20831
Curtis Mathes 21087
CyberH ome 20816, 20874, 21023, 21024,
21117, 21129
Page 25

25
Daewoo 20705, 20784, 20833, 20869,
21169, 21172, 21234, 21242
Daytek 20872
Denon 20490, 20634
Desay 21 407
Disney 20675, 21270
Dual 21068, 21085
Durabrand 21127
DVD2000 20521
Emerson 20591, 20675, 20821
Enterprise 20591
Fisher 20670
Funai 20675, 21334
Gateway 21073, 21077, 21158
GE 20522, 20717, 20815
Go Video 20715, 20741, 20744, 20783,
20833, 20869, 21044, 21075,
21099, 21158, 21304, 21730
Go Vision 21072
GoldStar 20741
GPX 20699, 20769
Gradiente 20490
Greenhill 20717
Grundig 20539
Harman/Kardon 20582, 20702
Hitachi 20573, 20664
Hiteker 20672
iLo 21348
Initial 20717
Integra 20571, 20627
Jaton 21078
JBL 20702
JSI 21423
JVC 20558, 20623, 20867, 21164
jWin 21049, 21051
Kawasaki 20790
Kenwood 20490, 20534
KLH 20717, 20790, 21020, 21149
Konka 20711
Koss 20651, 21423
Landel 20826
Lasonic 20798, 21173
Page 26

26
Lecson 21533
Lenoxx 21127
LG 20591, 20741, 20801, 20869
LiteOn 21058, 21158, 21416, 21440
Loewe 20511
Magnav ox 20503, 20539, 20646, 20675,
20821
Malata 20782, 21159
Marantz 20539
McIntosh 21533
Memorex 20695, 20831, 21270
Microsoft 20522
Mintek 20717, 20839
Mitsubishi 20521, 21521
Momitsu 21082
NAD 20591, 20692, 20741
NEC 20785
Nesa 20717
Next Base 20826
NexxTech 21402
Norcent 20872, 21003, 21107, 21265
Onkyo 20503, 20627, 20792
Oritron 20651
Panaso nic 20490, 20503, 20703, 21362,
21462, 21490, 21762
Philips 20503, 20539, 20646, 20675,
21267, 21354
PianoDisc 21024
Pioneer 20525, 20571, 20631
Polaroid 21020, 21061, 21086
Polk Audio 20539
Portland 20770
Presidian 20675
Proceed 20672
Proscan 20522
ProVision 20778
Qwestar 20651
RCA 20522, 20571, 20717, 20790,
20822
Rio 20869
RJTech 21360
Rotel 20623
Rowa 20823
Page 27

27
Setup Codes for Audio Amplifiers/Tuners
Sampo 20698, 20752
Samsung 20490, 20573, 20744, 20820,
21044, 21075
Sansui 20695
Sanyo 20670, 20695, 20873
Sensory Science 21158
Sharp 20630, 20675, 20752, 21256
Sharper Image 21117
Sherwood 20633, 20770, 21043, 21077
Shinsonic 20533, 20839
Sonic Blue 20869, 21099
Sony 20533, 20864, 21033, 21431,
21533
Sungale 21074
Superscan 2 0821
SVA 20860, 21105
Sylvania 20675, 20821
Symphonic 20675
Teac 20790, 20809
Technics 20490, 20703
Technosonic 20730
Techwood 20692
Theta Digital 20571
Toshiba 20503, 2 0695, 21154
Tredex 20800, 20803, 20804
Urban Concepts 20503
US Logic 20839
Venturer 20790
Vizio 21064, 21226
Xbox 20522
Yamaha 20490, 20539, 20545
Yamakawa 20872
Zenith 20503, 20591, 20741, 20869
Zoece 21265
ADC 30531
Adcom 30616
Aiwa 30121, 30189, 31243, 31388,
31405, 31641
Akai 30224, 31255, 31512
Alco 31390
AMC 31077
Page 28

28
Amphion Media Works 31563, 31615
AMW 31563, 31615
Anam 31074, 31609
Apex Digital 31257, 31430, 31774
Arcam 31189
Audiotronic 31189
Audiovox 31390, 31627
B & K 30701, 30820, 30840
BK 30702
Bose 30639, 31229, 31253, 31933
Brix 31602
Cambridge Soundworks 31370
Capetronic 30531
Carver 30008, 30121, 30189, 30360,
31189, 31289
Classic 31352
Coby 31389
Criterion 31420
Daewoo 31250
Delphi 31414
Denon 30121, 30273, 30771, 31142,
31360
Emerson 30424
Fisher 30219, 30360, 31801
Garrard 30424
Gateway 31517, 31567
Go Video 31532
Harman/Kar don 30110, 30189, 30891, 31289,
31304, 31306
Hitachi 31273, 31801
Initial 31426
Inkel 30062
Integra 30135, 31298, 31320
JBL 30110, 31306
JV C 30074, 31058, 31374, 31495,
31811
Ken wood 30077, 30186, 31313, 31569,
31570
KLH 31390, 31412, 31428
Koss 30424, 31366, 31497
Lasonic 31798
Lenoxx 31437
Lexicon 31076
Page 29

LG 31293
Linn 30189
Liquid Video 31497
Magnav ox 30128, 30189, 30531, 31189,
31269, 31514
Marantz 30039, 30128, 30189, 31189,
31269, 31289
McIntosh 31289
MCS 30039, 30346
Micromega 31189
Mitsubishi 31393
Myryad 31189
Nakamichi 30347, 31313
NEC 30235
Norcent 31389
Nova 31389
Onkyo 30135, 30380, 30842, 31298,
31320, 31531
Optimus 30177, 30186, 30219, 30531,
30670, 31023, 31074
Oritron 31366, 31497
Panasonic 30039, 30309, 31288, 31308,
31316, 31350, 31363, 31518,
31548, 31633, 31763, 31764
Philips 30189, 31189, 31266, 31269
Pioneer 30014, 30150, 30531, 30630,
31023, 31384
Polaroid 31508
Polk Audio 30189, 31289, 31414
Proscan 31254
Quasar 30039
RCA 30346, 30360, 30530, 30531,
31023, 31074, 31254, 31390,
31511, 31609
Realistic 30163
Regent 31437
Rio 31869
Saba 31519
Samsung 31295, 31304, 31500
Sansui 30189, 30346, 31189
Sanyo 30219, 31469, 31801
Scott 30163, 30322
Page 30

30
Setup Codes for Audio Amplifiers
Sharp 30186
Sharper Image 31556
Sherwood 30062, 31077, 31423, 31517,
31567, 31653
Shinsonic 31426
Sirius 31602, 31627, 31811
Sonic Blue 31532, 31869
Sony 30168, 31058, 31258, 31406,
31441, 31558, 31622, 31658,
31758, 31759, 31858
Soundesign 30670
Stereophonics 31023
Sunfire 31313
Teac 30163, 31074, 31267, 31390,
31528
Technics 30039, 30208, 30309, 31308,
31518, 31633
Thorens 31189
Toshiba 30135
Venturer 31390
Victor 30074
Wards 30014, 30189
XM 31406, 31414
Yamaha 30176, 30186, 31176, 31276,
31331, 31375
Zenith 31293
Adcom 30577, 31100
AudioSource 30011
Bose 30674
Carver 30892
Durabrand 31561
Elan 30647
GE 30078
Harman/Kardon 30892
JVC 30331
Kenwood 30356
Left Coast 30892
Lenoxx 31561
Luxman 30165
Marantz 30321, 30892
McIntosh 30251
Nakamichi 30321
Page 31

31
NEC 30264
Optimus 30395, 30823
Parasound 30246
Philips 30892
Pioneer 30823
Polk Audio 30892
RCA 30823
Realistic 30395
Sansui 30321
Shure 30264
Sony 30689, 30815, 31126
Soundesign 30078, 30211
Victor 30331
Wards 30078, 30211
Yamaha 30133, 30143, 30354, 30504
Page 32

 Loading...