

Page 1

Advanced Installation Meter
User’s Manual
© 2010 Rev B
Page 2

i
Contents
Warranty iv
Return Policy v
Getting Started 1
Introduction 1
Using This Manual 2
Overview 2
Conventions 4
Getting To Know Your Meter 5
Features 5
Accessories 7
Display 8
Buttons 8
Navigation 9
HOME Screen 10
Powering Your Meter 10
Power-On 10
Standby Mode 11
Restart 11
Power-Off 11
Power Management 12
Battery Charging 13
Battery Replacement 14
Page 3

AIM User’s Manual
ii
Getting Technical Support 17
Safety Instructions 18
Technical Specifications 19
Spare Parts List 20
Setting Up the Meter 21
Entering Registration Information 22
Changing Volume Setting 24
Changing the Display Contrast or Brightness 25
Changing Time and Date Settings 26
Changing Automatic Timer Settings 28
Setting Up a Job 30
Starting a Job 31
Modifying the Setup for a Job 33
Notes 33
ODU Type 34
Switch Type 35
Zip Code 36
Page 4

AIM User’s Manual
iii
Installing an ODU 37
Aligning the ODU 37
Task A. Installation Setup 39
Task B. Coarse Azimuth Adjustment 40
Task C. Coarse Elevation Adjustment 40
Task D. Tilt Adjustment (95°, 3-LNB,
Slimline-5, and Slimline-5S (SWiM) ODUs Only) 41
Task E. Fine Elevation Adjustment
(Slimline ODUs Only) 41
Task F. Fine Azimuth Adjustment
(Slimline ODUs Only) 43
Performing EIV Following ODU Installation 45
Performing EIV 47
Performing Other Network Tests 50
Performing an In-Line Test 51
Performing a Satellite Tune Test 53
Performing a SWiM LF Power Test 57
Performing a Cable Resistance Test 59
Performing a Transponder Survey 61
Page 5

AIM User’s Manual
iv
Managing Records 65
Understanding Records 66
Account Records 66
Setup Records 67
User Records 67
Test Records 67
Data Records 68
Viewing Records 69
Deleting Records 73
Transferring Records 75
Updating the Meter 77
Glossary 79
Index 81
Page 6

AIM User’s Manual
iv
Warranty
Trilithic, Inc. warrants that each part of this product will be free from defects in
materials and workmanship, under normal use, operating conditions and service, for
a period of fifteen (15) months from date of shipment. The obligation of Trilithic, Inc.
under this warranty shall be limited, at the sole option of Trilithic, Inc., to replacing
the product or repairing any defective part.
This warranty and the rights created hereunder are neither transferable nor
assignable without the prior written consent of Trilithic, Inc.
Replaceable items such as batteries, soft cases, and input connectors, etc. are not
included nor covered by this warranty.
The remedy set forth herein shall be the only remedy available to the Buyer under
this warranty, and, in no event, shall Trilithic, Inc. be liable for incidental or
consequential damages for any alleged breach of this warranty. This Warranty shall
not apply to any part of the product that, without fault of Trilithic, Inc., has been
subsequently altered or modified, nor shall it apply to any failure caused by a part
not supplied by Trilithic, Inc. and subsequently attached to or incorporated into the
product. This warranty shall not apply to any damage caused by accident, fire, or
other casualty, negligence, misuse, or to any cause whatsoever other than as a result
of a defect directly attributable to Trilithic, Inc.
Except for the warranty and exclusions set forth above, and the warranties, if any,
available to the buyer from those who supply Trilithic, Inc., there are no warranties,
express or implied (including, without limitation, any implied warranty or warranty
of merchantability of fitness for a particular purpose), with respect to the condition
of the product.
Page 7

AIM User’s Manual
v
Return Policy
Before returning a product for service, please call Trilithic Customer Service at
888-895-7630 for an RMA number. During this call, a Product Service Representative
will schedule your unit for service, note the nature of the problem, and provide
instructions for the return of your product.
All AIM service will be provided by Trilithic at:
Trilithic, Inc.
9710 Park Davis Drive
Indianapolis, In. 46235 USA
Phone: (888) 895-7630
Fax: (317) 895-3613
email: service@trilithic.com
Page 8

1
1 Getting Started
Introduction
Congratulations on your new Advanced Installation Meter (AIM)! The AIM was
developed in collaboration with DIRECTV to provide customized features for
installing and troubleshooting DIRECTV satellite receiver systems.
The AIM is a rugged meter suitable for both indoor and outdoor use. When fully
charged, the AIM can be used to install satellite receiver systems in approximately
six single-family homes on a single charge. Both an AC power adapter and a
convenient vehicle power adapter are provided for charging the meter. The carrying
case protects the meter and its accessories during transport and storage.
The AIM’s large display and keypad make it easy to navigate to the features you
need. On-screen directions guide you through ODU installation, Extended
Installation Verification (EIV), and other test processes.
The AIM lets you track information for each account, including account settings and
test results. You can transfer this information from the meter to a PC using a USB
flash drive. Using its USB connection, the AIM can be easily updated in the field as
new features become available.
Page 9

1 Getting Started AIM User’s Manual
2
Using This Manual
Overview
Read this manual completely before using your AIM. Also, retain this manual for
future reference.
For information to help you get started using your AIM, see the sections below:
Getting to Know Your Meter, starting on page5.
This section provides an overview of the AIM, including information about the
meter and its accessories, its display and buttons, and how to navigate through
the screens on the meter.
Powering Your Meter, starting on page10.
This section provides instructions for how to turn on and turn off the meter, an
overview of the meter’s power-saving features, and instructions for how to
charge the battery and replace the battery.
Getting Technical Support, starting on page17.
This section describes how to access technical support.
Safety Instructions, starting on page18.
This section provides important safety instructions for using the AIM.
Technical Specifications, starting on page19.
This section provides information about the dimensions, capabilities and
operating range of the AIM.
Spare Parts List, starting on page20.
This section provides a list of replacement parts that can be ordered for the AIM.
Page 10

1 Getting Started AIM User’s Manual
3
Instructions for using the AIM’s features are provided in the following chapters:
Chapter 2: Setting Up the Meter, starting on page21.
Before you use your AIM, you need to enter registration information and
confirm the meter’s settings. This chapter provides instructions for entering
registration information, as well as setting the meter’s volume, display contrast
and brightness, time limits for power-saving features, and date and time.
Chapter 3: Setting Up a Job, starting on page30.
Before you perform tasks for an installation using the AIM, you can set up the
information for the job. This chapter provides instructions for entering the
account number, selecting the ODU type, selecting the switch type, and entering
the zip code.
Chapter 4: Installing an ODU, starting on page37.
The AIM guides you through the steps for aligning and performing follow-up
Extended Installation Verification (EIV) for each ODU. This chapter provides
instructions for how to complete these processes using the AIM.
Chapter 5: Performing EIV, starting on page47.
You can perform Extended Installation Verification (EIV) at selected points in the
distribution network to quickly confirm that the installation is satisfactory for all
supported orbital slots. EIV is an easy way to pinpoint any potential problems
with the installation. This chapter provides instructions for performing EIV at the
ODU and other locations in the distribution network.
Page 11

1 Getting Started AIM User’s Manual
4
Chapter 6: Performing Other Network Tests, starting on page50.
If there is a problem with a DIRECTV installation, you can run network tests to
help you troubleshoot the problem. This chapter provides instructions for
performing tests including the In-line test, Satellite Tune test, SWiM LF Power
test, Cable Resistance test, and Transponder Survey.
Chapter 7: Managing Records, starting on page65.
The AIM stores information for each account, including setup information and
test results. This chapter provides instructions for how to view records, delete
records, and transfer records to or from the AIM using a USB flash drive.
Chapter 8: Updating the Meter, starting on page77.
You can update the AIM as new features become available. This chapter provides
instructions for updating the meter’s firmware.
Conventions
The following conventions are used in this manual to help guide you through the
features of the AIM:
Each screen is referenced by the name that appears in the title bar.
Words that appear on the screen (titles, on-screen options and softkey labels)
are shown in bold.
The instructions describe how to navigate through the AIM’s features using the
meter’s softkey buttons. However, you also can use other meter buttons for
navigation (including the arrow buttons, alphanumeric buttons, and OK button).
For more information, see page9.
To make instructions easy to read, buttons are referenced only by their label.
For example:
Press NEXT to continue.
Page 12

1 Getting Started AIM User’s Manual
5
Getting To Know Your Meter
Features
Your AIM has the following features:
Connectors
1 IRD F connector
2 ODU F connector
3 Type A USB connector (Standard )
4 Type B USB connector (Mini)
5 Power input
Buttons
6 Softkeys
7 Navigation keypad
8 Alphanumeric keypad
9 Operation buttons
10 Power
Other
11 LCD display
Figure 1 Front View
11
10
9
8
7
6
5
4
3
2
1
Page 13

1 Getting Started AIM User’s Manual
6
12 Speaker
13 Meter serial number
Figure 2 Back View
12
13
Page 14

1 Getting Started AIM User’s Manual
7
Accessories
Your AIM comes with the following accessories. If any of the following items are
missing, contact your supplier.
1 Carrying case (with shoulder strap and detachable storage pocket)
2 100 – 240 VAC power adapter
3 12 VDC vehicle power adapter
4 25 Ω Cable Test Load
5 512 MB USB flash drive (containing AIM User’s Manual)
Figure 3 Meter Accessories
2
1
3
54
Page 15
1 Getting Started AIM User’s Manual
8
Display
The AIM has a large LCD display with a backlight for easy readability. Each screen
that appears on the display has the following:
1 Title bar: Indicates the screen that is displayed.
2 Battery icon: Indicates the power level of the battery.
3 Main area: Shows information about the task being performed.
4 Message bar: Provides: (a) instructions to guide you through the task being
performed; or, (b) status messages.
5 Softkey labels: Indicate options that vary based on the screen shown. To select
an option, press the button below that option.
Buttons
The following buttons let you interact with the meter:
4 softkeys: Select options that correspond to the on-screen labels above the
buttons.
4 arrows: Let you navigate up and down to select an option in a list, as well as
right or left when entering information.
OK: Selects the option highlighted on the screen.
10 alphanumeric buttons: Let you enter information or select an option in a
list.
Back: Lets you go back to the previous screen.
Fn: Lets you quickly change the display contrast, display brightness, and volume.
CONFIG: Lets you view, delete and transfer records, change meter settings, and
upgrade the meter’s firmware. (For more, see page21, page65, and page77.)
HOME: Displays the HOME screen. (For more, see page10.)
HELP: Displays instructions to help you complete the task being performed.
MUTE: Turns on and off the sound on the meter.
Figure 4 Meter Display
2
1
3
5
4
Page 16

1 Getting Started AIM User’s Manual
9
Navigation
Keep in mind the following guidelines when using the meter buttons to navigate
through the AIM’s features:
To select a softkey option, press the button below that option.
To highlight an option in a list, do one of the following:
– Use the arrow buttons to highlight the option.
– Use the alphanumeric keypad to enter the number for the option.
To select a highlighted option in a list, do one of the following:
– Press the NEXT or SELECT softkey (based on the screen)
– Press the OK button.
To return to the HOME screen, do one of the following:
– Press the DONE softkey (if available)
– Press the HOME button.
To return to the previous screen, do one of the following:
– Press the BACK softkey (if available)
– Press the BACK button.
Page 17

1 Getting Started AIM User’s Manual
10
HOME Screen
The HOME screen lets you access the AIM’s main features. You can press the HOME
button at any time to access the HOME screen.
The HOME screen provides four softkeys that correspond to each of the main
features of the AIM:
SETUP: Lets you set up the information for a job. See “Setting Up a Job” on
page30.
INSTALL: Guides you through the steps for aligning and performing follow-up
Extended Installation Verification (EIV) for each ODU. See “Installing an ODU” on
page37.
EIV: Guides you through the steps for performing Extended Installation
Verification (EIV) at the ODU or another location to help you troubleshoot a
problem. See “Performing EIV” on page47.
TEST: Lets you run network tests to help you troubleshoot a problem with an
installation. See “Performing Other Network Tests” on page50.
Powering Your Meter
Power-On
To turn on the AIM, press and hold the POWER button until the backlight turns on.
The meter turns on, briefly displays a splash screen, and then displays the HOME
screen.
To start a job, press SETUP and follow the instructions in “Starting a Job” on
page31.
Page 18
1 Getting Started AIM User’s Manual
11
Standby Mode
You can place your AIM in a power-saving state called Standby mode. Standby
mode lets you turn off the AIM display and other features to extend the charge of
the battery. You can quickly exit Standby mode and resume working on the screen
where you left off.
To enter Standby mode:
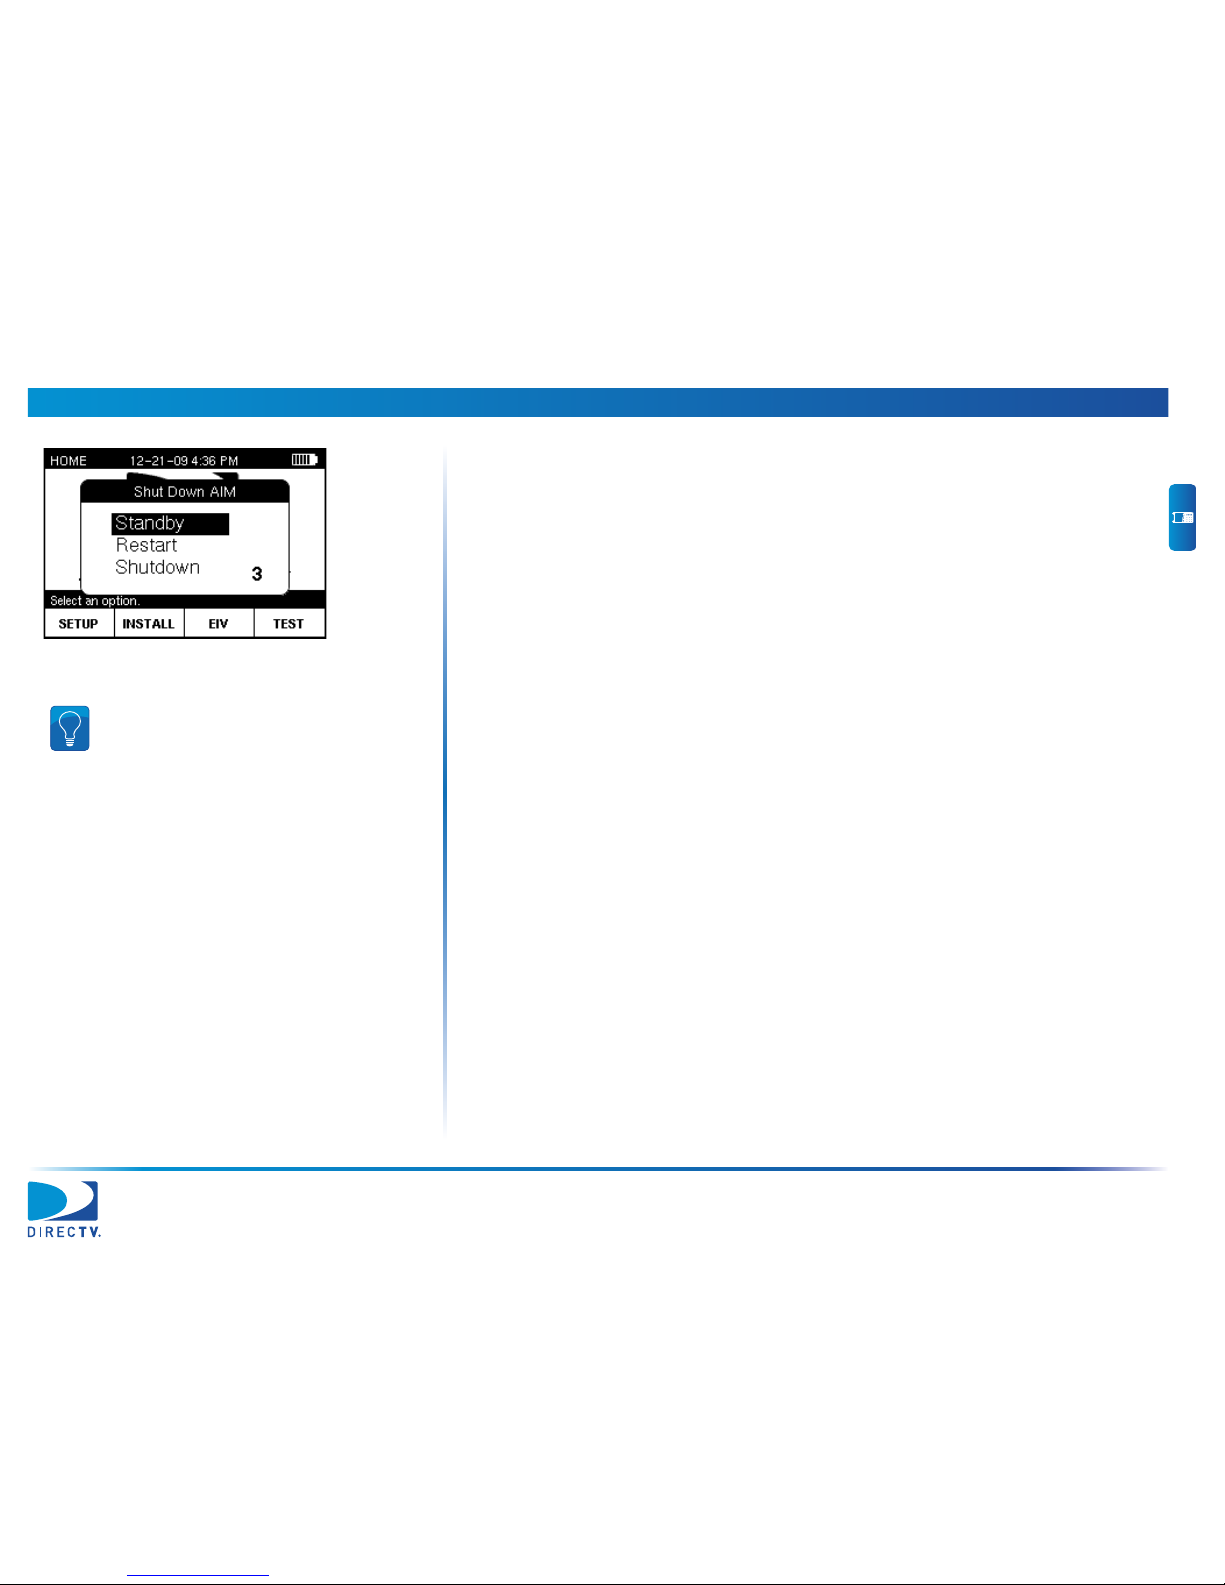
1 Press and hold the POWER button until the SHUT DOWN AIM screen appears.
2 Use
c or d to highlight Standby and press OK.
The meter enters Standby mode.
To exit Standby mode:
Press the POWER button.
Restart
To restart the AIM:
1 Press and hold the POWER button until the SHUT DOWN AIM screen appears.
2 Use c or d to highlight Restart and press OK.
The meter turns off, and then automatically turns back on.
Power-Off
To turn off the AIM:
1 Press and hold the POWER button until the SHUT DOWN AIM screen appears.
2 Use c or d to highlight Shutdown and press OK.
The meter turns off.
Tip: You have 3 seconds to make a selection on
the SHUT DOWN AIM screen before the meter
automatically turns off.
Page 19

1 Getting Started AIM User’s Manual
12
Power Management
Your AIM is powered by an 8-cell 9.6 V 3.8 AH NiMH battery pack. The battery
supplies power to the meter, as well as to the LNB and SWiM during installation of
an ODU. When fully charged, the AIM’s battery provides sufficient power to install
satellite receiver systems in approximately six single-family homes on a single
charge.
The AIM has the following power-saving features that help to extend the battery
charge:
If no buttons have been pressed on the AIM for 2 minutes, the backlight on the
display turns off. The backlight automatically turns back on when you press any
button on the meter.
If no buttons on the AIM have been pressed for 10 minutes, the meter enters a
power-saving mode called Standby. The AIM automatically exits Standby mode
when you press and hold the POWER button until the backlight turns on.
If no buttons on the AIM have been pressed for 30 minutes, the meter
automatically turns off. To turn the meter on, press and hold the POWER button
until the backlight turns on.
You can customize the time periods for each of the power-saving features on the
AIM (see “Setting Up the Meter ” on page21). However, extending the time period
longer than the default setting shortens the time that the battery charge lasts.
Note: If you are using your AIM for the first
time, you should fully charge the battery before
use. See “Battery Charging” on page13.
Page 20

1 Getting Started AIM User’s Manual
13
Battery Charging
You can charge the AIM’s battery from a power outlet using the AC power adapter
provided with the meter. You also can charge the AIM in your vehicle while the
vehicle is running using the vehicle power adapter. The AIM can be charged while it
is powered off or while it is powered on, which allows you to use the AIM while it is
charging.
The battery icon in the top right of the AIM display indicates the power level of the
battery. The AIM should be charged before the battery icon shows only one
remaining bar of power. If the remaining bar flashes, the AIM should be charged
immediately.
Caution: When charging the meter battery, make sure that the ambient temperature
is between 40°F (5°C) and 100°F (37°C) to prevent damage to the battery.
You should fully charge the AIM’s battery before you use it for the first time. To
charge the battery:
1 Plug the AC power adapter into a power outlet, or plug the vehicle power
adapter into a 12 VDC socket, such as a cigarette lighter socket.
2 Plug the other end of the power adapter into the AIM’s power input connector.
The charging process begins. A plug icon appears at the top of the display and
the bars in the battery icon sequentially flash to show that the meter is charging.
(If the meter is off, a battery icon appears on the display.)
Caution: Use only the AC power adapter or vehicle power adapter provided with
the meter to charge the meter battery.
3 When the charging process is complete, the display shows a filled battery icon.
Unplug the power adapter from the AIM’s charging connector. Then unplug the
other end from the power outlet or 12 VDC socket.
Note: It normally takes approximately 4 hours
to fully charge the AIM if its battery is depleted.
Page 21

1 Getting Started AIM User’s Manual
14
Battery Replacement
If necessary, you can replace the AIM’s battery. To obtain a new battery, contact
Trilithic. See “Spare Parts List” on page20.
You also can return your AIM to Trilithic Customer Service and request that the
battery be replaced. See “Return Policy” on pagev.
Caution: ESD (electro-static discharge) can damage the meter. When removing and
replacing the battery, observe proper ESD precautions to avoid static discharge. We
recommend performing this procedure at a functional ESD workstation. Avoid
touching the meter’s circuit board during the procedure.
Important: Make sure the AIM is turned off and is not connected to a power source
before you remove and replace the battery.
To remove the battery:
1 Using a Phillips-head screwdriver, remove the 6 screws from the back housing of
the AIM. See Figure 5.
Figure 5 Removing the Back Housing Screws
Screws Screws
Tip: We recommend using a power Phillips
screwdriver that can provide 6 to 9 in-lbs of
torque.
Page 22

1 Getting Started AIM User’s Manual
15
2 Carefully separate the front housing and the back housing, and place the unit on
a flat work surface.
3 Using the Phillips-head screwdriver, remove the 4 screws on the battery cover
and remove the cover. See Figure 6.
4 Disconnect the battery connector from the circuit board. See Figure 7.
5 Remove the battery from the back housing.
Figure 6 Removing the Battery Cover
Screws
Screws
Battery cover
Figure 7 Removing the Battery
Battery
Battery connector
Snap cover
Page 23

1 Getting Started AIM User’s Manual
16
To replace the battery:
1 Place the new battery in the compartment in the AIM back housing with the
battery wires routed as shown in Figure 7.
2 Reconnect the battery connector to the circuit board.
3 Replace the battery cover and 4 screws. Use the Phillips-head screwdriver to
tighten the 4 screws. See Figure 6.
4 If the snap cover for the power input and USB connectors was dislodged during
the process, replace it by inserting it in the slot as shown in Figure 7.
5 Place the back housing on top of the front housing. Make sure that the battery
wires are tucked into the opening at the bottom of the back housing and are not
pinched between the housings.
6 Use the Phillips-head screwdriver to reinstall the 6 screws securing the back
housing to the front housing. See Figure 5.
7 To confirm that the battery has been installed correctly, press and hold the
Power button to make sure that the AIM turns on.
8 Follow local guidelines for battery disposal.
Note: We recommend using a torque setting of
6 to 9 in-lbs to tighten the back housing screws
in order to provide a seal that protects the
electronics from environmental conditions.
Page 24

1 Getting Started AIM User’s Manual
17
Getting Technical Support
When you need instructions for using the AIM, your first resource for help is this
manual. If you cannot find the information you need, you can:
Go to the DIRECTV Satellite Installer website or other websites provided by
DIRECTV. DIRECTV websites contain product specifications and information, tips,
release information, marketing information, Frequently Asked Questions (FAQs),
bulletins and other technical information. You can also check these websites for
product updates.
Contact Trilithic technical support. Technical support is available Monday
through Friday from 8:00 am to 5:00 pm EST at 1-317-895-3600 or
1-800-344-2412 (toll free). You can also e-mail technical support at
techsupport@trilithic.com.
For a quicker support response when calling or sending e-mail, provide the
following information:
– your name and company name
– the technical point of contact (name, phone number, e-mail)
– the AIM serial number, firmware and hardware version numbers
– a detailed description of the problem you are having, including any error or
information messages
Page 25

1 Getting Started AIM User’s Manual
18
Safety Instructions
When operating and maintaining the AIM meter, basic safety precautions should
always be followed to reduce the risk of electric shock and injury to persons,
including the following:
Warning! The AIM meter is capable of generating 21 volts. Never connect the
AIM to devices that may be damaged by application of AC or DC voltage.
Thoroughly read this User's Manual before using the meter.
Thoroughly read this User's Manual before attempting to replace the battery.
Do not disassemble the meter, unless you are replacing the battery.
Disassembling the meter could produce an electric shock.
Do not place the strap of the carrying case over your neck or otherwise attach it
to your person, as this could result in severe injury.
Do not expose the meter to rain or moisture. Avoid using the meter in severe
weather conditions.
Use only the battery, AC power adapter, and vehicle power adapter provided by
Trilithic. Using substitute batteries or power adapters voids the warranty and
could produce an electrical shock.
Never attempt to repair or refurbish the battery. Dispose of the battery properly.
Refer to this User's Manual for instructions on making connections to the ODU
and IRD F connectors.
Page 26

1 Getting Started AIM User’s Manual
19
Technical Specifications
Frequency Range 250 MHz to 2150 MHz
Signal Level Range -10 dbm to -69 dbm
RF Input Connector Replaceable F-Type (2)
Input Impedance 75 ohm
Measurements Refer to the instructions in this manual.
LNB Power Supply 13 volts / 18 volts
SWiM Power Supply 21 volts
Communications USB flash drive (Linux format only)
Battery 8-cell 9.6 Volt 3.8 AH Rechargeable NiMH
Operating Temperature -25°F to 125°F (-29°C to 52°C)
Storage Temperature -40°F to 150°F (-40°C to 65°C)
Battery Charging Temperature 40°F to 100°F (5°C to 37°C)
Display 240
× 160 pixel backlit LCD
Weight 2 lbs, 8.6 oz (1150 g)
Dimensions 9.6”
× 4.6” × 2.3”
(244.4 mm
× 118 mm × 58.7 mm)
Page 27

1 Getting Started AIM User’s Manual
20
Spare Parts List
You can order the following parts for the AIM. Contact Trilithic at 888-895-7630 and
request the corresponding part number below:
100 – 240 VAC power adapter: 0610177000
12 VDC vehicle power adapter: 2072097000
Battery pack: 0090056000
25 Ω Cable Test Load: 2011379000
F connector: 0200690000
Carrying case: 2131417000
Page 28

21
2 Setting Up the Meter
Before you use your AIM, you should enter registration information, including your
ID, name, phone number, and company (see page22). You also should review the
meter’s settings. You can change the following settings:
volume (see page24)
display contrast and brightness (see page25)
time and date, including format (see page26)
time limits for automatically turning off the display backlight, entering Standby
mode, and turning off the meter (see page28).
Tip: To quickly adjust the setting for display
contrast, display brightness, or volume, you can
press Fn from any screen. On the UTILITIES
window, use c or d to highlight the setting you
want to change, then use e or f to select the
new level. Press Fn to exit.
Page 29

2 Setting Up the Meter AIM User’s Manual
22
Entering Registration Information
Before you use your AIM, you should enter registration information in the meter,
including your name, ID, phone number, and company.
To enter registration information:
1 Press CONFIG to go to the CONFIGURATION screen.
2 Use
c or d to highlight Settings and press SELECT to go to the SETTINGS
screen.
3 Use c or d to highlight Registration and press SELECT to go to the
REGISTRATION screen.
4 Use c or d to highlight the item you want to enter (ID, Name, Phone, or
Company). Then press SELECT to go to the entry screen.
Page 30

2 Setting Up the Meter AIM User’s Manual
23
5 Use the alphanumeric keypad to enter the ID, name, phone number or company.
6 Press ENTER to save and return to the REGISTRATION screen.
7 Repeat Step 4 through Step 6 for each item on the REGISTRATION screen.
8 When you have finished entering registration information, press DONE to return
to the SETTINGS screen.
Note: To delete a character, press the Back
button. You also can use e or f to navigate
within your entry, or press CLEAR to delete the
entry and start over. Press CANCEL to exit
without saving changes.
Tip: To enter only numbers, press NUMERIC. To
enter letters and numbers, press ALPHA. To
enter capital letters, continue pressing the letter
button until the capital letter appears.
Tip: To enter a space or a special character
(such as -, #, &, or +), press the “1” button
repeatedly until the space or character you
want to enter appears.
Page 31

2 Setting Up the Meter AIM User’s Manual
24
Changing Volume Setting
You can change the volume setting for your AIM.
To change the volume settings:
1 Press CONFIG to go to the CONFIGURATION screen.
2 Use
c or d to highlight Settings and press SELECT to go to the SETTINGS
screen, which shows the current settings for the meter.
3 Use c or d to highlight Volume and press SELECT to go to the VOLUME
screen.
4 Use e or f to select the desired volume setting. To turn on or off the tone that
sounds each time a key is pressed, press KEYBEEP ON / OFF.
5 Press ENTER to return to the SETTINGS screen.
Tip: You can temporarily turn on or turn off the
meter sound by pressing MUTE. You also can
press Fn to quickly adjust the volume setting.
Page 32

2 Setting Up the Meter AIM User’s Manual
25
Changing the Display Contrast or Brightness
You can change the display contrast and display brightness settings for your AIM.
To change the display contrast or brightness:
1 Press CONFIG to go to the CONFIGURATION screen.
2 Use c or d to highlight Settings and press SELECT to go to the SETTINGS
screen, which shows the current settings for the meter.
3 Use
c or d to highlight Contrast or Brightness and press SELECT to go to the
CONTRAST or BRIGHTNESS screen.
4 Use e or f to select the desired setting. Then press ENTER to return to the
SETTINGS screen.
Tip: You can press Fn to quickly adjust the
display contrast or display brightness settings.
Page 33

2 Setting Up the Meter AIM User’s Manual
26
Changing Time and Date Settings
You can change the time and date settings of your AIM, including the format for the
time and date.
To change the time and date settings:
1 Press CONFIG to go to the CONFIGURATION screen.
2 Use c or d to highlight Settings and press SELECT to go to the SETTINGS
screen, which shows the current settings for the meter.
3 Use c or d to highlight Time and Date and press SELECT to go to the TIME
AND DATE screen.
Page 34

2 Setting Up the Meter AIM User’s Manual
27
4 Use c or d to highlight the item you want to change (Time Format, Date
Format, Time, or Date). Then press SELECT to go to the entry screen.
5 Use c or d to highlight the desired format setting, or use the numeric keypad
to enter the time or date. Then press SELECT to return to the TIME AND DATE
screen.
6 When you have f inished changing time and date settings, press DONE to return
to the SETTINGS screen.
Note: When entering time or date, you can
press the Back button to delete a character. You
also can use e or f to navigate within your
entry, or press CLEAR to delete the entry and
start over. Press CANCEL to exit without saving
changes.
Tip: When entering the time, press AM or PM
as appropriate.
Page 35

2 Setting Up the Meter AIM User’s Manual
28
Changing Automatic Timer Settings
You can change the automatic timer settings for your AIM, including:
Backlight Timer: If no buttons have been pressed on the AIM after the
specified time limit, the backlight on the display turns off. The backlight
automatically turns back on when you press any button on the meter.
Standby Timer: If no buttons on the AIM have been pressed after the specified
time limit, the meter automatically enters a power-saving mode called Standby.
The AIM automatically exits Standby mode when you press and hold the
POWER button until the backlight turns on.
Shutdown Timer: If no buttons on the AIM have been pressed after the
specified time limit, the meter automatically turns off. The meter can be turned
back on by pressing and holding the POWER button until the backlight turns on.
The AIM’s automatic timer settings are designed to help extend the battery charge.
You can customize the automatic timer settings. However, extending the time
period longer than the default setting decreases the time that the battery charge
lasts.
To change automatic timer settings:
1 Press CONFIG to go to the CONFIGURATION screen.
2 Use
c or d to highlight Settings and press SELECT to go to the SETTINGS
screen, which shows the current settings for the meter.
Page 36

2 Setting Up the Meter AIM User’s Manual
29
3 Use c or d to highlight the automatic timer setting you want to change:
– Highlight Backlight Timer to set the time limit for automatically turning off
the display backlight after no buttons have been pressed.
– Highlight Standby Timer to set the time limit for automatically entering
Standby mode after no buttons have been pressed.
– Highlight Shutdown Timer to set the timer for automatically turning off the
meter after no buttons have been pressed.
4 Use the numeric keypad to enter a timer setting.
5 Press NEXT to return to the SETTINGS screen.
Tip: Press HOURS, MINUTES, or SECONDS to
switch between time units. To turn off the timer,
enter “0”.
Note: To delete a character, press the Back
button. You also can use e or f to navigate
within your entry, or press CLEAR to delete the
entry and start over. Press CANCEL to exit
without saving changes.
Page 37

30
3 Setting Up a Job
Before you perform tasks for an installation using the AIM, you need to set up the
information for the job. Setup tasks include:
entering the account number (see page31)
entering notes (optional; see page33)
selecting the ODU type (see page34)
selecting the switch type (see page35)
entering the zip code (see page36).
Page 38

3 Setting Up a Job AIM User’s Manual
31
Starting a Job
To start a job, enter the account number for the installation. The AIM stores
information about the tasks you perform for the installation in records associated
with the account number.
For the first job at an installation, you also set the ODU type, switch type, zip code,
and notes either by accepting the default settings (based on the previous job), or by
changing the default settings. See “Modifying the Setup for a Job” on page33.
To s t ar t a j o b:
1 From the HOME screen, press SETUP to go to the MODIFY JOB SETUP screen.
2 Use c or d to highlight Account #. Then press SELECT to go to the ACCOUNT
NUMBER screen.
3 Using the numeric keypad, enter the account number for the job. Then press
ENTER.
Note: To delete a character, press Back. You
also can use e or f to navigate within your
entry, or press CLEAR to delete the entry and
start over. Press CANCEL to exit without saving.
Page 39

3 Setting Up a Job AIM User’s Manual
32
The MODIFY JOB SETUP screen reappears, showing the account number you
entered and the default settings for:
–ODU Type
–Notes
–Switch Type
–Zip Code
4 To change the default settings, see “Modifying the Setup for a Job” on page33.
5 When you have completed the setup information for the job, press DONE on the
MODIFY JOB SETUP screen to return to the HOME screen. To install an ODU
without returning to the HOME screen, press INSTALL.
Tip: The account number can be up to 22 digits.
Note: The default settings are based on the
values entered for the previous job.
Page 40

3 Setting Up a Job AIM User’s Manual
33
Modifying the Setup for a Job
You can change the ODU type, switch type, and zip code settings for a new job or
the current job from the MODIFY JOB SETUP screen. You also can add notes for the
job to include key information about the job, such as the specific room of the
installation.
To access the MODIFY JOB SETUP screen, press SETUP from the HOME screen.
Notes
To change the notes for a job:
1 On the MODIFY JOB SETUP screen, use c or d to highlight Notes and press
SELECT to go to the NOTES screen.
2 Using the keypad, enter the notes for the job.
3 Press ENTER to return to the MODIFY JOB SETUP screen.
Tip: To delete a character, press the Back
button. You also can use e or f to navigate
within your entry, or press CLEAR to delete the
entry and start over. To exit without saving
changes, press CANCEL.
Tip: To enter only numbers, press NUMERIC. To
enter letters and numbers, press ALPHA. To
enter capital letters, continue pressing the letter
button until the capital letter appears.
Tip: To enter a space or a special character
(such as -, #, &, or +), press the “1” button
repeatedly until the space or character you
want to enter appears.
Page 41

3 Setting Up a Job AIM User’s Manual
34
ODU Type
To change the ODU type for a job:
1 On the MODIFY JOB SETUP screen, use c or d to highlight ODU Type and
press SELECT to go to the ODU TYPE screen.
2 Use
c or d to highlight the ODU type for the job.
3 Press SELECT to return to the MODIFY JOB SETUP screen.
Tip: You also can press the number for an
option to highlight it.
Tip: To scroll quickly through the ODU types,
press PAGE UP or PA GE DN. To exit without
saving changes, press CANCEL.
Page 42

3 Setting Up a Job AIM User’s Manual
35
Switch Type
To change the switch type for a job:
1 On the MODIFY JOB SETUP screen, use c or d to highlight Switch Type and
press SELECT to go to the SWITCH TYPE screen.
2 Use
c or d to highlight the type of switch for the job and press SELECT.
3 If the ODU configuration includes a 95° ODU and a 6 x 8 multiswitch or SWiM,
the 95 PORT CONNECTION screen appears. Use c or d to highlight the port
to which the 95° ODU is connected.
4 Press SELECT to return to the MODIFY JOB SETUP screen.
Tip: To exit without saving changes, press
CANCEL.
Page 43

3 Setting Up a Job AIM User’s Manual
36
Zip Code
To change the zip code for a job:
1 On the MODIFY JOB SETUP screen, use c or d to highlight Zip Code and
press SELECT to go to the ZIP CODE screen.
2 Using the numeric keypad, enter the zip code for the job. Then press ENTER.
The default azimuth, elevation and tilt coordinates for the job appear.
3 Press DONE to return to the MODIFY JOB SETUP screen.
Tip: To delete a character, press the Back
button. You also can use e or f to navigate
within your entry, or press CLEAR to delete the
entry and start over. To exit without saving
changes, press CANCEL.
Page 44

37
4 Installing an ODU
The AIM guides you through the steps for aligning and performing follow-up
Extended Installation Verification (EIV) for each ODU.
Aligning the ODU
The tasks for aligning an ODU vary depending on the type of ODU. All ODU types
require coarse adjustments to be made in the azimuth and elevation directions. The
95° ODU also requires an adjustment in the tilt direction. To make coarse
adjustments, move the ODU in the appropriate direction and use the AIM to
determine the position that obtains the maximum possible signal power.
Slimline ODUs require fine adjustments (dithering) to be performed in the azimuth
and elevation directions to further hone the signal power. To dither, rotate the fine
adjustment jack screws to:
obtain a “reference” signal power on one side of the beam peak
obtain the identical strength on the other side of the beam peak
split the difference between the two reference points to obtain the obtain the
maximum signal power for all applicable orbital slots.
The AIM guides you through the dithering process using a series of audible tones to
notify you when the reference values have been obtained.
Important: The DIRECTV training materials are the primary source of ODU
installation instruction. Those documents supersede the instructions in this manual.
Page 45

4 Installing an ODU AIM User’s Manual
38
The table below indicates which tasks need to be performed for each ODU. When
an installation includes two ODUs, you must perform the installation tasks for each
ODU. The AIM Install feature guides you through the tasks based on the selected
ODU.
When using the AIM to align an ODU, refer to the appropriate sections for
assistance:
“Task A. Installation Setup” on page39
“Task B. Coarse Azimuth Adjustment” on page40
“Task C. Coarse Elevation Adjustment” on page40
“Task D. Tilt Adjustment (95°, 3-LNB, Slimline-5, and Slimline-5S (SWiM) ODUs
Only)” on page41
“Task E. Fine Elevation Adjustment (Slimline ODUs Only)” on page41
“Task F. Fine Azimuth Adjustment (Slimline ODUs Only)” on page43
ODU Installation Tasks
ODU
Supported
Orbital Slots Setup
Coarse Azimuth
Adjustment
Coarse Elevation
Adjustment
Tilt
Adjustment
Fine Elevation
Adjustment
(Dither)
Fine Azimuth
Adjustment
(Dither)
3-LNB (18” x 20”) 101, 110, 119
999
9
95° 95
9999
Round (18”) 101
999
Slimline-3 99, 101, 103
999 99
Slimline-5 99, 101, 103, 110, 119
999
9
99
Slimline-3S (SWiM) 99, 101, 103
999 99
Slimline-5S (SWiM) 99, 101, 103, 110, 119
999
9
99
World Direct 95, 101
9999
Page 46

4 Installing an ODU AIM User’s Manual
39
Task A. Installation Setup
To perform the installation setup:
1 Start the job for the installation (“Starting a Job” on page31).
2 From the HOME screen, press INSTALL.
The PRE-CONFIGURE ODU screen appears showing the default azimuth and
elevation coordinates for the job. If appropriate, the default tilt coordinate also
appears.
3 Perform the ODU site survey. Using the AIM azimuth and elevation coordinates,
confirm that the selected location has a clear line-of-sight to the supported
orbital slots (see “ODU Installation Tasks” on page38).
4 Install the ODU according to the DIRECTV procedure.
5 Connect the AIM’s ODU F Connector to the ODU’s LNB output.
6 Press NEXT on the PRE CONFIGURE ODU screen.
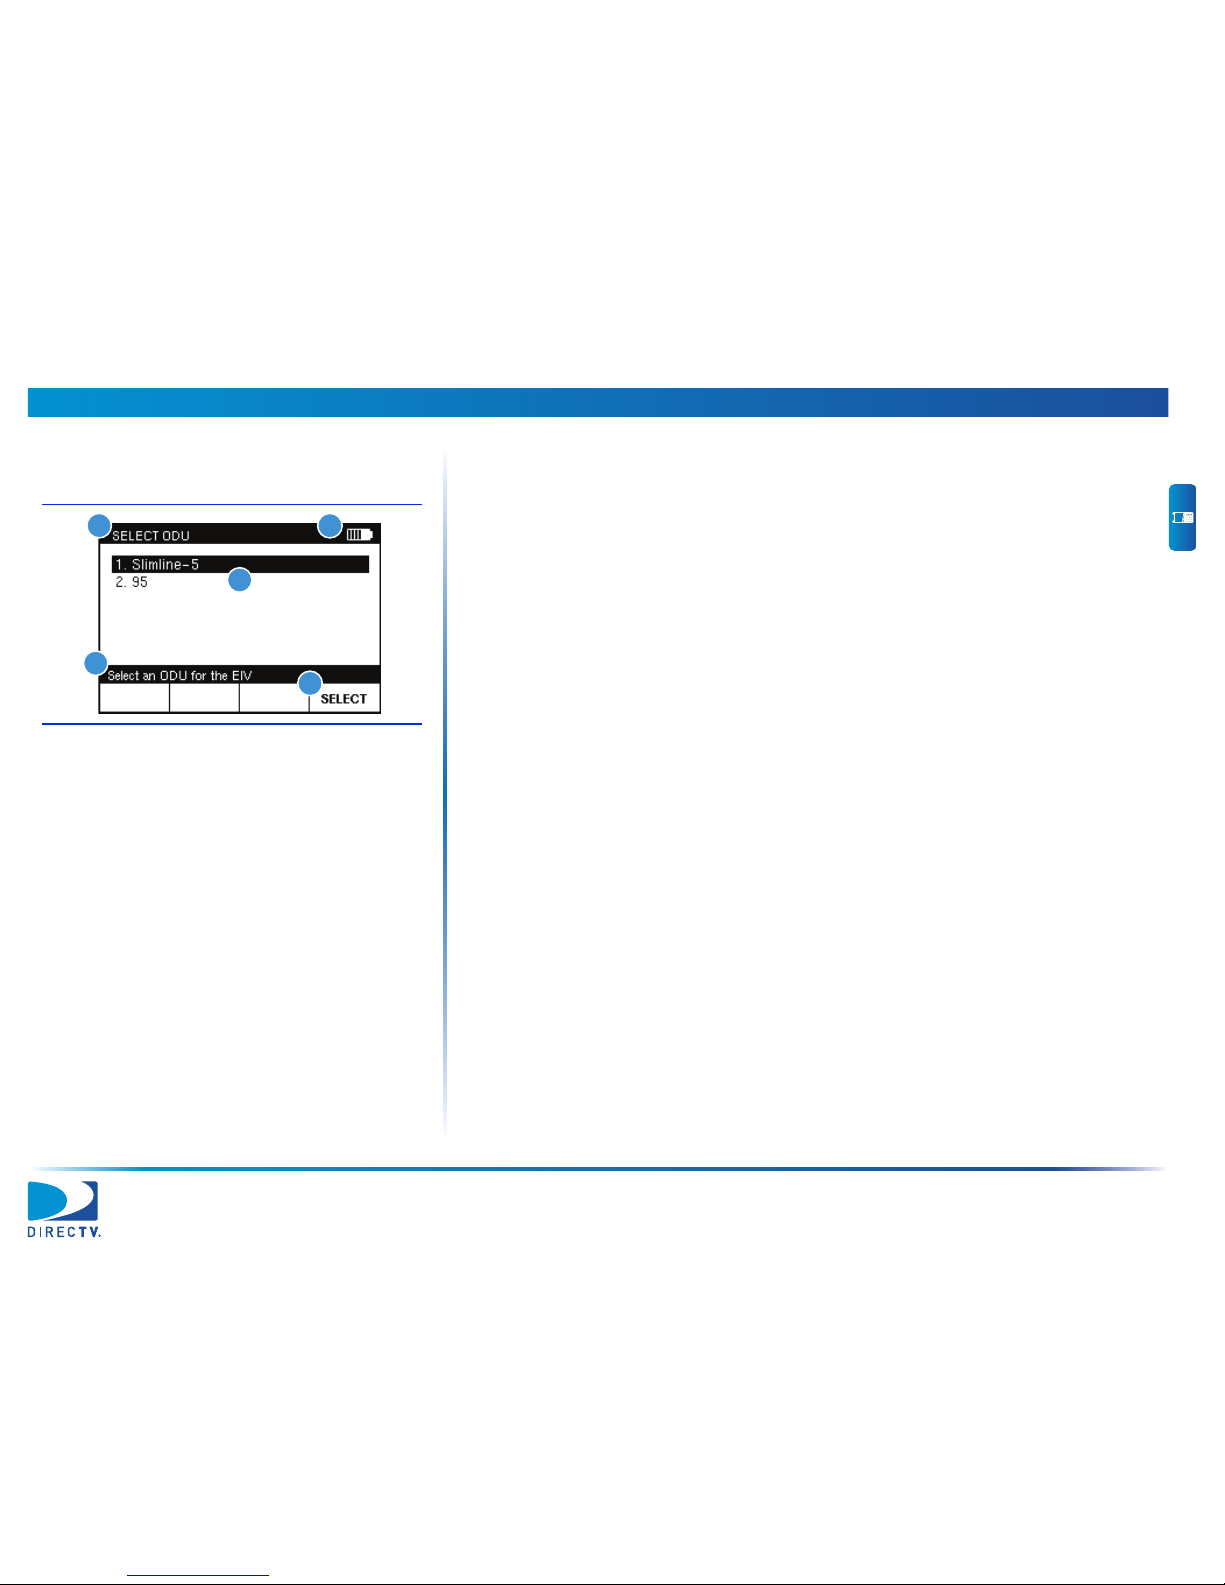
If the installation includes two ODUs, the SELECT ODU screen appears.
Use c or d to highlight the ODU to align and press SELECT to continue.
Note: The default coordinates for the job are
based on the ODU type and zip code selected
for the job.
Page 47

4 Installing an ODU AIM User’s Manual
40
Task B. Coarse Azimuth Adjustment
To perform the coarse azimuth adjustment:
1 While monitoring the signal power bar on the COARSE AZ & EL ADJ screen,
rotate the ODU on the mast in the azimuth direction until the maximum signal
power is reached.
2 Lock down the mounting bracket collar on the mast.
Task C. Coarse Elevation Adjustment
To perform the coarse elevation adjustment:
1 Loosen the ODU’s elevation lock-down screws.
2 While monitoring the signal power bar on the COARSE AZ & EL ADJ screen,
rotate the ODU in the elevation direction until the AIM indicates that it is
“locked” onto the signal and the maximum signal power is reached.
Important: You might need to alternate between performing the coarse elevation
adjustment and the coarse azimuth adjustment to achieve the maximum signal
power.
3 Tighten the elevation lock-down screws.
4 Press NEXT to continue.
Note: “Lock” appears on the screen when the
signal power is above the minimum level
required to supply the IRD.
Note: The PEAK measurement is the maximum
signal power achieved thus far during the
installation process. To clear the peak, press
CLEAR PEAK.
Page 48
4 Installing an ODU AIM User’s Manual
41
Task D. Tilt Adjustment (95°, 3-LNB, Slimline-5, and Slimline-5S (SWiM) ODUs
Only)
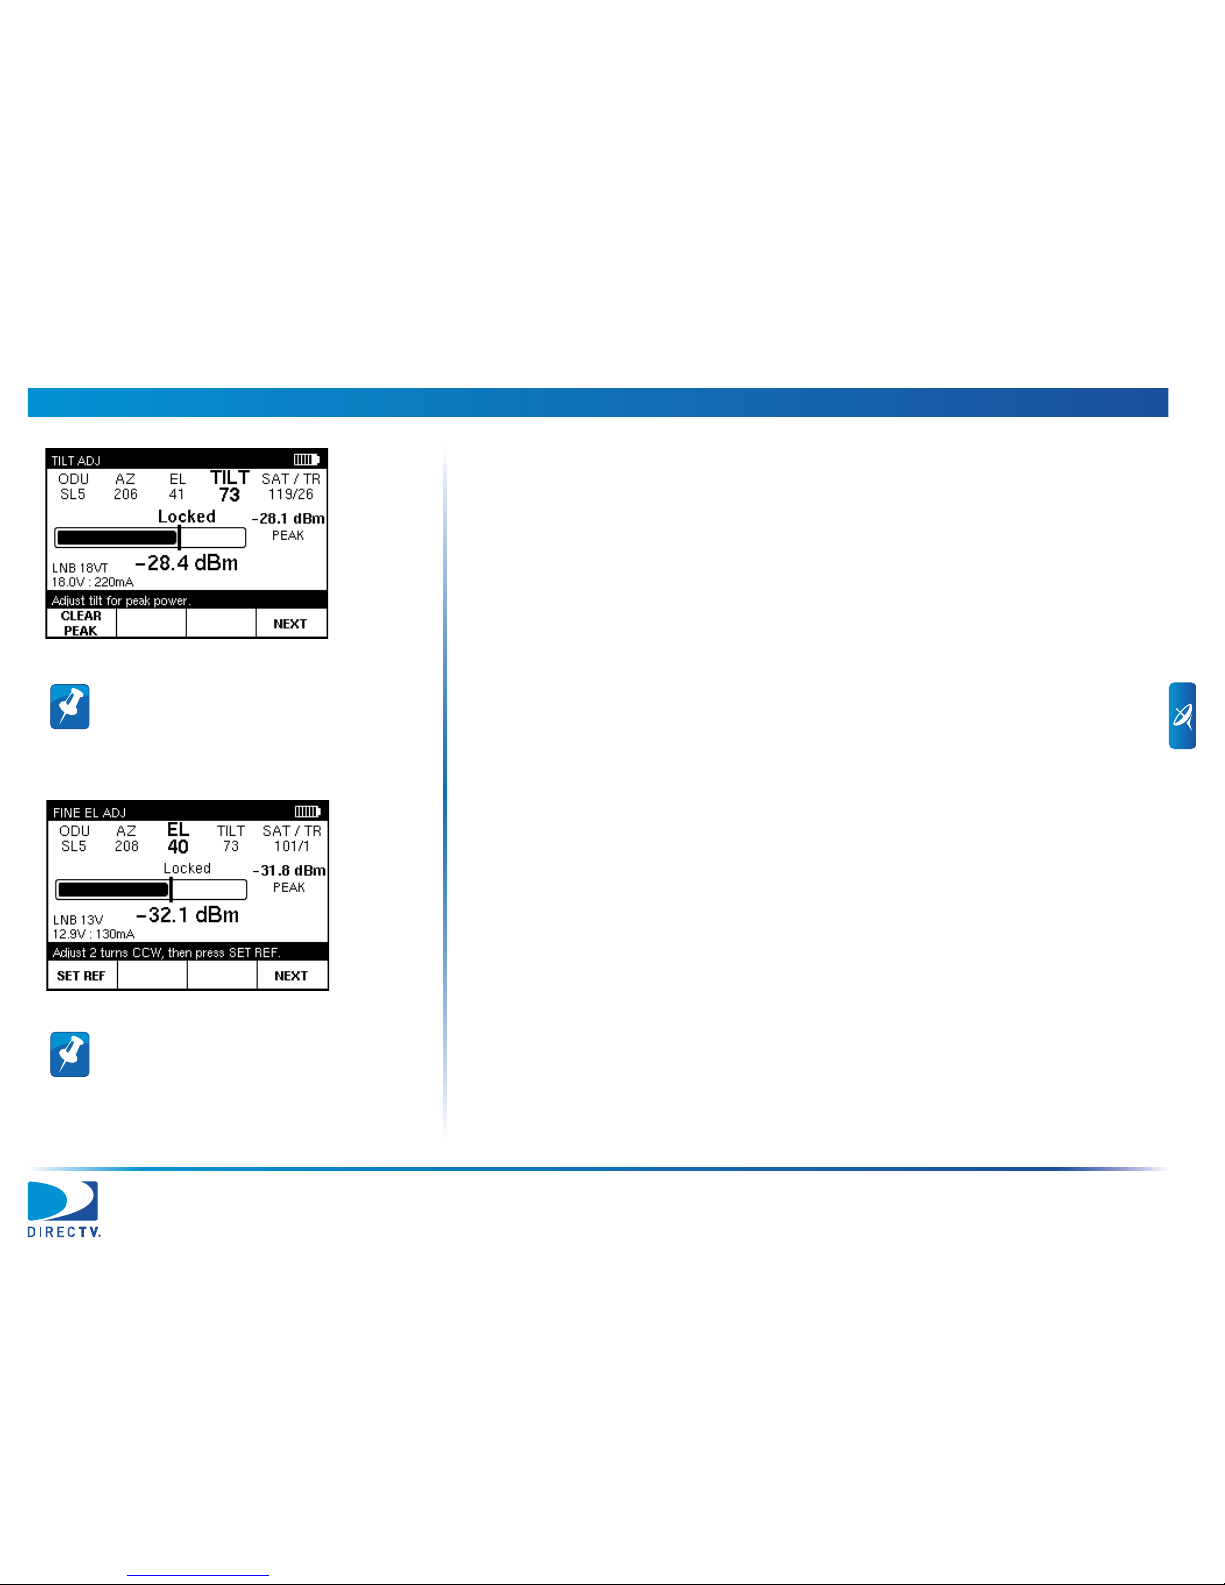
To perform the tilt adjustment:
1 Loosen the ODU’s tilt lock-down screws.
2 While monitoring the Es/No bar on the TILT ADJ screen, slowly rotate the ODU
around the tilt axis until the maximum Es/No value is reached.
3 Tighten the tilt lock-down screws.
4 Press NEXT to continue.
For 3-LNB ODUs only, the VERIFY AZ & EL screen appears following the tilt
adjustment to ensure the azimuth and elevation are still properly aligned. Adjust
the coarse azimuth and elevation if necessary following the steps in “Task B.
Coarse Azimuth Adjustment” on page40 and “Task C. Coarse Elevation
Adjustment” on page40.
Task E. Fine Elevation Adjustment (Slimline ODUs Only)
To perform the fine elevation adjustment:
1 Loosen the ODU’s elevation lock-down screws.
2 Turn the ODU’s elevation jack screw counterclockwise 2 turns.
3 On the FINE EL ADJ screen, press SET REF to set the reference value.
The AIM sounds a confirmation tone and displays the reference value.
4 Zero out the readout dial on the elevation jack screw.
5 Turn the elevation jack screw clockwise until the meter sounds a confirmation
tone and the displayed signal power matches the reference value.
Note: Es/No is a measure of the received carrier
strength relative to the strength of the received
noise, which is an indication of the quality of the
signal.
Note: It will take around four turns to reach the
reference value.
Page 49

4 Installing an ODU AIM User’s Manual
42
6 Refer to the ODU’s dial and use the AIM’s numeric keypad to enter the number
of turns it took to return to the reference value. Then press OK.
7 Zero out the readout dial on the elevation jack screw.
8 Refer to the AIM screen and turn the elevation jack screw counterclockwise the
number of turns indicated on the AIM screen.
9 Tighten the elevation lock-down screws.
10 Press OK and then NEXT to continue.
Example: If it took four and a half turns to
return to the reference value, enter 4.50.
Page 50

4 Installing an ODU AIM User’s Manual
43
Task F. Fine Azimuth Adjustment (Slimline ODUs Only)
To perform the fine azimuth adjustment:
1 Loosen the ODU’s azimuth lock-down screws.
2 Turn the ODU’s azimuth jack screw counterclockwise 2 turns.
3 On the FINE AZ ADJ screen, press SET REF to set the reference value.
The AIM sounds a confirmation tone and displays the reference value.
4 Zero out the readout dial on the azimuth jack screw.
5 Turn the azimuth jack screw clockwise until the meter sounds a confirmation
tone and the displayed signal power matches the reference value.
6 Refer to the ODU’s dial and use the AIM’s numeric keypad to enter the number
of turns it took to return to the reference value. Then press OK.
7 Zero out the readout dial on the azimuth jack screw.
Note: It will take around four turns to reach the
reference value.
Example: If it took four and a half turns to
return to the reference value, enter 4.50.
Page 51

4 Installing an ODU AIM User’s Manual
44
8 Refer to the AIM screen and turn the azimuth jack screw counterclockwise the
number of turns indicated on the AIM screen.
9 Tighten the azimuth lock-down screws.
10 Press OK and then NEXT to continue.
Page 52

4 Installing an ODU AIM User’s Manual
45
Performing EIV Following ODU Installation
When you complete the alignment process for the ODU, the EIV AT ODU screen
appears. You can:
immediately perform Extended Installation Verification (EIV) on the ODU that
you just aligned. Follow the steps below.
if the installation includes two ODUs, you can press NEXT to return to the
SELECT ODU screen and align the other ODU.
press DONE to return to the HOME screen and perform EIV later. For
instructions, see “Performing EIV” on page47.
To perform the Extended Installation Verification (EIV) for the ODU that you just
aligned:
1 On the EIV AT ODU screen, press RUN EIV and wait briefly for the results.
Page 53

4 Installing an ODU AIM User’s Manual
46
2 On the EIV AT ODU RESULTS screen, review the results for all supported orbital
slots and SWiM channels (if applicable). A satisfactory result is indicated by 9.
A problem is indicated by X.
If 9 appears for all supported orbital slots, the ODU alignment is acceptable.
If X appears for an orbital slot, perform the following steps:
a Press REPEAT EIV to confirm the problem.
b If X appears again for one or more orbital slots, you can press EIV DETAIL to
determine which tests failed. Troubleshoot any failures following the
instructions provided by DIRECTV.
c To repeat the alignment process, press REPEAT ALIGN.
3 When you have finished reviewing EIV results on the EIV AT ODU RESULTS
screen, you can press DONE to return to the HOME screen.
If the installation includes two ODUs, you can press NEXT to return to the
SELECT ODU screen and align the other ODU.
Note: On the EIV AT ODU DETAILS screen, you
can press NEXT to view the details for another
orbital slot, or press BACK to scroll back
through the details to the EIV AT ODU
RESULTS screen.
Page 54

47
5 Performing EIV
Extended Installation Verification (EIV) can be performed at any point in the
installation to quickly confirm that the installation is satisfactory for all supported
orbital slots. EIV is an easy way to pinpoint any potential problems with the
installation. The AIM guides you through the steps for the testing.
To perform the Extended Installation Verification (EIV):
1 Start the job for the installation (“Starting a Job” on page31).
2 From the HOME screen, press EIV to go to the SELECT CONFIGURATION
screen.
3 Use
c or d to highlight the equipment configuration for the installation and
press SELECT to go to the MEASUREMENT LOCATION screen.
4 Use c or d to highlight the location where you are testing.
5 Connect the AIM ODU F connector at the point in the distribution network
where you want to test. Then press SELECT to go to the EIV screen.
Example: To test between the ODU and the
multiswitch, disconnect the cable connecting
the ODU to the multiswitch and connect it
to the AIM’s ODU F connector.
Page 55

5 Performing EIV AIM User’s Manual
48
If the installation includes two ODUs, the SELECT ODU screen appears.
Use c or d to highlight the ODU for which you want to perform EIV and press
SELECT to go to the EIV screen.
6 On the EIV screen, press RUN EIV and wait briefly for the results.
Note: To add a note about the EIV, such as
details about where the EIV is being performed,
press NOTES. Then enter the note following the
instructions on page33.
Page 56

5 Performing EIV AIM User’s Manual
49
7 On the EIV RESULTS screen, review the results for all supported orbital slots and
SWiM channels (if applicable). A satisfactory result is indicated by 9. A problem
is indicated by X.
If 9 appears for all supported orbital slots, the ODU alignment is acceptable.
If X appears for an orbital slot, perform the following steps:
a Press REPEAT EIV to confirm the problem.
b If X appears again for one or more orbital slots, you can press EIV DETAIL to
determine which tests failed. Troubleshoot any failures following the
instructions provided by DIRECTV.
8 When you have finished reviewing EIV results on the EIV RESULTS screen, you
can press DONE to return to the HOME screen.
You a l s o can p r e ss CHANGE LOC to perform EIV for another location.
Note: To change the location where you are
testing, press CHANGE LOC.
Note: On the EIV DETAILS screen, you can
press NEXT to view the details for another
orbital slot, or press BACK to scroll back
through the details to the EIV RESULTS screen.
Page 57

50
6 Performing Other Network Tests
If there is a problem with a DIRECTV installation, you can run network tests to help
you troubleshoot the problem. These tests include:
In-line test (see page51)
Satellite Tune test (see page53)
SWiM LF Power test (see page57)
Cable Resistance test (see page59)
Tra nspond er Survey (see page61)
The AIM guides you through the steps for each test.
Page 58

6 Performing Other Network Tests AIM User’s Manual
51
Performing an In-Line Test
You can use the AIM’s In-line test feature to help determine the cause of a problem
in an installation. Connecting the AIM in series with the equipment, you can
progressively test each segment of the connection between the ODU and the IRD to
locate a problem. The AIM can measure the voltage, current, and 22 kHz signals to
verify that the correct control signals are being transmitted through the coaxial
cable.
To p e rf o rm a n I n - li n e t e s t :
1 Start the job for the installation (“Starting a Job” on page31).
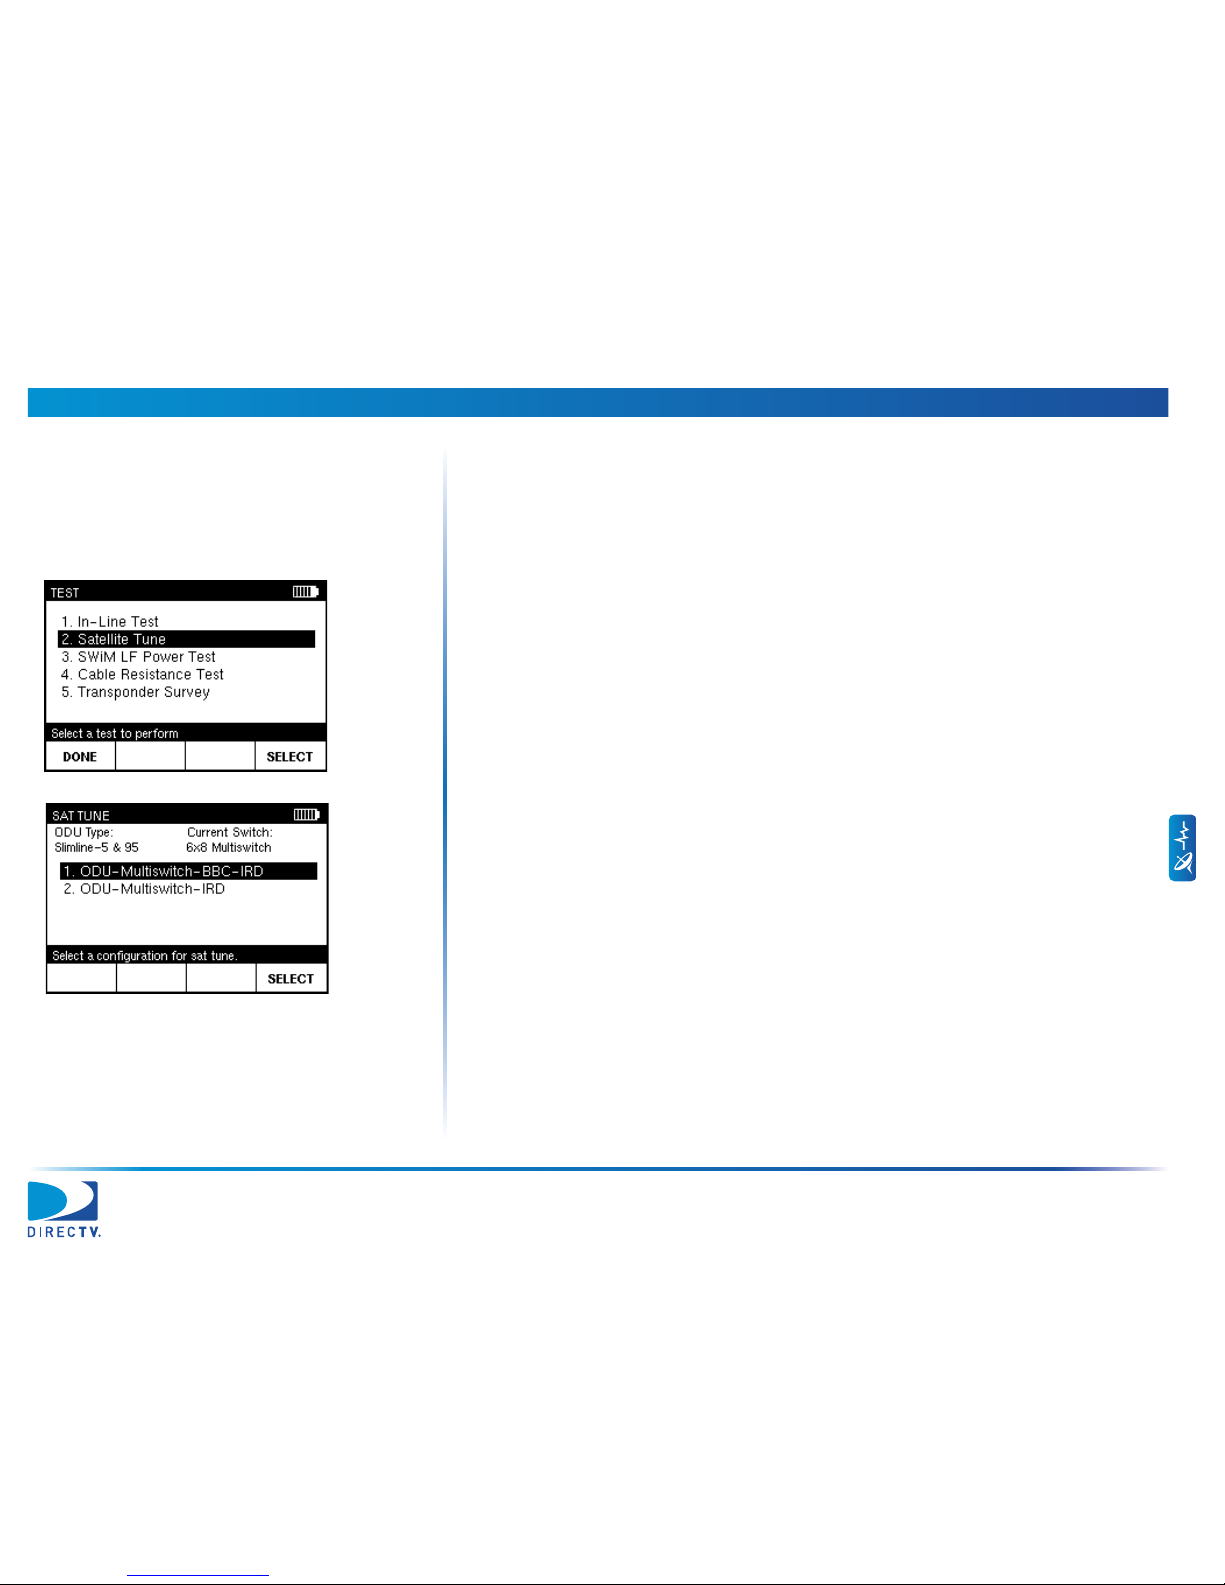
2 From the HOME screen, press TEST to go to the TEST screen.
3 Use
c or d to highlight In-Line Test and press SELECT to go to the
IN-LINE TEST screen.
4 Use
c or d to highlight the equipment configuration for the installation and
press SELECT to continue.
Page 59

6 Performing Other Network Tests AIM User’s Manual
52
5 Use c or d to highlight the location where you are testing.
6 Connect the AIM in series with the equipment at the location where you want to
test.
7 Press SELECT and wait briefly for the results of the test.
8 On the IN-LINE TEST RESULTS screen, review the results of the test. The screen
indicates whether the test passed or failed. The screen also shows:
– Voltage supplied (in volts).
– Current supplied (in milliamps).
– If present, amplitude of the 22 kHz tone.
– Indication as to whether DiSEqC commands are being received by the
multiswitch (MSW) and BBC.
9 Troubleshoot any problems following the instructions provided by DIRECTV.
10 Press DONE to return to the TEST screen.
Example: To test between the ODU and the
multiswitch, disconnect the cable connecting
the ODU to the multiswitch and connect it
to the AIM’s ODU F connector. Then connect
the AIM’s IRD F connector to the multiswitch.
Note: As messages are received from the
multiswitch (MSW) and BBC, the multiswitch
port and BBC frequency range flash bold. If no
messages are received, “N/A” appears.
Page 60
6 Performing Other Network Tests AIM User’s Manual
53
Performing a Satellite Tune Test
You can use the AIM’s Satellite Tune feature to tune to any DIRECTV transponder.
Connecting the AIM in different locations in the distribution network, you can
progressively test each segment of the connection between the ODU and the IRD to
locate a problem.
To perform a Satellite Tune test:
1 Start the job for the installation (“Starting a Job” on page31).
2 From the HOME screen, press TEST to go to the TEST screen.
3 Use c or d to highlight Satellite Tune and press SELECT to go to the
SAT TUNE screen.
4 Use c or d to highlight the equipment configuration for the installation and
press SELECT to continue.
Page 61
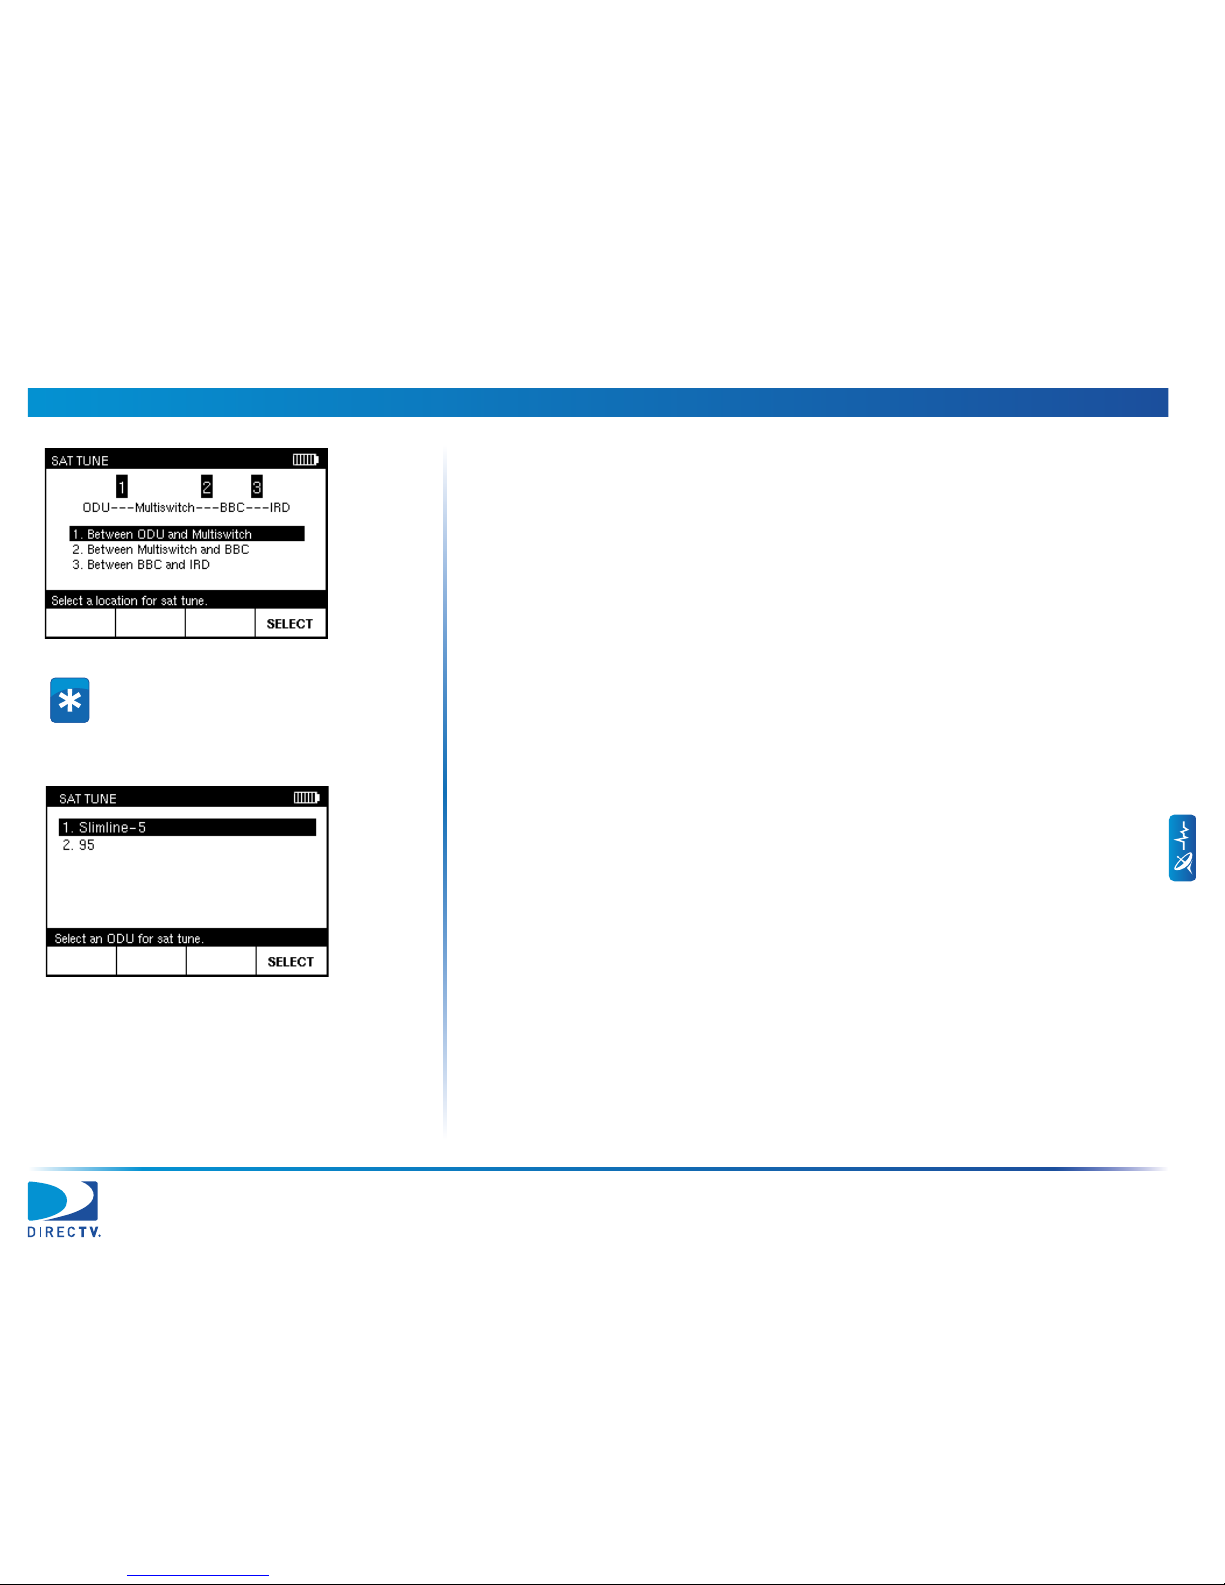
6 Performing Other Network Tests AIM User’s Manual
54
5 Use c or d to highlight the location where you are testing.
6 Connect the AIM ODU F connector at the point in the distribution network
where you want to test.
7 Press SELECT to continue.
8 If the installation includes two ODUs, use
c or d to highlight the ODU to test
and press SELECT to continue.
Example: To test between the ODU and the
multiswitch, disconnect the cable connecting
the ODU to the multiswitch and connect it
to the AIM’s ODU F connector.
Page 62
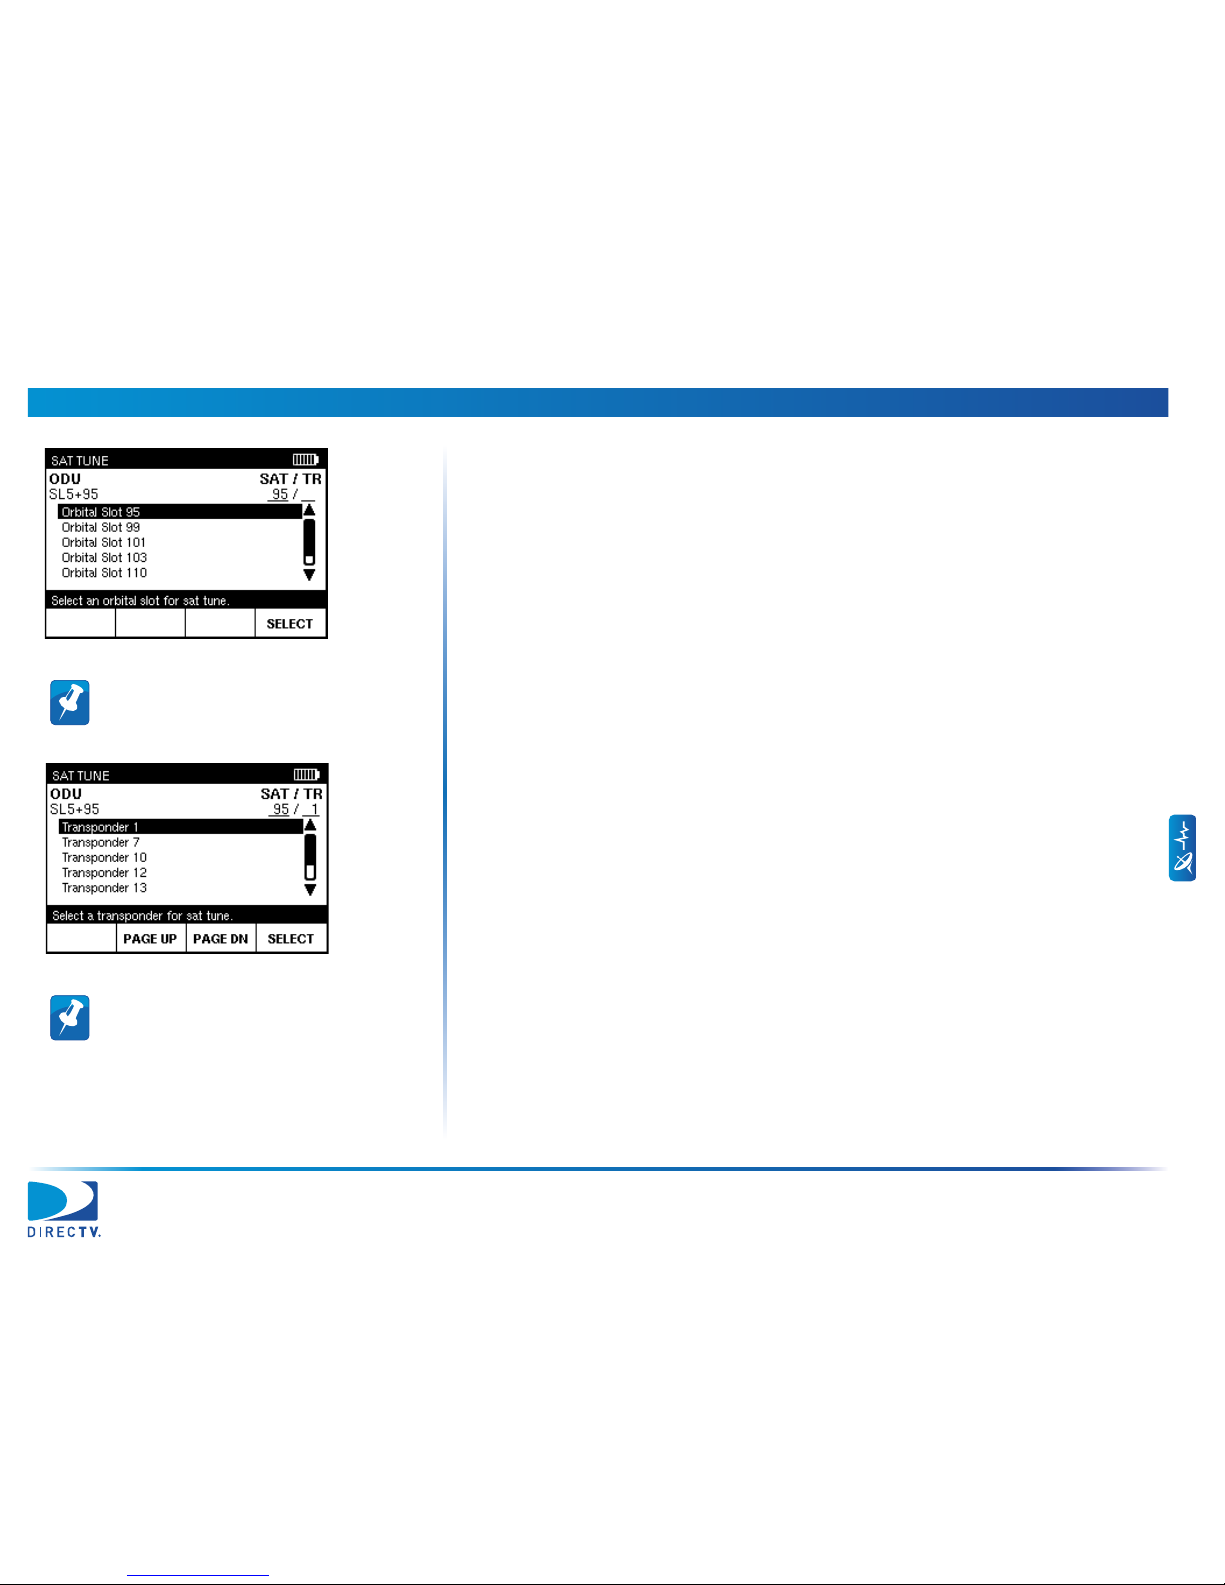
6 Performing Other Network Tests AIM User’s Manual
55
9 Use c or d to highlight the orbital slot to test and press SELECT to continue.
10 Use c or d to highlight the transponder to test. Then press SELECT and wait
briefly for the results of the test.
Note: You also can use the keypad to enter the
orbital slot number.
Note: You also can use the keypad to enter the
transponder number. Use PAGE UP or
PAGE DN to scroll quickly through the
transponders.
Page 63

6 Performing Other Network Tests AIM User’s Manual
56
11 On the SAT TUNE RESULTS screen, review the results of the test. The screen
shows:
– Power of the transponder signal (in dBm—power ratio in decibels of the
measured power referenced to one milliwatt).
– Measurement of the carrier-to-noise ratio, expressed as Es/No in decibels.
–Frequency offset of the transponder signal from its expected frequency
(in megahertz)
– Indication as to whether the transponder signal is above the power lock
threshold.
12 Troubleshoot any problems following the instructions provided by DIRECTV.
a To repeat the test at a different location, press CHANGE LOC.
Then go to Step 5.
b To repeat the test at a different orbital slot, press CHANGE SAT.
Then go to Step 9.
c To repeat the test at a different transponder, press CHANGE TR.
Then go to Step 10.
To repeat the test for a sequential transponder, use
c or d to change the
transponder number to the next or previous transponder. The SAT TUNE
RESULTS screen updates to show the results of the test for the selected
transponder.
13 Press DONE to return to the TEST screen.
Note: The SAT TUNE RESULTS screen
automatically updates to show the most recent
test results for the transponder.
Page 64

6 Performing Other Network Tests AIM User’s Manual
57
Performing a SWiM LF Power Test
You can use the AIM’s SWiM LF Power test feature to determine whether there is a
communications problem between the SWiM and the IRD. To perform this test,
disconnect all IRDs in the distribution network, then connect the AIM in place of an
IRD. The AIM determines whether the SWiM LF Power level is sufficient.
To p e rf o rm a SW iM L F Pow e r t e st :
1 Start the job for the installation (“Starting a Job” on page31).
2 From the HOME screen, press TEST to go to the TEST screen.
3 Use c or d to highlight SWiM LF Power Test and press SELECT to go to the
SWiM LF POWER TEST screen.
4 Disconnect all IRDs in the distribution network. Then connect the AIM in place of
an IRD.
5 Press NEXT and wait briefly for the results of the test.
Page 65

6 Performing Other Network Tests AIM User’s Manual
58
6 On the SWiM LF POWER TEST RESULTS screen, review the results of the test.
The screen shows whether the SWiM LF power level is sufficient.
7 Troubleshoot any problems following the instructions provided by DIRECTV.
To repeat the SWiM LF Power test in case of a failure, press RETRY.
8 Press DONE to return to the TEST screen.
Note: The SWiM LF POWER TEST RESULTS
screen automatically updates to show the most
recent test results.
Page 66
6 Performing Other Network Tests AIM User’s Manual
59
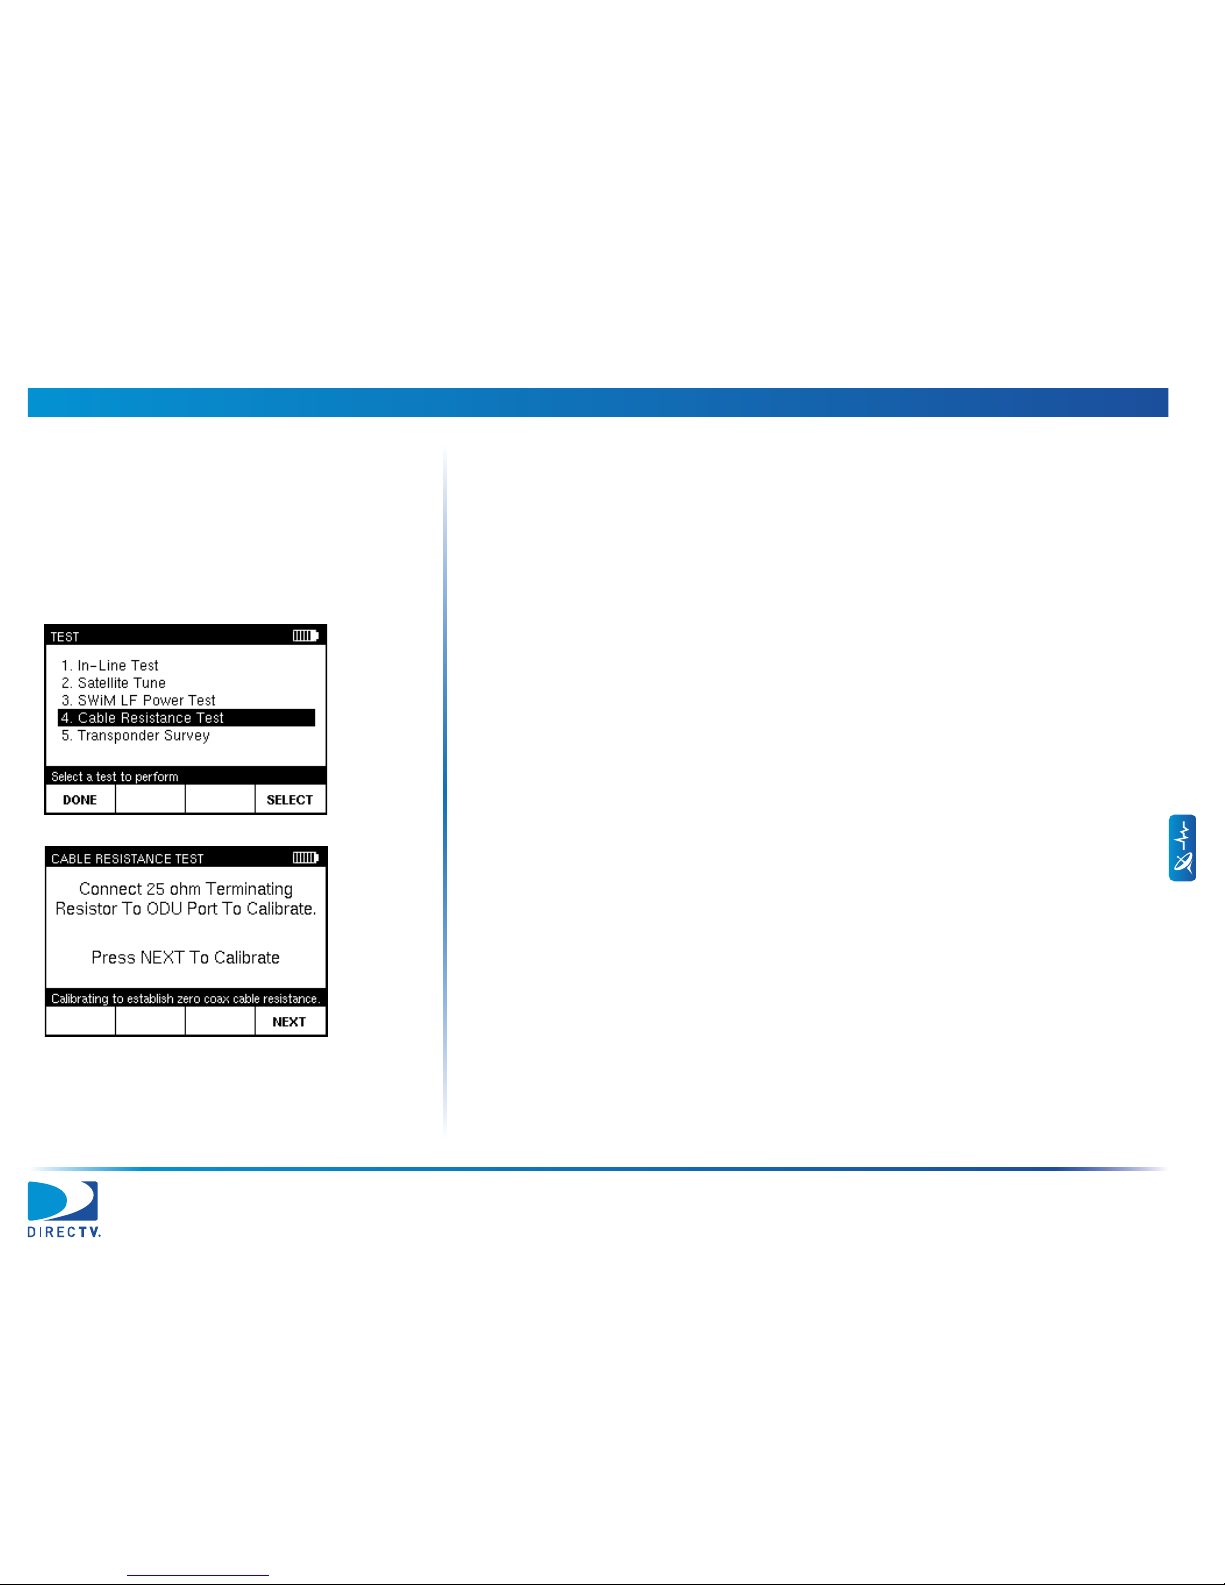
Performing a Cable Resistance Test
You can use the AIM’s Cable Resistance test feature to help determine whether there
is a problem with a cable used in the distribution network. To complete this test, you
must use the 25 Ω Cable Test Load (provided with the AIM). By placing the Cable
Test Load on the end of a cable, you can determine the resistance value for the
cable. A high resistance value indicates that the cable may have been inadvertently
cut. A low resistance value indicates that the cable may have a short.
To perform a Cable Resistance test:
1 Start the job for the installation (“Starting a Job” on page31).
2 From the HOME screen, press TEST to go to the TEST screen.
3 Use
c or d to highlight Cable Resistance Test and press SELECT to go to the
CABLE RESISTANCE TEST screen.
4 Connect the 25 Ω Cable Test Load to the AIM ODU F connector.
5 Press NEXT to confirm the resistance of the Cable Test Load.
If the resistance is outside of the allowable range, a message appears. Perform the
following steps:
a Press RE-TEST to confirm the problem.
b If the resistance is still outside of the range, the Cable Test Load has failed.
Replace the Cable Test Load and re-start the Cable Resistance test.
Page 67

6 Performing Other Network Tests AIM User’s Manual
60
6 Connect the Cable Test Load to one end of the cable you want to test. Then
connect the other end of the cable to the AIM ODU F connector.
7 Press NEXT and wait briefly for the results of the test.
8 On the CABLE RESISTANCE RESULTS screen, review the resistance of the cable
in ohms, adjusted for the 25 Ω Cable Test Load.
9 Troubleshoot any problems following the instructions provided by DIRECTV.
To repeat the Cable Resistance test, press REPEAT.
10 Press DONE to return to the TEST screen.
Note: If a message appears stating that DC
voltage was detected, the cable is not
connected to the Cable Test Load.
Make sure you are testing the appropriate
cable, then press NEXT to continue the test.
Page 68

6 Performing Other Network Tests AIM User’s Manual
61
Performing a Transponder Survey
You can use the AIM’s Transponder Survey feature to record the signal power,
carrier-to-noise ratio (ES/No), frequency offset, and lock status for all transponders
that can be received using the selected equipment. This can help to determine the
location of a problem for an installation. Connecting the AIM in the distribution
network, you can progressively test each segment of the connection between the
ODU and the IRD to locate a problem.
To perform a Transponder Survey:
1 Start the job for the installation (“Starting a Job” on page31).
2 From the HOME screen, press TEST to go to the TEST screen.
3 Use
c or d to highlight Scan and press SELECT to go to the TRANSPONDER
SURVEY screen.
4 Use
c or d to highlight the equipment configuration for the installation and
press SELECT to continue.
Page 69

6 Performing Other Network Tests AIM User’s Manual
62
5 Use c or d to highlight the location where you are testing.
6 Connect the AIM ODU F connector at the point in the distribution network
where you want to test.
7 Press SELECT to continue.
8 If the installation includes two ODUs, use
c or d to highlight the ODU to test.
Then press SELECT to continue.
Example: To test between the ODU and the
multiswitch, disconnect the cable connecting
the ODU to the multiswitch and connect it
to the AIM’s ODU F connector.
Page 70

6 Performing Other Network Tests AIM User’s Manual
63
9 Press RUN TR SURVEY to start the test. The screen indicates each orbital slot
and transponder as they are scanned.
10 When the scan test is complete, press VIEW to go to the TRANSPONDER
SURVEY RESULTS screen.
Note: To add a note about the transponder
survey, such as details about where the survey is
being performed, press NOTES. Then enter the
note following the instructions on page33.
Page 71

6 Performing Other Network Tests AIM User’s Manual
64
11 Use c or dto review the results of the test. The screen shows the following
information for each transponder:
– Power of the transponder signal (in dBm—power ratio in decibels of the
measured power referenced to one milliwatt).
– Measurement of the carrier-to-noise ratio, expressed as Es/No in decibels.
–Frequency offset of the transponder signal from its expected frequency (in
megahertz)
– Indication whether the transponder signal is above the power lock threshold.
– Voltage supplied (in volts).
– Current supplied (in milliamps).
– ODU used.
– SWiM channel used.
12 Troubleshoot any problems following the instructions provided by DIRECTV.
To repeat the test at a different location, press CHANGE LOC.
13 Press DONE to return to the TEST screen.
Tip: Use PAGE UP and PAGE DN to scroll
quickly through test results.
Page 72

65
7 Managing Records
The AIM stores information for each account, including the setup information for
the installation, and the results for each EIV and Transponder Survey. For all
accounts, you can:
view records (see page69)
delete records (see page73)
transfer records to and from a USB flash drive (see page75).
The AIM can hold up to 100 record files. When there are 100 stored record files and
a new file is to be added, the oldest file is deleted.
Page 73

7 Managing Records AIM User’s Manual
66
Understanding Records
The AIM stores information in different types of records, including:
account records (page66)
setup records (page67)
user records (page67)
test records (page67)
data records (page68).
These records are stored in log files and survey files.
A log file contains records of all types. Select a log f ile to view setup
information, as well as results from an EIV or Transponder Survey.
A survey file contains test and data records for a particular Transponder Survey.
Select a survey f ile for quick access to Transponder Survey results.
An EIV file contains test and data records for a particular EIV. Select an EIV file
for quick access to EIV results.
Account Records
An account record is generated each time a new account number is entered or an
EIV or Transponder Survey is performed. This record shows the account number, as
well as the time and date when the account number was added or the test was
performed.
Page 74

7 Managing Records AIM User’s Manual
67
Setup Records
A setup record is generated each time the setup information is updated for the
account or an EIV or Transponder Survey is performed. This record shows the new
setup information (including ODU, switch, and zip code), as well as the time and
date when the change was made or the test was performed.
User Records
A user record is generated each time the registration information is updated for the
AIM or an EIV or Transponder Survey is performed. This record shows the
registration information (installer name, phone, and company), as well as the time
and date when the change was made or the test was performed.
Test Records
A test record is generated each time an EIV or Transponder Survey is performed.
This record shows summary information about the test, including the time and date,
ODU and equipment configuration for the installation, the location where the test
was performed, the account number, and notes (if applicable). One example is
shown.
Page 75
7 Managing Records AIM User’s Manual
68
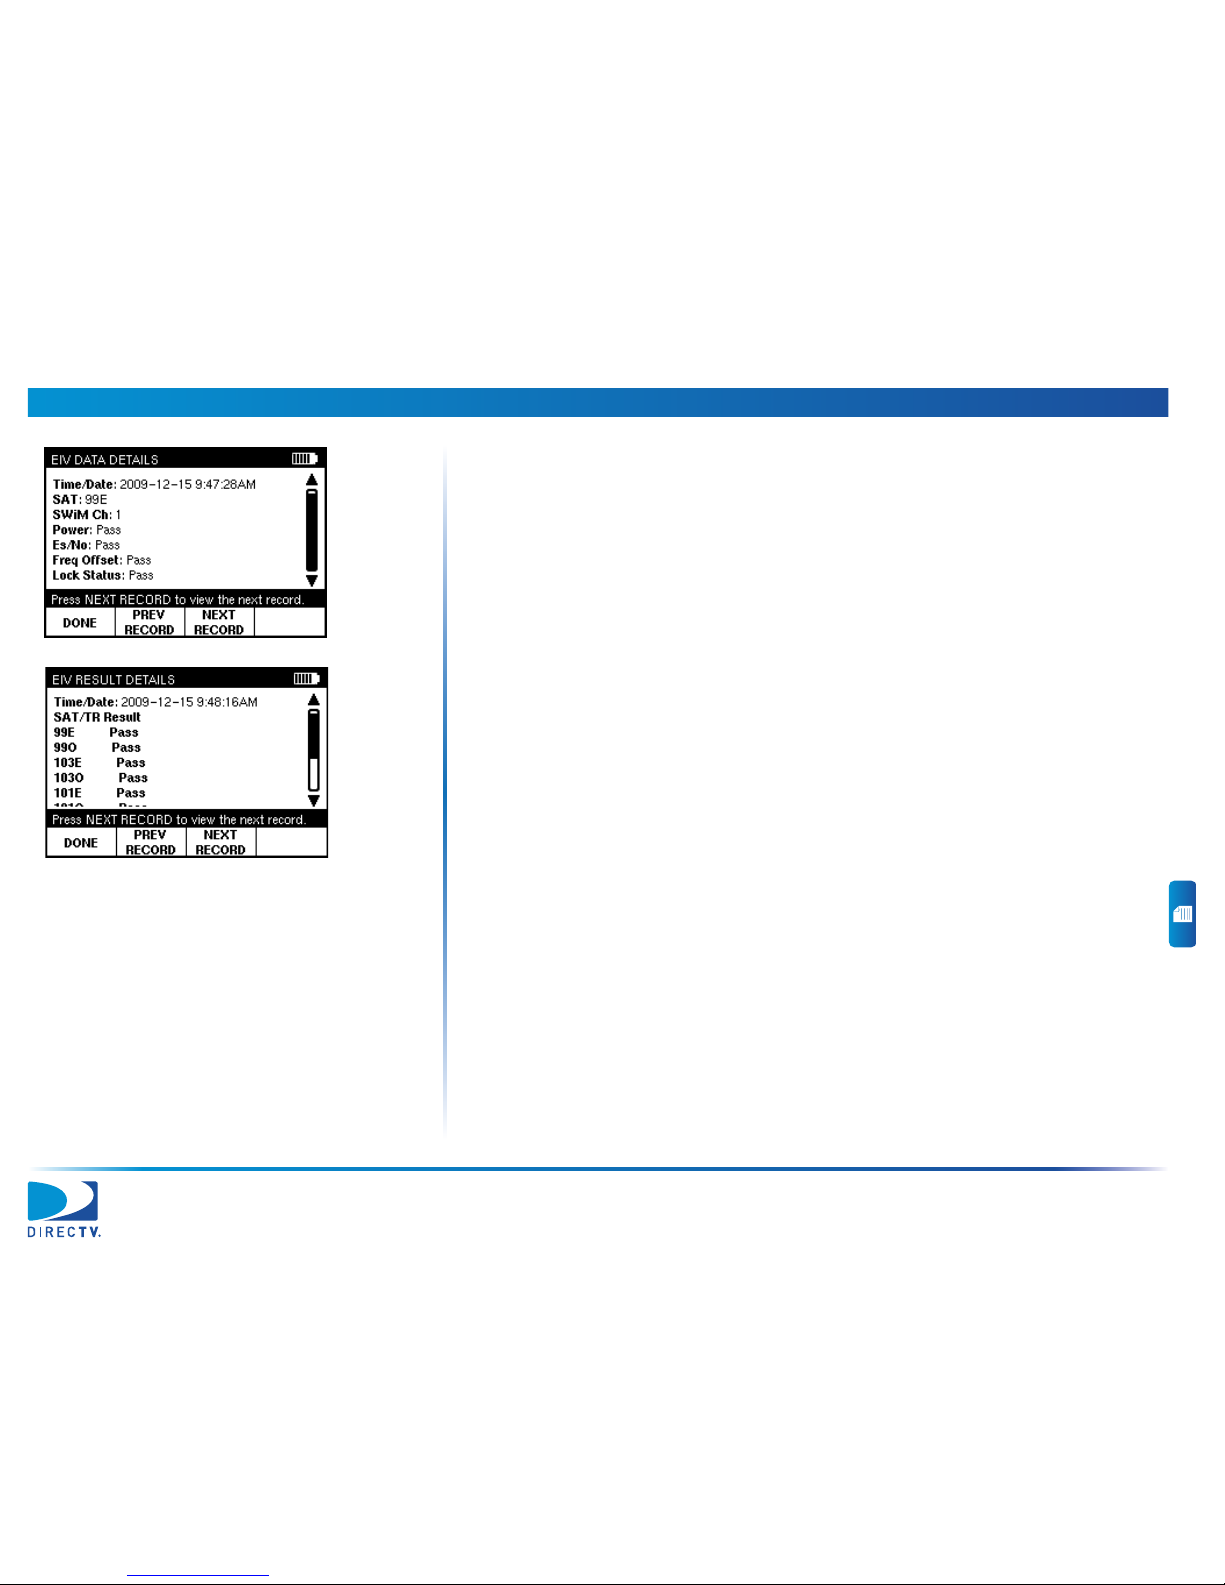
Data Records
Several data records are generated each time an EIV or Transponder Survey is
performed. Data records show the detailed test results for individual transponders
and SWiM channels (if applicable). Two examples are shown.
Page 76

7 Managing Records AIM User’s Manual
69
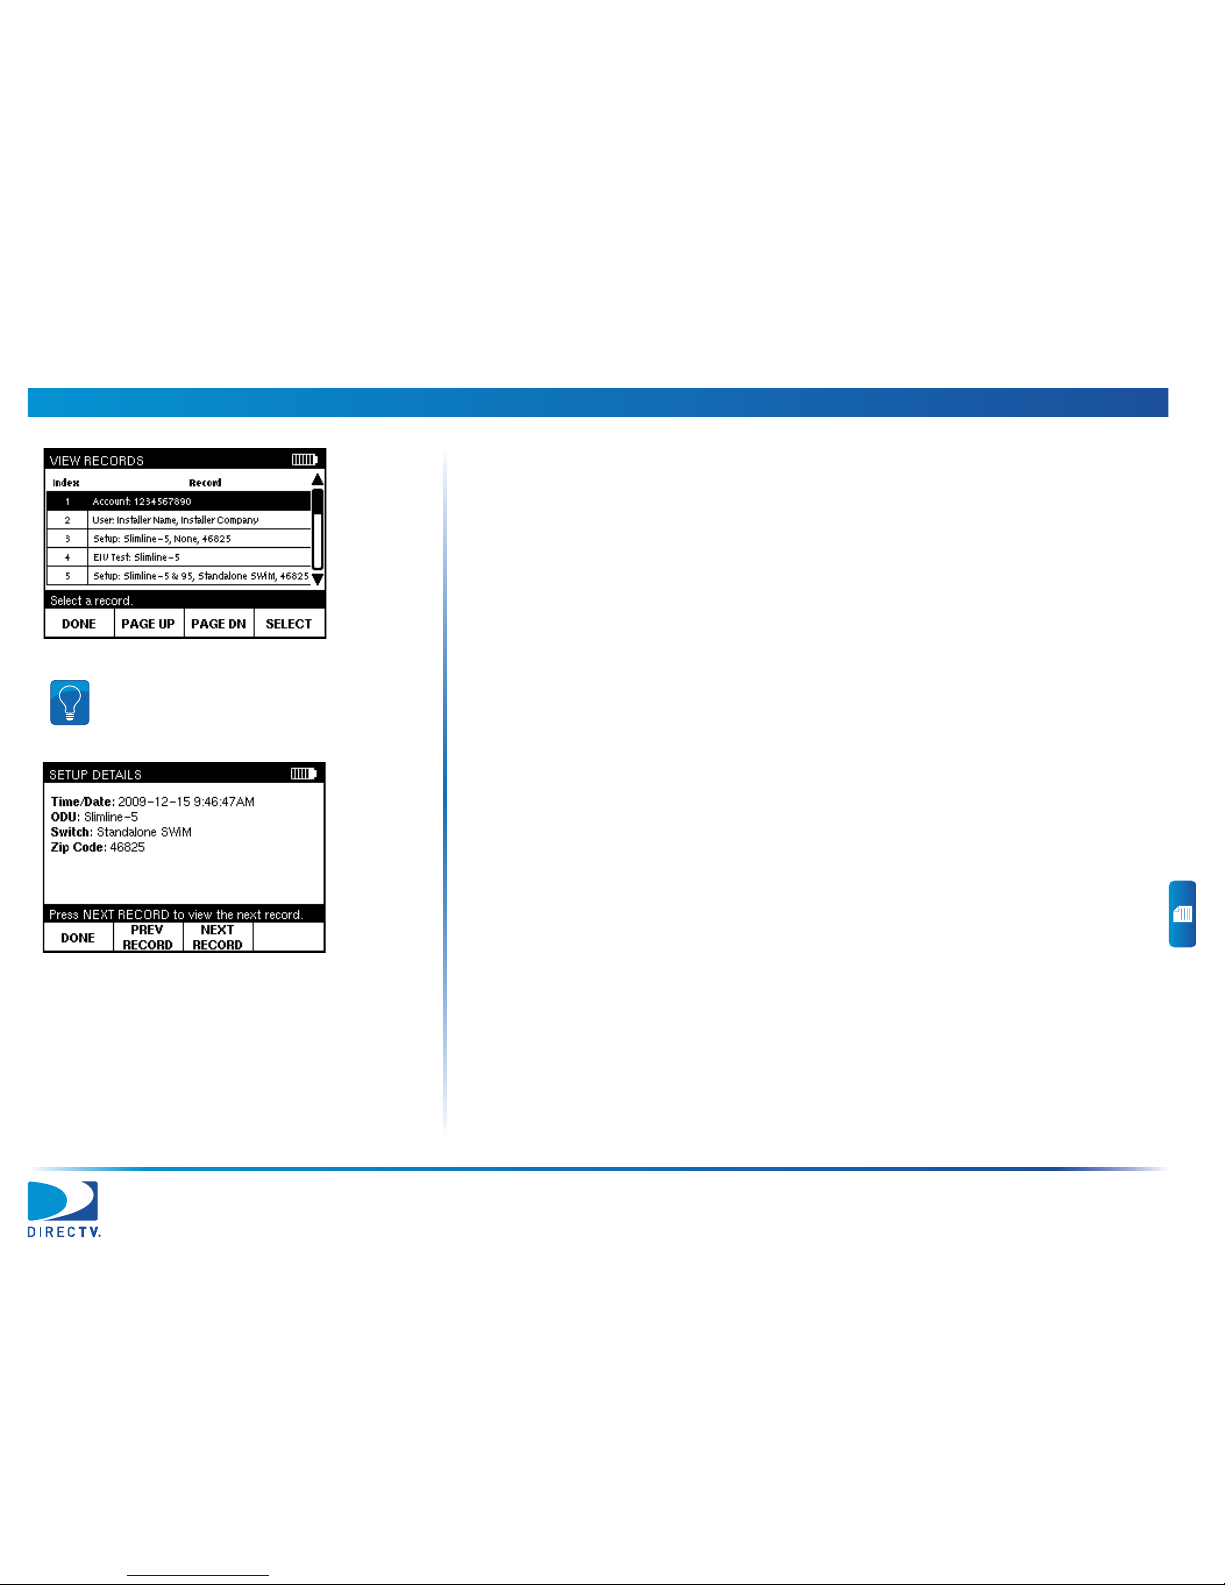
Viewing Records
You can view all records generated for each account number.
To v i ew r e cor d s:
1 Press CONFIG to go to the CONFIGURATION screen.
2 Use
c or d to highlight Records and press SELECT to go to the RECORDS
MAIN screen.
3 Use c or d to highlight View Records and press SELECT to go to the VIEW
RECORDS screen.
4 Use
c or d to highlight the log file or survey file that contains the records you
want to view and press SELECT.
To view log file records, go to Step 5.
To view survey file records, go to Step 6.
To view EIV file records, go to Step 7.
Page 77
7 Managing Records AIM User’s Manual
70
5 If you selected a log file, use c or d to highlight the record that you want to
view and press SELECT.
The record you selected appears. (See “Understanding Records” on page66 for
more information on record types.)
You can press NEXT RECORD or PREV RECORD to go to the next or previous
record in the log file.
Tip: Use PAGE UP and PAGE DN to scroll
quickly through the records.
Page 78

7 Managing Records AIM User’s Manual
71
6 If you selected a record from a survey file, the VIEW SURVEY INFO screen
appears.
You can press NEXT to view the data record for the Transponder Survey on the
VIEW SURVEY DATA screen.
Tip: Use PAGE UP and PAGE DN to scroll
quickly through the test results.
Page 79
7 Managing Records AIM User’s Manual
72
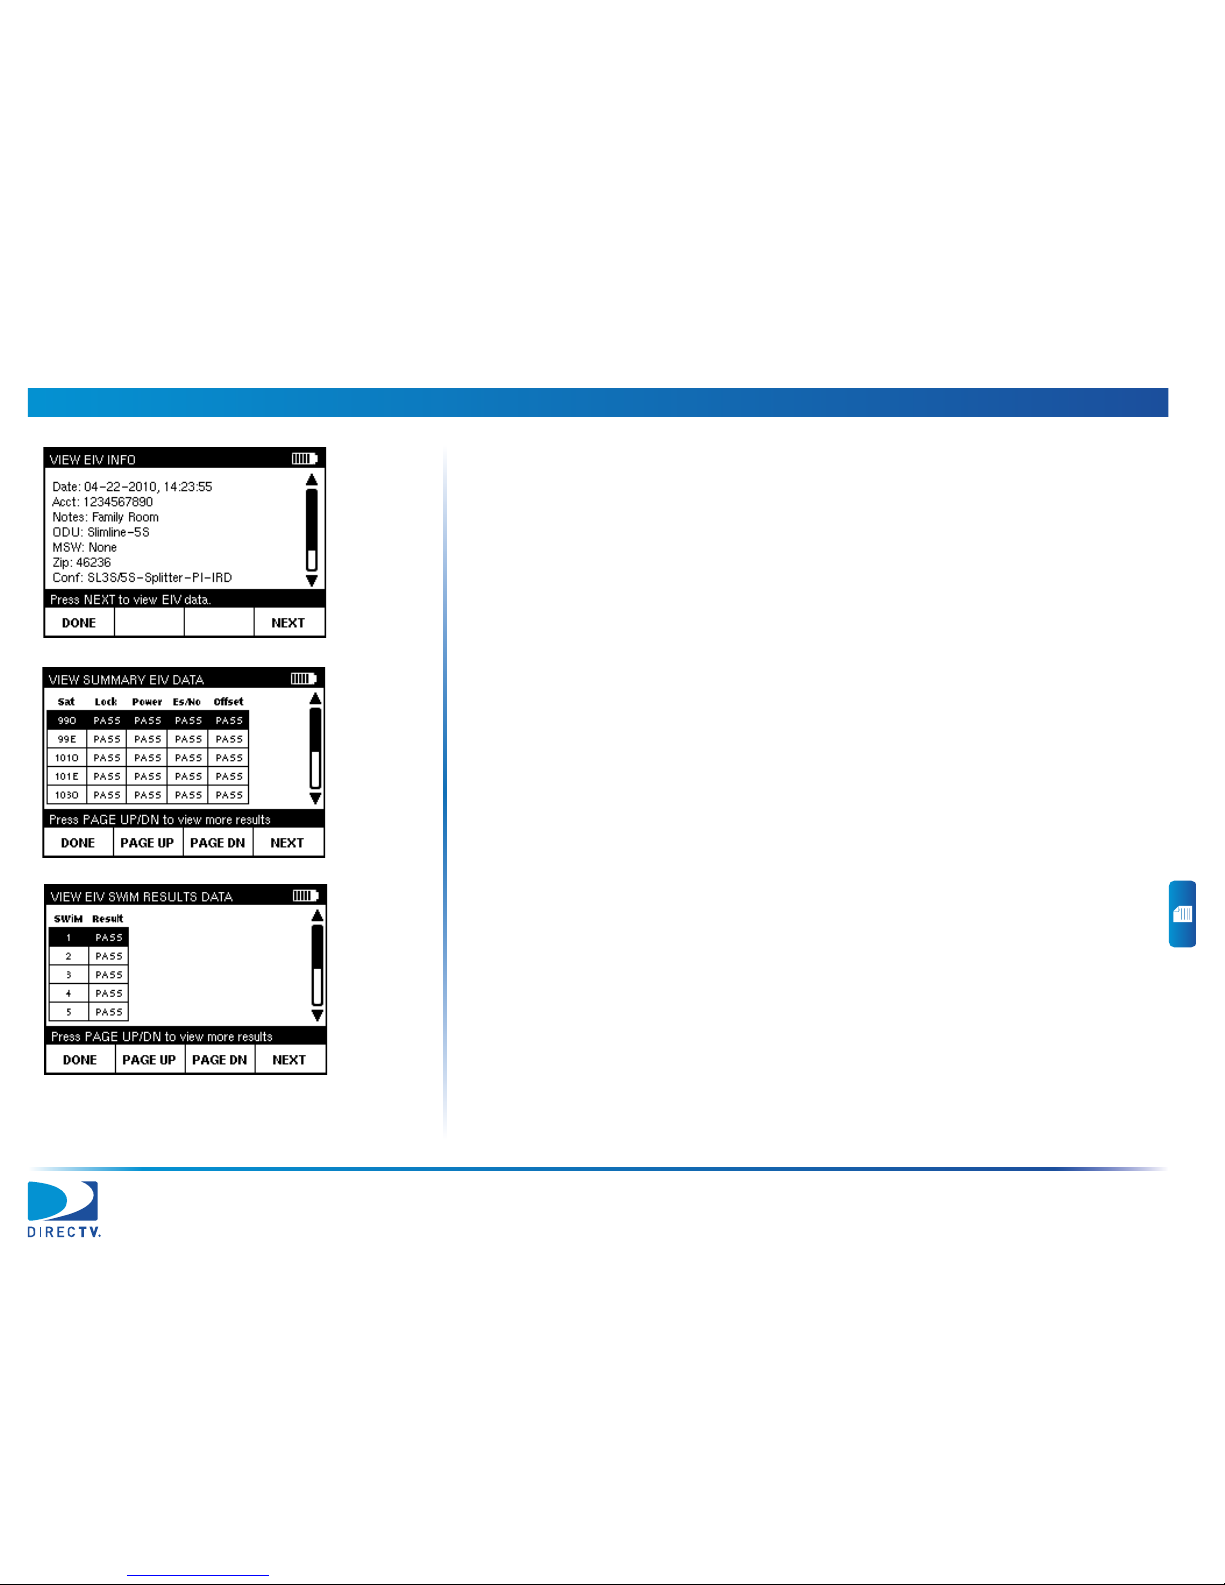
7 If you selected a record from an EIV file, the VIEW EIV INFO screen appears.
You can press NEXT to view the data records for the EIV on the VIEW
SUMMARY EIV DATA screen, VIEW EIV SWiM RESULTS DATA screen (SWiM
installations only) and VIEW RAW EIV DATA screen (SWiM installations only).
Page 80

7 Managing Records AIM User’s Manual
73
8 To view another record, press DONE to go to the VIEW RECORDS screen and
select another record.
Deleting Records
You can delete a single log file or survey file, or all record files for all accounts.
To delete records:
1 Press CONFIG to go to the CONFIGURATION screen.
2 Use c or d to highlight Records and press SELECT to go to the RECORDS
MAIN screen.
3 Use c or d to highlight Delete Records and press SELECT to go to the DELETE
RECORDS screen.
Page 81

7 Managing Records AIM User’s Manual
74
4 To delete a single record file, use c or d to highlight Single Record File and
press SELECT. Go to Step 5.
To delete all record files, use c or d to highlight All Records and press SELECT.
A message appears to confirm the deletion. Go to Step 6.
5 Use c or d to highlight the log file or survey f ile that you want to delete and
press SELECT. A message appears to confirm the deletion.
6 Press OK to delete the selected records.
The records are deleted, and the RECORDS MAIN screen appears.
Tip: Use PAGE UP and PAGE DN to scroll
quickly through the record files. Press DONE to
return to RECORDS MAIN without deleting a
record file.
Page 82

7 Managing Records AIM User’s Manual
75
Transferr ing Records
You can transfer records from your AIM to a PC using a USB flash drive. You also can
transfer records from a USB flash drive to the AIM.
You can transfer a single log file or survey file, or all record files for all accounts.
To transfer records:
1 Press CONFIG to go to the CONFIGURATION screen.
2 Use
c or d to highlight Records and press SELECT to go to the RECORDS
MAIN screen.
3 Use c or d to highlight Transfer Records and press SELECT to go to the
TRANSFER RECORDS screen. A message appears stating to insert the USB flash
drive.
4 Insert the USB flash drive into the appropriate USB connector on the meter. The
press OK to go to the TRANSFER RECORDS screen.
5 To transfer records from the AIM to a USB flash drive, use
c or d to highlight
To USB Flash Drive and press SELECT to continue.
To transfer records to the AIM from a USB flash drive, use
c or d to highlight
From USB Flash Drive and press SELECT to continue.
Page 83

7 Managing Records AIM User’s Manual
76
6 To transfer a single record file, use c or d to highlight Single Record File and
press SELECT. Go to Step 7.
To transfer all record files, use c or d to highlight All Records and press SELECT.
Go to Step 8.
7 Use c or d to highlight the log file or survey file that you want to transfer and
press SELECT.
8 If you are transferring records from the AIM to a USB flash drive, press MOVE to
transfer the records and delete them on the AIM, or press COPY to transfer the
records and retain a copy of each record on the AIM.
The records are transferred, and the RECORDS MAIN screen appears.
Tip: Use PAGE UP and PAGE DN to scroll
quickly through the record files.
Page 84

77
8Updating the Meter
You can update your AIM as new features become available. You can update the
AIM application, the AIM’s database (which includes reference information used by
the AIM), or both the application and database.
When you update the meter firmware, you must plug the AIM into a power outlet
using the AC power adapter.
To update the firmware:
1 Plug the AC power adapter into a power outlet. Plug the other end of the power
adapter into the AIM’s power input connector.
2 Press CONFIG to go to the CONFIGURATION screen.
3 Use
c or d to highlight Firmware Upgrade and press SELECT to go to the
FIRMWARE UPGRADE screen.
4 Use c or d to highlight the type of update you want to perform and press
SELECT.
Tip: To view the current AIM firmware version,
press CONFIG to go to the Configuration
screen. Then use c or d to highlight Firmware
Versi on s and press SELECT.
Page 85

8 Updating the Meter AIM User’s Manual
78
5 Insert the USB flash drive that contains the firmware upgrade in the appropriate
USB connector on the meter. Wait for 15 seconds, then press OK.
The firmware update process begins. A message appears when the firmware
update is complete.
6 Press OK to turn off and restart the meter.
After the meter turns on and the HOME screen appears, you can remove the
USB flash drive from the meter ’s USB connector.
Page 86

79
A Glossary
azimuth The angular distance (side to side) from true
north along the horizon of an ODU to a
selected satellite.
BBC B-band Converter
A Ka-band RF converter that allows viewing
of high definition channels with some IRDs.
carrier-to-noise ratio
(Es/No)
A measure of the received carrier strength
relative to the strength of the received noise,
which is an indication of the quality of the
signal (in dB).
dithering A process used with Slimline ODUs to make
fine adjustments in the azimuth and
elevation directions to hone signal power.
EIV Extended Installation Verification
An automated process for using the AIM to
confirm proper alignment of an ODU.
elevation The angular distance (up and down) above
the horizon of an ODU to a selected satellite.
IRD Integrated Receiver Decoder
Integrated receiver with a built-in decoder
for unscrambling subscription channels.
Also called satellite receiver and set-top box.
LNB Low-Noise Block Downconver ter
Component located at the end of the arm
projecting from an ODU that receives the
signals sent by the satellite and converts
them to a lower frequency that can be
accepted by a compatible satellite receiver.
Page 87

A Glossary AIM User’s Manual
80
multiswitch Device that splits up the satellite feed
without compromising quality to support
multiple IRDs.
ODU Out-Door Unit
Term used to collectively refer to the satellite
equipment, including the satellite dish, that
is placed outside a building.
orbital slots The location of geostationary satellites
around the globe.
signal power A measure of the strength of the radio
frequency signal being received from a
selected satellite transponder.
SWiM Single-Wire Multiswitch
Technology that allows distribution of
satellite signals on a single cable.
tilt Rotational adjustment to compensate for
the Earth’s curvature between the ODU and
a satellite’s signal beam.
transponder A receiver/transmitter on a satellite, which
receives a microwave signal from earth,
amplifies it, and retransmits it back to earth
at a different frequency. A satellite has
several transponders.
Page 88

B
81
Index
Numerics
95 PORT CONNECTION screen, 35
A
ACCOUNT NUMBER screen, 31
AIM
buttons
, 5, 8
Cable Test Load
, 7, 20, 59
carrying case
, 7, 20
display
, 8
display settings
, 25
entering Standby mode
, 11
F connectors
, 5, 20
features
, 1, 5
power adapters
, 7, 13, 20
power-saving features
, 12, 28
restarting
, 11
turning off
, 11
turning on
, 10
USB flash drive
, 7, 20, 75, 77
volume
, 24
aligning an ODU
, 37
automatic timer settings, changing
, 28
azimuth adjustment
coarse
, 40
fine
, 43
B
backlight, 28
BACKLIGHT TIMER screen
, 29
battery
charging
, 13
replacing
, 14
saving power
, 12
BRIGHTNESS screen
, 25
buttons
overview
, 5, 8
using
, 9
C
CABLE RESISTANCE RESULTS screen, 60
Cable Resistance test
performing
, 59
viewing results
, 60
CABLE RESISTANCE TEST screen
, 59
Cable Test Load
, 7, 20, 59
carrying case
, 7, 20
changing
backlight timer setting
, 28
display brightness
, 25
display contrast
, 25
job setup information
, 33
notes for a job
, 33
ODU type for a job
, 34
shutdown timer setting
, 28
Standby timer setting
, 28
switch type for a job
, 35
time and date setting
, 26
volume setting
, 24
zip code for a job
, 36
Page 89

AIM User’s Manual
82
charging the meter’s battery, 13
checking the current firmware version
, 77
COARSE AZ & EL ADJ screen
, 40
COMPANY screen
, 23
CONFIGURATION screen
, 22, 24, 25, 26, 28,
69, 73, 75, 77
CONTRAST screen
, 25
D
DATE FORMAT screen, 27
DATE screen
, 27
DELETE RECORDS screen
, 73
deleting records
, 73
display
changing the brightness setting
, 25
changing the contrast setting
, 25
overview
, 8
E
EIV
performing
, 45, 47
viewing results
, 46, 49, 69
EIV AT ODU DETAILS screen
, 46
EIV AT ODU RESULTS screen
, 46
EIV AT ODU screen
, 45
EIV DETAILS screen
, 49
EIV RESULTS screen
, 49
EIV screen
, 48
elevation adjustment
coarse
, 40
fine
, 41
entering
account number
, 31
notes for a job
, 33
ODU type for a job
, 34
registration information
, 22
switch type for a job
, 35
Standby mode
, 11
zip code for a job
, 36
Extended Installation Verification
see EIV
F
F connectors, 5, 20
FINE AZ ADJ screen
, 43
FINE EL ADJ screen
, 41
firmware
checking the current version
, 77
updating
, 77
FIRMWARE UPGRADE screen
, 77
H
HOME screen, 10
I
ID screen, 23
In-line test
performing
, 51
viewing results
, 52
IN-LINE TEST RESULTS screen
, 52
IN-LINE TEST screen
, 51
Page 90

AIM User’s Manual
83
J
jobs
entering notes
, 33
entering the account number
, 31
entering the ODU type
, 34
entering the switch type
, 35
entering the zip code
, 36
L
log file, 66
M
MEASUREMENT LOCATION screen, 47
MODIFY JOB SETUP screen
, 31
N
NAME screen, 23
navigation
, 9
NOTES screen
, 33
O
ODU TYPE screen, 34
ODUs
aligning
, 37
coarse azimuth adjustment
, 40
coarse elevation adjustment
, 40
fine azimuth adjustment
, 43
fine elevation adjustment
, 41
installing
, 37
orbital slots
, 38
performing EIV
, 45, 47
preliminary installation
, 39
tilt adjustment
, 41
types
, 38
P
performing
Cable Resistance test
, 59
coarse azimuth adjustment
, 40
coarse elevation adjustment
, 40
EIV at another location
, 47
EIV at the ODU
, 45
fine azimuth adjustment
, 43
fine elevation adjustment
, 41
In-line test
, 51
preliminary installation
, 39
Satellite Tune test
, 53
SWiM LF Power test
, 57
tilt adjustment
, 41
Transponder Survey
, 61
PHONE screen
, 23
power adapters
, 7, 13, 20
power management
, 12
power-saving features
, 28
PRE-CONFIGURE ODU screen
, 39
preliminary installation
, 39
R
record types, 66
records
deleting
, 73
transferring
, 75
understanding
, 66
viewing
, 69
RECORDS MAIN screen
, 69, 73, 75
registration information, entering
, 22
REGISTRATION screen
, 22
replacing the meter’s battery
, 14
restarting the meter
, 11
Page 91

AIM User’s Manual
84
S
safety instructions, 18
SAT TUNE RESULTS screen
, 56
SAT TUNE screen
, 53
Satellite Tune test
performing
, 53
viewing results
, 56
saving power
, 12, 28
SELECT CONFIGURATION screen
, 47
SELECT ODU screen
, 39, 48
setting the reference value
, 41, 43
setting up
jobs
, 30
meter
, 21
SETTINGS screen
, 22, 24, 25, 26, 29
settings, changing
, 21
setup information
, 30
SHUT DOWN AIM screen
, 11
SHUTDOWN TIMER screen
, 29
softkeys
, 8
spare parts
, 20
Standby mode
, 11, 28
STANDBY TIMER screen
, 29
starting a job
, 31
survey file
, 66
SWiM LF POWER RESULTS screen
, 58
SWiM LF Power test
performing
, 57
viewing results
, 58
SWiM LF POWER TEST screen
, 57
SWITCH TYPE screen
, 35
T
technical specifications, 19
technical support
, 17
TEST screen
, 51, 53, 57, 59, 61
TILT ADJ screen
, 41
tilt adjustment
, 41
TIME AND DATE screen
, 26
time and date, changing
, 26
TIME FORMAT screen
, 27
TIME screen
, 27
TRANSFER RECORDS screen
, 75
transferring records using a USB flash drive
,
75
Transponder Survey
performing
, 61
viewing results
, 64, 69
TRANSPONDER SURVEY RESULTS screen
,
63
TRANSPONDER SURVEY screen
, 61
turning off the meter
, 11
turning on the meter
, 10
U
updating the meter firmware, 77
USB flash drive
, 7, 20, 75, 77
Page 92

AIM User’s Manual
85
V
VERIFY AZ & EL ADJ screen, 41
VIEW EIV INFO screen
, 72
VIEW EIV SWiM RESULTS DATA screen
, 72
VIEW RAW EIV DATA screen
, 72
VIEW RECORDS screen
, 69
VIEW SUMMARY EIV DATA screen
, 72
VIEW SURVEY DATA screen
, 71
VIEW SURVEY INFO screen
, 71
viewing
Cable Resistance test results
, 60
EIV results
, 46, 49, 69
In-line test results
, 52
records
, 69
Satellite Tune test results
, 56
SWiM LF Power test results
, 58
Transponder Survey results
, 64, 69
VOLUME screen
, 24
volume setting, changing
, 24
Z
ZIP CODE screen, 36
 Loading...