

Page 1

Confidential & Proprietary
Page 2
A3-KaKu Installation Training, Process
and Set Up
Confidential & Proprietary
1. Classroom
1. Go over Power point presentation with trainers and “Advanced
Product Technicians”
2. Show Training Video and complete assessments
(you will need a Projector, Power point, Television and VCR)
2. “Hands on” (you will need Tools and equipment , New Ka/Ku Satellite Dish,
New Ka/Ku 6x8 Multi-switch (if/when available)
Acutrac PRO 22 or BirDog (with new KaKu files installed www.Birdog.TV ), 2”
NPRM or pole mount, New H20 Receiver and Television
1. Have selected technicians (rotate through groups) mount and peak
the Ka/Ku ODU, in designated area (parking lot) with 6x8 Ka/Ku
multi-switch (if/when available).
., Signal meter such as a
Page 3

Objectives
Confidential & Proprietary
• Train technicians on basic Ka technology
• Train technicians to successfully complete an
A3-KaKu ODU installation and upgrade
• Train technicians to assemble KaKu ODU
• Train technicians on mounting options of
KaKu ODU
Page 4

Objectives (cont)
Confidential & Proprietary
• Train technicians on ODU peaking methods,
including Dithering (fine tuning)
• Train technicians on how to install H20 HDTV IRD
• Train technicians on the use of the BBC (B band
converter) for use with All H20 IRD's
Page 5

What is Ka?
• What is Ka?
• The Ka band uplink uses frequencies between 27.5Ghz and
31Ghz and the downlink uses frequencies between 18.3 and
18.8Ghz and between 19.7 and 20.2Ghz.
• Ka band dishes are much smaller than C band dishes. Ka
band dishes vary from 2' to 5' in diameter.
• Ka band satellites typically transmit with much more power
than C band satellites.
Confidential & Proprietary
• The higher frequencies of Ka band are significantly more
vulnerable to signal quality problems caused by rainfall,
known as rainfade.
Page 6

What is A3 and MPEG4?
• What is A3
• A3 stands for Advanced Modulation, Advanced Coding and
Advanced Compression. It is a new technology that will
allow DIRECTV to offer more high-definition (and ultimately
standard) channels.
• What is MPEG4
• MPEG4 is the most recent version of a standard for the
digital representation of video, audio and certain types of 3D
information. It processes detailed 3D representation for
Confidential & Proprietary
faces, human bodies and general 3D scenes. The 3D scene
representation points to the VRML (Virtual Reality Modeling
Language) standard as it's representation.
Page 7
New mounts
• Why do we need a new precision mount?
• The new Ka orbital slots at 99° and 103° are centered
symmetrically around the existing DIRECTV 101° slot
• Another satellite company will be operating two future Ka
orbital slots that are very close spaced to our new 99° and
103° Ka slots.
• If the DIRECTV Ka/Ku antenna is not precisely aligned, the
other guys Ka orbital slots will interfere with DIRECTV Ka
Confidential & Proprietary
programming
• The other Ka satellites are not on-line yet and incorrectly
installed DIRECTV Ka/Ku systems may not show up for
some time.
Page 8
Azimuth
New Mount
Confidential & Proprietary
Elevation Fine-Tune
Fine-Tune
Page 9

Things You Should Know
Confidential & Proprietary
• The Ku and especially the Ka portion of the antenna
have a narrower beam width than previous DIRECTV
antennas.
• The Ka/Ku antenna requires over 10 times more
alignment accuracy than previous DIRECTV ODUs
• Complete Ka and Ku alignment is performed using
only the 101° and 119° Ku slots.
• A “Dithering” method is used to precisely align the
antenna by symmetrically detuning the antenna and
finding identical signal levels either side of peak.
Page 10

Review Questions
• What is Ka?
• What is MPEG4?
Confidential & Proprietary
• Why is a new mount needed?
Page 11

Ka/Ku ODU Assembly
Confidential & Proprietary
• Assemble the Antenna on the Ground
Why?
• It’s easier than on the roof.
• You won’t loose (as many) parts
• Less chance of damaging the ODU and LNB’s
Page 12

Ka/Ku ODU Assembly
Confidential & Proprietary
Tips
• Assemble the 110°/119° LNB, bracket and
interconnect cables but don’t attach to LNB arm.
• The 110°/119° LNB has 3 sets of mounting holes for
different regions, see the region chart in the manual.
• Preset AZ, EL and Tilt according to customers Zip
code found in the guided setup of the H20 IRD.
• LNB’s and dishes are NOT interchangeable between
manufacturers at this time. The LNB and arm are
keyed to prevent mismatching
Page 13

Ka/Ku ODU Mast Installation Procedures
Confidential & Proprietary
• Attach the Mast to the house ensuring that all 3 center holes
will be secured into a 2”x4” stud, or roof truss, and use the 4
corner holes on every install.
• Monopoles are used to provide additional support for the
ODU
• Attach the ODU to the mast and house in one of the
following ways:
Page 14

Ka/Ku ODU Mast Installation Procedures
Confidential & Proprietary
• Be sure to always seal the foot assembly and monopoles from
the weather using approved silicon caulk or bishop tape
anywhere water may leak into the house from the holes drilled.
• Pole mounts require at least 150LB of concrete
• Pole should be 2” in diameter and at least 16 ga.
• Pole should be 2’ below ground and 4’ above ground
• Pole should be modified so it will not spin (cut bottom of pole at
an angle or insert bolt through bottom)
• Using the supplied bubble level, level the mast and tighten all
necessary bolts.
• Failure to level the mast correctly will cause the peaking of the ODU
to be impossible.
Page 15

Ka/Ku ODU Installation Procedures
Confidential & Proprietary
• Attach the pre-assembled ODU to the AZ/EL hardware.
• Slide the AZ/EL and ODU hardware onto the installed mast, and
tighten the mast clamp bolts just enough so the antenna has
only side-to-side movement for later Azimuth alignment.
• Run all necessary cables into the feed arm
• Assemble the LNB’s using the provided hardware
• Refer to the included LNB Zone chart for correct settings for
attaching the 110° and 119° LNB’s to the 99°, 101°, and 103° LNB’s
• Zone 1 will have the 110° and 119° LNB’s closest to the 99°, 101°,
and 103° LNB’s
• Zone 3 will have the 110° and 119° LNB’s furthest apart from the
99°, 101°, and 103° LNB’s
• Zone 2 will have the 110° and 119° LNB’s in the middle setting
Page 16

110/119 LNB Zone Chart
Confidential & Proprietary
Page 17

Peaking Coordinates
Confidential & Proprietary
DMA
1 Detroit 48304 42.6 / 83.2 213 38 72
2 New York 07458 41.1 / 74.1 231 35 62
3 Los Angeles 92307 34.6 / 117.1 140.0 46.3 111.9
4 Chicago 60467 41.6 / 87.8 203.8 40.1 75.6
5 Philadelphia 19145 39.9 / 75.2 228.5 36.7 62.5
6 San Francisco 94954 38.2 / 122.6 131.7 40.3 115.1
7 Boston 01460 42.5 / 71.5 234.8 32.6 61.7
8 Dallas-Fort Worth 75212 32.8 / 96.9 184.6 51.6 83.7
9 Washington, DC 20117 39.0 / 77.7 224.0 38.8 64.0
10 Atlanta 30341 33.9 / 84.3 213 47 67
11 Houston 77024 29.8 / 95.5 188.1 54.7 80.5
12 Tampa 33567 27.9 / 82.1 219.8 51.3 58.5
13 Seattle 98272 47.9 / 121.9 133.6 31.4 107.9
14 Minneapolis 55340 45.1 / 93.6 191.7 37.5 82.7
Representative
Zip Code
Lat / Long Ka/Ku Azimuth Ka/Ku Elevation Ka/Ku Tilt
15 Miami 33196 25.6 / 80.7 224.7 52.5 54.1
16 Sacramento 95682 38.6 / 121.0 133.8 40.7 113.2
17 Pittsburgh 15221 40.4 / 79.9 219.6 38.5 67.1
18 Baltimore 21234 39.4 / 76.5 226.2 37.8 63.2
19 San Diego 92065 33.1 / 116.9 139.9 47.9 112.8
Page 18

Peaking Coordinates (cont)
Confidential & Proprietary
DMA
20 Hartford 06033 41.7 / 72.5 233.1 33.8 61.8
21 Charlotte 28206 35.3 / 80.8 218.9 43.7 64.0
22 Nashville 37204 36.1 / 86.8 206.4 45.5 71.4
23 West Palm B 33478 26.9 / 80.2 224.6 51.0 55.0
24 Birmingham 35214 33.6 / 86.9 206.7 48.1 69.9
25
26 Cleveland 44281 41.1 / 81.7 216.0 38.5 69.2
27 Denver 80112 39.6 / 104.9 166.9 44 94.7
28 Orlando 32707 28.7 / 81.3 220.9 50.1 58.4
29 St Louis 63105 38.6 / 90.3 198.7 43.9 76.9
30 Indianapolis 46220 39.9 / 86.1 207.3 41.3 72.9
31 Raleigh 27520 35.6 / 78.5 223.4 42.3 61.9
Phoenix
(Kaibeto)
Representative
Zip Code
85017
86053
Lat / Long Ka/Ku Azimuth Ka/Ku Elevation Ka/Ku Tilt
33.5 / 112.1
36.5 / 111.3
150.1
152.6
49.3
46.3
106.2
103.6
32 Kansas City 64056 39.1 / 94.3 190.1 44.2 81.8
33 Milwaukee 53089 43.1 / 88.2 202.9 38.6 76.7
34 Columbus 43004 40.0 / 82.8 214.0 40.1 69.6
35
36 Fresno 93657 36.8 / 119.4 136.0 43.1 112.9
Salt Lake
(Aneth)
84119
84510
40.7 / 111.9
37.1 / 109.4
152.1
156.8
41.6
46.1
102.4
100.9
Page 19

Aiming and Fine-tuning the ODU
• Coarse align the Azimuth and Elevation
• Set the in-line signal meter for 101° RHCP (13 volts with no 22KHz
tone).
• Slowly rotate the antenna around the mast in the Azimuth direction
until a peak level is obtained, and then lock down the mast clamp
bolts.
Confidential & Proprietary
• Using a ½” nut driver, adjust the fine elevation screw for maximum
signal level. If the fine elevation screw runs out of range, or is not
centered in its range of movement, loosen the elevation lock down
screw and move the coarse elevation slightly to keep the bolt
centered.
Page 20

Aiming and Fine-tuning the ODU
Confidential & Proprietary
• Coarse Align the Azimuth and Elevation (cont.)
• Record the Coarse signal level at this point for comparison
during a later step.
• After coarse alignment, verify reception of 101° on the
customer’s IRD
• You may check channels 490 and 491 on any of the installed
IRD’s
Page 21

Review Questions
• Why is it necessary to course align the ODU?
• What polarity must you peak 101 to?
Confidential & Proprietary
Page 22

Aiming and Fine-tuning the ODU
• Fine-tuning the Tilt
• Set the in-line signal meter for 119° RHCP reception (13 volts
with 22KHz tone)
• Slowly rotate the dish (left/counter clockwise,
right/clockwise), around the tilt axis, in order to peak the 119°
signal, then carefully tighten the Tilt lockdown nuts
Confidential & Proprietary
Page 23

Aiming and Fine-tuning the ODU (cont)
• Fine-tuning the Elevation
• Set the in-line signal meter for 101° RHCP reception (13 volts with no 22KHz
tone).
• Looking at the back of the ODU, lock down the Left side Elevation bolt, leaving
the Right side slightly loose.
• With the Elevation having been coarse peaked previously, now grasp the plastic
Elevation readout dial and rotate until 0 (zero) is lined up with the indicator.
– Be careful not to turn the Elevation fine adjustment bolt during this step
• Using a ½” Nut Driver, rotate the Elevation fine tune screw exactly 2 turns
Counter Clockwise and record the level from the signal meter. (This level will be
Confidential & Proprietary
lower than the that obtained in the Elevation coarse peak.)
– Note this signal level
Page 24

Aiming and Fine-tuning the ODU
Elevation (cont)
• Fine-tuning the Elevation (Cont.)
• While counting the exact number of turns as well as fractions of a
turn, rotate the Elevation fine tune screw Clockwise (through the
Peak) and continue until an identical signal level is reached as that
recorded from the last step (roughly 4-7 turns). The numbers
displayed on the dial will not correspond directly to the total distance
turned.
– EXAMPLE: If you stop on 6 you actually moved 4 increments clockwise past
zero, not 6.
Confidential & Proprietary
– Record the number of turns
• Divide the number of turns just recorded by 2. Reset the dial to
Zero, then rotate the Elevation fine-tune screw Counter Clockwise
by the calculated amount.
• Signal strength should be equal to or greater than the original
course peak number.
• Tighten the Elevation lock down nut.
Page 25

Aiming and Fine-tuning the ODU
• Fine-tuning the Azimuth
• The Azimuth fine-tuning procedure uses identical
signal readings either side of peak in order to
arrive at precise alignment.
• DO NOT DEVIATE FROM THE
FOLLOWING STEPS!!!
Confidential & Proprietary
Page 26

Aiming and Fine-tuning the ODU (cont)
• Fine-tuning the Azimuth (cont)
• Verify that the Azimuth lock down bolts are slightly
loosened so as to allow free movement of the
dither mechanism
• Set the in-line signal meter for 101° RHCP
reception (13 volts with no 22KHz tone).
Confidential & Proprietary
• Unscrew and pull out the Dither lock pin and verify
dish will move slightly side to side without binding.
• Make sure to start with the azimuth dither pin
centered.
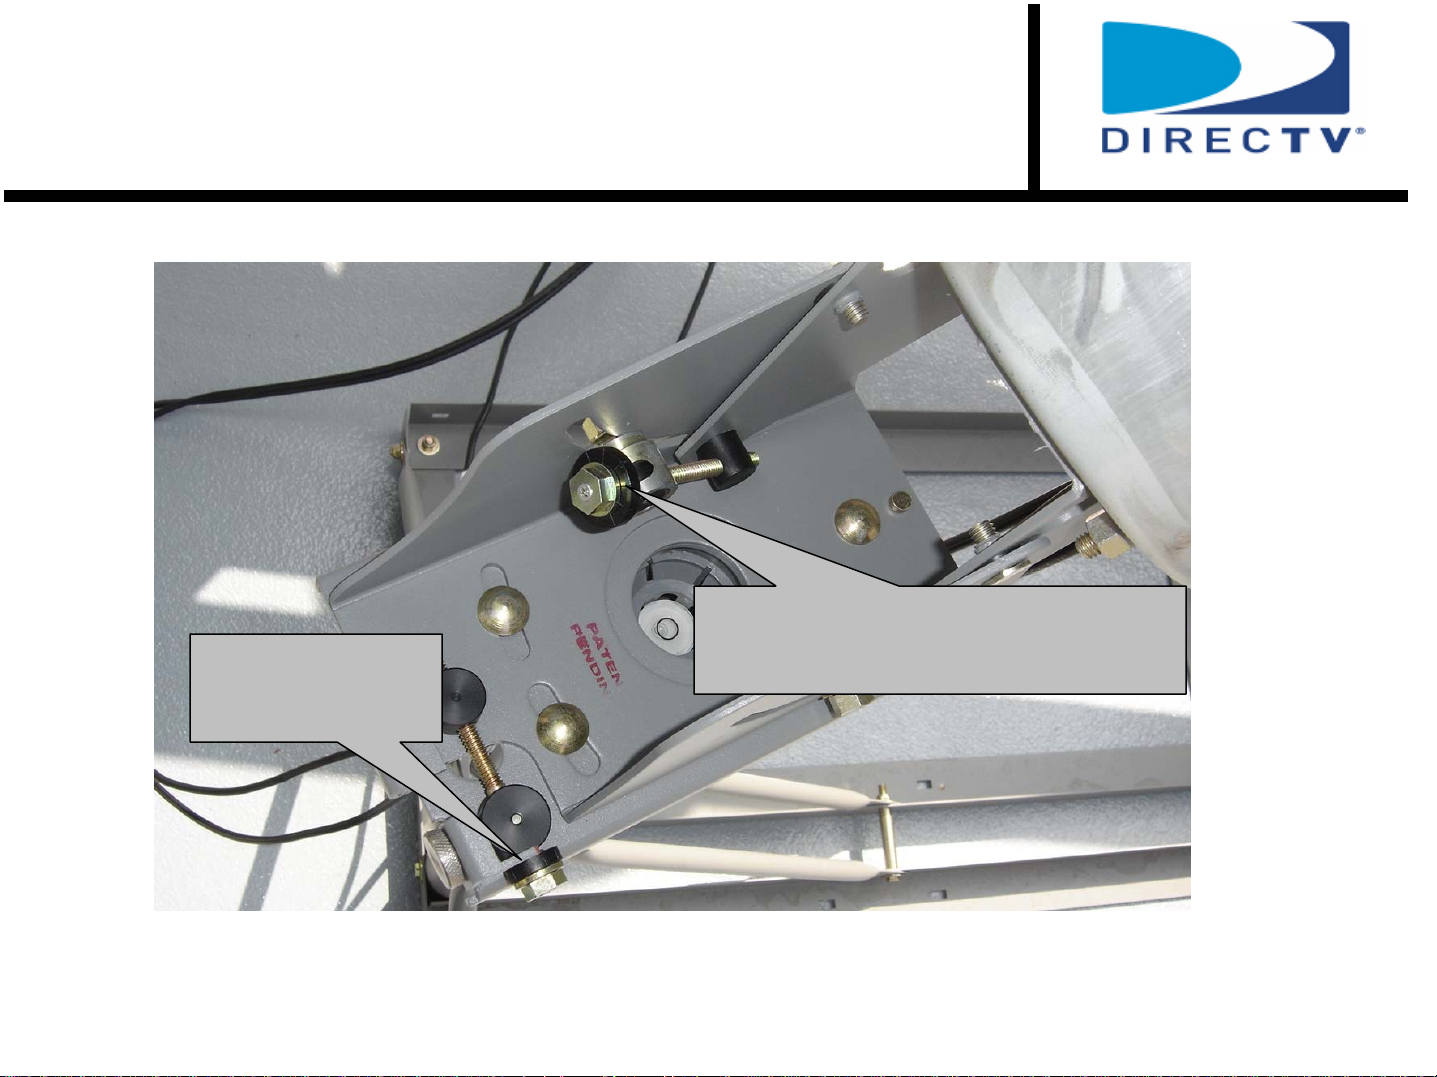
Page 27

Aiming and Fine-tuning the ODU (cont)
Elevation Fine-Tune
Confidential & Proprietary
Dither lock screw
Azimuth Fine-Tune
Make sure these bolts are
loose during alignment
Page 28

Aiming and Fine-tuning the ODU (cont)
• Fine-tuning the Azimuth (cont)
• Move the dish fully to the Left against the dither stop and
read the signal level. This level will be lower than that
obtained during coarse Azimuth peak.
• Move the dish fully to the Right against the opposite dither
stop and compare the signal level to the previous reading.
Confidential & Proprietary
Page 29

Aiming and Fine-tuning the ODU (cont)
• Fine-tuning the Azimuth (Cont.)
• Turn the Azimuth fine adjustment screw to increase the lower
of the two signal levels and repeat left/right dither process
until IDENTICAL Signal Levels are achieved for the Left and
Right stops. You may have to make several adjustments to
achieve identical signal levels.
• When signal levels are Exactly the same at the left and right
dither stops, then move the dish to the center of the dither
Confidential & Proprietary
range and replace the dither lock pin. You may need to
move the dish slightly side to side until the lock pin is fully
engaged.
Page 30

Aiming and Fine-tuning the ODU (cont)
• Fine-tuning the Azimuth (Cont.)
• Tighten the Azimuth lock down bolts.
• the current signal level should now be equal to or
greater than what was recorded for coarse
alignment. A lower level would indicate a possible
alignment problem and will require repeating the
Fine-tune steps.
Confidential & Proprietary
• Verify adequate signal levels are available for
101°, 103°, 110°, and 119° using the signal meter
in the H20 IRD.
– If they are low, repeat the Fine-tuning steps
Page 31

Aiming and Fine-tuning the ODU (cont)
• Fine-tuning the Azimuth (Cont)
• You can damage the mount if threads bottom out and you
keep turning the fine-tune screws.
• Strive for IDENTICAL levels between the left and right dither
stops.
• Give the meter enough time to stabilize the readings at each
dither stop.
• Move to the left and right dither stop by grasping the rear of
Confidential & Proprietary
the mount, do not use the reflector/ODU.
Page 32

Basic Dither Peak Principle
Hey, hey over here!
Your Dither readings
are not symmetrical!
Confidential & Proprietary
Now your
right on!
Page 33

Things You Should Know about Fine
Tuning and Dithering
Confidential & Proprietary
Page 34

Review Questions
• What is Fine tuning?
• What is Dithering?
• Why is Dither alignment important?
Confidential & Proprietary
• After Fine tuning all settings, should the signal be
Greater, Lesser, or Equal to your initial Course signal
level?
Page 35

B-Band Conversion
•BBC (B-Band Converter)
• Ka LNB frequencies are between 250Mhz and 750Mhz
• H20 is unable to view these frequencies
• BBC up-converts the B-Band into a 1650-2150Mhz usable spectrum
• Must be used for all H20 IRD’s and is included in the package
Confidential & Proprietary
Page 36

BBC Installation
Confidential & Proprietary
In from ODU or
Satellite In
BBC
Multi-switch
Page 37

Review Questions
• What is a BBC?
• Why must the BBC be used?
• When do you need to install the BBC?
Confidential & Proprietary
Page 38

IRD requirements for Ka HD programming
• Only the New H20 HDTV IRD will be compatible with
the Ka-A3 HD signals, during the IRD guided setup
be sure to choose the Ka/Ku Dish selection.
• No auto-detect is required
Confidential & Proprietary
• Legacy IRDs will continue to receive Ku signals.
Page 39

Review Questions
• Which IRD's are compatible with the new Ka
frequencies?
• Which Satellite slots can the D10/D11 see?
Confidential & Proprietary
• Can legacy IRD’s be used? And in what capacity?
• Are any IRD’s completely incompatible?
Page 40

Ka/Ku (101°, 103°, 110°, and 119°)
Installation Overview
Confidential & Proprietary
1. Perform and review Site Survey with customer
1. Identify Ka/Ku ODU location
2. Ensuring LOS from 99°, 101°, 103°, 110°, and 119° from the site of the
ODU
2. Assemble and mount ODU
3. Ground ODU to meet DIRECTV and NEC requirements
4. Connect IRDs to televisions
5. Connect BBC (B band converter) to necessary H20 IRD’s being installed
6. Connect cables from ODU to multi-switch (if more than 4 lines are needed)
7. Connect cables from multi-switch to IRDs
8. Check signal strength on the receiver for 101
°, 103°, 110°, and 119° on
the installed H20 IRD’s built in signal meter
9. Check test channels 490-494 and 498 (Macrovision) for satellite
confirmation on All IRD’s installed
10. Provide customer education
Page 41

Multi-switch requirements
Confidential & Proprietary
•If customer requires more than 4 lines you must use the new wide band 6x8.
•If customer requires programming from 95º or 72.5º you must use the new wide
band 6x8.
•Existing 4x8 and 6x8 are not compatible due to frequency range requirements.
•If locals at 72.5°, and/or International programming at 95° are needed, separate
dishes for each of these two orbital slots must be installed with single lines from
each additional ODU run into the Flex ports on the new 6x8 switch.
Page 42

Ka/Ku ODU with 4 or less lines
Confidential & Proprietary
Page 43

Ka/Ku ODU with 5-8 Lines needed
Confidential & Proprietary
Page 44

Ka/Ku ODU and 95° International
Confidential & Proprietary
Page 45

Ka/Ku ODU and 72.5°
Confidential & Proprietary
Page 46

Ka/Ku ODU with 95° International, and 72.5°
Confidential & Proprietary
Page 47

Things to Know
Confidential & Proprietary
• All legacy IRDs will continue to receive current Ku
programming
• H20 IRDs are currently the only IRD that will allow for viewing
of the Ka programming
• There are complete coordinates for aligning the Ka/Ku ODU
in the H20 IRD (refer to list provided).
• If customers are still in need of an over the air HD antenna, a
home run line must be installed.
• Diplexing the OTA and or Cable Modem frequencies is no longer
acceptable due to the B-Band frequencies being used.
Page 48

Things to Know (Cont)
Confidential & Proprietary
• You must use your signal meter set to 13 Volts at the ODU to peak in 101°.
• You must use your signal meter set to 13 Volts with 22KHz tone to peak in 119°
• Add attenuation to your meter to counter the strong gain from the ODU size
• Birdog’s need to have their BER setting set to LOG, not Linear
• Anytime a customers requires more than 4 outputs the new 6x8 multi-switch must be
used—the 4x8 is not compatible.
• Each flex port on the 6x8 offer both 18v and 13v
• Only used for combination customers requiring international programming from a second ODU
for 95
• Must use first available Flex Port
• Be sure to terminate the second flex port
° or 72.5 locals
• Pole diameter is 2” O.D.
• Must use monopole for additional support of ODU on all wall and roof mounts.
• A manual download will be required at time of installation
• At the “Hello” screen press 0,2,4,6,8, using the remote control
 Loading...