

Directions VTU008 Quick Start Manual

Vehicle Tracking
Quick Start guide
version 2.0
© 2005 ... Directions Ltd

Vehicle Tracking quick start guideI
Table of Contents
Part I Introduction
................................................................................................................................... 11 Welcome
Part II Before you start
................................................................................................................................... 11 Precautions
................................................................................................................................... 22 Inserting a SIM card
Part III Connecting the unit
................................................................................................................................... 31 Cigarette lighter adaptor
................................................................................................................................... 32 Connection
Part IV Connecting the GPS antenna
................................................................................................................................... 41 Standard antenna
................................................................................................................................... 42 Sensitive antenna
Part V Inputs and Outputs
................................................................................................................................... 41 Connecting binary inputs
................................................................................................................................... 42 Connecting binary outputs
Part VI Specifications
1
1
3
3
4
5
Part VII Software Installation
................................................................................................................................... 61 Adding a new Vehicle or Group
................................................................................................................................... 82 Setting up a tracking unit
................................................................................................................................... 153 Downloading data from a unit
................................................................................................................................... 164 Tracking your vehicles
................................................................................................................................... 175 Replaying a journey
................................................................................................................................... 196 History Table
................................................................................................................................... 197 Configuring Vehicle Tracking
................................................................................................................................... 228 Scheduling
................................................................................................................................... 259 Geofencing
.......................................................................................................................................................... 25Setting up a geofence
.......................................................................................................................................................... 27Setting up a local geofence
Index
6
0
© 2005 ... Directions Ltd
1 Introduction
Dear Customer,
Thank you for purchasing VTU008 Tracking Unit…
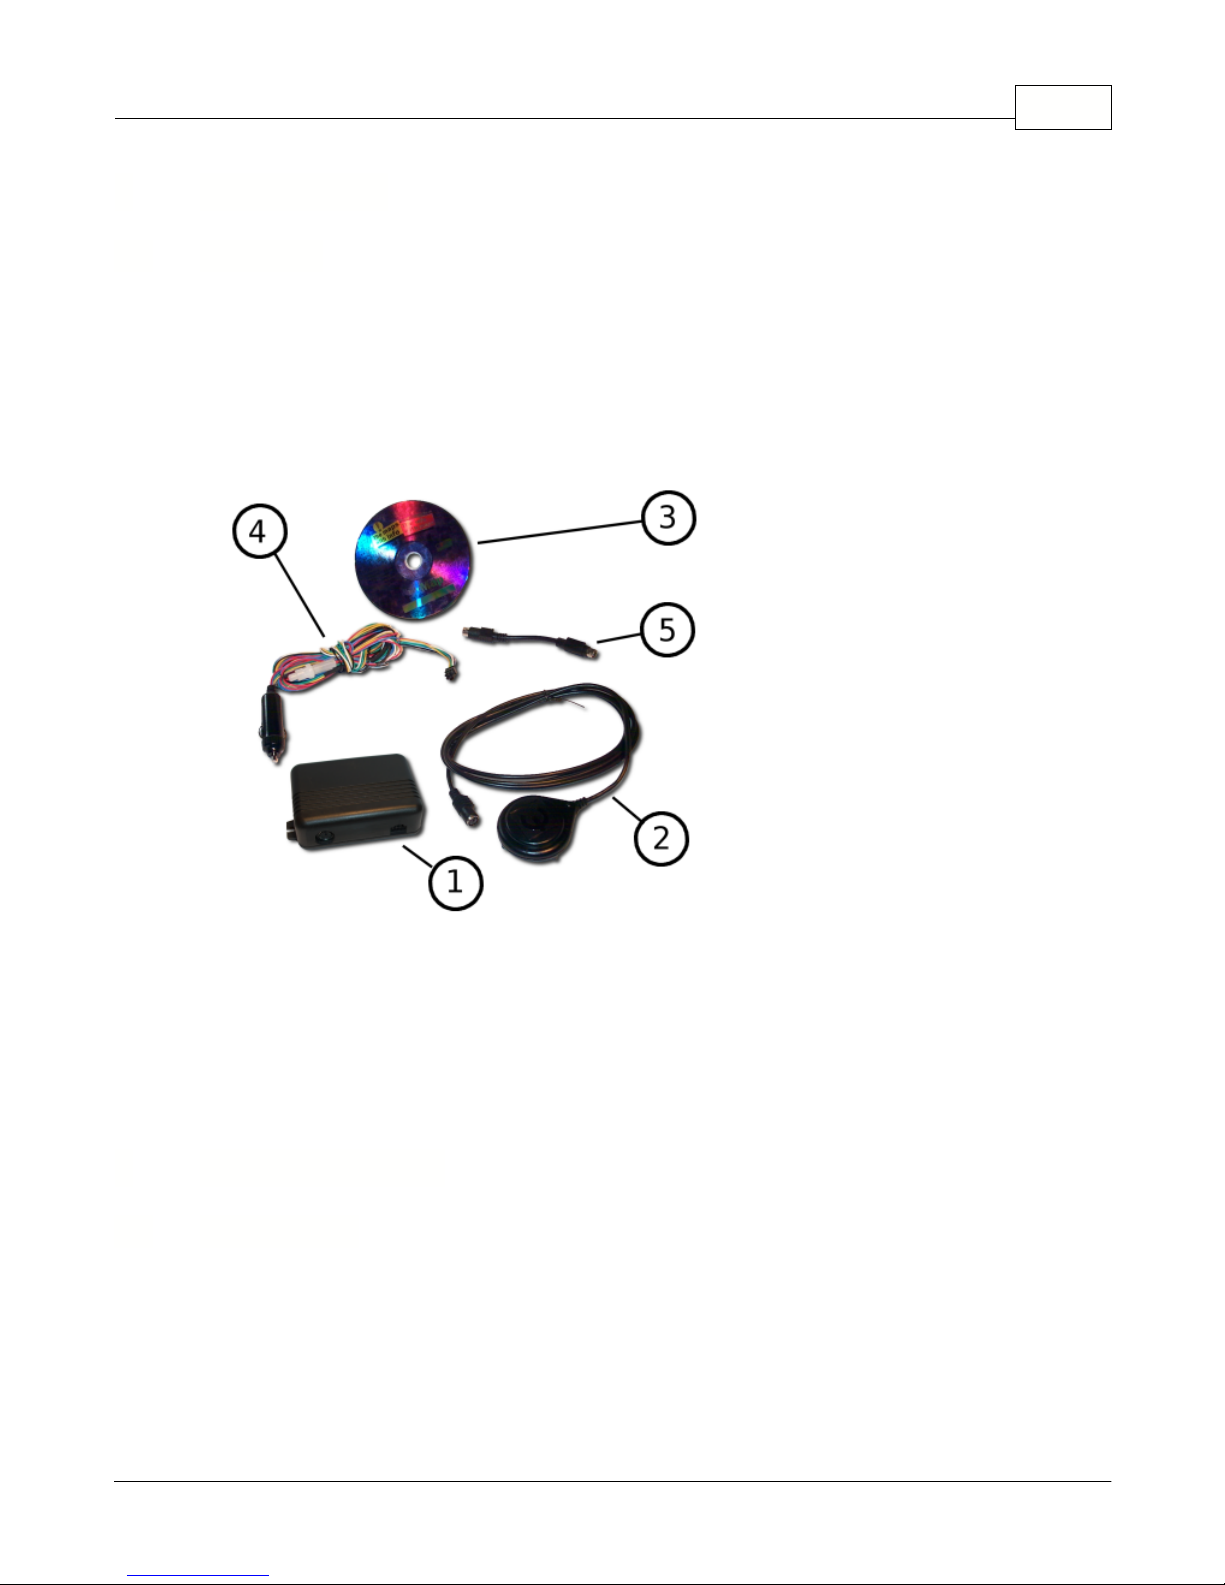
What is included in the pack:
1.
VTU008 unit
2.
GPS smart antenna
3.
VT Software CD
4.
Power lead
5.
Connector lead for the sensitive GPS antenna (is not included or necessary with newer high sensitivity
packages)
We recommend that electrical installation is performed by qualified persons.
Electrical installation must be performed carefully after checking the input voltage. All electric wires must
be properly insulated
. All unused wires must also be properly insulated and if no future use is
foreseen
then
they can be cut shorter. Secure the lead and leftover wires so that they are not loose, but take care not to
damage the insulation.
Do not place the battery the wrong way round.
1.1 Welcome
Introduction 1
2 Before you start
2.1 Precautions
© 2005 ... Directions Ltd
Vehicle Tracking quick start guide2
Before you start with hardware installation, you will need to insert a SIM card first.
If this has been done by
your supplier, please skip this chapter.
1)
Inserting the SIM card
a)make sure that the unit is disconneted from the elecrical supply
b)
make sure that the PIN number is either disabled or set to 0000. This is most easily done using a mobile
phone.
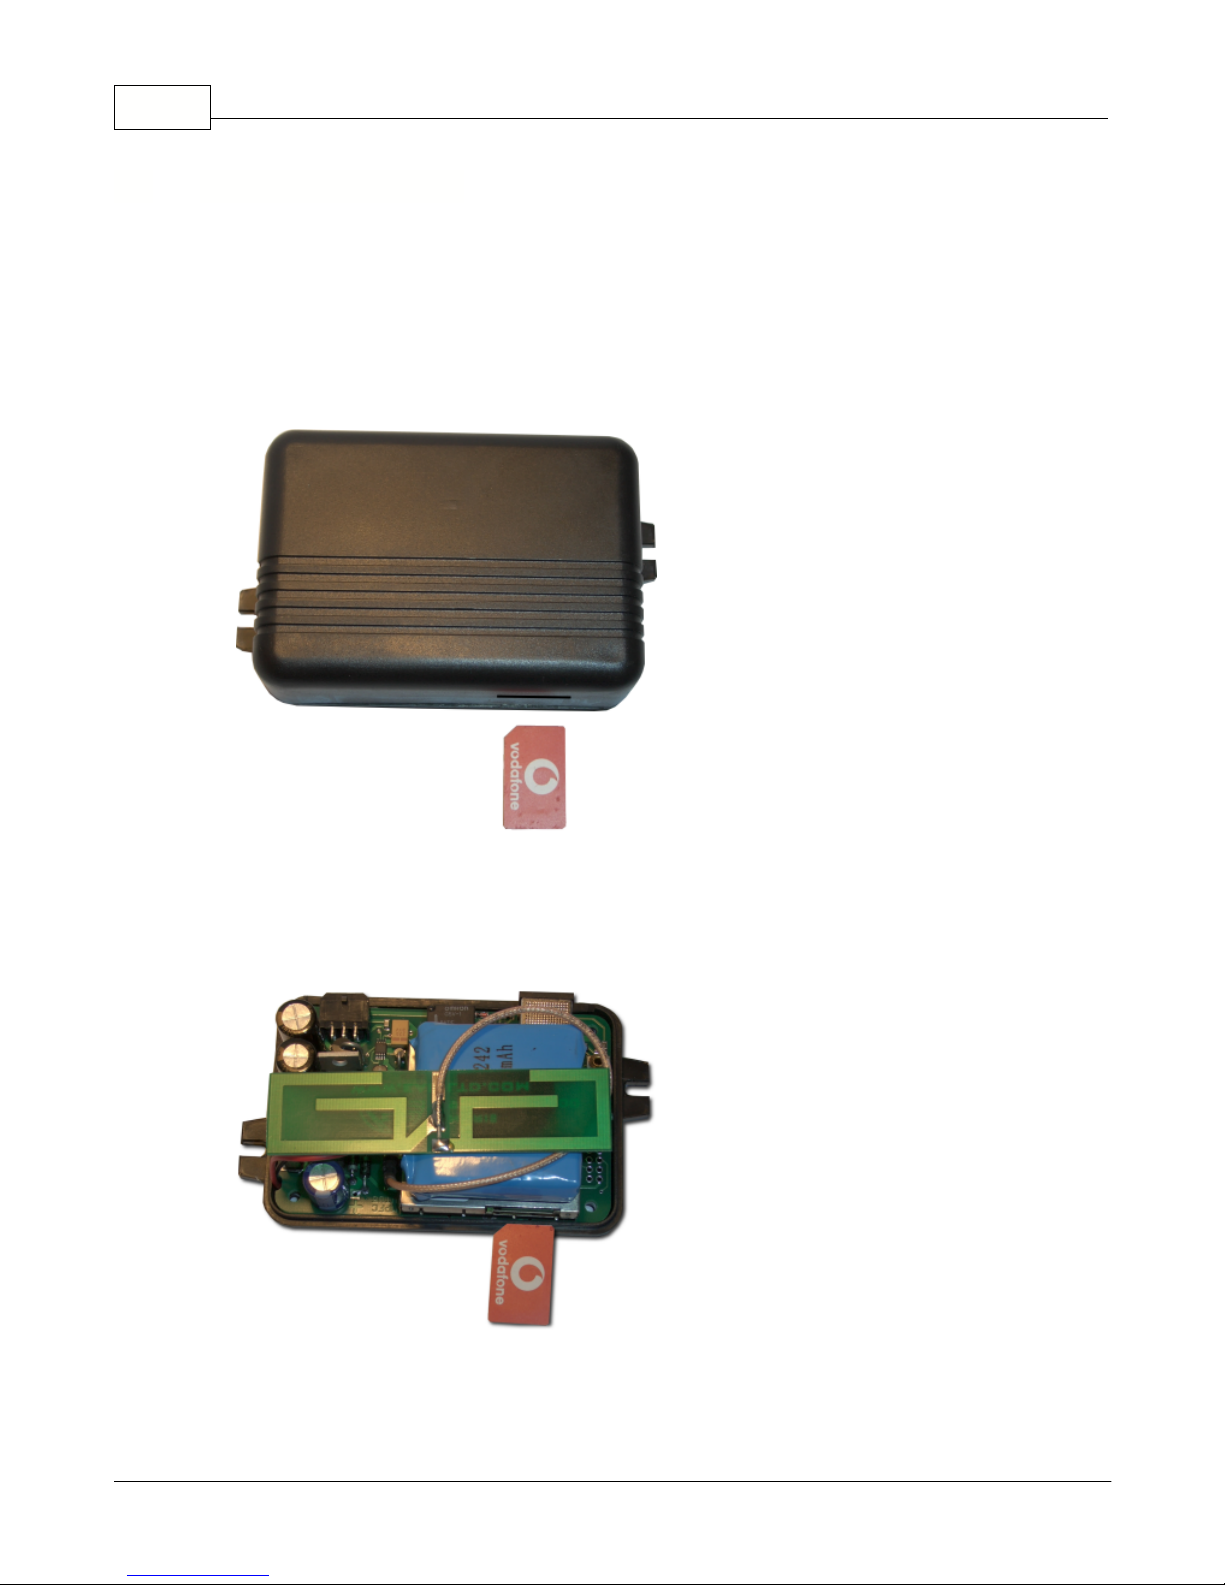
c)insert your SIM as per picture below
d) if your unit does not have a slot in the casing,
unscrew the four screws at the bottom of the Tracking
Unit and open it
e)
insert your SIM card as per picture
f)
assemble the Tracking unit – do not over tighten the screws as you could damage the plastic casing
2.2 Inserting a SIM card
© 2005 ... Directions Ltd
3 Connecting the unit
There are two ways to connect the unit
Make sure the vehicle is turned off.
Push the cigarette lighter plug in to your vehicle's cigarette lighter socket. If your vehicle has a 12V power
supply (usually found in the boot) use that instead. Please remember that cigarette lighter sockets usually switch
off when the ignition is off cutting the electrical supply to the tracking unit. It can take several minutes to start
receiving GPS signal when ignition is turned back on, so you may loose the start of your journey.
We recommend that electrical installation is performed by a qualified auto-electrical engineer.
Electrical installation must be performed carefully after checking the input voltage. All electric
wires must be properly insulated. All unused wires must also be properly insulated and if no
future use is foreseen then they can be cut shorter. Secure the lead and leftover wires so that
they are not loose, but take care not to damage the insulation.
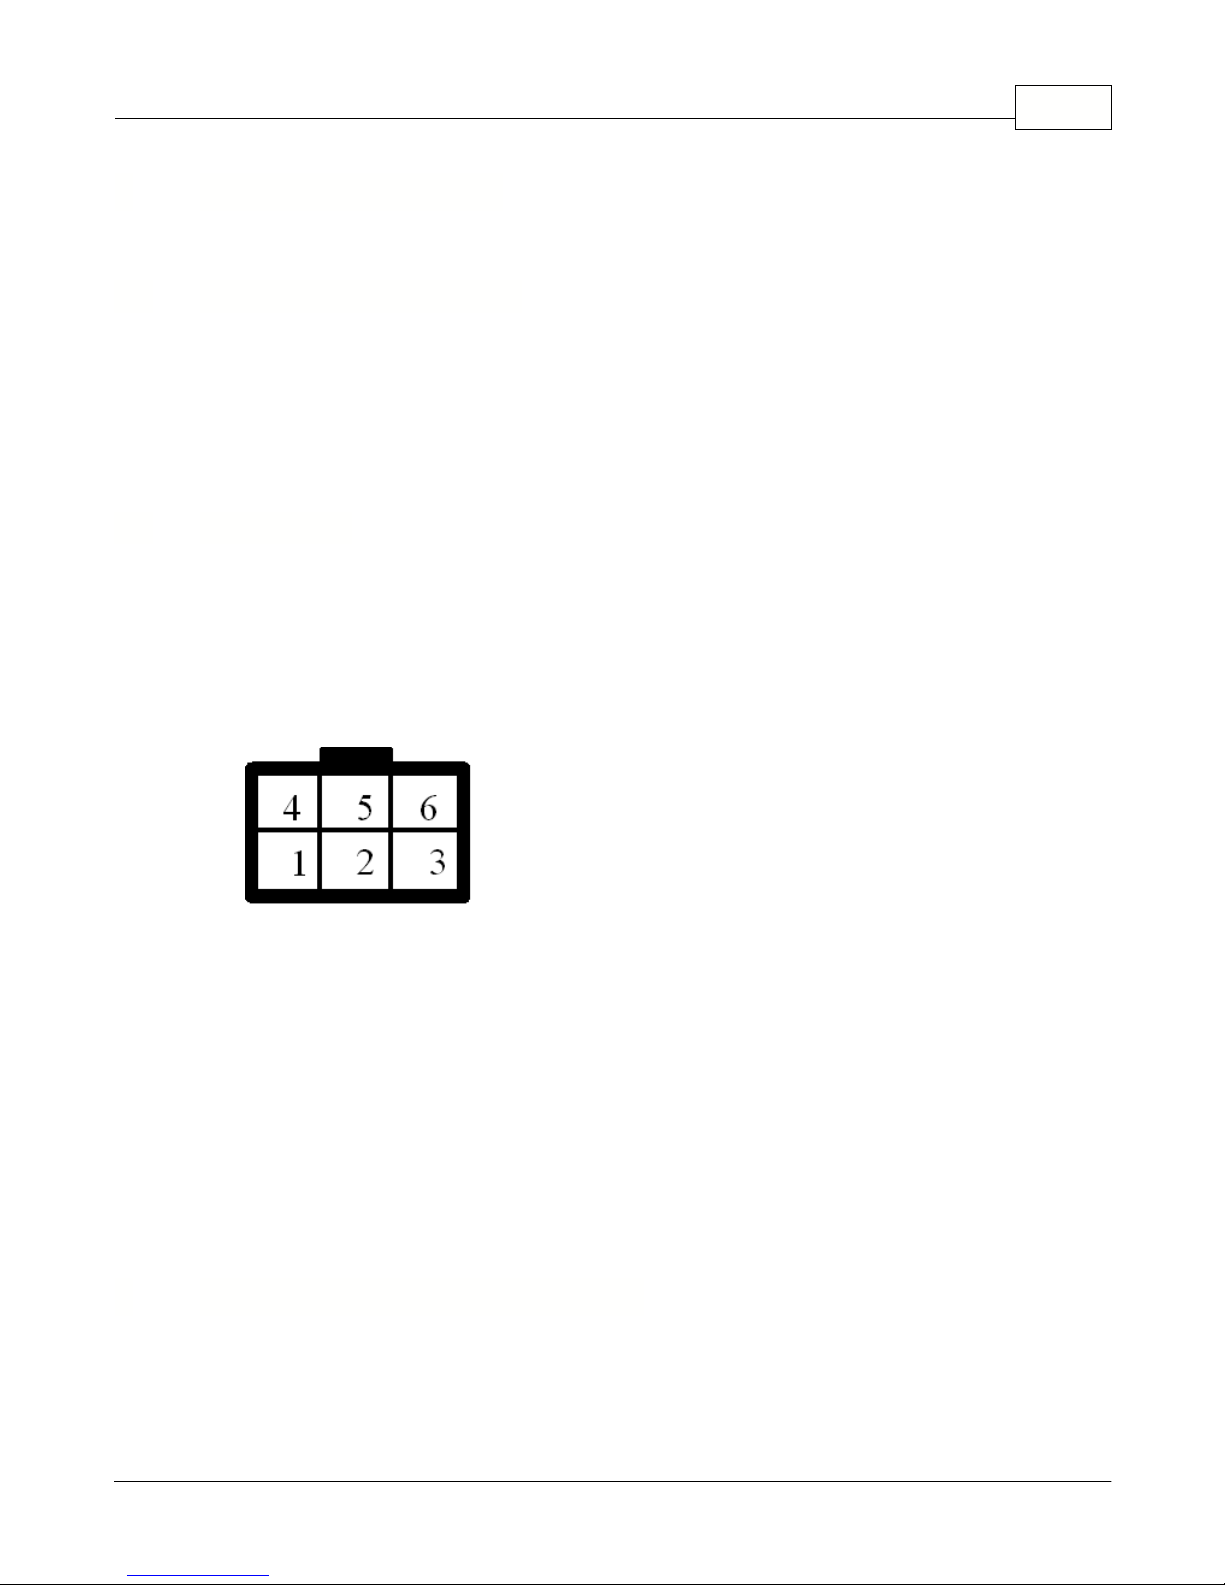
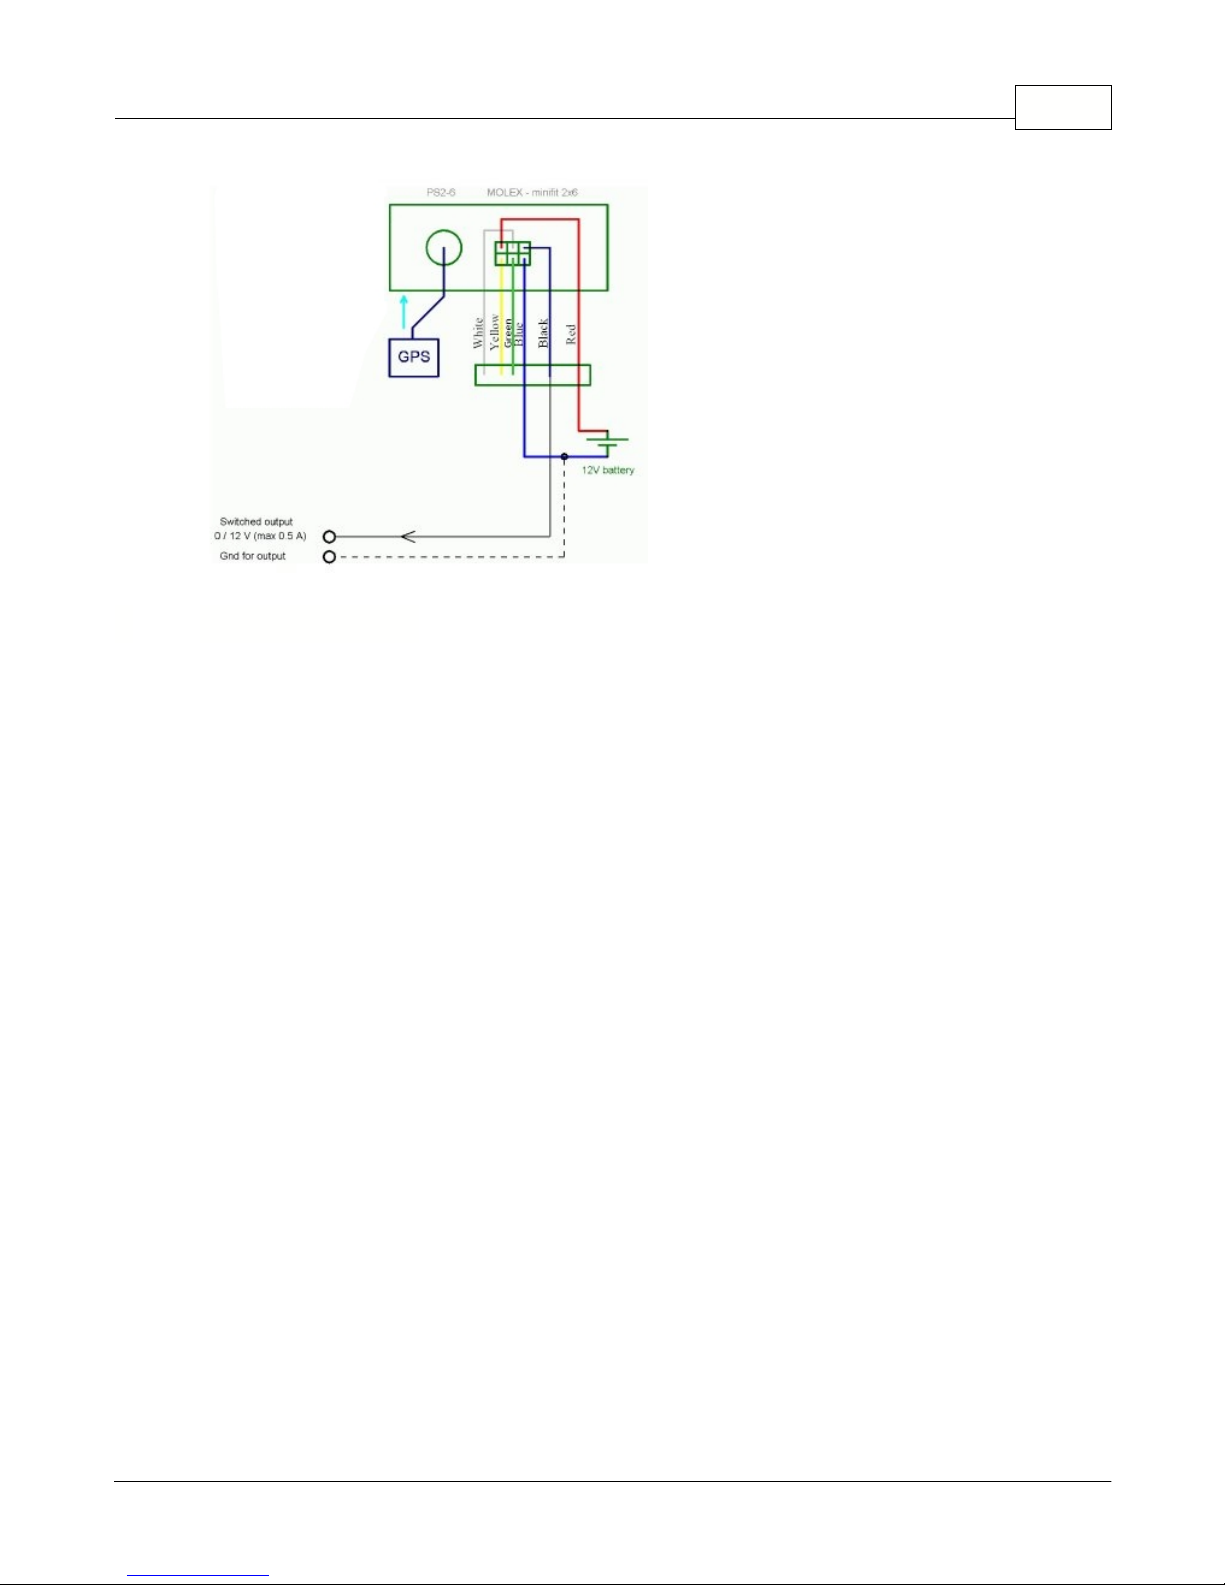
MOLEX 6 Connector
Overview of the power connector:
pin
colour
description
1
yellow
Binary input 2
2
green
Ground for inputs 1 and 2
3
blue
ground – car chassis
4
red
+12V (if not using relay then input voltage can be between +10 and 24V)
5
white
Binary input 1
6
black
Binary output – relay
There are two types of antenna supplied with the VTU008- a standard GPS antenna and a high sensitive
version.
3.1 Cigarette lighter adaptor
3.2 Connection
Connecting the unit 3
4 Connecting the GPS antenna
© 2005 ... Directions Ltd
Vehicle Tracking quick start guide4
Connect the antenna to the tracking unit using the PS2 connector. The antenna must be positioned
horizontally and have clear view of the sky. The antenna should work perfectly on the dashboard under the
front windscreen (unless your vehicle has a heated fron windscreen). It can also be fitted on the roof. The
underside of the antenna is magnetised, which enables it to stick to the exterior of a vehicle even in the most
severe condition, and is completely waterproof.
This antenna can be concealed in the vehicle and is ideal for covert fitting. Before attaching the antenna to
the tracking unit you must fit the connector cable. The connector cable has a PS2 type plug on each end, but
each is encased in different hardened plastic. Please connect the grooved end to the antenna and the smooth
end to the tracking unit. In most cases the cable should have already come attached to the GPS antenna
from the manufacturer. Once connected the antenna must be position horizontally and is magnetic from the
underside. For optimum performance it is recommended you fit it away from metal cover, for example, in
the dashboard or in a plastic bumper.
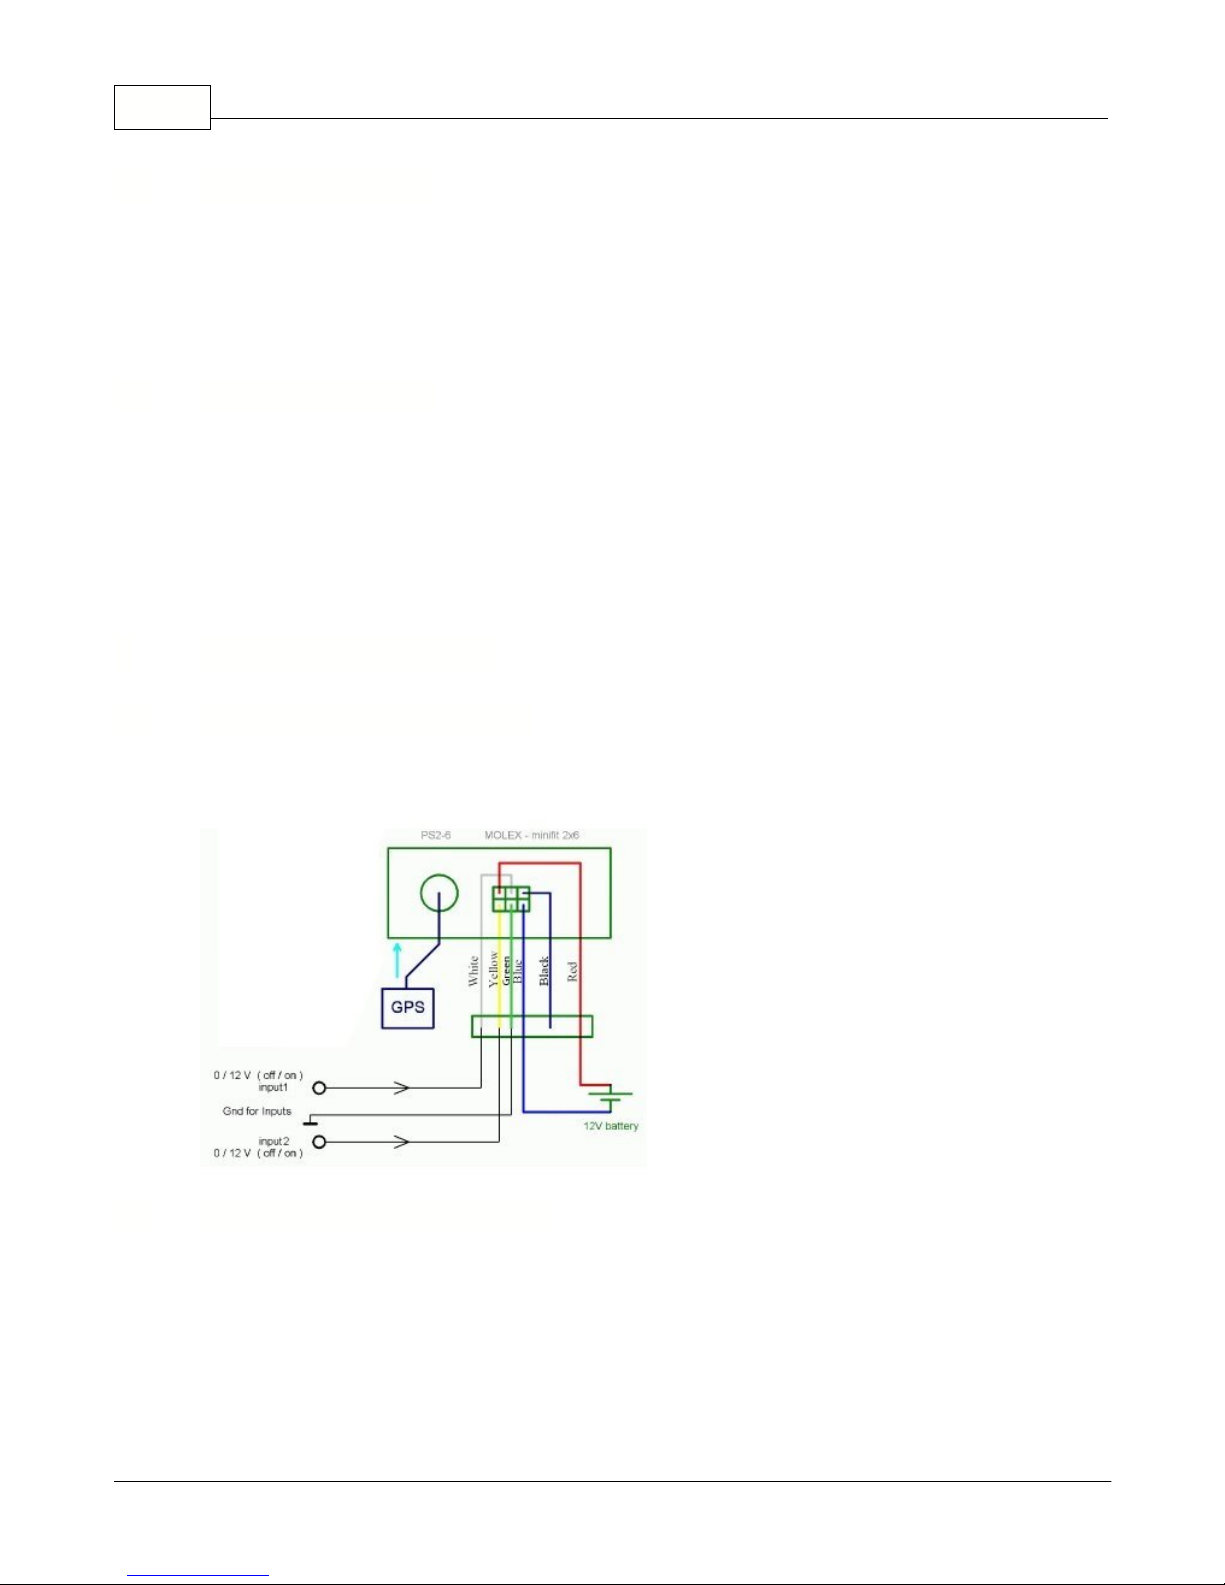
Connect binary inputs according to the schema:
Connect binary output according to the schema:
4.1 Standard antenna
4.2 Sensitive antenna
5 Inputs and Outputs
5.1 Connecting binary inputs
5.2 Connecting binary outputs
© 2005 ... Directions Ltd
6 Specifications
Specifications:
Power
DC 10 to 24 V
Power consumption (average)
120mA / 12V
Power consumption in sleep-mode
12mA / 12V
Motion sensor
Flash memory
400,000 positions,
GSM specifications:
GSM tri band modem
900 / 1800 MHz
GSM Circuit Switched Data
up to 14.4 kbps
Antenna Type
Built in dual band antenna
GPS specifications:
Channels
12 parallel
Cold Start
48 sec.
Warm Start
38 sec.
Hot Start
8 sec.
Update Rate
1 Hz
Position Accuracy
25m CEP without SA
Magnetic mount
Digital input (protected)
2
Digital output (0.5A)
1
Serial port (RS 232) - NMEA output, download history...
1
Dimension
120 x 80 x 29 mm
Operating Temperature
-20 to +65
o
C
Operation Humidity
95%,NO Condensing
Inputs and Outputs 5
© 2005 ... Directions Ltd

Vehicle Tracking quick start guide6
Run SETUP.EXE from the installation CD and follow the on-screen instructions.
The default language is selected according to settings in Windows (Start/Settings/Control
Panel/Regional and language options). You can change the language in Navigator in Settings.
Currently available languages are English, Czech, German and Italian.
Available Maps
The following countries are covered
:
Country
Size [MB]
Coverage
(%)
Supplier
Notes
Andorra
2
100
Tele Atlas
Austria
168
100
Tele Atlas
Belgium
112
100
Tele Atlas
Czech Republic
107
73.7
Tele Atlas
Denmark
95
100
Tele Atlas
Finland
173
100
Tele Atlas
France
1200
100
Tele Atlas
Germany
1180
100
Tele Atlas
Great Britain
776
100
Tele Atlas
Hungary
1810Tele Atlas
Ireland (Republic of Ireland)
13
45.09
Tele Atlas
Italy
958
100
Tele Atlas
Luxemburg
10
100
Tele Atlas
Netherlands
177
100
Tele Atlas
Norhtern Ireland
16.5
Tele Atlas
is installed with
Great Britain
Norway
200
100
Tele Atlas
Poland
44
8.7
Tele Atlas
Portugal
5543Tele Atlas
San Marino
2
100
Tele Atlas
Spain
49382Tele Atlas
Sweden
339
100
Tele Atlas
Switzerland
113
100
Tele Atlas
TOTAL
6300
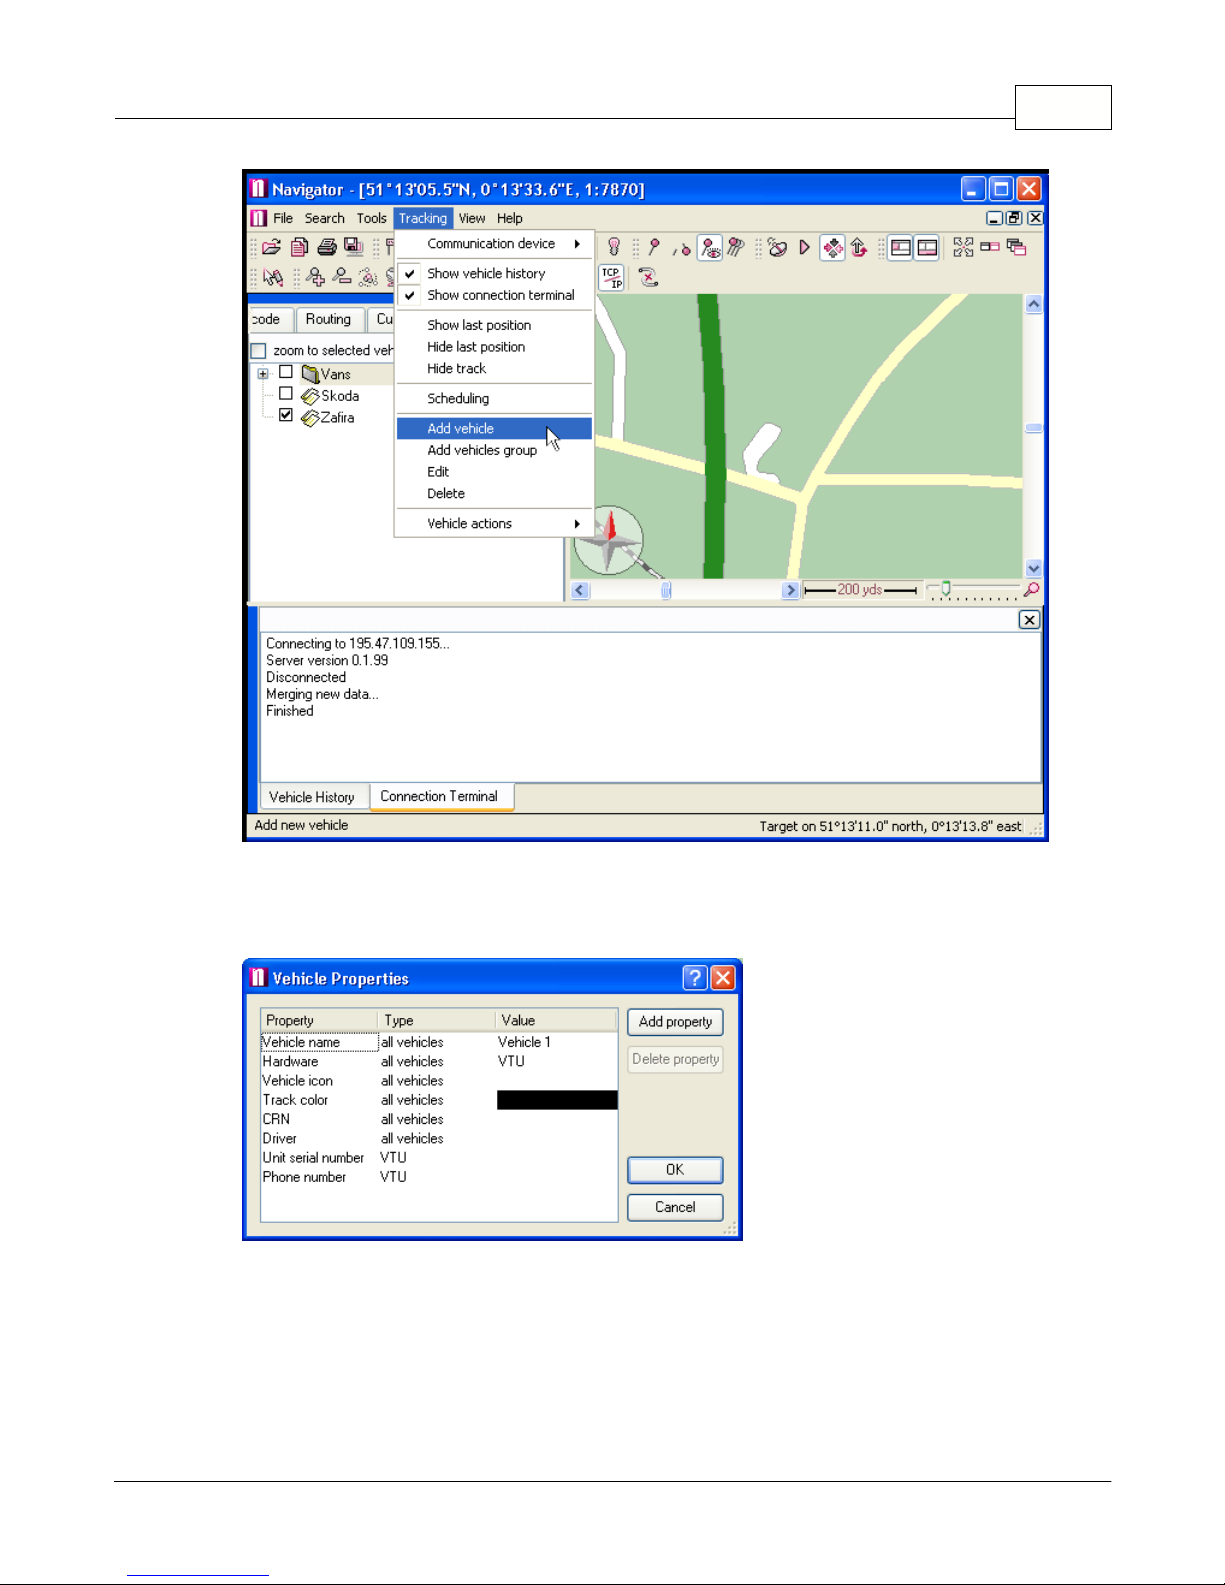
From the menu select
Tracking / Add vehicle or Add group
. Alternatively, you can right click on a
group in the list and select
Vehicles / Edit /Add vehicle
to add a vehicle into that group.
7 Software Installation
7.1 Adding a new Vehicle or Group
© 2005 ... Directions Ltd
Software Installation 7
You can also manage your vehicles using the buttons located at the bottom of the
Vehicles
tab.
When you add a new vehicle will see the
Vehicle properties
dialog:
Make sure that you enter the correct parameters here.
Name
- a label under which the vehicle will be shown on screen.
Hardware
- Select which hardware unit you are using, for VTU007 or VTU008 select VTU.
Icon
- You must enter a valid icon which will be used to represent the vehicle on the map. Some
icons a available in the application folder (usually c:\Program files\Navigator\picts2\car_icons)
Track color
- the colour that the vehicle journeys will be represented in on the map. To make
different easily distinguishable you can select different track colours for different vehicles.
© 2005 ... Directions Ltd
 Loading...