

Page 1
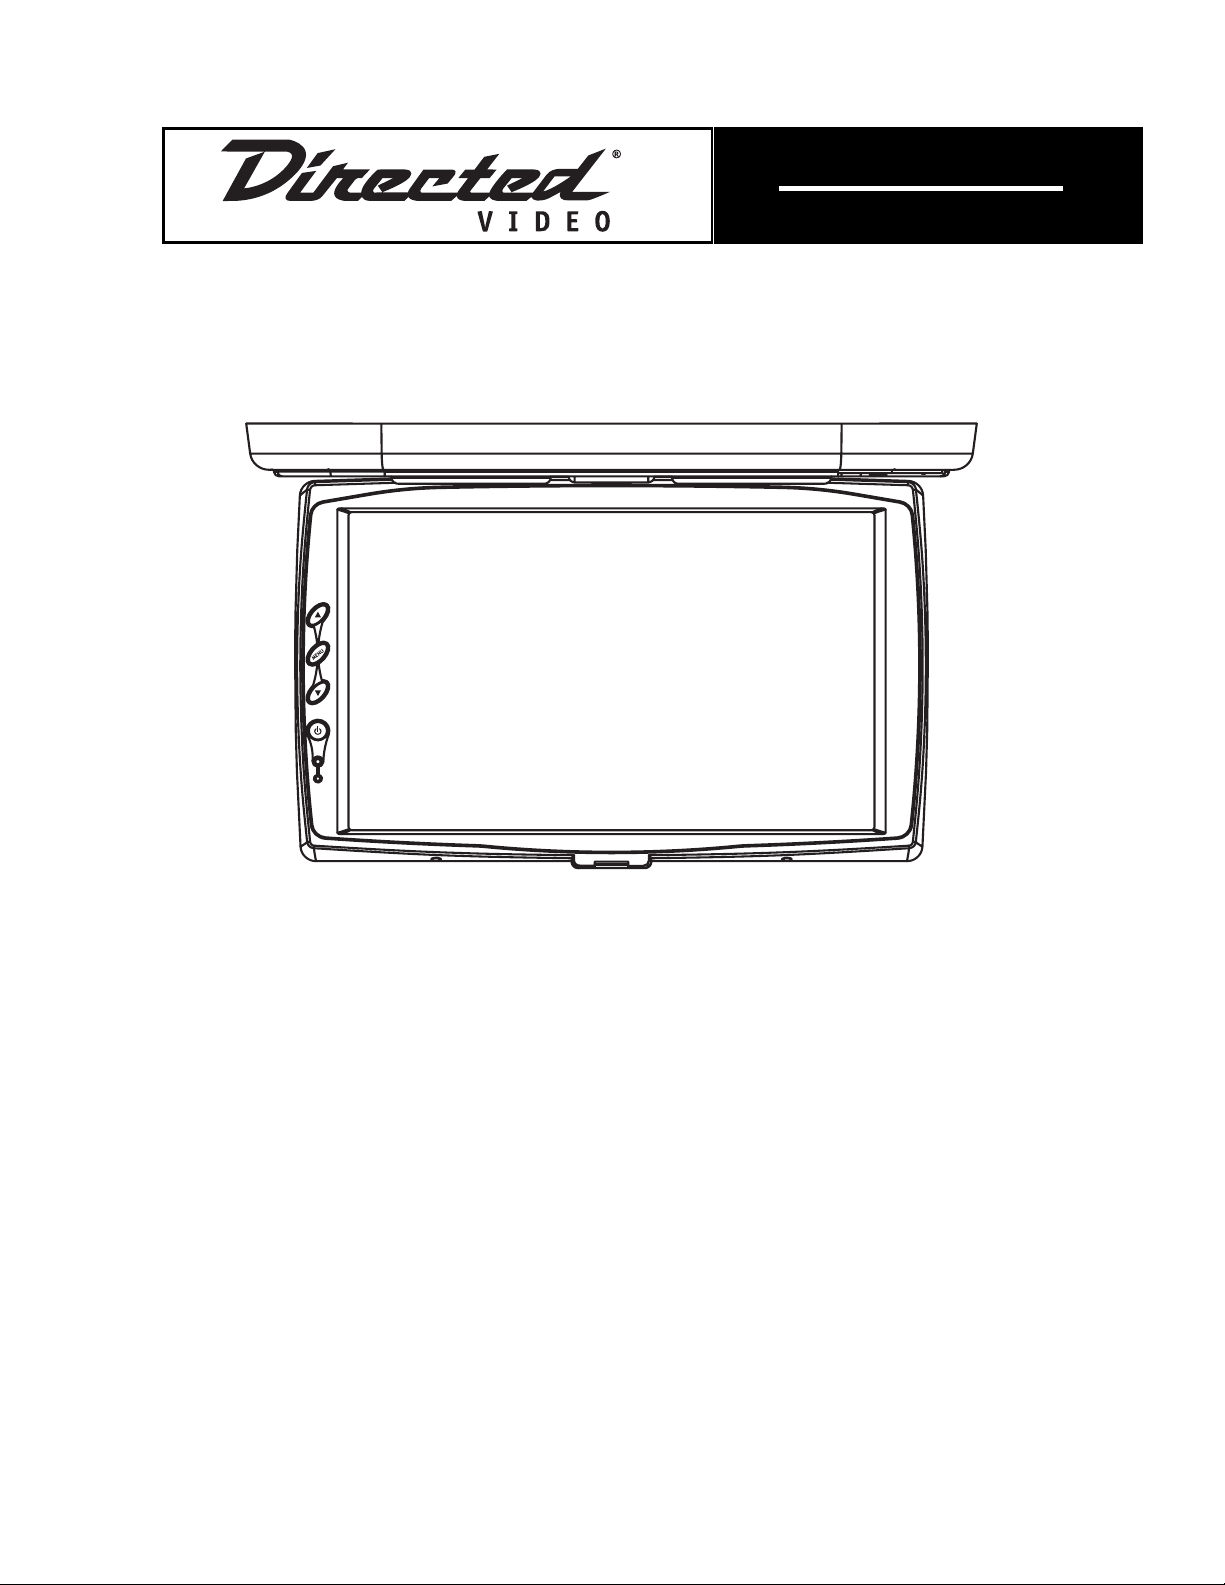
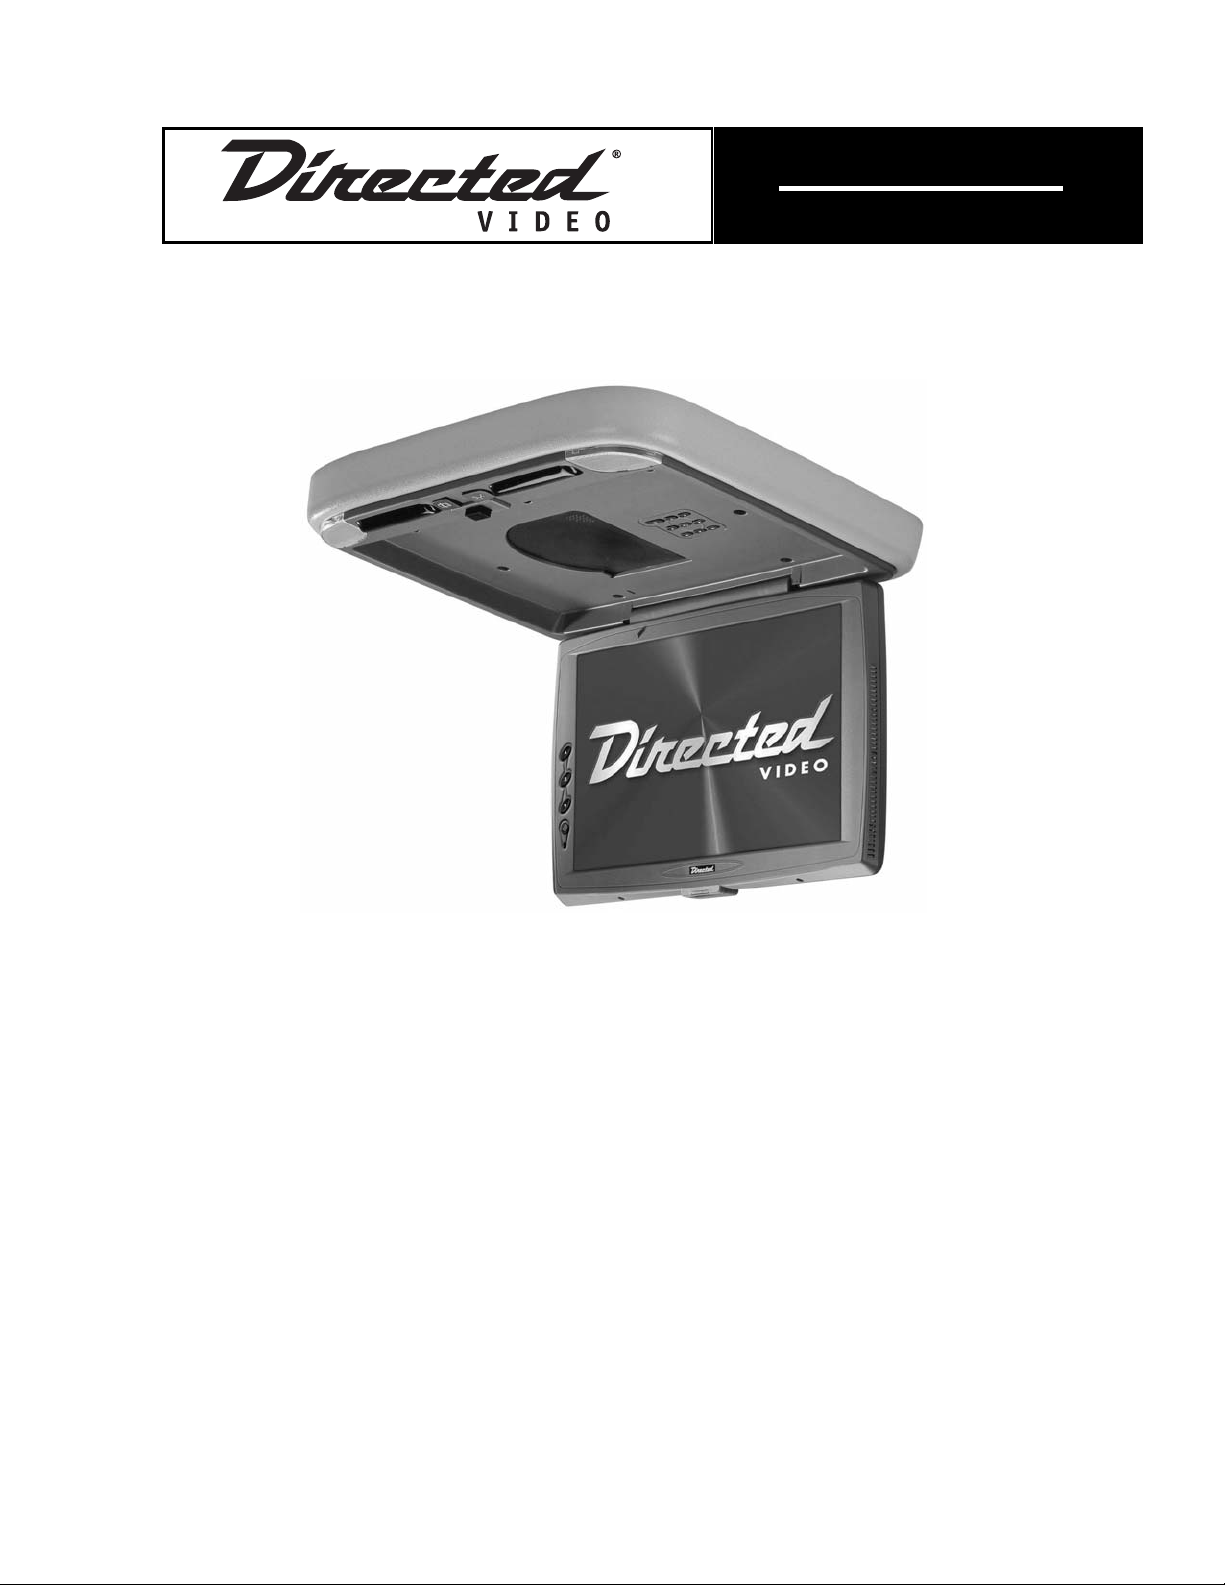
1155..22”” ((1166::99))
OOvveerrhheeaadd VViiddeeoo
MMoonniittoorr//DDVVDD PPllaayyeerr
MMOODDEELL OOHHDD11550000
OO WW NN EE RR ’’ SS GG UU II DD EE
IINNSSTTAALLLLAATTIIOONN GGUUIIDDEE
© 2005 Directed Electronics, Inc. N82150 07-05
Page 2

© 2005 Directed Electronics, Inc. all rights reserved
NON-TRANSFERABLE LIMITED ONE YEAR CONSUMER WARRANTY
Directed Electronics, Inc. (Directed) promises to the original purchaser that the new automotive video
monitor and/or source unit(s) (the Product) that is purchased and installed from a Directed authorized
dealer more than ninety (90) days after the purchase of a new vehicle are warranted for a period of one
(1) year from date of purchase of the Product.
Directed promises to the original purchaser that all video accessories will be free from defects in materials and workmanship under normal use and condition for a period of ninety (90) days after the date of
purchase. A sales receipt and/or warranty registration card is required to provide proof of date of purchase
of the Product or accessories.
Should the Product be determined defective during the applicable warranty period, the defect(s) will be
repaired or replaced with a new or reconditioned part(s), at Directed’s option. To obtain warranty service, the
Product must be returned to a Directed authorized dealer along with proof of purchase and installation.
Note: This warranty does not cover labor costs for the removal and reinstallation of the Product. IN
ORDER FOR THIS WARRANTY TO BE VALID, YOUR PRODUCT MUST BE SHIPPED WITH PROOF OF
PURCHASE AND INSTALLATION BY AN AUTHORIZED DIRECTED DEALER. ALL PRODUCTS
RECEIVED BY DIRECTED FOR WARRANTY REPAIR WITHOUT PROOF OF DIRECTED DEALER
INSTALLATION WILL BE DENIED.
This warranty is non-transferable and does not apply to any Product that has been modified or used in a
manner contrary to its intended purpose, and does not cover damage to the Product caused by installation or removal of the Product.This warranty is VOID if the product has not been purchase from an author-
ized Directed dealer or has been damaged by accident or unreasonable use, negligence, acts of God,
neglect, improper service or other causes not arising out of defect in materials or construction. This warranty does not cover the elimination of externally generated static or noise, or the correction of antenna
problems or weak television reception, damage to tapes, video games, software, camcorders, discs,
speakers, accessories or vehicle electrical systems, cosmetic damage or damage due to negligence, misuse, abuse, failure to follow operating instructions, accidental spills or customer applied cleaners, damage
due to environmental causes such as floods, airborne fallout, chemicals, salt, hail, windstorms, lightning
or extreme temperatures, damage due to accidents, road hazards, fire, theft, loss or vandalism, damage
due to improper connection to equipment of another manufacturer, modification of existing equipment, use
of a faulty tape cartridge or cleaning of the VCR head, or Product which has been opened or tampered
with for any reason or which has been damaged due to alteration or service performed by anyone other
than Directed Electronics, Inc.
ALL WARRANTIES INCLUDING BUT NOT LIMITED TO EXPRESS WARRANTY, IMPLIED WARRANTY, WARRANTY OF MERCHANTABILITY, FITNESS FOR PARTICULAR PURPOSE, AND WARRANTY
OF NON-INFRINGEMENT OF INTELLECTUAL PROPERTY ARE EXPRESSLY EXCLUDED TO THE
MAXIMUM EXTENT ALLOWED BY LAW, AND DIRECTED NEITHER ASSUMES NOR AUTHORIZES
ANY PERSON TO ASSUME FOR IT ANY LIABILITY IN CONNECTION WITH THE SALE OF THE
PRODUCT. DIRECTED HAS ABSOLUTELY NO LIABILITY FOR ANY AND ALL ACTS OF THIRD PARTIES INCLUDING ITS LICENSED DEALERS OR INSTALLERS. IN NO EVENT WILL DIRECTED ELECTRONICS, INC. BE LIABLE FOR ANY INCIDENTAL, SPECIAL OR CONSEQUENTIAL DAMAGES
(INCLUDING LOSS OF PROFITS), BY PURCHASING THIS PRODUCT, THE CONSUMER AGREES
AND CONSENTS THAT ALL DISPUTES BETWEEN THE CONSUMER AND DIRECTED SHALL BE
RESOLVED IN ACCORDANCE WITH CALIFORNIA LAWS IN SAN DIEGO COUNTY, CALIFORNIA.
Some states do not allow limitation on how long an implied warranty lasts. In such states, the limitations
or exclusions of this Limited Warranty may not apply. Some states do not allow the exclusion or limitation
of incidental or consequential damages. In such states, the exclusion or limitation of this Limited Warranty
may not apply to you.This Limited Warranty gives you specific legal rights, and you may have other rights
which vary from state to state.
Some states do not allow the exclusion or limitation of incidental or consequential damages. In such
states, the exclusion or limitations of this Limited Warranty may not apply to you. This Limited Warranty
gives you specific legal rights and you may have other rights which vary from state to state.
3
Page 3

© 2005 Directed Electronics, Inc. all rights reserved
TTaabbllee ooff CCoonntteennttss
Safety Instructions and Cautions . . . . . . . . . . . . . . . . . . . . . . . . . . . . . . . . . . . . .6
Welcome . . . . . . . . . . . . . . . . . . . . . . . . . . . . . . . . . . . . . . . . . . . . . . . . . . . . .7
Notice .........................................................................................................7
Important . . . . . . . . . . . . . . . . . . . . . . . . . . . . . . . . . . . . . . . . . . . . . . . . . . . .7
When Cleaning the Vehicle .............................................................................7
While Driving ...............................................................................................7
When Parked ................................................................................................7
Proper Use ...................................................................................................7
Repairs........................................................................................................7
Radio/TV Tuner Use .......................................................................................7
Installation..................................................................................................8
Picture Quality..............................................................................................8
Important Information . . . . . . . . . . . . . . . . . . . . . . . . . . . . . . . . . . . . . . . . . . . .8
FCC Notice ...................................................................................................8
Your Warranty ...............................................................................................8
Precautions..................................................................................................9
Electrical Connections....................................................................................9
Signal Connection........................................................................................10
Typical Wiring Diagram . . . . . . . . . . . . . . . . . . . . . . . . . . . . . . . . . . . . . . . . . . .11
Remote Control Unit . . . . . . . . . . . . . . . . . . . . . . . . . . . . . . . . . . . . . . . . . . . . .13
Remote Buttons ..........................................................................................13
Battery Replacement....................................................................................14
Precautions ................................................................................................14
Loading and Unloading Discs . . . . . . . . . . . . . . . . . . . . . . . . . . . . . . . . . . . . . . .15
Loading Disc...............................................................................................15
Unloading Disc............................................................................................15
Operating the Monitor . . . . . . . . . . . . . . . . . . . . . . . . . . . . . . . . . . . . . . . . . . .16
Open/Close the Display Monitor.....................................................................16
Power Up/Down the Display Monitor . . . . . . . . . . . . . . . . . . . . . . . . . . . . . . . . . .16
Function Mode (Menu) .................................................................................16
DVD BASIC OPERATION: . . . . . . . . . . . . . . . . . . . . . . . . . . . . . . . . . . . . . . . . . . .17
DVD playback (DVD).....................................................................................17
Next track or previous track (DVD/MP3/CD).....................................................17
Play/Pause (DVD/MP3/CD) ............................................................................18
Stop (DVD/MP3/CD).....................................................................................18
Repeat mode ..............................................................................................18
Camera angle (DVD).....................................................................................18
Subtitle (DVD) ............................................................................................19
DVD menu (DVD) .........................................................................................19
Title menu (DVD).........................................................................................19
Display function (DVD/MP3/CD).....................................................................20
4
Page 4

© 2005 Directed Electronics, Inc. all rights reserved
DVD Advanced Operation . . . . . . . . . . . . . . . . . . . . . . . . . . . . . . . . . . . . . . . . . .21
DVD Typical Setup menu and Configuration .....................................................21
System Setting............................................................................................21
Language Setup ..........................................................................................22
Audio Setup................................................................................................23
Video Setup................................................................................................24
Technical Specifications . . . . . . . . . . . . . . . . . . . . . . . . . . . . . . . . . . . . . . . . . .25
Specifications . . . . . . . . . . . . . . . . . . . . . . . . . . . . . . . . . . . . . . . . . . . . . . . . .26
GENERAL ....................................................................................................26
AUDIO .......................................................................................................26
VIDEO........................................................................................................26
CONNECTORS ...............................................................................................26
OHD1500 Previous Model . . . . . . . . . . . . . . . . . . . . . . . . . . . . . . . . . . . . . . . . .27
Precautions ................................................................................................28
Electrical Connections ..................................................................................28
Signal Connection........................................................................................29
Typical Wiring Diagram . . . . . . . . . . . . . . . . . . . . . . . . . . . . . . . . . . . . . . . . . . .30
Function Keys . . . . . . . . . . . . . . . . . . . . . . . . . . . . . . . . . . . . . . . . . . . . . . . . .31
Operating the Monitor . . . . . . . . . . . . . . . . . . . . . . . . . . . . . . . . . . . . . . . . . . .32
Open/Close the Display Monitor.....................................................................32
Power Up/Down the Display Monitor . . . . . . . . . . . . . . . . . . . . . . . . . . . . . . . . . .32
Signal Source (Mode) ...................................................................................32
Function Mode (Menu) .................................................................................32
Door Light On/Off .......................................................................................33
Courtesy Light On/Off ..................................................................................33
Basic Functions . . . . . . . . . . . . . . . . . . . . . . . . . . . . . . . . . . . . . . . . . . . . . . . .33
DVD Playback..............................................................................................33
Audio CD playback.......................................................................................33
Play/Pause (DVD/MP3/CD) ............................................................................35
Stop (DVD/MP3/CD).....................................................................................35
"GO TO" Function (DVD/MP3/CD) ...................................................................35
Advanced Playback (DVD/MP3/CD) .................................................................36
5
Page 5

© 2005 Directed Electronics, Inc. all rights reserved
SSaaffeettyy IInnssttrruuccttiioonnss aanndd CCaauuttiioonnss
WWAARRNNIINNGG::
TO REDUCE THE RISK OF FIRE OR ELECTRIC SHOCK, DO NOT EXPOSE THIS EQUIPMENT TO RAIN OR MOISTURE. TO REDUCE THE RISK OF FIRE OR ELECTRIC SHOCK AND
ANNOYING INTERFERENCE, USE ONLY THE INCLUDED HARDWARE.
THIS MONITOR IS ONLY DESIGNED FOR REAR SEAT PASSENGER VIEWING AND IS NOT
INTENDED FOR VIEWING BY THE DRIVER WHILE THE VEHICLE IS IN MOTION. SUCH USE MAY
DISTRACT THE DRIVER OR INTERFERE WITH THE SAFE OPERATION OF THE VEHICLE, AND
MAY ALSO VIOLATE STATE LAW.
DIRECTED ELECTRONICS, INC. DISCLAIMS ANY LIABILITY FOR ANY BODILY INJURY,
INCLUDING FATALITIES, OR PROPERTY DAMAGE THAT MAY RESULT FROM ANY IMPROPER OR
UNINTENDED USES OF THIS PRODUCT.
SHOULD THE LCD PANEL BREAK OR LEAK FLUID, AVOID ALL CONTACT WITH THE UNIT. IF
YOU SHOULD COME IN CONTACT WITH THE LEAKED FLUID, WASH THE AFFECT AREA THOROUGHLY WITH WAS AND SEEK IMMEDIATE MEDICAL ATTENTION.
■
During operation, if the unit should over-heat or malfunction, switch off the unit and see your
dealer. Do not disassemble the unit as there are no user-serviceable parts in this unit and the
warranty will be voided.
■
Should there be a need to replace a blown fuse, turn off the unit and disconnect all power to the
player. Use only the correct rating fuse to avoid electrical damage to the unit.
■
Only operate the monitor as described in this guide. Attempts to use or modify this monitor con-
trary to the descriptions in this guide may cause damage and void the warranty.
■
Extremes in temperature can cause abnormal display operation. This monitor has an optimal oper-
ating temperature range between 35-115 degrees Fahrenheit. If the vehicle interior is outside
this range, do NOT operate the monitor until the temperature is within its operating range.
■
Exposure to moisture or dust can cause harmful damage to the internal electronics. Do not mount
near cup holders or in areas where spills may occur.
■
This monitor is designed for use in vehicles with standard (-) 12 volt ground electrical systems.
■
Do not operate for an extended period of time without the engine running or the vehicle’s bat-
tery voltage may drop to damaging levels.
■
Do not drop the LCD panel or subject it to direct impact. This will damage the panel and/or the
back light element.
■
When operating the unit, avoid contact with the LCD panel.
■
Prevent metal or foreign objects being locked between the LCD screen and the enclosure. Foreign
objects may impair smooth running of the disc and may cause electrical problems.
■
Keep unit away from equipment with strong magnets such as large loudspeakers.
■
To prevent malfunction, do not play discs other than the ones listed below: DVD audio discs, DVD-
ROMs, CD-ROMs, Photo CDs and DVDs with region numbers other than this player's region number.
6
Page 6

© 2005 Directed Electronics, Inc. all rights reserved
WWeellccoommee
Thank you for your purchase of Directed’s Overhead Monitor with integrated DVD. Prior to operating
this unit, please fully read this instruction manual and retain it for future reference.
NNOOTTIICCEE
If you have the unit with an LED on the front left of the LCD then use this front portion of the man-
ual. If you do not, then use the manual towards the rear of this manual. The non-LED unit portion
of this manual has only the information necessary for that unit.
IImmppoorrttaanntt
WWHHEENN CCLLEEAANNIINNGG TTHHEE VVEEHHIICCLLEE
Do not spray this unit with water or cleaning solutions. Moisture and the chemicals found in clean-
ing fluids could damage the consoles finish and interior electronics. A soft damp, lens cleaning cloth
should be used to wipe the screen.
WWHHIILLEE DDRRIIVVIINNGG
This unit is intended for use in the rear seat area only. It should not be installed in a location that
would allow the driver to view it while driving.
WWHHEENN PPAARRKKEEDD
The screen is easily removable. Always close the screen when parking for an extended period of time
to avoid potential theft or extended exposure to direct sunlight.
PPRROOPPEERR UUSSEE
Do not touch the screen. Do not pull or hang from the fold down monitor door.
RREEPPAAIIRRSS
If the monitor stops working for any reason, discontinue use immediately and consult with your
retailer about any necessary repairs.
RRAADDIIOO//TTVV TTUUNNEERR UUSSEE
When the unit is used in conjunction with a Radio/TV tuner, please assure that the receiver is man-
ufactured to receive television broadcast signals that are transmitted via terrestrial radio waves.
Reception quality will change and vary according to vehicle location and weather conditions.
7
Page 7

© 2005 Directed Electronics, Inc. all rights reserved
IINNSSTTAALLLLAATTIIOONN
Avoid installing the monitor at a location, where it will be under direct sunlight or a hot air vent.
Operating temperature of the unit is from 32-140 degrees Fahrenheit. Install the unit at a dry loca-
tion, where it is away from condensation. Only correct size of fasteners or installation cables should
be used during installation. Failure to do so may cause a mechanical failure and create a fire haz-
ard. The installation should be done by an authorized Directed dealer.
NNOOTTEE::
If the internal temperature of the vehicle is higher than the normal operating temperature, please allow the vehicle to cool down prior to operating
the unit.
PPIICCTTUURREE QQUUAALLIITTYY
The picture quality of this LCD unit depends strictly on its installed location. To achieve the best
picture quality, adjust the brightness control or viewing angle of the unit until the optimum view-
ing is achieved.
IImmppoorrttaanntt IInnffoorrmmaattiioonn
FFCCCC NNOOTTIICCEE
This device complies with Part 15 of FCC rules. Operation is subject to the following two conditions:
(1) This device may not cause harmful interference, and (2) this device must accept any interfer-
ence received, including interference that may cause undesirable operation.
Changes or modifications not expressly approved by the party responsible for compliance could void
the user's authority to operate this device.
YYOOUURR WWAARRRRAANNTTYY
Your warranty registration must be completely filled out and returned within 10 days of purchase.
Your product warranty will not be validated if your warranty registration is not returned. Make sure
you receive the warranty registration from your dealer. It is also necessary to keep your proof of pur-
chase, which reflects that the product was installed by an authorized dealer.
8
Page 8
© 2005 Directed Electronics, Inc. all rights reserved
IInnssttaallllaattiioonn GGuuiiddee
PPRREECCAAUUTTIIOONNSS
1. This unit should be installed by an authorized Directed dealer.
2. This product is designed to operate with a 12V DC, negative ground battery system.
3. Disconnect the ground wire from the battery terminal prior to connecting the unit to the electrical system.
4. The wiring from some other products or accessories might bear similar color code as this product;
however, they might be of other function. Please refer to the electrical connection diagrams of
this product prior to installing to avoid improper connection.
5. Use proper connectors and insulation to prevent electrical damage to the unit.
6. Do not connect the yellow wire and red wire together of this product directly to the +12V. Connect
the red wire of this product to the ACC of the ignition key switch and yellow wire to +12V. Failure
to do so may result in permanent drainage of the battery charge.
7. Only supplied accessories should be used to avoid damage to the unit during installation.
8. Ensure that the display monitor is suitably installed at a location, such that it will not obstruct
the rear view mirror and/or the air condition vents.
9. Do not install this unit at a declining angle exceeding 30 degrees.
10. Do not install screws over the plane surface, which may affect monitor eject or retract function.
EELLEECCTTRRIICCAALL CCOONNNNEECCTTIIOONNSS
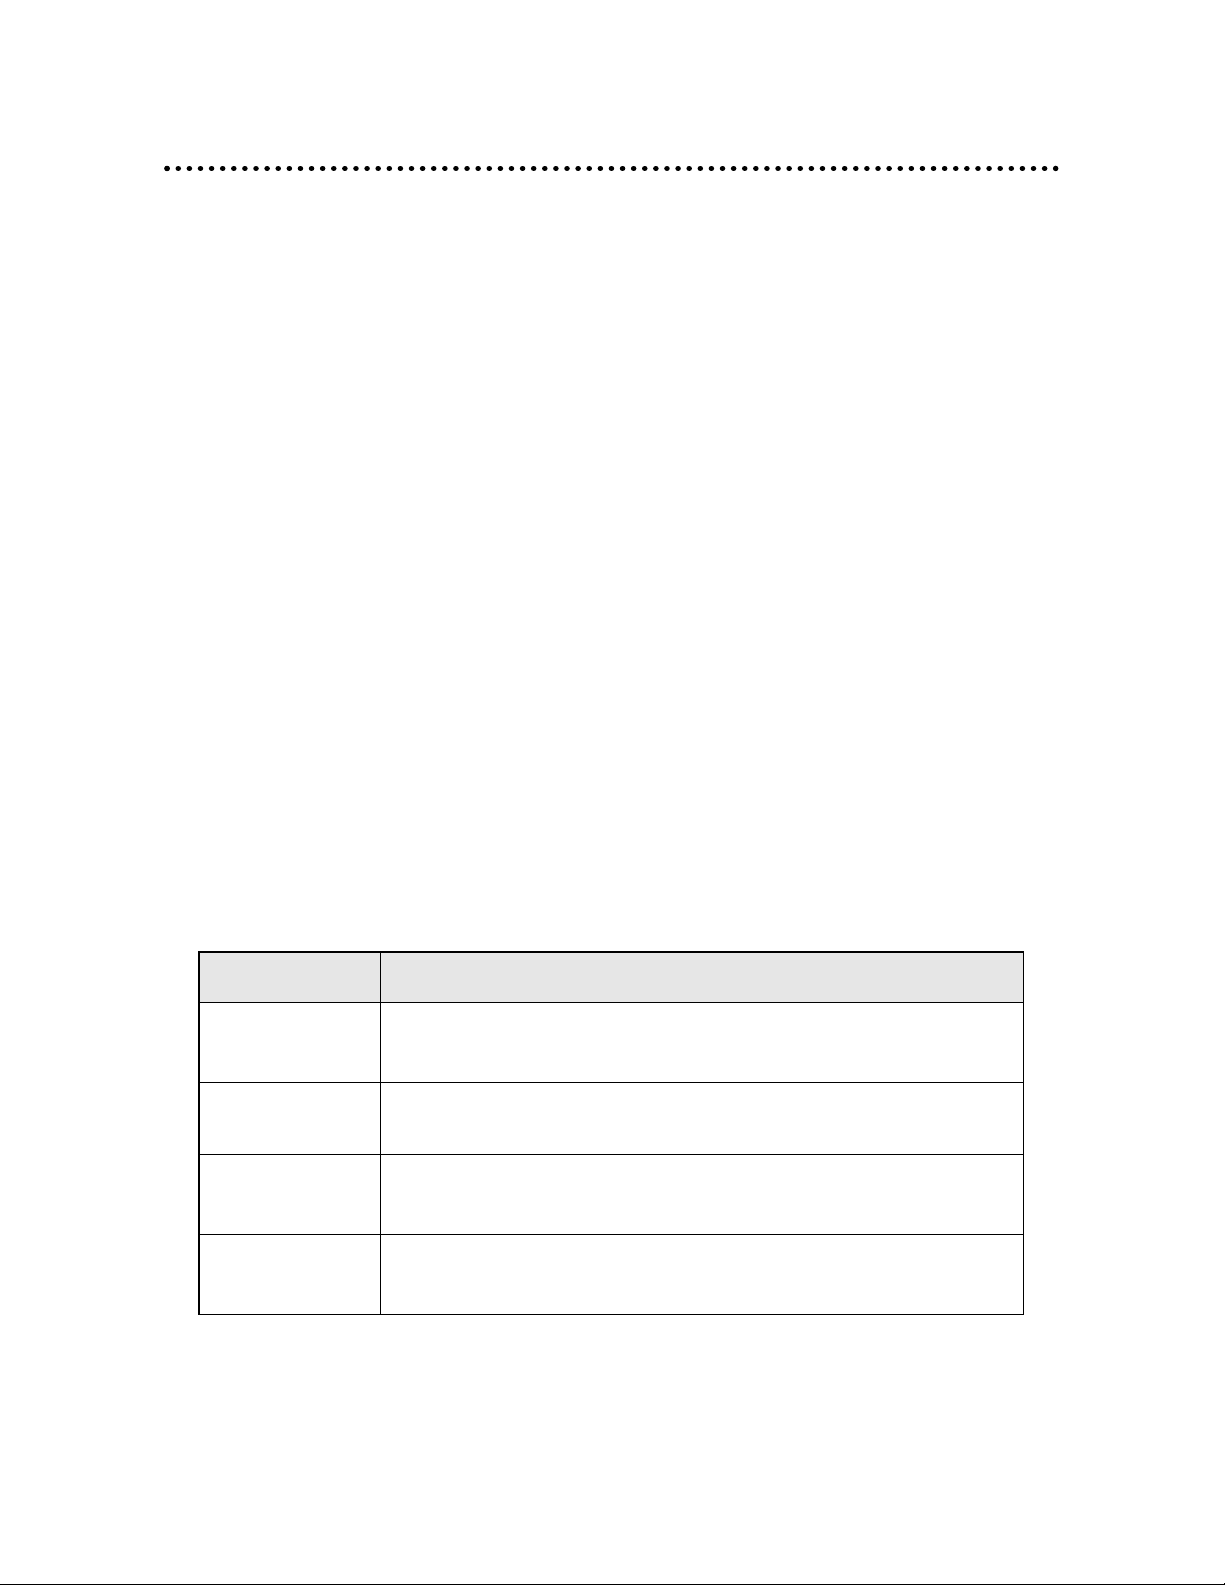
PPoowweerr CCaabbllee ((44--ppiinn,, oonnee ppiinn nnoott uusseedd))
CCoolloorr CCooddee FFuunnccttiioonn
Black This wire is the ground source for the monitor and DVD.
Red
Accessory +12V switched power source for the monitor and DVD. This
wire supplies the main power to the system.
Yellow
Constant +12V power. This wire supplies power to the DVD for last
position memory.
Blue
Connect to parking brake switch or connect to ground. This wire must
be connected if the driver can view the screen while driving.
9
Page 9
© 2005 Directed Electronics, Inc. all rights reserved
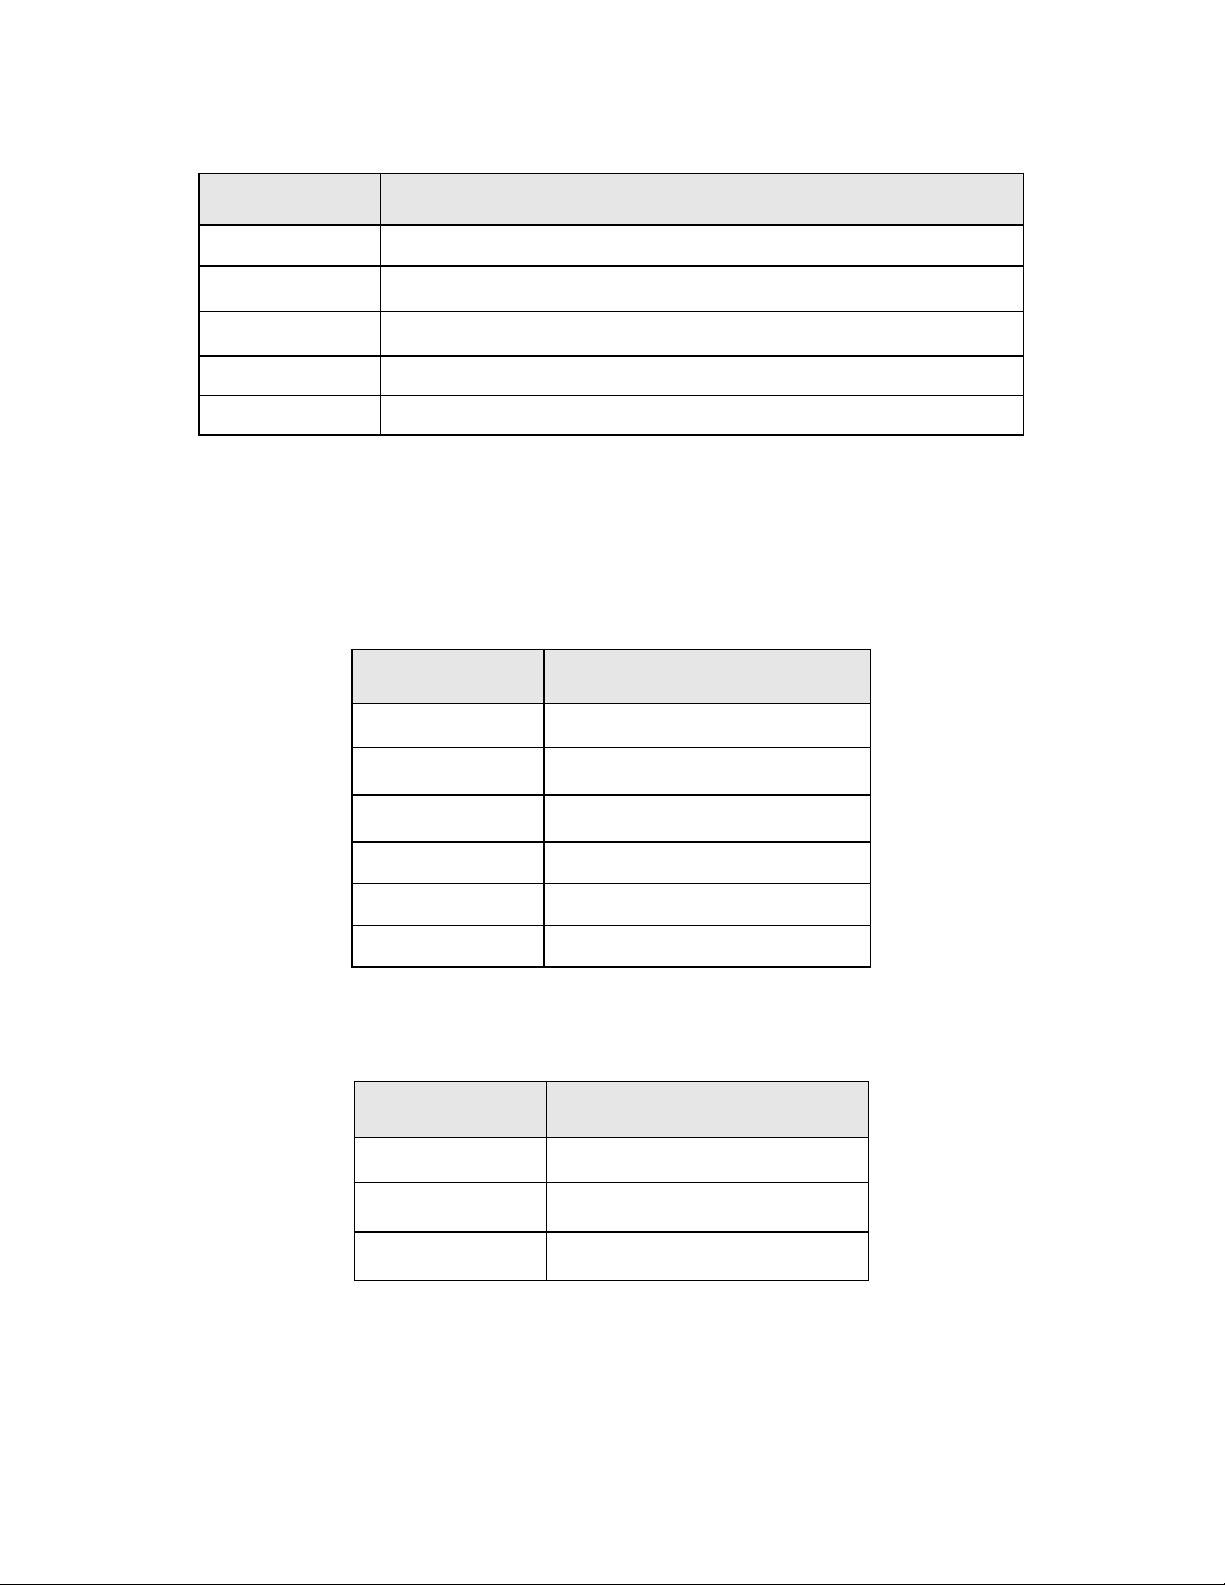
DDoommee LLiigghhtt CCaabbllee ((55--ppiinn))
The Red and Yellow wires should be connected together and then run to the domelight circuit.
SSIIGGNNAALL CCOONNNNEECCTTIIOONN
AAddaapptteerr AAuuddiioo
AAddaapptteerr VViiddeeoo
CCoolloorr CCooddee FFuunnccttiioonn
Yellow 1 (RCA) Video - In (V-IN 1)
Yellow 2 (RCA) Video - In (V-IN 2)
Yellow 3 (RCA) Video - Out (V-OUT 1)
CCoolloorr CCooddee FFuunnccttiioonn
Red 1 (RCA) Audio - Right (Input)
White 1 (RCA) Audio - Left (Input)
Red 2 (RCA) Audio - Right (Input)
White 2 (RCA) Audio - Left (Input)
Red 3 (RCA) Audio - Right (Output)
White 3 (RCA) Audio - Left (Output)
CCoolloorr CCooddee FFuunnccttiioonn
Black This wire supplies the ground to the domelight circuit.
Red This wire supplies +12V switched power to the domelight circuit.
Yellow This wire supplies +12V constant power to the domelight circuit.
Purple This wire connects to the (+) door trigger.
Grey This wire connects to the (-) door trigger.
10
Page 10
© 2005 Directed Electronics, Inc. all rights reserved
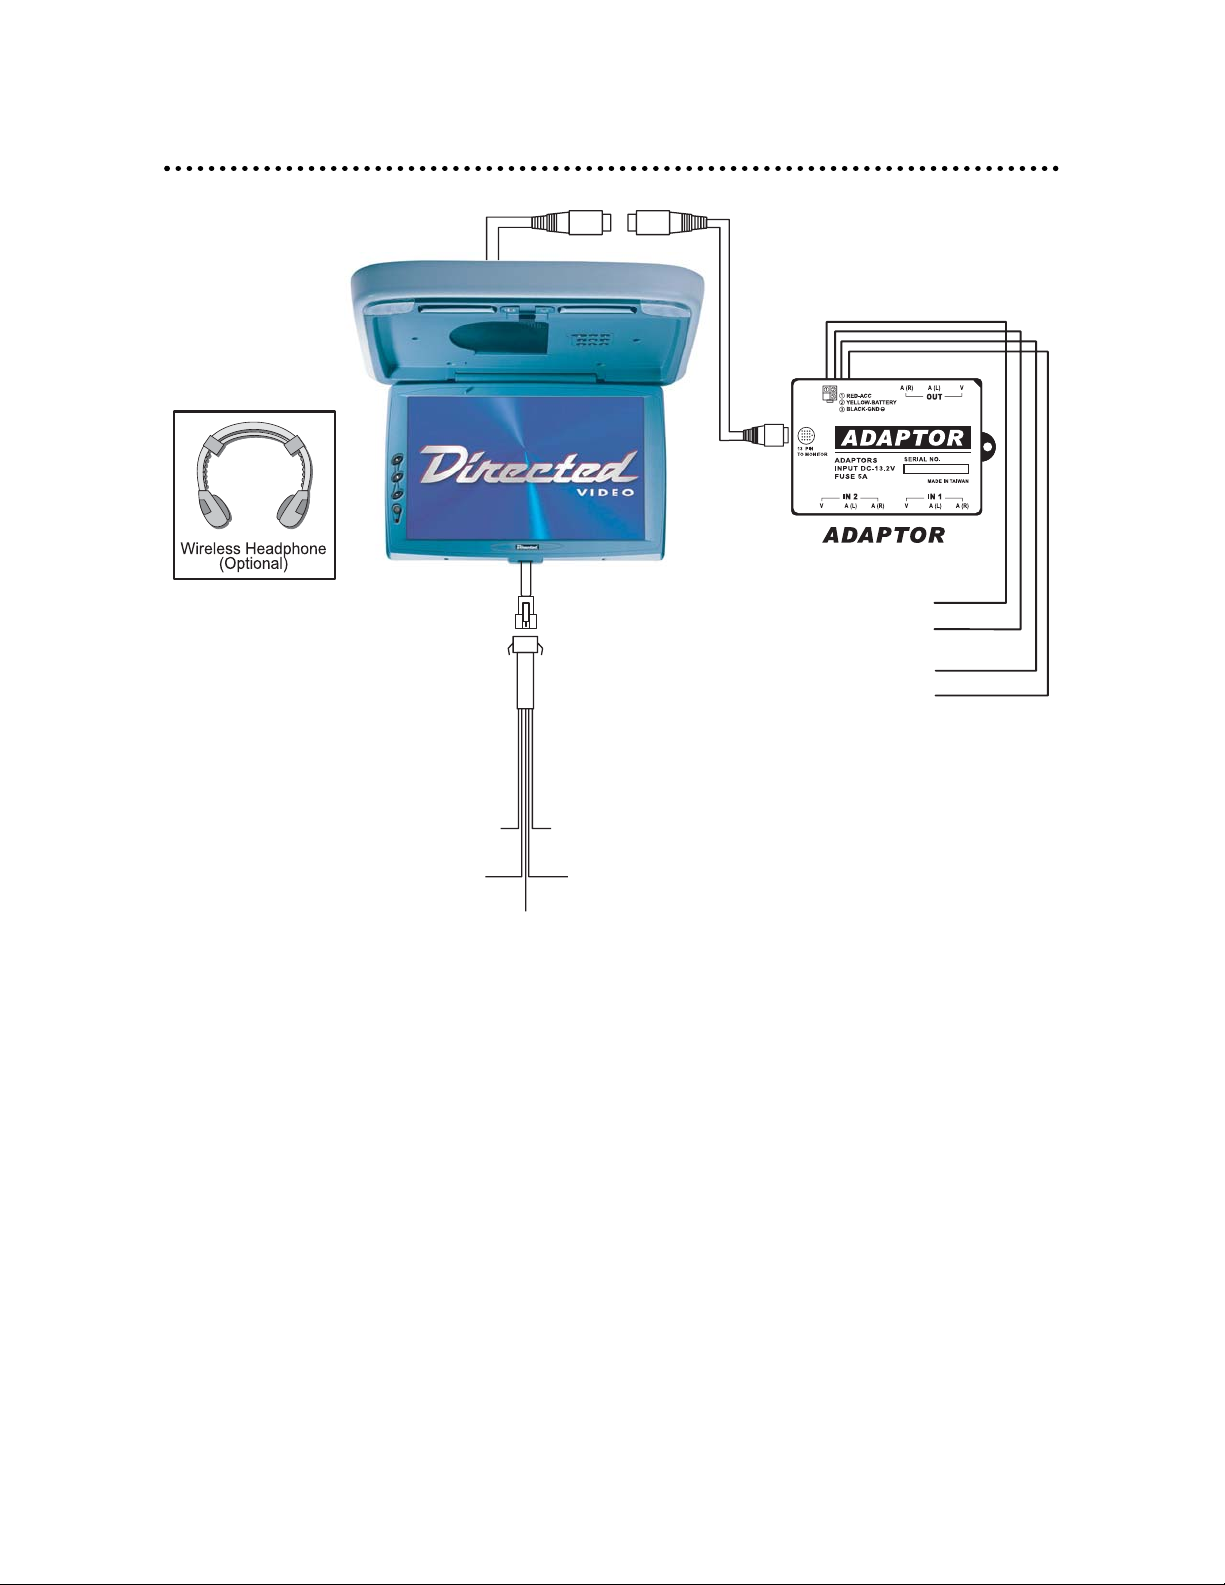
TTyyppiiccaall WWiirriinngg DDiiaaggrraamm
11
RED 12V Ignition
YELLOW 12V Constant
BLACK Ground
BLUE Parking Brake or Ground
RED 12V Ignition
YELLOW 12V Constant
GRAY (-) Door Trigger
BLACK Ground
PURPLE (+) Door Trigger
Page 11
© 2005 Directed Electronics, Inc. all rights reserved
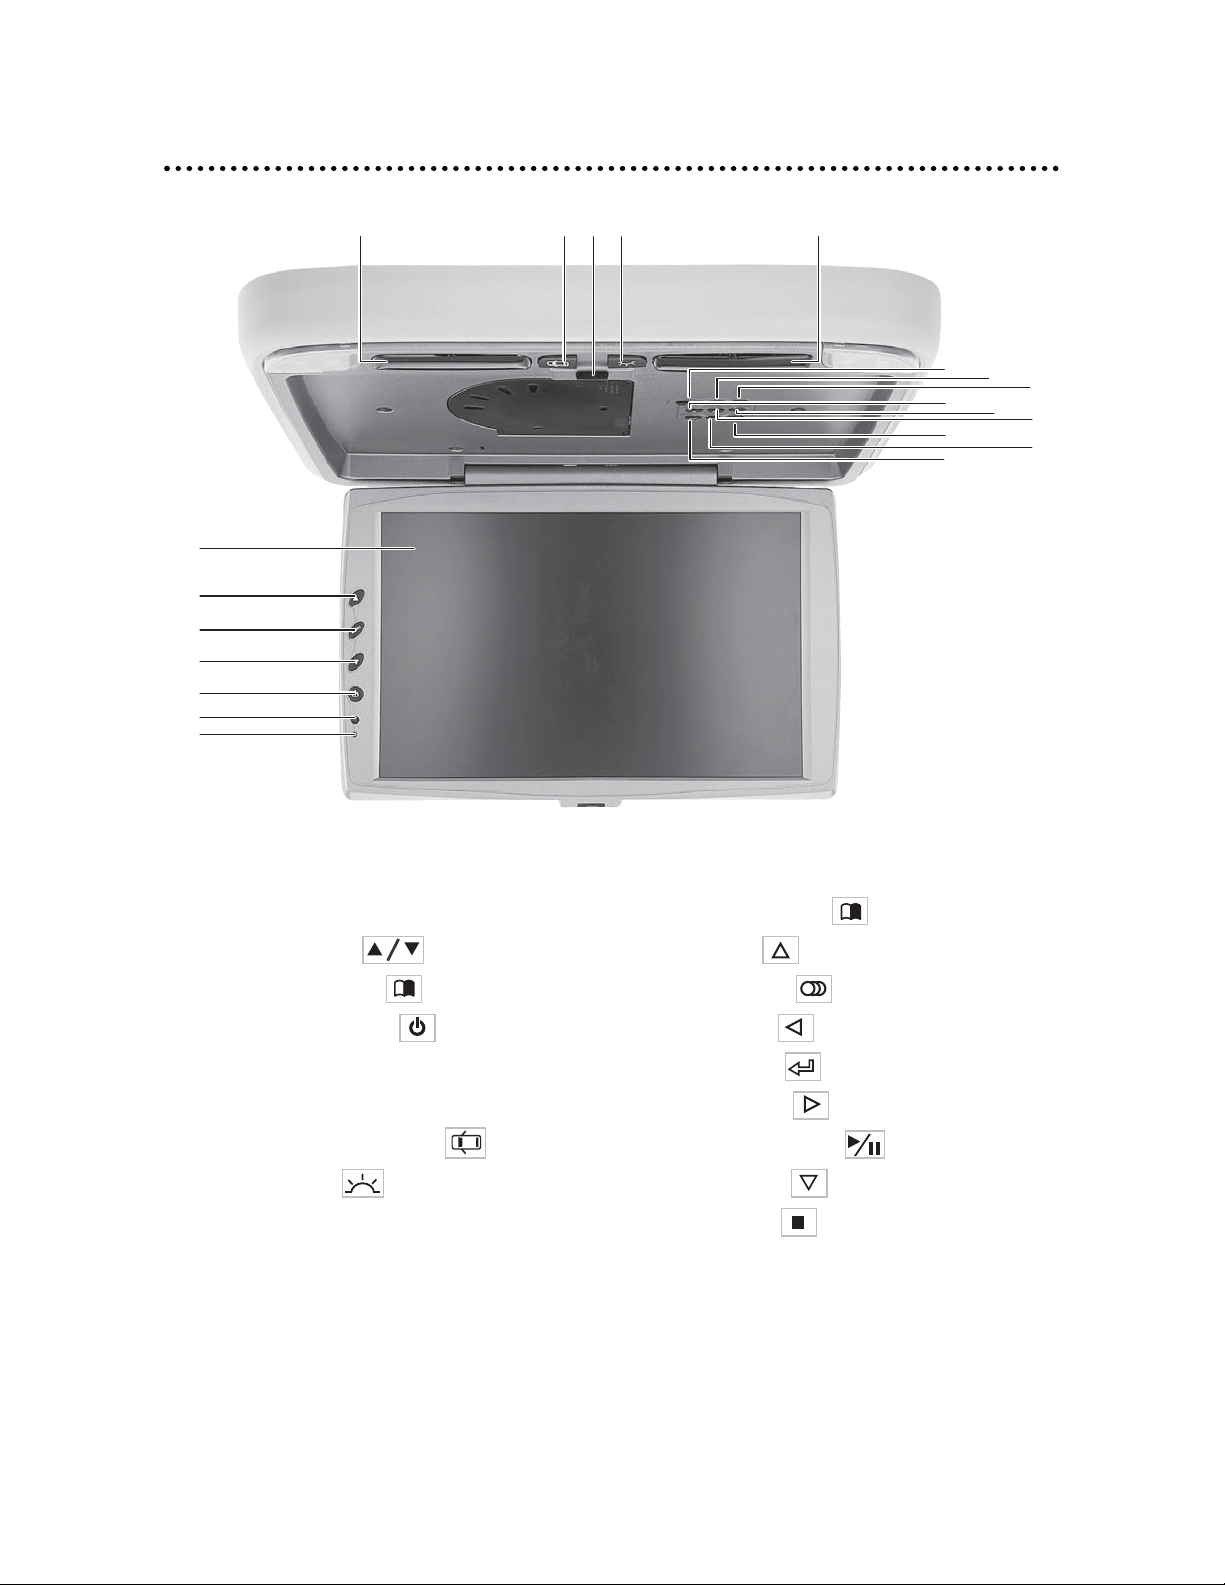
FFuunnccttiioonn KKeeyyss
DDiissppllaayy aanndd UUnniitt DDVVDD FFuunnccttiioonn KKeeyyss
1. LCD Display 11. DVD MENU button
2. UP/DOWN button 12. UP button
3. VIDEO MENU button 13. AUDIO button
4. Power ON/OFF button 14. LEFT button
5. IR Sensor 15. Enter button
6. LED 16. RIGHT button
7. Door Light ON/OFF button 17. PLAY/PAUSE button
8. Courtesy Light 18. DOWN button
9. OPEN/Close latch 19. STOP button
10. IR transmitter
8
12
10
1
2
3
2
4
5
6
8
97
10
11
12
16
13
15
1
14
19
17
Page 12
© 2005 Directed Electronics, Inc. all rights reserved
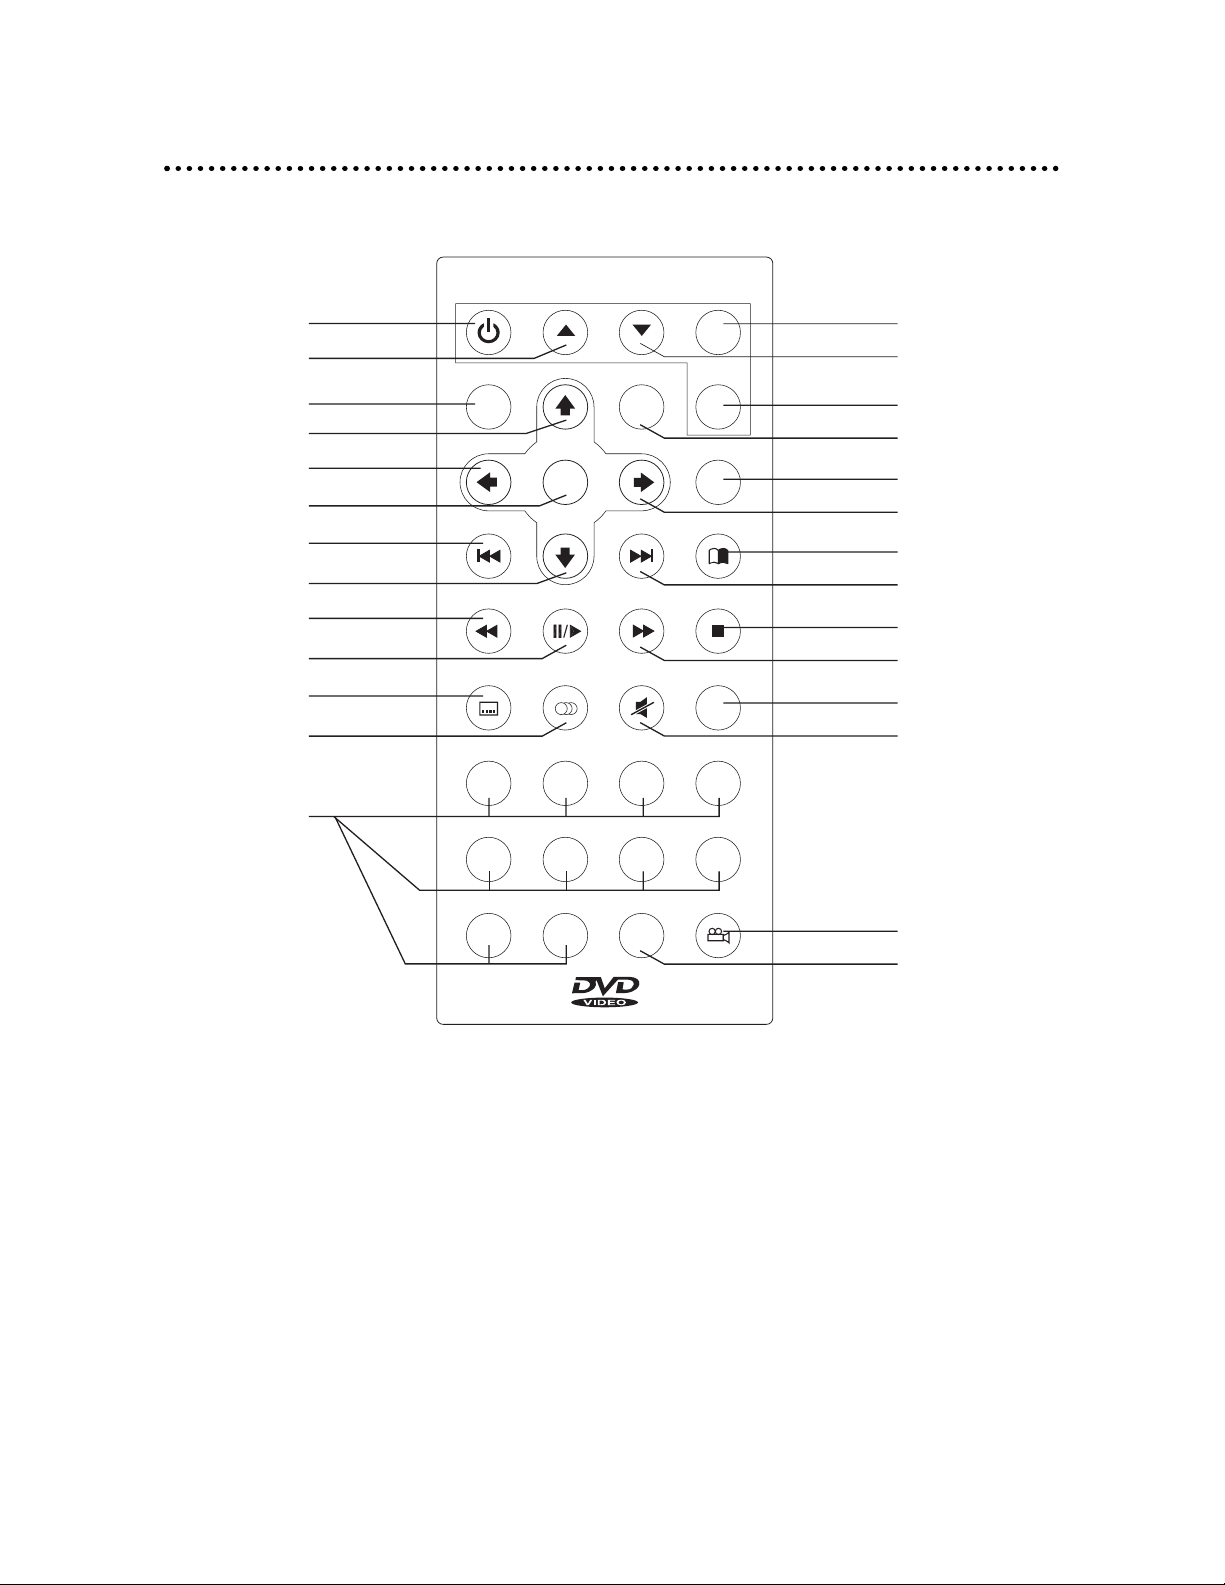
RReemmoottee CCoonnttrrooll UUnniitt
RREEMMOOTTEE BBUUTTTTOONNSS
1. POWER 14. MODE (AV1/AV2/DVD)
2. UP (display) 15. DOWN (display)
3. DVD SETUP 16. VIDEO MENU
4. UP cursor 17. DISPLAY (on screen)
5. LEFT cursor 18. TITLE
6. ENTER 19. RIGHT cursor
7. PREV (previous) 20. MENU
8. DOWN cursor 21. NEXT
9. F. REV (fast reverse) 22. STOP
10. PLAY/PAUSE 23. F.FWD (fast forward)
11. SUBTITLE 24. REPEAT (1/ALL)
12. AUDIO 25. MUTE
13. 1–0 (numeric buttons) 26. ANGLE
27. GO TO
13
POWER
MONITOR
MODE
1 14
2
3
4
5
6
7
8
9
10
11
12
SETUP
LEFT RIGHT
ENTER
PREV NEXT
F.REV
1
DOWN
PLAY/
PAU SE
AUDI OSUBTITLE
DISPLAY
UP
F. F W D
MUTE
2
VIDEO
MENU
TITLE
MENU
STOP
REPEAT
1/ALL
3
4
15
16
17
18
19
20
21
22
23
24
25
13
5
6
87
ANGLEGOTO
9
0
26
27
Page 13
© 2005 Directed Electronics, Inc. all rights reserved
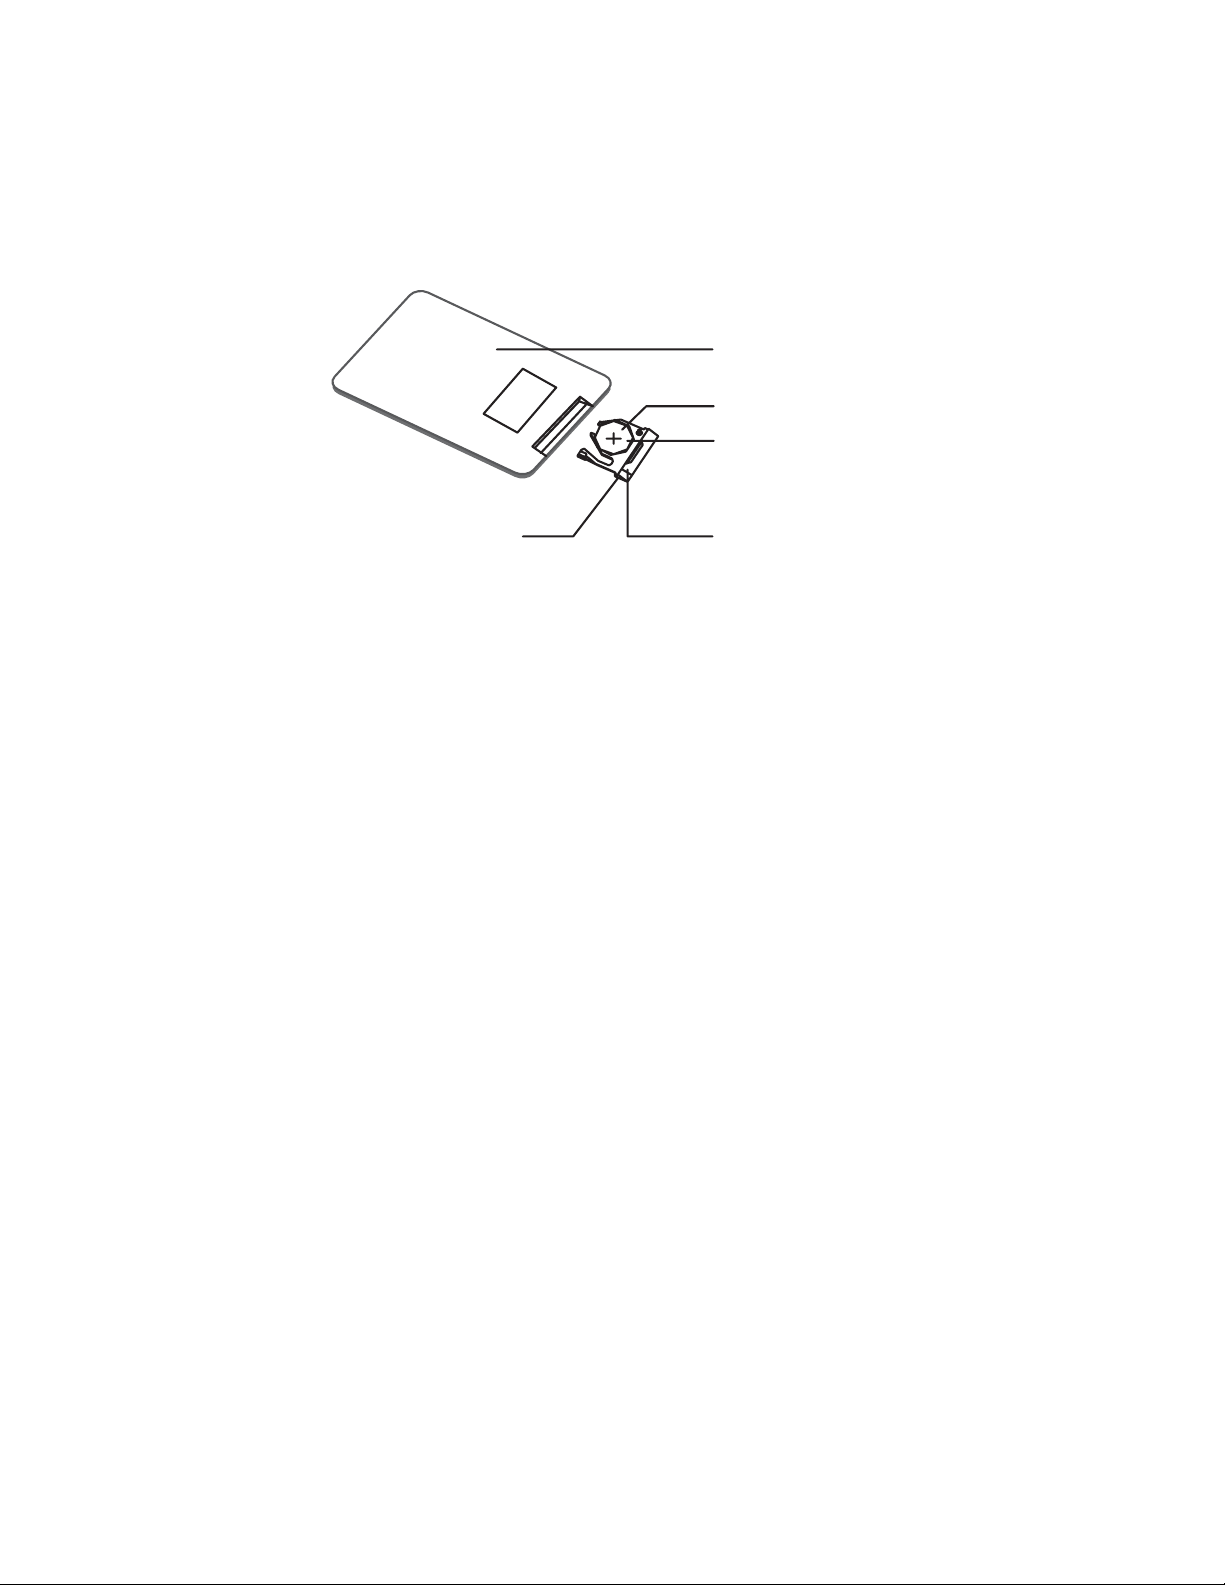
BBAATTTTEERRYY RREEPPLLAACCEEMMEENNTT
NOTE: Before using remote after installation, remove the battery plastic protective
slip.
1. Move the small latch to the right and slide out the battery holder.
2. Remove old battery and replace it with a new battery (CR2025) with the positive “+” sign facing
as shown above.
3. Push battery holder back into its compartment until it is locked.
PPRREECCAAUUTTIIOONNSS
1. Properly dispose of used battery.
2. Do not misuse battery by shorting the positive “+” and negative “-” terminal or put it into fire.
Overheating may cause the battery to explode and cause a fire hazard.
3. If the remote is not to be used for a long period, remove the battery from the remote to prevent
damage from battery leakage.
4. To avoid accidents, prevent children from playing with the battery.
14
Remote Controller
+ side
Battery
Latch
Battery Holder
Page 14
© 2005 Directed Electronics, Inc. all rights reserved
LLooaaddiinngg aanndd UUnnllooaaddiinngg DDiissccss
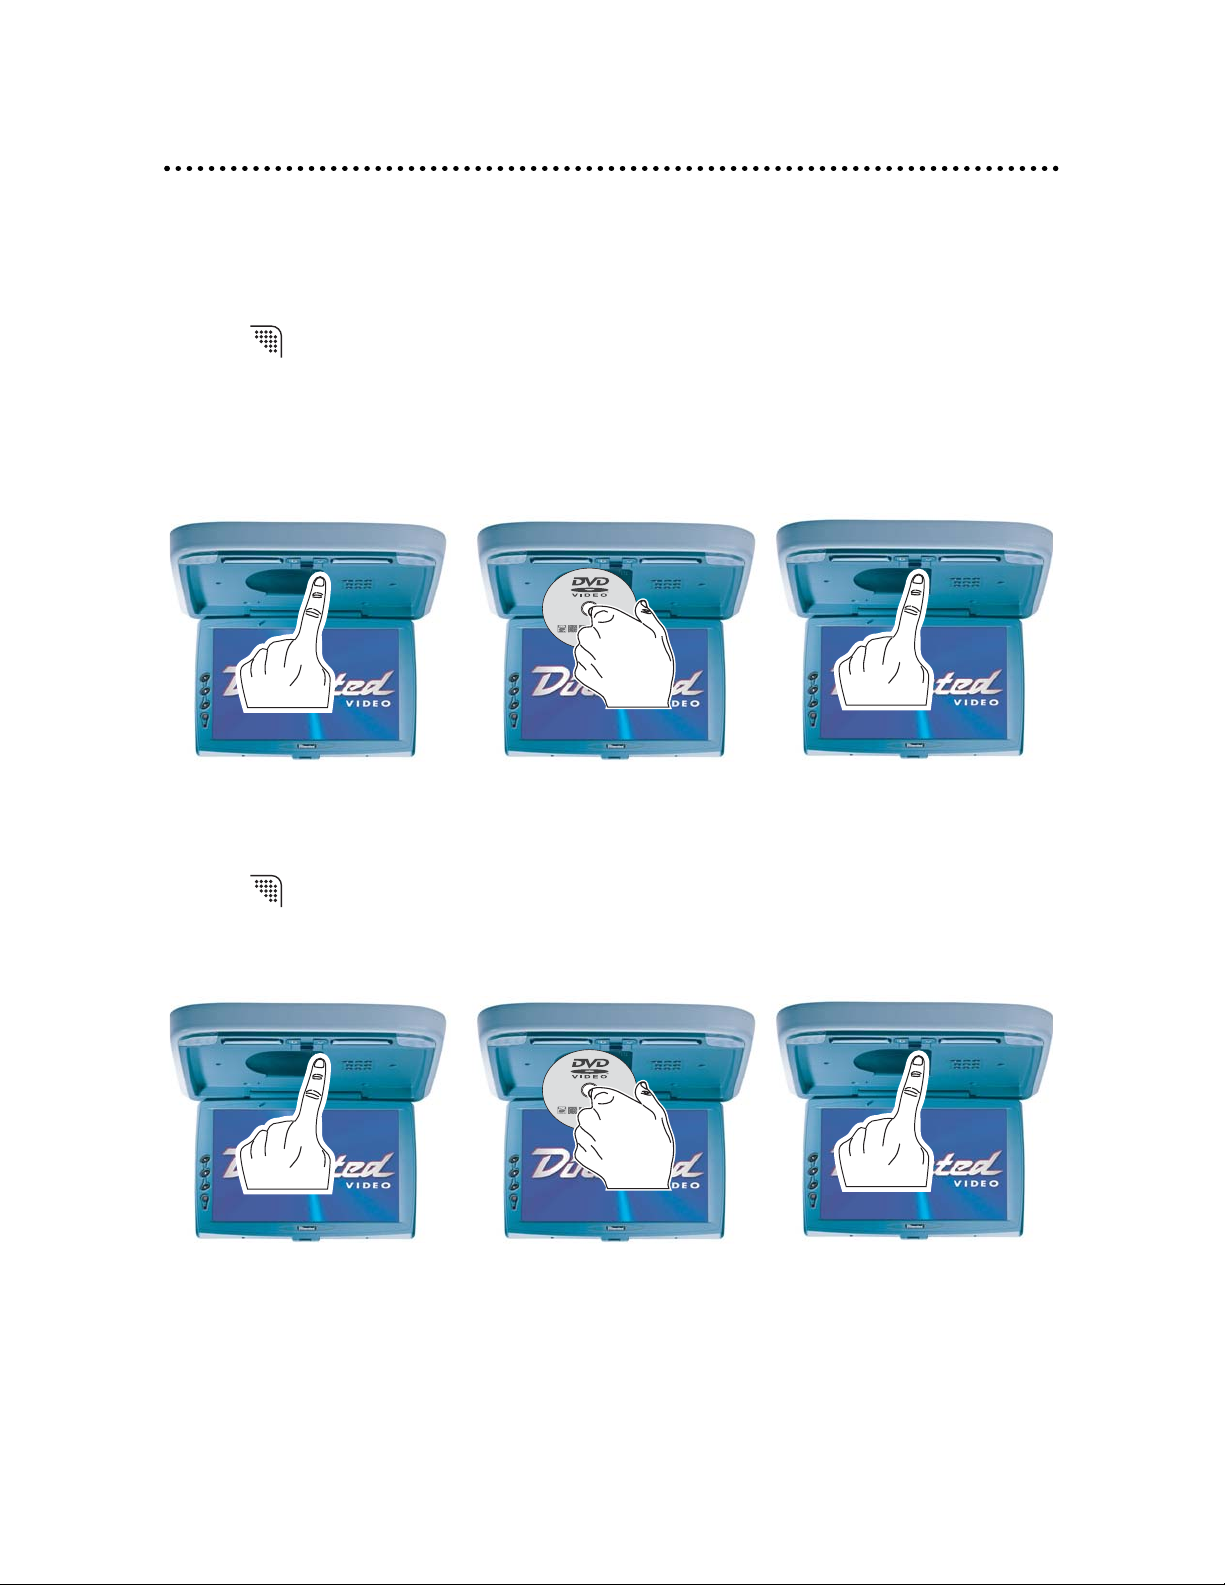
You can use single side and dual layer DVDs, VCDs, CD-audio and CD-R compatible 12cm discs with
this system.
LLOOAADDIINNGG DDIISSCC
1. Press at the upper right corner to open the door.
2. Load with the recorded side (the shiny side) facing up. With double-sided discs, load with the
side you want to watch facing up. Ensure that the disc is seated properly before pushing tray
back into its locking position.
3. Push to close the door.
UUNNLLOOAADDIINNGG DDIISSCC
1. Press at the upper right corner to open the door.
2. Remove the disc. (Avoid touching the recorded surface.)
3. Push to close the door, until you hear a click sound from the door mechanism.
15
Page 15

© 2005 Directed Electronics, Inc. all rights reserved
OOppeerraattiinngg tthhee MMoonniittoorr
OOPPEENN//CCLLOOSSEE TTHHEE DDIISSPPLLAAYY MMOONNIITTOORR
To open the display monitor, push the "OPEN" latch and pull the monitor down to the desired position.
To close the display monitor, push the monitor up until it latches closed with an audible click.
PPoowweerr UUpp//DDoowwnn tthhee DDiissppllaayy MMoonniittoorr
The unit will power up when the display monitor is unlatched and pulled down. (If the unit does
not power up, press the Power button on either the remote or on the left side of the LCD screen.
To turn the power Off to the unit, press the POWER button on the remote or press and hold power
button on left side of screen for 4 seconds. Also the power will shut Off when the display monitor
is placed in the closed and latched position.
If the hand icon displays in the upper left-hand corner of the screen when using the remote, it indi-
cates that the command issued is not allowed during the mode that the monitor display is present-
ly in, or is not available on this system.
FFUUNNCCTTIIOONN MMOODDEE ((MMEENNUU))
Press remote "VIDEO MENU" button or monitor "MENU" button to activate the screen set up
sequence as follows:
RESET: Resets COLOR, BRIGHTNESS, TINT, DIMMER, FORMAT to factory settings.
Once the desired setting is selected with the S or T buttons, press the cursor key to the desired
setting. Once the correct function is selected, press the cursor keys W or X (for the desired adjust-
ment).
TTFFTT VViiddeeoo MMeennuu
C
olor 8
Brightness 8
Tint 8
Sharpness 8
Contrast 8
Dimmer OFF
Format FULL
Reset X
16
Page 16

© 2005 Directed Electronics, Inc. all rights reserved
DDVVDD BBAASSIICC OOPPEERRAATTIIOONN::
Place LCD in open position
((11)) DDVVDD NNAAVVIIGGAATTIIOONN KKEEYYSS
The remote control's [ LEFT ], [ RIGHT ], [ UP ], [ DOWN ] & [ ENTER ] allows the user to navigate
the DVD MENU or DVD TITLE MENU or DVD SETUP MENU
((22)) SSTTOOPP PPLLAAYYBBAACCKK
Press remote control's [ STOP ] or the front panel's [ STOP ] to stop DVD playback.
((33)) PPLLAAYY // PPAAUUSSEE
Press remote control's or the front panel's [ PLAY ] button to start DVD playback or pause DVD play-
back
DDVVDD PPLLAAYYBBAACCKK ((DDVVDD))
(1) Press the remote control’s or the front panel's "MODE" button to select the DVD mode.
(2) DVD playback commences.The disc will start to play if the disc does not have any menu record-
ed on it.If the disc has one or more titles recorded on it, a menu screen will appear on the moni-
tor.
(3) Press ¨/§/©/ª on the remote to select the preferred title.
(4) Press the ENTER button, the selected item will now start playing.
Press the MENU or TITLE button, the menu screen will appear on the monitor.
NNEEXXTT TTRRAACCKK OORR PPRREEVVIIOOUUSS TTRRAACCKK ((DDVVDD//MMPP33//CCDD))
Press () during playback MP3, Audio CD. The player will skip forward to the next track each time
the button is pressed.
When using DVDs the player will skip forward to the next chapter each time the button is pressed.
Press (
) during playback MP3, Audio CD. The player will skip backward to the previous track each
time the button is pressed.
When using DVDs the player will skip backward to the previous chapter each time the button is
pressed.
17
Page 17

© 2005 Directed Electronics, Inc. all rights reserved
PPLLAAYY//PPAAUUSSEE ((DDVVDD//MMPP33//CCDD))
Press the "PLAY/PAUSE" (X/) button, during playback. The player will be placed in the pause
mode.
Press the "PLAY/PAUSE" (X/) button again, the player will return to normal playback.
SSTTOOPP ((DDVVDD//MMPP33//CCDD))
(1) During Audio CD playback, when "STOP" () button is pressed, the CD playback will stop.
(2) During DVD playback, when the "STOP" () button is pressed, press "PLAY/PAUSE (X/)" but-
ton to continue. The player records the point where the "STOP" () button is pressed (Resume play-
back function). Press the PLAY/PAUSE (X/) button again, the play will resume from this point.
If "STOP" () button is pressed. “OP” will apppear and the resume playback function will be cleared.
NNOOTTEE::
Resume playback function is not available for Audio CDs.
RREEPPEEAATT MMOODDEE
For Audio CD/MP3/DVD
When REPEAT button on the remote is pressed,
REP 1 = The current track will be repeated
REP ALL = All the folders will be repeated
REP OFF = Repeat mode will be switched off
CCAAMMEERRAA AANNGGLLEE ((DDVVDD))
Some DVD discs may contain scenes, which have more than one viewing angle. For these discs, the
same scene can be viewed from a different angle by using the "ANGLE" button.
1. During DVD playback, press the "ANGLE" button on remote. “ x/y” will appear, x represents
the current camera angle, and "y" represents the total available camera angle.
2. Press the ANGLE button on remote until the preferred angle is selected. The ANGLE selection will
cycle through all available camera angle.
NNOOTTEE::
This function will only work on discs where different camera angles have
been recorded.
18
Page 18
© 2005 Directed Electronics, Inc. all rights reserved
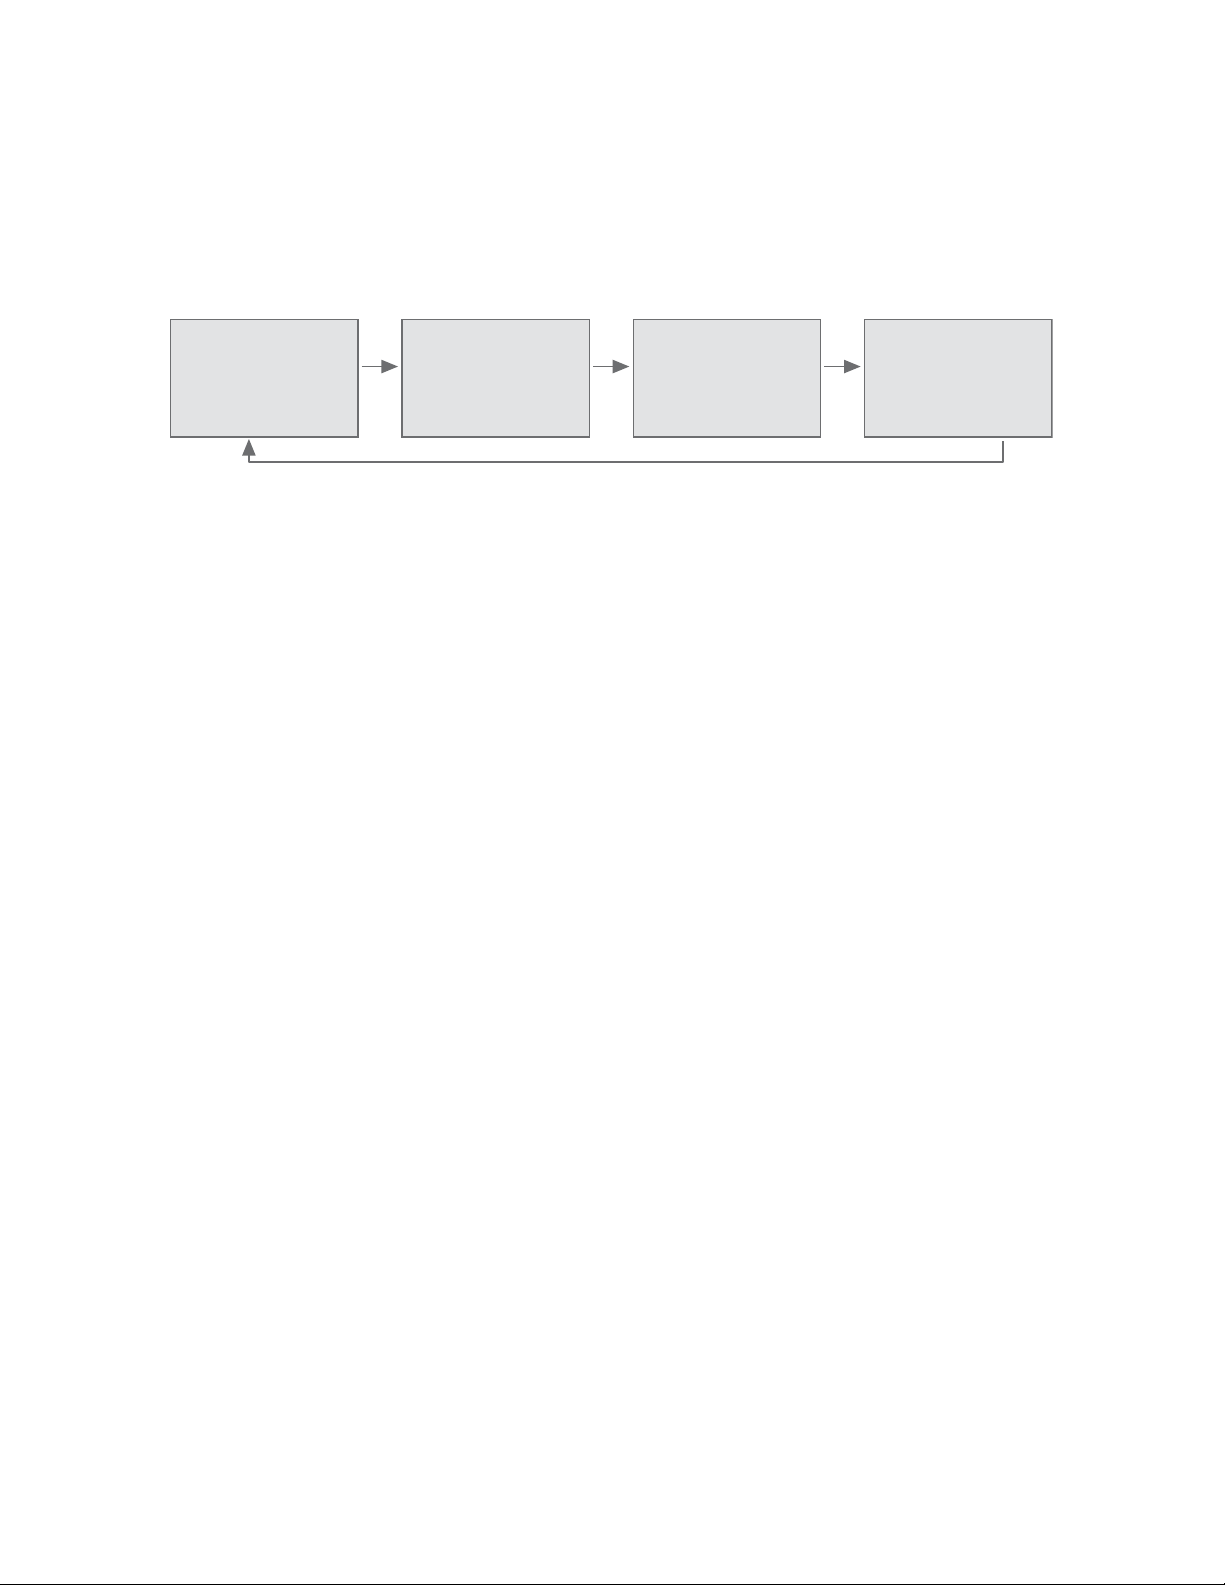
SSUUBBTTIITTLLEE ((DDVVDD))
During DVD playback, you may change the subtitle language from the one selected at the initial set-
ting to a different language, if available.
1. Pressing "SUBTITLE ON/OFF" button, the following will appear.
2. Press the "SUBTITLE" button until the preferred subtitle is selected. The SUBTITLE selection will
cycle through all available subtitles.
NNOOTTEE::
(1) The "SUBTITLE" works only for discs that have multiple subtitle.
(2) In some cases, the subtitle will not changed immediately to the one
selected.
DDVVDD MMEENNUU ((DDVVDD))
Most DVD discs have unique menu structures call DVD menu.The DVD menu’s contents and operation
may differ from disc to disc.
1. During DVD playback, press the MENU button.The DVD menu available on the disc will be
displayed.
2. Use ¨/§/©/ª to select the preferred item or use the numeric button(s) to make a selection.
3. Press "ENTER" button, the selected item will start playing.
TTIITTLLEE MMEENNUU ((DDVVDD))
Some DVD discs may have more than one title. If the disc has a title menu recorded on it, the "TITLE"
button can be used to access it.
1. During DVD playback, press the TITLE button. A list of the titles may be displayed.
2. Use ¨/§/©/ª to select the preferred item.
3. Press "ENTER" button, the selected title will start playing.
19
SUBTITLE 01/03 ENGLISH SUBTITLE 02/03 FRANCH SUBTITLE 03/03 SPANISH SUBTITLE OFF
Page 19
© 2005 Directed Electronics, Inc. all rights reserved
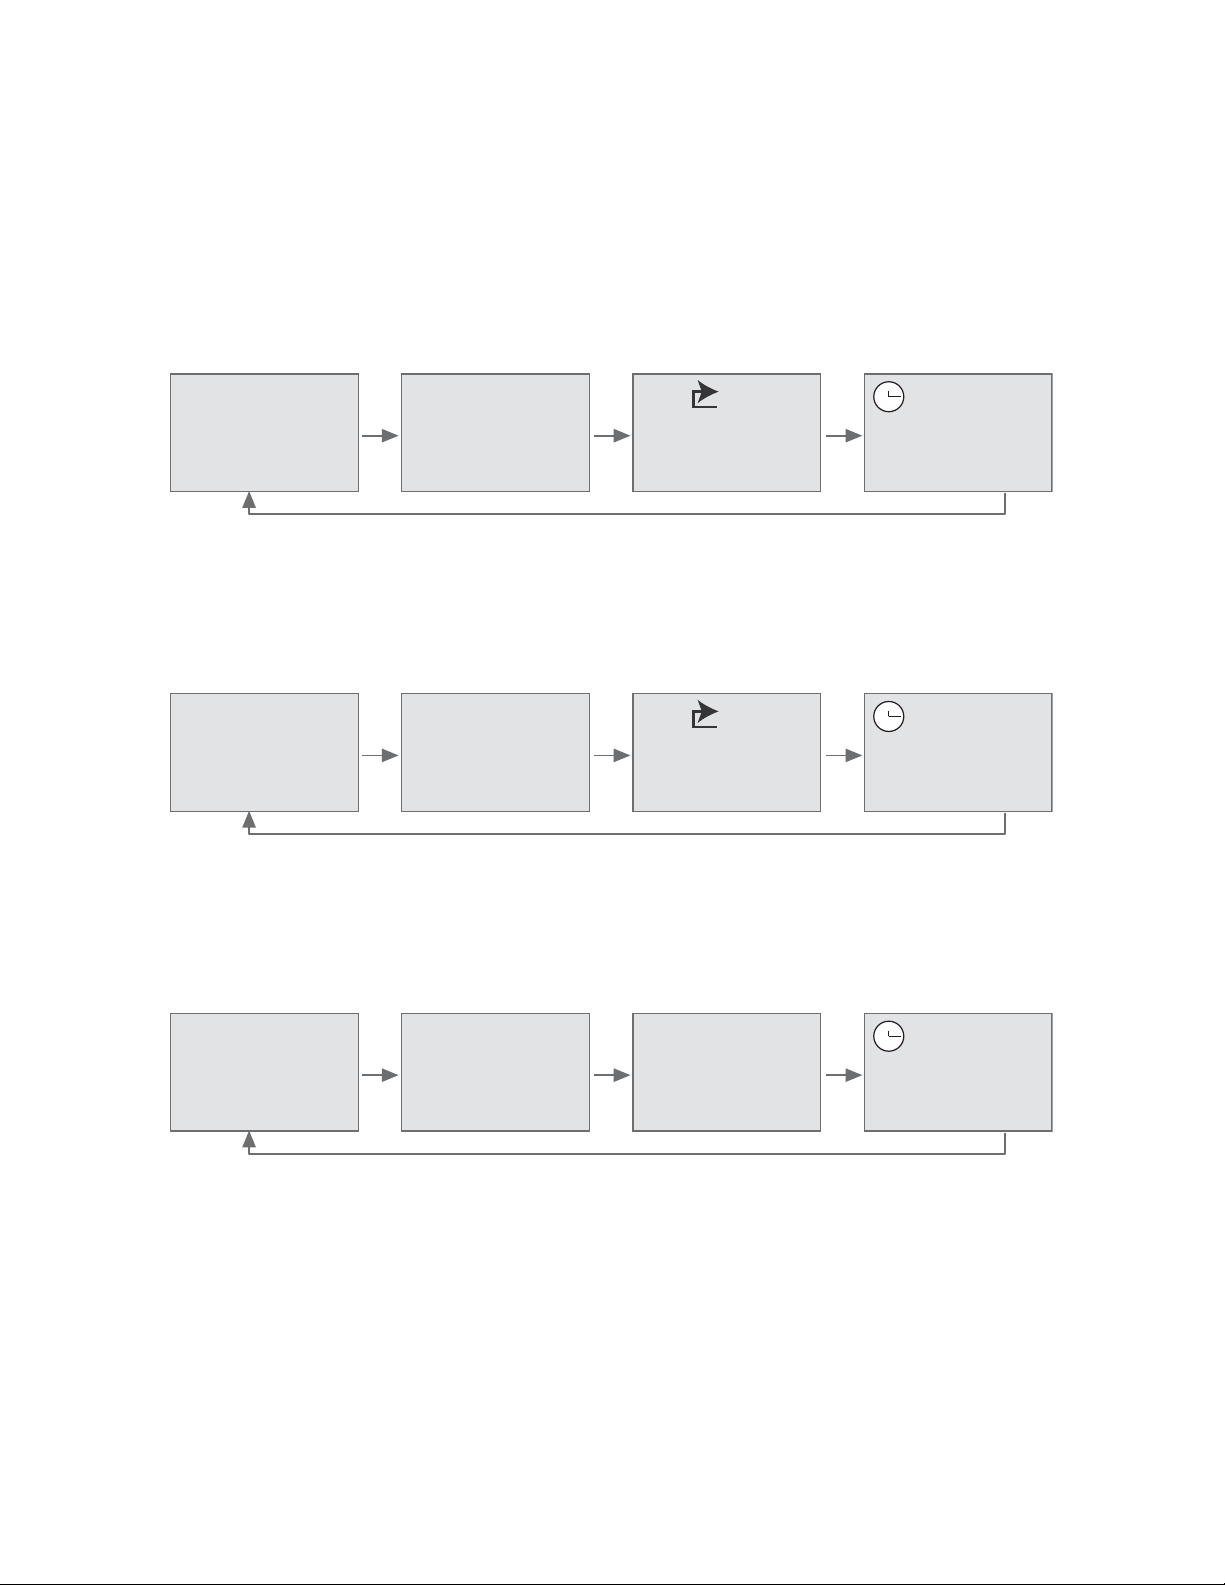
DDIISSPPLLAAYY FFUUNNCCTTIIOONN ((DDVVDD//MMPP33//CCDD))
The display function enables you to view the status, current title number, track number and the total
playing time of the disc on the TV screen.
Audio CD
When the “DISPLAY” key is pressed, the following OSD will be shown.
MP3
When the “DISPLAY” key is pressed, the following OSD will be shown.
DVD
When the “DISPLAY” key is pressed, the following OSD will be shown.
20
CD TRK 1/20 X 00:01:10
(Repeat) (Time)
MP3 TRK 1/20 X 00:01:10
(Repeat) (Time)
DVD TT CH 1/451/4 00:01:10
(Chapter)(Title) (Time)
Page 20
© 2005 Directed Electronics, Inc. all rights reserved
DDVVDD AADDVVAANNCCEEDD OOPPEERRAATTIIOONN
DDVVDD TTYYPPIICCAALL SSEETTUUPP MMEENNUU AANNDD CCOONNFFIIGGUURRAATTIIOONN
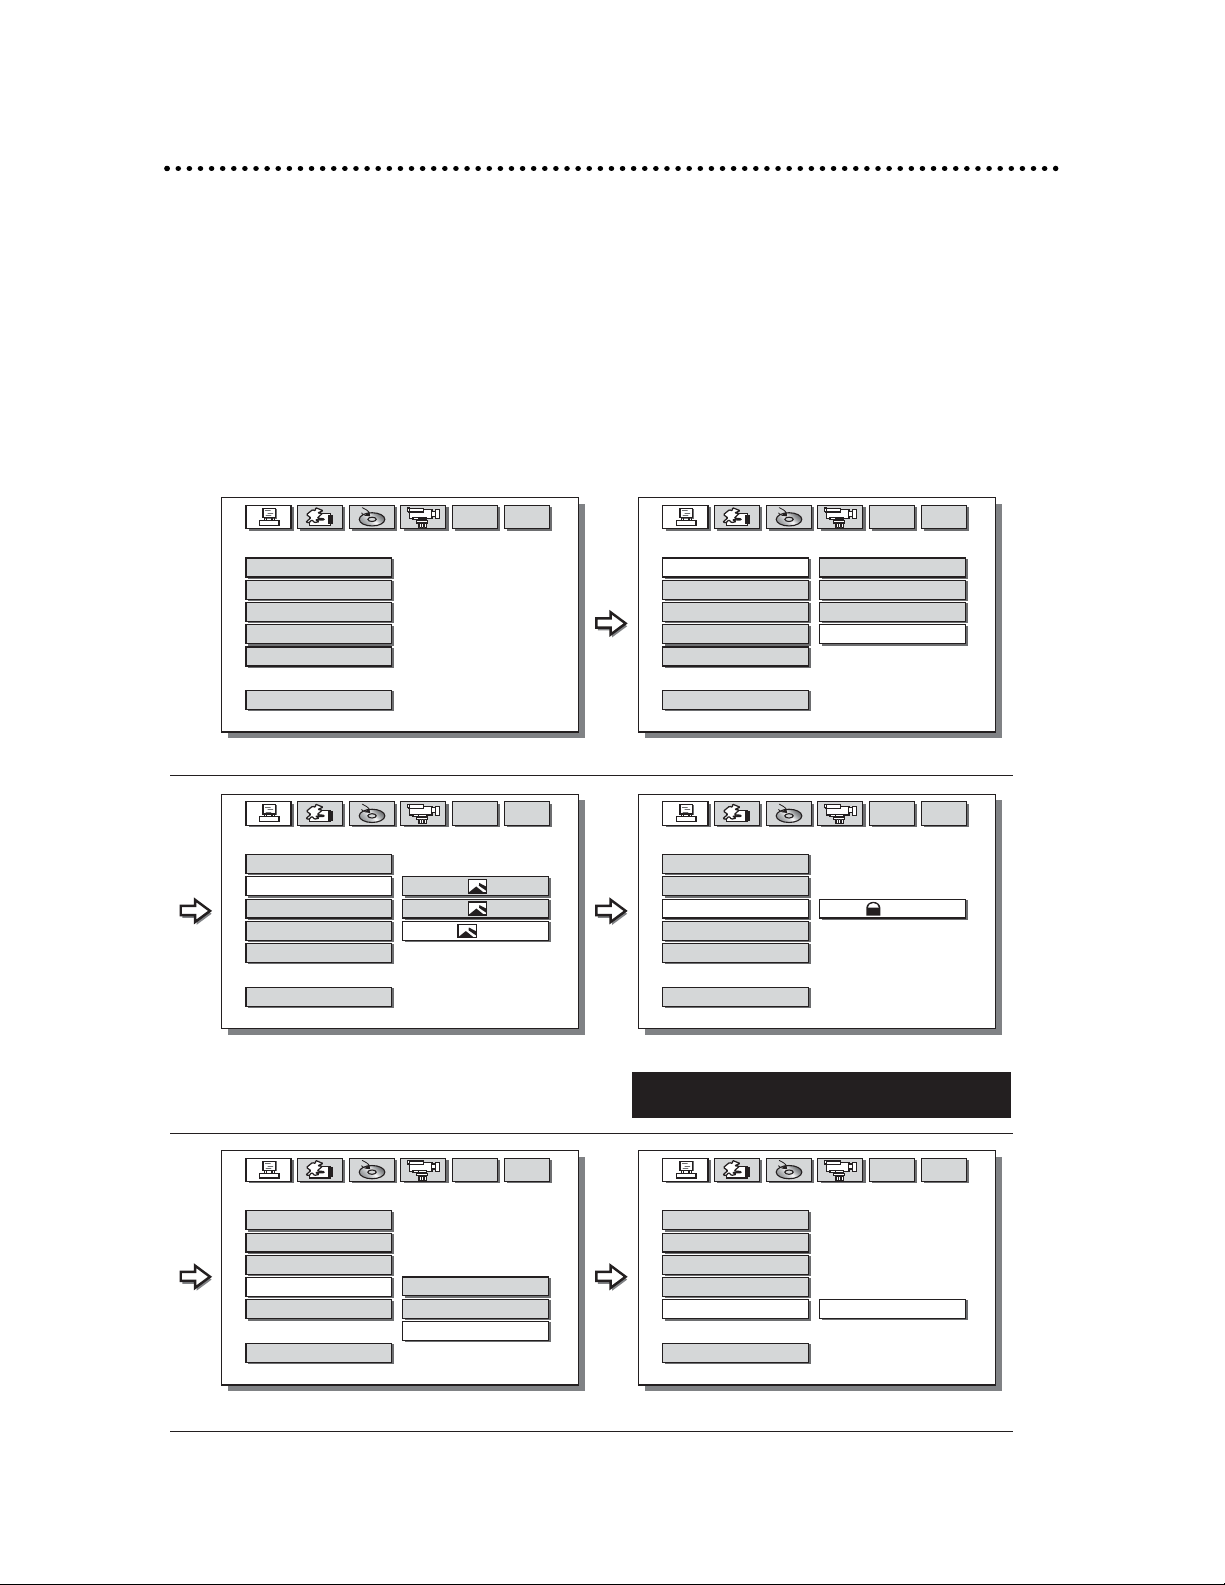
When the player is in stop mode, pressing "SETUP" button will allow you to modify some of the play-
er’s basic settings, you can use "UP / DOWN / RIGHT / LEFT" buttons to highlight a selection, and
press "ENTER" button to confirm the selection.
NNOOTTEE::
Some DVD menu settings do not apply to this system, since it is specifically engineered for automotive use. Changing the state of some settings can
cause apparent system failure.
SSYYSSTTEEMM SSEETTTTIINNGG
21
SYSTEM SETUP
TV SYSTEM
TV TYPE
PA SSWORD
RATING
DEFAULT
EXIT SETUP
SYSTEM SETUP
TV SYSTEM
TV TYPE
PA SSWORD
RATING
DEFAULT
EXIT SETUP
SYSTEM SETUP
TV SYSTEM
TV TYPE
PA SSWORD
RATING
DEFAULT
EXIT SETUP
NTSC
PA L6 0
PA L
AUTO
SYSTEM SETUP TV SYSTEM SETUP
SYSTEM SETUP
TV SYSTEM
4:3PS
4:3LB
16:9
TV TYPE
PA SSWORD
RATING
DEFAULT
EXIT SETUP
---
TV TYPE SETUP PASSWORD SETUP
* The Factory original Password is "1234". Use
"1234" when forget the password YOU set.
SYSTEM SETUP
TV SYSTEM
TV TYPE
PA SSWORD
RATING
DEFAULT
EXIT SETUP
SYSTEM SETUP
TV SYSTEM
TV TYPE
PA SSWORD
NO ADULT
KID SAFE
VIEW ALL
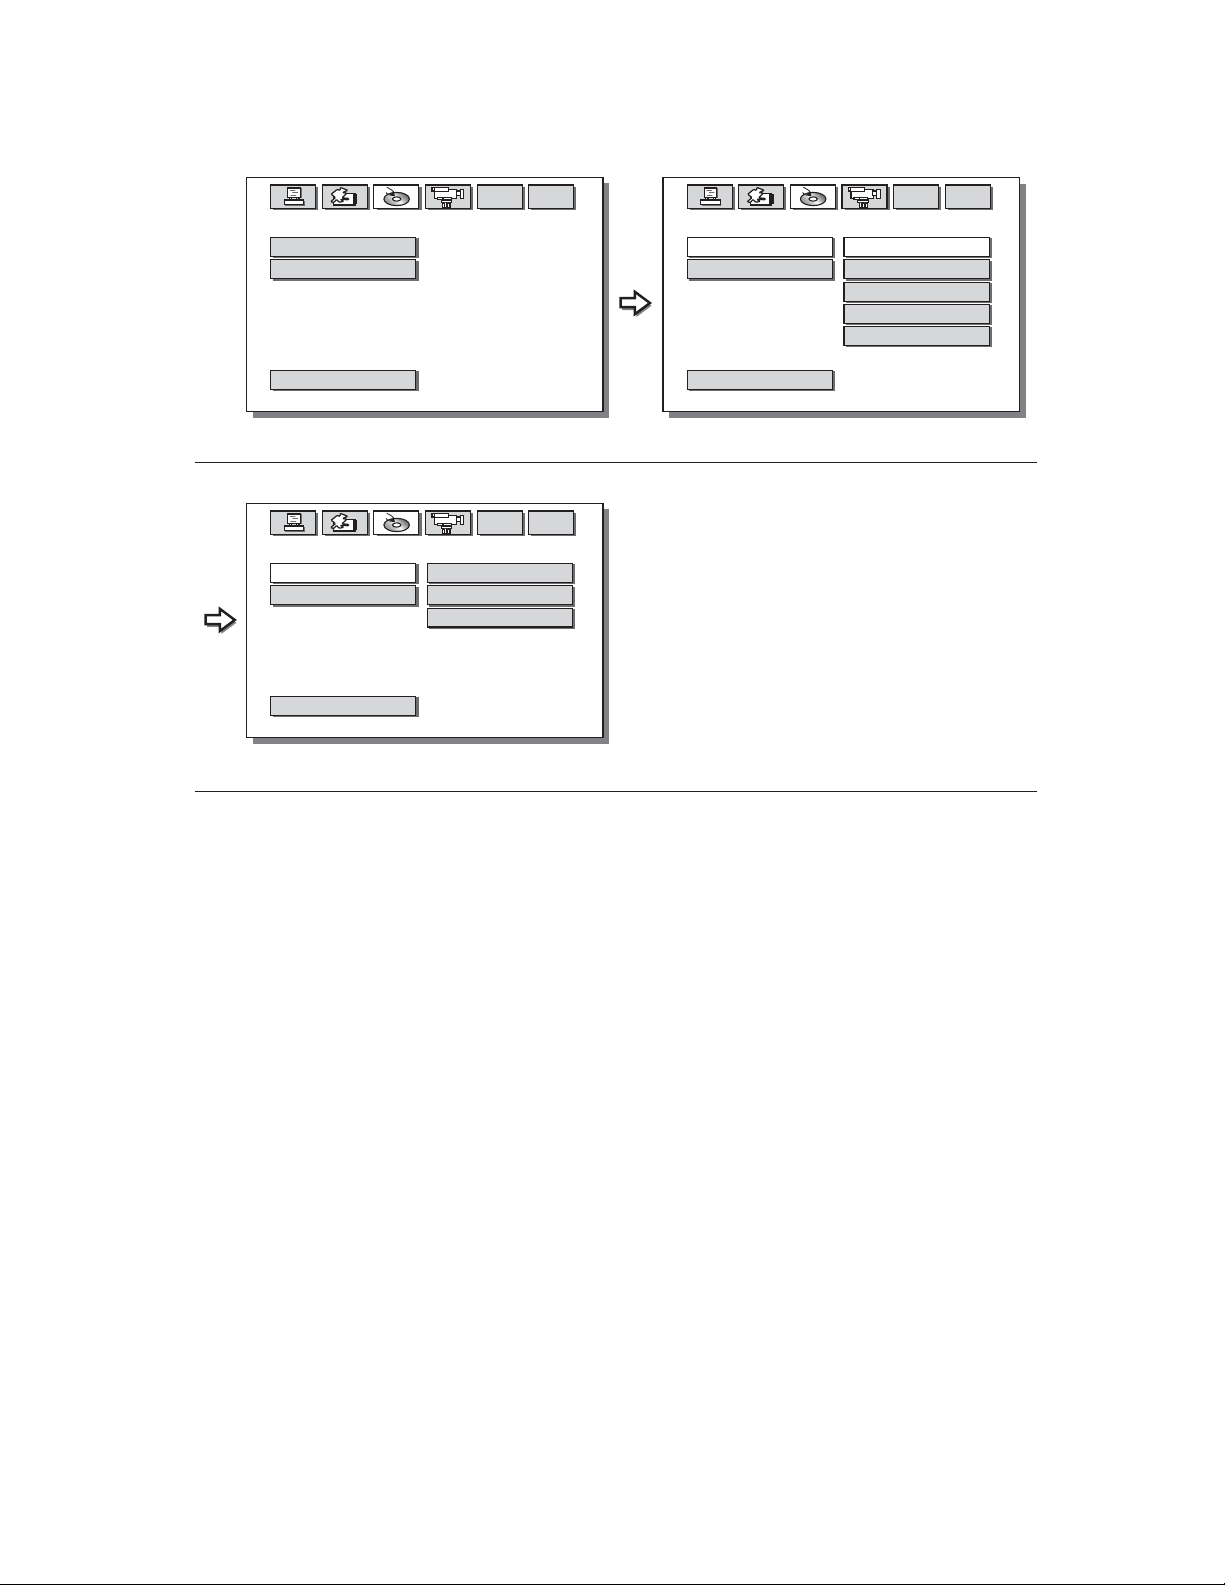
RATING
DEFAULT
EXIT SETUP
RESTORE
RATING SETUP DEFAULT SETUP
Page 21
© 2005 Directed Electronics, Inc. all rights reserved
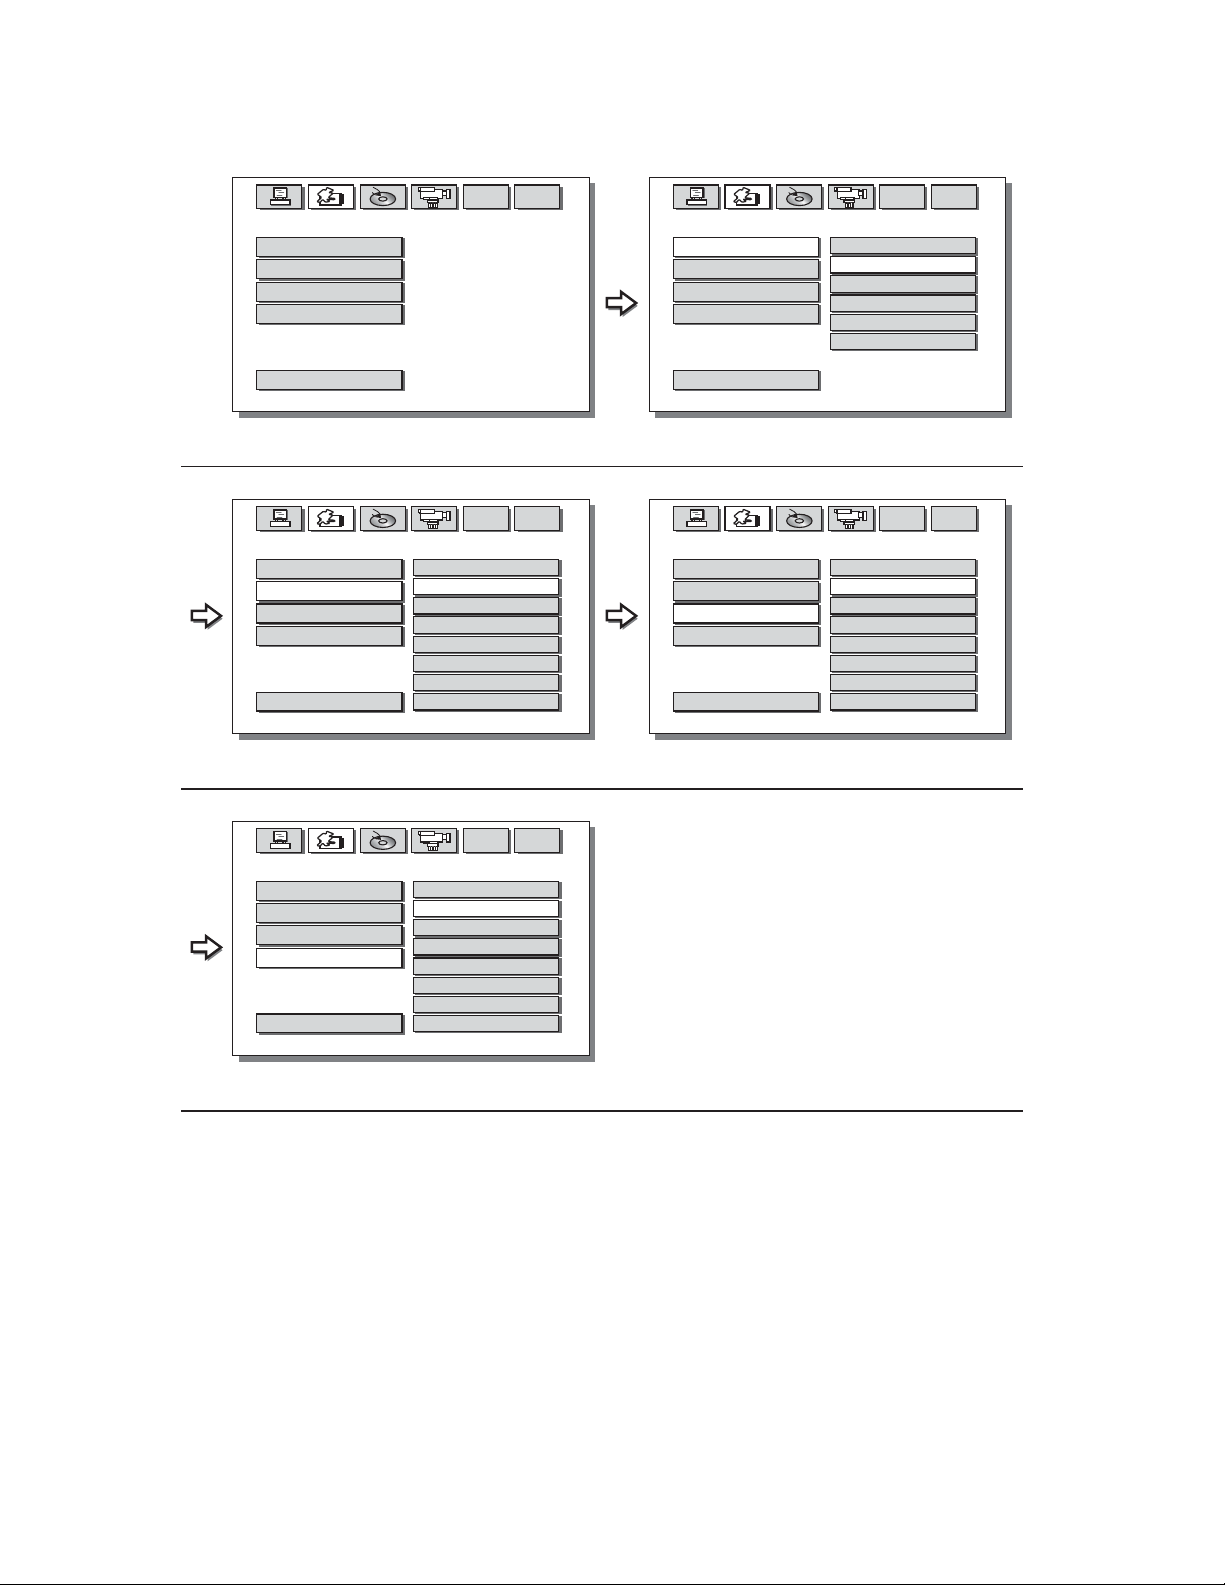
LLAANNGGUUAAGGEE SSEETTUUPP
22
LANGUAGE SETUP
OSD LANGUAGE
AUDIO LANG
SUBTITLE LANG
MENU LANG
EXIT SETUP
LANGUAGE SETUP
OSD LANGUAGE
AUDIO LANG
SUBTITLE LANG
MENU LANG
EXIT SETUP
AUDIO LANG SETUP SUBTITLE LANG SETUP
LANGUAGE SETUP
OSD LANGUAGE
AUDIO LANG
SUBTITLE LANG
MENU LANG
EXIT SETUP
ENGLISH
CHINESE
GERMAN
SPANISH
FRENCH
PORTUGUESE
LANGUAGE SETUP OSD LANG SETUP
CHINESE
ENGLISH
JAPAN
FRENCH
SPANISH
PORTUGUESE
LATIN
GERMAN
LANGUAGE SETUP
OSD LANGUAGE
AUDIO LANG
SUBTITLE LANG
MENU LANG
EXIT SETUP
CHINESE
ENGLISH
JAPAN
FRENCH
SPANISH
PORTUGUESE
GERMAN
OFF
LANGUAGE SETUP
OSD LANGUAGE
AUDIO LANG
SUBTITLE LANG
MENU LANG
EXIT SETUP
MENU LANG SETUP
CHINESE
ENGLISH
JAPAN
FRENCH
SPANISH
PORTUGUESE
GERMAN
LATIN
Page 22
© 2005 Directed Electronics, Inc. all rights reserved
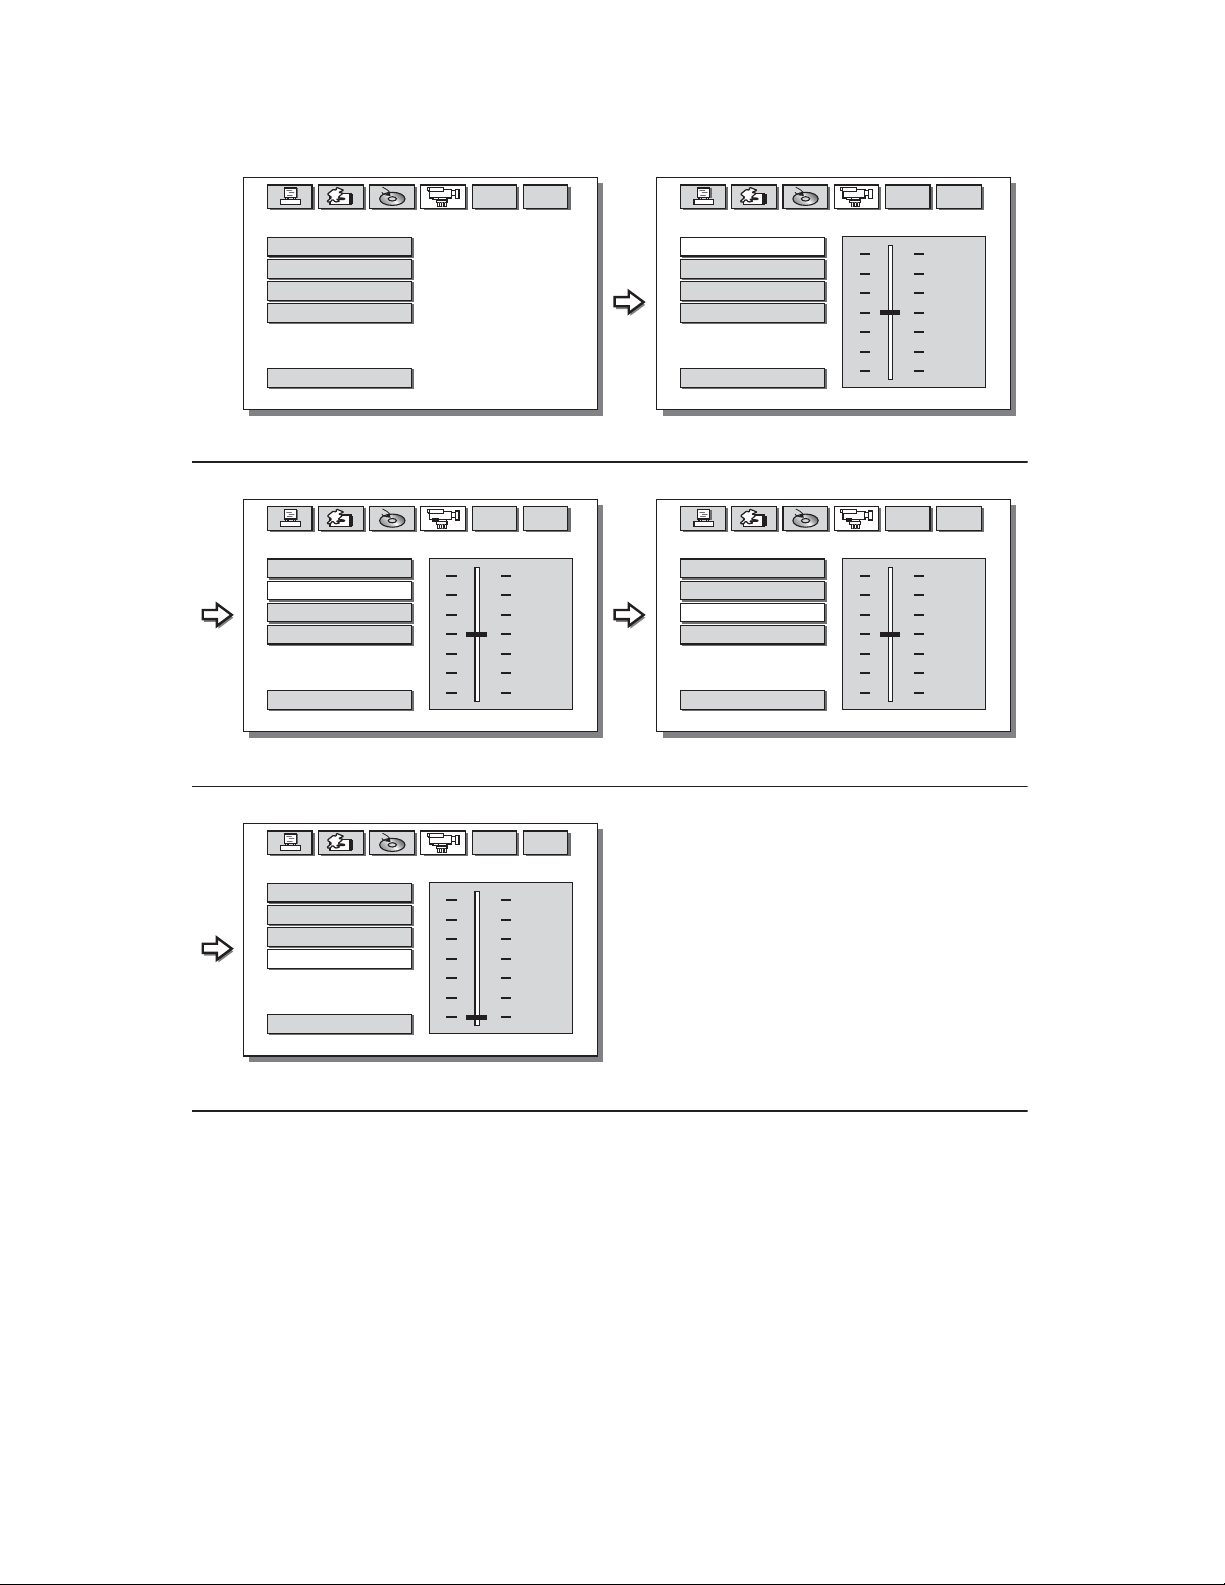
AAUUDDIIOO SSEETTUUPP
23
AUDIO SETUP
EQ
DUAL MONO
EXIT SETUP
AUDIO SETUP EQ AUDIO SETUP
AUDIO SETUP
EQ
DUAL MONO
EXIT SETUP
STEREO
MONO L
MONO R
DUAL MONO AUDIO SETUP
AUDIO SETUP
EQ
DUAL MONO
EXIT SETUP
STANDARD
CLASSIC
ROCK
JAZZ
POP
Page 23
© 2005 Directed Electronics, Inc. all rights reserved
VVIIDDEEOO SSEETTUUPP
24
VIDEO
BRIGHTNESS
CONTRAST
HUE
SATURATION
EXIT SETUP
VIDEO
BRIGHTNESS
CONTRAST
HUE
SATURATION
EXIT SETUP
VIDEO
BRIGHTNESS
CONTRAST
HUE
SATURATION
EXIT SETUP
12
10
8
6
4
2
0
VIDEO SETUP BRIGHTNESS SETUP
VIDEO
12
10
BRIGHTNESS
CONTRAST
8
6
4
2
0
HUE
SATURATION
EXIT SETUP
+6
+4
+2
0
-2
-4
-6
CONTRAST SETUP HUE SETUP
VIDEO
BRIGHTNESS
CONTRAST
HUE
SATURATION
EXIT SETUP
12
10
8
6
4
2
0
SATURATION SETUP
Page 24

© 2005 Directed Electronics, Inc. all rights reserved
TTeecchhnniiccaall SSppeecciiffiiccaattiioonnss
Type Roof Mount Color Display Monitor
Display System 15.2 inch Active Matrix Color TFT LCD NTSC/PAL Selectable
Display Pixels 1,024,000 pixels
Aspect Ratio 16 : 9
Resolution 3,072,000 = 1280(W) x 800(H) x 3 RGB
Active Area 13 (W) x 8.2 (H) inches
(332.2 (W) x 207.6 (H) mm)
Back Light 10,000 hours normal operation
Mechanism Manual Open/Close
Display Angle Horizontal: Up/Down < 100°
Source Composite video input x 2
Composite video output x 1
Audio L/R input x 2
Audio L/R output x 1
Wireless Audio Infrared audio transmitter (Support IR receiver
Stereo head phone, L-channel: 2.3MHz /R-channel: 2.8MHz)
Effective listening angle: 30°
Effective range: 4 meter
Dome Light 3W x 2 with door sensor connection
Operating Voltage DC 11~16V
Operating Current 2.9A, Typical
Operating Temperature 0°C to 55°C
NNOOTTEE::
All specifications are subjected to change without prior notification.
25
Page 25

© 2005 Directed Electronics, Inc. all rights reserved
SSppeecciiffiiccaattiioonnss
GGEENNEERRAALL
Power Supply 13.2V DC Typical
Current Consumption 2.9 A Typical
Remote control Infrared remote
Mounting Roof mounting
Dimension (WxDxH) W 18.1” x D 14” x H 2”
(W 460 mm x D 355 mm x H 50 mm)
AAUUDDIIOO
Audio Characteristic 2-Channel Analog
Analog Output 1.8V/ 10 kohm load (1kHz)
Analog input 1.8V/ 600 ohm load (1kHz)
Frequency Response 20Hz-20kHz
S/N Ratio >=70dB
Dynamic Range >=60dB
Distortion <=0.4%
VVIIDDEEOO
DVD Video
Video decompression MPEG-2(ISO/IEC-13818), MPEG-1
Disc format DVD, CD, MP3, CD-R, C-RW, SVCD
Video Output 1.0Vpp/75 ohm
Video Input 1.0Vpp/75 ohm
CCOONNNNEECCTTOORRSS
Video output Composite Video Output x1
Audio output Analog output (L/R) x1
Video input Composite Video input x 2
Audio input Analog input (L/R) x 2
Power connector Power supply input
NNOOTTEE::
All specifications are subjected to change without prior notification.
26
Page 26
1155”” ((1166::99))
OOvveerrhheeaadd VViiddeeoo
MMoonniittoorr//DDVVDD PPllaayyeerr
MMOODDEELL OOHHDD11550000
NNOOTTEE::
This section contains a description of the earlier version
of this model.
OO WW NN EE RR ’’ SS GG UU II DD EE
IINNSSTTAALLLLAATTIIOONN GGUUIIDDEE
© 2005 Directed Electronics, Inc. N82150 07-05
OOHHDD11550000 PPrreevviioouuss MMooddeell
Page 27
© 2005 Directed Electronics, Inc. all rights reserved
28
IInnssttaallllaattiioonn GGuuiiddee
PPRREECCAAUUTTIIOONNSS
1. This unit should be installed by an authorized Directed dealer.
2. This product is designed to operate with a 12V DC, negative ground battery system.
3. Disconnect the ground wire from the battery terminal prior to connecting the unit to the electrical system.
4. The wiring from some other products or accessories might bear similar color code as this product;
however, they might be of other function. Please refer to the electrical connection diagrams of
this product prior to installing to avoid improper connection.
5. Use proper connectors and insulation to prevent electrical damage to the unit.
6. Do not connect the yellow wire and red wire together of this product directly to the +12V. Connect
the red wire of this product to the ACC of the ignition key switch and yellow wire to +12V. Failure
to do so may result in permanent drainage of the battery charge.
7. Only supplied accessories should be used to avoid damage to the unit during installation.
8. Ensure that the display monitor is suitably installed at a location, such that it will not obstruct
the rear view mirror and/or the air condition vents.
9. Do not install this unit at a declining angle exceeding 30 degrees.
10. Do not install screws over the plane surface, which may affect monitor eject or retract function.
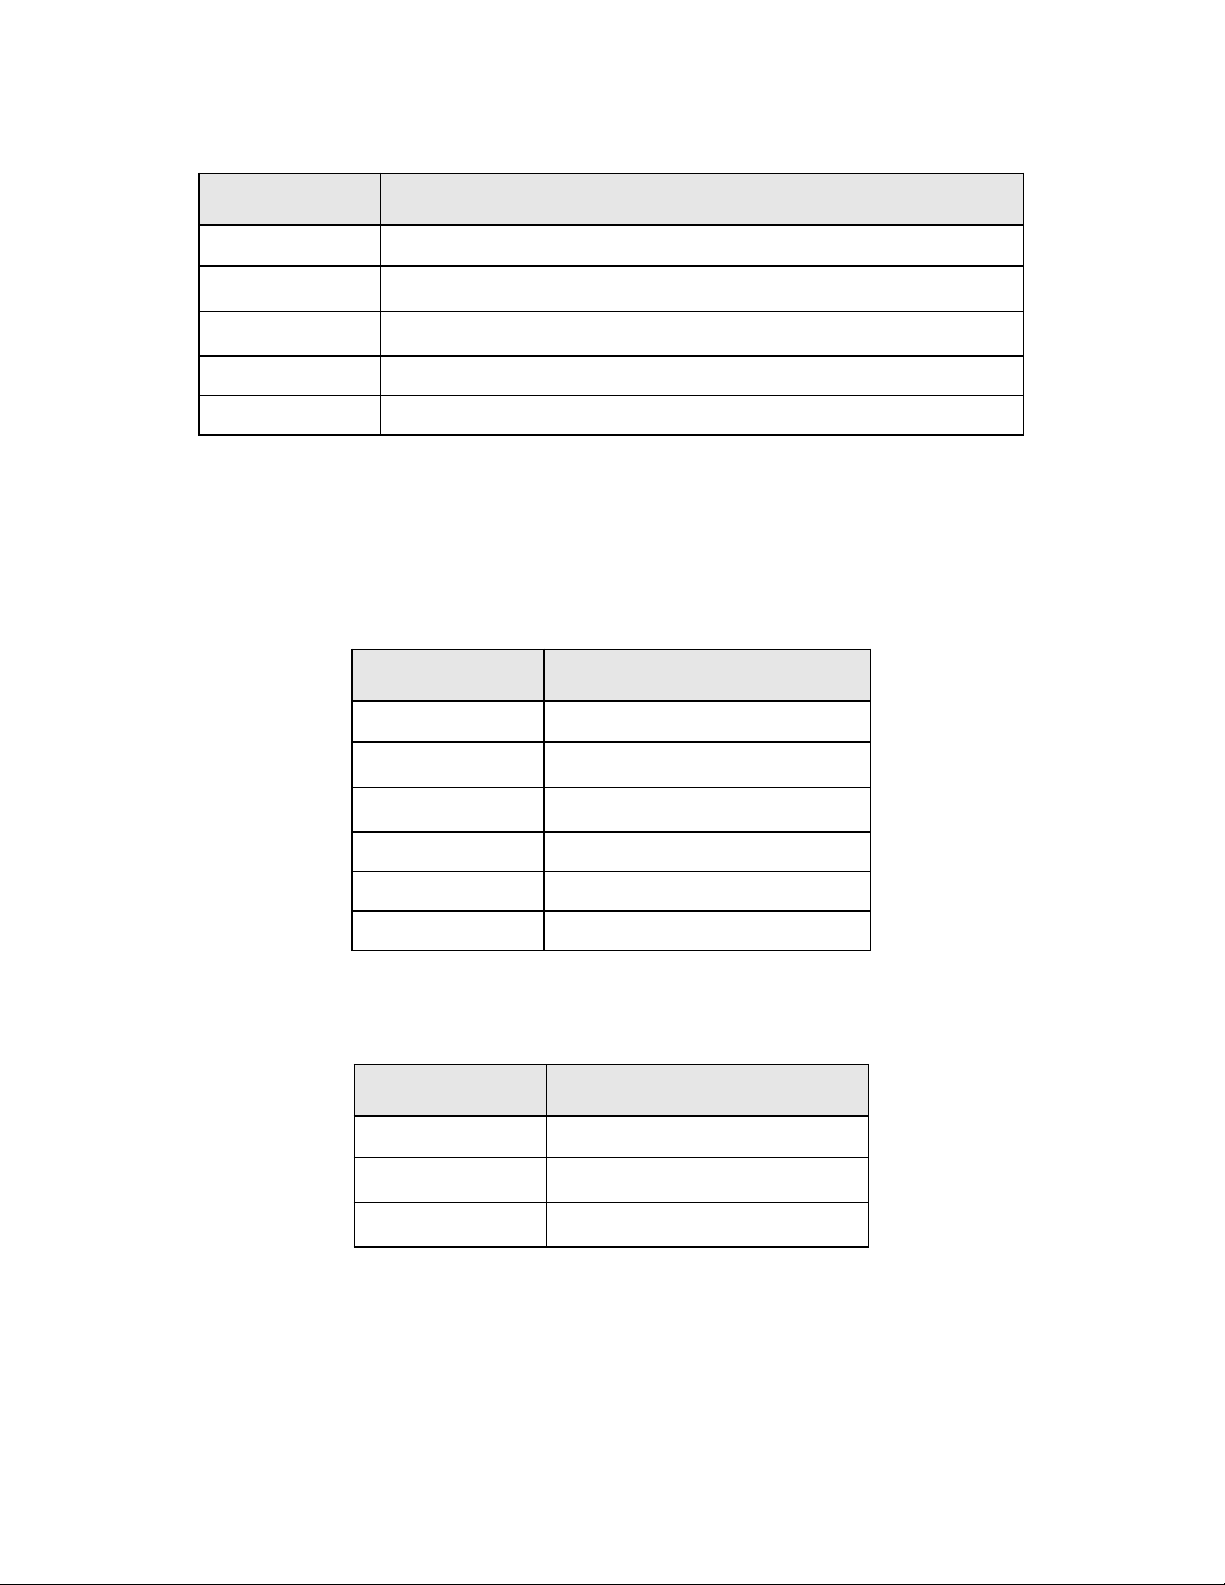
EELLEECCTTRRIICCAALL CCOONNNNEECCTTIIOONNSS
PPoowweerr CCaabbllee ((44--ppiinn,, oonnee ppiinn nnoott uusseedd))
CCoolloorr CCooddee FFuunnccttiioonn
Black This wire is the ground source for the monitor and DVD.
Red
Accessory +12V switched power source for the monitor and DVD. This
wire supplies the main power to the system.
Yellow
Constant +12V power. This wire supplies power to the DVD for last
position memory.
Page 28
© 2005 Directed Electronics, Inc. all rights reserved
29
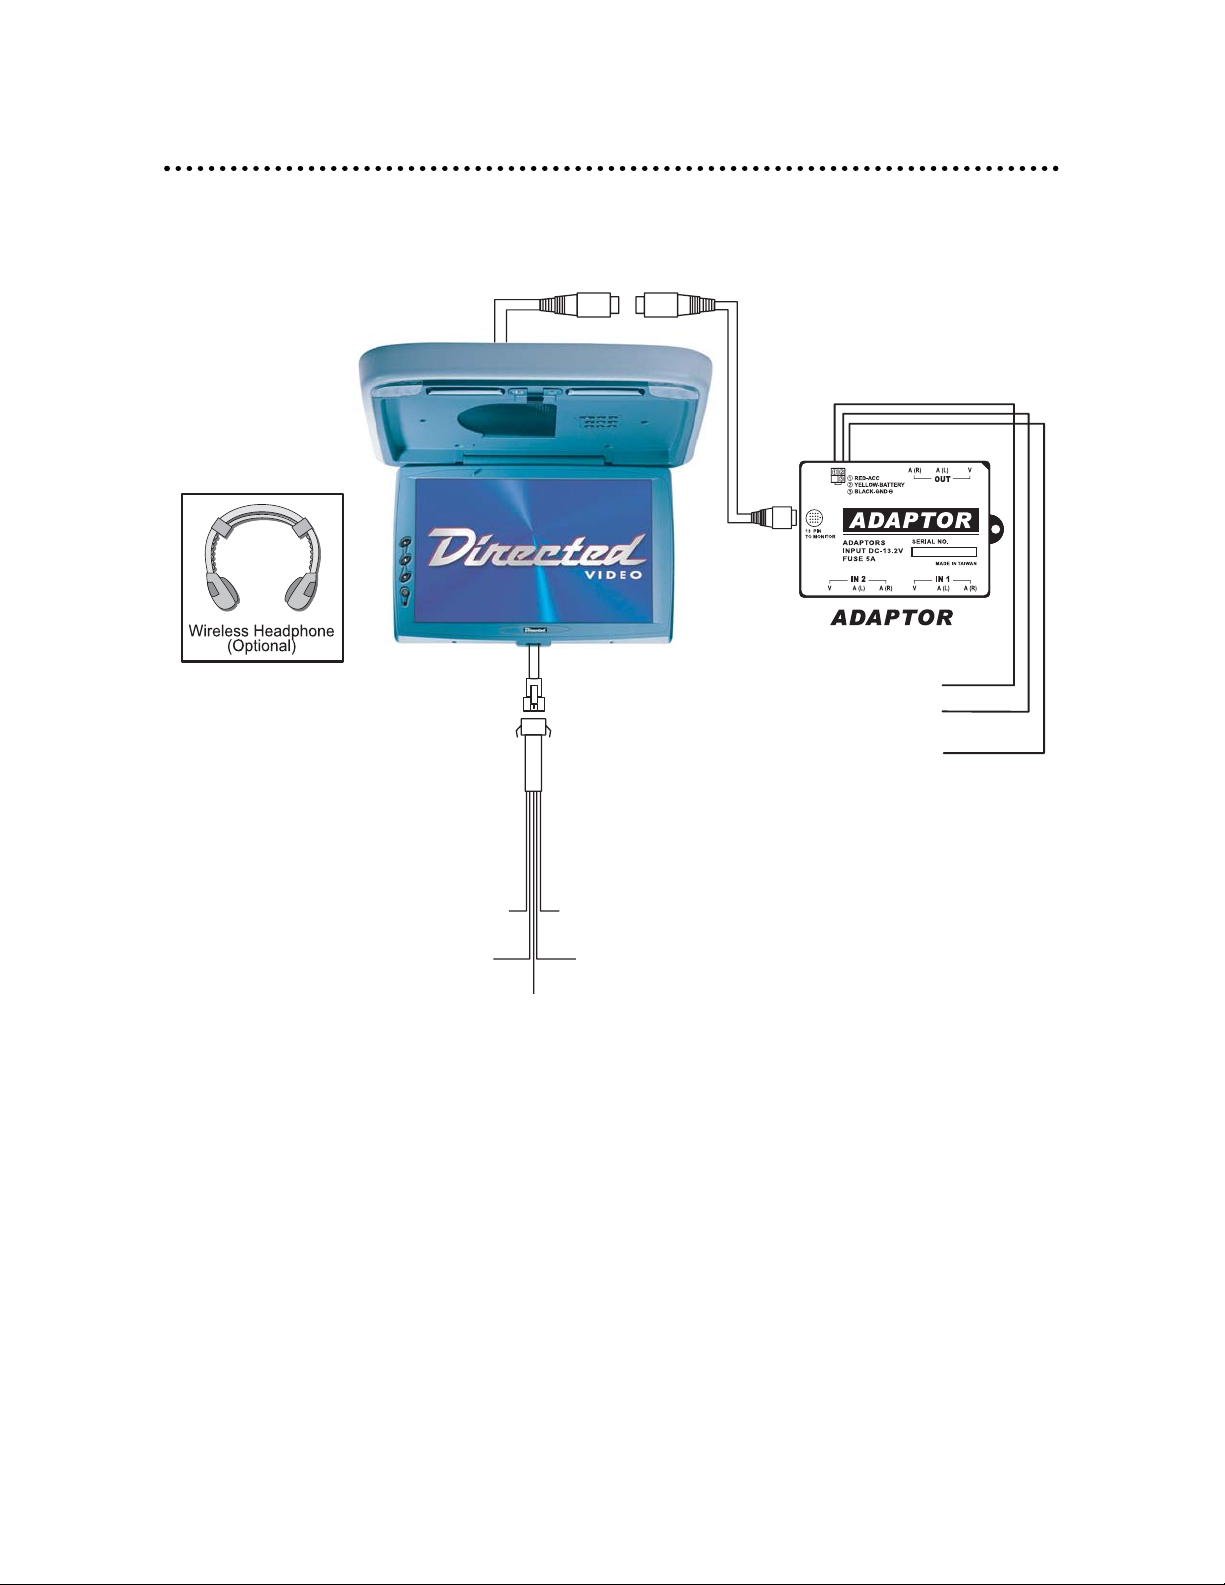
DDoommee LLiigghhtt CCaabbllee ((55--ppiinn))
The Red and Yellow wires should be connected together and then run to the domelight circuit.
SSIIGGNNAALL CCOONNNNEECCTTIIOONN
AAddaapptteerr AAuuddiioo
AAddaapptteerr VViiddeeoo
CCoolloorr CCooddee FFuunnccttiioonn
Yellow 1 (RCA) Video - In (V-IN 1)
Yellow 2 (RCA) Video - In (V-IN 2)
Yellow 3 (RCA) Video - Out (V-OUT 1)
CCoolloorr CCooddee FFuunnccttiioonn
Red 1 (RCA) Audio - Right (Input)
White 1 (RCA) Audio - Left (Input)
Red 2 (RCA) Audio - Right (Input)
White 2 (RCA) Audio - Left (Input)
Red 3 (RCA) Audio - Right (Output)
White 3 (RCA) Audio - Left (Output)
CCoolloorr CCooddee FFuunnccttiioonn
Black This wire supplies the ground to the domelight circuit.
Red This wire supplies +12V switched power to the domelight circuit.
Yellow This wire supplies +12V constant power to the domelight circuit.
Purple This wire connects to the (+) door trigger.
Grey This wire connects to the (-) door trigger.
Page 29
© 2005 Directed Electronics, Inc. all rights reserved
30
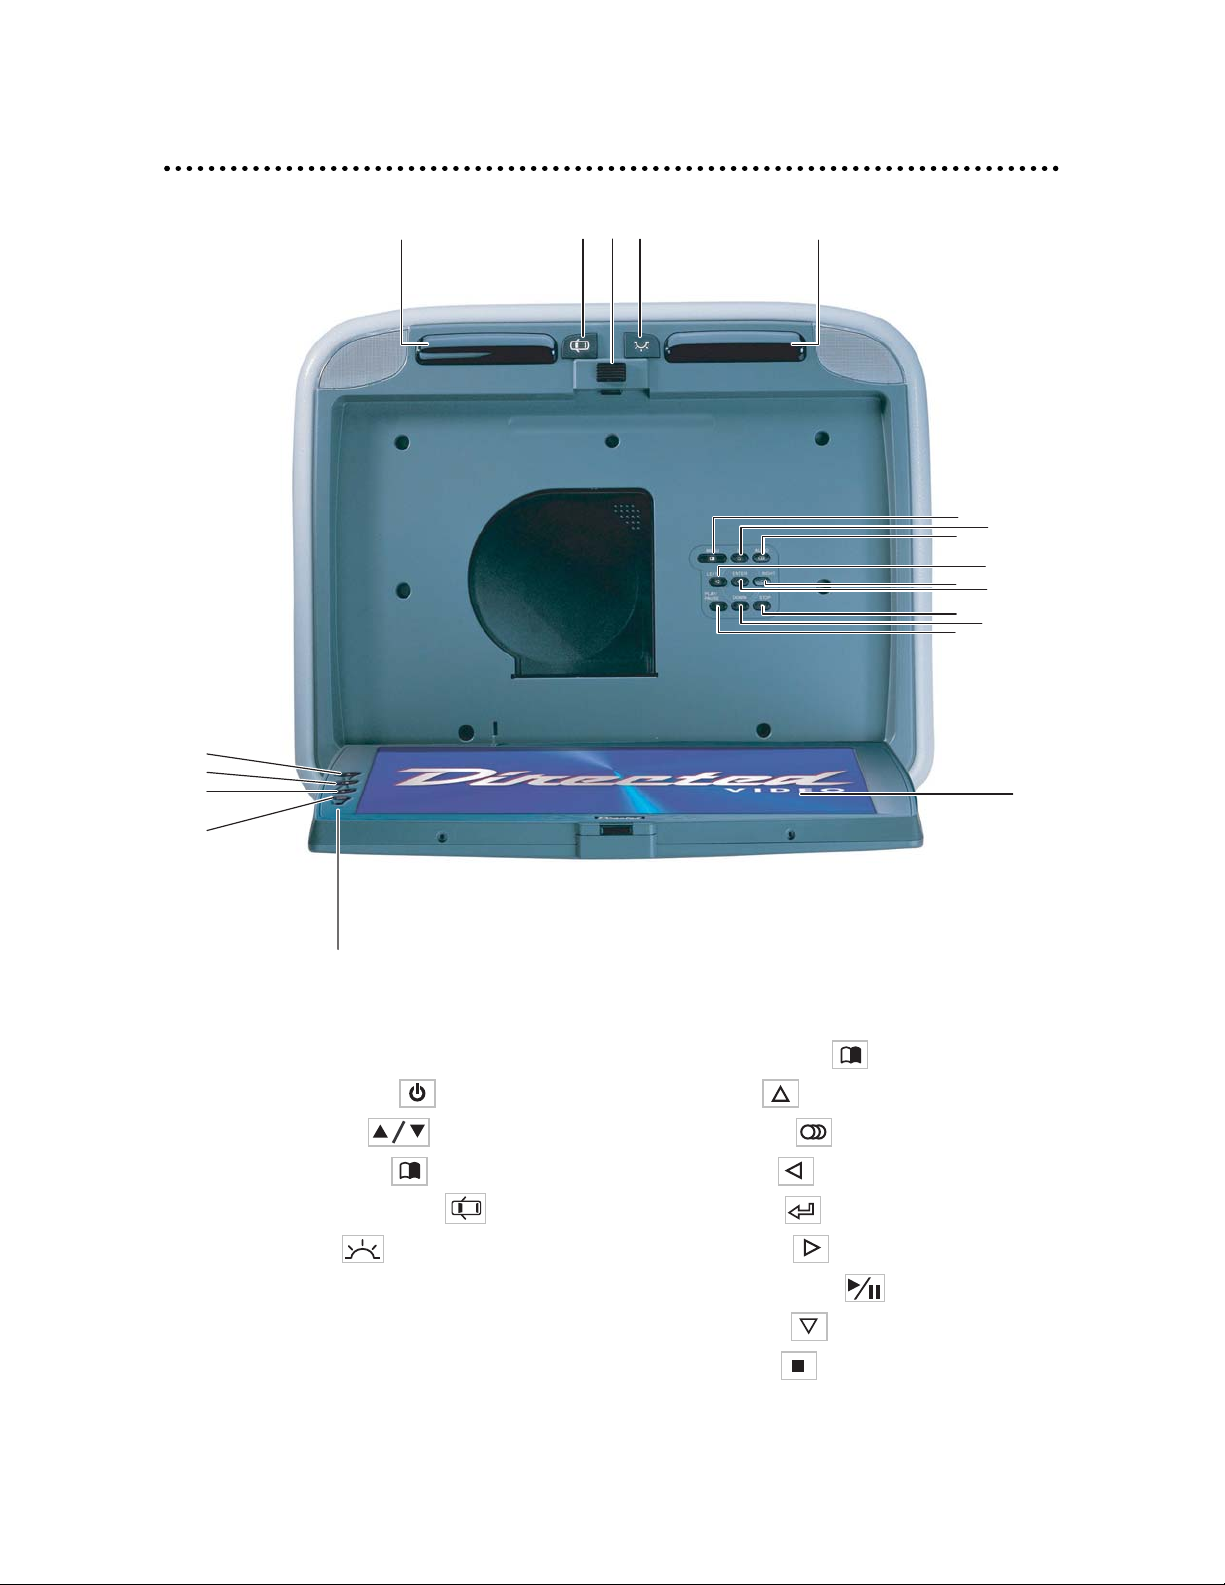
TTyyppiiccaall WWiirriinngg DDiiaaggrraamm
RED 12V Ignition
YELLOW 12V Constant
RED 12V Ignition
YELLOW 12V Constant
GRAY (-) Door Trigger
BLACK Ground
BLACK Ground
PURPLE (+) Door Trigger
Page 30
© 2005 Directed Electronics, Inc. all rights reserved
31
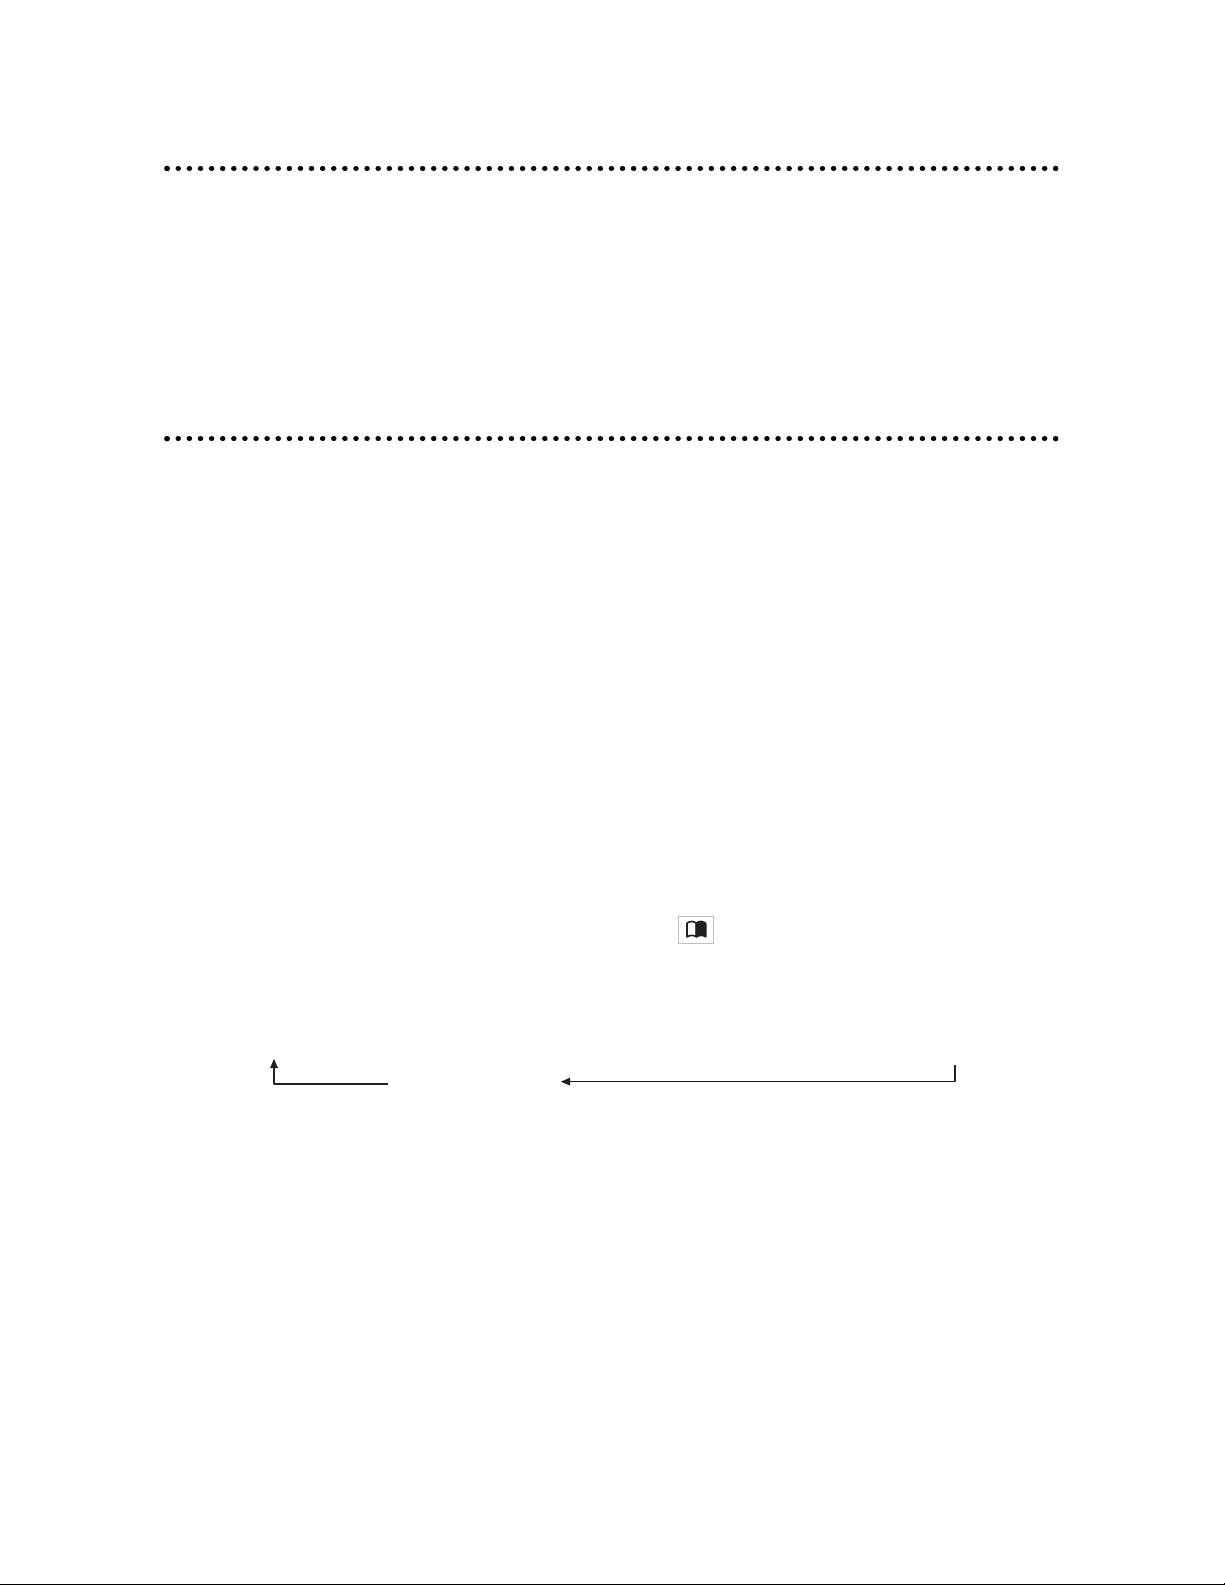
FFuunnccttiioonn KKeeyyss
DDiissppllaayy aanndd UUnniitt DDVVDD FFuunnccttiioonn KKeeyyss
1. LCD Display 10. DVD MENU button
2. Power ON/OFF button 11. UP button
3. UP/DOWN button 12. AUDIO button
4. VIDEO MENU button 13. LEFT button
5. Door Light ON/OFF button 14. Enter button
6. Courtesy Light 15. RIGHT button
7. IR Sensor 16. PLAY/PAUSE button
8. OPEN/Close latch 17. DOWN button
9. IR transmitter 18. STOP button
758
3
4
3
86
10
11
12
13
15
14
18
17
16
1
2
9
Page 31
© 2005 Directed Electronics, Inc. all rights reserved
32
OOppeerraattiinngg tthhee MMoonniittoorr
OOPPEENN//CCLLOOSSEE TTHHEE DDIISSPPLLAAYY MMOONNIITTOORR
To open the display monitor, push the "OPEN" latch and pull the monitor down to the desired position.
To close the display monitor, push the monitor up until it latches closed with an audible click.
PPoowweerr UUpp//DDoowwnn tthhee DDiissppllaayy MMoonniittoorr
The unit will power up when the display monitor is unlatched and pulled down. (If the unit does
not power up, press the Power button on either the remote or on the left side of the LCD screen.
To turn the power Off to the unit, press the POWER button on the remote three times. Also the power
will shut Off when the display monitor is placed in the closed and latched position.
If the icon displays in the upper left-hand corner of the screen when using the remote, it indicates
that the command issued is not allowed during the mode that the monitor display is presently in,
or is not available on this system.
SSIIGGNNAALL SSOOUURRCCEE ((MMOODDEE))
Press remote (MODE) button to select the input signal AV1, AV2 or DVD.
FFUUNNCCTTIIOONN MMOODDEE ((MMEENNUU))
Press remote "VIDEO MENU" button or monitor "MENU" button to activate the screen set up
sequence as follows:
COLOR: Color adjustment BRIGHTNESS: Brightness adjustment
CONTRAST: Contrast adjustment TINT: Adjustment to color saturation
RESET: Resets COLOR, CONTRAST, BRIGHTNESS, and TINT to factory settings.
Once the desired setting is selected, press the cursor key to the desired setting. If a key is not acti-
vated within 5 seconds, this function mode will turn OFF. Once the correct function is selected, press
the cursor key (or the desired setting). If no key is depressed, this function mode will turn OFF in
about 5 seconds.
COLOR → CONTRAST → BRIGHTNESS → TINT
RESET
Page 32
© 2005 Directed Electronics, Inc. all rights reserved
33
DDOOOORR LLIIGGHHTT OONN//OOFFFF
Engage this switch to activate the dome light(s) when a door is open.
Note: This function can be operational only when the Gray wire of the dome light
circuit is connected to the door switch.
CCOOUURRTTEESSYY LLIIGGHHTT OONN//OOFFFF
Activate this switch to “ON/OFF” to illuminate the dome light(s).
BBaassiicc FFuunnccttiioonnss
DDVVDD PPLLAAYYBBAACCKK
1. Select video source (DVD).
2. Load a disc into the unit.
3. DVD playback commences.
NNoottee::
The disc will start to play if there are no titles recorded on the disc. If one
or more titles are recorded on the disc, a menu screen will appear on the
LCD screen.
4. Press / / / to select the preferred title.
5. Press the "ENTER" button, the selected item will now start playing.
6. Return to the menu screen.
7. Press the DVD "MENU" button, the menu screen will appear.
8. After operation, press the "POWER" button to put the unit into standby mode.
Note: If the “WRONG REGION” message appears, it means that the corresponding
operation is prohibited either by the player or by the disc.
AAUUDDIIOO CCDD PPLLAAYYBBAACCKK
1. Press the remote control’s "
PPOOWWEERR
" button or the LCDs "
PPOOWWEERR
" button to switch-on
the unit’s power.
2. Insert a disc into the unit.
3. Press "
PPLLAAYY//PPAAUUSSEE
" button to start the playback of the disc.
Page 33

© 2005 Directed Electronics, Inc. all rights reserved
34
FFAASSTT FFOORRWWAARRDD OORR RREEVVEERRSSEE ((DDVVDD//MMPP33//CCDD))
1. Press the "
FFFF
" button during playback. Each time this button is pressed, the unit will go into
a rapid advance playback mode. This will be shown on the LCD, depending on the speed of the
playback selected.
■
CD playback
FF 1X FF 2X FF 3X FF 4X PLAY
Press "
PPLLAAYY
" button, the speed will go back to standard.
■
MP3/DVD playback
FF 2X FF 4X FF 6X FF 8X PLAY
Press "
PPLLAAYY
" button, the speed will go back to standard.
2. Press the “
FFRR
” button during playback. Each time this button is pressed, the unit will go into
a rapid reverse playback mode. This will be shown on the LCD, depending on the speed of the
playback selected.
■
CD playback
FR 1X FR 2X FR 3X FR 4X PLAY
Press "
PPLLAAYY
" button, the speed will go back to standard.
■
DVD playback
FR 2X FR 4X FR 6X FR 8X PLAY
Press “
PPLLAAYY
” button, the speed will go back to standard.
NNEEXXTT TTRRAACCKK OORR PPRREEVVIIOOUUSS TTRRAACCKK ((DDVVDD//MMPP33//CCDD))
1. Press the "
NNEEXXTT
" button during playback.
■
MP3/Audio CD
The player will skip forward to the next track each time the button is pressed. "NEXT" will be
displayed on the LCD screen.
■
DVD
The player will skip forward to the next title/chapter each time the button is pressed.
"TITLE aa/bb CHAPTER cc/ddd" will be displayed on the LCD screen.
WHERE aa:Current TITLE
bb:Total TITLE
cc:Current CHAPTER
ddd:Total CHAPTER
2. Press the "
PPRREEVV
" button during playback.
■
MP3/Audio CD
The player will skip to the beginning of the previous track each time the button is pressed.
"
PPRREEVVIIOOUUSS
" will be displayed on the LCD screen.
■
DVD
The player will skip to the beginning of the previous chapter each time the button is pressed.
Page 34
© 2005 Directed Electronics, Inc. all rights reserved
35
PPLLAAYY//PPAAUUSSEE ((DDVVDD//MMPP33//CCDD))
1. Press the "
PPLLAAYY//PPAAUUSSEE
" button, during playback. "PAUSE" will display on the LCD. The play-
er is placed in the pause mode.
2. Press the "
PPLLAAYY//PPAAUUSSEE
" button again. "PLAY" will momentarily display on the LCD. The
player returns to normal playback.
SSTTOOPP ((DDVVDD//MMPP33//CCDD))
1. During Audio CD playback, when "
SSTTOOPP
" button is pressed, the CD playback will stop.
2. During DVD playback, when the "
SSTTOOPP
" button is pressed,the DVD playback will stop. “PRESS
PLAY TO CONTINUE” will display on the LCD. Press the "
PPLLAAYY//PPAAUUSSEE
" button to continue play-
back from the point where the "
SSTTOOPP
" button was pressed.
3. During DVD playback, if the "
SSTTOOPP
" button is pressed twice. "STOP" will display on the LCD.
Press the "
PPLLAAYY//PPAAUUSSEE
" button to resume playback from the first chapter of the DVD.
NNOOTTEE::
The resume playback function is not available for audio CDs.
""GGOO TTOO"" FFUUNNCCTTIIOONN ((DDVVDD//MMPP33//CCDD))
The “
GGOO TTOO
” function enables you to go to a specific location by entering the time/track/chapter or title.
■
MP3/Audio CD
When the "
GGOO TTOO
" button is pressed the following will be displayed:
Use the numeric keys to enter the desired disc time and pressing the “
EENNTTEERR””
button will cause
the player to start playing at the selected time.
■
DVD
When the "
GGOO TTOO
" button is pressed once the following is displayed:
(1)
If the "GO TO" button is pressed twice the following is displayed:
(2)
Use the numeric keys to enter the desired title or chapter or chapter time and pressing the "ENTER"
button will cause the player to start playing at the selected title, chapter or chapter time.
TITLE xx/xx xx:xx:xx
TITLE xx/xx CHAPTER xxx/xxx
GOTO _ _:_ _
Page 35

© 2005 Directed Electronics, Inc. all rights reserved
36
AADDVVAANNCCEEDD PPLLAAYYBBAACCKK ((DDVVDD//MMPP33//CCDD))
RREEPPEEAATT MMOODDEE
■
MP3/Audio CD
When the “
RREEPPEEAATT
” button is pressed:
REP ONE = The current track will be repeated.
FOLDER REP = The current folder will be repeated.
FOLDER = All the folders will be repeated.
■
DVD
When the “
RREEPPEEAATT
” button is pressed:
CHAPTER REPEAT = The current chapter will be repeated.
TITLE REPEAT = After the DVD plays, the current title menu will be displayed.
REPEAT OFF = The repeat mode will be switched off.
CCAAMMEERRAA AANNGGLLEE ((DDVVDD))
Some DVD discs may contain scenes, which have more than one viewing angle. For these discs, the
same scene can be viewed from a different angle by using the "
AANNGGLLEE
" button.
1. During DVD playback, press the "
AANNGGLLEE
" button. “x/y” will appear. “x” represents the current
camera angle, and “y” represents the total number available camera angles.
2. Press the "ANGLE" button until the preferred angle is selected. The ANGLE selection will
cycle through all available camera angles.
NNOOTTEE::
This function will only work on discs where multiple camera angles have
been recorded.
AAUUDDIIOO FFUUNNCCTTIIOONN ((DDVVDD))
The audio function works only for discs that have multiple audio soundtracks.
During DVD playback, press the AUDIO button. "AUDIO x/y" will appear, x represents the current
audio stream and y represents the total available audio streams.
Press the "AUDIO" button until the preferred audio stream is selected.The "AUDIO" selection will
cycle through all available audio streams.
Page 36

© 2005 Directed Electronics, Inc. all rights reserved
37
SSUUBBTTIITTLLEE ((DDVVDD))
During DVD playback, you may change the subtitle language from the one selected at the initial set-
ting to a different language, if available.
(1) Press the "SUBTITLE ON/OFF" button.
(2) During DVD playback and SUBTITLE ON, press the "SUBTITLE" button. "SUBTITLE x/y" will appear,
x represents the current subtitle and y represents the total available subtitle.Press the "SUBTITLE"
button until the preferred subtitle is selected. The "SUBTITLE" selection will cycle through all avail-
able subtitles.
Page 37
Directed Electronics, Inc.
Vista, CA 92081
www.directed.com
© 2005 Directed Electronics, Inc.—All rights reserved
N82150 07-05
TThhee ccoommppaannyy bbeehhiinndd tthhiiss ssyysstteemm iiss DDiirreecctteedd EElleeccttrroonniiccss,, IInncc..
Since its inception, Directed has had one purpose, to provide consumers with the finest vehicle security, car stereo
products, rear seat entertainment, and accessories available. The recipient of more than 20 patents in the field of
advanced electronic technology, Directed is ISO 9001 registered.
Quality Directed Electronics products are sold and serviced throughout North America and around the world.
Call
((880000)) 227744--00220000
for more information about our products and services.
Directed®is committed to delivering world-class quality products
and services that excite and delight our customers.
 Loading...