

Page 1

Model 718W
Owner's Guide
Page 2

Page 3

i
©
1999 Directed Electronics, Inc.
Limited One-Year
Consumer Warranty
Directed Electronics, Inc. (“DEI®”) promises to the original purchaser to repair or replace with
a comparable reconditioned model any DEI
®
unit (hereafter the “unit”), which proves to be
defective in workmanship or material under reasonable use during the first year, excluding
accessories, following the date of purchase of the unit provided the following conditions are
met: the unit was professionally installed and serviced by a professional installer; the unit will
be professionally reinstalled in the vehicle in which it was originally installed by a professional installer; and the unit is returned to DEI, shipping prepaid with a clear, legible copy of the
bill of sale or other dated proof of purchase bearing the following information: consumer’s
name, telephone number and address; the dealer’s name, telephone number and address; complete DEI product description, including accessories; the year, make and model of the vehicle;
vehicle license number and vehicle identification number. This warranty is non-transferable and
is automatically void if: the original purchaser has not completed the warranty card and mailed
it within ten (10) days of the date of purchase to the address listed on the card; the unit’s
date code or serial number is defaced, missing or altered; the unit has been modified or used
in a manner contrary to its intended purpose; or the unit has been damaged by accident,
unreasonable use, neglect, improper service, installation or other causes not arising out of
defects in materials or construction. TO THE MAXIMUM EXTENT ALLOWED BY LAW, ALL WAR-
RANTIES, INCLUDING BUT NOT LIMITED TO EXPRESS WARRANTY, IMPLIED WARRANTY, WARRANTY OF MERCHANTABILITY, FITNESS FOR PARTICULAR PURPOSE AND WARRANTY OF NONINFRINGEMENT OF INTELLECTUAL PROPERTY, ARE EXPRESSLY EXCLUDED; AND DEI NEITHER
ASSUMES NOR AUTHORIZES ANY PERSON OR ENTITY TO ASSUME FOR IT ANY DUTY, OBLIGATION OR LIABILITY IN CONNECTION WITH ITS PRODUCTS. DEI DISCLAIMS AND HAS
ABSOLUTELY NO LIABILITY FOR ANY AND ALL ACTS OF THIRD PARTIES INCLUDING DEALERS OR INSTALLERS. DEI SECURITY SYSTEMS, INCLUDING THIS UNIT, ARE DETERRENTS
AGAINST POSSIBLE THEFT. DEI IS NOT OFFERING A GUARANTEE OR INSURANCE AGAINST
VANDALISM, DAMAGE OR THEFT OF THE AUTOMOBILE, ITS PARTS OR CONTENTS; AND HEREBY EXPRESSLY DISCLAIMS ANY LIABILITY WHATSOEVER, INCLUDING WITHOUT LIMITATION,
LIABILITY FOR THEFT, DAMAGE AND/OR VANDALISM. THIS WARRANTY DOES NOT COVER
LABOR COSTS FOR MAINTENANCE, REMOVAL OR REINSTALLATION OF THE UNIT OR ANY CONSEQUENTIAL DAMAGES OF ANY KIND. IN THE EVENT OF A CLAIM OR A DISPUTE INVOLVING
DEI OR ITS SUBSIDIARY, THE PROPER VENUE SHALL BE SAN DIEGO COUNTY IN THE STATE
OF CALIFORNIA. CALIFORNIA STATE LAWS AND APPLICABLE FEDERAL LAWS SHALL APPLY
AND GOVERN THE DISPUTE. THE MAXIMUM RECOVERY UNDER ANY CLAIM AGAINST DEI
SHALL BE STRICTLY LIMITED TO THE AUTHORIZED DEI DEALER’S PURCHASE PRICE OF THE
UNIT. DEI SHALL NOT BE RESPONSIBLE FOR ANY DAMAGES WHATSOEVER, INCLUDING BUT
NOT LIMITED TO, ANY CONSEQUENTIAL DAMAGES, INCIDENTAL DAMAGES, DAMAGES FOR
THE LOSS OF TIME, LOSS OF EARNINGS, COMMERCIAL LOSS, LOSS OF ECONOMIC OPPORTU-
Page 4

ii
©
1999 Directed Electronics, Inc.
NITY AND THE LIKE. NOTWITHSTANDING THE ABOVE, THE MANUFACTURER DOES OFFER A
LIMITED WARRANTY TO REPLACE OR REPAIR THE CONTROL MODULE AS DESCRIBED ABOVE.
Some states do not allow limitations on how long an implied warranty will last or the exclusion or limitation of incidental or consequential damages. This warranty gives you specific legal
rights and you may also have other rights that vary from State to State. DEI does not and has
not authorized any person or entity to create for it any other obligation, promise, duty or obligation in connection with this security system. This product is not covered by the Guaranteed
Protection Plan (GPP).
Make sure you have all of the following information from your dealer:
A clear copy of the sales receipt, showing the following:
■ Date of purchase
■ Your full name and address
■ Authorized dealer's company name and address
■ Type of alarm installed
■ Year, make, model and color of the automobile
■ Automobile license number
■ Vehicle identification number
■ All security options installed on automobile
■ Installation receipts
Page 5

1
©
1999 Directed Electronics, Inc.
Table of Contents
Limited One-Year Consumer Warranty. . . . . . . . . . . . . . . . . . . . . . . . . . . . . . i
What Is Included . . . . . . . . . . . . . . . . . . . . . . . . . . . . . . . . . . . . . . . . . . . . . 3
Important Information. . . . . . . . . . . . . . . . . . . . . . . . . . . . . . . . . . . . . . . . . 3
FCC/ID Notice . . . . . . . . . . . . . . . . . . . . . . . . . . . . . . . . . . . . . . . . . . . . . 3
System Maintenance . . . . . . . . . . . . . . . . . . . . . . . . . . . . . . . . . . . . . . . . . 4
Your Warranty . . . . . . . . . . . . . . . . . . . . . . . . . . . . . . . . . . . . . . . . . . . . . 4
Transmitter Functions . . . . . . . . . . . . . . . . . . . . . . . . . . . . . . . . . . . . . . . . . 4
Using Your System . . . . . . . . . . . . . . . . . . . . . . . . . . . . . . . . . . . . . . . . . . . 5
Arming . . . . . . . . . . . . . . . . . . . . . . . . . . . . . . . . . . . . . . . . . . . . . . . . . 5
Disarming. . . . . . . . . . . . . . . . . . . . . . . . . . . . . . . . . . . . . . . . . . . . . . . . 5
High Security Disarm . . . . . . . . . . . . . . . . . . . . . . . . . . . . . . . . . . . . . . . . 6
Silent Mode . . . . . . . . . . . . . . . . . . . . . . . . . . . . . . . . . . . . . . . . . . . . . . 6
Panic Mode. . . . . . . . . . . . . . . . . . . . . . . . . . . . . . . . . . . . . . . . . . . . . . . 6
Shock Sensor Adjustment. . . . . . . . . . . . . . . . . . . . . . . . . . . . . . . . . . . . . . . 7
Adjusting the Shock Sensor Warn-Away. . . . . . . . . . . . . . . . . . . . . . . . . . . . . 7
To Test and Adjust the Current Warn-Away Setting . . . . . . . . . . . . . . . . . . . . . 7
Adjusting the Shock Sensor Full Trigger . . . . . . . . . . . . . . . . . . . . . . . . . . . . 8
To Test and Adjust the Current Full Trigger Setting . . . . . . . . . . . . . . . . . . . . . 8
Code Hopping . . . . . . . . . . . . . . . . . . . . . . . . . . . . . . . . . . . . . . . . . . . . . . . 9
Programming Options . . . . . . . . . . . . . . . . . . . . . . . . . . . . . . . . . . . . . . . . . 9
Glossary of Terms . . . . . . . . . . . . . . . . . . . . . . . . . . . . . . . . . . . . . . . . . . . . 10
Quick Reference Guide (Removable) . . . . . . . . . . . . . . . . . . . . . . . . . . . . . . 13
Page 6
2
©
1999 Directed Electronics, Inc.
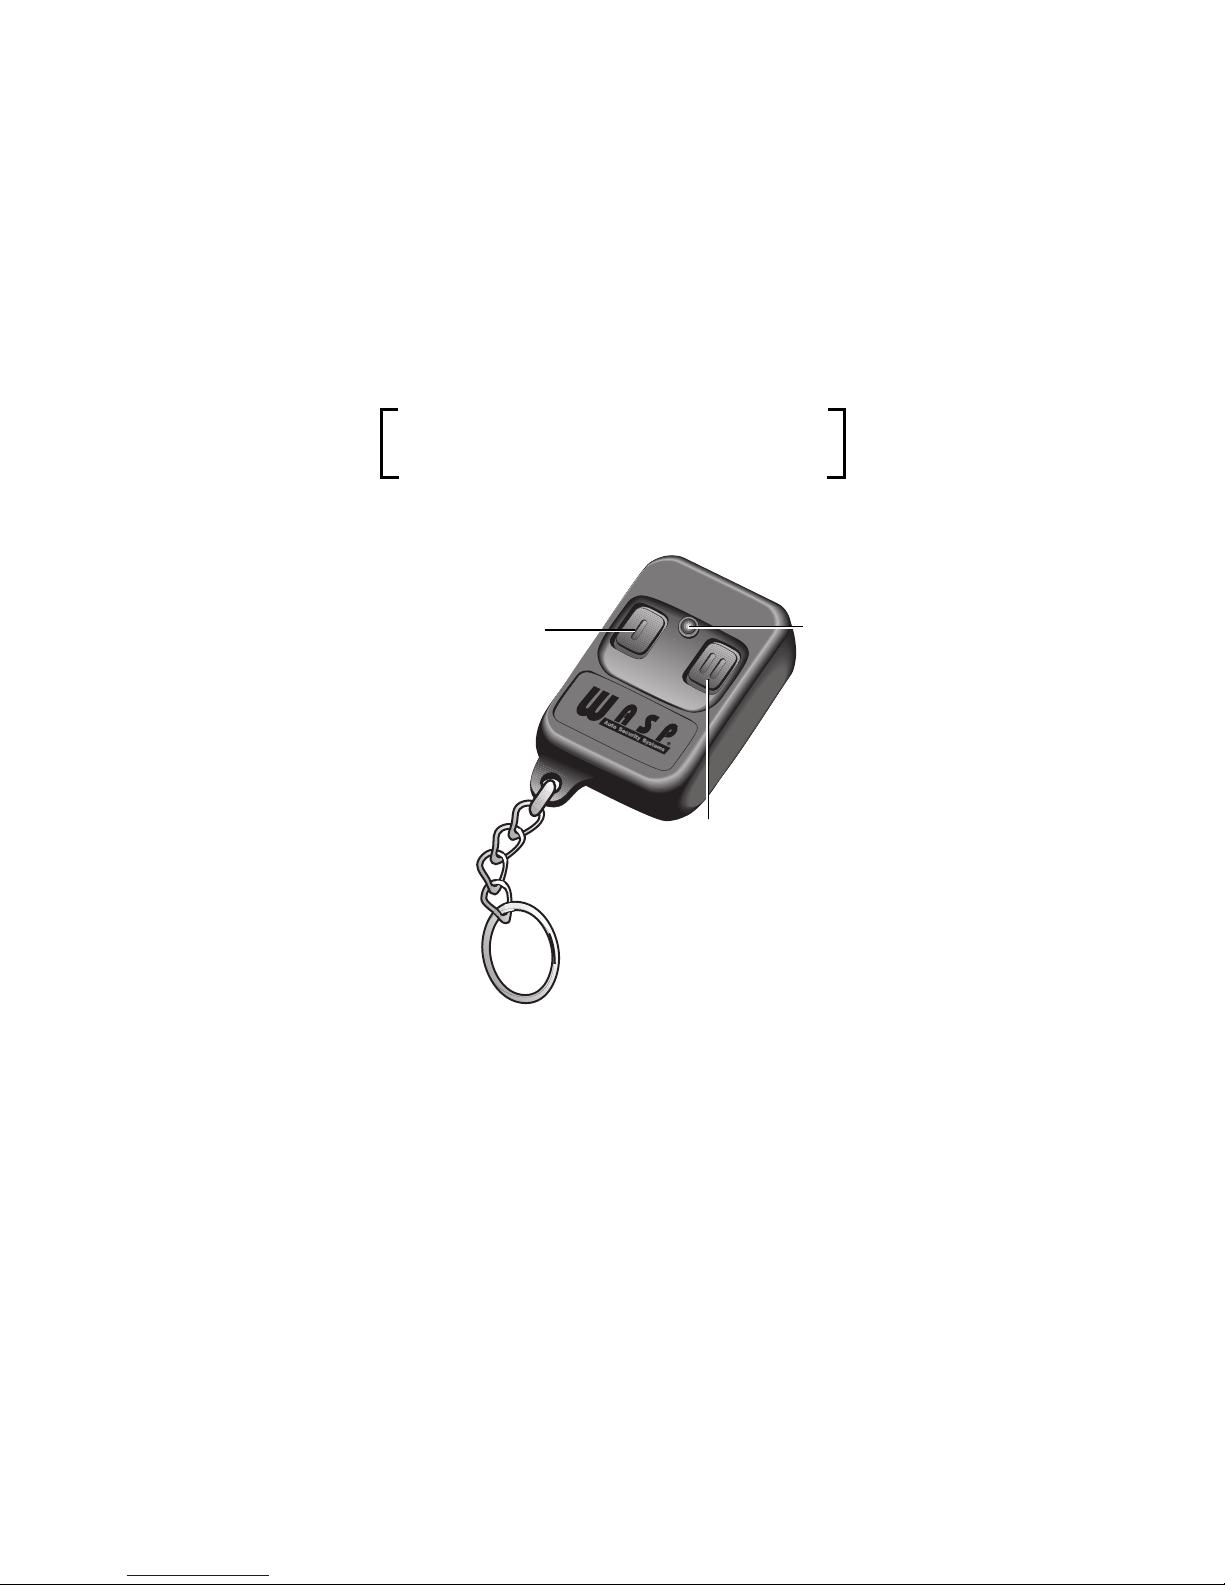
Transmitter Configuration
Arm
Disarm
Panic
Shock Sensor Adjustment
LED
Silent Mode
Shock Sensor Adjustment
Page 7

3
©
1999 Directed Electronics, Inc.
What is Included
■ The control module
■ A pair of two-button transmitters
■ A siren on-board the control module
■ A Stinger
®
DoubleGuard®dual-stage shock/impact sensor, on-
board the control module
■ The red status LED indicator light
Important Information
Congratulations on the purchase of your state-of-the-art vehicle
security system. This system has been designed to provide years
of trouble-free operation. This owner’s guide should help you to
get the most out of your system. Please take the time to read it
thoroughly prior to using the system.
This device complies with Part 15 of FCC rules. Operation is subject
to the following conditions: (1) This device may not cause harmful
interference, and (2) This device must accept any interference re-
ceived, including interference that may cause undesired operation.
Changes or modifications not expressly approved by the party responsi-
ble for compliance could void the user's authority to operate this device.
FCC/ID Notice
Page 8

4
©
1999 Directed Electronics, Inc.
The system requires no specific maintenance. Your remote control
is powered by a miniature 12V battery, type GP23A, that will last
approximately one year under normal use. When the battery weak-
ens, operating range will be reduced and the LED on the remote
will dim when pressed.
Your warranty card must be returned and the bar-code serial num-
ber must not be removed. If the warranty card is not returned you
don’t have a warranty. It is also necessary to keep your proof of
purchase which reflects that the product was installed by an
authorized dealer. Make sure you receive the warranty card from
your dealer.
Transmitter Functions
Button
Arming, disarming, panic and shock sensor adjustments functions
are controlled by .
Button
Silent Mode
™
and shock sensor adjustment are controlled by .
Your Warranty
System Maintenance
Page 9

5
©
1999 Directed Electronics, Inc.
Using Your System
You can turn on, or arm, the system by pressing on your trans-
mitter for one second. When the system arms, you will hear a short
siren sound, or chirp. The system is now protecting your vehicle.
When armed, your vehicle is protected in the following ways:
■ Light impacts will trigger the Warn Away
™
signal. When trig-
gered, the siren will chirp for a few seconds.
■ Heavy impacts will trigger the system. The trigger sequence
is 30 seconds of constant siren.
■ The current sensor monitors the electrical system and can
detect an interior light if a door is opened. If the current sen-
sor is being used to detect door entry, the domelight in the
vehicle must be working and left in the “Door” position. If
the domelight does not illuminate when a door is opened, the
current sensor cannot detect the entry.
To turn off, or disarm the system, press again. You will hear
two chirps, and the system will disarm. If the siren chirps four
times when disarming, the system was triggered in your absence.
This is called Tamper Alert.
Disarming
Arming
Page 10

6
©
1999 Directed Electronics, Inc.
Your system includes a High Security Disarm feature. During the
trigger sequence, using the transmitter to disarm the system will
only stop the trigger sequence (the siren will stop). However, the
system will remain armed. This is extremely useful if you must stop
the system from sounding, but are unable to visually check the
vehicle. The trigger will stop, but the vehicle will remain protected.
To disarm the system with the transmitter during a trigger, press
on your transmitter. The siren will stop sounding. Next press
once more and the system will chirp four times to report that
there was a trigger (Tamper Alert) and the system will disarm.
To temporarily turn off the arm or disarm chirps, use Silent Mode™.
Simply press briefly before arming or disarming, and the con-
firmation chirp(s) will be eliminated for that one operation only.
If you want the arm/disarm chirps turned off permanently, consult
your dealer, or the installation guide.
If you are threatened in or near your vehicle, you can attract
attention by triggering the system with your transmitter! Just
press for 1.5 seconds, and you will enter Panic Mode. The siren
will sound for 30 seconds. To stop Panic Mode at any time, press
on the transmitter again.
Panic Mode
Silent Mode
High Security Disarm
Page 11

7
©
1999 Directed Electronics, Inc.
Shock Sensor Adjustment
The system features a Doubleguard®shock sensor inside the control
unit. All adjustments to the sensor are made using the transmitter.
1. Disarm the system by pressing on the transmitter.
2. Within five seconds, press and hold on the transmitter
until the unit generates a long chirp.
3. Release on the transmitter.
Strike the vehicle to test the current setting. If the impact is
detected the unit will chirp three times.
■ If the current setting is acceptable, do nothing and the unit
will exit shock sensor adjustment mode.
■ If the current setting is unacceptable, press to decrease
the sensitivity or to increase the sensitivity. Each time
is pressed, the unit will emit one chirp and the sensitiv-
ity is decreased one step. Each time is pressed, the unit
will emit two chirps and the sensitivity will be increased one
step. There are 16 possible settings. When the maximum or
minimum setting (Warn-Away
™
off) is achieved, the siren will
emit a long chirp.
To Test and Adjust the Current Warn-Away Setting
Adjusting the Shock Sensor Warn-Away
Page 12

8
©
1999 Directed Electronics, Inc.
1. Arm the system by pressing on your transmitter .
2. Within five seconds, press and hold on the transmitter
until the unit generates a long chirp.
3. Release on the transmitter.
Strike the vehicle to test the current setting. If the impact is
detected the unit will chirp three or four times.
■ If the current setting is acceptable do nothing and the unit
will exit shock sensor adjustment mode.
■ If the current setting is unacceptable press to decrease
the sensitivity or to increase the sensitivity. Each time
is pressed, the unit will emit one chirp and the sensitiv-
ity is decreased one step. Each time is pressed, the unit
will emit two chirps and the sensitivity will be increased one
step. There are 16 possible settings. When the maximum set-
ting is achieved, the siren will emit two short chirps followed
by a long chirp. When the minimum setting (full trigger off)
is achieved, the siren will emit one short chirp followed by a
long chirp.
NOTE: If more than five seconds elapse without an adjustment, shock
sensor adjustment mode will be exited. Repeat steps 1 through 3 to make
additional adjustments. The siren will generate one long chirp followed
by two short chirps when the shock sensor adjustment mode is exited.
To Test and Adjust the Current Full Trigger Setting
Adjusting the Shock Sensor Full Trigger
Page 13

9
©
1999 Directed Electronics, Inc.
Code Hopping
The receiver and transmitters each use a mathematical formula
called an algorithm to change their code each time the transmit-
ter is used. This technology has been developed to increase the
security of the unit. The control unit knows what the next codes
should be. This helps to keep the transmitter synchronized with
the control unit even if you use the remote control out of range
of the vehicle. However, if the transmitter has been pressed many
times out of range of the vehicle, or the battery has been removed,
it may get out of sync with the control unit and fail to operate the
system. To resynchronize the remote control simply press on
the remote control several times within range of the vehicle. The
alarm will automatically resynchronize and respond to the trans-
mitters normally.
Programming Options
Programming options control what your system does during nor-
mal operation, and require few or no additional parts; however,
some options may require additional installation labor. The facto-
ry settings are in bold.
■ Arming/disarming confirmation chirps on or off.
■ Current sensor on or off.
Page 14

10
©
1999 Directed Electronics, Inc.
Glossary of Terms
Control Unit: The “brain” of your system. Usually hidden under-
neath the dash area of the vehicle. It houses the microprocessor
which monitors your vehicle and controls the alarm's functions.
LED: Red light mounted somewhere in the vehicle. It is used to
indicate the status of your system. It is also used to report trig-
gers and faults in the system or sensors.
Shock Sensor: This system is packaged with a Doubleguard
®
Shock
Sensor. This sensor designed to pick up impacts to the vehicle or
glass.
Siren: Noise generating device on-board the control module. It is
responsible for generating the “chirps” you hear, as well as the
tones you hear while the alarm is triggered.
Transmitter: Hand-held, remote control which operates the vari-
ous functions of your system.
Trigger or triggered response: This is what happens when the
alarm “goes off” or “trips.” The triggered response of your system
consists of 30 seconds of siren sounding.
Warn Away
®
response: Lighter impacts to the vehicle will gener-
ate the Warn-Away response. It consists of several seconds of siren
chirps.
Page 15

11
©
1999 Directed Electronics, Inc.
Notes
Page 16

12
©
1999 Directed Electronics, Inc.
Notes
Page 17

13
©
1999 Directed Electronics, Inc.
QUICK REFERENCE GUIDE:
To arm using your remote
■ You can activate, or arm, the system by pressing of your transmitter
for one second. When the system arms, you will hear a short siren sound,
or chirp.
To disarm using your remote
■ To disarm the system, press again. You will hear two chirps. If the
siren chirps four times when disarming, this is called Tamper Alert.
To activate Panic Mode
■ Press and hold down for 1.5 seconds.
To exit Panic Mode
■ Press again.
To activate Silent Mode
™
■ Press briefly before arming or disarming, and the confirmation chirp(s)
will be eliminated for that one operation only.
Cut along dotted line and fold for a quick and easy reference to keep in your purse or wallet.
✂✂
✂✂
Page 18

Page 19

Page 20

The company behind this system is Directed Electronics, Inc.
Since its inception, DEI®has had one purpose, to provide consumers with the finest
vehicle security and car stereo products and accessories available. The recipient of
more than 20 patents in the field of advanced electronic technology, DEI is ISO 9001
registered.
Quality Directed Electronics products are sold and serviced throughout North America
and around the world.
Call (800) 274-0200 for more information about our products and services.
®
Directed Electronics, Inc.
Vista, CA 92083
www.dei.com
© 1999 Directed Electronics, Inc. - All rights reserved
G718W 7/99
DEI is committed to delivering on time, the best products we know how to provide,
and to constantly work with our customers and vendors to improve our products, quality, delivery and customer friendly features.
 Loading...