

Page 1
REMOTE CONTROL SYSTEM
FOR ALTIMA 2007-2008
(AUTOMATIC ONLY)
XK811
1 way & 2 ways
Owner’s Manual
TX557
TX447
TRX722-2
Index
Remote start the vehicle ........................................................................................................................2
Service Mode (or Valet Mode)................................................................................................................2
Lock/Unlock doors (optionnal) ..............................................................................................................2
Tru nk (optionnal). ..... ..... ..... ..... ..... ..... ..... ................. ..... ..... ..... ..... ..... ..... ..... ................. .3
OTP (One Time programmed Start Time) ...........................................................................................3
Co ld we ath er s ta rt. .. ... .. ... .. ... .. ... .. ..... ..... .. ... .. ... .. ... .. ... .. ..... ..... .. ... .. ... .. ... .. ... .. ... .. ..3
Battery replacement .............................................................................................................................4
Remote car starter indication ............................................................................................................4
TX447 Transmitter function ..................................................................................................................5
TX557 Transmitter function ............................ ........................................... ......................6
TRX722-2 Transmitter function ............................................................................................................7
2 way transmitter’s icon signification......................................................................................................7
Disclaimer & warranty ..........................................................................................................................8
Page 2

Remote start the vehicle
To remote start the vehicle:
The doors and the hood must be closed..
! Press one time on button and release.
! Once the vehicle has started, the parking lights will stay ON while engine is running.
(3, 12 or 20 minutes, according to what was installed.)
To remote start the vehicle
! Press on button 1 time and release, the vehicle will shut off. The parking liht will flash twice
to confirm.
Note:
! It can be possible to ajust number of press on button to start the vehicle. (Option: 1 time or
2 time can be selected. This adjustement must to be done at installation by dealer.)
! To use the remote started vehicle, you must have the OEM transmitter, if not, the vehicle will
stop as soon as you press the brake pedal.
Service Mode (or Valet Mode)
Service Mode allows you to temporarily de-activate remote starter functions. When the system is in
service mode, the vehicle can only be started with the vehicle's ignition key. In Service Mode the
remote transmitter(s) will not activate the remote starter. Door locks and trunk may still be activated
using the remote transmitter(s).
To activate Service Mode with transmitter
Press and hold brake pedal.
!
! Press 3 times on button on the transmitter.
! The parking light will flash 2 times.
! Release brake pedal.
Service mode is now activated.
To deactivate Service Mode with transmitter
! Press and hold brake pedal.
! Press 4 times on button on the transmitter.
! The parking light will flash 2 times.
! Release brake pedal.
Service mode is now deactivated
Door locks (Optionnal)
To lock all doors
Press on button. The parking lights will flash once to confirm the doors are locked.
To unlock all doors
Press on button. The parking lights will flash twice to confirm the doors are unlocked.
2
Page 3

Trunk release (Optionnal)
To open the trunk, press on button for 4 seconds and release. The system will activate trunk
release (If installed.) The parking lights will flash 3 times to confirm.
OTP - One Time Programmed Start
OTP allows the user to program the remote engine starter to start in a preset number of hours.
OTP is a “one time” user programmable start setting which can be preset up to 24 hours in
advance.
To program
! Press and release button between 1 & 24 (Every press of the button = 1 hour.)
! Press button and release to confirm.
! The parking lights will flash the number of times that the was pressed to confirm how
many hours in advance system is programmed to start.
Note: OTP must be activated each time it is to be used.
To cancel this function:
! Press and release button 1 time.
! Then, press this button and release.
! The parking lights will flash once to indicate the OTP mode is cancelled.
This mode is canceled as soon as either the remote engine starter or key is used to start the
engine.
Note: To be use, the OTP mode must be enabled by dealer/installer at installation.
Cold Weather Start (Optionnal)
The cold weather start mode will start vehicle every 2 or 4 hours for a 24 hours period.
To activate
! Press button for 4 seconds.
! The parking lights will flash to confirm the Cold Weather start mode is activated.
! Once activated, the vehicle will start every 2 or 4 hours for a 24 hours period and run for a
preset runtime. (for a maximum of 6 or 12 times).
! This mode is canceled as soon as either the remote engine starter or key is used to start the
engine.
Note: Cold Weather Start option must be enabled by dealer/installer. (2 or 4 hour option may be
select.)
To cancel
Press and hold button for 4 seconds. The parking light will flash once to confirm cancellation.
3
Page 4

Battery replacement
TX447 transmitter
! Separate the case of transmitter by opening by the side. (FIG.: 1)
! Once the cover as been removed, insert new +3v lithium CR-2032 battery (FIG.: 2)
(Make sure polarity is correct + / -)
! Replace cover on transmitter and check for operation.
FIG.: 1
Transmitter’s side view
TX557 transmitter
! Remove screw from back of transmitter. (FIG.: 3)
! Pry off the front cover with the help of a coin. (FIG.:3)
! Once cover as been removed, insert new +3v lithium CR-2032 battery (FIG.: 4)
(Make sure polarity is correct + / -)
! Replace cover and screw.
! Check for normal operation.
Opening to
insert coin
Screw location
FIG.: 3 FIG.: 4
TRX722-2 transmitter
! Slide the battery compartment door on back of transmitter. (FIG.: 5)
! Once cover as been removed, insert AAA 1.5v battery (Make sure polarity is correct + / -)
! Replace cover and check for operation.
FIG.: 2
FIG.: 5
Lift cover
before
slidding
Note: Normal battery life is approximately two years, but can vary depending on use. Change once a year for
best performance.
Slide the door in this direction
Remote car starter indication
System
Remote started ON
Remote starter normally stop 2 flashs
Engine don’t start
Hood open / Brake
Starting with Service mode activated
Parking lights
3 flashs
4 flashs
5 flashs
4
Page 5

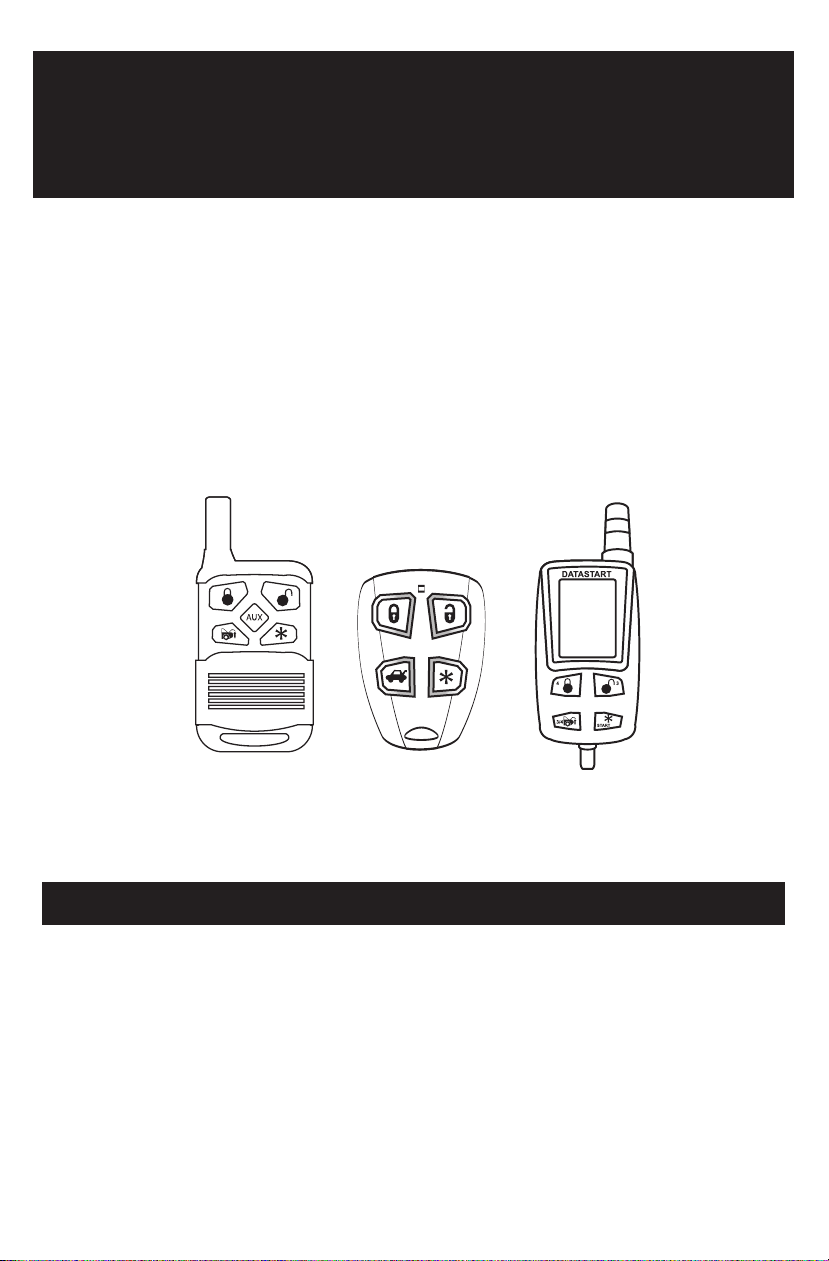
TX447 Transmitter’s functions
Lock:
Press one time on this button to lock
all doors. The parking light will flash
once to confirm.
Trunk (if applicable and installed)
To open the trunk, press this button
for 4 seconds and release. The
parking lights will flash 3 times to
confirm.
Unlock:
Press on this button to unlock all
doors. The parking lights will flash
twice and the dome light will come ON.
Remote start:
Press once on this button and
release. The parking lights will flash
to confirm the system received the
signal. Parking light will stay ON while
engine is running.
To remote stop the engine:
Press on this same button once and
release, the engine will stop. The
parking lights will flash twice to
confirm.
5
Page 6

TX557 Transmitter’s functions
Lock:
Press one time on this button to lock
all doors. The parking light will flash
once to confirm.
Trunk (if applicable and installed)
To open the trunk, press this button
for 4 seconds and release. The
parking lights will flash 3 times to
confirm.
Unlock:
Press on this button to unlock all
doors. The parking lights will flash
twice and the dome light will come ON.
Remote start:
Press once on this button and
release. The parking lights will flash
to confirm the system received the
signal. Parking light will stay ON while
engine is running.
To remote stop the engine:
Press on this same button once and
release, the engine will stop. The
parking lights will flash twice to
confirm.
6
Page 7

TRX722-2 Transmitter’s functions
Lock:
Press one time on this button to lock
all doors. The parking light will flash
once to confirm and this icon will
appear in LCD screen:
Trunk (if applicable and
installed)
To open the trunk, press this
button for 4 seconds and
release. The parking lights
will flash 3 times to confirm
and this icon will appear in
LCD screen:
Unlock:
Press on this button to unlock
all doors. The parking lights will
flash twice and the dome light
will come ON. This icon will
appear in LCD screen:
Remote start:
Press once on this button and release. The
parking lights will flash to confirm the
system received the signal. Parking light
will stay ON while engine is running and
this icon will appear in LCD screen:
To remote stop the engine:
Press on this same button once and
release, the engine will stop. The parking
lights will flash twice to confirm.
2 way transmitter’s icon signification
Started
Sucessfully
Vibration
Door Lock
Trunk
Open
Door (s)
Open
7
Page 8

LIMITED ONE-YEAR CONSUMER WARRANTY
For a period of ONE YEAR from the date of purchase of a Directed Electronics remote start or security product,
Directed Electronics. (“DIRECTED”) promises to the original purchaser, to repair or replace with a comparable
reconditioned piece, the security or remote start accessory piece (hereinafter the “Part”), which proves to be
defective in workmanship or material under normal use, provided the following conditions are met: the Part was
purchased from an authorized DIRECTED dealer; and the Part is returned to DIRECTED, postage prepaid, along with
a clear, legible copy of the receipt or bill of sale bearing the following information: consumer’s name, address,
telephone number, the authorized licensed dealer’s name and complete product and Part description.
This warranty is nontransferable and is automatically void if the Part has been modified or used in a manner
contrary to its intended purpose or the Part has been damaged by accident, unreasonable use, neglect,
improper service, installation or other causes not arising out of defect in materials or construction.
TO THE MAXIMUM EXTENT ALLOWED BY LAW, ALL WARRANTIES, INCLUDING BUT NOT LIMITED TO EXPRESS WARRANTY,
IMPLIED WARRANTY, WARRANTY OF MERCHANTABILITY, FITNESS FOR PARTICULAR PURPOSE AND WARRANTY OF NON
INFRINGEMENT OF INTELLECTUAL PROPERTY, ARE EXPRESSLY EXCLUDED; AND DIRECTED NEITHER ASSUMES NOR
AUTHORIZES ANY PERSON OR ENTITY TO ASSUME FOR IT ANY DUTY, OBLIGATION OR LIABILITY IN CONNECTION WITH ITS
PRODUCTS. DIRECTED HEREBY DISCLAIMS AND HAS ABSOLUTELY NO LIABILITY FOR ANY AND ALL ACTS OF THIRD PARTIES
INCLUDING DEALERS OR INSTALLERS. IN THE EVENT OF A CLAIM OR A DISPUTE INVOLVING DIRECTED OR ITS SUBSIDIARY,
THE PROPER VENUE SHALL BE SAN DIEGO COUNTY IN THE STATE OF CALIFORNIA. CALIFORNIA STATE LAWS AND
APPLICABLE FEDERAL LAWS SHALL APPLY AND GOVERN THE DISPUTE. THE MAXIMUM RECOVERY UNDER ANY CLAIM
AGAINST DIRECTED SHALL BE STRICTLY LIMITED TO THE AUTHORIZED DIRECTED DEALER’S PURCHASE PRICE OF THE PART.
DIRECTED SHALL NOT BE RESPONSIBLE FOR ANY DAMAGES WHATSOEVER, INCLUDING BUT NOT LIMITED TO, ANY
CONSEQUENTIAL DAMAGES, INCIDENTAL DAMAGES, DAMAGES FOR THE LOSS OF TIME, LOSS OF EARNINGS,
COMMERCIAL LOSS, LOSS OF ECONOMIC OPPORTUNITY AND THE LIKE. NOTWITHSTANDING THE ABOVE, THE
MANUFACTURER DOES OFFER A LIMITED WARRANTY TO REPLACE OR REPAIR AT DIRECTED’S OPTION THE PART AS
DESCRIBED ABOVE.
Some states do not allow limitations on how long an implied warranty will last or the exclusion or limitation of
incidental or consequential damages. This warranty gives you specific legal rights and you may also have other
rights that vary from State to State. DIRECTED does not and has not authorized any person or entity to create for it
a n y ot he r o b l i gati on , p r o m i se, d ut y o r obl ig at io n i n c o n nect io n w it h t h i s Pa r t.
920-0007 07-06
This Interfac
ll
w
be added to
i
for
atest vehicle
l
manufacturer
any consequential
ma ufactu
n r
other
interface
manufacturer an distribut
co nection
in
n w r m
other
product
kit
/
Data Bus Interface part
e
the
select vehicle list
upon completion
application guide.
or
the dist
er
i
and
dividual to assume
part(s) other han its
d
ith
p
rso
to assume
n i a
ibutors
of
r s e
damages
it
s
dist ibutors will no
’ r
t e
this product
the bypass
s
stained in
u a
obli ation
rs
of
o u
or liability
r pl
a N.B.:Under no
this
prod ct be liable
and
neithe
for it any obligat on
only.
has
been
tested
DISCLAIMER: Under
kit /
t
bu int rface par (s)
data
connection
, nor
will they
t y
listed
on the
of
compatib lity te
no circums ances shall
the
with
authorize an representative
in relation to the
cement.
for consequential
assu es
or liability other
nor
authorizes
th n the
vehicles.
i
part(s)
Other vehicles
ting. Vsit website
s i
be
t
inst
interface kit /
circumstance
damages
any repr
replacement of this e
held iable
l
llation.
or any
data
shall thes
sustained
e r
sentative o
the
for
The
bus n g
 Loading...