

Page 1
SIR-PVK1
Professional Vehicle Install Kit
Installation Guide
Page 2

Page 3

Desktop Docking Station
© Directed Electronics, all rights reserved.
3
Professional Vehicle Install Kit
Table of Contents
FCC Notice 4
Warning and Safety information 5
Congratulations 6
Package Contents 7
Important pre-installation notes 8
Choosing an apppropriate mounting location 9
Universal mounting bracket 10
Wiring and wire connections 11
Connecting the SIRIUS radio to the vehicle sound system 12
Final connections and testing 13
Warranty 15
Page 4

© Directed Electronics, all rights reserved.
4
FCC NOTICE:
This device complies with Part 15 of FCC rules. Operation is subject to the following conditions:
(1) This device may not cause harmful interference, and
(2) This device must accept any interference received, including interference that may cause undesired
operation. Changes or modifications not expressly approved by the party responsible for compliance could
void the user’s authority to operate this device.
Directed Electronics is not responsible for any radio or TV interference caused by unauthorized modifications to this equipment. Such modifications could void the User’s authority to operate the equipment.
Page 5

Desktop Docking Station
© Directed Electronics, all rights reserved.
5
Professional Vehicle Install Kit
Warning and Safety Information
Safety Precautions
Be sure to observe the following warning. Failure to follow these safety instructions and warnings may result in a serious
accident and/or personal injury.
• Installation must be performed according to this installation guide. Directed Electronics is not responsible for issues
arising from installations not performed according to the procedures in this guide.
• Do not install the dual voltage adapter or FM Direct Audio Relay where they will be exposed to high levels of humidity,
moisture, or dust.
• To avoid short circuits or damage, do not open the unit modules.
• If the modules emit smoke or unusual odors, disconnect power immediately.
• Do not drop the unit modules or subject them to strong shocks.
• The installation and use suggestions contained in this manual are subject to any restrictions or limitations that may
be imposed by applicable law. The purchaser should check applicable law for any restrictions or limitations before
installing and/or operating this unit.
Page 6

© Directed Electronics, all rights reserved.
6
Congratulations
Congratulations on the Purchase of your new SIR-PVK1 Professional Vehicle Install Kit!
The SIR-PVK1 is compatible with all SIRIUS Branded Plug and Play or portable radios. It may also be compatible with other
SIRIUS radios, consult your authorized SIRIUS dealer for specific compatibility questions
For the latest information about this and other SIRIUS products and accessories, visit http://www.directedsirius.com.
Page 7
Desktop Docking Station
© Directed Electronics, all rights reserved.
7
Professional Vehicle Install Kit
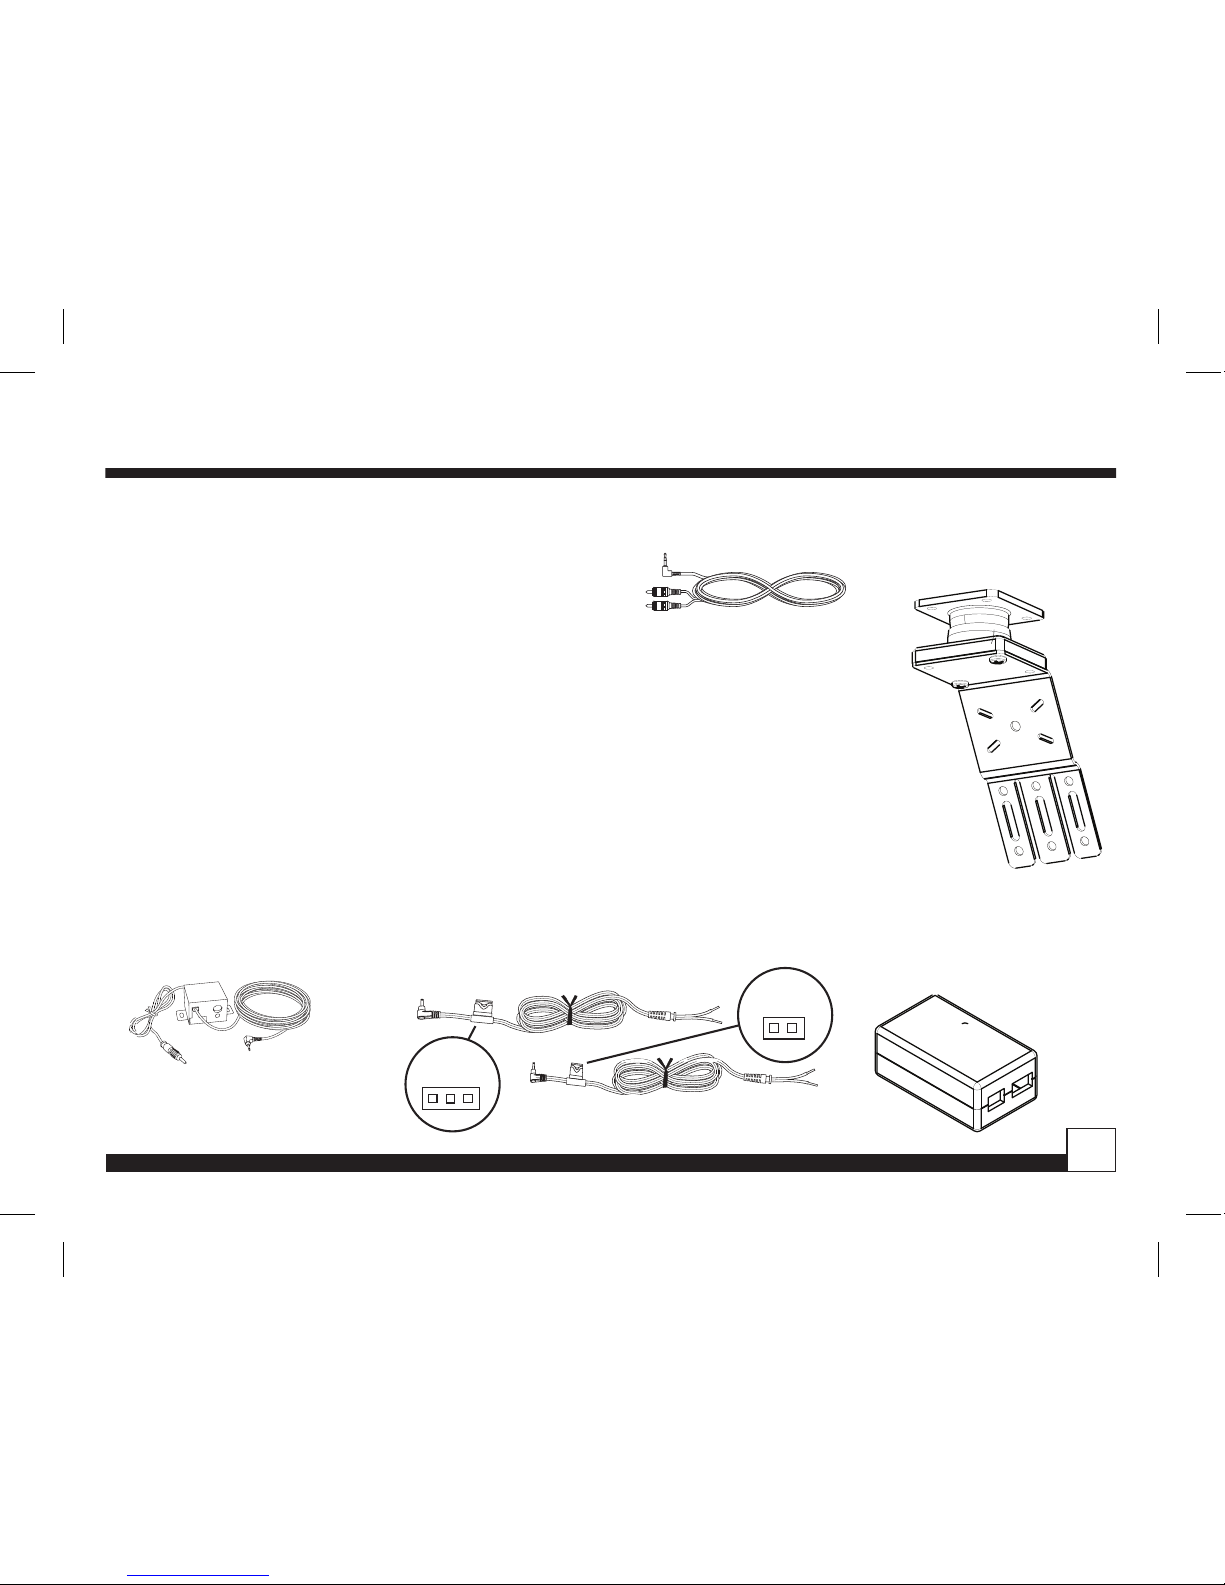
Package Contents
1 Dual voltage power supply, 5/12 volts
(with ground wire and ring terminal connected)
1 Universal Mounting Bracket
1 Swivel Base
1 FM Direct Audio Relay
1 3.5mm stereo to RCA male Audio Cable
1 5V harness with 2-pin connector
1 12V harness with 3-pin connector
1 ATC fuse holder with 3 amp fuse
1 Hardware kit:
1 Expandable wiring sleeve
3 wire hold downs
1 butt connector 18 awg
8 screws
FM D ire ct Audio Relay
Dual Voltage Power Supply Cables
2 pin 5v
3 pin 12v
Audio Cable
Swivel Base
on universal
Mounting Bracket
Dual Voltage
Power Adapter
FM D irect Audio Relay
Dual Voltage Power Supply Cables
2 pin 5v
3 pin 12v
Dual Voltage
Power Adapter
FM D irect Audio Relay
Dual Voltage Power Supply Cables
2 pin 5v
3 pin 12v
Audio Cable
FM D ire ct Audio Relay
Dual Voltage Power Supply Cables
2 pin 5v
3 pin 12v
Page 8

© Directed Electronics, all rights reserved.
8
IMPORTANT PRE-INSTALLATION NOTES
Directed Electronics recommends that you have this product professionally installed.
Read this entire installation manual as well as the owner's
guide provide with your Sirius radio before proceeding with
the installation.
If the installation notes in this manual are not followed,
it may result in personal injury or damage to the various
components of the Sirius radio, damage to the vehicle’s
audio/visual systems, damage to the vehicle’s electrical
systems, or damage to the vehicle’s mechanical systems.
Familiarize yourself with the existing audio/video system
in the vehicle by consulting the owner’s manuals for these
systems before making any wire or cable connections to
those systems.
The Dual Voltage Power Adapter is designed for 12 volt DC
negative ground, vehicle electrical systems only.
When faced with a blown fuse, always determine the cause
and correct the problem before replacing the fuse and be
sure to use a replacement fuse of the same type, rating and
amperage.
Do not cut any of the wires and cables included with the
Professional Vehicle Install Kit or the Sirius radio being
installed. Any excess cable or wire length should be neatly
bundled or coiled, and secured in
Do not route wires or cables across sharp edges, or
through holes which could result in the wire or cable becoming damaged, chafed, cut, or shorted. If routing across
sharp edges is unavoidable, use the provided Expandable
sleeve to protect the wires. Use rubber grommets when
routing through holes. Make sure to route all wires away
from any moving parts that may damage them.
Avoid pinching, squashing, kinking, or crimping any of the
wires used in this install or any of the vehicle’s existing
wires/cables during the installation.
Refer to the owner's guide for your Sirius radio to determine the voltage required in order to select correct plug to
be used for the output of the Dual Voltage Power Adapter.
The plugs provided with thise installation kit are designed
to fit Sirius-branded radios that operate on either 5V or 12V
DC. They are keyed and sized to prevent inadvertent connection to radios of incorrect voltage rating. Do not force
the coaxial output connector into the cradle of your Sirius
radio. If the connector does not appear to fit, stop and
make sure you have selected the correct output harness to
match your radio's voltage rating.
Page 9
Desktop Docking Station
© Directed Electronics, all rights reserved.
9
Professional Vehicle Install Kit
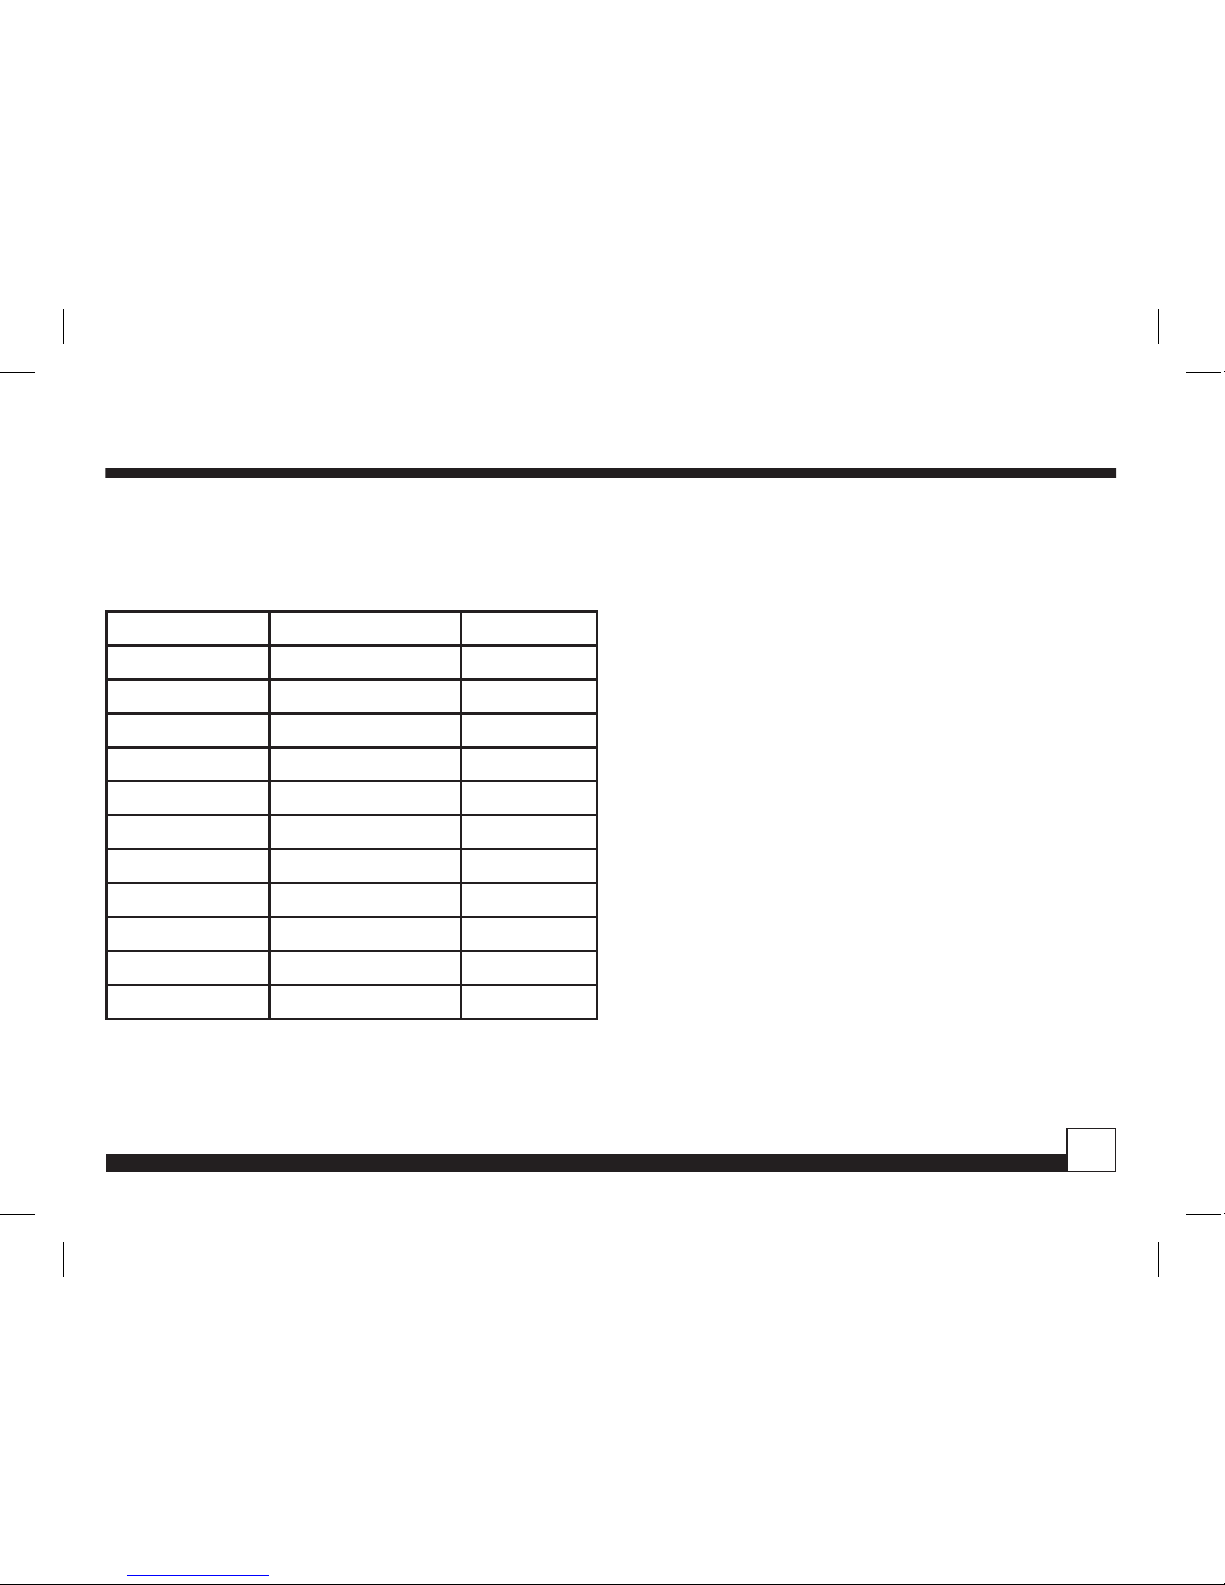
SIRIUS RADIO VOLTAGE GUIDE.
It is very important to choose a mounting location that does
not interfere with the driver’s view of the road, instrument
cluster or any displays in the vehicle while driving. It is
equally important that the mounting location does not interfere with any moving parts such as the glove box, shifter,
emergency brake etc. It is preferred that the install does
not obstruct air conditioning vents but if it is the only acceptable location, first check with the owner of the vehicle
before proceeding. Keep in mind though, that the tuner
should be mounted where the driver has easy access to the
Sirius radio controls and view of the display while minimizing distraction from the road while driving.
MODEL P/N VOLTAGE
Sportster SPR1, SPR1A 12V
Sportster replay SPR2 12V
Starmate ST1 12V
Starmate replay ST2 12V
Sirius One SV1 12V
Stiletto 10/100 SL10PK1, SL100PK1 5V
S50 S50TK1 5V
Sportster 3/4 SP3, SP4 5V
Starmate 3/4 ST3, ST4 5V
Stratus SV3TK1 5V
InV SV2TK1 5V
CHOOSING AN APPROPRIATE MOUNTING LOCATION.
Page 10

© Directed Electronics, all rights reserved.
10
UNIVERSAL MOUNTING BRACKET.
The bracket is designed to allow for many different mounting techniques. It can be bent or cut and mounted in
several different orientations to facilitate the proper placement and orientation of the Sirius radio being installed.
One common application is to pull a dash panel or console
and secure the “fingers” of the bracket with self tapping
screws behind the panel after bending or cutting it to place
the Sirius radio in the chosen location and orientation. The
elongated holes on the fingers can be used to shorten or
lengthen the distance it protrudes from behind the panel.
After securing the Universal Mounting Bracket replace
the panel removed earlier and check that there is enough
clearance for the bracket and that it does not interfere with
the fit of the vehicles panel.
In some cases the Sirius radio cradle can be mounted
directly to the Universal Mounting Bracket with the supplied screws. In other cases it may be necessary to attach
the swivel base to the Universal Mounting Bracket and then
the Sirius radio cradle to the swivel base to accommodate
proper positioning and orientation of the radio. Once the
appropriate orientation of the Swivel Bracket has been
determined, tighten the center screw to secure it from
moving. Be careful not to over-tighten the screw as it can
damage the Swivel Bracket.
Dual Voltage Power Supply Cables
2 pin 5v
3 pin 12v
The above arrows indicate typical locations where the Universal Mounting Bracket might be slipped past a trim panel
or console cover to mount it.
Page 11
Desktop Docking Station
© Directed Electronics, all rights reserved.
11
Professional Vehicle Install Kit
WIRING AND WIRE CONNECTIONS.
Refer to your Sirius radio owner's guide for directions
for mounting your antenna and routing the cable to your
mounting location. The guide will also indicate whether
your radio is a 5 volt unit or 12 volt unit. This is important
as you need to use the three pin plug for the Power Adapter
for 12 volt units and the two pin plug for 5 volt units. The
plugs are not interchangeable making it difficult to use the
wrong power harness and plug.
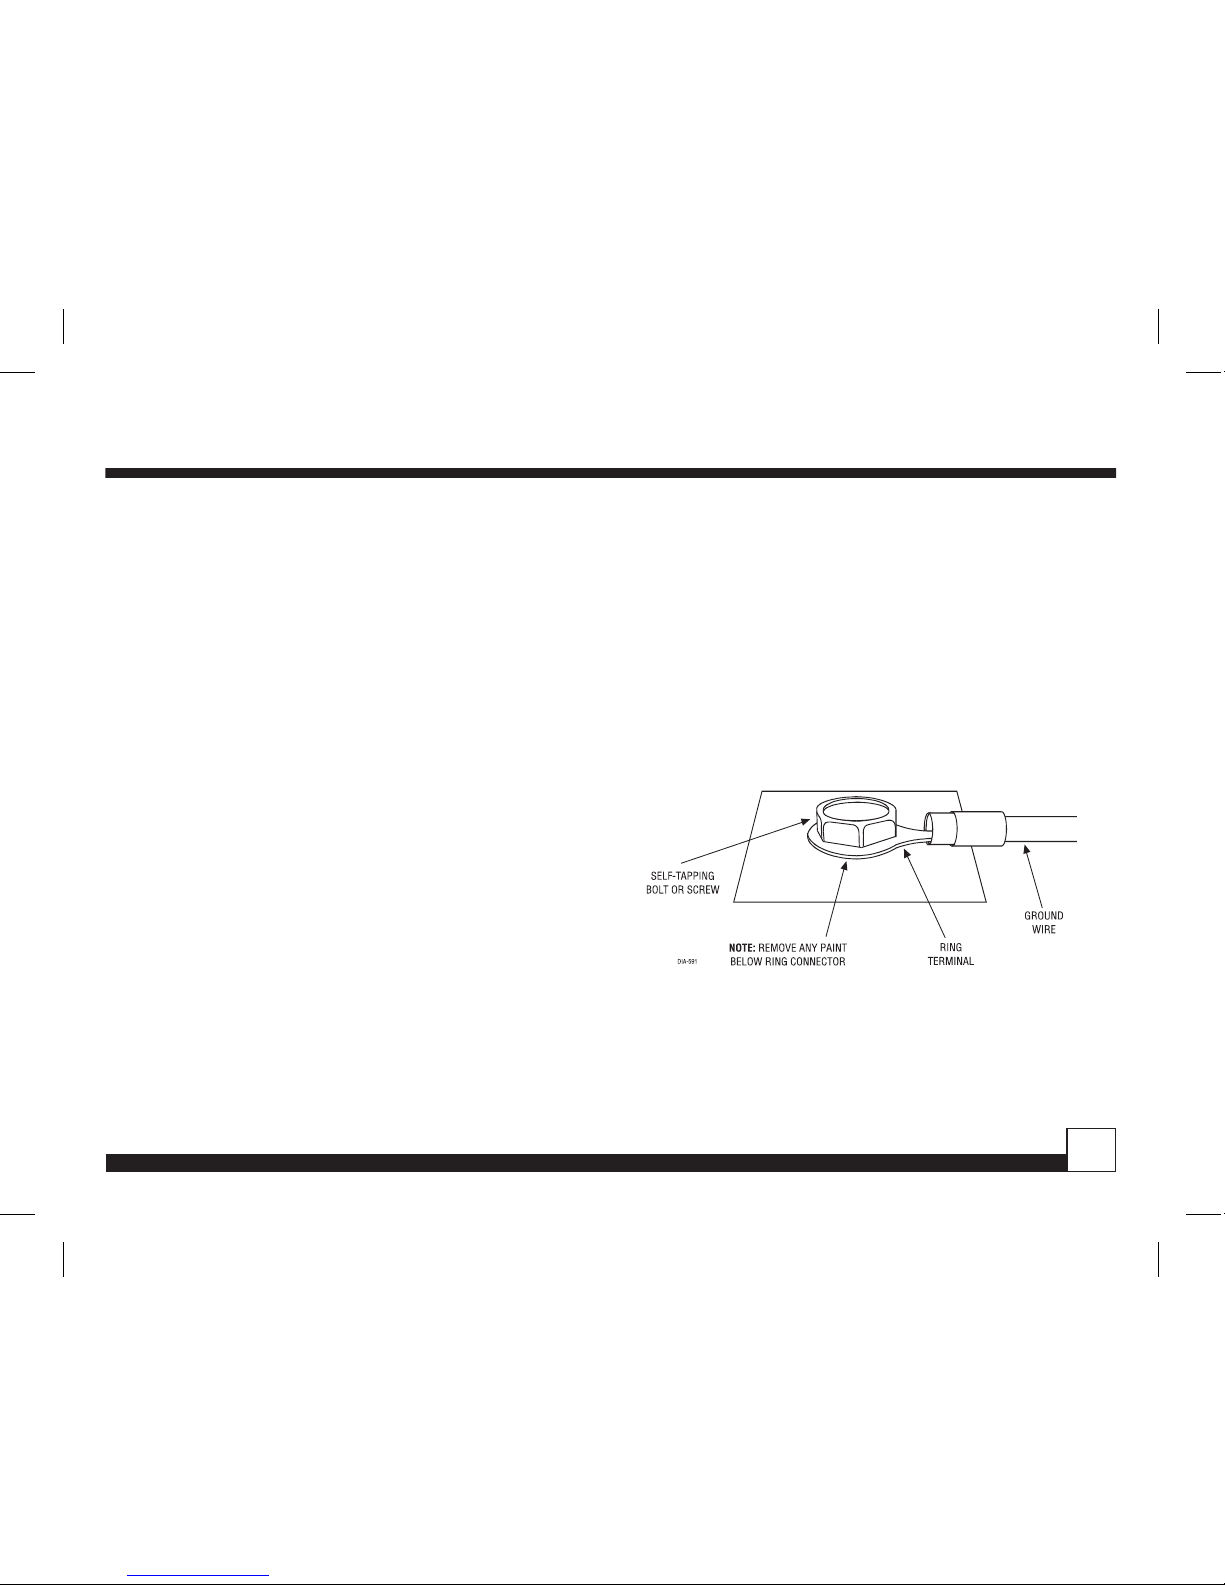
After determining the correct harness and plug you should
attach the black, ground wire of the Power Adapter wire
to a good chassis ground using the supplied ring terminal. The connection should be made to bare metal in the
vehicle. You may have to scrape paint to get down to bare
metal. The kick panel is usually a convenient location
for establishing the ground connection. Avoid brackets
under the dash and the steering column as they are almost
always very poor grounds. Next, test for a 12 volt circuit
in the vehicle that is switched with the key. An accessory circuit is preferred and can be identified as a circuit
that shows 12 volts when the key is turned on and drops
to 0 volts when the vehicle cranks and then returns to 12
volts when the key falls back to the run position. The fuse
holder should be attached to this circuit within 18 inches
of the source. Do not install the fuse at this time. Connect the red wire of the Power Adapter to the other side of
the fuse holder using the supplied butt connector. Do not
install the fuse until all other connections are completed.
The antenna can be plugged into the cradle at this time.
Make sure to follow all mounting and cable routing instructions for the antenna included with your Sirius radio.
Dual Voltage Power Supply Cables
2 pin 5v
3 pin 12v
Grounding Diagram
Page 12

© Directed Electronics, all rights reserved.
12
CONNECTING THE SIRIUS RADIO TO THE VEHICLE’S SOUND SYSTEM.
Your Sirius radio can be connected to the vehicle’s sound
system different ways depending on whether it is a factory
sound system or aftermarket head unit.
Most factory head units do not have auxiliary inputs. For
the best audio performance, use the supplied FM Direct
Audio Relay to route audio from your Sirius radio. You can
also use the wireless FM modulator built into your Sirius
radio by following the instructions for the wireless modulator contained in the owner's guide.
In some cases the wireless signal will not be strong enough
to overcome interference from local FM stations. In this
case it is recommended to use the supplied FM Direct
Audio Relay included in the kit. This will require pulling the
radio out of the dash and unplugging the vehicle antenna.
The antenna cable will then be plugged into the receptacle
on the FM Direct Audio Relay labeled “to car FM antenna”.
The plug labeled “to car FM radio” will then be plugged
into the antenna receptacle on the back of the radio. Some
vehicles may require antenna adapters for this connection,
consult your authorized dealer for details. Then route the
plug labeled “to satellite radio” to the back of the Sirius
cradle and plug it into the FM Out receptacle on the back
of the cradle. Securely bundle and hide any excess cable
behind a panel or under the dash of the vehicle securing it
so that it will stay in place while the vehicle is being driven.
Do not cut or shorten any of the cables of the FM Direct
Audio Relay as it may cause poor performance of the part.
In vehicles with aftermarket head units that have auxiliary
inputs, you can use the supplied 3.5mm stereo to RCA male
adapter cable. Connect the RCA jacks to the auxiliary inputs on the head unit and plug the 3.5 mm stereo plug into
the Line Out port on the back of the Sirius cradle. Some
radios may require a specific adapter to support routing
audio into the auxiliary inputs. Consult the owner's or
installation guide for your head unit for information about
using the auxiliary inputs. If the aftermarket head unit
does not have an auxiliary input you will have to use the FM
Direct Audio Relay connections described above for factory
sound systems.
FM Direct Audio Relay
Dual Voltage Power Supply Cables
2 pin 5v
3 pin 12v
Page 13

Desktop Docking Station
© Directed Electronics, all rights reserved.
13
Professional Vehicle Install Kit
FINAL CONNECTIONS AND TESTING.
At this point install the fuse into the fuse holder and seat
the Sirius radio into its cradle. Turn the ignition in the
vehicle on and turn the Sirius radio on. If your radio has
never been activated before, let it update the channels as
described in the Sirius owner's guide. Once the channels
have updated follow the operation guide’s instructions
to select the desired FM frequency you wish to use if you
are using one of the FM Modulating techniques described
above and verify that it is working with no distortion or
interference. If you are using the auxiliary inputs of an
aftermarket head unit simply select the auxiliary source
on the head unit and verify that it is playing Sirius, Weather
Channel (184) content.
At this point you can make final adjustments to the swivel
base if used and replace any panels in the vehicle that were
removed during the installation.
You can now contact Sirius to have your Tuner activated and
start enjoying over 130 channels of Sirius content.
Page 14

© Directed Electronics, all rights reserved.
14
Copyrights & Trademarks
2006 SIRIUS Satellite Radio Inc. All Rights Reserved
“SIRIUS”, the SIRIUS dog logo, channel names and logos are trademarks of SIRIUS Satellite Radio Inc. All Rights Reserved
Page 15

Desktop Docking Station
© Directed Electronics, all rights reserved.
15
Professional Vehicle Install Kit
Limited One Year Consumer Warranty
Directed Electronics (herein “DIRECTED”) promises to the original purchaser, to replace this product should it prove to be
defective in workmanship or material under normal use, for a period of one-year from the date of purchase from the dealer
as indicated by the date code marking of the product. During this one-year period, there will be no charge for this replacement PROVIDED the unit is returned to DIRECTED, shipping pre-paid. This warranty is non-transferable and does not apply
to any unit that has been modified or used in a manner contrary to its intended purpose, and does not cover damage to
the unit caused by installation or removal of the unit. This warranty is void if the product has been damaged by accident or
unreasonable use, neglect, improper service or other causes not arising out of defects in materials or construction. ALL
WARRANTIES, INCLUDING BUT NOT LIMITED TO EXPRESS WARRANTY, IMPLIED WARRANTY, WARRANTY OF MERCHANTABILITY, FITNESS FOR PARTICULAR PURPOSE, AND WARRANTY OF NONINFRINGEMENT OF INTELLECTUAL PROPERTY
ARE EXPRESSLY EXCLUDED TO THE MAXIMUM EXTENT ALLOWED BY LAW, AND DIRECTED NEITHER ASSUMES NOR AUTHORIZES ANY PERSON TO ASSUME FOR IT ANY LIABILITY IN CONNECTION WITH THE SALE OF THE PRODUCT. DIRECTED
HAS ABSOLUTELY NO LIABILITY FOR ANY AND ALL ACTS OF THIRD PARTIES INCLUDING ITS AUTHORIZED DEALERS OR
INSTALLERS. IN NO EVENT WILL DIRECTED BE LIABLE FOR ANY INCIDENTAL, SPECIAL OR CONSEQUENTIAL DAMAGES
(INCLUDING LOSS OF PROFITS) AND IN NO EVENT, SHALL DIRECTED’S LIABILITY EXCEED THE PURCHASE PRICE PAID
BY PURCHASER FOR THE PRODUCT. Some states do not allow the exclusion or limitation of incidental or consequential
damages, so the above limitation or exclusion may not apply to you. Some states do not allow limitations on how long an
implied warranty lasts, so the above limitation may not apply to you. Unit must be returned to DIRECTED, postage prepaid,
with bill of sale or other dated proof of purchase bearing the following information: consumer’s name, telephone number,
and address, authorized dealer’s name and address, and product description. Note: This warranty does not cover labor costs
for the removal and reinstallation of the unit. IN ORDER FOR THIS WARRANTY TO BE VALID, YOUR UNIT MUST BE SHIPPED
WITH PROOF OF PURCHASE FROM AN AUTHORIZED DIRECTED DEALER. BY PURCHASING THIS PRODUCT, THE CONSUMER AGREES AND CONSENTS THAT ALL DISPUTES BETWEEN THE CONSUMER AND DIRECTED SHALL BE RESOLVED
IN ACCORDANCE WITH CALIFORNIA LAWS IN SAN DIEGO COUNTY, CALIFORNIA.
Page 16

NSIRPVK1 09-06
© 2006 Directed Electronics, all rights reserved
 Loading...