

Page 1
TWO-WAY LCD AUTOMATIC/MANUAL
TRANSMISSION REMOTE STARTER WITH FULL
ALARM SYSTEM
INDUSTRY CANADA USER NOTICE:
Operation is subject to the following two conditions: (1) this device may not cause int erference, and (2) this device mu st
accept any interference, including interference that may cause undesired operation of the device.
To reduce potential radio interference to other users, the antenna type and its gain should be so chosen that the
equivalent isotropically radiated power (EIRP) is not more than that required for successful communication.
NOTE: The manufacturer is not responsible for any radio or TV interference caused by unau thorized modifications to
this equipment. Such modifications could void the user's authority to operate the equipment.
Doc#: 100827 Rev:1.5 © 2010 -PS-7870TWE-FM- -FcN- Canada
PS-7870TWE-FM
User Guide
WARNING!
It is the responsibility of the vehicle operators to ensure their vehicle
is parked in a safe and responsible manner.
1. a) Manual transmission: When leaving the vehicle, it is the user’s
responsibility to ensure that the gearshift lever is in the NEUTRAL
position and the parking brake is engaged in order to avoid accidents
upon remote starting.
b) Automatic transmission: When leaving the vehicle, it is the user’s
responsibility to ensure that the gearshift lever is in “Park” in order to
avoid accidents upon remote starting.
(Note: Make sure that the automatic vehicle cannot start in "Drive".)
2. It is the user's responsibility to ensure that the remote starter is
disabled or put into valet mode before servicing.
Designed & engineered in Canada
Battery Low Voltage Warnin
g
Once the battery is weak, the LCD remote will display a battery low voltage icon
and an “L-BAT” indication with 2 beeps to warn the user to charge it.
Page 2

P. 2 User Guide
Table of Contents
GOVERNMENT REGULATIONS ................................................................................................................................................ 4
INTRODUCTION .............................................................................................................................................................. 4
VEHICLE PRESETS ................................................................................................................................................................... 5
HEATER ................................................................................................................................................................................... 5
WINDSHIELD WIPERS, RADIO & HEADLIGHTS ............................................................................................................................... 5
USING THE TRANSMITTER ....................................................................................................................................................... 5
LCD REMOTE FUNCTIONS ......................................................................................................................................................... 5
LCD TRANSMITTER BASIC CONFIRMATIONS ................................................................................................................................. 6
BACKLIGHT .............................................................................................................................................................................. 6
CHARGING THE BATTERY ........................................................................................................................................................... 7
REMOTE’S ADVANCED FUNCTIONS AND MENU ................................................................................................................... 7
HOW TO ACCESS ADVANCED REMOTE FUNCTIONS AND MENU ....................................................................................................... 7
REMOTE STARTING YOUR VEHICLE .....................................................................................................................................10
SETTING YOUR VEHICLE INTO READY MODE ..............................................................................................................................10
REMOTE STARTING ..................................................................................................................................................................11
DRIVING OFF ...........................................................................................................................................................................11
ARMING AND DISARMING OF THE SYSTEM .........................................................................................................................11
INTRUSION ALERT VIA REMOTE ............................................................................................................................................12
REMOTE STARTER FEATURES ..............................................................................................................................................12
REMOTE DOOR LOCKS .............................................................................................................................................................12
REMOTE TRUNK RELEASE ........................................................................................................................................................12
IDLE MODE ..............................................................................................................................................................................13
VALET MODES .........................................................................................................................................................................13
PANIC MODE ...........................................................................................................................................................................15
QUICK LOCKOUTTM .................................................................................................................................................................15
COLD WEATHER MODE ............................................................................................................................................................15
EXTENDED RUN TIME ...............................................................................................................................................................16
INTRUSION CODES VIA LED LIGHT .............................................................................................................................................16
CAR FINDER™ ........................................................................................................................................................................16
TEMPERATURE REQUEST (IF ACC-TEMP-101 INSTALLED) ...........................................................................................................16
TEMPORARY CHIRP DELETE......................................................................................................................................................16
RELOCK ..................................................................................................................................................................................17
REMOTE FINDER ......................................................................................................................................................................17
MISSING A START OR A STOP CONFIRMATION ...................................................................................................................17
ADVANCED FEATURES: INSTALLATION-PROGRAMMABLE OPTIONS ..............................................................................17
IGNITION-CONTROLLED DOOR LOCKS ........................................................................................................................................17
SECURE LOCK .........................................................................................................................................................................17
“HOME VALETTM” MODE ...........................................................................................................................................................18
SAFE START MODE ..................................................................................................................................................................18
ENGINE RUN TIME ...................................................................................................................................................................18
TURBO MODE ..........................................................................................................................................................................18
SIREN CHIRPS .........................................................................................................................................................................19
ARMING ..................................................................................................................................................................................19
SHOCK SENSE & WARN AWAY SENSE ........................................................................................................................................20
SIREN/HORN CHIRP TIMING ......................................................................................................................................................20
PRIORITY DOOR: ......................................................................................................................................................................20
BYPASS ..................................................................................................................................................................................20
MULTI-CAR OPERATION ............................................................................................................................................................20
MULTI-LEVEL FEATURES (DEFAULT STATE) .......................................................................................................................21
TROUBLESHOOTING TRANSMITTING RANGE ......................................................................................................................22
DIAGNOSTICS – PARKING LIGHT FLASH TABLE .................................................................................................................22
Page 3
User Guide P. 3
What is EncryptR™ Technology?
EncryptR™ employs proprietary encryption software that sends unique codes from the
remote starter to the ADS-TB or ADS-AL-CA bypass module that cannot be replicated or
reversed with hi-tech equipment.
The EncryptR™ communication exchanged between the remote starter and the ADS bypass
module is best described as a “secret handshake” that is never the same and changes every
time it is used.
Since the command / communication is never exchanged in the same way twice, it is
impossible even for expert thieves to duplicate and it ensures the best security possible for
the remote starter system.
Added Security
Every installation of a Polarstart remote starter used in conjunction with an ADS-TB or an
ADS-AL-CA with the EncryptR™ Technology comes with a Limited Anti-Theft Warranty
covering up to 2000$ in the event of theft. In order to qualify, upon completion of the
installation, your installer should go on-line to www.encryptr.com
and fill out the Limited antitheft warranty form. A copy should be printed and given to you for your records. Within ten
(10) working days a pair of holographic stickers will be mailed to you. Upon receiving them,
you must ensure to affix them on both front side windows of your vehicle.
Holographic stickers to be affixed on both side windows.
Page 4
P. 4 User Guide
Governmentregulations
This device complies with part 15 of the FCC Rules. Operation is subject to the following two
conditions: (1) This device may not cause harmf ul i nterf erenc e, a nd (2) thi s dev ic e mus t ac cept an y
interference received, including interference that may cause undesired operation.
This equipment has been tested and fou nd to comply with the limits for a Class B digital devic e,
pursuant to part 15 of the FCC Rules. These limits are des igned to provide reasonable protec tion
against harmful interference in a r esidential insta llation. This eq uipment gener ates and can radiate
radio frequency energy and, if not installed and used in accordance with the instructions, may
cause harmful interference to radio communications. However, there is no guarantee that
interference will not occur in a particular installation. If this equipment does cause harmful
interference to radio or television recepti on, which can be deter mined by turning the e quipment off
and on, the user is encouraged to try to c orrect the interference by one or more of the following
measures:
• Reorient or relocate the receiving antenna.
• Increase the separation between the equipment and receiver.
• Connect the equipment into an outlet on a circuit different from that to which the
receiver is connected.
• Consult the dealer or an experienced radio/TV technician for help.
This device complies with the Ind ustry Canada Radio Standards S pecification RSS 210. It s use is
authorized only on a no-interferenc e, no-protection basis; in other words, this device must not be
used if it is determined that it causes harmful interferences to services authorized by IC. In
addition, the user of this device must acc ept any radio interface that may be received, even if this
interference could affect the operation of the device.
Warning! Changes or modifications not express ly appro v ed by the party re s pons ible for compliance
could void the user’s authority to operate this device.
Introduction
This is a state-of-the-art remote car starter system. The system is packed with advanced features
such as priority access to the driver’s door (commodity features), the Safe Start children safety
feature and SmartStart™.
SmartStart™ is a groundbreaking technology that enables your remote starter features to be
accessed by your smartphone. Features include keyless entry, trunk release, panic, remote
start/stop toggle and alarm notifications
1
. Note: S martStart™ must be profess ionally installed. For
more information, see your nearest authorised Directed Canada dealer.
With many advanced functions, this product will satisfy any one of your expectations from high-end
commodity and security systems, without neglecting any standard feature commonly offered by
entry-level starters.
1
Certain conditions apply. See your authorised Directed Canada dealer.
Page 5
User Guide P. 5
VehiclePresets
Heater
When leaving the vehicle it is recommended t o preset the acc essory controls in pre paration for the
next remote start. Settings for the blower motor (fan) should not be le ft on
HIGH. It is recommended
to leave the settings on
LOW or MEDIUM instead.
WindshieldWipers,Radio&Headlights
Certain vehicles energize the radio and / or windshield wipers and / or headlight circuits while
running under remote start. When leaving th e vehicle you must ensure that the windshield wiper
and headlight switches are OFF . Le aving the he adligh t switch ON on cert ain ty pes of vehic les could
cause them to remain
ON even after remote starter shut down, resulting in a dead battery.
UsingtheTransmitter
Your remote starter is equipped with a 6-button, multi-channel, 2-way remote control. It can
operate two independent vehicles equipped with identical remote s tarters (see Multi-car operation
section on page 20).
LCDRemoteFunctions
The transmitter offers several command-confirmation and timer features. This section explains
some of the key functions avail able. The next s ection gives a sum mary of the button com binations
used to access the functions.
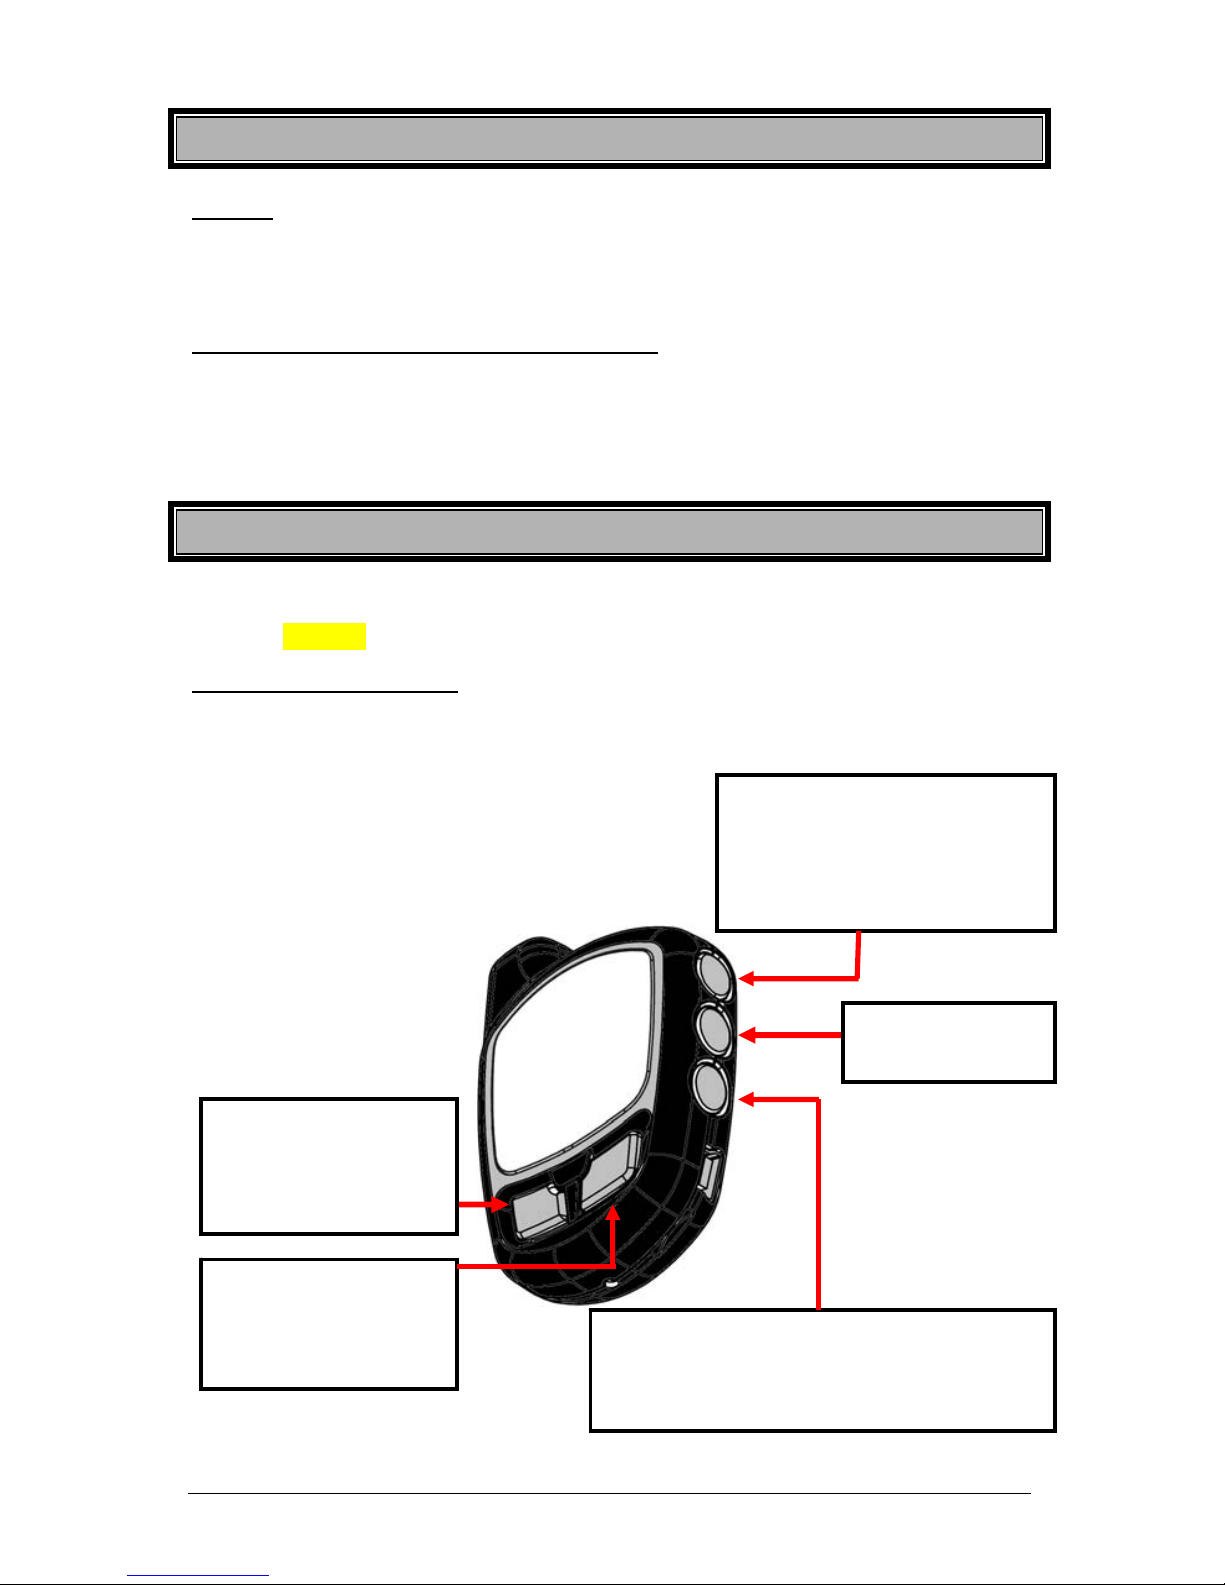
The functions of the transmitter are as follows:
Front view:
UNLOCK Button:
Unlocks all Doors and
disarms the Starter Kill (if
installed)
TRUNK Button:
Activates the Trunk
LOCK Button:
Locks all Doors and
arms the Starter Kill (if
installed)
START/STOP Button:
-Starts or Stops the engine (Normal functions).
-Starts the engine ONLY (if the Auxiliary Button is
programmed as STOP Button).
A
uxiliary Button:
Activates AUX 2, stops the Engine,
sets the Temperature, activates
Panic Mode, activates CWM (if
programmed).
Page 6
P. 6 User Guide
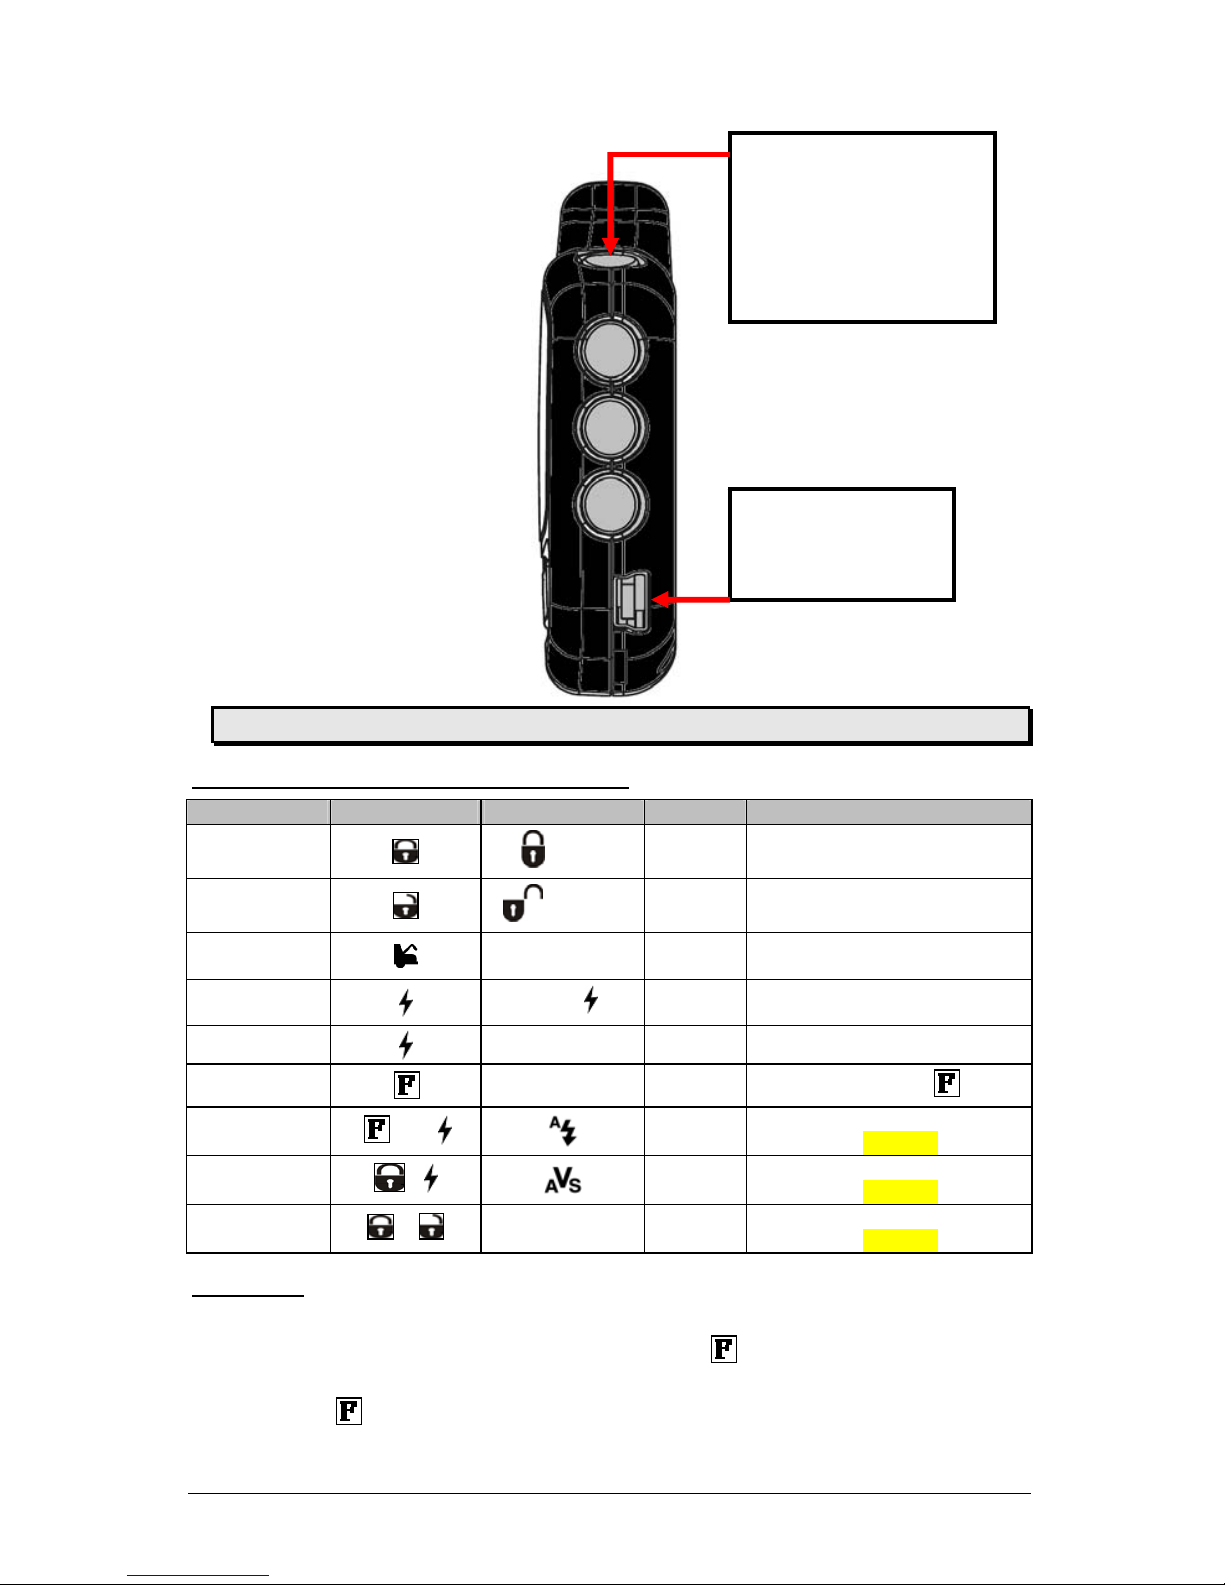
Side view:
CAUTION!! DO NOT USE A CHARGER OTHER THAN THE ONE SUPPLIED.
LCDTransmitterbasicconfirmations
Function Button pressed
Icon / text
Sound
Instructions / description
Lock
/ LOCK
1 beep Lock and arm the system
Unlock
/ UNLOCK
2 beeps Unlock and disarm the system
Trunk or aux 3
TRUNK 1 beep Trunk output
Start
0:15 +
3-beeps Start the engine
Stop
None 2-beeps Stop the engine
Back light
On for 2 seconds
Press and release the quickly
Cold weather
, then
1 beep
See Cold Weather Mode section
(page-15)
Combo Valet
+
1 beep
See Valet
mode section
(page-13)
Panic
or
None 1 beep
See Panic Mode section
(page-15)
Backlight
Three different ways to use the backlight:
• Turning the backlight on for 3 seconds, press the
for less than 1 second and
release.
• If the
button is pressed and held for more than 5 seconds the backlight will stay ON
as long as the button is held.
• To browse the MENU while the backlight is ON:
Function Button:
-Turns ON the backlight
-Allows access to Multilevel functions
-Enters Programming
mode
Charger port: the
battery charger plugs
into this port.
Page 7
User Guide P. 7
a) Press the for at least 1 second and release. The backlight should
turn ON.
b) Within 3seconds, press the
button for 2 seconds to access the
various functions.
ChargingtheBattery
• Plug in the USB charger.
CAUTION!! DO NOT USE A CHARGER OTHER THAN THE ONE SUPPLIED.
• The LCD displays “CHARGE” while the battery level bars within the battery icon flash.
• When charging is complete the LCD then displays “FULL”.
Remote’sadvancedfunctionsandMENU
HowtoaccessadvancedremotefunctionsandMENU
User
Transmitter
1. Press for 1 second and release
Î
Remote beeps once and MENU
appears on screen.
Note: At that point if you press you can
enter the remote’s MENU.
Î
Follow the steps listed below in
“Selecting and adjusting
advance MENU options”.
2. Press a 2nd time for 1 second and release
Î
Remote beeps once and L-01
appears on screen.
3. Press a 3rd time for 1 second and release
Î
Remote beeps once and L-02
appears on screen.
4. Press a 4th time for 1 second and release
Î
Remote beeps once and L-03
appears on screen.
Note: The order of LEVELS and MENU can be re-arranged in the menu option FBPRO.
Selecting and adjusting advanced menu options:
1. When in MENU, press
button to enter the menu.
2. Press
button to move up in the menu or button to move down in the
menu.
3. Press
button to select the option you would like to adjust.
4. Press button to increase the value or to activate or deactivate a function or
toggle through the selection.
5. Press
button to decrease the value or to activate or deactivate a function or
toggle through the selection.
6. Press
button to move to the next sub-option or go back to the main menu.
7. To SAVE modifications and EXIT remote’s MENU, do not touch any button for
approximately 5 to 10 seconds or press to immediately exit the MENU.
Page 8

P. 8 User Guide
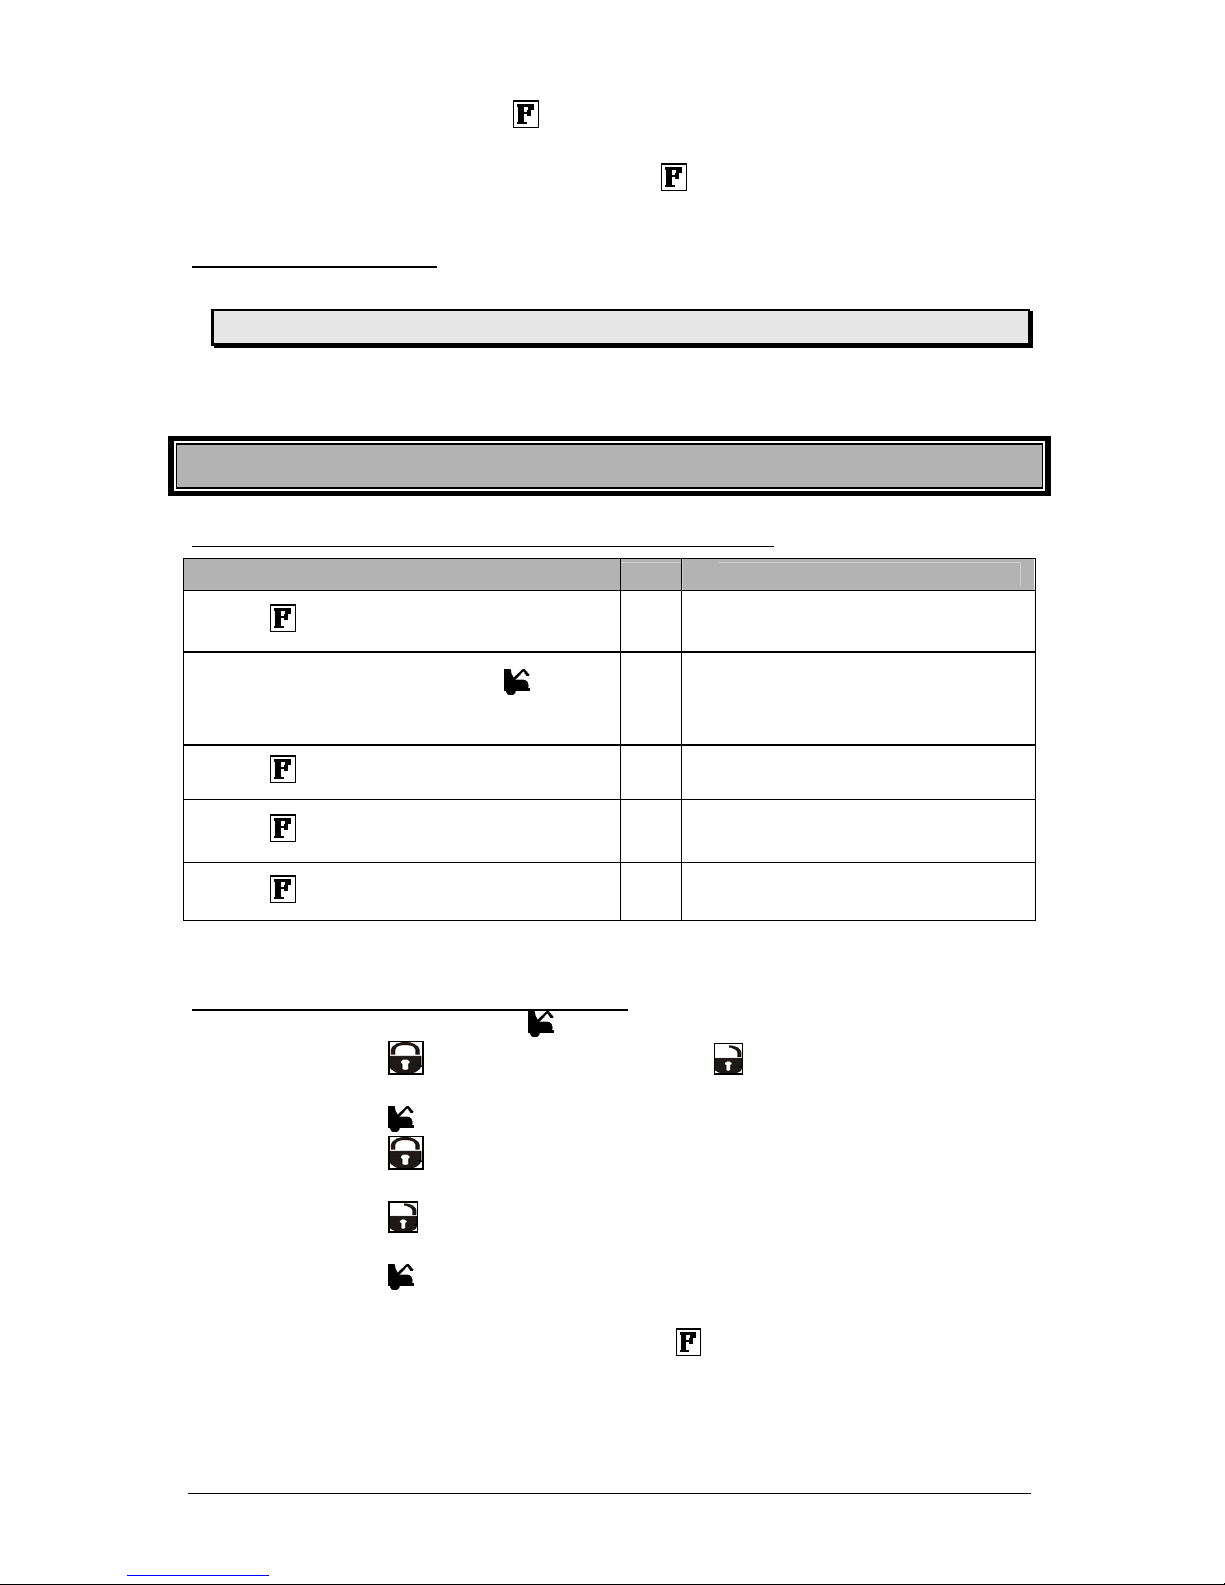
Remote’s advanced functions and MENU table:
Display Description
PARK
(1)
Parking meter countdown
This version of the countdown feature is particularly useful for keeping track of
parking meter time: the user may quickly set up the countdown using the
Parking
Menu
. The transmitter will beep 6 times, 5min before the Park ing countdown reaches
0 and beeps 6 times once the countdown expires.
Through Advanced Options, first press
to select MENU, then:
a. Choose PARK and press
.
b. Set the time at which you want set the alarm. First set the hour, and
press
. Then set the minutes and press .
c. Choose ON and wait. A flashing “P” and
will appear on the
screen to confirm activation.
ALARM
(2)
Alarm Clock
The LCD remote control has a built-in alarm clock, which can be set up using the
Alarm Clock Menu. Once the programmed time is reached, the remote will beep 6
times every minute until a button is pressed.
Through Advanced Options, first press
to select MENU, then:
a. Choose ALARM and press
.
b. Set the time at which you want to set the alarm. First set the hour,
and press
. Then set the minutes and press .
c. Choose ON and wait. A flashing “A” and
will appear on screen
to confirm activation.
CWM
(3)
Cold weather mode function:
Through Advanced Options, first press to select MENU, then:
a. Choose CWM and press
.
b. Choose ON/OFF, then press and hold until icon
appears/disappears.
VALET
(4)
Valet functions: (see page-13 for details)
1) Through Advanced Options, first press to select MENU, then:
a. Choose VALET and press
.
b. Press
or to select three kinds of Valet Modes:
i. CMVLT = Combo Valet
(Starter and alarm are disabled)
ii. VLTST = Valet Start
( Only the starter is disabled)
iii. VLTAM = Valet
(Only the alarm is disabled)
c. Once the selection is done, press
d. Choose ON/OFF, then press and hold
until;
i. The
icon appears/disappears to confirm Combo
Valet activation/deactivation.
ii. The
icon appears/disappears to confirm Valet start
activation/deactivation.
iii. The
icon appears/disappears to confirm Valet Alarm
activation/deactivation.
TSTAR
(5)
Time start function:
This feature is used to remote start the car at a pre-programmed time. Once the preprogrammed time is reached, the remote will send a start command to the car
module.
Page 9

User Guide P. 9
Through Advanced Options, first press to select MENU, then:
a. Choose TSTART and press
.
b. Set the time at which you want to remote start the vehicle. First set
the hour, and press
. Then set the minutes and press .
c. Choose ON and wait. A flashing “T” and will appear on the
screen to confirm activation.
Note:
The TSTART function can only be carried out once per remote start.
SECUR
(6)
Secure function:
This feature is used to lock the keypad of the transmitter to avoid accidental button
press. When the keypad is locked and a button is pressed, the LCD will display
“PRESF” for 1 second and goes back to the clock.
The transmitter keypad can also be locked as follows:
a. Press
to select MENU.
b. Within 3 seconds, press
.
c. The LCD will display “SECUR” to confirm locking of the keypad.
• Press for about 1sec, to unlock the transmitter’s keypad.
COLOR
(7)
Backlight color
The backlight can be set to 8 different colors.
Through Advanced Options, first press
to select MENU, then:
a. Choose COLOR and press
.
b. Choose the desired color by pressing
or
CONFM
(8)
Confirmation Mode Menu:
• BZVIB Î BUZ: The remote will beep to con firm various commands.
VIB: The remote will vibrate to confirm various commands.
Note: The
icon will appear on the screen to
confirm remote is set to vibration mode.
• BLITE Î ON: The LCD screen will flash when the alarm is triggered.
OFF: The LCD won’t flash if the alarm is triggered.
CLOCK
(9)
Clock:
The Clock menu is used to set the current time on your remote control.
Through Advanced Options, first press
to select MENU, then:
a. Choose CLOCK and press
.
b. Set the time at which you want to set the clock. First set the hour,
and press
, then set the minutes and press .
TEMP
(10)
Temperature display
Can be set to read the temperature in Celsius (CTEMP) or Fahrenheit (FTEMP)
LANGU
(11)
Language display
Can be set to either English or French
SBPRO
(12)
Side button function:
The side button can be programmed as:
• Panic button;
• Stop button;
• Temperature request button;
• Aux 2 outpu t button;
• or CWM.
KEYLOC
Keypad lock
Note: In order for this feature to work, “Secure function” must be set to ON.
Page 10

P. 10 User Guide
(13)
If there is no activity within the programmed time, the keypad will automatically lock
after 5 seconds, 10 seconds or 20 seconds.
• Press for about 1sec, to unlock the transmitter’s keypad.
ILLUM
(14)
LCD illumination:
When this function is enabled, the LCD will illuminate each time Lock, Unlock or
START is activated.
FBPRO
(15)
Button Function:
The order of LEVELS and MENU can be re-arranged using the
Button Function
Menu.
F Button Function
Menu
FBPRO Function Button Programming
Function Button
programming
M 1 2 3
1 2 3 M
2 3 1 M
2 1 3 M
3 1 2 M
MENU, level 1, level 2, level 3
Level 1, level 2, level 3, MENU
Level 2, level 3, level 1, MENU
Level 2, level 1, level 3, MENU
Level 3, level 1, level 2, MENU
RemoteStartingYourVehicle
SettingYourVehicleIntoReadyMode
If your vehicle has a manual transmission you must read the follow ing indications. The u nit must
first be set to Ready Mode in order to start the vehicle by remote. If t he unit is not set to Ready
Mode, it cannot remote start the vehicle.
Please note that Ready Mode can be enabled by the remote or the handbrake, depending on th e
option that was selected by your installer. T herefore, you must follow the appropriate procedure
between the two described below in order to set your vehicle into Ready Mode.
Once the system is set to Ready Mode, the vehicle can be remote started and stopped at any time.
The system will exit Ready Mode if a door, the hood or the trunk is opened, if the brake pedal is
pressed, if the parking brake is disengaged or if the ignition key is turned to the IGNITION ON
(RUN) position.
To set the system to Ready Mode:
If Ready Mode is enabled by remote
If Ready Mode is enabled by handbrake
1. Ensure that all the doors, hood and trunk are closed. Make sure that the gear selector is in the
neutral position.
2. With the engine already running, apply the
parking brake once and release the brake
pedal.
2. With the engine already running, apply the
parking brake twice within 10sec.
Make sure to release the brake pedal.
The parking lights will flash 3 times quickly
and remain lit.
Skip to step 4.
3. Within 20 sec. of engaging the parking
brake, press and hold , or on
the transmitter.
4. The parking lights will flash 3 times quickly
and remain lit.
-
5. Remove the key: the engine will continue running.
6. Exit the vehicle and close all doors, hood and trunk.
7. Press for approx. 1 second either:
Page 11

User Guide P. 11
• to lock the doors and shut down the engine;
• to unlock the doors and shut down the engine;
• to shut down the engine without affecting the doors.
8. The icon will appear on your screen.
RemoteStarting
1. Press the button for approximately 1 second and release.
2. The remote will beep once and the LCD will display “START”.
3. The remote will confirm the remote starter’s activation by beeping 3 times.
If your vehicle has an automatic transmission and it does not start at the first attempt, the system
will shut down, wait a few seconds a nd try to start the engine again. There will be 3 start attempts
before the system give s up.
DrivingOff
With the vehicle running under remote start, press the button to disarm the security system
(this will also unlock the doors). Enter the vehicle and do the following:
1. Turn the ignition key to the IGNITION ON (RUN) position. (Do not turn the key to the CRANK position
while the engine is running. This would cause the starter motor to re-engage.)
2. Press the brake pedal to disengage the remote starter unit.
You are now ready to drive off.
ArminganddisarmingoftheSystem
The Alarm can be configured by the installer either to Passive Mode (so as to arm a utomatically)
or Active Mode (so as to require the user’s intervention for arming). By default, the R emote Car
Starter is configured to Passive Mo de.
Passive mode:
To arm the alarm, press the
button on the transmitter, OR
1. In Passive Mode, the alarm will automatically arm 30sec once the last door is closed.
2. The LED on the antenna will flash quickly during the countdown preceding th e ac tiv ation
of the system.
3. Once the activation count down expires, the siren will chirp onc e and the LED will flash
slowly to indicate that the alarm is now armed.
To disarm the alarm, press the
button on the transmitter.
1. The LED on the antenna will flash quickly during the countdown preceding th e ac tiv ation
of the system.
2. The alarm will automatic ally rearm itself after 30sec if no door is left opened and the
ignition is not turned ON.
Active Mode:
To arm the alarm, press the
button on the transmitter.
1. The siren will chirp once.
2. The LED on the antenna will flash slowly.
To disarm the Alarm, press the
button on the transmitter.
1. The siren will chirp twice.
2. The LED on the antenna will remain OFF.
Page 12

P. 12 User Guide
Intrusionalertviaremote
The remote will beep or vibrate for about 60 seconds when an intrusion from door, hood, trunk,
shock or ignition is detected. At the same time, the LCD remote will display “
ALARM” and “DOOR /
HOOD / TRUNK / SHOCK /
real time” (depending on the type of alarm) alternately. The icons of door,
hood, trunk and shock, as well as the red backlight, will be flashing (when the
BLITE is set ON).
A
larm Type LCD Text
Icon
Sound or Vibration
DOOR ALARM + DOOR
60 seconds
HOOD ALARM + HOOD
60 seconds
TRUNK ALARM + TRUNK
60 seconds
SHOCK ALARM + SHOCK
60 seconds
IGNITION ALARM + real time NONE NONE
The user can press the
or button to stop the alarm (unless TWO-STAGE Mode has been
programmed – one press then only mutes the siren; the user needs to press twice in order to
disarm the system).
RemoteStarterFeatures
RemoteDoorLocks
If your system was installed with the Remote Door Locks option, you will have the convenience of
remote keyless entry.
To UNLOCK your doors and DISARM the system:
1. Press and hold the
button for approx. 1 sec
2. The
icon will appear on the remote’s LCD screen
3. The siren will chirp twice to confirm that the doors have been unlocked, the Starter Kill
feature is disarmed (if it was installed) and that the Alarm is disabled.
To LOCK your doors and ARM the system:
1. Press and hold the
button for approx. 1 sec.
2. The
icon will appear on the remote’s LCD screen
3. The siren will chirp once to confirm that the doors have been locked, the Starter Kill
feature is enabled (if it was installed) and that the Alarm is armed.
RemoteTrunkRelease
If your system was installed with the Remote Trunk Release option, you can open your trunk by
pressing the
button until the remote displays the text “TRUNK” on the s creen. In addition , this
will also disarm the alarm.
Page 13

User Guide P. 13
IdleMode
Convenience feature: Idle Mode allows you to keep the engine running and the doors
locked while you stop, for example, at a convenience store or for a short delivery. (remo ve
this part for IG)
This feature allows you to let the remote start er take over control of the vehicle (i.e. no Key in the
Ignition Switch) while the engine is running.
If your vehicle has an automatic transmission, proceed as follows to set the system to Idle Mode:
1. With the engine running, make sure to release the brake pedal and press the
, or
button on the transmitter until the parking lights come ON.
2. Remove the ignition key from the ignition switch.
The engine will continue running.
3. Exit the vehicle and close all doors, hood and trunk.
4. Press the
button to lock the doors, to arm the starter kill and to arm the alarm.
If your vehicle has a manual transmiss ion, Idle Mod e can be activat ed throug h the same ro utine as
that used for Ready Mode (page-10); at the last step, the butt on is pressed instead of the
other buttons. This will lock the doors, arm the system and leave the engine running.
Note 1: The engine will continue running unt il the user re-enters the vehicle or unti l the expiration
of the engine run time.
Note 2: If the pre-programmed run- time expires or if the user shuts down th e engine by remote
control, the vehicle will enter Ready Mode.
Caution!! Do not leave children or pets unattended in a vehicle standing in Idle Mode.
ValetModes
When the vehicle is in Combo Valet an d Valet Start, the remote starter is disabled. If the vehicle
needs to be serviced, or if you park it indoors, the Combo Valet and Valet Start will prevent the
engine from being remote-started accidentally.
There are 3 types of Valet Modes: Combo Valet, Valet Start and Valet Alarm.
• Combo Valet: Both remote starter and alarm are disabled.
• Valet Start: Only the starter function is disabled.
• Valet Alarm: Only the alarm functions are disabled.
1) ToputthesystemintoComboValet
a) To put the system into Combo Valet mode using the KEY:
i) Insert the ignition key into the ignition switch. Within 10 sec., turn the key 5 times
successively into the IGNITION/RUN and OFF positions.
ii) The parking lights will flash three times.
iii) Turn the ignition OFF.
iv) The LED on the antenna will come ON solid to indicate that the vehicle has
successfully entered Combo valet.
v) Press any command to refresh the screen; the
icon will appear on your LCD
remote.
b) To put the system into Combo Valet
mode using the TRANSMITTER:
Page 14

P. 14 User Guide
i) Press the and buttons simultaneously until the icon appears on your
LCD remote.
ii) The LED on the antenna will come ON solid to indicate that the vehicle has
successfully entered Combo valet.
c) To put the system into Combo Valet
mode using the PUSH BUTTON SWITCH:
i) Insert the ignition key into the ignition switch.
ii) Turn the key into the ON position
iii) Within 5 seconds, press the push button switch until the parking lights flash 3
times.
iv) Release the push button and turn the ignition to the OFF position.
v) The LED on the antenna will come ON solid to indicate that the vehicle has
successfully entered Combo valet.
vi) Press any command to refresh the screen; the
icon will appear on your LCD
remote.
2) TotakethesystemoutofComboValetMode
a) To take the system out of Combo Valet mode using the KEY:
i) Insert the ignition key into the ignition switch. Within 10 sec., turn the key 5 times
successively into the IGNITION/RUN and OFF positions.
ii) The parking lights will flash twice.
iii) Turn the ignition OFF.
iv) The LED on the antenna will flash quickly to indicate that the vehicle is now out of
Combo valet.
v) Press any command to refresh the screen; the icon will disappear on your
LCD remote.
b) To take the system out of Combo Valet mode using the TRANSMITTER:
i) Press the and buttons simultaneously until the icon disappears from
your LCD remote.
ii) The LED on the antenna will flash quickly to indicate that the vehicle is now out of
Combo Valet.
c) To take the system out of Combo Valet mode using the push button switch:
i) Insert the ignition key into the ignition switch.
ii) Turn the key into the ON position.
iii) Press the push button switch until the Parking lights flash twice.
iv) Release the push button and turn the ignition to the OFF position.
v) The LED on the antenna will flash quickly to indicate that the vehicle is now out of
Combo valet.
vi) Press any command to refresh the screen; the icon will disappear on your
LCD remote.
3) ToenableordisableCombovalet,ValetStartorValetAlarmviaremote:
i) Through Advanced Options, first press to select MENU (page-7).
ii) Choose VALET and press .
iii) Press or to toggle between three kinds of Valet Modes:
(1) CMVLT = Combo Valet (Starter and Alarm is enabled or disabled)
(2) VLTST = Valet Start (Only the starter is enabled or disabled)
(3) VLTAM = Valet alarm (Only the alarm is enabled or disabled)
Page 15

User Guide P. 15
iv) Once the selection is done, press .
v) Choose ON or OFF, then press and hold until;
(1) The
icon appears or disappears to confirm Combo Valet is enabled or
disabled.
(2) The icon appears or disappears to confirm Valet start is enabled or
disabled.
(3) The
icon appears or disappears to confirm Valet Alarm is enabled or
disabled.
The system will warn you if someone attempts to remote start the vehicle while in Combo Valet
and Valet Start. The parking lights will turn ON then OFF, then flash twice.
PanicMode
In an emergency situation, you c an activate panic mode by pres sing and holding the OR
button until the siren starts t o s ou nd. If th e v eh ic le is under a remote start, the engi ne wi ll shutdown
automatically before setting off the Siren. You can stop the Siren by pressing OR
Furthermore, the panic mode can be stopped by activating Va let Mode (page- 13)
* Panic Mode will automatically shut down after 30 sec.
QuickLockoutTM
(Also called Secure Panic.) For fast protection in emergency situations, the system will LOCK all
doors when you press the brake pedal while you hear the s ound signal. (Quick Lockout is only
available when panic mode has been set off.)
ColdWeatherMode
If the vehicle has a Manual transmi ssion, Ready mode (page-10) should b e set before entering
Cold Weather. When cold weather mod e is active, the engine st arts every 2 hours and runs for 3
minutes (or for 8 or 20 minutes with diesel engines ). Cold weather mode automatically ends after
24 hours. The vehicle must be set in ready mode (manual transmission) before the cold weath er
mode can be activated.
To enter Cold Weather Mode:
1. Through advance functio n remot e’s men u (page-6), select L-01.
2. Press and hold the
button until the icon will appear on the display.
To exit Cold Weather Mode, do any one of the following actions:
• Open the hood.
• Start the engine by remote.
• Turn the ignition key to the IGNITION ON (RUN) position.
• Through advance function remote’s menu (page-6), select L-01.
Press and hold the
button until the icon will disappear on the display.
To verify whether the system is in cold weather mode:
The
icon should appear on your remote display.
OR
Press the brake pedal:
If the vehicle is in cold weather mode, the parking lights will remain ON while the brake pedal
is pressed. (Automatic transmission ONLY)
Page 16

P. 16 User Guide
ExtendedRunTime
While the vehicle is running under a remote start, press and hold the button for more than
3 seconds until the remote beeps 3 times. This will reset the run time counter to zero and restart
the run time cycle from the beginning. The extended run time pro cedure can only be carried out
once per remote start.
To stop the vehicle, at any moment, simply press the button.
Example: If your remote car starter is program med for a run time of 3 min utes and your vehic le
has been running for 2 minutes already, pres sing the button will reset the count er
to zero and allow the engine to run for another cycle (in this case, 3 minute s).
IntrusionCodesviaLEDlight
The system monitors the foll owing:
• Any vibrations sensed by the shock sensor such as someone breaking of the window,
windshield, etc.
• Doors
• Ignition
• Trunk
• Hood
Note: If an intrusion has occurred the siren will sound for a maximum of 1minute.
When an intrusion has occurred, press ing will make th e siren chirps four times. The antenna’s
LED will provide an intrusion code corres ponding to the type of the intrusion that occurred. The
LED intrusion codes are flashed in continuous loops.
2 x = Doors intrusion 5x = Panic
3 x = Shock Sense 6x = Ignition
4x = Hood 7x = Trunk
CarFinder™
When enabled, the Car Finder™ option w ill he lp you l ocate your v ehicle by s ounding a s iren or the
horn. To initiate,
1. Through advance functio n remot e’s men u (page-6), select L-01.
2. Press
to sound the siren once without affecting the door.
TemperatureRequest(IfACCTemp101installed)
The user can request the temperatur e in the vehic le if a Temper ature Sens or Module (ACC-Temp-
101) is installed:
• Through advance function remote’s menu (page-6), select L-01.
• Immediately press the button and hold it until th e temperature is displayed on the
LCD screen.
TemporaryChirpDelete
To temporarily disable the chirp co nfirmations of the siren upon arming and disarming (e.g. in a
quiet neighbourhood):
• Press the
button. The remote will beep once.
• Immediately, press the
or button to arm or disarm system without any chirp.
Page 17

User Guide P. 17
Relock
If you unlock the doors with the re mote transmitter, but do not open any door, hood, trunk or turn
ignition
ON within 30 seconds, the system will automatically relock and arm.
Note: When the system is in act ive arming mode and the relock mode is enabled, the doors
will relock but the system will not rearm.
Remotefinder
This function will help you locate your remot e. The unit will send a signal to the remote to trigger
the remote to beep informing you of its location. Follow this procedure to activate remote finder.
1. Locate the push button switch in the car. (refer to your installer for its location)
2. Press and hold the push button switch until the parking lights flash 5 times.
Press the
or button to stop the beeping of the remote once it is found.
MissingaStartoraStopConfirmation
If you have not received a Start or the Stop confirmation after pressing the button, pressing the
button will refresh the display and will confirm if the vehicle was started or stopped.
If no Start Confirmation Was Received:
• Press the
button:
¾ The remote’s
icon will start flashing
¾ The icon and runtime time countdown will be displayed.
If no Stop Confirmation Was Received:
• Press the
button:
¾ The
will be displayed
¾ The remote’s
icon and the runtime countdown will disappear.
AdvancedFeatures:InstallationprogrammableOptions
The remote starter was designed with f lexibility and OEM integration in mind. With its programmable options, this unit can single-handedly control nearly any electrical system in your vehicle .
Caution: The programming of your system should be left to a professional. Changing any one
of the settings may affect the operation of your remote starter.
IgnitionControlledDoorLocks
This is an added security feature. If your Remote Car Starter was installed with the IgnitionControlled Door Locks option, the doors will automatically lock as soon as the ignition key is turned
to the IGNITION ON (RUN) position while the brakes are press ed. The remote car start er will also
lock any door that was unlocked and opened (then closed) the next time the brake pedal is
pressed. When the key is turned to the OFF position, the doors will automatically be unlocked.
SecureLock
(Disabled by default.) Before your vehicle c an be remote-started, the f actory security system must
first be disarmed. The Secure Lock feature may be req uired on certain v ehicle models wit h factory
security systems that automatically unlock the doors when the security system is disarmed.
Page 18

P. 18 User Guide
To keep your vehicle protected when the factory s ecurity system is disarmed for a remote start,
Secure Lock will relock your doors as soon as the vehic le is started. Once the en gine is shut down
by remote or after its runtime has expired, Sec ure Lock will also rear m your fac tory s ecurity sys tem
and relock the doors.
“HomeValetTM”Mode
If configured at installation, this feat ure will remotely set the vehicle to a no-remote-start mod e: if
the vehicle is parked indoors there is no danger of it s tarting accidentally by remote contr ol. If the
vehicle has a manual transmission, it should be set into ready mode before activating the Home
Valet™.
Note: Once the Home Valet Mode is activated, the vehicle will not start by rem ote, but the
alarm functions will remain active.
To take the system into home valet mode:
1. Press the
or button.
2. Within 3 seconds, press the
and buttons simultaneously.
3. The transmitter will beep once and the icon will display.
To take the system out of home valet mode:
• Turn the ignition key to the IGNITION ON (RUN) position.
The system will warn you if someone attempts to start your vehicle while it stands in home valet
mode. The parking lights will:
Turn ON then OFF; then
Flash twice, pause; then
Flash twice again.
SafeStartMode
This feature will eliminate accidental remote starts, e.g. when children are playing with the
transmitter.
Safe start enabled: If this feature is enabled, the user must press the button twice within
3 seconds to remote-start the vehicle.
Swap start: If this feature is enabled;
1. Through advance functio n remot e’s men u (page-6), select L-01.
2. Press
to remote start the vehicle.
The Aux 2 output can be activated by pressing the button.
EngineRunTime
If you have a gas engine, your remote starter can be progr ammed to run the engine for 3, 15, or
25 minutes (15 minutes by default). If you have a diesel engine, the remote starter can be
programmed to run the engine for 8, 20, or 30 minutes (20 minutes default).
TurboMode
If Turbo Mode is configured at installation, it will allow a turbocharger to idle down after the user
leaves the vehicle: the unit will take over the vehicle and keep it running for 60 seconds (or until it
is shut down by remote control), then shut down the engine.
If your vehicle has an automatic transmission, proceed as follows to set the system to Turbo
Mode:
1. With the engine running, make sure to release the brake pedal and press the , or
button on the transmitter until the parking lights come ON.
Page 19

User Guide P. 19
2. Remove the ignition key from the ignition switch.
The engine will continue running.
3. Exit the vehicle and close all doors, hood and trunk.
4. Press the
button; this will lock the doors, arm the system alarm and confirm tha t the
vehicle is in Turbo Mode.
5. The engine will shut down after 60 seconds.
If your vehicle has a manual transmission, follow all steps of the Ready Mode routine (page-10)
to activate Turbo Mode. At the last step,
• Press to lock the doors and have the engine shut down after 60 seconds;
The parking lights will flash 3 times and remain lit.
The alarm and starter kill will be armed.
• Press to unlock the doors and have the engine shut down after 60 seconds;
The parking lights will flash 3 times and remain lit.
• Press
To shut down the engine without affecting the doors.
Note: The vehicle will enter Ready Mode once the engine run time expires.
SirenChirps
The siren will chirp to confirm the system‘s basic operations:
• By default, when the doors are being locked, th e siren will give 1 chirp if all the d oors,
the hood and the trunk are closed.
• If one of the doors, the hood or t he trunk is open as the doors are being locked, the
siren will chirp 3 times.
• When the doors are being unlocked, the siren will give 2 chirps if no intrusion was
detected.
• If an intrusion was detected, the siren will 4 times if
is pressed.
The system can alternatively be set to: (must be configured by the installer)
• Warning Mode (no chirp during lock/unl ock – unless one of the doors, the h ood or the
trunk is open. In this case there wil l be 3 chirp when is pressed. – Or unles s the
alarm was triggered, in which case there will be 4 chirps when
is pressed.
• Open Zone Notification (the system will warn for doors opened up to 10 seconds after
arming).
• No Chirp (the vehicle will not chirp under any circumstance).
Arming
Arming of the system can be program by your installer into 4 different options. By default, your
system is programmed to “passive arming – 2 stage disarm”:
• Active arming: The system will only arm if
button is pressed.
• Passive arming (2 stage disarm): The system will automatically arm itself 30 seconds
after all doors, hood and trunk are closed.
Note: If an alarm is triggered, pressing the
button will stop the siren while keeping
the doors locked and the system armed.
• Passive arming (1 stage disarm): The system will automatically arm itself 30 seconds
after all doors, hood and trunk are closed
Note: If an alarm is triggered, pressing the
button will stop the siren and unlock the
doors.
Page 20

P. 20 User Guide
• Active arming with disarm notification: This feature will notify the user when the
vehicle is left disarmed after Ig nition is turne d off, or when the Module is disarm ed after
being previously armed, the opening or closing of a Door will cause the Horn or the
Siren to sound once after 10 sec. to warn the user that the vehicle was left
unprotected. Pressing
or will cancel this timer.
ShockSense&WarnAwaysense
If somebody hits, jostles or otherwise moves your car, the shock sensor sends a signal to the brain
indicating the intensity of the motion. Depending on the severity of the shock, the system can react
to a full shock by triggering the alarm or it can also respond to a lighter shock (30 % of the strength
of a full shock) by giving a warn-away (without triggering an Alarm condition). However, when the
Engine is running after a remote start, the full shock is disabled but will still give a warning sound if
warn-away is enabled.
Note: Refer to your installer if you wish to disable the shock sensor permanently.
Siren/HornChirpTiming
The pulse duration can be configured by your installer (from 5 ms. to 200 ms.).
Prioritydoor:
If configured by your installer, this gr eat feature allows y ou to unlock solely the driver’s door with a
single press of the
button on the transmitter, and to unlock the other doors, if desired, by
pressing the
button for a second time.
Bypass
Remote starters of this series have the ability to work in two-way mode (D2D) with Xpresskit and
ADS bypass modules. They also offer one-way communication with Fortin brand bypass modules.
Note: For Hardware 5.0 and higher, there can only be one bypass connected to the unit.
MulticarOperation
This option allows the owner of two vehicles, b oth equ ippe d with the s ame remo te starter mode l, to
control both systems independently with a single remote cont rol. To control the second vehicle:
Press
+ simultaneously: ............................................. LOCK
Press
+ simultaneously: ............................................. UNLOCK
Press
+ simultaneously: ............................................................ START
Press + simultaneously: ............................................... STOP
Press ¾ ¾ ¾ : .............................................. TRUNK
or
Press ¾ ¾ ¾ : ............................................ LOCK
Press ¾ ¾ ¾ : ............................................. UNLOCK
Press ¾ ¾ ¾ : .............................................. START
Press
¾ ¾ ¾ : .............................................. STOP
Press
¾ ¾ ¾ : ............................................. TRUNK
Note: Your remote control must be configured for second car operation by the installer.
Page 21

User Guide P. 21
MultiLevelFeatures(defaultstate)
The multi-level features allow yo u to ac cess differen t features of your vehic le or of a s econd car by
pressing the button onc e, twic e or t h ree times. For convenience purpose, the order of LEVELS
and MENU can be re-arranged through FBPRO setting (page-7).
Features:
• MENU: see page-7 for complete lists of MENU available.
• Basic features: AUX-2, Cold Weather mode, Swap Start, Temperature request.
• Multicar Operation: Allows the owner to control bot h vehicle equipped with the same
remote starter model.
To control the Multi level features, refer to the tables below:
FBPRO setting 1 *default FBPRO setting 2
FBPRO
setting
Features Levels
FBPRO
setting
Features Levels
M MENU MENU 1 Basic features L01
1 Basic features L01 2 Multicar operation L02
2 Multi car operation L02 3 N/A L03
3 N/A L03 M MENU MENU
FBPRO setting 3 FBPRO setting 4
FBPRO
setting
Features Levels
FBPRO
setting
Features Levels
2 Multi car operation L01 3 N/A L01
3 N/A L02 1 Basic features L02
1 Basic features L03 2 Multicar operation L03
M MENU MENU M MENU MENU
FBPRO setting 5
FBPRO
setting
Features Levels
2 Multi car operation L01
1 Basic features L02
3 N/A L03
M MENU MENU
Example: If the multi-level features are set to FBPRO setting 3, the basic features can be
accessed as follow:
x To activate AUX-2 feature, the user needs to browse the remote’s advanced functions (page-6)
and select L03. After selecting L03, immediately press lock to activate the AUX-2 feature.
Page 22

P. 22 User Guide
TroubleshootingTransmittingRange
Many factors may affect the operating range of the transmitter. Some of these are:
• The condition of the battery in the transmitter.
• The operating environment (for example: downtown radio-frequency noise, airports, cellular
phone towers…)
• Metal: any type of metal will affect operating range. This includes the vehicle itself.
• The shape of the vehicle can affect range as well (vans in general have less range).
• The shape of the roof a nd A-pillars brings about cons iderable radio-freq uency deflection (i n this
case the signal from the remote control). As a result, the directi on in which the vehicle is facing
in relation to the remote control c a n a ffec t th e ra nge. Straight on (standing in front of the v ehi c le )
generally gives you the greatest ran ge; the second best performance is from the b ac k . Us ing th e
remote control from either side of the vehicle will usually give the lowest range.
• The range will be significantly lower in a crowded parking lot than in open space.
• Always hold the transmitter high, approximately at shoulder height.
The operating range will be somewhat lower on veh icles equipped with an aftermarket or factory
alarm
Diagnostics–ParkingLightFlashTable
Parking lights flashes Description
1
• Doors locked.
• Trunk released.
• Start signal received from the remote.
• Runtime has expired
2 fast
• Doors unlocked
• Valet mode is deactivated
2 slow
• Shutdown by remote
4 fast
• Shutdown by brake
• A remote start was attempted while the brake pedal is engaged.
3 slow
• Runtime is extended.
1 slow Æ 2 fast
• Valet mode activated.
10 fast
• Shutdown by hood.
• A remote start was attempted while the hood is open.
ON Î twice
• Cold weather mode deactivated.
ON Î 3 times
• Cold weather mode activated.
Solid ON
• Engine is running under remote start.
Flash for 30 sec.
• Panic mode is triggered.
Flash for 60 sec.
• Alarm is triggered.
ON Î twice Î twice
• A remote start was attempted while the system is in home valet.
 Loading...