

Page 1
INDUSTRY CANADA USER NOTICE:
Operation is subject to the following two conditions: (1) this device may not cause interference, and (2) this device must
accept any interference, including interference that may cause undesired operation of the device.
To reduce potential radio interference to other users, the ant enna type and its gain sho uld be so chosen t hat the e quivalent
isotropically radiated power (EIRP) is not more than that required for successful communication.
NOTE: The manufacturer is not responsible for any radio or TV interference caused by unauthorized modifications to this
equipment. Such modifications could void the user's authority to operate the equipment.
Doc#: 110829 Rev: 1.3 © 2011 -CT-5471TW- -FcN- Canada
TWOWAY6BUTTONLCDAUTOMATIC/MANUALTRANSMISSION
REMOTESTARTERSYSTEMWITHFULLALARMSYSTEM
CT-5472TW
User Guide
WARNING!
It is the responsibility of the vehicle operator to ensure that their vehicle is parked in
a safe and responsible manner.
1. a) Manual transmission
: When leaving the vehicle, it is the user’s responsibility
to ensure that the gearshift lever is in the NEUTRAL position and the parking
brake is engaged in order to avoid accidents upon remote starting.
b) Automatic transmission
: When leaving the vehicle, it is the user’s
responsibility to ensure that the gearshift lever is in “Park” in order to avoid
accidents upon remote starting.
(Note: Make sure that the automatic vehicle cannot start in "Drive".)
2. It is the user's responsibility to ensure that the remote starter is disabled or put
into valet mode before servicing.
The Transmitter’s Battery:
Depending on the usage, the transmitter’s battery can last between 3 to 6 months. When the battery is low, the
transmitter will emit two “beeps” in a repetitive cycle. At that point the batteries should be replaced. We
recommend keeping a spare battery somewhere handy such as inside the glove compartment.
Page 2

P.2
User Guide
Table of Content
INTRODUCTION WITH SMARTSTART™ .............................................................................. 3
VEHICLE PRESETS .......................................................................................................................... 3
H
EATER & HEATED SEAT
................................................................................................................. 3
W
INDSHIELD WIPERS, RADIO & HEADLIGHTS
..................................................................................... 3
USING THE REMOTE CONTROL ..................................................................................................... 3
LCD R
EMOTE FUNCTIONS
................................................................................................................ 3
B
ASIC VEHICLE OPERATIONS
............................................................................................................ 4
T
RANSMITTER MODE SELECTION
...................................................................................................... 4
H
OW TO ACCESS REMOTE’S FUNCTION MENUS
: ................................................................................... 5
T
IMER COUNTDOWN ADJUSTMENT
.................................................................................................... 5
REMOTE-STARTING YOUR VEHICLE ............................................................................................. 6
S
ETTING YOUR VEHICLE INTO READY MODE
...................................................................................... 6
R
EMOTE-STARTING
.......................................................................................................................... 6
D
RIVING OFF
................................................................................................................................... 7
ARMING AND DISARMING OF THE SYSTEM................................................................................. 7
REMOTE STARTER FEATURES ...................................................................................................... 7
R
EMOTE DOOR LOCKS
..................................................................................................................... 7
R
EMOTE TRUNK RELEASE
................................................................................................................ 8
I
DLE MODE
...................................................................................................................................... 8
V
ALET MODE
................................................................................................................................... 8
P
ANIC MODE
................................................................................................................................. 10
Q
UICK LOCKOUT
™ ........................................................................................................................ 10
C
OLD WEATHER MODE
.................................................................................................................. 10
E
XTENDED RUN TIME
..................................................................................................................... 10
I
NTRUSION CODES VIA
LED
LIGHT
................................................................................................... 11
C
AR FINDER
.................................................................................................................................. 11
T
EMPORARY CHIRP DELETE
........................................................................................................... 11
MISSING A START OR A STOP CONFIRMATION ........................................................................ 11
ADVANCED FEATURES: INSTALLATION-PROGRAMMABLE OPTIONS .................................. 12
I
GNITION-CONTROLLED DOOR LOCKS
.............................................................................................. 12
S
ECURE LOCK
............................................................................................................................... 12
“H
OME VALET
TM
” M
ODE
................................................................................................................. 12
S
AFE START
.................................................................................................................................. 12
E
NGINE RUN TIME
......................................................................................................................... 13
T
URBO MODE
................................................................................................................................ 13
S
IREN CHIRPS
............................................................................................................................... 13
A
RMING
........................................................................................................................................ 14
S
HOCK SENSE & WARN AWAY SENSE
............................................................................................. 14
P
RIORITY DOOR
: ............................................................................................................................ 14
M
ULTI-CAR OPERATION
.................................................................................................................. 14
R
ELOCK
........................................................................................................................................ 15
MULTI-LEVEL FEATURES ............................................................................................................. 15
DIAGNOSTICS – PARKING LIGHT FLASH TABLE ...................................................................... 17
POOR TRANSMITTING RANGE ISSUES....................................................................................... 18
PROSTART LIMITED LIFETIME WARRANTY ............................................................................... 19
Page 3
User guide
P.3
IntroductionwithSmartStart™
This is a state-of-the-art remote car starter system. The system is packed with advanced features
such as priority access to the driver’s door (commodity features), the Safe Start children safety
feature and SmartStart™.
SmartStart™ is a groundbreaking technology that enables your remote starter features to be
accessed by your smartphone. Features include keyless entry, trunk release, panic, remote
start/stop toggle and alarm notifications
1
. Note: S martStart™ must be profess ionally installed. For
more information, see your nearest authorised Directed Canada dealer.
With many advanced functions, this product will satisfy any one of your expectations from high-end
commodity and security systems, without neglecting any standard feature commonly offered by
entry-level starters.
VehiclePresets
Heater&HeatedSeat
When leaving the vehicle it is recommended t o preset the acc essory controls in preparation for the
next remote start. Settings for t he blower motor (fan), front and rear, as well as h eated seats (if
equipped) should not be left on HIGH. It is recommended to leave the settings on LOW or
MEDIUM instead.
WindshieldWipers,Radio&Headlights
Certain vehicles require the radio and / or windshie ld wipers and / or headli ghts circuits to become
energized while running un der remote start. When leaving the vehicle you must ens ure that the
windshield wipers and headlights switches are OFF. Leaving the headlights switch ON on certain
types of vehicles could c ause them to remain ON even aft er re mot e s tart er s hut down, res ul ting in a
dead battery.
UsingtheRemoteControl
Your remote car starter is equipped with a 6-button multi-channel remote control. It can oper ate
two independent vehicles equipped with a remote car starter.
LCDRemoteFunctions
The transmitter offers several command-confirmation and timer features. This section explains
some of the key functions avail able. The next s ection gives a sum mary of the button c ombinations
used to access the functions.
Note: If you wish to exit a fu nc tio n while still in the proc es s of ac c es s ing it , s imp ly s tops and wait at
least 10 seconds: the transmitter will return to its normal state.
1
Certain conditions apply. See your authorised Directed Canada dealer.
Page 4
P.4 User Guide
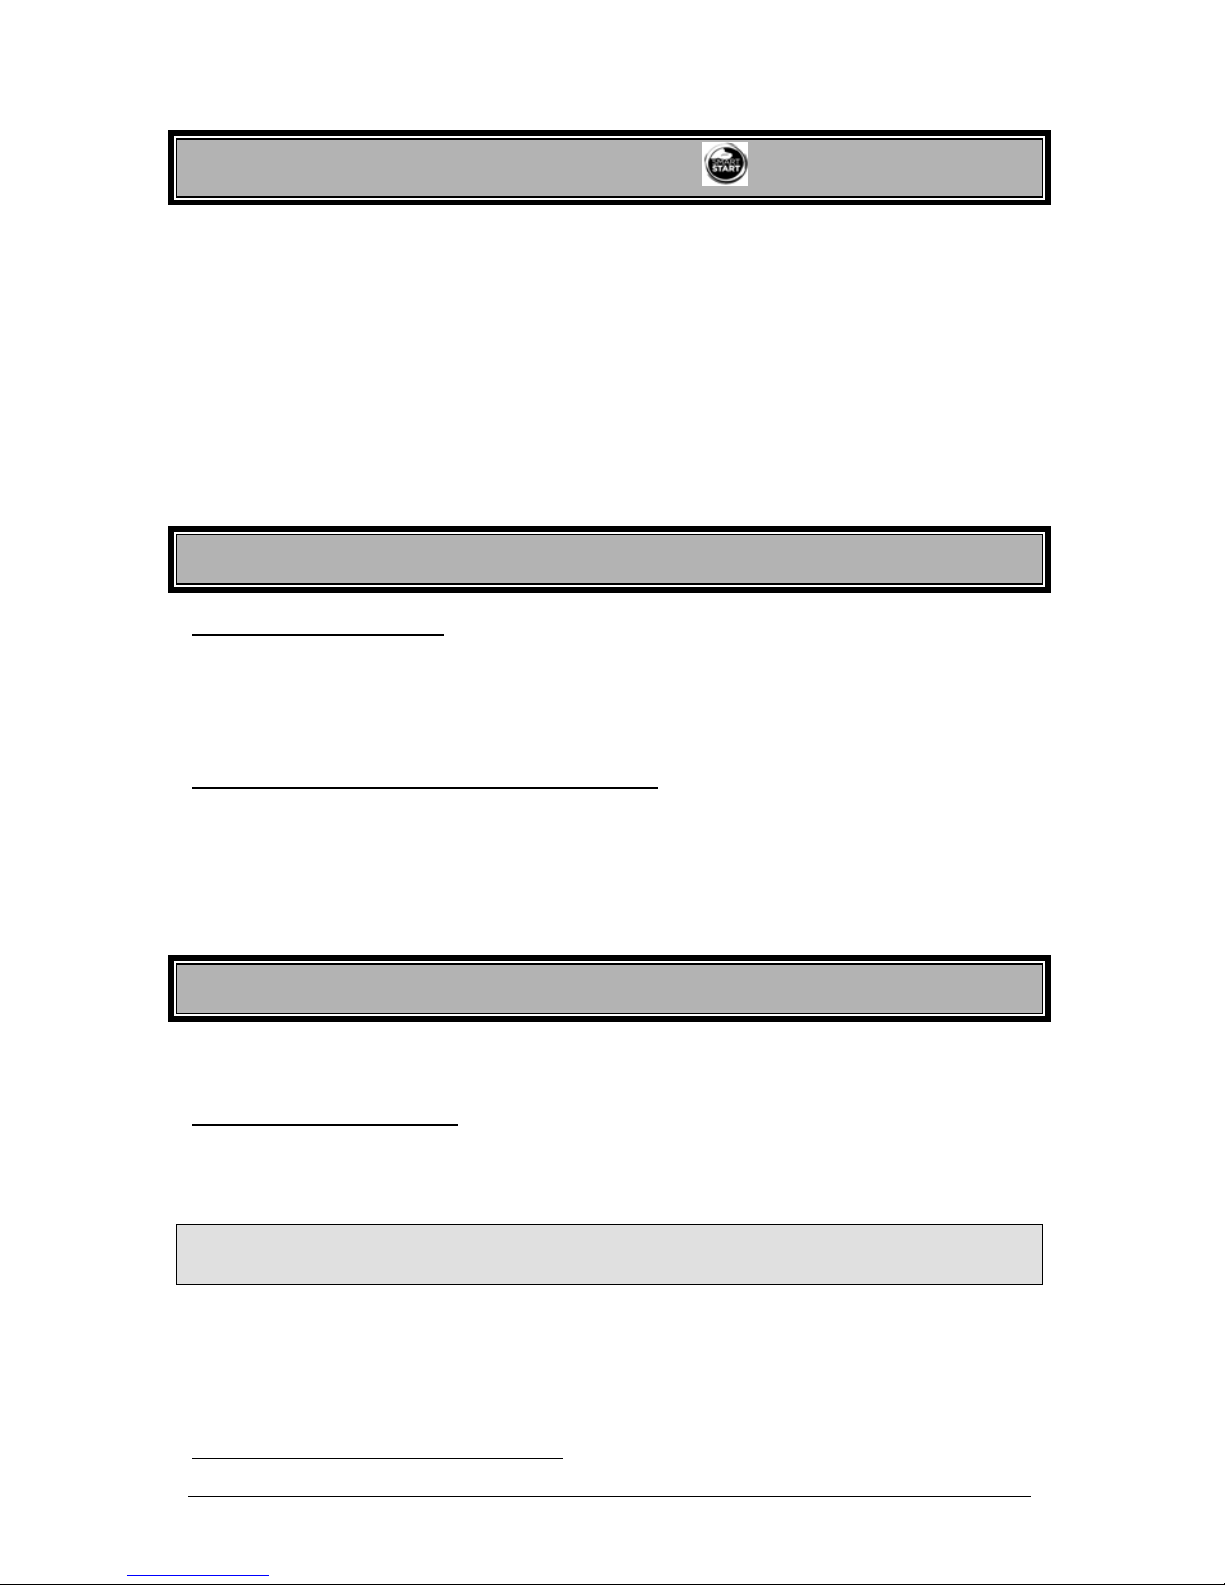
The functions of the transmitter are as follows:
LOCK:
Locks the doors and arms the system. Arms the Starter Kill (if
installed).
UNLOCK:
Unlocks the doors and disarms the system. Disarms the
Starter Kill (if installed).
TRUNK:
Opens the TRUNK and disarms the system.
Note: Trunk option must be installed.
START/STOP:
Remote starts or stops the engine.
AUX button:
Activates Panic mode.
FUNCTION button
Turns the backlight ON, allows access to the Multi-level
functions and to the Menu.
BasicVehicleOperations
Function Button pressed
Icon
Sound
Instructions /description
Lock
1 beep Lock and arm the system
Unlock
2 beeps
Unlock and disarm the
system
Trunk or aux 3
1 beep Trunk output
Start *
(see runtime
options below)
+
Melody Start the engine
Stop
None Melody Stop the engine
Back light
On for 5 seconds
Press once
Cold weather
+
1 beep
See Cold Weather Mode
section
Remote valet
+
1 beep See Vale mode section
Panic
,
or
None 1 beep See Panic Mode section
TransmitterModeSelection
Function Button pressed
Icon
sound
Instructions /description
Vibration mode
Press and hold
and then press
Vibrates 4x
A
larm clock mode
on/off
+
Melody
z Press once to have
alarm clock on
z Press twice to have
alarm clock off
Page 5
User guide P.5
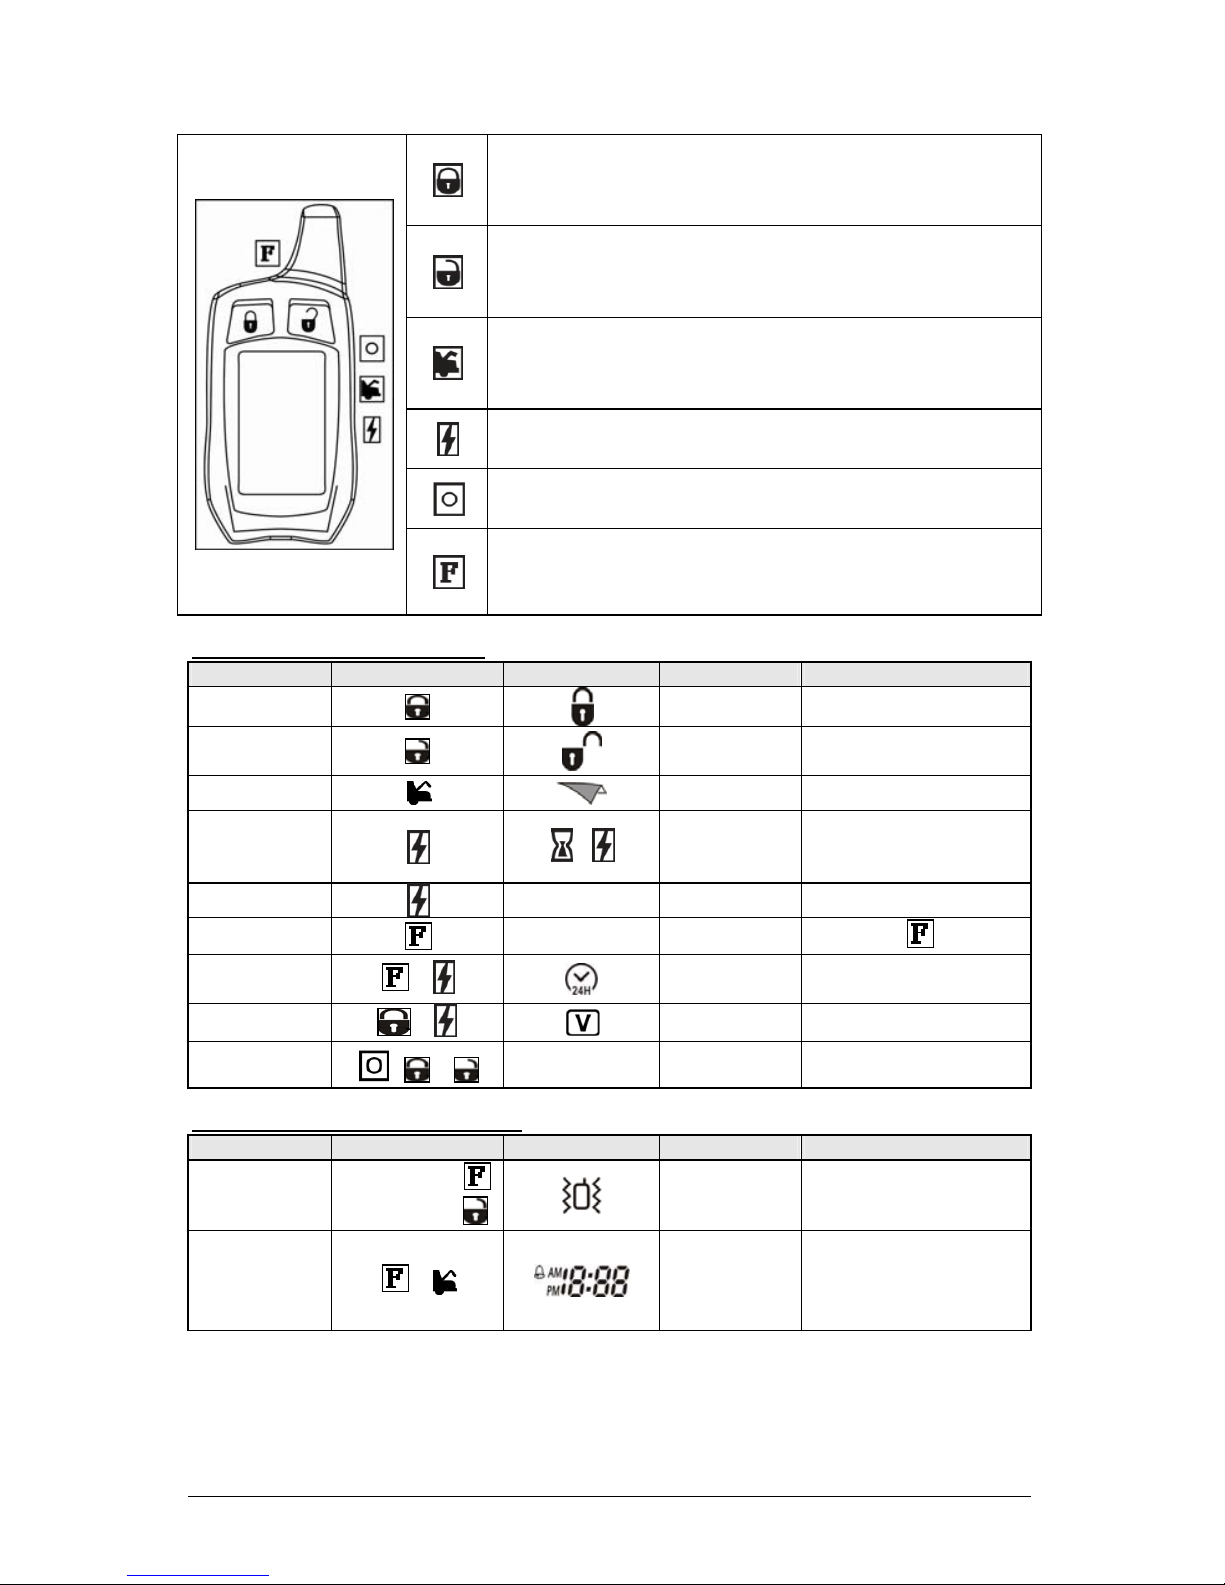
Howtoaccessremote’sfunctionmenus:
User
Transmitter
1. Press until the remote beeps once
Î
appears on screen.
2. Press a 2nd time for 2 second and release
Î
Remote beeps once and
appears on screen.
3. Press a 3rd time for 2 second and release
Î
Remote beeps once and
appears on screen.
4. Press and hold button a 4th time until 2
beeps are heard.
Î
You have now accessed the first
function of the remote.
Press the button to toggle between remote’s functions:
a. Press the button to increase the value or to activate or deac tivate a function or to toggle
through the melodies.
b. Press the to decrease the value or to ac tivate or deactivate a function or to toggle through
the melodies.
c. To save modifications, do not touch any buttons for approx 5 to 10 seconds. There will be a
beep and the display will return to the time.
Function Menu Table:
Function 1:
A
djust clock time (hour and
minutes)
Function 5: Timer countdown
Function 2:
A
djust alarm clock (hour and
minutes)
Function 6: Melody selection for timer
countdown
Function 3: Melody selection for the alarm
Function 7: Turn ON/OFF timer countdown
Function 4: Turn ON/OFF alarm cloc
k
TimerCountdownAdjustment
By pressing Icon
Sound
Instructions / description
+ 1st time
Melody
10 min parking countdown
mode
+ 2nd time
Melody
20 min parking countdown
mode
+ 3rd time
Melody
30 min parking countdown
mode
+ 4th time
Melody
60 min parking countdown
mode
+ 5th time
Melody
90 min parking countdown
mode
+ 6th time
Melody
120 min parking countdown
mode
+ 7th time
Melody Parking countdown off mode
Once the Countdown is activated it will continue counting down until reaching 0:00. If the Timer has
not reached 0:00 and you are starting th e vehicle, you shoul d reset your Countdown Time r to 0:00
before starting your vehicle as to avoid being startled.
Page 6

P.6 User Guide
RemoteStartingYourVehicle
SettingYourVehicleIntoReadyMode
If your vehicle has a manual transmission you must read the follow ing indications. The u nit must
first be set to Ready Mode in order to start the vehicle by remote. If t he unit is not set to Ready
Mode, it cannot remote start the vehicle.
Please note that Ready Mode can be enabled by the remote or the handbrake, depending on th e
option that was selected by your installer. T herefore, you must follow the appropriate procedure
between the two described below in order to set your vehicle into Ready Mode.
Once the system is set to Ready Mode, the vehicle can be remote started and stopped at any time.
The system will exit Ready Mode if a door, the hood or the trunk is opened, if the brake pedal is
pressed, if the parking brake is disengaged or if the ignition key is turned to the IGNITION ON
(RUN) position.
To set the system to Ready Mode:
If Ready Mode is enabled by remote If Ready Mode is enabled by handbrake
1. Ensure that all t he doors, hood and trunk are clos ed. Make sure that the gear selector is in the
neutral position.
2. With the engine running, apply the parking
brake once and release the brake pedal.
3. Within 20 sec. of engaging the parking
brake, press and hold , or on
the transmitter (SmartStart™ uses only the
SmartStart™ icon).
The parking lights will flash 3 times quickly
and remain lit. Release the button.
2. With the engine running, apply the parking
brake twice within 10 sec.
3. Make sure to release the brake pedal.
The parking lights will flash 3 times quickly
and remain lit.
4. Remove the key: the engine will keep on running.
5. Exit the vehicle. All doors should be closed, including the hood and trunk.
The engine keeps going until you press either;
• to lock the doors and shut down the engine;
• to unlock the doors and shut down the engine;
• to shut down the engine without affecting the doors.
WARNING: Engine runs until the pre-programmed run time expires.
6. The Parking lights will flash twice and the icon will appear on screen to indic ate Ready
mode is set. If the icon doesn’t appear, refresh the screen by pressing .
Remotestarting
Press the button for approximately 1 second. The remote will beep once. Approximately
5 seconds later, the remote will play a start mel ody and the engi ne will start. The parking lights will
remain ON during the pre-programmed run time of the engine.
If your vehicle does not start at the first attempt, the system will shut down, wait a few seconds and
try to start the engine again. There will be 3 start attempts before the system gives up.
Page 7

User guide P.7
DrivingOff
With the vehicle running remotely, pres s the butt on to disarm the starter kill (if installed) and
unlock the doors. Enter the vehicle and do the following:
1. Turn the ignition key to the IGNITION ON (RUN) position. (Do not turn the key to the CRANK
position while the engine is running. This would cause the starter motor to re-engage.)
2. Press the brake pedal to disengage the remote starter unit.
You are now ready to drive off.
ArminganddisarmingoftheSystem
The Alarm can be configured by the installer either to Passive Mode (so as to arm a utomatically)
or Active Mode (so as to require the us er’s intervention for arming). By default, the R emote Car
Starter is configured to Passive Mo de
Passive mode:
To arm the alarm, press the button on the transmitter, OR
1. In Passive Mode, the alarm will automatically arm 30sec once the last door is closed.
2. The LED on the antenna wil l flas h q uic k ly during th e c ount down preceding the activation
of the system.
3. Once the activatio n countdown expires, the siren will c hirp once and the LED will flash
slowly to indicate that the alarm is now armed.
To disarm the alarm, press the
button on the transmitter.
1. The LED on the antenna wil l flas h q uic k ly during th e c ount down preceding the activation
of the system.
2. The alarm will automat ically rearm itself after 30sec if no door is left opened and the
ignition is not turned ON.
Active Mode:
To arm the alarm, press the button on the transmitter.
1. The siren will chirp once.
2. The LED on the antenna will flash slowly.
To disarm the Alarm, press the
button on the transmitter.
1. The siren will chirp twice.
2. The LED on the antenna will remain OFF.
RemoteStarterFeatures
RemoteDoorLocks
If your system was installed with the Remote Door Locks option, you will have the convenience of
remote keyless entry.
To UNLOCK your doors and DISARM the system:
1. Press and hold the
button for approx. 1 sec
2. The
icon will appear on the remote’s LCD screen
3. The siren will chirp twice to confirm that the doors have been unlocked, the Starter Kill
feature is disarmed (if it was installed) and that the Alarm is disabled.
Page 8

P.8 User Guide
To LOCK your doors and ARM the system:
1. Press and hold the button for approx. 1 sec.
2. The icon will appear on the remote’s LCD screen
3. The siren will chirp once to confirm that the doors have been locked, the Starter Kill
feature is enabled (if it was installed) and that the Alarm is armed.
RemoteTrunkRelease
If your system was installed with the Remote Trunk Release option, you can open your trunk by
pressing the button until the remot e displays on the screen. In additio n, this will also
disarm the alarm.
IdleMode
Convenience feature: Idle Mode allows you to k eep the engine running and the doors lock ed
while you stop, for example, at a convenience store or for a short delivery.
This feature allows you to let the remote start er take over control of the vehicle (i.e. no Key in the
Ignition Switch) while the engine is running.
Activating Idle mode (Automatic transmission):
1. With the engine running, make sure to release the brake pedal and press the ,
or button on the transmitter until the parking lights come ON.
Note: SmartStart™ can be setup to use the SmartStart™ icon to activate Idle m ode.
2. Remove the ignition key from the ignition switch.
The engine will continue running.
3. Exit the vehicle. All doors, the hood and trunk should be closed
4. Press the button to lock the doors, to arm the starter kill and to arm th e alarm (if
available). The engine will continue running.
a. When re-entering the vehicle, the user must reinsert the key into the ignition and
turn it to the ON position (not Crank) without pressing on the brak e.
b. Once the key is in the ON position, press on the brake pedal to put the
transmission in gear. Pressing the brak e pedal at this step will cancel the remote
starter takeover.
c. Drive off.
If your vehicle has a manual transmiss ion, Idle Mod e can be activat ed throug h the same ro utine as
that used for Ready Mode (page 6); at the last step, press the button to lock the doors, arm
the system and leave the engine running.
Note 1: The engine will continue running unt il the user re-enters the vehicle or unti l the expiration
of the run time.
Note 2: If the pre-programmed r un-time expires or if the user shu ts down the engin e remotely, the
vehicle will enter Ready Mode automatically (manual transmissions only).
Caution!! Do not leave children or pets unattended in a vehicle standing in Idle Mode.
ValetMode
When the vehicle is in Val et Mode, the rem ote starter and al arm functionalities are disabled. If the
vehicle needs to be serviced, or if you park it indoors, Valet Mode will prevent the engine fr om
being remote-started accidentally.
Any of the following features will put the remote car starter into Valet Mode:
Page 9

User guide P.9
Ignition Valet: This feature allows you to set Valet Mode using the ignition key.
Remote valet: This feature allows you to set Valet Mode using the transmitter.
Valet switch: This feature allows you to set Valet Mode using a push button switch (optional).
To put the system into Valet Mode
Using the KEY (Ignition Valet Mode):
1. Insert the ignition key into the ignition switch. Within 10 sec., cycle the ignition key to the
IGNITION/RUN and OFF positions 5 times until the parking lights flash 3 times.
2. Turn the ignition OFF.
3. The LED on the antenna will stay ON indicating that the vehicle has successfully entered
Valet mode.
4. The icon will appear on the LCD display.
Using the TRANSMITTER (Remote Valet Mode):
1. Press the and buttons simultaneously until the icon appears on the LCD display.
2. The LED on the antenna will stay ON indicating that the vehicle has successfully entered
Valet mode.
Using the PUSH-BUTTON SWITCH (Valet Switch Mode):
1. Insert the ignition key into the ignition switch.
2. Turn the key to the ON position
3. Within 5 seconds, press the push-button switch until the parking lights flash 3 times.
4. Release the push-button and turn the ignition to the OFF position.
5. The LED on the antenna will stay ON indicating that the vehicle has successfully entered
Valet mode.
6. The icon will appear on the LCD display.
To take the system out of Valet Mode
Using the KEY (Ignition Valet Mode):
1. Insert the ignition key into the ignition switch. Within 10 sec., cycle the ignition key to the
IGNITION/RUN and OFF positions 5 times until the parking lights flash twice.
2. Turn the ignition OFF.
3. The LED on the antenna will switch OFF indicating that the vehicle is now out of Valet mode.
4. The icon will disappear from the LCD display.
Using the TRANSMITTER (Remote Valet Mode):
1. Press the and buttons simultaneously until the icon disappears from the LCD
display.
2. The LED on the antenna will switch OFF indicating that the vehicle is now out of Valet mode.
Using the PUSH BUTTON SWITCH (Valet Switch Mode):
1. Insert the ignition key into the ignition switch.
2. Turn the key to the ON position.
3. Press the push-button switch until the Parking lights flash twice.
4. Release the push-button and turn the ignition to the OFF position.
5. The LED on the antenna will switch OFF indicating that the vehicle is now out of Valet mode.
6. The icon will disappear on the LCD display.
If someone attempted to remote-start the vehic le while in Valet Mode; the parking lights will turn
ON, then OFF, then will flash twice.
Page 10

P.10 User Guide
PanicMode
In an emergency situation, you c an activate panic mode by pressing a nd holding the , or
button until the siren starts to sou nd.. If the vehicle is under a remote start, the engine will
shutdown automatically before setting off the Siren. You can stop the Siren by pressing:
(this will lock your doors and deactivate panic mode), or
(this will unlock your doors and deactivate panic mode).
Furthermore, the panic mode can be stopped by activating Valet Mode (page 8)
* Panic Mode will automatically shut down after 30sec.
QuickLockout™
(Also called Secure Panic.) For fast protection in emergency situations, the system will LOCK all
doors when you press the brake p edal while y ou hear the Siren s ounding. (Quic k Lockout is only
available when Panic mode has been triggered.)
ColdWeatherMode
If the vehicle has a manual transmission, Ready mode (page 6) should be set before entering
Cold Weather mode. When Cold Weather Mode is activ e, the engine sta rts every 2 hours and runs
for 3 minutes (or for 8 or 20 minutes with diesel engines). Cold Weather Mo de automatically ends
after 24 hours (or 12 starts).
To enter Cold Weather Mode:
1. Press the for 1 second and release. The remote will beep once and will
appear on the display.
2. Press and hold the button until the icon will appear on the display.
To exit Cold Weather Mode, do any one of the following actions:
• Open the hood.
• Start the engine by remote.
• Turn the ignition key to the IGNITION ON (RUN) position.
• Press the for 1 second and release. The remote will be ep once and will
appear on the display.
Press and hold the button until the icon will disappear on the display.
To verify whether the system is in cold weather mode:
• The icon should appear on your remote display.
OR
• (Automatic transmissions only) Press the brake pedal: If the vehicle is in Cold
Weather mode, the parking lights will remain ON while the brake pedal is pressed.
ExtendedRunTime
While the vehicle is running remot ely, press and hold t he button until the remote plays the start
melody. This will reset the run time counter to zero and restart the run time cycle from the
beginning.
Note: The extended run time procedure can only be carried out once per remote start.
To stop the vehicle, at any moment, simply press and release the button.
Page 11

User guide P.11
Example: If your remote car st arter is programmed for a run time of 3 mi nutes and your vehicle
has been running for 2 minutes already, pressing the button will reset the counter to z ero and
allow the engine to run for another cycle (in this case, 3 minutes).
IntrusionCodesviaLEDlight
The system monitors the foll owing:
• Any vibrations sensed by the shock sensor such as someone breaking of the window,
windshield, etc.
• Doors
• Ignition
• Trunk
• Hood
Note: If an intrusion has occurred the siren will sound for a maximum of 1minute.
When an intrusion has occurred, pressing unlock will make the siren chirps four times. The
antenna’s LED will provide an intrusion code corresponding to the type of the intrusion that
occurred. The LED intrusion codes are flashed in continuous loops.
2x = Doors intrusion 5x = Panic
3x = Shock Sense 6x = Ignition
4x = Hood 7x = Trunk
CarFinder
When enabled, the Car Finder option will h elp y o u locate your vehicle by sending a pu ls ati ng s ign al
through the siren. The siren will chirp once each time the and are pressed simultaneously.
TemporaryChirpDelete
To temporarily disable the chirp co nfirmations of the siren upon arming and disarming (e.g. in a
quiet neighbourhood):
• Press the button. The remote will beep once.
• Within 3 sec., press the or
button to arm or disarm system without any chirp.
MissingaStartoraStopConfirmation
If you have not received a Start or the Stop confirmation after pres sing the button, pressing the
button within range of the remo te starter’s signal will refresh the display and will confirm if the
vehicle was started or stopped.
If no Start Confirmation Was Received:
• Press the button:
¾ The remote’s icon will start flashing
¾ The icon and runtime time countdown will be displayed.
If no Stop Confirmation Was Received:
• Press the button:
¾ The will be display ed
¾ The remote’s icon and the runtime countdown will disappear.
Page 12

P.12 User Guide
AdvancedFeatures:InstallationprogrammableOptions
The Remote Car Starter was designed with flexibility and OEM integration in mind. With its
programmable options, this unit can single-handedly control nearly any electrical system in your
vehicle.
Caution: The programming of your system should be left to a professional. Ch anging any
one of the settings may affec t the operati on of your Remote Car Starter. Please note t hat the
following programmable options may require additional parts and labor.
IgnitioncontrolledDoorLocks
This is an added security feature. If your Remote Car Starter was installed with the IgnitionControlled Door Locks option, the doors will automatically lock as soon as the ignition key is turned
to the IGNITION ON (RUN) position while the brakes are press ed. The remote car start er will also
lock any door that was unlocked and opened (then closed) the next time the brake pedal is pressed
(only when doors are monitored). When the key is turned to the OFF position, the doors will
automatically be unlocked.
SecureLock
(Disabled by default.) Before your vehicle c an be remote-started, the f actory security system must
first be disarmed. The Secure Lock feature may be req uired on certain v ehicle models wit h factory
security systems that automatically unlock the doors when the security system is disarmed.
To keep your vehicle protected when the factory s ecurity system is disarmed for a remote start,
Secure Lock will relock your doors as soon as the vehic le is started. Once the en gine is shut down
by remote or after its runtime has expired, Sec ure Lock will also rear m your fac tory s ecurity sys tem
and relock the doors.
“HomeValetTM”Mode
If configured at installation, this feat ure will remotely set the vehicle to a no-remote-start mod e: if
the vehicle is parked indoors there is no danger of it s tarting accidentally by remote contr ol. If the
vehicle has a manual transmission, it should be set into ready mode before activating the Home
Valet™.
Note: Once the Home Valet Mo de is activated, the vehicle will not start by remote, but the
alarm functions will remain active.
To take the system into home valet mode:
• Press the or button.
• Within 3 seconds, press the and buttons simultaneously
• The transmitter will beep once and the icon will display.
To take the system out of home valet mode:
• Turn the ignition key to the IGNITION ON (RUN) position.
The system will warn you if someone attempts to start your vehicle while it stands in home valet
mode. The parking lights will:
i. Turn ON then OFF; then
ii. Flash twice, pause; then
iii. Flash twice again.
SafeStart
This feature will eliminate accidental remote starts, e.g. when children are playing with the
transmitter.
Page 13

User guide P.13
Safe start enabled: If this feature is enabled, the user must press the button twice within
3 seconds to remote-start the vehicle.
Swap start: If this feature is enabled;
1. Press the
for 1 second and release.
2. The remote will beep once and will appear on the display.
3. Press to remote start the vehicle.
The AUX 2 output can be activated by pressing the button.
EngineRunTime
If you have a gas engine, your Rem ote Car Start er ca n be pro gramm ed to ru n the engine for 3, 15,
or 25 minutes (15 minutes by default). If you have a diesel engine, the Remot e Car Starter can be
programmed to run the engine for 8, 20, or 30 minutes (20 minutes default).
TurboMode
If Turbo Mode is configured at installation, it will allow a turbocharger to idle down after the user
leaves the vehicle: the unit will take over the vehicle and keep it running for 60 seconds (or until it
is shut down by remote control), then shut down the engine.
If your vehicle has an automatic transmission, proceed as follows to set the system to Turbo
Mode:
1. With the engine running, make sure to release the brake pedal and press the ,
or button on the transmitter until the parking lights come ON.
Note: SmartStart™ can be setup to use the SmartStart™ icon to activate Turbo mode.
2. Remove the ignition key from the ignition switch.
The engine will continue running.
3. Exit the vehicle and close all doors, hood and trunk.
4. Press the button; this will lock the doors, arm the system alarm and confirm that the
vehicle is in Turbo Mode.
5. The engine will shut down after 60 seconds.
If your vehicle has a manual transmission, follow all steps of the Ready Mode routine (page 6) to
activate Turbo Mode. At the last step,
• Press to lock the doors and have the engine shut down after 60 seconds;
The parking lights will flash 3 times and remain lit.
The alarm and starter kill will be armed.
• Press
to unlock the doors and have the engine shut down after 60 seconds;
The parking lights will flash 3 times and remain lit.
• Press To shut down the engine without affecting the doors.
Note: The vehicle will enter Ready Mode once the engine run time expires.
SirenChirps
The siren will chirp to confirm the system‘s basic operations:
• By default, when the doors are being locked, the siren will give 1 chirp if all the doors,
the hood and the trunk are closed.
• If one of the doors, the hood or the trunk is open as the doors are being locked, the
siren will chirp 3 times.
• When the doors are being unlocked, the siren will give 2 chirps if no intrusion was
detected.
Page 14

P.14 User Guide
• If an intrusion was detected, the siren will 4 times if is pressed.
The system can alternatively be set to: (must be configured by the installer)
• Warning Mode (no chirp during lock/unlock – unl ess one of the d oors, the hood or th e
trunk is open. In this case t here will be 3 chirp when is pr essed. – Or unless the
alarm was triggered, in which case there will be 4 chirps when
is pressed.
• Open Zone Notification (the system will warn for doors opened up to 10 seconds after
arming).
• No Chirp (the vehicle will not chirp under any circumstance).
Arming
Arming of the system can be program by your installer into 4 different options. By default, your
system is programmed to “passive arming – 2 stage disarm”:
• Active arming: The system will only ar m if button is pressed
• Passive arming (2 stage disarm): The system will automatically arm itself 30 seconds
after all doors, hood and trunk are closed.
Note: If an alarm is triggered, pressing the
button will stop the siren while keeping
the doors locked and the system armed.
• Passive arming (1 stage disarm): The system will automatically arm itself 30 seconds
after all doors, hood and trunk are closed
Note: If an alarm is triggered, pressing the
button will stop the siren and unlock the
doors.
• Active arming with disarm notification: This feature will notify the user when the
vehicle is left disarmed after Ig nition is turne d off, or when the Module is disarm ed after
being previously armed, the opening or closing of a Door will cause the Horn or the
Siren to sound once after 10 sec. to warn the user that the vehicle was left
unprotected. Pressing or
will cancel this timer.
ShockSense&WarnAwaysense
If somebody hits, jostles or otherwise moves your car, the shock sensor sends a signal to the brain
indicating the intensity of the motion. Depending on the severity of the sh ock, the system can react
to a full shock by triggering the alarm or it can also respond to a lighter shock (30 % of the strength
of a full shock) by giving a warn-away (without triggering an Alarm condition). However, when the
Engine is running after a remote start the full shock is disabled but will still give a warning sound if
warn-away is enabled.
Note: Refer to your installer if you wish to disable the shock sensor permanently.
Prioritydoor:
This great feature allows the user to unlock solely the driver’s door with a single press of the
button on the transmitter, and to unlock the other doors, if des ired, by pres sing the button for a
second time.
MulticarOperation
This option allows the owner of two vehicles, b oth equ ippe d with the s ame remo te starter mode l, to
control both systems with a single remote control. To con trol the second vehicle:
Page 15

User guide P.15
• Press + : ................................................................ LOCK
• Press +
: .................................................................. UNLOCK
• Press + : ................................................................... START
• Press + : ................................................................... STOP
• Press
¾ + : .................................................... TRUNK
or
• Press
¾ ¾ + : ............................................... LOCK
• Press
¾ ¾ + : ................................................. UNLOCK
• Press
¾ ¾ + : .................................................. START
• Press
¾ ¾ + : .................................................. STOP
• Press
¾ ¾ + : ................................................. TRUNK
Start/Stop While in Safe Start Mode
Function Button press
Icon
Sound
Description
Start on safe
start mode
+x 2
+
Melody
Press +
simultaneously twice
within 3 seconds. Press
for 1 sec- a beep will be
heard- then press 1sec
and a melody will be
heard again.
Stop on safe
start mode
+
None Melody
Note: Your remote control must be configured for second car operation by the installer.
Relock
If you unlock the doors with the remote transmitter, but do not ope n any doors, hood or trunk, or
turn ignition within 30 seconds, the doors will automatically relock and rearm the system.
Note: When the s ystem is in active arming mod e and the relock mode is enabled, the doors will
relock but the system will not rear m.
MultiLevelFeatures
Basic Features Level 1
¾ : ................................................................................................................................. AUX 2
¾ : ......................................................................................................................................... cold weather
Multi-Car Operation Level 2
¾ ¾ : ............................................................................................................. 2
nd
car lock
¾ ¾ : ......................................................................................................... 2nd car unlock
¾ ¾ : ....................................................................................................... 2
nd
car start/stop
¾ ¾ : ............................................................................................................. 2
nd
car trunk
Customized Features Level 3
(May not be compatible with some vehicles)
Page 16

P.16 User Guide
Your installer can add customized features such as turning on the radio, opening sliding doors, etc.
¾ ¾ ¾ : .................................................................................. customized feature 1
¾ ¾ ¾ : .................................................................................... customized feature 2
¾ ¾ ¾ : ................................................................................... customized feature 3
¾ ¾ ¾ : ..................................................................................... customized feature 4
Accessing the Multi-Level Features and Other Transmitter Functions
x To access a Level 1 feature, press and ho ld the
button until you he ar a “beep”; within three
seconds of hearing the “bee p”, release the
butto n. will be displayed. This display
means that you are now in Level 1. Simply press the corresponding button to access the
desired feature.
x To access a Level 2 feature, press and hold the
button until you hear a “beep within thr ee
seconds of hearing the “beep”, rele ase the
button a nd press and release the button
once more. will be displayed. This display means that y ou are now in Level 2. Simply
press the corresponding button to access the desired feature.
x To access a Level 3 feature, press and ho ld the
button until you he ar a “beep”; within three
seconds of hearing the “beep”, releas e the
button and press and release the button two
more times. will be displayed. This display m eans that you are now in Lev el 3. Simply
press the corresponding button to access the desired feature.
x To access the transmitter functions (clock and alarm adjustments), press and hold the
button until you hear a “beep”; within three seconds of hearing the “beep”, release the
button and press and release th e
button thr ee more times. There will b e two quick “beeps”
indicating that you are now in the transmitt er functio ns adj ustment men u. The Hour posit ion will
be flashing. Simply press and relea se the button until you reach the desired location a nd
proceed with the adjustment by pressing the or buttons.
Your installer can customize the system as to personalize these multi-level features in an order that
best suits you. Your options are:
Option 1:
Level 1 (requires pressing the
button 1X) Æ Multi car operation
Level 2 (requires pressing the
button 2X) Æ Basic features
Level 3 (requires pressing the
button 3X) Æ Customized features
Option 2 (by default):
Level 1 (requires pressing the
button 1X) Æ Basic features
Level 2 (requires pressing the
button 2X) Æ Multi car operation
Level 3 (requires pressing the
button 3X) Æ Customized features
Option 3:
Level 1 (requires pressing the
button 1X) Æ Customized features
Level 2 (requires pressing the
button 2X) Æ Multi car operation
Level 3 (requires pressing the
button 3X) Æ Basic features
Option 4:
Page 17

User guide P.17
Level 1 (requires pressing the button 1X) Æ Basic features
Level 2 (requires pressing the
button 2X) Æ Customized features
Level 3 (requires pressing the
button 3X) Æ Multi car operation
Example: If the multi-level features was set to option 3, the setup would be as follows:
For “basic features”:
- To access the aux. 2 feature, the user needs t o press on the button three (3) times followed
by the button.
- To access cold weather mode, the us er needs to pres s on the button three (3) times followed
by the button.
Diagnostics–ParkingLightFlashTable
Parking lights flashes Description
1
• Doors locked.
• Trunk released.
• Start signal received from the remote.
• Runtime has expired
2 slow
• Shutdown by remote
2 fast
• Doors unlocked
• Valet mode is deactivated
3 slow
• Runtime is extended.
3 fast
• Valet mode activated.
4 fast
• Shutdown by brake
• A remote start was attempted while the brake pedal is engaged.
10 fast
• Shutdown by hood
• A remote start was attempted while the hood is open.
ON Î twice
• Cold weather mode deactivated
ON Î 3 times
• Cold weather mode activated.
Solid ON
• Engine is running under remote start.
Flash for 30 sec.
• Panic mode is triggered.
Flash for 60 sec.
• Alarm is triggered.
ON Î twice Î twice
• A remote start was attempted while the system is in home valet.
Page 18

P.18 User Guide
PoorTransmittingRangeIssues
Many factors may affect the operating range of the transmitter. Some of these are:
• The condition of the battery in the transmitter.
• The operating environment (for example: downtown radio-frequency noise, airports, cellular
phone towers…)
• Metal: any type of metal will affect operating range. This includes the metal in the car.
• The shape of the vehicle can affect range as well; vans in general have an especially poor
range.
• The shape of the roof and A-pillars brings ab out considerable rad io-frequency deflec tion (in this
case the signal from the remote cont rol). As a result, the dir ection in which th e vehicle is fac ing
in relation to the remote control can affect the range. Straight on – standing in front of the
vehicle – generally gives you the gr eatest ra nge; the second best p erformance is from the bac k.
Using the remote control from either side of the vehicle will usually give the lowest range.
• The range will be significantly lower in a crowded parking lot than in open space.
• Always hold the transmitter high, approximately at shoulder height.
• The operating range will be somew hat low er on ve hicl es equ ipped wi th an af term arket or f actory
alarm.
• Windows and windshields tinted with lead or metallic tints will decrease the operating range.
Page 19

User guide P.19
PROSTART LIMITED LIFETIME WARRANTY
REMOTE STARTERS:
As the manufacturer, DIRECTED ELECTRONICS, CANADA INC. (“Directed”) warrants to the original consumer purchaser only (non-transferable)
that the remote starter module (control box) shall be free from defects in materials and workmanship for as long as the original consumer
purchaser continuously owns the vehicle in which the remote starter was originally install ed, as specified below:
1) For the first yea r after the date of purchase, as specified by the date on the original proof of purcha se, Directed will replace the
remote starter module free of charge with a new remote starter module. Consumers shall provide a copy of the proof of purchase at
the point of purchase for the exchange to take place. The remainder of the coverage period of the original warranty will apply to the
new module.
2) For the secon d year after the date of purchase, as specified by date on the o riginal proof of purchase, Directed will replace the
remote starter module free of charge with a repaired or refurbished remote starter module. All product returns to Directed for
warranty service require a Return Merchandise Authorization (RMA). This RMA must be issued prior to returning product to
Directed. Products returned without this RMA number will be refused & returned to you at your expense. Consumers shall send the
module (only) and a copy of the proof of purchase, freight prepaid, along with their name, address and telephone number, to the
PROSTART SERVICE CENTER for the exchange to take place. MODULES RETURNED TO THE POINT OF PURCHASE AFTER
THE ONE-YEAR REPLACEMENT PERIOD WILL NOT BE ACCEPTED. A module will be returned to the consumer, freight collect,
within 4 weeks of receipt of the module. The remainder of the coverage period of the original warranty will apply to the exchanged
module. Directed will not be held responsible for modules sent without a proof of purchase. Directed will not be held responsible for
modules lost or damaged while in transit.
3) For the third year and any consecutive year after the date of purchase, as specified by the date on the original proof of purchase,
Directed will provide to the original consumer purchaser a repaired or refurbished remote starter module, for a repair and
shipping/handling charge of $45.00 plus applicable taxes, a cheque or money order made payable to DIRECTED ELECTRONICS,
CANADA INC must accompany the remote starter module. A module will be returned to the consumer, freight prepaid, within 4
weeks of receipt of the module. Directed will not be held responsible for modules sent without a cheque or money order and/or proof
of purchase. The consumer should follow the same procedure as in (2), and all conditions apply as in (2).
ACCESSORIES:
Directed warrants to the original consumer purchaser only (non-transferable) that it will replace any Directed accessory part for a one-year period
from date of purchase. Accessories will only be replaced if proven defective in material or workmanship, and if, when the accessory is returned to the
point of purchase, the retailer is provided with a copy of the proof of purchase.
THE WARRANTY IS VOID IF:
1) The product has been damaged, altered in any way or tampered with, without the explicit written consent of a
Directed technician. For remote starter modules, this includes the opening or removal of the plastic covering of the
module, or the removal or alteration of the barcode label on the plastic covering of the module.
2) The product is damaged due to accident, fire, flood, shipping and handling, misuse, neglect, or other conditions
beyond the control of Directed.
3) The product has been installed or repaired by anyone other than a certified technician.
4) The product has been improperly installed or used.
THE WARRANTY DOES NOT COVER:
1) Batteries.
2) Scratched or worn transmitter cases.
3) Installation and/or removal charges for all remote starter modules and accessories.
4) Shipping and handling charges incurred for product exchange or replacement.
5) Any material damages other than to the product itself.
6) Harnessing, LED lights, switches, inverters, relays, etc.
THIS LIMITED LIFETIME WARRANTY SHALL CONSTITUTE THE SOLE LIABILITY OF DIRECTED FOR OUR PRODUCTS, AND IS IN LIEU OF
ALL OTHER WARRANTIES, EXPRESSED OR IMPLIED. THERE ARE NO WARRANTIES OF MERCHANTABILITY AND FITNESS FOR A
PARTICULAR PURPOSE. NO PERSON, FIRM OR CORPORATION IS AUTHORIZED TO ASSUME FOR AUTOSTART ANY OTHER LIABILITY
WITH RESPECT TO THE SALE OR USE OF OUR PRODUCTS. DIRECTED’S LIABILITY, WHETHER BASED ON CONTRACT, TORT,
WARRANTY, STRICT LIABILITY, OR ANY OTHER THEORY, SHALL NOT EXCEED THE PRICE OF THE INDIVIDUAL UNIT WHOSE DEFECT
FOR DAMAGE IS THE BASIS OF THE CLAIM. UNDER NO CIRCUMSTANCE WILL AUTOSTART, ITS DISTRIBUTORS OR THEIR AGENTS
BEAR ANY LIABILITY WHATSOEVER FOR INCIDENTAL OR CONSEQUENTIAL DAMAGES.
The parties hereto elect that any dispute regarding the present document be submitted to the appropriate Court located in the Province of Quebec,
District of Montreal. The parties hereto agree that this document is governed by and interpreted in accordance with the law of Quebec. If the
purchaser is located in a province of Canada other than Quebec, all matters dealing with the warranty of quality will be governed by and interpreted
in accordance with the law of Ontario. If the purchaser is located outside Canada, all matters dealing with the warranty of quality will be governed by
and interpreted in accordance with the United Nations Convention on Contracts for the International Sale of Goods (the “Vienna Convention”).
PROSTART SERVICE CENTRE / WARRANTY PROGRAM
2750, Alphonse-Gariépy ave
Lachine, QC, H8T 3M2,
Canada
Phone: 1-800-361-7271 (Return Merchandise Authorization and/ or Warranty- related questions only)
 Loading...