

Page 1
Universal Sound System
/ /
/ /
Stiletto 10/100/2
Starmate 3/4
Sportster 3/4/5
Stratus 3/4
Owner’s Guide
Page 2

Page 3

Desktop Docking Station
Table of Contents
Safety Precautions and FCC Statement 5
Congratulations 6
How to Use this Guide 6
Box Contents 7
Unpacking and Setting up your Soloist
Battery Installation 8
Front View 9
Rear View 10
Remote Control 11
Docking Cradle Types 12
Before inserting the Stiletto Cradle 13
Inserting Docking Cradle 14
Setting the Clock 15
LCD Contrast Setting 16
Installing the Windowsill Antenna 17
Using your Soloist
Switching Soloist On and Off 18
Selecting a Source 18
Soloist Universal Sound System
Volume Control 19
Equalization Settings 19
Dynamic Bass Boost 19
Mute 20
Display Option 20
Using the Headphone Jack 20
Using Specific Sources
Sirius Satellite Radio 20
iPod Music Players 23
Line In/Aux In 24
Alarms and Timers
Alarm Clock 24
Music Timer 26
Sleep Timer 29
USB Communication 30
Specifications 31
Warranty 33
© Directed Electronics, all rights reserved.
3
Page 4

Page 5

Desktop Docking Station
Soloist Universal Sound System
Safety Precautions
Take the following precautions to keep Soloist in proper working order:
❍ Set up must be performed according to this manual. Directed Electronics is not responsible for issues arising from set
up not performed according to the procedures in this manual.
❍ Do not use any power supply other than the one included. This will damage or cause Soloist to be inoperable.
❍ Do not use Soloist where it will be exposed to high levels of humidity, moisture, or dust.
FCC NOTICE:
This device complies with Part 15 of FCC rules. Operation is subject to the following conditions:
(1) This device may not cause harmful interference, and
(2) This device must accept any interference received, including interference that may cause undesired
operation. Changes or modifications not expressly approved by the party responsible for compliance could
void the user’s authority to operate this device.
Directed Electronics is not responsible for any radio or TV interference caused by unauthorized modifications to this equipment. Such modifications could void the User’s authority to operate the equipment.
© Directed Electronics, all rights reserved.
5
Page 6
Congratulations
SNOOZE
POWER
SOURCE
MUTE
TIMER
MENU
PROG/
CLOCK
TIMER
PROG/
CLOCK
92/ 92/
TIMER
MENU
PROG/
CLOCK
+
_
Thanks for purchasing Soloist Universal Sound System. This elegant powered speaker system with its unique interchangeable cradle system will allow you to enjoy high quality audio from SIRIUS Satellite Radio, the ubiquitous iPod portable media
player, and many other popular digital audio and video devices. Be sure to save your sales receipt. It is your best record of
the date of purchase, which is required for warranty service. Read and follow all cautions, warnings and notes. For the latest
information about this and other products, visit www.directedsirius.com. For technical help regarding this product please
contact Directed Electronics at 1-800-753-0800.
How to Use this Guide
Button icons:
Soloist has buttons that are used to control the features
and functions of the system. In addition, an infrared remote
control is provided to control Soloist. Some buttons exist
only on Soloist or the remote, while some buttons exist in
both places.
In order to make this guide easy to understand, icons that
look just like the buttons on Soloist and the remote control
are used in the text.
An icon like this
An icon like this
control.
6
refers to a button on Soloist.
refers to a button on the remote
When you see both icons like this
use either the button on Soloist or the remote control.
Note: Since the volume up and down buttons exist on both
Soloist and the remote control, only Soloist's button will be
used in this guide.
Liquid Crystal Display (LCD) messages:
In most cases in this guide, pictures of the LCD are used to
indicate what you will see on the LCD. In cases where no
picture is provided bold text in quotations is used.
“HELLO” means this message will appear on the LCD.
Soloist features:
The name of Soloist features or modes are capitalized in
this guide.
Clock Set refers to the clock setting mode of Soloist.
or
© Directed Electronics, all rights reserved.
you can
Page 7

Desktop Docking Station
Box Contents
Unpack your Soloist universal sound system carefully and make
sure that everything listed below is present:
• Soloist Universal Sound System.
• AC/DC Power Adapter and Line Cord.
• Remote Control and battery.
• Docking Cradle for Stiletto 2.
• Docking Cradle for Stiletto 10, 100.
• Docking Cradle for Sportster 3, 4.
• Docking Cradle for Starmate/Stratus 3,4 and Sportster 5.
• Docking Cradle for iPod.
• Sirius Home Antenna.
• Owner's Guide.
• Clock Battery.
• Sirius Cradle Screw.
Soloist Universal Sound System
"SIRIUS" and the SIRIUS dog logo are registered trademarks of Sirius Satellite Radio Inc.
iPod is a registered trademark and the property of Apple Computer, Inc.
© Directed Electronics, all rights reserved.
Trademark of New Transducers Limited. All Patent Rights Reserved.
7
Page 8
UNPACKING AND SETTING UP YOUR SOLOIST
Battery Installation:
Soloist Internal Battery
The battery inside Soloist is used to keep the clock running in the event of a power loss. It should be replaced
every 2 years. The battery holder is located in the bottom
panel of Soloist dock. It has a slot on one side. Press
in from the side near the slot with your thumb nail to
release the battery cover. Once cover is removed battery
can be installed or replaced. To reinstall battery cover,
insert tabs on opposite side of cover into slots and snap
in place. The battery is a CR2025.
Inserting the Batteries
1. Open the battery compartment cover.
2. Insert the new battery. Make sure that the positive
and negative terminals of the battery are oriented as
shown in diagram.
3. Close the cover.
Remote Control Battery
The instructions for opening the battery compartment
are located on the back of the remote. The battery is a
CR2032.
8
Precautions
1. Properly dispose of used battery.
2. Do not misuse battery by shorting the positive “+” and
negative “-” terminals or put it into fire. Overheating
may cause the battery to explode and cause a fire
hazard.
3. To avoid accidents, prevent children from playing with
the battery.
Partial bottom view of Soloist
Battery cover
Battery
+
© Directed Electronics, all rights reserved.
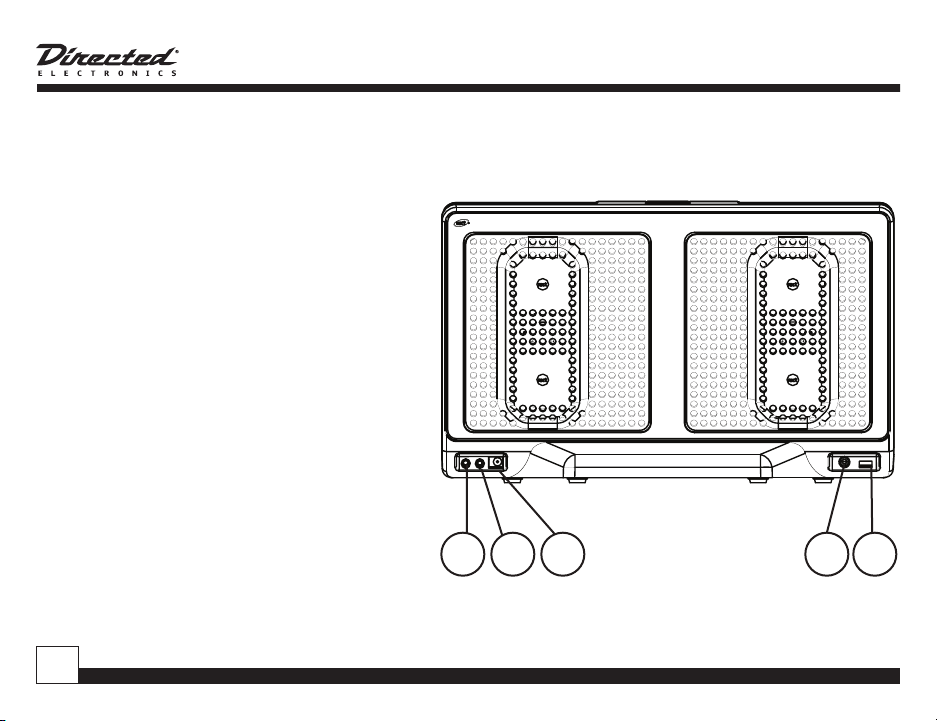
Page 9
Desktop Docking Station
31 2 54 876
11109 1312
9
10 11 12 13
7 8
1 2 3 4 5 6
1 2 3 4 5
Soloist - Front View
SNOOZE
SLEEP
POWER
SOURCE
MUTE
TIMER
MENU
PROG/
CLOCK
+
_
TIMER
MENU
PROG/
CLOCK
+
_
SNOOZE
SLEEP
POWER
SOURCE
MUTE
TIMER
MENU
PROG/
CLOCK
+
TIMER
MENU
PROG/
CLOCK
+
_
SNOOZE
SLEEP
POWER
SOURCE
MUTE
TIMER
MENU
PROG/
CLOCK
+
_
TIMER
MENU
PROG/
CLOCK
+
Soloist Universal Sound System
1
2
3
4
Music Timer Button
SNOOZE
Snooze/Clock Set Button
Alarm Clock Button
Sleep Timer Button
5 IR sensor
6 Liquid Crystal Display
7 panel
8 Docking Cradle
9
10
11
12 Headphone Output Jack
13 AUX Auxiliary Input Jack
NOTE: The panel is rugged, but can be damaged
if punctured or pushed too hard. If anything is touching
the panel while playing the sound can be noisy and/or
distorted.
© Directed Electronics, all rights reserved.
Volume Down Button
Power/Source Button
Volume Up Button
9
Page 10
E
11109 1312
D
C
B
15 1614
A
PROPRIETARY INFORMATION
STATEMENT
THIS DOCUMENT CONTAINS
CONFIDENTIAL AND PROPRIETARY
INFORMATION OF DIRECTED
ELECTRONICS INC, AND MAY NOT
BE DISCLOSED TO OTHERS,
REPRODUCED, OR USED WITHOUT
WRITTEN CONSENT FROM
DIRECTED ELECTRONICS INC.
Electronics, Inc.
DESCRIPTION
DATE APPROVED
1 2 3 4 5
Soloist - Rear View
1 Line Input Jack
2 Line Out Jack
3 DC 12V Input Jack
4 Sirius Antenna Jack
5 MINI USB Connector
10
© Directed Electronics, all rights reserved.
Page 11
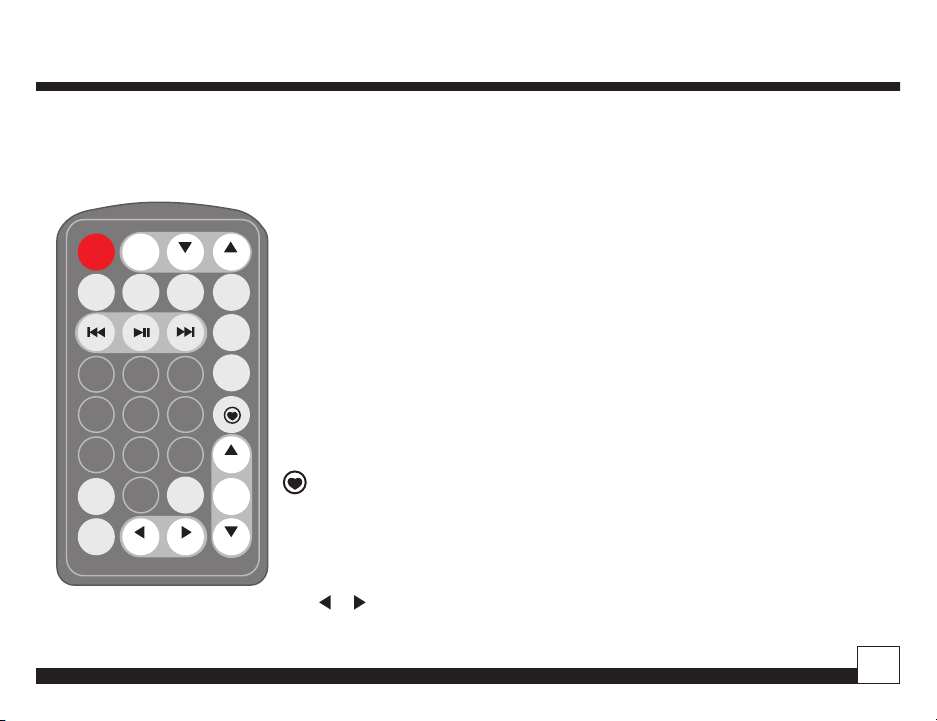
Desktop Docking Station
Remote Control
32:(5
6285&(
087(
92/ 92/
(4
'%% 7,0(5
781(
0(18
&+
&+&$7
&$7
6(/(&70(025<
%$1'
-803
352*
&/2&.
Soloist Universal Sound System
POWER/SOURCE - Turns the system On/Off and selects music source.
MUTE - Mutes the sound of Soloist.
VOL - Increases the volume level of Soloist and provides increment adjustment of
Soloist’s clock, alarm and timers.
VOL - Decreases the volume level of Soloist and provides decrement adjustment of
Soloist’s clock, alarm and timers.
EQ - Selects the equalization mode.
DBB - Dynamic Bass Boost.
PROG/CLOCK - Sets the clock as described on page 15.
Also sets the display option as described on page 20.
TIMER - Configures the Music Timer and turns it on and off as describe on page 26.
- Selects the previous track or fast reverses the selection.
- Plays and pauses the track.
- Selects the next track or fast forwards the selection.
TUNE - Sirius radio Direct Tune function.
MENU - Sirius radio Menu selection.
- Sirius Favorites (Stiletto 100) or Record (Stiletto 10).
CH & CH - Navigates through channels and display screens on Sirius radios.
BAND - Switches between preset bands on Sirius radios.
MEMORY - Sirius radio Memory function.
SELECT - Selects items highlighted on the Sirius display screen.
JUMP - Sirius radio Jump function.
CAT or - Navigates through categories on Sirius radios.
Numbers 0-9 - Used to select channels or presets on Sirius radios.
© Directed Electronics, all rights reserved.
11
Page 12

Docking Cradle Types
Stiletto 2
Sportster 3/4
iPod
Adapter for Starmate/Stratus 3, 4 and Sportster 5
Two sided adhesive tape is provided to
permanently attach this adaptor to the
Sportster 4 docking cradle.
Adjustable back stop for
different iPod models.
Stiletto 10/1OO
12
© Directed Electronics, all rights reserved.
Page 13

Desktop Docking Station
A
Top View
+
Soloist comes with the Sirius
connector secured to the left
with a screw
Connector sides from left to
right depending on cradle being
used
Front
If connector is positioned to
the right, insert screw here
Before Inserting the Stiletto Cradles
Soloist Universal Sound System
The Sirius connector can be moved to the left or right to
match up with the Sirius radio being docked. Soloist comes
setup for Sirius plug and play radios. If you plan to use a
Stiletto portable radio, the connector needs to be moved to
the right before inserting the cradle.
Remove the securing screw on the left of the connector and
slide the connector to the right. Secure the connector by
reinserting the screw in the hole on the right of the connector as shown.
© Directed Electronics, all rights reserved.
13
Page 14

Inserting Docking Cradle
Side view
Phillips Screw Driver
Screw
(optional)
Docking Cradle
(snaps in at rear)
Soloist
Before docking your music player, the proper cradle must
be installed in Soloist.
Make sure the docking cradle fits over the connectors.
Insert the two front tabs and then snap in at rear. The
provided screw can be inserted to secure the Sirius cradles
if desired.
If installing a Sirius docking cradle, make sure the connector is moved to the correct position as described on page
13.
14
© Directed Electronics, all rights reserved.
Page 15

Desktop Docking Station
TIMER
PROG/
CLOCK
SNOOZE
POWER
SOURCE
MUTE
TIMER
MENU
PROG/
CLOCK
TIMER
MENU
PROG/
CLOCK
+
_
TIMER
MENU
PROG/
CLOCK
+
TIMER
PROG/
CLOCK
SNOOZE
POWER
SOURCE
MUTE
TIMER
MENU
PROG/
CLOCK
TIMER
MENU
PROG/
CLOCK
+
_
TIMER
MENU
PROG/
CLOCK
+
Setting the clock
TIMER
PROG/
CLOCK
SNOOZE
POWER
SOURCE
MUTE
TIMER
MENU
PROG/
CLOCK
TIMER
MENU
PROG/
CLOCK
+
_
TIMER
MENU
PROG/
CLOCK
+
The clock can only be set when Soloist is off. When the
system is powered up for the first time, the display will
flash to indicate the clock is not set.
To enter the clock set routine:
Press
or
for 3 seconds.
Soloist Universal Sound System
Press
of the clock will flash.
Press
selected in 12 hour mode by advancing the hour until the
AM or PM is properly displayed.
or
or
again and the hours digits
to set the hour. AM and PM is
The Clock Set mode is activated and “12” will flash.
Press
HOUR” mode
© Directed Electronics, all rights reserved.
or
to select “12 HOUR” or “24
Press
or
again and the minutes
digits of the clock will flash.
Press
or
to set the minutes.
15
Page 16

Press
TIMER
PROG/
CLOCK
SNOOZE
POWER
SOURCE
MUTE
TIMER
MENU
PROG/
CLOCK
MUTE
TIMER
MENU
TIMER
MENU
PROG/
CLOCK
+
_
TIMER
MENU
PROG/
CLOCK
+
or
again and the clock is set.
The colon will flash to indicate the clock is running.
LCD Contrast Setting
The LCD contrast can only be set when Soloist is off.
16
Press and hold
for 3 seconds and Soloist will
enter into LCD contrast setting,
Press
or
to set the LCD contrast level.
5 different contrast levels are selectable.
© Directed Electronics, all rights reserved.
Page 17

Desktop Docking Station
Installing the Windowsill Antenna
1
2
3
4
5
Before installing the windowsill antenna, read this entire
section.
To ensure strong reception of the SIRIUS signal in your
home, it is important that the windowsill antenna be
oriented correctly. Note the following antenna placement
considerations:
BEST reception can be achieved by placing the antenna
outside on the roof. The antenna is waterproof. This position will afford the best view of the sky for best reception.
When placed in this location, an antenna extension cable
may be required.
BETTER reception can be achieved by placing the antenna
outside a window, or by mounting it to the side of the
house. In either case, try to achieve the best possible clear
view of the sky.
GOOD reception can be achieved by placing your antenna
in a window. Try to achieve a clear unobstructed view of the
sky. If your location is in major metropolitan area, the antenna may be located inside the home because terrestrial
transmitters are used to boost signal strength.
From the map shown here, determine your location and
aim the portion of the antenna with the logo toward the
location indicated by the X on the map.
Key:
Area 1: Aim the antenna East, Northeast, or Southeast
© Directed Electronics, all rights reserved.
Soloist Universal Sound System
Area 2: Aim the antenna North or Northeast
Area 3: Aim the antenna North or Northwest
Area 4: Aim the antenna West, Northwest or Southwest
Area 5: Aim the antenna Straight Up at the sky
Route the antenna cable to the dock. Be sure you avoid
any obstructions that could crimp, kink, or twist the cable.
Use protective grommets wherever rough openings are
encountered. If the antenna is installed outdoors, route the
cable from the antenna location to the interior of the home,
working the cable through the basement, under a window
sill, etc., and make adjustments to take up cable slack as
necessary.
Connect the antenna cable to the ANT connection on the
rear of the dock.
17
Page 18

USING YOUR SOLOIST
SNOOZE
SLEEP
POWER
SOURCE
MUTE
TIMER
MENU
PROG/
CLOCK
+
_
POWER
SOURCE
MUTE
TIMER
MENU
PROG/
CLOCK
SNOOZE
SLEEP
POWER
SOURCE
MUTE
TIMER
MENU
PROG/
CLOCK
+
_
POWER
SOURCE
MUTE
TIMER
MENU
PROG/
CLOCK
SNOOZE
SLEEP
POWER
SOURCE
MUTE
TIMER
MENU
PROG/
CLOCK
+
_
POWER
SOURCE
MUTE
TIMER
MENU
PROG/
CLOCK
Switching Soloist on and off
Press
or
to turn Soloist on. The LCD will
display "HELLO".
After 2 seconds, the LCD will display the current source.
Press and hold
or
for three 3 seconds to
turn Soloist off. The LCD will display "GOOD BYE"
The LCD backlight remains on for one minute. The
LCD backlight will turn on any time a button is pressed
and back off again one minute after the last button is
pressed.
Selecting a Source
Press
LCD will display the selected source. Soloist remembers
or
to select the desired source. The
the selected source when switched off and automatically
returns to that source when switched on again.
18
© Directed Electronics, all rights reserved.
Page 19

Desktop Docking Station
Soloist Universal Sound System
TIMER
MENU
PROG/
CLOCK
+
_
TIMER
MENU
PROG/
CLOCK
+
Volume Control
Press
The volume level can be set from 00 to 30. Soloist
remembers the volume level when switched off and
automatically returns to same level when switched on
again.
or
to adjust the volume on Soloist.
Equalization Settings
Five equalization settings can be set by pressing
The available settings are Flat (equalization off), Classic, Rock, Pop and Jazz. The LCD displays the selected
equalization setting.
© Directed Electronics, all rights reserved.
EQ
Soloist remembers the equalization setting when
switched off and automatically returns to same setting
when switched on again.
Dynamic Bass Boost (DBB)
DBB is a bass enhancement system that improves the
low frequency response of Soloist.
DBB
Press
to toggle DBB on and off. The LCD will
indicate the status.
Soloist remembers the DBB setting when switched
off and automatically returns to same setting when
switched on again.
19
Page 20

Mute
MUTE
TIMER
MENU
TIMER
PROG/
CLOCK
Press
indicate the status.
to toggle Mute on and off. The LCD will
Display Option
When listening to music, Soloist can display the selected
source or the clock on the LCD.
Using the Headphone Jack
The Headphone jack can be used with any pair of
headphones with the appropriate 3.5mm (1/8”) stereo
mini jack.
The audio output of Soloist is muted if headphones are
plugged into the headphone jack. When unplugging the
headphones, the volume is automatically reset to level
15 to avoid loud bursts of sound.
Press
the clock.
20
to switch between the current source and
© Directed Electronics, all rights reserved.
Page 21

Desktop Docking Station
Soloist Universal Sound System
USING SPECIFIC SOURCES
Sirius Radio
Docking your Sirius Radio
You can insert your Sirius radio into Soloist at any
time. Soloist can be on or off. Once your Sirius radio is
docked, Soloist will control the powering on and off of
the radio. The method of power control varies depending on whether you insert a plug and play radio or a
portable.
If you insert a plug and play radio, Soloist will control
the power supply to the radio. If your Sirius radio does
not power up when Soloist is turned on, it was likely
switched off when you removed it from the previous
cradle. You will need to switch it on once you insert it in
Soloist. You must turn Soloist on prior to attempting to
switch on your Sirius radio. After it is powered up, Soloist will switch your radio on and off. Once successfully
docked in Soloist, it is never necessary to turn off a plug
and play radio using the power button on the radio.
NOTE: Switching off your Sirius plug and play radio with
the power button on the Sirius radio will prevent Soloist
© Directed Electronics, all rights reserved.
from being able to turn on your Sirius radio when the
Alarm Clock or Music Timer goes off.
Soloist will control Sirius portable radios by putting them
to sleep and waking them up as needed. The power to
the cradle will always be on to allow the battery in the
portable to charge.
Your Sirius portable radio must be on or asleep before
inserting it into Soloist. If it is fully off, please turn it on
and wait for it to boot up before inserting it into Soloist.
If Soloist is on when you insert your Sirius portable
radio:
if your Sirius portable radio is on, it will stay on.
if your Sirius portable radio is asleep, it will wake up
and stay on.
If Soloist is off when you insert your Sirius portable
radio:
if your Sirius portable radio is on, it will go to sleep.
if your Sirius portable radio is asleep, it will wake up
briefly and then go to sleep.
If you insert your Sirius portable radio in Soloist with
Soloist off and your Sirius portable radio asleep, do not
attempt to turn on Soloist until your Sirius portable radio
turned on and gone back to sleep. If you turn on Soloist
21
Page 22

too soon, your Sirius portable radio may not properly
SNOOZE
SLEEP
POWER
SOURCE
MUTE
TIMER
MENU
PROG/
CLOCK
+
_
POWER
SOURCE
MUTE
TIMER
MENU
PROG/
CLOCK
POWER
SOURCE
MUTE
TIMER
MENU
PROG/
CLOCK
connect with Soloist. If this happens, please remove
your Sirius portable radio and reinsert it into Soloist.
Once successfully docked, it is never necessary to use
the power button on your Sirius portable radio. Doing so
may cause the Soloist to incorrectly control the Sirius
portable radio. If this happens, please remove your
Sirius portable radio and reinsert it into Soloist.
Listening to your Sirius Radio
Soloist’s remote control has buttons that control the
most common Sirius radio features. For details on how
these buttons control your specific Sirius radio, please
refer to the user guide that came with your radio.
or
to select Sirius. The LCD will display
the source.
Soloist is able to detect the presence of a Sirius radio.
If a Sirius radio is not docked into Soloist or improperly
docked, the LCD will display the error.
22
If you are using a Sirius portable radio, some of the
buttons on the remote control that came with the Sirius
portable radio are not present on Soloist’s remote
control. Soloist will recognize commands from the Sirius
portable radio's remote control and pass them to the
Sirius portable radio. If you often use a button that is on
the original remote control, but not on Soloist’s remote
control, you may want to use the original remote control.
All the buttons on the original remote control will func-
tion as expected except the power button. The Soloist
converts the power button on the original remote to
work exactly like the
on Soloist’s remote control.
© Directed Electronics, all rights reserved.
Page 23

Desktop Docking Station
Soloist Universal Sound System
SNOOZE
SLEEP
POWER
SOURCE
MUTE
TIMER
MENU
PROG/
CLOCK
+
_
POWER
SOURCE
MUTE
TIMER
MENU
PROG/
CLOCK
POWER
SOURCE
MUTE
TIMER
MENU
PROG/
CLOCK
MUTE
TIMER
MENU
POWER
SOURCE
MUTE
TIMER
MENU
PROG/
CLOCK
iPod Music Players
Soloist supports all 30-pin connector iPods. Insert your
iPod into Soloist to listen to music. You can insert the
iPod into Soloist with Soloist on or off. Once docked, Soloist will control the power state of the iPod and charge
the battery.
Press
display the source.
Soloist is able to detect the presence of an iPod. If an
iPod is not docked into Soloist or improperly docked, the
LCD will display the error.
© Directed Electronics, all rights reserved.
or
to select iPod. The LCD will
Once iPod is selected as the source, the iPod will wake
up and begin playing music where it last paused.
The
,
and
are used to control
music playback and select tracks. They work like the
corresponding buttons on the controls of the iPod.
When Soloist is powered off, the iPod will go to sleep.
Soloist will charge the battery in the iPod even when
powered off.
23
Page 24

Line In/Aux In
SNOOZE
SLEEP
POWER
SOURCE
MUTE
TIMER
MENU
PROG/
CLOCK
+
_
POWER
SOURCE
MUTE
TIMER
MENU
PROG/
CLOCK
TIMER
MENU
PROG/
CLOCK
+
_
TIMER
MENU
PROG/
CLOCK
+
_
TIMER
MENU
PROG/
CLOCK
+
Make sure to plug in your external source to the correct
jack on Soloist. Some sources might be an MP3 player,
cassette tape player, or a CD player. Set up the external
source to play music.
Make sure Soloist is powered on.
ALARMS AND TIMERS
Alarm Clock
Soloist is a full featured alarm clock that can be used to
wake up to your favorite music on Sirius satellite radios
or stored content on a Sirius portable radio or an iPod.
Press
or
to select AUX IN or LINE IN.
The LCD will display the source you have selected.
You can adjust the Soloist volume as usual, but to get the
best sound you may also need to adjust the volume of
the external source, if applicable.
24
Setting the Alarm Clock
The Alarm Clock can only be set when Soloist is off.
Press and hold
for 3 seconds. The Alarm Set
mode is activated and the hours digits of the Alarm
Clock will flash.
Press
or
to set the hour. AM or PM is
selected in 12 hour mode by adjusting the hour until AM
or PM is properly displayed.
© Directed Electronics, all rights reserved.
Page 25

Desktop Docking Station
Soloist Universal Sound System
TIMER
MENU
PROG/
CLOCK
+
_
TIMER
MENU
PROG/
CLOCK
+
_
TIMER
MENU
PROG/
CLOCK
+
TIMER
MENU
PROG/
CLOCK
+
_
TIMER
MENU
PROG/
CLOCK
+
_
TIMER
MENU
PROG/
CLOCK
+
TIMER
MENU
PROG/
CLOCK
+
_
ON
OFF
OFF
TIMER
MENU
PROG/
CLOCK
+
_
TIMER
MENU
PROG/
CLOCK
+
TIMER
MENU
PROG/
CLOCK
+
_
ON
OFF
Press
Clock will flash.
Press
Press
LCD will turn on.
Press
are , or .
© Directed Electronics, all rights reserved.
again and the minutes digits of the Alarm
or
to set the minutes.
again and one of the source icons on the
or
to select a source. The choices
Press
again. The current volume setting will be
displayed and the number indicating the volume level
will flash.
Press
or
to set the volume level of the
Alarm Clock.
Press
one last time and the Alarm Clock is set
up.
The
on the LCD will be on indicating the Alarm
Clock is set to go off at the programmed time.
Turning the Alarm Clock On and Off
Once the Alarm Clock has been set, you can turn it on or
off. The Soloist must be off to turn the Alarm Clock on
or off.
25
Page 26

Press
TIMER
MENU
PROG/
CLOCK
+
_
ON
OFF
TIMER
MENU
PROG/
CLOCK
+
_
ON
OFF
SNOOZE
POWER
SOURCE
MUTE
TIMER
MENU
PROG/
CLOCK
SNOOZE
SLEEP
POWER
SOURCE
MUTE
TIMER
MENU
PROG/
CLOCK
+
_
ON
OFF
briefly to toggle the
on the LCD on
and off.
When turning the Alarm Clock on, the LCD will briefly
display the time and source that are programmed, as
shown here.
Press
to have the Alarm Clock sound again
in 9 minutes.
The Alarm Clock will automatically stop sounding after
90 minutes if it is not reset manually.
Music Timer
Soloist has a flexible Music Timer that can turn Soloist
on each day at a preset time and play music for a preset
duration at a preset volume.
Waking to the Alarm Clock
At the programmed time, Soloist will turn on, adjust the
volume level, and play the selected source. If you have
selected Sirius radio or iPod as the source but do not
have your music player docked in Soloist, the buzzer will
sound instead.
Press
LCD will stay on indicating the Alarm Clock is still set for
the next day.
26
to reset the Alarm Clock. The
on the
Setting the Music Timer
The Music Timer can be set when Soloist is on or off.
Press and hold
TIMER
or
for 3 seconds. The
Timer Set mode is activated and the hours digits of the
Music Timer will flash.
© Directed Electronics, all rights reserved.
Page 27

Desktop Docking Station
To program the time the Music Timer will turn on:
TIMER
MENU
PROG/
CLOCK
+
_
TIMER
MENU
PROG/
CLOCK
+
SNOOZE
SLEEP
POWER
SOURCE
MUTE
TIMER
MENU
PROG/
CLOCK
+
_
OFF
OFF
ON
TIMER
MENU
PROG/
CLOCK
+
_
TIMER
MENU
PROG/
CLOCK
+
SNOOZE
SLEEP
POWER
SOURCE
MUTE
TIMER
MENU
PROG/
CLOCK
+
_
OFF
OFF
TIMER
MENU
PROG/
CLOCK
+
_
TIMER
MENU
PROG/
CLOCK
+
SNOOZE
SLEEP
POWER
SOURCE
MUTE
TIMER
MENU
PROG/
CLOCK
+
_
OFF
TIMER
MENU
PROG/
CLOCK
+
_
TIMER
MENU
PROG/
CLOCK
+
Soloist Universal Sound System
Press
selected in 12 hour mode by adjusting the hour until the
or
to set the hour. AM or PM is
AM or PM is properly displayed.
TIMER
Press
the Music Timer will flash.
Press
Press
Music Timer will turn off. The hours digits of the Music
Timer will flash.
© Directed Electronics, all rights reserved.
TIMER
or
or
or
again and the minutes digits of
to set the minutes.
again to program the time the
Press
or
to set the hour. AM or PM is
selected in 12 hour mode by adjusting the hour until the
AM or PM is properly displayed.
TIMER
Press
or
again and the minutes digits of
the Music Timer will flash.
Press
or
to set the minutes.
NOTE: You can not program the Music Timer on and
Music Timer off times as the same time.
27
Page 28

TIMER
SNOOZE
SLEEP
POWER
SOURCE
MUTE
TIMER
MENU
PROG/
CLOCK
+
_
OFF
OFF
TIMER
MENU
PROG/
CLOCK
+
_
TIMER
MENU
PROG/
CLOCK
+
LINE
AUX
ON
OFF
LINE
ON
OFF
SNOOZE
SLEEP
POWER
SOURCE
MUTE
TIMER
MENU
PROG/
CLOCK
+
_
ON
OFF
OFF
ON
TIMER
MENU
PROG/
CLOCK
+
_
TIMER
MENU
PROG/
CLOCK
+
SNOOZE
SLEEP
POWER
SOURCE
MUTE
TIMER
MENU
PROG/
CLOCK
+
_
SNOOZE
SLEEP
POWER
SOURCE
MUTE
TIMER
MENU
PROG/
CLOCK
+
_
Press
or
on the LCD will turn on.
again and one of the source icons
Press
Music Timer.
or
to set the volume level of the
Press
are , or
Press
setting will be displayed and the number indicating the
volume level will flash.
28
TIMER
or
or
to select a source. The choices
.
again. The current volume
TIMER
Press
or
one last time and the Music
Timer is set up. The on the LCD will be on indicating
the Music Timer is set to go off at the programmed time.
Turning the Music Timer On and Off
Once the Music Timer has been set, you can turn it on or
off. Soloist can be on or off to turn the Music Timer on
or off.
TIMER
Press
or
briefly to toggle the on the
LCD on and off.
When turning the Music Timer on, the LCD will briefly
cycle through all the parameters of the Music Timer that
are programmed.
© Directed Electronics, all rights reserved.
Page 29

Desktop Docking Station
Soloist Universal Sound System
OFF
OFF
SNOOZE
SLEEP
POWER
SOURCE
MUTE
TIMER
MENU
PROG/
CLOCK
+
_
SNOOZE
SLEEP
POWER
SOURCE
MUTE
TIMER
MENU
PROG/
CLOCK
+
SNOOZE
SLEEP
POWER
SOURCE
MUTE
TIMER
MENU
PROG/
CLOCK
+
SNOOZE
SLEEP
POWER
SOURCE
MUTE
TIMER
MENU
PROG/
CLOCK
+
When the Music Timer Activates
At the programmed time, Soloist will turn on, adjust the
volume level, and play the selected source. If you have
selected Sirius radio or iPod as the source but do not
have your music player docked in Soloist, Soloist will
sound an error tone for 10 seconds. After the error tone,
the Music Timer will deactivate and reset for tomorrow.
During Music Timer operation, the LCD will flash as
shown here.
TIMER
Press
ist will remain on until you turn it off. The on the LCD
will stay on indicating the Music Timer is still set for the
or
to cancel the Music Timer. Solo-
next day.
© Directed Electronics, all rights reserved.
Sleep Timer
Soloist features a Sleep Timer that is used to leave Soloist on while you fall asleep and turn Soloist off after a
preset time has elapsed. The Sleep Timer can be set for
10 to 90 minutes.
The Sleep Timer can only be activated when Soloist is on.
Press
to set the duration of the Sleep Timer. The
LCD will indicate the Sleep Timer.
The Sleep Timer is set for 90 minutes. To reduce the
time press
again. The Sleep Timer will be
reduced by 10 minutes each time you press
minimum setting is 10 minutes.
When the Sleep Timer elapsed, Soloist will shut off
automatically.
. The
29
Page 30

USB Communication
SNOOZE
POWER
SOURCE
MUTE
TIMER
MENU
PROG/
CLOCK
You can connect Soloist to a computer using a standard USB cable (sold separately). This will allow your
computer to communicate with Sirius portable radios
or iPod while docked in Soloist.
Sirius Portable Radios
Once the Sirius portable radio detects connection to
a computer, you may be prompted to stop satellite
radio reception. Once connected to a computer you
can transfer files, update the firmware or perform
any function normally possible when connected to a
computer.
If you want to listen to satellite radio, you may be
prompted to disconnect from the computer. If you
choose to do this, the USB connection is terminated.
You can restore the connection to the computer at any
time using the Sync function of Soloist.
The Sync function can only be used when Soloist is on
and a Sirius portable radio is properly docked in Soloist.
30
Press
for 3 seconds. The USB connection
will be restored and you may be prompted to stop satellite radio reception.
iPod Music Players
When the iPod is docked in Soloist and a USB connection is present, the iPod will connect to the computer
and operate as programmed in the iTunes software.
You will be able to transfer file just as if the iPod were
connected to the computer with the cable that came
with the iPod.
In some cases, the computer will not release the iPod
and allow it to resume playing music. iTunes can be
configured so that after the iPod and iTunes are synchronized the iPod can return to normal operation and
play music. Typically, this requires you to disable disk
use within the iTunes settings. Refer to the documentation that came with your iPod and within iTunes for
more information.
© Directed Electronics, all rights reserved.
Page 31

Desktop Docking Station
Specifications
Amplifier Output Power: 5W continuous per channel,
10W peak
Amplifier THD+N at rated power: <1%
Minimum Sensitivity: 100mV RMS for full output
Channel Separation: > 45 dB at 1kHz
Signal to Noise Ratio: > 70 dB
Input impedance: >20k Ohms
Headphone output: >5mW, 32 ohm headphones
Battery: 3.0V CR2025 for Clock backup & 3.0V CR2032 for
Remote Control Unit
AC Power Supply: 110 - 240 VAC to 12.0 VDC @ 3 A
Soloist Universal Sound System
© Directed Electronics, all rights reserved.
31
Page 32

Page 33

Desktop Docking Station
Soloist Universal Sound System
Limited One Year Consumer Warranty
Directed Electronics (herein “DIRECTED”) promises to the original purchaser, to replace this product should it prove to be
defective in workmanship or material under normal use, for a period of one-year from the date of purchase from the dealer
as indicated by the date code marking of the product. During this one-year period, there will be no charge for this replacement PROVIDED the unit is returned to DIRECTED, shipping pre-paid. This warranty is non-transferable and does not
apply to any unit that has been modified or used in a manner contrary to its intended purpose, and does not cover damage
to the unit caused by installation or removal of the unit. This warranty is void if the product has been damaged by accident
or unreasonable use, neglect, improper service or other causes not arising out of defects in materials or construction.
Units which are found to be damaged by abuse resulting in thermally damaged voice coils are not covered by this warranty
but may be replaced at the absolute/sole discretion of DIRECTED. ALL WARRANTIES, INCLUDING BUT NOT LIMITED TO
EXPRESS WARRANTY, IMPLIED WARRANTY, WARRANTY OF MERCHANTABILITY, FITNESS FOR PARTICULAR PURPOSE,
AND WARRANTY OF NONINFRINGEMENT OF INTELLECTUAL PROPERTY ARE EXPRESSLY EXCLUDED TO THE MAXIMUM
EXTENT ALLOWED BY LAW, AND DIRECTED NEITHER ASSUMES NOR AUTHORIZES ANY PERSON TO ASSUME FOR IT ANY
LIABILITY IN CONNECTION WITH THE SALE OF THE PRODUCT. DIRECTED HAS ABSOLUTELY NO LIABILITY FOR ANY AND
ALL ACTS OF THIRD PARTIES INCLUDING ITS AUTHORIZED DEALERS OR INSTALLERS. IN NO EVENT WILL DIRECTED
BE LIABLE FOR ANY INCIDENTAL, SPECIAL OR CONSEQUENTIAL DAMAGES (INCLUDING LOSS OF PROFITS) AND IN NO
EVENT, SHALL DIRECTED’S LIABILITY EXCEED THE PURCHASE PRICE PAID BY PURCHASER FOR THE PRODUCT. Some
states do not allow the exclusion or limitation of incidental or consequential damages, so the above limitation or exclusion
may not apply to you. Some states do not allow limitations on how long an implied warranty lasts, so the above limitation
may not apply to you. Unit must be returned to DIRECTED, postage prepaid, with bill of sale or other dated proof of purchase
bearing the following information: consumer’s name, telephone number, and address, authorized dealer’s name and address, and product description. Note: This warranty does not cover labor costs for the removal and reinstallation of the
unit. IN ORDER FOR THIS WARRANTY TO BE VALID, YOUR UNIT MUST BE SHIPPED WITH PROOF OF PURCHASE FROM AN
AUTHORIZED DIRECTED DEALER. BY PURCHASING THIS PRODUCT, THE CONSUMER AGREES AND CONSENTS THAT ALL
DISPUTES BETWEEN THE CONSUMER AND DIRECTED SHALL BE RESOLVED IN ACCORDANCE WITH CALIFORNIA LAWS
IN SAN DIEGO COUNTY, CALIFORNIA. 9200018 09-06
© Directed Electronics, all rights reserved.
33
Page 34

© 2007 Directed Electronics, all rights reserved
GSOLOD1 2007-08
 Loading...