

Page 1
ONE-WAY FM AUTOMATIC/MANUAL
TRANSMISSION REMOTE STARTER
INDUSTRY CANADA USER NOTICE:
Operation is subject to the following two conditions: (1) this device may not cause interference, and (2) this
device must accept any interference, including interference that may cause undesired operation of the
device.
To reduce potential radio interference to other users, the antenna type and its gain should be so chosen that
the equivalent isotropically radiated power (EIRP) is not more than that required for successful
communication.
NOTE: The manufacturer is not responsible for any radio or TV interference caused by unauthorized
modifications to this equipment. Such modifications could void the user's authority to operate the equipment
Doc#: 110908 Rev:1.3 © 2011 - 1W-FM-A/M-HD - - FcN - Canada
_____________
User Guide
WARNING!
It is the responsibility of the vehicle operator to ensure their vehicle
is parked in a safe and responsible manner.
1. a) Manual transmission
: When leaving the vehicle, it is the user’s
responsibility to ensure that the gearshift lever is in the NEUTRAL
position and the parking brake is engaged in order to avoid accidents
upon remote starting.
b) Automatic transmission
: When leaving the vehicle, it is the user’s
responsibility to ensure that the gearshift lever is in “Park” in order to
avoid accidents upon remote starting.
(Note: Make sure that the automatic vehicle cannot start in "Drive".)
2. It is the user's responsibility to ensure that the remote starter is
disabled or put into valet mode before servicing.
Designed & engineered in Canada
Page 2

P.2 User Guide
Table of Contents
Government regulations .................................................................................................................. 3
Introduction with SmartStart™ ............................................................................................. 3
Using the Remote Control ............................................................................................................... 4
Vehicle Presets ................................................................................................................................. 4
Heater ........................................................................................................................................... 4
Windshield Wipers & Radio & Headlights ..................................................................................... 4
Arming and disarming the starter kill (if installed) ....................................................................... 4
Remote-Starting Your Vehicle ......................................................................................................... 5
Setting Your Vehicle in to Ready Mode ........................................................................................ 5
Remote-starting ............................................................................................................................ 6
Driving Off ..................................................................................................................................... 6
Remote Starter Features .................................................................................................................. 7
Remote Door Locks ...................................................................................................................... 7
Remote Trunk Release ................................................................................................................. 7
Idle Mode ...................................................................................................................................... 7
Valet Mode .................................................................................................................................... 8
Panic Mode ................................................................................................................................... 9
Quick LockoutTM ............................................................................................................................ 9
Cold Weather Mode ...................................................................................................................... 9
Extended Run Time .................................................................................................................... 10
Disable/Enable LED flashing ...................................................................................................... 10
Constant output .......................................................................................................................... 10
Advanced Features: Installation-programmable Options .......................................................... 10
Ignition-controlled Door Locks .................................................................................................... 10
Secure Lock ................................................................................................................................ 11
Safe Start .................................................................................................................................... 11
Engine Run Time ........................................................................................................................ 11
Turbo Mode ................................................................................................................................ 11
“Home ValetTM” Mode ................................................................................................................. 12
AUX 1 .......................................................................................................................................... 12
Horn Chirp Timing ....................................................................................................................... 12
Multi-car Operation ..................................................................................................................... 12
AUX 2 .......................................................................................................................................... 13
OEM-Style Alarm ........................................................................................................................ 13
Intrusion Codes via horn ............................................................................................................. 13
Troubleshooting Poor Transmitting Range ................................................................................. 14
Diagnostics – Parking Light Flash Table ..................................................................................... 14
Page 3
User guide P.3
Governmentregulations
This device complies with part 15 of the FCC Rules. Operation is subject to the following two
conditions: (1) This device may not cause harmful interference, and (2) this device must accept any
interference received, including interference that may cause undesired operation.
This equipment has been tested and found to comply with the limits for a Class B digital device,
pursuant to part 15 of the FCC Rules. These limits are designed to provide reasonable protection
against harmful interference in a residential installation. This equipment generates and can radiate
radio frequency energy and, if not installed and used in accordance with the instructions, may
cause harmful interference to radio communications. However, there is no guarantee that
interference will not occur in a particular installation. If this equipment does cause harmful
interference to radio or television reception, which can be determined by turning the equipment off
and on, the user is encouraged to try to correct the interference by one or more of the following
measures:
• Reorient or relocate the receiving antenna.
• Increase the separation between the equipment and receiver.
• Connect the equipment into an outlet on a circuit different from that to which the
receiver is connected.
• Consult the dealer or an experienced radio/TV technician for help.
This device complies with the Industry Canada Radio Standards Specification RSS 210. Its use is
authorized only on a no-interference, no-protection basis; in other words, this device must not be
used if it is determined that it causes harmful interferences to services authorized by IC. In
addition, the user of this device must accept any radio interface that may be received, even if this
interference could affect the operation of the device.
Warning! Changes or modifications not expressly approved by the party responsible for compliance
could void the user’s authority to operate this device.
IntroductionwithSmartStart™
This is a state-of-the-art remote car starter system. The system is packed with advanced features
such as priority access to the driver’s door (commodity features), the Safe Start children safety
feature and SmartStart™.
SmartStart™ is a groundbreaking technology that enables your remote starter features to be
accessed by your smartphone. Features include keyless entry, trunk release, panic, remote
start/stop toggle and alarm notifications
1
. Note: SmartStart™ must be professionally installed. For
more information, see your nearest authorised Directed Canada dealer.
With many advanced functions, this product will satisfy any one of your expectations from high-end
commodity and security systems, without neglecting any standard feature commonly offered by
entry-level starters.
1
Certain conditions apply. See your authorised Directed Canada dealer.
Page 4
P.4 User Guide
UsingtheRemoteControl
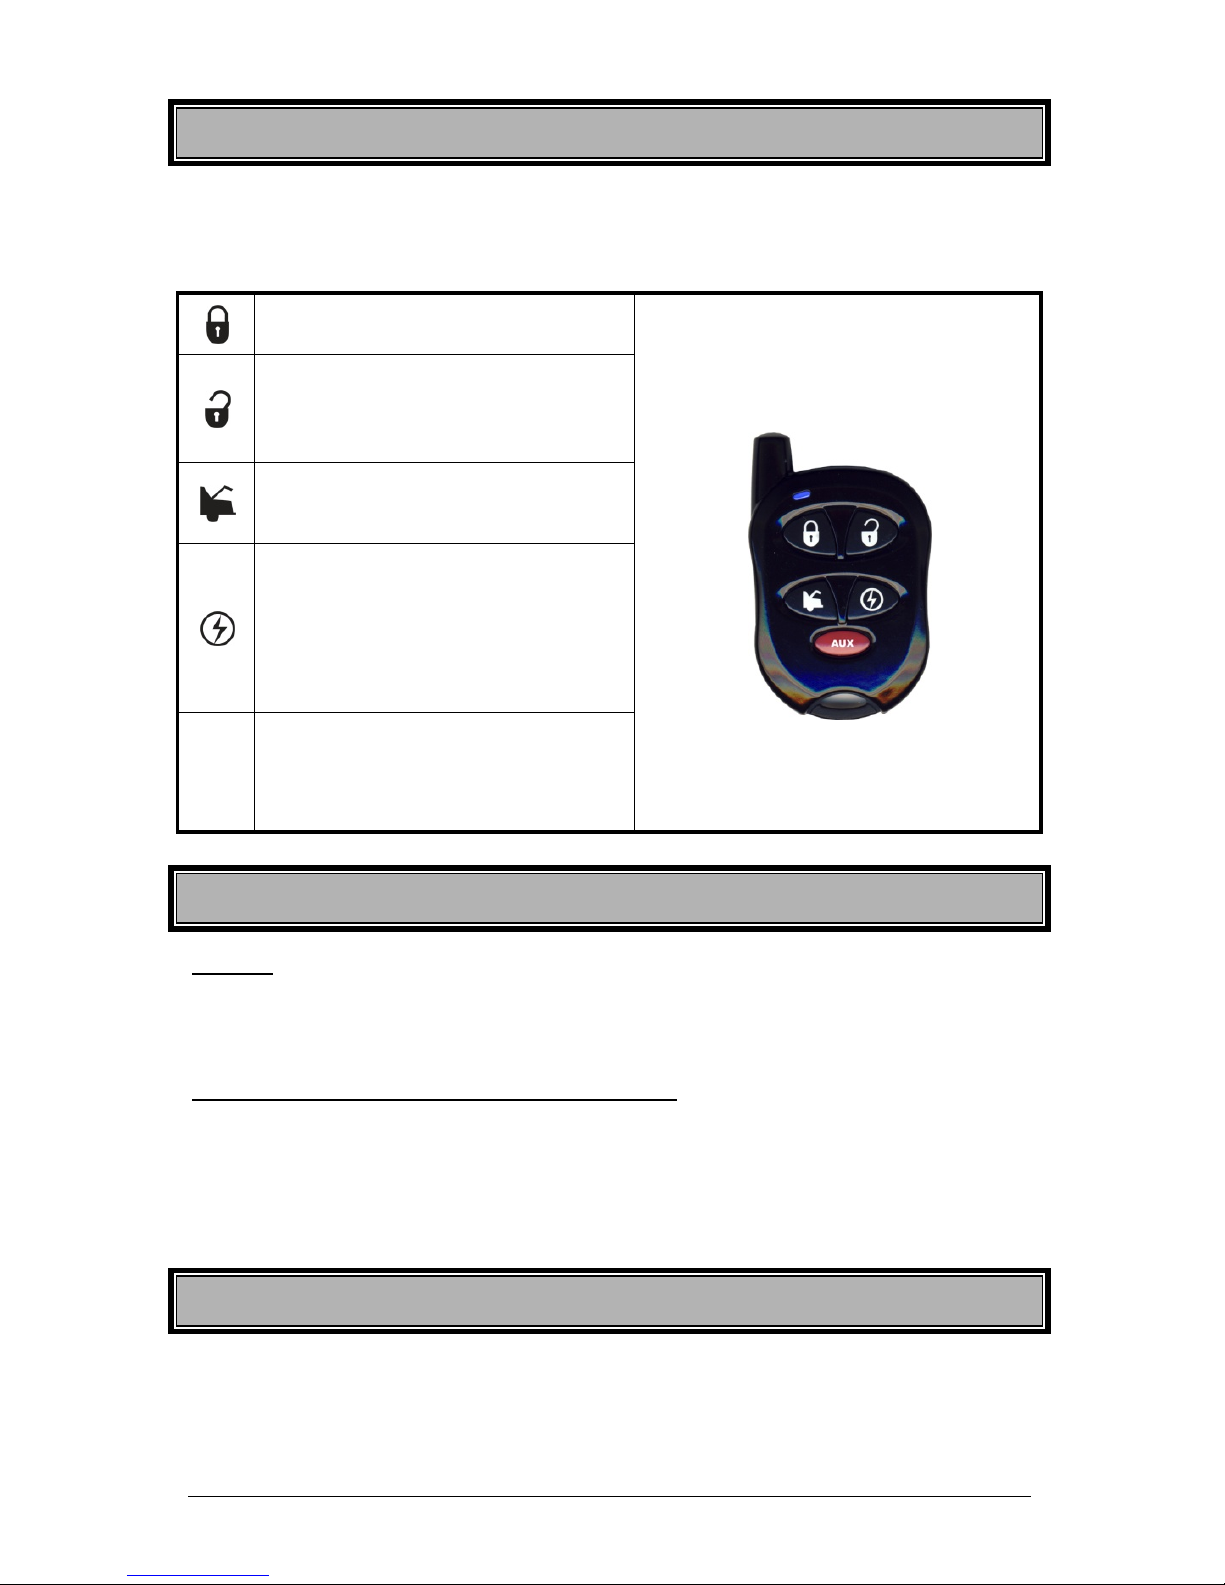
Your Remote Car Starter is equipped with a 5-button multi-channel remote control. It can operate
two independent vehicles equipped with a Remote Car Starter (see Multi-Car Operation page-12,
later in this Guide, for second-car transmitter functions).
The functions of the transmitter are as follows:
LOCK: Locks the DOORS and arms the
STARTER KILL (if installed)..
(Image as reference only)
UNLOCK: Unlocks the DOORS and
disarms the STARTER KILL (if installed).
Activates the AUX 1 output if Priority
Door Access is configured.
TRUNK: Opens the TRUNK
or activates
the AUX 3 output.
Note: Trunk option must be installed.
START/STOP: Remote starts or stops
the engine. Gets the system into Cold
Weather mode by pressing the AUX
button and then pressing and holding the
START/STOP button for 3 seconds.
Note: Icon may vary.
AUX
AUX: This button serves as a second
function button.
This button allows assigning different
functions to any of the other four buttons.
VehiclePresets
Heater
When leaving the vehicle it is recommended to preset the accessory controls in preparation for the
next remote start. Settings for the blower motor (fan), front and rear, should not be left on HIGH. It
is recommended to leave the settings on LOW or MEDIUM instead.
WindshieldWipers&Radio&Headlights
Certain vehicles require the radio and / or windshield wiper and / or headlight circuits to become
energized while running under remote start. When leaving the vehicle you must ensure that the
windshield wiper and headlight switches are OFF. Leaving the headlight switch ON on certain
types of vehicles could cause them to remain ON even after remote starter shut down, resulting in
a dead battery.
Arminganddisarmingthestarterkill(ifinstalled)
This added security feature will prevent the vehicle from starting with the Ignition key when the
starter kill is armed. If the system was installed with the starter kill option, the vehicle will not be
able to start with the key unless the system has been unlocked first or put into Valet Mode
(page 8).
Page 5
User guide P.5
Note: If the Starter Kill is installed, the vehicle will benefit from a protection against starter motor
damage that could occur after remote-starting the engine should the user, by force of habit, turn
the ignition key to the CRANK position.
The Starter Kill (if installed) can be configured by the installer either to Passive Mode (so as to arm
automatically) or Active Mode (so as to require the user’s intervention for arming). By default, the
Remote Car Starter is configured to Passive Mode.
Passive mode:
To arm the Starter Kill:
• Press the button on the transmitter.
OR
• Let the Starter Kill arm automatically 1 minute (by default) or 3 minutes (if configured this way)
after the ignition is turned OFF or once the last door is closed (if the doors are monitored).
• The LED on the antenna will flash quickly during the countdown preceding the activation
of the Starter Kill.
• Once the activation countdown expires, the LED will send a series of quick double
flashes to indicate that the Starter Kill is now armed.
To disarm the Starter Kill:
• Press the button on the transmitter.
• The Starter Kill will automatically rearm itself after 1 minute (by default) or 3 minutes (if
configured this way) if no door is left opened (if the doors are monitored) and the ignition
is not turned ON.
Active Mode:
To arm the Starter Kill:
• Press the button on the transmitter.
• The parking lights will flash once.
• The LED on the antenna will flash slowly.
• If remote door locks are installed, this will also lock the doors and arm the OEM-style
alarm (if configured).
To disarm the Starter Kill:
• Press the button on the transmitter.
• The parking lights will flash twice.
• The LED on the antenna will remain OFF.
• If remote door locks are installed, this will also unlock the doors and disarm the OEM-
style alarm (if configured).
RemoteStartingYourVehicle
SettingYourVehicleintoReadyMode
If your vehicle has a manual transmission you must read the following indications. The unit must
first be set to Ready Mode in order to start the vehicle by remote. If the unit is not set to Ready
Mode, it cannot remote start the vehicle. Please note that Ready Mode can be enabled by the
remote or the handbrake, depending on the option that was selected by your installer. Therefore,
you must follow the appropriate procedure between the two described below in order to set your
vehicle into Ready Mode.
Page 6
P.6 User Guide
Once the system is set to Ready Mode, the vehicle can be remote started and stopped at any time.
The system will exit Ready Mode if a door, the hood or the trunk is opened, if the brake pedal is
pressed, if the parking brake is disengaged or if the ignition key is turned to the IGNITION ON
(RUN) position.
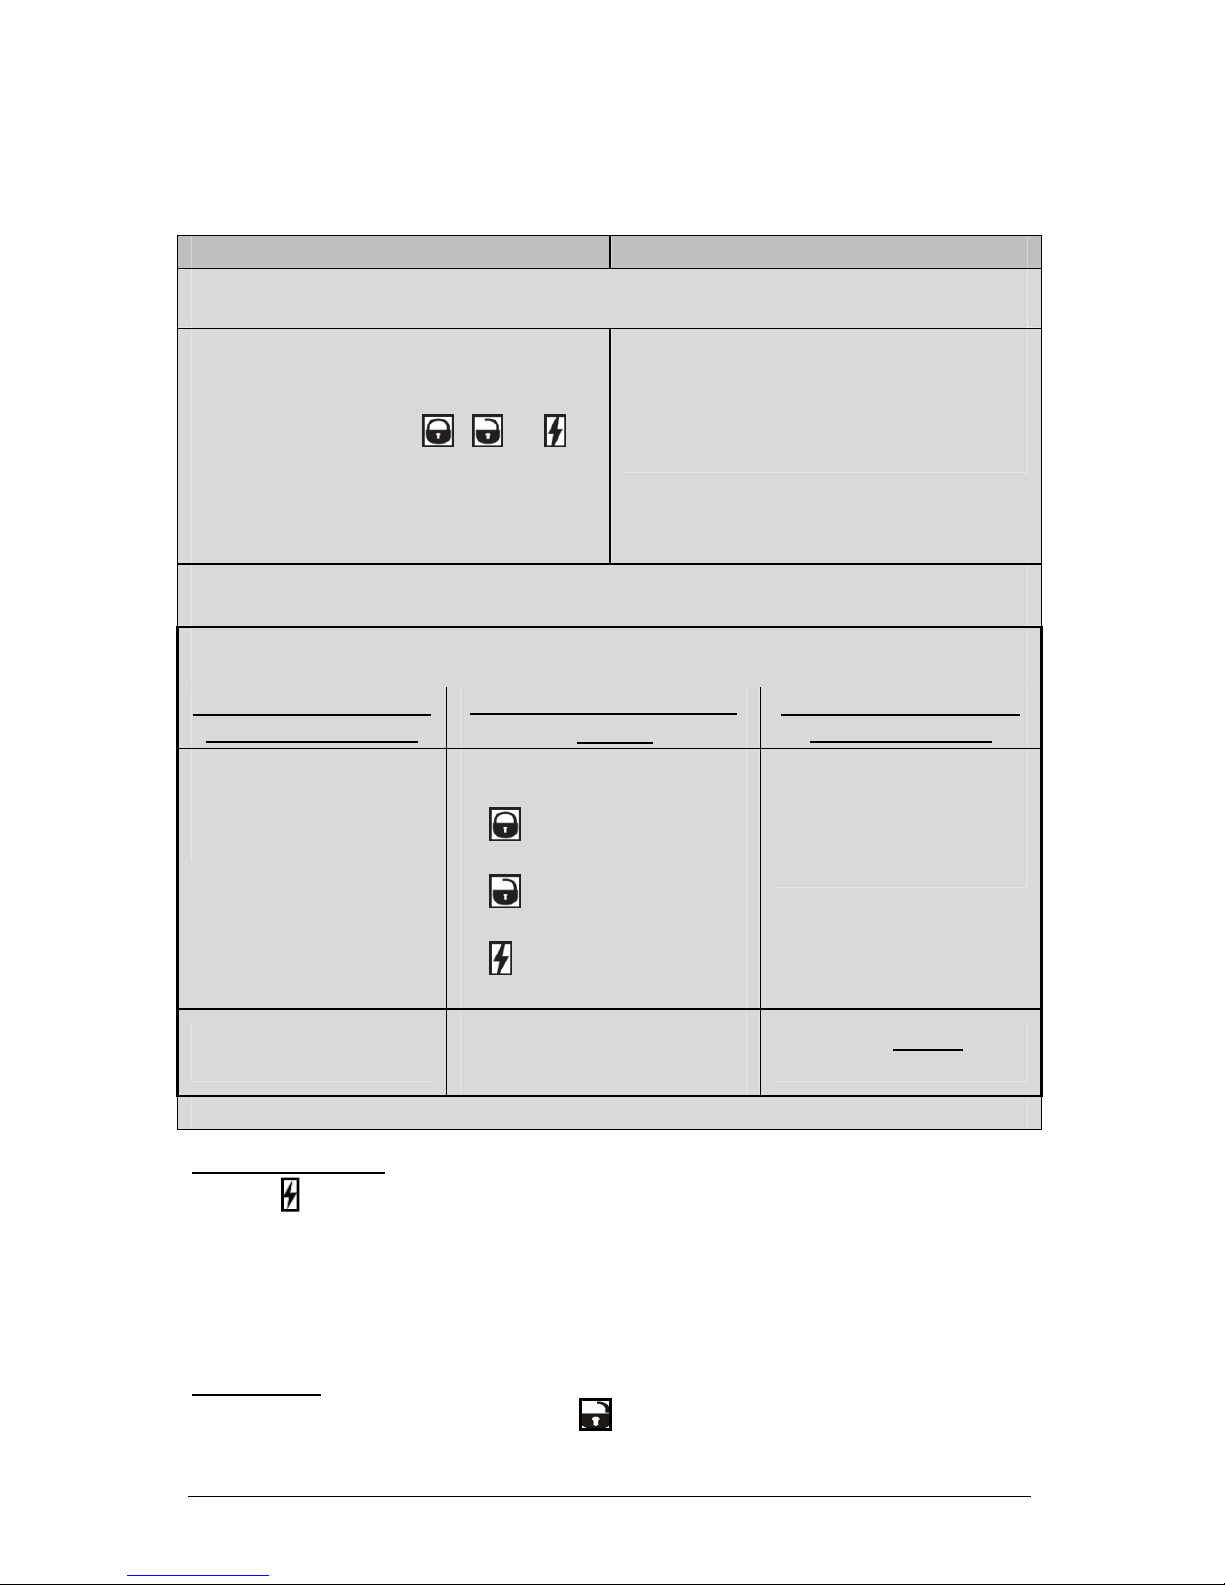
To set the system to Ready Mode:
If Ready Mode is enabled by remote If Ready Mode is enabled by handbrake
1. Ensure that all the doors, hood and trunk are closed. Make sure that the gear selector is in the
neutral position.
2. With the engine running, apply the parking
brake once and release the brake pedal.
3. Within 20 sec. of engaging the parking
brake, press and hold , or on
the transmitter (SmartStart™ uses only the
SmartStart™ icon).
The parking lights will flash 3 times quickly
and remain lit. Release the button.
2. With the engine running, apply the parking
brake twice within 10 sec.
3. Make sure to release the brake pedal.
The parking lights will flash 3 times quickly
and remain lit.
4. Remove the key: the engine will keep on running.
5. Exit the vehicle. All doors should be closed, including the hood and trunk.
6. THERE ARE THREE POSSIBLE OPTIONS TO COMPLETE READY MODE (programmable
by installer)
OPTION 1: Automatic shut
down without auto lock
OPTION 2: Manual shut down
(default)
OPTION 3: Automatic shut
down with auto lock
The engine runs for 8 sec.
before finally shutting down
the engine, without user
interaction.
The engine keeps going until you
press either;
a. to lock the doors and shut
down the engine;
b. to unlock the doors and
shut down the engine;
c. to shut down the engine
without affecting the doors.
The engine runs for 8 sec.
then locks the doors before
finally shutting down the
engine, without user
interaction.
WARNING: The vehicle is
not armed or locked down.
WARNING: Engine runs until the
pre-programmed run time
expires.
WARNING: Do not leave
your keys in the vehicle!
7. The Parking lights will flash twice to indicate Ready mode is set.
Remotestarting
Press the button for approximately 1 second. The parking lights will turn ON to inform you that
the Remote Car Starter has received your signal. Approximately 5 seconds later, the engine will
start. The parking lights will remain ON during the pre-programmed run time of the engine.
If your vehicle does not start at the first attempt, the system will shut down, wait a few seconds and
try to start the engine again. There will be 3 start attempts before the system gives up.
DrivingOff
With the vehicle running remotely, press the button to disarm the starter kill (if installed) and
unlock the doors. Enter the vehicle and do the following:
Page 7
User guide P.7
1. Turn the ignition key to the IGNITION ON (RUN) position. (Do not turn the key to the CRANK
position while the engine is running. This would cause the starter motor to re-engage.)
2. Press the brake pedal to disengage the remote starter unit.
You are now ready to drive off.
Note: On some Push-To-Start (PTS) vehicles, no takeover is possible as pressing the brakes will
shut the engine down. Please talk to your technician to determine if the “Takeover mode” can be
set for your vehicle.
RemoteStarterFeatures
RemoteDoorLocks
If your system was installed with the Remote Door Locks option, you will have the convenience of
remote keyless entry.
To LOCK your doors and arm the starter kill (if installed):
1. Press and hold the button for approx. 1 sec.
2. The parking lights will flash once to confirm that the doors have been locked.
To UNLOCK your doors and disarm the starter kill (if installed):
1. Press and hold the
button for approx. 1 sec.
2. The parking lights will flash twice to confirm that the doors have been unlocked.
RemoteTrunkRelease
If your system was installed with the Remote Trunk Release option, you can open your trunk by
pressing the button for 3 seconds on the remote transmitter. In addition, this will also disarm
the OEM style alarm (if installed).
IdleMode
Convenience feature: Idle Mode allows you to keep the engine running and the doors locked
while you stop, for example, at a convenience store or for a short delivery
This feature allows you to let the remote starter take over control of the vehicle (i.e. no Key in the
Ignition Switch) while the engine is running.
If your vehicle has an automatic transmission, proceed as follows to set the system to Idle Mode:
1. With the engine running, make sure to release the brake pedal and press the ,
or
button on the transmitter until the parking lights come ON.
Note: SmartStart™ can be setup to use the SmartStart™ icon to activate Idle mode.
2. Remove the ignition key from the ignition switch.
The engine will continue running.
3. Exit the vehicle and close all doors, hood and trunk.
4. Press the button to lock the doors, to arm the starter kill and to arm the alarm (if
available). The engine will continue running.
a. When re-entering the vehicle, the user must reinsert the key into the ignition and turn it
to the ON position (not Crank
) without pressing on the brake.
b. Once the key is in the ON position, press on the brake pedal to put the transmission in
gear. Pressing the brake pedal at this step will cancel the remote starter takeover.
c. Drive off.
Page 8
P.8 User Guide
If your vehicle has a manual transmission, Idle Mode can be activated through the same routine
as that used for Ready Mode (page-5); at the last step, press button to lock the doors, arm the
system and leave the engine running.
NEW FEATURE – Push-To-Start Idle Mode
This feature is a variation of “Idle mode”, but made specifically for Push-To-Start vehicles, with
automatic or manual transmissions. (Consult your installer for availability of this feature.) Follow the
same steps as the normal Idle Mode procedure, except for when re-entering the vehicle while the
engine is running;
1. Press unlock
2. Open then close all doors.
3. You have 1.5 minutes (or 3 minutes) to press on the brake pedal, to get in gear and
drive off.
Note 1: Pressing on the brake pedal after the allocated (1.5 or 3-min.) period will shut the engine
down.
Note 2: The engine will continue running until the user re-enters the vehicle or until the expiration
of the run time.
Note 3: If the pre-programmed run-time expires or if the user shuts down the engine remotely, the
vehicle will enter Ready Mode automatically (manual transmissions only).
Caution!! Do not leave children or pets unattended in a vehicle standing in Idle Mode.
ValetMode
When the vehicle is in Valet Mode, the remote starter and alarm functionalities are disabled. If the
vehicle needs to be serviced, or if you park it indoors, Valet Mode will prevent the engine from
being remote-started accidentally.
Any of the following features will put the remote car starter into Valet Mode:
Ignition Valet: This feature allows you to set Valet Mode using the ignition key.
Remote Valet: This feature allows you to set Valet Mode using the transmitter.
To put the system into Valet Mode
Using the KEY (Ignition Valet Mode):
1. Insert the ignition key into the ignition switch. Within 10 sec., cycle the ignition key to the
IGNITION/RUN and OFF positions 5 times until the parking lights flash 3 times.
2. Turn the ignition OFF.
3. The LED on the antenna will stay ON indicating that the vehicle has successfully entered
Valet mode.
Using the TRANSMITTER (Remote Valet Mode):
1. Press the and buttons simultaneously until the parking lights flash 3 times.
2. The LED on the antenna will stay ON indicating that the vehicle has successfully entered
Valet mode.
To take the system out of Valet Mode
Using the KEY (Ignition Valet Mode):
1. Insert the ignition key into the ignition switch. Within 10 sec., cycle the ignition key to the
IGNITION/RUN and OFF positions 5 times until the parking lights flash twice.
2. Turn the ignition OFF.
3. The LED on the antenna will flash rapidly, indicating that the vehicle is now out of Valet
mode.
Page 9
User guide P.9
Using the TRANSMITTER (Remote Valet Mode):
1. Press the and buttons simultaneously until the parking lights flash twice.
2. The LED on the antenna will flash rapidly, indicating that the vehicle is now out of Valet
mode.
If someone attempted to remote-start the vehicle while in Valet Mode; the parking lights will turn
ON, then OFF, then will flash twice.
PanicMode
Note: Panic mode can only be activated if the horn has been adequately configured by the
installer.
In an emergency situation, you can activate panic mode by pressing and holding the AUX button
for more than 3 seconds, until the horn starts honking. If the vehicle is under a remote start, the
engine will shutdown automatically before setting off the horn. You can stop the horn by pressing:
(this will lock your doors and deactivate panic mode), or
(this will unlock your doors and deactivate panic mode).
Furthermore, the panic mode can be stopped by activating Va let Mode (page 8)
* Panic Mode will automatically shut down after 30 sec.
QuickLockoutTM
(Also called Secure Panic.) For fast protection in emergency situations, the system will LOCK all
doors when you press the brake pedal while you hear the Horn sounding. (Quick Lockout is only
available when panic mode has been set off.)
ColdWeatherMode
If the vehicle has a manual transmission, Ready mode (page 5) should be set before entering
Cold Weather mode. When Cold Weather Mode is active, the engine starts every 2 hours and runs
for 3 minutes (or for 8 or 20 minutes with diesel engines). Cold Weather Mode automatically ends
after 24 hours (or 12 starts).
To enter Cold Weather Mode:
• Rapidly press AUX twice. The remote’s LED will start flashing.
• Press and hold until the parking lights will flash for 2 seconds, pause, and then flash
3 times.
To exit Cold Weather Mode, do any one of the following actions:
• Open the hood.
• Start the engine by remote.
• Turn the ignition key to the IGNITION ON (RUN) position.
• Rapidly press AUX twice. The re mote’s LED will start flashing.
Press and hold until the parking lights will flash for 2 seconds, pause, and then
flash twice.
If Safe Start is enabled, you can activate Cold Weather Mode by:
• Pressing and releasing the button, then;
• Pressing and holding the button until the parking lights flash 3 times.
Page 10
P.10 User Guide
To verify whether the system is in Cold Weather Mode:
• (Automatic transmissions only) Press the brake pedal: If the vehicle is in Cold Weather
mode, the parking lights will remain ON while the brake pedal is pressed.
ExtendedRunTime
With the vehicle running under a remote start, pressing and holding the button for more than
3 seconds will reset the run time counter to zero and restart the run time cycle from the beginning.
• The horn (if programmed) will honk once;
• The parking lights will flash slowly 3 times then remain lit.
To stop the vehicle at any moment, simply press the button. This procedure can only be carried
out once per remote start.
Example: If your Module is programmed for a runtime of 3 minutes and your vehicle has been
running for 2 minutes already, pressing the button will reset the counter to zero and the Engine
will run for another cycle (in this case, 3 minutes).
Disable/EnableLEDflashing
To disable the LED: Press and simultaneously until the parking lights flash 3 times.
To Enable the LED: Press and simultaneously until the parking lights flash once.
Constantoutput
Pressing and holding the button for more than 3 seconds will lock all doors and will send a
constant pulse as long as the button is held down (maximum of 15 seconds). This constant
pulse can be configured to activate certain functionalities such as rolling up the windows – Please
refer to your installer to see if your vehicle is compatible with this option.
Pressing and holding the button for more than 3 seconds will unlock all doors and will send a
constant pulse as long as the button is held down (maximum of 15 seconds). This constant
pulse can be configured to activate certain functionalities such as rolling down the windows –
Please refer to your installer to see if your vehicle is compatible with this option.
AdvancedFeatures:InstallationprogrammableOptions
The Remote Car Starter was designed with flexibility and OEM integration in mind. With its
programmable options, this unit can single-handedly control nearly any electrical system in your
vehicle.
Caution: The programming of your system should be left to a professional. Changing any one of
the settings may affect the operation of your Remote Car Starter.
IgnitioncontrolledDoorLocks
This is an added security feature. If your Remote Car Starter was installed with the IgnitionControlled Door Locks option, the doors will automatically lock as soon as the ignition key is turned
to the IGNITION ON (RUN) position while the brakes are pressed. The remote car starter will also
lock any door that was unlocked and opened (then closed) the next time the brake pedal is pressed
(only when doors are monitored). When the key is turned to the OFF position, the doors will
automatically be unlocked.
Page 11

User guide P.11
SecureLock
(Disabled by default.) Before your vehicle can be remote-started, the factory security system must
first be disarmed. The Secure Lock feature may be required on certain vehicle models with factory
security systems that automatically unlock the doors when the security system is disarmed.
To keep your vehicle protected when the factory security system is disarmed for a remote start,
Secure Lock will relock your doors as soon as the vehicle is started. Once the engine is shut down
by remote or after its runtime has expired, Secure Lock will also rearm your factory security system
and relock the doors.
SafeStart
This feature will eliminate accidental remote starts, e.g. when children are playing with the
transmitter.
Safe start enabled: If this feature is enabled, the user must press the button twice within
3 seconds to remote-start the vehicle.
Swap start: If this feature is enabled;
1. Rapidly press AUX twice. The remote’s LED will start flashing.
2. While the LED is flashing, press to remote start the car.
The AUX 2 output can be activated by pressing the button.
EngineRunTime
On a gas engine, the Remote Car Starter can be programmed to run the engine for 3, 15, or
25 minutes (15 minutes by default). On a diesel engine, the Remote Car Starter can be
programmed to run the engine for 8, 20, or 30 minutes (20 minutes by default).
TurboMode
If Turbo Mode is configured at installation, it will allow a turbocharger to idle down after the user
leaves the vehicle: the unit will take over the vehicle and keep it running for 60 seconds (or until it
is shut down by remote control), then shut down the engine.
If your vehicle has an automatic transmission, proceed as follows to set the system to Turbo Mode:
1. With the engine running, make sure to release the brake pedal and press the ,
or button on the transmitter until the parking lights come ON.
Note: SmartStart™ can be setup to use the SmartStart™ icon to activate Turbo mode.
2. Remove the ignition key from the ignition switch. The engine will continue running.
3. Exit the vehicle and close all doors, hood and trunk.
4. Press the button; this will lock the doors, arm the OEM-style alarm (if configured|)
and confirm that the vehicle is in Turbo Mode.
5. The engine will shut down after 60 seconds.
If your vehicle has a manual transmission, follow all steps of the Ready Mode routine (page-5) to
activate Turbo Mode. At the last step,
• Press to lock the doors and have the engine shut down after 60 seconds;
The parking lights will flash 3 times and remain lit.
The OEM-style alarm and starter kill (if configured) will be armed.
• Press
to unlock the doors and have the engine shut down after 60 seconds;
The parking lights will flash 3 times and remain lit.
• Press to shut down the engine without affecting the doors.
Note: The vehicle will enter Ready Mode once the engine run time expires.
Page 12

P.12 User Guide
“HomeValetTM”Mode
If configured at installation, this feature will remotely set the vehicle to a no-remote-start mode: if
the vehicle is parked indoors there is no danger of it starting accidentally by remote control. If the
vehicle has a manual transmission, it should be set into ready mode before activating the Home
Valet™.
Note: Once the Home Valet Mode is activated, the vehicle will not start by remote, but the
OEM alarm functions will remain active.
To take the system into home valet mode:
1. Press the or
button.
2. Within 3 seconds, press the and buttons simultaneously for 3 sec.
3. The P-lights will flash once
To take the system out of home valet mode:
• Turn the ignition key to the IGNITION ON (RUN) position.
The system will warn you if someone attempts to start your vehicle while it stands in home valet
mode. The parking lights will:
Turn ON then OFF; then
Flash twice, pause; then
Flash twice again.
AUX1
Note: This 500 mA negative Aux 1 output can be used for many different applications
Priority door:
This great feature allows the user to unlock solely the driver’s door with a single press of the
button on the transmitter, and to unlock the other doors, if desired, by pressing the
button for a second time.
The output will provide a 1-second negative output when the button is pressed a second
time on the transmitter.
Horn Confirmation:
AUX 1 can be programmed to trigger the horn every time the button is pressed, or when
the button is pressed twice within 3 seconds. When horn confirmation is activated, panic
mode is enabled. If horn confirmation is disabled, panic mode will not be available.
HornChirpTiming
The pulse duration can be configured by your installer (from 5 ms to 200 ms).
MulticarOperation
This option allows the owner of two vehicles, both equipped with the same remote starter model, to
control both systems with a single remote control. To control the second vehicle:
Press TRUNK + LOCK buttons simultaneously: .................... LOCK
Press TRUNK + UNLOCK simultaneously: ........................... UNLOCK
Press TRUNK + START/STOP simultaneously: .................... START
Press TRUNK + START/STOP simultaneously: .................... STOP
Or
Press AUX 2X QUICK ¾ AUX ¾ LOCK: .............................. LOCK
Press AUX 2X QUICK ¾ AUX ¾ UNLOCK:......................... UNLOCK
Press AUX 2X QUICK ¾ AUX ¾ START/STOP: ................. START
Page 13

User guide P.13
Press AUX 2X QUICK ¾ AUX ¾ START/STOP: ................. STOP
Press AUX 2X QUICK ¾ AUX ¾ TRUNK: ........................... TRUNK
Note: Pressing the AUX button 2x quickly causes the LED to flash slowly and to shift to level 1
(AUX 2, configurable by your installer). Pressing the AUX button 3x quickly causes the LED to
flash fast and to shift to level 2 (second car operation).
AUX2
If configured at installation, this feature can be activated by pressing the 2x on the AUX button (or
“Shift level 1”), followed by pressing the button while the LED is slowly flashing.
OEMStyleAlarm
The OEM-style alarm (if configured by your installer) monitors the doors, hood and ignition switch
of your vehicle. It will sound the horn if a door or the hood is opened, or if the key is turned in the
ignition.
• To arm the OEM-style alarm, press the button on the transmitter.
- The OEM-style alarm will ONLY arm if the button on the transmitter is pressed.
- The LED on the antenna will flash slowly to indicate that the OEM-style alarm is now
armed.
• To disarm the OEM-style alarm, press the
button on the transmitter.
- To stop the horn from sounding if the OEM-style alarm is triggered, press the or
button, or put the system in and out of Valet Mode (page-8)
IntrusionCodesviahorn
The system monitors the following:
• Doors
• Hood
• Ignition
Note: If an intrusion has occurred the HORN will sound for a maximum of 1 minute.
If an intrusion has occurred and pressed, the horn provides an intrusion code corresponding to
the type of intrusion that occurred.
Diagnostic table:
1x = power interruption 4x = Doors intrusion
3x = Hood 6x = Ignition
Page 14

P.14 User Guide
TroubleshootingPoorTransmittingRange
Many factors may affect the operating range of the transmitter. Some of these are:
• The condition of the battery in the transmitter.
• The operating environment (for example: downtown radio-frequency noise, airports, cellular
phone towers…)
• Metal: any type of metal will affect operating range. This includes the metal in the car.
• The shape of the vehicle can affect range as well; vans in general have an especially poor
range.
• The shape of the roof in A-pillars brings about considerable radio-frequency deflection (in this
case the signal from the remote control). As a result, the direction in which the vehicle is
facing in relation to the remote control can affect the range. Straight on – standing in front of
the vehicle – generally gives you the greatest range; the second best performance is from the
back. Using the remote control from either side of the vehicle will usually give the lowest
range.
• The range will be significantly lower in a crowded parking lot than in open space.
• Always hold the transmitter high, approximately at shoulder height. Holding the transmitter
against your chin will also increase your range: your head acts as an antenna.
• The operating range will be somewhat lower on vehicles equipped with an aftermarket or
factory alarm.
Diagnostics–ParkingLightFlashTable
Parking lights flashes Description
1
• Doors locked.
• Trunk released.
• Start signal received from the remote.
• Runtime has expired
2 fast
• Doors unlocked
• Valet mode is deactivated
2 slow
• Shutdown by remote
4 fast
• Shutdown by brake
• A remote start was attempted while the brake pedal is engaged.
3 slow
• Runtime is extended.
3 fast
• Valet mode activated.
10 fast
• Shutdown by hood
• A remote start was attempted while the hood is open.
ON Î twice
• Cold weather mode deactivated
ON Î 3 times
• Cold weather mode activated.
Solid ON
• Engine is running under remote start.
Flash for 30 sec.
• Panic mode is triggered.
Flash for 60 sec.
• Alarm is triggered.
ON Î twice Î twice
• A remote start was attempted while the system is in home valet.
Page 15

Page 16

Page 17

Page 18

Guide de l’utilisateur P.15
x Le métal : tous les métaux ont un impact sur le rayon d’action de l’émetteur, y compris le
métal de la voiture.
x La forme du véhicule peut également influencer le rayon d’action ; règle générale, les
fourgons et fourgonnettes donnent les rayons d’actions les plus réduits.
x La forme du toit et des montants avant (montants en « A ») du pare-brise cause des
déviations radioélectriques importantes (en l’occurrence : des déviations du signal de la
Télécommande). Conséquemment, l’orientation du véhicule par rapport à la Télécommande
a un impact sur le rayon d’action. L’usager bénéficiera généralement du plus grand rayon
d’action disponible s’il fait face au véhicule. La performance d’une Télécommande actionnée
derrière le véhicule vient en second lieu. Si la Télécommande est utilisée de l’un ou l’autre
des côtés du véhicule, le rayon d’action sera généralement à son plus bas.
x Le rayon d’action sera sensiblement réduit dans un stationnement rempli, en comparaison
avec un espace libre.
x Tenez toujours la Télécommande bien haut, à peu près à hauteur d’épaule. Vous pouvez
améliorer le rayon d’action en tenant la Télécommande appuyée contre votre menton : votre
tête agit alors comme une antenne.
x Le rayon d’action sera quelque peu réduit sur un véhicule muni d’une alarme d’origine ou
ajoutée.
Tablesdiagnostiques–Feuxdestationnement
Clignotements Description
1
x Verrouillage des portières.
x Ouverture du coffre.
x Le module a reçu le signal de démarrer.
x Temps de marche écoulé.
2 rapides
x Déverrouillage des portières.
x Le mode valet est désactivé.
2 lents
x Arrêt commandé par la télécommande.
3 lents
x Prolongement de la durée de marche.
3 rapides
x Le mode valet est activé.
4 rapides
x Arrêt commandé par appui sur la pédale de frein.
x Tentative de démarrage pendant que la pédale de frein est
engagée.
10 rapides
x Arrêt par l’ouverture du capot.
x Tentative de démarrage pendant que le capot est ouvert.
ON
Î
2 fois
x Désactivation du mode temps froid.
ON
Î
3 fois
x Activation du mode temps froid.
Continu
x Temps de marche en fonction.
Clignote 30 sec.
x Mode panique est déclenché.
Clignote 60 sec.
x L’alarme est déclenchée.
ON
Î
2 fois
Î
2 fois
x Tentative de démarrage pendant que le véhicule est en mode
valet chez soi.
Page 19

P.14 Guide de l’utilisateur
Appuyez sur COFFRE + DÉMARR./ARRÊT simultanément : ................................. ARRÊT
Appuyez sur AUX 2X RAPIDE
¾
AUX ¾ COFFRE : .............................................. COFFRE
Remarque : Appuyer 2 fois rapidement sur le bouton AUX fait clignoter la DEL lentement et
basculer le système au niveau 1 (AUX 2, configurable par l’installateur). Appuyer 3 fois rapidement
sur le bouton AUX fait clignoter la DEL rapidement et de basculer le système au niveau 2 (Régime
multi-véhicule).
AUX2
Si configuré à l’installation, cette fonctionnalité peut être activée en appuyant 2 fois sur la touche
AUX (« Niveau 1 ») suivi par la touche pendant que la DEL clignote lentement.
Alarmedetyped’origine
L’alarme de type d’origine (si configurée par votre installateur) surveille les portières, le capot et le
commutateur d’allumage de votre véhicule. Si une portière ou le capot s’ouvre ou si la clé est
tournée dans le commutateur d’allumage, le klaxon émettra des signaux sonores.
x Pour armer l’alarme de type d’origine, appuyez sur la touche de la télécommande.
- L’alarme de type d’origine sera armée SEULEMENT si l’on appuie sur la touche
de la télécommande.
- Le voyant à DEL sur l’antenne clignotera lentement, indiquant que l’alarme de type
d’origine est armée.
x Pour désarmer l’alarme de type d’origine, appuyez sur la touche
de la
télécommande.
- Pour empêcher que le klaxon retentisse si l’alarme de type d’origine est déclenchée,
appuyez sur la touche ou ou faites entrer le système en Mode Valet puis
faites-le en sortir (page-8)
Codesd’effractionvialeklaxon
Le système surveillera les suivantes:
x Les portières
x Capot
x Allumage (Ignition)
Remarque : S’il y a eu intrusion (« effraction ») dans votre véhicule, le KLAXON retentira pour un
maximum de 1 minute.
En cas d’effraction, vous recevrez un code en appuyant sur la touche . Le klaxon vous
informera du type d’intrusion en envoyant une série de signaux sonores de la façon suivante :
Tables diagnostiques – signaux sonores
1x = interruption dans la source d’alimentation 4x = Effraction par une Portière
3x = capot 6x = Allumage
PourRéglerunproblèmederayond’action
Plusieurs facteurs peuvent avoir une incidence sur le rayon d’action de la Télécommande, entre
autres :
x L’état de la pile de la Télécommande.
x L’environnement dans lequel le Télédémarreur fonctionne (par exemple : interférences
radioélectriques au centre ville, aéroports, tours de transmission pour téléphonie
cellulaire…).
Page 20

Guide de l’utilisateur P.13
Modevaletchezsoi
MD
Si cette fonctionnalité est configurée à l’installation, elle permettra à l’utilisateur d’activer à distance
un mode spécial où les fonctions de démarrage à distance sont désactivées : si le véhicule est
stationné à l’intérieur, ceci évitera les démarrages à distance accidentels causés par la
télécommande ou par un déclencheur externe. Si le véhicule est muni d’une transmission
manuelle, le système doit être mis en mode prêt à démarrer afin d’entrer en mode valet chez soi
MD
.
N.B. : Lorsque ce mode est activé, le véhicule ne pourra pas être démarré à distance. Les
fonctions de l’alarme d’origine demeureront cependant actives.
Pour activer le mode valet chez soi :
1. Appuyez sur le bouton ou
2. En 3 secondes ou moins, appuyez simultanément sur les boutons et pour 3 sec.
3. Les feux de stationnent clignoteront une fois.
Pour quitter le mode « Valet chez soi »
x Tournez la clé de contact en position d’allumage (IGNITION ON / RUN).
Cette fonctionnalité signale une tentative de démarrage survenue lorsque le véhicule est en mode
valet chez soi. Les feux de stationnement exécuteront la séquence suivante :
S’allument puis s’éteignent; puis clignotent deux fois, puis marquent une pause; puis clignotent
deux fois à nouveau.
AUX1
Note : Cette sortie de 500mA peut servir à de nombreuses applications différentes.
Porte prioritaire
Cette fonction permet à l'utilisateur d'ouvrir uniquement la porte du conducteur en pressant une
première fois le bouton de
de la télécommande, et une deuxième fois pour ouvrir les autres
portes, si désiré. La sortie fournira une impulsion négative lorsque le bouton
de la
télécommande est appuyé pour la deuxième fois.
Klaxon de Confirmation:
AUX 1 peut être programmé pour déclencher le klaxon chaque fois que le bouton est appuyé,
ou quand il est appuyé deux fois durant un intervalle de 3 secondes. Lorsque le klaxon de
confirmation est activé, le mode panique est validé. Si le klaxon de confirmation est désactivé, le
mode panique ne sera pas actif.
Ajustementdeduréedessignauxduklaxon
La durée d'impulsion peut être configurée par votre installateur (de 5 ms a 200 ms).
Régimemultivéhicule
Cette option permet au possesseur de deux véhicules munis de télédémarreur de même série de
contrôler les deux télédémarreurs avec une seule télécommande. Pour contrôler le second
véhicule :
Appuyez sur AUX 2X RAPIDE
¾
AUX ¾VERR. : .................................................. VERR.
Appuyez sur AUX 2X RAPIDE
¾
AUX ¾DÉVERR : .............................................. DÉVERR.
Appuyez sur AUX 2X RAPIDE
¾
AUX ¾DÉMARR./ARRÊT : ............................... DÉMARR.
Appuyez sur AUX 2X RAPIDE
¾
AUX ¾DÉMARR./ARRÊT : ............................... ARRÊT
Appuyez sur AUX 2X RAPIDE
¾
AUX ¾COFFRE : ............................................... COFFRE
ou
Appuyez sur les touches COFFRE + VERR. simultanément : ................................. VERR.
Appuyez sur COFFRE + DÉVERR simultanément : ................................................ DÉVERR.
Appuyez sur COFFRE + DÉMARR./ARRÊT simultanément : ................................. DÉMARR.
Page 21

P.12 Guide de l’utilisateur
Démarrage sécuritaire activé : Lorsque le Démarrage sécuritaire est activé à l’installation,
l’utilisateur devra actionner la touche 2 fois en 3 secondes pour démarrer le véhicule à distance.
Démarrage sécuritaire spécial : Lorsque le Démarrage sécuritaire est activé à l’installation;
1. Rapidement appuyer sur AUX deux fois. La DEL de la télécommande se met à clignoter.
2. Pendant que la DEL clignote, appuyer sur pour démarrer la voiture à distance.
La sortie AUX 2 peut alors être actionnée par le biais du bouton .
Tempsdemarchedumoteur
Si votre véhicule a un moteur à essence, votre Télédémarreur peut être réglé pour maintenir le
moteur en marche pendant 3, 15 ou 25 minutes (15 minutes par défaut). Pour un moteur diesel, le
Télédémarreur peut être réglé pour maintenir le moteur en marche pendant 8, 20 ou 30 minutes
(20 minutes par défaut).
ModeTurbo
Si le mode Turbo est configuré à l’installation, vous aurez la possibilité de laisser le
turbocompresseur de votre véhicule reposer lorsque vous le quittez : le Télédémarreur prendra le
véhicule en charge et le maintiendra en marche pendant 60 secondes (ou jusqu’à ce que le moteur
soit éteint par la télécommande), puis éteindra le moteur.
Si votre véhicule est muni d’une transmission automatique, procédez comme suit pour faire
passer le véhicule en mode Turbo :
1. Alors que le moteur est en marche, relâchez la pédale de frein et appuyez sur la touche
,
ou de la télécommande jusqu’à ce que les feux de stationnement
s’allument.
Remarque : SmartStart
MD
peut être configuré pour utiliser l’icône SmartStart
MD
pour
activer le mode Turbo.
2. Retirez la clé du commutateur d’allumage. Le moteur sera maintenu en marche.
3. Sortez du véhicule et fermez toutes les portières, le capot et le coffre.
4. Appuyez sur la touche ceci aura pour effet de verrouiller les portières et d’armer
l’alarme de type d’origine (si configurée), et confirmera que le véhicule est en mode
Turbo.
5. Le moteur sera éteint après avoir tourné 60 secondes en mode Turbo.
Si votre véhicule est muni d’une transmission manuelle, suivez toutes les étapes de la routine du
mode Prêt à démarrer (page-6) pour activer le mode Turbo. À la dernière étape,
x Appuyez sur la touche pour verrouiller les portières et éteindre le moteur après
60 sec.;
Les feux de stationnement clignoteront 3 fois puis demeureront allumés.
L’alarme de type d’origine et l’antidémarreur (si configurés) seront alors armés.
x Appuyez sur la touche pour déverrouiller les portières et éteindre le moteur après
60 sec.;
Les feux de stationnement clignoteront 3 fois puis demeureront allumés.
x Appuyez sur la touche pour éteindre le moteur sans affecter les portières.
Note: Le véhicule passera en mode Prêt à démarrer une fois le temps de marche du moteur
expiré.
Page 22

Guide de l’utilisateur P.11
Désactiver/ActiverlevoyantDEL
Pour désactiver la DEL : Appuyez simultanément sur et jusqu’à ce que les feux de
stationnement clignotent 3 fois.
Pour activer la DEL : Appuyez simultanément sur et jusqu’à ce que les feux de
stationnement clignotent 1 fois.
SortieConstante
Enfoncer la touche pendant plus de 3 secondes verrouille toutes les portières et envoie une
impulsion continue pour la durée de la pression sur la touche (15 secondes maximum). Cette
impulsion continue peut être utilisée afin d’activer certaines fonctionnalités comme la fermeture des
fenêtres. Veuillez vous informer auprès de votre installateur sur la compatibilité de votre véhicule.
Enfoncer la touche
pendant plus de 3 secondes déverrouille toutes les portières et envoie une
impulsion continue pour la durée de la pression sur la touche
(15 secondes maximum). Cette
impulsion continue peut être utilisée afin d’activer certaines fonctionnalités comme l’ouverture des
fenêtres. Veuillez vous informer auprès de votre installateur sur la compatibilité de votre véhicule.
Fonctionnalitésdepointe,configurablesàl’installation
Le Télédémarreur est conçu pour être flexible est intégrable aux systèmes d’origine des fabricants.
Avec ses options programmables, l’unité peut contrôler pratiquement tout système électrique sur
votre véhicule.
Attention : La programmation de votre Télédémarreur devrait être confiée à un professionnel.
Toute modification aux réglages pourrait affecter le fonctionnement de votre Télédémarreur.
Verrouillagedesportièresàl’allumage
Voici une caractéristique additionnelle de sécurité. Si votre Télédémarreur est installé avec le
Verrouillage des portières à l’allumage, les portières seront automatiquement verrouillées dès que
la clé sera tournée en position d’allumage (IGNITION ON / RUN) et que vous actionnerez la pédale
de frein. Le démarreur à distance verrouillera également toute portière ayant été déverrouillée et
ouverte (puis refermée) lorsque vous appuierez une deuxième fois sur la pédale de frein
(seulement lorsque les portières sont surveillées par le système). Lorsque la clé reviendra en
position OFF, les portières se déverrouilleront automatiquement.
Verrouillagesécuritaire
(Désactivé par défaut.) Avant de pouvoir faire démarrer votre véhicule, le Télédémarreur doit
d’abord désarmer le système d’alarme d’origine si votre véhicule en est muni. La caractéristique de
Verrouillage sécuritaire peut être nécessaire pour certains véhicules munis de systèmes d’alarme
d’origine qui déverrouillent automatiquement les portières lors du désarmement du système
d’alarme.
Afin de maintenir la protection de votre véhicule lorsque le système d’alarme d’origine est désarmé
lors d’un démarrage à distance, le Verrouillage sécuritaire reverrouillera automatiquement les
portières immédiatement après chaque démarrage à distance. Une fois le moteur éteint ou à la fin
de sa durée de marche préprogrammée, le Verrouillage sécuritaire réarmera votre système
d’alarme d’origine et reverrouillera vos portières.
Démarragesécuritaire
Cette caractéristique du démarreur empêchera les démarrages à distance accidentels, par
exemple lorsque des enfants jouent avec la télécommande.
Page 23

P.10 Guide de l’utilisateur
* Le mode « Panique » s’éteint automatiquement après 30 secondes.
Mode«Paniquesûreté»
MD
(Dit « Quick Lockout »
MD
.) Pour une protection rapide en cas d’urgence, le Télédémarreur
verrouillera toutes les portières si vous actionnez la pédale de frein pendant que le klaxon est
déclenché. (« Panique-sûreté » n’est disponible que si le mode « Panique » est déclenché.)
ModeTempsfroid
Si vous véhicule est muni d’une transmission manuelle, le mode Prêt à démarrer (page 6)
devrait être activé avant de passer en mode Temps froid. Lorsque le mode Temps froid est activé,
le moteur démarrera toutes les 2 heures et sera maintenu en marche pendant 3 minutes (ou
pendant 8 ou 20 minutes avec un moteur diesel). La routine du mode Temps froid prendra fin
automatiquement après 24 heures (ou 12 démarrages).
Pour passer en mode Temps froid :
x Rapidement appuyer sur AUX deux fois. La DEL de télécommande se met à clignoter.
x Appuyer et maintenir jusqu’à ce que les feux de stationnement s’allument pendant
2 secondes, feront une pause, puis clignoteront de nouveau 3 fois.
Pour désactiver le mode Temps froid, exécutez l’une des actions suivantes :
x Ouvrez le capot.
x Faites démarrer le moteur à distance.
x Tournez la clé en position de marche (IGNITION ON (RUN)).
x Rapidement appuyer sur AUX deux fois. La DEL de télécommande se met à clignoter.
Appuyez sur la touche jusqu’à les feux de stationnement s’allument pendant 2
secondes, fassent une pause, puis clignotent une fois.
Si le mode Démarrage sécuritaire est activé, vous pouvez passer en mode Temps froid en :
x Appuyant puis relâchant la touche puis;
x En appuyant de nouveau sur la touche jusqu’à ce que les feux de stationnement
clignotent 3 fois.
Pour vérifier si le système est en mode Temps froid :
x (Transmissions Automatiques seulement) Appuyez sur la pédale de frein; si le véhicule est
en mode Temps froid, les feux de stationnement demeureront allumés tant et aussi longtemps
que l’on appuie sur la pédale de frein.
Prolongationdeladuréedemarchedumoteur
Une fois le moteur démarré par le biais de la télécommande et tant que le moteur est en marche,
vous pouvez faire recommencer le cycle de la durée de marche du moteur en maintenant
enfoncée la touche pendant 3 secondes ou plus.
x Le klaxon (si programmé) retentira une fois;
x Les feux de stationnement clignoteront lentement 3 fois, puis demeureront allumés.
Pour arrêter le moteur, en tout temps, il vous suffit de presser sur la touche . Cette option ne
peut être répétée qu’une seule fois par démarrage.
Exemple : Si votre module est programmé pour une durée de 3 minutes et que votre véhicule
tourne depuis 2 minutes, le compteur reviendra à 0 en appuyant sur la touche , et le moteur
tournera pour un autre cycle (dans ce cas-ci, 3 minutes).
Page 24

Guide de l’utilisateur P.9
ModeValet
Le télédémarreur peut être placé en mode Valet pour désactiver les fonctions de démarrage à
distance et d’alarme. Si le véhicule doit être laissé en réparation, ou si vous le stationnez à
l’intérieur, le mode Valet préviendra les démarrages à distance accidentels.
Le mode Valet peut être activé de l’une ou l’autre des façons suivantes :
Valet par le commutateur d’allumage : Cette caractéristique permet de passer en mode Valet à
l’aide de la clé.
Valet à distance : Cette caractéristique permet de passer en mode Valet à l’aide de la
télécommande.
Pour passer en mode Valet
À l’aide de la CLÉ (Valet par le commutateur d’allumage) :
1. Insérez la clé dans le commutateur d’allumage et, avant 10 secondes, tournez la clé
successivement en position d’allumage (
IGNITION ON/RUN) puis en position OFF 5 fois jusqu'à
ce que les feux de stationnement clignotent 3 fois.
2. Le voyant DEL de l’antenne s’allumera en continu pour indiquer que le véhicule est
dorénavant en mode Valet.
À l’aide de la TÉLÉCOMMANDE (Valet à distance) :
1. Enfoncez simultanément les touches et jusqu’à ce que les feux de stationnement
clignotent 3 fois.
2. Le voyant DEL de l’antenne s’allumera en continu pour indiquer que le véhicule est
dorénavant en mode Valet.
Pour quitter le mode Valet
À l’aide de la CLÉ (Valet par le commutateur d’allumage) :
1. Insérez la clé dans le commutateur d’allumage et, avant 10 secondes, tournez la clé
successivement en position d’allumage (
IGNITION ON/RUN) puis en position OFF 5 fois jusqu'à
ce que les feux de stationnement clignotent 2 fois.
2. Le voyant DEL de l’antenne clignotera rapidement pour indiquer que le véhicule n’est plus en
mode Valet.
À l’aide de la TÉLÉCOMMANDE (Valet à distance) :
1. Enfoncez simultanément les touches et jusqu’à ce que les feux de stationnement
clignotent 2 fois.
2. Le voyant DEL de l’antenne clignotera rapidement pour indiquer que le véhicule n’est plus en
mode Valet.
Si quelqu'un a essayé de télédémarrer le véhicule pendant que le système était en mode Valet; les
feux de stationnement s'allumeront, s’éteindront, puis clignoteront 2 fois.
Mode«Panique»
Remarque : Le mode Panique peut être déclenché uniquement si le klaxon a été configuré à
cet effet lors de l’installation.
En situation d’urgence, vous pouvez déclencher le mode « Panique » en enfonçant la touche AUX
pendant plus de 3 secondes, jusqu’à ce que le klaxon retentisse. Si le véhicule a été démarré à
distance, le moteur s’éteindra automatiquement avant de déclencher le klaxon. Vous pouvez
arrêter le signal sonore du klaxon en appuyant sur :
(ceci verrouillera vos portières et désactivera le mode Panique), ou
(ceci déverrouillera vos portières et désactivera le mode Panique).
Il est également possible de sortir du mode Panique en activant le Mode Valet (page 9)
Page 25

P.8 Guide de l’utilisateur
ModeVéhiculeenattente
Fonctionnalité utile : Le mode Véhicule en attente vous permet de verrouiller les portières tout en
laissant le moteur en marche, par exemple lorsque vous arrêtez faire une course ou une livraison.
Ce mode vous permet de laisser le Télédémarreur prendre le contrôle du véhicule (sans que la clé
de contact ne soit dans le commutateur d’allumage) alors que le moteur demeure en marche.
Pour activer le mode Véhicule en attente (transmission automatique) :
1. Pendant que le moteur tourne, assurez-vous de ne pas toucher à la pédale de frein et
appuyez sur la touche
, ou jusqu’à ce que les feux de stationnement s’allument.
Remarque : SmartStart
MD
peut être configuré pour utiliser l’icône SmartStart
MD
pour activer le
mode Véhicule en attente.
2. Retirez la clé. Le moteur sera maintenu en marche.
3. Sortez du véhicule. Toutes les portières, le capot et le coffre doivent être fermés.
4. Appuyez sur la touche pour verrouiller les portes, pour armer le dispositif antidémarrage
et pour armer l’alarme. Le moteur sera maintenu en marche.
a. Au retour dans le véhicule, insérez la clé dans le commutateur d’allumage, tournez la
clé à la position « ON » (pas à « Crank »
) sans toucher à la pédale de frein.
b. Une fois la clé à la position « ON », appuyez sur la pédale de Frein pour mettre le levier
de transmission en position de conduite. À cette étape, le Frein désactive la prise en
charge du module de démarrage à distance.
c. Vous pouvez maintenant conduire normalement.
Si votre véhicule est muni d’une transmission manuelle, le mode Véhicule en attente peut être
activé par la même routine que pour le mode Prêt à démarrer (page 6), à la dernière étape,
appuyer sur la touche pour verrouiller les portières, armer le système et laisser le moteur en
marche.
NOUVEAUTÉ – Mode Véhicule en attente avec « PTS »
Cette option est une variation du Mode Véhicule en attente, conçue spécifiquement pour les
véhicules ayant l’option « PTS », qu’ils soient manuels ou automatiques. (Veuillez consulter votre
installateur afin de connaître la disponibilité de cette option.) Suivez les mêmes indications que
pour le Mode Véhicule en attente normal, excepté que, lorsque vous réintégrez le véhicule alors
que le moteur tourne;
1. Appuyez sur DÉVERR.
2. Ouvrez puis fermez toutes les portières.
3. Vous avez 1,5 minutes (sinon 3 minutes) pour appuyer sur la pédale de frein, pour
embrayer le levier de vitesse et partir.
Remarque 1 : Appuyer sur la pédale de frein après le temps alloué (1,5 ou 3 min.) coupera le
moteur.
Remarque 2
: Le moteur demeurera en marche jusqu’à ce que l’utilisateur entre de nouveau dans
son véhicule ou jusqu’à l’expiration du temps de marche du moteur.
Remarque 3 : Si le temps de marche du moteur arrive à expiration ou si l’utilisateur éteint le
moteur à l’aide de la télécommande, le véhicule passera en mode Prêt à démarrer
automatiquement (transmissions manuelles seulement).
Attention !! : Ne laissez pas d’enfants ou d’animaux sans surveillance dans une voiture dont le
moteur est en marche.
Page 26

Guide de l’utilisateur P.7
AVERTISSEMENT : Le
véhicule n’est ni armé,
ni verrouillé.
AVERTISSEMENT : Le moteur tournera
continuellement jusqu’à l’expiration du
temps de marche préprogrammé.
AVERTISSEMENT : Ne
laissez pas vos clés
dans le véhicule !
8. Les feux de stationnement clignotent 2 fois pour confirmer la configuration du mode Prêt à
démarrer.
PourDémarrer
Appuyez sur la touche pendant environ 1 seconde. Les feux de stationnement s’allumeront pour
vous indiquer que le Télédémarreur a reçu votre signal. Le moteur démarrera environ 5 secondes
plus tard. Les feux de stationnement demeureront allumés pendant la durée de marche
préprogrammée.
Si votre véhicule ne démarre pas dès la première tentative, le système s’éteindra, attendra
quelques secondes et tentera à nouveau de démarrer le moteur. Le système procédera à
3 tentatives de démarrage, avant d’abandonner en cas d’échecs répétés.
PourPartir
Suite à un télédémarrage, lorsque le moteur tourne, enfoncez la touche pour désarmer le
Dispositif d’antidémarrage (si installé) et déverrouiller les portières. Entrez dans le véhicule et
procédez comme suit :
1. Tournez la clé dans le commutateur d’allumage en position d’allumage (Run). (Ne tournez
pas la clé en position de démarrage (Crank) pendant que le moteur est en marche. Ceci
amènerait un surdémarrage.)
2. Actionnez la pédale de frein pour désengager le module de démarrage à distance.
Vous pouvez maintenant partir.
Remarque : Dans certains véhicules équipés de l’option « PTS », la Prise en charge de l’option
« PTS » n’est pas possible puisque le frein éteint le moteur peu importe le cas. Veuillez en parler à
votre technicien afin de déterminer si la Prise en charge de l’option « PTS » peut fonctionner dans
votre véhicule.
Caractéristiquesdudémarreuràdistance
Verrouillageàdistance
Si votre démarreur à distance à été installé avec l’option de verrouillage à distance, vous pourrez
profiter du télédéverrouillage.
Pour VERROUILLER les portières et ARMER le système :
1. Enfoncez la touche pendant environ 1 seconde.
2. Les feux de stationnement clignoteront 1 fois pour confirmer le verrouillage des
portières.
Pour DÉVERROUILLER les portières et DÉSARMER le système :
1. Enfoncez la touche pendant environ 1 seconde.
2. Les feux de stationnement clignoteront 2 fois pour confirmer le déverrouillage des
portières.
Ouvertureducoffreàdistance
Si votre système est installé avec l’Ouverture du coffre à distance, vous pourrez ouvrir votre coffre
en enfonçant le bouton pendant 3 secondes sur la télécommande. En outre, ceci désarmera
également l’alarme de système d’origine (si installé).
Page 27

P.6 Guide de l’utilisateur
PourFairedémarrervotrevéhiculeàdistance
FairepasserletélédémarreurenmodePrêtàdémarrer
Si votre véhicule est muni d’une transmission manuelle, vous devez lire attentivement les
instructions suivantes. Pour pouvoir démarrer à distance, le télédémarreur doit être d’abord mis en
mode prêt à démarrer. Si l’unité n’est pas en mode prêt à démarrer, il ne sera pas possible de faire
démarrer le moteur à distance.
Veuillez noter que le mode prêt à démarrer peut être activé à l’aide de la télécommande ou du frein
de stationnement, selon l’option choisie par votre installateur. Par conséquent, vous devez suivre
la procédure appropriée parmi les deux décrites ci-dessous afin de faire passer votre véhicule en
mode prêt à démarrer.
Dès que le télédémarreur est en mode prêt à démarrer, on peut faire démarrer et éteindre à
distance le véhicule à volonté. Le système quitte le mode prêt à démarrer lorsqu’une portière, le
capot ou le coffre est ouvert, lorsque la pédale de frein est actionnée, lorsque le frein de
stationnement est relâché ou lorsque la clé est mise en position d’allumage (IGNITION ON (RUN).
Voici comment faire passer le télédémarreur en mode prêt à démarrer :
Si Prêt à démarrer est activé par la
télécommande
Si Prêt à démarrer est activé par le frein de
stationnement
1. Assurez-vous que toutes les portières, le capot et le coffre sont fermés et que le levier de
vitesse est en position neutre.
2. Pendant que le moteur est en marche,
engagez le frein de stationnement une fois et
relâchez la pédale de frein.
3. En 20 sec. ou moins, appuyez sur la touche
, ou de la télécommande et
maintenez-la enfoncée (SmartStart
MD
n’utilise que l’icône SmartStart
MD
).
4. Les feux de stationnement clignoteront 3 fois
rapidement et resteront allumés. Relâchez le
bouton.
2. Pendant que le moteur est en marche,
engagez le frein de stationnement 2 fois en
10 sec.
3. Assurez-vous que la pédale de frein est bien
relâchée.
4. Les feux de stationnement clignoteront 3 fois
rapidement et resteront allumés.
5. Retirez la clé : le moteur se maintiendra en marche.
6. Sortez du véhicule. Toutes les portières doivent être fermées, y compris le capot et le coffre.
7. IL Y A MAINTENANT 3 OPTIONS POSSIBLES POUR COMPLÉTER LE MODE PRÊT À
DÉMARRER (configurable à l’installation)
OPTION 1 : Arrêt
automatique sans
verrouillage
automatique
OPTION 2 : Arrêt manuel
(option par défaut)
OPTION 3 : Arrêt
automatique avec
verrouillage
automatique
Le système laisse le
moteur tourner 8 secs.
avant de finalement
arrêter le moteur, le tout
sans action de
l’utilisateur.
Le moteur continue de tourner jusqu’à ce
qu’une des touches suivantes soit
enfoncée :
x pour verrouiller les portières et
couper le moteur;
x pour déverrouiller les portières et
couper le moteur;
x pour couper le moteur sans affecter
les portières.
Le système laisse le
moteur tourner 8 secs.
puis verrouille les
portières avant de
finalement arrêter le
moteur, le tout sans
action de l’utilisateur.
Page 28

Guide de l’utilisateur P.5
ArmementduDispositifd’antidémarrage(siinstallé)
Ce dispositif de sécurité supplémentaire empêche le véhicule de démarrer le véhicule par la clé
quand le dispositif d’antidémarrage est armé. Lorsque le système est installé avec l'option de
dispositif d’antidémarrage, le véhicule ne peut être démarré avec la clé à moins que le système
n’ait été désarmé ou mis en Mode Valet (page 9)
Remarque : Si le Dispositif d’antidémarrage est installé, le véhicule bénéficiera d’une protection
contre les dommages pouvant survenir au démarreur dans le cas où l’utilisateur, par habitude,
ferait passer la clé en position de démarrage lorsque le moteur est déjà en marche après un
démarrage à distance.
S’il est installé, le Dispositif d’antidémarrage peut être configuré à l’installation soit en mode passif
(de manière à s’armer automatiquement) ou en mode actif (de manière à rendre nécessaire
l’intervention de l’utilisateur pour l’armement). Par défaut, le télédémarreur est configuré en mode
passif.
Mode Passif
Pour armer le dispositif d’antidémarrage :
x Appuyez sur la touche de la télécommande.
OU
x Laissez le dispositif d’antidémarrage s’armer automatiquement 1 minute (par défaut) ou
3 minutes (si configuré de la sorte) après que le contact ait été mis en position d’arrêt (OFF),
ou une fois la dernière portière refermée (si les portières sont surveillées).
x Le voyant DEL sur l’antenne clignotera rapidement lors du compte à rebours précédant
l’activation du dispositif d’antidémarrage.
x À l’expiration du décompte d’activation, la DEL émettra une série de double-
clignotements indiquant ainsi que le dispositif d’antidémarrage est maintenant armé.
Pour désarmer le dispositif d’antidémarrage :
x Appuyez sur la touche
de la télécommande.
x Le dispositif d’antidémarrage sera automatiquement réarmé après 1 minute (par défaut)
ou 3 minutes (si configuré de la sorte) si aucune portière n’est laissée ouverte (si les
portières sont surveillées) et si le contact n’est pas allumé.
Mode actif
Pour armer le dispositif antidémarrage :
x Appuyez sur la touche de la télécommande.
x Les feux de stationnement clignoteront 1 fois.
x Le voyant DEL situé sur l’antenne clignotera lentement.
x Si un système de verrouillage électrique est installé dans le véhicule, ceci activera aussi
le verrouillage des portières et armera l’alarme d’origine (si configuré).
Pour désarmer le dispositif antidémarrage :
x Appuyez sur la touche
de la télécommande.
x Les feux de stationnement clignoteront 2 fois.
x Le voyant DEL situé sur l’antenne demeurera éteint.
x Si un système de verrouillage électrique est installé dans le véhicule, ceci activera aussi
le déverrouillage des portières et désarmera l’alarme d’origine (si configuré).
Page 29

P.4 Guide de l’utilisateur
Utilisationdelatélécommande
Votre Télédémarreur est muni d’une télécommande multi-canal à 5 boutons. La télécommande
peut contrôler deux véhicules indépendants dotés de Télédémarreur identiques (voir la section
Régime multi-véhicule ci-dessous dans ce Guide).
Voici les fonctions de la télécommande :
VERROUILLAGE : Verrouille toutes les
portières et arme le dispositif
antidémarrage (si installé).
(Image à titre indicatif seulement)
DÉVERROUILLAGE : Déverrouille les
portières et désarme le Dispositif
d’antidémarrage (si installé). Active la
sortie AUX 1 si l’Accès Prioritaire est
configuré.
COFFRE : Ouvre le COFFRE ou actionne
la sortie AUX 3.
Remarque : L’option COFFRE doit être
installée.
DÉMARRAGE/ARRÊT : Fait démarrer ou
éteindre le moteur. Fait passer en mode
Temps Froid en appuyant sur la touche
AUXILIAIRE, puis SUR pendant
3 secondes. Remarque : L’icône peut
varier.
AUX
AUXILIAIRE : Sert de touche bascule. En
combinaison avec les autres touches, elle
permet de leur assigner plus de fonctions.
Réglagesdesaccessoires
Chauffage
Il est conseillé de prérégler les commandes de l’habitacle avant de quitter votre véhicule, en
prévision du prochain démarrage. Le réglage du chauffage (ventilateur) avant et arrière ne devrait
pas être laissé en position Haute (HIGH). Nous recommandons de laisser ces réglages en position
basse ou moyenne (LOW ou MEDIUM).
Essuieglace,radioetphares
Sur certains véhicules, le circuit de la radio et/ou des essuie-glaces et/ou des phares est
obligatoirement mis sous tension suite à un démarrage à distance. Lorsque vous quittez le
véhicule, assurez-vous que les commandes des essuie-glaces et des phares sont en position OFF.
Si vous laissez l’interrupteur des phares en position ouverte (ON), vous risquez, avec certains
véhicules, que les phares s’allument après démarrage à distance, ce qui mettrait la batterie à plat.
Page 30

Guide de l’utilisateur P.3
Réglementationsgouvernementales
Ce dispositif respecte le règlement du département fédéral des communications tel qu’il est stipulé
au paragraphe 15. Son fonctionnement est assujetti aux conditions suivantes : (1) ce dispositif ne
peut causer d’interférence nuisible et (2) ce dispositif doit accepter toute interférence reçue,
incluant toute interférence pouvant causer un fonctionnement non désiré.
Cet équipement a été testé et est conforme aux limites d'un appareil numérique de classe B, tel
qu’il est stipulé au paragraphe 15. Ces limites ont pour but d'offrir une protection raisonnable
contre des interférences nuisibles dans une installation résidentielle. Cet équipement génère et
peut répandre une énergie de radio fréquence, et s'il n'est pas installé et utilisé comme décrit par le
manuel d'instruction, il peut causer des interférences nuisibles aux communications radio.
Cependant, il n'y a aucune garantie sur l'absence totale d'interférences dans certaines
installations. En cas d'interférences nuisibles causées aux radios ou aux téléviseurs, déterminées
en allumant et éteignant l'équipement, l'utilisateur est encouragé à essayer d'y remédier par une ou
plusieurs des mesures suivantes :
x Réorienter ou relocaliser l'antenne de réception.
x Accroître la séparation entre l'équipement et le récepteur.
x Brancher l'équipement dans une sortie de circuit différente de celle à laquelle le
récepteur est branché.
x Consulter le détaillant ou un technicien radio / TV expérimenté pour de l'aide.
Cet appareil est conforme aux Spécificités Radio Standards du Canada, RSS 210. Son utilisation
n'est autorisée que sur un principe de base de non-interférence et de non-protection; en d'autres
termes, il ne doit pas être utilisé s'il est déterminé qu'il provoque des interférences nuisibles aux
services autorisés par l'IC. De plus, son utilisateur doit accepter toute interférence radio qu'il peut
recevoir, même si elle affecte le fonctionnement de l'appareil.
Avertissement ! Tout changement ou modification non expressément approuvé par la partie
responsable du respect de cette règle pourrait causer l’annulation du droit de l’utilisateur à se
servir de ce dispositif.
IntroductionavecSmartStart
MD
Le système de démarrage à distance installé dans votre véhicule est doté de nombreuses
fonctionnalités de pointe, telles que l’accès prioritaire à la portière du conducteur (fonctionnalités
de confort), le démarrage sécuritaire (fonctionnalité de sécurité à l’épreuve des enfants) et
SmartStart
MD
.
La technologie supérieure SmartStart
MD
permet à votre téléphone intelligent de reproduire les
fonctionnalités d’un système de démarrage à distance avec options. Les options SmartStart
MD
sont
le télédéverrouillage, l’ouverture du coffre, le mode panique, le télédémarrage et les alertes
d’intrusion
1
. Remarque : SmartStart
MD
doit être installé professionnellement. Pour plus
d’information, voyez votre détaillant Directed Canada autorisé près de chez vous.
Avec ses nombreuses fonctions dernier cri, ce produit saura satisfaire toutes vos attentes vis-à-vis
des systèmes de confort et de sécurité haut de gamme, sans négliger les fonctionnalités
élémentaires généralement offertes sur les systèmes de démarrage à distance de base.
1
Certaines conditions s’appliquent. Voyez votre détaillant Directed Canada autorisé.
Page 31

P.2 Guide de l’utilisateur
Table des matières
Réglementations gouvernementales .............................................................................................. 3
Introduction avec SmartStart
MD
............................................................................................. 3
Utilisation de la télécommande ....................................................................................................... 4
Réglages des accessoires ............................................................................................................... 4
Chauffage ...................................................................................................................................... 4
Essuie-glace, radio et phares ........................................................................................................ 4
Armement du Dispositif d’antidémarrage (si installé) .................................................................. 5
Pour Faire démarrer votre véhicule à distance ............................................................................. 6
Faire passer le télédémarreur en mode Prêt à démarrer .............................................................. 6
Pour Démarrer ............................................................................................................................... 7
Pour Partir ...................................................................................................................................... 7
Caractéristiques du démarreur à distance .................................................................................... 7
Verrouillage à distance .................................................................................................................. 7
Ouverture du coffre à distance ...................................................................................................... 7
Mode Véhicule en attente .............................................................................................................. 8
Mode Valet ..................................................................................................................................... 9
Mode « Panique » .......................................................................................................................... 9
Mode « Panique-sûreté »
MD
......................................................................................................... 10
Mode Temps froid ........................................................................................................................ 10
Prolongation de la durée de marche du moteur .......................................................................... 10
Désactiver/Activer le voyant DEL ................................................................................................ 11
Sortie Constante .......................................................................................................................... 11
Fonctionnalités de pointe, configurables à l’installation ........................................................... 11
Verrouillage des portières à l’allumage ....................................................................................... 11
Verrouillage sécuritaire ................................................................................................................ 11
Démarrage sécuritaire ................................................................................................................. 11
Temps de marche du moteur....................................................................................................... 12
Mode Turbo ................................................................................................................................. 12
Mode valet chez soiMD ................................................................................................................. 13
AUX-1 .......................................................................................................................................... 13
Ajustement de durée des signaux du klaxon ............................................................................... 13
Régime multi-véhicule ................................................................................................................. 13
AUX 2........................................................................................................................................... 14
Alarme de type d’origine .............................................................................................................. 14
Codes d’effraction via le klaxon ................................................................................................... 14
Pour Régler un problème de rayon d’action ................................................................................ 14
Tables diagnostiques – Feux de stationnement ......................................................................... 15
Page 32

TÉLÉDÉMARREUR UNIDIRECTIONNEL
FM POUR TRANSMISSION
AUTOMATIQUE/MANUELLE
AVIS D’INDUSTRIE CANADA :
L’utilisation de cet appareil est sujette aux deux conditions suivantes : 1) cet appareil ne doit causer aucune
interférence nuisible; 2) cet appareil doit accepter toute interférence qui pourrait nuire à son fonctionnement.
Pour réduire le brouillage radioélectrique qui risque d’affecter d'autres utilisateurs, il est important de choisir le
type et le gain de l'antenne de façon que la puissance isotrope rayonnée équivalente (PIRE) ne dépasse pas
ce qui est nécessaire pour assurer une communication efficace.
REMARQUE : Le fabricant ne peut être tenu responsable du brouillage radioélectrique causé par des
modifications non autorisées apportées à l’appareil. De telles modifications pourraient annuler le droit de
jouissance de l’utilisateur de cet appareil.
Doc#: 110908 Rev:1.3 © 2011 - 1W-FM-A/M-HD - - PGa-FcN - Canada
_____________
Guide de l’utilisateur
ATTENTION !
Il est de la responsabilité du conducteur du véhicule de s’assurer que
celui-ci est stationné de façon convenable et sécuritaire.
1. a) Transmission manuelle : L’utilisateur doit s’assurer que le levier de
vitesse est à la position NEUTRE et que le frein de stationnement est
appliqué de façon adéquate avant de quitter le véhicule afin d’éviter tout
dommage au moment du démarrage à distance.
b) Transmission automatique
: L’utilisateur doit s’assurer que le levier
de transmission est en position « Park » avant de quitter le véhicule afin
d’éviter tout dommage au moment du démarrage à distance.
(Note : Assurez-vous que le véhicule à transmission automatique ne peut
pas démarrer lorsque le levier de transmission est en position « Drive ».)
2. L’utilisateur doit s’assurer de désactiver le démarreur à distance ou de le
mettre en mode valet avant de confier véhicule à un mécanicien ou un
technicien affecté à l’entretien.
Conçu au Canada
 Loading...