

Page 1
DIGITAL RemoTe sTART sysTem
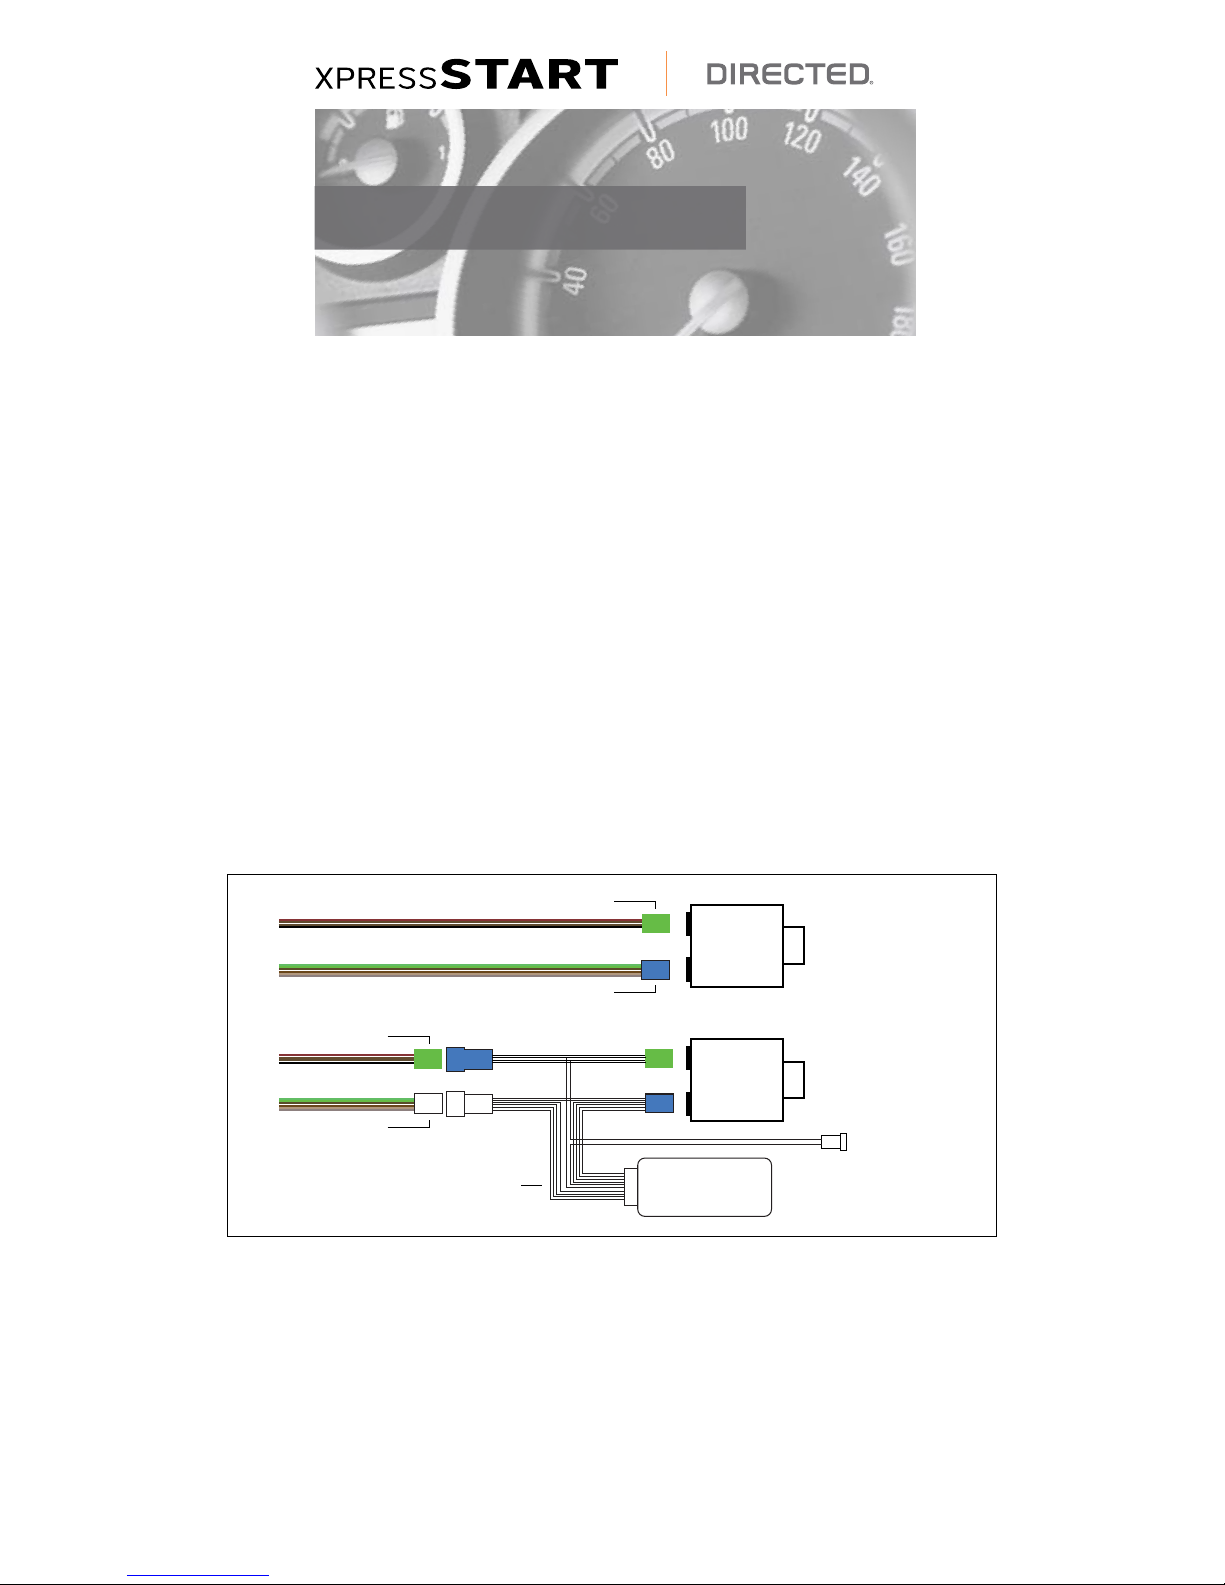
REMOVE WHITE SHELL
AND REPLACE WITH
PROVIDED BLUE SHELL
WHITE 10 PIN PLUG
(BLACK INSERT WITH
WHITE OUTER SHELL)
EIS
(KEY CYLINDER)
EIS
(KEY CYLINDER)
EIS
(KEY CYLINDER)
EIS
(KEY CYLINDER)
FIT ORIGINAL WHITE
SHELL TO THE
PROVIDED T-HARNESS
FACTORY HARNESS WITH
BLUE SHELL FITTED
XPRESSSTART
XPRESSSTART
VALET SWITCH
SUPPLIED T-HARNESS
AFTER INSTALLATION
BEFORE INSTALLATION
VALET SWITCH
BLACK PLUG
WHITE PLUG
AFTER INSTALLATION
BEFORE INSTALLATION
BLACK PLUG
WHITE PLUG
SUPPLIED T-HARNESS
The XPRESSSTART Mercedes Solution is designed as a direct plug in interface to the rear of the Mercedes Benz key cylinder. Please
read this manual in it’s entirety prior to installation as there is a specific order of operation that needs to be followed.
Tools and Parts you will need:
XPRESSSTA RT Mercedes Solution
• T-20 driver
• Drill
• 3/4” drill bit or Unibit
www.xpResskIT.co m
Installation Instructions
2012+ Mercedes Benz ML Class
2013+ Mercedes Benz GL Class
2013 Mercedes Benz G Class
XPRESSSTART Wiring Overview
W/X166
GREEN PLUG
mADe IN THe U sA
GREEN PLUG
WHITE PLUG
SUPPLIED T-HARNESS
BLUE PLUG
XPRESSSTART
EIS
(KEY CYLINDER)
EIS
(KEY CYLINDER)
ML & GL Installation
1. Remove (3) T-20 screws from the driver’s under dash panel.
2. Lower dash panel down and move air vent out of the clips that hold it in place.
3. Reach up to the rear of the EIS. There are two retaining clips on the top and bottom of the EIS.
4. Grasp the wiring harness while squeezing the retaining clips together to remove the EIS.
5. Pull the EIS with harness attached out of the dash to access the wiring.
6. Unplug both plugs (blue and green) from the EIS.
BEFORE INSTALLATION
AFTER INSTALLATION
VALET SWITCH
1© 2012 Directed. All rights reserved.
QRNMB166 2012-12
Page 2

7. Remove the blue housing from the harness and install it on to the supplied XPRESSSTART T-harness.
Installation
1. Remove (3) T-20 screws from the driver’s under dash panel.
2. Lower dash panel down and move air vent out of the clips that hold it in place.
3. Reach up to the rear of the EIS. There are two retaining clips on the top and bottom of the EIS.
4. Grasp the wiring harness while squeezing the retaining clips together to remove the EIS.
5. Pull the EIS with harness attached out of the dash to access the wiring.
6. Unplug both plugs (blue and green) from the EIS.
7. Remove the blue housing from the harness and install it on to the supplied Smartkey Starter® T-
harness.
8. Install the supplied white housing on to the empty plug where the blue housing originally was.
9. Plug the T-harness into the factory wiring and the EIS.
10.Once ALL connections are secured, turn on the valet switch and verify the LEDs visible inside the
XPRESSSTART are flashing.
11.Start the vehicle with the key or with the push button to verify your work. If the vehicle starts and
runs, you’ve made all the connections correctly.
12.Shut the vehicle off.
13.Push the panic button once on the remote to test the XPRESSSTART.
14.Once you are satisfied with its operation, shut down the XPRESSSTART by pushing the panic
button once.
15.Locate a place to secure the XPRESSSTART module in the dash cavity away from any heat
sources.
16.Secure the module in its final location.
17.Locate a place for the valet override switch. Recommended location is the driver’s under dash
panel.
18.Drill a 3/4” hole in the desired location.
19.Route the wires for the valet switch through hole made in step 18.
20.Plug in the valet switch to the XPRESSSTART valet switch leads. Make sure the spade
connectors are fully installed on the switch.
21. Line up the vent to the under dash panel in the clips that hold it into place.
22.Reinstall the under dash panel making sure the vent is lined up to the duct in the dash.
23.Reinstall (3) T-20 screws to hold the panel in place
8. Install the supplied white housing on to the empty plug where the blue housing originally was.
9. Plug the T-harness into the factory wiring and the EIS.
10. Once ALL connections are secured, turn on the valet switch and verify the LEDs visible inside the XPRESSSTART are flashing.
11. Start the vehicle with the key or with the push button to verify your work. If the vehicle starts and runs, you’ve made all the
connections correctly.
12. Shut the vehicle off.
13. Push the panic button once on the remote to test the XPRESSSTART.
14. Once you are satisfied with its operation, shut down the XPRESSSTART by pushing the panic button once.
15. Locate a place to secure the XPRESSSTART module in the dash cavity away from any heat sources.
16. Secure the module in its final location.
17. Locate a place for the valet override switch. Recommended location is the driver’s under dash panel.
18. Drill a 3/4” hole in the desired location.
19. Route the wires for the valet switch through hole made in step 18.
20. Plug in the valet switch to the XPRESSSTART valet switch leads. Make sure the spade connectors are fully installed on the
switch.
21. Line up the vent to the under dash panel in the clips that hold it into place.
22. Reinstall the under dash panel making sure the vent is lined up to the duct in the dash.
23. Reinstall (3) T-20 screws to hold the panel in place.
24. If vehicle is equipped with KeylessGo, see additional required connection on page 4 to retain KeylessGo features.
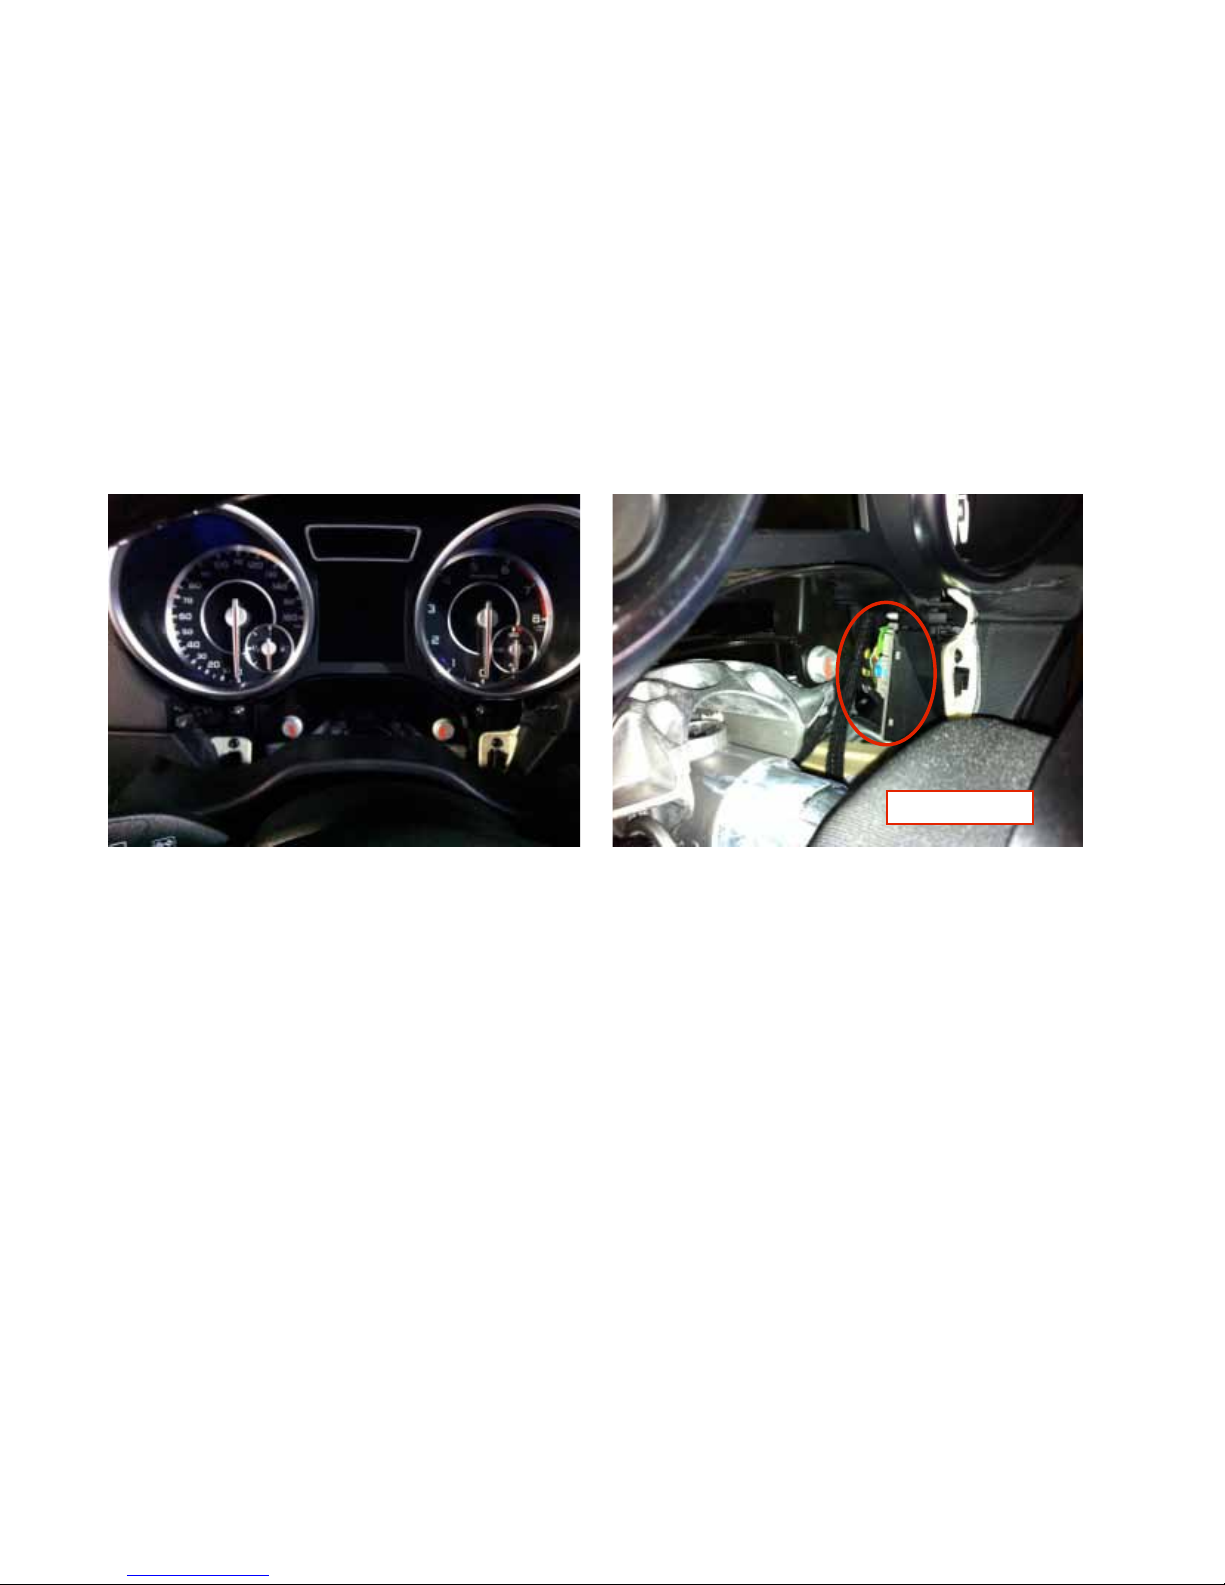
Remove (3) T-20 Lower panel and move vent
EIS removed T-harness installed
2 © 2012 Directed. All rights reserved.
Page 3
G Wagon Installation
Installation
1. Lower the steering column and extend it to its maximum.
2. Grasp the plastic trim below the instrument cluster and pull toward you.
3. Continue removing the boot around the steering column and pull it away from the dash as far as it
will go.
4. Reach in the behind the EIS and unplug the two plugs, (1) green plug and (1) blue plug, and
unplug them.
5. Connect the Smartkey Starter® harness in line with the plugs and connect the opposite end into
the rear of the EIS.
6. Remove the under dash panels using a T-20 driver.
7. Route the Smartkey Starter® harness to a location where the starter can be mounted away from
heat and moving parts.
8. Connect the Smartkey Starter® to the T-harness and securely mount it.
9. Drill a 3/4” hole for the valet switch in an easily accessible location under the dash.
10.Remove the valet switch from the T-harness and mount it in the hole just drilled and reconnect the
wires.
11.Start the vehicle with the key and let it run for 60 seconds then turn it off.
12.Press the panic button on the keyfob once and test the remote start.
13.Reassemble the under dash.
14.Reinstall the steering wheel boot.
EIS plugs
1. Lower the steering column and extend it to its maximum.
2. Grasp the plastic trim below the instrument cluster and pull toward you.
3. Continue removing the boot around the steering column and pull it away from the dash as far as itwill go.
4. Reach in the behind the EIS and unplug the two plugs, (1) green plug and (1) blue plug, and unplug them.
5. Connect the XPRESSSTART harness in line with the plugs and connect the opposite end into the rear of the EIS.
6. Remove the under dash panels using a T-20 driver.
7. Route the XPRESSSTART harness to a location where the starter can be mounted away from heat and moving parts.
8. Connect the XPRESSSTART to the T-harness and securely mount it.
9. Drill a 3/4” hole for the valet switch in an easily accessible location under the dash.
10. Remove the valet switch from the T-harness and mount it in the hole just drilled and reconnect the wires.
11. Start the vehicle with the key and let it run for 60 seconds then turn it off.
12. Press the panic button on the keyfob once and test the remote start.
13. Reassemble the under dash.
14. Reinstall the steering wheel boot.
EIS plugs
Remove steering wheel boot EIS plug location at rear of EIS
3© 2012 Directed. All rights reserved.
Page 4

2012+ ML, 2013+ GL W/X166 KeylessGo Connection
The KeylessGo connection for the 2012 ML is quite involved and requires significant disassembly of the rear of the vehicle. This
guide assumes the basic XPRESSSTART Mercedes Solution is installed and functioning properly.
Tools and Parts you will need:
• E14 Torx Socket - ML only
• T30 Torx Driver - GL only
• T45 Torx Bit
• T40 Torx Bit
• Panel Removal Tool
• Pick tool
• KG20 Harness
ML Installation
1. Remove the driver’s rear door sill plate.
2. Fold the driver’s rear seat bottom forward.
3. Remove (2) bolts holding the seat bottom to the floor.
4. Remove the driver’s side rear seat bottom from the vehicle.
5. Remove (1) bolt holding the center seat back bracket and (1) bolt holding the seat belt.
6. Fold the rear driver’s side seat back down.
7. Pry up the covers for the tie down loops in the cargo area.
8. Remove the bolts from each tie down and remove the hooks from their mounts.
9. Remove the cargo cover.
10. Remove the foam inserts directly behind the rear seats.
11. Remove (2) additional bolts that hold the driver’s side rear seat back.
12. Unclip the wire harness that is clipped to the driver’s side rear seat bracket.
13. Flip the driver’s side rear seat back into the cargo area making sure the wire harness doesn’t get pinched or pulled beyond its
limit.
14. Pull up the carpet to access the KeylessGo module on the floor.
15. Route the supplied KeylessGo harness from the XPRESSSTART module to the rear seat area.
16. Unplug the main connector from the KeylessGo module.
17. Remove the shroud from the main KeylessGo connector.
18. Remove the brown and brown/red wires from the KeylessGo plug. Make a note of the wire locations in the plug.
19. Insulate the ends of the removed wires.
20. Using the supplied W166 KG adapter, populate the brown and brown/red wires into the locations where the factory wires
were removed.
21. Reinstall the shroud for the KeylessGo main plug and plug it back in.
22. Close all doors, hood and hatch to test the remote start.
23. Remote start the vehicle. If everything is connected properly, you should be able to lock and unlock the vehicle using the touch
sensors on the door handles while the remote start is running.
24. Unlock and enter the vehicle. Push the start button one time. The lights should flash three times to confirm key take over.
25. Turn off the vehicle.
26. Secure the KG20 harness to existing wiring.
27. Lay the carpet back in place.
28. Remount the seat back and seat belt. Make sure the wire harness is clipped back into place.
29. Fold the seat back down and install the foam inserts and the cargo cover.
30. Reinstall the cargo tie down hooks.
31. Fold the seat back up.
32. Reinstall the seat bottom and bolt it in place.
33. Reinstall the sill plate.
4 © 2012 Directed. All rights reserved.
Page 5

21.Reinstall the shroud for the KeylessGo main plug and plug it back in.
22.Close all doors, hood and hatch to test the remote start.
23.Remote start the vehicle. If everything is connected properly, you should be able to lock and unlock the
vehicle using the touch sensors on the door handles while the remote start is running.
24.Unlock and enter the vehicle. Push the start button one time. The lights should ßash three times to conÞrm
key take over.
25.Turn off the vehicle.
26.Secure the KG20 harness to existing wiring.
27.Lay the carpet back in place.
28.Remount the seat back and seat belt. Make sure the wire harness is clipped back into place.
29.Fold the seat back down and install the foam inserts and the cargo cover.
30.Reinstall the cargo tie down hooks.
31.Fold the seat back up.
32.Reinstall the seat bottom and bolt it in place.
33.Reinstall the sill plate.
Remove sill plate""""""Unbolt seat bottom
Remove sill plate Unbolt seat bottom
Seat bottom removed Unbolt seat back
Unbolt cargo tie downs Remove cargo cover
5© 2012 Directed. All rights reserved.
Page 6

Unbolt cargo tie downs"""""Remove cargo cover
Unbolt cargo tie downs"""""Remove cargo cover
Remove foam inserts""""""Unbolt seat bracket
Remove foam inserts Unbolt seat bracket
Unclip wire harness Flip seat back into cargo area
Pull up carpet Unplug KeylessGo module
6 © 2012 Directed. All rights reserved.
Page 7

Pull up carpet"""""""Unplug KeylessGo module
""""""""New pins installed, reinstall shroud
Shroud removed from plug
New pins installed, reinstall shroud Plug KeylessGo module in
7© 2012 Directed. All rights reserved.
Page 8

GL Installation
Installation - GL
1. Remove driver’s rear door sill.
2. Fold driver’s middle row seat all the way forward.
3. Remove torx bolt holding seat belt to rear side panel.
4. Pull back weather strip on the back side of the rear door opening.
5. Remove (1) T-30 torx from inside the rear retractible cover mount.
6. Pop side panel partially out.
7. Route the 166 KG adapter to the rear side panel area.
8. Reach in and unplug connector on KG module (see picture).
9. Remove the shroud from that connector
10.Remove the brown and brown/red pins from the black connector making a note of their position
11.Install the pins from the 166 KG adapter into the spots where the factory wires were removed.
12.Reinstall the shroud for that plug.
13.Reinstall the plug into the module.
14.Pop the side panel back into place.
15.Reinstall (1) T-30 Torx and cosmetic cover.
16.Reinstall Torx bolt for seat belt.
17.Reinstall driver’s rear door sill panel.
1. Remove driver’s rear door sill.
2. Fold driver’s middle row seat all the way forward.
3. Remove torx bolt holding seat belt to rear side panel.
4. Pull back weather strip on the back side of the rear door opening.
5. Remove (1) T-30 torx from inside the rear retractible cover mount.
6. Pop side panel partially out.
7. Route the 166 KG adapter to the rear side panel area.
8. Reach in and unplug connector on KG module (see picture).
9. Remove the shroud from that connector
10. Remove the brown and brown/red pins from the black connector making a note of their position
11. Install the pins from the 166 KG adapter into the spots where the factory wires were removed.
12. Reinstall the shroud for that plug.
13. Reinstall the plug into the module.
14. Pop the side panel back into place.
15. Reinstall (1) T-30 Torx and cosmetic cover.
16. Reinstall Torx bolt for seat belt.
17. Reinstall driver’s rear door sill panel.
Remove door sill Remove seat belt
Remove screw cover Remove T-30
8 © 2012 Directed. All rights reserved.
Page 9

Remove screw cover""""""Remove T-30
KG module under bracket
Remove screw cover""""""Remove T-30
Pull back weather strip """""Pop out side panel
KG module under bracket
remove white plug
KG module under bracket
Pull back weather strip Pop out side panel
Remove white plug Plug removed
KG module under bracket
Shroud removed KG harness properly installed into plug
9© 2012 Directed. All rights reserved.
Page 10

Accessory Connection Instructions
SKS On Board KeylessGo Finder Instructions
Each XPRESSSTART is equipped with a (4) pin and a (3) pin connector at the end.
The (4) pin connector is designed to accept a D2D cable from an XL202 RF translator module to provide the ability for adding long
range remotes and 2 way capability to the XPRESSSTART. There is no programming required for the module. The remotes need to
be programmed to the XL202 which should have instructions provided with it.
The (3) pin connector is designed to accept the ESP cable that comes with the Directed SmartStart module (DSM100, DSM200 or
DSM250). The cable can be plugged directly in to the port. The power and ground must be connected (soldered and taped) to the
XPRESSSTART harness. Please see the below diagram. DO NOT USE THE 4 PIN PLUG ON A SMARTSTART MODULE.
SmartStart power
top row, Þrst pin,
red
SmartStart ground
bottom row, Þrst
pin, brown
Troubleshooting Diagnostic Flashes
While running on remote start, any of the following will cause vehicle shut down.
• opening the hood (7 flashes)
• depressing the brake pedal (6 flashes)
• increasing the RPM over normal idle (8 flashes)
• three failed starts/low RPM (9 flashes)
• communications error (10 flashes)
The vehicle will be limited to (5) remote starts between normal keyed operation.
If the lights flash (5) times the starter is out of sync with the vehicle. This is a rare occurrence. Should it happen, you must start the
vehicle with the key or the KeylessGo button for at least one minute to synchronize.
10 © 2012 Directed. All rights reserved.
 Loading...