

Page 1
Two-Way LCD Remote System
INDUSTRY CANADA USER NOTI CE:
Operatio n is subject t o the followi ng two condi tions: (1) this device may not caus e interference, and (2) this
device must accept any interference, including interference that may cause undesired operation of the device.
To reduce potential radio interf erence to o ther users, t he antenna t ype and its gain should be so chosen t hat
the equiv alent isotropically radiated power (EIRP) is not more than that required for successful comm unication.
NOTE: The manufacturer is not res ponsible for any radio or TV interference caused by unauthorized
modifications to this equipment. Such modifications could void the user's authority to o perate the equipment.
Doc#: 120914 Rev:1.7 © 2012 - AS-RFK2800 - - CP - Canada
AS-RFK2800
User Guide
Designed & engineered in Canada
Available functionalities depend on vehicle. Consult your dealer for more information.
Page 2

P.2 User Guide
Note: Some functionalities and behaviours may not be available on certain vehicles. See
dealer for available options.
Table of Contents
Government Regulations ........................................................................................................ 3
Charging the Remote Control ................................................................................................ 4
LCD 2-Way ................................................................................................................................ 4
Fault Condition Alerts .......................................................................................................... 5
Status Screen Icons ................................................................................................................ 5
Basic Commands..................................................................................................................... 6
Remote Start ........................................................................................................................ 6
Lock ..................................................................................................................................... 6
Unlock .................................................................................................................................. 6
AUX/Trunk ........................................................................................................................... 6
Advanced C ommands ............................................................................................................. 6
Runtime Reset ..................................................................................................................... 6
LCD Remote Configurati on .................................................................................................... 7
Navigating Menus and Options............................................................................................ 7
Access Menu Items ............................................................................................................. 7
Remote Pairing .................................................................................................................... 7
Remote Features (Main Menu) ............................................................................................ 7
Setup Remote menu ............................................................................................................ 7
Pair Remote ......................................................................................................................... 9
Demo Mode ......................................................................................................................... 9
Power Off ............................................................................................................................. 9
Exit ....................................................................................................................................... 9
Remote Start Features .......................................................................................................... 10
Disabling Remote Start ...................................................................................................... 10
Remote and System Operations .......................................................................................... 10
Out of Range ..................................................................................................................... 10
No Remote Output ............................................................................................................. 10
1-Way Companion Remote Control ..................................................................................... 11
Using the 1-Way Companion Remo te ............................................................................... 11
Accessing Commands ....................................................................................................... 11
Lock Keypad ...................................................................................................................... 11
Programming ..................................................................................................................... 11
Battery Information (1-Way) ............................................................................................... 12
Battery Information (LCD) ..................................................................................................... 12
Low Battery ........................................................................................................................ 12
Low Battery Alerts .............................................................................................................. 12
Battery Life ......................................................................................................................... 13
Battery Disposal ................................................................................................................. 13
Page 3

User Guide P.3
Government Regulations
This device complies with part 15 of the FCC Rules. Operation is subject to the following two
conditions: (1) This device may not cause harmful interference, and (2) this device must accept any
interference received, including interference that may cause undesired operation.
This equipment has be en tested and found to comply with the li mits for a Class B digi tal device,
pursuant to part 15 of the FCC Rule s. These limit s are designed to p rovide reasonable protection
against harmful interference in a res idential ins tallation. T his equipment generates and can radi ate
radio frequency energy and, if not installed and used in accordance with the instructions, may
cause harmful interference to radio communications. However, there is no guarantee that
interference will not occur in a particular installation. If this equipment does cause harmful
interference to radio or tel evision recept ion, which can be determined by t urning the equipme nt off
and on, the user is encouraged to t ry to correct the interference by one or more of the following
measures:
• Reorient or relocate the receiving antenna.
• Increase the separation between the equipment and receiver.
• Connect the equipment into an outlet on a circuit different from that to which the
receiver is connected.
• Consult the dealer or an experienced radio/TV technician for help.
This device complies with the Industry Canada Radio Standar ds Specificati on RSS 210. Its use is
authorized only on a no-interference, no-protecti on basis; in other words, this devic e must not be
used if it is determined that it causes harmful interferences to services authorized by IC. In
addition, the user of this dev ice must accept any radi o interface that may be rec eived, even if this
interference could affect the operation of the device.
Warning! Changes or modifications not expressly approved by the party responsible for
compliance could void the user’s authority to operate this device.
Page 4
P.4 User Guide
Charging the Remote Control
Your Autostart LCD remote is powered by an internal rechargeable battery that can only be
serviced by an authorized Di rected dealer. Due to tra nsit and storage tim e prior to your purchase,
the battery charge may have depleted. T o ensure proper operation, check the battery level and
connect the battery charge r if not fully charged. See the “Battery Information (LCD)” and “Status
Screen Icons” sections for more information about the battery.
Charging the remote control:
1. Plug the AC adapter into a 110V AC outl et. Insert the mi ni-USB connector into the mi niUSB port located on the side of the remote control (see diagram under LCD 2-way). The
text field will displ ay CHARGE to indicate the remote c ontrol is charging (The remote
remains operational while charging and can command the system).
2. Once fully charged the text field will display FULL.
3. The remote control is then ready for us e. Disconnec t the mini -USB end from the remot e
control first and then the AC adapter from the AC outlet.
Note: If the battery is excessively depleted when the charge r is connected, functionali ty may be
delayed while it charges to the minimum voltage required to operate the display, after which normal
charging resumes.
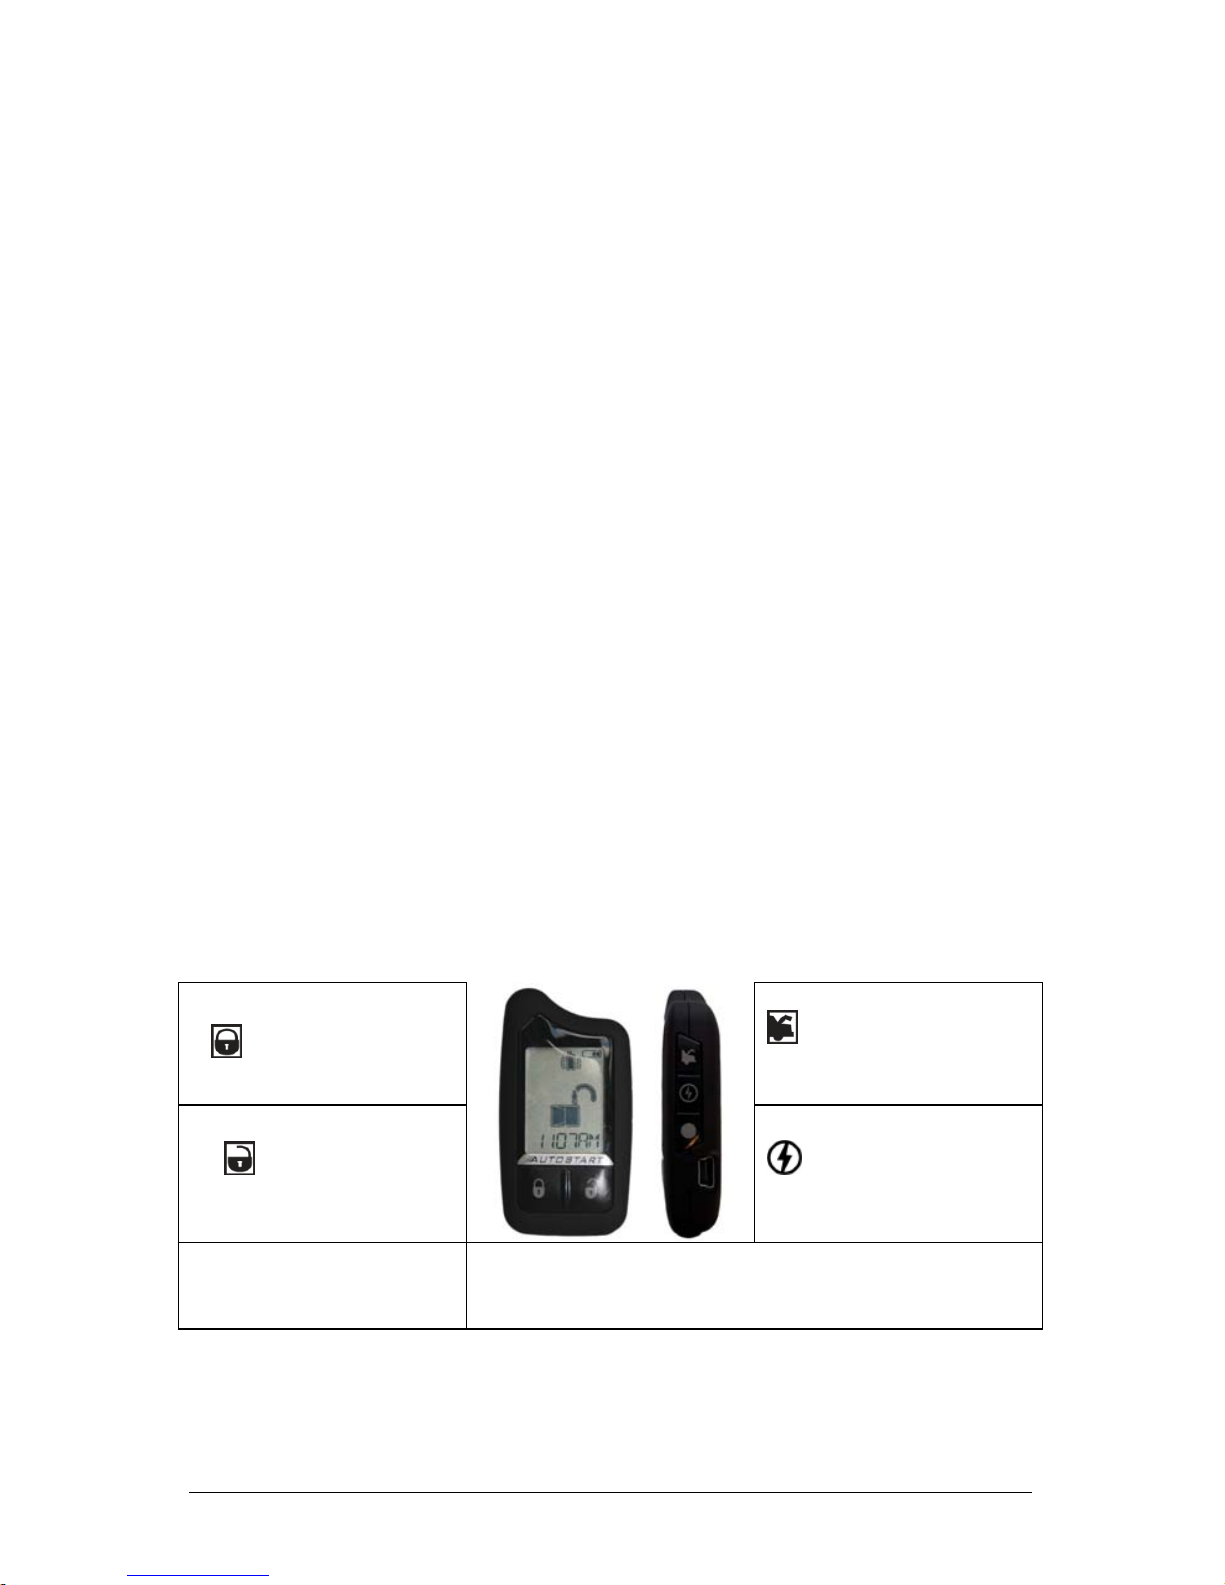
LCD 2-Way
Your remote system is equippe d with a 5-button multi-channel remote c ontrol. T he fu nctions of t he
transmitter are as follows:
DISPLAY:
Status Screen: The upper portion of the display contains status icons for the System, Remote
Start and Remote Control.
Text field: The lower portion of display – shows the Clock, or Runtime, as well as Command
confirmations, Page messages and programming menus.
LOCK: Locks the doors.
TRUNK: Opens the
TRUNK.
UNLOCK: Unlocks the
doors.
START/STOP: Remote
starts or stops the engine.
MINI-USB PORT: The battery
charger plugs into this port.
SHIFT: Allows access to programming and modifies operation
of the other buttons.
N.B.: Pressing then the LOCK button will activate the AUX 1 output.
Pressing then the UNLOCK button will activate the AUX 2 output.
Page 5

User Guide P.5
Fault Condition Alerts
If, when performing a command, a condi tion exis ts that does not allow activation of a Remote Start
feature*, the NOT AVAILABLE or REMOTE START ERROR text and a fault tone will play.
* Remote Start featu re not available when the Remote S tart status is incorrect upon recei ving the
command. Refer to the notes included in the command descriptions that address these faults.
Status Screen Icons
The table below describes all the status screen icons.
Icon
Description
System
Status
Locked: The system is Locked.
Unlocked: The system is Unlocked.
Remote Start
Remote start is active, the engine i s running.
On during Aux/Trunk channel acti vation.
On during Fault Report to indicate the Hood is open.
Remote Co ntrol Status
Bars indicate battery level is Full, ¾,½,¼ or Empty.
On while th e remote control is transmitting a command.
On while th e remote control is receiving a message.
On with Out of Range fault tone to indicate the remote failed to receiv e a command
confirmation.
Pager on: The remote wi ll wake up to listen for m essages.
Pager off : The remote will not wake up to list en for messages .
The remote will Vibrate when messages are received.
The remote will emit B eeps and Tones when messages are received.
Text Field Text field Displays the Clock, Runtime, message text and feature me nus.
Page 6

P.6 User Guide
Basic Commands
Remote Start
Press and release
Activates (or if On, deactivates) the engine. The parking lights and engine turn On and the
REMOTE START ON text and tones play, or the engine and parking lights turn Off and the
REMOTE START OFF text and tones play to confirm, the Remote Start status icons update. The
icon will display in the status screen and the text field will display the Runtime or Clock as
programmed. If Remote Start fails to activate, REMOTE START ERROR text and a fault tone play.
The runtime is predetermi ned based on vehicle application. The engine will shut down when the
preset runtime times out or when any shutdown zone becomes active.
Lock
Press and release
The doors lock and parking li ghts flas h once. The ARMED text and beeps play to con firm and the
System Status Icons update.
Note: If the remote is set to Remote Keyless Entry (RKE), it will display LOCK/UNLOCK;
otherwise, it will display ARMED/ DISARMED.
Unlock
Press and release
The doors unlock and parking lights flash twice. T he DISARM text and b eeps play to co nfirm and
the system status icons update.
Note: If the remote is set to Remote Keyless Entry (RKE), it will display LOCK/UNLOCK;
otherwise, it will display ARMED/ DISARMED.
AUX/Trunk
Press and hold
The Trunk opens (if connec ted) whe n this button i s pressed fo r mo re than 2 seconds. The TRUNK
text and tones play to confirm.
Advanced Commands
Runtime Reset
Press the button 1 time and then
Re-starts the remote start runtime counter if remote start is active.
Page 7

User Guide P.7
LCD Remote Configuration
Operations of the LCD remote and how it communicates m essages are set in the configurati on
Main Menu. The following instructions will direct you through the available programming options.
Navigating Menus and Options
Navigating menus and features, changing options, and exiting are performed using the remote
control buttons. The following instructions discuss how to access and configure the settings.
Access Menu Items
1. Press and hold the button for 8 seconds, the remote will beep once, MAIN MENU is
displayed.
2. Release the button to display the Main Menu item list, SETUP REMOTE is displayed.
3. The Main Menu has been accessed and configuring can begin.
Use the following process to view the Main Menu features, options and settings in the
text field. The following actions are commonly used throughout the configuration
operation.
o Press the
or buttons to cha nge the featu re or option that i s displayed
in the text field.
o Press the button to choose the feature in the text field and view its
options. Press it wh en th e des i red feature or opti on is in the text field to s et i t
as the new setting.
4. To exit configuration: use the or buttons.
Remote Pairing
The following instruction will step you through the remote pairing operation.
1. Perform the steps under the “Access Menu Items” secti on to access the Pair Remote
mode.
2. When the remote beeps 3 times and PAIR is displayed the remote is ready to pair.
3. Within 5 seconds press and rel ease 1 time the Integra ted Program ming Button (IPB) on
the XL202.
4. Within 5 seconds, press and hol d IPB on t he XL202 . The st atus LED will flash one t ime
to confirm the system is ready for remote pairing.
5. Press and hold the
button the remote will emit several tones to confirm successful
pairing. SUCCESS is displayed and the remote returns to the main menu.
6. Release the IPB on the XL202.
Note: FAILED will be displayed and the remote will stay in the pair mode in case of an
unsuccessful pairing. Check the system status and try again.
Note: Consult the installation center for the location of the XL202 or refer to dealer for
programming.
Remote Features (Main Menu)
The following Main Menu list of features available for configuration of the remote control.
Setup Remote menu
Keypad Lock
Options: OFF, AUTO
Page 8

P.8 User Guide
When OFF, the keypad butt ons do not loc k and always perform a c ommand when pressed. W hen
set to AUTO, the remote buttons lock after a 20 sec ond laps e betwee n butt ons press es to prevent
unintentional operati ons. If a button is pressed when locked a fault tone p lays as an ale rt follow ed
by unlock instructions in t he text field. To unlock the buttons , press the
button followed by the
button. The unlock tones play and READY is displayed in th e text field, a comman d can now be
performed.
Page Mode
Options: POWER SAVE, OFF, ON
Paging is how the LCD remote monitors your sy stem’s messages. POWER SAVE ext ends battery
life by turning Paging Off after 72 hours if the remote control i s not used during this period. Jus t
press any button to resume system monitoring. Wh en set to ON it wakes up every few s econds to
listen for pages from the sy stem. When set to OFF it does not wake up to receive remote start or
alarm trigger pages.
Page Alert
Options: TONE VIBE, TONE, VIBE, SCREEN ONLY
There are several ways for the LCD to alert you w hen it has receiv ed a m essage fro m the s ystem.
TONE VIBE will alert by both emittin g tones and vibrating the remote. Select TONE to be alerted
by tones that are unique for each m essage. Select VIBE and the LCD will silently alert you with a
gentle vibration, or select SCREEN ONLY when you don’t want to be interrupted.
Remote Start Info
Options: RUNTIME, TEMP, CLOCK
The text field can be set to display the information you prefer during remote start.
RUNTIME: Remote Start Runtime, TEMP (not available on this system), or the CLOCK will be
displayed in the text field while Remote Start is on.
Runtime Alert (Not available on this system)
Options: ON, OFF
Car 2
Options: OFF, ON, HOME
Turns OFF or ON, 2 car operation from the remote. The option for HOME is not available.
Screen Color
Options: OFF, WHITE, LT GRN, VIOLET, AQUA, RED, GREEN, BLUE
The status screen back lighting can be OFF, or will illuminate with a s elected color during output
when set to one of the option colors.
Temp Unit (Not available on this system)
Options: F, C
Button Beep
Options: ON, OFF
When set to ON, the remote will emit a b eep as conf irmation of a button press. Whe n set to OFF,
beeps are not emitted for button presses.
Page 9

User Guide P.9
System Type
Options: SEC, RKE
Note: If the remote is set to Remote Keyless Entry (RKE), it will display LOCK/UNLOCK;
otherwise, it will display ARMED/DISARMED.
Clock Set
Options: HOUR, MIN
Review
Displays firmware version.
Exit
Exits and returns to the main menu.
Pair Remote
See the “Remote Pairing” section on page 7.
Demo Mode
Demo Mode plays a pre-selected group of animati ons as a demonstration tool t o show friends or
family. Running Demo mode shortens the battery life over time if used excessively.
• SINGLE SILENT: The remote will display a selection of icons on the status screen
without beeps and tones then stop.
• SINGLE SOUND: The remote wi ll displ ay a selection of ic ons on the st atus screen with
beeps and tones then stop.
• LOOP SILENT: The remote will display a selecti on of icons on the status screen without
beeps and tones in an endless loop until the battery charger is disconnected.
• LOOP SOUND: The remote will di splay a selection of ic ons on the status screen with
beeps and tones in an endless loop until the battery charger is disconnected.
Note: Loop Silent and L oop Sound a re not avai lable and will not appear i n the Dem o Mode menu
unless the battery charger is connected.
Power Off
When an extended period of non-operation is antic ipated, turning the p ower off will preserve the
battery charge. Press th e
button w hil e POWER OFF is dis played. T he status s creen icons c lear
as the Power Off tones play, the remote is turned off.
To turn the remote on, Pres s and hol d the button for 3 s econds , the status s creen i cons ref resh
as the power on tones play. The remote als o turns itself on and begins charging whe n the battery
charger is connected.
Exit
To return to normal operation, press the button while EXIT is displayed.
Page 10

P.10 User Guide
Remote Start Features
Disabling Remote Start
Remote start can be di sabled by moving the Toggle S witch to the Off position. If remote st art is
attempted while Off, the engine wi ll not start. Move the switch back to the O n position to resume
normal operation.
Note: Consult the installation center for the location of Toggle switch.
Remote and System Operations
Out of Range
Each time a command is performed the remote will expect a command confirmation from the
system. If a command co nfirmation is not recei ved the out-of-range icon (
) and a fault tone wi ll
play as an alert.
No Remote Output
Occasionally when a command is performed the remote may not generate a command
confirmation output or Out of Ran ge output. This indi cates that the system received the c ommand
but it was an incompl ete c omm and ( e.g. Aux butt on p res sed too s h ort t o ac ti vate the trunk release )
or it was an illegal message (e. g. t he command was corrupted due t o loc al RF i nterfere nce). T hese
are temporary normal functions of th e system and remote, perform the c ommand again within 1 0
seconds to return to normal operation.
Page 11

User Guide P.11
1-Way Companion Remote Control
LOCK: Locks the doors.
TRUNK: Opens the
TRUNK.
UNLOCK: Unlocks the
doors.
START/STOP: Remote
starts or stops the engine.
SHIFT:
Allows access to
programming and modifies
operation of the other buttons.
Using the 1-Way Companion Remote
The companion 1 way remote comm ands the system features as shown i n the previous table, but
without the message display of the LCD remote. Parking light flashes is used to indicate that a
command has been received and ac ti vated as desc ribed in the “Basic Co mmands ” and “Advanced
Commands” sections.
Accessing Commands
Similar to the LCD remote, Basic commands a re performed when a c ommand button is pressed
directly. To perform Advanced Commands press the button 1 to 4 times to access function
levels,
x4 in the table for example implies pressing 4 times. The LED flashes in groups for a
few seconds to indicate the lev el. Press the desired command button while
the LED is flashing to
perform the command.
Lock Keypad
When On, the remote control buttons lock if more than 20 seconds lapses between button p resses .
If a button is pressed when locked, a fault tone is emitted. To unlock the buttons; press the
button followed by the button, the buttons unlock and tones play to confirm.
Programming
To enter; hold the button for 8 sec onds, the remote emits on e long beep and turns the LED on,
the programming main menu has been accessed.
To exit; press and release the
button to go back and repeat to exit. 1 short and 1 long beep i s
emitted for each step back, the LED turns off when programming is exited.
Remote Features Menu
Press and release the
button, 2 LED flashes and beeps indicate the remote featu res menu is
accessed and can be set. Press the buttons indicated below, 1 beep and fl as h turns the feat ure on,
2 beeps and flashes turns the feature off.
• Autolock feature: Press
to turn on/off.
• Remote Beeps: Press to turn on/off.
Page 12

P.12 User Guide
Remote Learning
Press the button, 3 LED flashes and beeps indicates the remote is ready to program to the
system.
Per the instruction in the “Remote Pai ring” section of this guide, following step 4. Press and hol d
the
button, there will be no confirmation of pairing completed for this remote control.
Battery Information (1-Way)
The 1-way companion remote is pow ered by one 3V c oin c ell l it hium battery (PN CR-2032) that wil l
last approximately one year under normal use.
Battery Replacement
1. Using a small flat narrow object, push latch down towards battery tray while gently
prying the tray outwards from both ends until released. Remove the tray from the
remote control housing.
2. While observing the correct polarity, replace the old battery with a new one. Seat battery
flush into tray and sl ide back into ho using until securely lat ched. The remote cont rol is
now ready for use.
Battery Information (LCD)
The LCD remote control is powered by an internal rec hargeable battery t hat can be se rviced only
through an authorized Directed dealer. The i nformation and precautions in this section can help
maximize your battery’ s life and usage in providing your LCD remot e control with many years of
trouble free operation.
Warnings! NEVER connect the supplied AC adapter to products other than the LCD remote
control. It is a hi gh current device d esigned specifical ly for rapid cha rging of the LCD battery and
may cause severe damage or explosion when connected to any other products.
Charging the battery when the temperature is below 32°F (0°C) o r above 113°F (45°C ) may c ause
severe battery damage and/or reduce battery life. Avoid placing the remote control in areas
exposed to extreme cold or heat (direct sunlight) when charging the battery.
Low Battery
After a command is performed the LCD and 1-way companion remote control s check their battery
level and, when the l evel requires attenti on, wi ll begi n gen erati ng alerts . Once the alerts b egin they
will continue to command the system for several days but should be charged at the earliest
opportunity or failure to control the system may occur.
Low Battery Alerts
After performing a command, LOWBAT and sev eral beeps play on the LCD remote to indi cate the
battery needs to be charged.
Important! To preserve power at critical ly low battery lev els the LCD t urn s the pager off an d stops
receiving messages from the sy stem. It will continue to command the sys tem until the battery c an
be charged.
Page 13

User Guide P.13
Battery Life
The LCD remot e contr ol has many fe atures th at mak e it one of the most u ni que rem ote controls on
the market today, including superior long range communication with the system. The default
feature settings prov ide for excellent battery cha rge duration. However, to maximize this duration
between charges, the following suggestions will help:
• Turn the remote Off: When not i n use and/ or out of range o f the vehicle t he remote can
be turned off in the Main menu.
• Turn Paging off: The remote wi ll not wake up to check fo r messages with Pagi ng off in
the Setup Remote menu.
• Turn Beeps off: The Button beeps can be turned off in the Setup Remote menu. The
command beeps still play normally.
Battery Disposal
Directed cares about the environment. If you need to dispose of the battery, please
do so in accordance with your municipal requirements for battery disposal.
 Loading...