

DirectCM DCM2200i Technical Reference Manual
DCM2200i
Technical Reference Manual

DCM2200i
Table of Contents
Copyright/Limited Warranty..........................................................................................................1
Trademark Notice .....................................................................................................................1
Limitation of Liability.................................................................................................................1
Notices......................................................................................................................................1
Life Support and Nuclear Facilities...........................................................................................2
Energy Star® Notice.....................................................................................................................3
Network Compatibility...............................................................................................................3
Welcome.......................................................................................................................................4
System Information...................................................................................................................4
Manual Conventions................................................................................................................. 4
Manual Updates........................................................................................................................ 5
Notebook Safety and Care...........................................................................................................6
Operating Environment.............................................................................................................6
Using Your Notebook................................................................................................................8
Cleaning Your Notebook.........................................................................................................12
Using the Battery Safely .........................................................................................................13
Getting Started ...........................................................................................................................14
Notebook Package .................................................................................................................14
Attaching the AC Adapter.......................................................................................................14
Opening the Cover..................................................................................................................16
Turning On and Off.................................................................................................................17
Notebook Features.....................................................................................................................20
Performance Features............................................................................................................20
Front Open View.....................................................................................................................22
Front and Rear Views.............................................................................................................23
Side Views..............................................................................................................................25
Bottom View............................................................................................................................27
AC Adapter .............................................................................................................................28
Switches and Status Indicators ..............................................................................................29
Power Management ...................................................................................................................30
AC Adapter .............................................................................................................................31
Battery Pack ...........................................................................................................................32
ii

Table of Contents
Power Management................................................................................................................34
Power Saving Tips..................................................................................................................35
Keyboard and Touchpad............................................................................................................36
Keyboard ................................................................................................................................36
Numeric Keypad .....................................................................................................................37
Special Function Keys............................................................................................................37
Touchpad................................................................................................................................38
Storage Devices.........................................................................................................................40
PC Cards ................................................................................................................................40
Optical Drive ...........................................................................................................................43
Memory Card Slot...................................................................................................................46
Hard Disk Drive (HDD) ...........................................................................................................47
Communication ..........................................................................................................................48
Modem....................................................................................................................................48
Ethernet ..................................................................................................................................49
Wireless LAN..........................................................................................................................50
Bluetooth Wireless Connection .............................................................................................. 52
Video and Audio.........................................................................................................................53
Video Features .......................................................................................................................53
Audio Features .......................................................................................................................54
BIOS Setup.................................................................................................................................55
Starting BIOS Setup ...............................................................................................................56
System Setup Menus..............................................................................................................56
Navigating the BIOS ...............................................................................................................57
Main Menu..............................................................................................................................57
Advanced Menu......................................................................................................................58
IDE Configuration Submenu...................................................................................................58
Super IO Configuration Submenu ..........................................................................................59
Security Menu.........................................................................................................................59
I/O Interface Security Submenu .............................................................................................60
Power Menu............................................................................................................................60
Boot Menu ..............................................................................................................................61
Boot Settings Configuration Submenu ...................................................................................61
Exit Menu................................................................................................................................62
iii

DCM2200i
Regulatory Notices.....................................................................................................................63
Product Specification..............................................................................................................64
Wireless LAN Module Statement............................................................................................65
Electromagnetic Compatibility ................................................................................................65
FCC Radiation Exposure Statement ......................................................................................65
FCC Part 68 Statement ..........................................................................................................65
CTR21 Statement...................................................................................................................66
Canadian Radio Interference Regulations..............................................................................66
Class 1 Laser Product ............................................................................................................67
Power Cord Requirement.......................................................................................................67
Safety Approval ......................................................................................................................69
Service and Support................................................................................................................... 70
DirectCM Technical Support...................................................................................................70
Glossary.........................................................................................................................................71
iv

Copyright/Limited Warranty
Copyright 2006 DirectCM, A Division of MPC Computers, LLC. All rights reserved. The
information in this document is subject to change without prior notice in order to improve
reliability, design, and function and does not represent a commitment on the part of the
manufacturer. In no event will the manufacturer or seller of a DirectCM™ product be liable for
direct, indirect, special, incidental, or consequential damages arising out of the use or inability to
use the product or documentation, even if advised of the possibility of such damages. Except as
stated in the applicable DirectCM™ limited warranty, DirectCM™, its parent company and
affiliates, by this manual, make no other express warranties. THE IMPLIED WARRANTY OF
MERCHANTABILITY AND THE IMPLIED WARRANTY OF FITNESS FOR A PARTICULAR
PURPOSE ARE HEREBY DISCLAIMED. IF THESE LIMITATIONS DO NOT APPLY TO YOU,
THEN ALL IMPLIED WARRANTIES AND CONDITIONS OF MERCHANTABILITY AND FITNESS
FOR A PARTICULAR PURPOSE ARE LI MITED IN TIME TO THE TERM OF THE LIMITED
WARRANTY PERIOD REFLECTED ON YOUR PACKING SLIP OR INVOICE. NO
WARRANTIES, WHETHER EXPRESS OR IMPLIED, WILL APPLY AFTER THE LIMITED
WARRANTY PERIOD HAS EXPIRED. This document contains proprietary information that is
protected by copyright. All rights are reserved. No part of this document may be photocopied,
reproduced, or translated to another language without the prior written consent of:
DirectCM™
906 E. Karcher Road
Nampa, Idaho 83687
Trademark Notice
Windows, Windows XP, and Microsoft are trademarks or registered trademarks of Microsoft
Corporation. Pentium M and Centrino are trademarks or registered trademarks of Intel
Corporation. Other product names mentioned herein are used for identification purposes only and
may be trademarks and/or registered trademarks of their respective companies.
Limitation of Liability
While reasonable efforts have been made to ensure the accuracy of this manual, the
manufacturer and seller assume no liability resulting from errors or omissions in this manual, or
from the use of the information contained herein.
Notices
No part of this publication may be reproduced, stored in a retrieval system, or transmitted in any
form or by any means (mechanical photocopying, recording, or otherwise) without the prior
written permission of the manufacturer.
The information within this manual is subject to change without notice.
The manufacturer shall not be held liable for technical or editorial errors or omissions contained
herein, nor for incidental or consequential damages resulting from the furnishing, performance, or
use of this material.
1

DCM2200i
Life Support and Nuclear Facilities
Products sold by DirectCM™ are not authorized for use as critical components in medical devices
or systems or in nuclear facilities without the express written approval of the Chief Executive
Officer of DirectCM™.
EMA001092-00, PJH, 06-2 0-2006
2

DCM2200i
Energy Star® Notice
The need to reduce the pollution associated with energy production is imperative. The
Environmental Protection Agency (EPA) developed the E
problem of energy waste. This cooperative effort between government and private industry is
designed to decrease the power consumed by computing equipment as well as a wide range of
other products, homes, and buildings. E
NERGY STAR specifications require that the DCM2200i
enter a low-power "sleep" mode after a period of inactivity.
NERGY STAR program to combat the
DirectCM™ is proud to be an official E
that most DirectCM™ computer systems meet the stringent E
the savings achieved through E
NERGY STAR partner. This voluntary partnership signifies
NERGY STAR guidelines. You will see
NERGY STAR labeled equipment in the form of lower power bills—
without sacrificing performance or paying more for your system.
We join E
configurations and system options may prevent your system from meeting E
NERGY STAR in its commitment to reduce unnecessary pollution. Although certain
NERGY STAR
guidelines, your system still has built-in energy saving features. Check with your DCM sales
representative to see if your configuration meets the E
NERGY STAR guidelines.
Refer to the Power Management section in this manual for more information on modifying your
Power Management settings or default times.
Network Compatibility
The power-saving functions may vary among different network operating systems. If the system is
to be permanently connected to a network, we recommend the DCM2200i’s "wake up" function
be tested before relying on this mode.
3
DCM2200i
Welcome
Congratulations on the purchase of your DCM2200i. Whether you are a new or an experienced
notebook user, this Technical Reference Manual can help you get the most from your notebook.
The following sections in this chapter contain more information about your notebook and this
manual:
• System Information
• Manual Conventions
• Manual Updates
System Information
If you require technical support in the future, the following information will help a DirectCM
technician locate the specifications for your notebook and aid in returning it to normal operation.
Model Name and Manual Number Information
Model Number
Manual Number
DCM2200i
EMA001092-00
Manual Conventions
The following conventions are used throughout this manual.
Note: Important information concerning the operation of your notebook.
Caution: Failure to follow directions could result in loss of data or damage
to equipment. Failure to heed these cautions could negate the user
warranty.
Warning: Failure to follow directions will result in loss of data or damage to
equipment and/or could result in physical harm. Failure to heed these
warnings could negate the user warranty.
4

DCM2200i
Special Text
The text in this guide is formatted to highlight unique information or instructions. Review the
following examples of special text used throughout this manual:
• Screen (window) names, functions, or anything that appears on the screen is formatted in
bold. For example: Click OK, the Standards screen, the Edit menu.
• Keyboard strokes are indicated by brackets. For example: Press [Enter], use the [Alt] key.
When keys should be held down simultaneously, they are separated by the + sign. For
example: Press [Ctrl+Alt+Delete]. When keys should be pressed sequentially, they will be in
individual brackets without the + sign. For example: Press [1][Enter]. The [1] key should be
pressed first, and then the [Enter] key should be pressed.
• Screen messages are indicated by quotes. For example: The message "Enter your
username and password" will appear.
• Anything that you need to type will app ear in ita lic s . Fo r example: Enter the word password.
Optical Device Naming Convention
In many installation programs you will have to get a program from the optical device. The
program installation sequence assumes that the optical drive is Drive D:\; however, this is not
always the case. The name of the optical drive is the letter following the letter assigned to your
last hard drive. For instance, if you have one hard drive with two partitions, the hard drives are
Drives C: and D: and the optical drive is then Drive E.
Touchpad Conventions
You may be asked to click or double-click on items on the display screen. As a general note the
touchpad actions are similar to a wheel mouse and any differences are explained fully.
The object that needs to be clicked upon will be displayed in Bold text such as the Start button.
Windows Conventions
Almost all Windows® programs will display the name of a button or icon if you place the touchpad
pointer on the item you want information about.
Software User Documentation
Your notebook may be shipped from the factory with several software programs installed. If so,
the software may include its own online documentation. Refer to the documentation or the Help
options in the software for more information.
Manual Updates
Periodically, updates are made to our manuals. Use the following instructions for finding the most
current Technical Refer ence Manual for your system. Please note that not all of the manual
updates will be applicable to your s ystem .
1. Go to the DirectCM Support Web site at http://www.directcm.com
2. Find the DCM2200i Electronic Manual link and select the EMA001092-XX link.
5
DCM2200i
Notebook Safety and Care
Your DCM notebook has been manufactured to the highest quality standards and is designed and
tested to meet the latest standards for safety of information technology equipment. With proper
care, it should provide years of trouble-free service.
To ensure safe use of this product, it is important that the safety instructions marked on the
product and in the documentation are fol lo wed.
Warning: Always follow these instructions to help guard against personal
injury and damage to your system.
The following sections in this chapter contain safety information about your notebook as well as
information that will help en s ure your s ystem has the longes t lif e poss ible :
• Operating Environment
• Using Your Notebook
• Cleaning Your Notebook
• Using the Battery Safely
Operating Environment
Temperature Concerns
The system specifications ensure the notebook will operate in ambient (room) temperatures up to
86° F (30° C). It is important to keep your notebook out of direct sunlight and other heat sources
(such as lamps and heating vents). Make sure the fan vent on the left side of your notebook is not
blocked when you use your notebook .
If room temperature consistently exceeds 86° F (30° C), move the notebook to a cooler location
to keep it under the maximum temperature.
Caution: The notebook's Liquid Crystal Display (LCD) screen may be
damaged by exposure to intense sunlight, which builds up excessive heat
inside the display enclosure. Only exposure to indirect or subdued sunlight
is recommended.
Moisture and Humidity Concerns
While your notebook will generally run better in cooler environments, there are notebook
components that are adversely affected by cold temperatures.
Exposing the notebook to cold temperatures can produce condensation that can damage
individual components or destroy your system.
Warning: Never expose the notebook to moisture. Moisture exposure can
lead to an electrical shock or fire hazard. Operating the notebook in areas
with high humidity can damage system components.
6

Temperature and Humidity Operational Levels
DCM2200i
Environment
Ambient temperature, operating 32°F to 86°F (0°C to 30°C)
Ambient temperature, storage -23°F to 122°F (-5°C to 50°C)
Relative humidity (noncondensing), operating 20% to 80%
Relative humidity (noncondensing), storage 5% to 90%
Magnetic Fields
Place the notebook away from electromagnetic or radio frequency interference (for example,
television/stereo sets, copying machines, and air conditioners).
Direct Sunlight and Extreme Temperatures
• Avoid using or storing the notebook in extremely hot or cold areas such as a car on a hot
day. Keep the notebook away from heaters and out of direct sunlight. Exposure to
excessive heat may damage components.
• If you have left your notebook in a hot place, let it cool down slowly to room temperature
(with the LCD panel open) before using it.
• Should your notebook be exposed to excessively cold temperatures allow it to warm up
to room temperature before turning it on.
• Do not place the notebook near fire or other heat sources.
Humidity, Rain, and Moisture
• Do not use your notebook in harsh conditions or near water. Never spill liquid of any kind
on the notebook.
• Avoid exposing your notebook to sudden changes in temperature or humidity. Do not
place your notebook near or over a radiator or heat register or in a built-in enclosure
unless proper ventilation is provided.
• Do not expose the notebook to rain or moisture.
7

DCM2200i
Other Environmental Concerns
High levels of dust, dirt, or smoke can also damage your notebook. Place the notebook in an area
with good ventilation. Periodically check the notebook's case, side, and bottom to ensure that
dust or dirt is not accumulating on the ventilation portholes.
Shock, Vibration, and Altitude Operational Levels
Operational (power on) Non Operational (power off)
Shock
Vibration
Altitude
10 G, 11 ms, half-sine 60 G, 11 ms, half-sine
2 grms, 20 to 500 Hz 3.1 grms, 5 to 500 Hz
Up to 7,700 ft Up to 40,000 ft
Using Your Notebook
The following information helps you avoid potential problems as you use your notebook.
Follow all the instructions and cautions/warnings in this manual.
Note: This portable device and its antenna should not be co-located nor operated
in conjunction with any other intentional transmitter in a collocated environment.
Powering Your Notebook
• Use only approved AC adapters, auto adapters, batteries, memory modules, and other
options. The notebook requires a 65W AC adapter. An AC adapter with lower wattage will
not power the system.
• If you are using the notebook with the AC adapter, do not allow anything to rest on the
power cord.
• Do not use the AC adapter or battery if the shell is cracked or damaged.
• The notebook can be powered by an internal battery pack or by an external AC power
source, which is supplied with the notebook. Using a different kind of battery pack or AC
power source in your notebook may create an explosion or fire hazard.
• The notebook is equipped with a 3-wire type plug. If you are unable to insert the plug into
the outlet, contact your electrician to replace your obsolete outlet.
• If an extension cord is used with the notebook, the total amperage ratings on the
products plugged into the extension cord cannot exceed the extension cord’s amperage
rating. Also, the total of all products plugged into the wall outlet should not exceed 15
amps.
• Your notebook contains electrical filters, fuses, protections, and a built-in surge protector.
However, we strongly recommend using a high-quality, external surge protector. An
external surge protector looks like an extension cord with several grounded outlets. It will
help shield your notebook from lightning strikes, surges, shorts, and other electrical
hazards. We also recommend plugging your phone line into a surge protector.
8

DCM2200i
• If your local area is subject to frequent electric power failures, attach an Uninterruptible
Power Supply (UPS) to the notebook. A UPS will give you time to save all data files and
properly turn off the notebook.
General Work Area Concerns
• Set the notebook on a flat, stable surface. Do not place the notebook on an unstable cart,
stand, or table. Exposure to strong vibration can damage the notebook's hard disk.
• Handle batteries, optical drives, hard drives, and other notebook devices with care. If
notebook devices are dropped, damage may result.
• Do not place the notebook in a location where people can step on or trip over the cord.
• Ensure that the ventilation openings on the sides of your notebook are not blocked.
Overheating
• To prevent possible overheating of the notebook's processor, do not block the ventilation
openings. Occasionally check the vents and remove any dust that has accumulated on
the outside of the vents. Only push approved objects through slots in the notebook. If
unapproved objects are pushed through slots, they may touch dangerous voltage points
or short out parts, which could result in an electric shock or fire.
• To ensure that your notebook operates reliably, never place the system on a bed, sofa,
rug, or other similar surface.
• Do not place your notebook in a carrying case while the notebook is in Standby mode or
powered on. If you do, this will result in damage to the notebook. However, if you must
put the system in a carrying case, either shut the system down or use the Hibernate
option.
Display Panel
• The Liquid Crystal Display (LCD) has a polarized surface and can be damaged easily. To
prevent damage, avoid touching the screen.
• Do not slam your notebook shut and never pick up or hold your notebook by the display.
Working with Memory Modules
• Do not remove the memory-module compartment door or try to install a memory module
when the notebook is on.
• Save your data files frequently, and make backup copies of your files.
Servicing Your Notebook
Warning: Do not try to disassemble your notebook. Opening the system
chassis voids your warranty. Only a DCM authorized service center can
replace or add parts inside the chassis. For more information, call DCM.
• If your notebook does not operate normally when the operating instructions are followed,
adjust only those controls that are covered by the operating instructions. Improper
adjustment of other controls may result in damage.
9

DCM2200i
• Under the following conditions unplug the notebook from the wall outlet and refer
problems to a service representative:
• The power cord or plug is damaged or frayed.
• Liquid has been spilled onto your notebook.
• The notebook has been exposed to rain or water.
• The notebook exhibits a distinct change in performance.
Storing Your Notebook
• If possible, leave the power cord connected to the notebook and an electrical outlet when
the notebook is not in use. This extends the life of the battery and keeps the battery fully
charged.
• If you will not be using the notebook for a long period of time (a month or more), you
should charge the battery until it is completely full. After you have charged the battery,
remove the battery from the notebook.
Traveling With Your Notebook
Always shut the notebook off before moving it. Any sudden jar or shock may permanently
damage the hard disk. Hard disks are more resistant to shock if they are properly shut down. If
you are transporting the notebook over long distances, completely repackage it in its original
packing material. If the original packaging is unavailable, pack the notebook with as much
padding as possible to ensure that the components are not exposed to excessive vibration or
shock.
Caution: Do not place your notebook in a bag or carrying case while the
notebook is in Standby mode or powered on. If you do, this may result in
damage to the notebook. However, if you must put the notebook in a
carrying case, shut the system down.
If you are traveling by airplane, follow these tips:
• Travel with the notebook as carry-on luggage. Do not check the notebook with your
baggage.
• Allow the notebook and disks to go through the X-ray security devices. Do not carry disks
through metal detectors because data loss can occur.
• Make sure that the battery is charged or the power cord is easily accessible. You may be
required to turn on your notebook for airport security personnel.
• Be prepared to turn off your notebook during take off and landing.
Locking Your Notebook
As a precaution when you are traveling or using your notebook in an unsecured area, you should
keep your notebook as safe as possible. One way to keep your notebook safe is to use a Security
Lock System.
To use the lock, loop the lock cable around a stationary object such as a table. Insert the lock into
the Kensington lock hole, and turn the key to secure the lock. Store the key in a safe place.
10

DCM2200i
Caution: Any damage to the machine caused by using a locking/security
device is not covered under warranty.
Laser Safety
All systems equipped with optical drives comply with the appropriate safety standards, including
IEC 825. The laser devices in these components are classified as "Class 1 Laser Products" under
a US Department of Health and Human Services (DHHS) Radiation Performance Standard.
Should the unit ever need servicing, contact an authorized service location.
Caution: Use of controls, adjustments, or performing procedures other than
those specified in this manual may result in hazardous radiation exposure.
To prevent exposure to laser beams, do not try to open the enclosure of a
CD or DVD drive.
Power Cord Requirements
The power cord set (wall plug, cable, and AC adapter plug) you received with your notebook
meets the requirements for use in the United States and Canada.
Power cord sets for use in other countries must meet the requirements of the country where you
use the notebook. For more information on power cord set requirements, contact DCM.
General Requirements
The requirements listed below are applicable to all countries:
• The length of the power cord set must be a minimum of 6 feet (1.8m) and a maximum of
9.75 feet (3.0m).
• All power cord sets must be approved by an acceptable accredited agency responsible
for evaluation in the country where the power cord set will be used.
• The power cord set must have a minimum current capacity of 7 A and a nominal voltage
rating of 125 or 250 volts AC, as required by each country's power system.
• The appliance coupler must meet the mechanical configuration of an EN 60 320/IEC 320
Standard Sheet C7 connector f or mating with ap pl iance inlet on the notebook.
11

DCM2200i
Cleaning Your Notebook
Use the following information when cleaning your notebook.
• Before cleaning, turn off your notebook and unplug it from the wall outlet. Do not use
liquid cleaners or aerosol cleaners. Use a soft cloth and denatured alcohol for cleaning
the notebook case and LCD. Never apply the denatured alcohol directly to the LCD
screen. Always apply the alcohol to the cloth first; then wipe down the screen.
• Cleaning kits designed to clean floppy disk drives and optical drives are available at most
computer/electronic stores and should be used periodically.
• Clean the ventilation grills regularly to maintain optimal thermal regulation of the
notebook. To do this, you may use a soft brush or a vacuum cleaner (with appropriate
head adapter) to remove the dust buildup on the ventilation grills.
Handling Spills
If you spill something on your notebook, do the following:
• Turn off your notebook and unplug it immediately.
• Drain as much of the liquid from the keyboard as possible. Be careful not to let the liquid
drip onto the LCD screen. Allow the notebook to dry for several days before trying to use
it.
• If you spill liquid on an external keyboard or keypad, unplug it and drain as much of the
liquid as possible. Allow the keyboard to sit at room temperature for a full day before
trying to use it.
Caution: Sweet liquids leave a sticky residue that may jam the keyboard
despite your efforts to dry it.
• If you spill liquid on the LCD screen, clean it immediately with a soft cloth and denatured
alcohol. Do not use water, window cleaner, acetone, aromatic solvent, or dry, rough
towels.
Caution: Some liquids damage the polarized LCD screen. If your screen is
damaged, contact your authorized manufacturer’s service center for a
replacement.
12

DCM2200i
Using the Battery Safely
Caution: To avoid damage to your notebook, use only a DCM supplied or
approved battery for your specific notebook model.
Warning: Danger of explosion if battery is incorrectly replaced. Replace only
with the same or equivalent type recommend by DCM. Discard used
batteries according to DirectCM’s instructions (see below).
Follow these guidelines to safely use the battery:
• Turn off your notebook and unplug it if you accidentally:
• Expose the equipment to liquid.
• Drop, jar, or damage the notebook.
• Use only approved battery chargers.
• Do not disassemble the battery, heat it above 212° F (100°C), or burn it. The battery used
in this notebook may cause a fire or chemical burn if mistreated.
• Your notebook's rechargeable battery may be considered hazardous waste. If you
replace your battery with a new one:
• Keep the old battery out of the reach of children.
• Dispose of the old battery prom ptly.
• Make sure that you follow all federal, state, and local requirements when you
dispose of the old battery.
Attention:
This product contains a rechargeable battery. The battery is recyclable. At the end of its useful
life, under various state and local laws, it may be illegal to dispose of this battery into the
municipal waste stream. Check with your local solid waste officials for details in your area for
recycling options or proper disposal.
13

DCM2200i
Getting Started
The following sections in this chapter provide detailed information on using your notebook for the
first time:
• Notebook Package
• Attaching the AC Adapter
• Opening the Cover
• Turning On and Off
Notebook Package
After you have carefully unpacked your notebook, verify that you have all of the items listed
below. For a pre-configured model, you should have the following items:
• DCM notebook
• Cloth for screen cleaning and LCD protection
• Accessories
• AC adapter with AC power cord
• DCM2200i Driver CD
• Phone/modem (RJ-11) telephone cable
• LAN (RJ-45) networking cable
• Ferrite beads (large and small)
• Lithium ion battery, pre-inst all ed
• If applicable, Operating System Recovery CD
• Warranty inform ation
• Appropriate application software (Software is installed at the factory—you do not need to
install any software unless your system or documentation prompts you to do so.)
Inspect all of the items. If any item is damaged or missing, please contact your account
representative imm ediately.
Keep the shipping carton and packing materials in case you need to ship or store this unit.
Attaching the AC Adapter
Your notebook runs on power from the battery in the notebook or from an electrical outlet. The
first time that you use your notebook, fully charge the battery by attaching the power cord to the
notebook and to an electrical outlet.
Note: All batteries lose their charge if they sit unused for an extended time period.
When not used, a battery can discharge fully in 2 to 3 months. The battery may
have discharged in the time it took for the notebook to be shipped from the factory
to you.
14
DCM2200i
Caution: Use only the AC adapter included with the DCM2200i. Using other
AC adapters may damage the DCM2200i.
Caution: To avoid damage to the system's components caused by electrical
surges, plug your system into a surge protector. During an electrical storm,
unplug both the surge protector from the power outlet and the telephone
line from the phone jack.
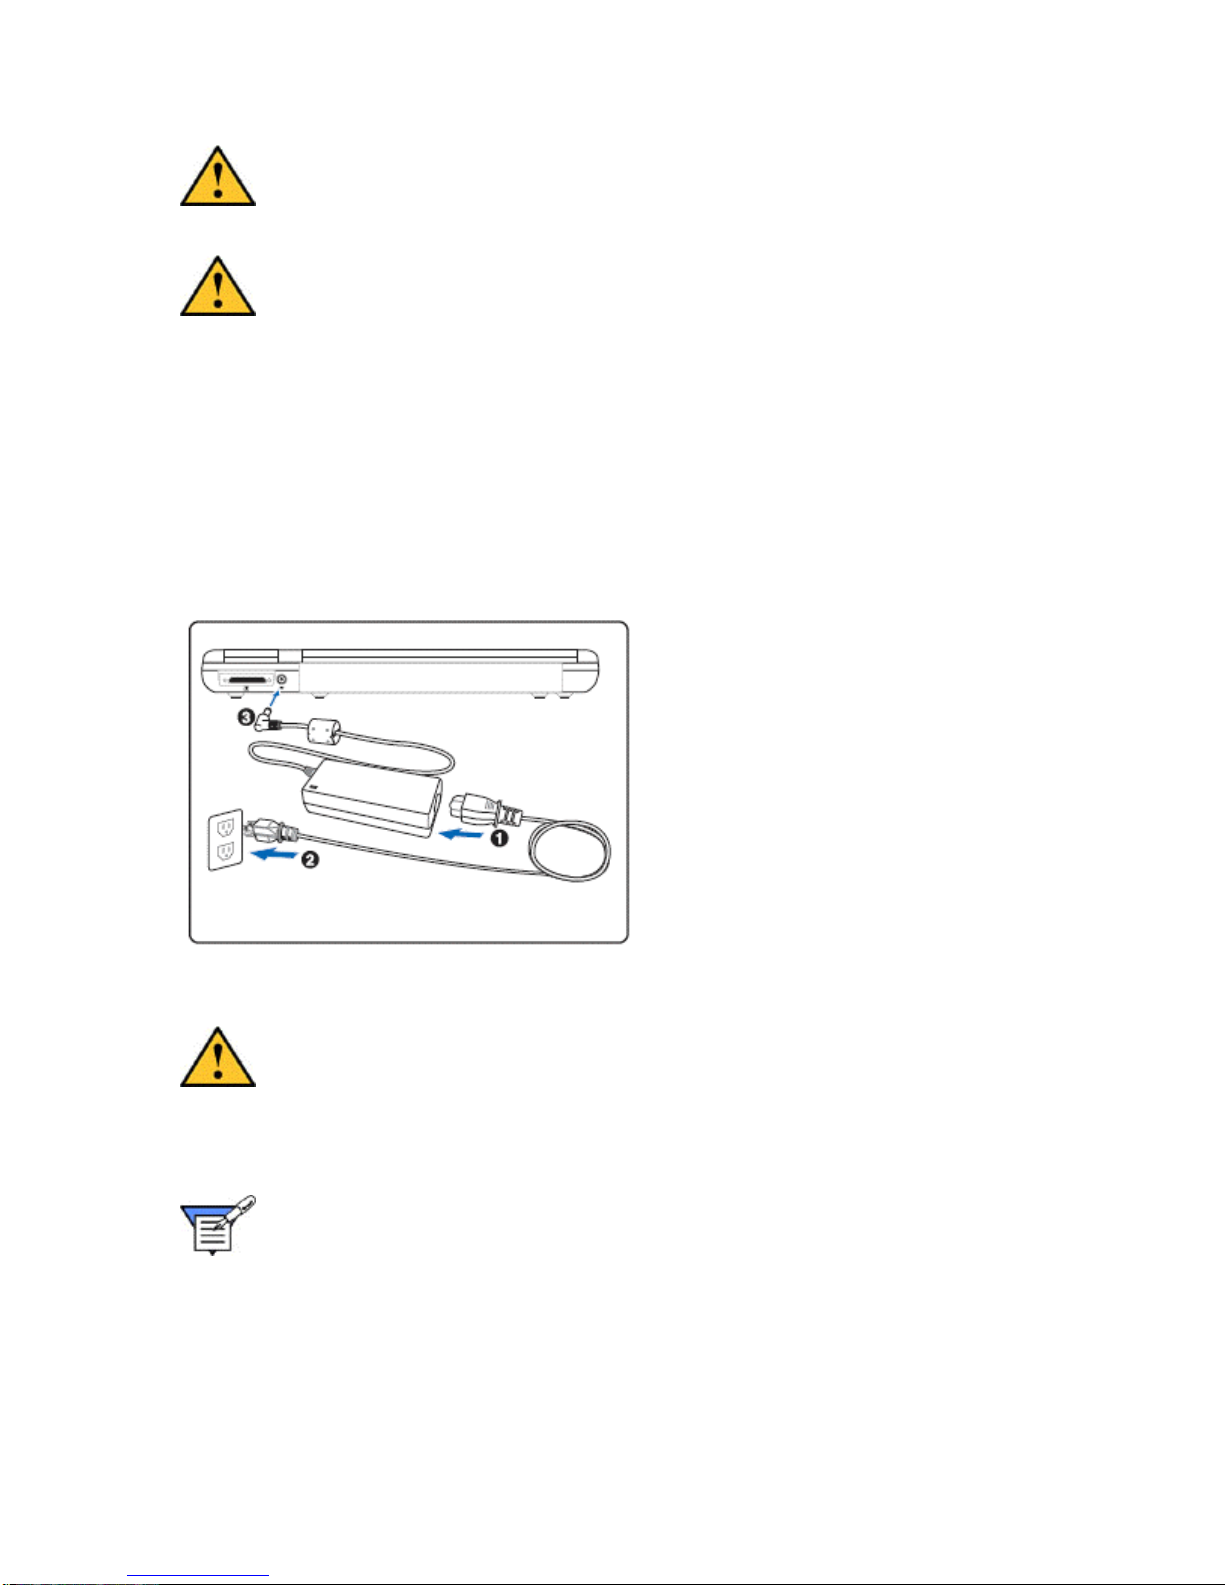
To attach the power cord:
1. Make sure the notebook is turned off.
2. Connect the power cord to the AC adapter (1) and then to an electrical outlet (2).
3. Plug the DC cord of the AC adapter into the power connector on the rear of the notebook
(3).
Attaching the AC Adapter
When the AC adapter is connected, power is being supplied from the electrical outlet to the AC
adapter and into your DCM2200i. Now, you are ready to turn on the notebook.
Caution: When you disconnect the AC adapter, disconnect from the
electrical outlet first and then from the DCM2200i. A reverse procedure may
damage the AC adapter or the notebook.
When unplugging the connector, always hold the plug head. Never pull on
the cord.
Note: When the AC adapter is connected, it also charges the battery pack. For
information on using battery power, see Power Management.
The battery starts charging as soon as you plug the power cord into an electrical outlet. The
battery charges faster if the notebook is turned off during charging.
If the battery is fully depleted and the notebook is turned off, the battery charges in about 4-6
hours. If the notebook is turned on, the battery charges in about 6-10 hours. When the battery is
charging, the battery charge light is orange.
15
DCM2200i
See Power Management for more information on using your notebook's battery.
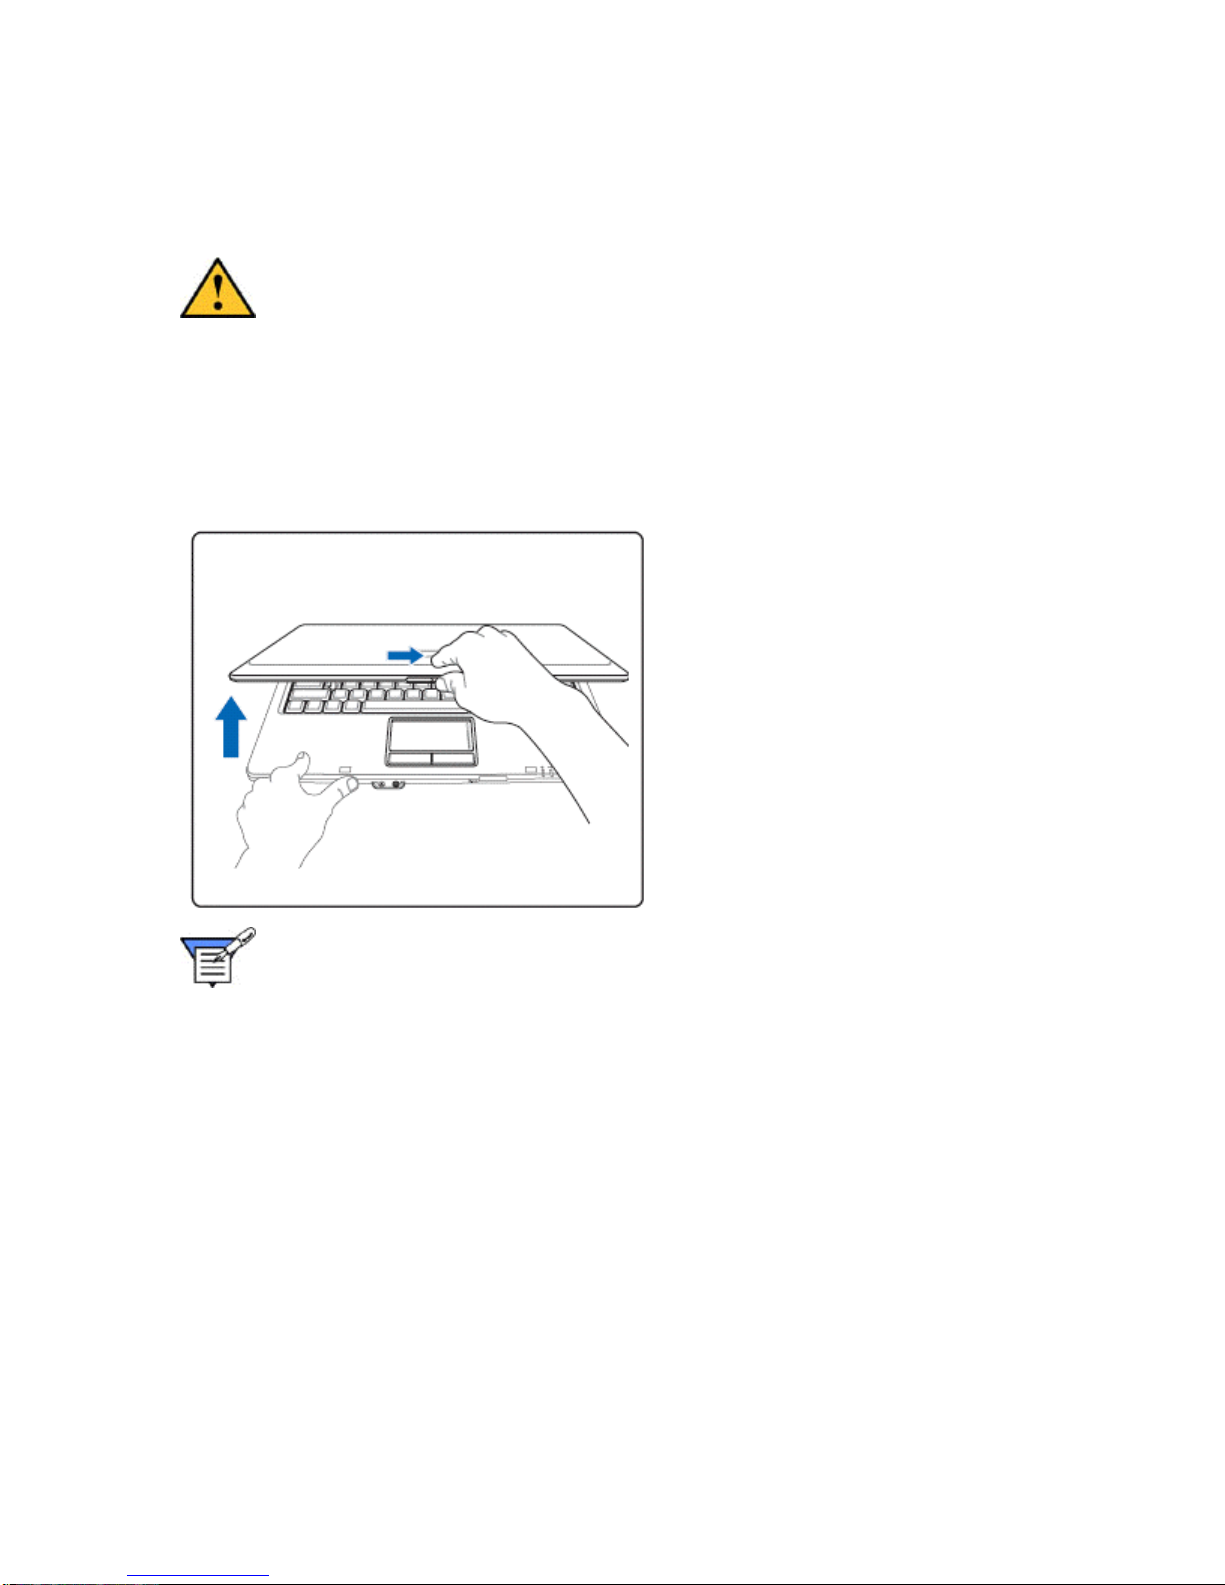
Opening the Cover
Caution: Be gentle when opening and closing the cover. Opening it
vigorously or slamming it shut could damage the notebook.
To open the top cover:
1. Slide the LCD latch right and lift up the lid.
2. Tilt the lid to a comfortable viewing position.
Opening the Cover
Note: This notebook comes with a screen cleaning cloth. When turning off the
notebook, place the cloth over the keyboard and close the cover.
Closing the Display Panel
1. Holding the edge of your display panel, pull it forward until it is flush with the body of your
notebook.
2. Push down until you hear a click. This will engage the locking mechanism and prevent
your display panel from opening unexpectedly.
16
DCM2200i
Turning On and Off
Caution: To avoid damage to the system's components caused by electrical
surges, plug your system into a surge protector. During an electrical storm,
unplug both the surge protector from the power outlet and the telephone
line from the phone jack.
Turning On
The power button is used to turn on your notebook from its off state. Once you have connected
your AC adapter or charged the internal Lithium Ion battery, you can power on your notebook.
Note: When you turn on your notebook be sure you have a power source. This
means that either the battery is installed and charged, or that the AC adapter is
connected with AC power.
Caution: Do not carry your notebook around with the power on or subject it
to shocks or vibration, as you risk damaging your notebook.
When you power on your notebook, it will perform a Power On Self Test (POST) to check the
internal parts and configuration for correct functionality. If a fault is found, your notebook will emit
an audio warning and/or an error m ess age will be dis p l a yed.
After satisfactory completion of the Power On Self Test (POST), your notebook will load your
operating system.
Note: An operating system is the platform for all your software application
programs to run on. Your DCM2200i is shipped from the factory with Windows®
XP.
Note: The first time you start your notebook you will see the operating system
registration screens. Follow the online instructions. You must complete this
process to use your notebook. A tutorial is provided.
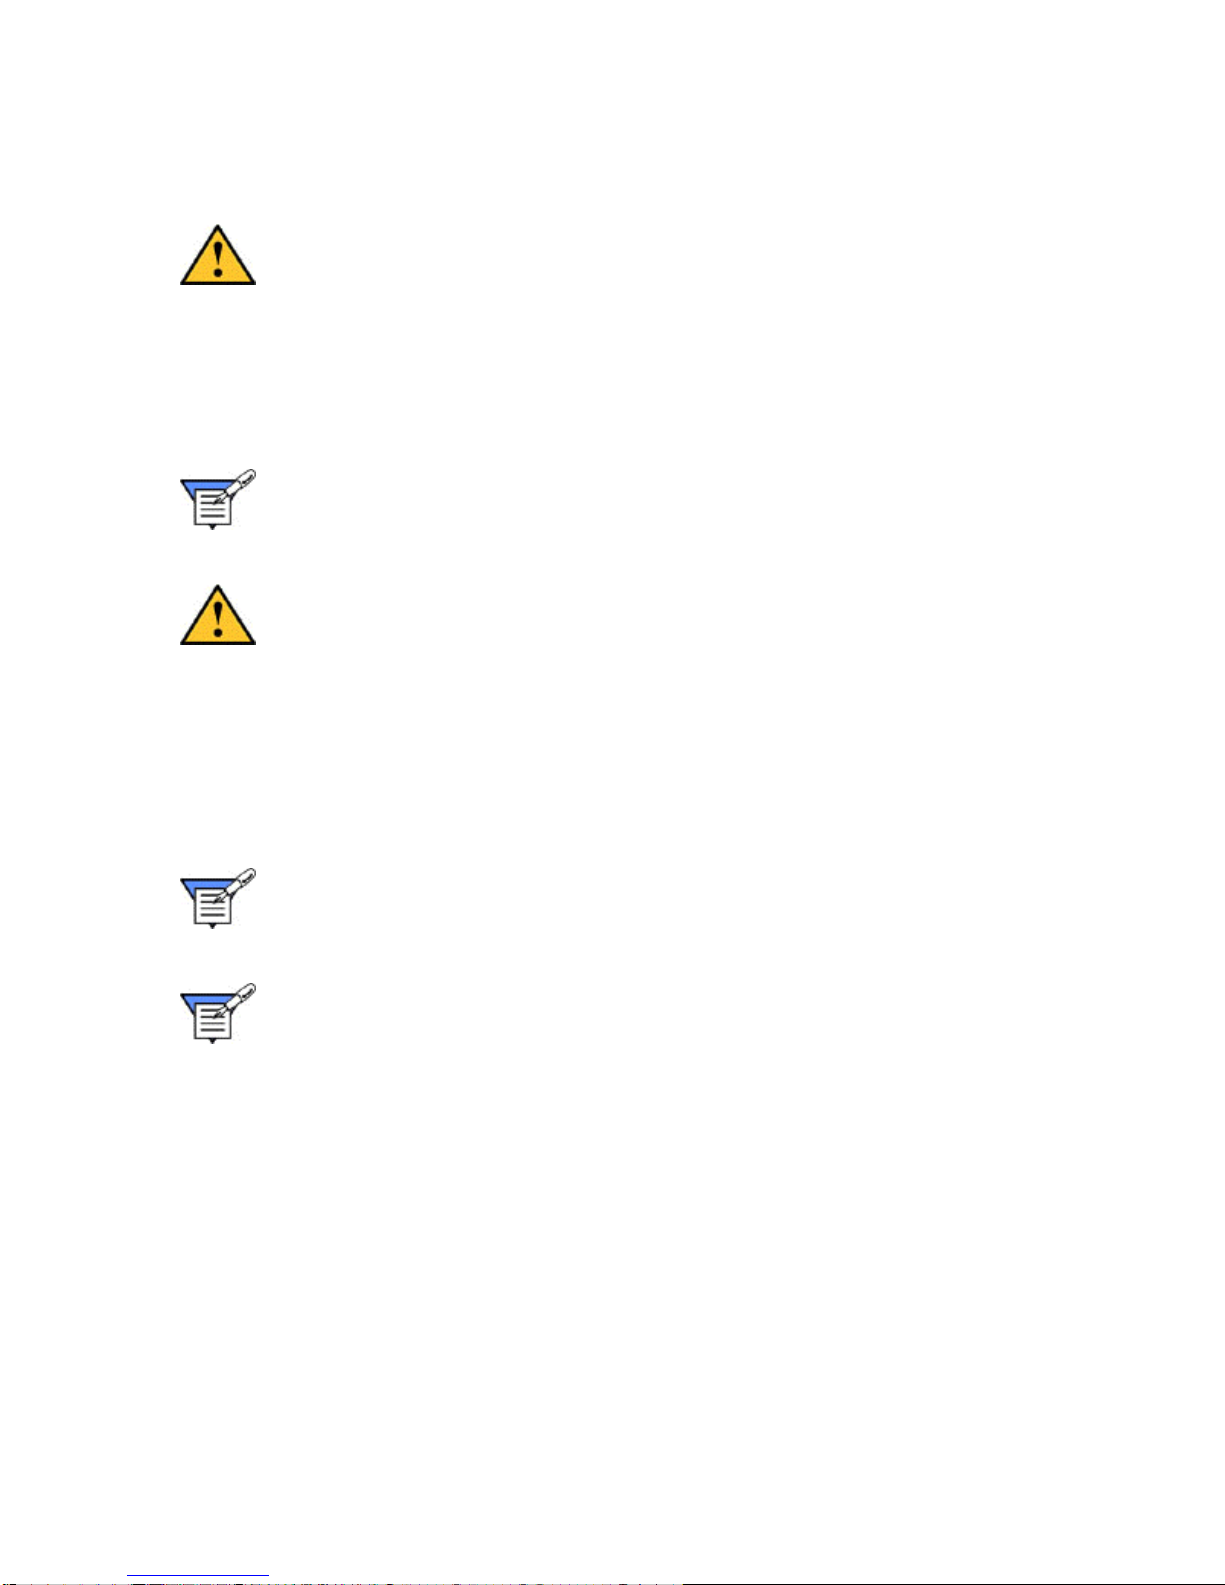
1. Make sure the notebook is connected to AC power.
2. Press the power button.
17
DCM2200i
Turning on the Notebook
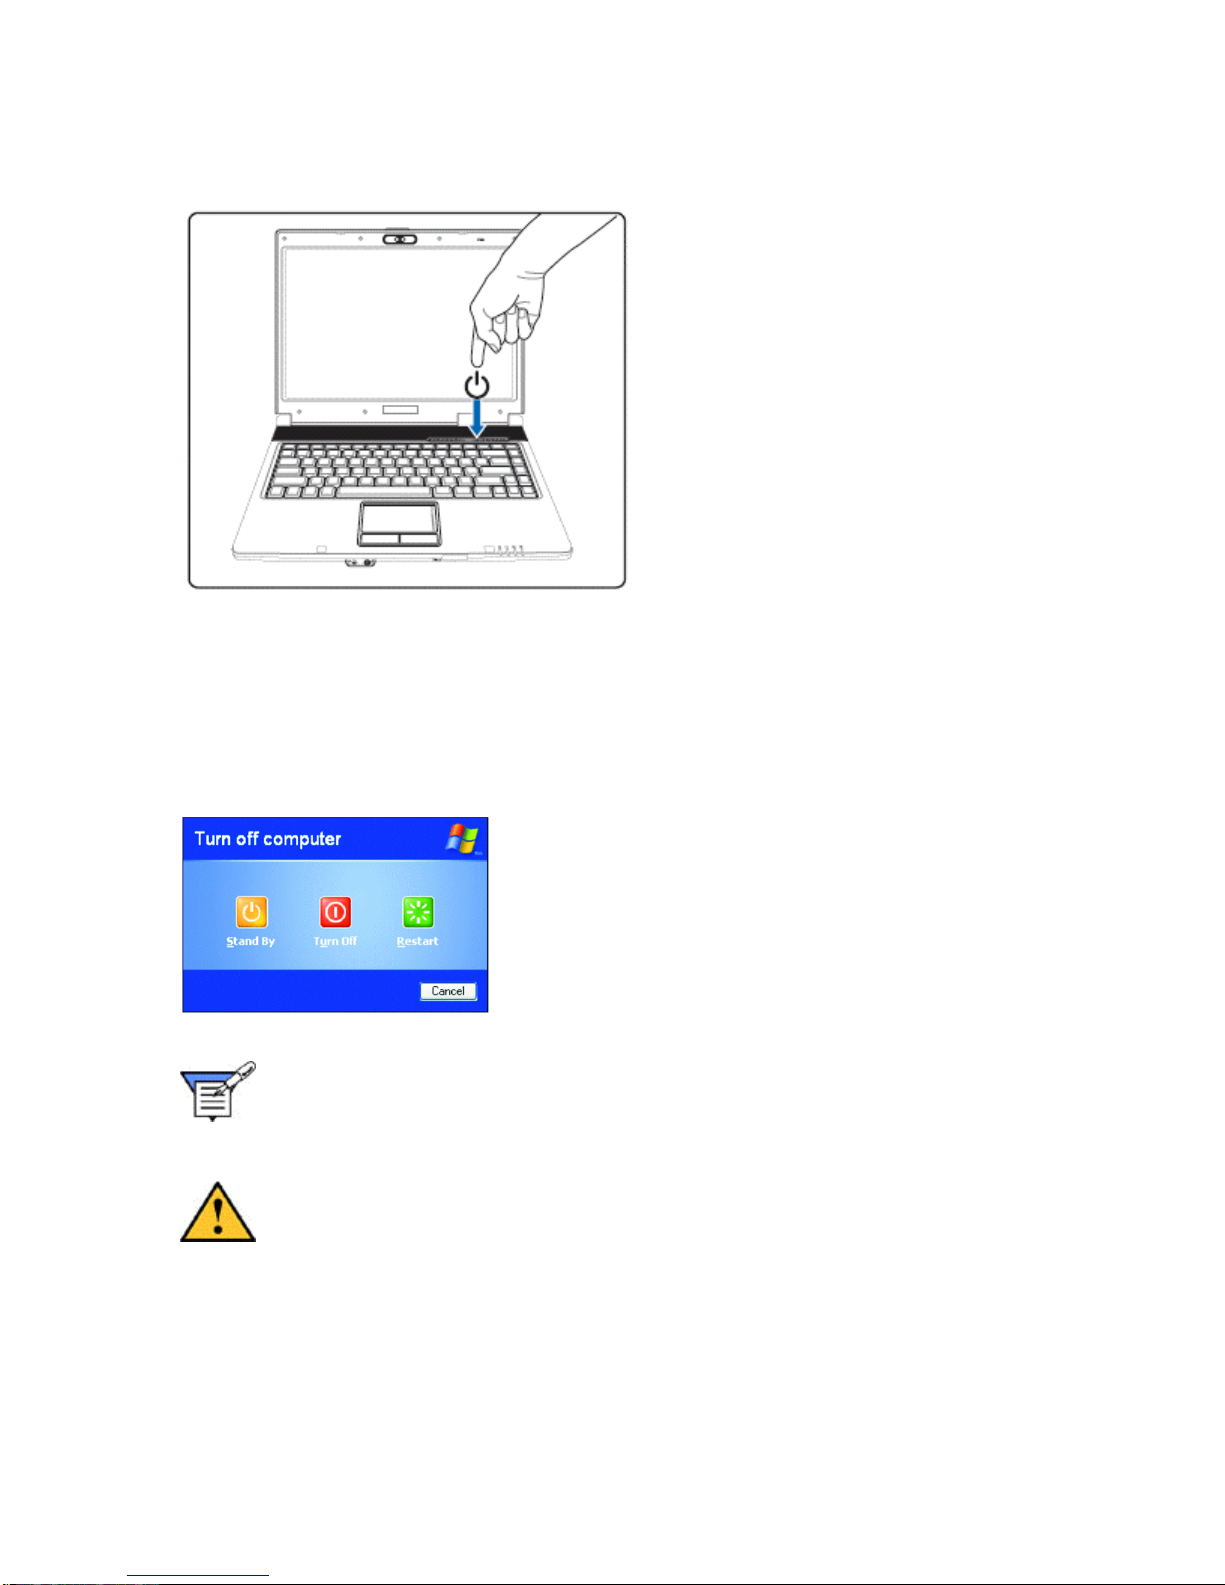
Turning Off
Prior to shutting down your notebook, ensure all of your data and current work are saved.
To turn off the notebook:
1. Click the Start button on the taskbar.
2. Select Shut Down to display the Shut Down Windows screen.
Note: If you need to restart your notebook after software (re)installation or
because it is not responding, select the Restart option.
3. Click Shut Down to complete the shutdown sequence.
Caution: If you need to turn the notebook on again immediately after turning
it off, wait at least five seconds. This will give the hard disk drive and optical
drives a chance to spin down. Turning the power off and on rapidly can
damage the notebook.
18

DCM2200i
Standby or Hibernation Mode
When you finish a working session, you can power down the DCM2200i by turning off the
notebook or placing the notebook in Standby or Hibernation Mode.
Standby, unlike Hibernation Mode, does not store unsaved information on your hard disk;
unsaved information is stored only in the notebook memory. If there is an interruption in power,
the information is lost. Before putting your notebook in Standby Mode, you should save your files.
Standby/Hibernation Mode Actions
To stop in this mode... Do this... To start up or resume
again...
Off
Standby
Hibernation
If you choose to stop in Standby or Hibernation Mode, you can return to where you left off the
next time you start up the notebook. See Power Management for more information.
Follow the operating
system's shutdown
procedure.
If the system is locked up
because of hardware or
software problems, press
the power button to turn off
the notebook.
Depending on your
Windows settings, you can
put the notebook in Standby
Mode by:
closing the display
cover
pressing [Fn+F1]
pressing the power
button
Depending on your
Windows settings, you can
put the notebook in
Hibernation Mode by:
closing the display
cover
pressing [Fn+F1]
pressing the power
button
Press the power button.
Press any key or the power
button.
Press the power button.
19

DCM2200i
Notebook Features
Your DCM2200i is a lightweight portable notebook that includes features to meet your computing
needs at home or on the road.
The following sections in this chapter will help you locate and identify the connectors and
components on your notebook .
Note: The appearance, location, and existence of the components mentioned may
vary by model.
• Performance Features
• Front Open View
• Front and Rear Views
• Side Views
• Bottom View
• AC Adapter
• Switches and Status Indicators
Performance Features
• Display: 14.1-inch WXGA TFT LCD 1280x800
• Processor: Intel® Centrino, Intel® Core Solo or Duo processors. Supports single and
dual core
• Processor Packaging: Micro FCPGA
• Chipset: Intel® 945GM
• System Bus: 667MHz front side bus
• Memory: Two SO-DIMM sockets supporting 533MHz or 667MHz DDR2 SDRAM
expandable to 2GB
• Expansion Slots: One MiniCard for wireless option
• Graphics: Integrated Intel® Media Accelerator 950 Graphics
• System Bays: 1 optical bay, 1 battery bay, 1 hard drive bay
• Fixed Optical Bay Options: DVD/CDRW Combo or DVDRW Dual Drive
• Additional Features: 4-in-1 Media Card Reader (supports MMC, SD, MS and MS-Pro)
• Hard Disk Drive: User Rem ovable 40, 60, 80, 100 or 120G B
• Audio: SoundMax Digital HD Audio
• Communications: Integrated 56Kbps V.92 fax/modem & 10/100/1000 NIC with built-in
RJ-45 jack and RJ-11 jacks. Integrated Bluetooth. Internal antenna for 802.11a/b/g
wireless option. Wireless on/ off indicator switch on system
• Keyboard: 87-key keyboard
• Pointing Device: 2-button touchpad with Touchpad on/of f button
• Built-in I/O Ports: 4 USB 2.0, CRT, S-Video, IEEE1394, Microphone-in, Audio-out,
SPDIF, RJ-11, RJ-45, internal Mic and Port Replicator connector
20
 Loading...