

Diplomat DMW1108BL/W Owner's Use And Care Manual
Owner’s Use and Care Guide
Guide de soin d'utiliser-et
Guía a utilizar y a cuidar
Model - Modèle - Modelo
DMW1108BL/W
23
4
7
CLOCK
R
E
S
E
T
5
8
9
0
6
POWER
TIMER
COOK
COOK BY
WEIGHT
SPEED
DEFROST
DEFROST BY
WEIGHT
1
BAKED POTATO
BEVERAGE
POPCORN
FROZEN DINNER
PIZZA
REHEAT
S
T
A
R
T
S
T
O
P
23
4
7
CLOCK
R
E
S
E
T
5
8
9
0
6
POWER
TIMER
COOK
COOK BY
WEIGHT
SPEED
DEFROST
DEFROST BY
WEIGHT
1
BAKED POTATO
BEVERAGE
POPCORN
FROZEN DINNER
PIZZA
REHEAT
S
T
A
R
T
S
TO
P
Danby Products Limited, Guelph, Ontario Canada, N1H 6Z9
Danby Products Inc., Finlay, Ohio USA, 45839-0669
CAUTION: Read and follow all safety rules and operating instructions before first use of this
product.
PRÉCAUTION: Veuillez lire attentivement les consignes de sécurité et les instructions
d’utilisation avant l’utilisation initiale de ce produit.
PRECAUCIÓN: Lea y observie todas las reglas de seguridad y las instrucciones de operacion
antes de usar este producto por primera vez
DIPLOMAT 1.1cu.ft. Microwave Oven
Owner’s Use and Care Guide .................................1-16
DIPLOMAT 1.1pi’Four à micro-ondes
Guide de soin d'utiliser-et....................................17-32
DIPLOMAT 1.1pies cúbicos Horno microondas
Guía a utilizar y a cuidar ....................................33-48
ver 1. 11. 08 JF

YOU CAN CHANGE THE POPCORN SETTING TO “REMEMBER” A DIFFERENT
COOK TIME.
You may wish to do this if your favourite size of popcorn is something other than the 3 1/2 oz.
size, or if your 3 1/2 oz. bag does not cook properly. Sizes from the individual 2 oz. size up to
the larger “family size” packages are no available. If you do change the popcorn setting, the
oven will continue to select the new setting each time you touch the POPCORN pad, until you
reset it again.
To reset POPCORN time: Tap POPCORN pad twice. ENTER TIME appears on display. Touch
number pads to enter minutes and seconds. Touch START pad. This new cook time will remain
whenever you use the POPCORN pad, until you reset it.
VOUS POUVEZ MODIFIER LE REGLAGE DE MAÏS SOUFFLE POUR QU’IL
“SEPAPPELLE” UNE DUREE DIFFERENTE DE CUISSON.
Vous pouvez choisir de le fiare si le format de votre marqure préférée de maïs soufflé est
different des formats de 3 1/2oz, ou votre maïs de soufflé des formats de 3 1/2 oz. n’est pas
bien cuisiné). On tourve maintenant des formats allant du format individuel de 2 onces au
grand format “familial”. Si vous modifier le réglage, le four continuer d’utiliser le régalage
modifié chaque fois vous appuyez sur la touche POPCORN, jusqu’a ce que vous fassiez une
nouvelle modification.
Pour modifier la durée de caisson, appuyez deux fois sur la touché POPCORN. Les mots
ENTER TIME s’affichent. Entrez la durée en minutes et secondes á l’aide des toucheds de
chiffres. Appuyez sur la touche START/STOP. Cette nouvelle durée de caisson sera conserve
en mémoire pour l’utilisation de la touche POPCORN jusqu’a ce qu’elle soit modifiée.
PUEDE CAMBIAR LA GRADUACIÓN PARA POPCORN PARA “RECORDERA” UN
TIEMPO DE COCCIÓN DIFFERENT.
Es possible que desee hacer esto si el tamaño de su bolsa de popcorn favorite es diferente al
de 3 1/2onzas. Ahora hay tamaños de bolsas individuales de 2 onzas hasta los mas grandes,
de “tamaño familiar”. Pero, si usted no cambia la graduación cada vez que toque el boton
POPCORN, hasta que lo vuelva a reposicionar.
Para cambiar la graduación del tiempo para POPCORN, toque dos veces botón POPCORN.
En el visualizador aparece mensaje: ENTER TIME (entre el tiempo). Toque los botones
correspondientes en el teclado numérico para entrar minutos y segundos. Toque el boton
START (arrancar). Este nuevo tiempo de cocción se mantendrá cada vez que use el botón
POPCORN, hasta que lo resposicione.

FEDERAL COMMUNICATIONS COMMISSION RADIO
FREQUENCY INTERFERENCE STATEMENT (USA ONLY)
This equipment generates and uses ISM frequency and if not installed and used properly, that is in
strict accordance with the manufacturer’s instructions, may cause interference to radio and television
reception. It has been type-tested and found to comply with limits for an ISM Equipment pursuant to
part 18 of FCC Rules, which are designed to provide reasonable protection against such
interference in a residential installation. However, there is no gaurantee that interference will not
occur in particular installations. If this equipment does cause interference to radio or television
reception, which can be determined by turning the equipment off and on, the user is encouraged to
try to correct the interference by one or more of the following methods:
• Reorient the receiving antenna of radio or television.
• Relocate the microwave oven with respect to the receiver.
• Move the microwave oven away from the receiver.
• Plug the mirowave into a different outlet so that microwave and receiver are on different branch
circuits. The Manufacturer is not responsible for any radio or TV interference caused by
UNAUTHORIZED MODIFICATION to this microwave oven. It is the responsibility of the user to
correct such interference.
COMMISSION FÉDÉRALE DES COMMUNICATIONS ÉNONCÉ À PROPOS
DES INTERFERENCES DE RADIOFRÉQUENCE (É.-U.d’A. SEULEMENT)
Cet équipment produit et utilize de fréquence ISM. Si son installation et utilization n’est pas selon les
instructions du fabricant, l’équipment peut occasionner de l’interférence à la reception des ondes de
radio et de television. L’équipment a ete eprouve et satisfait les limites des equipements ISM
conformément à la section 18 des réglements de la CDC concus afin de foumir de la protection
raissonnable contre toute interference dans les installations résidentielles. Cependant, cette installtion
n’est pas garantie exempt de tout vice d’interferences. Sic et equipement occasionne de l’intérference
à la diffusion d’ondes de radio ou de television, qui peut être constaté en allumant ou éteignant
l’appareil, l’utilisateur est encourage de corriger l’interférence en essayant l’une ou l’autre des
methods suivantes:
• Réorientez l’antenne de reception de radio ou de television.
• Déplacez le four à micro-ondes en rapport au récepteur
• Déplacez le four à micro-ondes à un endroit plus éloigné du récepteur.
• Branchez le four à micro-ondes dans un prise de courant différente pour qu’il soit sur un circuit
different de celui du récepteur. Toutes interference à la radiofréquence ou à la fréquence de la
television occasionnées par la MODIFICATION NON AUTORISÉE à ce four à micro-ondes ne sont
pas la responsabilité du FABRICANT.
L’utilisateur est responsible des corrections de cette interference.
DECLARACION SOBRE INTERFERENCIA DE FRECUENCIAS DE RADIO
COMUNICACIONES DEL COMITÉ FEDERAL DE COMUICACIONES (E.U.A. SOLIMENTE)
Este aparato genera y usa frecuencias ISM y si no se instala y se usa correctamente, es decir,
cumpliendo rigurosamente las instrucciones des fabricante, puede causar interferencia a la recepción
de radio y television. Este aparato ha pasado las pruebas para su tipo y se ha encontrado que
cumplen con los limites para equipos ISM según la sección 18 de las Reglas de la FCC, que se han
diseñado para propricionar una protecición razonable contra tal tipo de interferencia en istalaciones
residenciales. Sin embargo, no se puede garantizar que no ocurran interferencias en ciertas
instalaciones, Si este aparato causa interferencia en la recpcion de radio o television, lo cual se
puedo determiner encendiendo y apagando el aparato, se recomienda qu el usuario trate de corregir
tal interferencia por medio de uno los siguientes métodos:
• Cambiar le dirección de la antenna de recepción de radio o television
• Cabiar la ubicación del homo de microoddas con respecto al receptor.
• Mover el horno de microoddas con respecto al receptor.
Enchufar el horno de microondas en un tomacorriente diferente para que al microondas y el receptor
estén connectados a diferentes circuitos de remificacion. El Fabricanto no se hace responsable de
interferencia alguna de radio o television causadra por MODIFICACIONES NO AUTORIZADAS
efectuandas en este horno de microondes. El usuario tiene la responsabilidad de corregir tales
interference.

TABLE OF CONTENTS
Precautions to Avoid Possible Exposure to
Excessive Microwave Energy ..............................................2
IMPORTANT SAFETY INSTRUCTIONS ......................................2
Grounding Instructions ....................................................3
Utensils Guide ..........................................................4
Microwave Cooking Principles ..............................................4
SPECIFICATIONS .......................................................5
BEFORE YOU CALL FOR SERVICE ..........................................5
Part Names ..............................................................6
Control Panel ............................................................6
Operating INSTRUCTIONS .................................................7
1 SETTING THE CLOCK .............................................7
2 SETTING THE OVEN TIMER ........................................8
3 SETTING THE COOKING TIME & POWER LEVEL .........................8
4 SETTING “SPEED DEFROST” ........................................9
5 SETTING “COOK BY WEIGHT” .......................................10
6 SETTING “DEFROST BY WEIGHT” ....................................11
7 SETTING “SAFETY LOCK” ..........................................12
ABOUT “ONE TOUCH” COOKING ...........................................12
SETTING “POPCORN” ..............................................12
SETTING “BAKED POTATO” .........................................13
SETTING “PIZZA” ..................................................13
SETTING “BEVERAGE” ..............................................13
SETTING “FROZEN DINNER” .........................................14
SETTING “REHEAT” .................................................14
CLEANING AND CARE ..................................................15
WARRANTY ..........................................................16
INTRODUCTION
Thank you for purchasing a Danby Microwave Oven. This Owner’s Use and Care Guide will provide you
with valuable information necessary for the proper care and maintenance of your new appliance. If properly
maintained, your Danby appliance will give you many years of trouble free operation. Please take a few
moments and read the instructions thoroughly and familiarize yourself with all of the operational aspects of
this appliance.
For easy reference, may we suggest that you attach a copy of your sales slip/receipt to this page, along
with the following information which is found on the manufacturers nameplate, located on the rear panel of
the unit.
Model Number:
Serial Number:
Date of Purchase:
Dealer’s Name & Address:
This information will be necessary if your unit requires servicing, and/or for general inquiries. To contact a
Customer Service Representative, call Danby TOLL FREE 1-800-26-DANBY®
KEEP THESE INSTRUCTIONS FOR FUTURE REFERENCE
1

PRECAUTIONS TO AVOID POSSIBLE EXPOSURE TO EXCESSIVE MICROWAVE
ENERGY
a) DO NOT attempt to operatue this oven with the door open since open-door operation can result
in harmful exposure to microwave energy. It is important not to defeat or tamper with the safety interlocks.
b) DO NOT place any object between the oven front face and the door or allow soil or cleaner residue
to accumulate on sealing surfaces.
c) DO NOT operate the oven if it is damaged. It is particularly important that the oven door close
properly and that there is no damage to the:
1) Door (bent)
2) Hinges and latches (broken or loosened)
3) Door seals and sealing surfaces
d) The oven should not be adjusted or repaired by anyone except properly qualified service personnel.
IMPORTANT SAFETY INSTRUCTIONS
1. Read all instructions before using the appliance.
2. Read and follow the specific “precautions to avoid
possible exposure to excessive microwave
energy” above
3. The oven must be placed on a countertop which is
a minimum of 920mm (36inches) from the floor. For
correct operation, the oven must have sufficient air
flow. Allow 7.8” of space above the oven, 4” at back,
and 2” at both sides. Do not cover or block any
openings on the appliance. Do not remove feet.
4. This appliance must be grounded. Connect only to
properly grounded outlet. See “grounding
instructions” on page 3.
5. Some products such as whole eggs, sealed
containers, and closed jars, for example, may
explode and should not be heated in this oven.
6. Use this appliance only for its intended use as
described in this manual. Do not use corrosive
chemicals or vapors in this appliance. This type of
oven is specifically designed to heat, cook, or dry
food. It is not designed for industrial or laboratory
use.
7. As with any appliance, close supervision is
necessary when used by children.
When using electrical appliances, basic safety precautions should be followed, including the following:
WARNING: To reduce the risk of burns, electric shock, fire, injury to persons or exposure to excessive
microwave energy:
8. To reduce the risk of fire in the oven cavity:
a) Do not overcook food. Carefully attend appliance if
paper, plastic, or other combustivle materials are
placed inside the oven to facilitate cooking.
b) Remove wire twist-ties from paper or plastic bags
before placing bags in the oven.
c) If materials inside the oven should ignite, keep
oven door closed, turn oven off, and disconnect the
power cord or shut off power at the fuse or circuit
breaker panel.
d) Do not use the cavity for storage purposes. Do not
leave paper products, cooking utensils, or food in the
cavity when not in use.
9. Microwave heating of beverages can result in
delayed eruptive boiling, therefore care has to be
taken when handling the container.
10. Do not deep fry food in the microwave. It is
difficult to control the fat which could cause a fire
hazard.
11. Pierce foods with heavy skins such as potatoes,
whole squash, apples, and chestnuts before cooking.
12. The contents of feeding bottles and baby food
jars should be stirred/shaken before serving in order
to avoid burns.
13. See door surface cleaning instructions on page
15.
2

GROUNDING INSTRUCTIONS (cont’d)
Power Supply Cord:
1. A short power supply cord is provided to reduce the risk of entanglement or tripping.
2. Longer cord sets or extension cords are available and may be used if care is excerised in their use.
3. If a long cord or extension cord is used:
a) The marked electrical rating of the cord set or extension cord should be at least as great as the
electrical rating of the appliance.
b) The extension cord must be a grounding-type 3-wire cord, and the longer cord should be
arranged so that it will not drape over the counter or table top where it can be pulled on by children or
tripped over unintentionally.
UTENSILS GUIDE
1. The ideal material for a microwave utensil is transparent to microwaves, and should allow energy to
pass through the container and heat the food.
2. Microwaves cannot penetrate metal, so metal utensils or dishes with metallic trim should not be used.
3. Do not use recycled paper products when microwave cooking, as they may contain small metal
fragments which may cause sparks and/or fires.
4. A round dish is preferable to oval or rectangular dishes, because food cooked in corners allows more
exposure to microwaves. Over cooking at corners may occur. The list below is a general guide to help you
select the correct utensils.
Cookware Microwave Cooking
Heat-Resistant Glass Yes
Non Heat-Resistant Glass No
Heat-Resistant Ceramics Yes
Microwave-Safe Plastic dish Yes
Kitchen Paper Yes
Metal Tray No
Metal Rack No
Aluminum Foil & Foil Containers Yes
MICROWAVE COOKING PRINCIPLES
The speed and evenness of microwave cooking is affected by the foods themselves. Microwaves
penetrate foods to a depth of 1.8 to 3.8cm (
3
/4 to 1/2 inches) on all surfaces. The interior of foods greater
than 5cm (2 inches) in diameter heats by conduction. Food with high water, fat, or sugar content
respond quickly to microwave energy.
Quantity: Microwave cooking times are directly related to the amount of food in the oven, because
energy is absorbed by the food itself.
4

MICROWAVE COOKING PRINCIPLES (cont’d)
Size: Small pieces cook faster than large ones.
To speed cooking, cut pieces smaller than 5cm (2
inches), so microwaves can penetrate to the centre from all sides. For even cooking, make all the
pieces the same size.
Shape: Foods irregular in shape, like fish or
chicken breasts, take longer to cook in thicker
parts. To help them cook evenly, place the thickest
parts to the outside of the dish, where they will
receive more energy.
Starting Temperature: Frozen or refrigerated food
takes longer to heat than food at room
temperature.
Moisuture Content: Microwaves are attracted by
moisture. Naturally moist foods microwave better
than dry ones. Add a minimum of liquid to moist
foods, as excess water slows cooking. Prick foods
with skins, like those on potatoes or squash, so
internal steam can escape.
Fat and Bone: Marbling within meat, or a thin, even
layer of fat on a roast, speeds cooking. Large fatty
areas or excess drippings in dish attract energy
away from meat to slow cooking. Center bones do
not affect cooking, but bones on the side of meat
conducts heat to the areas next to it.
Density: The depth to which microwaves penetrate
foods varies depending on their density. Porous
foods, like ground beef or mashed potatoes,
microwave faster than dense ones like steak or
whole potatoes.
SPECIFICATIONS
Power Consumption: 120V-60Hz, 1450W
Output: 1000W
Operation Frequency: 2450MHZ
Outside Dimensions: 12”(H) x 20
11/16”
(w) X 17
5/16
”(D) or
305mm(H) x 525mm(W) x 384mm(D)
Oven Cavity Dimensions: 219mm(H) x 305mm(W) x 384mm (D)
Oven Capacity: 1.1 cu.ft.
Cooking Uniformity: Turntable System (12
3/8
” / 314mm)
Net Weight: Approx. 39.4lbs./17.9kg
BEFORE YOU CALL FOR SERVICE
If the oven fails to operate:
A) Check to ensure that the oven is plugged in
securely. If it is not, remove the plug from the
outlet, wait 10 seconds, and plug it in again
securely.
B) Check for a blown circuit fuse or tripped main
circuit breaker. If these seem to be operating
properly, test the outlet with another appliance.
C) Check the ensure that the control panel is
programmed correctly and the timer is set.
D) Check to ensure that the door is securely closed,
engaging the door safety lock system. Otherwise, the
microwave energy will not follow into the oven.
IF NONE OF THE ABOVE RECTIFY THE SITUATION, THEN CONTACT A
QUALIFIED TECHNICIAN. DO NOT TRY TO ADJUST OR REPAIR THE OVEN YOURSELF
5
PART NAMES
1. Door Safety Lock System
2. Oven Window
3. Microwave outlet cover
4. Turntable-Shaft
5. Roller Ring
6. Glass Tray
7. Control Panel
8. Door Release Button
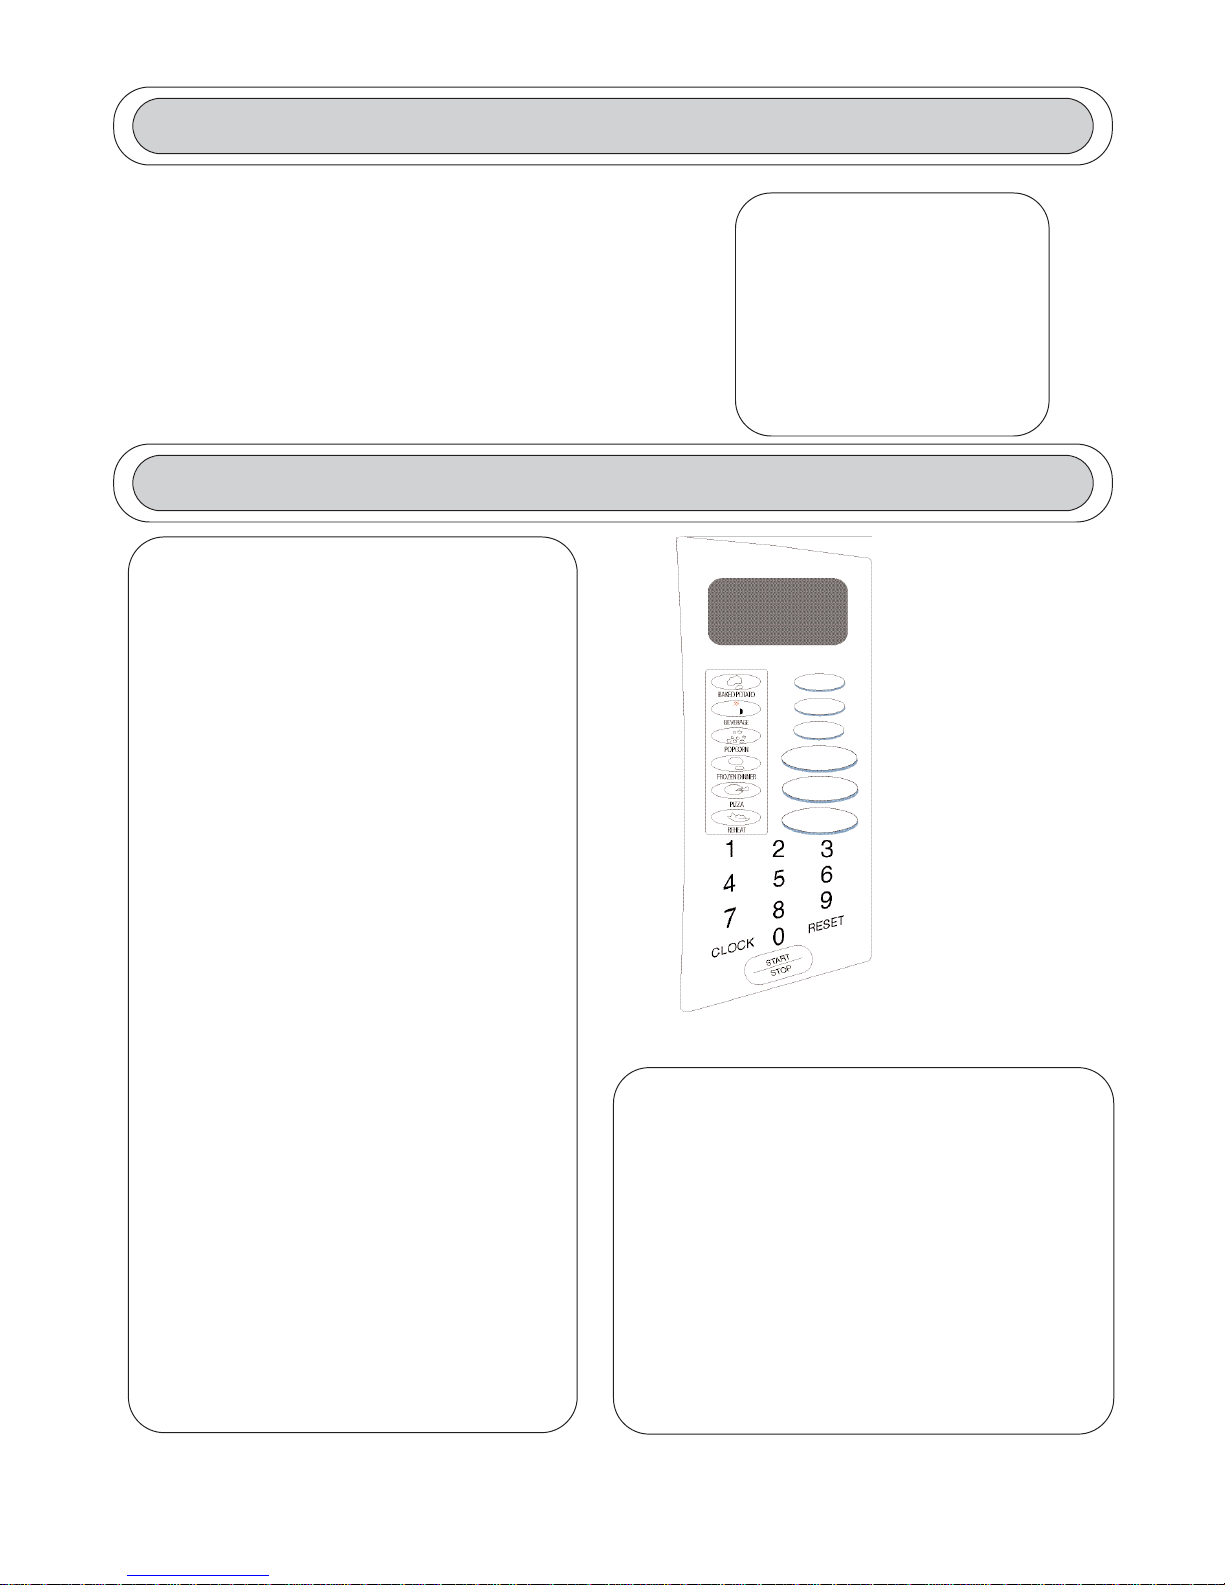
CONTROL PANEL
DISPLAY
When set, displays clock/timer, shows cooking
function (COOK, DEFROST, etc.) and step-bystep word prompts (telling you which pad to
touch) for easy oven setting.
BAKED POTATOES
Automatic program designed for best
microwaving potatoes. For small potatoes (46oz.), touch once, touch AMOUNT (1 to 4) then
touch START. For large potatoes (8-10oz.) tap
pad twice, touch AMOUNT (1 to 4) then START.
POPCORN PAD
Automatic one-step setting for a
1
/2 - 3 oz. bag of
microwave popcorn. Touch POPCORN pad, then
START. See page on “POPCORN” to reset
control for packages of different ounce weight.
PIZZA PAD
Automatic program designed for pizza. Touch
once, then touch START for reheating 1 slice;
tap pad twice, then START for frozen whole
microwave pizza.
BEVERAGE PAD
Automatic setting for cups or mugs of hot
beverages (tea/coffee). For cup size (5-7oz.),
touch pad once, touch AMOUNT (1-4) then
START. For larger mugs (8-11) then START.
REHEAT PAD
Automatically programs oven to heat a plate of
food evenly. Touch REHEAT pad then START.
FROZEN DINNER
Automatic program designed for best reconstituting a
variety of frozen single-serving entrees and
dinners. For smaller single servings (7-9oz.) touch
once, then AMOUNT then START. For a single larger
(TV type) frozen dinner (10-12oz.) tap pad twice then
START.
NUMBER PADS
Touch to set cook, speed defrost, timer and clock.
(Also see following pages for more details.)
6

CONTROL PANEL (cont’d)
POWER PAD
Oven automatically cooks at high power. For a
lower power level, set cook time, touch POWER
and enter number (1-9) for desired power level.
TIMER PAD
Independent kitchen timer. Set any time, even
while oven is operating. Touch TIMER pad, set
time then START. Touch RESET to cancel.
COOK PAD
Cook at one power level for a period of time, then
automatically switch to another power level for the
remaining cook time.
COOK BY WEIGHT
Touch COOK BY WEIGHT pad, enter weight of
meat accurately, then START. After partial cooking,
oven stops, leaving time on display. Turn over meat
when oven stops after partial cooking. Re-touch
START to finish.
DEFROST BY WEIGHT
Automatic defrosting for large meats. Controls power
level to thaw without excessive outside warming.
SPEED DEFROST
Automatically programs lower power levels for even
defrosting. Touch SPEED DEFROST, set time and
START.
CLOCK
Touch pad once, touch number pads and then
CLOCK to set the clock
RESET
Touch to clear display of unused time after cooking,
also cancels the timer.
START/STOP PAD
Touch as final step in setting oven. Touch to stop
microwaving while oven is in operation (re-touch to
continue timing shown on display). Will not stop timer.
OPERATING INSTRUCTIONS
1. SETTING THE CLOCK
A. Setting the clock when the oven is plugged in.
- When the oven is first plugged into a wall outlet,
touch the CLOCK pad once, the display will show
“ENTER CLOCK TIME”.
- Enter the correct time of day by touching the
correct number pads.You must select at least 3
digits (one for hour(s) and two for minutes). For
minute less than 10, precede the minutes digit
with a 0 (ex. 5 minutes past two, set 2:05). The
colon (:) will flash between hour and minute digits.
If you prefer not to have the clock displayed, set
the clock for 00:00 and the display will only show
a colon.
- Touch CLOCK to lock in the time. Colon will stop
flashing and clock will begin to keep current time.
After clock has been set, the word prompt clock
will always show on the display unless oven is in
a cooking operation.
B. Changing the clock time.
- Touch the CLOCK pad once, the display will
show “ENTER CLOCK TIME”.
- Enter the correct time of day by touching the
correct number pads. Remember to set at least 3
digits (one for hour(s), two for minutes), and
precede minutes under 10 with a 0.
- Touch CLOCK to lock in the time. Colon will stop
flasing and begin to keep current time.
C. Notes on setting the clock.
- If you make a mistake in setting the time, start
over by pressing the CLOCK pad twice.
- To recall time of day while you are cooking,
press the CLOCK pad. Time will be displayed for
3 seconds before returning to countdown of
cooking time.
- In case of power failure, when the power is
restored, the control will be in a clock set mode.
Follow directions for setting the clock.
7

OPERATING INSTRUCTIONS
(cont’d)
C. Notes on Setting the Clock (cont’d)
Beeps during oven setting; One Beep:
Oven accepts the entry. Information has been
entered in the correct sequence. Two Beeps:
Oven does not accept the entry. Check and try
again.
2. SETTING THE OVEN TIMER
A. Timer works independent from cooking and
can be set anytime for various kitchen tasks.
Use oven timer though oven is also timing a
microwave cooking function. Set time as
follows:
- Touch the TIMER pad. Word prompts ENTER
TIMER TIME show on the display. If you are
using the TIMER while cooking, Cooking time
countdown will be temporarily replaced on the
display while timer is being set.
- Enter the amount of time you wish to set by
touching the correct number pad from one digit
(ex. 5 for 5 second) to four digits (2400 for 24
minutes). ENTER TIMER remains on the
display.
- Touch START/STOP pad. Word prompt TIMER
starts flashing and timer countdown can be
seen on display for 3 seconds before cooking
tim is returned to display. Word prompt TIMER
is displayed alone with additional word prompt
indicating current cooking mode.
B. Notes on Setting the Oven Timer.
To STOP or RESET TIMER when microwave is
not cooking, touch RESET pad.
- When setting timer DURING a cooking
operation, take care to set timer correctly. Once
the timer is set during cooking, setting cannot
be changed without resetting the cooking
function at the same time. Touching RESET will
not allow you to change timer setting while
cooking.
- When end of time is reached, one long
been can be heard and timer will leave the
display. If oven is not cooking, CLOCK and
time of day (if set) will return to the display. If
oven is in
cooking operation, one long beep can be
heard and TIMER will leave display while
oven continues cooking time countdown.
3. SETTING THE COOKING TIME &
POWER LEVELS
A. Quick & Easy
When cooking at 100% power, simply set
cooking time by touching number pads (ex. 3
minutes, touch 3-0-0) and START. 100%
power is automatically set. For 1-step cooking, you do not have to touch COOK pad
before setting time.
B. To Cook at Lower Power Levels
After setting cook time, touch POWER pad
then single digit representing the power level
desired. Touch START pad. Since oven
automatically assumes 100% power, you
must switch power level (when desired) after
setting cook time.
USE THESE SINGLE DIGITS TO
REPRESENT POWER LEVELS:
Digit % of Power
9 90%
8 80%
7 70%
6 60%
5 50%
4 40%
3 30%
2 20%
1 10%
8
 Loading...