

Diplomat ADEPT DA 370, ADEPT DA 380 Product Information
DIPLOMAT DENTAL s.r.o.
Vrbovská cesta 17
921 01 Piešťany
SLOVENSKO
PRODUCT INFORMATION
DENTAL UNIT
DIPLOMAT ADEPT DA 370
DIPLOMAT ADEPT DA 380

INSTRUCTIONS FOR USE DA 370, DA 380
CONTENTS
1. ABOUT .................................................................................................................................................................... 3
DA 380 CART ............................................................................................................................................................. 3
2. PRODUCT DESCRIPTION .................................................................................................................................. 4
3. TECHNICAL DATA ............................................................................................................................................... 4
4. GENERAL DESCRIPTION AND DIMENSIONS OF DA 370 DENTAL UNIT .............................................. 5
GENERAL DESCRIPTION AND DIMENSIONS OF DA 380 DENTAL UNIT .................................................. 6
GENERAL DESCRIPTION AND DIMENSIONS OF DA 380 CART .................................................................. 7
4.1 Unit plate ............................................................................................................................. 8
5. PRE-INSTALLATION REQUIREMENTS .......................................................................................................... 8
5.1 Environmental conditions .................................................................................................. 8
5.2 Utilities ................................................................ ................................................................ 8
5.3 Floor surface ....................................................................................................................... 9
5.4 Environment ..................................................................................................................... 10
6. ASSEMBLY AND INSTALLATION .................................................................................................................. 10
7 .PUTTING THE UNIT INTO OPERATION ........................................................................................................ 10
8. OPERATING THE UNIT ..................................................................................................................................... 12
8.1Control panel and instrumentation .................................................................................. 12
8.1.1 Symbol description ............................................................................................................................................. 12
8.1.2 Control panel brake button ................................................................................................................................ 19
8.1.3. Setting the Tray – table ..................................................................................................................................... 20
8.1.4 Operating individual instruments ....................................................................................................................... 20
8.3 Spittoon block .................................................................................................................. 38
8.3.1 Assistant’s Instrumentation ................................................................................................................................ 40
8.3.2 Assistant’s panel with Touch Screen .................................................................................................................. 41
8.3.3 Assistant’s instrumentation ................................................................................................................................ 43
8.5 Dental light ........................................................................................................................ 45
8.6 Hygiene ............................................................................................................................. 47
8.7 Headrest manual adjustment ........................................................................................... 47
8.8 Rightside armrest manual adjustment ............................................................................ 47
8.9 Before leaving your workplace ........................................................................................ 48
9. PRODUCT MAINTENANCE .............................................................................................................................. 49
10. CLEANING, DISINFECTION AND DECONTAMINATION ......................................................................... 50
10.1 Disinfecting the internal handpiece tubings ................................................................. 50
10.2 Cleaning and deconaminating aspiration and waste system ................................ ...... 50
10.4 Cleaning and disinfecting and other parts of the unit ................................................. 52
12. REPAIR SERVICE ............................................................................................................................................ 53
13. CONTENTS OF THE PACKAGE ................................................................................................................... 53
14. WARRANTY ....................................................................................................................................................... 54
ASSEMBLY PLANS ................................................................................................................................................ 54
gb_da370-da380_2014_06 2/55
INSTRUCTIONS FOR USE DA 370, DA 380
1. ABOUT
These Instructions for Use are intended to provide you with a necessary information about
DIPLOMAT ADEPT DA 370 and DA 380 dental units. Please, familiarize yourself with
information provided in this handout before operating the unit. It is expected, that dental unit
will be used by a specialist, familiar with the following instructions for use as well as with the
instructions for any other products and applications that are being used in conjunction with a
unit. To ensure proper operation and peak performance, installations and/or adjustments
should be done by authorized technicians or (licensed) service personnel only. The utility
requirements as well as the installation requirements, specified in DIPLOMAT ADEPT DA
370 and DA 380 Instructions for Use must be observed.
DA 370 DA 380
DA 380 CART
gb_da370-da380_2014_06 3/55
INSTRUCTIONS FOR USE DA 370, DA 380
max. 5 rotary handpieces
min. 1 dental syringe
max. 6 handpieces with lighting
1 ultrasonic scaler
max. 5 turbines
1 polymerizing lamp (LED)
max. 5 micromotors (max.5 x DC motor, max.2 x MX motor)
1 polisher
Supply voltage
230V ± 10%
Frequency
50 Hz ± 2 %
Max. power input at 230V/50 Hz
1900 VA + 10%
Input air pressure
0,45 - 0,8 MPa
Input water pressure
0,3 - 0,6 MPa
Total weight
210 kg + max.45 kg depending on model
Type of shock protection
Class I equipment
Degree of shock protection
B type applied parts
Water temperature for the cup
25 - 45 °C (with water heater fitted)
Tray table recommended max. load
1,5 kg
Side table recommended max. load
3 kg
Dental Chair
Chair seat lifting range
332 ÷ 805 mm 15 mm
Back rest inclination angle (from vertical position)
13°÷ 97 ° 2°
Chair seat inclination angle (from horizontal position)
3°÷ 21° 2°
Vertical positioning cycle duration
max. 17sec
Backrest positioning cycle duration
max. 18 sec
Chair swing motion cycle duration
max. 8 sec
Patient load (EN ISO 6875)
max. 200 kg
Operating mode
1 : 16 (cycle: e.g. 25s run, 400s rest)
Noise level
max. 54 dB
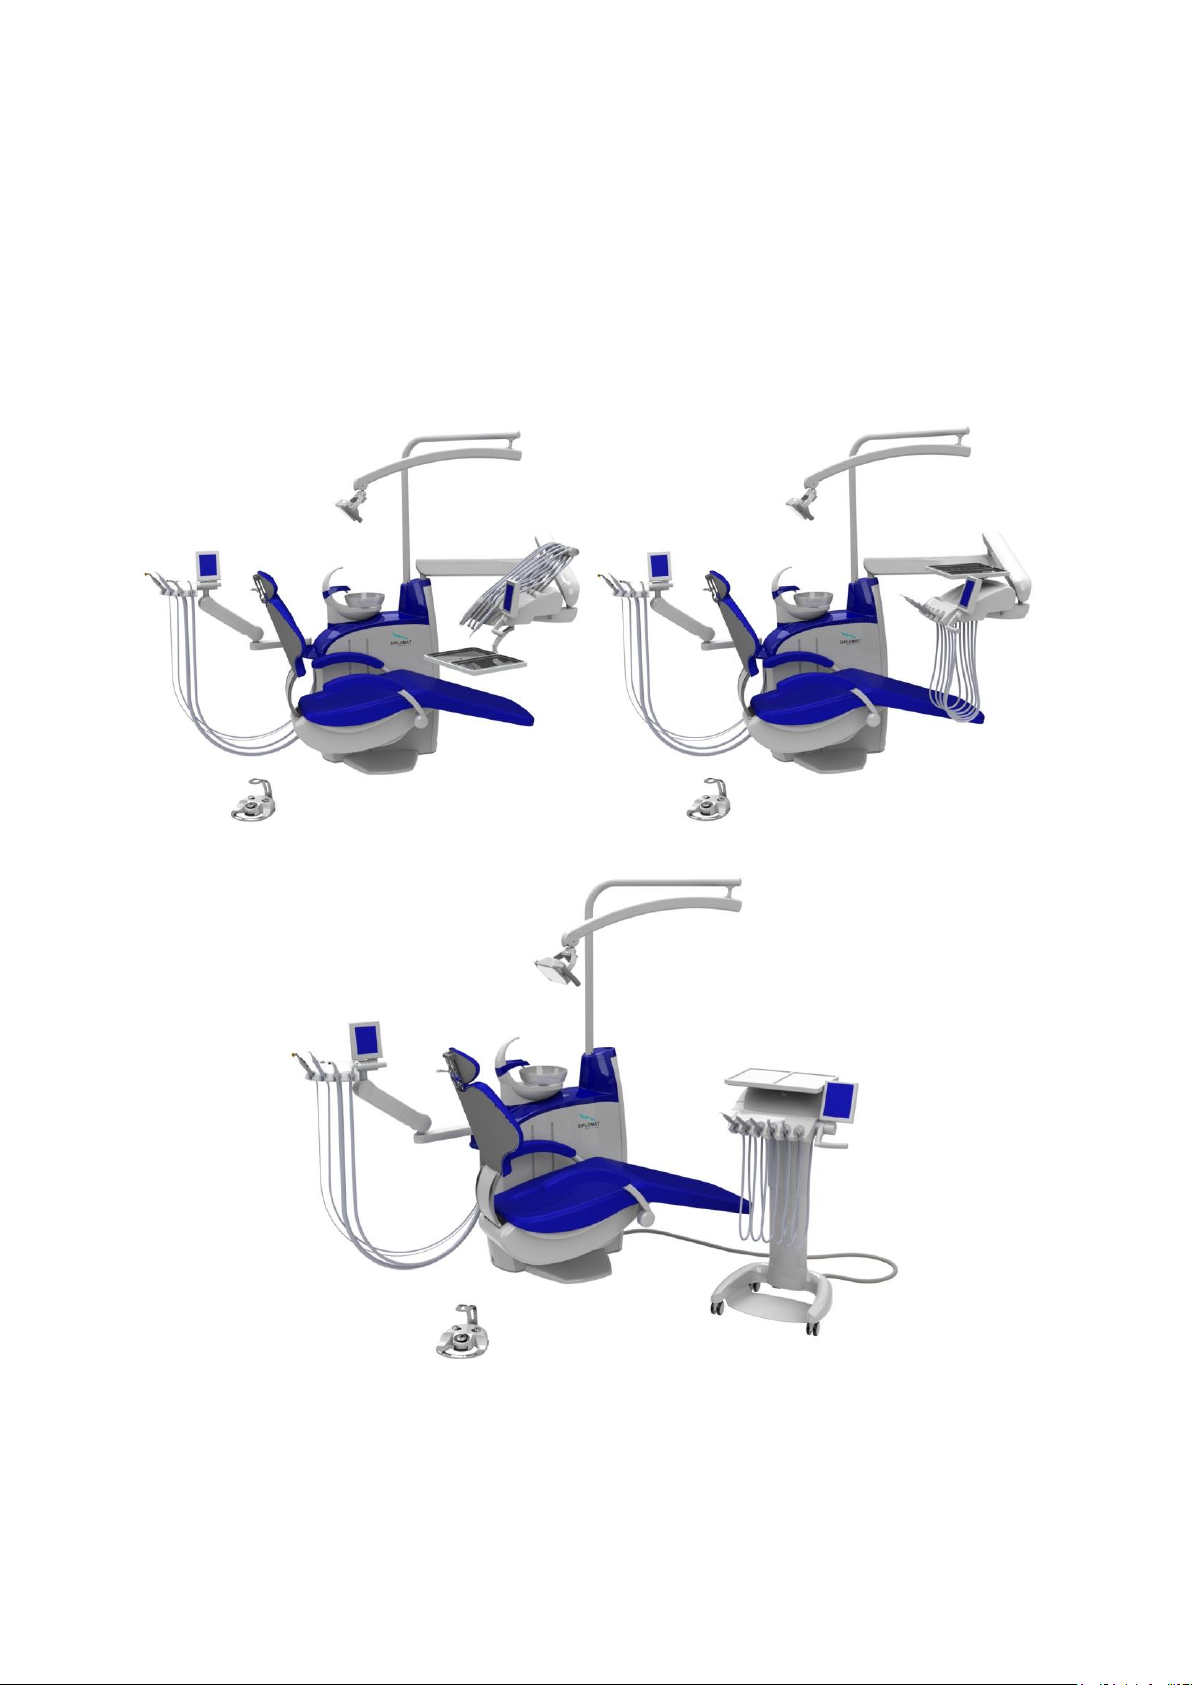
2. PRODUCT DESCRIPTION
Diplomat Adept DA 370 and DA 380 are floor mounted dental units with an integrated
patient’s chair. The DA 370 model has an overhead delivery system and DA 380 model has
bottom-led instrument hoses. Diplomat Adept DA 380 dental unit is also available in a Cart
Version. The control panel with instruments and handpieces and console for dental light are
mounted on the top of a supporting base spittoon block. In a special mobile Cart Version
DA380 features a cart-mounted rear delivery system. Handpieces, except for syringe, saliva
ejector, large and small aspirators, polymerizing lamp and intraoral camera (if equipped) are
controlled with the foot controller. On the all-in-one control panel there is a touch screen with
controlling components and x-ray viewer. The handle enables a smooth repositioning of
control panel. Spittoon block is equipped with assistant's control panel and with large and
small aspirators. The spittoon bowl, rinsing and cup-filling spouts are detachable. Large and
small aspirators' tips are also detachable and are disinfection- and sterilization-friendly. As an
optional furnishing, light console-mounted tray tables as well as the monitors with
pantographic holders are available upon request. Both models of Diplomat Adept dental units
have a dental syringe on a control panel.
Caution
Saliva ejector's tips are for single use only. They can not be used persistently.
The following control panel configurations are available:
Important note
For optional and supplementary equipment see current catalogue.
3. TECHNICAL DATA
gb_da370-da380_2014_06 4/55
INSTRUCTIONS FOR USE DA 370, DA 380
1.Spittoon block with assistant‘s console
2.Control panel
3.Foot controller
4.Control panel’s console
5.Dental light
6.Dental light‘s consloe
7.Dental chair
Caution
To eliminate the risk of electric shock, equipment must be connected to the mains supply
with a reliable connection to protective earth. Operation mode is continuous with intermittent
loading, common to the dental practice. Operating mode ratio for the chair is 1:16, meaning,
e.g. 25 sec. active motor, 400 sec. rest.
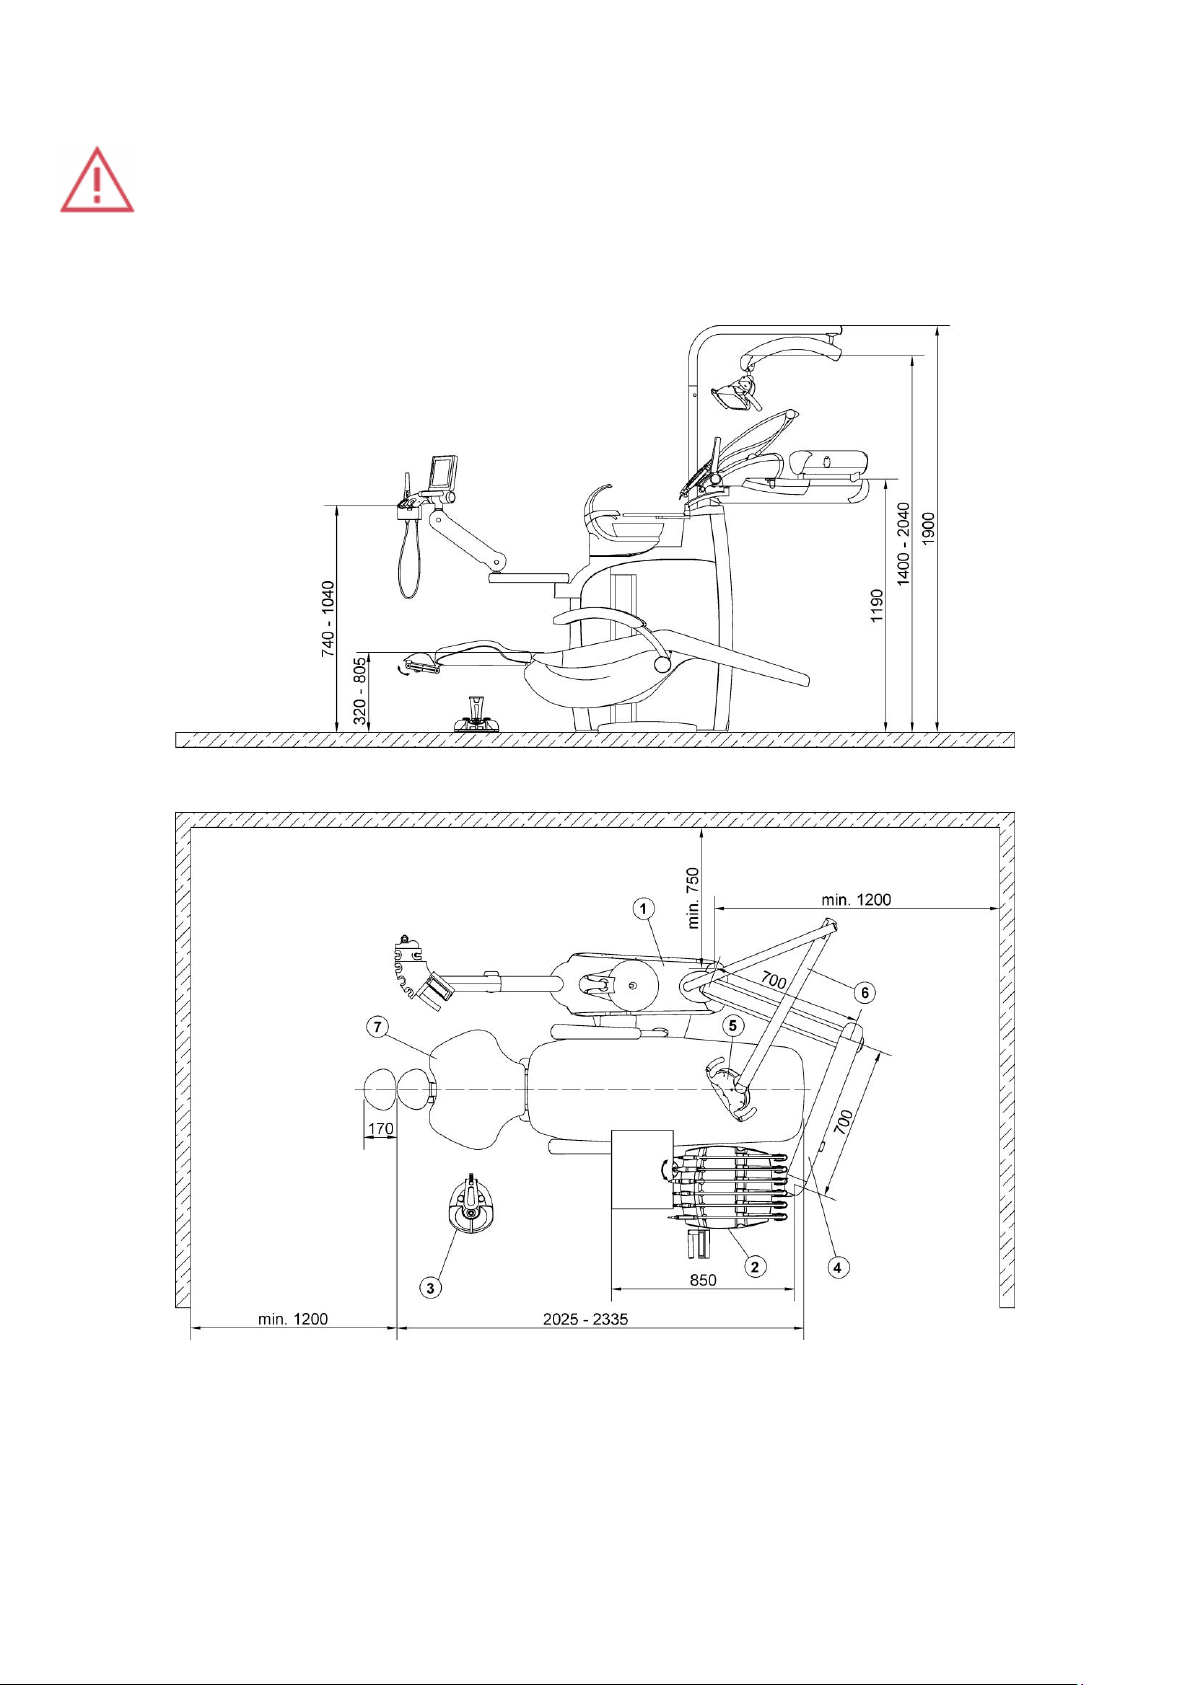
4. GENERAL DESCRIPTION AND DIMENSIONS OF DA 370 DENTAL UNIT
gb_da370-da380_2014_06 5/55

INSTRUCTIONS FOR USE DA 370, DA 380
1.Spittoon block with assistant‘s console
2.Control panel
3.Foot controller
4.Control panel’s console
5.Dental light
6.Dental light‘s console
7.Dental chair
GENERAL DESCRIPTION AND DIMENSIONS OF DA 380 DENTAL UNIT
gb_da370-da380_2014_06 6/55
INSTRUCTIONS FOR USE DA 370, DA 380
1.Spittoon block with assistant‘s console
2.Control panel
3.Foot controller
4.Cart
5.Dental light
6.Dental light‘s console
7.Dental chair
GENERAL DESCRIPTION AND DIMENSIONS OF DA 380 CART
gb_da370-da380_2014_06 7/55
INSTRUCTIONS FOR USE DA 370, DA 380
1 – designation of the unit type
2 – basic electrical parameters
3 – serial number
4 – production date
5 - mode of operation of the chair
0434
4.1 Unit plate
5. PRE-INSTALLATION REQUIREMENTS
5.1 Environmental conditions
Do not install in the premises with a potential explosion hazard!
5.2 Utilities
Water
It is required to use only pure water with input pressure of 0,3 MPa to 0,6 MPa and with
min.4 l/min. flow rate. Water should contain no particles larger than 50 µm or in case of
occurrence of such 50 the µm advance filter should be installed so the clogging will not occur
(especially important for the pipes with small diameter).
gb_da370-da380_2014_06 8/55
INSTRUCTIONS FOR USE DA 370, DA 380
Using water form a central distribution for instrument cooling
The 5 µm advance filter should be installed. If the water contains more than 50 mg of CaO/l
or 36 mg of MgO/l, a water treatment system should be installed at the connection point to
water distribution. It is strongly required as the hard water can cause the breakdown of the
unit. It is also required to install a water treatment system if you are not using distilled water
for instrument cooling. Use Copper or PE supply tubes for waterline extension after the filter.
A certified main shut-off valve must be installed. (Note: shut-off valve is not supplied with a
unit.) It is also required to install backflow prevention device if the unit is connected to the
communal water distribution (not supplied with the unit).
Air
Oil-free, clean and dry air, with a minimum flow of 55 l/min and a pressure of 0,45 to 0,8
MPa must be used. The manufacturer recommends using copper and PE tubings.
Suction system
Static vacuum index must be measured at the spot and must be within the range of
min. 0,005 MPa (50 mbar) to max. 0,02 MPa (200 mbar). If the static vacuum index is higher
than 0,02 MPa, then suction CONTROL valve should be connected to the suction branch in
order to limit the max. vacuum to 0,02 MPa. This regulating valve is not a part of the kit. The
suction unit must produce the flow rate of at least 450l/min. measured at the spot.
Waste
The waste branch must have continuous slope of min. 1% and min. flow rate of 10l/min. and
must have no sharp bends and sections that might cause backflow. Do not use the same
waste branch in conjunction with another dental unit or a basin! It is allowed to use
polypropylene or cured polyethylene tubes.
Caution
All of the pre-installation and installation operations must be performed in accordance with
the applicable standards of the particular country and in coherence with the valid product
documentation, which any of the authorized representatives of Diplomat possess.
Important note
If the installation of amalgam separator is required by the local regulations, then the cuspidor
block without such must be connected to an external amalgam separator.
Amalgam separator should be installed according to the manufacturer's instructions packed
with the product.
Recommended mains fuse rating
Recommended fuse rating for the supply main is 16A. (If using a circuit breaker, use circuit
breaker "C" type). No other equipment should be connected to the supply main! Max.
electrical power input of dental unit is 1900VA. The supply main must conform to prevailing
local codes. If all the conditions fit the pre-installation requirements, the dental unit can be
installed and connected to the utilities.
Recommendation
The manufacturer recommends using an instantaneous residual-current device with 30mA
sensitivity. Only if installation of RCD does not contradict local regulations.
5.3 Floor surface
The floor must have at least 100mm thick concrete foundation. The floor slope should not
exceed 1%. Antistatic floor is recommended.
gb_da370-da380_2014_06 9/55
INSTRUCTIONS FOR USE DA 370, DA 380
Main switch
5.4 Environment
Environment temperature range from +10° C to +40° C
Relative humidity range from 30% to 75 %
Atmospheric pressure range from 700 hPa to 1060 hPa
6. ASSEMBLY AND INSTALLATION
Unpacking the unit and inspecting the delivery
Examine the package for any outside indication of damage. If any damage is found do not
open the package and notify the forwarding agent or the
seller immediately. In case no outside damage is found, carefully open the package and
unpack the individual parts of the dental unit. Check all the parts for damage, quantity, etc.
according to the list provided in chapter 13 of this Instruction for Use and according to the
enclosed check-list.
If the touch sense keyboard is the part of package it should be handled especially carefully
while unpacking.
7 .PUTTING THE UNIT INTO OPERATION
1. Turn on compressor and let it pressurize the system
2. Open central water distribution
3. Turn on suction system (for cuspidor block configuration with large and small aspirators)
4. Turn on the main switch - position I, see picture below
gb_da370-da380_2014_06 10/55
INSTRUCTIONS FOR USE DA 370, DA 380
Warning! Too many
handpieces in use.
DA 370 08:58
The main switch LED lights up and the following data is displayed:
The following indicates that the system is ready to operate. The unit is connected to the
water and air distribution. Three short beeps conform that the unit is ready for work. It is
necessary to wait for approx. 10 minutes until the water is warmed up to the desired
temperature (only if the electrical water heater of the cup filling is installed). Do not take out
any instruments or press keyboard buttons when turning the dental unit on. The foot
controller should be at a zero position.
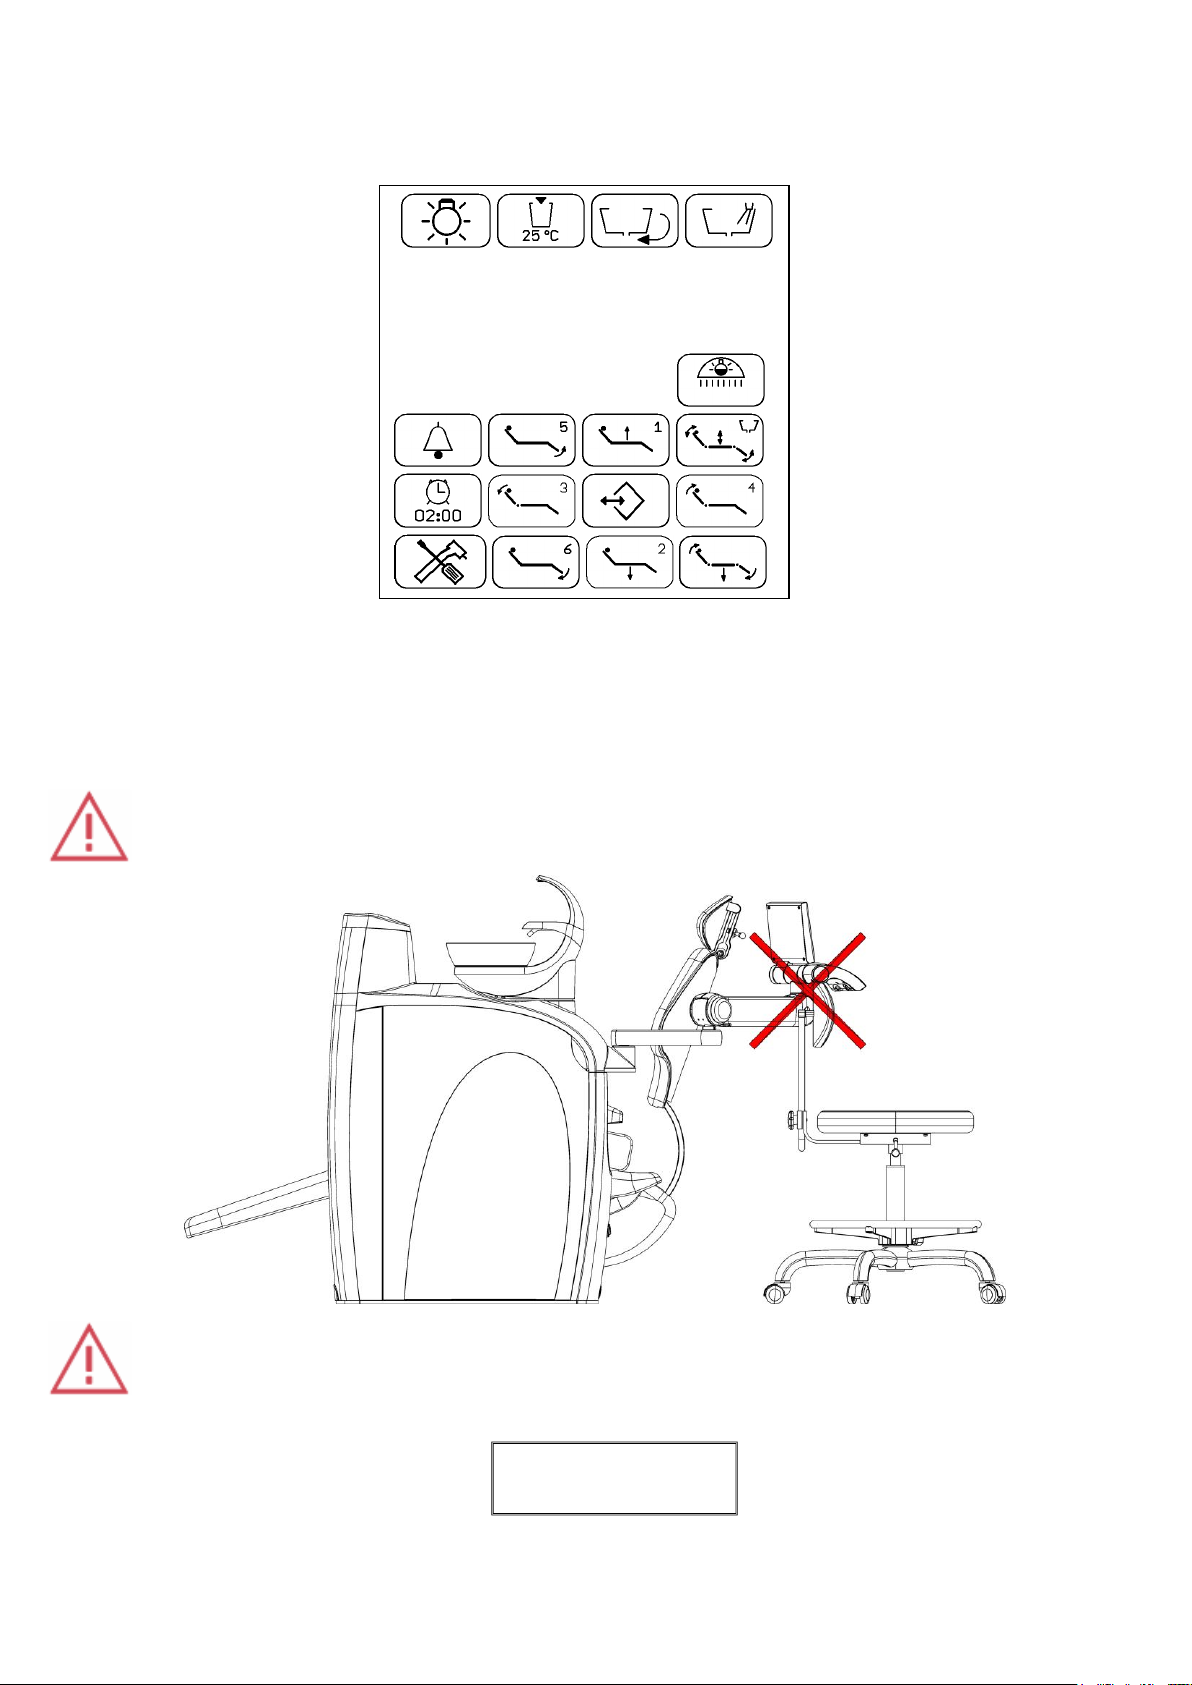
Caution
Assistant's arm and panel should be positioned so that they do not obstruct dental chair or
dentist’s stool motion (see fig.).
Caution
Except for the saliva ejector, large and small aspirators (depending on modification)
polymerizing lamp and syringe (on the control panel and on the assistant‘s panel) only one
instrument can be in use or taken out at a time. If 2 handpieces are active at a time the
following error message will be displayed:
gb_da370-da380_2014_06 11/55
INSTRUCTIONS FOR USE DA 370, DA 380
Magnetic clamp for Xray films
DA 370 08:58
8. OPERATING THE UNIT
8.1Control panel and instrumentation
The touch screen display is readable from any working position.
8.1.1 Symbol description
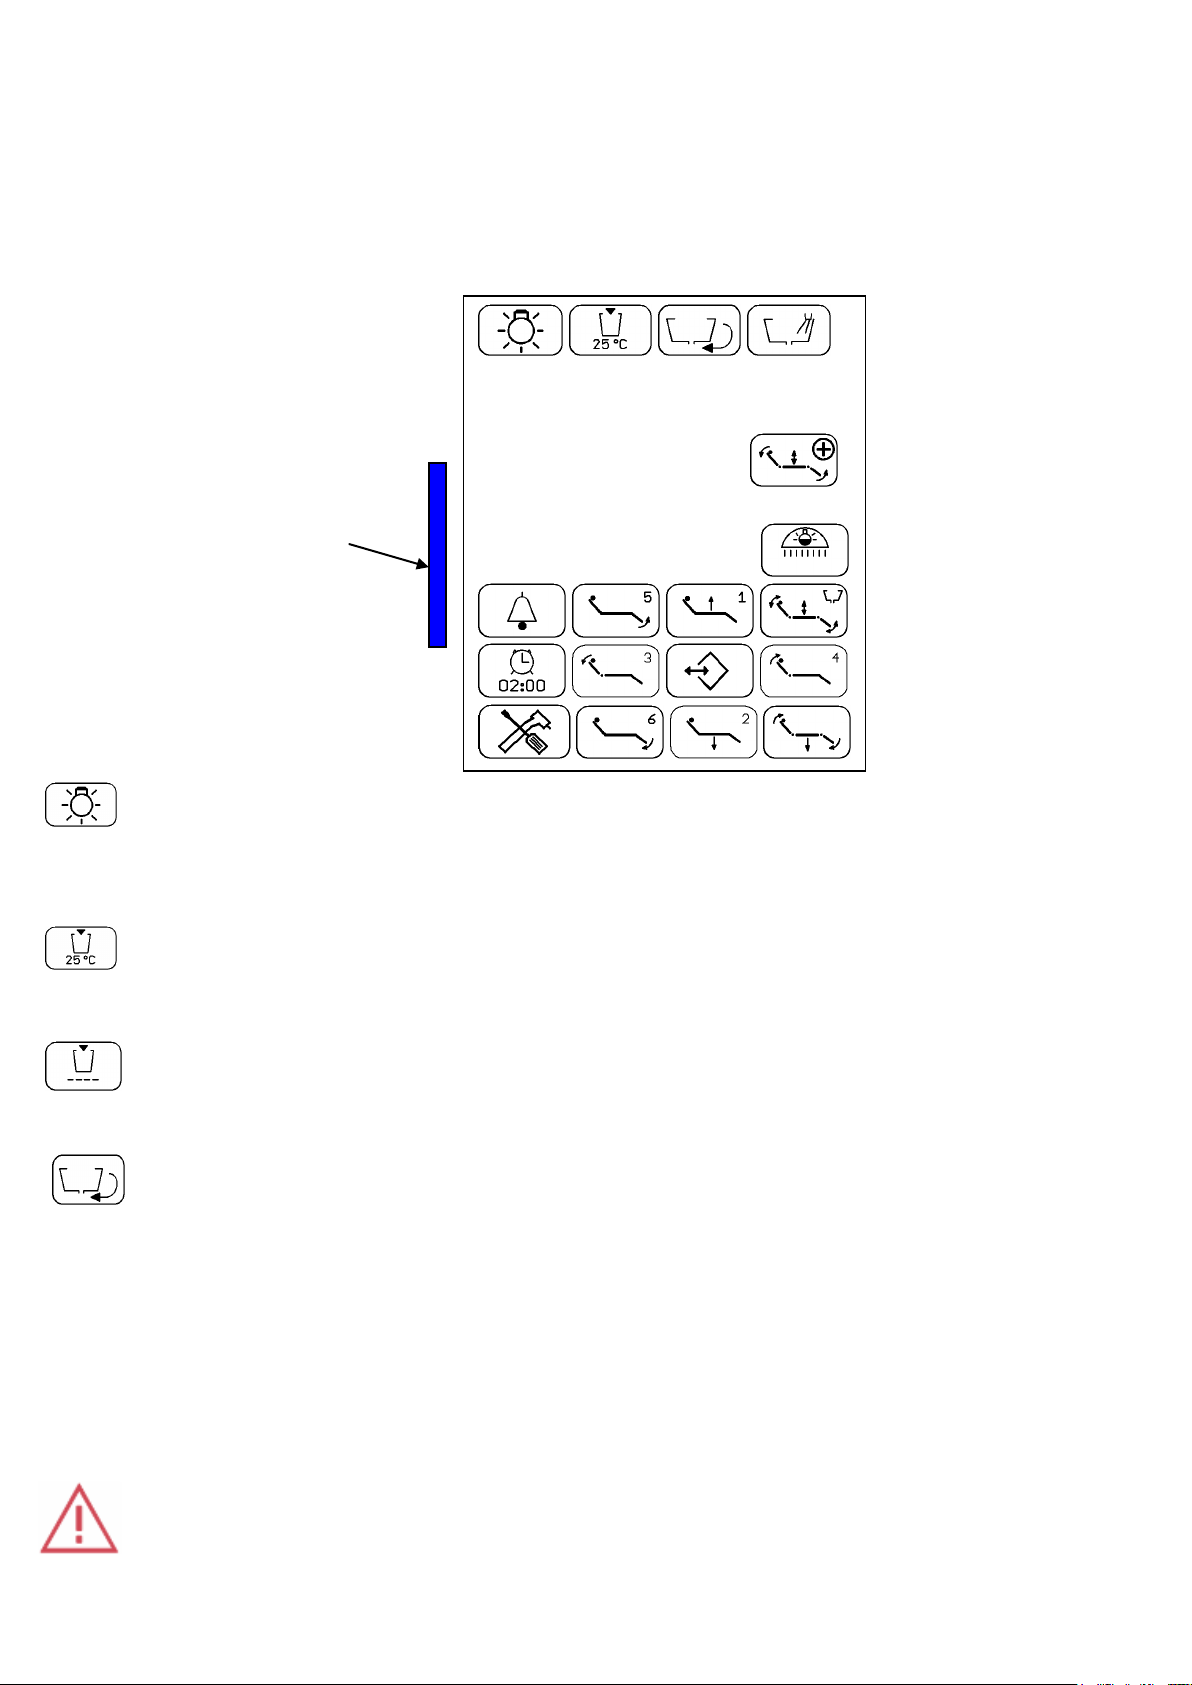
.
Turning the X-Ray viewer On/Off
Use this key to increase display brightness. Clip the x-ray file to the screen with a magnetic
clamp (supplied together with the unit). Press this key again or withdraw a handpiece to
restore previous brightness. You can also turn X-Ray viewer on when a handpiece is not in
the holder.
Cup fill – Water temperature
Press and hold this key for more than 1,5sec. to activate cup filling. Filling cycle duration will
be saved automatically. Use this key to start the cup filling for the preset duration. Press this
key fast to terminate the cup filling cycle without changing preset cycle duation.
Water temperature settings can be found in the SETUP menu. The temperature adjustment
range is from 25°C to 45°C.
If the water heating system is not installed, information on water temperature is not
displayed.
Bowl sviweling – initial position, limiting preset position and programming.
Press and hold this key for more then 1,5 sec. to activate bowl sviweling. Swiveling cycle
duration will be saved automatically. Release the key as the desired bowl position is
reached. Pressing the key activates swiveling of the bowl towards the patient untill the
limiting preset position is reached. For the bowl to return to its home position at the spittoon
block press the button once again. Bowl rinse starts automatically when the bowl is back to
the home position.
Automatic bowl rinse when the bowl reaches “zero position” can be turned off in the Setup
menu. Pressing the button fast during the swivelling cycle will end the cycle without changing
previously set swivel duration.
The bowl swivels untill the limiting (end) position is reached. The arrows on the display
indicate swiveling direction.
Caution
gb_da370-da380_2014_06 12/55
INSTRUCTIONS FOR USE DA 370, DA 380
DA 370 08:58
Do not activate bowl swivelling while the dental chair is in motion!
Bowl rinse
Press and hold this key for more then 1,5 sec. to activate bowl rinse function. Rinsing cycle
duration will be saved automatically. Use this key to start the bowl rinsing cycle for the preset
duration. Press this key fast during the rinsing cycle to terminate the bowl rinsing cycle
without changing preset cycle duation.
Rinsing starts automatically when the bowl is back to the home position.
Main light
Three basic modes of illumination brightness:
Off
Normal mode
Dim mode – suitable for working with dental composites
Press the button to turn the dental light on, press this key subsequently to toggle between
the modes. Press and hold the button to turn the dental light off.
When using the XENOS operating light with the sensor, only the button is displayed
and the light is controlled manually by means of the sensor (see the Instructions for Use of
the XENOS dental operating light), or of the button . Press the button to turn the light
on; press the button again shortly to change over the light illuminance. Then press the button
for longer period (ca 2 seconds) to turn the light off.
Indicating the unit type DA 370 or DA 380.
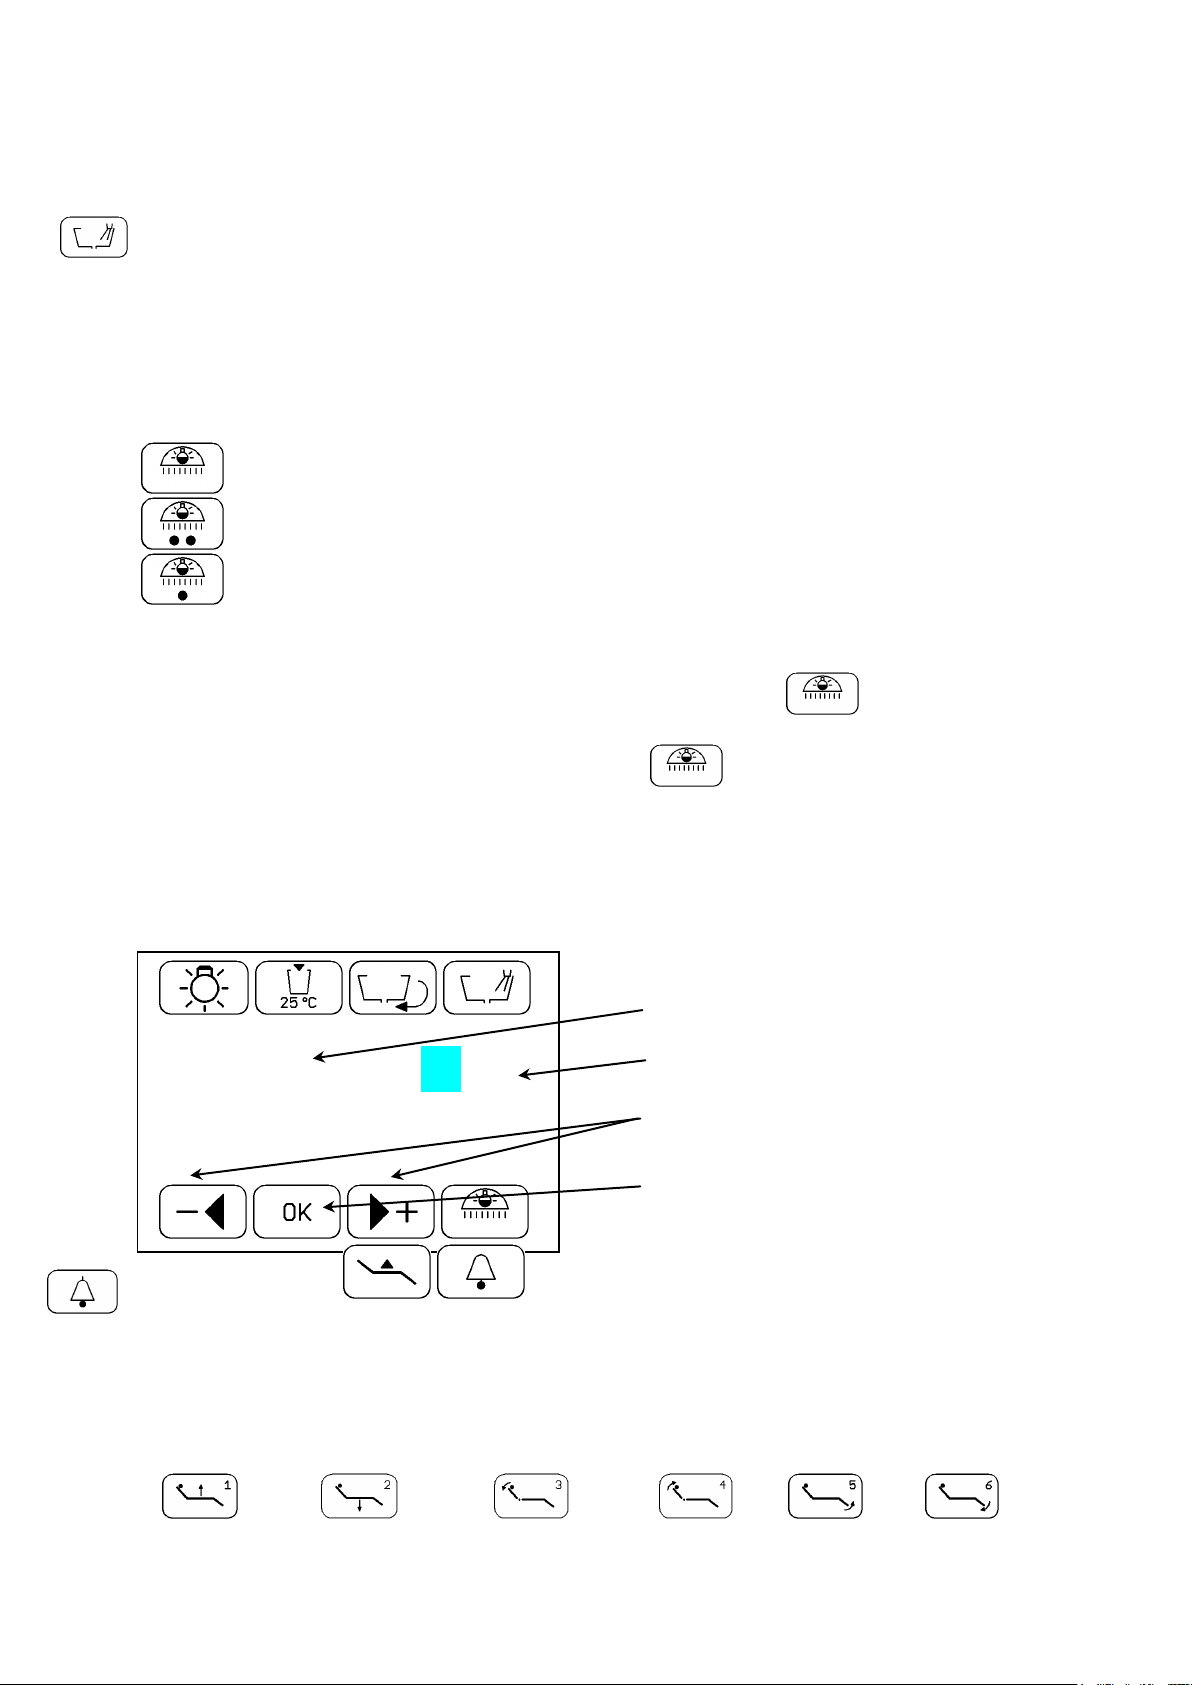
Current time
Unit type
Press to highlight the time icon on the
screen,
then adjust to desired value
and press OK to confirm
Doorbell - press and hold the key to turn the doorbell relay on. (Relay is inbuilt in the
spittoon block).
Chair positioning
Use these keys to adjust the chair position as desired. Adjustment is only possible when
handpieces are in the holders or the foot controller is in the zero position if a handpiece is
withdrawn.
gb_da370-da380_2014_06 13/55
INSTRUCTIONS FOR USE DA 370, DA 380
Chair base up Chair base down Backrest down Backrest up Toeboard up Toeboard
down
Saving customized settings/quick key for preset positions.
Use the program key to save your settings or to recall the preset positions.
Saving customized chair position:
Adjust the chair to the desired position using the controls and press the following keys
subsequently:
+ +one of the keys you wish to customize:
, , , , , .
Press and hold the button (for ca. 3sec) until you hear the sound signal: short-long
beeps. This sound signal indicates that the programming mode is now active and you can
now continue chair programming. Please, follow these instructions to ensure that your new
setting will be saved properly.
As every setting is saved, you will hear one long and two short confirmation beeps.
As the setting was not saved, you will hear three long beeps.
Recalling customized settings:
Press the following keys subsequently:
+ one of the keys for which the desired setting was saved.
The dental light turns on automatically when the chair reaches the desired working position
(when repositioning from the Entry-Exit position).
Entry/Exit position
Use this key to adjust the chair into the Entry/Exit position. The main light will be turned off
and spittoon bowl will return to its home position and rinsed automatically.
The key is active only when handpieces are not in use.
Programming Entry position:
Program the Entry position as instructed above, under „Saving customized chair position“,
i.e. press the following keys subsequently: + + .
Press and hold the button (for ca. 3sec) until you hear the sound signal: short-long beeps.
This sound signal indicates that the programming mode is now active and you can now
continue chair programming. Please, follow these instructions to ensure that your new
settings will be saved properly.
As every setting is saved, you will hear one long and two short confirmation beeps.
As the setting was not saved, you will hear three long beeps.
To recall the Entry position simply press key.
Mouth wash position
Use this key to adjust the chair into the programmed mouth wash position. The key is active
only when handpieces are not in operation.
Programming Mouth wash position:
Program the Mouth wash position as instructed above, under „Saving customized chair
position“,
i.e. press the following keys subsequently: + + .
Press and hold the button (for ca. 3sec) until you hear the sound signal: short-long
gb_da370-da380_2014_06 14/55
INSTRUCTIONS FOR USE DA 370, DA 380
beeps. This sound signal indicates that the programming mode is now active and you can
now continue chair programming. Please, follow these instructions to ensure that your new
settings will be saved properly.
As every setting is saved, you will hear one long and two short confirmation beeps.
As the setting was not saved, you will hear three long beeps.
To avoid the chair collision against the spittoon bowl, the maximum chair’s lifting level
(when in the Mouthwash position) is limited by the factory settings.
To recall the Mouth wash position simply press key .
Press this key again to adjust the chair back into previous working position.
If the chair motion was interrupted during the mouth wash positioning cycle (caused by
accidental handpiece or control key activation, etc.), press again to continue
adjustment cycle. Press key to adjust the chair back into working position. Note: this
adjustment is only possible if the chair has already reached its mouth wash position.
If the chair motion was interrupted during the adjustment back into working position, press
key again to continue adjustment cycle.
Note: As the chair is in the mouth wash position pressing any other key but , will result
in skipping the adjustment into working position.
Press "Mouthwash" button to recall Mouthwash position. The bowl will start swiveling towards
the patient and dental light will be turned off automatically. The bowl moves back into its
home position and the dental turns on automatically when you adjust the chair back into
working position. Auto functions are active only on spittoons with built-in actuator. For the
manually controlled spittoons: if the spittoon bowl is positioned in such a way that it might
obstruct the chair motion the chair motion will be blocked and you will hear the following
acoustic signal: continuous short beeps. You will need to return the bowl into its home
position manually in order to continue the chair repositioning.
Selection of the memory set of the chair
The chair enables two sets of the program positions of the chair to be stored into the
memory. One set consists of six user positions 1 - 6, getting-on position and rinsing position.
To select the desired set, press and hold the button until you hear an audible signal (
ca 3 seconds) and then choose the desired set by means of the button or the
button. The chosen set is indicated at the right top corner of the button with a number
in a circle, i.e. , or .
Anti-shock position (Trendelenburg position)
Press this button to adjust the chair into Anti-shock position. The position's parameters are
pre-set and cannot be changed. The bowl returns into its home position automatically when
the Anti-shock is being recalled (only for spittoons with built-in actuator). For the manually
controlled spittoons: if the spittoon bowl is positioned in such a way that it might obstruct the
chair motion the chair motion will be blocked and you will hear the following acoustic signal:
continuous short beeps. You will need to return the bowl into its home position manually in
order to continue the chair repositioning.
Caution
The programming key is active only within 4 seconds after been pressed, i.e. the
successive key should be pressed within 4 seconds to enable programming. Otherwise, the
gb_da370-da380_2014_06 15/55

INSTRUCTIONS FOR USE DA 370, DA 380
key becomes inactive and should be pressed again.
Before lifting the chair (or adjusting its position when already elevated to the upper
track) make sure, the spittoon bowl is in its home position.
If the bowl is positioned in such a way that it obstructs the chair motion the chair motion will
be blocked automatically and the following error message will be displayed E10-BOWL.
Note, that any chair adjustments that require upward motion are impossible until the spittoon
bowl is at its home position. Blocking is indicated by repeating short beeps. These beeps will
not stop until the bowl is in its home position. Then the chair repositioning will restart. Do not
reposition the bowl during the chair adjustment cycle - it results in chair motion blocking! In
this case blocking is indicated by short – long – short – long – short beeps. If the spittoon
bowl is controlled by engine (motor) then the spittoon bowl rotates away automatically.
Bring the bowl back into its home position and then continue chair adjustment cycle. If any
object passes against the chair while it is travelling, chair's motion will be terminated and
reversed to prevent damage (reverse motion is not activated anytime the backrest collides
against an obstacle). Reverse motion will continue until the safety brake switch is released
from an obstacle or until the chair will travel to its end-position (if the safety brake switch is
not released). This reverse cycle is accompanied by the warning sound - repeating long
beep.
Safety brake secures the chair motion downwards, back rest motion backwards and collision
against the assistant’s panel. In the event of collision against the assistant's panel the error
message !! Chair Collision !! – chair motion is blocked accompanied by the sound signal
- 2 long beeps is displayed. In this case, “Reverse motion” of a dental chair is not activated.
In order to avoid collisions and possible assistant’s panel damage, the manufacturer
recommends positioning the assistant's panel (before repositioning the chair!) in such a way
that it will not obstruct the chair motion.
In case the chair is not maintained properly, an error message will be displayed to inform the
user that a problem occurred.
You may receive either of the following error messages:
E01-EEC RAM error
E02-EEW an error occurred while trying to save your setting into unit’s internal
memory
E03-MOT1 motor1 error
E04-MOT2 motor2 error
E05-MOT3 motor3 error
E06-RNG1 motor1– preset speed limit exceeded
E07-RNG2 motor2– preset speed limit exceeded
E08-RNG3 motor3– preset speed limit exceeded
E09-RNGA autosetup error
E10-BOWL chair repositioning is impossible because of the bowl position
E12-COMM error in serial communication
E13-CON1 cabling error pot1 – fault/disconnection
E14-CON2 cabling error pot2 – fault/disconnection
E15-CON3 cabling error pot3 – fault/disconnection
E16-SSW chair safety brake is squeezed
E17-ASET autoset did not complete correctly
Alarm
Serves as a reminder and has a countdown timer function. Available settings: from 30sec 1min - 2min - 4min to 16min (factory preset is 2mins). Use the key to start countdown. To
gb_da370-da380_2014_06 16/55
INSTRUCTIONS FOR USE DA 370, DA 380
Setup
Prog L Rinse
Prog R Chipbl
Alarm 02:00
Keypad tone 01
Water Cup 37 °C
Language English
Hygiene Dur. 10 m.
Water heating Off
Setup
Light intensity 00
Light intensity setup
disable countdown press the key again.
Foot control battery status
This status bar is shown on the display when using wireless foot controller and displays the
current battery percentage:
- battery is empty
- 33% full
- 66% full
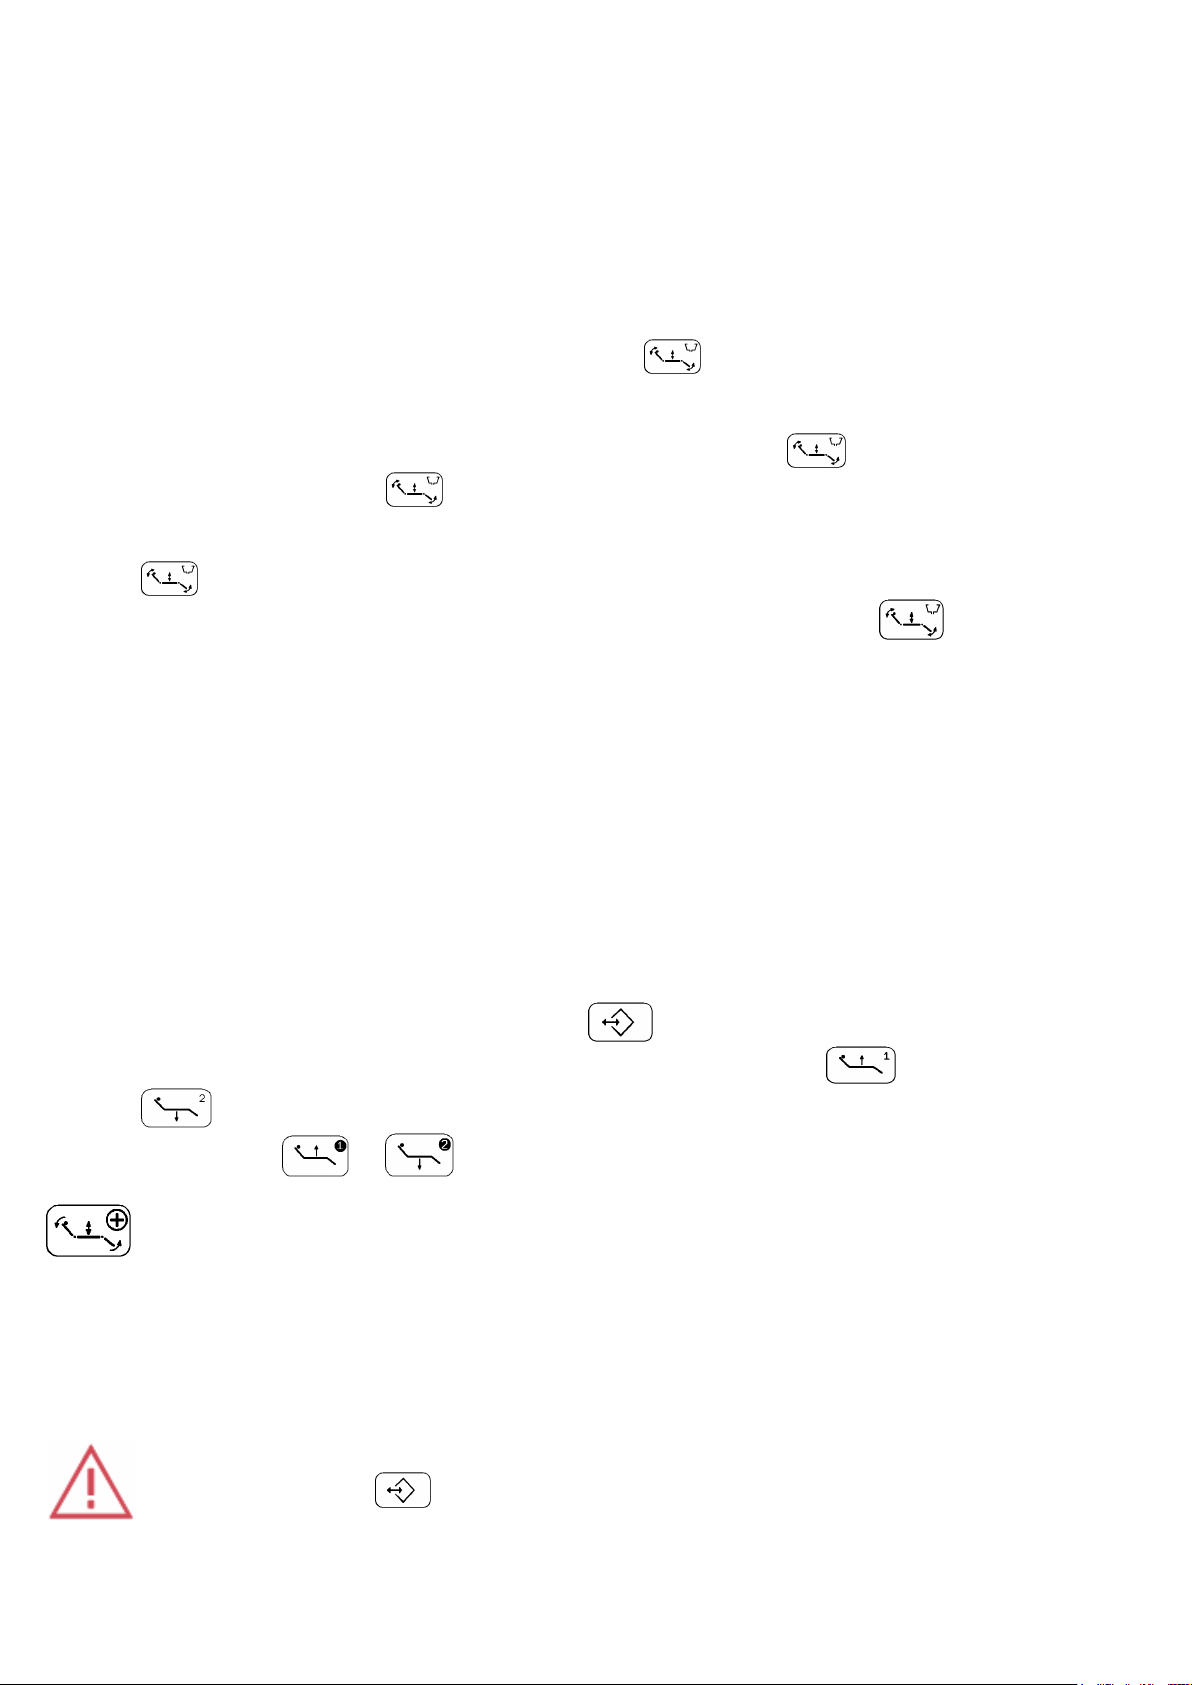
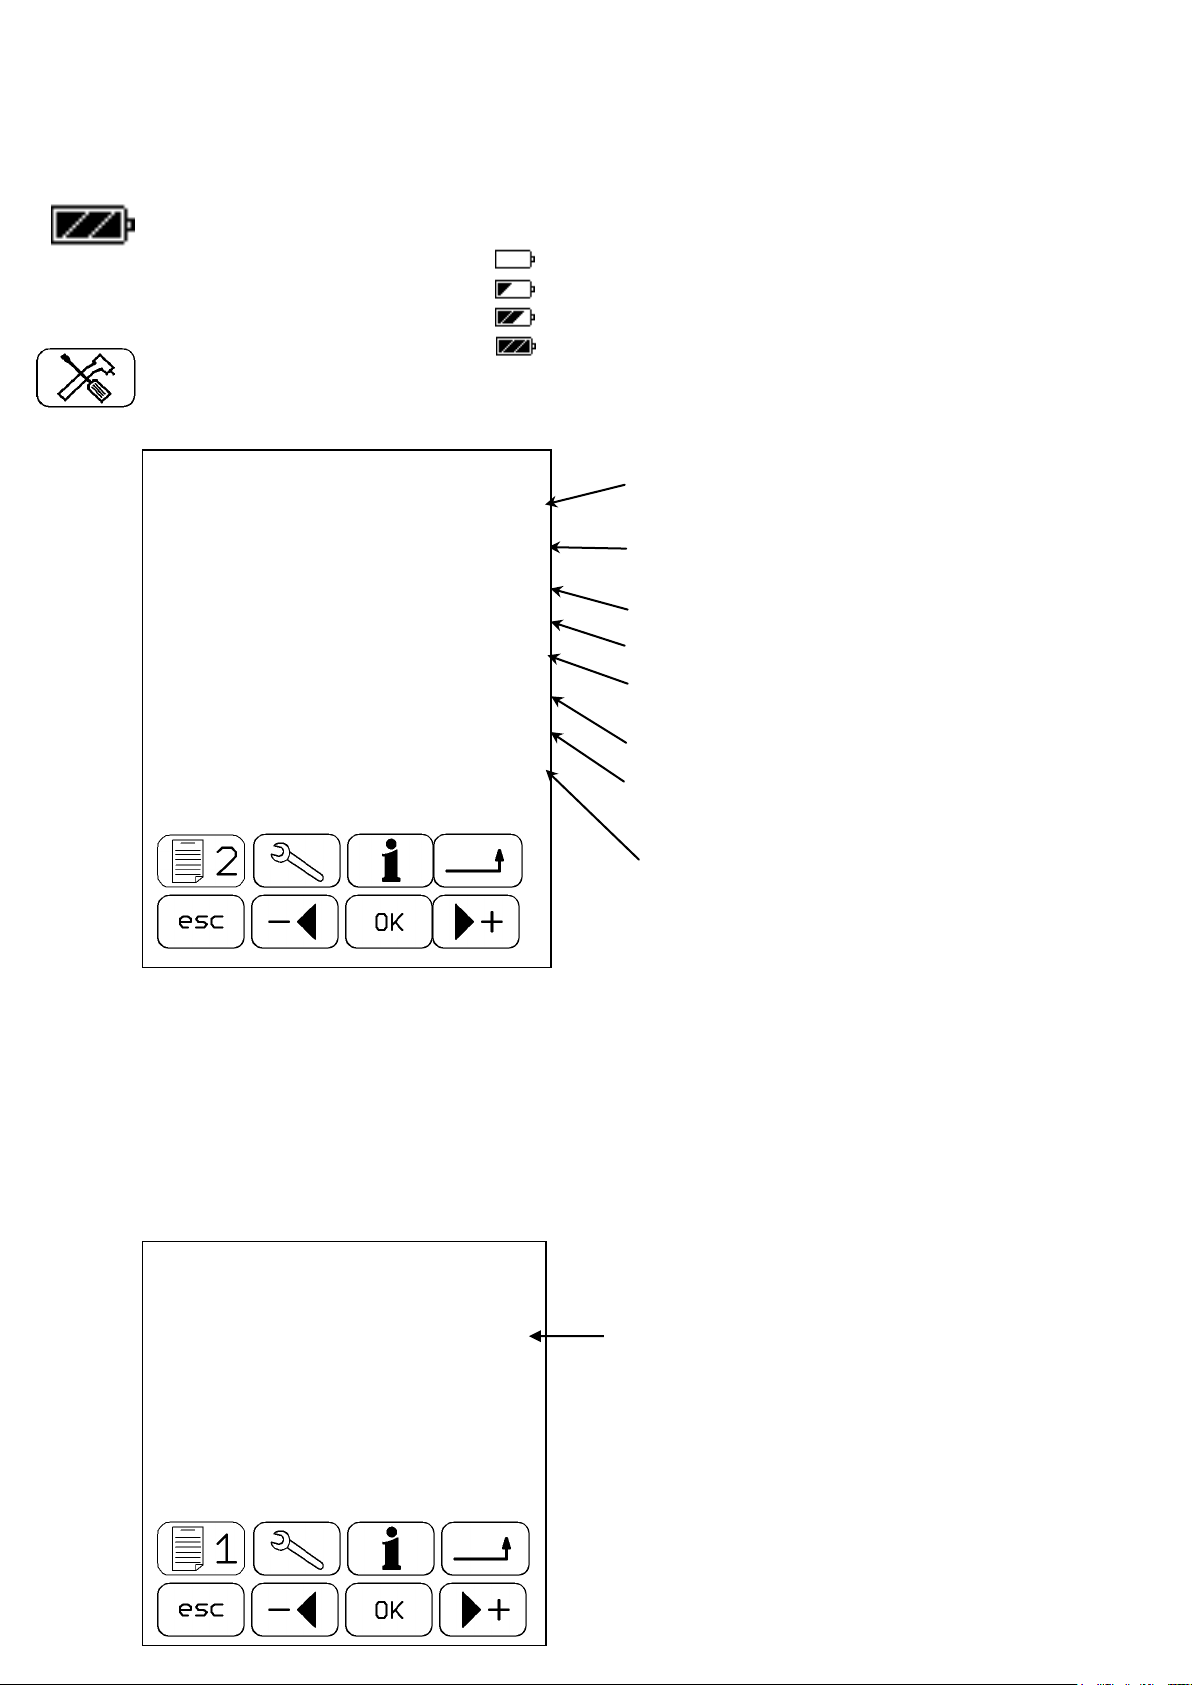
Setup menu
Setup menu. Tab 1
Nastavenie funkcie ľavého tlačidla pedálu Programming the bottom left lever of the
Programming the bottom right lever of the
Alarm time setup
Keypad tone volume setup
If the Hygiene system (available upon request only) is not installed on the unit, menu bar
Hygiene Duration is inactive and the time status is not displayed (-).
If the water heater for the patient's cup is not installed, than menu bar "Water for the Cup" is
inactive and the temperature is not displayed (- - -).
If the water heating system was not installed (upon request only), the menu bar Water
heating is inactive and (- - -) symbols are displayed.
Warm water can reach the handpiece only after remaining cold water would be poured out
from the hose completely.
Setup menu. Tab 2
ody pre nástroje
gb_da370-da380_2014_06 17/55
- 100% full
foot controller
foot controller
Patient’s cup water temperature setup (if
heating system installed)
Language bar
Setting the Hygiene cycle duration/if
equipped with Hygiene system
Setting up Water temperature for
handpieces (if boiler is installed).
 Loading...