

Dino AM-351 User Manual

Dino Digital Microscope User’s Manual
1
Dino Digital Microscope
AM-351
User’s Manual
Thank you for choosing Dino Digital Microscope!
We do hope you enjoy using this Dino Digital Microscope – to share, to learn, to
explore the miracle of the nature world. You may view the magnified view from
pollen to butterfly wings via PC and TV. You can also take picture or video from
what you have seen on the computer by using included application software --
DinoCapture. Not only ideal for school, especially the science class, that will
have more interaction and sharing between the teacher and students. Also
ideal for home, that will bring a different learning experience to parents and
children.
Please read this manual carefully before using Dino Digital Microscope.

Dino Digital Microscope User’s Manual
2
Contents
Product Specifications ........................................................................... 3
Safety Precautions ............................................................................... 3
Contents and Name of Parts .................................................................. 4
Connecting to TV Monitor ...................................................................... 6
System Requirement ...................................................................... 6
Connecting Procedure..................................................................... 7
Operate Dino Microscope................................................................. 9
Connecting to PC................................................................................ 12
System Requirements................................................................... 12
Driver Installation Procedure ......................................................... 13
Windows XP .......................................................................... 13
Windows 2000 ...................................................................... 18
Windows 98se ....................................................................... 21
Connecting Procedure................................................................... 27
Operate Dino Digital Microscope..................................................... 29
DinoCapture Application Software................................................... 31
Picture / Video Folder ............................................................. 33
Menu Function List................................................................. 36
Open The Picture ................................................................... 40
Open The Video Or Time Lapsed Video...................................... 41
Using Dino Digital Microscope as PC Camera .......................................... 42
Q&A ................................................................................................. 43
Copyright.......................................................................................... 46
Certification....................................................................................... 46
Limited Liability ................................................................................. 46

Dino Digital Microscope User’s Manual
3
Product Specifications
1. Resolution:640*480 VGA
2. Built-in 3 optical Lens with different magnification power.
3. Magnification power: 10x, 100x~200x, 400x~600x.
4. Built-in oblique and backside LED light.
5. Built-in microphone.
6. Frame rate: up to 30 FPS
7. Interface:USB2.0/1.1 (PC), NTSC or PAL (TV)
Safety Precautions
1. Avoid using or storing the 5V adapter at places exposed to direct sunlight,
subject to extremely high temperature or wet.
2. Do not attempt to service this product yourself. Opening the covers may
expose you to dangerous voltage points or other risks.
3. When hands are wet, do not plug in or remove the adaptor or other
connectors.
4. Using or storing Dino Digital Microscope, do not plug in any other cables,
not belong to Dino Digital Microscope.
5. Avoid using or storing Dino Digital Microscope at the environments with
high vibration.
6. Do not use any detergent or volatile solution, which will damage the
camera case, painted surfaces & Lens. Only use a soft cleaning cloth.
7. If the lens is dirty, please use a kens brush on soft cloth to wipe clean.
Avoid touching them with your fingers. Exercise care to avoid scratching
the Lens.
8. Do not put heavy things or put pressure on Dino Digital Microscope,
especially, on Dino Digital Microscope with rack.
9. Without protection, do not put
Dino Digital Microscope outdoor to avoid
the lens damaged by high temperature or humidity.
10. Using and storing Dino Digital Microscope at Temp: 0
o
C~ 40oC, Humidity:
45%~85%.
11. If water has entered
Dino Digital Microscope device and the inspection
stage, immediately turn the power off and remove the 5V adapter. Do
not use dryer neither.
Dino Digital Microscope User’s Manual
4
12. Using or storing Dino Digital Microscope, need to watch all cables to avoid
trip over or Dino Microscope fall down.
13. To avoid electric shock, remove all electricity source before moving PC or
TV.
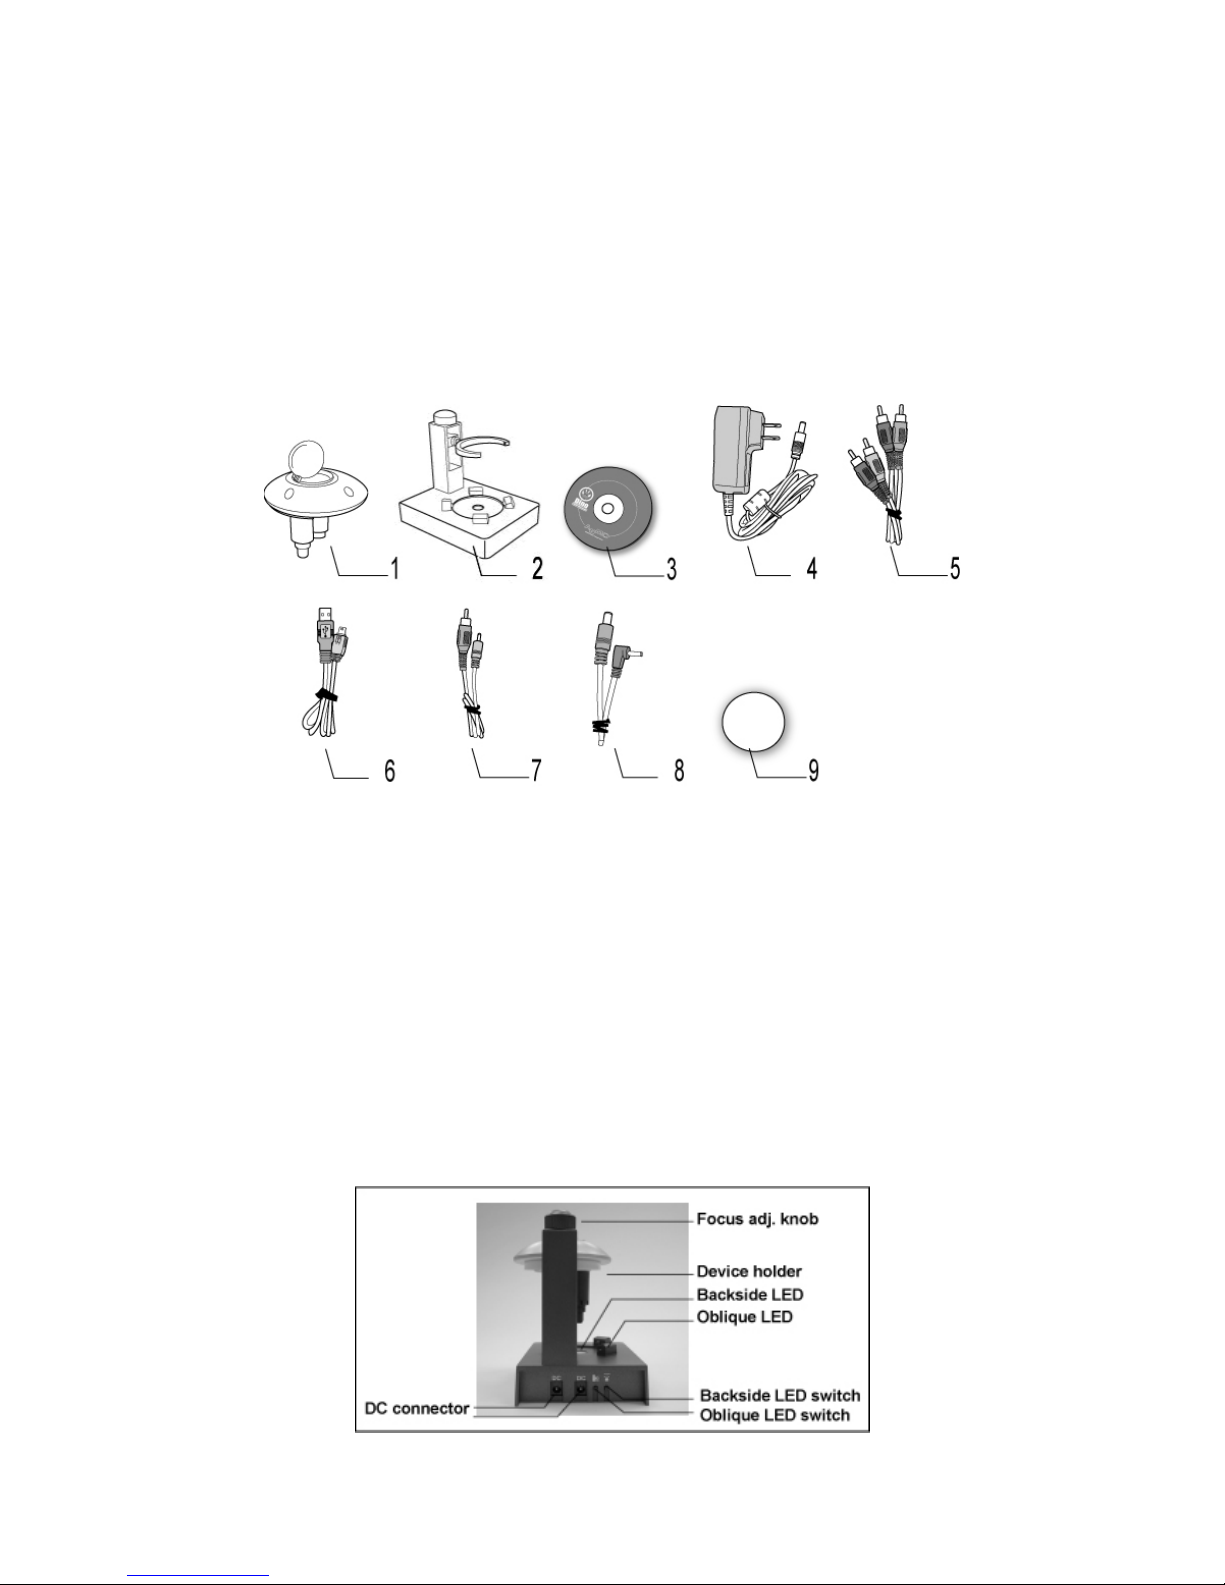
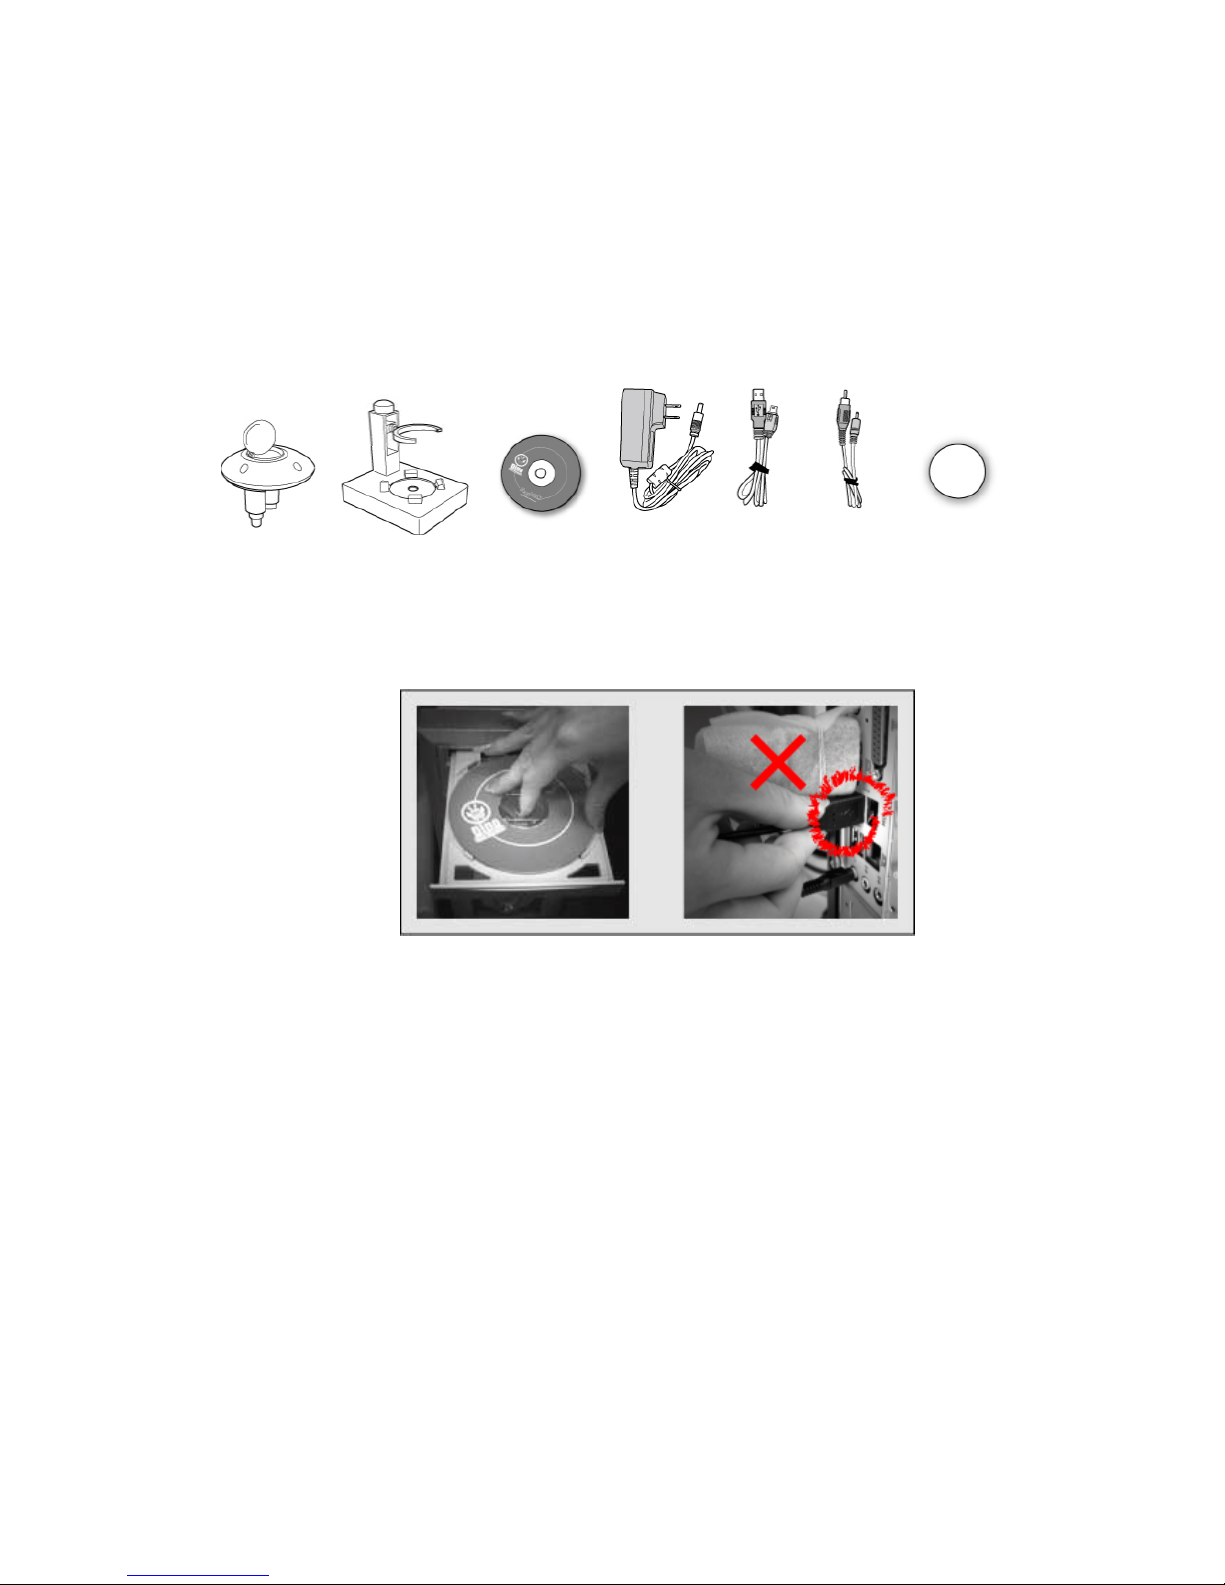
Contents and Name of Parts
1. Dino Digital Microscope Device
2. Rack
3. CD (user’s manual included)
4. 5V AC Adaptor (Input:100V ~ 240V, Output:DC5V)
5. AV Cable《AUDIO + VIDEO》 (2m)
6. USB Cable《USB2.0 / 1.1》 (1.8m)
7. AV to Microphone Jack Cable (2m)
8. DC Cable (30cm)
9. Inspection Plate (Dia.40mm)
Dino Digital Microscope User’s Manual
5
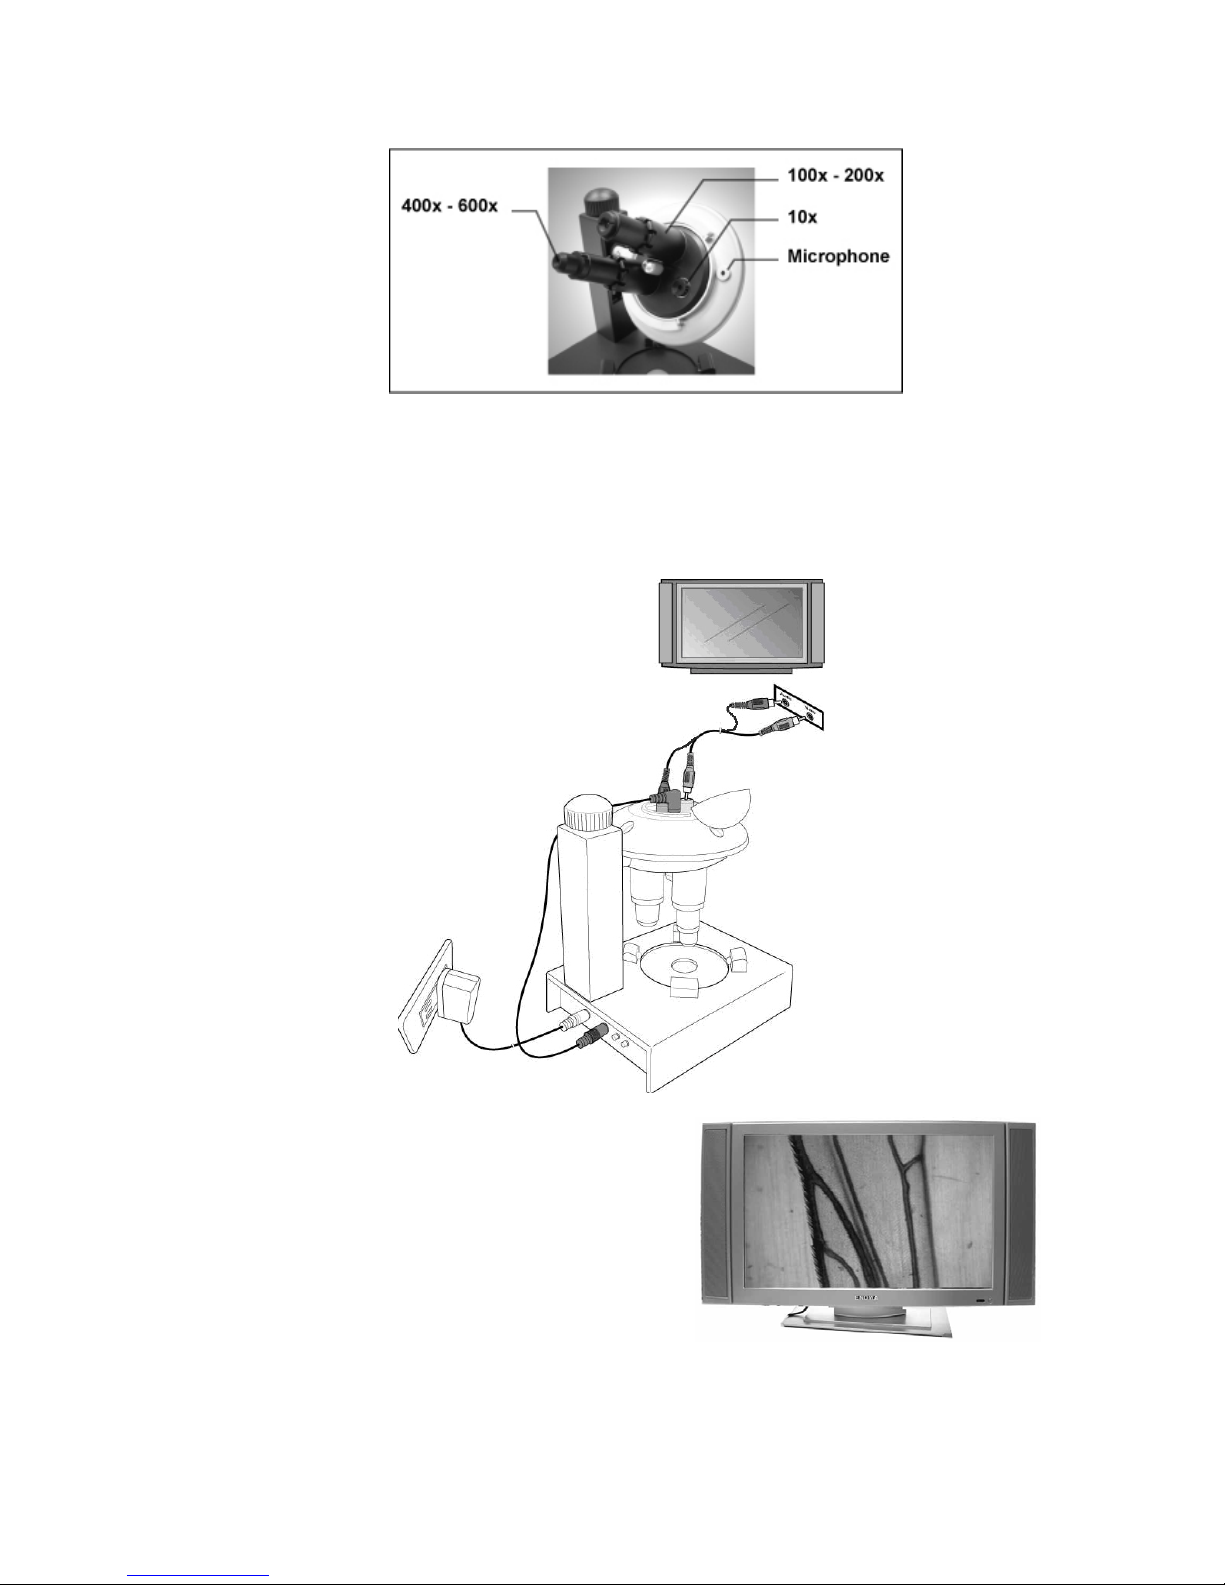
Objective Lens
- Normal Lens: 10x
- Low Power Objective Lens: 100x ~ 200x
- High Power Objective Lens: 400x ~ 600x
Remark: The magnification is subject to the ratio of the object size to be
showed on 15” display screen.
Dino Digital Microscope User’s Manual
6
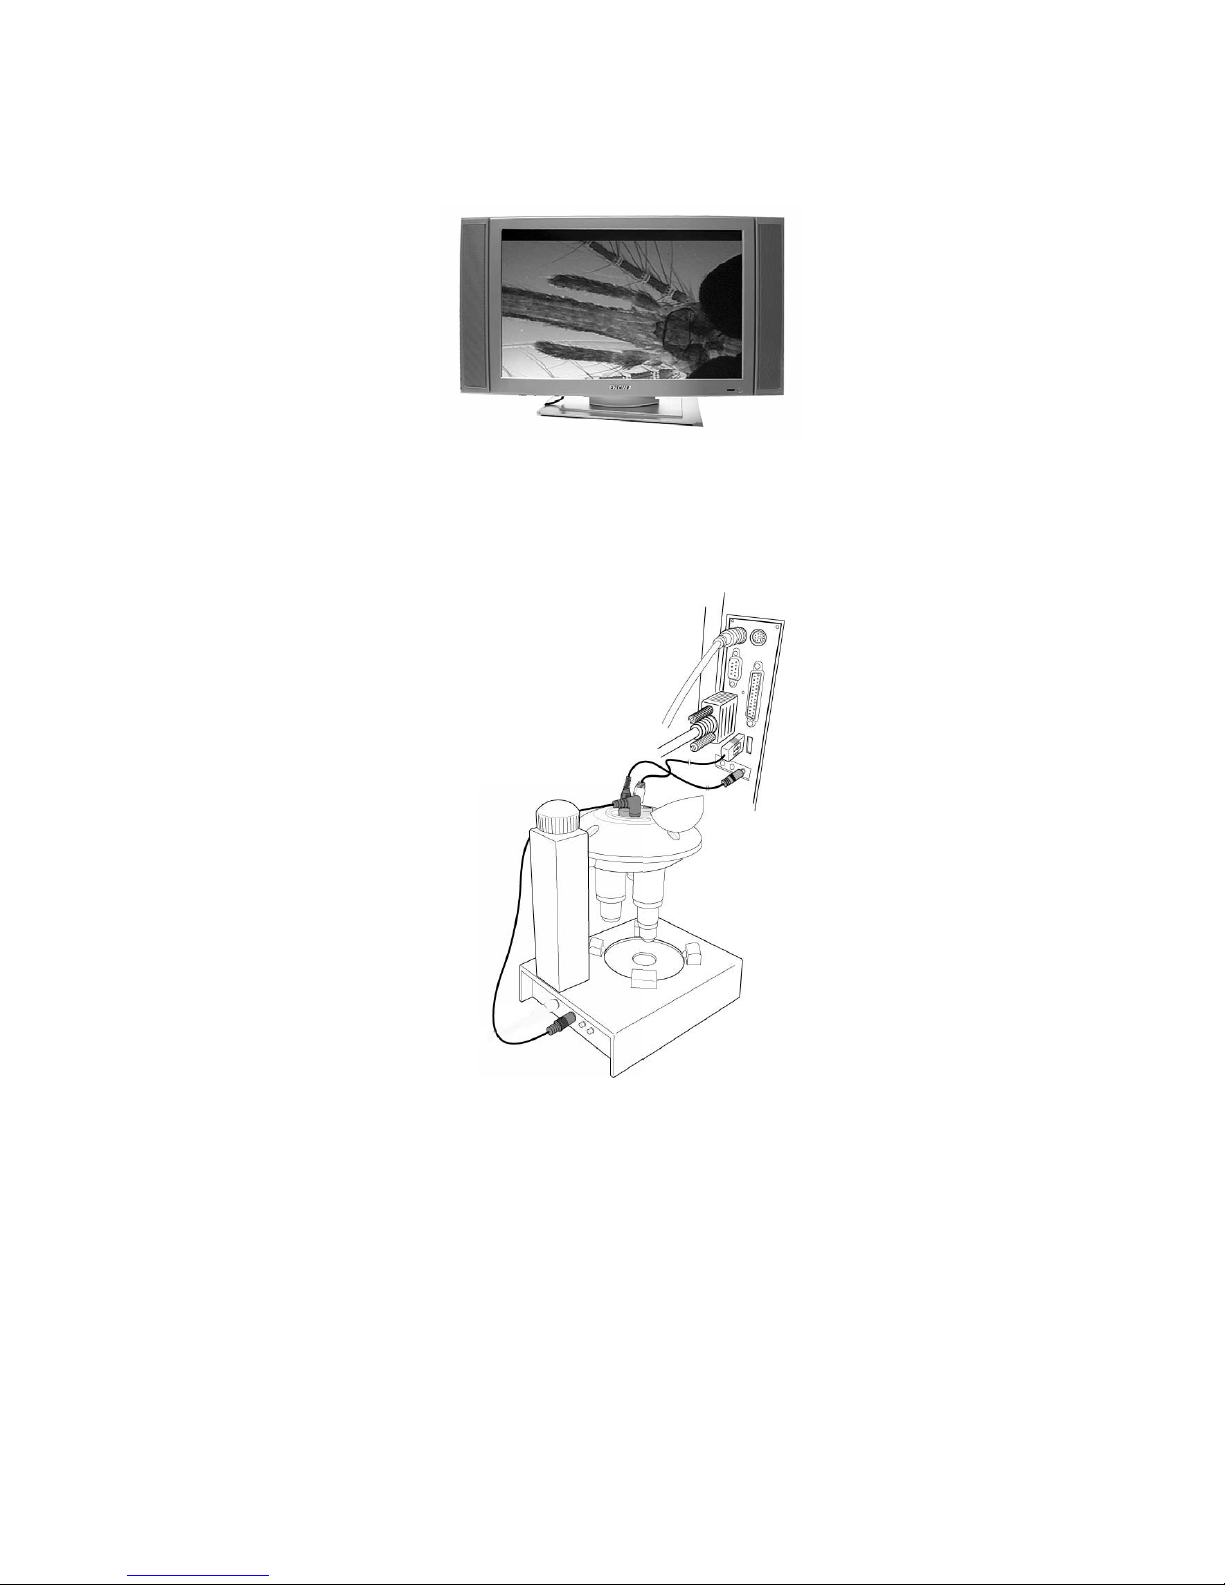
Connecting to TV Monitor
System Requirement
z TV (with AV input function
Remark: The TV’s video format (NTSC or
PAL) has to be matched with the video
format (NTSC or PAL) of Dino Digital
Microscope.
z Device needed: Dino Digital Microscope Device, Rack, 5V AC Adaptor, AV Cable,
DC Cable, and Inspection Plate.
Dino Digital Microscope User’s Manual
7
Connecting Procedure
The following procedure will show you how to properly connect Dino Digital
Microscope with your TV.
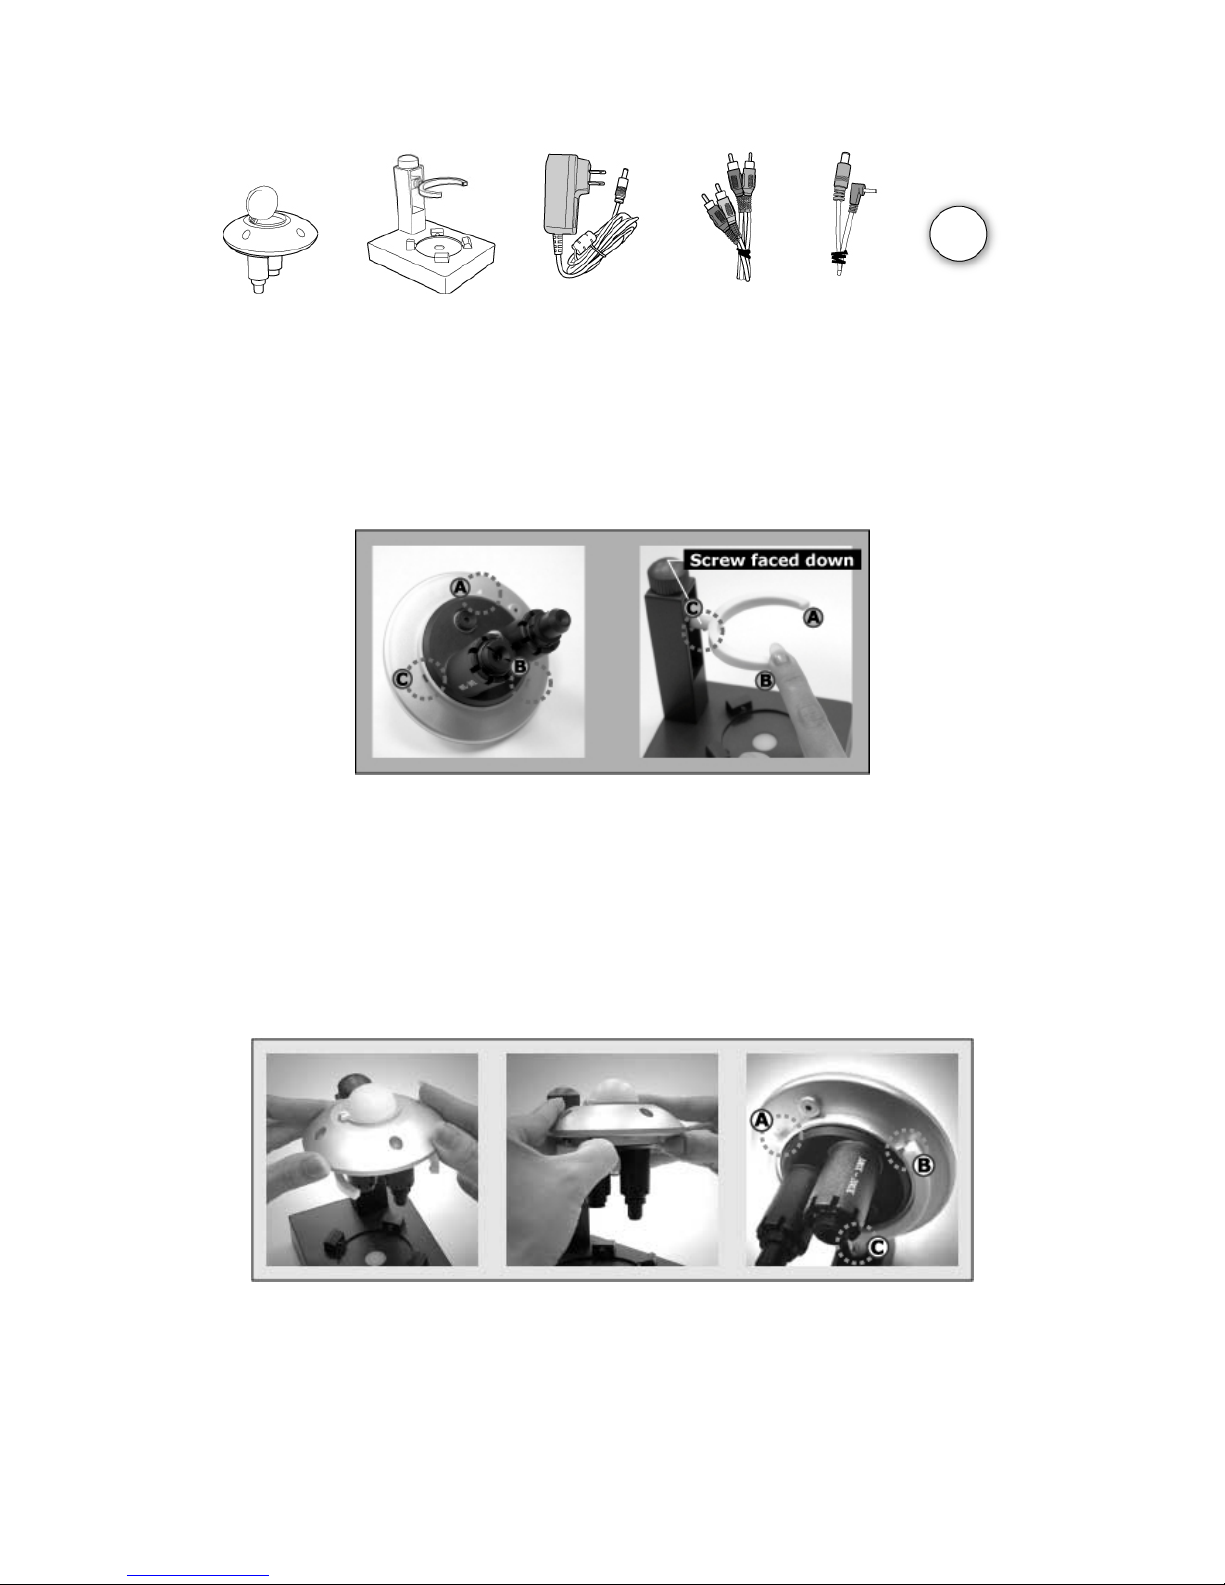
Step.1 There are A, B, C locations on Dino Digital Microscope Device and Device
Holder.
Notice: The device holder’s screw has to be faced down, otherwise the
digital microscope device will not be able to well fit into the device
holder.
Buckle Dino Digital Microscope device’s A, B tenons to device holder’s A, B
locations and Dino Digital Microscope device’s C location aims at device
holder’s C location.
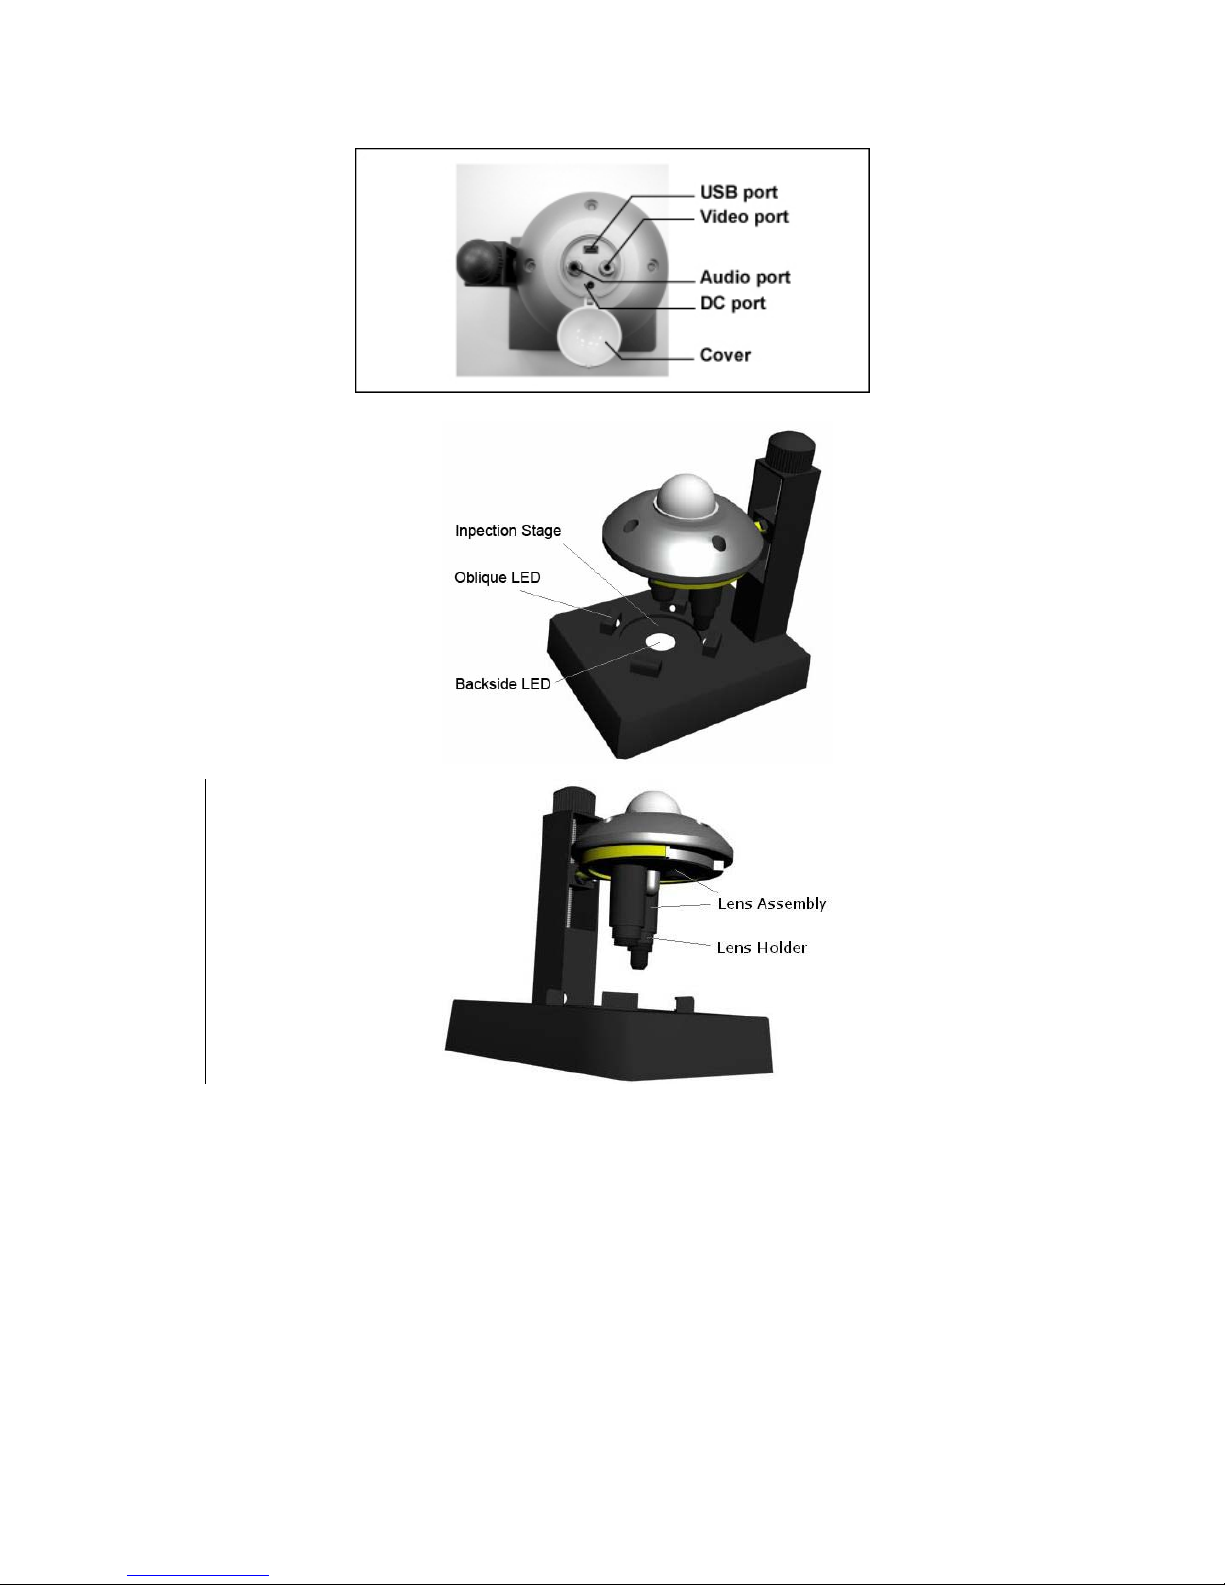
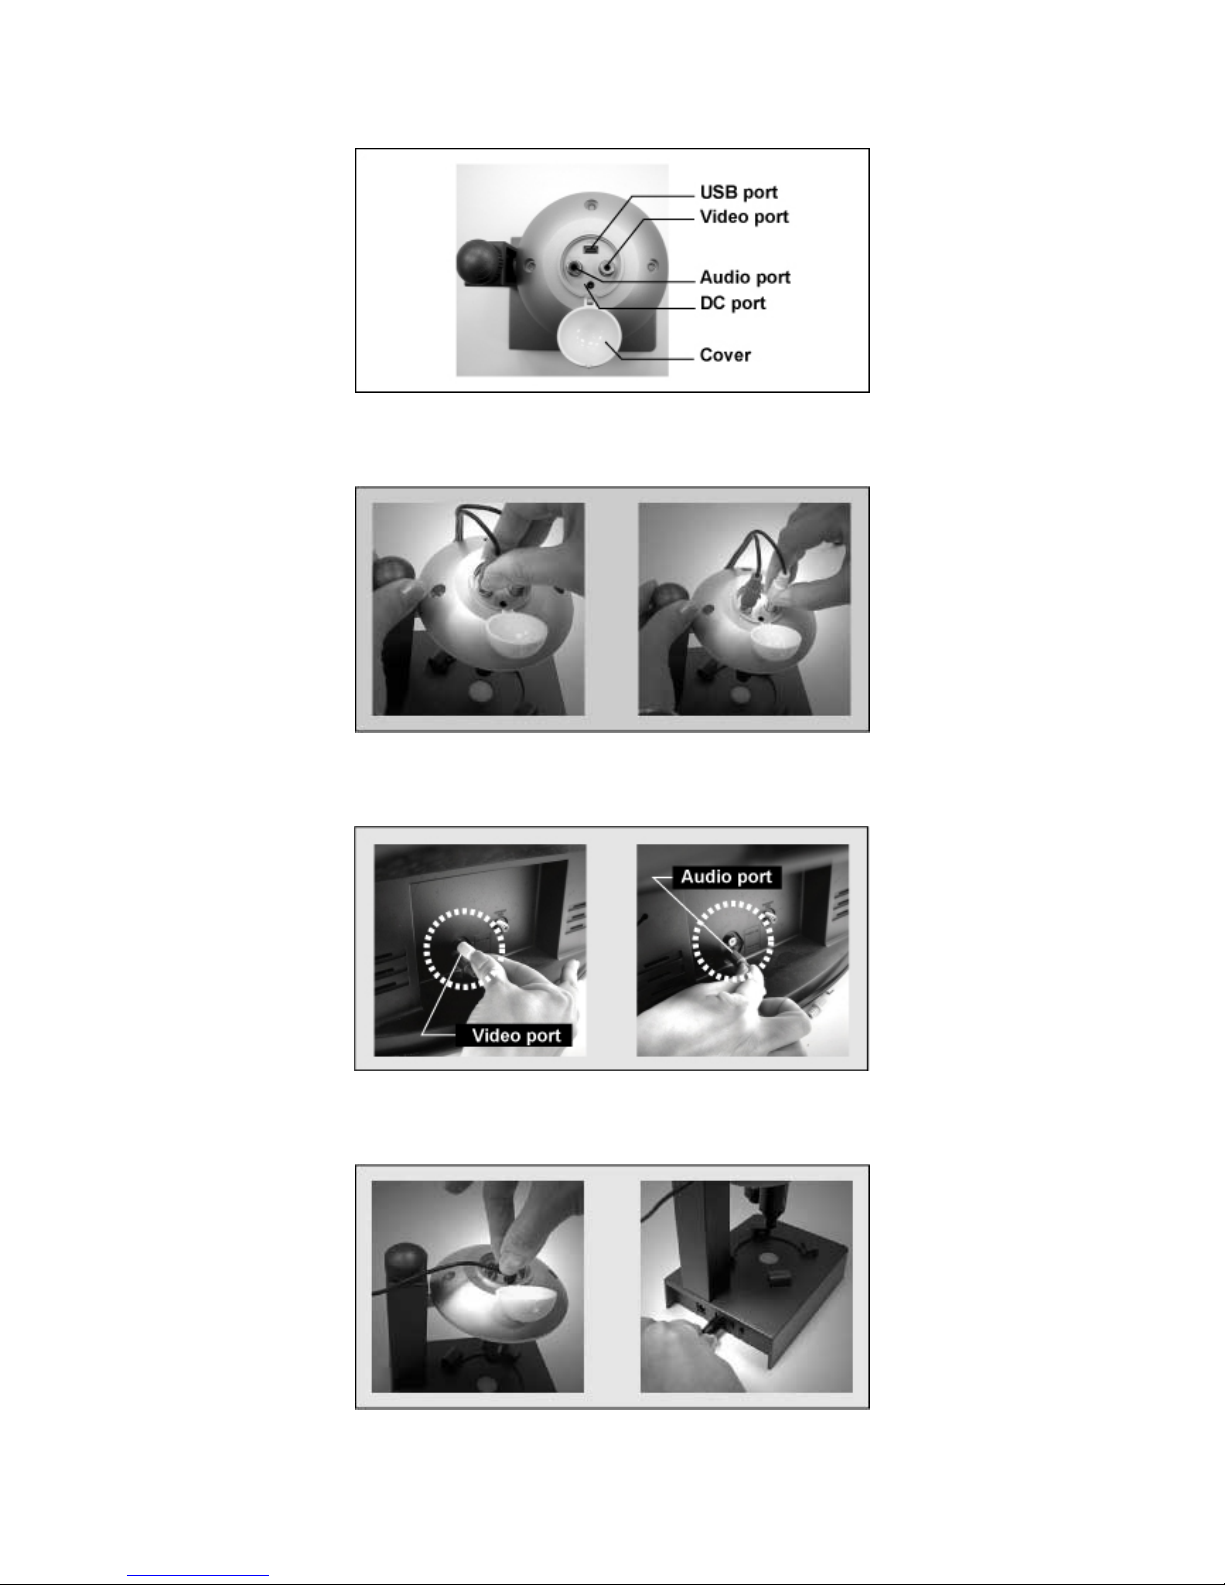
Step.2 Open the device’s cover, there are 4 sockets underneath.
Dino Digital Microscope User’s Manual
8
Step.3 Plug the red one of AV cable to the red socket (Audio), and yellow one to
the yellow socket (Video) respectively.
And plug the other end of AV cable to the Video / Audio Input socket on TV
monitor.
Step.4 Connect DC cable from the mini DC jack on the device to the DC-out socket
on the rack base.
Dino Digital Microscope User’s Manual
9
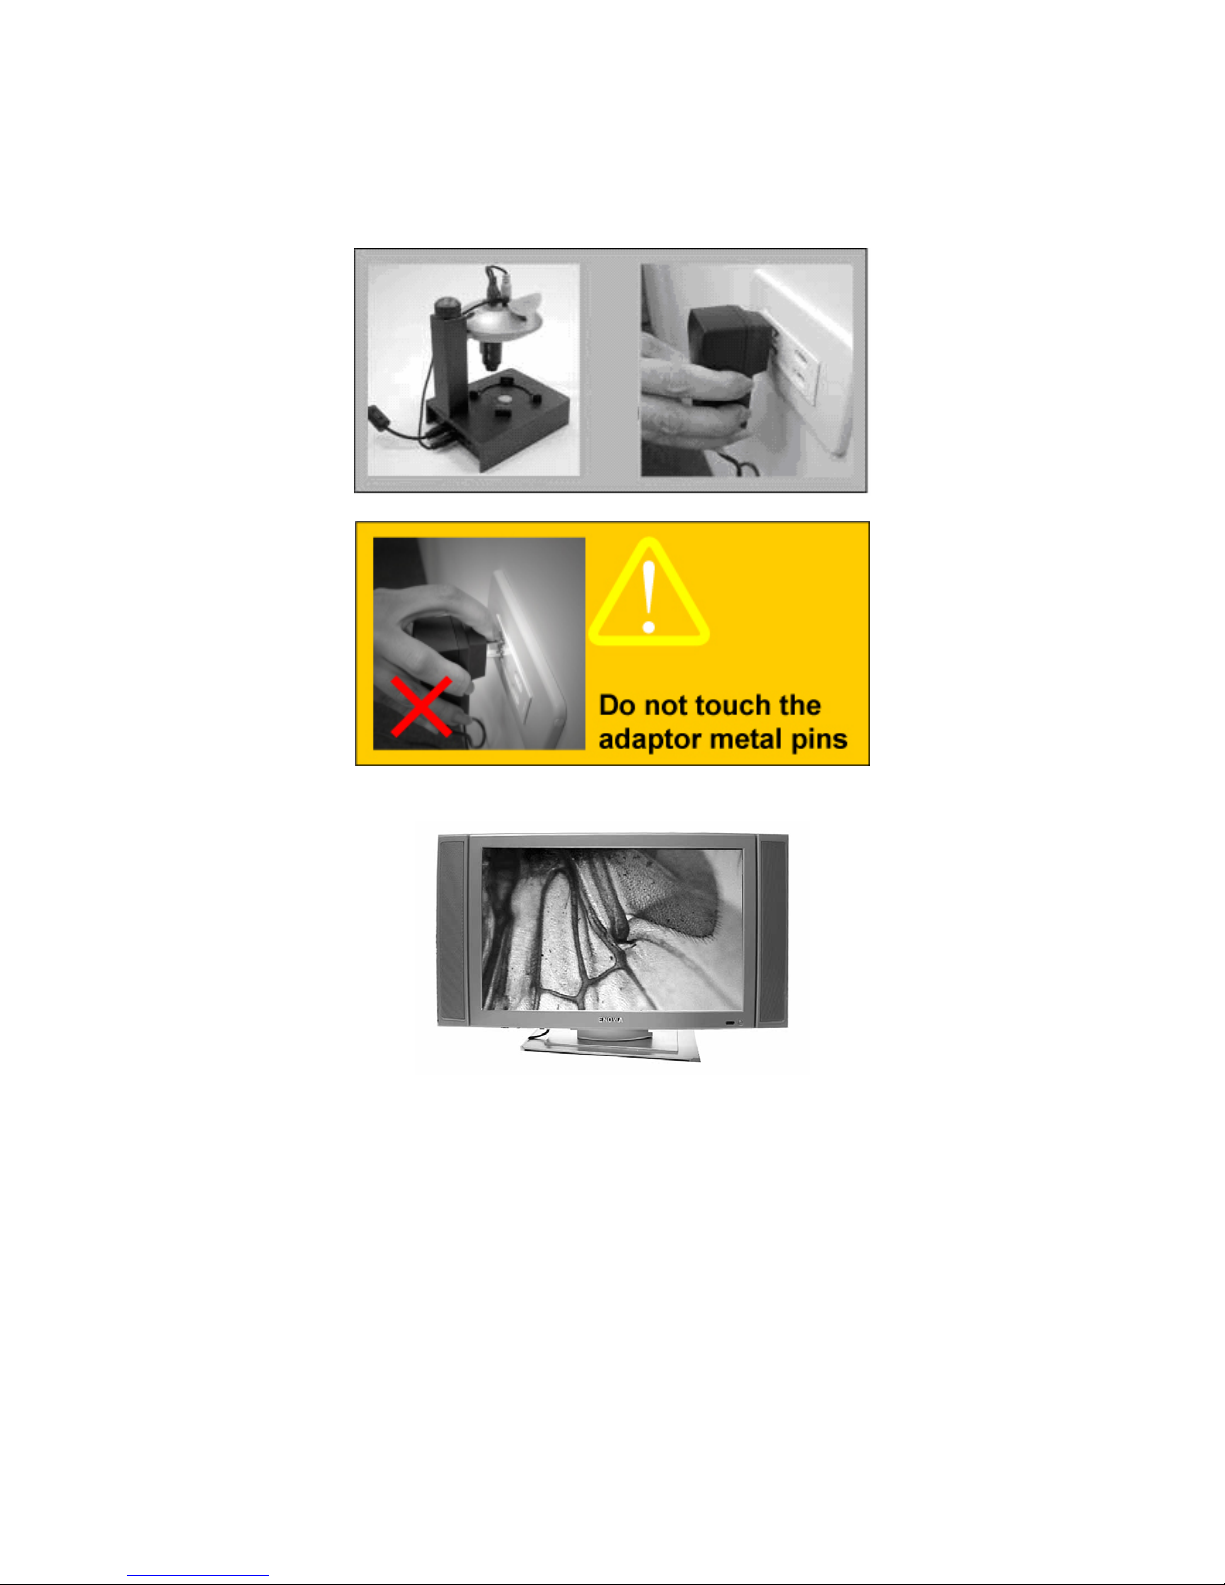
Step.5 Connect the output of the AC adapter to the DC jack on the rack base and
plug 5V AC adapter to the power socket of 100~240V AC.
Step.6 Power on TV and select the channel for in-put AV signal.
Operate Dino Microscope
The following procedure will show you how to operate Dino Digital Microscope.
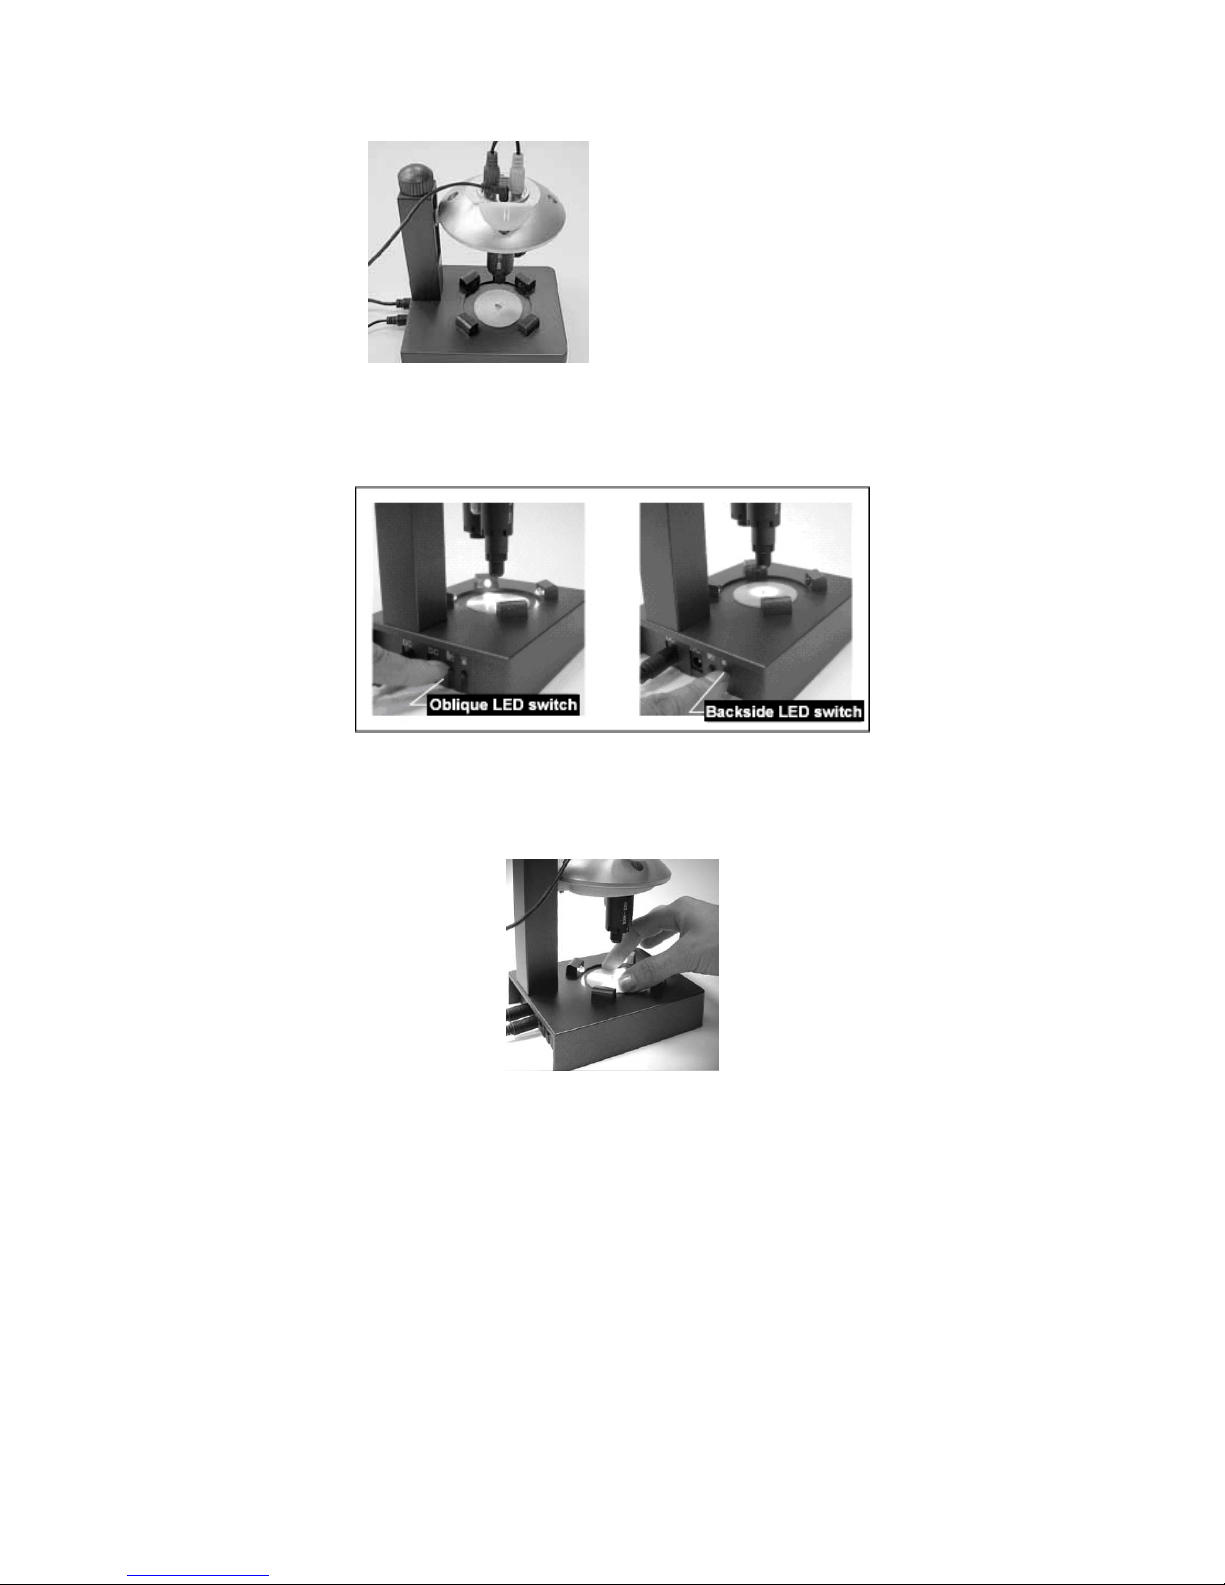
1. To have up-right image, suggest placing Dino Digital Microscope with rack’s
arm on the left side, as shown.
Dino Digital Microscope User’s Manual
10
up-right image position
2. Switch on the LED light with your choice. There are two sets of LED light,
backside and oblique, can be switched independently.
3. Place the inspection plate onto the Inspection Stage, and then put the
to-be-observed object near the center position.
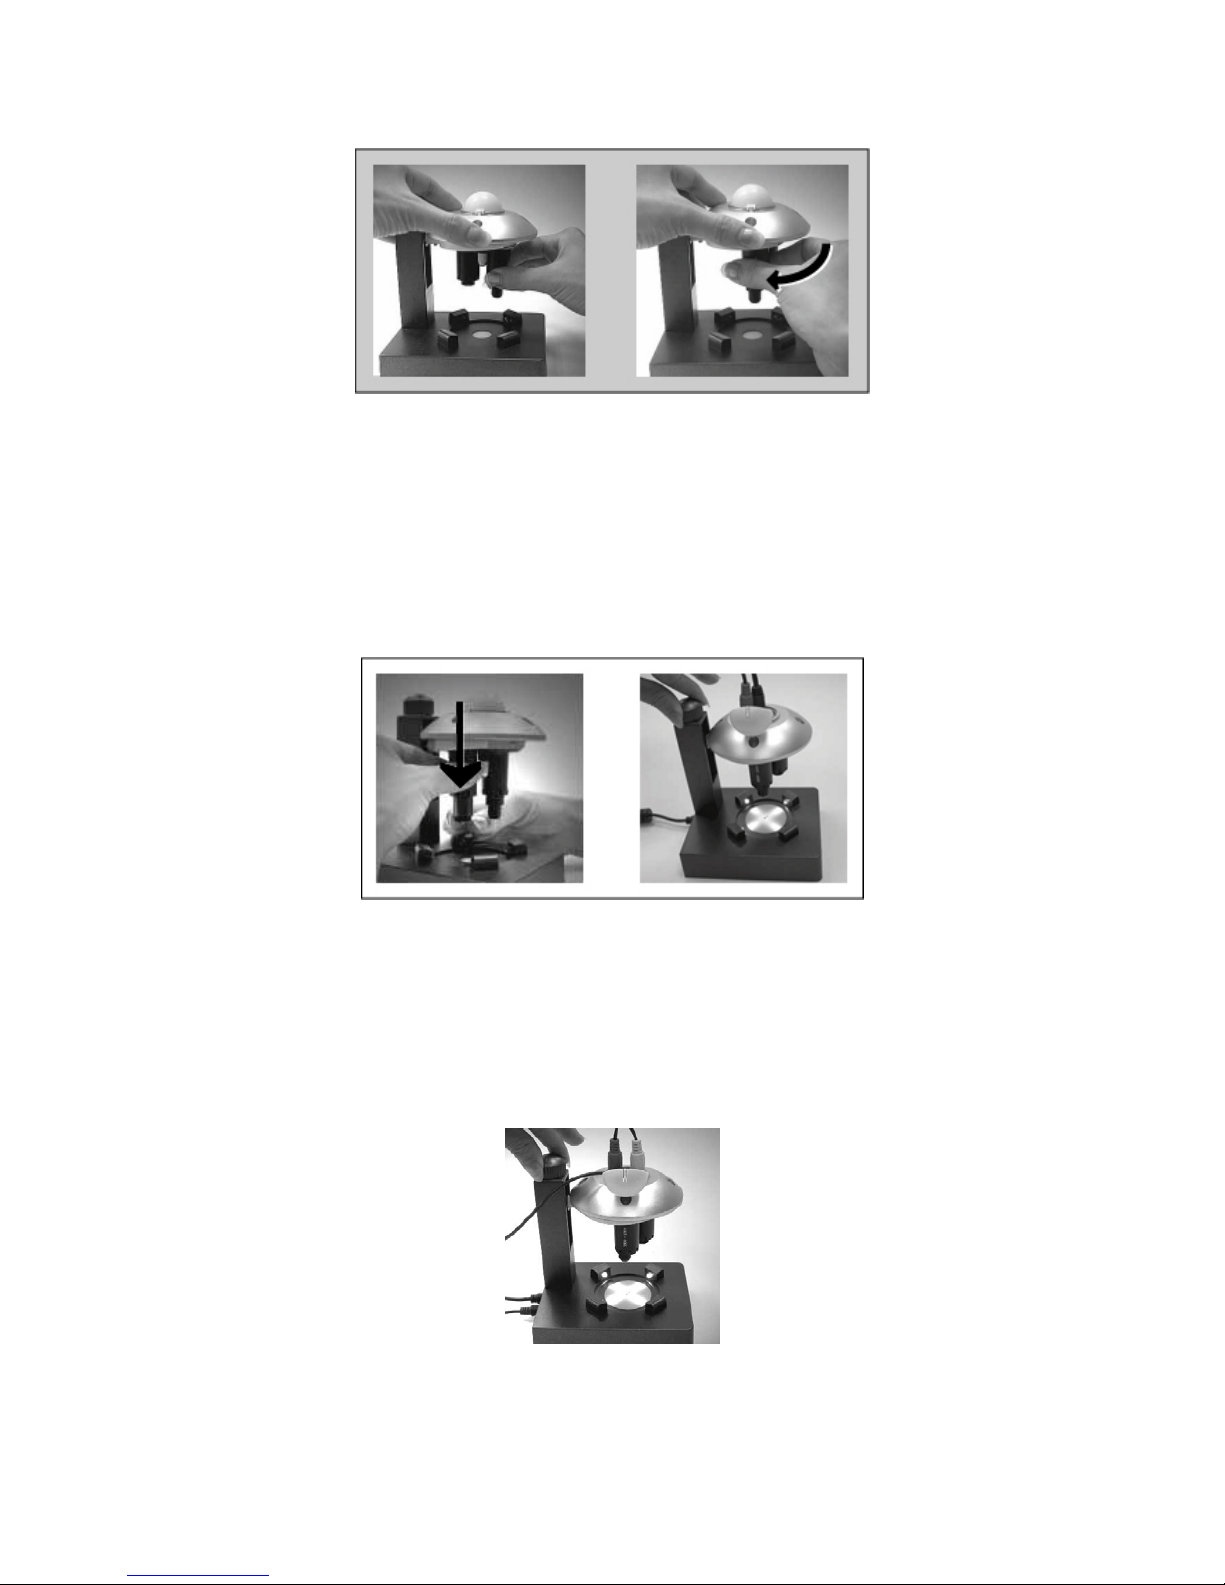
4. Select the lens to be used by pulling the Lens Assembly downward and rotating
it until feeling another click. The lens right above the center of Inspection
Stage is the one chosen.
It is suggested to hold the Device by another hand while rotating the Lens
Assembly.
Dino Digital Microscope User’s Manual
11
5. The other way to adjust magnification power is to adjust the Lens Holder’s
length by pulling the Lens Holder downward or upward. The Lens Holder is
pulling downward, the magnification is higher. Adjust the Focus Adjustment
Knob until the image became clear at the location you are interested with.
It is suggested to hold the Lens Holder’s top by another hand while pulling the
Lens Holder downward or upward.
Remark: Before changing the lens, it is suggested to heighten the lens position
by pushing the Lens Holder back toward the original position, for
preventing the lens contacting with LED sockets.
6. To adjust the focus, rotate the Focus Adjustment Knob until the clearest image
is obtained on TV screen.
7. When using microphone, it’s not necessary to turn the microphone toward
the user.
Dino Digital Microscope User’s Manual
12
Remark: If TV’s format is PAL, there will be a black bar on TV screen top as shown.
Connecting to PC
System Requirements
● PC’s system requirements:
9 OS: Windows 98se, 2000, XP
9 CPU: Pentium IV 1.5G, Celeron, AMD Athlon or above
9 Memory: 128MB
9 HDD storage space: at least 150MB
( for driver and application software installation)
Dino Digital Microscope User’s Manual
13
9 Graphic card: 16-bit or above
9 CD-ROM driver
9 Sound card and speaker
9 USB2.0 / 1.1 port (to have better image, USB2.0 is recommended)
● Device needed: Dino Digital Microscope Device, Rack, CD-ROM, 5V AC Adaptor,
USB Cable, AV to Microphone Jack Cable, Inspection Plate.
Driver Installation Procedure
■ Power on PC and place installation CD into CD-ROM driver, do not connect
USB Cable from Dino Digital Microscope to PC before driver installation.
■ Select driver installation, and follow the instructions to complete installation.
■ As driver installation completed, and if system asking for re-start, please
re-start the Windows OS.
Note: The driver needs to be installed only once for each computer.
Windows XP
1. Place the installation CD into CD-ROM driver, the installation program should be
started automatically. Otherwise, please execute the AUTORUN.EXE directly
from the CD.
2. Select “Driver Installation” from Dino digital Microscope Installation menu
screen as shown.

Dino Digital Microscope User’s Manual
14
3. Click “Next” to continue, as shown.
 Loading...