

Dinli DMX 450 Owner's Manual

1
Dear Dinli Quad Users:
Before the delivery of each new vehicle from Dinli factory, the fuel in carburetor is drained off to ensure the
excellent performance and safety of the vehicle. Therefore, when first starting a new vehicle, it is normal to take
20~30 seconds. The quality of each Dinli Quad is guaranteed. Study this manual thoroughly and enjoy your riding
Dinli Quad.
I. PREFACE
WARNING
STOP! If you have the impression that four wheels give you the stability of a car, you are wrong. If you
have the impression that a quad is simple to drive and similar to those other vehicles, that you are
wrong. The risks involved are at least equal to those faced when riding a motorcycle.
!

OWNER’S MANUAL
2
POTENTIAL HAZARD
Given the realities of sport quads and/or the limits of your own riding abilities you may lose control.
The limits are impossible to be specific about because of the variation in terrain and rider ability are
nearly unlimited.
WHAT CAN HAPPEN
You could loss control, have an accident and be severely injured, paralyzed or killed.
HOW TO AVOID THE HAZARD
The hazards of quad riding cannot completely avoid. They can be minimized with training, good
judgment, experience, use of helmet, protective gear and development of skills in weight shifting,
throttle and brake control. Reading and understanding this Owner's Manual and warning labels,
and completing a quad training course are essential and can begin your learning process.

3
Experienced Riders Only
All Dinli quads are high performance, sport and/or competition machines and should only be operated by
licensed competition riders in excellent physical condition. Operators should be well-trained and experienced in the
operation of high performance competition vehicles.
● This vehicle is not for beginners or the inexperienced.
● Before you ride this vehicle, read this Owner's Manual thoroughly and understand all of the instructions, warnings,
cautions, and notes presented.
About this manual
The purpose of this manual is to provide the vehicle owner with important safety, service, maintenance, and
tuning information. Read and understand this manual before operating and working on the vehicle. Keep your
Owner's Manual on the vehicle while you ride.
If you lose this manual, contact an authorized Dinli dealer for a replacement.
● Read and understand the entire procedure before performing any work. If you are unfamiliar with or doubt your
own abilities to complete a procedure as described, have an authorized Dinli dealer service your vehicle.
Addenda to this manual
Before you begin reading the manual, go to the “Addenda” section at the end of this manual.
The addenda or “supplements” section provides any additional, replacement, or supplemental information for your
product available at the time of shipment.

OWNER’S MANUAL
4
COMMENTS?
If you have any comments or suggestions about this Owner's Manual, we'd appreciate hearing from you.
Please send to:
DIN LI METAL INDUSTRIAL CO., LTD.
NO.51, Industrial 9th Rd., Tali City, Taichung 412 Taiwan, R.O.C.
Tel: 886 (04) 2491-7666
Fax: 886 (04) 2491-7166
E-mail: globalservice@dinli.com.tw

5
NOISE REGULATION
TAMPERING WITH NOISE CONTROL SYSTEM PROHIBITED
The CE Directives and U.S. federal law prohibits the following acts or the causing there of;
(1) The removal or rendering inoperative by any person, other than for purposes of maintenance, repair or
replacement, of any device or element of design incorporated into any new vehicle for the purpose of noise
control prior to its sale or delivery to the ultimate purchaser or while it is in use; or (2) the use of the vehicle after
such device or element of design has been removed or rendered inoperative by any person.
AMONG THOSE ACTS PRESUMED TO CONSTITUTE TAMPERING ARE THE ACTS LISTED BELOW:
1. Removing, puncturing, or altering of the muffler, the baffle system, header pipes, or any other component which
conducts exhaust gases.
2. Lack of proper maintenance.
3. Replacing, altering, modifying any moving part of the vehicle or parts of the exhaust, intake (e.g. air filters) with
parts other than those specified by the manufacturer.
Limitations
All information in this Owner's Manual is based upon the latest product data and specifications available at the
time of printing. Dinli Metal Industrial Co., Ltd. reserves the right to make product changes and improvements which
may affect illustrations, photographs and explanations contained in this Owner's Manual. No part of this publication
may be reproduced, stored in a retrieval system, or transmitted in any form or by any means, (electronic mechanical
photocopying, recoding or otherwise), without the prior written permission of Dinli Metal Industrial Co., Ltd. All the
procedures and specifications found in this publication are subject to change with out prior notice and without Dinli
Metal Industrial Co., Ltd. incurring any obligation. The illustrations in this publication are intended for reference use
only and may not depict the actual model or component parts. Your model may differ.

OWNER’S MANUAL
6
Dear Users:
Congratulations on your purchase of DINLI ATV. It represents the result of many years of Dinli experience in
the production of fine machines. You can now appreciate our craftsmanship and reliability of the masterpieces.
SAFTY ALTERTS
FAILURE TO FOLLOW THE WARNINGS CONTAINED IN THIS MANUAL CAN RESULT IN SERIOUS INJURY OR
DEATH.
● Keep this Owner's Manual with your vehicle at all times.
II. INTRODUCTION
7
● Pay special attention to all messages preceded by the Safety Alert Symbol. It means ATTENTION! BECOME
ALERT! YOUR SAFETY IS INVOLVED
DANGER
Indicates that severe personal injury or DEATH will result if instructions are not followed.
!
!
Messages with the Safety Alert Symbol
WARNING
Indicates a potential hazard that could result in serious injury or death.
!
CAUTION
Indicates a potential hazard which COULD result in vehicle damage if instructions are not followed.
NOTE:
Provides helpful information.

OWNER’S MANUAL
8
● A QUAD IS NOT A TOY AND CAN BE HAZARDOUS TO OPERATE.
● A quad handles differently from other vehicles including motorcycles and cars. A collision or rollover can occur
quickly, even during routine maneuvers such as turning and driving on hills or over obstacles, if you fail to take
proper precautions.
● Severe injury or Death can result if you do not follow these instructions:
01. Read this manual and all labels carefully and follow the operating procedures described.
02. Never operate a quad without proper instruction. Take a training course. Beginners should receive training from
a certified instructor. Contact an authorized quad dealer to find out about the training courses nearest you.
03. Always follow the age recommendation: A child under 16 years old should never operate a quad with engine size
greater than 90cc.
04. Never allow a child under age 16 to operate a quad without adult supervision, and never allow continued use of a
quad by a child if he or she does not have the abilities to operate it safely.
06. Never operate a quad without wearing an approved helmet that fits properly. You should also wear eye
protection (goggles or face shield), gloves, boots, long-sleeved shirt or jacket, and long pants.
07. Never consume alcohol or drugs before or while operating this quad.
08. Never operate at excessive speeds. Always go at a speed that is proper for the terrain, visibility, operating
conditions, and your experience.
09. Never attempt wheelies, jumps or other stunts.
10. Always inspect your quad each time you use it to make sure it is in safe operating condition. Always follow the
inspection and maintenance procedures and schedules described in this manual.
11. Always keep both hands on the handlebars and both feet on the foot pegs of the quad during operation.
12. Always go slowly and be extra careful when operating on unfamiliar terrain. Always be alert to changing terrain
conditions when operating the quad.
III. IMPORTANT SAFETY MESSAGE

9
13. Never operate on excessively rough, slippery or loose terrain until you have learned and practiced the skills
necessary to control the quad on such terrain. Always be especially cautious on these kinds of terrain.
14. Always follow proper procedures for turning at low speeds before attempting to turn at faster speeds. Do not turn
at excessive speed.
15. Never operate the quad on hill too steep for the quad or for your abilities. Practice on smaller hills before
attempting larger hills.
16. Always follow proper procedures for climbing hills as described in this manual. Check the terrain carefully before
you start up any hill. Never climb hills with excessively slippery or loose surfaces. Shift your weight forward.
Never open the throttle suddenly or make sudden gear changes. Never go over the top of any hill at high speed.
17. Always follow proper procedures for going down hills and for braking on hills as described in this manual. Check
the terrain carefully before you start down any hill. Shift your weight backward. Never go down a hill at high
speed. Avoid going down a hill at an angle that would cause the vehicle to lean sharply to one side. Go straight
down the hill where possible
18. Always follow proper procedures for crossing the side of a hill as described in this manual. Avoid hills with
excessively slippery or loose surfaces. Shift your weight to the uphill side of the quad. Never attempt to turn the
quad around in any hill until you have mastered the turning technique described in this manual on level ground.
Avoid crossing the side of a steep hill if possible.
19. Always use proper procedures if you stall or roll backwards when climbing a hill. To avoid stalling, use the proper
gear and maintain a steady speed when climbing a hill. If you stall or roll backwards, follow the special procedure
for braking described in this manual.
20. Always check for obstacles before operating in a new area. Never attempt to operate over large obstacles, follow
proper procedures when operating over obstacles as described in this manual.
21. Always be careful when skidding or sliding. Learn to safely control skidding or sliding by practicing at low speeds
and on level, smooth terrain. On extremely slippery surfaces, such as ice, go slowly and be very cautious in
order to reduce the chance of skidding out of control.

OWNER’S MANUAL
10
22. Never operate a quad in fast flowing water or in water deeper than that specified in this manual. Remember that
wet brakes may have reduced stopping ability. Test you brakes after leaving water. If necessary, apply those
several times to let friction dry out the linings.
23. Always use the size and type of tires specified in this manual. Always maintain proper tire pressure as described
in this manual.
24. Never modify a quad through improper installation or use of accessories.
25. Never install a twist grip throttle on this quad.
26. Never exceed the stated load limits for a quad. Cargo should be properly distributed and securely attached.
Reduce speed and follow instructions in this manual for carrying cargo. Allow greater distance for braking.
● When starting the engine, the battery must be installed to facilitate starting and increase the engine performance.
When reading this manual, remember:
This vehicle complies with all applicable CE directives of Europe homologation in effect at the time of
manufacture. You should check your local riding laws and regulations before operating this machine.
WARNING
Indicates a potential hazard that could result in serious injury or death.
!

11
I. PREFACE--------------------------------------------------------------------------------------------------------------------------------------1
II. INTRODUCTION ----------------------------------------------------------------------------------------------------------------------------6
III. IMPORTANT SAFETY MESSAGE ----------------------------------------------------------------------------------------------------8
IV. CONTENTS --------------------------------------------------------------------------------------------------------------------------------11
1. LOCATION OF THE WARNING AND SPECIFICATION LABELS------------------------------------------------------------15
2. MACHINE IDENTIFICATION------------------------------------------------------------------------------------------------------------18
2-1 Vehicle Identification Number (VIN)-----------------------------------------------------------------------------------------19
2-2 Engine Serial Number----------------------------------------------------------------------------------------------------------20
2-3 Key ID number-------------------------------------------------------------------------------------------------------------------21
3. PARTS AND CONTROL FUNCTIONS-----------------------------------------------------------------------------------------------22
3-1 Seat---------------------------------------------------------------------------------------------------------------------------------25
3-2 Main Switch-----------------------------------------------------------------------------------------------------------------------28
3-3 Headlights-------------------------------------------------------------------------------------------------------------------------30
3-4 Taillight-----------------------------------------------------------------------------------------------------------------------------31
3-5 Front Break Lever---------------------------------------------------------------------------------------------------------------32
3-6 Parking Brake--------------------------------------------------------------------------------------------------------------------33
3-7 Foot Brake Pedal----------------------------------------------------------------------------------------------------------------35
3-8 Footpegs & Footboard----------------------------------------------------------------------------------------------------------36
3-9 Shift Lever-------------------------------------------------------------------------------------------------------------------------37
3-10 Fuel Tank Cap------------------------------------------------------------------------------------------------------------------38
3-11 Handle Grips--------------------------------------------------------------------------------------------------------------------39
3-12 Throttle Lever-------------------------------------------------------------------------------------------------------------------40
3-13 Fuse-------------------------------------------------------------------------------------------------------------------------------42
3-14 Locking Steering ---------------------------------------------------------------------------------------------------------------43
IV. CONTENTS

OWNER’S MANUAL
12
3-15 Fuel Valve -----------------------------------------------------------------------------------------------------------------------44
3-16 Speedometer -------------------------------------------------------------------------------------------------------------------45
3-17 Fuel Tank ------------------------------------------------------------------------------------------------------------------------47
3-18 Handlebar Assembly ---------------------------------------------------------------------------------------------------------47
3-19 Clutch Lever (manual) -------------------------------------------------------------------------------------------------------50
4. SAFE OPERATION------------------------------------------------------------------------------------------------------------------------51
4-1 Ride Sensibly---------------------------------------------------------------------------------------------------------------------52
4-2 Crossing Through Shallow Water--------------------------------------------------------------------------------------------53
4-3 Turning-----------------------------------------------------------------------------------------------------------------------------54
4-4 Riding Down Slope--------------------------------------------------------------------------------------------------------------55
4-5 Climbing Hill-----------------------------------------------------------------------------------------------------------------------57
4-6 Modifications----------------------------------------------------------------------------------------------------------------------59
5. PER-RIDE INSPECTION-----------------------------------------------------------------------------------------------------------------60
5-1 Pre- Ride Checklist--------------------------------------------------------------------------------------------------------------61
6. OPERATION--------------------------------------------------------------------------------------------------------------------------------62
6-1 Cold Starting----------------------------------------------------------------------------------------------------------------------63
6-2 Starting a Warm Engine -------------------------------------------------------------------------------------------------------64
6-3 Break-In----------------------------------------------------------------------------------------------------------------------------65
6-4 Manual Shift ----------------------------------------------------------------------------------------------------------------------67

13
7. MAINTENANCE & ADJUSTMENT----------------------------------------------------------------------------------------------------71
7-1 Work safely------------------------------------------------------------------------------------------------------------------------72
7-2 Maintenance schedule---------------------------------------------------------------------------------------------------------78
7-3 Air Filter----------------------------------------------------------------------------------------------------------------------------80
7-4 Frame, Subframe, Swingarm-------------------------------------------------------------------------------------------------81
7-5 Fuel ---------------------------------------------------------------------------------------------------------------------------------84
7-6 Engine Oil--------------------------------------------------------------------------------------------------------------------------87
7-7 Engine Cooling System -------------------------------------------------------------------------------------------------------92
7-8 Brakes -----------------------------------------------------------------------------------------------------------------------------96
7-9 Electrical -------------------------------------------------------------------------------------------------------------------------103
7-10 Air --------------------------------------------------------------------------------------------------------------------------------115
7-11 Exhaust-------------------------------------------------------------------------------------------------------------------------114
7-12 Suspension--------------------------------------------------------------------------------------------------------------------115
7-13 Wheels--------------------------------------------------------------------------------------------------------------------------116
7-14 Tires------------------------------------------------------------------------------------------------------------------------------119
7-15 Vehicle Immersion -----------------------------------------------------------------------------------------------------------122
8. CLEANING---------------------------------------------------------------------------------------------------------------------------------123
9. STORAGE----------------------------------------------------------------------------------------------------------------------------------125
10. TRANSPORTING-----------------------------------------------------------------------------------------------------------------------126
11. TROUBLESHOOTING----------------------------------------------------------------------------------------------------------------127
12. MODEL SPECIFICATION------------------------------------------------------------------------------------------------------------130
12-1 ENGINE------------------------------------------------------------------------------------------------------------------------130
12-2 CHASSIS-----------------------------------------------------------------------------------------------------------------------132
12-3 BATTERY-----------------------------------------------------------------------------------------------------------------------134

OWNER’S MANUAL
14
13. QUAD LIMITED WARRANTY-------------------------------------------------------------------------------------------------------137
13-1 WARRANTY CONDITIONS-----------------------------------------------------------------------------------------------137
13-2 WARRANTY PERIOD-------------------------------------------------------------------------------------------------------137
13-3 WARRANTY TRANSFER--------------------------------------------------------------------------------------------------137
13-4 WARRANTY EXCLUSION-------------------------------------------------------------------------------------------------137
13-5 COMPETITION MODEL EXCLUSION----------------------------------------------------------------------------------137
13-6 PARTS AND LABOR COVERED BY WARRANTY------------------------------------------------------------------138
13-7 PARTS AND LABOR NOT COVERED BY WARRANTY-----------------------------------------------------------138
13-8 WARRANTY LIMITATION--------------------------------------------------------------------------------------------------140
14. MAINTENANCE RECORD-----------------------------------------------------------------------------------------------------------141
ADDENDA-------------------------------------------------------------------------------------------------------------------------------------142

15
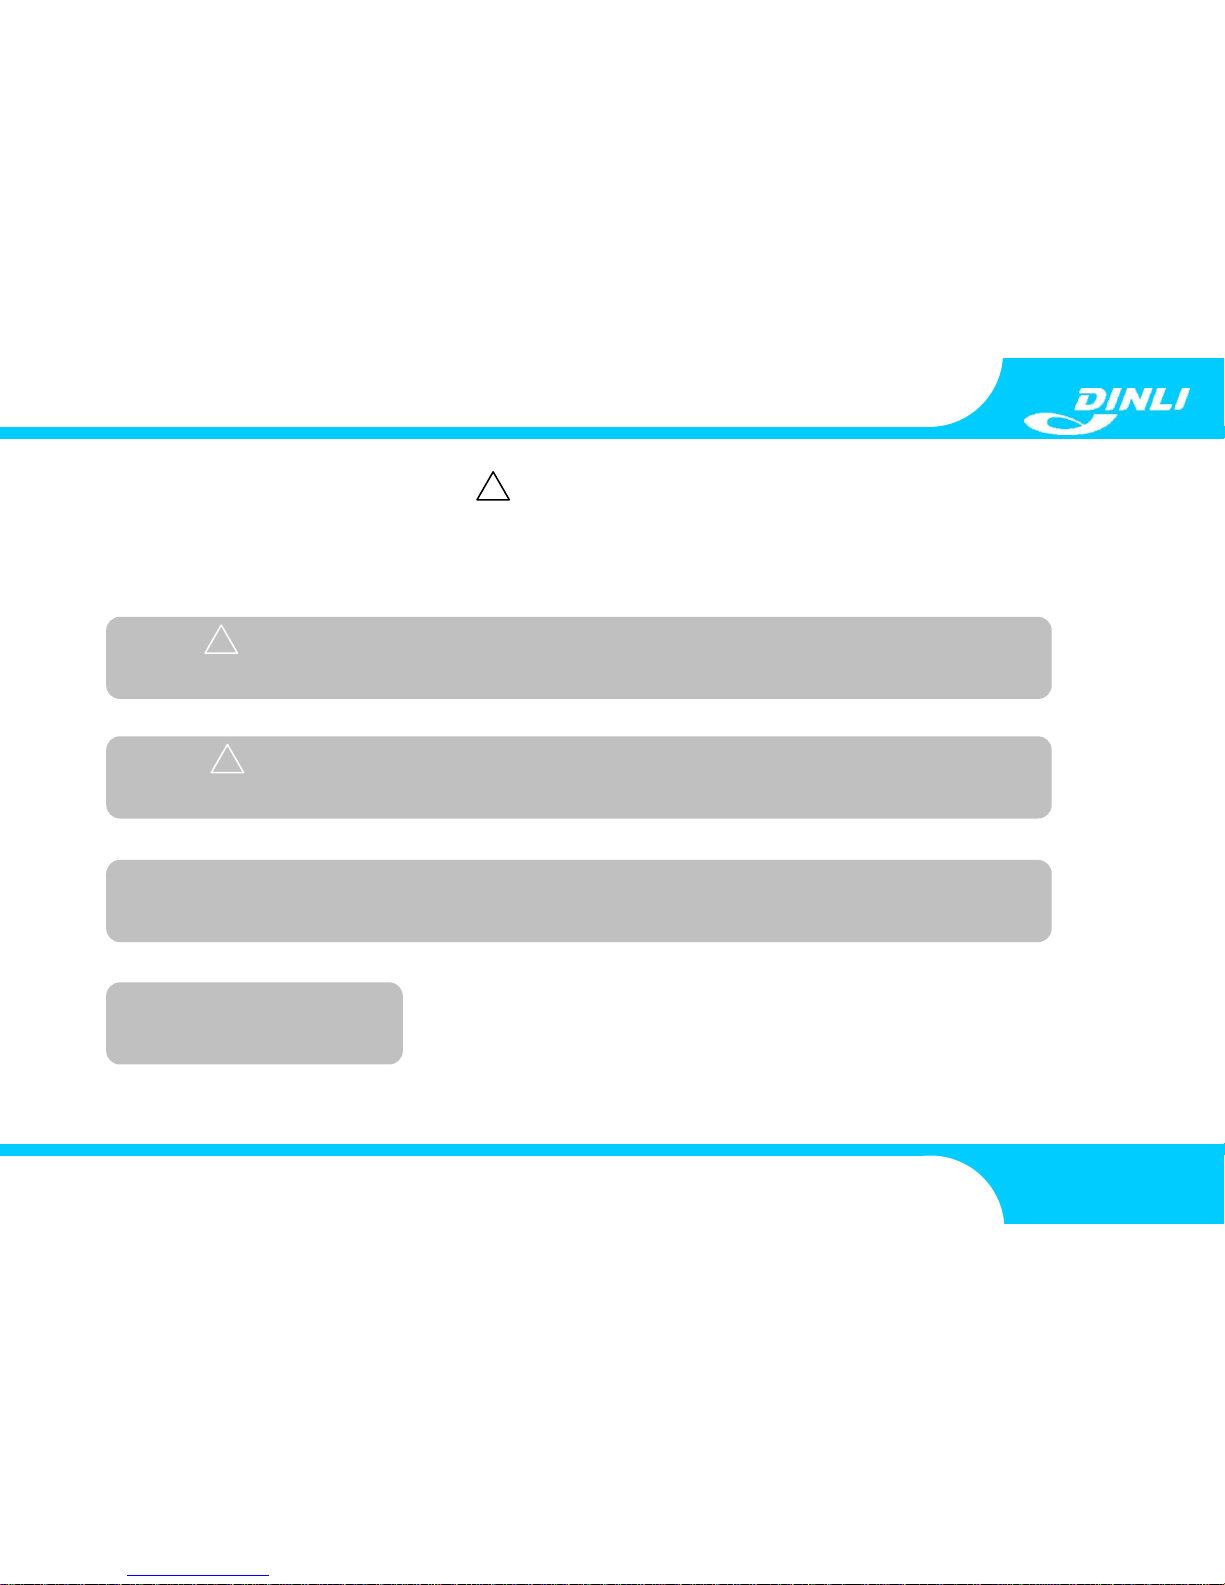
Examples of all vehicle warning labels are found in this section. Read and understand the actual ones on your
vehicle. The labels contain information which is important to your safety and that of anyone else who operates the
quad.
● The warning labels should be considered permanent parts of vehicle, they are needed parts for any operator.
● If any label is missing, worn, damaged, or becomes unreadable, be sure to replace it.
Dinli offers replacement labels at no charge. A label's number is printed in the lower right corner of the label and
here parts number in the manual. Contact an authorized Dinli dealer for replacements.
● Label locations are shown in the following illustration. Examples of the labels are shown on the following pages.
● Always replace labels in the correct position. See the illustration for the correct location of the warning labels on
your vehicle.
1. LOCATION OF THE WARNING AND SPECIFICATION LABELS
OWNER’S MANUAL
16

17
Do not consume alcohol,
drugs or cigarettes before or
during operating the ATV
Maximum Vehicle Load:
200kg, (441 lbs)
Includes weight of operator,
cargo and accessories.
Never load over 165kg or
may cause loss of control.
Always wear protective
clothing when driving your
ATV.
Always stop the vehicle
completely before changing
from forward into reverse or
vice versa.
Failure to do so may harm
the gear box.
Operating this ATV if you are
under the age of 16
increases your chance or
severe injury or death
Never operate this ATV if
you are under age 16.
Read the Owner’s Manual
before riding the vehicle.
OWNER’S MANUAL
18
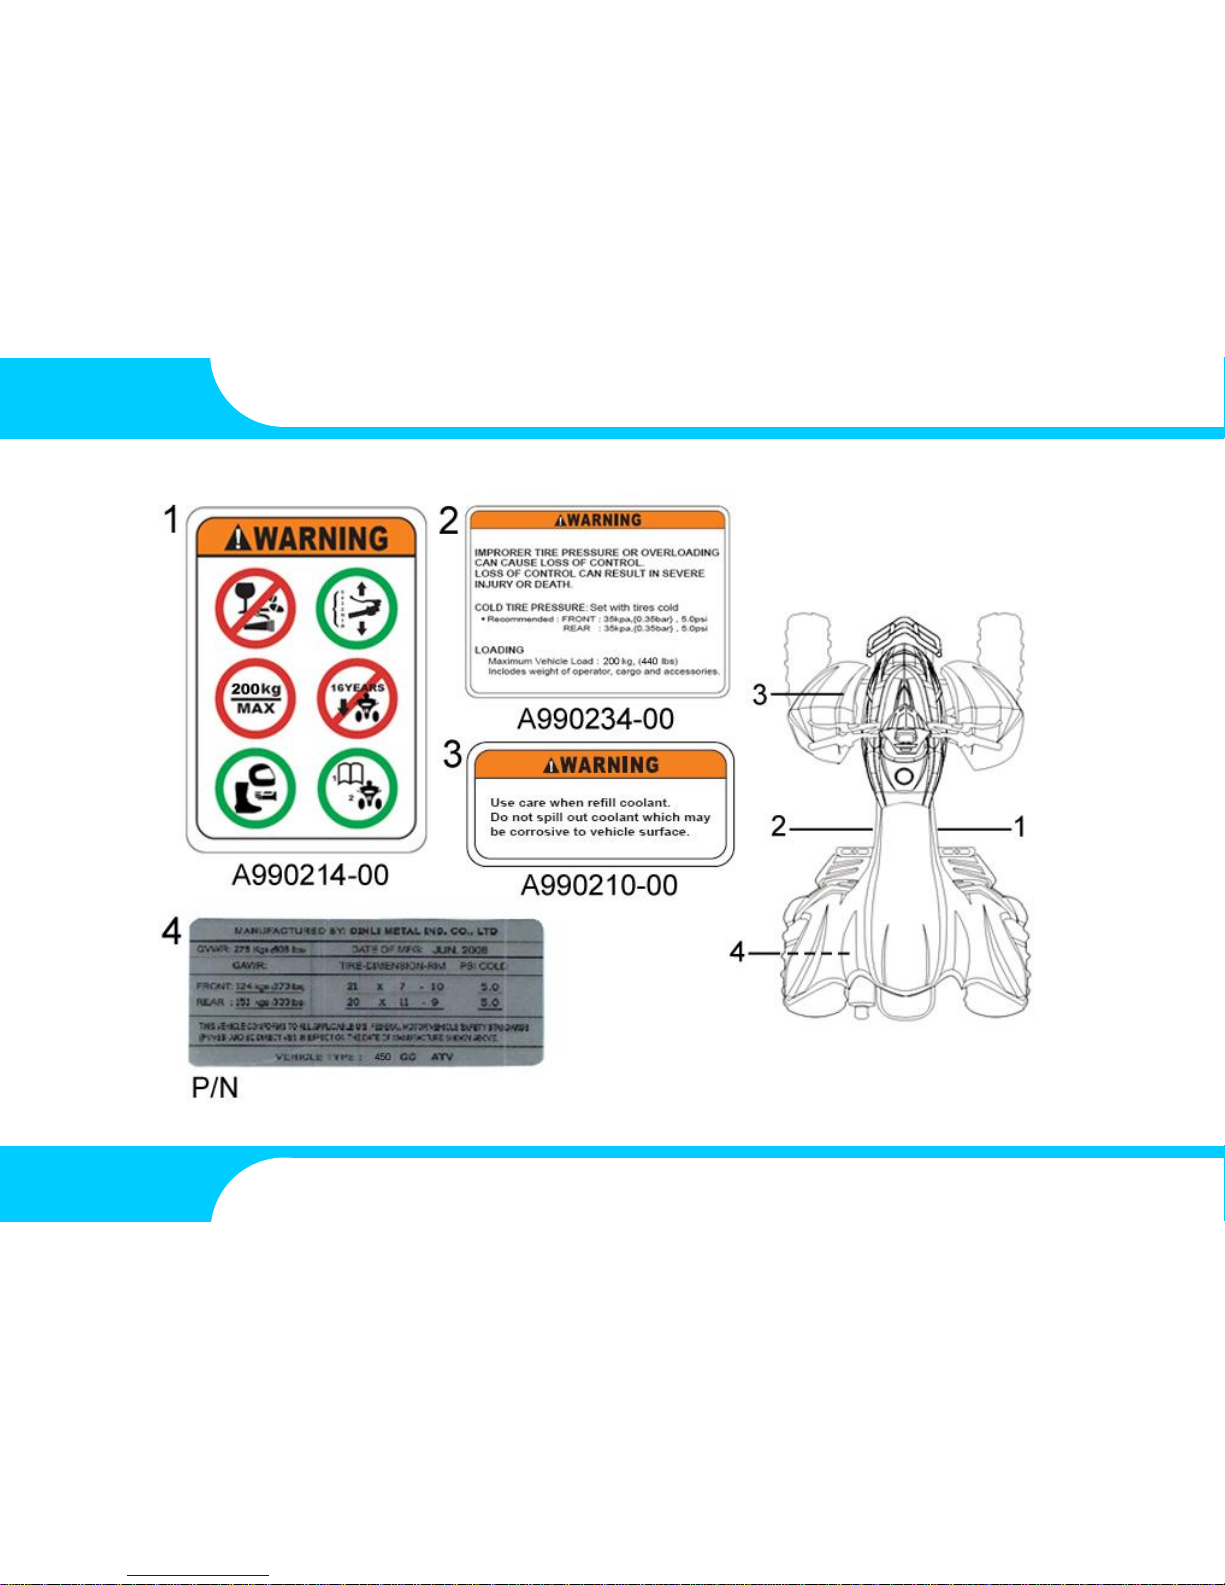
Record your vehicle's identification numbers in the spaces provided. Keep another record of the numbers in a safe
place; you may need them for parts, service information, or theft recovery. Your vehicle's ID numbers identify it from
others of the same model type.
2. MACHINE IDENTIFICATION
NOTE:
Your vehicle may differ from those shown in the illustrations in this manual.
Engine serial number
Factory VIN label
Vehicle identification
number (VIN)
19
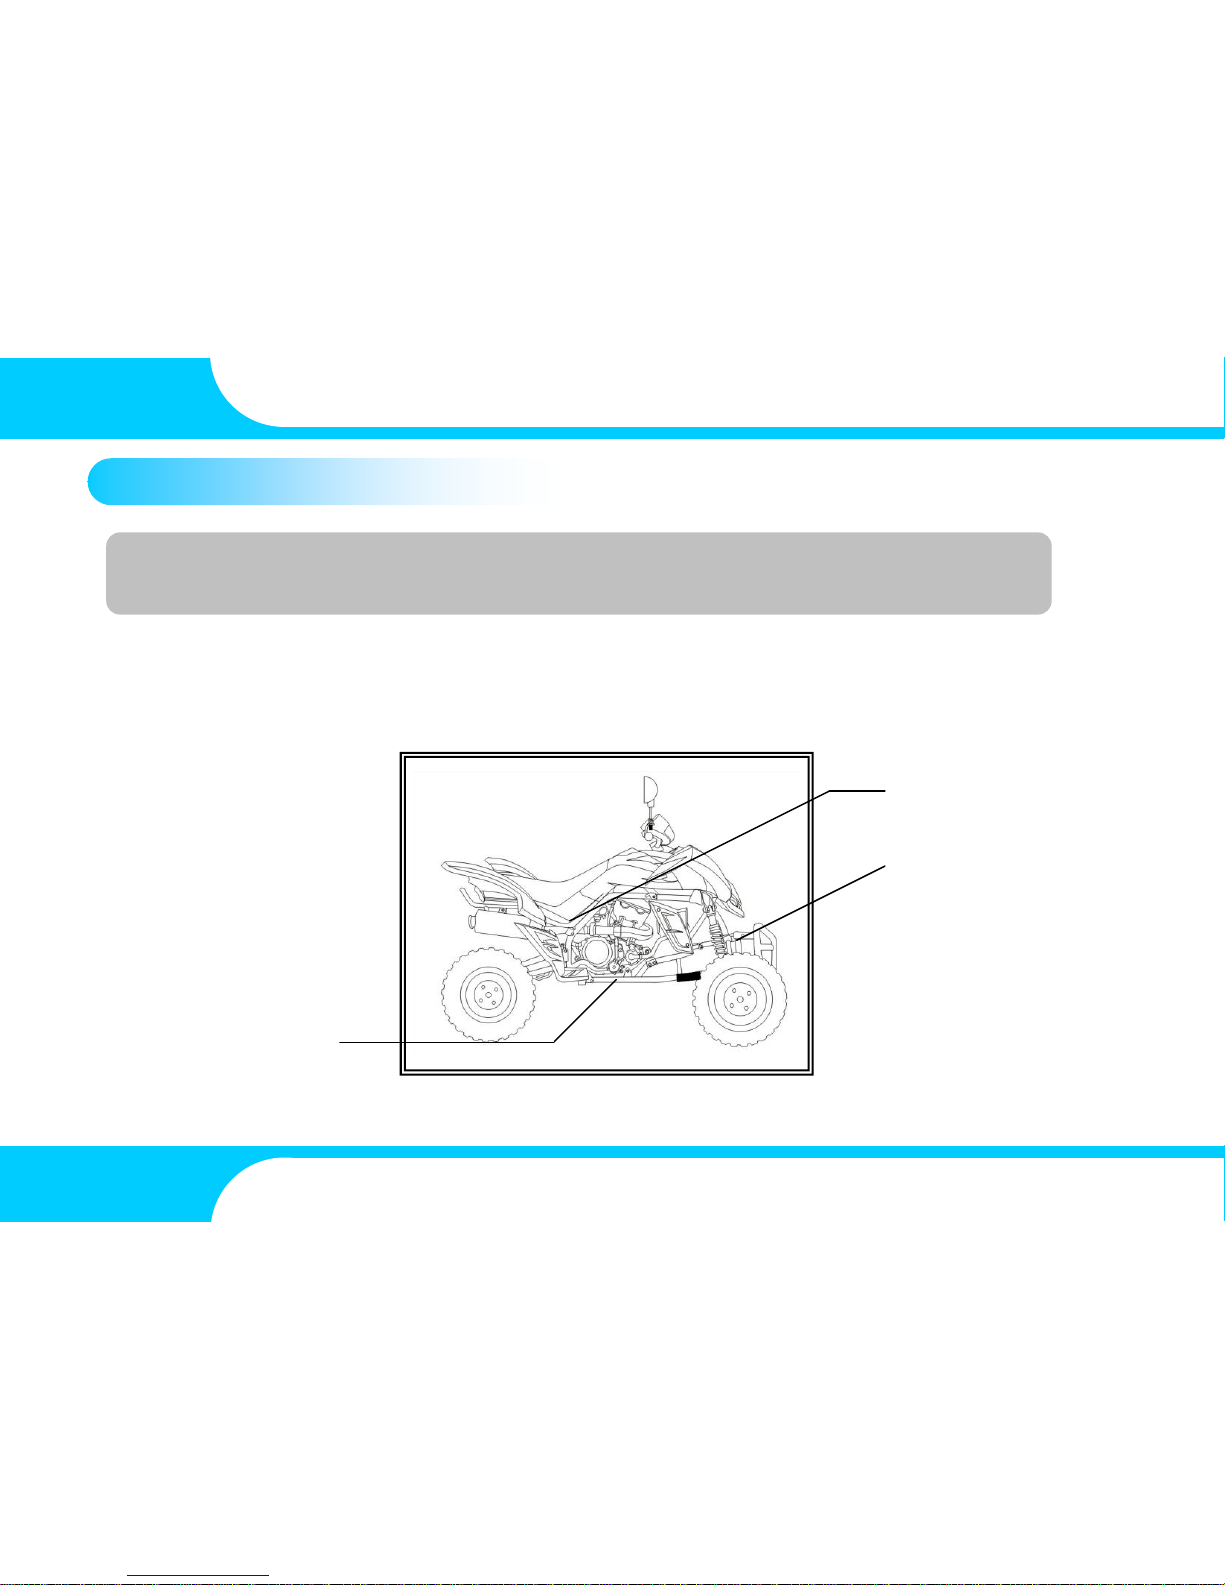
2-1 VEHICLE IDENTIFICATION NUMBER (VIN)
The vehicle identification number (VIN) is etched / stamped into the right side of frame.
The VIN also appears on a temporary factory applied adhesive label on the front frame
1. Etched vehicle identification number 2. Factory VIN LABEL
Write your number here
OWNER’S MANUAL
20
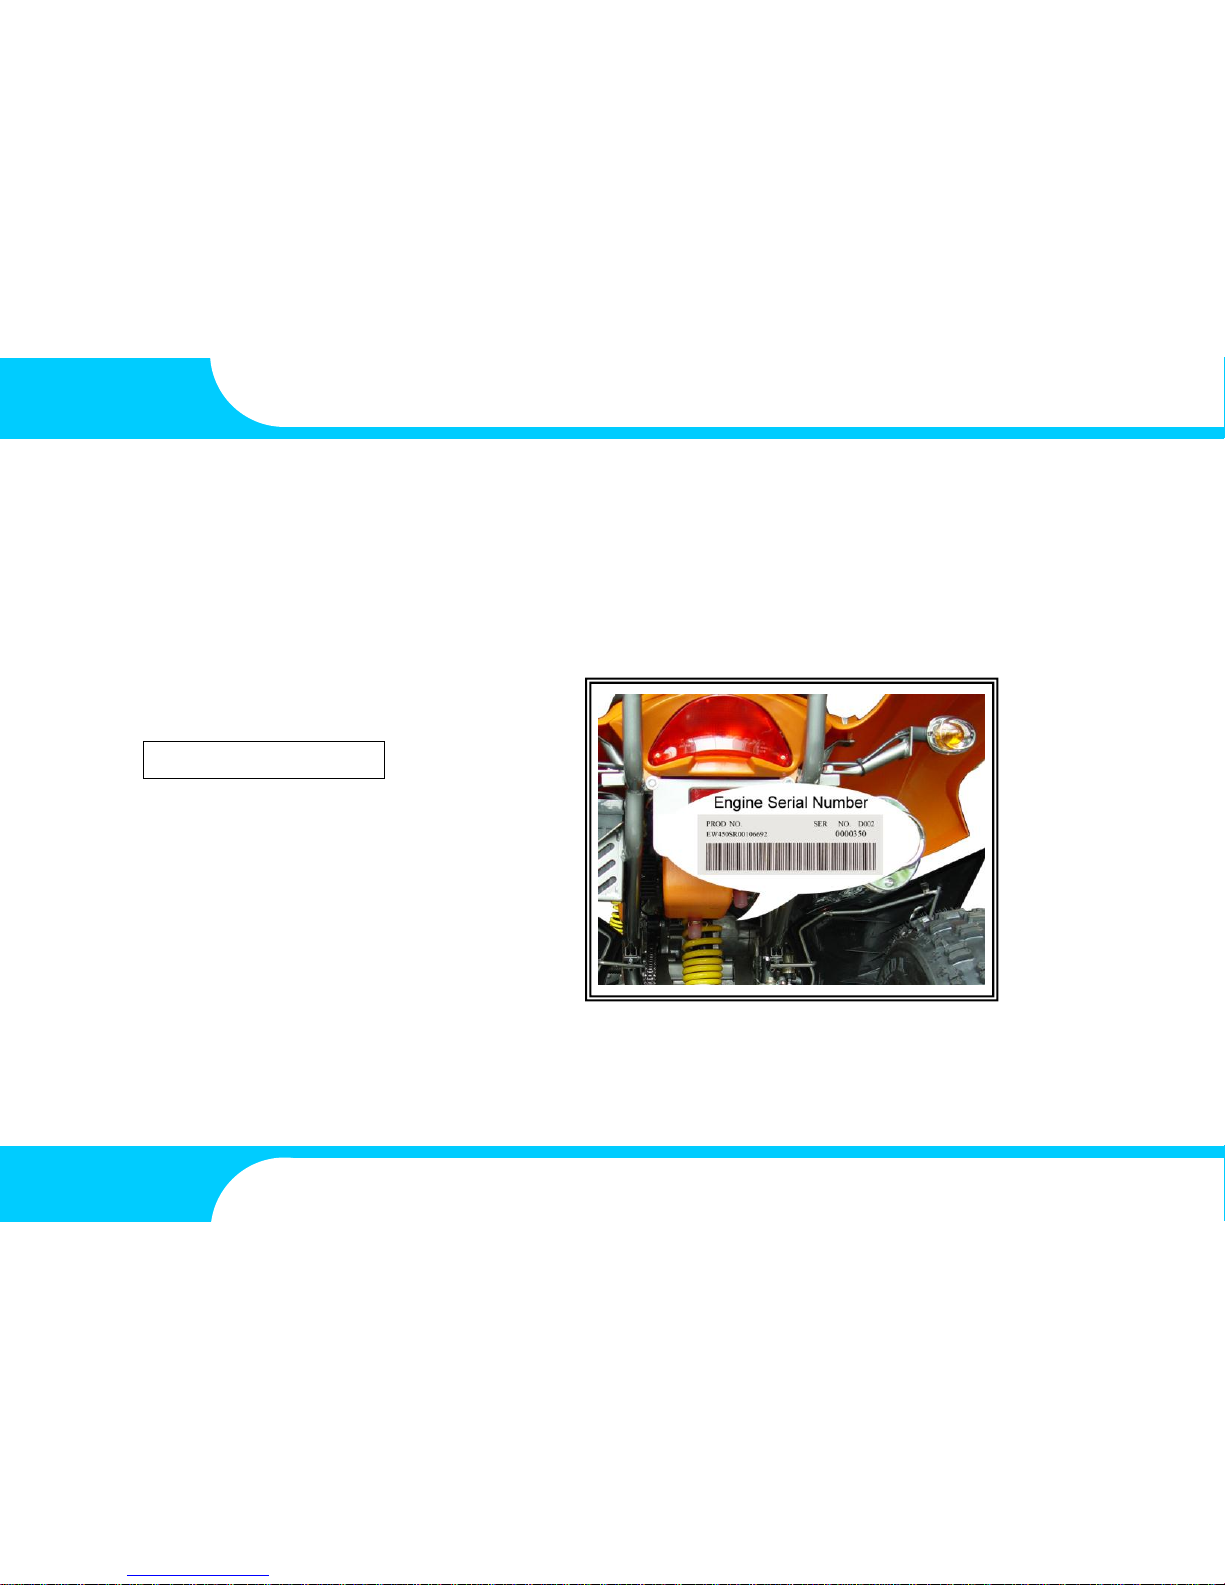
2-2 ENGINE SERIAL NUMBER
The engine serial number is etched / stamped into the left crankcase of the engine.
1. Engine serial number
Write your number here
21
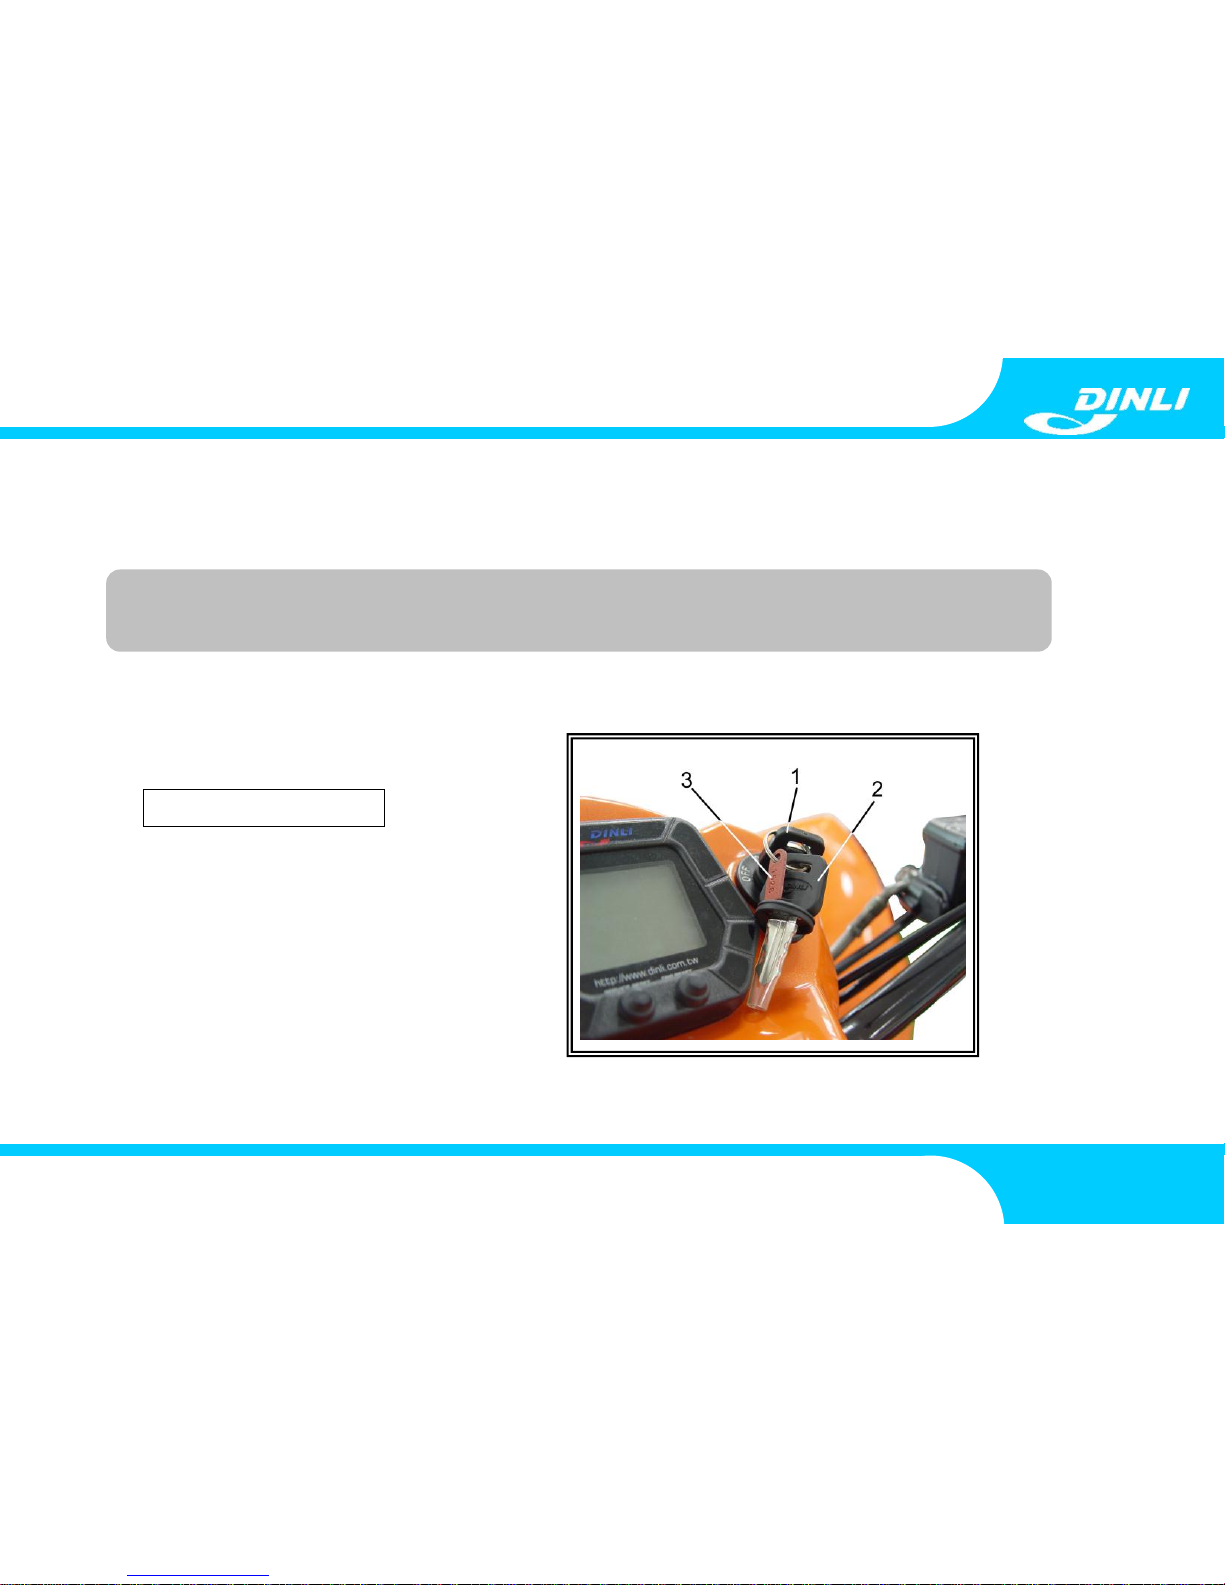
2-3 KEY ID NUMBER
Key identification numbers are etched / stamped into key tag.
1. Primary key
2. Spare key
3. Tag (With Key ID number)
Write your number here
NOTE:
Keep your spare key in a safe place in case you lose the primary key.
OWNER’S MANUAL
22
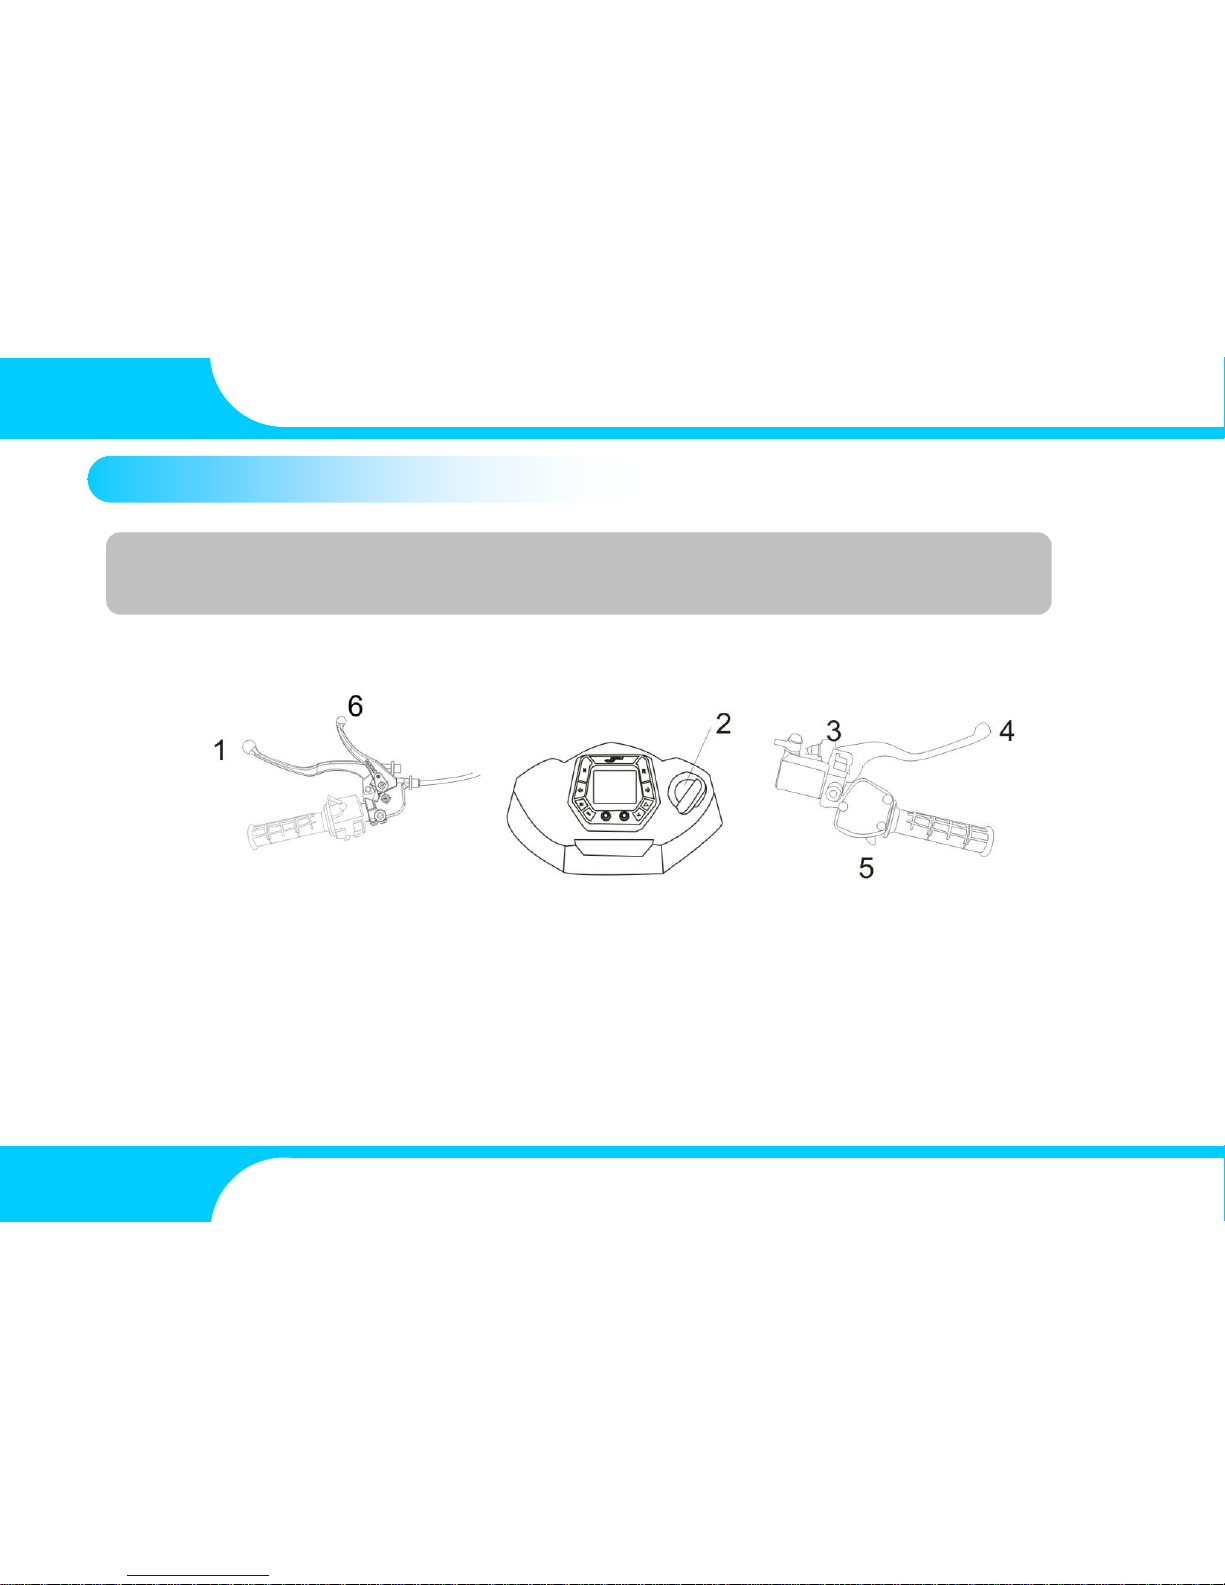
1. Clutch lever 4. Rear brake lever
2. Main switch 5. Throttle lever
3. Parking brake lock 6. Parking brake lever
3. PARTS AND CONTROL FUNCTIONS
NOTE:
Your vehicle may differ slightly from those shown in the illustrations in this manual.
23
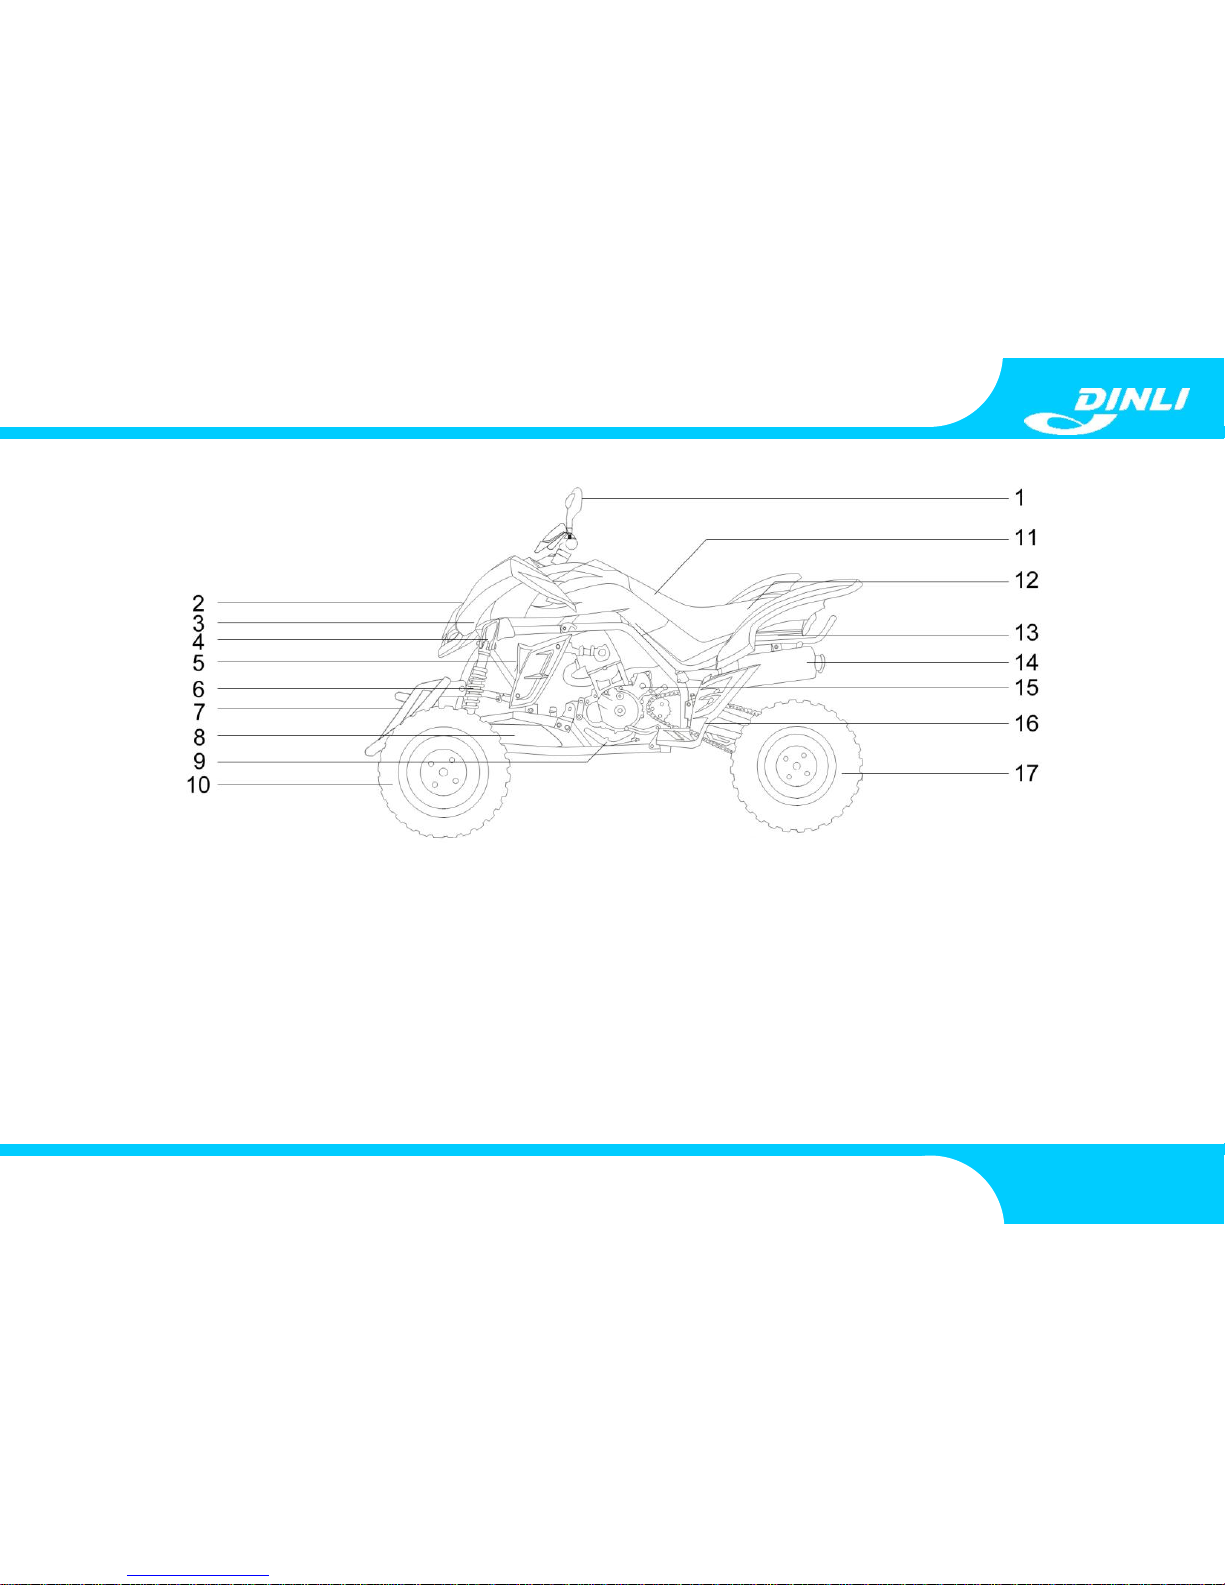
1. Rear mirror 8. Oil tank 15. Starter motor
2. Headlight assembly 9. Shift lever 16. Footpeg & Footboard
3. Fuel pump 10. Front wheel 17. Rear wheel
4. Coolant recovery bottle 11. Seat
5. Radiator 12. Air filter(under seat)
6. Front shock absorber 13. Battery
7. Front bumper 14. Muffler

OWNER’S MANUAL
24
18. Speedometer & Indicator lights 20. Tail light (stop light)
19. Handlebar assembly 21. Rear turn signal lights
Start switch 22. Rear shock absorber
Hazard switch 23. Front turn signal lights
Horn button 24. Handle grips
Lights switch 25. Fuel tank
Turn signal switch 26. Rear brake caliper
25
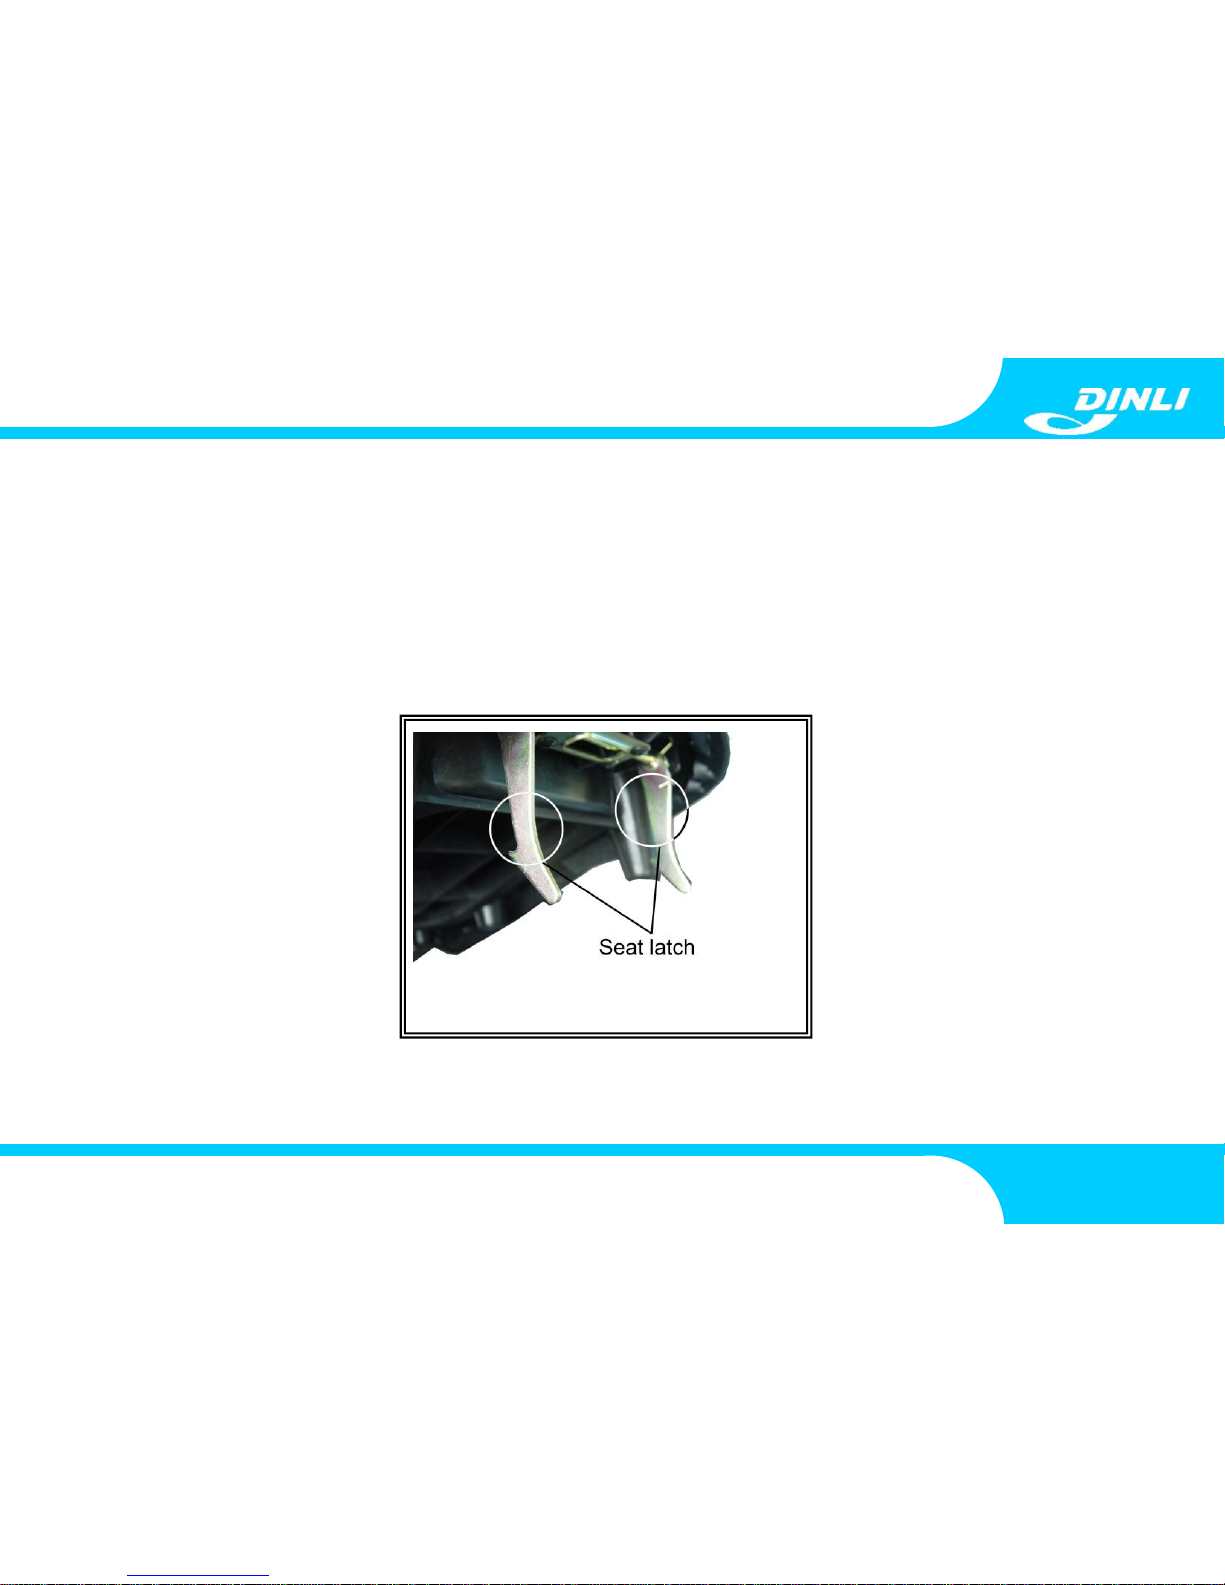
3-1. SEAT
The entire length of the seat is required so that you can shift body weight / position while riding to maintain vehicle
control and stability. Make sure the seat is in good condition and fastened securely before you ride.
1. To remove the seat, pull away the seat latch from the sub-frame.
2. Use your fingertips to lift up the rear of the seat slightly. Then, pull the seat back toward the rear of the vehicle and
lift it off.
OWNER’S MANUAL
26
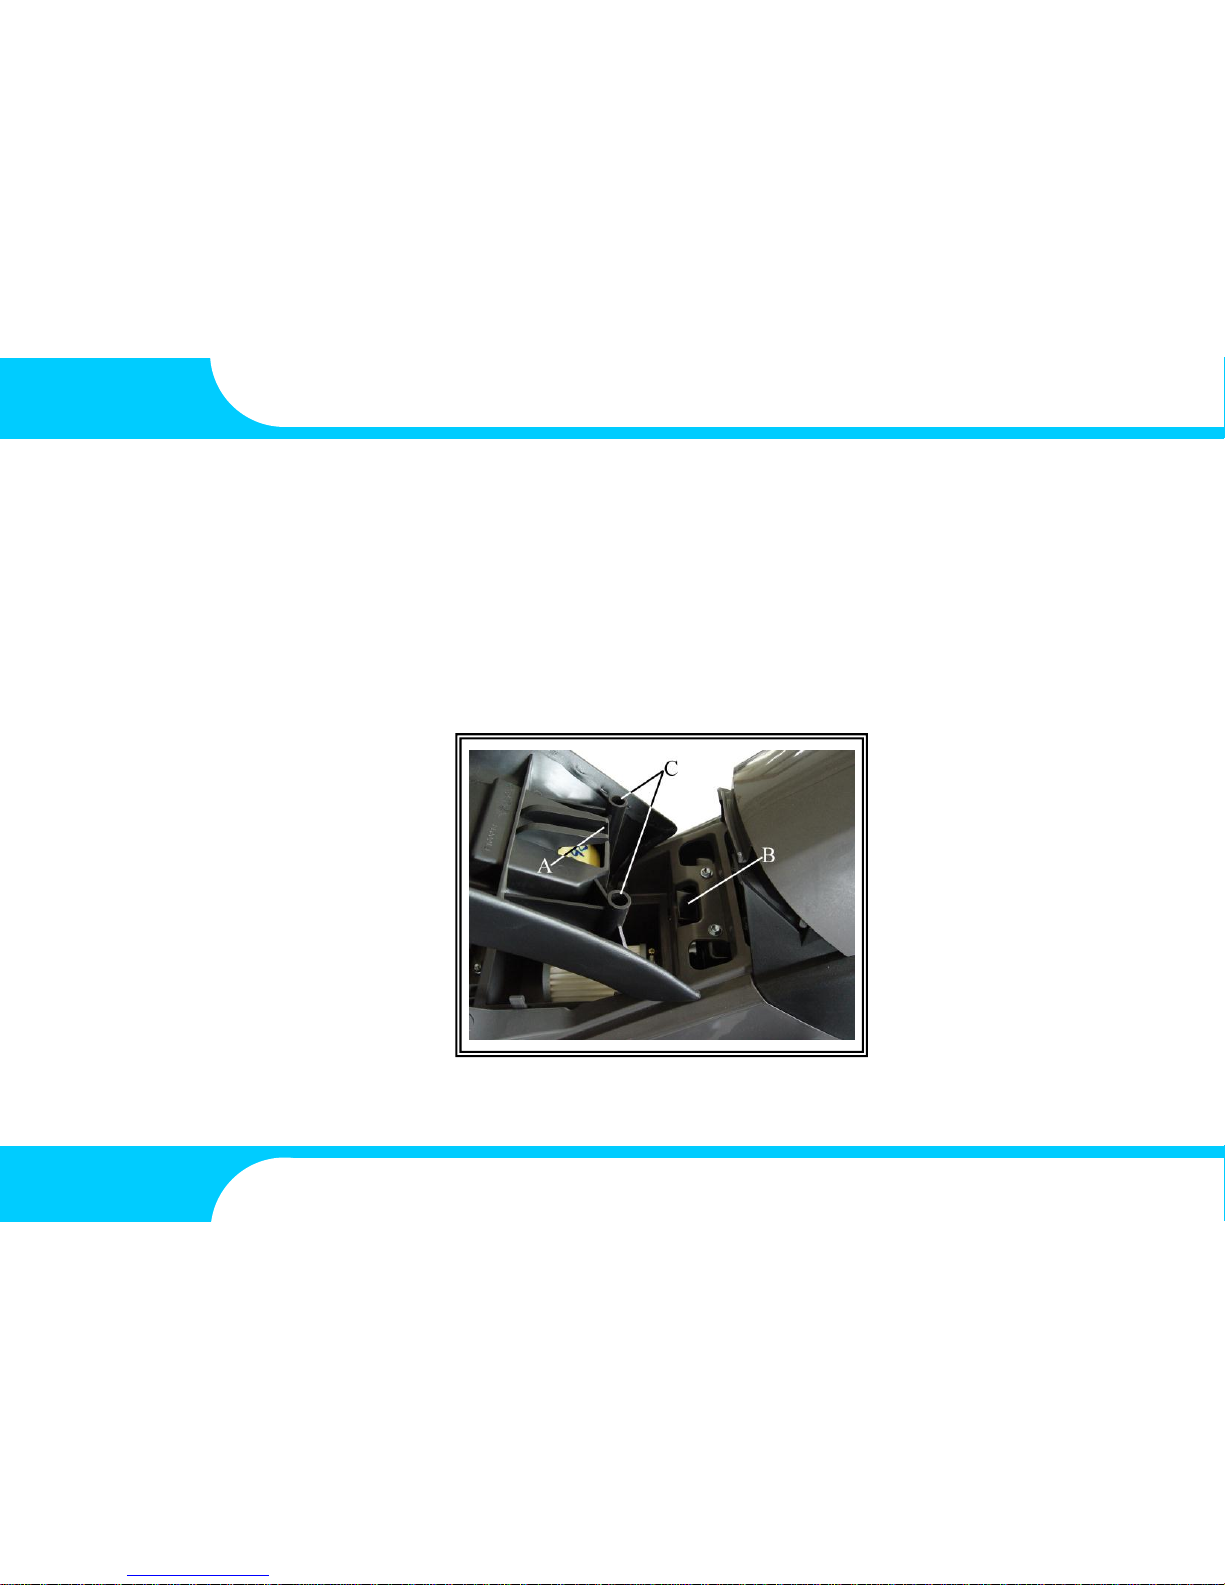
3. To install the seat, align the receiver on the seat with the catch on the frame and put the stoppers in the holes.
4. Press down gently on the middle of the seat and slide the seat forward onto the catch of frame.
If correctly aligned, the rear seat pegs will slip easily.
A. Catch
B. Receiver
C. Stoppers

27
When reading this manual, remember:
WARNING
POTENTIAL HAZARD
Loose, damaged, or improperly installed seat
WHAT CAN HAPPEN
The seat can shift or come off while you are riding causing you to lose control of the vehicle, you can
be severely injured or death.
HOW TO AVOID THE HAZARD
Always make sure the seat is locked into position on the mounts and secured properly with the
retention bolt, Never ride the quad with a damaged seat. Have it replaced.
!
CAUTION
Do not force the seat pegs through the holes in the rear fender or sub-frame buffers; you could
damaged the seat.
WARNING
Indicates a potential hazard that COULD result in serious injury or death.
!
OWNER’S MANUAL
28
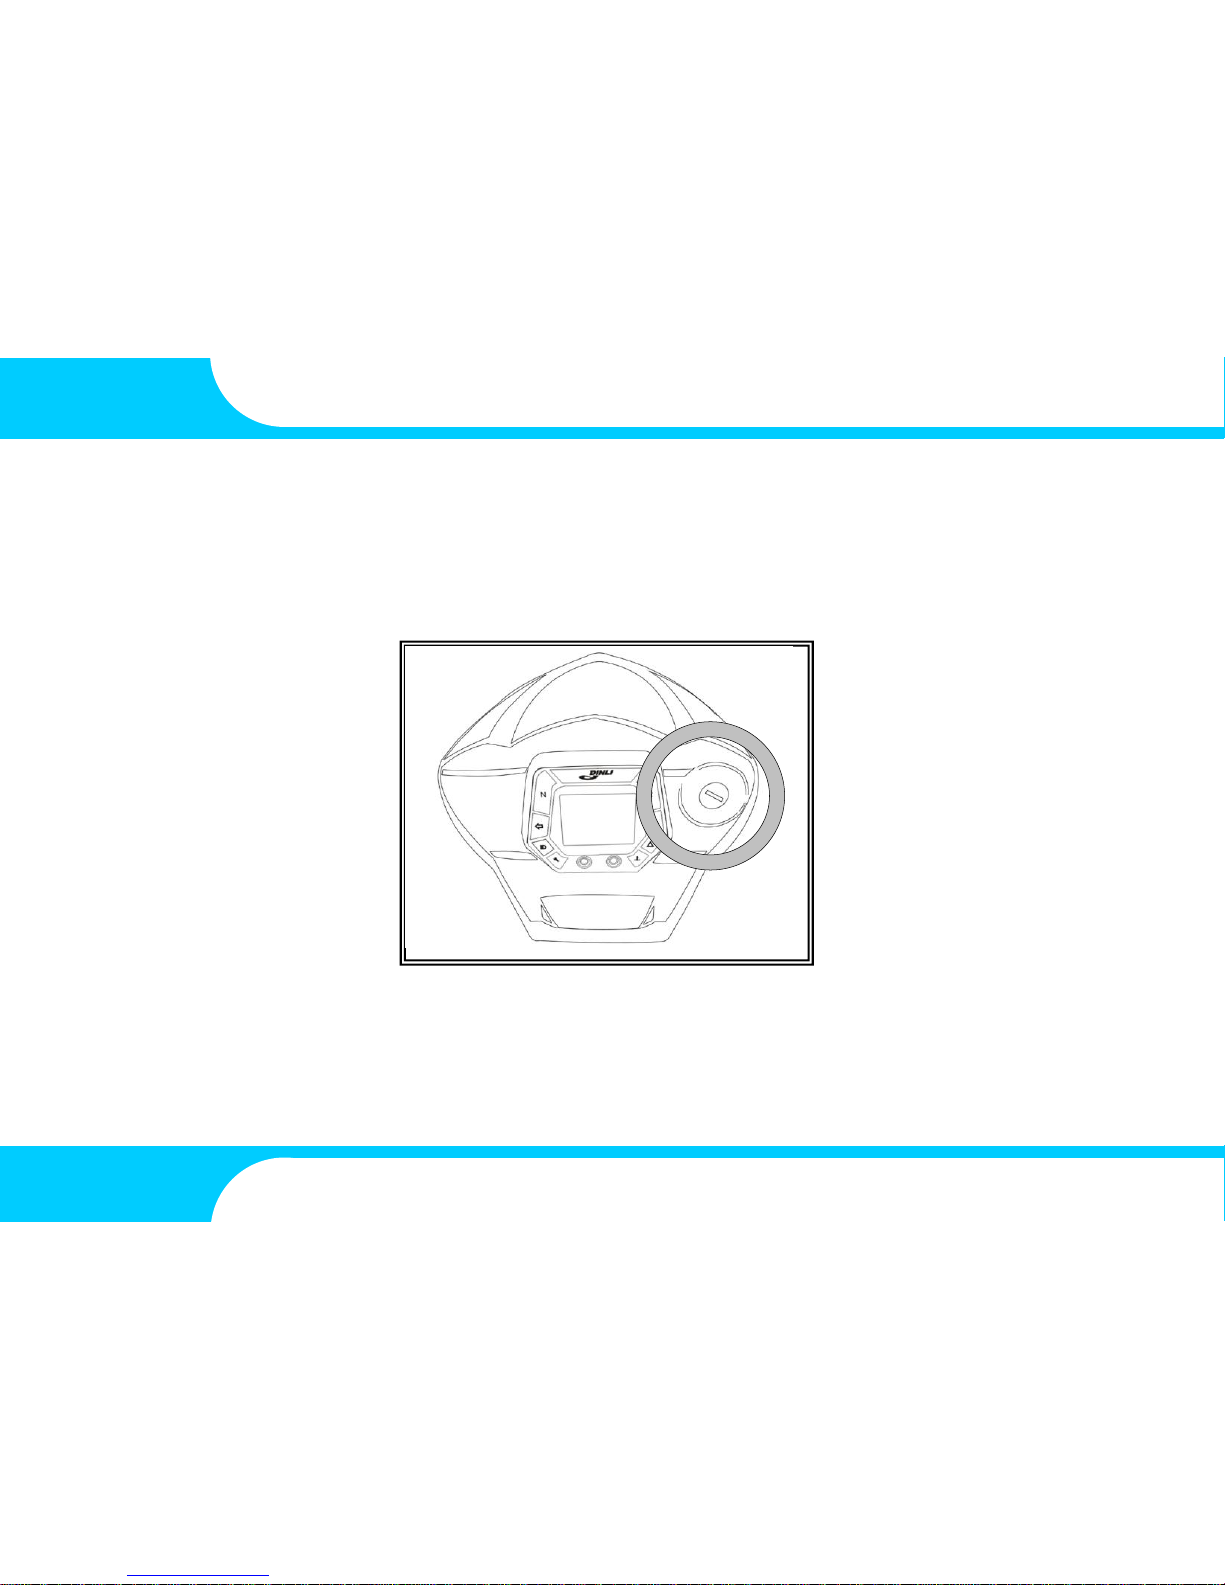
3-2. MAIN SWITCH
The main switch is located between the handlebars. Always remove the key from the switch to help prevent
unauthorized vehicle use or theft.
Ignition switch (key shown inserted) & Switch positions
29
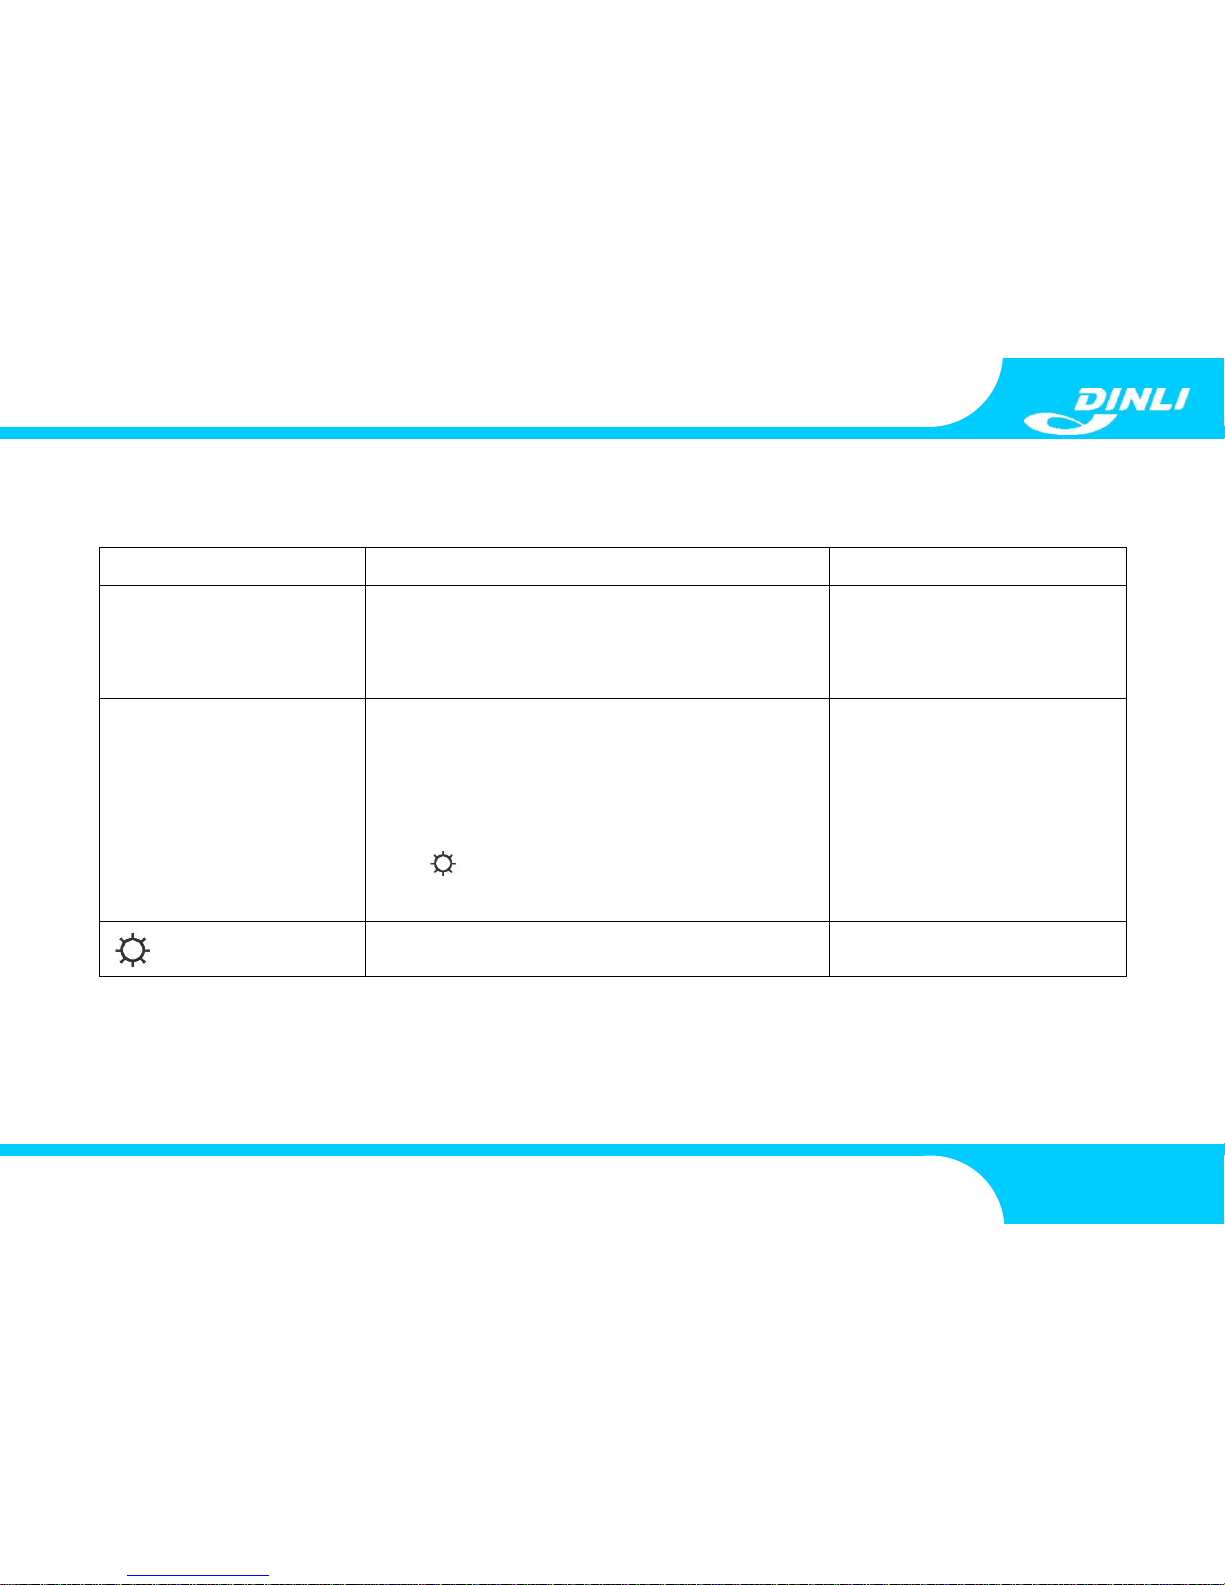
Functions of the respective switch position are as follows:
Key position
Function
Key
“OFF”
The engine and lighting cannot be operated.
Turning the main switch to the “OFF” position,
will stop a running engine.
Removal
“ON”
With the brake lever pulled in, the engine started
using the switch.
We recommend starting the engine with the
main switch in the “ON” position then switch to
the “ “position.
ON
Lighting (headlights and taillight are activated)
ON
OWNER’S MANUAL
30
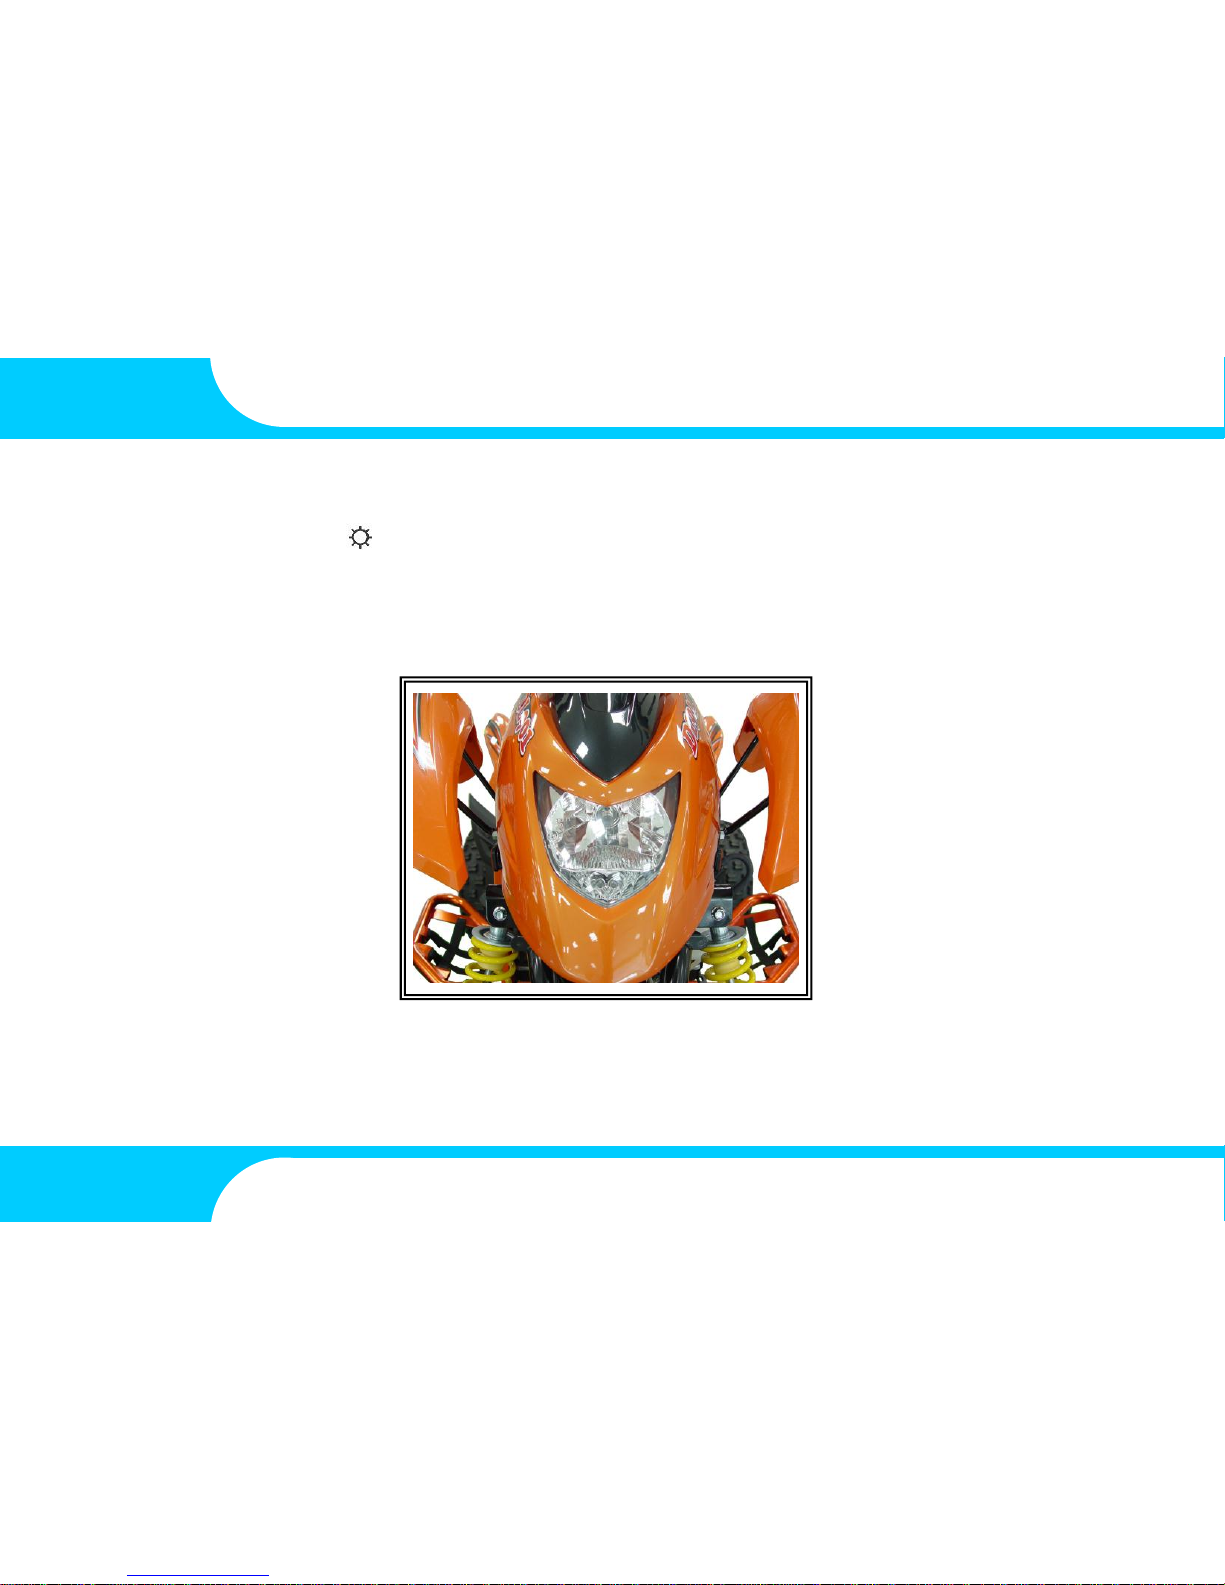
3-3. HEADLIGHT
Turn the main switch to the “ ” position to activate the headlights. Test for the proper operation of the headlights
before operating the vehicle.
Headlight
 Loading...