

Page 1

DIGNO® F
User Guide
Page 2

Page 3

DIGNO® F User Guide Contents
1
Introduction
Introduction.........................................................................3
Getting Started
Package Contents............................................................... 6
Parts & Functions.............................................................. 6
USIM Card............................................................................ 7
Internal Storage & SD Card.............................................10
Charging Battery.............................................................. 13
Power On/Off................................................................... 14
Using Touchscreen............................................................ 15
Basic Operations
Basic Operations...............................................................18
Phone Number................................................................... 20
Silent Mode....................................................................... 20
Airplane Mode................................................................... 21
Text Entry.........................................................................21
Using a Google Account................................................... 22
Google Play....................................................................... 23
Security Codes.................................................................. 25
USIM PIN............................................................................26
Entering Sleep Mode........................................................ 27
Updating Software........................................................... 27
Handset Interface
Home Screen Basics..........................................................30
Status Bar......................................................................... 30
Using Notifications Window............................................ 32
Phone
Placing/Answering Calls...................................................34
Optional Services..............................................................35
Using Contacts..................................................................40
Messaging & Internet
Messaging.......................................................................... 42
Sending S! Mail/SMS.........................................................42
Using Gmail....................................................................... 43
Using Chrome.................................................................... 44
Camera
Capturing Still Images/Videos......................................... 48
Music & Images
Music Files.........................................................................50
Still Images/Videos...........................................................50
Connectivity
Connecting by Wi-Fi.........................................................52
Using Bluetooth® Function.............................................. 53
Exchanging Data by Infrared...........................................53
DIGNO
®
F
Page 4

2
Global Services
Making Calls while Abroad.............................................. 56
Handset Settings
Handset Settings.............................................................. 60
Profile................................................................................ 61
Wi-Fi Settings...................................................................61
Bluetooth Settings........................................................... 62
Data Usage Settings.........................................................63
More Settings................................................................... 63
Changing Home..................................................................64
Call Settings..................................................................... 64
Display Settings................................................................65
Sound & Notification Settings........................................65
App Settings..................................................................... 66
Storage Settings...............................................................67
Battery Settings...............................................................67
Eco Mode Settings............................................................68
Memory Settings...............................................................68
Location Settings............................................................. 69
Start Screen Settings...................................................... 69
Security Settings..............................................................70
Account Settings.............................................................. 71
Language & Input Settings..............................................72
Backup & Reset.................................................................72
Date & Time Settings...................................................... 73
Accessibility Settings.......................................................73
Printing Settings.............................................................. 74
About Phone......................................................................75
For Assistance
Specifications....................................................................78
Materials............................................................................78
Customer Service.............................................................. 79
Safety Precautions
Safety Precautions........................................................... 82
General Notes................................................................... 90
Water/Dust/Shock Resistance......................................... 96
Page 5
Introduction
Introduction
Thank you for purchasing DIGNO® F.
Before You Begin
・DIGNO® F is referred to as "handset" in this guide.
・Read "Safety Precautions" and this guide thoroughly
beforehand for proper usage.
・Accessible services may be limited by contract conditions.
・Unauthorized copying of any part of this guide is
prohibited.
・Guide content subject to change without prior notice.
・Contact SoftBank Customer Support, General Information if
you find inaccuracies.
Guide Usage Notes
・Most operation descriptions are based on default settings.
・Unless noted otherwise, descriptions are for Home Screen.
・Some operation descriptions may be omitted.
・In this guide and on handset, "abroad" means "outside Japan"
with regard to handset/service usage.
・In this guide, microSD™/microSDHC™/microSDXCTM Card is
referred to as "SD Card."
3
Introduction
Screenshots & Key Labels
Screenshots and Key labels are provided for reference only.
Actual handset windows, menus, etc. may differ in appearance.
Accessing Guide on Handset
Access this Guide on handset via Guide icon in Apps Menu or
via Guide indicator on Status Bar.
Guide indicator is hidden on Status Bar by default. Follow
these steps to show Guide indicator:
Access Guide Indicator on BACK
DIGNO
®
F
Page 6

4
Page 7

Getting Started
Package Contents............................................................... 6
Parts & Functions.............................................................. 6
USIM Card............................................................................ 7
Internal Storage & SD Card.............................................10
Charging Battery.............................................................. 13
Power On/Off................................................................... 14
Using Touchscreen............................................................ 15
Page 8
6
Package Contents
Package Contents
・Handset (DIGNO® F)
(Battery is built in)
・クイックスタート (Japanese)
・お願いとご注意 (Japanese)
・Warranty (Japanese)
・microSDHC™ memory card (16 GB)(complimentary sample)
Parts & Functions
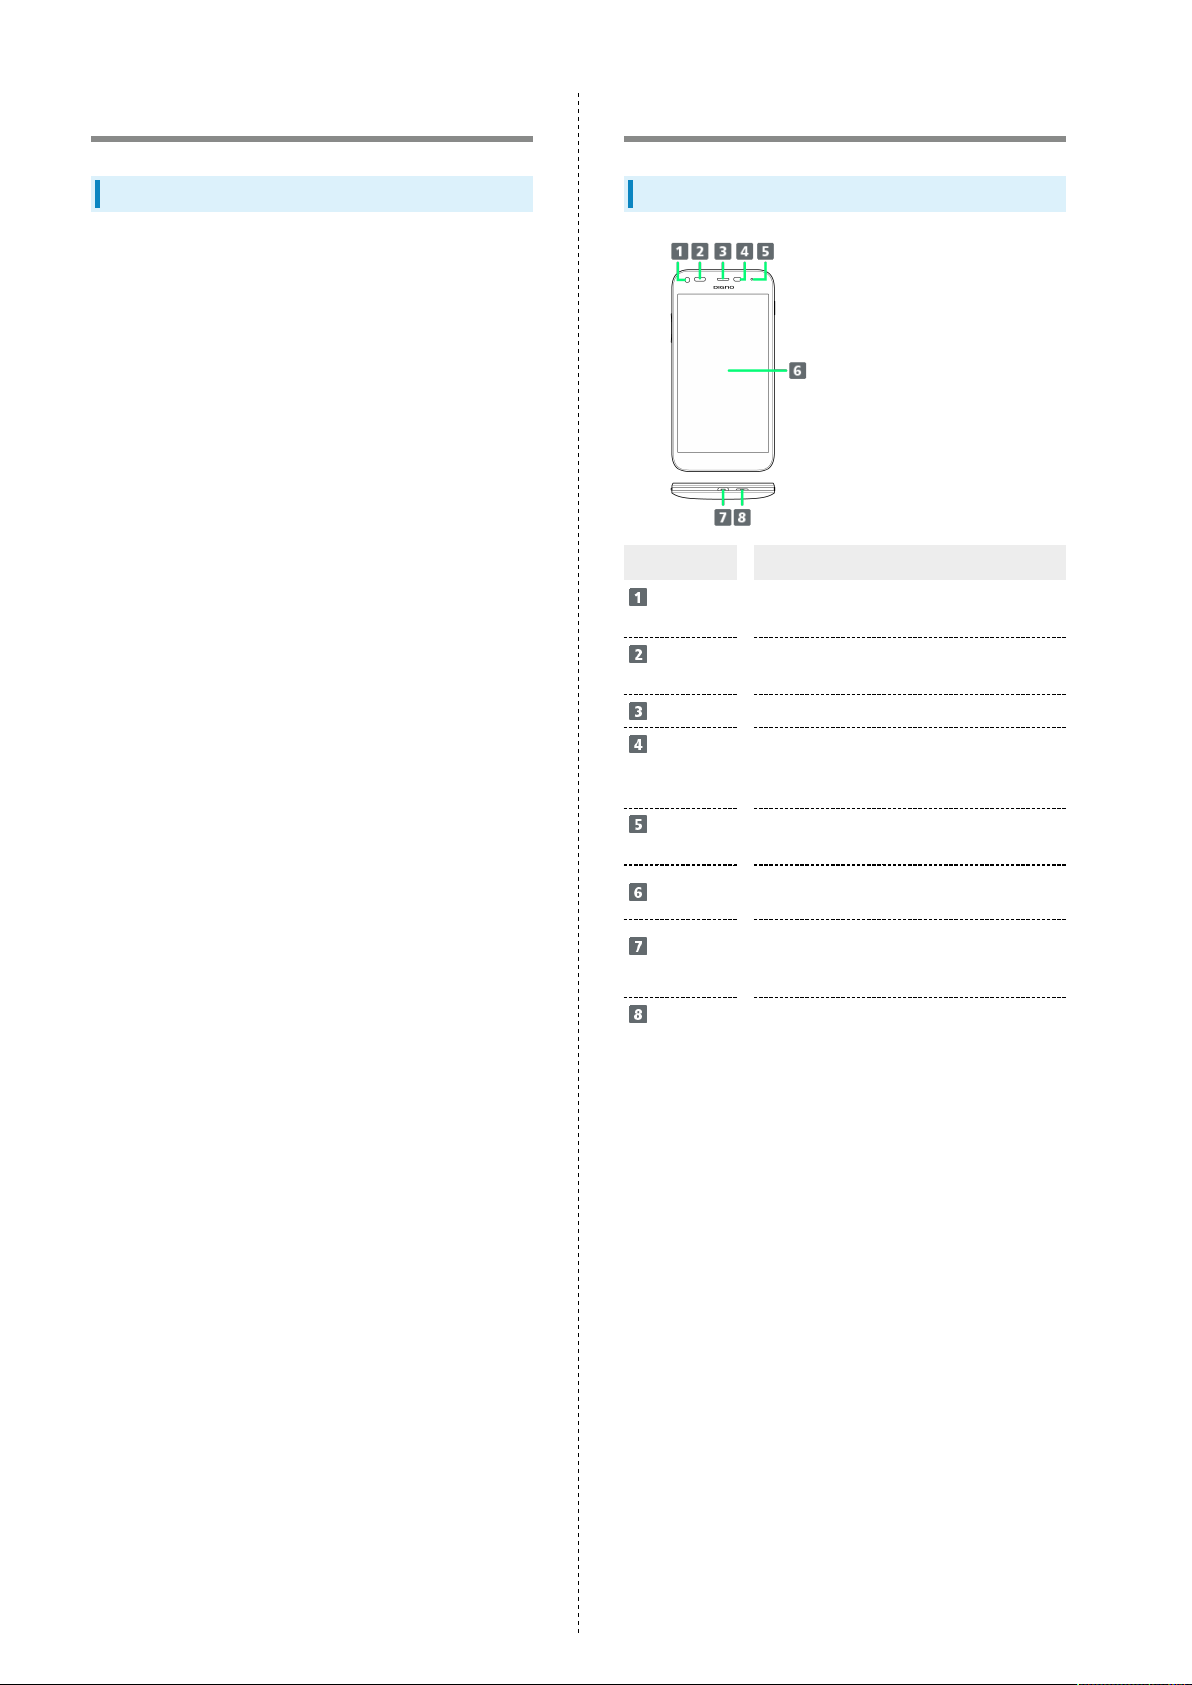
Handset
Part Description
Front
Camera
Infrared
Port
Earpiece
Light/
Proximity
Sensor
Incoming/
Charging LED
Display
External
Device Port
Mic
Take still images or videos of yourself,
etc.
Transfer by infrared
Hear the other party's voice here
Detects surrounding brightness/prevents
Touchscreen misoperation during call
Lights/flashes while charging or for
arriving calls/mail
Touchscreen-type display, operate with
your fingers on Display
Connect AC Charger (commercially
available) or Micro USB cable
(commercially available)
Speak here
Page 9

USIM Card
USIM Card is an IC card containing phone number and other
customer information.
Inserting USIM Card
Always power off beforehand.
7
Getting Started
Part Description
3.5mm
Headphone
Port
Camera
Speaker
Light
Card Slot
Back Cover
Connect headphones
Capture images
Ringer and Speakerphone sound from here
Use as camera flash/flashlight
Open Back Cover to install USIM card and
SD card
Open to insert/remove USIM Card or SD
Card
Cautions
Handset is airtight to maintain water resistance (IPX7).
Pressing handset forcefully may produce sound around
Earpiece, but this is not a function or performance
abnormality.
Keys
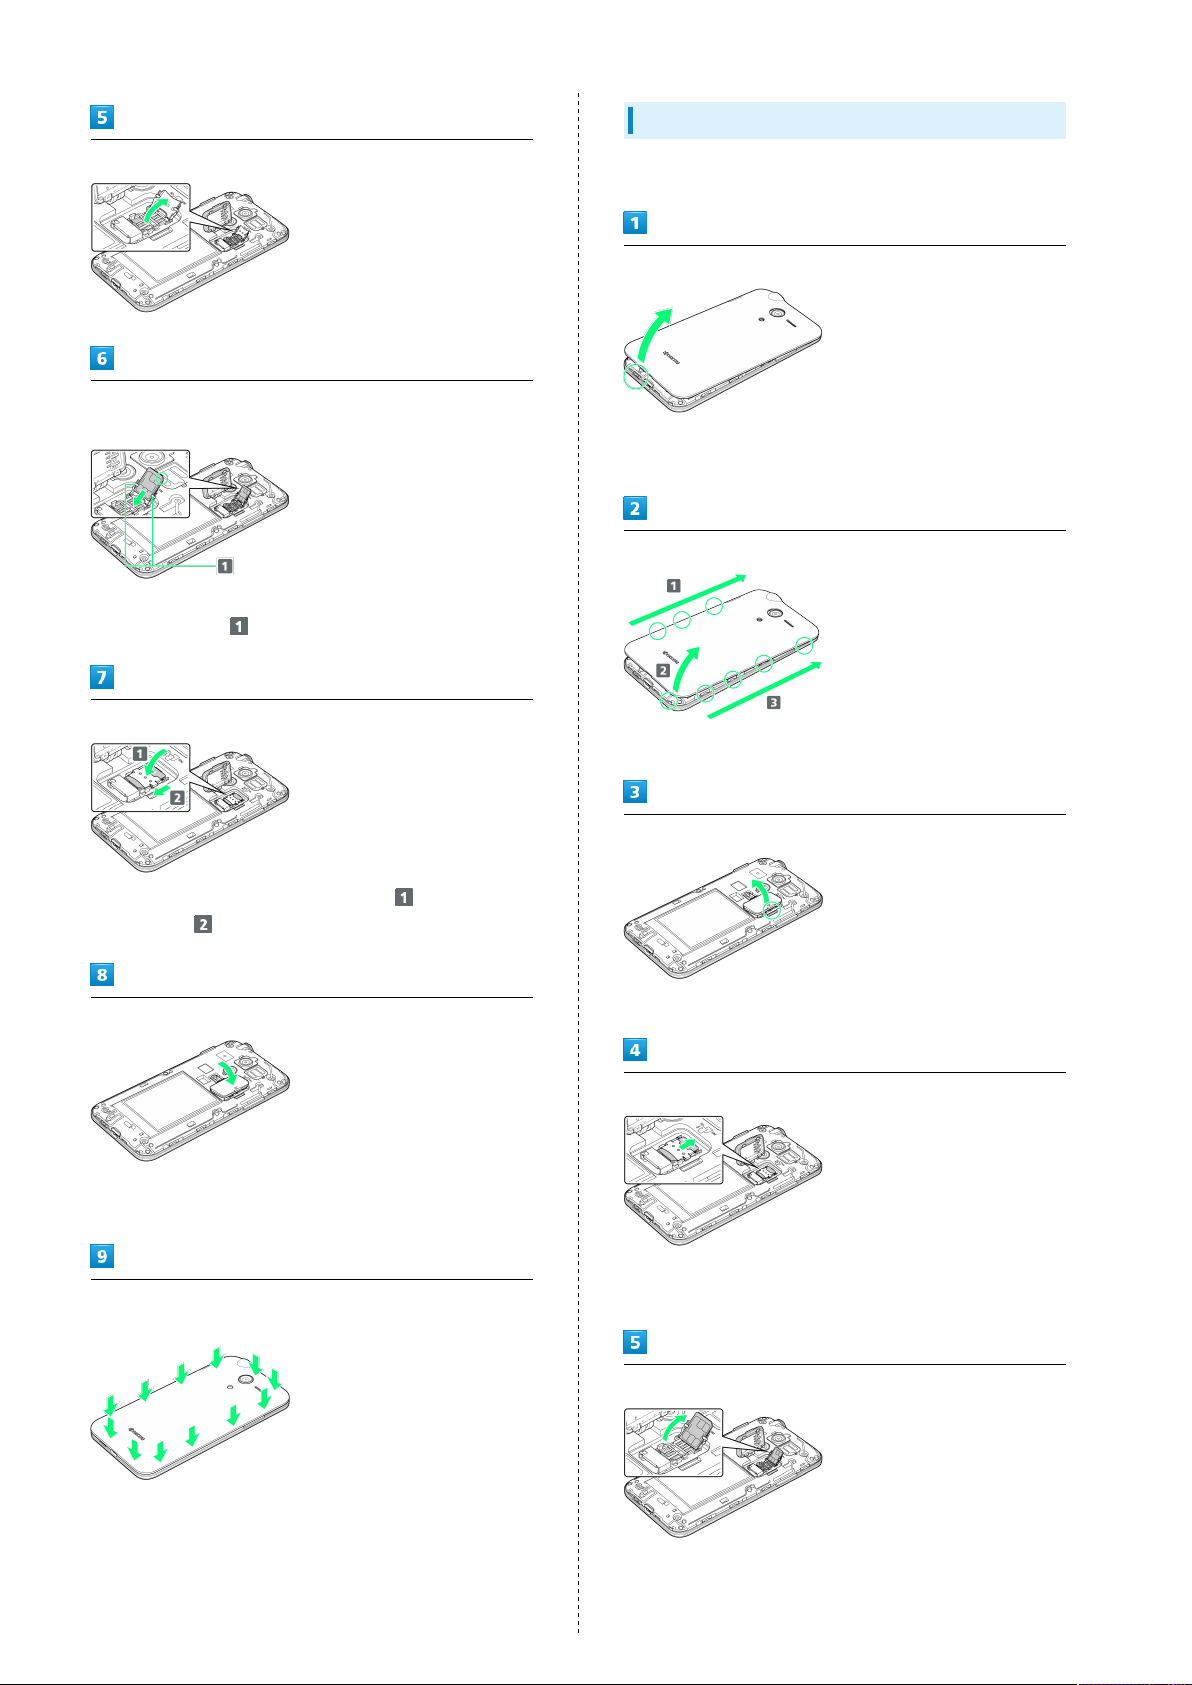
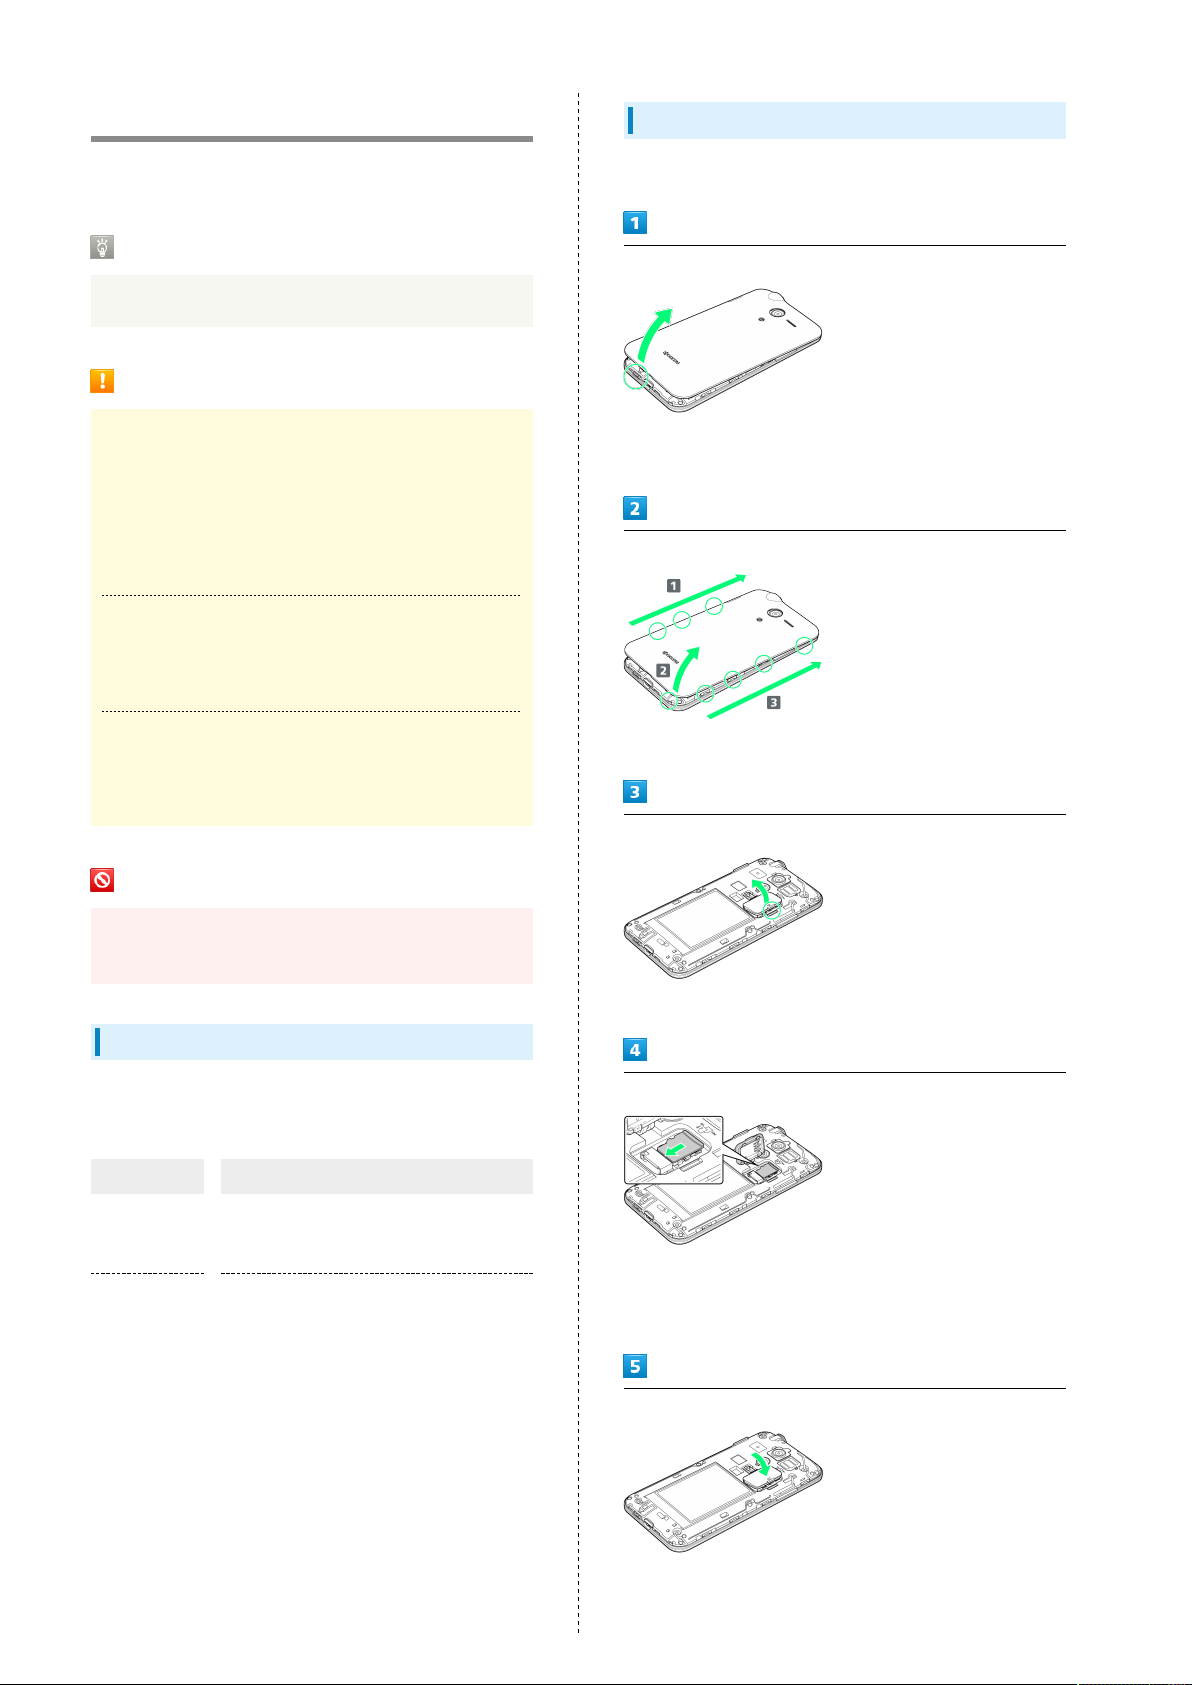
Lift Back Cover
・Lift gently from notch in direction shown.
・Avoid overflexing Back Cover; may damage Back Cover.
Remove Back Cover
・Release tabs in order shown while lifting Back Cover.
Open Card Slot Cap
Key Description
Power Key
( )
Volume Up
Key
Volume
Down Key
Turn Display on/off
Long Press for power on/off and settings
such as reboot and Airplane mode
Increase the volume
Decrease the volume
Long Press to turn Silent mode on
・Lift gently in direction shown from notch to open.
Unlock USIM Card Slot Cover
・Press and slide USIM Card Slot Cover in direction shown
with pad of finger until it clicks.
DIGNO
®
F
Page 10
8
Removing USIM Card
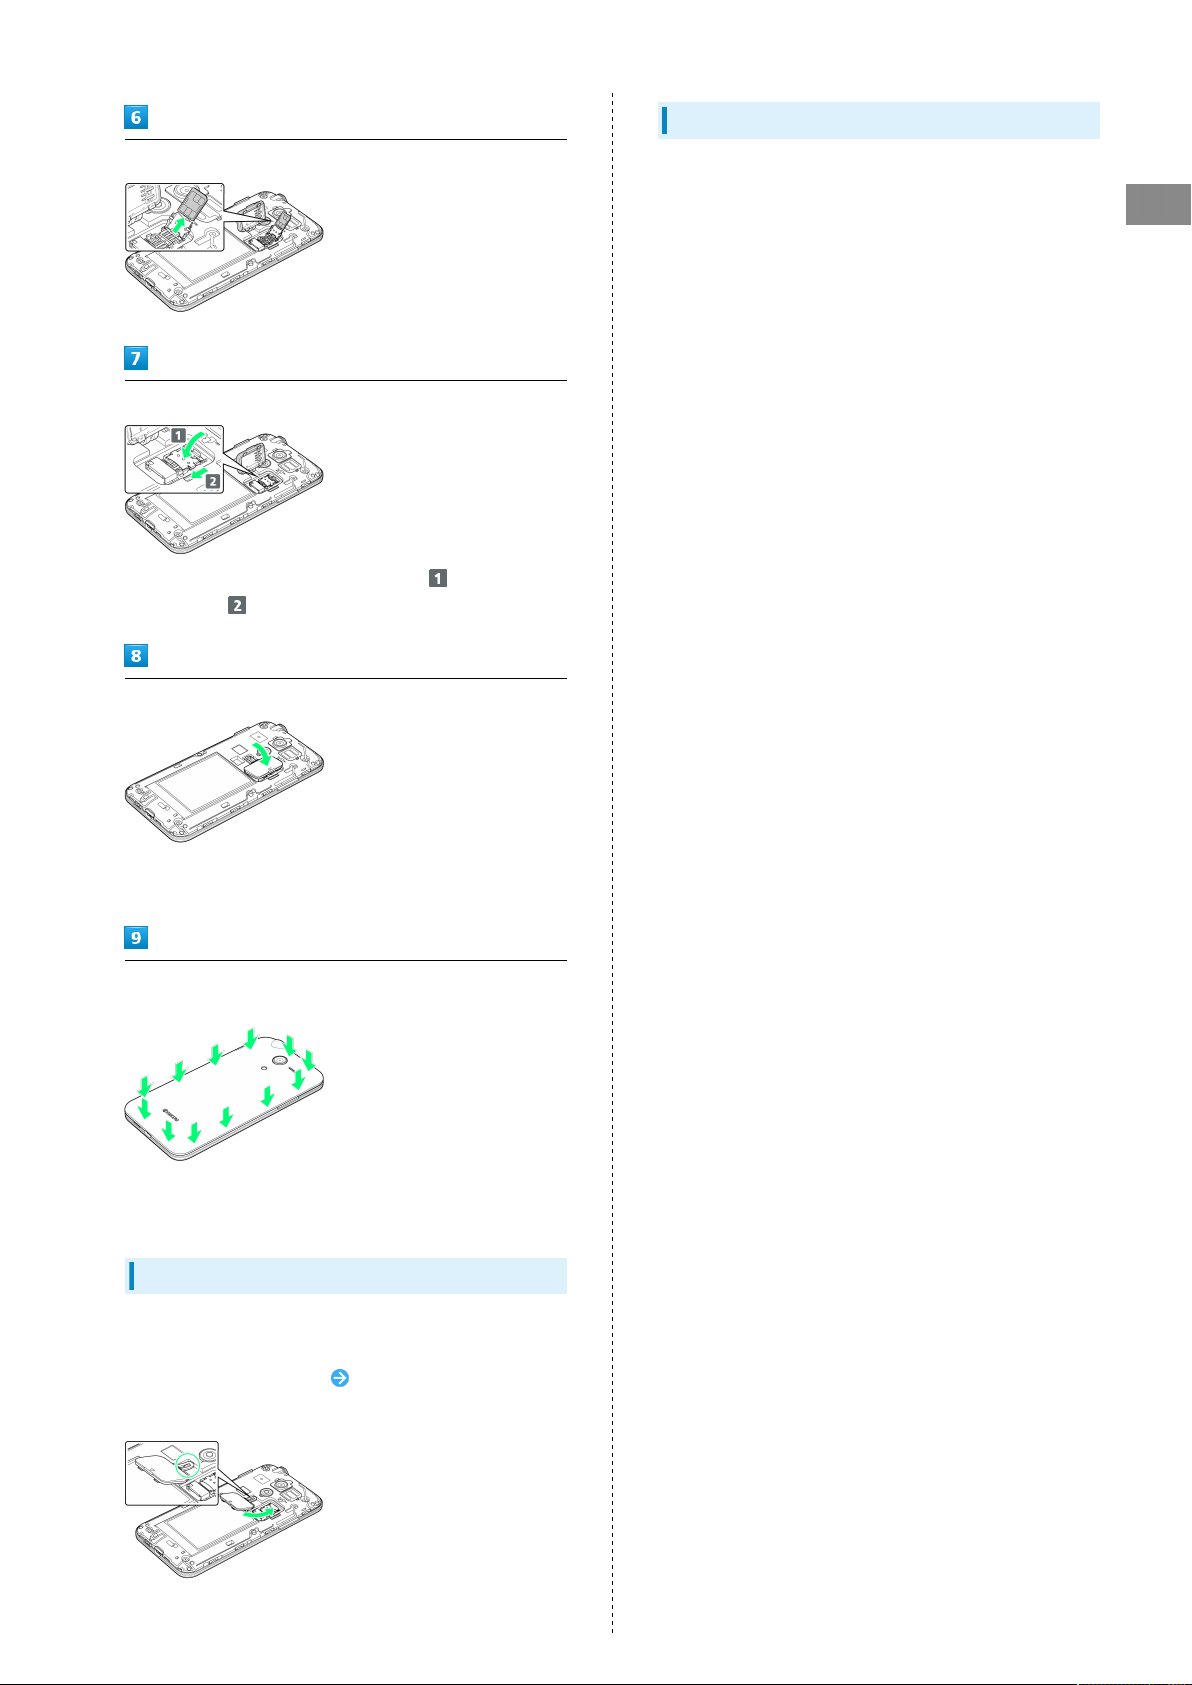
Lift USIM Card Slot Cover in direction shown
Slide USIM Card in direction shown to insert in USIM Card Slot
Cover
・Note location of notch.
・
Slide underneath on USIM Card Slot Cover.
Lock USIM Card Slot Cover
Always power off beforehand.
Lift Back Cover
・Lift gently from notch in direction shown.
・Avoid overflexing Back Cover; may damage Back Cover.
Remove Back Cover
・Release tabs in order shown while lifting Back Cover.
・
Lower USIM Card Slot Cover in direction , and then slide
in direction with pad of finger until it clicks.
Close Card Slot Cap
・Lower Card Slot Cap in direction shown.
・Close firmly ensuring Card Slot Cap is not raised.
Place Back Cover on main unit, and then press firmly where
shown to attach completely
Open Card Slot Cap
・Lift gently in direction shown from notch to open.
Unlock USIM Card Slot Cover
・Press and slide USIM Card Slot Cover in direction shown
with pad of finger until it clicks.
Lift USIM Card Slot Cover in direction shown
・Close firmly making sure there are no gaps to prevent water
intrusion.
Page 11
SIM-Unlocking Handset
9
Slide USIM Card in direction shown to remove
Lock USIM Card Slot Cover
・
Lower USIM Card Slot Cover in direction , and then slide
in direction with pad of finger until it clicks.
Close Card Slot Cap
Handset can be SIM-unlocked. SIM-unlocking handset allows
other-carrier SIM cards to be used with it.
・Some services, functions, etc. may have restrictions when
an other-carrier SIM card is used. SoftBank Corp. does not
guarantee operation whatsoever.
・For details, see SoftBank Website.
Getting Started
・Lower Card Slot Cap in direction shown.
・Close firmly ensuring Card Slot Cap is not raised.
Place Back Cover on main unit, and then press firmly where
shown to attach completely
・Close firmly making sure there are no gaps to prevent water
intrusion.
Card Slot Cap
Card Slot Cap is designed to be easy to remove. If it becomes
removed, reattach as follows.
Hook Card Slot Cap as shown Turn Card Slot Cap in
direction shown
DIGNO
®
F
Page 12
10
Internal Storage & SD Card
Handset supports SD Cards up to 200 GB. Some SD Cards may
not operate properly.
Complimentary sample SD Card
Complimentary sample SD Card is not covered by warranty.
SD Card Cautions
Data
Information stored on SD Card can become lost or changed
accidently or as a result of damage. It is recommended
that you keep a separate copy of important data. SoftBank
Corp. is not responsible for damages from data that is lost
or changed.
Reading/Writing Data
Never power off handset while it is reading/writing to SD
Card.
Inserting SD Card
Always power off beforehand.
Lift Back Cover
・Lift gently from notch in direction shown.
・Avoid overflexing Back Cover; may damage Back Cover.
Remove Back Cover
Battery Level
A low battery charge may prevent reading/writing to SD
Card.
Handling SD Card
Use/store SD Cards away from the reach of infants. May
cause choking if swallowed.
Storage
Two storage areas are available with handset, internal storage
and SD Card. They function as follows.
Type Function
Internal
storage
SD Card
Captured still images/videos, mail
attachments, etc. are saved here. Connect
with a PC to exchange files.
Use for transferring files. Save image,
music, and other files to SD Card for use
on handset.
・Release tabs in order shown while lifting Back Cover.
Open Card Slot Cap
・Lift gently in direction shown from notch to open.
Place SD Card as shown and slide in direction shown to insert
・Insert SD Card all the way gently without bending and with
terminals facing down.
・Insert only SD Cards.
Close Card Slot Cap
・Lower Card Slot Cap in direction shown.
・Close firmly ensuring Card Slot Cap is not raised.
Page 13

Removing SD Card
11
Place Back Cover on main unit, and then press firmly where
shown to attach completely
・Close firmly making sure there are no gaps to prevent water
intrusion.
Always unmount SD Card and then power off beforehand.
Getting Started
Lift Back Cover
・Lift gently from notch in direction shown.
・Avoid overflexing Back Cover; may damage Back Cover.
Remove Back Cover
・Release tabs in order shown while lifting Back Cover.
Open Card Slot Cap
・Lift gently in direction shown from notch to open.
Slide SD Card in direction shown to remove
・Remove gently without bending.
Close Card Slot Cap
・Lower Card Slot Cap in direction shown.
・Close firmly ensuring Card Slot Cap is not raised.
DIGNO
®
F
Page 14
12
Formatting SD Card
Place Back Cover on main unit, and then press firmly where
shown to attach completely
・Close firmly making sure there are no gaps to prevent water
intrusion.
When using a new SD Card for the first time, always format it
on handset.
・Formatting erases all data on SD Card. Carefully check any
SD Card that was used on another device before formatting.
・Charge Battery while formatting, or format with adequate
battery charge.
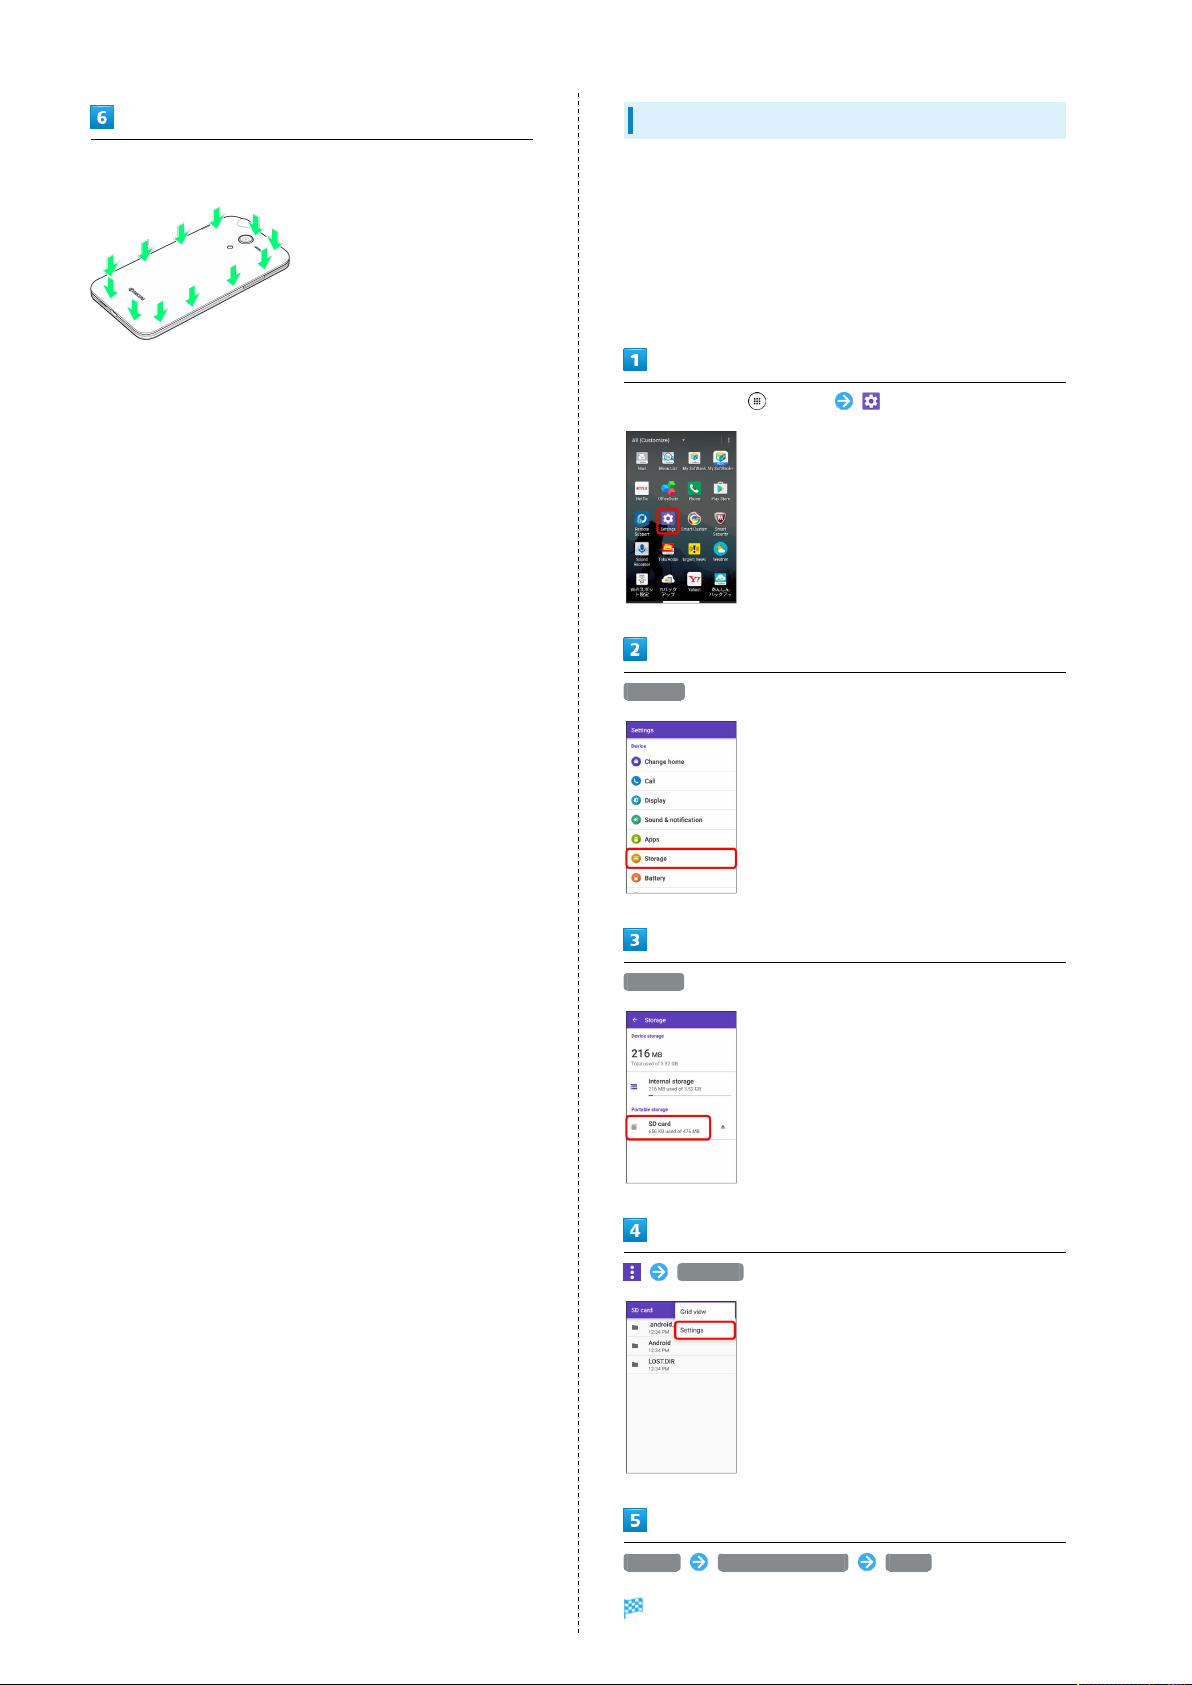
In Home Screen, (Apps) (Settings)
Storage
SD card
Settings
Format ERASE & FORMAT DONE
Handset erases all data in internal storage.
Page 15
13
Card Slot Cap
Card Slot Cap is designed to be easy to remove. If it becomes
removed, reattach as follows.
Hook Card Slot Cap as shown Turn Card Slot Cap in
direction shown
Charging Battery
Charging with AC Charger
See SoftBank Website for information on AC Charger and
other peripherals. The following explains how to charge
handset using SB-AC12-HDQC.
・See User Guide for your AC Charger.
・Never connect Micro USB plug while handset or AC Charger
is wet.
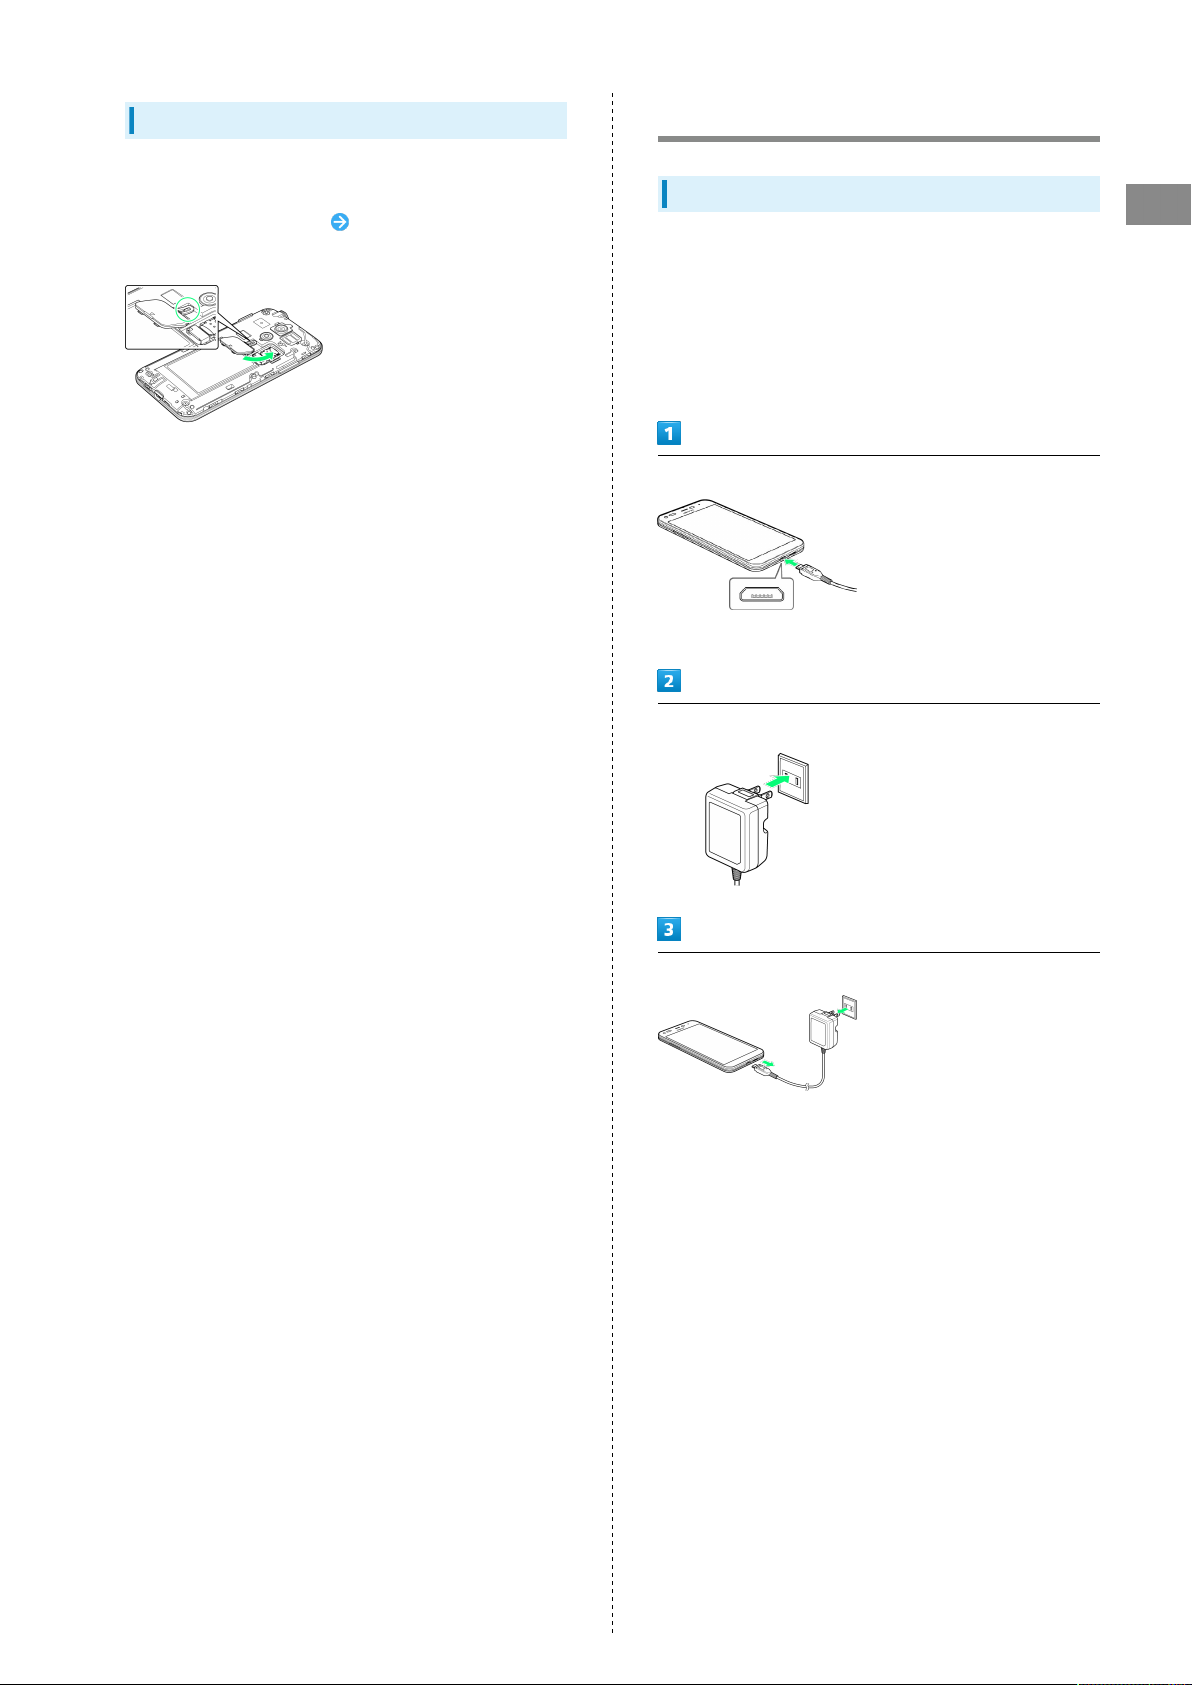
Connect AC Charger
・Grasp Micro USB plug and insert as shown.
Getting Started
Plug AC Charger into household AC outlet
After charging, remove AC Charger
・Unplug from outlet and disconnect handset.
DIGNO
®
F
Page 16

14
Charging by PC
Battery can be charged by Micro USB Cable.
・Always turn on PC beforehand.
・Battery may not charge depending on type of connection to
the PC.
Insert Micro USB plug into External Device Port
・Grasp Micro USB plug and insert as shown.
Insert USB plug into PC
Power On/Off
Power On
(Long Press)
Start Screen appears.
・To exit from Sleep mode, see "Exiting Sleep to Access Start
Screen."
・Startup wizard appears the first time handset is powered
on.
After charging, remove Micro USB Cable from PC and handset
Power Off
(Long Press)
Power off OK
Handset powers off.
Page 17

15
Using Touchscreen
Handset uses a touchscreen-type Display. Operate with your
fingers on Display.
Tap
Contact Display lightly and briefly.
Touch & Hold
Contact Display lightly; release finger when screen changes.
Pinch/Spread
Contact Display lightly, then close/widen fingers.
Getting Started
Drag
Touch icon or other item lightly, move it where desired, and
release finger.
Swipe/Flick
Contact Display lightly, then brush screen up/down or left/
right.
DIGNO
®
F
Page 18

16
Page 19

Basic Operations
Basic Operations...............................................................18
Phone Number................................................................... 20
Silent Mode....................................................................... 20
Airplane Mode................................................................... 21
Text Entry.........................................................................21
Using a Google Account................................................... 22
Google Play....................................................................... 23
Security Codes.................................................................. 25
USIM PIN............................................................................26
Entering Sleep Mode........................................................ 27
Updating Software........................................................... 27
Page 20
18
Basic Operations
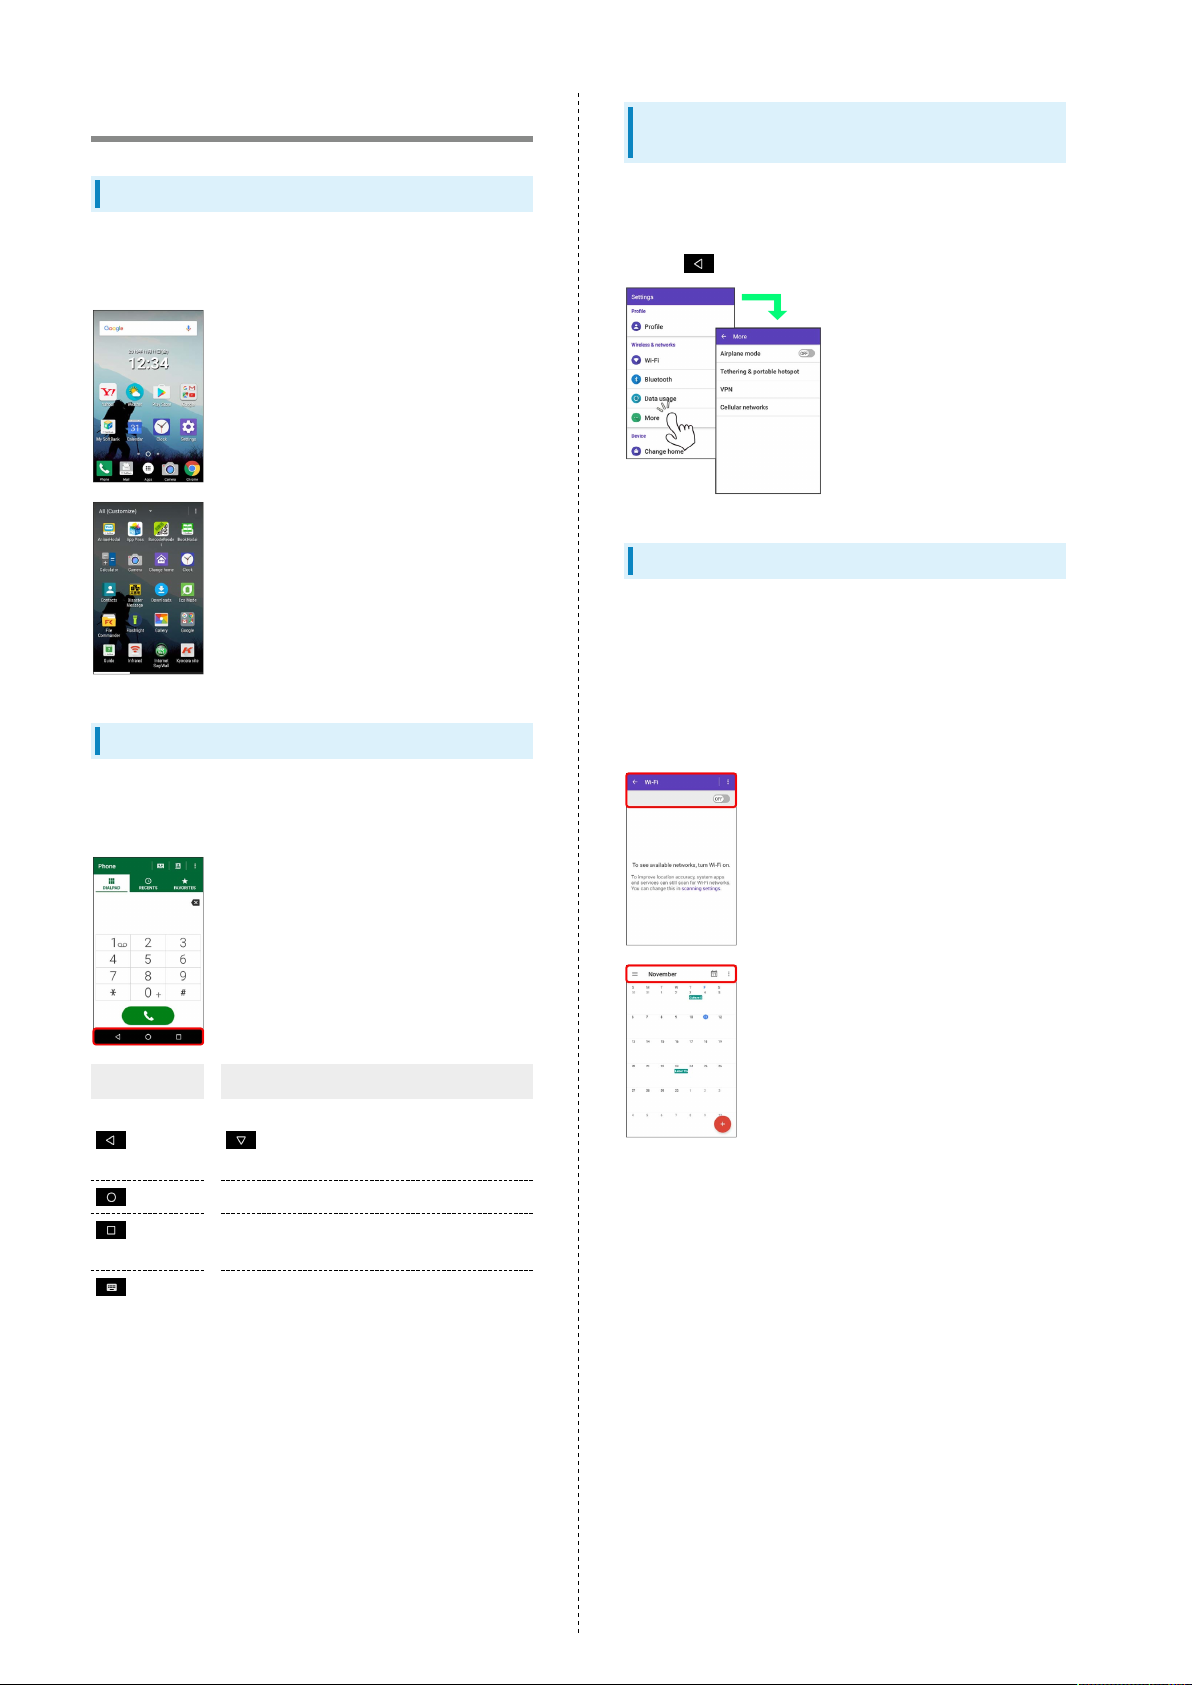
Home Screen & Apps Menu
Most handset operations start in Home Screen (appears at
power on) or in Apps Menu.
Selecting Options and Navigating
Screens
Tap menu items, icons, onscreen key, etc. to open assigned
items.
・
Press to go back or escape.
Action Bar
Current application/settings window title appears on Action
Bar (Display top). Tap onscreen key or icons at right of Action
Bar to turn function off/on or access available functions.
Navigation Bar
Tap icons on Navigation Bar (Display bottom) for the
following functions/operations.
Icon Description
Return to previous screen. Appears as
(Back)
(Home)
(Recent
apps)
for onscreen keyboard; Tap to close
keyboard.
Return to Home Screen.
Open listing of recently used applications
and activate or delete applications.
・Icons for available functions may also appear at the bottom
of Display.
・Touch & Hold icon for function name.
(Keyboard)
Change keyboards.
Page 21
19
Menu Operations
Tap in Action Bar, etc. for settings and options of
available functions currently in Display.
Touching & Holding Display may also access settings and
options that are available.
Using Google Now on Tap
Touch & Hold for information related to onscreen
content.
・When launching for the first time, follow onscreen
instructions to enable Now on Tap.
Disabling Now on Tap
In Home Screen, (Apps) (Google)
(Google) Settings Now on Tap
( )
・If Now on Tap is disabled, Google Now cards appear when
Touching & Holding .
Capturing Screenshots
Long Press and Volume Down Key at the same time.
Basic Operations
Handset Settings and Making Settings
In Home Screen, Tap (Apps) then (Settings) to
customize the operation of handset functions.
Portrait Orientation & Landscape
Orientation
The screen changes to portrait orientation when handset is
rotated sideways.
・Depending on the current screen, the orientation may not
change even by changing handset orientation.
・
Alternatively, (Long Press) Screenshot .
・
View captured screenshots in (Gallery), etc.
・Screenshot capture may not work depending on the
application or function.
DIGNO
®
F
Page 22
20
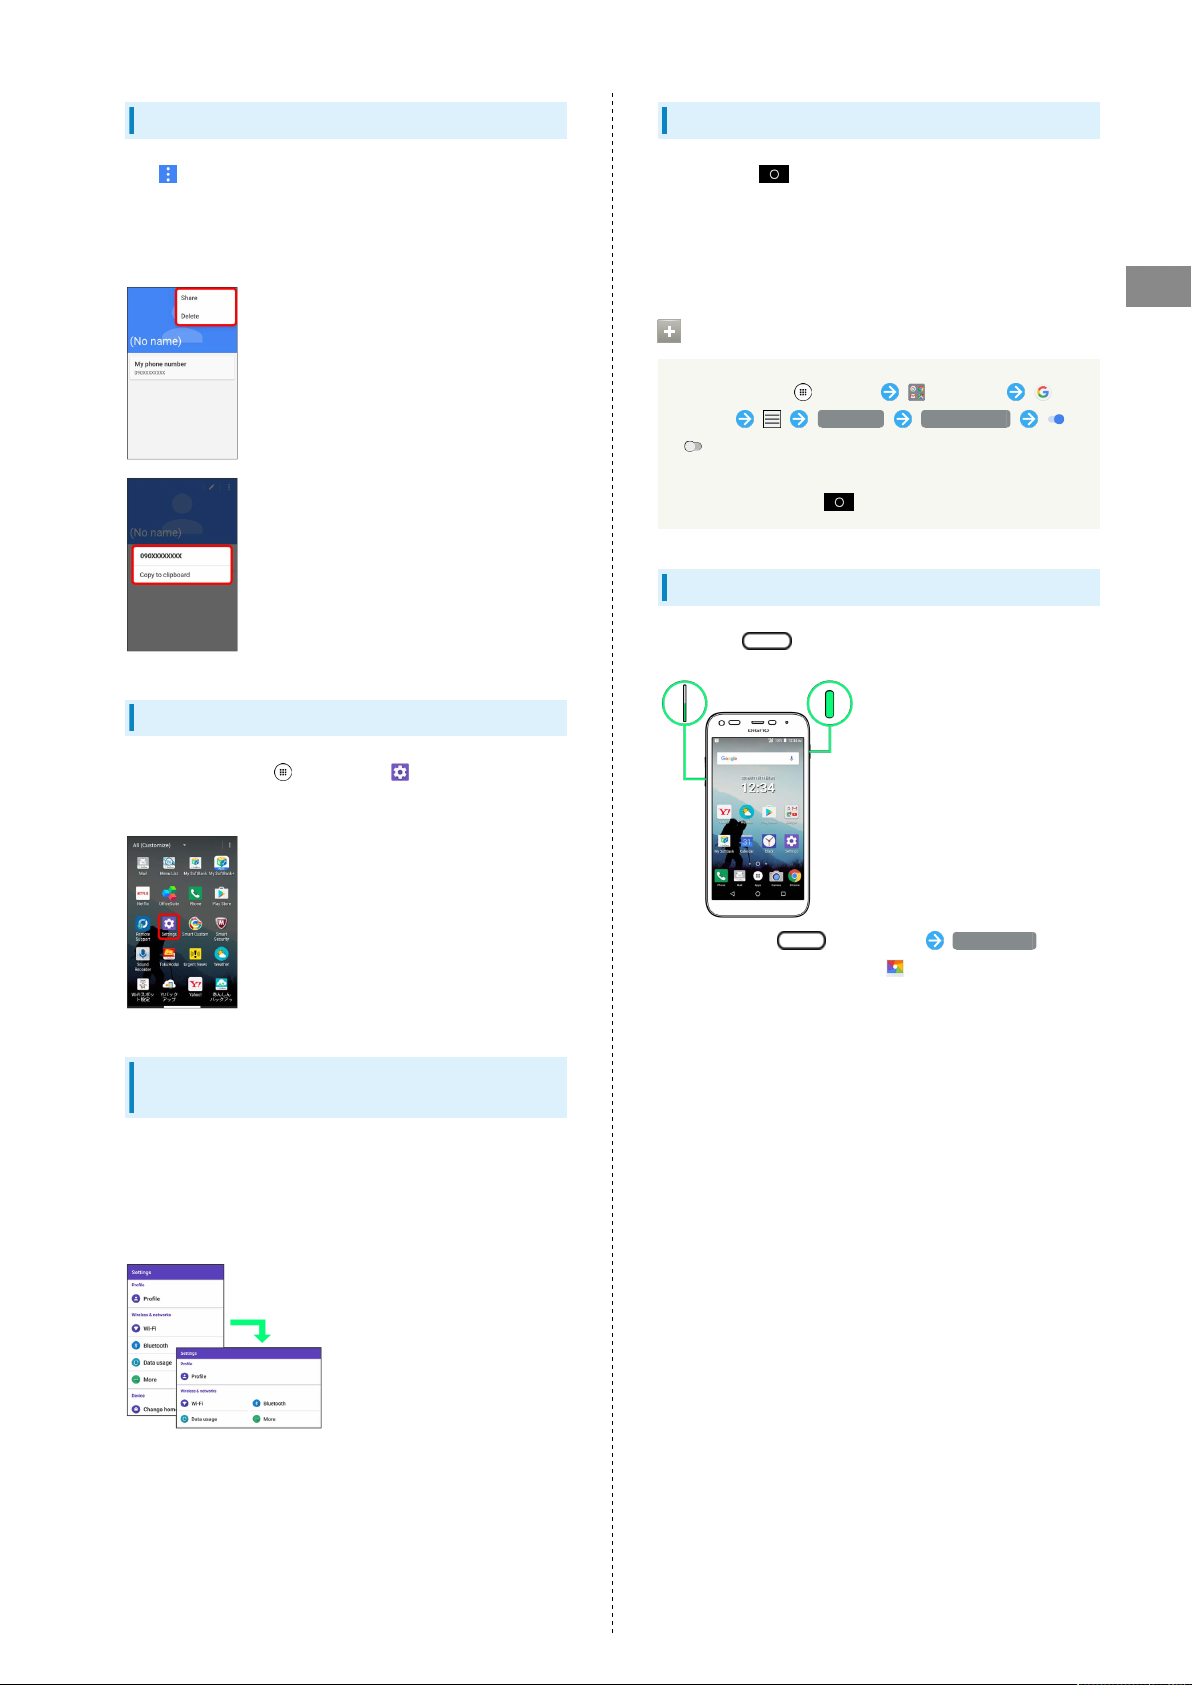
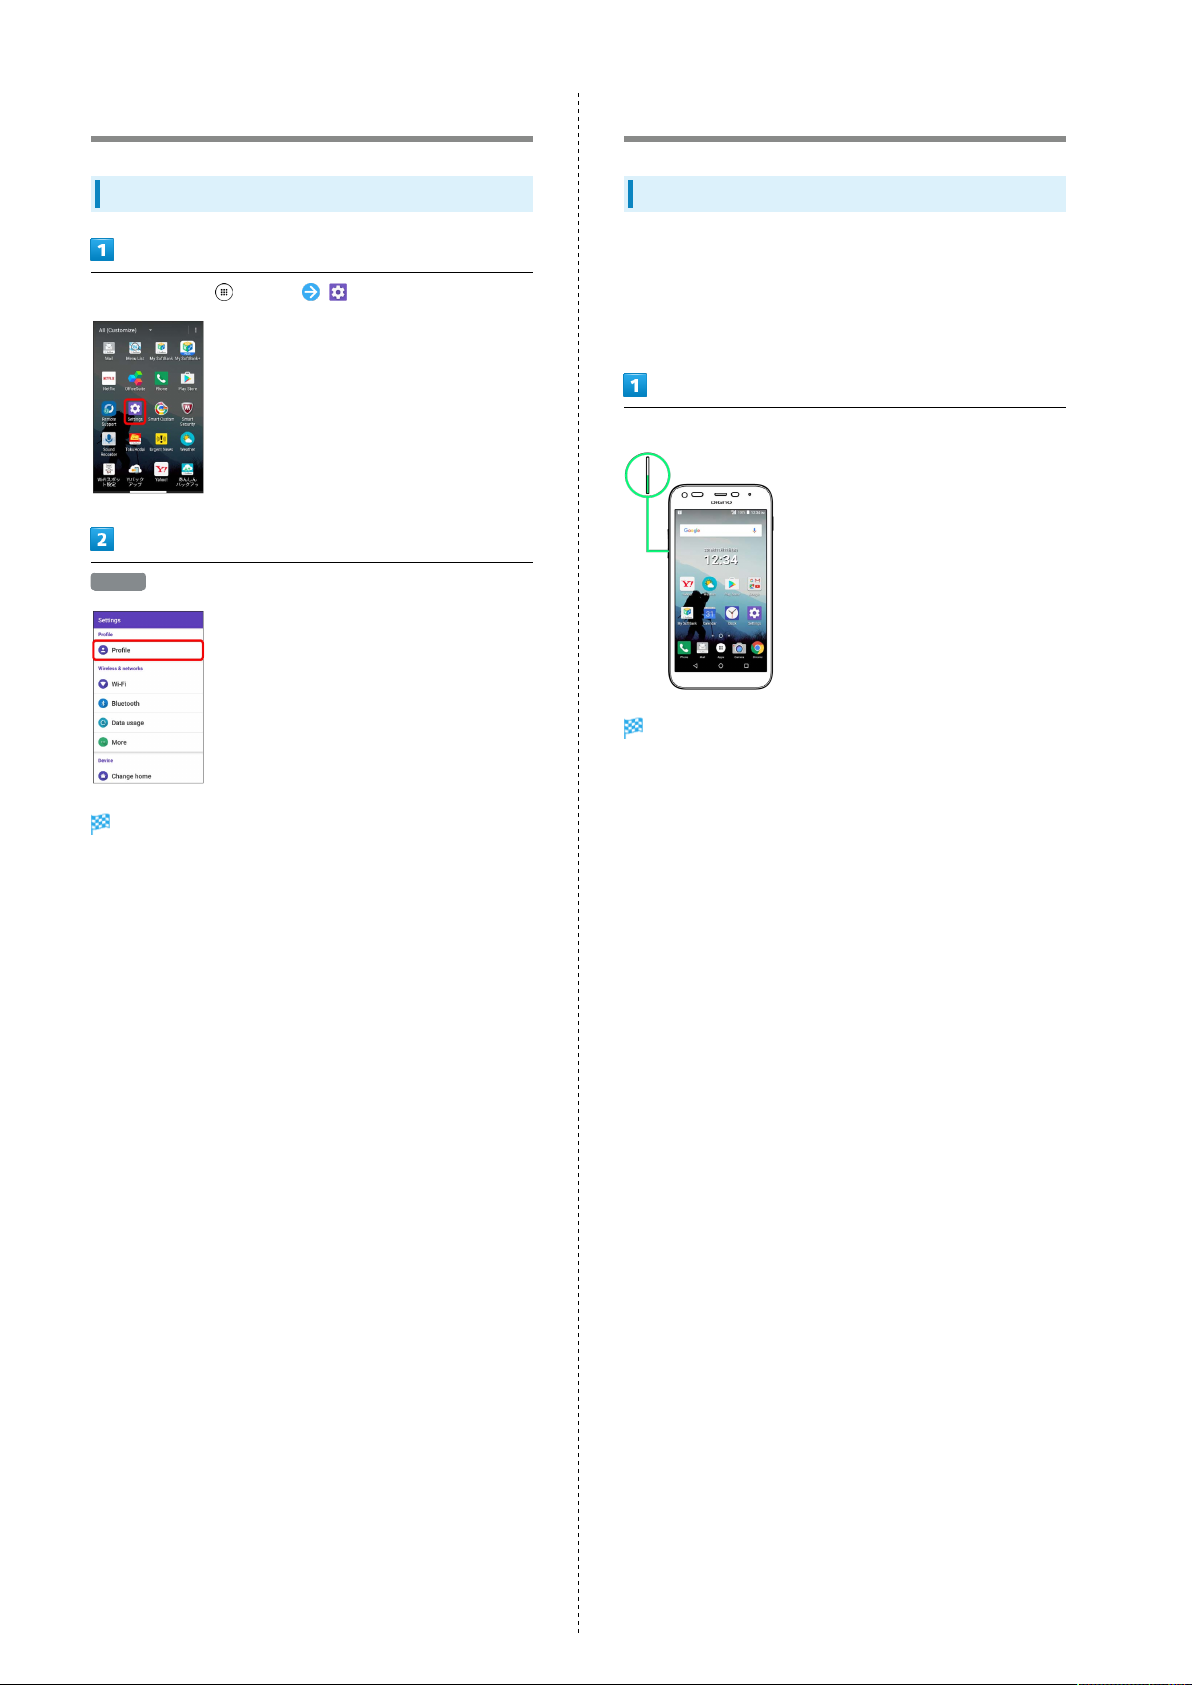
Phone Number
Checking Your Phone Number
In Home Screen, (Apps) (Settings)
Profile
Silent Mode
Using Silent Mode
Set ringtone, operation sounds, etc. not to sound to avoid
disturbing others around you.
・Camera shutter, video start/stop tones, etc. sound even in
Silent mode.
Volume Down Key (Long Press)
Check phone number.
Handset is in Silent mode.
・Press Volume Up Key twice to exit Silent mode.
Page 23
21
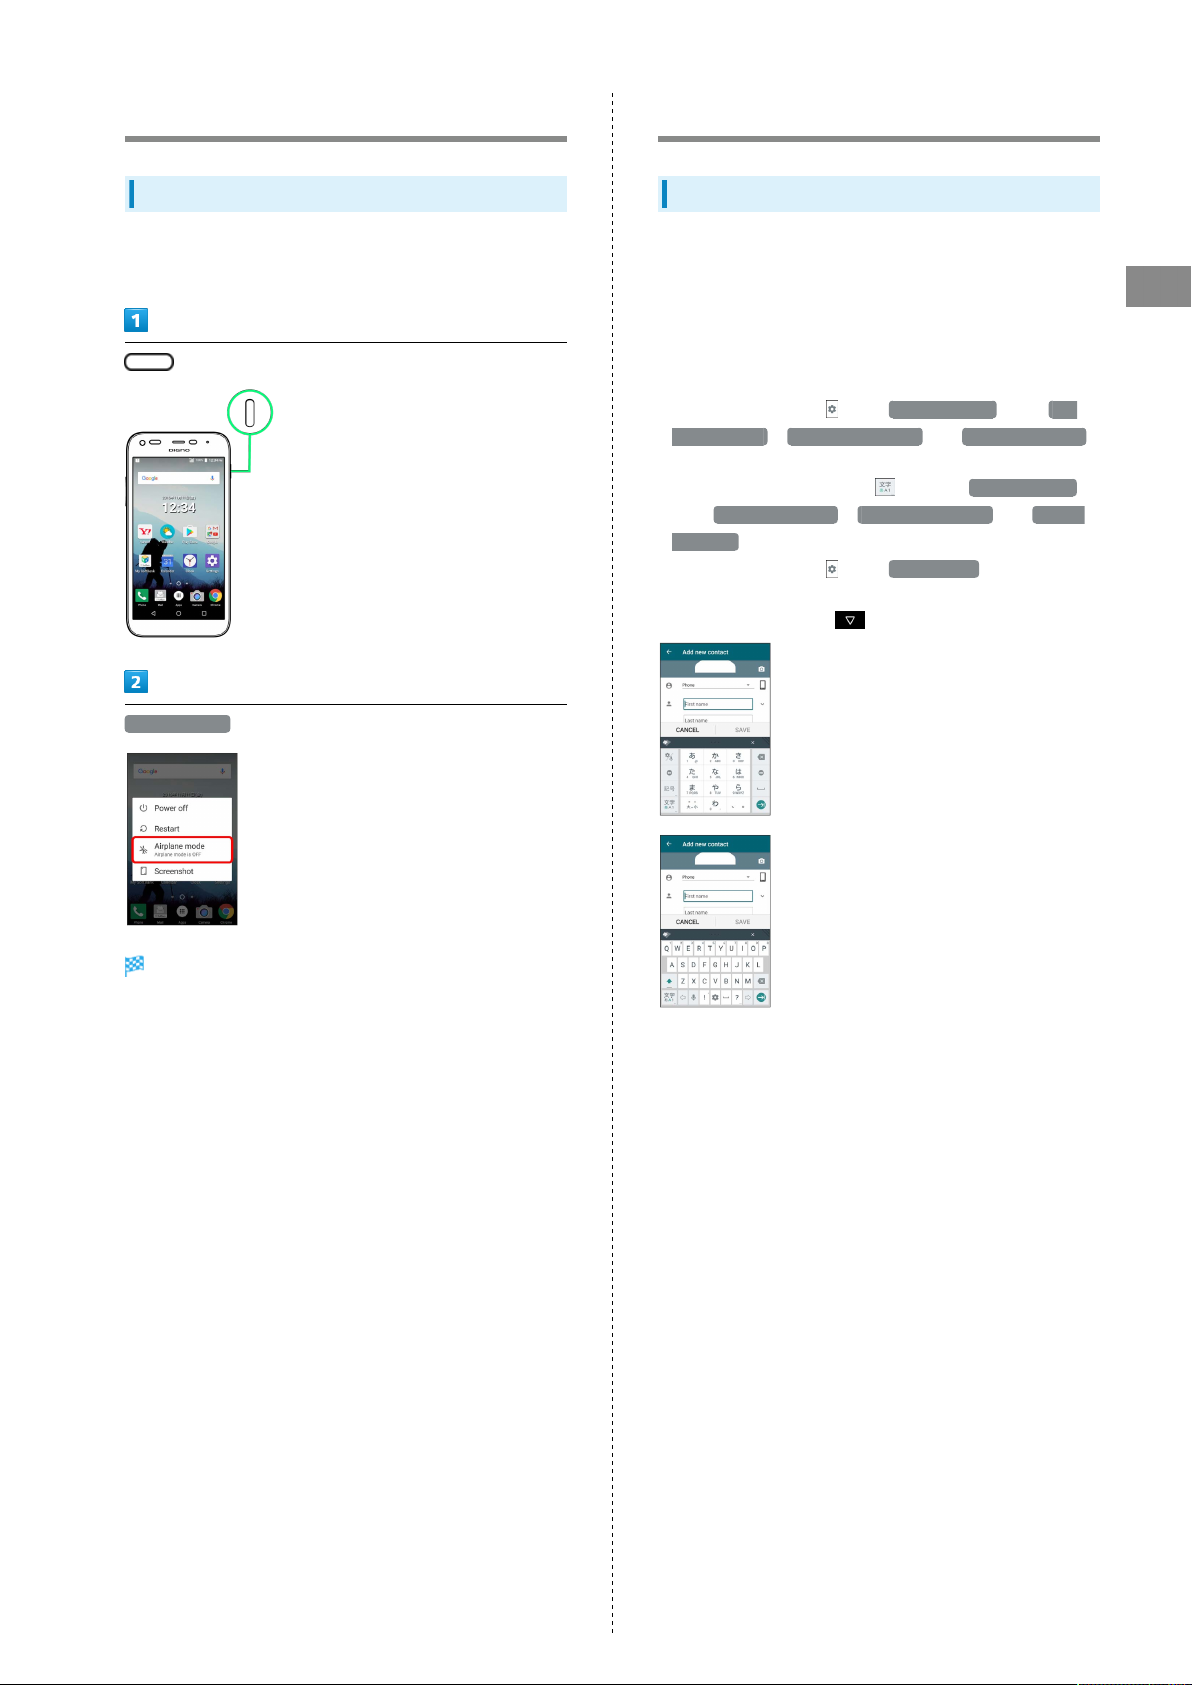
Airplane Mode
Using Airplane Mode
Disable all functions that emit signals. Handset remains
powered on.
(Long Press)
Text Entry
Keyboards
Use onscreen keyboards for text entry. In 10-key keyboard,
several characters are assigned to each key. In QWERTY
keyboard, one letter is assigned to each key. In 50-key
keyboard, kana are assigned to each key in 50-syllable order
(goju-onjun). Also use Keitai Input for entering with a mobile
phone-type keyboard.
・
In any keyboard, Tap then Keyboard type then 10-
key keyboard , QWERTY keyboard , or 50-key keyboard
for 10-key, QWERTY, or 50-key keyboard. Alternatively, in
any keyboard, Touch & Hold and Tap Keyboard type
then 10-key keyboard , QWERTY keyboard , or 50-key
keyboard .
・
In any keyboard, Tap then Keitai Input for Keitai
Input.
・
To hide keyboard, Tap .
Basic Operations
Airplane mode
Handset is in Airplane mode.
・Tap again while in Airplane mode to cancel.
DIGNO
®
F
Page 24
22
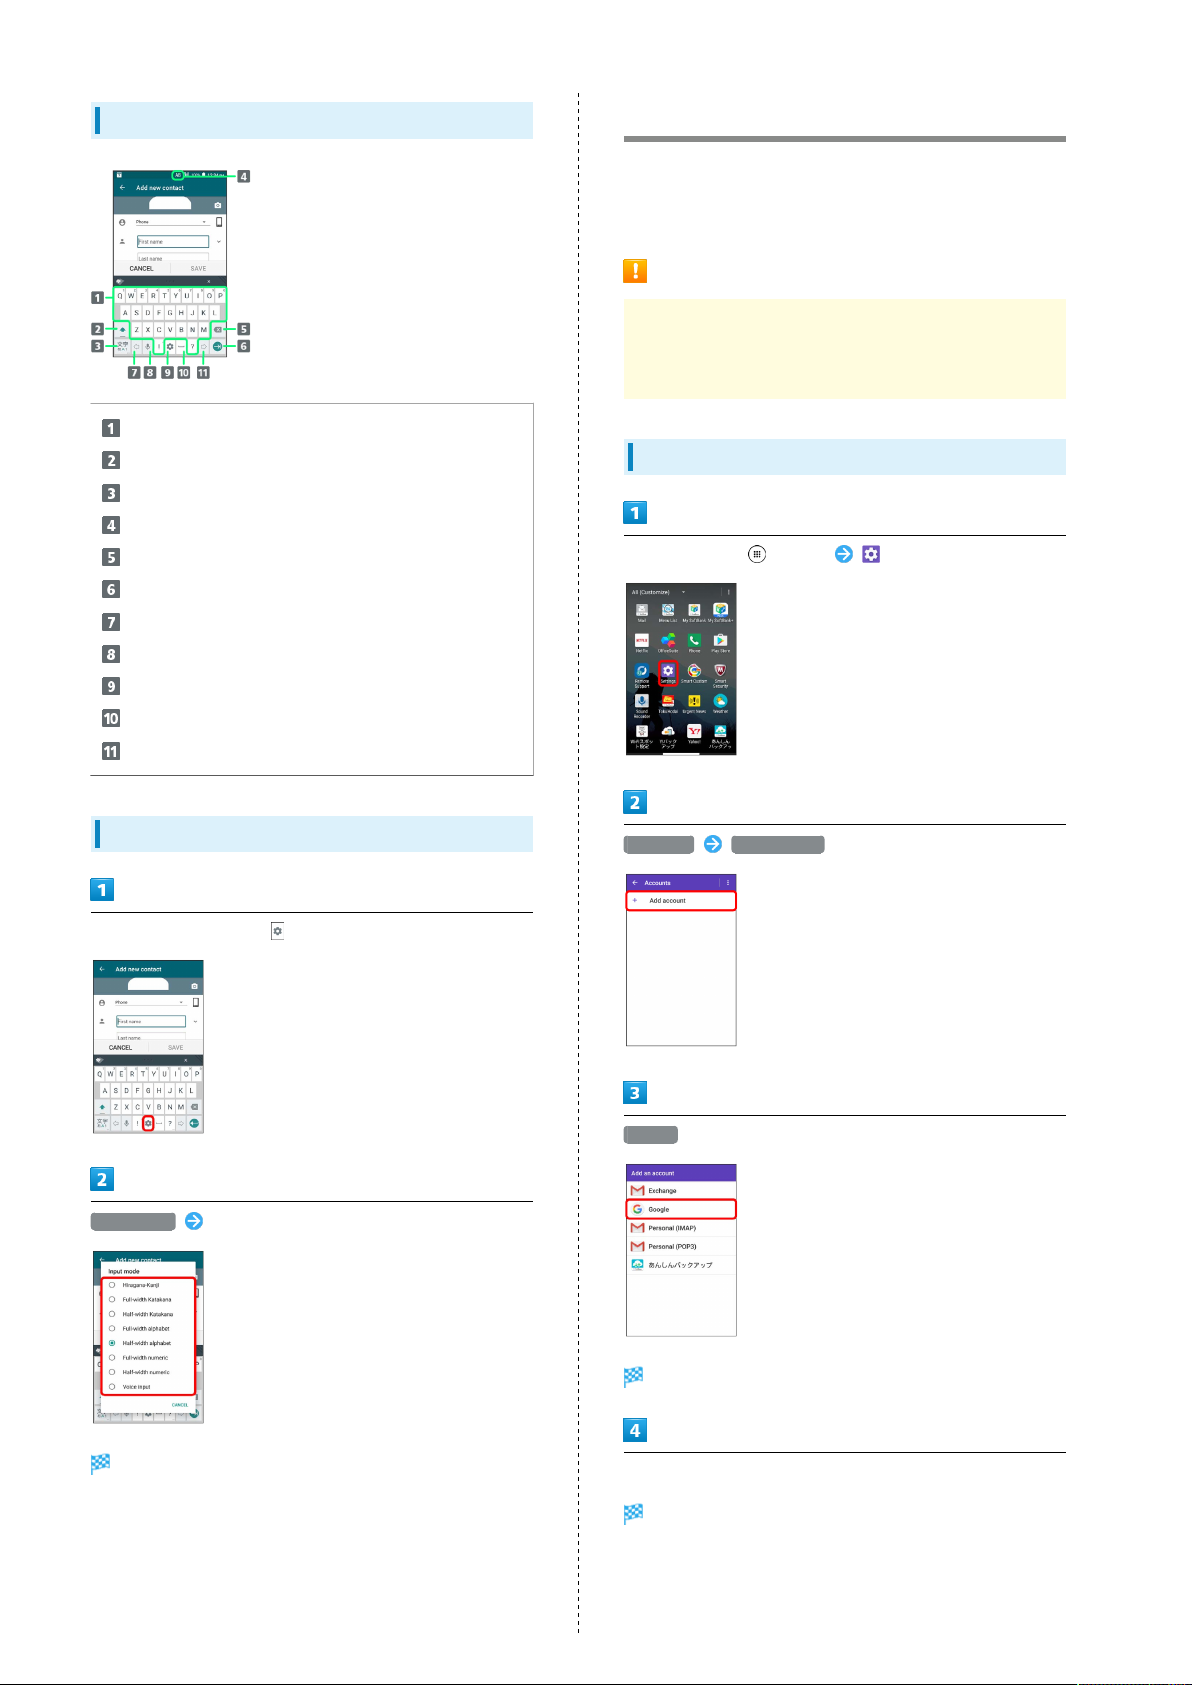
QWERTY Keyboard Layout
Enter characters
Toggle uppercase/lowercase or symbols
Toggle entry modes; Touch & Hold to set entry mode
Current character type
Delete character to left of cursor
Insert line break; confirm current characters
Move cursor left
Switch to voice typing
Set entry mode
Enter space
Move cursor right
Using a Google Account
Use a Google account and get more convenience with Google
services. A Google account is required to use some services or
fully use some applications.
Google Account Cautions
The ID and password for your Google account are also used
for other setting and synchronize functions; be sure to
keep a record of them.
Creating a Google Account
In Home Screen, (Apps) (Settings)
Switching Character Types
In a text entry window,
Input mode Tap Input mode
Accounts Add account
Google
Window for adding a Google account opens.
Input mode changes.
Follow onscreen instructions
A Google account is added.
Page 25
23
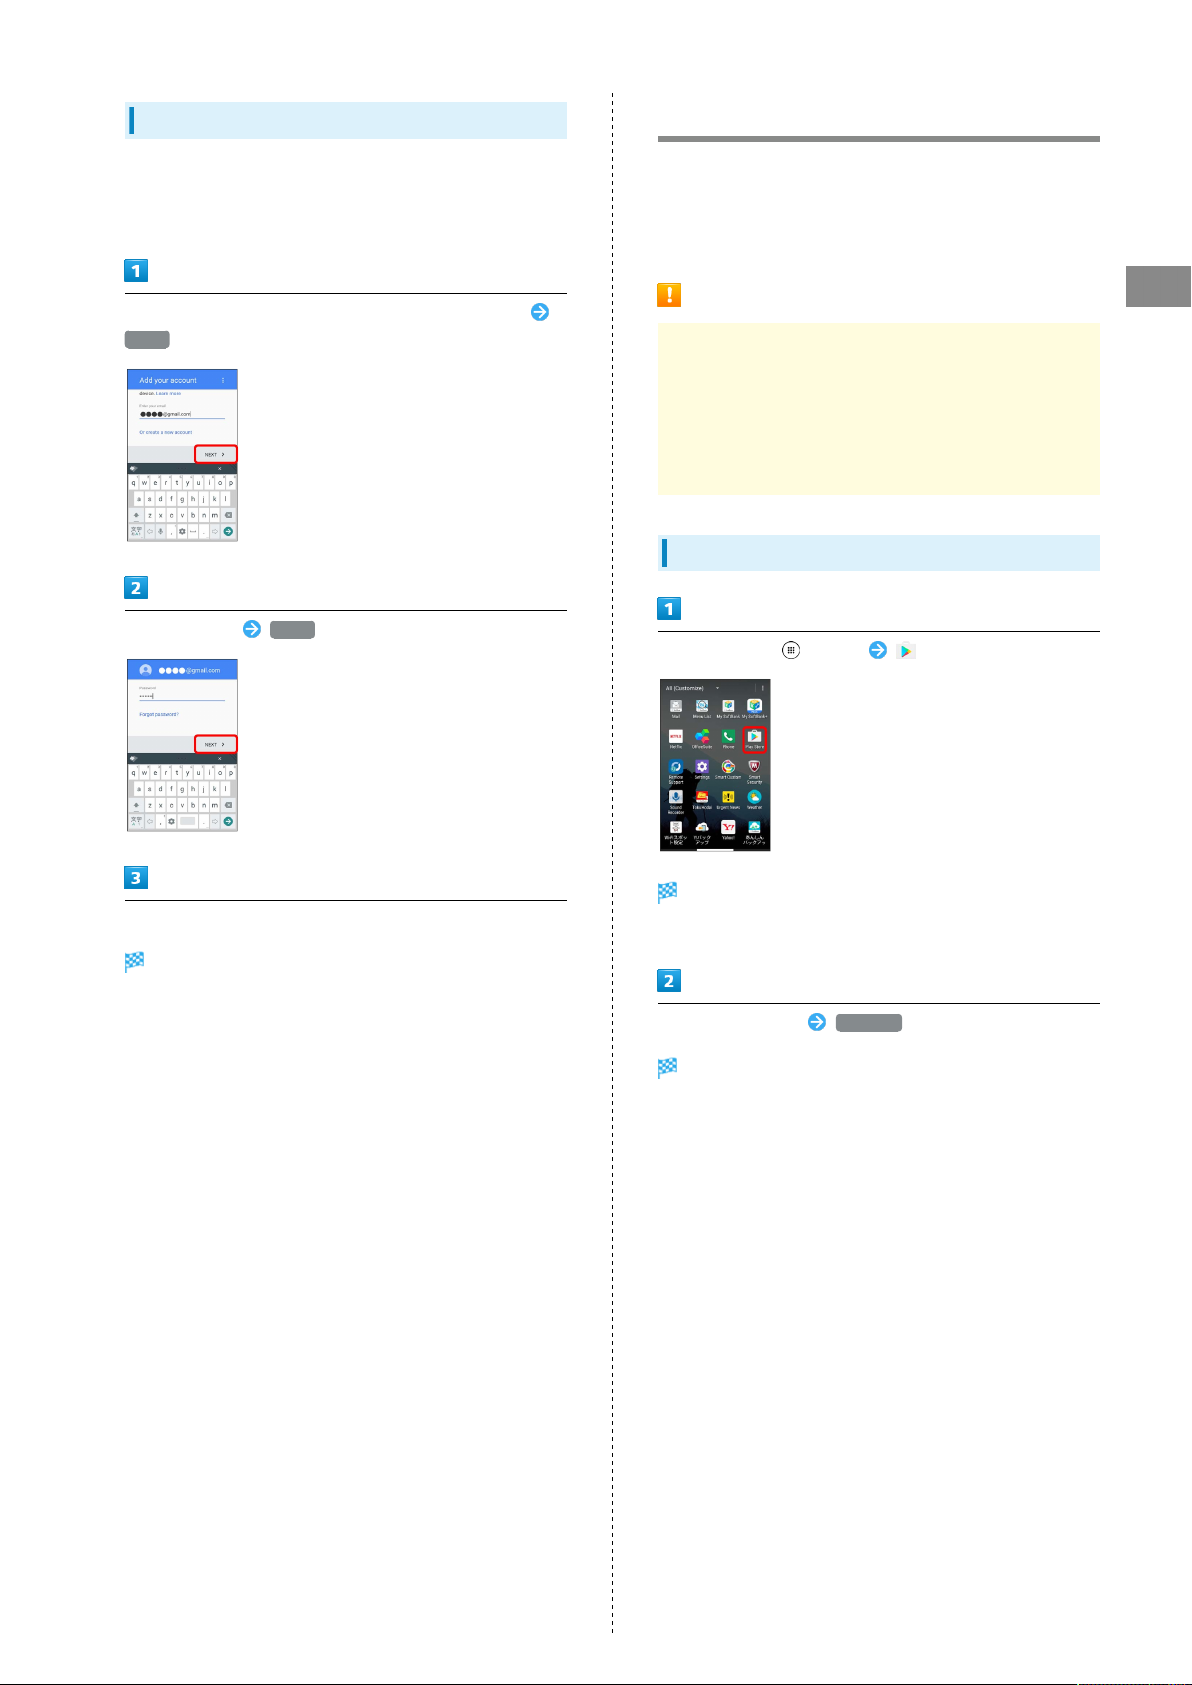
Logging In with a Google Account
If an application is activated that requires a Google account,
a window for adding a Google account opens. Sign in with a
Google account you have so you can use the application.
In window for adding Google account, enter mail address
NEXT
Enter password NEXT
Google Play
Download a variety of applications (free/paid) from Google
Play. Change the setting of downloaded applications to enable
manual or automatic updates. Log in to your Google account
beforehand.
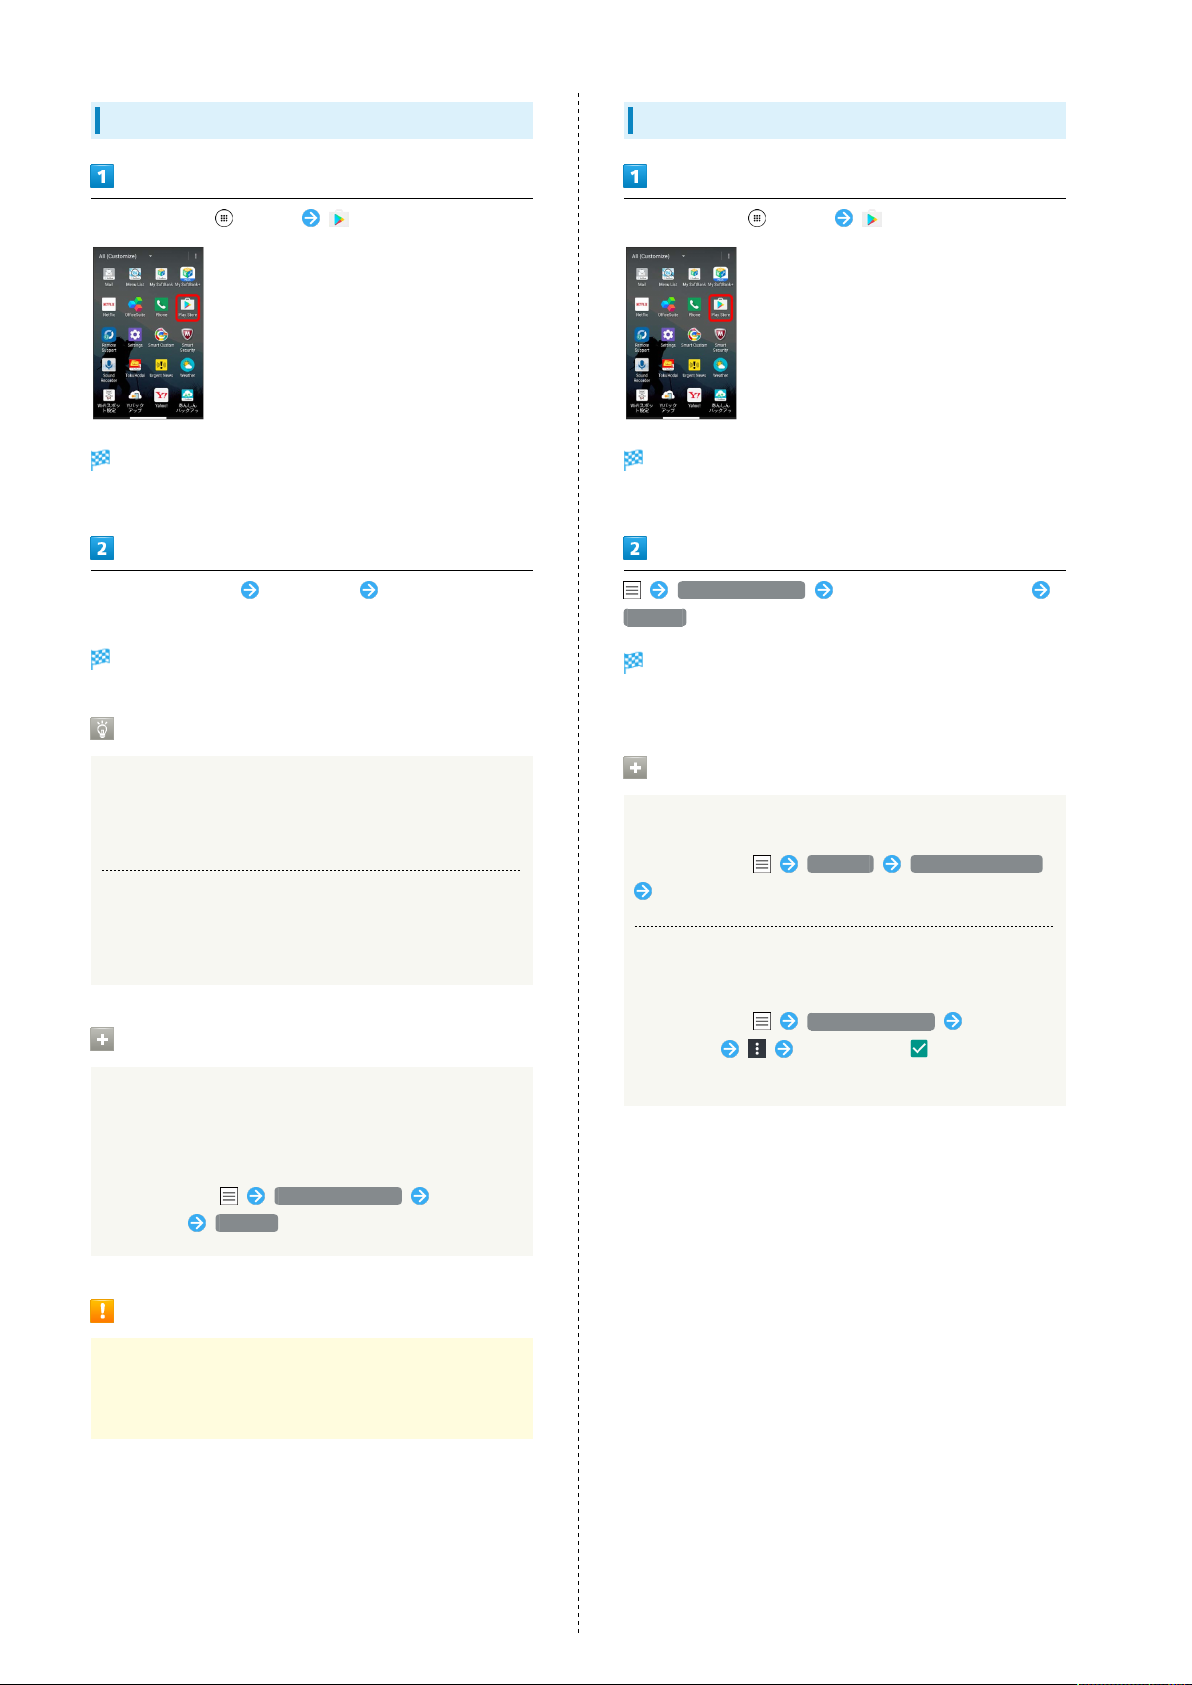
Installing Applications
Basic Operations
Many different kinds of applications can be installed
on handset from Google Play (provided by Google Inc.).
SoftBank Corp. is not responsible in any way for userinstalled applications (quality, reliability, legality, fitness
for a purpose, credibility, accuracy, etc.) or resulting
malfunctions (viruses, etc.).
Installing Free Applications
In Home Screen, (Apps) (Play Store)
Follow onscreen instructions
You are logged in to your Google account.
Google Play appears.
・If confirmation appears, follow onscreen instructions.
Tap free application INSTALL
Application is downloaded and installed.
DIGNO
®
F
Page 26
24
Purchasing Paid Applications
In Home Screen, (Apps) (Play Store)
Google Play appears.
・If confirmation appears, follow onscreen instructions.
Tap paid application Tap amount Follow onscreen
instructions
Application is downloaded and installed.
Purchased Applications
Updating Applications
In Home Screen, (Apps) (Play Store)
Google Play appears.
・If confirmation appears, follow onscreen instructions.
My apps & games Tap application to update
UPDATE
The application is downloaded and installed.
・If confirmation appears, follow onscreen instructions.
Payment
Pay only once. Redownloads of uninstalled applications are
free of charge.
On Other Android Devices
Install an application on any Android device under the same
Google account for free.
Requesting Refunds
Refund is possible within a limited time. By requesting
a refund, the application is deleted and the charge is
cancelled. A refund request is valid only once per one
application.
In Google Play, My apps & games Tap
application REFUND
Purchasing Applications
Setting Application Updates
Setting Automatic Application Updates
In Google Play, Settings Auto-update apps
Set update method
Setting Automatic Updates for Individual
Applications
In Google Play, My apps & games Tap
application Auto-update ( )
・Automatic updates are unavailable for some applications.
Purchase applications at your own risk. SoftBank Corp. is
not responsible for any disadvantage resulting for user or
third parties.
Page 27

25
Uninstalling Applications
Applications installed from Google Play can also be
uninstalled.
In Home Screen, (Apps) (Play Store)
Google Play appears.
・If confirmation appears, follow onscreen instructions.
My apps & games Tap application to uninstall
UNINSTALL OK
Security Codes
Code Types
Some functions/services require these codes for use.
・Do not reveal Security Codes. SoftBank Corp. is not liable
for misuse or damages.
・If you forget Security Codes, contact us for recovery.
For more information, see SoftBank Website (http://
www.softbank.jp/en/mobile/).
Types Details
PIN/Password
Center Access
Code
Use Screen unlock functions
Not set by default
4-digit code in service contract
Change services; use Optional Services via
landlines
Basic Operations
Application is uninstalled.
How to Use Google Play
In Google Play, Help & Feedback
The Web browser will take you to the Google Play Help
Web page.
Follow onscreen instructions
A description for each item appears.
DIGNO
®
F
Page 28
26
USIM PIN
USIM PIN is a code for USIM Card. It is used to prevent
unauthorized use by others.
PIN is 9999 by default.
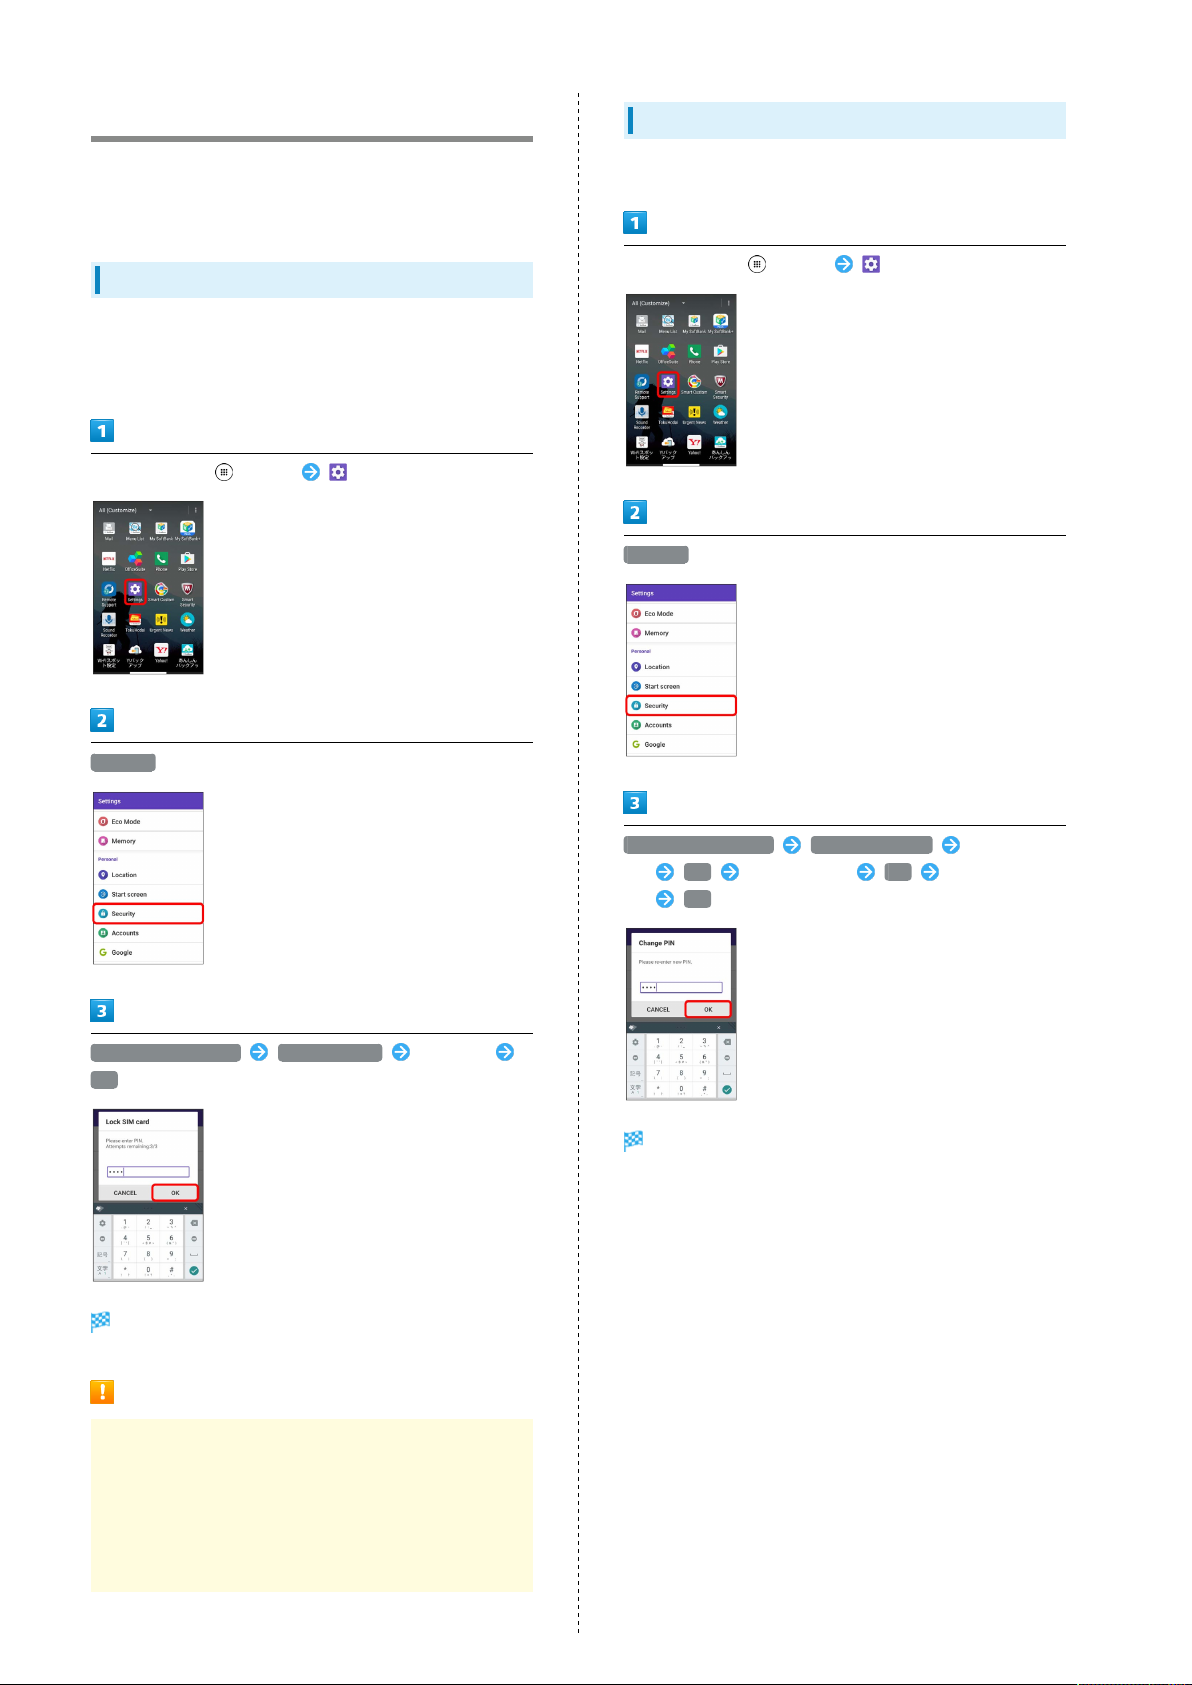
Enabling USIM PIN
When PIN is enabled, a window for entering PIN appears to
allow handset use each time handset is powered on with USIM
Card installed.
In Home Screen, (Apps) (Settings)
Changing USIM PIN
First enable USIM PIN to change PIN.
In Home Screen, (Apps) (Settings)
Security
Security
Set up SIM card lock Lock SIM card Enter PIN
OK
PIN is enabled.
Set up SIM card lock Change PIN code Enter current
PIN OK Enter new PIN OK Re-enter new
PIN OK
PIN is changed.
PIN Cautions
Entering incorrect PIN three consecutive times activates
PIN Lock. To cancel, Personal Unblocking Key (PUK) is
required; contact Customer Service. Entering incorrect PUK
ten consecutive times locks USIM Card, disabling handset.
For recovery, USIM Card must be reissued at a SoftBank
Shop (fees apply).
Page 29
27
Entering Sleep Mode
After a period of no operation, Display goes out and handset
enters Sleep mode. Alternatively, Press to enter
Sleep mode. This saves battery power and prevents accidental
Touchscreen operation.
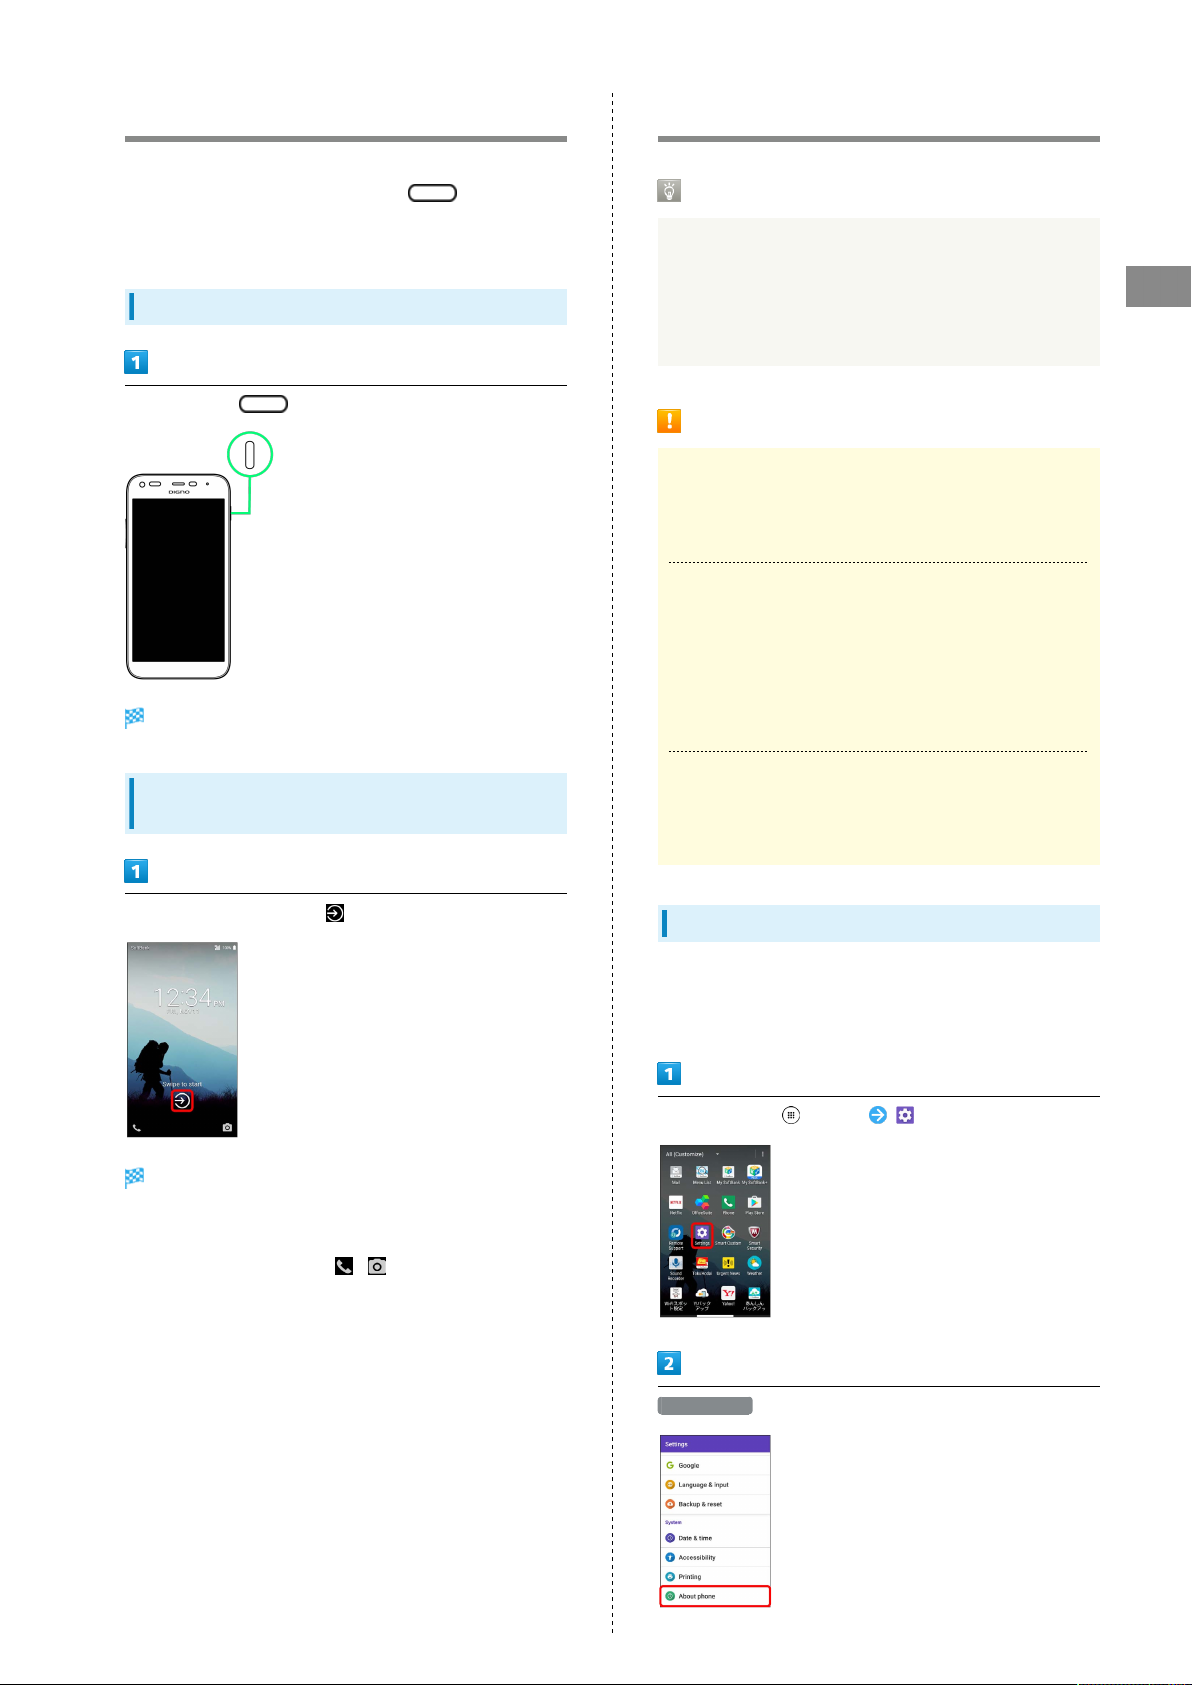
Exiting Sleep to Access Start Screen
In Sleep mode,
Start Screen appears.
Updating Software
Before Updating Software
Saved data may be lost depending on condition of handset
(malfunctioning, damaged, water seepage, etc.). It is
recommended that you back up important data before
updating software. SoftBank Corp. is not responsible for
damages from loss of data.
Software Update Cautions
During Update
Handset cannot be used until software is updated. It may
take time to update software.
Signal during Update
Operate handset where signal reception is good and
without changing location. Also operate with adequate
battery charge. Signal becoming weak or Battery becoming
low during an update may cause an update failure. An
update failure may disable handset.
Basic Operations
Accessing Home Screen from Start
Screen
In Start Screen, Drag/Flick
Home Screen or the screen before entering Sleep appears.
・Set a security lock for the Start Screen. For details, see
"Start Screen Settings."
・
In Start Screen, Drag/Flick / to quickly activate
Phone/Camera.
If Using Other Functions
Other functions cannot be operated during a software
update.
Updating Software
Handset checks at a preset time whether an update is
required, and automatically updates the software if required.
Follow these steps to update software manually.
In Home Screen, (Apps) (Settings)
About phone
DIGNO
®
F
Page 30

28
System Update Software Update Software
Update Follow onscreen instructions
Software updates.
・If confirmation appears, follow onscreen instructions.
Setting Whether to Update
Automatically
In Home Screen, (Apps) (Settings)
About phone System Update Software Update
Automatic Update Settings NOT AUTOMATICALLY
UPDATE / AUTOMATICALLY UPDATE
・"Automatically update" is set by default.
・
If Automatic Update Settings is set to "Automatically
update," Tap Update Schedule Settings to set the time
for starting the update.
Page 31

Handset Interface
Home Screen Basics..........................................................30
Status Bar......................................................................... 30
Using Notifications Window............................................ 32
Page 32

30
Home Screen Basics
Most handset operations are done from Home Screen.
Customize Home Screen with application shortcuts, widgets,
and folders.
Home Screen Layout
Area Description
Status Bar
Customize
Area
Quick
launch area
Navigation
Bar
Drag/Flick down for Notifications Window.
Place application shortcuts, folders,
widgets freely.
Tap icons to activate applications and
functions. Place up to 4 shortcuts to
applications. Also place folders here.
Tap icons to access functions.
Status Bar
Status Bar appears at the top of Display. Notification
Indicators for new mail, etc. and Status Indicators for handset
appear here.
Status Bar Layout
Notification Indicators
Status Indicators
Toggling Home Screen Sheets
Flick Home Screen left/right to toggle sheets.
・
In any Home Screen sheet, Tap to return to Home
Screen top sheet.
Page 33

31
Main Notification Indicators
Notification Indicators appearing in Status Bar include the
following.
・Other Notification Indicators also appear depending on the
application.
Indicator Description
Functions Guide (Drag/Flick Status
Bar down and open from Notifications
Window)
/
/
/
New Gmail
New Text Message (SMS)/S! Mail
New Hangouts Message
New Message (Auto Answering)
Music Playing
Wi-Fi Available
Call Arriving/in Progress
Missed Call
Call On Hold
New Message (Voicemail)
Calendar Event Notification
Snoozing/Unchecked Alarm
Timer Running
Stopwatch Running
Urgent News
Data Uploading
Data Downloading
Application Update Notification
Application Installation(s) Complete
Sharing File via Bluetooth
Readying SD Card
Screenshot
Screenshot Failed
Eco Mode
®
Main Status Indicators
Status Indicators appearing in Status Bar include the
following.
・Other Status Indicators also appear depending on the
application.
Indicator Description
Obtaining Location
Auto Answering Set
Bluetooth® On
Bluetooth® Connected
Silent (Priority Only) Mode
Silent (Alarms Only) Mode
Silent (Total Silence) Mode
Silent (Vibrate) Mode
4G LTE/4G Data in Use
3G/HSPA Data in Use
Wi-Fi Connected
Signal Strength
Roaming
No Signal
Airplane Mode
Charge Battery
Battery Low
Battery Charged
Battery Charging
Alarm Set
1 Handset supports FDD-LTE (SoftBank 4G LTE) and
SoftBank 4G (AXGP); indicator appears when handset is
connected to either. Handset connects to SoftBank 4G
first.
1
Handset Interface
DIGNO
®
F
Page 34

32
Using Notifications Window
Open notifications (missed call, etc.), check handset status or
change various settings.
Opening Notifications Window
Drag/Flick Status Bar down
Notifications Window appears.
Closing Notifications Window
Touch Display bottom and Drag/Flick up
・If notifications or running functions are shown, Drag/
Flick upward from the bottom of Display to close.
・
Alternatively, Tap .
Page 35

Phone
Placing/Answering Calls...................................................34
Optional Services..............................................................35
Using Contacts..................................................................40
Page 36

34
Placing/Answering Calls
How to dial directly to make a call and answer a call, as well
as options when a call is arriving/during a call are described.
Phone Function
Emergency Location Report
Making emergency calls (110, 119 or 118) from SoftBank
handset (3G) automatically reports handset location to
corresponding agency (police, etc.). This system is referred
to as Emergency Location Report, and notifies location
based on positioning from base stations.
・Location Report does not incur registration/transmission
fees.
・Location/signal conditions affect positioning accuracy.
Always provide location and call purpose.
・Hiding Caller ID (using 184, etc.) cancels Location Report.
However, corresponding agency may obtain location
information in life threatening situations.
・Location Report is not sent for calls made while outside
Japan.
VoLTE and HD Voice
Handset supports VoLTE and HD Voice for higher voice call
quality.
Tap dialpad to enter the other party's number
・Enter area code first for calling landline numbers.
Handset dials number. Call begins when other party
answers.
Placing Calls
In Home Screen, (Apps) (Phone)
Phone opens.
To end call,
Call ends.
Call window opens.
Page 37

35
Answering Calls
When call arrives, Tap ANSWER
Call begins.
・If not in Sleep mode or Start Screen when call arrives, pop-
up for incoming call appears.
・Tap caller indication for incoming call window.
To end call,
Optional Services
This handset is compatible with SoftBank Optional Services.
Optional Services
The following optional services are available.
Service Description
Call
Forwarding
Voicemail
Call Waiting
Group Calling1Merge multiple calls.
Notify Caller
ID
Call Barring
1 Requires separate subscription
Divert calls to a preset number when out
of service area or unable to answer.
Divert calls to a Voicemail Center to take
messages when out of service area or
unable to answer.
1
Answer calls during a call.
Send or hide your number when placing
calls.
Restrict incoming/outgoing calls by
conditions.
Phone
Call ends.
DIGNO
®
F
Page 38

36
Using Call Forwarding
In Home Screen, (Apps) (Phone)
Always forward / When Busy / When unanswered /
When unreachable
Settings for the service appear.
Call settings
Call settings open.
Call service settings
In settings for service, Always forward / When Busy /
When unanswered / When unreachable
The forwarding window opens.
Forwarding
Voicemail/Call forwarding
Call Forwarding is enabled.
Number Enter number ADD
The forwarding number is set.
Page 39

OK
Call Forwarding is set.
37
Using Voicemail
In Home Screen, (Apps) (Phone)
Phone
Call settings
Call settings open.
Call service settings
Voicemail/Call forwarding
DIGNO
®
F
Page 40

38
Changing Call Waiting Settings
Always forward / When Busy / When unanswered /
When unreachable
Settings for the service appear.
In settings for service, Always forward / When Busy /
When unanswered / When unreachable
Requires separate subscription.
In Home Screen, (Apps) (Phone)
Call settings
The forwarding window opens.
Voicemail
OK
Call settings open.
Call service settings
Call waiting ( )
Voicemail is set.
・
appears in Status Bar for new message. Dial "1416" then
follow voice guidance.
Call Waiting is turned off.
・
Tap Call waiting to toggle on ( )/off ( ).
・
When call arrives during another call, tone sounds. Drag
to right to begin call.
Page 41

39
Using Group Calling
Requires separate subscription.
During a call, Add call
Enter number
Changing Caller ID Notification Settings
In Home Screen, (Apps) (Phone)
Phone
Call settings
When call connects, Conference call
Group Calling starts.
Call settings open.
Call service settings
Accept Caller ID ( )
Notify Caller ID is set.
・
Tap Accept Caller ID to toggle on ( )/off ( ).
DIGNO
®
F
Page 42

40
Using Call Barring
In Home Screen, (Apps) (Phone)
Call settings
Using Contacts
Save phone numbers, mail addresses, etc. to Contacts.
Adding New Contacts
In Home Screen, (Apps) (Contacts)
Contacts appear.
Tap Google account
Call settings open.
Call service settings
Outgoing Call Barring / Incoming Call Barring
・Log in to your Google account beforehand.
Enter items SAVE
Contact is added.
Tap outgoing/incoming restriction
Call Barring is set.
Page 43

Messaging & Internet
Messaging.......................................................................... 42
Sending S! Mail/SMS.........................................................42
Using Gmail....................................................................... 43
Using Chrome.................................................................... 44
Page 44

42
Messaging
S! Mail
Exchange messages with S! Mail-compatible SoftBank handsets
and email compatible devices (other mobiles, PCs, etc.) beyond
SMS character entry limit; attach media files.
SMS
Exchange short messages (up to 160 single-byte characters)
using handset numbers as addresses.
Gmail
Gmail is Google's webmail service. Handset automatically syncs
with Gmail.
Sending S! Mail/SMS
Sending S! Mail/SMS
In Home Screen, (Apps) (Mail)
・Alternatively, enter phone numbers or email addresses in
Recipient field directly.
Phonebook / Outgoing History / Incoming History /
Mail Group
・
Tap Phonebook , Outgoing History , or Incoming
History to select recipients from Phonebook, Outgoing
History, or Incoming History.
・
Tap Mail Group to select a mail group and set all the
members on the list as recipients.
Page 45

Select recipients OK
・
Tap Phonebook / Outgoing History / Incoming History /
Mail Group to change recipient lists.
・
After setting recipients, Tap to check recipients’
phone numbers/email addresses or set them to Cc/Bcc.
・If recipients are set to Cc/Bcc, the mail is sent as S! Mail.
・
To delete a recipient, Tap and then .
Alternatively, Tap and then Delete recipient .
Tap Subject field/text entry field Enter subject/text
Using Gmail
Creating/Sending Gmail
In Home Screen, (Apps) (Google)
(Gmail)
Mail list opens.
43
Messaging & Internet
・
Tap to attach a file.
・If a subject is entered or a file is attached, the mail is sent
as S! Mail.
Send
S! Mail/SMS is sent.
・Failed S! Mail/SMS messages are saved as drafts.
Mail composition window opens.
Enter recipient/subject/mail text
Mail is sent.
DIGNO
®
F
Page 46

44
Using Chrome
Use Chrome to browse the Internet.
TLS
TLS (Transport Layer Security) is a protocol for encrypting
sent/received data. While in a screen connected by
TLS, data is encrypted to safely send/receive private
information, credit card numbers, corporate secrets,
etc., and provide protection against online threats
(eavesdropping, falsification, impersonation, etc.).
TLS Cautions
When opening a secured page, users must decide as their
responsibility whether or not to open the page with use
of TLS. SoftBank Corp. and the Certification Authorities
Symantec Website Security G.K. and Cybertrust make no
guarantees whatsoever to users regarding security of TLS.
Adding Bookmarks
In Home Screen, (Apps) (Google)
(Chrome)
Chrome opens.
Show Web page to add
Using Chrome
In Home Screen, (Apps) (Google)
(Chrome)
Chrome opens.
・If confirmation appears, follow onscreen instructions.
・Tapping Web links within text messages automatically opens
Chrome. If it does not open automatically, follow onscreen
instructions.
Tap entry box at top Enter search words or URL
Current Web page is added to Bookmarks.
Search results appear or a Web page opens.
Page 47

Opening New Tabs
Open several tabs to switch between Web pages easily.
In Home Screen, (Apps) (Google)
(Chrome)
Chrome opens.
New tab
45
Messaging & Internet
New tab appears.
・
To switch tabs, Tap Recent tabs and then target tab.
DIGNO
®
F
Page 48

46
Page 49

Camera
Capturing Still Images/Videos......................................... 48
Page 50

48
Capturing Still Images/Videos
Capturing Still Images/Videos
File Format for Still Images
File format for still images is JPEG.
File Format for Videos
File format for videos is MPEG-4.
Camera Cautions
If Lens Becomes Dirty
Fingerprints/smudges on lens prevent capturing of clear
still images/videos. Wipe lens with a soft cloth beforehand.
Avoid Exposure to Direct Sunlight
Be careful not to expose lens to direct sunlight for long
periods. May discolor color filter and affect color of
images.
Capturing Videos
In Home Screen, (Apps) (Camera)
Viewfinder appears.
Aim Camera at subject
Capturing Still Images
In Home Screen, (Apps) (Camera)
Viewfinder appears.
・If confirmation appears, follow onscreen instructions.
Aim Camera at subject
Video recording starts.
To stop recording,
Camera beeps and video is saved.
・
Tap during recording to take a still image.
Shutter clicks and still image is saved.
Page 51

Music & Images
Music Files.........................................................................50
Still Images/Videos...........................................................50
Page 52

50
Music Files
Playing Music
In Home Screen, (Apps) (Google) (Play
Music)
Listen Now opens.
・If confirmation appears, follow onscreen instructions.
Music library
Still Images/Videos
Viewing Captured Still Images/Videos
In Home Screen, (Apps) (File Commander)
Pictures / Videos
Music library opens.
Flick screen left/right and select category (such as "ALBUMS")
Tap item Tap song
A file index for each category appears.
・Continue by following onscreen instructions.
Song plays.
Page 53

Connectivity
Connecting by Wi-Fi.........................................................52
Using Bluetooth® Function.............................................. 53
Exchanging Data by Infrared...........................................53
Page 54

52
Connecting by Wi-Fi
Handset supports Wi-Fi (wireless LAN). Access the Internet
via a household Wi-Fi connection environment. For Wi-Fi
router (manufactured by FON) users, see "Fonルーターかんたん
設定ガイド (http://mb.softbank.jp/mb/special/network/pdf/
wifi_howto_01.pdf)" for details.
Connecting to Access Points
Select a scanned access point (Wi-Fi network) and connect.
In Home Screen, (Apps) (Settings)
Tap access point Enter password CONNECT
Handset is connected.
・The password, for a household wireless LAN router, is
sometimes found on a sticker on the router (WEP, WPA, KEY,
etc.). Contact the router manufacturer for information.
For password for a public wireless LAN, check with user's
service provider.
・Entering a password is not required if an access point is not
security protected.
Wi-Fi
Wi-Fi settings open.
Wi-Fi is enabled ( ).
・
To disable Wi-Fi, Tap ( ).
Page 55

53
Using Bluetooth® Function
Connect to a Bluetooth®-capable wireless phone, etc. for calls
or to a hands-free device such as a headset.
Enabling Bluetooth® Function
・Wireless connection to all Bluetooth® functions is not
guaranteed for handset.
・Handset may not connect properly depending on the other
device.
・Noise may be experienced in some situations while listening
to music, etc. wirelessly or talking in a hands-free call.
In Home Screen, (Apps) (Settings)
Exchanging Data by Infrared
Exchange data with a mobile phone or other device by
infrared.
Receiving Data
In Home Screen, (Apps) (Infrared)
Infrared window opens.
・If confirmation appears, follow onscreen instructions.
Bluetooth
Bluetooth® settings open.
Receive
Connectivity
Commence sending on other device OK
Data is saved.
・If a contact etc. is received, confirmation to save appears.
Bluetooth® function is enabled ( ).
・
To disable Bluetooth® function, Tap ( ).
DIGNO
®
F
Page 56

54
Sending Selected Data
Gallery is described.
In Home Screen, (Apps) (Gallery)
Select
Tap image to send
・
・
Tap Select all to select all images.
Changes to Deselect all if all images are selected. Tap
Deselect all to cancel all selections.
Infrared
Send-ready window opens.
Commence receiving on other device
Data is sent.
Page 57

Global Services
Making Calls while Abroad.............................................. 56
Page 58

56
Making Calls while Abroad
International Calls to Japan and Other
Countries from Abroad
In Home Screen, (Apps) (Phone)
Phone opens.
Handset dials number. Call begins when other party
answers.
Call window opens.
Touch & Hold
"+" appears.
Enter country code then other party number (omit first 0)
・Do not omit first 0 from phone numbers when dialing Italy
(39).
Page 59

Calls to Landline Phones/Mobile Phones
in Country of Stay
Place calls the same way you would within Japan.
・Do not enter country code or omit first 0 from phone
numbers.
In Home Screen, (Apps) (Phone)
Phone opens.
57
Call window opens.
Tap dialpad to enter number
Global Services
Handset dials number. Call begins when other party
answers.
DIGNO
®
F
Page 60

58
Page 61

Handset Settings
Handset Settings.............................................................. 60
Profile................................................................................ 61
Wi-Fi Settings...................................................................61
Bluetooth Settings........................................................... 62
Data Usage Settings.........................................................63
More Settings................................................................... 63
Changing Home..................................................................64
Call Settings..................................................................... 64
Display Settings................................................................65
Sound & Notification Settings........................................65
App Settings..................................................................... 66
Storage Settings...............................................................67
Battery Settings...............................................................67
Eco Mode Settings............................................................68
Memory Settings...............................................................68
Location Settings............................................................. 69
Start Screen Settings...................................................... 69
Security Settings..............................................................70
Account Settings.............................................................. 71
Language & Input Settings..............................................72
Backup & Reset.................................................................72
Date & Time Settings...................................................... 73
Accessibility Settings.......................................................73
Printing Settings.............................................................. 74
About Phone......................................................................75
Page 62

60
Handset Settings
Handset Settings
In Home Screen, (Apps) (Settings) to customize
operation of handset functions.
Handset settings include the following items.
Item Description
Profile
Wi-Fi Enable Wi-Fi connection.
Bluetooth Enable Bluetooth® connection.
Data usage Check mobile data usage and set limit.
More
Change home Change the home application.
Call
Display Set Wallpaper, Display brightness, etc.
Sound &
notification
Apps Check installed and running applications.
Storage
Battery Check Battery usage.
Eco Mode
Memory Check memory usage.
Location Enable location information.
Start screen Make Start Screen settings.
Security Set USIM Card Lock, etc.
Accounts Create/add accounts and sync accounts.
Google Make settings for Google services.
Language &
input
Backup &
reset
Date & time Set functions for date and time.
Accessibility Set functions for text-to-speech, etc.
Printing Make settings for Cloud Print, etc.
About phone Check handset status.
Check and edit your phone number, e-mail
address, etc.
Set other functions for wireless and
networks.
Check call information and set call
operation.
Make sound and notification settings
such as ringtone, vibration, notification
ringtone, and operation tones.
Check space in internal storage and on SD
Card. Also erase SD Card storage data or
mount/unmount SD Card.
Set Eco mode to reduce unnecessary power
consumption.
Set functions for language and text entry.
Back up handset information and initialize
handset.
In Home Screen, (Apps) (Settings)
Handset settings open.
Set items
Settings are made.
Page 63

61
Profile
Profile
Check and edit your phone number, e-mail address, etc.
In Home Screen, (Apps) (Settings)
Profile
Wi-Fi Settings
Wi-Fi Settings
In Home Screen, (Apps) (Settings)
Wi-Fi
Profile appears.
Check each item
Check profile.
Wi-Fi settings open.
Wi-Fi is enabled ( ).
・
To disable Wi-Fi, Tap ( ).
Handset Settings
DIGNO
®
F
Page 64

62
Tap access point Enter password CONNECT
Handset is connected.
・The password, for a household wireless LAN router, is
sometimes found on a sticker on the router (WEP, WPA, KEY,
etc.). Contact the router manufacturer for information.
For password for a public wireless LAN, check with user's
service provider.
・Entering a password is not required if an access point is not
security protected.
Bluetooth Settings
Bluetooth Settings
In Home Screen, (Apps) (Settings)
Bluetooth
Bluetooth® settings open.
Set items
Settings are made.
Page 65

63
Data Usage Settings
Data Usage Settings
Check amount of mobile data transfers and set limit on usage.
In Home Screen, (Apps) (Settings)
Data usage
More Settings
More Settings
Set operation of other functions.
Item Description
Airplane mode
Tethering
& portable
hotspot
VPN Add a VPN.
Cellular
networks
In Home Screen, (Apps) (Settings)
Disable all settings that emit signals.
Handset stays powered on.
Make tethering settings.
Set a network mode, etc.
Data usage window opens.
More
Handset Settings
More settings appear.
Set items
Settings are made.
DIGNO
®
F
Page 66

64
Changing Home
Changing Home
Set the home application to use.
In Home Screen, (Apps) (Settings)
Change home
Call Settings
Call Settings
Check call information and set call operation.
Item Description
Call Time Check accumulated call time.
Hide Caller ID Show caller information for arriving call.
Voice memo Play back, delete, etc. voice memos.
Heard effect Set in-call sound quality.
SMS response
Auto
answering
VoLTE voice
call
Incoming
Reject
Call service
settings
Edit an SMS response message for arriving
calls.
Make settings for Auto Answering.
Set whether to use LTE for voice calls.
Bar calls from arriving.
Make settings for Voicemail, Call
Forwarding, Call Barring, etc. For details,
see "Changing Caller ID Notification
Settings," "Using Call Barring," "Using
Voicemail," "Using Call Forwarding," and
"Changing Call Waiting Settings."
Home change settings appear.
Tap home application OK
Home application is set.
・If settings open, follow onscreen instructions.
In Home Screen, (Apps) (Settings)
Call
Call settings appear.
Set items
Settings are made.
Page 67

65
Display Settings
Display Settings
Make settings for Display brightness, Wallpaper, etc. Settable
items are the following.
Item Description
Brightness
level
Adaptive
brightness
Wallpaper Set Wallpaper for Home Screen.
Sleep
Daydream
Font size Set size of font for Display.
When device
is rotated
Display
battery
percentage
In Home Screen, (Apps) (Settings)
Display
Set brightness of Display.
Enable adjustment of brightness for
surroundings.
Set time until Display turns off if not
operated.
Set screensaver on/off, conditions for
activating, etc.
Set whether to rotate Display with
handset orientation automatically.
Set whether to show the percentage of
battery left in Status Bar.
Sound & Notification Settings
Sound & Notification Settings
Make ringtone, operation tones, and other sound and
notification settings. Settable items are the following.
Item Description
Media volume Set volume for music, videos, etc.
Alarm volume Set volume for alarm.
Ring volume Set volume for Phone ringtone, etc.
Notification
volume
Also vibrate
for calls
Do not disturb Make Silent mode settings.
Phone
ringtone
Vibration
pattern
Default
notification
ringtone
Other sounds
Incoming LED Set Incoming LED pattern.
Pulse
notification
light
When device
is locked
App
notifications
Notification
access
Do Not
Disturb access
Display quick
settings
Set volume for notification ringtones.
Enable vibration for ringtone.
Set Phone ringtone.
Set vibration for incoming calls.
Set notification ringtone.
Set operation sound for dialpad, unlocking
the screen, etc.
Set whether Incoming LED pulses for new
mail and notifications.
Show notification content in Start Screen.
Set notification from applications
individually.
Check applications that can access
notifications.
Check applications that can access Do Not
Disturb.
Set whether on/off settings are shown in
Notifications Window.
Handset Settings
Display settings appear.
Set items
Settings are made.
In Home Screen, (Apps) (Settings)
DIGNO
®
F
Page 68

66
Sound & notification
Set items
Settings are made.
App Settings
App Settings
Check installed applications.
In Home Screen, (Apps) (Settings)
Apps
Apps settings appear.
Tap items
Check applications.
Page 69

67
Storage Settings
Storage Settings
Check amount of internal storage/SD Card space, mount SD
Card, or delete SD Card data. Settable items are the following.
Item Description
Device
storage
Portable
storage
In Home Screen, (Apps) (Settings)
Check total/free amount of internal
storage space, etc.
Check total/free amount of SD Card
space, or eject, mount, or initialize SD
Card.
Battery Settings
Battery Settings
Check Battery usage.
In Home Screen, (Apps) (Settings)
Battery
Storage
Storage settings appear.
Check/Tap items
Check storage statuses.
Battery settings open.
Tap items
Check Battery condition.
Handset Settings
DIGNO
®
F
Page 70

68
Eco Mode Settings
Eco Mode Settings
Adjust Backlight time-out and Display brightness to reduce
battery consumption.
In Home Screen, (Apps) (Settings)
Eco Mode
Memory Settings
Memory Settings
Check memory usage.
In Home Screen, (Apps) (Settings)
Memory
Eco Mode window appears.
OFF
Handset enters Eco mode ( ).
Set items
Memory settings open.
Tap items
Check memory usage.
Settings are changed immediately after an item is
changed.
Page 71

69
Location Settings
Location Settings
Enable location information. Settable items are the following.
Item Description
Mode Set mode for determining location.
Recent
location
requests
Location
services
In Home Screen, (Apps) (Settings)
Location
Show applications recently using location.
Make settings for applications using
location information.
Start Screen Settings
Start Screen Settings
Check information and set operation of Start Screen. Settable
items are the following.
・
Items shown differ depending on the Security type
setting.
Item Description
Security type Set the type of security.
Make pattern
visible
Automatically
lock
Power button
instantly
locks
Show
application
shortcuts
Start screen
message
Start screen
background
Smart Lock
Enable traced unlock pattern to be visible
for Start Screen.
Set time until Start Screen locks
automatically after Display times out with
no activity.
Enable press to lock Start Screen.
Enable shortcuts on Start Screen.
Set a Start Screen message.
Set Wallpaper in Start Screen.
Set whether handset checks for trusted
devices/locations and automatically
unlocks.
Location settings appear.
/
Item is set.
・
Tap / to toggle on ( )/off ( ).
In Home Screen, (Apps) (Settings)
Start screen
Start Screen settings appear.
Handset Settings
DIGNO
F
®
Page 72

70
Set items
Security Settings
Settings are made.
Security Settings
Make settings for USIM Card Lock, etc. Settable items are the
following.
Item Description
Encrypt phone Encrypt handset data.
Set up SIM
card lock
Make
passwords
visible
Device
administrators
Unknown
sources
Storage type Show storage type.
Trusted
credentials
Install from
SD card
Clear
credentials
Trust agents Set whether to show trusted agents.
Screen pinning
Apps with
usage access
Make settings for USIM Card lock.
Enable password to be visible as password
is entered.
Check and enable/disable applications
managing handset.
Enable installation of applications from
unknown sources.
Show trusted credentials.
Install certificates from storage.
Delete all certificates.
Set to keep only screen of specified
application in view.
Manage applications that can access
application usage history data.
In Home Screen, (Apps) (Settings)
Security
Security settings open.
Page 73

Set items
71
Account Settings
Settings are made.
Account Settings
Create/add accounts and make sync settings.
In Home Screen, (Apps) (Settings)
Accounts
Account settings open.
Add account Select account to add Follow onscreen
instructions
Account is added.
Handset Settings
DIGNO
®
F
Page 74

72
Language & Input Settings
Language & Input Settings
Set functions for language and text entry. Settable items are
the following.
・Items shown depend on handset usage.
Item Description
Language Set the language shown on Display.
Current
Keyboard
iWnn IME Set operation of iWnn IME.
Google voice
typing
iWnn IME
Keitai Input
Text-tospeech output
Pointer speed
Change the keyboard for entering text.
Make settings for Google voice entry.
Set Keitai Input operation.
Make detailed voice-to-text settings.
Set the speed of the pointer for a mouse/
trackpad.
Backup & Reset
Backup & Reset
Make settings for backing up information and initialize data.
Settable items are the following.
Item Description
Back up my
data
Backup
account
Automatic
restore
Network
settings reset
Factory data
reset
・Initializing handset erases all data on handset. It is
recommended that you back up important data beforehand.
・Erased information cannot be restored. Erase after checking
adequately.
Enable backup for application data, etc.
Check the account used for backing up
data.
Enable recovery of data.
Reset Wi-Fi, mobile data, Bluetooth
Settings.
Initialize handset data.
®
In Home Screen, (Apps) (Settings)
Language & input
Language & input window opens.
In Home Screen, (Apps) (Settings)
Backup & reset
Backup & reset settings appear.
Set items
Settings are made.
Set items
Settings are made.
Page 75

73
Date & Time Settings
Date & Time Settings
Set functions for date and time. Settable items are the
following.
Item Description
Automatic
date & time
Automatic
time zone
Set date
Set time
Select time
zone
Use 24-hour
format
In Home Screen, (Apps) (Settings)
Set the date automatically.
Enable use of time zone information from
the network.
Set the date manually. Available when
Automatic date & time is cancelled
( ).
Set the time manually. Available when
Automatic date & time is cancelled
( ).
Set the time zone manually.
Available when Automatic time zone is
cancelled ( ).
Enable 24-hour format.
Accessibility Settings
Accessibility Settings
Set captions, magnification gestures, and other useful
accessibility functions. Settable items are the following.
Item Description
TalkBack
Switch Access
Magnification
gestures
Font size Increase size of onscreen text.
High contrast
text
Auto-rotate
screen
Speak
passwords
Text-tospeech output
Color
inversion
Color
correction
Captions Enable captioning.
Touch & hold
delay
Power button
ends call
Accessibility
shortcut
1
Set handset to read out screen
information.
Set handset to be controllable by one or
several switches.
Enable Display to be enlarged.
Make text easier to see by adding outline,
etc.
Enable automatic rotation of Display.
Enable password to be read aloud.
Set text-to-speech.
Invert screen colors.
Correct screen colors.
Set time to press Display for Touch &
Hold.
Set to end call when pressed.
Set shortcut to quickly show accessibility
settings.
Handset Settings
Date & time
Date & time settings appear.
Set items
Settings are made.
1 Enabled when TalkBack installed.
In Home Screen, (Apps) (Settings)
DIGNO
®
F
Page 76

74
Accessibility
Accessibility settings appear.
Set items
Settings are made.
・If confirmation appears, follow onscreen instructions.
Printing Settings
Printing Settings
Make settings for Cloud Print, etc.
In Home Screen, (Apps) (Settings)
Printing
Printing settings open.
・Follow onscreen instructions.
Page 77

75
About Phone
About Phone
Check handset status. Items that can be checked/set are the
following.
Item Description
System
Update
Status Check condition of handset.
Legal
information
Model number Check model number.
Android
version
Android
security patch
level
Kernel version Check the kernel version.
Build number Check the build number.
Technical
regulations
conformity
certification
Make settings for system update.
Check copyright information, terms of
use, etc.
Check the Android version.
Check the Android security patch level.
Confirm certification.
Options for Developers
Follow steps below to access options for developers
on Settings screen. Available options are intended for
developers. Do not change the settings except when
developing applications, etc.; may result in handset
malfunction.
In About phone window, Tap build number 7 times
・To continue and access developer options, in Home
Screen, (Apps) (Settings) Developer
options .
In Home Screen, (Apps) (Settings)
About phone
Handset information appears.
Handset Settings
Check/set each item
Check/set handset information.
DIGNO
®
F
Page 78

76
Page 79

For Assistance
Specifications....................................................................78
Materials............................................................................78
Customer Service.............................................................. 79
Page 80

78
Specifications
DIGNO® F
Item Description
Weight Approx. 138 g
Approx. 1190 min. (3G)
Continuous
Talk Time
Continuous
Standby Time
2
Charging
Time (handset
power off)
Dimensions (W
x H x D)
Maximum
Output
Approx. 570 min. (GSM)
1
Approx. 880 min. (4G LTE: FDD-LTE
network)
Approx. 860 hours (3G)
Approx. 870 hours (GSM)
Approx. 600 hours (4G: AXGP network)
Approx. 650 hours (4G LTE: FDD-LTE
network)
AC Charger (SB-AC12-HDQC): Approx. 140
min.
Approx. 72 × 142 × 10.8 mm (excluding
projections)
4G (LTE:FDD-LTE network): 0.2 W
3G: 0.2 W
GSM (900 MHz): 2 W
GSM (1800 MHz, 1900 MHz): 1 W
Materials
DIGNO® F
Parts Material/Finishing
Outer Case
Back Cover
Interior Case PC resin/gold plating (antenna)
Display
Power Key,
Volume Up/
Down Key,
Camera Ring,
Key Panel
Card Slot Cap
USIM Card
Slot Cover
Camera/Light Acrylic resin
PA resin (containing glass fiber)/UV-cured
acrylic coating
PC resin/
Black: heat-cured urethane coating
Red, white: UV-cured acrylic coating
Chemically strengthened glass/anti-soiling
treatment
PC resin/UV-cured acrylic coating
PC resin + urethane resin + silicone
rubber
Stainless steel
1 Average for a fully charged Battery and normal signal
reception at a single location.
2 Average for a fully charged Battery and normal signal
reception at a single location without being in call or
operation. Value when data transmission/Urgent News is
disabled. Time varies with conditions of usage (charge,
temperature, etc.) and function settings.
Internal Battery
Item Description
Voltage 3.8 V
Type Lithium-ion
Capacity 2300 mAh
Page 81

Customer Service
For SoftBank handset or service information, call General
Information. For repairs, call Customer Assistance.
SoftBank Customer Support
General Information
From a SoftBank handset, dial toll free at 157
From a landline/IP phone, dial toll free at 0800-919-0157
Customer Assistance (Repairs/Lost
Handsets)
From a SoftBank handset, dial toll free at 113
From a landline/IP phone, dial toll free at 0800-919-0113
If you cannot reach a toll free number, use the number
(charges apply) below for your service area:
Hokkaido Area, Tohoku Area, Hokuriku Area, Kanto &
Koshinetsu Area: 022-380-4380
Kansai Area: 06-7669-0180
Chugoku Area, Shikoku Area, Kyushu & Okinawa Area:
092-687-0010
79
Smartphone Technical Support Center
From a SoftBank handset, dial toll free at 151
From a landline/IP phone, dial toll free at 0800-1700-151
SoftBank Global Call Center
From outside Japan, dial +81-92-687-0025 (toll free from
SoftBank handsets)
If handset is lost/stolen, call this number immediately
(international charges apply)
For Assistance
DIGNO
®
F
Page 82

80
Page 83

Safety Precautions
Safety Precautions........................................................... 82
General Notes................................................................... 90
Water/Dust/Shock Resistance......................................... 96
Page 84

82
Safety Precautions
For proper handset use, carefully read Safety Precautions
beforehand. Keep this guide for future reference.
Observe these safety precautions to prevent injury or damage
to property.
Labels
Risks of injury or damage from improper use are categorized
by levels.
Mark Descriptions
Great risk of death or serious injury1 from
improper use
Risk of death or serious injury1 from
improper use
Risk of injury2 or damage to property
from improper use
1 Serious injury includes: Loss of eyesight, physical injury,
high temperature burns, low temperature burns, electric
shock, fractures, poisoning and other conditions having
side effects or requiring hospitalization or long-term
treatment.
2 Injury includes: Physical injury, high-temperature
burns, low-temperature burns, electric shock, and other
conditions not requiring hospitalization or long-term
treatment.
3 Damage to property includes: Incidental damage to
structures and household property and/or to pets and
livestock.
Symbols
3
Handset, USIM Card, AC Charger
(Commercially Available), Micro
USB Cable (Commercially Available)
(Common)
Do not use, store, or leave handset or
related hardware in places subject to high
temperatures or where heat collects (near
an open flame or heating equipment, under a
kotatsu or blanket, in direct sunlight, or inside
a car on a hot day).
May cause fire, burns, injury, electric shock, etc.
Do not place handset or related hardware in or
near a microwave oven, induction cooktop, etc.
or pressure cooker.
May cause fire, burns, injury, electric shock, etc.
Do not place handset or related hardware
directly on or get soiled with sand, dirt or
mud. Do not touch if hands are dirty with sand,
etc.
May cause fire, burns, injury, electric shock, etc.
For details on water and dust resistance, see "Water/Dust/
Shock Resistance."
Mark Descriptions
Action prohibited
Disassembly prohibited
Exposure to liquids prohibited
Handling with wet hands prohibited
Action compulsory
Unplug power cord
Do not charge if wet with water or other
liquid (beverage, sweat, seawater, pet urine,
etc.).
May cause fire, burns, injury, electric shock, etc.
For details on water resistance, see "Water/Dust/Shock
Resistance."
Do not disassemble or modify.
May cause fire, burns, injury, electric shock, etc.
Do not get wet with water or other liquid
(beverage, sweat, seawater, pet urine, etc.).
May cause fire, burns, injury, electric shock, etc.
For details on water resistance, see "Water/Dust/Shock
Resistance."
Page 85

Do not allow water or other liquid (beverage,
sweat, seawater, pet urine, etc.) to enter
3.5mm Headphone Port or External Device Port.
May cause fire, burns, injury, electric shock, etc.
For details on water resistance, see "Water/Dust/Shock
Resistance."
83
Do not drop, step on, throw, or otherwise
subject to strong force or impact, or to
vibration.
May cause fire, burns, injury, electric shock, etc.
Use only SoftBank-designated optional
accessories.
May cause fire, burns, injury, electric shock, etc.
Do not allow conductive materials (anything
metal, pencil lead, etc.) to contact or dust to
enter 3.5mm Headphone Port or External Device
Port.
May cause fire, burns, injury, electric shock, etc.
Do not cover or wrap with a blanket, etc.
during use or while charging.
May cause fire, burns, etc.
If charging does not complete even after
specified charging time, stop charging.
Overcharging or other conditions may cause fire, burns,
injury, etc.
Always turn off handset as well as stop
charging before entering gas stations or
other places where flammable gases or fine
particulates generate.
Using handset in presence of flammable gases may cause
explosion, fire, etc.
If you notice an unusual odor, unusual sound,
smoke, overheating, discoloration, deformation,
etc. while using, charging or storing handset,
do the following.
- Unplug from outlet.
- Turn handset power off.
Not doing the above may cause fire, burns, injury, electric
shock, etc.
Safety Precautions
DIGNO
F
®
Page 86

84
Do not use damaged.
May cause fire, burns, injury, etc.
Do not place on an uneven or unstable surface.
Be particularly careful while vibrator is
activated.
Handset
Do not throw in fire or heat.
May cause Battery to ignite, rupture, overheat, or leak,
resulting in fire, burns, injury, etc.
May fall, leading to injury, etc.
Do not store in a humid or dusty location or
any place that reaches a high temperature.
May cause fire, burns, electric shock, etc.
For details on water and dust resistance, see "Water/Dust/
Shock Resistance."
Before a child uses handset or related
hardware, a parent/guardian should provide
instruction and ensure proper usage.
Failing to do so may cause injury, etc.
Keep out of reach of infants.
Failing to do so may result in small parts being accidentally
swallowed or may cause injury, electric shock, etc.
Do not pierce, hammer, step on, or otherwise
subject to excessive force.
May cause Battery to ignite, rupture, overheat, or leak,
resulting in fire, burns, injury, etc.
If matter from inside Internal Battery gets in
eyes, do not rub, immediately rinse with clean
water, and promptly seek medical attention.
Internal Battery matter can cause blindness or illness.
If matter from inside Display gets in eyes or
mouth, do not rub, immediately rinse with clean
water, and promptly seek medical attention.
Matter inside Display may cause blindness or illness.
Handset may become hot with extended use
or while charging. Also be careful not to
unintentionally be in contact with handset for
a long time (falling asleep, etc.).
If using applications, calling, transferring data, watching
videos, etc. or charging for an extended period, handset,
AC Charger/Micro USB Cable may become hot. Long contact
with hot parts may cause redness, itchiness, rash, lowtemperature burns, etc. depending on the individual.
Page 87

Do not look into Infrared Port when sending
data by infrared.
May affect eyesight.
When using infrared transfer, do not point
Infrared Port at an appliance or other
apparatus having infrared capability.
May cause appliance, etc. to misoperate and cause an
accident, etc.
Do not shine Light near or photograph with
Light close to someone's eyes. Especially, do
not photograph infants up close.
May affect eyesight, etc. May also temporarily affect
eyesight or startle, leading to injury or other accident.
85
Before boarding an aircraft, power off handset
or place handset in Airplane mode.
Restrictions are in place for use aboard aircraft; follow
airline instructions.
May affect aircraft instrumentation.
Prohibited use aboard an aircraft may be punishable by
law.
Follow instructions of each medical institution
for use in a hospital.
Power off handset where use is prohibited.
May affect electronic devices and electric medical
equipment.
Always power off handset when using handsfree calling, the ringtone is sounding, or when
waiting for a call.
Do not shine Light at or use Light to
photograph the driver of a vehicle, etc.
May interfere with driving, leading to accident, etc.
Do not look at a repeatedly flickering screen
for a long period.
May cause convulsions, loss of consciousness, etc.
Do not allow water or other liquids (beverage,
sweat, seawater, pet urine, etc.) or foreign
objects such as anything metal, flammable
material, etc. to enter handset USIM Card/SD
Card Slot (from Card Slot Cap).
Do not mistake USIM Card and SD Card Slots.
May cause fire, burns, injury, electric shock, etc.
If an earphone-microphone, etc. is attached for
gaming or video/music playback, adjust to a
moderate volume.
Too loud a volume or use for a long period may affect
hearing.
Inability to hear surrounding sound may also cause an
accident.
Individuals with a weak heart should take care
with handset vibration and ringtone settings
for new calls/mail.
May affect heart.
Safety Precautions
Individuals with an electric medical device
should consult with the device manufacturer
or distributor regarding any effects from
electronic signals before using handset.
May affect the electric medical device.
Do not expose Camera lens to direct sunlight
for extended period.
Concentration of light by lens may cause fire, burns,
injury, etc.
DIGNO
®
F
Page 88

86
Keep handset power off near high precision
electronic devices or devices using weak
signals.
May cause devices to misoperate, etc.
Devices that may be affected:
Hearing aids, implanted cardiac pacemakers and implanted
defibrillators, other electric medical equipment, other
automatically controlled equipment, etc. Individuals using
an implanted cardiac pacemaker, implanted defibrillator, or
other electric medical equipment should consult with the
device manufacturer or distributor regarding any effects
from electronic signals.
If Display becomes damaged and internal
matter leaks, do not allow it to get on skin
(face, hands, etc.), clothing, etc.
May cause blindness, harm to your skin, etc.
If internal matter should get in your eyes or mouth or on
your skin or clothing, immediately rinse with clean water.
If in your eyes or mouth, immediately seek medical
attention after rinsing.
To open Back Cover, use only as much strength
as necessary.
If Display or Camera lens becomes damaged,
be careful with shattered glass and exposed
handset interior.
Touching broken portions or exposed components may cause
burns, injury, electric shock, etc.
If Internal Battery leaks or emits odor,
immediately discontinue use and keep away
from flames.
Leaking fluid can catch fire and ignite, rupture, etc.
Do not allow pets, etc. to bite handset.
Internal Battery may ignite, rupture, overheat, or leak,
resulting in fire, burns, injury, etc.
Back Cover may break, causing injury, etc.
Avoid pinching fingers when attaching Back
Cover.
May cause injury, etc.
Do not use handset without Back Cover
attached.
May cause burns, injury, electric shock, etc.
Do not dispose of with ordinary waste.
May cause ignition, resulting in fire, burns, injury, etc.
May also degrade the environment. Bring old handsets to
a SoftBank Shop or other location accepting handsets, or
dispose of in accordance with local collection regulations.
If matter from inside Internal Battery leaks,
do not let it get on skin (face, hands, etc.),
clothing, etc.
May cause blindness, harm skin, etc.
If matter gets in eyes/mouth or on skin/clothing,
immediately rinse with clean water.
If matter gets in eyes/mouth, first rinse and then
promptly seek medical attention.
Page 89

Before using handset in a vehicle, consult
with the vehicle manufacturer or distributor
regarding any effects from electronic signals.
Although rarely, some makes of car may have onboard
electronic devices that can be affected. Immediately
discontinue use if such devices are onboard.
If any skin abnormality occurs with use of
handset, immediately discontinue use and seek
medical attention. May cause itchiness, rash,
etc. depending on the individual.
For details on materials used in handset, see "DIGNO® F."
Internal Battery
Internal Battery is the following type.
Symbol
on Label
Li-ion00 Lithium-ion
Do not throw Internal Battery (handset) in fire
or heat Internal Battery (handset).
Internal Battery igniting, rupturing, overheating, or leaking
may cause fire, burns, injury, etc.
Battery Type
87
Handset Speaker uses magnetic components.
Make sure that nothing metal (cutter blades,
staples, etc.) have become attached to it.
Attached objects may cause injury, etc.
When viewing Display, view in a sufficiently
bright place with Display at an adequate
distance.
Viewing in a dark place too closely may affect vision, etc.
Do not pierce, hammer, step on, or otherwise
subject to excessive force.
Internal Battery igniting, rupturing, overheating, or leaking
may cause fire, burns, injury, etc.
If matter from inside Internal Battery gets in
eyes, do not rub, immediately rinse with clean
water, and promptly seek medical attention.
Internal Battery matter can cause blindness or illness.
Safety Precautions
DIGNO
®
F
Page 90

88
If you notice an unusual odor, overheating,
discoloration, deformation, etc., do not use
Internal Battery (handset).
Internal Battery igniting, rupturing, overheating, or leaking
may cause fire, burns, injury, etc.
If Internal Battery leaks or emits odor,
immediately discontinue use and keep away
from flames.
Leaking fluid may ignite, causing ignition, rupturing, etc.
Do not allow pets, etc. to bite handset.
AC Charger (Commercially Available),
Micro USB Cable (Commercially
Available)
Do not use AC Charger or Micro USB Cable if
damaged.
May cause fire, burns, electric shock, etc.
Do not use AC Charger or Micro USB Cable in
bath room or other humid location.
May cause fire, burns, electric shock, etc.
Internal Battery igniting, rupturing, overheating, or leaking
may cause fire, burns, injury, etc.
If Internal Battery matter leaks, do not allow
it to get on skin (face, hands, etc.), clothing,
etc.
May cause blindness, harm to your skin, etc.
If internal matter should get in your eyes or mouth or on
your skin or clothing, immediately rinse with clean water.
If in your eyes or mouth, immediately seek medical
attention after rinsing.
If thunder is audible, do not touch AC Charger
or Micro USB Cable.
May cause electric shock.
Do not short-circuit Charging Terminals while
plugged in. Do not touch Charging Terminals
with hands, fingers, etc.
May cause fire, burns, electric shock, etc.
Do not place heavy objects on, pull, or
otherwise subject AC Charger or Micro USB
Cable to excessive force.
May cause fire, burns, electric shock, etc.
When plugging in/unplugging AC Charger, do
not allow anything metal (metal strap, etc.) to
come in contact.
May cause fire, burns, electric shock, etc.
Do not use a travel converter with AC Charger.
May cause ignition, overheating, electric shock, etc.
Page 91

89
If AC Charger is connected to handset, do
not place excessive force where they are
connected.
May cause fire, burns, injury, electric shock, etc.
Do not touch AC Charger cord or Micro USB
Cable, Charging Terminals, or power plug with
wet hands.
May cause fire, burns, electric shock, etc.
Use with the specified power source at the
specified voltage.
If charging while abroad, charge with an AC
Charger compatible with use abroad.
Use with an incorrect power source or voltage may cause
fire, burns, electric shock, etc.
AC Charger: 100 V AC (household AC outlet only)
AC Chargers compatible with use abroad: 100 V to 240 V
AC (be sure to connect only to household AC outlet)
If Charging Terminals are bent or otherwise
deformed, immediately discontinue use. Do not
try to return to original shape and resume use.
Short-circuiting of Charging Terminals may cause fire,
burns, injury, electric shock, etc.
If not using AC Charger, unplug from outlet.
Leaving plugged in may cause fire, burns, injury, electric
shock, etc.
If water or other liquid (beverage, sweat,
seawater, pet urine, etc.) enters, immediately
unplug from outlet.
May cause fire, burns, electric shock, etc.
Before caring for equipment, unplug from
outlet.
Wipe away dust on power plug.
Using with dust on plug may cause fire, burns, electric
shock, etc.
When plugging in AC Charger, plug in firmly.
Failing to do so may cause fire, burns, electric shock, etc.
Hold AC Charger by body to unplug and do not
pull forcefully by cord.
Pulling by cord can damage cord, causing fire, burns,
electric shock, etc.
When connecting/disconnecting AC Charger
from handset, insert/remove straight from
terminal without bending, and without pulling
by cord or otherwise subjecting to excessive
force.
Failing to do so may cause fire, burns, injury, electric
shock, etc.
Failing to do so may cause fire, burns, electric shock, etc.
Do not be touching AC Charger for a long
period while plugged in.
May cause burns, etc.
USIM Card
When handling USIM Card, be careful not to
scratch fingers, etc. on notch.
May cause injury, etc.
Safety Precautions
DIGNO
®
F
Page 92

90
Handset Use & Electronic Medical
Equipment
When carrying handset, keep a minimum of
15 cm from implanted cardiac pacemaker,
implanted defibrillator, etc.
Radio waves may interfere with the operation of electric
medical devices.
When using electronic medical equipment (other
than implanted cardiac pacemaker/defibrillator)
outside of medical institutions, consult device
manufacturer about the influence of radio
waves.
Radio waves may interfere with the operation of electric
medical equipment.
Set handset to not emit radio waves (power
off or place in Airplane mode) if you will be
in a packed location and cannot maintain a
distance of 15 cm from those around you.
Persons with an implanted pacemaker, defibrillator, etc.
may be around you. Radio waves may affect operation of
electric medical devices.
Follow instructions of each medical institution
for use of handset in a hospital.
May affect electric medical equipment.
General Notes
Observe the following for optimal performance. Please use
handset after reading carefully.
【503KC】 here refers to this mobile phone 【DIGNO® F】.
Usage Basics
・Content saved on handset (Address Book, mail, music,
photos, videos, etc.) may be altered or erased due to
accident, malfunction/repair, or other handling. Keep a copy
of important content. SoftBank Corp. is not liable for any
damages or lost profit resulting from alteration or loss of
content.
・Do not use in places with much dust or vibration.
・Use of handset near a landline phone, TV, or radio may
affect the image and sound quality of the equipment.
・Depending on conditions of use (in call, using Internet or
mail, charging, etc.), handset and USIM Card may become
warm. This is not a defect or malfunction.
・Be sure to charge Internal Battery before using handset for
the first time or if handset has not been used for a long
time. (During charging, Internal Battery may become warm.
This is not a defect or malfunction.)
・Depending on usage, bulges may appear on Internal Battery
near end of battery life. This is normal for lithium-ion
batteries and does not affect safety.
・Sticker on handset with serial number (visible when Back
Cover removed) is certification that your SoftBank handset
is licensed under the Radio Law and Telecommunications
Business Law. Do not remove.
・Mail saved on handset, downloaded content (whether paid
for or free), etc. cannot be transferred to an exchange
SoftBank handset (replacing old handset, submitting handset
for repairs, etc.).
・When using handset in public places, take care not to annoy
other people around you.
・Wearing polarized sunglasses may cause Display to appear
dark or distorted at certain angles.
・Be sure to center Earpiece over ear to hear Earpiece sound.
Your ear may block Earpiece (sound hole) and prevent clear
sound.
・Trying to use keys during content playback may cause
content to stop or other abnormal operation.
・Surrounding brightness is detected by Brightness Sensor.
Avoid covering Sensor.
・Keeping Viewfinder open or shooting videos, operating
Browser, etc. repeatedly for a continuous and extended
period causes handset to become warm. Skin contact for
extended period when handset is warm may cause low-
temperature burns.
・Handset may become warm depending on usage and where
used, and some functions (charging, etc.) will stop as a
precaution. Handset powers off if use is continued while
warm.
・If a message appears indicating error due to temperature
while External Device Port is in use, immediately disconnect
cable.
・SD Card may be warm after extended use. This is normal.
・Do not use or store SD Card in locations prone to static
electricity or electrical noise.
Page 93

91
・Back up SD Card data to a PC or other media. SoftBank Corp.
is not liable for any damages resulting from loss of saved
data due to damage, etc. of SD Card.
・Be careful not to forget PIN/Password for unlocking Start
Screen if set. If forgotten, you will be required to visit your
nearest SoftBank Shop for assistance. Saved information
and settings will be lost.
・A variety of applications can be installed to handset from
"Google Play™" provided by Google Inc. SoftBank Corp.
makes no guarantee whatsoever with regard to the nature
(quality, reliability, legality, suitability for a purpose,
validity of information, accuracy, etc.) of these applications
that you yourself have installed, or with regard to any
problems (viruses, etc.) resulting from them.
・A Google account is required for use of Google services such
as Google Play.
Your Google account is used by other setting functions and
synchronization functions; be sure to keep a written record
of account information.
・Never modify handset. Use of modified handset is a
violation of the Radio Law and Telecommunications Business
Law.
Handset has received certification of compliance with
technical standards as a specific wireless device based
on the Radio Law as well as compliance with technical
standards as a device based on the Telecommunications
Business Law, indicated by the "technical conformity mark
" on its nameplate sticker.
Removing screws and modifying handset interior voids
technical conformity certification. Using handset with
its technical conformity certification voided infringes on
the Radio Law and Telecommunications Business Law, and
handset should never be used in this condition.
Precautions
・Excess weight on handset may damage Display or internal
parts, resulting in malfunction. Do not sit with handset in
pocket or place at bottom of bag with other heavy objects.
Even without exterior damage, it will not be covered under
warranty.
・Do not use the following items in extreme temperatures or
high humidity (use in temperatures between 5˚C – 35˚C and
humidity within 35% – 85%).
-AC Charger (commercially available)
-Micro USB Cable (commercially available)
・Do not use the following items in extreme temperatures or
high humidity. Use in temperatures between 5˚C – 35˚C and
humidity within 35% – 90% (limited use in temperatures
between 36˚C – 40˚C).
-DIGNO® F unit
・Clean External Device Port and 3.5mm Headphone Port
with a cotton swab occasionally. If dirty, may cause poor
connection. Do not apply force and deform or scratch
terminals.
・To clean handset, wipe it with a dry, soft cloth. Do not use
benzene, thinner, alcohol, soap, or other solvents. Doing so
may discolor or remove exterior features or print.
・Usable battery time decreases in extreme temperature
conditions (left in car with closed windows on a hot day,
etc.). Battery life also shortens. Using handset at room
temperature is recommended.
・Before extended period of disuse, store handset away from
high temperature and humidity. Note that not energizing
handset for extended period may cause content in handset
to be erased.
・Internal Battery is near end of its life when charging no
longer restores handset functionality or bulges appear.
Replace Internal Battery. For replacement, visit a SoftBank
Shop or contact SoftBank Customer Support. Life depends
on conditions of usage.
・Do not dispose of handset with other waste. For
environmental and recycling reasons, please take old handset
to a SoftBank Shop, etc., where Internal Battery can be
recycled.
・Handset Display pixels may be missing or remain lit. This is
not a defect or malfunction.
・Do not subject Display to strong shock such pressing
forcefully or hitting it. May cause scratches or breakage.
・Display uses high-transparency glass, and can appear dirty
due to smudging, dust, etc. To clean, wipe with a dry, soft
cloth.
・Do not let a hard object rub against and scratch Display or
Camera Lens.
・When placing handset in a pocket or bag, ensure that metal
or other hard materials do not contact Display.
・Water forms inside handset (called condensation) if moved
from a cold to hot place (outdoors to indoors) or used in
high humidity. May cause malfunction.
・Do not leave near air conditioning vent. Condensation from
sudden temperature changes may corrosion of handset
interior and malfunction.
・A strong magnet nearby may cause malfunction.
Safety Precautions
DIGNO
®
F
Page 94

92
・Be careful not to drop handset and scratch surface finish.
Remaining water, etc. may cause surface finish to peel.
・Display may be difficult to view in bright conditions
(outdoors, under fluorescent lighting, etc.). This is not a
defect or malfunction.
・If not using AC Charger (commercially available), unplug
from outlet.
・Do not wrap cable of AC Charger (commercially available)
around plug. May cause electric shock, ignition, or fire.
・USIM Card remains the property of SoftBank Corp. If
lost or damaged, it is replaced at cost. If it seems to be
malfunctioning or if lost/stolen, visit a SoftBank Shop or
contact SoftBank Customer Support. Take old USIM Card
(after subscription cancelation, etc.) to a SoftBank Shop.
・Do not use excessive force to insert/remove USIM Card.
・Malfunction due to inserting USIM Card in another IC Card
reader/writer, etc. is at your own risk.
・Keep IC (metal) portion clean for use.
・Do not adhere labels, etc. on USIM Card.
・Do not disassemble or modify USIM Card. May cause content
to be erased or malfunction.
・Install SD Card correctly. SD Card can only be used if
installed correctly.
Touchscreen
・Operate handset with fingers for touch operation. Do
not operate with a pen, pencil, or other pointed object.
In addition to not operating correctly, it may scratch or
damage Display.
・Adhering stickers or sheets (commercially available
protective films, privacy protectors, etc.) may cause
Touchscreen misoperation.
・Soiling on Display may cause misoperation. Wipe with a dry,
soft cloth.
・If carrying in pocket or bag, metal or other conductive
objects that are close to Touchscreen may cause it to
misoperate.
・While touch operation is possible while wearing gloves, glove
thickness/material may prevent optimal operation.
・If gloves have any water on them and operation is not
possible, wipe away water.
・If operation with gloves on is not possible after having
operated Touchscreen with bare hands, place handset in
Sleep mode and then wake it.
・If glove fingers do not fit and operation is not possible,
use pads of fingers to operate.
Camera
・Do not leave Camera Lens under direct sunlight. May burn or
fade colors of elements.
・Shooting photos or storing handset in a warm place for
extended period may affect image quality.
・Camera is high-precision, including pixels which always
appear bright or dark. Blue, red, white, etc. dots will appear
when shooting in extremely dark conditions.
・When shooting indoors under fluorescent lighting, flickering
(extremely faint and not visible) may appear as stripes in
image. This is not a defect or malfunction.
・Camera may make sound during operation, such as when
being activated. This is not a defect or malfunction.
・Keeping Viewfinder open or shooting videos, operating
Browser, etc. repeatedly for a continuous and extended
period causes handset to become warm. Skin contact for
extended period when handset is warm may cause low-
temperature burns.
・Observe proper etiquette when using Camera.
・Creating a public nuisance with Camera may be punishable by
law.
・Practice taking and previewing pictures, videos, and audio
before using Camera on important occasions like wedding
ceremonies.
・Photo files (below, content) may be altered or erased due
to repairs or other handling. SoftBank Corp. is not liable
for any damages or lost profit resulting from content
alteration/erasure or its restoration.
・Do not use Camera in locations where shooting photos or
videos is prohibited.
Music/Videos
・Do not listen to music or watch videos while driving a
vehicle or riding a scooter/bicycle. Such use of a mobile
phone is prohibited by law (use while riding a bicycle
may also be punishable). Also be alert while walking;
if surroundings are difficult to hear or attention is
on Display, a traffic accident may result. Be careful
especially at railway crossings, on station platforms, and at
intersections.
・Listening at loud volume for an extended period may affect
hearing.
・Take care not to disturb those around you (on train, etc.)
with earphone or other noise.
Page 95

93
Urgent News (Application)
・Receive setting is enabled by default.
・Alert sounds when Urgent News is received, even in Silent
mode. When set to Total Silence, handset vibrates only
without alert sound.
・Alerts are not received during calls/transmissions or in poor
signal conditions.
・Depending on usage/situation, handset may receive alerts
for other areas or no alerts.
・When receive setting is enabled, handset standby time
becomes shorter.
・SoftBank Corp. cannot be held liable for any damages
associated with this service, including accidents resulting
from received information, reception timing or reception
failure.
Bluetooth
・Frequencies
Handset Bluetooth® function uses 2.402 GHz – 2.480 GHz
frequencies in the 2.4 GHz band.
2.4FH1/XX1: Uses 2.4 GHz band, FH-SS and other
modulation, with a maximum interference range of 10 m.
mobile device bandwidth differentiation.
・Bluetooth® Cautions
・Handset Bluetooth® function is certified as conforming
to Japanese domestic and FCC standards. Use is restricted
in some countries/regions. Confirm local laws before use
abroad.
・The 2.4 GHz band used by handset Bluetooth® function
is shared by other devices. Handset Bluetooth® function
tries to minimize effects of other devices using the same
bandwidth, but connection speed and distance may be
reduced or function may be disconnected.
・Connection speed and distance vary depending on distance
between connected devices, obstacles, and Bluetooth
devices.
・Before Using Bluetooth
Bluetooth® operating frequency band is used by industrial,
scientific, consumer and medical equipment including
microwave ovens, other similar radio stations, premises
radio stations for identifying mobile units used in
manufacturing lines (radio stations requiring a license),
specified low power radio stations (radio stations requiring
no license) and amateur radio stations (hereafter, "other
radio stations").
1. Before handset use, be sure "other radio stations" are not
in use nearby.
2. If handset radio waves interfere with "other radio
stations," promptly move or power off.
3. For further information, visit a SoftBank Shop or contact
SoftBank Customer Support.
・All handset operations when connected with a Bluetooth®compatible device are not verified and therefore not
guaranteed.
・Handset supports the Bluetooth®-standard security
function for secure radio communication. However,
be careful when using Bluetooth®, as security may be
insufficient depending on conditions of usage or settings.
・SoftBank Corp. accepts no liability for data/information
leaks during communication using Bluetooth®.
®
: Utilizes 2.402 GHz – 2.480 GHz band without
®
®
Safety Precautions
DIGNO
®
F
Page 96

94
Wi-Fi (Wireless LAN)
・Frequencies
Handset Wi-Fi function uses 2.402 GHz – 2.480 GHz
frequencies in the 2.4 GHz band.
Uses 2.4 GHz band, DS-SS/OFDM modulation, with a
maximum interference range of 40 m.
:Utilizes 2.402 GHz – 2.480 GHz
band with mobile device bandwidth differentiation.
・Wi-Fi Cautions
・Handset wireless LAN function is certified as conforming
to Japanese domestic and FCC standards/EC Directives. Use
is restricted in some countries/regions including France.
Confirm local laws before use abroad.
・The 2.4 GHz band used by handset Wi-Fi function is
shared by other devices. Handset Wi-Fi function tries to
minimize effects of other devices using the same bandwidth,
but connection speed and distance may be reduced or
function may be disconnected.
・Connection speed and distance vary depending on distance
between connected devices, obstacles, and Wi-Fi devices.
・Before Using Wi-Fi
Wi-Fi operating frequency band is used by industrial,
scientific, consumer and medical equipment including
microwave ovens, other similar radio stations, premises
radio stations for identifying mobile units used in
manufacturing lines (radio stations requiring a license),
specified low power radio stations (radio stations requiring
no license) and amateur radio stations (hereafter, "other
radio stations").
1. Before handset use, be sure "other radio stations" are not
in use nearby.
2. If handset radio waves interfere with "other radio
stations," promptly move or power off.
3. For further information, visit a SoftBank Shop or contact
SoftBank Customer Support.
・All handset operations when connected with a Wi-Ficompatible device are not verified and therefore not
guaranteed.
・Handset supports the Wi-Fi-standard security function
for secure radio communication. However, be careful when
using Wi-Fi, as security may be insufficient depending on
conditions of usage or settings.
・SoftBank Corp. accepts no liability for data/information
leaks during communication using Wi-Fi.
CE Declaration of Conformity
In some countries/regions, such as France, there are
restrictions on the use of Wi-Fi. If you intend to use Wi-Fi
on the handset abroad, check the local laws and regulations
beforehand.
KYOCERA Corporation hereby declares that 503KC is in
compliance with the essential requirements and other relevant
provisions of Directive 1999/5/EC.
A copy of the original declaration of conformity for each
model can be found at the following Internet address:
http://www.kyocera.co.jp/prdct/telecom/consumer/ce/
Specific Absorption Rate (SAR) for This
Product (for Japan)
This mobile phone 【503KC】 meets Japanese technical
regulations* and international guidelines for exposure to radio
waves.
The Japanese technical regulations for exposure to radio
frequency energy established permitted levels of radio
frequency energy, based on standards developed by
independent scientific organizations through periodic and
thorough evaluation of scientific studies.
The regulations employ a unit of measurement known as the
Specific Absorption Rate, or SAR.
The SAR limit is 2 watts/kilogram (W/kg) averaged over ten
grams of tissue.
The limit includes a substantial safety margin designed to
assure the safety of all persons, regardless of age and health.
The value of the limit is equal to the value given in
international guidelines recommended by ICNIRP**, which is in
collaboration with the World Health Organization (WHO).
The highest SAR value for this mobile phone is 0.565 W/kg***
when tested for use at the ear, and 0.354 W/kg*** when worn
on the body in the below manner****.
While there may be differences between the SAR levels of
various phones and at various positions, all phones meet the
Japanese technical regulations.
Although the SAR is determined at the highest certified power
level, the actual SAR of the phone during operation can be
well below the maximum value.
Use at positions other than at the ear****
This mobile phone may be used at positions other than at
the ear. By using an accessory such as a belt clip holster
that maintains a 1.5 cm separation with no metal (parts)
between it and the body and the mobile phone, this mobile
phone will comply with international guidelines for radio wave
protection.
* The technical regulations are provided in Article 14-2 of the
Ministry Ordinance Regulating Radio Equipment.
** International Commission on Non-Ionizing Radiation
Protection
*** The value is under simultaneous transmission use
conditions.
The World Health Organization has announced that "A large
number of studies have been performed over the last two
decades to assess whether mobile phones pose a potential
health risk. To date, no adverse health effects have been
established as being caused by mobile phone use."
For more information about SAR, see the following websites:
Ministry of Internal Affairs and Communications (MIC)
http://www.tele.soumu.go.jp/e/sys/ele/body/index.htm
Association of Radio Industries and Businesses (ARIB)
http://www.arib-emf.org/01denpa/denpa02-02.html
(Japanese)
Safety Information
To prevent possible hearing damage, do not listen at high
volume levels for long periods.
Page 97

This mobile phone【503KC】is confirmed to comply with
guidelines relating to effects of radio wave exposure as
set forth by the Council of Europe (CE) and the Federal
Communications Commission (FCC). Refer to the following.
European RF Exposure Information
Your mobile device is a radio transmitter and receiver. It is
designed not to exceed the limits for exposure to radio waves
recommended by international guidelines. These guidelines
were developed by the independent scientific organization
ICNIRP and include safety margins designed to assure the
protection of all persons, regardless of age and health.
The guidelines use a unit of measurement known as the
Specific Absorption Rate, or SAR. The SAR limit for mobile
devices is 2.0 W/kg and the highest SAR value for this
device when tested at the ear is 0.458 W/kg*. As mobile
devices offer a range of functions, they can be used in other
positions, such as on the body. In this case, the highest
tested SAR value is 1.342 W/kg* at the separation distance
of 0.5 cm from the body. For electronic safety, maintain the
separation distance with accessories containing no metal, that
position handset a minimum of the above distance. Use of
other accessories may not ensure compliance with RF exposure
guidelines.
* The tests are carried out in accordance with international
guidelines for testing.
The World Health Organization has stated that present
scientific information does not indicate the need for any
special precautions for the use of mobile devices. They note
that if you want to reduce your exposure then you can do so
by limiting the length of calls or using a hands-free device to
keep the mobile phone away from the head and body.
World Health Organization
http://www.who.int/emf
List of Specific Absorption Rates (SAR) for radio waves by
smartphone/3G model
http://www.softbank.jp/mobile/support/sar/ (Japanese)
95
FCC RF Exposure Information
Your handset is a radio transmitter and receiver. It is
designed and manufactured not to exceed the emission limits
for exposure to radio frequency (RF) energy set by the Federal
Communications Commission of the U.S. Government.
The guidelines are based on standards that were developed
by independent scientific organization through periodic and
thorough evaluation of scientific studies. The standards
include a substantial safety margin designed to assure the
safety of all persons, regardless of age and health.
The exposure standard for wireless handsets employs a unit of
measurement known as the Specific Absorption Rate, or SAR.
The SAR limit set by the FCC is 1.6 W/kg. The tests are
performed in positions and locations (e.g. at the ear and worn
on the body) as required by the FCC for each model.
The highest SAR value for this model handset as reported to
the FCC when tested for use at the ear is 0.376 W/kg, and
when worn on the body in a holder or carry case, is 0.717 W/
kg.
Body-worn Operation; This device was tested for typical
body-worn operations with the handset kept 1 cm from
the body. To maintain compliance with FCC RF exposure
requirements, use accessories that maintain a 1 cm separation
distance between the user’s body and the handset. The use of
beltclips, holsters and similar accessories should not contain
metallic components in its assembly.
The use of accessories that do not satisfy these requirements
may not comply with FCC RF exposure requirements, and
should be avoided. The FCC has granted an Equipment
Authorization for this model handset with all reported SAR
levels evaluated as in compliance with the FCC RF emission
guidelines. SAR information on this model handset is on
file with the FCC and can be found under the Display Grant
section of (http://www.fcc.gov/oet/ea/) after searching on
FCC ID JOYYKCA04.
Additional information on Specific Absorption Rates (SAR)
can be found on the FCC website at (https://www.fcc.gov/
general/radio-frequency-safety-0).
The World Health Organization has stated that present
scientific information does not indicate the need for any
special precautions for the use of mobile devices. They note
that if you want to reduce your exposure then you can do so
by limiting the length of calls or using a hands-free device to
keep the mobile phone away from the head and body.
World Health Organization
http://www.who.int/emf
List of Specific Absorption Rates (SAR) for radio waves by
smartphone/3G model
http://www.softbank.jp/mobile/support/sar/ (Japanese)
Safety Precautions
DIGNO
®
F
Page 98

96
FCC Notice
This device complies with part 15 of the FCC Rules. Operation
is subject to the following two conditions: (1) This device
may not cause harmful interference, and (2) this device must
accept any interference received, including interference that
may cause undesired operation.
Note:
This equipment has been tested and found to comply with
the limits for a Class B digital device, pursuant to part
15 of the FCC Rules. These limits are designed to provide
reasonable protection against harmful interference in a
residential installation. This equipment generates, uses, and
can radiate radio frequency energy and, if not installed and
used in accordance with the instructions, may cause harmful
interference to radio communications.
However, there is no guarantee that interference will not
occur in a particular installation. If this equipment does cause
harmful interference to radio or television reception, which
can be determined by turning the equipment off and on, the
user is encouraged to try to correct the interference by one
or more of the following measures:
- Reorient or relocate the receiving antenna.
- Increase the separation between the equipment and receiver.
- Connect the equipment into an outlet on circuit different
from that to which the receiver is connected.
- Consult the dealer or an experienced radio/TV technician for
help and for additional suggestions.
Warning
The user is cautioned that changes or modifications not
expressly approved by the manufacturer could void the user’s
authority to operate the equipment.
FCC Compliance Information
The product is certified by Federal Communications
Commission (FCC).
The FCC ID of this product is JOYYKCA04.
Or you can check as follows.
How to check:
Display "Apps" on the Home screen → [Settings] → [About
phone] → [Technical regulations conformity certification]
Water/Dust/Shock Resistance
Handset has waterproof ratings equivalent to IPX5 and IPX7
and dustproof rating equivalent to IP5X (Back Cover and Card
Slot Cap completely secure). Handset is also provided with
shock resistance complying with military standards (SoftBank
testing). Specifically, handset can be used in rain (less than
20 mm per hour) without an umbrella. Handset can also be
used in bathrooms, kitchens, at poolside, and other places
with water.
* For details, see "In Various Environments."
However, failure to observe precautions given here may allow
water, sand, foreign particles, etc. to enter handset and
may cause overheating, ignition, electric shock, scratches,
malfunction, etc. For safe handset use, first read precautions
here.
IPX5 equivalent
Handset continues to function as a phone after being sprayed
from all directions with 12.5 L of water per minute from
a 6.3 mm diameter nozzle for at least 3 minutes, from a
distance of approximately 3 m.
IPX7 equivalent
Handset continues to function as a phone without water
intrusion after being slowly immersed in still tap water of
room temperature to a depth of 1 m, and left there for
approximately 30 minutes before being removed again.
IP5X equivalent
Handset will maintain a certain level of functionality and
safety even after particulates in dustproof testing (dia. 75
μm or less) have entered handset.
Compliance with Military Standards
Although drop testing in compliance with MIL-STD-810G
Method 516.7:Shock-Procedure IV as stipulated by the US
Department of Defense (product dropped in 26 directions
onto plywood (lauan) from a height of 1.22 m), this is not a
guarantee with regard to all types of shock.
* As handset is designed with shock resistance in everyday
usage, handset may break if subjected to excessive impact
such as being thrown against something. Dropping may
produce scratches, etc. even if handset performance is
unaffected.
Before Use
・Close Card Slot Cap securely and attach Back Cover firmly to
prevent water intrusion.
Confirm that Cap and Cover are completely secure so that
there are no gaps.
Page 99

・Particles (lint, a single hair, grain of sand/dirt, etc.) lodged
between joining surfaces may allow water intrusion.
・DO NOT open/close Card Slot Cap or attach/remove Back
Cover if hands/handset is wet.
・Do not place handset directly on beach sand, etc. Exposing
Mic/Earpiece/Speaker/3.5mm Headphone Port/External
Device Port, etc. to sand may reduce volume.
・Do not use submersed (including key operation).
・Do not expose to or immerse in liquid other than room
temperature fresh water or tap water (soap/detergent/bath
salt water, hot spring water, hot water, muddy water, sea
water, pool water, alcohol, etc.).
97
In Various Environments
・Rain
・Do not use in heavy rain (20 mm or more per hour).
* Water remaining on Display may cause Touchscreen to
malfunction.
・DO NOT open/close Back Cover/Card Slot Cap while
exposed to rain or if hands are wet. May cause malfunction,
etc.
・Bath room
・Do not immerse or drop in bathtub. Do not use submersed.
* Water remaining on Display may cause Touchscreen to
malfunction.
・Do not immerse in soap/detergent/bath salt water or hot
spring water.
・Do not expose directly to warm shower.
・Do not expose to hot water.
・Avoid prolonged use in bath room.
・Use handset in temperatures between 5˚C – 35˚C and
humidity within 35% – 90% (limited use in temperatures
between 36˚C – 40˚C).
・Kitchen
・Do not expose to or immerse in liquid other than fresh
water or tap water (water with soap/detergent or spices, or
beverage).
・Do not expose to or immerse in hot water or in chilled
water.
・Do not leave handset in extremely hot/cold locations,
(e.g., near ovens/stoves or in refrigerators).
・Do not subject handset to strong water pressure (more
than 6 L per minute).
・Poolside
・Do not immerse or drop in pool water. Do not use
submersed.
・Pool water is chlorinated. If wetted with pool water,
promptly wash off with room temperature tap water. Do not
use a brush.
* Somewhat low water pressure (6 L or less per minute)
Safety Precautions
DIGNO
®
F
Page 100

98
Shared Precautions
・Close Card Slot Cap firmly after confirming rubber seal
is correct location. Also attach Back Cover firmly. Lodged
particles, no matter how small (lint, a single hair, grain of
sand, etc.), may allow water intrusion.
・Do not insert pointed object between Card Slot Cover and
handset. May scratch seal and allow water to enter.
・Do not open or close Card Slot Cover while wearing gloves.
Lodged particles (lint, hair, sand, etc.) from glove may allow
water intrusion.
・Check handset and hands for moisture, sand, grime, etc.
before opening or closing Card Slot Cap or attaching/
removing Back Cover. May enter handset or become lodged in
Cap or Cover, resulting in malfunction or water intrusion. If
moisture, sand, grime, etc. is visible, no matter how small,
first wipe handset and hands with lint-free clean, dry cloth
before handling.
・Do not leave handset wetted. Water may enter from gaps.
May also reduce volume. If wetted, shake handset, and
promptly remove as much water as possible with a lint-free
clean, dry cloth. In cold regions, handset may freeze and
cause malfunction.
・Handset is waterproof for only for fresh water/tap water.
Not waterproof for hot water, salt water, soap water,
chemicals, sweat, etc. If exposed to other types of moisture
or sand/mud/etc., promptly wash off with room temperature
tap water. Wash using hands (do not use brush) and hold
Back Cover/Card Slot Cap secured.
* Somewhat low water pressure (6 L or less per minute)
・Do not expose to strong water pressure (e.g., tap/shower
water that hurts) above rating (IPX5, IPX7) or immerse for
extended period.
・Do not wash in a washing machine, ultra-sonic washing
machine, etc.
・Do not subject to strong shock while submersed (e.g., drop
into basin, toilet, washing machine with water).
・Do not insert pointed objects in holes of Mic, Earpiece,
Speaker, 3.5mm Headphone Port, or External Device Port.
・Rubber seal on back of Card Slot Cap is vital to
waterproofing/dustproofing. Observe the following.
・Do not remove or scratch.
・Do not allow particles to adhere. Lodged particles (lint,
hair, sand, etc.) may allow water intrusion. Always remove.
・Remaining liquid other than fresh water or tap water (hot
water, salt water, detergent water, chemicals, sweat, etc.)
may degrade waterproofing.
・Be careful rubber seal is not pinched when securing Card
Slot Cap. Forcing Cap closed with rubber seal pinched can
scratch seal and may degrade waterproofing/dustproofing.
・Replace components for water, dust, and shock resistance
every two years regardless of appearance. Replacement
can be provided at cost while handset is retained. Visit a
SoftBank Shop or contact SoftBank Customer Support.
・Do not drop or otherwise subject handset to strong shock.
May degrade water, dust, or shock resistance.
・Handset is airtight to maintain water resistance (IPX7).
Pressing handset forcefully may produce sound around
Earpiece, but this is not a function or performance
abnormality.
・Handset will not float.
・Do not immerse in hot water, use in a sauna, or subject to
hot air from a hair dryer, etc.
・Use handset in temperatures between 5˚C – 35˚C and
humidity within 35% – 90% (limited use in temperatures
between 36˚C – 40˚C). Use in extremes beyond these ranges
may degrade water, dust, and shock resistance.
・Sudden temperature change results in condensation. Let
handset reach room temperature before moving from cold
to hot places (e.g., shower/bath) to prevent condensation.
Handset has no anti-condensation features.
* If condensation forms inside Display, leave at room
temperature until condensation dries.
・Do not run tap water directly on External Device Port.
・Do not leave handset with any water drops on it. May short-
circuit External Device Port.
・Do not leave any water on External Device Port.
・Before using External Device Port, check that there is no
foreign matter in Port.
・Handset fulfills performance requirements for assumed
usage. However, handset is not guaranteed for any and all
conditions of actual usage. Malfunction determined to be
due to mishandling is not covered under warranty.
 Loading...