

Page 1

USER MANUAL
Page 2

IMPORTANT! Look through before you start operation!
Engine of the vehicle start with unclosed and unshut bonnet, safety protection and housings is
prohibited. Limiting temperature of safe engine start with application of means of start facilitation is
-30С0. Engine start at environmental temperature lower than -30С0 isn't guaranteed. Manual
emergency engine start is foreseen.
Means of engine start facilitation under hard frost:
1. When you have finished your trip, before you power off an engine, press a throttle arm intensively
several times. Spark plug will clear itself and it will be easier to start the snowmobile next time.
2. Start the snowmobile at regular intervals and warm up the engine. At temperature
approximately -30
degrees the engine cools down to atmospheric temperature in 30-40
minutes.
3. Take accumulator battery off the snowmobile and keep it warm during long-term
parking
4. Don't allow intense accumulator battery discharge, possibly don't leave the snowmobile in freezing
temperatures for a long time (start at low temperatures can damage the engine).
Page 3
THANK YOU FOR
Thank you for purchase of DINGO snowmobile. This manual contains important information on safety measures, presents information
on special takings and practical skills that are necessary for driving this vehicle, and also includes instructions on safe driving and
necessary maintenance.
Driving the snowmobile is an exciting thing and we hope that you will get real pleasure.
In the process of manufacture of this means of transport all existing and current laws and norms concerning noise and environmental
impact were observed.
Before you use your new snowmobile read this manual attentively and up to the end. It contains important information on safety
measures. Don't drive your snowmobile without having an appropriate experience.
Don't let children drive this vehicle. This can lead to major injuries. Remember that for legal snowmobile operation you must have a
tractor driver / machine operator certificate
of an appropriate category and register your snowmobile in State Technical Authority.
Remember that your snowmobile isn't intended for public roads.
Please, have a look at the following legend that will help you better orientate yourself in this manual and distinguish the most important
service conditions and precautions:
- Attention! Important information! - Attention! Life threatening!
- Keep off! Flammable! - Keep off! Caustic agents and their fumes!
- Keep off! Explosive! - For your information!
2
THANK YOU FOR
Page 4

CONTENTS
Safety measures……………………………………………………………………………….………………... 5
Description of DINGO snowmobile …………………………………………………………../…………..…. 7
Assembly / disassembly procedure……………………………..………………..…………………………….. 8
Identification codes ……………………………………………………………………………………………. 15
Specification ……...……………………………………………………………………………………………. 16
Structure of the snowmobile ……...…………..………………………………………………………..………. 17
Basic control…………………………..…………………………………….……………………………..…… 19
Preoperational phase………………...…………………………………………………………….…………… 24
Snowmobile running in...……………………………………………...………………………..……………… 25
Driving the snowmobile …………….……………………………………………………….………………… 26
Snowmobile transportation……………………………………………………………………………….……. 27
Slinging of the snowmobile ………………………………………………………………………………… 27
Luggage transport…………………...……………………………………………..…………………………… 28
Periodic servicing..…………………………………………………………………………………….……….. 29
Engine oil testing and changing………………………………………………………..……….………… 29
Reductor oil changing……………………………………………………………………………………… 30
Carburetor adjustment………………….………………………………………………………………… 31
Accumulator battery maintenance….…………………………………………………………………..… 32
3
Cutout……………………………..….…………………………………………………………….………… 32
Braking system ….………………………………………………………………………………………… 33
Page 5

CONTENTS
Driving chain …………………………………………………………………..…………………………… 34
Air filter ………………………………….………………..…………………………….…………………… 35
Alternate engine start……………………………………………………………………………………… 35
Head lights adjustment ….. …………………………………………………………….………………… 36
Headlight lamp replacement …….…………………………………………………………………………36
Valve setting…….……….……..……………………………………………………….…………………… 37
Spark plug resistance test …...…………………………………………….…………………….………… 37
Track adjustment ….…………..……………………………………………….…………..……………… 38
Washing and storing …………………………………………………………………………………………… 40
Routine maintenance…………………………………………………………………………………..………. 41
Electric circuit diagram……………………………………………………..……………………..…………… 42
Terms of warranty……………………………………………………………………………….……………… 45
Warranty certificate…………………………………………………………………………………………….. 47
Maintenance coupon……………………………………………………………………………………………. 48
Warranty certificate ………………………………………………………………………..…………………... 52
4
CONTENTS
Page 6

SAFETY MEASURES
The snowmobile is a high risk vehicle. Driving the snowmobile is different from driving other vehicles,
including 4-wheelers and automobiles. Even when making simple manoeuvres, such as turns, driving uphill or
driving on an uneven surface a collision or rollover of vehicle may easily occur if all protective measures aren't
observed.
Read attentively this manual and all legend and follow the prescribed driving instructions.
Don't drive your snowmobile without an appropriate training. Don't let people who don't have a tractor
driver / machine operator certificate of an appropriate category and necessary driving experience drive the
snowmobile.
Driving the snowmobile intoxicated is prohibited.
Always be extremely attentive while driving an unfamiliar territory. Be ready to changes of terrain
conditions while driving your snowmobile.
Always hold both hands on a wheel and both feet on footboards while driving.
Don't drive your snowmobile on descents too sharp for your vehicle and your experience. Practice on
small descents before you proceed with big ones.
Jumps and other tricks are prohibited.
Never choose too high speed if it doesn't correspond to your skills and service conditions. Always choose
speed appropriate to a road, degree of visibility, service conditions, and your experience.
Always follow the rules of inspection and maintenance, specified in this manual. Before every usage of
the snowmobile make sure that it is in good order and
is safe for driving.
Driving the snowmobile without a protective helmet of an appropriate size is prohibited. Also one has to
wear eye protection and clothing appropriate to weather conditions.
While driving for long distances always have a reserve fuel load.
5
Page 7

SAFETY MEASURES
Always follow the appropriate instructions of this manual while crossing a sloping surface. Avoid
slopes with a too slippery or damaged surface. Move your weight to the side of a slope. Never turn your
snowmobile on a slope until you practice your turn technique on even surface. If possible avoid crossing sharp
hills.
Always follow appropriate instructions of this manual while descending and braking on a hill. Inspect
a road attentively before descent. Move your weight back.
Never descend a hill on high speed. Avoid descending a hill angle-wise. This may make your snowmobile tilt
sidewise. If possible, descend carefully down.
Never exceed a work load of your snowmobile. A transported load should be evenly distributed and
safely fixed. Leave a big distance for braking.
Never fix your snowmobile with the help of inappropriate equipment or
devices.
Always follow appropriate instructions of the manual while driving uphill. First check a road surface.
Never drive uphill on a too slick road
or a road with a damaged topping. Move your weight forward. Never drive uphill on high speed.
Always keep to appropriate recommendations if while driving uphill the engine died
or the vehicle started moving back. For the engine not to die while driving uphill, sustain a steady speed.
Be careful in case of sliding or drifting. Learn to drive safely in case of
sliding or drifting, practicing at underspeed on an even, smooth surface. On too slickery surfaces like ice move
slowly and be very careful to mitigate the risk of sliding or drifting.
Driving the snowmobile at the age up to 18 is prohibited.
6
Page 8

DESCRIPTION OF DINGO SNOWMOBILE
The snowmobile purpose.
The snowmobile DINGO T150 is an off-road motor vehicle designed for
transporting of people, loads through snowy bad roads at environmental temperature from plus
5
0
С to minus 400С. Because of design features of the snowmobile a long driving on ice or packed snow is not allowed, as
slide moldings of a track block may burn. If such a trip is needed from time to time go to areas with a soft snow for
lubrication of slide moldings.
Design of snowmobile.
The DINGO T150 snowmobile is designed according to a classical scheme 'two skis ahead/one track behind'. When
using this scheme the snowmobile is supported by three points situated in a triangle. Due to this the snowmobile has an
optimal stability sufficient for solving of the majority of tasks before it. Also the design is a guarantee of its comparatively
little weight, optimal location of gravity center, movability and maintenance accessibility of the main units.
On the DINGO T150 snowmobile is installed a four cycle gasoline engine with a volume of 149.6
cubic centimeters with an additional oil forced/air forced cooling (oil radiator). A carburetor is equipped with an automatic
throttle arm diffuser heating which guarantees its stable work in diverse temperature range.
The DINGO T150 snowmobile is equipped with an automatic transmission-CVT. Transmission selector lever serves
for switching to reverse or forward running and switching to neutral.
The snowmobile is equipped with a track with a length 2626 m and width 380 mm with grousers with height of 23 mm,
a roller-slide suspension of a caterpillar truck with two bumpers with a possibility of regulation.
The snowmobile is completed with a two-stand wheel grips and a gas cock heating, a 12V socket for outer equipment,
a closed suspension space with pockets and braces, a windshield glass, an electronic multimode instrument panel, a system of
emergency engine shutting down, a system of alternate engine start, a hydraulic disc brake.
7
Page 9

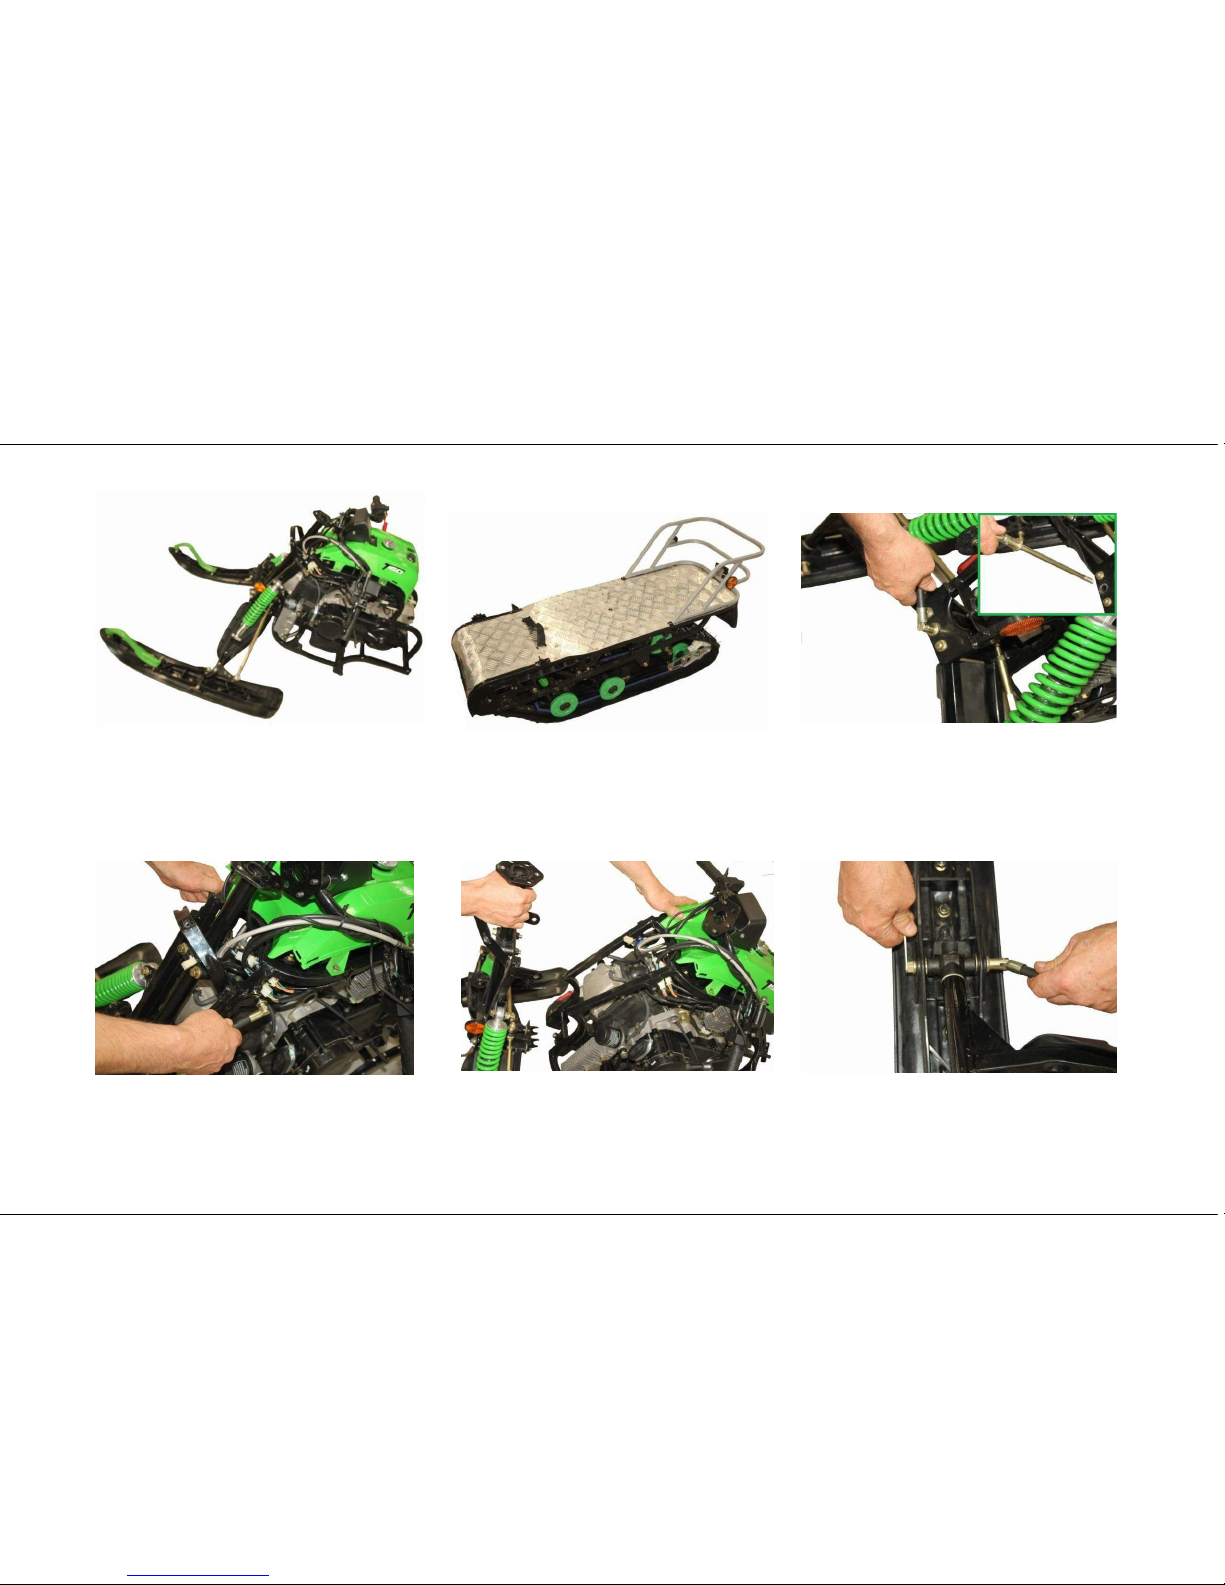
ASSEMBLY / DISASSEMBLY PROCEDURE
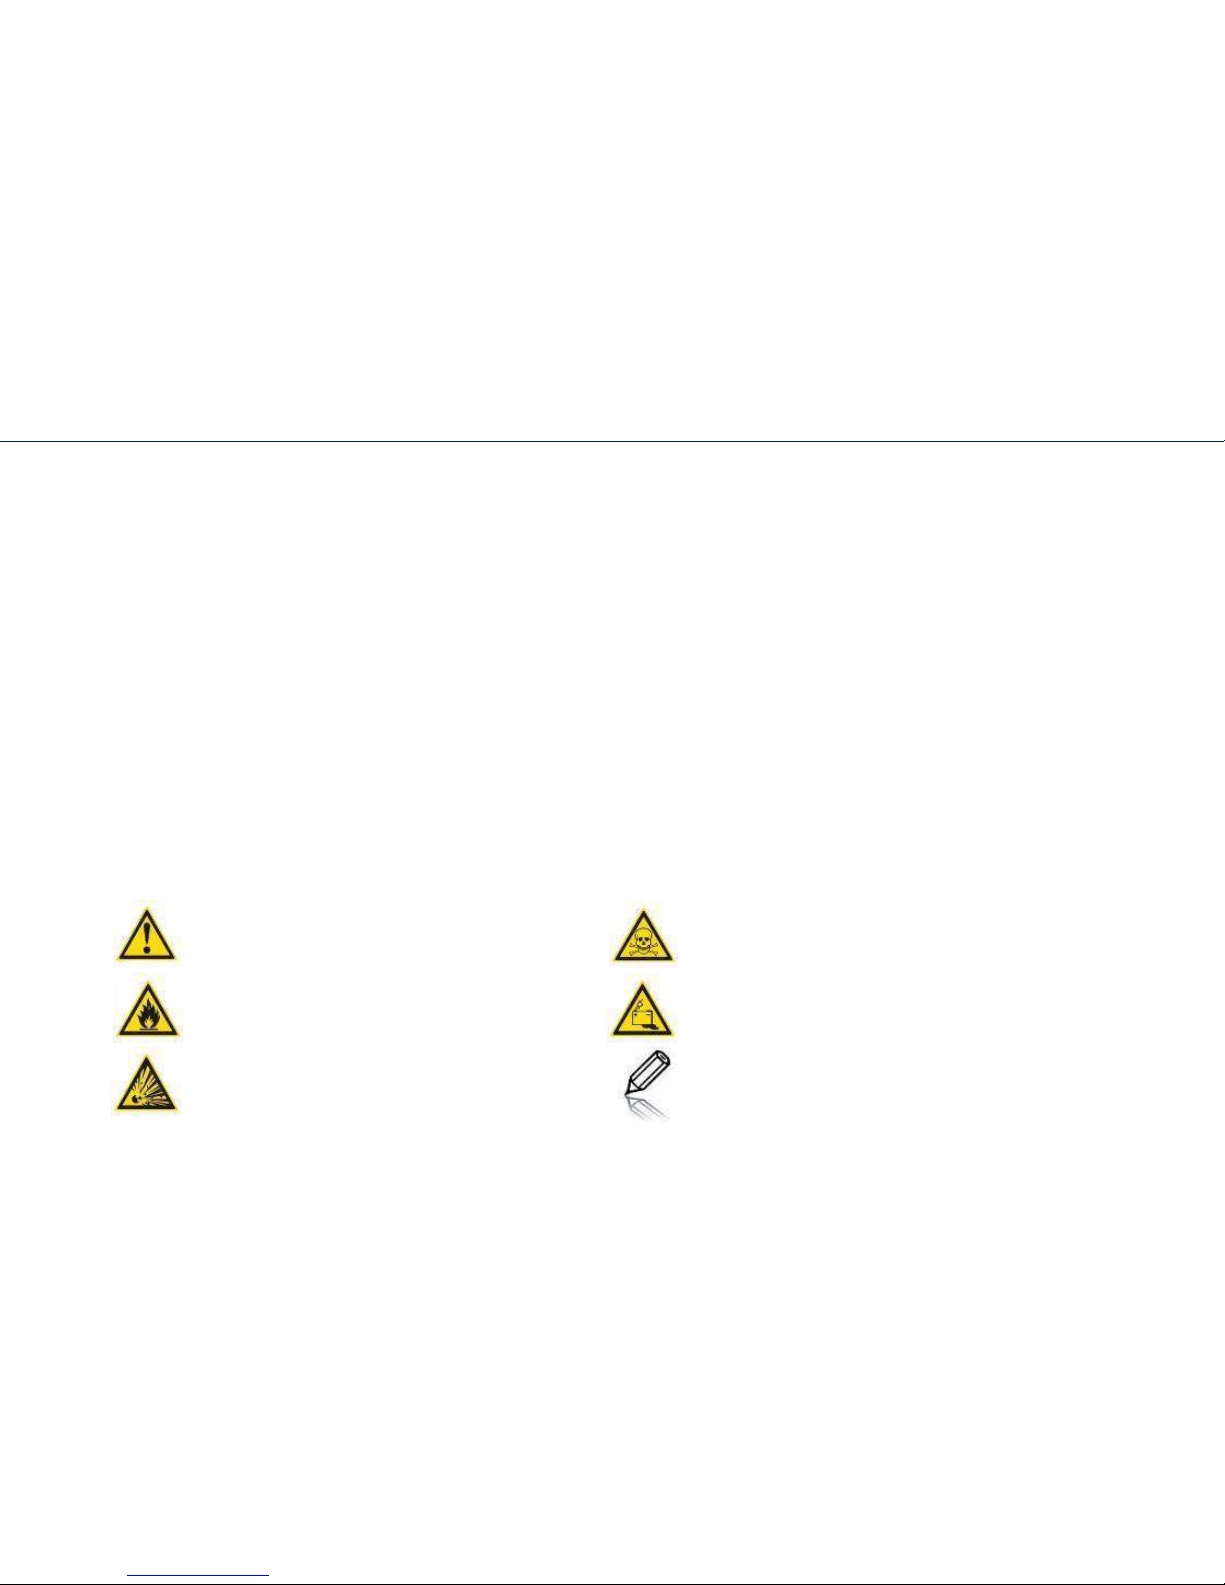
1. Unscrew two screws of wheel clamping. 2. Take off the windshield glass. 3. Fasten the wheel on a tank plastic as
it is shown in the picture.
3. Unscrew a motor block central screw of
plastic clamping.
4. On the left and right sides of a snowmobile unscrew screws of seat frame clamping.
8
Page 10
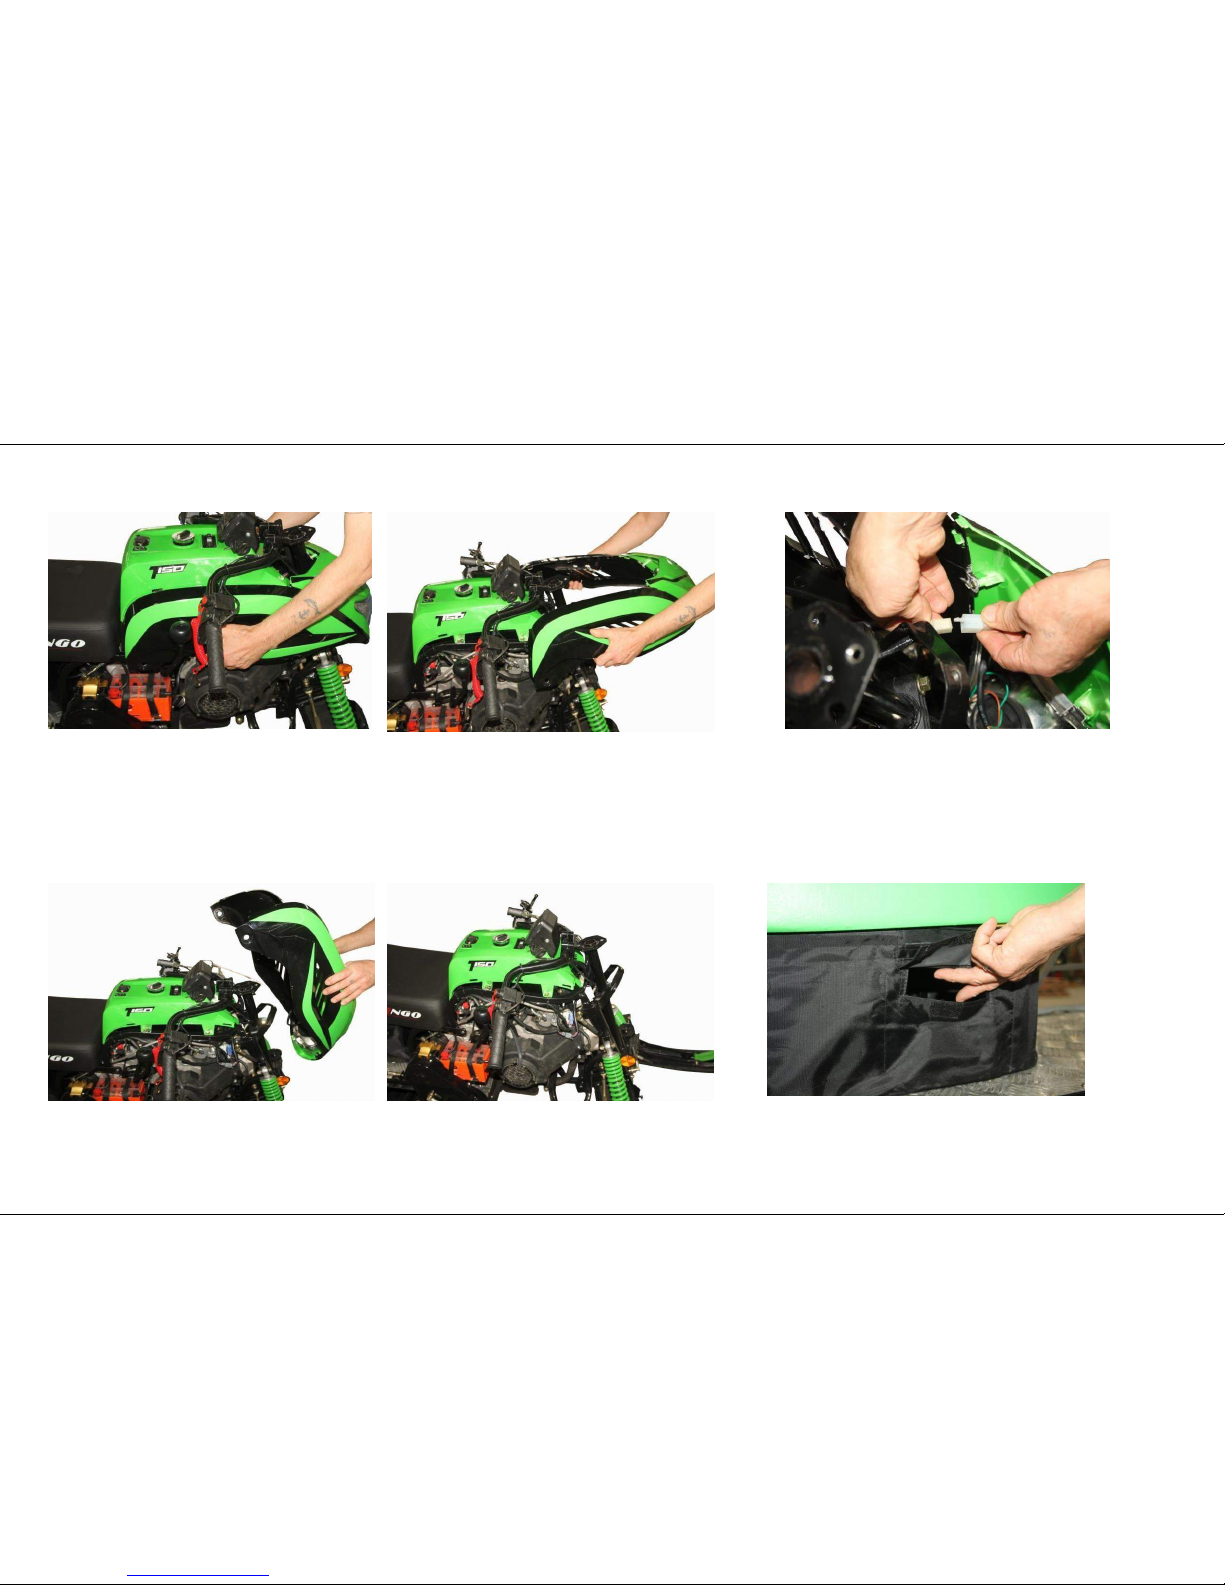
5. Take off motor block plastic as shown in the picture.
6. Detach a head light connector.
7. Take off motor block plastic fully.
8. Open a seat lock.
9
ASSEMBLY / DISASSEMBLY PROCEDURE
Page 11
ASSEMBLY / DISASSEMBLY PROCEDURE
9. Open a seat. 10. Unscrew two screws of clamping of frame to a track block
frame.
12. Take off a seat with a frame. 13. Unscrew a footboard skid screw located in a
front part of the snowmobile (on a left and right
side of the snowmobile).
11. Detach head lights of a back light and a
temperature detector.
14. Take off a footboard (from a left and right
side of the snowmobile).
10
Page 12
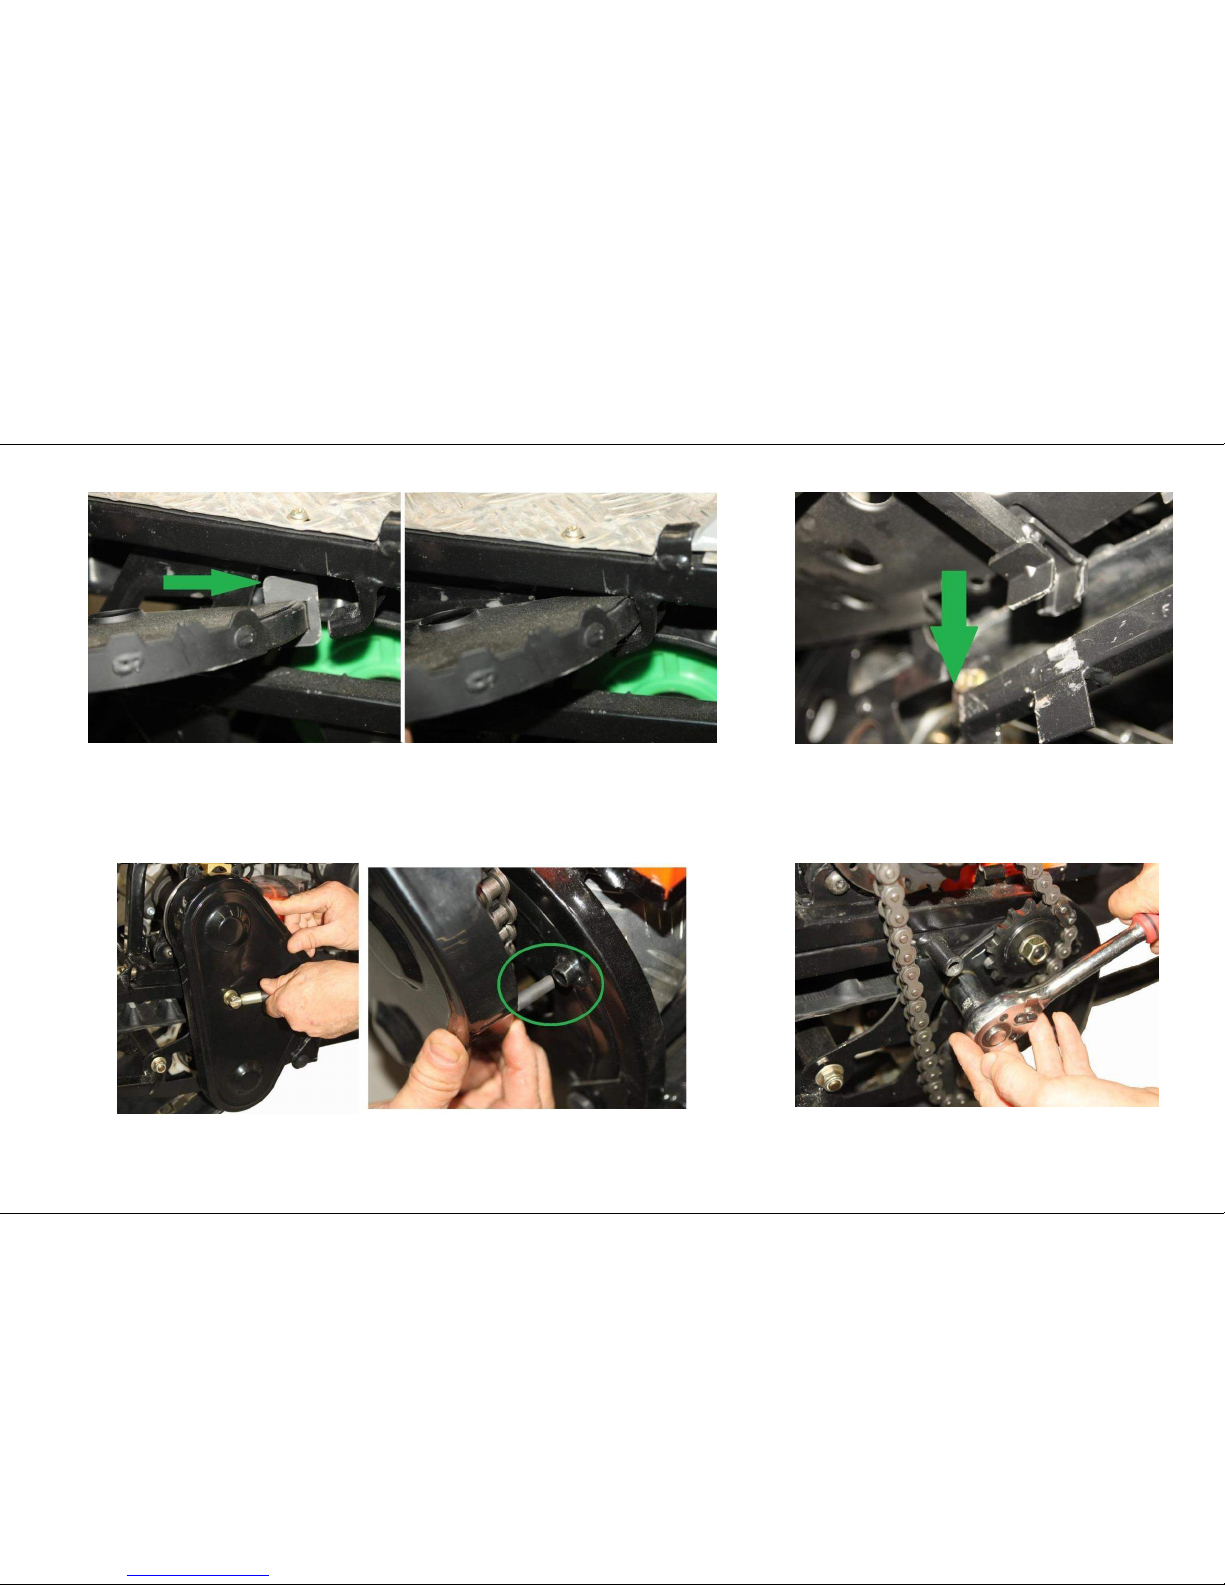
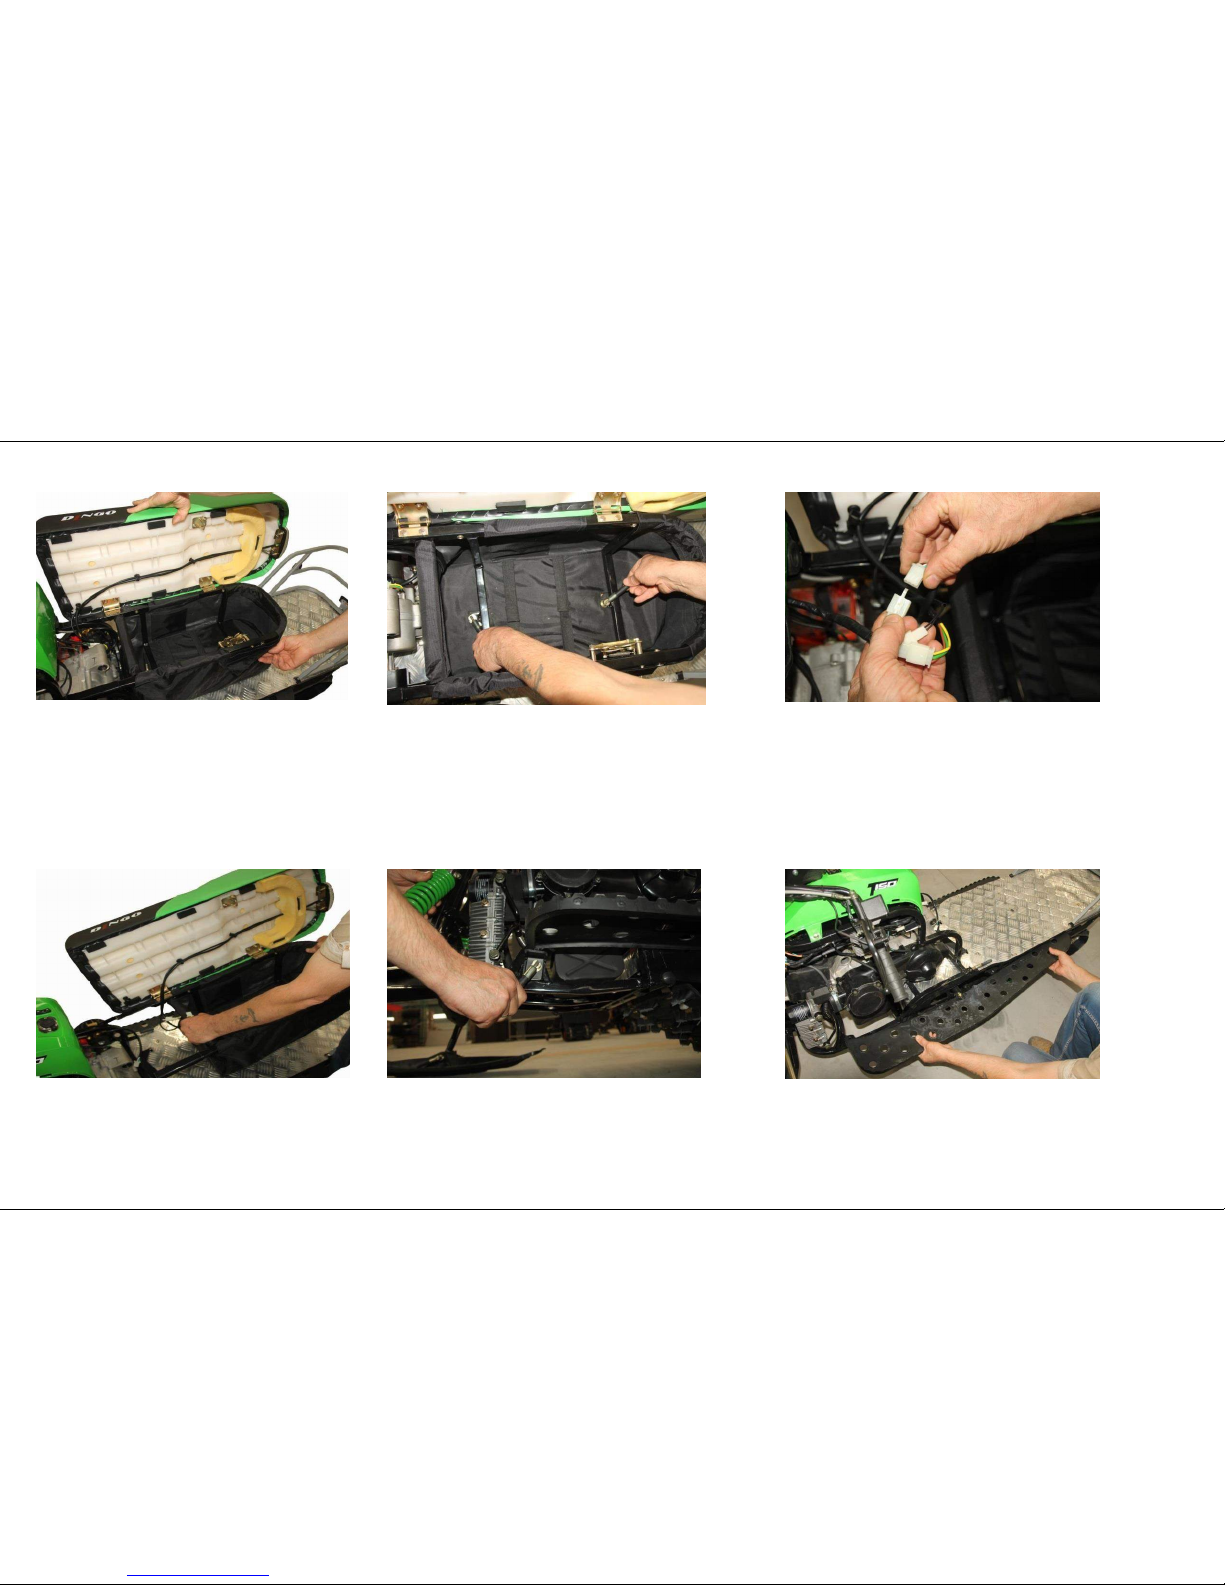
15. Pay attention at fixation method of a side footboard in a back part of the
snowmobile (the footboard should be inserted in a frame groove).
17. Take off a chain cover. Pay attention at a cover holder (it is highlighted in green in the
photo).
11
16. … in the front part of the snowmobile.
18. With a 19 key wrench loosen a nut of a
chain tensioner.
ASSEMBLY / DISASSEMBLY PROCEDURE
Page 13

ASSEMBLY / DISASSEMBLY PROCEDURE
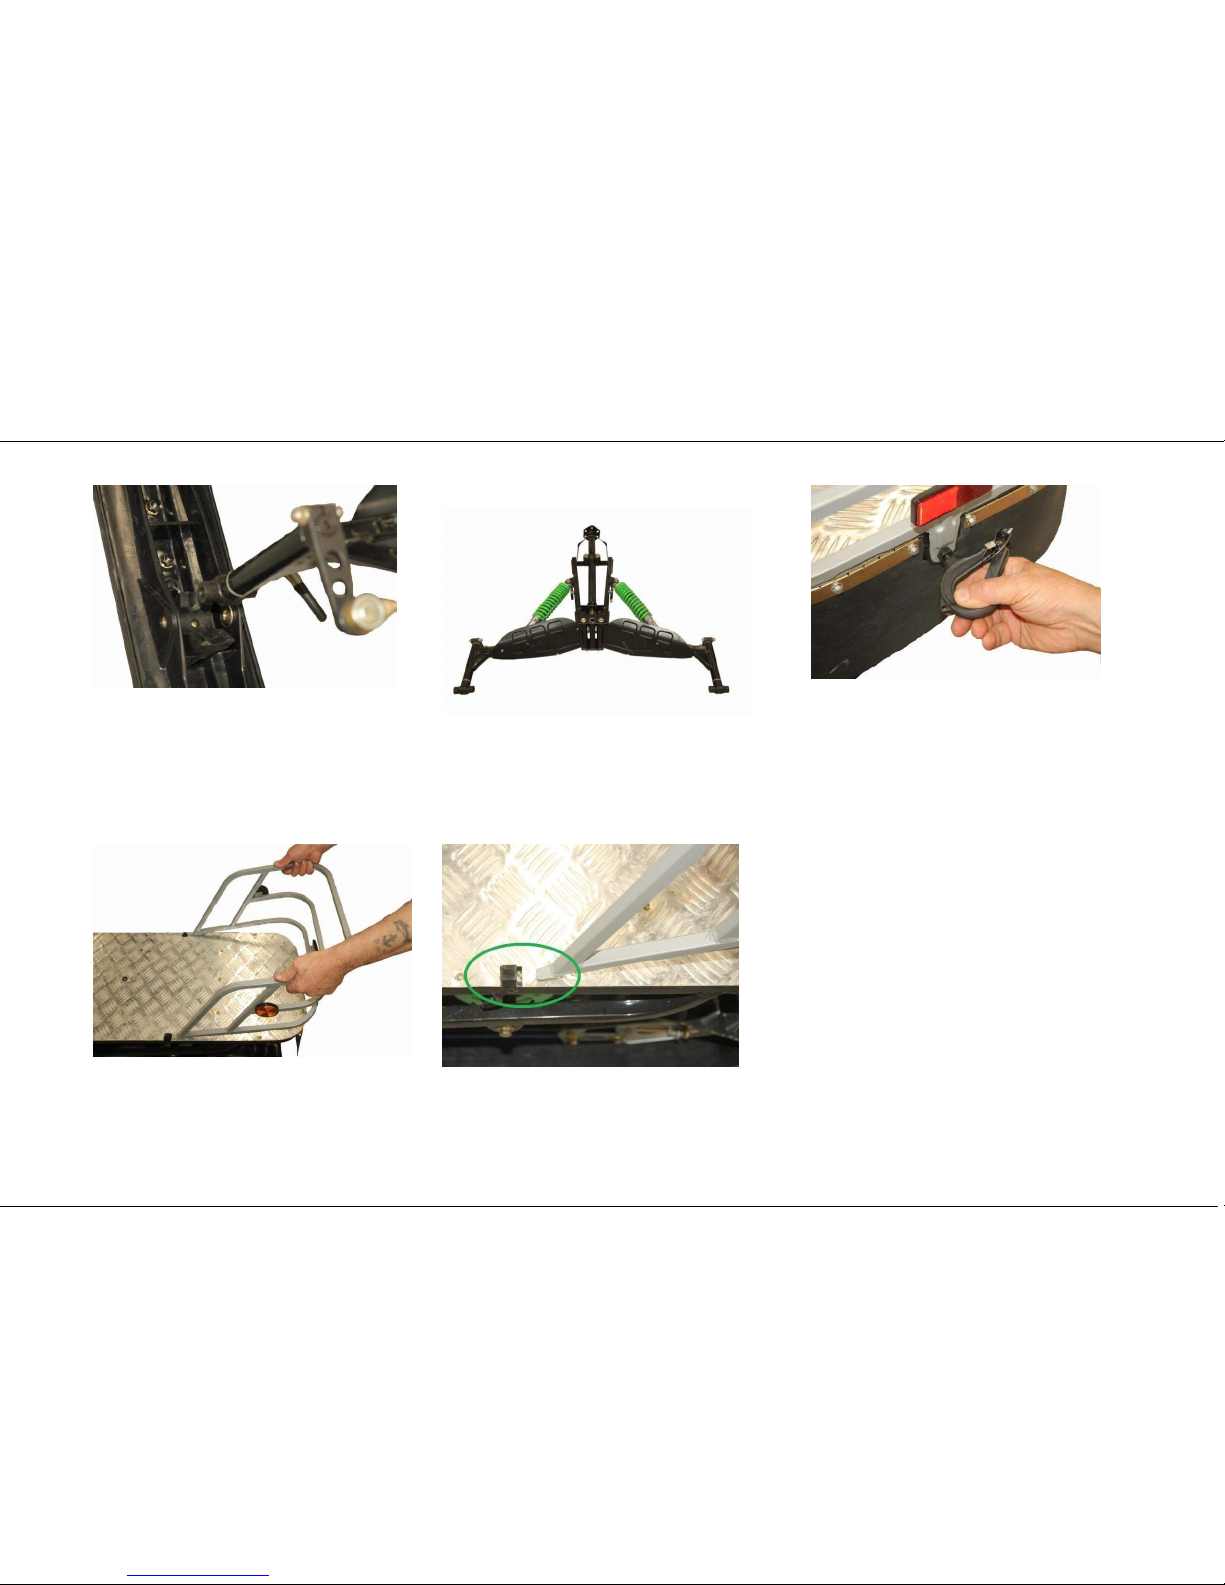
19. For further taking off the chain one should shift the chain tensioner to a position specified in
the picture.
20. Take off the chain.
21. Unscrew two screws of motor block
frame clamping to the track block.
22. Divide the snowmobile into two parts – a track block and an engine block.
12
Page 14
ASSEMBLY / DISASSEMBLY PROCEDURE
23. After point 22 is done the snowmobile will look like specified in the picture. 24. To detach a front suspension block
one should unscrew a central screw...
25. ... and two side screws. 26. Separate the motor block and the
front suspension block.
27. Unscrew skis.
13
Page 15
ASSEMBLY / DISASSEMBLY PROCEDURE
28. Take off skis from the front suspension
block.
29. After this procedure the ski block will
look like specified in the picture.
30. Unscrew a towing eye.
31. Take off a boot. Pay attention at a boot fixation method on the
snowmobile frame (highlighted in green).
PERFORM THE
SNOWMOBILE ASSEMBLY
IN REVERSE SEQUENCE
AFTER ASSEMBLY ONE SHOULD
CHECK A FUNCTION OF ALL
UNITS OF THE SNOWMOBILE
14
Page 16
IDENTIFICATION CODES
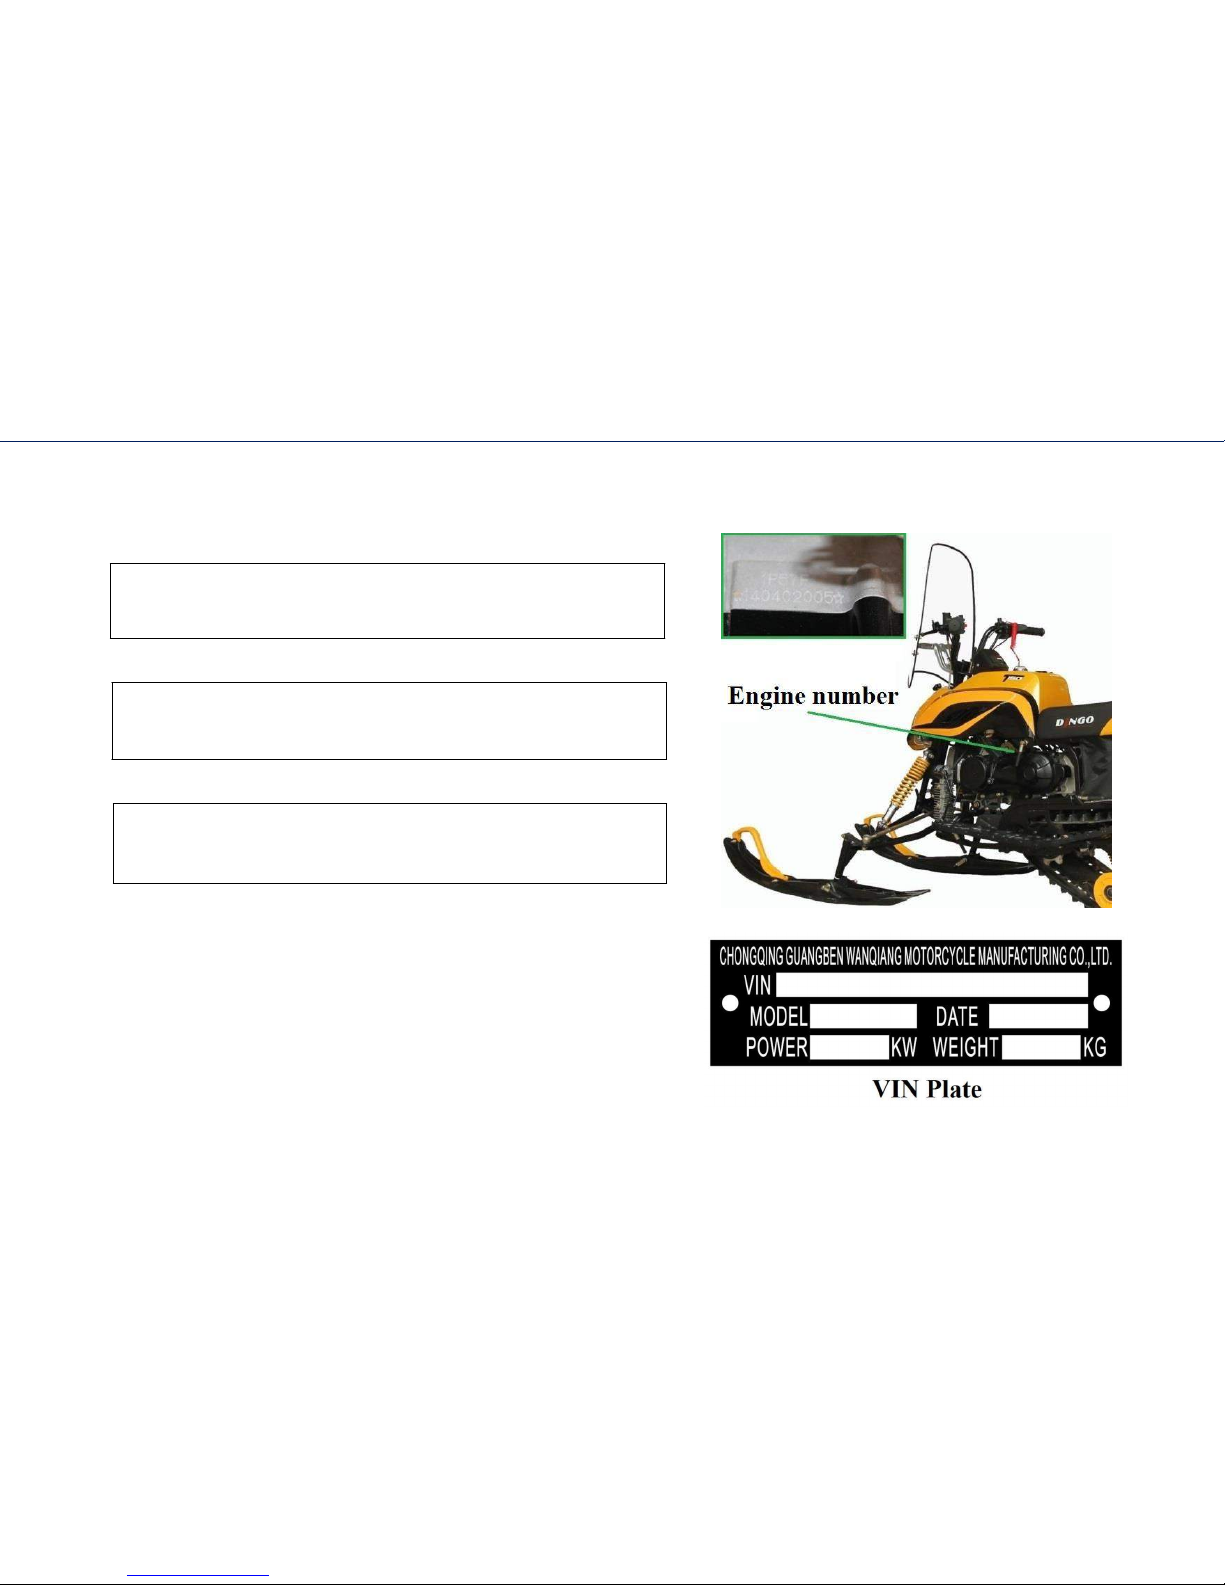
Write down a snowmobile identification number (VIN), engine number and a snowmobile model for references to them in future.
1. Identification number (VIN):
2. Engine number:
3. Vehicle model:
Identification number ТС (VIN) is marked on the snowmobile frame.
The engine number is marked on the snowmobile engine.
A model number plate of the snowmobile is fixed with rivets to the
snowmobile frame.
The frame model number should be specified in case of replacement parts
ordering from an authorized distributor.
15
IDENTIFICATION CODES
Page 17

SPECIFICATION
16
Point
Technical parameter
Dimensions L x W x H
2570х965х1065 mm
Height according to a saddle
715 mm
Dry weight
153 kg
Front suspension
Wishbone suspension
Braking system
Hydraulic, with a disc brake
Engine
Single-cylinder, four cycle, with oil forced/air forced cooling
Maximal power
Maximal power 6.8 kW / 9.25 l/s (7500 rpm)
Torsion moment
9.8 n/m (6000 rpm)
Feed system
Carburetor with an inlet diffuser heating
Working volume
149,6 сm3
Transmission
CVT, with a reverse. Operation mode F-N-R.
Track drive
Chain, type 530 (pitch 15,875mm), 22 threads
Starting system
Electric starter with a reserve manual starting
Fuel specification
92# gasoline
Fuel-tank capacity
7 l
Driver
Tracked, with front location of driving sprockets
Track
Rubber-fabric, armoured. Length 2626 mm (52 windows with a pitch
50.5mm), width 380 mm. Grouser height 23 mm.
Adjusting mechanism
Screw
Skis
Supportive rotating
Maximum carrying capacity
150 kg
Maximum speed
40 km/h
Passenger capacity
1 person
SPECIFICATION
Page 18
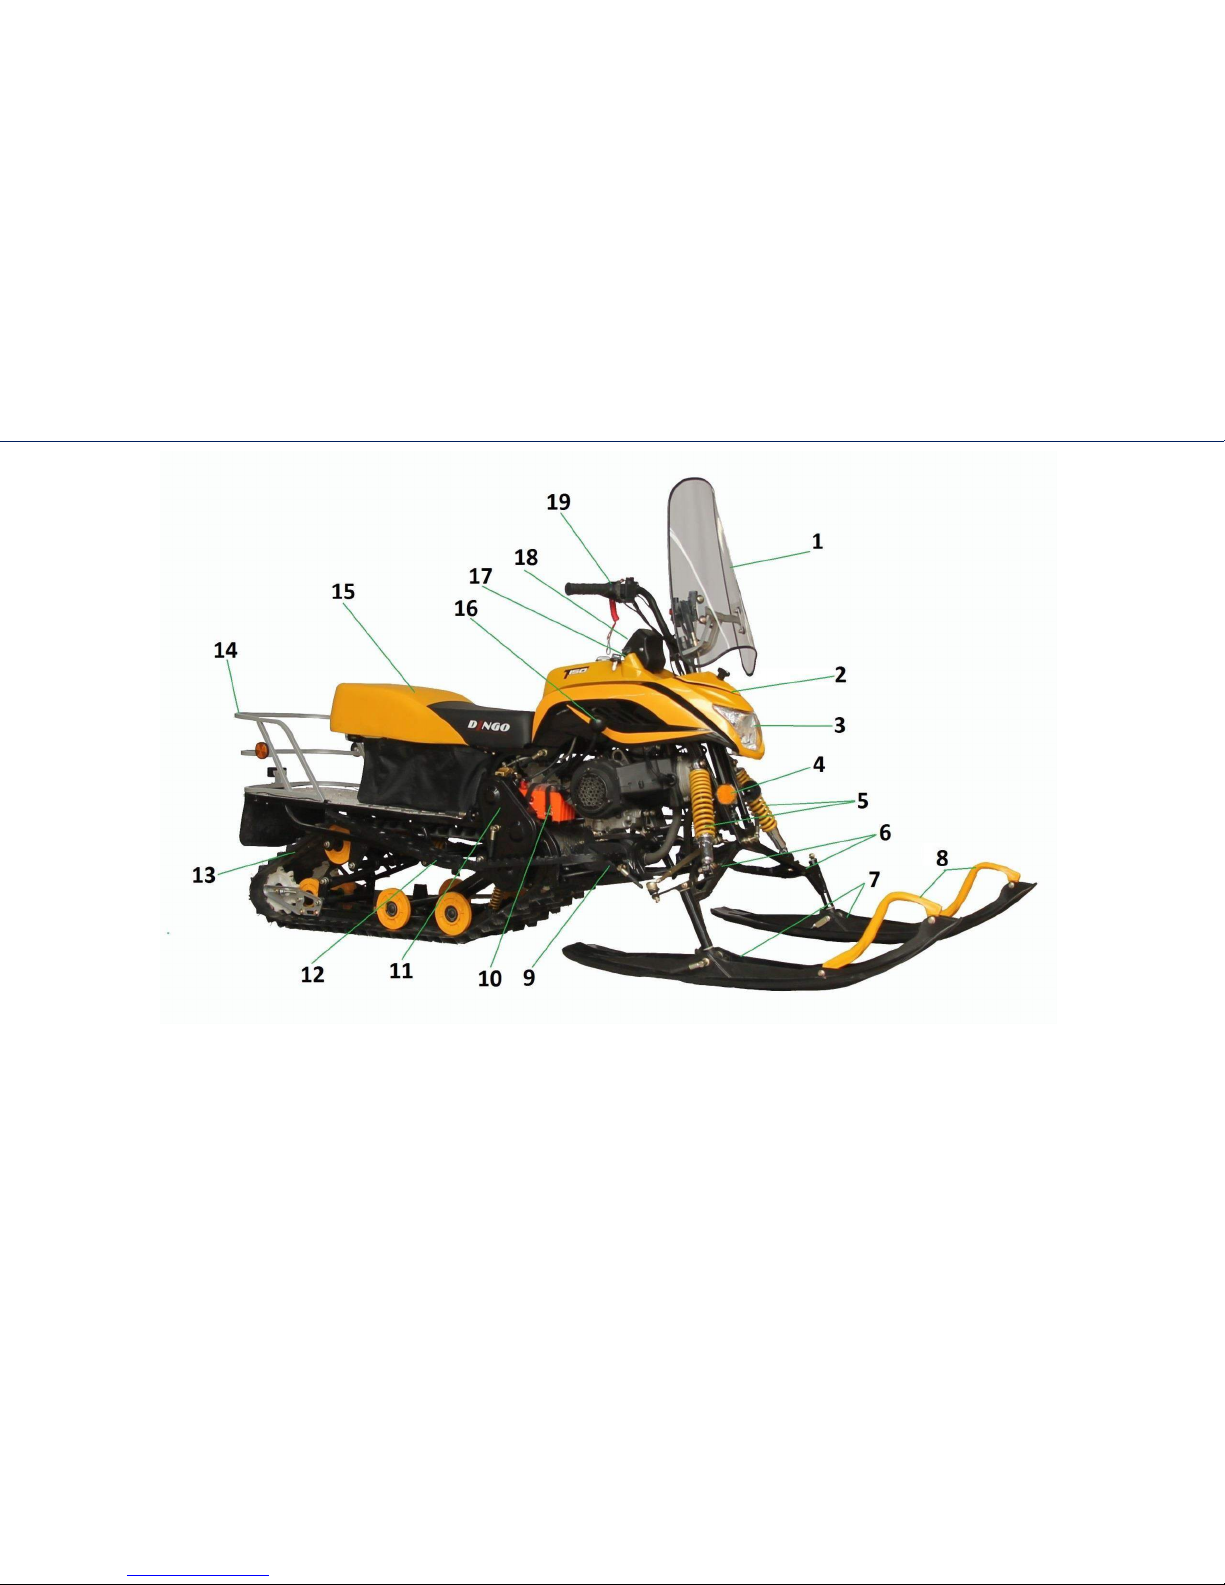
1. Wind deflector; 2. Motor block plastic; 3. Headlamp; 4. Head side deflectors; 5. Front shock insulators; 6. Front suspension levers;
7. Skis; 8. Ski end (handle); 9. Damper; 10. Accumulator battery; 11. Control chain protection cap; 12. Footboard; 13. Track; 14. Boot
/ lift handle; 15. Seat; 16. Transmission selector lever; 17. Ignition lock; 18. Instrument panel; 19. Wheel;
17
STRUCTURE OF THE SNOWMOBILE
Page 19
STRUCTURE OF THE
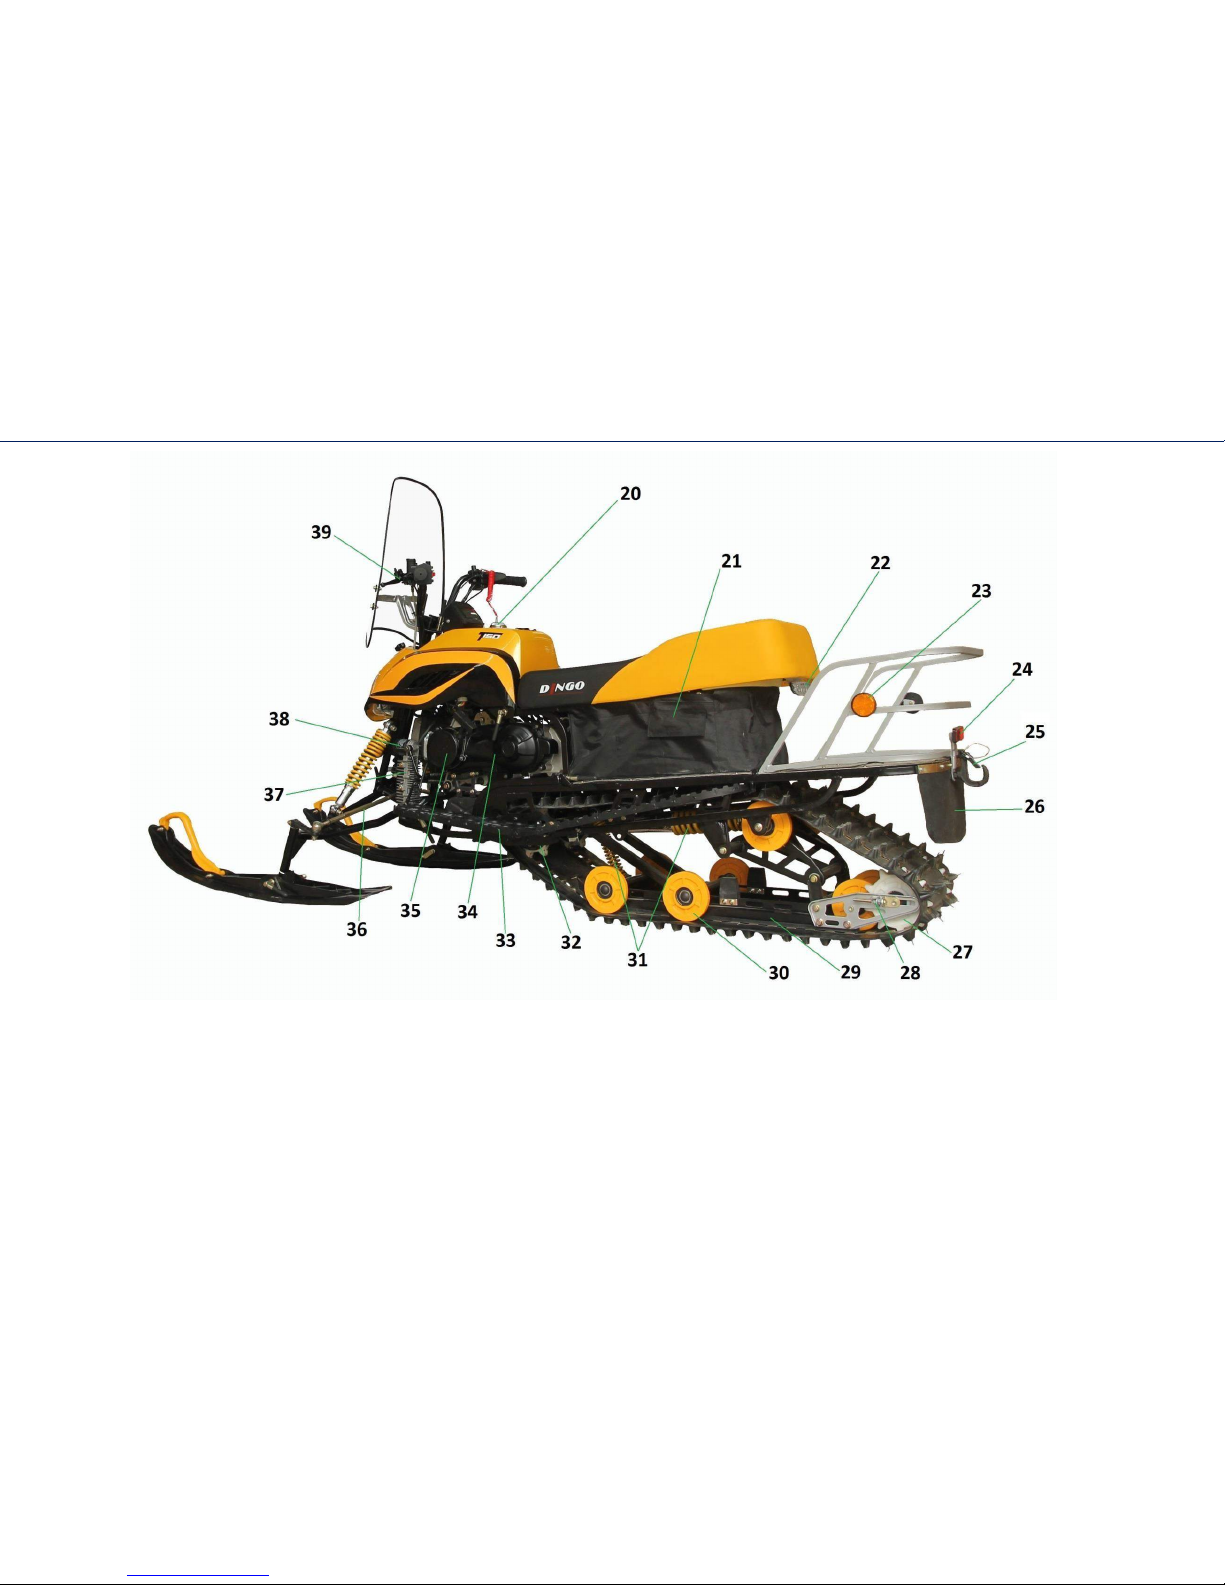
20. Fuel tank; 21. Closed undersaddle space; 22. Rear light / rear lamp; 23. Side deflector; 24. Side deflector; 25. Tow
bar; 26. Track apron; 27. Control shaft (directing); 28. Track adjustment; 29. Plain slideways (slides); 30. Lower track
wheel; 31. Insulator; 32. Control shaft; 33. Footboard; 34. Engine; 35. Engine manual starting control; 36. Control arm;
37. Oil radiator; 38. Oil filter; 39. Service brake control.
18
STRUCTURE OF THE SNOWMOBILE
Page 20
BASIC CONTROLS
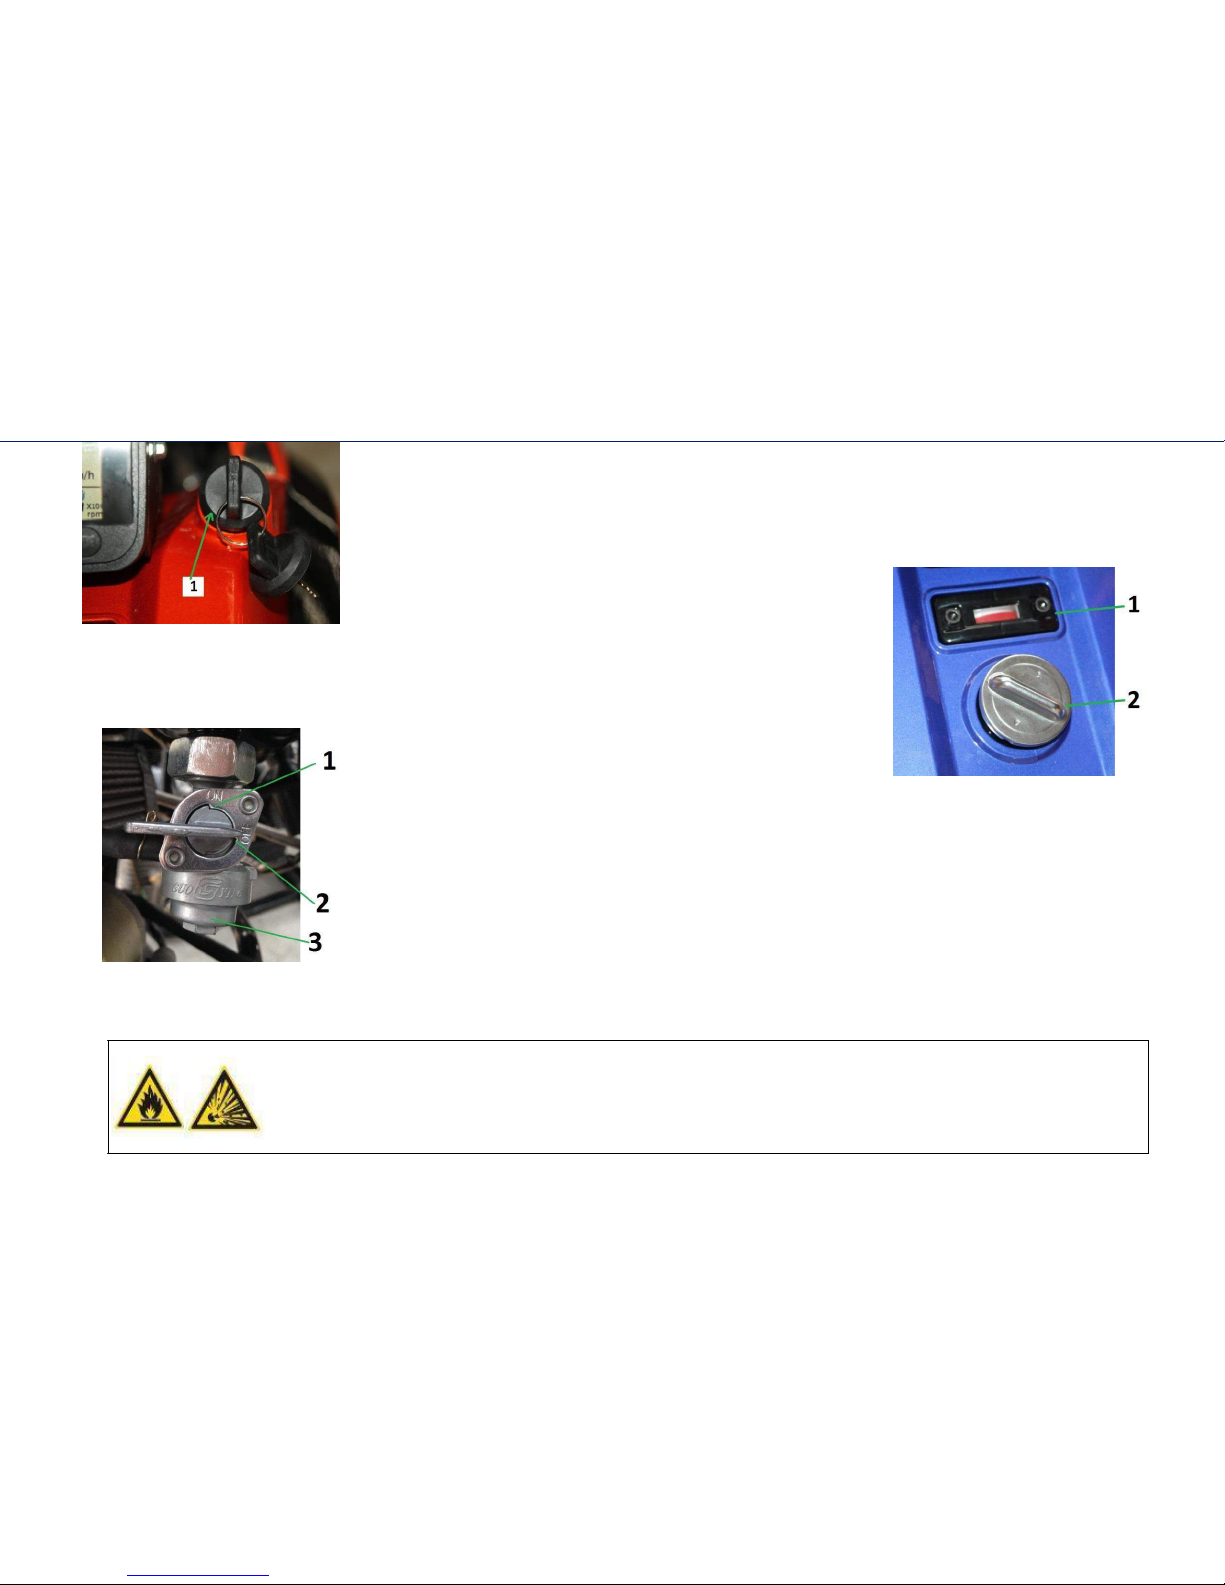
Ignition lock.
Ignition lock (1) is located to the right from instrument panel on a tank plastic (in the photo).
There are two ignition lock positions:
1. 'OFF' position - the whole circuit is broken; a key can be withdrawn from the ignition lock.
2. 'ON' position - the whole circuit is completed; the engine may be started; impossible to
withdraw the key.
Fuel tank
1. Fuel indicator. The green indicator shows
fuel level in a tank. If the fuel indicator is fully green – the tank is full, if the indicator is fully red –
the tank is empty. Reloading of the snowmobile is required. 2. Fuel tank cap.
Maximal fuel tank capacity is 7 liters. Fill the snowmobile only with gas with octane number 92. Kill
the engine while filling. Fill the snowmobile only with a cold engine, using for it a funnel
with a net with diameter not less than 150mm, excluding fuel
insertion on a damper and engine. While taking off the fuel tank
cap rotate it slowly. For tightening turn right. Gasoline level should
be not higher than tank filler edge, otherwise the fuel will be
splashing out. Don't fill an adders to gasoline – using them may
bring the engine out of operation.
While driving to far distances one should always have a reserve fuel load!
Fuel valve:
Fuel valve with a mud box (3) is located under the gas tank. It has the following
fixed positions: 'ON' position (On) (1) – normal position during the snowmobile work. Gasoline
comes through the fuel valve to the carburetor.
'OFF' position (Off) (2) – valve position during the snowmobile stop. Gasoline is not enter into the
carburetor.
Perform the snowmobile filling with care, as gasoline is classified as a highly inflammable liquid, its
fumes are explosive. Don't smoke while filling the snowmobile and don't fill not far from naked flame
source! It is prohibited to operate the snowmobile in case of dribbling of fuel from the carburetor, fuel
valve or fuel tank.
19
Page 21
BASIC CONTROL
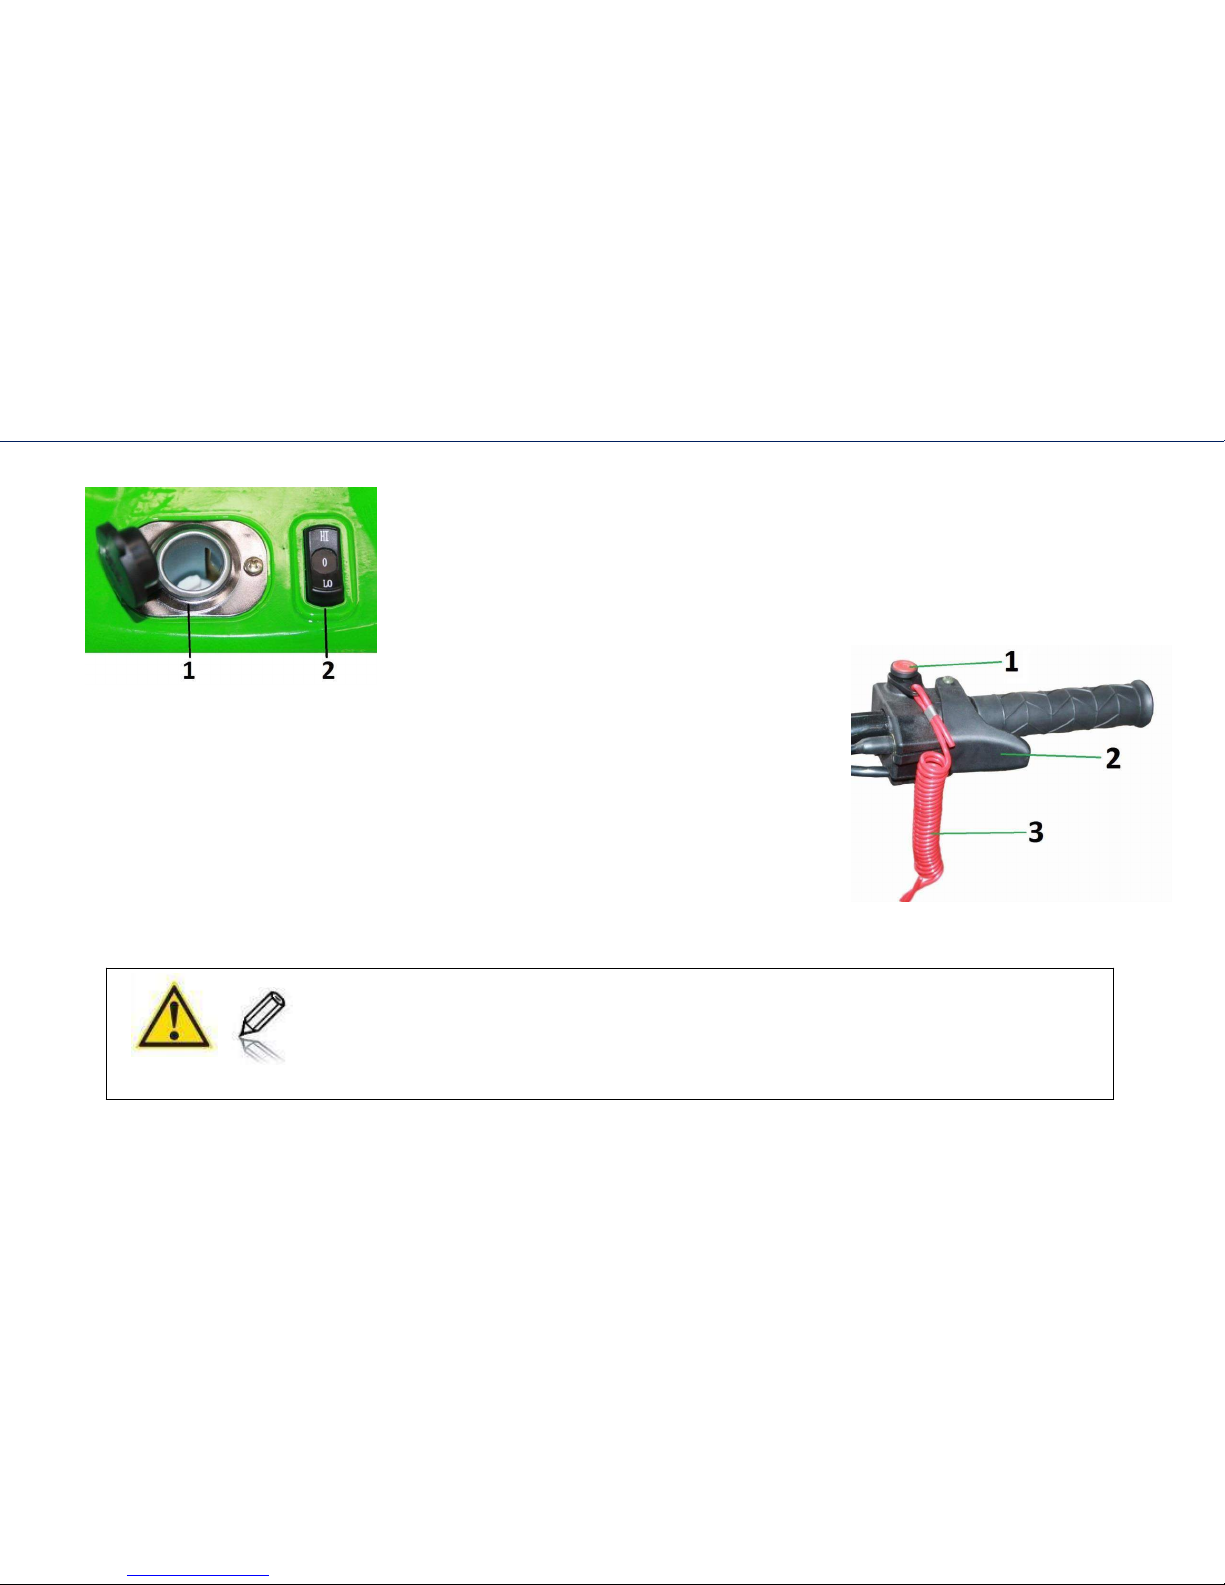
1. Socket for outer equipment 12V: Located on the panel behind the gas tank, designed for 12V
mains supply of peripheral equipment. Operating voltage: 12V. Total current: 5
А. Maximal total power: 60 W. Intended for low-current products!
2. Wheel grips of a wheel and a gas cock heating switch. Indicator of switching on the wheel grips
and the gas cock heating is a red LED flashing on a button. There are three switch modes:
'0' - wheel grips is off;
'LO' - A medium mode of wheel grips heating is on;
'HI' - A maximal mode of wheel grips heating is on.
Right lever controls:
1. Device for engine emergency stop. Intended for snowmobile engine emergency stop. Is
activated while pulling out a pin.
2. Throttle control. For acceleration press the throttle control. For deceleration release the
throttle control. Before start of the engine check a throttle control and make sure that it
works smoothly. Make sure that the control returns back to idle position as soon as it
becomes free.
3. Cord with a pin and a carbine. For your safety while driving the snowmobile always
fasten a strap of the engine emergency stop device cord to your right arm's wrist. It
will help
to kill the snowmobile engine and the snowmobile itself in case of falling or any other case of emergency.
Socket for outer equipment is intended for low-current products. Not intended for usage
of consumers having power of 60 W and current rate of more than 5 A.
Don't let a headlamp light and additional electric appliances connected to a lighter if the
engine doesn't work. It
may lead to a full or partial battery discharge.
20
BASIC CONTROLS
Page 22
BASIC CONTROL
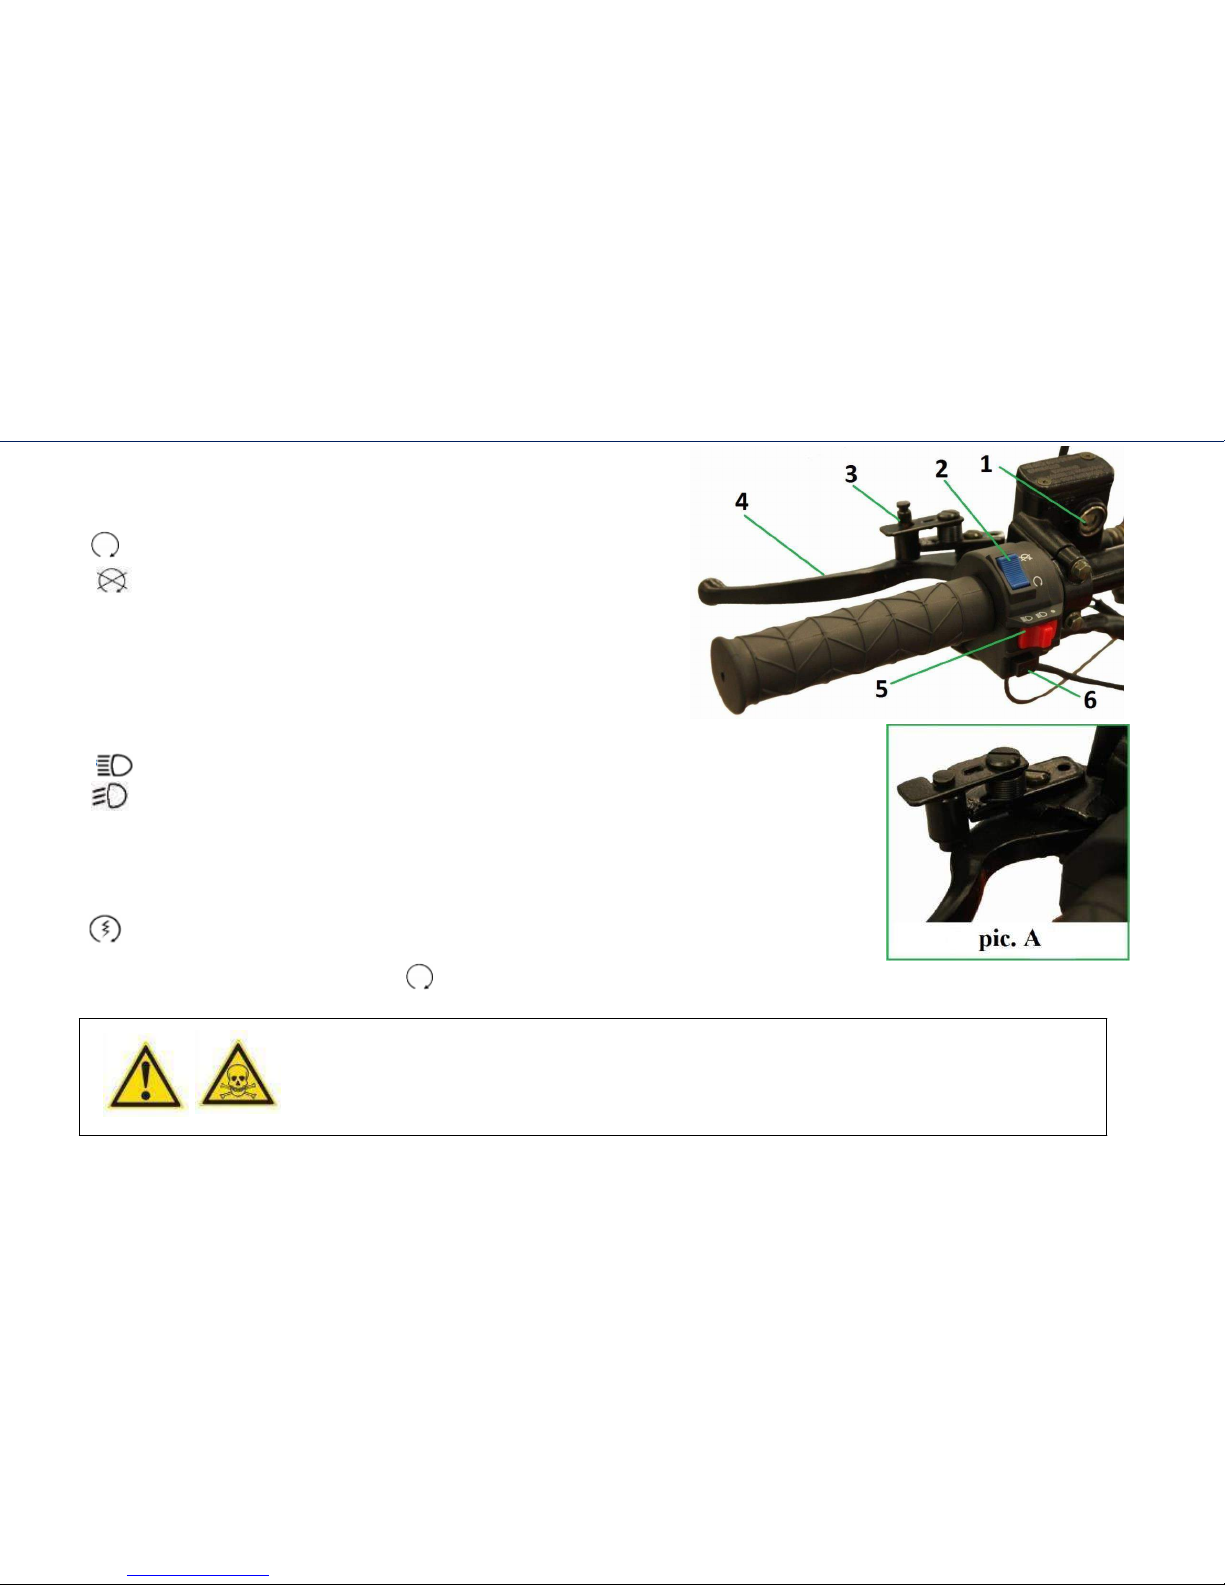
Right lever controls:
1. Brake fluid level monitoring window.
2. Engine stop button:
« »: A switch should be in this position in case of the engine start.
« »: In case of switch shifting to this position the engine will stop.
3. A stopping brake lever.
To switch on the stopping brake press a brake handle out and shift the
stopping brake lever down (See pic. A). For releasing the stopping brake
press the brake handle out again and return the brake lever to its original
position.
4. Brake lever.
5. Lighting control switch:
« » - Position lights, distance lights are on;
« » - Position lights, dimmed headlights are on;
«» - Position lights are on.
The snowmobile is equipped with a device that automatically switches on the position lights after engine
start.
6. Engine stop button:
« »: To start the engine one should press this button with a pressed brake lever and
position of engine stop button in position « ». Don't press the engine start button on a working engine, this may lead to the
snowmobile breakdown.
Before driving always check smoothness of the throttle control work. Of the throttle control
seizes – don't drive until you fix this problem. Driving with a
21
broken throttle is dangerous.
BASIC CONTROLS
Page 23

BASIC CONTROL
Instrument panel:
The snowmobile is equipped with a digital instrument panel which has
the following controls and shows the following operational parameters
of the snowmobile:
1. The SET button – mode setting button. Pressing this button in case
of an active instrument panel mode lets change parameters of
information display and adjust clock;
2. MODE button – selection of instrument panel modes. To enter the
menu in the instrument panel press and hold the MODE button for 5
seconds. After entering the instrument panel menu a quick pressing the
MODE button lets gradually enter the panel modes, change display of
speed and distance covered in kilometers and miles. Flashing of the
panel's mode shows its active mode – for example, flashing of clock's
category will show that the clock setting mode is chosen.
A quick pressing the MODE button changes counter reading of elapsed
run from daily to general run.
3. Tachometer – shows rotational rate (number of rotations per minute) of the engine shaft;
4. Speedometer – shows speed of the snowmobile movement in km/h mph.
5. Hours;
6. Back run switching on indicator light;
7. A switched on neutral indicator light;
8. Environmental temperature indicator, in °C;
9. Battery discharge indicator light;
10. An elapsed run counter shows general or daily run of the snowmobile in kilometers / miles.
22
BASIC CONTROLS
Page 24
BASIC CONTROL
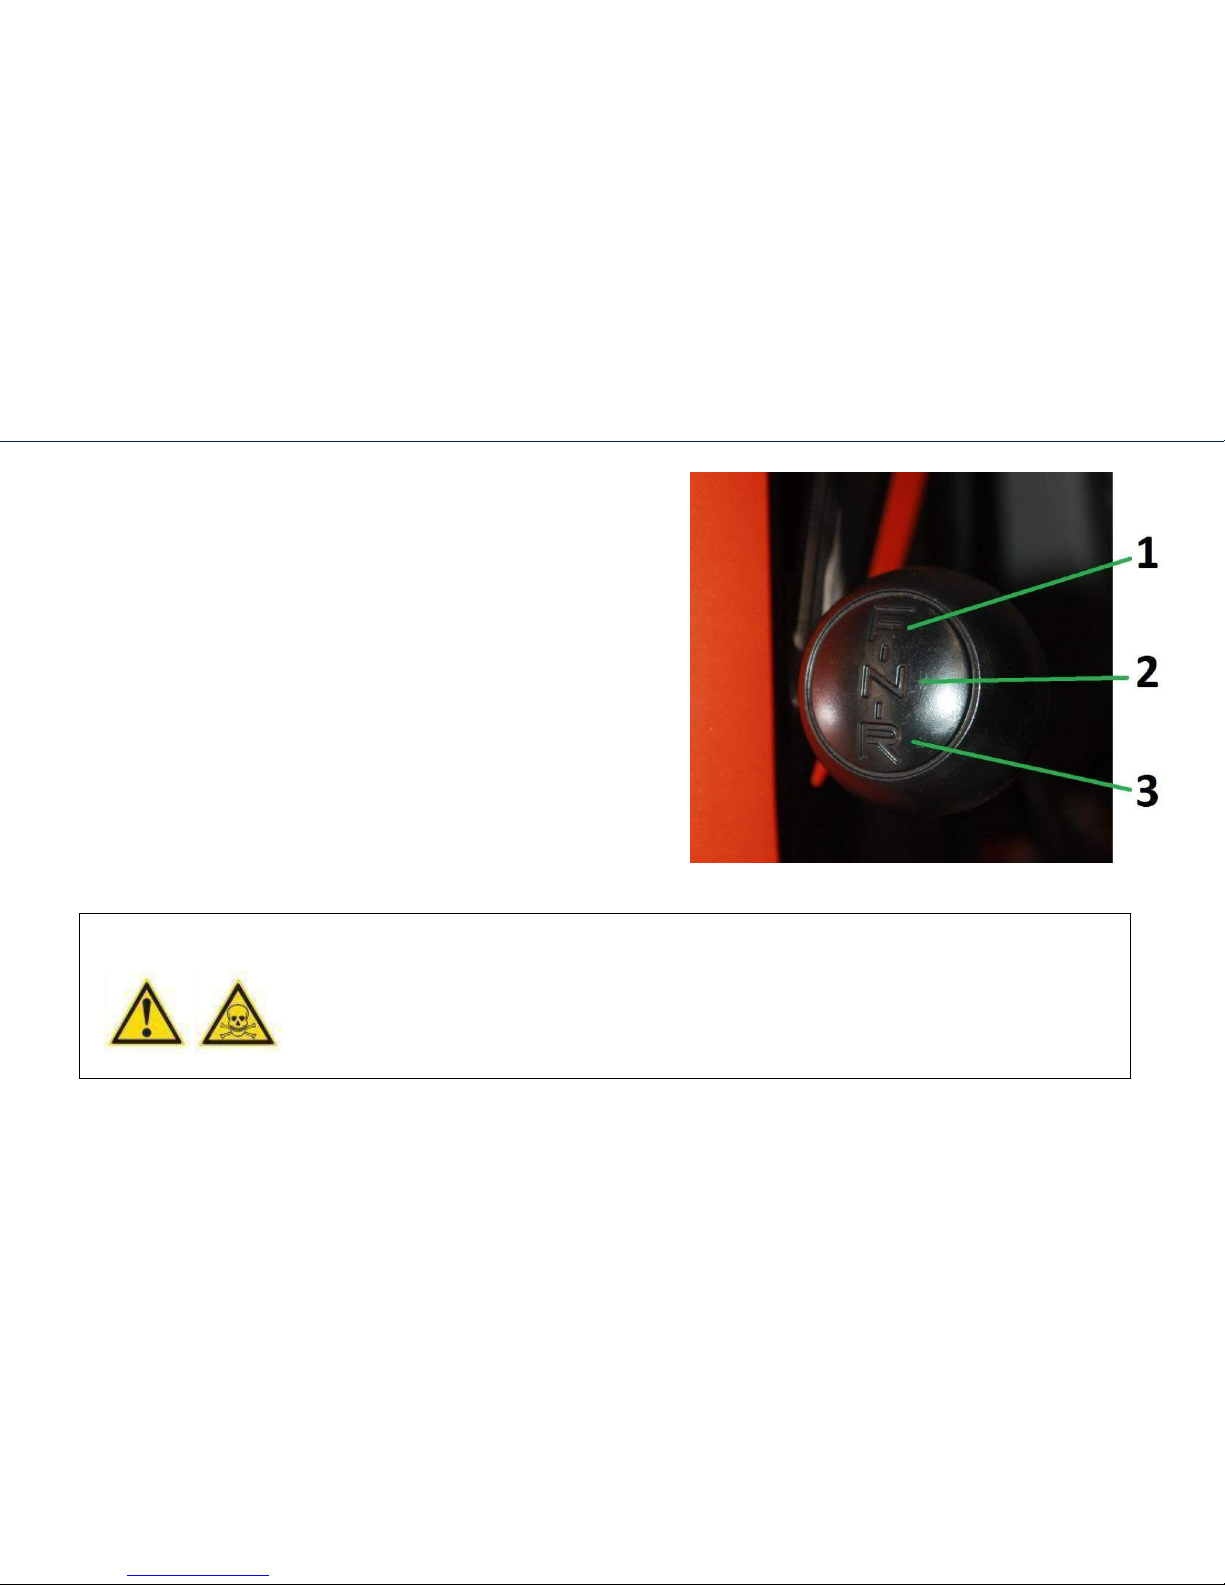
Transmission:
The snowmobile is equipped with an automatic transmission - variator.
Transmission selector
lever is located in the right side in the direction of travel of the snowmobile and
serves for switching to forward or back running, as well as switching off the
neutral.
1. «F» - Forward running position. It is switched on when the lever is 'pushed
off' from the 'Neutral' position.
2. N» - Neutral;
3. «R» - Position «Reverse». Switching on is performed with a switch
shifting to 'pull' position;
Back run switching on is performed after the full stop of the snowmobile, it is
prohibited to switch it on in motion – this may lead to transmission breakdown.
Back running may be used on a smooth surface only. Be attentive and careful
– the snowmobile may develop a quite high speed!
Also, during the snowmobile movement it is prohibited to shift the
transmission
selector lever to 'N' position – this may lead to transmission breakdown.
Back run switching on is performed only after the full stop of the snowmobile, it is
prohibited to switch it on in motion. Back running may be used on a smooth surface only.
During the snowmobile movement it is prohibited to shift the transmission selector lever to
'N' position – this may lead to transmission breakdown.
23
BASIC CONTROLS
Page 25

The snowmobile testing before driving:
Test the snowmobile before driving: Points listed here will take only several minutes, but consequently they can
save time and ensure safety during drive.
Check fuel level. Brake – check, if needed pump over the braking system (free play should make 10-20 mm). Track – check for
damages, check its level of sag. Throttle – check the throttle lever arm
and roping as well as throttle lever arm free play - if needed regulate or check. Light –
make sure in normal work of all lighting devices. Steering mechanism – check turn effortlessness and stability. Check the fuel pipe and
make sure in its hermetic state and safety. If the fuel pipe is old and cracked, replace it. Under filling conditions don't let fuel overfill the
tank and flow out of an opening. Electrical parts between an engine coil and a plug should be tightly connected to avoid accident.
Engine start:
Never start the engine in an closed airless space. It's life threatening.
Shift the transmission selector lever to 'N' position. Shift the fuel tank valve to 'ON'
position. Insert a key into the ignition lock and turn it to 'ON' position. Press and hold the brake lever. If at the same time you hear a
buzz it means that all necessary actions for engine start have been performed.
Shift the engine stop button to « » position and check a position of engine emergency stop pin – it should be connected. After the
buzz is gone, one may start the engine. Press an
electric start button « » and then slightly press the throttle control for fuel delivery, engine should start. Electric start button pressing
time shouldn't exceed 1-3 seconds. If the engine doesn't start at once, make a 30 seconds brake and try starting again, otherwise the
battery will quickly discharge.
After the engine has started, the electric start button should be released at once. In working engine conditions the electric start
button shouldn't be pressed, this will lead to electric starter breakdown. For extending the engine life cycle after a cold engine start
one should let it warm up. It is prohibited to boost a cold engine. If while pressing the lever arm the engine rotations fall it means that it
has been insufficiently warmed up. This snowmobile model is equipped with an automatic startup fortifier. After its automatic
breakaway engine rotations fall by approximately 200-300 rpm, after which one can start movement shifting the transmission selector
lever to 'F' position.
24
PREOPERATIONAL PHASE
Page 26
25
SNOWMOBILE RUNNING
IN:
For the snowmobile to work and serve well it should be put through running in. Proper new snowmobile treatment during
running in is vital for the engine durability. The snowmobile engine needs breaking-in during 20 running hours or during run of about 500
km before it will be able to work normally in full production. During the run all working details wear in to one another and calibrate a
working gap.
At the factory SAE 10W30 API SF-CC engine oil is filled to a snowmobile sump that doesn't guarantee an effective engine start at
low temperatures. In this connection before the first usage it is recommended to replace the engine oil for an appropriate to
planned service conditions one (for further details see p. 29).
During the first 500 km comply with the following
recommendations:
- speed shouldn't exceed 30 km/h, run time shouldn't be more than 1 hour;
- prevent excess loads, long driving uphill, engine cranking for more than 7000 rpm, but during a breaking-in period it is useful to make
short accelerations with the snowmobile and move with various speeds.
- necessarily replace oil in the engine after the first 100 km run and perform the snowmobile maintenance. This will help achieving the
best performance and long engine service.
A new CVT-belt is worn in during an about 50 km run. In this period one should avoid intensive accelerations and brakings of the
snowmobile, loads towage as well as sustained motion with a constant speed.
In case of emergence of questions during the snowmobile run as well as for avoiding possible breakdowns in the period of the run and
during a period of guarantee one should contact an authorized service center.
ATTENTION! A transporting oil is filled to the engine. Before the first snowmobile usage one
should replace oil in the engine and oil in the reductor for oil in accordance with forthcoming
service conditions of the snowmobile (for further details on oil replacement see p. 27).
Long accelerations with a fully open throttle arm, a long travel on high speed as well as engine
overheating are prohibited for a normal run.
Before the travel start always examine snowmobile's brakes – this will help to avoid various
breakdowns during travel and emergency proved by it.
SNOWMOBILE RUNNING IN
Page 27

DRIVING THE SNOWMOBILE
Before driving the snowmobile for the fist time put your feet directly on a footboard and put your hands on a wheel. Start the engine,
before you start let it warm up and press the brake lever out. After that shift the transmission selector lever to 'F' position. Release the
brake, and to pull away smoothly press the throttle control with your right hand thumb. The snowmobile speed is regulated with the
throttle control pressing. During your first driving move slowly. Getting acquainted with the snowmobile and learning ways of its
driving should be performed on an even surface.
To perform a turn or a sharp turn rotate the wheel to a side you should turn to. At the same time one should tilt the upper part of the body
frame inward the turn having transferred the body weight to the inner snowmobile footboard. This will let to perform a turn in a more
safe and smooth way.
Before every travel perform check of all units of the snowmobile.
In case of driving the snowmobile always keep to these recommendations for work with the snowmobile gearbox:
1. One should pull away smoothly on the snowmobile when passing a run with a load or a trailer as well as in severe conditions;
While driving always keep to the following protective measures:
1. Slow down before approach to an uneven surface;
2. Try to avoid sharp turns that may lead to a drift and the snowmobile turnover.
While driving uphill always keep to the following protective measures:
1. One should drive uphill strictly in a straight line keeping one's feet on footboards and transferring the body weight to
the front;
2. Try avoiding driving uphill sharp hills with a lifting angle more than 13 - 15°;
3. Be ready to quickly get out of the snowmobile at any point.
While descending a slope keep to the following protective measures:
1. One should descend strictly in a straight line keeping one's feet on footboards and transferring the body weight to
the back;
2. Maximally slow down.
The snowmobile stop:
1. For the snowmobile stop release an accelerator lever and smoothly press the brake lever up to a full stop.
2. After the snowmobile stop shift the transmission selector lever to 'N' position.
An excessively high speed in conditions of descending may lead to loss of control over the
snowmobile. Driving the snowmobile intoxicated is prohibited. For your safety while driving use a
helmet and protection elements. Driving the snowmobile at the age up to 18 is prohibited. This
model
isn't intended for public roads.
26
Page 28

SNOWMOBILE TRANSPORTATION
SNOWMOBILE TRANSPORTATION
For your comfort while transporting this snowmobile model is
designed as a demountable one. The snowmobile disassembly and
assembly procedure is described on page 8 of the manual. A
disassembled snowmobile may be easily placed in a boot and on a
rear seat of a passenger car.
In case of loading and transporting the snowmobile in an
assembled state keep to the following recommendations:
- don't drive under your own power on a trailer or car
vehicle float body;
- always safely secure the snowmobile on a trailer or car
vehicle float body;
- for avoiding damages or dirtying the snowmobile
while its transporting on an open trailer or car vehicle float body cover it with a protecting cover;
- in case of transporting the snowmobile with the help of a vehicle float body before starting a movement always check a tow bar and
preventers reliability.
SLINGING OF THE SNOWMOBILE
Lifting and transporting the snowmobile should be done with slings to a
track block frame and front suspension elements. Marked slinging points
should be also used for tying the snowmobile down when driving uphill.
27
SNOWMOBILE TRANSPORTATION
Page 29
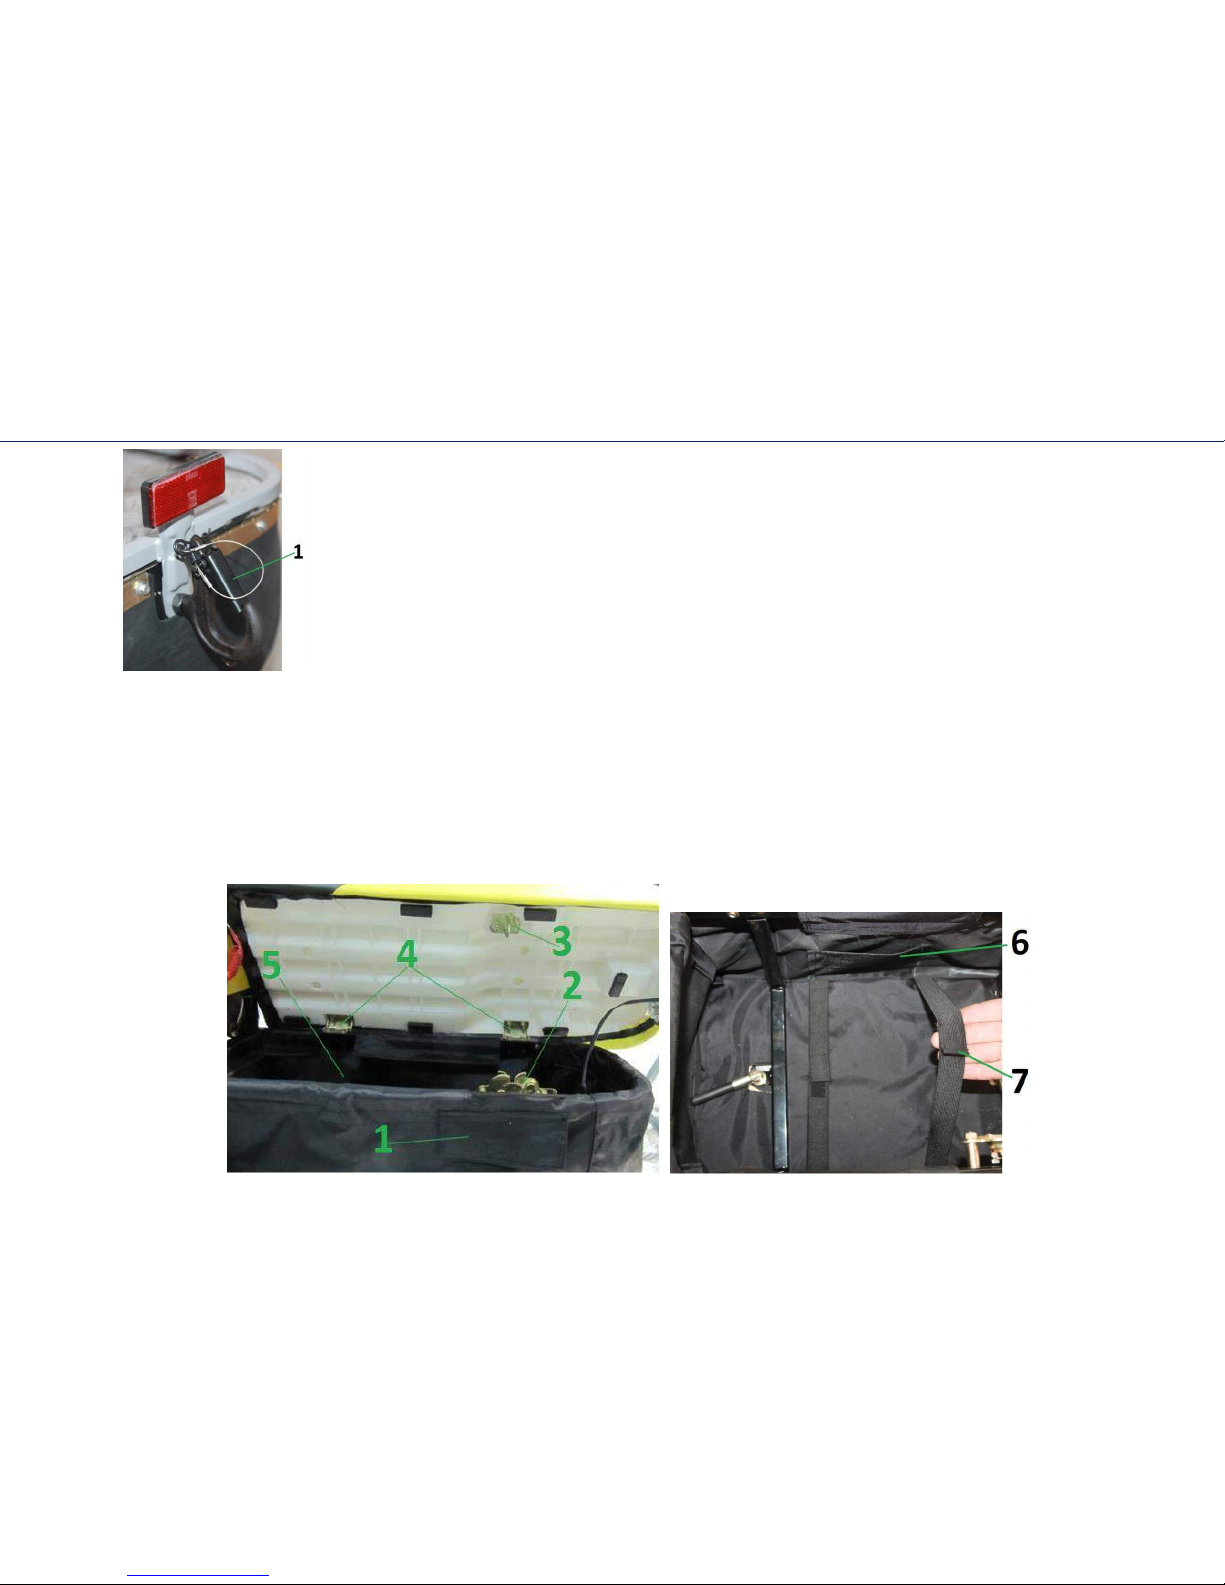
LUGGAGE TRANSPORT
Vehicle float body towage:
Your snowmobile can tow a vehicle float body with a maximal weight of 100 kg. For its towage
the snowmobile is equipped with a tow bar (1). For your safety a towed vehicle float body should have and
back reflective elements or signs made of a light-reflecting material on both sides corresponding to State
Standard. ATTENTION! Towing of the vehicle float body is prohibited during a snowmobile run.
Luggage compartment:
A luggage compartment of the snowmobile is located under a seat. It is a cover made of a close texture
pulled on a seat frame.
1. Seat valve lock; 2. Seat lock; 3. Seat lock counterpart; 4. Loops; 5. Luggage compartment.
For access to a luggage compartment (5) one must bend the seat valve lock (1) back, draw a lock catch (2) to the right and throw the
seat off. For closing of luggage compartment one should install a seat on its place and slightly push on it to a
specific seat lock click: luggage compartment is closed.
Before driving make sure that the luggage compartment is fully closed. Don't place inflammable objects in the luggage compartment.
Don't put valuable things to the luggage compartment.
For convenience there is a documents pocket (6) foreseen in a luggage compartment as well as regulated elastic rubber belts (7).
for strapping of a load in the luggage compartment.
28
Page 30
PERIODIC SERVICING
ENGINE OIL TESTING AND CHANGING
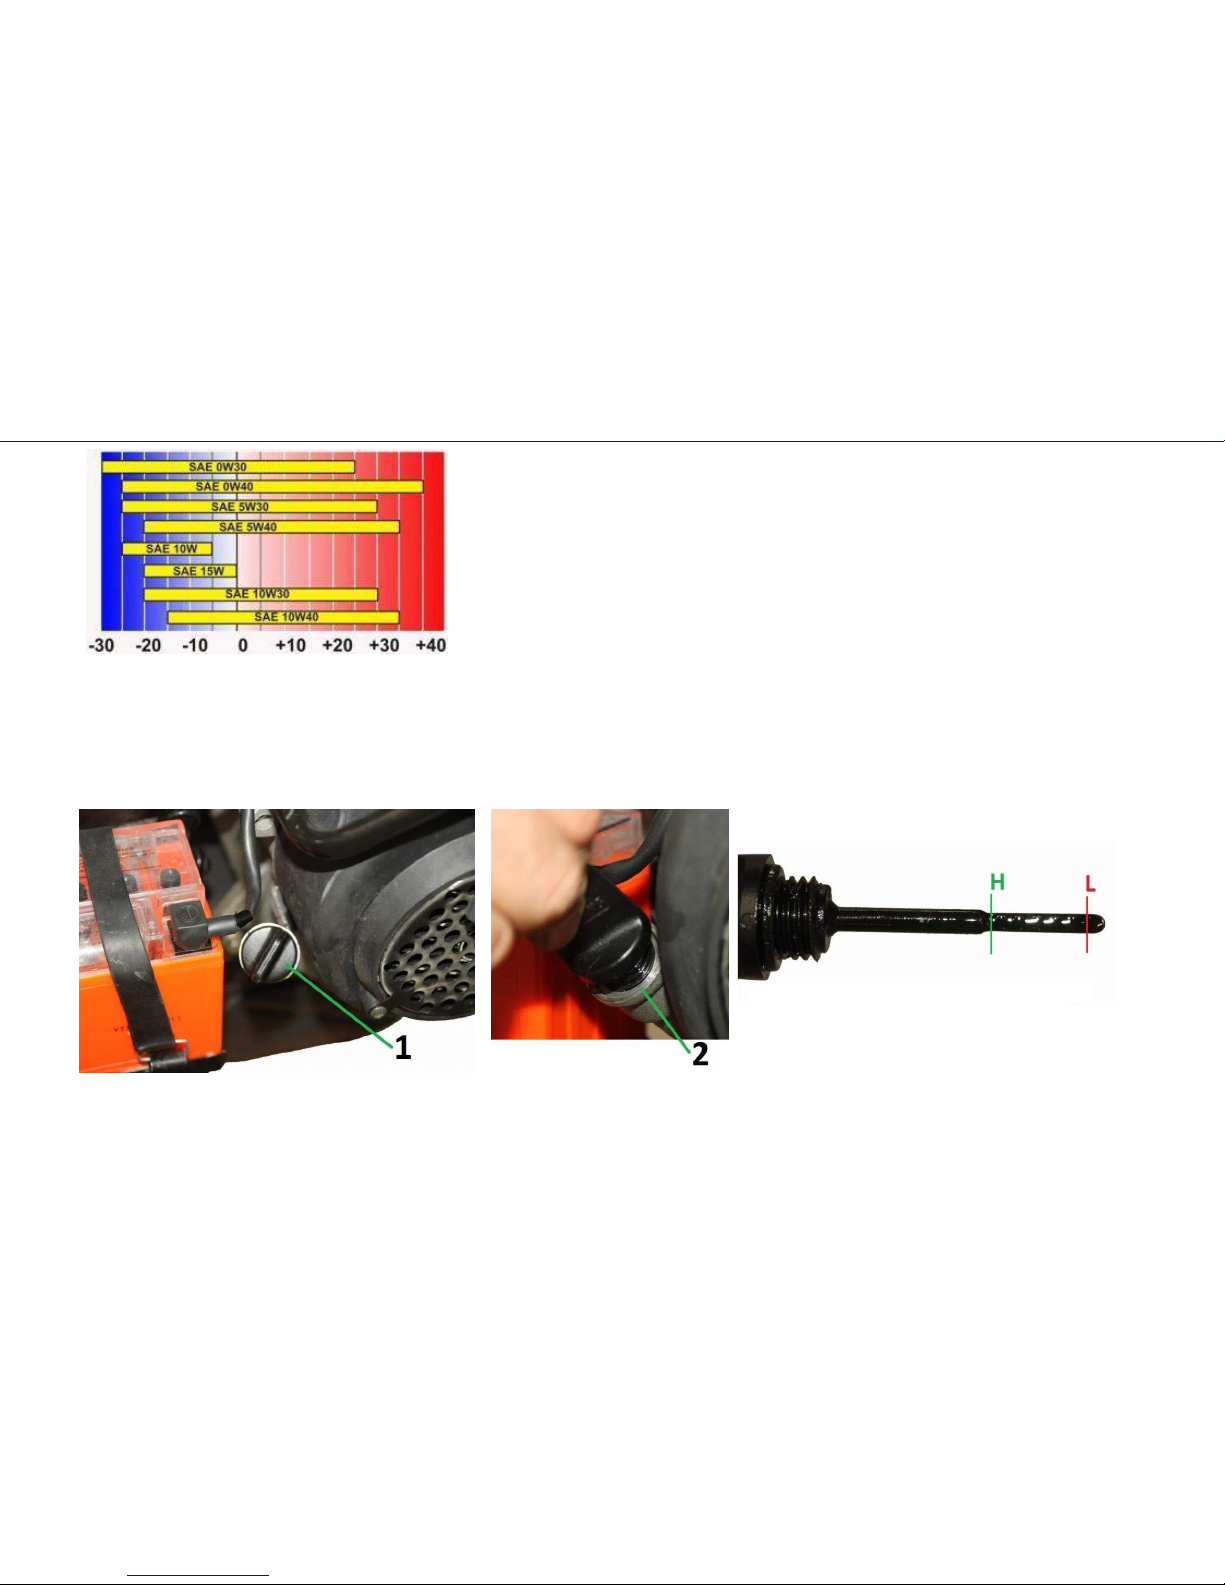
At a factory the snowmobile is filled with a transporting oil for SAE 10W30 API
SF-CC gasoline engines. Before you start operation oil should be replaced. It is
recommended to use oil specially intended for four cycle snowmobiles engines, but
using of a usual oil for four cycle gasoline engines is possible. An oil viscosity can be
chosen in accordance with a climate according to specified scheme.
Don't throw waste oils to waste receptacles and don't pour it on earth or to drain
water.
Oil level check:
Check oil level before every trip. Put your snowmobile on an even horizontal surface. Take off
an oil gage (1) and clean it off oil. Insert it into a sump hole without screwing it into a screw thread (2) and take it off for level check. Oil
level should be between the upper ('H') and lower ('L') marks. If needed, add to the sump certain amount of oil of a grade filled to the
engine before. Don't overfill over upper mark. Engine operating with a lack of oil or excess oil may be a cause of damage.
29
Page 31

earlier). Tighten a sump drain plug.
Engine oil changing:
To guarantee a full waste oils draining
put your snowmobile on an even horizontal surface. Warm up
the engine. To drain oil unscrew engine oil level gauge (1,
p.27) and a drain plug (3) with the help of 17” wrench. After a
base oil has finished draining by gravity, unscrew the oil filter
(4). Wait until the oil will drain to the full. Put the oil filter on
its place (oil filter replacement is performed once in 1200 km or
in 1 year, depending on which becomes
Fill to engine sump oil of a recommended type through a oil level gauge opening (volume 0.95 l). Start the engine and let it work for
3-5 minutes at idle speed. In 2-3 minutes after the engine stop make sure that the oil level is between the upper ('H') and lower ('L')
marks. If needed, top up oil. Make sure in
absence of engine oil dribbling.
Reductor oil changing:
Reductor transporting oil changing is
recommended to be performed in a warm
room for a storage compound to come out a
drain hole itself.
To ensure a quick and full draining of waste
oils from the reductor one has to disconnect a
motor and track blocks, as the drain hole
of reductor tank (6) is located over the track
block.
Warm up the engine. Put an oil collection can under the reductor. Unscrew a drain plug (6) and a sealing bolt at an oil feed opening (5) (with
the help of the 17” wrench) to drain the whole oil. Drain oil from the reductor. Clean the drain plug and put it to its place. Fill 0.75 l (750 ml)
of a transmission oil (SAE 80W/90) into the oil feed opening (5) and put the sealing bolt on its place. During
the snowmobile operation check the engine reductor for possible oil leakage. Engine operation with lack of oil in the reductor may lead to its
damage.
30
PERIODIC SERVICING
Page 32

CARBURETOR ADJUSTMENT
ATTENTION! Independent change of the
main carburetor settings may negatively
affect the engine start and stable work. If
needed, regulations are better to perform in
a specialized workshop.
1. Fuel-mixture adjusting screw. This screw regulates a ratio of fuel and air
coming to a cylinder at idle of the engine.
2. Idle adjustment screw. Idle adjustment should be performed on a warmed up
engine. For this start it and let it work at idle for 5-7 minutes. On a started engine
rotate the Idle adjustment screw (2) (clockwise – increasing, counterclockwise –
decreasing rotations number of the shaft). Idle rpm should correspond to 1700 rpm
± 100rpm.
3. Lever free travel regulation. Lever free travel should be within limits of 2 - 6
mm. For adjustment take off a rubber dust containment of a throttle cable
adjusting mechanism and weaken a half nut. If the lever free travel is big, screw
out an adjust nut (counterclockwise), if it is small - screw it. After regulating
tighten the half nut and put on a rubber.
31
PERIODIC SERVICING
Page 33

ACCUMULATOR BATTERY MAINTENANCE
A gel accumulator battery not in service is used on the snowmobile.
12V9Ah (12 volt, 9 ampere-hours) – number 1 in the picture.
If the snowmobile is not used for a long time, take off the accumulator battery to
decrease its discharge. First take off a negative conductor and then a plus wire. While
installing the accumulator battery perform connection recursively. After recharge of
the accumulator battery keep it in a dark ventilated room. If the accumulator battery is
left on the snowmobile, one should disconnect the negative conductor.
Take off the negative conductor on a regular basis and clean a positive and negative
clamps. In case of replacement use a accumulator battery with similar characteristics.
If needed, charge the accumulator battery with the help of a certified charger with a
charge current that makes 0.1 from the battery capacity (900 mА).
CUTOUT
To avoid fire in case of a short circuit in a snowmobile in vehicle network a fuse (2) is used. In case of the fuse breakdown one should
open a plastic box and replace it for a similar one with the same nominal (15A). Installation of fill pieces instead of fuses as well as
installation of fuses more powerful than specified is prohibited!
32
PERIODIC SERVICING
Page 34

BRAKING SYSTEM
Brake fluid level checking:
This snowmobile model is equipped with a hydraulic brake. Put the snowmobile
on an even surface. A reserve tank upper cover should be in a horizontal plane (possibly, a
changing of a wheel rake or a right handle angle position in relation to the wheel is also
needed). Measure free travel on the lever end, its size should make 10-20 mm.
Check the brake fluid level in the monitoring window, it should be not less than a minimum
permissible level marked as 'LOWER'. Press
the brake lever with effort and look how the brake fluid level will change, if it
becomes lower than a marked limit its is necessary to fill up some brake fluid.
First check a brake free travel and a level of fluid.
Use only brake fluid of DOT4 class.
Bleeding of brakes. If in the process of braking you feel that brakes have become
weak it is necessary to perform their bleeding.
1. Press the brake lever and weaken a bleeding air valve screw for
the air to come off the braking system. After that it is necessary to tighten an air outlet
screw (without releasing the brake lever).
2. Alternatively press and release the brake lever several times until you make sure in
effective work of brake.
Brake blocks:
Always watch brake blocks wear. Replace brake blocks if their wear has reached a limit
mark of blocks wear. If while an operation process a specific 'squeak' of brakes is heard,
quickly turn to a service workshop for brake blocks replacement.
Brake fluid may cause irritation. It is necessary to avoid contact of brake fluid with skin or its
contact with eyes. In case of contact with skin, wash this site with water carefully. In case of
brake fluid contact with eyes, it is necessary to wash eyes with much clean water and quickly
during consult
33
a doctor.
PERIODIC SERVICING
Page 35

PERIODIC SERVICING
DRIVING CHAIN
The chain durability depends on its appropriate lubrication and regulation. A lack
of maintenance may lead to early wear or damage of a chain transmission and sprockets. It
is necessary to check and lubricate the snowmobile driving chain from time to time.
The chain transmission unit of the snowmobile onsists of:
1. Brake wheel;
2. Caliper;
3
3. Driving sprocket;
4
4. Control chain (chain 530, 22 parts)
5
5. Chain tensioner sprocket.
6
6. Chain tension adjusting mechanism.
For regulation of chain tension it is necessary to weaken the half nut, perform a chain
tension adjustment (bending of chain vertical reach pointed with an arrow at load of
about 5 kg should be not more than 10-15 mm), tighten the nut.
7. Driven sprocket.
Chain transmission condition check:
1. Put your snowmobile on an even surface, shift the transmission selector lever
to neutral position.
2. Check chain slack.
3. Move the snowmobile back and forth. Check driving chain slack. Chain slack should be unchanged.
4. Check sprocket teeth for possible wear or damages.
5. If chain transmission or sprockets have an excessive wear or damages they should be replaced. Never use a new chain with worn
sprockets, this will lead to a quick chain wear.
Lubrication:
A special low temperature lubricant should be used for snowmobiles chain. Every part of the chain should be
drenched so that the lubricant penetrate between joints of plates, dowels, slugs and rollers.
34
PERIODIC SERVICING
Page 36

PERIODIC SERVICING
AIR FILTER
Taking off, cleaning and installation of air filter:
The air filter should be maintained on a regular basis. Keeping the air filter
clean is very important for correct engine work.
Disassembly procedure: Weaken a yoke screw supporting the filter and take the filter off.
Replace the filter. An assembly is performed recursively.
Replace a filtering element every 1000 km.
If the filtering element is installed loosely, dust and mud can get into a cylinder, at the same
time a severe abrasive wear takes place.
ALTERNATE ENGINE START
In case of accumulator battery or electric starter breakdown
the snowmobile engine may be started with the help of a reserve manual starting
system. For this it is necessary:
1) Insert a key into the ignition lock and turn it to 'ON' position.
2) Shift an engine stop button to « » position. Check a position of engine emergency
stop pin – it should be connected.
3) Shift the transmission selector lever to 'N' position.
4) Pull a reserve engine start handle smoothly up to a moment when you hear a click,
then pull it sharply. If needed, if an engine hasn't started at the first attempt,
perform this procedure once again.
35
PERIODIC SERVICING
Page 37

PERIODIC SERVICING
HEADLIGHTS ADJUSTMENT
This snowmobile DINGO model is equipped with a regulated headlight lamp.
For regulation it is necessary: 1. To weaken a headlight takedown screw with a screwdriver (pic. 1);
2. To regulate the headlight in accordance with necessity (pic. 2 and 3);
3. After regulation secure the takedown screw weakened in point 1.
HEADLIGHT LAMP REPLACEMENT
For headlight lamp replacement motor block plastic together with a headlight (pic. 1) should be taken off and a clearance lamp should be drawn
out/replaced
2V3W (pic.2). According to pictures 3-4 draw out and replace the lamp H4 (12V35W). Perform the assembly in reverse sequence.
36
PERIODIC SERVICING
Page 38

PERIODIC SERVICING
VALVE SETTING
Snowmobile engine compartment packaging lets performing a valve clearance setting without taking off the engine from the
snowmobile. For it motor block plastic and front suspension block should be taken off (see p. 13).
ATTENTION! Independent change of valve clearance may negatively affect the engine start and stable work. If needed, idle
adjustment is better to perform in a specialized workshop.
SPARK PLUG RESISTANCE TEST
Spark plug is an important engine component, the condition of which can be easily checked.
Spark plug condition may point at the engine condition. For example, white or black carbon on
center electrode isolator points at carburation problems. Don't try diagnosing such problems
independently – turn to an authorized service center.
You should check the plug on a regular basis (and clean it, if needed) which will help to prolong
its durability. If electrodes destruction becomes excessive, you should replace the spark plug
with a plug of an appropriate type – C7HSA or A7RTC. Under conditions of severe frosts (-30
0С and lower) it is recommended to degrade a plug heat rating by one grade, it means to install
C6HSA type.
Before installing the spark plug measure a gap between electrodes. It should be as specified in
the scheme.
37
PERIODIC SERVICING
Page 39

PERIODIC SERVICING
TRACK ADJUSTMENT:
For track adjustment it is necessary to:
1. Preparation before adjustment. Track adjustment as well as its centering should be performed on a disconnected from the
remaining snowmobile track block. Check the track block (pic. 1). Clean a running gear from snow, ice and mud and check lining
wear of slides, effortlessness of rollers rotation, integrity of rollers circumference, plays in suspension.
2. Checking and regulation of track adjustment. Release tensioner fixing bolts (pic. 2, a 5 mm Allen key),
half nut (pic. 3, 13 mm spanner wrench), and track adjuster and recoil group nuts (pic. 4, 13 mm spanner wrench). Then, screwing up
track adjuster and recoil group nuts (pic. 5, 13 mm spanner wrench), look at track adjustment at a place specified in picture 6. Track
shouldn't slack, but at the same time it should sag by 1,5 – 2 cm at slight pressing with a hand.
38
PERIODIC SERVICING
Page 40

PERIODIC SERVICING
3) Track alignment.* Track alignment. In an inverted state slightly rotate the track. Slides should be located parallel in relation to track
windows (green line) (see picture 1). If there is a displacement a centering should be performed using track adjuster and recoil group from
the left and right side of track block.
After track alignment operation adjustment should be checked once again, after which tighten adjuster nuts, half nuts and bolts tensioner
fixing bolts.
Main characteristics of overtensioned track: the snowmobile pulls away 'hard', accelerates 'hard'; a repeated engine overheat in usual
service conditions; intensive wear of slides pads; the snowmobile stops overrunning, it means that it stops abruptly.
The main characteristics of weak tension of tracks: driver shaft sprockets jumping in relation to a track while driving on a soft snow
and driving through hindrances (track block articulation), track displacement in relation to slides, track rubbing with slides (as they move
not along braces), taking the track off leading and driven leds of a track block in conditions of sideloads.
* This operation should be performed together with an assistant.
39
PERIODIC SERVICING
Page 41

Washing the snowmobile:
While washing the snowmobile the following details shouldn't be washed with water under pressure - ignition lock, electrical
equipment
switches, a damper out port. This may damage them.
After cleaning the snowmobile wash it with clean water. Wipe the snowmobile dry. Start the engine and let it work for several
minutes.
Stand-by storage of the snowmobile:
In condition of long storage, for example in summer (more than one month)
take measures for keeping the snowmobile in good condition. Perform its
maintenance.
Wash the snowmobile and wipe it dry. Rub painted
metallic details with a wax. Drain fuel from tank and carburetor. Take off the spark
plug. Fill to a cylinder a small amount of motor oil (15-20 ml) of the same type that is
filled to the engine, slowly rotate the shaft by 1-2 rotations and put the plug on its
place.
Disconnect an accumulator battery. When taking the accumulator off first
disconnect the negative conductor, then a positive one. Keep it in
a dark, cool, and well aired room. When installing
first connect the positive conductor, then a negative one.
Water should be removed from crank chambers of a front suspension, the track block frame, seat frame. It is also necessary to
remove water and replace a lubricant in track block bearings.
Cover the snowmobile with a cover or a material not letting air in. Store your snowmobile in an aired room not accessible for rain,
direct sunbeams and without big heat differences. In a period of a long storage
the snowmobile should be humped up, the track should be weakened and shouldn't touch surface. It will be also useful to turn the
track over by two-three rotations not rarer than once a month.
Snowmobile operating after storage:
Take off the cover and clean the snowmobile from a storage material. Check accumulator voltage. Recharge it
if voltage is lower than 12.0 volt. Put the accumulator on its place. Fill a fresh fuel.
Before driving examine the snowmobile. Perform a trial run in a safe place to make sure in normal
snowmobile work.
40
WASHING AND STORING
Page 42

ROUTINE MAINTENANCE
The snowmobile should be maintained in certain periods of time – either in a specified run (km) or in definite periods of time after
sale, depending on what becomes earlier. Before maintenance its careful washing should be performed. Tabulated signs mean the
following: W: wash, check, adjust, lubricate; C: clean; R: replace; A: adjust.
41
Point
Odometer (km)
100
(1 month)
300
(3 month)
600
(6 month)
900
(month)
1200
(12 month)
1500
(15 month)
Note
Fuel system
W W W W W
Throttle work
W W W W W
W
Work of carburetor at idle
speed
W W W W W
W
Engine oil R R R
Replacement every 600 km
Spark plug
W W W R W
R
Oil filter C C
R
In 1200 m or once a year (which will become
earlier)
Driving chain
W W W W W
W
Brake
W W W W W
W
Brake blocks wear
W W W W W
Headlamp, back light
W W W W W
W
once a month
Front suspension units
W W W W W
W
Once in 3 months
Elements of hand wheel
W W W W W
W
Fixing joints
W W W W W
W
once a month
Track block
W W W W W
W
Once in 3 months
Oil in reductor
W R W Further once in 1500 km
Page 43

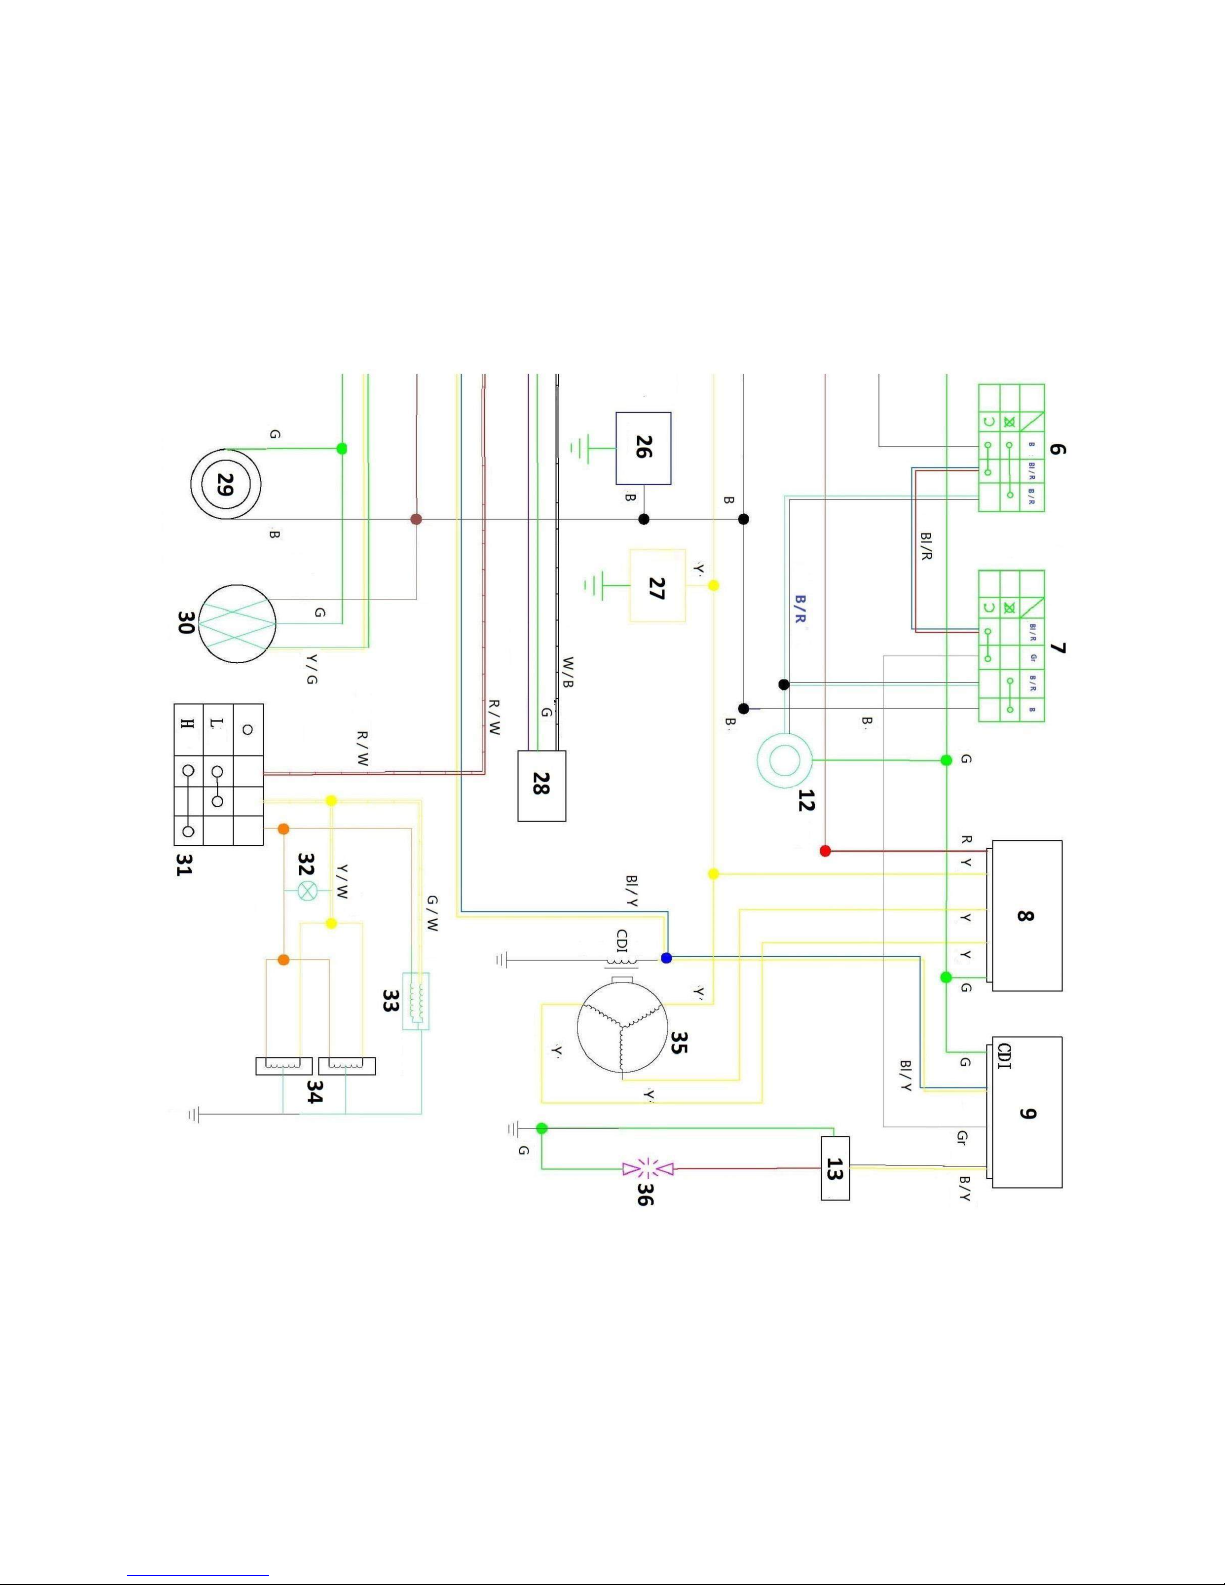
ELECTRIC CIRCUIT DIAGRAM
Cords colors in a scheme:
Y – yellow;
R – red;
G – green;
B – black;
Bl – blue;
W – white;
Gr– grey.
1) Electric starter button; 2) Starter; 3) Start relay; 4) Accumulator battery 12V9Ah; 5) Ignition lock;
6) Ignition emergency stop switch (pin, right block of wheel switches); 7) Key off
(left block of wheel switches); 8) Regulator-voltage rectifier; 9) Electronic ignition unit;
10) Engaged gear detector; 11) Cutout; 12) Buzz ; 13) Engine coil ; 14) Battery discharge indicator light; 15) A switched on neutral
indicator light; 16) Back run switching on indicator light; 17) Environmental temperature indicator; 18) Speedometer / Tachometer;
19) Position lights indicator; 20) Low-high beam lamp, H4 12V 35W (head lighting); 21) Position lights lamp, 12V3W; 22)
Environmental temperature detector; 23) Brake lever detector; 24) Position lights switching on detector; 25) Left block of wheel
switches. Low-high beam switch; 26) Carburetor inlet barrel heating; 27) Carburetor fortifier; 28) Speed sensor; 29)Socket for
outer equipment connection, 12V; 30) stop lamp / tail lamp; 31) Wheel grips of a wheel and a gas cock heating switch; 32) Wheel
grips of a wheel and a gas cock heating indicator light; 33) Gas cock heating component; 34) Left and right wheel grips heating
component; 35) Generator; 36) Spark plug.
42
Page 44

43
Page 45
10 10
44
Page 46

TERMS OF WARRANTY
DEAR PURCHASER! STUDY TERMS OF WARRANTY CAREFULLY!
A product warranty period makes 6 months from the day of sale or 500 km depending on what becomes earlier (in case of
absence of violation of these Co nditions). Intermediate maintenance is done for free in a Service center of an authorized distributor or in
a Service center Authorized by the Corporate seller and lays in replacement of defective product parts. A delivery of a defective item to
a service center is done by the Purchaser with their own transport and at their own expense. The Corporate seller and their
representatives reserve the right to replace a defective product or replace a defective unit with an intact one without sacrificing a
warranty period.
Intermediate maintenance claims are not accepted in the following cases:
- in case of expiration of a warranty period;
- in case of absence of warranty certificate or its incorrect filling;
- in case of obvious mechanic damage or damages because of an accident, improper operation (operation out of specified temperature
range, using of not recommended operational
goods, fluids etc.) and a careless product handling;
-in case of insertion to a product of foreign particles and other damaging elements;
- in case of damages occurred in the time of disasters, accidents, acts of terror or warfare;
- in case of absence in the warranty certificate of a mark about a timely passing of a compulsory maintenance of the product in the
Service center of an authorized distributor or in a Service center Authorized by the Corporate seller;
- in case of using of not original accessories for tuning of the vehicle installation of which effects
operational characteristics of technical equipment;
- in case of independent repair or repair in a Service center unauthorized by the Corporate seller.
Terms of maintenance:
No 1 – in 1 month since sale date or upon reaching 100 km, depending on what becomes earlier;
No 2 – in 3 months since sale date or upon reaching 500 km, depending on what becomes earlier
No 3 – in 6 months since sale date or upon reaching 1000 km, depending on what becomes earlier.
No 4 and the following – every 500 km or 6 months, depending on what becomes earlier.
An overmileage for passing of maintenance not more than 50 kilometers is allowed. All kinds of maintenance are fee-paying.
In case of finding drawbacks of the vehicle a purchaser should stop operation at once having taken all accessible measures to exclude or
maximally decrease a collateral damage from a problem that emerged.
A snowmobile durability makes 3 years or 3000 km of run (which becomes earlier). After termination of the snowmobile life cycle
45
Page 47

TERMS OF WARRANTY
its further operation is possible upon condition of the Russian Federation statutory compliance by an owner and annual inspection that
confirms the snowmobile's availability to further operation.
Warranty is does not apply to:
- consumable: brake blocks, nozzles and plastic goods, accumulator batteries, track, slides, hoses,
cables, bushings, suspension bushes, spark plugs, filters, oils, brake fluid, lamps, cutouts, bearings.
- checking and adjustment: Carburetor adjustment, adjustment of valve clearances, adjustment of hand wheel, bleeding of braking
system, adjustment of lighting equipment;
- environmental effects consequences: in case of insertion of water to units, storage of the vehicle in inappropriate conditions,
fissures, cracks, external injuries.
Warranty is canceled in case of:
- warranty certificate loss or damage;
- violation of this maintenance regulations by a distributor or a Service center Authorized by a producer;
- violation of rules of technical operation, including violation of rules of run, exceeding of an admissible
snowmobile carrying capacity, violation of other requirements and recommendations of this 'Manual';
- exceeding of run between maintenance of more than 50 kilometers from predetermined run;
- careless handling with equipment
- using of non-original spare parts;
- using of fuel different from a recommended one;
- repair of the vehicle by unqualified personnel;
- unauthorized change of construction, electrical equipment and settings of the vehicle;
- using of the vehicle in any sports or commercial purposes.
Warranty work sequence: for examination of a claim a purchaser should come with the vehicle and the warranty certificate to an
equipment salesman or an authorized service center. Equipment is accepted for a warranty repair
only in clean state.
Industrial manufacturer and a service center will not have liability for damage done to persons or objects in the result of the product
using even in case of presence of defects in a material or units of the latter.
Received product in good repair and in a complete configuration.
Agree with warranty conditions:
46
Date Signature Name
Page 48
WARRANTY
Product
Model
Engine number
Frame
number
Sale date
Client's name
Address
Date of the snowmobile issue to the first owner
The snowmobile warranty period is specified in warranty conditions. This certificate is valid only on conditions of
its filling on a day of sale and presence of valid signatures of a salesman and a purchaser or their representatives.
Signature of the purchaser: Signature of the salesman:
Date:
Date:
47
Place of Seal
Page 49

48
WARRANTS
The 1st maintenance (the 1st month since the day of sale or upon reaching 100 km).
Date:
Works performed by:
Master's name: Signature:
List of works:
Stamp of a
service
center
The 2nd maintenance (the 3d month since the day of sale or upon reaching 500 km).
Date:
Works performed by:
Master's name: Signature:
List of works:
Stamp
of a service
center
Page 50

WARRANTS
The 3d maintenance (the 6th month since the day of sale or upon reaching 1000 km).
Date:
Works performed by:
Master's name: Signature:
List of works:
Stamp of a
service
center
The 4th maintenance (the 9th month since the day of sale or upon reaching 1500 km).
Date:
Works performed by:
Master's name: Signature:
List of works:
Stamp
of a service
49
center
Page 51

WARRANTS
The 5th maintenance (the 12th month since the day of sale or upon reaching 2000 km).
Date:
Works performed by:
Master's name: Signature:
List of works:
Stamp of a
service
center
The 6th maintenance (the 15th month since the day of sale or upon reaching 2500 km).
Date:
Works performed by:
Master's name: Signature:
List of works:
Stamp
of a service
50
center
Page 52

WARRANTS
The 7th maintenance (the 18th month since the day of sale or upon reaching 3000 km).
Date:
Works performed by:
Master's name: Signature:
List of works:
Stamp of a
service
center
The 8th maintenance (the 21st month since the day of sale or upon reaching 3500 km).
Date:
Works performed by:
Master's name: Signature:
List of works:
Stamp
of a service
51
center
Page 53

WARRANTY CERTIFICATE
Product
Model
Engine number
Frame number
Date of sale
Date of Receipt
Date of issue
Manifestation of a
fault
Works performed by:
Name
of a master
Signature
Warranty period – 6 months or 500 km of run.
Stamp of a service
center
52
Page 54

WARRANTY CERTIFICATE
Product
Model
Engine number
Frame number
Date of sale
Date of Receipt
Date of issue
Manifestation
of a fault
Works performed by:
Name
of a master
Signature
53
Warranty period – 6 months or 500 km of run.
Stamp of a service
center
Page 55
WARRANTY CERTIFICATE
Product
Model
Engine number
Frame number
Date of sale
Date of Receipt
Date of issue
Manifestation
of a fault
Works performed by:
Name
of a master
Signature
Warranty period – 6 months or 500 km of run.
Stamp of a service
center
54
Page 56

NOTES
Page 57

NOTES
Page 58

QUALITY CONTROL PAPER
1. Frame (bearing component)
2. Engine
3. Transmission
4. Running gear (suspension, hand wheel)
5. Braking system
6. Electrical equipment
7. Appearance
8. Wrapping
9. Delivery completeness
Quality control department
VIN number
Page 59

KÄYTTÖOHJEET
Page 60

Tärkeää! Tutustu ohjeisiin ennen käyttöä!
Ajoneuvon moottoria ei saa käynnistää, jos ei ole suljettu eikä lukittu moottoripeltiä, suojelevia
aitauksia ja koteloja. Moottorin luotettavan käynnistämisen korkein lämpötila käyttäen
käynnistämistä helpottavia välineitä on -30
С0. Moottorin käynnistäminen ympäristön lämpötilan
ollessa alle -30C0 ei ole suositeltavaa. On mahdollista käynnistää moottori käsin hätäkäynnistimellä.
Kovassa pakkasessa moottorin käynnistämistä helpottavat keinot:
1. Matkan päätyttyä ennen moottorin sammuttamista paina intensiivisesti muutaman kerran
kuristusläpän vipua. Sytytystulppa puhdistuu, ja seuraavalla kerralla moottorikelkan
käynnistäminen sujuu helpommin.
2. Ajoittain käynnistä moottorikelkka, niin että moottori lämpenisi. Lämpötilan ollessa -30 astetta,
moottori jäähtyy ilman lämpötilaan 30-40 minuutissa.
3. Ota käynnistysakku pois moottorikelkasta ja säilytä sitä lämmössä pitkän pysähtymisen aikana.
4. Estä käynnistysakkua menettämästä sähköä aläkä jätä tarpeettomasti moottorikelkkaa
pakkasilmaan pitkäksi ajaksi (matalissa lämpötiloissa tapahtuva käynnistäminen vahingoittaa
moottoria).
Page 61

KIITOS OSTOKSESTA
Kiitämme sinua siitä, että ostit DINGO-moottorikelkan. Nämä käyttöohjeet sisältävät käyttöturvallisuuteen liittyviä tärkeitä tietoja,
kertovat erikoisista käyttötavoista ja käytännöllisistä taidoista, joita tarvitaan tämän ajoneuvon ohjaamiseen, sekä sisältävät turvalliseen
ohjaamiseen ja välttämättömään tekniseen hoitoon liittyviä ohjeita.
Moottorikelkkaa on hauska ajaa ja me toivomme, että sinä todella nautit siitä.
Tätä ajoneuvoa valmistettaessa noudatettiin kaikkia olemassa ja voimassa olevia lakeja ja normeja, jotka liittyvät meluun ja ympäristöön
vaikuttamiseen.
Ennen kuin ryhdyt käyttämään uutta moottorikelkkaasi lue nämä käyttöohjeet huolella ja loppuun. Ne sisältävät turvallisuuteen liittyviä
tärkeitä tietoja. Älä aja moottorikelkkaa ilman riittävää kokemusta.
Estä lapsia ohjaamasta tätä ajoneuvoa. Se voi johtaa vakaviin vammoihin. Muistathan, että ajaaksesi moottorikelkkaa laillisesti sinun on
omistettava vastaavaa luokkaa oleva traktoristin ja koneenkäyttäjän todistus sekä rekisteröitävä moottorikelkkasi Valtiollisen teknisen
valvonnan virastossa (Gostehnadzor).
Muista, että moottorikelkalla ei saa ajaa yleisessä käytössä olevilla teillä.
Ole hyvä ja tutustu seuraaviin merkintöihin, jotka auttavat sinua suuntautumaan paremmin näissä käyttöohjeissa ja löytämään erityisen
tärkeät käyttöehdot ja varoitukset:
- Huomaa! Tärkeä tieto!
- Huomaa! Hengenvaarallista!
- Varo helposti syttyvää ainetta!
- Varo syövyttäviä aineita ja niiden höyryjä!
- Varo räjähtävää ainetta!
- Muistiin pantavaksi!
60
Page 62

SISÄLTÖ
61
Turvallisuusmääräykset …..…………………………………………………………………………………..
63
DINGO Т150 -moottorikelkan kuvaus ……………………………………………………………………….
65
Asentaminen ja purkaminen ...……………………………………………………..………………..……….
66
Koneen tunnukset …………………………………………………………………………………………….
73
Tekninen kuvaus……...……………………………………………………………………………………….
74
Moottorikelkan rakenne……...…………..…………………………………………………………..……….
75
Pääohjauslaitteet…………………………..……………………………………………………..……………
77
Käyttöön valmistaminen………………...……………………………………………….……………………
82
Moottorikelkan koeajo ...……………………………………………...……………...………………………
83
Moottorikelkan ohjeeminen………….…………………………………………………..……………………
84
Moottorikelkan kuljetus…..………………………………………………………..………………………….
85
Moottorikelkan siirto ……………………………………………………………...………………………
85
Tavaroiden kuljetus………………...…………………………………………………………………………
86
Määräaikainen huolto ..……………………………………………………………………………..………..
87
Moottoriöljyn tarkastus ja vaihto…………………………………………………….…………………
87
Öljyn vaihto reduktorissa…………………………………………………………………………………
88
Kaasuttimen sääteleminen………………….……………………………………………………………
89
Akun huolto ….……………………………………………………………………………………..……
90
Sulake……………………………..….……………………………….………..……………………………
90
Jarrujärjestelmä….………………………………………………………………………………………
91
Page 63

SISÄLTÖ
62
Telamatto………………………………………………………………………...…………………………
92
Ilmasuodatin………………………………….………………..……………………………………………
93
Moottorin varakäynnistäminen…………………………………………………...………………………
93
Päävalojen sääteleminen….. ……………………………………………………………………………
94
Päävalojen lamppujen vaihto…….………………………………………………………………………
94
Venttiilien sääteleminen …….……….……..………………………………………………………………
95
Sytytystulpan tarkastus…...……………………………………………………………..…….…………
95
Telamaton pingottuksen sääteleminen….…………..……………………………………………………
96
Pesu ja säilytys……………………………………………………………………..…………………………
98
Huoltotyöt…………………………………………………………………………………………………….
99
Sähkölaitteiden kaavio……………………………………………………..…………………………………
100
Takuuehdot……………………………………………………………………………………………………
103
Takuutodistus…………………………………………………………………………………..……………..
105
Huoltopalvelujen todistukset………………………………………………………………………………….
106
Takuutodistukset……………………………………………………………………………………….……...
110
Pääviat ja niiden poistamisen menetelmät.………………………………………………......................……..
113
Moottori ei käynnisty…………………………………………………………………………...…………
113
Moottori ei tuota riittävää tehoa ……..………………………………………….................................…
114
Moottori ei toimi tasaisesti tyhjäkäynnissä………………………………........................………………
114
Jarru ei toimi tehokkaasti….………………………………………………………………….…………
115
Page 64

TURVALLISUUSMÄÄRÄYKSET
Moottorikelkka on korkean vaaran ajoneuvo. Moottorikelkan ohjaaminen eroaa muiden ajoneuvojen
ohjaamisesta mukaan lukien mönkijät ja autot. Jopa sinun suorittaessasi tavallisia liikkeitä, kuten käänteitä,
ylösajamista tai ajamista epätasaisella pinnalla, voi helposti tapahtua törmäys tai ajoneuvon kumous, jos sinä
et noudata turvallisuusmääräyksiä.
Lue tarkasti nämä käyttöohjeet ja kaikki merkinnät ja noudata mainittuja ohjausohjeita.
Älä ohjaa moottorikelkkaa, jos sinulta puuttuu edellytettävä pätevyys. Älä anna ajaa moottorikelkkaa
ihmisille, joilla ei ole vastaavaa luokkaa olevaa traktoristin ja koneenkäyttäjän todistusta ja tarvittavaa
ajokokemusta.
Moottorikelkan käyttäminen alkoholin ja huumeiden aiheuttamassa vaikutuksessa on kiellettyä.
Ole aina hyvin varovainen liikkuessasi tuntemattomassa maastossa. Ole valmis maaston muutoksiin
ajaessasi moottorikelkkalla.
Pidä aina molemmat kätesi ohjauspyörässä ja molemmat jalkasi jalansijoilla ohjaamisen aikana.
Älä ohjaa moottorikelkkaa rinteissä, jotka ovat liian jyrkkiä tälle ajoneuvolle ja kokemukseesi nähden.
Harjoittele ensin laskua pienissä rinteissä ennen kuin lasket suurissa.
Älä suorita moottorikelkalla hyppyjä sekä muita temppuja.
Älä koskaan aja liian nopeasti jos sinulla ei ole ajokokemusta. Valitse aina sopiva vauhti olosuhteiden ja
nopeusrajoituksien mukaan.
Noudata aina tarkastus- ja huoltomääräyksiä, jotka sisältyvät näihin käyttöohjeisiin. Ennen kuin käytät
moottorikelkkaa varmistaudu, että se on kunnossa ja turvallinen ohjauksessa.
Moottorikelkkaa ei saa ajaa ilman sopivaa kokoa olevaa suojaavaa kypärää. Lisäksi on suojattava silmät
ja käytettävä vaatteita, jotka vastaavat sääoloja.
Ajaessasi pitkille matkoille laita mukaasi riitävät määrät polttoainevaroja.
63
Page 65

TURVALLISUUSMÄÄRÄYKSET
Noudata aina näiden käyttöohjeiden vastaavia määräyksiä liikkuessasi kaltevalla pinnalla. Vältä
mäkiä, joiden pinta on liian liukas tai vaurioitunut. Siirrä painosi nousun suuntaan. Älä koskaan käännä
moottorikelkkaa mäessä ennen kuin olet harjoitellut kääntämisen tekniikkaa tasaisella pinnalla. Mahdollisuuden
salliessa vältä jyrkkien mäkien yliajamista.
Noudata aina näiden käyttöohjeiden määräyksiä laskiessasi mäkeä ja jarruttaessasi mäessä. Tarkasta
tietä huolellisesti ennen laskua. Siirrä painosi taaksepäin. Älä koskaan laske mäkeä kovaa vauhtia. Vältä mäen
laskemista kulmassa, mikä voi aiheuttaa moottorikelkan sivuun kallistumisen. Mahdollisuuden salliessa laske
suoraan alas.
Älä koskaan ylikuormita moottorikelkkaa. Kuljetettava kuorma on levitettävä tasaisesti ja
kiinnitettävä turvallisesti. Jätä pitkä välimatka jarruttamista varten.
Älä koskaan korjaa moottorikelkkaa käyttäen sopimatonta kalustoa tai laitteistoa.
Noudata aina näiden ohjeiden vastaavia ohjeita noustessasi mäkeä. Tarkasta ensin tien pintaa. Älä
koskaan nouse mäkeä liian liukkaalla tiellä tai vaurioituneella tiella. Siirrä painosi eteenpäin. Älä koskaan
nouse mäkeä kovaa vauhtia.
Noudata aina vastaavia ohjeita, jos sinun noustessasi mäkeä moottori on sammunut tai ajoneuvo on
ajanut taaksepäin. Estääksesi moottorin sammumista nousun aikana ylläpidä tasaista nopeutta.
Ole varovainen liukumisen tai sivuunajon aikana. Opettele turvallinen ohjaaminen liukumisen ja
sivuunajamisen tapahtuessa harjoittelemalla tasaisella ja sileällä pinnalla matalaa vauhtia ajaen. Liian liukkailla
pinnoilla, kuten jäällä, liiku hitaasti ja ole hyvin varovainen pienentääksesi liukumisen tai sivuunajamisen
riskiä.
Alle 15-vuotiailta moottorikelkan ohjaaminen ilman ajo-oikeutta on kielletty.
64
Page 66

DINGO Т150 -MOOTTORIKELKAN KUVAUS
Moottorikelkan tarkoitus.
DINGO T150 -moottorikelkka on mekaaninen maastoajoneuvo, jonka tarkoitus on ihmisten liikkuminen ja
kuormien kuljettaminen lumimaastossa ympäristön lämpötilan ollessa 50C:sta lämmintä -400C: seen
pakkasta. Moottorikelkan rakenneominaisuuksista johtuen jäällä tai tallatun lumen päällä pitkään kestävä
ajaminen on kielletty, sillä se voi aiheuttaa telamaton suksien peitelistojen palamisen. Tällaisen matkan
tapauksessa aja ajoittain alueille, joissa on löyhää lunta suksien peitelistojen voitelemista varten.
Moottorikelkan rakenne.
DINGO T150 -moottorikelkka on luotu klassisella kaaviolla ”suksipari edessä/ yksi telamatto takana”. Tätä
kaaviota käyttäen moottorikelkka tukeutuu pintaan kolmen pisteen varassa, jotka muodostavat kolmion.
Tämän ansiosta moottorikelkka on hyvin tukeva, mikä mahdollistaa useimpien sille asetettujen tehtävien
suorittamisen. Kaiken lisäksi tällainen rakenne on edellytys moottorikelkan suhteellisen pienelle painolle,
painopisteen sopivalle sijainnille ja helposti tapahtuvalle purkamiselle sekä mahdollistaa kaikkien
pääsolmujen ja laitteiden korjauksen.
DINGO T150 -moottorikelkkaan on asennettu nelitahtinen bensiinikäyttöinen kaasutinmoottori, jonka
tilavuus on 149,6 cm3 ja joka sisältää ilmajäähdytyksen, sekä öljyjäähdytyksen (öljyradiaattori).
Kaasuttimessa on kuristusläpän diffusöörin automaattisesti lämmittävä järjestelmä, mikä takaa kaasuttimen
vakaan työn eri lämpötiloissa.
DINGO T150 -moottorikelkassa on automaattinen voimansiirtojärjestelmä. Variaattorin vaihteiston valitsin
säätää peruuttamista tai eteenpäin ajamista sekä neutraalin vaihteen kytkimistä.
Moottorikelkassa on säädettävä 2626 mm pitkä ja 380 mm leveä telamatto, 23 mm korkeat harjat, telakärryn
valssin- ja jalaksentuenta kahdella iskunvaimentimella.
Moottorikelkkaan on asennettu ohjauspyörän kahvojen ja kaasuliipaisimen kaksipaikkainen
lämmitysjärjestelmä, 12V pistorasia ulkolaitteita varten, istuimen alla on säilytystilaa, löytyy myös tuulilasi,
digitaalinen mittaristo, moottorin hätäsammutusjärjestelmä, moottorin varakäynnistysjärjestelmä ja
hydrauliset levyjarrut.
65
Page 67

ASENTAMINEN JA PURKAMINEN
1. Kierrä pois ohjaustangon kiinnityksen
kaksi ruuvia.
2. Ota tuulilasi irti.
3. Kiinnitä ohjaustanko tankin muoviin
niin kuin kuvassa.
3. Kierrä pois moottorilohkon muovin
kiinnityksen pääruuvi.
4. Kierrä moottorikelkan vasemmalta ja oikealta puolelta istuimen kiinnitysruuvit pois.
66
Page 68

ASENTAMINEN JA PURKAMINEN
5. Ota moottorilohkon muovi irti niin kuin kuvassa.
6. Irrota etulampun pistoke.
.
7. Ota moottorilohkon muovi kokonaan pois.
8. Avaa istuimen lukko.
67
Page 69

ASENTAMINEN JA PURKAMINEN
9. Avaa istuin.
10. Kierrä kaksi ruuvia irti, jotka kiinnittävät
istuimen rungon telamattolohkon runkoon.
11. Irrota takalampun ja lämpötilamittarin
liittimet.
12. Ota istuin ja runko irti.
13. Kierrä pois jalansijan kiinnitysruuvi, joka
sijaitsee moottorikelkan etuosassa
(moottorikelkan vasemmalla ja oikealla puolella).
14. Ota jalkatuet irti (moottorikelkan
vasemmalta ja oikealta puolelta).
68
Page 70

ASENTAMINEN JA PURKAMINEN
15. Huomioi sivullisen jalkatuen kiinnitystapa moottorikelkan takaosassa (jalkatuki on
sijoitettava raamissa olevaan uraan) sekä ...
16. ... etuosassa.
17. Ota pois ketjun suojus. Huomioi suojauksen kiinnityslaite (kuvassa merkitty vihreällä).
18. 19 mm avainvälin hylsyavaimella avataan
hiukan ketjun kiristimen mutteri.
69
Page 71

ASENTAMINEN JA PURKAMINEN
19. Ketjun irrotuksessa ketju on säädettävä kuvassa olevaan asentoon.
20. Ota ketju pois.
21. Kierrä pois kaksi ruuvia, joilla
moottorilohkon osa on kiinnitetty
telalohkoon.
22. Jaa moottorikelkka kahteen osaan - telalohkoon ja moottorilohkoon.
70
Page 72

ASENTAMINEN JA PURKAMINEN
23. Sinun suoritettuasi kohta 22 moottorikelkka näyttää tältä.
24. Irrottaaksesi etujousi tuen sinun on
kierrettävä pois keskiruuvi ...
25. ... sekä kaksi sivuruuvia.
26. Irrota moottorilohko ja etujousi tuet
toisistaan.
27. Ota sukset irti.
71
Page 73

ASENTAMINEN JA PURKAMINEN
28. Ota sukset etujousen rungosta pois.
29. Sen jälkeen keula näyttää tältä.
30. Kierrä pois vetosolmukka.
31. Irroita tavarateline. Kiinnitä huomiota siihen miten tavarateline on kiinnitetty
moottorikelkan runkoon (merkitty vihreällä).
MOOTTORIKELKKA
ASENNETAAN KÄÄNTEISESSÄ
JÄRJESTYKSESSÄ.
ASENTAMISEN JÄLKEEN ON
TARKASTETTAVA KAIKKIEN
MOOTTORIKELKAN OSIEN JA
LAITTEIDEN TOIMIVUUTTA.
72
Page 74
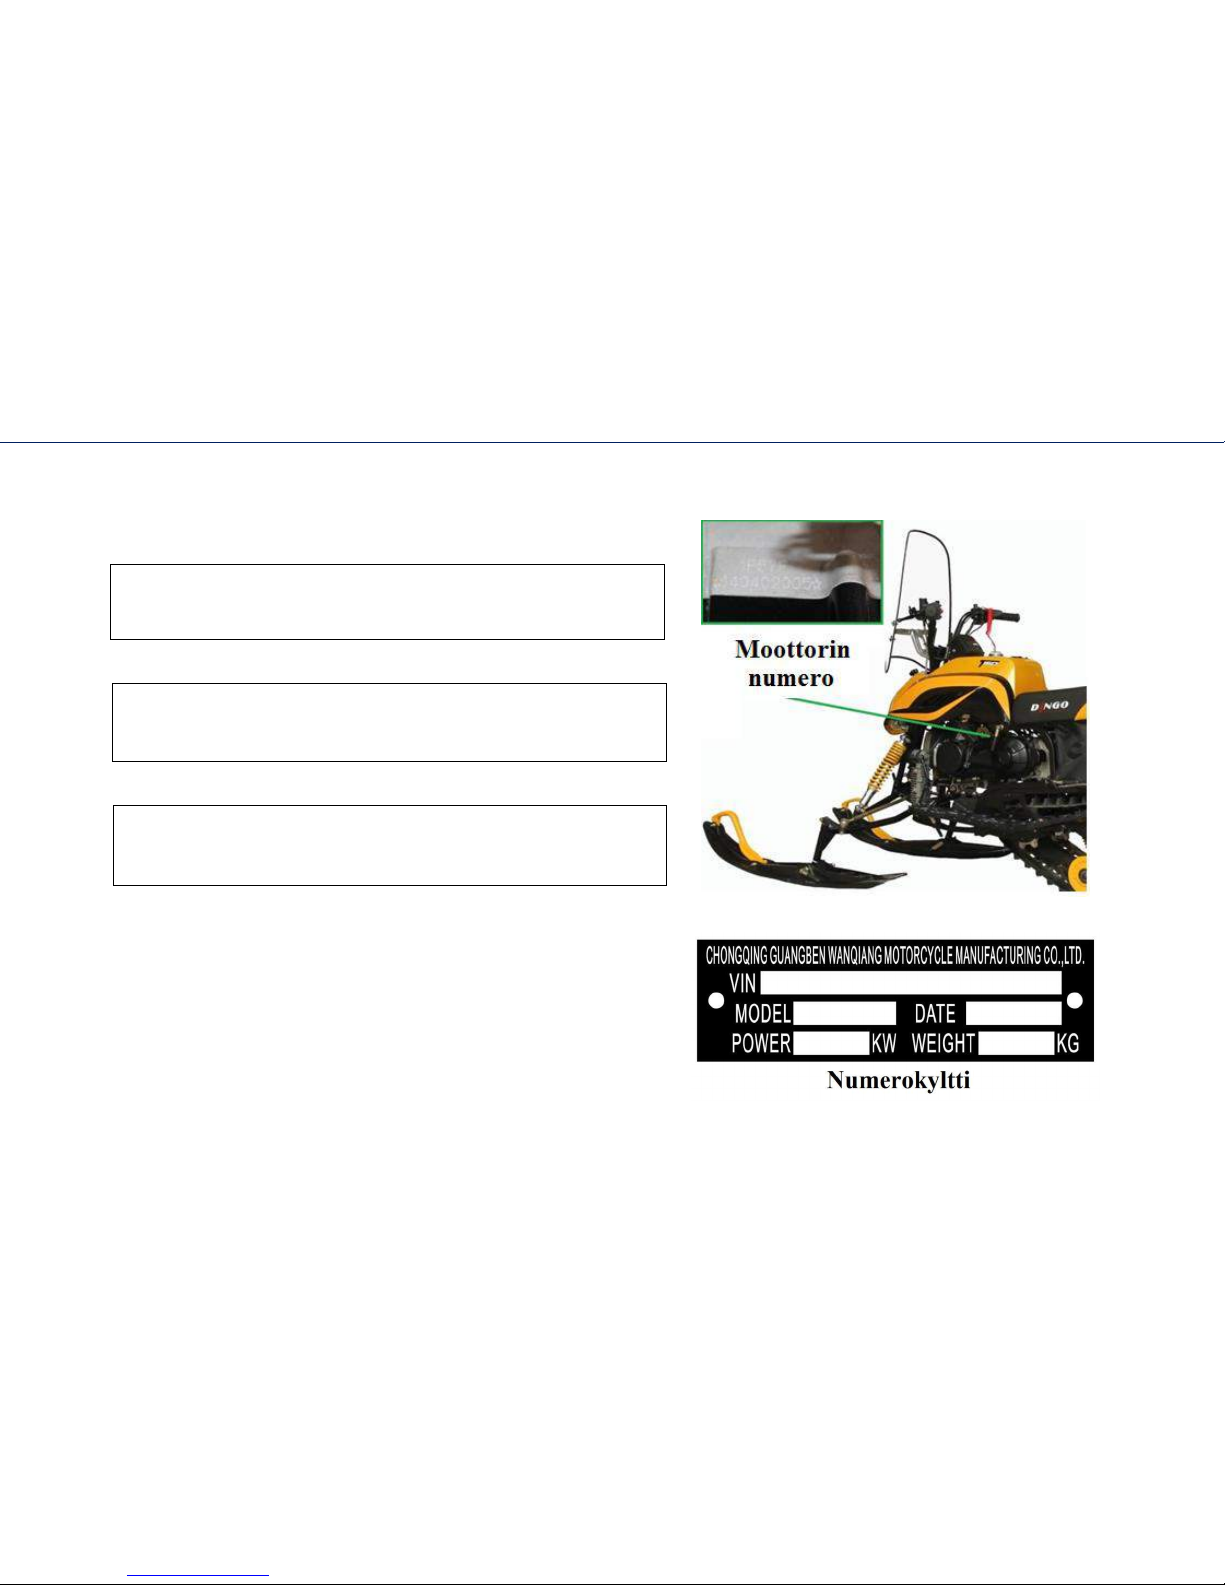
MOOTTORIKELKAN TUNNUKSET
Kirjoita ylös moottorikelkan tunnus (VIN), moottorin numero ja moottorikelkan malli viitataksesi niihin tulevaisuudessa.
1. Valmiste numero (VIN):
2. Moottorin numero:
3. Ajoneuvon malli:
Moottorikelkan valmistenumero TC (VIN) on merkitty moottorikelkan
runkoon.
Moottorin numero on merkitty moottorikelkan moottoriin.
Moottorikelkan mallin numerokyltti on kiinnitetty niiteillä moottorikelkan
runkoon.
Tilatessa varaosia viralliselta jälleenmyyjältä on ilmoitettava
moottorikelkan mallin numero.
73
Page 75

TEKNISET TIEDOT
74
Kohta
Tekniset arvot
Koko Pituus x Leveys x Korjeus
2570х965х1065 mm
Korkeus satulaa myöten
715 mm
Kuiva paino
153 kg
Etujoustintuenta
Riippumaton vipujoustintuenta
Jarrujärjestelmä
Hydraulinen, levyjarru
Moottori
Yksisylinterinen, nelitahtinen, pakollinen ilma- ja nestejäähdytys
Maksimi kapasiteetti
6,8 kWt / 9,25 hv (7500 r/min)
Vääntö
9,8 Nm (6000 r/min)
Polttoainejärjestelmä
Kaasutin sisädiffusöörin lämmittimellä
Moottorintilavuus
149,6 cm3
Vaihteisto
Variaattori reverssilla. Työjärjestys F-N-R.
Telamatto
Ketju, tyyppi 530 (askel 15, 875 mm), 22 lenkkiä
Käynnistysjärjestelmä
Sähköstartti varakäsikäynnistimellä
Polttoaine
95# bensiini
Polttoainesäiliön tilavuus
7 l
Propulsiojärjestelmä
Telaketju, käyttöpyörä etuosassa
Telaketju
Kumia ja kangasta, lujitettu. Pituus 2626 mm (52 ikkunaa askeleella 50,5
mm), leveys 380 mm. Nastan korkeus 23 mm.
Telaketjun pingotusmekanismi
Ruuvimekanismi
Sukset
Jalka- ja vaappusukset
Maksimi kuorma
150 kg
Maksimi nopeus
40 km/t
Matkustajien määrä
1 henkilö
Page 76

MOOTTORIKELKAN RAKENNE
1. Tuulisuoja; 2. Moottorilohkon muovi; 3. Ajovalo; 4. Etusivuheijastimet; 5. Etuiskunvaimentimet; 6. Etujoustintuennan vivut; 7.
Sukset; 8. Suksien nostokahvat; 9. Vaimennin; 10. Akku; 11. Ketjusuoja; 12. Astinlauta; 13. Telamatto; 14. Tavarateline / nostokahva;
15. Istuin; 16. Transmission vaihdevalitsin; 17. Sytytysjärjestelmä; 18. Mittaristo; 19. Ohjaustanko;
75
Page 77

MOOTTORIPYÖRÄN RAKENNE
20. Bensatankki; 21. Suljettu säilytys-tila; 22. Takavalo / pysäköintivalo; 23. Sivu heijastimet; 24. Takaheijastin; 25.
Vetokytkinlaite; 26. Telaketjun suoja; 27. Käyttöpää (ohjaava); 28. Telaketjun pingotussäädin; 29. Liukukiskot; 30.
Myötäsukavalssi; 31. Iskunvaimennin; 32. Veto-akseli; 33. Astinlauta; 34. Moottori; 35. Moottorin käsikäynnistys; 36.
Raidetanko; 37. Nestejäähdytin; 38. Nestesuodatin; 39. Jarrukahva.
76
Page 78

PÄÄOHJAUSLAITTEET
Sytytysjärjestelmä.
Virtalukko (1) sijaitsee oikealla mittaristosta.
On olemassa kaksi sytytyslaitteen asentoa:
1. Asento ”OFF” - koko virtapiiri on katkaistu; avain voi olla
poissa sytytyslaitteesta.
2. Asento ”On” - koko virtapiiri on suljettu; moottorin voi
käynnistää; avainta ei voi ottaa pois.
Polttoainesäiliö.
1. Polttoaineen mittari. Vihreä indikaattori osoittaa polttoaineen tasoa säiliössä. Jos polttoaineen
indikaattori on kokonaan vihreä, niin säiliö on täynnä. Jos indikaattori on kokonaan punainen, niin
säiliö on tyjhä. Silloin tankkaus on tarpeeseen.
2. Polttoainesäiliön korkki.
Polttoainesäiliön maksimi tilavuus on 7 litraa. Tankkaa moottorikelkkaan vain bensiinillä, jonka
oktaaniluku on 95. Sammuta moottori tankkauksen ajaksi. Tankkaa moottorikelkkaa vain silloin,
kun moottori on jäähtynyt, ja käytä silloin seulasuppiloa, jonka halkaisija on vähintään 150 mm,
näin estät polttoaineen pääsemästä vaimentimeen ja moottoriin. Laittaessasi bensatankin korkkia
kiinni, kierrä se varovasti paikalleen. Tiukentamiseksi väännä se oikealle. Bensiinin taso ei saa
ulottua reunan yli, muuten polttoaine valuu yli . Älä kaada bensiiniin lisäkkeitä, niiden käyttö voi
häiritä moottorin toimintaa.
Lähtiessäsi kaukomatkalle ota ehdottomasti mukaasi lisää polttoainetta.
Bensahana:
Bensahana (3)sijaitsee bensatankin alla. Sillä on seuraavat asennot: Asento ”ON” (Päällä) (1)
tarkoittaa normaalia asentoa moottorikelkan toiminnan aikana. Bensiini pääsee polttoaineventtiilin kautta kaasuttimeen.
Asento ”OFF” (Päältä pois) on venttiilin asento moottorikelkan pysähtymisen aikana. Bensiini ei pääse kaasuttimeen.
Tankkaa moottorikelkka varovaisesti, sillä bensiini kuuluu helposti syttyviin nesteisiin, sen höyryt voivat
aiheuttaa räjähdystä. Älä tupakoi moottorikelkan tankkauksen aikana äläkä tankkaa avotulen lähteiden
läheisyydessä!
Moottorikelkan käyttö ON KIELLETTY polttoaineen valuessa kaasuttimesta, polttoaineventtiilistä tai
bensiinisäiliöstä.
77
Page 79

PÄÄOHJAUSLAITTEET
1. Ulkolaitteiden pistorasia 12V: Sijaitsee bensasäiliön takana, joka on tarkoitettu ulkolaitteiden
lataukseen. Työjännite: 12V. Summittainen virta: 5 A. Maksimi summittainen teho: 60 W.
Tarkoitettu heikkovirtaisille laitteille!
2. Ohjaustangon kahvojen ja kaasuliipaisimen lämmityslaitteiden katkaisin. Nappiin
syttyvä punainen hohtodiodi osoittaa ohjaustangon kahvojen ja kaasuliipaisimen
lämmityslaitteiden olevan päällä. Katkaisimella on kolme eri asentoa:
”O” - Ohjaustangon kahvojen lämmityslaite on suljettu; ”LO” - Ohjaustangon
kahvojen lämityslaite on puoleksi päällä; ”HI” - Ohjaustangon kahvojen
lämmityslaite toimii täydellä teholla.
Oikean kahvan ohjauslaitteet:
1. Moottorin hätäkatkasija. Tarkoitettu moottorikelkan moottorin hätäkatkaisemiseen
kolaritilanteissa. Toimii kuminauhan irrotessaan varmistimesta.
2. Kaasuvipu. Kasvattaaksesi nopeutta paina kaasuavipua. Hiljentääksesi käyntiä päästä
kaasuvipu pois. Ennen moottorin käynnistämistä tarkista kuristimen vipu
varmistautuaksesi, että se toimii sujuvasti. Varmistaudu, että vipu palautuu tyhjäkäynnin
asentoon heti sen jälkeen, kun se jättää vapaaksi.
3. Ollaksesi turvassa moottorikelkkaillessa pidän aina hätäkatkaisimen nauha oikeassa
kädessä kiinni. Tämä auttaa pysäyttämään moottorikelkan moottorin esimerkiksi jos kelkan
kyydistä tippuu pois.
Ulkolaitteiden pistorasia on tarkoitettu heikkovirtaisille laitteille. Se ei ole tarkoitettu
sähköä kuluttaville laitteille, joiden teho ylittää 60 W ja joiden virranvoima on yli 5 A.
Älä jätä etuvalon lamppua sekä muita sytyttimeen liitettyjä sähkölaitteita päälle, jos
moottori ei toimi. Tämä voi johtaa lopulliseen tai osittaiseen akun purkautumiseen.
78
Page 80

PÄÄOHJAUSLAITTEET
Vasemman kahvan ohjauslaitteet:
1. Jarrunesteen tason valvonta.
2. Moottorin pysähdytysnappi:
« »:Katkaisimen pitää olla tässä asennossa moottoria käynnistettäessä.
« »:Katkaisimen siirtäessä tähän asentoon moottori sammuu.
3. Seisontajarrun vipu.
Laittaaksesi seisontajarrun päälle paina jarrukahvaa ja siirrä seisontajarrun
vipu alaspäin (Ks. Kuva A). Laittaaksesi seisontajarrun päältä paina
uudestaan jarrun kahvaa ja palauta jarrun vipu alkuperäiseen asentoon.
4. Jarru kahva.
5. Valokatkaisija:
« » - Takavalot ja kaukovalot ovat päällä;
« » - Takavalot ja lähivalot ovat päällä;
«» - Takavalot ovat sammuksissa.
Moottorikelkka on varustettu laitteella, joka kytkee päälle automaattisesti takavalot moottorin
käynnistettyä.
6. Moottorin käynnistysnappi:
« »: Moottorin käynnistykseen sinun on painettava ensin jarru pohjaan ja vasta sitten
käynnistysnappia. Käynnistyksen aikana virtalukon on oltava ”ON” asennossa« ». Älä paina käynnistysnappia moottorin
ollessaan käynnissä, tämä voi johtaa starttimoottorin rikkomiseen.
Ennen matkaa tarkista aina, toimiiko kaasuvipu sujuvasti. Jos kaasuvipu jumittuu,
keskeytä matka kunnes vika on korjattu. Ajaminen kaasun ollessa viallinen on vaarallista.
79
Page 81

PÄÄOHJAUSLAITTEET
Kojelauta:
Moottorikelkka on varustettu digitaalisella mittarilla, jossa on
seuraavat ohjauslaitteet ja joka näyttää seuraavia moottorikelkan
käyttöarvoja:
1. Nappi SET on työtilojen valitsin. Tämän napin painaminen
kojelaudan ollessa aktiivisessa toiminnassa mahdollistaa tietojen
näyttämisen arvojen muuttamisen ja kellon virittämisen;
2. Nappi MODE tarkoittaa mittarin työtilojen valintaa. Päästäksesi
mittarin valikoimaan paina pitkään nappia MODE viiden sekunnin
kuluessa. Päästyäsi mittarin valikoimaan MODE-napin lyhyt
painaminen mahdollistaa sen, että pääset vuoronperään mittarin
toimintatiloihin ja valitset nopeuden ja ajetun matkan osoittamisen
tavat niin, että ne näkyvät kilometreissä tai peninkulmissa.
Vilkkuminen osoittaa kojelaudan aktiivista toimintatilaa.
MODE-napin nopea yhden kerran tapahtuva painaminen muuttaa
matkamittarin arvoja vuorokaudessa kuljetun matkan ja yleisen
kuljetun matkan välillä.
3. Kierroslukumittari osoittaa moottorin kampiakselin kierrosten
tiheyttä (kierrosten määrä minuutissa);
4. Nopeusmittari osoittaa moottirkelkan liikumisen nopeutta kilometreissä per tunti ja peninkulmissa per tunti.
5. Kello;
6. Peruutusta osoittava merkkilamppu;
7. Päällä olevan nollavaihten merkkilamppu;
8. Ympäristön lämpötila celsiusasteissa;
9. Akun purkamisen merkkilamppu;
10. Kuljetun matkan mittari, osoittaa moottorikelkan yleistä tai vuorokaudessa kuljettua matkaa kilometreissä/peninkulmissa.
80
Page 82

PÄÄOHJAUSLAITTEET
Transmissio:
Moottorikelkka on varustettu automaattisella vaihteistolla eli variaattorilla.
Vaihteiston toimintatilojen valitsin sijaitsee moottorikelkan oikealla puolella
menosuuntaan päin ja on tarkoitettu etenemiseen tai pakitukseen sekä
nollavaihteen valitsemiseen.
1. ”F” - Etenemisen asento. Laitetaan päälle painamalla vipua ”itsestään
eteenpäin” Neutraali-asennosta.
2. ”N” - Neutraali;
3. ”R” - Reverssi-asento. Laitetaan päälle siirtämällä vipu asentoon ”itseään
kohti”.
Pakki laitetaan päälle vain moottorikelkan täydellisen pysähtymisen jälkeen,
pakin laitto liikkeellä ollessa on kiellettyä, koska se voi aiheuttaa
vaihdelaatikon rikkoutumisen. Pakittaa voi vain tasaisella pinnalla. Ole tarkka
ja varovainen - moottorikelkka voi peruuttaa aika kovaa vauhtia!
Moottorikelkan liikkuessa vaihteiston toimintatilojen valitsimen siirto Nasentoon on kielletty, se voi aiheuttaa vaihteiston rikkoutumisen.
Pakki laitetaan päälle vain moottorikelkan ollessaan pysähtyneenä. Peruutaa voi vain tasaisella
pinnalla.
Moottorikelkan liikkuessa vaihteiston toimintatilojen valitsimen siirto N-asentoon on kielletty, se
voi aiheuttaa vaihteiston rikkoutumisen.
81
Page 83

KÄYTTÖÖN VALMISTAMINEN
Moottorikelkan tarkastus ennen matkaa:
Tarkista moottorikelkka ennen matkaa. Tässä luetellut kohdat vievät vain muutaman minuutin, mutta auttavat säästämään aikaa ja
turvaamaan oloa matkan aikana.
Tarkista polttoaineen määrä. Tarkista jarrut, tarvittaessa pumppaa jarrujärjestelmä (vapaakäynnin pitää olla 10-20 mm). Tarkasta, onko
telaketjussa vaurioita, tarkasta sen pingotustaso. Kuristin - tarkista kaasuvipu ja köyden kiinnitys sekä tyhjäkäynti, tarvittaessa säädä tai
korjaa. Valot - varmistaudu, että kaikki valolaitteet toimivat kunnolla. Tarkista ohjausmekanismin kääntämisen sujuvuutta. Tarkista
bensaletkut ja varmista, että se on turvallinen. Jos bensaletkut ovat vanhat tai haljennut, vaihda ne. Tankkauksen aikana estä
polttoaineen ylittämästä säiliön reunoja ja valumasta. Sähköosat ja sytytystulpan välissä on liitettävä osat kunnolla kiinni.
Moottorin käynnistäminen:
Älä koskaan käynnistä moottoria suljetussa tuulettamattomassa tilassa. Se on hengenvaarallista.
Siirrä vaihteiston toimintatilojen valitsin N-asentoon. Siirrä polttoainesäiliön hana ON-asentoon. Laita avain virtalukkoon ja käännä se
ON-asentoon. Pidä jarru pohjassa. Jos näin tehdessäsi kuulet summerin äänimerkin, se tarkoittaa, että et ole suorittanut kaikkia
tarvittavia toimenpiteitä moottorin käynnistämiseksi.
Siirrä moottorin sammutusnappi asentoon « » sekä tarkista moottorin hätäkatkaisijan vivun asentoa - sen täytyy olla kytkettynä
siihen kiinni. Summerin äänimerkin vaiettua moottorn voi käynnistää. Paina sähkökäynnistimen nappia « » ja sen jälkeen paina
ryyppyä polttoaineen syöttämiseksi jolloin moottorin täytyy käynnistyä. Sähkökäynnistimen napin painaminen ei saa kestää yli 1-3
sekuntia. Jos moottori ei käynnisty heti, pidä 30 sekunnin tauko ja yritä käynnistää uudestaan, muuten akku purkautuu liian nopeasti.
Moottorin käynnistettyä sähkökäynnistimen napista täytyy heti päästää irti. Moottorin toimiessa sähkökäynnistimen nappia ei saa
painaa, se johtaa sähköstartin rikkoutumiseen. Moottorin toimimisen pidentämiseksi kylmän moottorin käynnistämisen jälkeen sen
täytyy antaa lämmetä. Kylmää moottoria ei saa ottaa heti käyttöön. Jos kaasuvipua painettaessa moottorin kierrosten määrä putoaa, se
tarkoittaa, että se ei ole lämmennyt riittävästi. Tämän moottorikelkan malli on varustettu automaattisella rikastimella. Sen automaattisen
sammumisen jälkeen moottorin kierrokset putoavat noin 200-300 r/min, minkä jälkeen voi aloittaa liikkumisen siirrettyä vaihteiston
toimintatilojen valitsimen F-asentoon.
Käynnistääksesi moottorin ympäristön äärrimmäisen kylmissä lämpötiloissa on käännettävä sytytysavain ON-asentoon,
odotettava 3 minuuttia (sen ajan kuluessa käynnistysakku ja kuristinluukun diffusööri lämpenevät), ja vasta sen jälkeen voi
painaa sähköstartin nappia.
82
Page 84

MOOTTORIKELKAN KOEAJO
Moottorikelkan sisäänajo:
Jotta moottorikelkka toimisi hyvin ja kestäisi pitkään, sillä täytyy ajaa sisäänajo. Uuden moottorikelkan oikeanlainen kohteleminen
sisäänajon aikana on tärkeää moottorin toimivuuden kannalta. Moottorikelkan moottori vaatii 20 moottorituntia ajoa tai 500 km ajettua
matkaa ennen kuin se alkaa toimia täydellä teholla. Sisäänajon aikana kaikki toimivat osat sopeutuvat käyttöön.
Tehtaalla moottorikelkan kampikammioon kaadetaan moottoriöljyä SAE 10W30 API SF-CC, joka ei tuota moottorin
luotettavaa käynnistämistä kylmissä lämpötiloissa. Sen vuoksi ennen ensimmäistä käyttökertaa suosittelemme moottoriöljyn
vaihtamista sellaiseen öljyyn, joka vastaa olosuhteisiin ja moottorin laadukkaaseen toimivuuteen (siitä tarkemmin sivulla 29).
Ensimmäisen 500 kilometrin aikana noudata seuraavia ohjeita:
- nopeus ei saa ylittää 30 km/h ja jatkuvan työn ajan on oltava korkeintaan 1 tunti;
- älä rasita moottorikelkkaa liikaa, vältä pitkiä ylämäkiä ja moottorin kierroslukujen kasvua yli 7000 r/min, välillä on kuitenkin
sisäänajon aikana hyödyllistä kiihdytellä moottorikelkalla ja liikkua eri nopeuksilla.
- vaihda ehdottomasti moottorissa olevat öljyt ensimmäisten 100 kilometrin jälkeen ja vie moottorikelkka esitarkastukseen/ensihuoltoon.
Se auttaa saamaan aikaan parasta työtä ja pitkää palveluaikaa moottorille.
Variaattorin uusi vyö mukautuu toimintaan noin 50 kilometrin ajetun matkan aikana. Tämän aikana on vältettävä moottorikelkan rajuja
kiihdytyksiä ja jarruttuksia, kuormien vetämistä sekä pitkää liikkumista pysyvällä nopeudella.
Jos moottorikelkan koeajon ja takuuajan aikana syntyy kysymyksiä ja mahdollisia vikoja on käännyttävä oikeutetun korjaamon puoleen.
Huomaa! Moottoriin on kaadettu kuljetusöljyä. Ennen moottorikelkan ensimmäistä käyttöä
moottorissa ja hidastusvaihteessa oleva öljy on vaihdettava moottorille sopivaksi. (tarkemmin
öljyn vaihdosta ks. s. 27)
Rajut kiihdytykset ja kovaa ajaminen, jolloin kaasuläppä on täysin auki on epäsuositeltavaa jos
ajaa pitkää matkaa ja on vielä sisäänajo meneillään.
Ennen liikkumista tarkista aina moottorikelkan jarrut, koska se auttaa välttämään vaarallisia
tilanteita.
83
Page 85

MOOTTORIKELKAN OHJAUS
Ennen ensimmäistä ajoa aseta jalat astinlaudoille ja kädet ohjaustangolle. Käynnistä moottori, ennen liikkumista ja anna sen lämmetä
kunnolla. Paina jarrukahvaa ja sen jälkeen siirrä vaihteiston ohjausvipu F-asentoon. Päästä jarru ja lähteäksesi liikkeelle paina oikean
käden peukalolla kaasuvipua. Moottorikelkan nopeutta säädetään painamalla kaasuvipua. Ensimmäisen matkan aikana liiku hitaasti.
Moottorikelkan käyttäytymiseen täytyy tutustua tasaisessa maastossa.
Kääntyäksesi sivuun tai ympäri väännä ohjaustankoa siihen suuntaa, johon olet kääntymässä, jolloin samaan aikaan vartalon yläosa
kallistuu käänteen puolelle . Tämä tekee kääntämisestä turvallisemman ja sujuvamman.
Ennen jokaista matkaa tarkasta kaikki moottorikelkan osat ja laitteet.
Ajaessasi moottorikelkalla noudata aina seuraavia moottorikelkan vaihteiston työhön liittyviä ohjeita:
1. Sisäänajon aikana moottorikelkalla pitää lähteä matkalle hiljalleen.
Liikkuessasi noudata aina seuraavia turvallisuusmääräyksiä:
1. Hiljennä nopeutta ennen epätasaiselle pinnalle ajoa;
2. Yritä välttää jyrkkiä mutkia, jotka voivat aiheuttaa moottorikelkan sivuun ajoa.
Noustessasi noudata aina seuraavia turvallisuusmääräyksiä:
1. On noustava ehdottomasti suoraa linjaa noudattaen, jolloin jalat ovat jalansijoilla ja vartalon paino on siirretty eteenpäin.
2. Yritä välttää nousua jyrkille ylängöille, joiden nousukulma on 13-150;
3
.
L
Laskiessasi rinnettä noudata seuraavia turvallisuusmääräyksiä:
1. On laskettava ehdottomasti suoraa linjaa noudattaen ja pitäen jalkoja astinlaudoilla ja siirtäen vartalon painoa taaksepäin;
2. Hiljennä nopeus mahdollisimman pieneksi.
Moottorikelkan pysäyttäminen:
1. Pysäyttääksesi moottorikelkan päästä kaasuvipu ja paina hiljalleen jarrukahvaa, kunnes moottorikelkka on pysähtynyt täysin;
2. Moottorikelkan pysähdyttyä siirrä vaihteiston ohjausvipu N-asentoon.
Liiallinen tilanne-nopeus rinteessä voi johtaa moottorikelkan hallinnan menettämiseen.
Moottorikelkan ajaminen päihteiden aiheuttamassa tilassa on kiellettyä. Tehdäksesi olosi
turvalliseksi ajaessasi moottorikelkkaa käytä kypärää ja suojaimia. Moottorikelkan ajaminen on
kielletty alle 15-vuotiailta ilman ajo-oikeutta. Tämä malli ei ole tarkoitettu yleisille teille
ajamiseen.
84
Page 86

MOOTTORIKELKAN KULJETUS
Moottorikelkan kuljetus
Mukavaa kuljetusta varten tämän moottorikelkan malli on
suunniteltu purettavaksi. Moottorikelkan purkamisen ja kokoamisen
järjestys on kuvattu näiden ohjeiden mukaan sivulla 8. Purettu
moottorikelkka on helppo laittaa henkilöauton tavaratilaan ja
takapenkille.
Lastatessasi ja kuljettaessasi moottorikelkan kootussa muodossa
noudata seuraavia ohjeita:
- älä aja moottorikelkalla perävaunun tai auton kuormatasanteelle;
- aina kiinnitä moottorikelkka kunnolla perävaunun tai auton
kuormatasanteeseen;
- suojataksesi moottorikelkan vaurioilta ja likaantumiselta
perävaunun tai auton avoimella kuormatasanteella tapahtuvan
kuljetuksen aikana peitä se pressulla;
- kuljettaessasi moottorikelkkaa perävaunun avulla tarkasta aina
ennen liikkumista vetokoukun ja apuvälineiden kestävyyttä.
[Teksti kuvassa] Puretun moottorikelkan sijainnin vaihtoehto
autossa, jonka tavaratila on tyyppiä hatchback.
Moottorikelkan kiinnittäminen naruilla
Moottorikelkan nosto ja siirto suoritetaan naruilla, jotka kiinnitetään
telaketjun runkoon ja etujoustintuennan osiin. Samoja narujen
kiinnittämisen paikkoja tulee käyttää moottorikelkka nostaessa.
85
Page 87

TAVAROIDEN KULJETUS
Perävaunun vetäminen:
Moottorikelkkanne voi vetää perävaunun, jonka massa on korkeintaan 100 kg. Sen vetämistä varten
moottorikelkka on varustettu vetokoukulla (1). Jotta matkanne olisi turvallinen. Vedettävän perävaunun
kummassakin laidassa täytyy olla heijastimet tai valoa heijastavaa materiaalia sisältävät merkit, jotka
vastaavat Valtiollista GOST-standardia. HUOM! Perävaunun vätäminen moottorikelkan sisääajon aikana
on kielletty.
Tavaratila:
Moottorikelkan tavaratila sijaitsee istuimen alla. Se on tiukkaa kangasta oleva kotelo, joka on istuimen rungossa.
1. Istuimen lukon läppä; 2. Istuimen lukko; 3. Istuimen lukon lukko; 4. Saranat; 5. Tavaraosasto.
Päästäksesi tavaraosastoon (5) on väännettävä sivuun istuimen lukon läppä (1), siirrä oikealle lukon kieleke (2) ja siirrä istuin sivuun.
Sulkeaksesi tavaraosasto on asennettava istuin paikoilleen ja painaa sitä hieman kunnes kuuluu istuimen lukon tyypillinen raksahdus:
jolloin tavaratila on suljettu.
Ennen matkaa varmistaudu, että tavaratila on tiiviisti kiinni. Älä laita tavaratilaan palavia esineita. Äläkä laita tavaratilaan arvokkaita
esineitä. Mukavuuttanne varten tavaraosastossa on tasku papereita (rekisteriotetta) varten(6) ja säädettävät elastiset kumivyöt (7)
kuorman kiinnittämiseksi tavaraosastossa.
86
Page 88

MÄÄRÄAIKAINEN HUOLTO
Moottoriöljyn tarkastus ja vaihto
Tehtaalla moottorikelkkaan laitettiin kuljetusöljyllä, jota käytetään
bensiinimoottoreissa. SAE 10W30 API SF-CC. Ennen moottorikelkan käyttöä öljy on
vaihdettava. Suositeltavaa on sellaisen öljyn käyttö, joka on tarkoitettu erityisesti
moottorikelkkojen nelitahtisille moottoreille, mutta on mahdollista käyttää myös
tavallista nelitahtisille bensiinimoottoreille tarkoitettua öljyä. Öljyn viskositeetin voi
valita ilmastoa vastaavaksi ohessa olevan kaavion mukaan.
Älä vie jäteöljyä roskalaatikoihin äläkä kaada sitä maahan tai muualle luontoon.
Öljyn tason tarkastus:
Ennen jokaista matkaa tarkasta ölyn määrä. Laita moottorikelkka tasaiselle vaakapinnalle. Ota tikku pois(1) ja puhdista se öljystä. Laita
se kampikammion aukkoon kiertämättä sitä kierteeseen (2) ja ota takaisin tarkistaaksesi ne. Öljyn tason täytyy olla ylämerkinnän (”H”)
ja alamerkinnän (”L”) valissä. Tarvittaessa lisää lohkoon tietty määrä öljyä sitä merkkiä, jota moottoriin kaadettiin aikaisemmin. Varo
kaatamasta yli ylämerkinnän. Liian paljon öljyä sisältävän viallisen moottorin käyttö voi vahingoittaa moottorin ja aiheuttaa rikon.
Öljykoetin
87
Page 89

MÄÄRÄAIKAINEN HUOLTO
Moottoriöljyn vaihto:
Kaataksesi jäteöljyn pois kokonaan laita moottorikelkka
tasaiselle vaakapinnalle. Lämmitä moottori. Kaataaksesi öljyn
kierrä pois öljykoetin (1, sivu 27) ja valuaukon muhvi (3)
avaimella, jonka koko on 17. Sen jälkeen, kun pääöljy on
lakannut valumasta itsenäisesti, kierrä öljysuodatin irti (4).
Odota kunnes öljy on valunut pois kokonaan. Laita
öljysuodatin paikalle (Öljysuodattimen vaihto tapahtuu kerran
1200 kilometrissä tai yhden vuoden päästä, riippuen siitä, miten
paljon tulee kilometrejä). Kierrä kampikammion valuaukon
muhvin kiinni.
Kaada kampikammioon suositeltua öljyä öljykoettimen suun kautta (tilavuus 0, 95 litraa). Käynnistä moottori ja anna sen toimia 3-5
minuuttia tyhjäkäynnillä. 2-3 minuuttia moottorin pysähtymisen jälkeen varmista, että öljyn taso on ylämerkinnän (”H”) ja alamerkinnän
(”L”) välissä. Tarvittaessa kaada lisää öljyä. Varmista, että moottoriöljy ei valu.
Öljyn vaihto
hidastusvaihteessa:
Kuljetusöljyn vaihto on suositeltavaa suorittaa
lämpimässä tilassa, jotta säilöntävoide
poistuisi itsenäisesti valuaukosta. Kaataaksesi
nopeasti ja kokonaan jäteöljyn
hidastusvaiheesta on irrotettava toisistaan
moottorilohko ja telalohko, sillä
hidastusvaihteen säiliön (6) valuaukko on
telalohkon yläpuolella. Lämmitä moottori.
Aseta moottorin hidastusvaihteen alle astia
öljyn keräystä varten. Kierrä valutappi auki (6) ja tiivistävä pultti valuaukosta (5) (avaimella, jonka koko on 17”) valuttaaksesi kaikki
öljyt. Kaada öljy hidastusvaihteesta. Puhdista valutappi ja aseta se paikoilleen. Kaada sisään 0,75 litraa (750 ml) vaihteisto öljyä (SAE
80W/90) valuaukkoon (5) ja aseta tiivistävä pultti paikoilleen. Käyttäessäsi moottorikelkkaa tarkasta moottorin hidastusvaihdetta
mahdollisen öljyn valumisen varalta. Moottorin käyttö hidastusvaihteessa olevan öljyn määrän ollessa vähäistä voi aiheuttaa moottorin
kiinnileikkaamisen.
88
Page 90
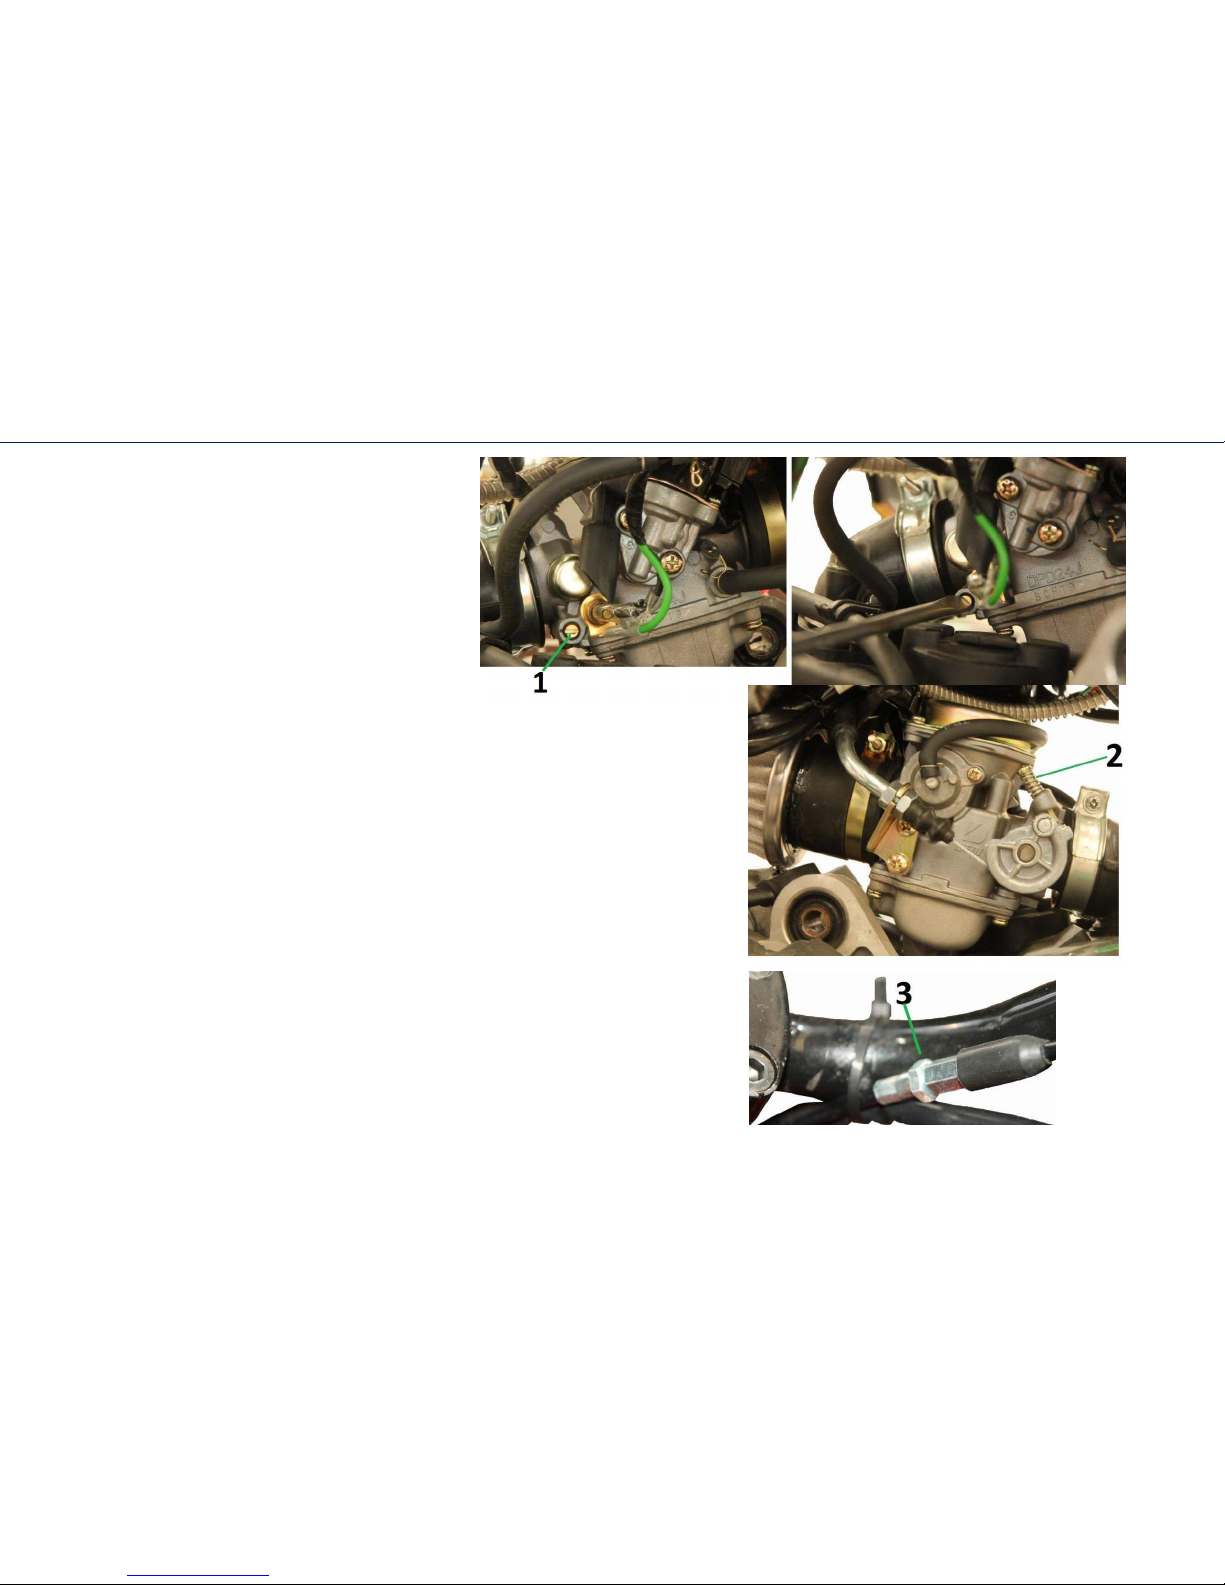
MÄÄRÄAIKAINEN HUOLTO
Kaasuttimen säätäminen
HUOMAA! Kaasuttimen asennettujen
päälaitteistokokonaisuuksien itsenäinen
muuttaminen voi vaikuttaa kielteisesti
moottorin käynnistämiseen ja vakinaiseen
työhön. Tarvittaessa kaasutin on parempi
säätää korjaamolla.
1.Seoksen laatua säätävä venttiili. Tällä ventiilillä säädetään bensiinin ja sen
ilman seosta.
2. Tyhjäkäynnin kierroksia säätävä venttiili. Tyhjäkäynnin kierrosten säätämistä
täytyy suorittaa lämmitetyllä moottorilla, mitä varten se käynnistetään ja annetaan
toimia tyhjin kierroksin 5-7 minuuttia. Käynnistetyssä moottorissa väännetään
tyhjäkäynnin säätöventtiiliä (2) (myötäpäivään se kasvattaa ja vastapäivään se
laskee kampiakselinkierrosten lukua). Tyhjäkäynnin kierrosten on vastattava 170
r/min ± 100 r/min.
3. Kaasukahvan vapaakäynnin säätäminen. Kaasukahvan tyhjäkäynnin on oltava
rajoissa 2-6 mm. Säätääksesi sitä ota pois pölyltä suojaava kumikalvo
kaasuköyden säätömekanismin päältä ja heikennä vastamutteri. Jos kaasuvivun
vapaakäynti on suurta, niin kierrä säätävä mutteri pois (vastapäivään), jos se on
pientä, niin kierrä mutteri kiinni. Säätämisen jälkeen tiukenna vastamutteri ja laita
kumi päälle.
89
Page 91

MÄÄRÄAIKANEN HUOLTO
Akun huolto
Moottorikelkassa käytetään geeliakkua 12V9Ah (12 V, 9 At) - kuvassa numerolla 1. Jos
moottorikelkkaa ei tulla pitkään tarvitsemaan niin akku otetaan irti vähentääkseen sen
purkautumista. Ensin otetaan pois miinus johto, sitten plussan johto. Asentaessasi akkua
liitä johdot käänteisessä järjestyksessä. Akun latauksen jälkeen säilytä se pimeässä
tuuletettavassa tilassa. Jos akku on jätetty moottorikelkkaan, on suositeltavaa irrottaa
miinus johto. Akkua on hyvä irrottaa säännöllisesti ja puhdistaa plus- ja
miinuskytkentäliittimet. Akkua vaihtaessasi käytä akkua, jonka ominaisuudet ovat
vastaavia alkuperäiseen.
Jos akkua pitää tarvittaessa ladata niin laturin on oltava 2,2Ampeerinen ja se saa ladata
korkeintaan 14.8 voltin jännitteellä.
Sulake
Oikosulun aiheuttaman tulipalon estämiseksi moottorikelkan sähköverkostossa sijaitse sulake (2). Sulakkeen mentyä rikki on
avattava muovilaatikko ja vaihtaa se samanlaiseen, (15A). Irto-osien asentaminen on kielletty!
90
Page 92

MÄÄRÄAIKAINEN HUOLTO
Jarrujärjestelmä
Jarrunesteen tason tarkastus:
Tämän moottorikelkan malli on varusteltu hydraulisilla jarruilla. Aseta moottorikelkka
tasaiselle pinnalle. Paisuntasäiliön yläkannen on oltava vaaka-asennossa (mahdollisesti
ohjaustankoa joutuu kallistamaan). Tarkista jarrunesteen taso valvontaikkunasta, se ei saa
olla alle minimi rajan alla. Paina kovasti jarruvipua ja katso, miten jarrunesteen taso muuttuu,
jos se laskee alemmaksi merkittyä rajaa, silloin täytyy kaataa lisää jarrunestettä.
Tarkista vielä kerran jarruvivun toimimista ja nesteen taso.
Käytä vain DOT4- jarrunestettä.
Jarrun pumppaaminen. Jos jarruttaessasi tunnet, että jarrusta on tullut ”heikompi”,
niin sitä on pumpattava.
1. Paina jarruvipua ja löysää venttiiliä, jotta ilma pääsee ulos jarrujärjestelmästä. Sen jälkeen
täytyy heti kiertää ruuvi kiinni. (löysäämättä jarruvipua).
2. Paina ja päästä vuorotellen jarruvipua muutaman kerran, kunnes olet varma, että jarru
toimii tehokkaasti.
Jarrukenkä
Seuraa aina jarrukenkien kulumista. Vaihda jarrukengät, jos niiden kuluminen on
saavuttanut jarrukenkien kulumisen rajamerkinnän. Jos moottorikelkkaa käyttäessäsi sinä
kuulet tyypillistä jarrun ”vinkumista”, käänny heti korjaamon puolelle jarrupalojen
vaihtamiseen.
Jarruneste voi aiheuttaa iholle ärsytystä. Vältä jarrunesteen kontaktia ihon kanssa ja estä sen
pääsemästä silmiin. Jarrunesteen päästyä iholle huuhtele huolellisesti sitä paikkaa vedellä. Jos
jarruneste on päässyt silmiin, ne pitää pestä isolla tehokkaasti vedellä ja käydä sen lääkärissä
mahdollisimman pian.
91
Page 93

MÄÄRÄAIKAINEN HUOLTO
Ketjut
Ketjun käyttöaika riippuu ihan sen oikeasta voitelemisesta ja säätämisestä. Huollon
puute voi johtaa ennenaikaiseen ketjun kulumiseen tai rattaiden vaurioitumiseen. Ketjut
on hyvä tarkistaa säännöllisesti ja voidella jos on tarve.
Moottorikelkan ketjuvetoon sisältyy:
1. Jarrulevy;
2. Jarrutuki;
3. Ratas;
4. Ketju (530. ketju, 22 lenkkiä);
5. Ratas;
6. Ketjun kiristys, löysäämällä mutteria, ketjun kireyttä saa säädettyä..
7. Ratas.
Ketjujen tarkistus
1. Aseta moottorikelkka tasaiselle pinnalle ja laita vaihde neutraaliin asentoon.
2. Tarkista ketjun kireys.
3. Siirrä moottorikelkkaa edestakaisin. Tarkista ketjun kireys. Ketjun kireyden on
pysyttävä samana.
4. Tarkista rattaiden hampaita mahdollisen kulumisen tai vaurioiden varalta.
5. Jos ketjut tai rattaat ovat liian kuluneita tai vaurioituneita, ne pitää vaihtaa. Älä koskaan
käytä uutta ketjua kuluneiden rattaiden kanssa, se kuluttaa ketjua nopeammin.
Voitelu:
On käytettävä erikoista aerosolivoidetta ketjuja varten. On voideltava ketjun jokainen lenkki, niin että voide pääsee levyjen,
tikkuhakkeiden, liukulaakereiden ja rollien liitosten väliin.
92
Page 94

MÄÄRÄAIKAINEN HUOLTO
Ilmasuodatin
Ilmasuodattimen irroittaminen, puhdistus ja asentaminen:
Ilmasuodatinta on hoidettava säännöllisesti. Ilmasuodattimen puhtaus on hyvin tärkeää
moottorille ja sen toiminnalle.
Irrottamisen järjesty. Löysää suodattimen klemmaria ja ota suodatin pois. Vaihda suodatin.
Asentaminen tapahtuu käänteisessä järjestyksessä.
Suodattimen vaihtaminen/putsaaminen on suositeltavaa 1000km välein.
Jos suodatin ei ole asennettu kunnolla, pöly ja lika voivat päästä välittömästi sylinteriin, jolloin moottori voi kärsiä.
Moottorin varakäynnistäminen
Akun tai sähköstartin mentyä rikki moottorikelkan moottorin voi käynnistää käsin
varakäynnistysjärjestelmän avulla. Se toimii näin:
1) Laita avain virtalukkoon ja väännä se ”ON”-asentoon.
2) Siirrä sammutusnappi « »-asentoon. Tarkista moottorin hätäkatkasijan asentoa,
vivun täytyy olla kytkettynä.
3) Siirrä vaihdevipu ”N”-asentoon.
4) Vedä käynnistysnarua ja jos ei ensimmäisellä yrityksellä lähde käyntiin niin
kokeile uudelleen.
93
Page 95
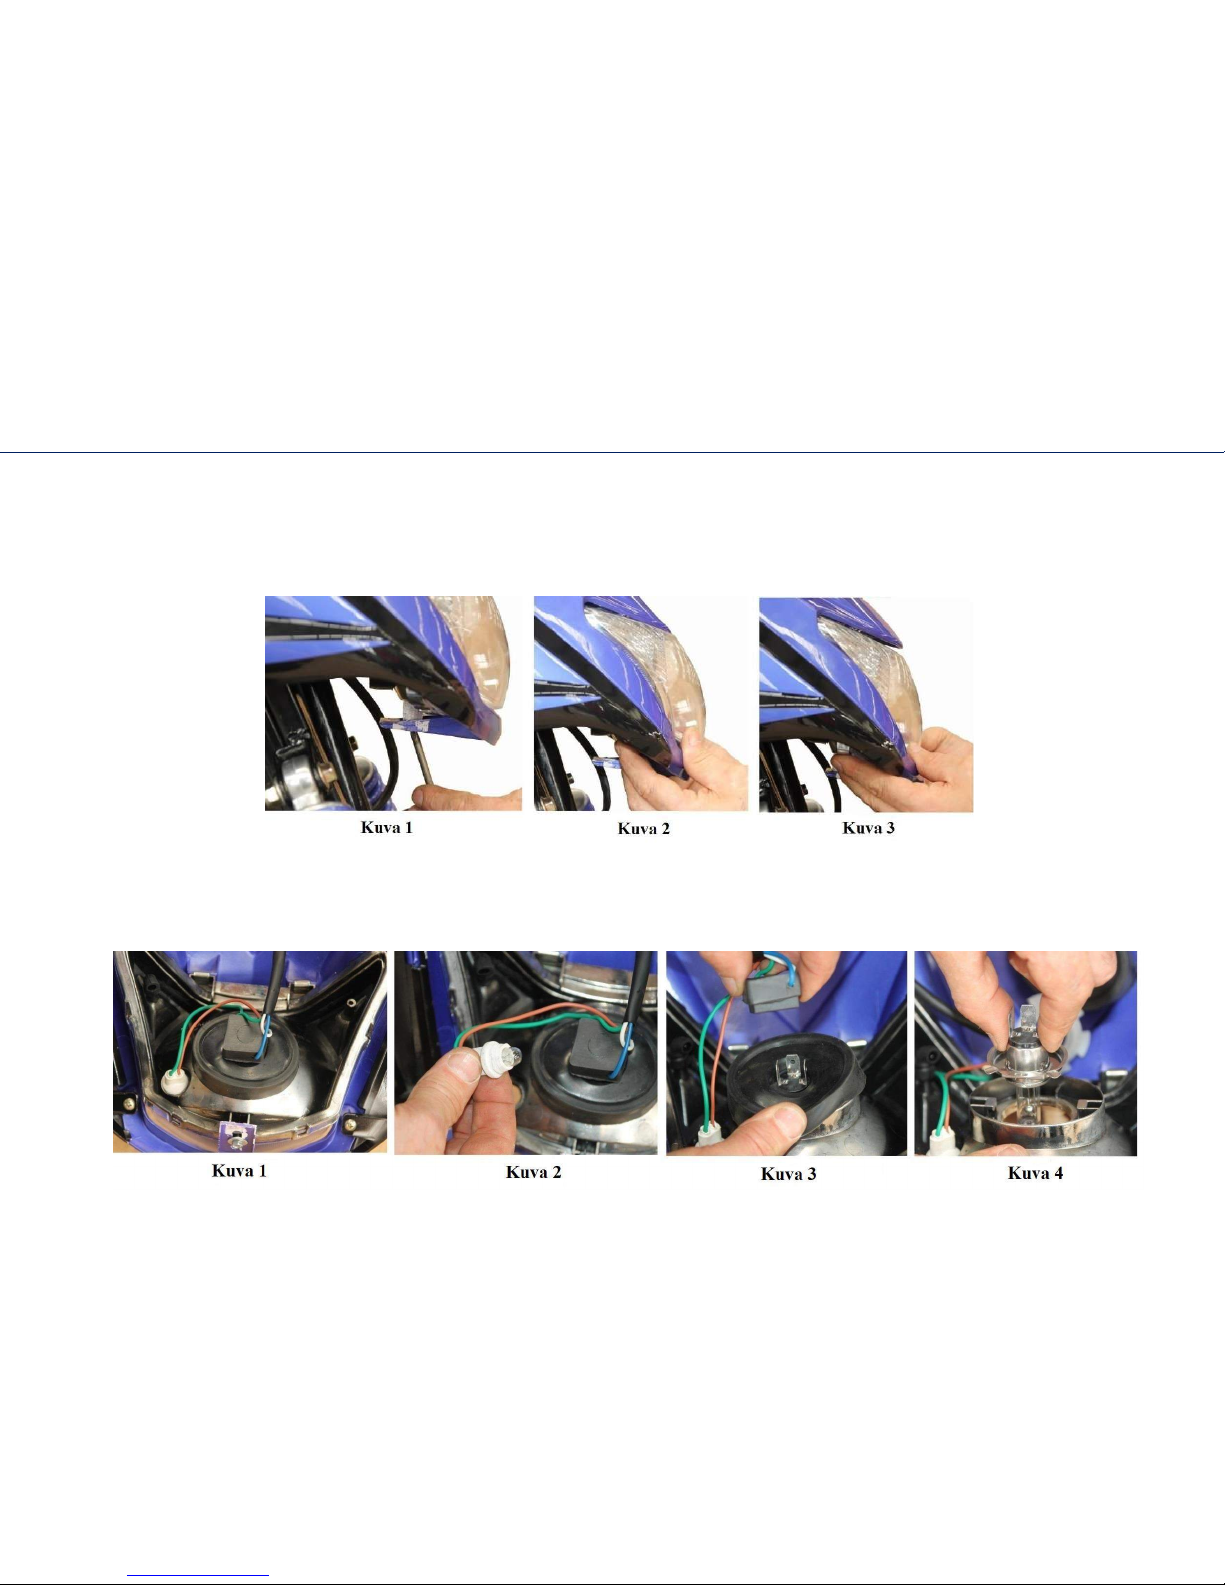
MÄÄRÄAIKAINEN HUOLTO
Etuosassa sijaitsevan lampun säätäminen
Tämä DINGO-mallinen kelkka on varusteltu korkeussäädettävillä ajovaloilla.
Näin säädät lamppua: 1. Heikennä ristipäisellä ruuvimeisselillä lampun kiinnitysruuvia (kuva 1);
2. Säädä lamppua tarpeenmukaisesti (kuvat 2 ja 3);
3. Säätämisen jälkeen tiukenna kohdassa 1 heikennetty kiinnitysruuvi.
POLTTIMOIDEN VAIHTO
Vaihtaaksesi polttimot on irroitettava maski päävalon kanssa (kuva 1) ja otettava poltin irti. Polttimon vaihdon näkee 3-4 kuvissa.
Parkkivalon poltin on 2V3W (kuva 2). Ajovalo on H4 (12V35W). Asentaminen tapahtuu käänteisessä järjestyksessä.
94
Page 96

MÄÄRÄAIKAINEN HUOLTO
VENTTIILIEN SÄÄTÄMINEN
HUOMAA! Venttiilien säätäminen itsenäisesti voi aiheuttaa koneen hajoamista jos säätö tapahtuu väärin.
Ennen moottorin ensimmäistä käynnistystä täytyy tarkastaa venttiilit ja tarvittaessa säätää ne. Liittyen siihen, että ympäristön lämpötilan
laskiessa venttiilit supistuvat. Venttiilien säätäminen kannattaa tehdä viileissä tiloissa jotta saadaan säädöt kohdilleen. Säädöt ovat 0,1-
0,15 mm ympäristön lämpötilan ollessa +200C (riippuen oletettavista käyttöoloista).
Moottorikelkan venttiilien säätöön ei tarvitse irroittaa koko moottoria, riittää vain irroittaa keula ja muovit niin pääsee koneeseen käsiksi.
Ohjeet: (ks. s. 13).
Venttiilien säätämisen järjestys:
1. Ota irti;
2. Aseta 3. tahdin ylin kuolinkohta pyörittämällä kampiakselia
moottorin hätäkäynnistimen kahvaa vetäen. Merkintä kuvassa 3 on
oltava asennossa ”sylinteristä poispäin” (1 kuvassa).
3. Tarkasta holkkumat. Normaalissa säätämisessä koetin pääsee
sisään pienellä vaivalla ja se pitää siirtää holkkumassa käyttäen
vähän voimaa, mutta niin, ettei siihen tulisi naarmuja.
4. Jos säätäminen on tarpeessa, heikennä vastamutteri
(”ulkopuolella”). Sitten muuta holkkuma pyörittämällä säätöpulttia
(”sisässä”) - myötäpäivään suoritettava pyöritys supistaa holkkumaa
ja vastapäivään suoritettava pyöritys suurentaa holkkumaa. Sen
jälkeen päästämättä säätöpulttia kiristä vastamutteri.
5. Asentaminen tapahtuu käänteisessä järjestyksessä.
Sytytystulpan tarkastus
Sytytystulppa on tarkistettava säännöllisesti (ja tarvittaessa puhdistettava se), mikä voi pidentää sen toimivuus aikaa. Jos elektrodit
vaurioituvat liiallisesti sinun on vaihdettava sytytystulppa vastaavaa tyyppiä olevalla sytytystulpalla - C7HSA tai A7RTC. Kovissa
pakkasissa (-300C ja kylmemmissä lämpötiloissa) on suositeltavaa alentaa sytytystulpan hehkulukua yhtä astetta alemmaksi, toisin
sanoen säätää tyyppi C6HSA.
Ennen sytytystulpan asentamista mittaa elektrodien välissä oleva holkkuma. Sen pitää olla 0,6-0,7 mm.
95
Page 97

MÄÄRÄAIKAINEN HUOLTO
TELAMATON PINGOTUKSEN SÄÄTÄMINEN:
Telamaton säätäminen toimii näin:
1. Säätämistä edeltävät työt. Telaketjun tiukkaaminen, samoin kuin sen kohdistaminen, on parempi säätää silloin kun tela on
irrotettu muusta moottorikelkasta. Käännä telaa (kuva 1). Puhdista osat lumesta, jäästä ja liasta ja tarkista koko tela kunnolla.
2. Telamaton kiristäminen, tarkistus ja säätö. Heikennä pingottimen kiinnityspultit (kuva 2, kuusiokoloavain, joka on kooltaan 13
mm), vastamutteri (kuva 3avaimella, joka on kooltaan 13 mm) ja telaketjun pingottimen mutterit (kuva 4, avaimella, jonka koko on 13
mm). Sitten kiristäessäsi muttereita (kuva 5, avaimella, jonka koko on 13 mm) seuraa telamaton kiristystä siitä kohtaa, joka on merkitty
kuvassa 6. Telamatto ei saa roikkua, mutta samalla sen täytyy painautua alas noin 1,5-2 cm, kun kädellä siitä hieman painaa.
3. Telaketjun kohdistaminen.* Telaketjun kohdistaminen. Moottorikelkan ollessa kääntöasennossa pyöritä hitaasti telaketjua.
Liukuraiteiden täytyy olla rinnakkaisesti telamaton aukkoihin nähden (vihreä linja) (ks. kuva 1). Jos tapahtuu siirtymä, on suoritettava
kohdistaminen käyttämällä telan kiristystä sen vasemmalta tai oikealta puolelta.
Telamaton kohdistamisen jälkeen kireys on tarkastettava vielä kerran, minkä jälkeen kiristetään mutterit, vastamutterit ja
kiristimen kiinnityspultit.
* Tätä toimintaa on suositeltavaa suorittaa apulaisen/ammattilaisen kanssa.
96
Page 98

MÄÄRÄAIKAINEN HUOLTO
Tuntomerkit liian tiukasta matosta: moottorikelkka lähtee ”raskaasti” paikoiltaan, se kiihtyy ”raskaasti”; sekä se ylikuumenee;
kulutusosat kuluvat nopeammin; kaasua löysättyään moottorikelkka pysähtyy saman tien eikä luista eteenpäin.
Tuntomerkit liian kireästä telaketjusta: vetoakselin käyttöpyörien ylihyppiminen kuormituksessa kuten puuteri lumessa, liukurattaat
hankaavat telaketjua (toisin sanoen ne eivät liiku)
Takajousien säätäminen:
Tarvittaessa voit säätää takajousien jäykkyyttä ja korkeutta muuttamalla
vaaka-asennossa olevan iskunvaimentimen asentoa (ks. kuva 7).
97
Page 99

PESU JA SÄILYTYS
Moottorikelkan pesu:
Pestessään moottorikelkkaa älä pese seuraavia osia paineella - sytytysjärjestelmää, sähkölaitteiden katkaisijoita, vaimentimen
päästöaukko. Paine voi vahingoittaa niitä.
Moottorikelkan puhdistuksen jälkeen huuhtele sitä puhtaalla vedellä. Pyyhi
moottorikelkka kuivaksi. Käynnistä moottori ja anna sen toimia muutaman minuutin.
Moottorikelkan säilöntä:
Pitkän säilytysajan kuluessa, esimerkiksi kesällä (yli yhden kuukauden), säilytä
moottorikelkkaa hyvässä kunnossa ja suorita huoltotyöt.
Pese moottorikelkka ja pyyhi se kuivaksi. Voitele maalattuja metalliosia
vahatahnalla. Kaada polttoaine pois säiliöstä ja kaasuttimesta. Ota sytytystulppa irti.
Kaada sylinteriin pieni määrä samaa tyyppiä olevaa moottoriöljyä (15-20 ml) kuin se,
mitä on kaadettu moottoriin, pyöritä hitaasti kampiakseli 1-2 kierrosta ja aseta
sytytystulppa paikoilleen.
Irroita akku. Irroittaessasi akun ota ensin miinus johto irti ja sitten plussa. Säilytä
akku pimeässä, viileässä ja hyvin tuulettuvassa tilassa. Asennettaessasi akkua liitä
ensin plussa johto ja sitten miinus.
Jousista ja laakereista on kuivattava vedet ja kosteus pois ja rasvattava ne uudelleen.
Peitä moottorikelkka pressulla, joka päästää sisään ilmaa. Säilytä moottorikelkkaa tuuletettavassa tilassa, joka on suojassa sateelta,
peitä auringon säteiltä ja säilytä jossakin missä ei tapahdu suuria lämpötilan muutoksia.Pitkän säilytysajan kuluessa moottorikelkan
täytyy olla ripustettuna, telaketjun täytyy olla vaimeana eikä se saa koskea pintaa. On myös hyvä kiertää telaketjua kaksi-kolme
kertaa kerran kuukaudessa.
Moottorikelkan käyttö säilönnän jälkeen:
Ota suoja pois ja puhdista moottorikelkkaa. Tarkista akun jännite. Lataa akkua, jos sen virta on alle 12.0 V. Laita akku paikoilleen.
Kaada tuoretta polttoainetta.
Ennen matkaa tarkista moottorikelkka. Suorita koeajo turvallisessa paikassa varmistautuaksesi, että moottorikelkka toimii kunnolla.
98
Page 100

MÄÄRÄYSTYÖT
99
Moottorikelkka on vietävä huoltoon tietyin aikavälein - joko tietyn kuljetun matkan (km) suorittamisen jälkeen tai tietyin aikavälein
myynnin jälkeen riippuen siitä, kumpi tapahtuu ensin. Ennen huoltotöitä moottorikelkka on pestävä huolellisesti. Taulukon merkinnät
tarkoittavat seuraavaa: П: tarkasta, pese, säädä, voitele; О: puhdista; З: vaihda; Р: säädä.
Kohta
Matkamittari (km)
100
(1. kk)
300
(3. kk)
600
(6. kk)
900
(9. kk)
1200
(12. kk)
1500
(15. kk)
Huomautukset
Polttoainejärjestelmä
П П П П П
Kuristimen toiminta
П П П П П
П
Kaasuttimen toiminta tyhjäkäynnissä
П П П П П П
Moottoriöljy
З З З
Vaihto joka 600 km
Sytytystulppa
П П П З П
З
Öljysuodatin
О О 3
Joka 1200 km tai kerran vuodessa (kumpi
tapahtuu ensin)
Ketju П П П П П П
Jarru П П П П П П
Jarrupalojen kulutus
П П П П П
Etuosassa olevan päävalon lamppu,
takavalot
П П П П П П kerran kuukaudessa
Etujouset
П П П П П
П
kerran kolmessa kuukaudessa
Ohjaustanko
П П П П П
П
Kiinnitysruuvit
П П П П П П kerran kuukaudessa
Telaketju
П П П П П
П
kerran kolmessa kuukaudessa
Öljy hidastusvaihteessa
П З П
Myöhemmin kerran1500 km:ssä
 Loading...