


General Information Agri NIR™ Analyzer Rev. A11
ENGLISH
1
INTRODUCTION
Some images included in this manual may differ from the real ones due a recent product updates. The
methods of use described are equally correct.
AgriNIR™ by
optical analyzer for fresh forages based on NIR
technology in order to measure humidity (dry
matter), crude protein, st arc h, ash, ADF a nd NDF of
the analyzed materials. Thanks to AgriNIR™ the
analysis of most relevant and variable ingredients
(forages!) used in your rati os can be performed j ust
in a few seconds on site, allowing to know in real
time its actual nutritional values.
AgriNIR™ is bas e d on NI R (Near Inf r a-Red) technology: it scans the sample with light and reads the
spectra absorbed by the sam ple in the NIR region.
Thanks to chemometrics techniques and
mathematical algorithms based on multivariate
analysis, the AgriNIR™ is able to provide
predictions on actual nutrients of the sample in a
real time.
This instrument structure is composed by :
• a microcomputer that manages the data, carries out mathematical operations applying complex
algorithms, providing the final results and the user interface devices: screen, keyboard and printer;
• an optica l group: the sam ple scanner and the NIR sensor, a trans ducer able to tr ansform the opt ical
signal in an electrical one.
is a portable
During the process of analysis there are the following main steps:
1. the light source emits light investing the sample inserted into the sample cup;
2. the sample absorb part of the light accordingly to its actual nutritional values;
3. the thermo-controlled NIR sensor collects spectra and measures the absorbance transforming the
optical in an electrical signal, then in numerical data;
4. the data are transf erred to the microcomputer able to apply all mathematical algorithm s in order
to predict the actual nutritional values for the sample.

General Information AgriNIR™ Analyzer Rev. A11
2
LICENCE AGREEMENT
IMPORTANT NOTICE: Acceptance and use of the enclosed NIR system (hereinafter
referred to as “Purchased Product”) constitutes your agreement to the following terms
and conditions. Please carefully read the following terms and conditions before using or
reselling the Purchased Product.
1. Limited License . Dinamica generale, an Italian company (“Owner”) is the owner of
the following Patents related to NIR solutions EP 2 377 392 / US 8 651 730 (“Patents”).
Owner hereby grants to the customer(“Customer”) a non-exclusive, non-transferable,
revocable, limited license to use the technology described in the Patents to use the
Purchased Product in the process covered by the Patents (“Licensed Product”), and to
sell and offer for sale other Licensed Product in accordance with the terms and
conditions set forth herein. Alternatively, Customer may resell the Purchased Product to
another entity for the purpose of that entity assembling the Licensed Product under a
permitted sublicense from the Customer with the same terms as this Agreement.
2. Acceptance of Terms and Conditions . Customer warrants that it has the authority
to enter into this binding agreement. If Customer does not accept the terms and
conditions, Customer shall not use the Purchased Product. Customer understands and
agrees that if it uses the Purchased Product as permitted herein, it will be deemed to
have accepted these terms and conditions and they shall become a binding agreement.
3. Limitations on Use
expressly authorized in this Agreement, and that any use not expressly authorized in
this Agreement is prohibited. Customer agrees that it will not: (i) loan, rent, lease,
assign, sublicense, distri bute
or otherwise transfer its rights under this Agreement to a third party, other than to resell
the Purchased Product to another entity for the purpose of that entity assembling the
Licensed Product; (ii)
copy or reproduce the Licensed Product; or (iii) grant any sublicenses other than to an
end user of the Licensed Product, or to another entity for the purpose of that entity
assembling the unit of a Licensed Pr od uct . C ust o mer agr ees to use r eason abl e e f for ts
to prevent any unauthorized
use or copying of the Licensed Product and will notify Owner immediately upon learning
of any such unauthorized use or copying.
Customer’s obligations under this section shall survive any termination of this
Agreement or the license granted hereunder. Any unauthorized use of the Licensed
Product will result in, among other things, the immediate termination of this license.
4. Ownership of Proprietary Rights . Customer acknowledges that the Licensed
Product is covered intellectual and/or proprietary rights, and that all such intellectual and
proprietary rights are owned by Owner. Customer hereby acknowledges that it has no
rights in the foregoing except as expressly granted herein.
. Customer agrees that it will use the Licensed Product only as
5. NO WARRANTY
and Customer acknowledges and agrees that Owner will not assume any product
liability or any other
liability for the Purchased Product or the Licensed Product. The Purchased Product is
furnished to Customer “AS IS.” Except as otherwise provided by separate
documentation, OWNER
MAKES NO WARRANTIES, EITHER EXPRESS OR IMPLIED, WITH RESPECT TO
THE PURCHASED
. Customer agrees to fully test and evaluate the Purchased Product

General Information Agri NIR™ Analyzer Rev. A11
ENGLISH
3
PRODUCT.
Customer agrees that Owner shall have no liability resulting from
Customer’s use of the Purchas ed Pro duct for any indirect damages includi ng
consequential, incidental or special
damages for loss of profit, good will or otherwise. Customer shall indemnify and hold
Owner harmless from any and all losses, expenses, damages, costs or expenses of any
kind,
including but not limited to reasonable attorneys’ fees, incurred by Owner resulting from
Customer’s use of the Purchased Product. NO ORAL OR WRITTEN STATEMENTS
MADE BY OWNER OR ITS EMPLOYEES INCLUDING BUT NOT LIMITED TO
STATEMENTS REGARDING CAPACITY,
SUITABILITY FOR USE, OR PERFORMANCE OF THE PURCHASED PRODUCT
SHALL BE DEEMED A WARRANTY OR REPRESENTATION BY OWNER FOR ANY
PURPOSE NOR GIVE RISE TO ANY LIABILITY OR OBLIGATION OF OWNER.
6. Remedies for Violations
. Owner reserves the right to seek all remedies available at
law and in equity for violations of this Agreement, including but not limited to the right to
recover the
Licensed Product.
7. Fees . In consideration for the rights granted under this Agreement, Customer has
paid a license fee that was included in the amount invoiced to the Customer for the sale
of the Purchased Product.
8. Entire Agreement . Except as expressly stated herein to the contrary, this Agreement
constitutes the entire agreement between the parties regarding the subject matter
hereof, and no verbal or written prior statements or representations of any sort made by
any party shall be effective or valid for any purpose whatsoever. This Agreement may
be amended only upon the mutual consent of all parties in writing.
9. Severability . If any provision of this Agreement shall be held to be invalid, illegal or
unenforceable, the validity, legality and enforceability of the remaining provisions shall
not in any way be affected or impaired thereby. The failure of any party to enforce any
provision of this Agreement shall not be considered a waiver thereof, nor shall such
failure prevent the future enforcement of any such provision.
10. Governing Law. This Agreement and the relationship between the parties shall be
governed in all respects by the laws of Italy. The parties consent to the jurisdiction and
venue of the Italian court of Bologna for resolution of any dispute under to this
Agreement.
Use or sale of the Licensed Product or of Purchased Product shall bind Customer
to all terms and conditions herein without the necessit y of signatures on this
Agreement.

General Information AgriNIR™ Analyzer Rev. A11
4
1.
2.
32 VDC
is not responsible for
3.
4.
5.
6.
clearing the
7.
ft and
8.
BEFORE USING
For a correct function ing of the device, it will be nec essary to put t he AgriNIR™ on a
horizontal surface allowing the user to move easily the fodder box containing the
sample to analyze.
The AgriNIR™ device must be supplied with a tension between 9,5 –
through the suitable connector put on the upper of the case. That can be done
through:
• Power Supply (output at 12 VDC) provided with the device;
• Supply cable (optional) with plug for car lighter supply.
In case other supply sources were used,
damages to people or the AgriNIR™ device.
For a correct functioning verify:
• In case of supplying through a 12 VDC s upplier, that the cable f or the supp lier is
If it is not the case,
If it is not the case, is not responsible for damages to the AgriNIR™.
connected to a tension between 100-240 VAC;
• In case of supplying through th e plu g f or car li ght er, that the battery has a tension
always higher then 9,5 Volts.
During delivery of the AgriNIR™ it is important:
• Not to put mobile and/or sharpened objects inside the case preventing the
electronic/optoelectr onic (graphical displa y, printer, communication cable , optical
fiber protected by a black sheath put at the bottom of the case) device from
being broken or wrongly hurt.
• To fasten the accessories (fodder box, accessories for the fodder box, power
supplier, supply cable, s up ply cable with plug for car lighter, c le arin g ac c ess or ies)
to prevent them from moving inside the case or the electronic/optoelectronic
device from being broken.
is not responsible for damages to the AgriNIR™.
DO NOT POWER the AgriNIR™ d evice ( b y suppl y power c able f or car ligh ter) du ring
transporting by car.
Disconnect the supply cable from the device before servicing and/or
AgriNIR™.
If it is not the case, is not responsible for da mages to people or to
the AgriNIR™.
To clean the AgriNIR™ correctly:
• for the upper part (display, keyboard, printer, reading glass) use a so
DO NOT use neither alcohol nor other solvents!
DO NOT wet with water!
If it is not the case,
If it is not the case, is not responsible for damages to the device.
slightly wet cloth;
• For the bottom (metal chassis of the f odder b ox and reading window of the R ead
NIR) use pressurized air or a soft and slightly wet cloth.
is not responsible for damages to the AgriNIR™.
For a correct function ing of the sampling fodder b ox, use a soft cloth or pressur ized
air or flowing water. DO use neither alcohol nor other solvents!

General Information Agri NIR™ Analyzer Rev. A11
ENGLISH
5
1.
2.
used. While working the
3.
4.
5.
6.
7.
8.
9.
CANNOT be consid ered responsible for damages to people or
10.
NOTES FOR THE USER
After switch ing ON the AgriNIR™, recomm ends strongly to wait
at least
the exercise temperature of the optoelectronic device.
For a correct func tioning of the o ptoelectronic device contained in the AgriNIR™, it’s
better to monitor the temperature of the place where it is
device mustn’t exceed the temperature range between 0°C and +40°C.
If it is not the case, is not responsible for damages to the AgriNIR™.
If ambient temperature is 3 5°C or upper, DO NOT keep the AgriNIR™ device turned
on for more than 2 hours time (
15 minutes before executing the analys is. That will allow the o ptimization of
IMPORTANT!
for machines HW rev. B3 or previous).
If it is not the case,
In case of use of the devic e outside, it SHOULD NOT
be exposed directly to climatic agents such as rain,
snow, hail ...
If it is not the case,
In case AgriNIR™ were supplied through the suitable supply cable (optional) with
plug for car lighter, disconnect this cable when the vehicle’s battery is being charged.
If it is not the cas e, is not responsibl e for damages to people or to
the AgriNIR™.
Disconnect the supply cable from the device before servicing and/or clearing the
AgriNIR™.
If it is not the case, is not responsible for da mages to people or to
the AgriNIR™.
For a correct functioning verify:
• In case of supplying through a 1 2 VDC supp lier, that t he cable f or the supp lier is
connected to a tension between 100-240 VAC;
• In case of supplying throug h th e plu g f or car li ght er, that the battery has a tension
always higher then 9,5 Volts.
is not responsible for damages to the AgriNIR™.
is not responsible for damages to the AgriNIR™.
DO NOT use USB extension cables LONGER than 1 meter to connect the USB
memory key to the USB connector available on the front unit of AgriNIR™ device.
things because of a misuse of the device.
DOES NOT assum e the responsibilit y for the result provide d by
AgriNIR™ in case there were not correspondence between the material analyzed and
the one declared by the system.
11. This marking on the product or on its pack aging illustrates that
this product may not be disposed of with normal household
waste. You are responsible for disposal of this equipment in a
correct way and in according to local regulatio ns .

General Information AgriNIR™ Analyzer Rev. A11
6
1 CONTENTS
INTRODUCTION ................................................................................................................... 1
LICENCE AGREEMENT ........................................................................................................ 2
BEFORE USING .................................................................................................................... 4
NOTES FOR THE USER ....................................................................................................... 5
1 CONTENTS .................................................................................................................. 6
2 TECHNICAL DATA & CONFIGURATION ..................................................................... 7
3 ACCESSORIES SUPPLIED .......................................................................................... 9
4 ELECTRIC CONNECTIONS ....................................................................................... 11
4.1 Supplying AgriNIR™ with the provided power supply ..................................................... 11
Supplying AgriNIR™ with the power cable for car lighter plug ........................................ 12
4.2
5 Description of the portable Analyzer AgriNIR™ ........................................................... 13
6 Use of the Portable AgriNIR™ Analysis System .......................................................... 16
6.1 NIR Parameters and NIR Families ................................................................................... 16
Correct Use of the Fodder Box for the Samples to Analyze ............................................ 18
6.2
Turning on the AgriNIR™ system .................................................................................... 21
6.3
States & Messaging of NIR analyzer internal system ...................................................... 23
6.4
Error Messaging of NIR analyzer internal system ........................................................... 25
6.5
Initial Optical Checking of the AgriNIR™ system ............................................................. 27
6.6
Analysis Samples Identifying ........................................................................................... 31
6.7
Analysis Exe cution with AgriNIR™ System ..................................................................... 34
6.8
Case of incorrect analysis ................................................................................................ 39
6.9
6.10 Analysis printing on tickets ............................................................................................... 40
Analysis saving on USB pen drive ................................................................................... 42
6.11
Analysis History – available only for AgriNIR W .............................................................. 44
6.12
Other Settings of AgriNIR™ System ................................................................................ 46
6.13
Calibration Updating of AgriNIR™ System ...................................................................... 47
6.14
Update Calibrations for AgriNIR W ....................................................................................... 48
6.14.1
LOADING OF NEW NIR DATA STRUCTURE (NIRDATA.BIN file) ................................ 50
6.15
Deleting Analysis on internal memory ............................................................................. 52
6.16
Deleting the initial message of FULL MEMORY .............................................................. 53
6.17
Printer Header Settings .................................................................................................... 55
6.18
7 CLEANING THE DEVICE ............................................................................................ 57
8 DEVICE SERVICING .................................................................................................. 58
8.1 Verification and Servicing of the Optical Group ............................................................... 58
Replacement of the Printer’s Paper ................................................................................. 59
8.2
9 RESPONSIBILITIES ................................................................................................... 60
10 CE CONFORMITY DECLARATION ............................................................................ 61
11 WARRANTY ................................................................................................................ 62

General Information Agri NIR™ Analyzer Rev. A11
ENGLISH
7
2 TECHNICAL DATA & CONFIGURATION
AgriNIR™ configurations
Code Machine Features
999-0228 AgriNIR Analyzer
999-0565 AgriNIR W Analyzer
999-0347 AgriNIR Analyzer with GSM/GPRS
Accuracy
[Note 2. at next page]
Working Temperature
[Note 1. at next page]
Power
Display
Dimensions 50 x 31 x 46 cm
Weight 20 Kg
standard machine
Worldwide version
with GSM/GPRS Quad-Band internal modem
[ see the tables at next page ]
0° ÷ +40°C
12 ÷ 18 VDC
60W max
LCD monochromatic
¼ VGA
Box ABS plastic
Protection Grade n. a.
Quad-Band GSM release 99
850/900/1800/1900 MHz
GMS / GPRS
internal modem
[only cod. 999-0347]
Paper Type
Paper width
Paper Type suggested
Roll diameter inner core
GPRS multi-slot class 12
Output power :
• Class 4 (2 W) for EGSM850
• Class 4 (2 W) for EGSM900
• Class 1 (1 W) for GSM1800
• Class 1 (1 W) for GSM1900
Thermal paper roll
(thermal side outside of the roll)
57 mm ±0.5 mm
from 55 g/m² to 70 g/m²
13 mm
Outer roll diameter max. Ø44mm
Soul type Cardboard or plastic

General Information AgriNIR™ Analyzer Rev. A11
8
NOTES FOR THE USER points N°
NIR
Families
NOTES.
If AgriNIR™ machine has Hardware revision B3 or p revious (the HW rev. is showed on yell ow
1.
label together machine S/N), the maximum working temperature recommended is 35°C.
For Hardware revision B4 or newer the maximum working temperature is 40°C.
Please DO NOT exceed the limits of temperature, according to
2 and 3 at page 3.
The percentage of Accuracy DOES NOT express the mathematical percentage of the error on
2.
analysis result, but it represents the maximum error in percentage points between the analysis
result (just expressed in pe rcent age points ) prov ided b y AgriNIR™ and the real analysis va lue, tha t
you can obtain by chemical analysis on the material in question.
Please see below the specific AgriNIR™ Accuracy values for each NIR family / parameters :
AgriNIR™
accuracy for
DG standard
calibrations package
CORN SILAGE
HAY
HIGH
MOISTURE
CORN
ALFALFA HAY
NIR Families
GRASS SILAGE
T.M.R.
SOYBEAN
FLOUR
NIR Chemical Parameters
Moisture
( Humidity )
Starch
Crude
Protein
ADF NDF Ash
±2,0% ±2,0% ±1,0% ±1,0% ±1,5% ±0,5% ±0,5%
±1,0% n.a. ±1,0% ±2,0% ±2,5% ±1,5% ±0,5%
±2,0% ±3,0% ±1,0% ±1,5% ±2,5% ±0,5% ±0,5%
±1,0% n.a. ±1,5% ±3,0% ±3,0% ±1,0% ±0,5%
±2,0% n.a. ±1,5% ±2,0% ±2,5% ±1,5% ±0,5%
±2,0% ±2,0% ±1,0% ±1,5% ±2,0% ±0,5% ±0,5%
±1,0% n.a. ±1,5% n.a. ±1,5% ±1,0% ±1,0%
Crude Fat
( Ether
Extract )
AgriNIR™
accuracy for
DG grains
calibrations package
[ optional ]
CORN GRAIN
WHEAT GRAIN
Moisture
( Humidity )
±1,0% ±1,0% ±1,0% n.a. ±1,0% ±1,0% ±1,0%
±1,0% ±1,0% ±1,0% n.a. ±1,0% ±1,0% ±1,0%
NIR Chemical Parameters
Starch
Crude
Protein
ADF NDF Ash
Crude Fat
( Ether
Extract )

General Information Agri NIR™ Analyzer Rev. A11
ENGLISH
9
3 ACCESSORIES SUPPLIED
Accessory Description
FODDER BOX
Tray with glass for fodder samples
and its pressure plate.
Also it presents special housing for
Check-Cell.
PRESSOR
The pressor with sponge is used for
grains or dry and chopped m att er.
The pressor without sponge is used
for forages of wet and voluminous
type.

General Information AgriNIR™ Analyzer Rev. A11
10
CHECK CELL
Special sample cell
acetyl resin for the
optics testing of
the machine.
POWER SUPPLY
AC input :
100-240V~2A, 50-60Hz
DC output :
12V, max 8A
and
AC power cable with SCHUKO plug
IEC320 connector.
Power cable for car lighter
plug
USB memory pen-drive
Roll of thermal paper for
printer
AgriNIR™ User Manual

Configuration AgriNIR™ Analyzer Rev. A11
ENGLISH
11
Power Connector
Power Supply
AgriNIR™ Analyzer
4 ELECTRIC CONNECTIONS
4.1 Supplying AgriNIR™ with t he pr ov ided power supply
IN : 100-240VAC – 2A
OUT : 12VDC – max 8A

Configuration AgriNIR™ Analyzer Rev. A11
12
Power Connector
AgriNIR™ Analyzer
4.2 Supplying AgriNIR™ with t he powe r cable for car lighter plug
Power cable for car lighter plug

Configuration AgriNIR™ Analyzer Rev. A11
ENGLISH
13
FODDER BOX
NIR OPTICAL UNIT
Knob and security
Communication
Printer
USB plug
PROG / DATA connector for
Screen and keypad
ELECTRONIC UNIT
GSM/GPRS
ON / OFF
5 Description of the portable Analyzer
AgriNIR™
In the following pictures it is explained how the system AgriNIR™ is composed:
modem led
available only for
AgriNIR 999-0347
for memory
pen drive
downloading data and
programming AgriNIR™
[ DG assistance only ]
for inserting the sample to analyze
hinge of NIR Unit
cable of NIR Unit

Configuration AgriNIR™ Analyzer Rev. A11
14
USB
Sample of forage
Measured Light
Optical Spectra Archive
DGNirManager
The portable Analyzer AgriNIR™ is composed by:
FODDER BOX → sampling box with screwed handles on presser, for the collection of the forage samples
that has to be analyzed with AgriNIR™.
NIR OPTICAL UNIT → optical unit for acquisition of light produced by the sample to be analyzed.
This unit consists of:
• Read NIR → O ptic a l rea di ng h ead that s ens es t h e lig ht s pec tra produced by the f eed c omponent
present in the fodder box inside AgriNIR™ system.
• Optical Fiber → transmits the light sensed by Read NIR head to NIR optical sensor.
• NIR sensor → optoe lectronic device that receives the light spectra sensed b y Read NIR head
on the feed component and transforms them in electrical signals.
ELECTRONIC UNIT → processing and control unit o f the AgriNIR™ system . With this unit the operator
can start the anal ysis on the feed com ponents put in t he fodder box, and get the anal ysis results sho wn
on display. These results can be printed on a paper or stored on a USB Pen Drive.
USB MEMORY PEN DRIVE → Memory unit that allows to store the results of the performed analysis and
to transfer them to PC through the management software DGNirManager.
Please see NOTES FOR THE USER point N° 8 at page 3.
The conceptual model that def ines the functioning of the por tab le a na l ysis s ystem AgriNIR™ is explained
in the following scheme :
Setting of :
NIR Families;
Chemical Parameters;
Calibration Curves.
AgriNIR™ Analyzer
key
NIR Families and
Chemical Parameters
NIR Calibrations
Data saving for :
analysis results;
optical spectra.
Spectra

Configuration AgriNIR™ Analyzer Rev. A11
ENGLISH
15
For the setting of the feed c omponents to an alyze and the st orage of the performed anal ysis on PC it is
used the management program DGNirManager produced by
This software product on PC allows the user to:
• set the Chemical Parameters for the analysis to be performed with the AgriNIR™ system;
• mark the feed components that will be analyzed with the AgriNIR™ system, b y means of NIR
Families components giving them proper theoretical reference values for the chemical
parameters that charac teri z e them; after having completed i ts own s et of f eed c omponents, this is
transferred to AgriNIR™ system through the USB memory key;
.
• store all the analysis p erformed with AgriNIR™ system and r elevant optical spectra sensed on
the analyzed components, previously stor ed o n U SB memory key; after having c ompleted its own
set of analysis, new Calibration Curves can be performed, i.e. new setting curves to be
transferred to the AgriNIR™ s ystem through the USB m emory key, in order to m ake AgriNIR™
analysis even more accurate.

Use AgriNIR™ Analyzer Rev. A11
16
NIR Parameters
all chemical parameters analyzable by an optical NIR analysis system
NIR Families
the categories or families of feed components analyzable by an optical NIR
6 Use of the Portable AgriNIR™ Analysis
System
6.1 NIR Parameters and NIR Families
In case of standard calibratio ns package, the portable anal ysis system AgriNIR™
can analyze till t o a max of
common use in cattle breeding.
In all NIR analysis systems produced by
defined:
For cattle feeding, the l ist of all chemical NIR parameters t hat can be analyzed for each NIR fam ily is
expressed in the following table:
7 chemical param eters for a max of 7 f eed components categor ies of most
and therefore also for AgriNIR™ it is
analysis system
NIR chemical
parameters that
can be analyzed in
every NIR Family
DG standard
calibrations package
CORN SILAGE
HAY
HIGH
MOISTURE
CORN
ALFALFA HAY
NIR Families
GRASS SILAGE
T.M.R.
SOYBEAN
FLOUR
NIR Chemical Parameters
Moisture
( Humidity )
Starch
YES YES YES YES YES YES YES
YES NO YES YES YES YES YES
YES YES YES YES YES YES YES
YES NO YES YES YES YES YES
YES NO YES YES YES YES YES
YES YES YES YES YES YES YES
YES NO YES NO YES YES YES
Crude
Protein
ADF NDF Ash
Crude Fat
( Ether
Extract )
It is necessary to keep this table in mind while defining with DGNirManager the feed components to
analyze.
• The a.m. definition of the NIR families and therefore of the feed components categories
analyzable by NIR systems, is subjected to market requests and intends to include all feed
components mostl y used in cattle breed ing. Moreover, depending on th e usage of the AgriNIR™
system (according to th e NIR Cal ibrations carried out by special ized labor atories) it is poss ible to
create NIR Families that are c ompletely different f rom those mentioned here (e. g. NIR family for
Olive Husk).

Use AgriNIR™ Analyzer Rev. A11
ENGLISH
17
NIR
Families
is an Optional Calibration
• For every NIR fam ily it is necess ary to set the suitable Theoretical Refer ence Values for each
NIR chemical param eter that can be analyzed (see table above). These reference values are
normally the result of laboratory chemical analysis performed on different samples of the NIR
family and allow to t he AgriNIR™ s ystem to m ake a “selection” of the optical analys is that result
incorrect (ex. due to a b ad optical reading, to a false position of the sample under the read ing
head Read NIR, to a too much damaged component, to external rests present, etc...).
In case of
portable analysis s ystem AgriNIR™ can an alyze following NIR grain families and a llows these chemical
NIR parameters :
grains calibrations package (optional calibrations for grains), the
NIR chemical
parameters that
can be analyzed in
every NIR Family
DG grains
calibrations package
[ optional ]
CORN GRAIN
WHEAT GRAIN
The of
package that the final customer can add, when he orders a new AgriNIR™ machine.
NIR Chemical Parameters
Moisture
( Humidity )
Starch
YES YES YES NO YES YES YES
YES YES YES NO YES YES YES
grains calibrations package
Crude
Protein
ADF NDF Ash
Crude Fat
( Ether
Extract )

Use AgriNIR™ Analyzer Rev. A11
18
6.2 Correct Use of the Fodder Box for the Sam ples to Analyze
Before going on with the real use of the Portable AgriNIR™ Analysis System, it is important to understand
the correct use of the fodder box containing the sample to analyze.
This fodder box (provided with the AgriNIR™) is composed by :
• an upper side with glass, to allow the optical scanning of the sample;
• a metallic frame able to maintain the sample properly (with the right pressure!) in front of the
scanning window glass.
To fill in the fodd er box with the food sample to an alyze, it is very IMPORTANT t o put in practice the
following simple rules:
• make sure the fodder box GLASS IS CLEAN, without residues of other samples;
• in case of very soft materials with long pieces, as hay, alfalfa, or grass silage, it is NECESSARY :
sampling m aterial usi ng a specia l Corer (strongl y suggested! ) and then cut the sa mple in
order to have parts with length equal to 2/3 cm;
press the sample in order to reduce its volume up to 1/2 or 1/3 of the original one;
• the sample must be put int o the fodder in order t o cover complete ly the scanning w indow (glass)
without open spaces. Be low you can see 2 d ifferent pictures reporting how th e sample has to be
putted inside the fodder: quantity, pressure…
• in the first picture below, you can see a sample well prepared and ready for analysis
OK!
good pressure without
air spaces.
• in the second p ictur e be low, a sam ple prep ared i n a wrong wa y: sam ple qua ntit y is wro ng an d its
pressure on the glass is too low
NO!
low pressure with air
spaces.

Use AgriNIR™ Analyzer Rev. A11
ENGLISH
19
• after the insertion of the metallic frame in the f odder for pressing the sam ple, it is necessary to
check that its upper handles do not exceed the fodder profile:
OK!
Upper handles are inside the
fodder profile.
NO!
Upper handles are over the
fodder profile, creating
mechanical interference
during the insertion of the
fodder inside the AgriNIR™
body for sample scanning.
As soon as the fodder is ready with sample inside, insert the fodder box (glass side up) into the
AgriNIR™ body using the hall on the right side (see picture below).

Use AgriNIR™ Analyzer Rev. A11
20
NO!
Just started the analysis (after press <ENTER>), it is required to perform the following actions :
• fodder has to be move d front and rear with a uniform speed spending about 2 seconds for a
complete scanning cycle: 1 sec to front and 1 sec to rear;
• the fodder profile has to be always inside the AgriNIR™ box.
OK!
The fodder box is completely inside
the AgriNIR™ body.
OK!
The fodder box is on the edge of the
AgriNIR™ body, but NOT outside.
NO!
The fodder box is partiall y outside f rom
the AgriNIR™ body.

Use AgriNIR™ Analyzer Rev. A11
ENGLISH
21
6.3 Turning on the AgriNIR™ system
Press key to turn ON the portable AgriNIR™ analyzer, the following screens will appear :
ONLY FOR AgriNIR W:
In this phase there is the in itializati on of AgriNIR™ system either from hardwar e or from software point of
view. During this initialization the device loads all the settings requested from the customer and previously
set.
After, ONLY FOR AgriNIR W, a screenshot with an initialization time of 5 minutes appears.
After all initialization p hases, the system autom atically proposes f ollowing screen, where it is possible to
set the :
CUSTOMER CODE identif ier num ber of th e custom er ( ex. the owner of the f orages sam ples) which
the AgriNIR™ system performs the analysis on the requested feed components.
Basically it represents the use mode of the machine on behalf of third parties.

Use AgriNIR™ Analyzer Rev. A11
22
NIR status icon
Current Date & Time
List of NIR
available on
AgriNIR™
Temperature of the internal NIR
Power supply voltage
GSM/GPRS signal level
Below in the display
Function Icons
After set the customer code, press <ENTER> to continue in the main screen :
sensor, controlled at 32°C
Available only for AgriNIR
Analyzer with GSM/GPRS
cod. 999-0347
families
analyzer
Name of the selected
NIR family
there are a set of
graphical icons.
Every function icon can
be activated by one key
Function Keys
on keyboard
corresponding of the 6
F-keys on the keypad.
Below in the disp lay can appear m aximum 6 function icons . In case of mor e function icon are av ailable
the following keys :
NEXT PAGE, to access to the next set of function icons
PREVIOUS PAGE, to return to the previous set of function icons
For example, if you press
if you press
ONLY FOR AgriNIR W:
in the main screen you can access to the next 4 function icon :
you can return to the 6 previous function icon :

Use AgriNIR™ Analyzer Rev. A11
ENGLISH
23
phase is
15
6.4 States & Messaging of NIR analyzer internal system
After turning on the AgriNIR™, before going on with the execution of the analysis it is better to wait
always at least
• the thermoregulation of the NIR optical sensor to reach the target temperature of 32°C;
• the necessary warming up of the internal lamp of the Read NIR reading head;
• one first calibration of the optical references of the internal NIR analysis system.
By the way, to help the user the AgriNIR™ system shows on the right t op of the sc reen an icon referr ing
to the contemporary state of the NIR system:
AgriNIR AgriNIR W Description of the icon
15 minute before starting to allow :
WARM-UP
the internal NIR system is executing the initial warm-up phase to reach the
target temperature of 32°C and to warm-up of the internal lamp.
OPTICAL CALIBRATION
the internal NIR system is executing the calibration phase of the optical
references.
READY
the AgriNIR™ system is ready for the analysis execution.
RUNNING ANALYSIS
the AgriNIR™ system is executing the analysis.
CONNECTION MISSING or ERROR STATUS
the NIR group is not connected to the electronic unit or there is an issue the
internal NIR system.
ERROR OF NIR CALIBRATION
After turning ON the machine BEFORE STARTING w ith t he a na l ysis executions, the AgriNIR™ system
executes automatically :
The system can’t performs the calibration.
1. the WARM-UP phase of the NIR group with status icon , to allow :
the thermoregulation of the NIR optical sensor to reach the target temperature of 32°C;
the necessary warming up of the internal lamp of the Read NIR head;
2. the CALIBRATION phase of the NIR group w ith status icon , to a llo w th e f irs t calibr at ion of
the optical references of the internal NIR analysis system;
3. after these first two phases the AgriNIR™ analyzer is READY, with status icon .
Although the WARM-UP takes less time and the CALIBRATION
already done, it’s STRONGLY RECOMMENDED to wait always at least
minutes before starting use the AgriNIR™ machine.
Please see NOTES FOR THE USER point N° 1 at page 3.

Use AgriNIR™ Analyzer Rev. A11
24
ne executes automatically
If you start the analysis execution during the WARM-UP phase, the AgriNIR™ system shows the
following message:
The status icon of the NIR system indicates
WARM-UP phase.
the
At the end of the calibration this message
disappears and the AgriNIR™ begins
automatically the CALIBRATION phase and its
message (see the next picture below).
If you start the a nalysis exec ution during the
following message :
CALIBRATION phase, th e AgriNIR™ system sho ws the
The status icon of the NIR system indicates
CALIBRATION phase.
the
At the end of the calibration this message
disappears and the AgriNIR™ begins
automatically the AN ALYSIS EXE CUTIO N of the
selected component.
During normal functioning, the AgriNIR™ machi
the optical calibration phase :
• every 5 minutes;
• just after every analysis execution.
For this reason it's possible :
the NIR status icon changes automatically to
to have the NIR calibration message during analysis execution.
;

Use AgriNIR™ Analyzer Rev. A11
ENGLISH
25
Error State
It’s NOT possible to detect the
6.5 Error Messaging of NIR analyzer internal system
After turning on the AgriNIR™, s et the Cus tomer Code to co ntinue in th e main s creen, if appear s (before
start the WARM-UP phase) :
TROUBLESHOOTING
1. Please check if a data c able is connected to the PR OG / DATA connector (please
see the picture at page 10). In th is case the intern al NIR system takes more time to
start the communication and to update NIR status icon and NIR temperature.
2. Please check if the communication cabl e from Electronic Un it (front control pa nel) is
connected to the NIR group inside the bottom box.
NIR system is in
temperature of the internal NIR
sensor
3. Please check if the communication cable from Electronic Unit to NIR group is not
damaged.
4. If is not the case 1 or 2, please contact the Customer Service.
During functioning of the AgriNIR™ machine, if appears this following messages :
the AgriNIR™ machine c annot communicate
with its internal NIR analyzer.

Use AgriNIR™ Analyzer Rev. A11
26
TROUBLESHOOTING
1. Please check if the communication cabl e from Electronic Un it (front control panel) is
connected to the NIR group inside the bottom box.
2. Please check if the communication cable from Electronic Unit to NIR group is not
damaged.
3. If is not the case 1 or 2, please contact the Customer Service.
During functioning of the AgriNIR™ machine, if appears this following messages :
the thermoregulation of the internal NIR
optical sensor CANNOT maintain the target
temperature of 32°C.
TROUBLESHOOTING
1. Verify if the environm ental temperature, where the AgriNIR™ machine is locat ed, is
out of the Working Temperature range. Please see Technical Data at page 5.
2. Remove completely the NIR group from the AgriNIR™ machine, then check if the
filter fan and the finned heat sink (visible on the back side where the shield is pierced)
are clean. Otherwise proceed to clean using a low flow of compressed air.
3. Verify if the fan on the c onnector side of t he NIR Group is working, ot herwise c ontact
the
Please IMMEDIATELY turn OFF the
AgriNIR™ m achine and leave it off for at
least
30 minute.
Customer Service for the spare part.
4. If is not the case 1, 2 or 3, please contact the Customer Service.

Use AgriNIR™ Analyzer Rev. A11
ENGLISH
27
back right angle corner
NO
6.6 Initial Optical Checking of t he AgriNIR™ system
Every day
recommend to execute the
BEFORE start using the AgriNIR™ analyzer,
OPTICS TEST using the CHECK-CELL accessory.
CHECK CELL special sample cell acetyl resin for the optics testing of the AgriNIR™ machine.
Follow the procedure below to perform the
1. Insert the CHECK-CEL L in the de dicat ed seat on t he u pper ed ges of t he fodder b ox, making s ure the
correct orientation :
OPTICAL TEST PROCEDURE.
beveled corner to match to the
seat of the fodder box

Use AgriNIR™ Analyzer Rev. A11
28
2. Insert completel y the fodder box and t he CHECK-CELL w ith its glass-face side up, inside the
AgriNIR™ box until the bottom :
3. In the main screen, pres s to access to the next 4 function icon , then pres s to enter
AGRINIR OPTICS TEST procedure :
on
the AgriNIR™ anal yzer shows instructions to
execute properly the
OPTIC S TEST.
Press <ENTER>
or <RESET>
to start optics test
to exit without testing.

Use AgriNIR™ Analyzer Rev. A11
ENGLISH
29
4. Press <ENTER> to start the automatic testing procedure :
WARNING!
DO NOT move the fodder box with the
CHECK-CELL inside during testing
execution.
If you move the fodder box, the CHECK-CELL
cannot be in front of the internal optical re ading
window (ReadNIR window, where is the lamp
light); consequentl y the CHECK-C ELL cann ot be
properly read.
Pressing <RESET>
testing execution is immediately aborted.
5. After 40 seconds, the AgriNIR™ analyzer shows the optical test result :
The AgriNIR™ internal optics is OK!
Now you can proceed to execute analysis.
Press <ENTER>
exit and continue.
or <RESET> to
6. If the testing exec u tio n t akes more than 4 0 sec o nds ( 2 minutes), the optics test could fail. In this case
the AgriNIR™ analyzer shows following message :
WARNING!
The AgriNIR™ internal optics is FAIL!
Consult the following troubleshooting procedure
to solve the issue.
Press <ENTER>
exit and continue.
In this case you can save t he optical spectra on
USB memory ke y pressing F-key
send data to the
Service for checking.
or <RESET> to
, then
Customer

Use AgriNIR™ Analyzer Rev. A11
30
TROUBLESHOOTING
1. Verify if the CHECK-CELL is properly inserte d inside the f odder box. Pleas e see the
pictures at page 23 point 1.
2. Verify if the fodd er box with CHECK-CELL is properly inserted inside the AgriNIR™
analyzer box. Please see the pictures at page 24 point 2.
3. Verify the cleaning of the CHECK-CELL glass or the ReadNIR glass insi de the NIR
group on the bottom side.
4. Verify if the CHEC K-CELL glass or the ReadNIR glass is broken, other wise contact
the
5. Verify if the lam p inside the NIR group is not on its correct position or its t ime life is
expiring (1 year) ; in second case, please contact the
Service for the spare part.
Customer Service for the spare parts.
Customer
6. Verify if the optic fiber terminal (visible inside the NIR group through t he g lass win do w
on the bottom side) is properly inserted on its brass fitting, otherwise if it's moved
please contact the
Customer Service.
7. If it's none of the previous cases, please s ave the optical spectra on U SB memory
key and contact the
Customer Service.

Use AgriNIR™ Analyzer Rev. A11
ENGLISH
31
6.7 Analysis Samples Identifying
Before starting the analysis on the forage sample, it’s possible to set the following identifiers.
If you press F-key
SAMPLE ID
is the current sample identifier number : this ID number will be automatically proposed
before starting the analysis on the sample and it will be printed on the tickets at the end of
analysis execution.
it’s possible to set :
SAMPLE ID, it allows to mark the parti-cular
physical sample to analyze.
Press the cursor keys
… to change the
Sample ID value.
Press <ENTER>
Press <RESET>
or the F-keys
to exit and save value.
to exit without saving.
LAST S AMPLE ID
is the previous sample identifier number used in the last analysis.
After every analysis the SAMPLE ID number is automatically increased by 1.
If you press F-key
it’s possible to set :
CUSTOMER CODE, it allows to give a
code number to the client who the analysis
sample belongs.
Press the cursor keys
… to change the
Customer Code value.
Press <ENTER>
or the F-keys
to exit and save value.
Press <RESET>
to exit without saving.
CUSTOMER CODE
this number will be printed on the tickets at the end of analysis execution.

Use AgriNIR™ Analyzer Rev. A11
32
If you press F-key it’s possible to set :
CLIENT INFORMATION, it allows to give
more details about the client who the physical
sample belongs.
Only the COMPANY name will be printed on the tickets at the end of analysis execution.
All the
Client’s data, when analysis is saved on USB memory key.
To modify the d ata in the
press keys
press F-key
CLIENT INFORMATIONs will be stored in the INFO.DAT file containing the
CLIENT INFORMATION window :
to move up / down the cursor and select the information;
to enter in edit mode on the selected information.
After pressed F-key
press keys
press
appear automatically the string icons on the bottom :
to move right / left the cursor “_“ ;
to insert a character at the beginning;

Use AgriNIR™ Analyzer Rev. A11
ENGLISH
33
press to select capital letters / small letters, numbers, symbols;
press
press
press
press
press <ENTER>
press <RESET>
press F-key
to insert a character at the cursor position;
to delete a character at the cursor position;
to delete all characters from the cursor position to the end on the right;
to insert a character at the end on the right;
to confirm the new data string;
to exit without modify the data string;
to save all data and quit
If you press F-key
memory.
If you press F-key
analyzer by
you can recall the Client Information previously stored on internal
you can recall the Client Information defaults provided on the AgriNIR™
:

Use AgriNIR™ Analyzer Rev. A11
34
Please take care to select the correct Component / NIR family before
feed components
6.8 Analysis Execution with AgriNIR™ System
After turned ON the AgriNIR™ system and performed following phases :
• WARM-UP (at least 15 minutes) and CALIBRATION please see at page 19 for more details;
• optics test with CHECK-CELL
• identification of the sample (using SAMPLE ID
(CUSTOMER CODE
it’s possible to prepare th e sample inside the fodder box (see at page 14 for more detai ls) and starts to
execute the analysis.
In the main screen it’s possible to select the component to analyze by pressing the keys
and CLIENT INFORMATION );
please see at page 23 for more details;
) and set the customer information
:
In case of
can analyze till to a max of
Moving the pointer you ca n c hoos e among 7 NIR families / components ( Corn S il age, Hay, High Moistur e
Corn, Alfalfa Hay, Gras s Silage, TMR, Soybean F lour) : every component t hat can be chosen in th is list
represents a feed components category (the NIR family) which the sample to analyze can belong.
Select a different com ponent / NI R families m eans select a different NIR c alibrati on inside the AgriNIR™
analyzer.
standard calibrations package, the portable analysis system AgriNIR™
7 NIR families (feed components categories) as mentioned at page 13.
starting the analysis on the forage sample.
The Component / NIR family selected represents the
category which the sample to analyze belong.

Use AgriNIR™ Analyzer Rev. A11
ENGLISH
35
Examples :
• Sample of HAY OF STEADY LAWN :
sample must be taken by the Corer (or shredded), then put it in the fodder box;
select the component (or NIR family) N° 2 HAY to execute the analysis.
• Sample of CORN SILAGE :
sample must be taken without grinding, then put it in the fodder box;
select the component (or NIR family) N° 1 CORN SILAGE to execute the analysis.
After selected the com ponent to anal yze, the AgriNIR™ system propose the Sam ple ID num ber to as sign
on the physical sample to be analyzed :
SAMPLE ID, it’s the actual number to assign to
the physical sample.
LAST SAMPLE ID, it’s the previous number
assigned to last physical sample analyzed.
Press <ENTER>
Press <RES ET>
where you can choice a different component.
If you press <ENTER>
two analysis execution modes :
to confirm the Sample ID and continue with analysis execution.
to quit immediatel y the anal ysis (without exec uting) an d return to the m ain scr een
to confirm, the AgriNIR™ s ystem gives the possibility to choos e between
Press the cursor keys
… to change the
Sample ID value.
or the F-keys
press <ENTER>
of you want choose the
MULTIPLE ANALYSIS mode;
press <RESET>
of you want choose the
SINGLE ANALYSIS mode;

Use AgriNIR™ Analyzer Rev. A11
36
INSTRUCTIONS FOR PROPER SELECTION OF ANALYSIS MODE
Case of SAMPLES HOMOGENEOUS and LOW QUANTITY
Case of SAMPLES NOT HOMOGENEOUS
Case of LARGE SAMPLE QUANTITY
The AgriNIR™ analyzer allows two analysis execution modes to satisfy following cases :
Examples : High Moisture Corn, Soybean Flour
1. If the sample is already grinded not more than 2/3 m m , it's poss ible to put direct ly
the sample inside the fodder box.
2. Select
Examples : Corn Silage, Hay, Alfalfa Hay, Grass Silage, TMR
1. Provide to shred the material to obtain pieces not longer than 2/3 cm, then put the
2. Select
3. Mix the sample inside the fodder box between a single analysis and the next.
Examples : bunker of Corn Silage, Grass Silage or TMR; bale of Hay or Alfalfa Hay
1. Collect enough samples that are r epresentative of the entire bunker front, or the
2. Provide to shred each samples to obtai n pieces not longer than 2/3 cm, then put
3. Select
4. After executed a single anal ysis, take next the sam ple and put it into t he fodder
SINGLE ANALYSIS mode to execute the analysis.
sample inside the fodder box.
MULTIPLE ANALYSIS mode, using at least 3 analysis.
entire bale, etc…
one sample inside the fodder box.
MULTIPLE ANALYSIS mode, using N° of analysis = N° of co llected
samples.
box.
In case of
SINGLE ANALYSIS execution mode (pressing <RESET> ) :
the AgriNIR™ system starts automatically with
the execution of a si ng le an alysis
component and therefore on the sample in the
fodder box.
Please start IMMEDIATELY to move the
fodder box as soon as you press
<RESET>
If you want to quit immediately the analysis, press<RESET>
on the selected
WARNING!
.
during the analysis execution.

Use AgriNIR™ Analyzer Rev. A11
ENGLISH
37
In case of MULTIPLE ANALYSIS execution mode (<ENTER> ) :
the AgriNIR™ system requests the number of
analysis to perform on the component in the
fodder box :
MAXIMUM 20 ANALYSIS
WARNING!
Please start IMMEDIATELY to move the
fodder box as soon as you press
<ENTER>
During the execution of the repeated analysis are shown screens like this :
Here it’s indicated the execution in progress of
the analysis N° 2 of the 5 total analysis.
Before starting ever y single anal ysis (of the tot al
N° scheduled), the AgriNIR™ system asks
always for a confirmation from the operator.
.

Use AgriNIR™ Analyzer Rev. A11
38
DRY MATTER
MOISTURE (Humidity)
Chemical Parameters on DM
Chemical Parameters on AsIs
At the end of the analysis executions (single or multiple) the AgriNIR™ system shows the results :
value of the
sample.
value of the sample :
calculated as 100% - Moisture.
the chemical values expressed on the
dry matter :
calculated as Param
values of the sample.
On display it is shown a table that reports the pred iction values of NIR chemical parameters obtained
from the analysis performed on the sample in the fodder box.
The values of the chemical parameters are always expressed in % and in 2 columns :
• in the left column are the prediction values expressed on AsIs, that is to say the total %
present in the sample just analyzed;
• in the right column are the prediction v alu es exp ressed o n t he D RY MATTER, that tot o say on
the sample part without water.
/ DM%
AsIs
NOTE. In case of MULTIPLE ANALYSIS the AgriNIR™ s ystem does not s how the r esults af ter ev ery
single analysis performed but only at the end of the execution of the last analysis.
The prediction va lues of the NIR chemic al parameters are the resu lt of the prediction AVERAGES of the
single analysis performed. In case of analysis not right performed, the AgriNIR™ system does not
consider them in the final average of the results.
In case a NIR chemical parameter following results :
n.a.
Parameter NOT AVAILAB LE
This chemical parameter hasn’t been defined for the NIR family chosen in analysis.
Parameter with WRONG RESULT
Err.
Out.
The AgriNIR™ analyzer cannot predict this chemical parameter.
Please check the sample in the fodder box, the NIR family chosen or the NIR calibration.
Parameter OUT OF RANGE
This chemical parameter prediction value is out of the acceptability range.
In this picture you can see :
STARCH is not available for GRASS SILAGE
PROTEIN is out of range
ADF, NDF are not possible to predict

Use AgriNIR™ Analyzer Rev. A11
ENGLISH
39
is broken, otherwise contact the
6.9 Case of incorrect analysis
In case of analysis (sing le or repeated) that are NOT correct, the AgriNIR™ s ystem shows the following
error message :
TROUBLESHOOTING
1. Verify if the sample is properly inserted inside the fodder box. Please see the
paragraph Correct Use of the Fodder Box for the Samples to Analyze at page 14.
2. Verify if the fodder box is properly moved d uring analysis execution. P lease see the
paragraph Correct Use of the Fodder Box for the Samples to Analyze at page 16.
If you press <ENTER>
system proposes again to execute the analysis
on the same component just selected.
If you press <RESET>
system quit the anal ysis execution phase o n the
selected component.
the AgriNIR™
the AgriNIR™
3. Verify if you have c h osen the correct NIR family / component before start the anal ysis
on the sample.
4. Verify the cleaning of the Fodder Box glass or the ReadNIR glass inside the NIR
group on the bottom side.
5. Verify if the Fodder Box glass or the R eadNIR glass
Customer Service for the spare parts.
6. Verify if the lam p inside the NIR group is not on its correc t position or its time lif e is
expiring (1 year) ; in second case, please contact the
Service for the spare part.
Customer
7. Verify if the optic fiber terminal (visible insi de the N IR g roup thr o ugh t he g las s w in do w
on the bottom side) is properly inserted on its brass fitting, otherwise if it's moved
please contact the
Customer Service.
8. If it' s none of the previous cas es, please contact the Customer
Service.

Use AgriNIR™ Analyzer Rev. A11
40
6.10 Analysis printing on tic ke t s
At the end of analysis execution, when the AgriNIR™ system shows the results table :
If you press the F-key
If you press the F-key
ticket (max. 99 copies) displaying the current number of printouts in a small box on the bottom of the
screen.
you can PRINT ON A TICKET the analysis results.
you can set th e PRINTOU T NUMBER i.e. the number of copies of the
Press the cursor keys
Then press <ENTER>
After setting the number of copies of the ticket, press the F-key
copies of the ticket of analysis results.
or the F-keys to change the PRINT N°.
to confirm the set copies of the ticket to print and exit.
to PRINTS all the requested

Use AgriNIR™ Analyzer Rev. A11
ENGLISH
41
Printer Header
NIR Family Identifier Number
Kind of Analyzed Component (NIR Family Name)
Identifier Number of the Analyzed Physical Sample
Customer Code and Company Name
AgriNIR machine serial number
The printout of the ticket after the analysis performed on a sample is :
[ see at page 48 how to set ]
who the particular sample belongs
Analysis Results of Chemical Parameters
(on AsIs and on the Dry Matter)
Time - Hour of the Analysis Execution

Use AgriNIR™ Analyzer Rev. A11
42
6.11 Analysis saving on USB pen drive
At the end of analysis execut ion, when the AgriNIR™ s ystem shows the results table, you can s tore the
results on the USB memory key :
Press F-key
On USB memory key a file folder is created with naming convention < Date Time >, which contains :
to SAVE THE DATA ON USB PEN DRIVE (on USB memory key).
analysis folders on USB key
one file .txt with naming convention < ID NIR Family _ progressive number > for each single
analysis just executed (1 file in Single Analysis mode, N file in Multiple Analysis mode);
single analysis mode multiple analysis mode
NOTE. These files .txt is used on ly associated with DGNirManager software to store the optica l
spectra of the analyzed samples, then to create new calibration curves.

Use AgriNIR™ Analyzer Rev. A11
ENGLISH
43
Sample ID
Name, value of
AgriNIR™
NIR family
the file INFO.DAT containing the Client ’s Data set on AgriNIR™ by Client Infor mation windows
(see at page 30) :
the file with nam ing con vention < DATE&T IME > containing the analys is results (show on displa y
at the end of analysis execution) :
Date & Time of
analysis execution
At the end of data saving on USB key, automatically :
• is PRINTED the number of ticket set previously;
• the following message is shown on the display :
chemical parameter
machine S/N
Machine S/N serial number of AgriNIR™
device used to make the analysis
Sample ID identifier number of the particular
physical sample just analyzed
NIR family identifier of the NIR family of the
analyzed component
Date date of the analysis execution
Time hour of the analysis execution

Use AgriNIR™ Analyzer Rev. A11
44
During the data store on USB Key, if the following error messages appear :
Fig. 1 Fig. 2
Error message in Fig. 1 the USB Key (Pen Drive) is not connected to the proper USB port on
AgriNIR™;
Error message in Fig. 2 the USB Key (Pen Drive) has been disconnected from USB port or
It’s necessary to erase a part of data stored on USB Key.
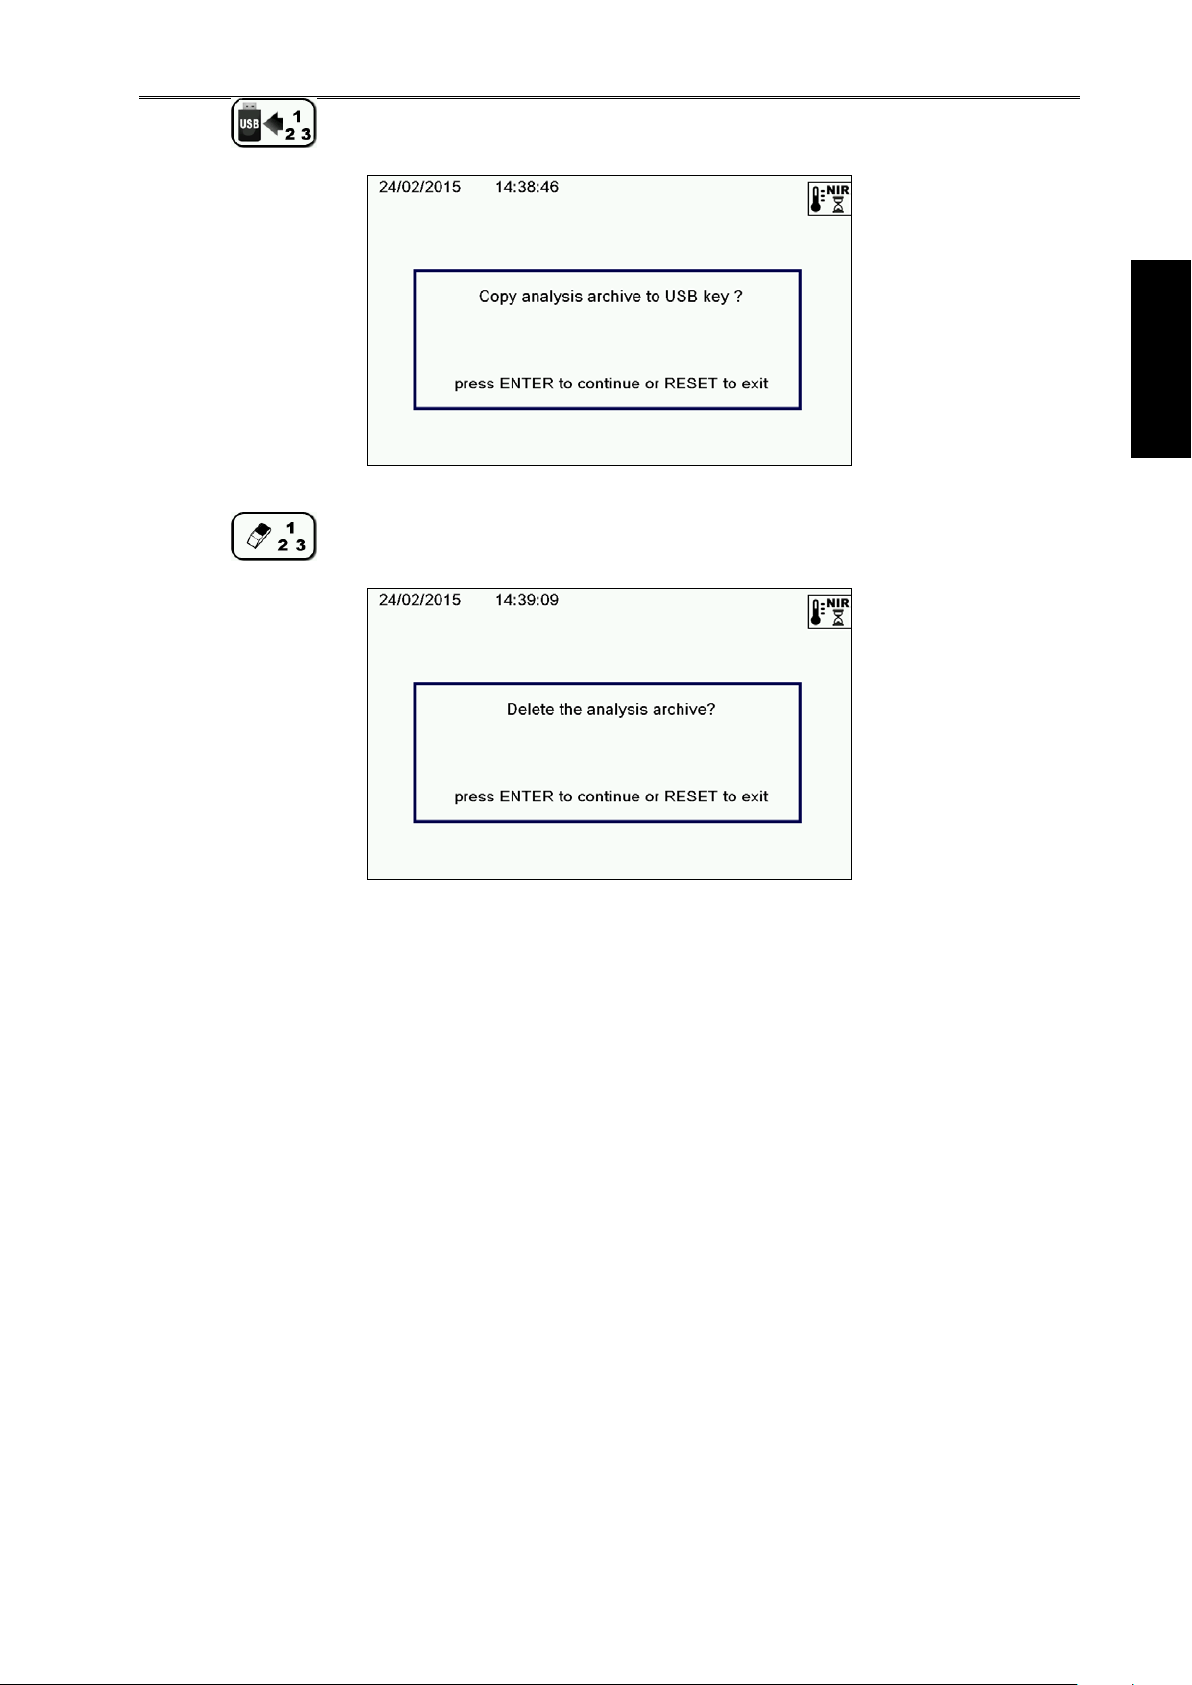
6.12 Analysis History – available only for AgriNIR W
The AgriNIR™ W save automatically the last 100 analysis executed inside an archive.
It is possible recall the analysis through this history in order to save it (on USB key), display it on the
screen, and eventually print it.
On the main page, press the
At this point, the follow screen will appear with the list of analysis executed:
key in order to switch to the next page and then press .
Use AgriNIR™ Analyzer Rev. A11
ENGLISH
45
Press the key in order to copy the datas of analysis on the usb memory card.
Press the
key in order to delete the archive relative to the analysis.

Use AgriNIR™ Analyzer Rev. A11
46
6.13 Other Settings of AgriNIR™ System
In the main two screens, the AgriNIR™ system allows other simple setting commands :
buttons to go to the NEXT and PREVIOUS screen.
B&W DISPLAY INVERSION
with this command you can invert the
display from white background to black
background and vice versa.
CONTRAST ADJUSTMENT
with this command you can adjust the
display contrast.
DATE & TIME SETTING
with this command you can set the
current date and time of the AgriNIR™
system.
NOTE. This is important for a correct data
chronology.

Use AgriNIR™ Analyzer Rev. A11
ENGLISH
47
6.14 Calibration Updating of AgriNIR™ System
In the second main component selection screen, the AgriNIR™ system offers the following setting
commands :
CALIBRATION CURVES
UPDATING
With this command you can update the
calibration curves of the NIR families (available
on the main screen l ist) that can be analyzed by
the AgriNIR™ system.
To update the calibrations :
1. insert the USB memory key with the file
2. select the ID of the c omponent (see component list in t he main screen) where you wish to update
the calibration;
comp.a37 containing the new calibration curves;
3. press the special key
system.
to update the calibr ation in the interna l memor y of the AgriNIR™
NOTE. DO NOT remove the USB memory key until the message of ended calibration is displayed!
If the file
calibration curves IS NO T available on the USB
Key, the error message here shown on the left
appears.
comp.a37 that contains the new

Use AgriNIR™ Analyzer Rev. A11
48
6.14.1 Update Calibrations for AgriNIR W
Switch ON the AgriNIR-W machine keeping pressed both the
BOOTLOADER screen appears.
Press the F5 button to start loading the AgriNIR-W calibration upgrade.
+ buttons until the

Use AgriNIR™ Analyzer Rev. A11
ENGLISH
49
Press the F1 button to continue the AgriNIR-W calibration upgrade.
Wait the calibration loading (few seconds) until the GREEN SCREEN will appear.
Press the
button to switch OFF the AgriNIR-W machine.

Use AgriNIR™ Analyzer Rev. A11
50
AgriNIR
Chiavetta
nirdata.bin
6.15 LOADING O F NEW NIR DATA STRUCTURE (NIRDATA.BIN file)
USB
file
The NIR Data Structure contains the l ist of the NIR families an d chemical parameters available for the
analysis performed by the AgriNIR™ ana l yzer.
For NIR Data Structure upgrading is necessar y to reload the c onfiguration f ile nirdata.bin (prov ided by
dinamica generale or created by DGNirManager program). Please follow the steps below.
1. Copy nirdata.bin file into the USB key : please, don’t use any other existing folders!
2. Connect the USB key to the AgriNIR™ machine.
3. Turn ON the AgriNIR™ machine and press <ENTER>
Structure :
to accept the new NIR Data

Use AgriNIR™ Analyzer Rev. A11
ENGLISH
51
4. DO NOT remove the USB memory key while the file is being loaded!
5. Verify the new NIR Families list just loaded on the AgriNIR™ machine.
6. Execute an analysis to check the new Chemical Parameters now available on the AgriNIR™
machine.

Use AgriNIR™ Analyzer Rev. A11
52
6.16 Deleting Analysis on internal memory
DELETING ANALYSIS DATA FROM INTERNAL MEMORY
With this command you can permanently delete the data from the internal memory concerning the
analysis performed (either valid or wrong) and relevant optical spectra acquired from the analyzed
samples.
Pressing <ENTER> you start the deleting
procedure of the anal ysis data from the internal
memory of the AgriNIR™ system.
In this phase all data conc erning the CORRECT
ANALYSIS, i.e. wit h no errors, are deleted from
the internal memory.
In this phase all data concerning the WRONG
ANALYSIS, i.e. with errors or not successful
(“Analysis Error” is displayed), are deleted from
the internal memory

Use AgriNIR™ Analyzer Rev. A11
ENGLISH
53
6.17 Deleting the initial mes s a ge of FULL ME MO RY
After a certain num ber of analysis (approx. 60-70) per formed with the AgriNIR™ system , the following
message may appear when switching the system on :
When switching the system on, this mess age is
displayed to warn th at the space of the internal
memory for the Analysis Execution Log is
reaching its full capacity.
NOTE. This section of inte rnal mem ory is NO T acc essible to the user and m ay NOT be deleted with the
deleting function
To delete the section of internal memory for the Analysis Execution Log follow this procedure :
, as this function refers only to the memory area for the analysis data performed.
When switching the system on, when the
message “System Initialization” is displayed,
press <ENTER> for a few seconds until the
SYSTEM CONFIGU-RATION environment
appears.
Access the configuration menu 6 :
“Setup protected by pas sword”

Use AgriNIR™ Analyzer Rev. A11
54
Enter the password
procedure of the Analysis Execution Log in the
internal memory of the AgriNIR™ system.
Press <ENTER> to confirm the deleting
procedure of the Analysis Execution Log.
After a few seconds you get the message
informing that the deleting procedure of the
Analysis Execution Log was successful!
At the end you return to the main screen of SYSTEM CONFIGURATION :
1334 to access the deleting
press < RESET > for at least 1 SEC to exit and return to the use environment of the AgriNIR™
system.

Use AgriNIR™ Analyzer Rev. A11
ENGLISH
55
Printer Header
6.18 Printer Header Settings
It is possible to s et the Printer Header on tickets printed by the AgriNIR™ s ystem, with your preferred
data :
To set your Printer Header on the tickets, follow this procedure :
When switching the system on, when the
message “System Initialization” is displayed,
press <ENTER> for a few seconds until the
SYSTEM CONFIGURATION environment
appears.
Access the configuration menu 5 :
“Printer header”

Use AgriNIR™ Analyzer Rev. A11
56
press buttons to select data to modify;
press to recall the default printer
header (“Dinamica Generale …”).
press <ENTER> to edit the new data value
press buttons to insert a character;
press to move the cursor;
press to insert a character at the beginning;
press to select capital letters / small letters, numbers, symbols;
press to insert a character at the cursor position;
press to delete a character at the cursor position;
press to delete all characters from the cursor position to the end on the right;
press to insert a character at the end on the right.
press <ENTER> to confirm the new data value;
press <RESET> to exit without modify the data value.
You can use the SPECIAL CHARACTERS (not printable!) :
1¦ to set double width characters, on the printable string
2¦ to set double height characters, on the printable string
3¦ to set double width and double height characters, on the printable string
At the end, after set all data on the Printer Header :
press < RESET > to return to the main screen of SYSTEM CONFIGURATION;
press < RESET > for at least 1 SEC to exit and return to the use environment of the AgriNIR™
system.

Service AgriNIR™ Analyzer Rev. A11
ENGLISH
57
7 CLEANING THE DEVICE
It is important to clean thor oughl y and periodicall y the AgriNIR™ system, especially the lower m etal body
where the sample fodder box and the Read NIR module are positioned.
To clean the system correctly going on as follows:
• disconnect the connect or o f the elec tric ca ble an d loos en the sec uring k nob of the N IR Group, as
shown in pict. 6A;
• turn the securing bracket of the NIR Group by 90° anticlockwise, as shown in pict. 6B;
• raise the NIR Group up as sho wn in pict. 6C;
• clean with a soft lig htly wet cloth the Rea d NIR r ead ing hea d’s wind o w and el iminate the residues
around (see pict. 6C);
• clean with a soft wet cloth or even with pres suri zed air (a low press ure of 2/3 bar m ax) the fodder
box sliding site (see pict. 6C);
• it is possible discon nect the fan filter and c lean it with press urized air (a low press ure of 2/3 bar
max) (see pict. 6D).
It would be better to follow this procedure after executing analysis on samples with a high water
percentage (for example, corn silage).

Service AgriNIR™ Analyzer Rev. A11
58
8 DEVICE SERVICING
8.1 Verification and Servici ng of the O pti cal Gr oup
a) Remove the NIR Group from the metal support in the bottom of the case.
To do this :
• open the NIR Group (as indicated in section 6 pict. 6A and 6B);
• unhook the metal hinge supporting the NIR Group:
• remove the NIR Group from the metal bottom of the case.
b) Verify the protection glass of the Read NIR head.
If it is broken, get in touch with
c) Verify the communication state between NIR Group and Electronic Unit :
• a few seconds after s witching on the system, also th e lamp of the Read NIR reading h ead
must turn on (visible from the hole for inserting the fodder box on the right side of the case);
• after 2 minutes the ac tuator mus t move the optica l calibration door (just und er the Read NI R
reading head’s window see sect. 6 pict. 6C) towards the optical fiber, taking it in working
conditions after about 1 minute.
d) Verify the condition of the lamp: if during the checks made according to step C the lamp has not
turned on, check that the lamp is correc tly connected in the Re ad NIR head (open the door on the
side of the head unscrewing the 4 M4 self-locking nuts) and check that the lamp is not damaged.
To access the lamp:
• unscrew the 4 M4 self-locking nuts from the lamp cover on the NIR Group side
• CAREFULLY remove the cover with the lamp disconnecting the cable from the lamp socket;
Assistance Service.
If the lamp is broken or not correctly working, get in touch with
Service.
Assistance

Service AgriNIR™ Analyzer Rev. A11
ENGLISH
59
e) Verify the state of the linear actuator: if during the c hecks listed in st ep C the linear actuator h as not
moved the calibratio n door , c hec k the actuator’s c on ne c tion to the Re ad N IR ’s e lec tr onic b oar d (open
the door on the side of the head unscrewing the 4 M4 self-locking nuts and check the 4-wiredconnector).
If during the chec ks listed i n step C th e calibration door does n ot move f rom one side to the other of
the reading window, check that there are not mechanical obstacles.
f) Verify the optical fiber: ex ecute the analysis of the component. If AGRINIR™ continues s howing the
message “ANALYSIS ERROR!”, check that the extremity of the optical fiber inside the Read NIR
reading head’s window is clean.
WARNING! The optical fi ber is directly connected in side the NIR optical sensor and shows a little
glass fiber inside, that’s why:
• THE NIR GROUP SHOULD NOT BE OPENED (exc ept for the lamp cover as indicated in
step D and E);
• in case of faults, get in touch with
Assistance Service.
8.2 Replacement of the Printer’s Paper
a) Turn the AGRINIR™ off.
b) Open the front p anel of the print er by pres sing t he centr al green k ey (it lights up when th e AgriNIR™
system is switched on).
c) Pull out the empty paper plastic support.
d) Insert the new THERM IC PAPER roll, keeping attention to
insert correctly the paper through the printer site.
e) Hook again the front panel of the printer, ex erting a light pressure on the points show in the picture
below :
f) Turn the AGRINIR™ on.
g) Let the paper advanc e pus hing <FEED >
been inserted correctly.
on the printer. If the paper is block ed, check that it has

Rules AgriNIR™ Analyzer Rev. A11
60
9 RESPONSIBILITIES
The AgriNIR™ system is an analysis device that needs moving material in front of the
optical reading head Read NIR, to have a good scan of the sample in the fodder box
and obtain therefore a prediction in line with the expectations.
We remind that the AgriNIR™ system can have the GSM communication system, which
gives the possibility to :
• monitor the functionality of the AgriNIR™ system from a remote service centre;
• update the internal calibrations of NIR analy sis;
• send collected samples to analyze in a laboratory according to the “SAMPLES
COLLECTION HANDBOOK”.
All the analysis values performed by AgriNIR™ system are shown on display and stored
for future controls through the use of the special USB memory key (Pen Drive).
In particular the AgriNIR™ analysis results:
• are available directly on the screen or can be printed on a ticket at the end of the
analysis;
• can be transferred on PC, through the USB memory key (Pen Drive), to the
management program DGNirManager to store and use them for any updating of
the calibration curves of the NIR families analyzed by the AgriNIR™ system.

Rules AgriNIR™ Analyzer Rev. A11
ENGLISH
61
10 CE CONFORMITY DECL ARATION
Company’s name : Dinamica Generale s p a
Company’s address : Via Mondadori, 15
46025 Poggio Rusco (MN)
ITALY
WE DECLARE THAT THE PRODUCT:
Model : AgriNIR™ ANALYZER
Description : Portable Analysis System
Options : All configurations
is made in conformity with the following directives and standards required by European
2004/108/EC, respecting the following laws:
EMC generic standard for emission:
EN 61326-1
EN 55011 (1999) – A 1 (2000) – A2 (2003)
EMC generic standard for immunity:
EN 61000-4-2 (96) – A1 (99) – A2 (01)
EN 61000-4-3 (97) – A1 (02)
EN 61000-4-4 (96) – A1 (01) – A2 (01)
EN 61000-4-5 – (1997)
EN 61000-4-6 (97) – A1 (01)
EN 61000-4-8 (97) – A1 (01)
POGGIO RUSCO, 28/08/2006
This document is an exclusive property of Dinamica Generale spa
Even partial re production is forbidden.

Rules AgriNIR™ Analyzer Rev. A11
62
NOTES :
11 WARRANTY
The supplier guara ntees, for 24 months from the de livery date, the good qualit y of materials used, the
excellent construction and the steady functioning of the instrument they have manufactured and that
bears the tradem ark or the product ion serial num ber. During th e warranty per iod the suppl ier undertak es
to repair or replace, f ree supplier’s head office, f aulty parts due to poor mater ials or faulty construction,
provided that such parts are delivered free port supplier’s head office.
Shortcomings and def ects due to inc orrect use of instrum ents, inade quate m aintenance, ch anges c arried
out without the supplier’s approval, normal wear are not included in this guarantee.
Liability and compensations by the supplier due to direct or indirect damages to persons, objects or
production, even as a consequence of faulty functioning of the supplied instruments or of material or
construction defects, are not included in this warranty.

Rules AgriNIR™ Analyzer Rev. A11
ENGLISH
63
Congratulations Dear User!
You have chosen a product by dinamica
generale®, a leading company in the development and production of
electronic weighing systems, automation systems and NIR
solutions. These systems bring a highly technological level in ever y
field of application such as zootechnical, feeding, industrial and
biomedical. Year by year the international market recognizes our
quality, experience, reliability and most of all our innovative
technology, as a part of a highly developed and innovative know
how. These are the pillars of our work and according to these beliefs
we are at your service, providing you with a simple as well as new,
precise and professional product, which is going to make your job
easier for many years. This users manual intends to take you
through the different performances of the weighing system in the
easiest way and to show you some new functions as well. dinamica
generale® did not forget to provide you even with the basic
information: the configuration, the use of different accessories at
your disposal, the service of “searching for faults” and the
equipment’s safety rules, in order to guarantee our customers
always more and more support and technical assistance for years to
come.
Now there is nothing left for us to do but wish you a work well done!
The team of dinamica generale®


ISO 13485:2012ISO 14001:2004

Cod. 985-0039 Rev. A11
 Loading...