

Page 1
TIMRA
electrical ambience heating / elektrische sfeerhaard / Elektrokamin
installation and operating instructions / installatie- en bedieningshandleiding
/ Montage- und Bedienungsanweisung
UK
The product complies with the European Safety Standards EN60335-2-30 and the European Standard Electromagnetic Compatibility (EMC)
EN55014, EN60555-2, EN60555-3. These cover the essential requirements of EEC Directives 2006/95/EC and 2004/108/EC.
NL DE
IT
08/50602/0 Issue 0
Page 2

TABLE OF CONTENTS
1. FOREWORD 1
2. INTRODUCTION 1
3. SAFETY PRECAUTIONS 1
4. INSTALLATION 2
4.1 Installation Instructions 2
UK
4.2 Installation Space 2
4.3 Location and Minimum Free Space 2
5. OPERATION 3
5.0 Operation 3
5.1 Initializing the remote control 3
5.2 Remote control operation 4
5.3 Manual operation 4
5.4 Thermal safety cut 5
6. CLEANING AND MAINTENANCE 5
6.1 Cleaning 5
6.2 Lamp replacement 5
6.3 To refit Front Cover 6
7. RECYCLING 6
Page 3

- 1 -
UK
1. FOREWORD
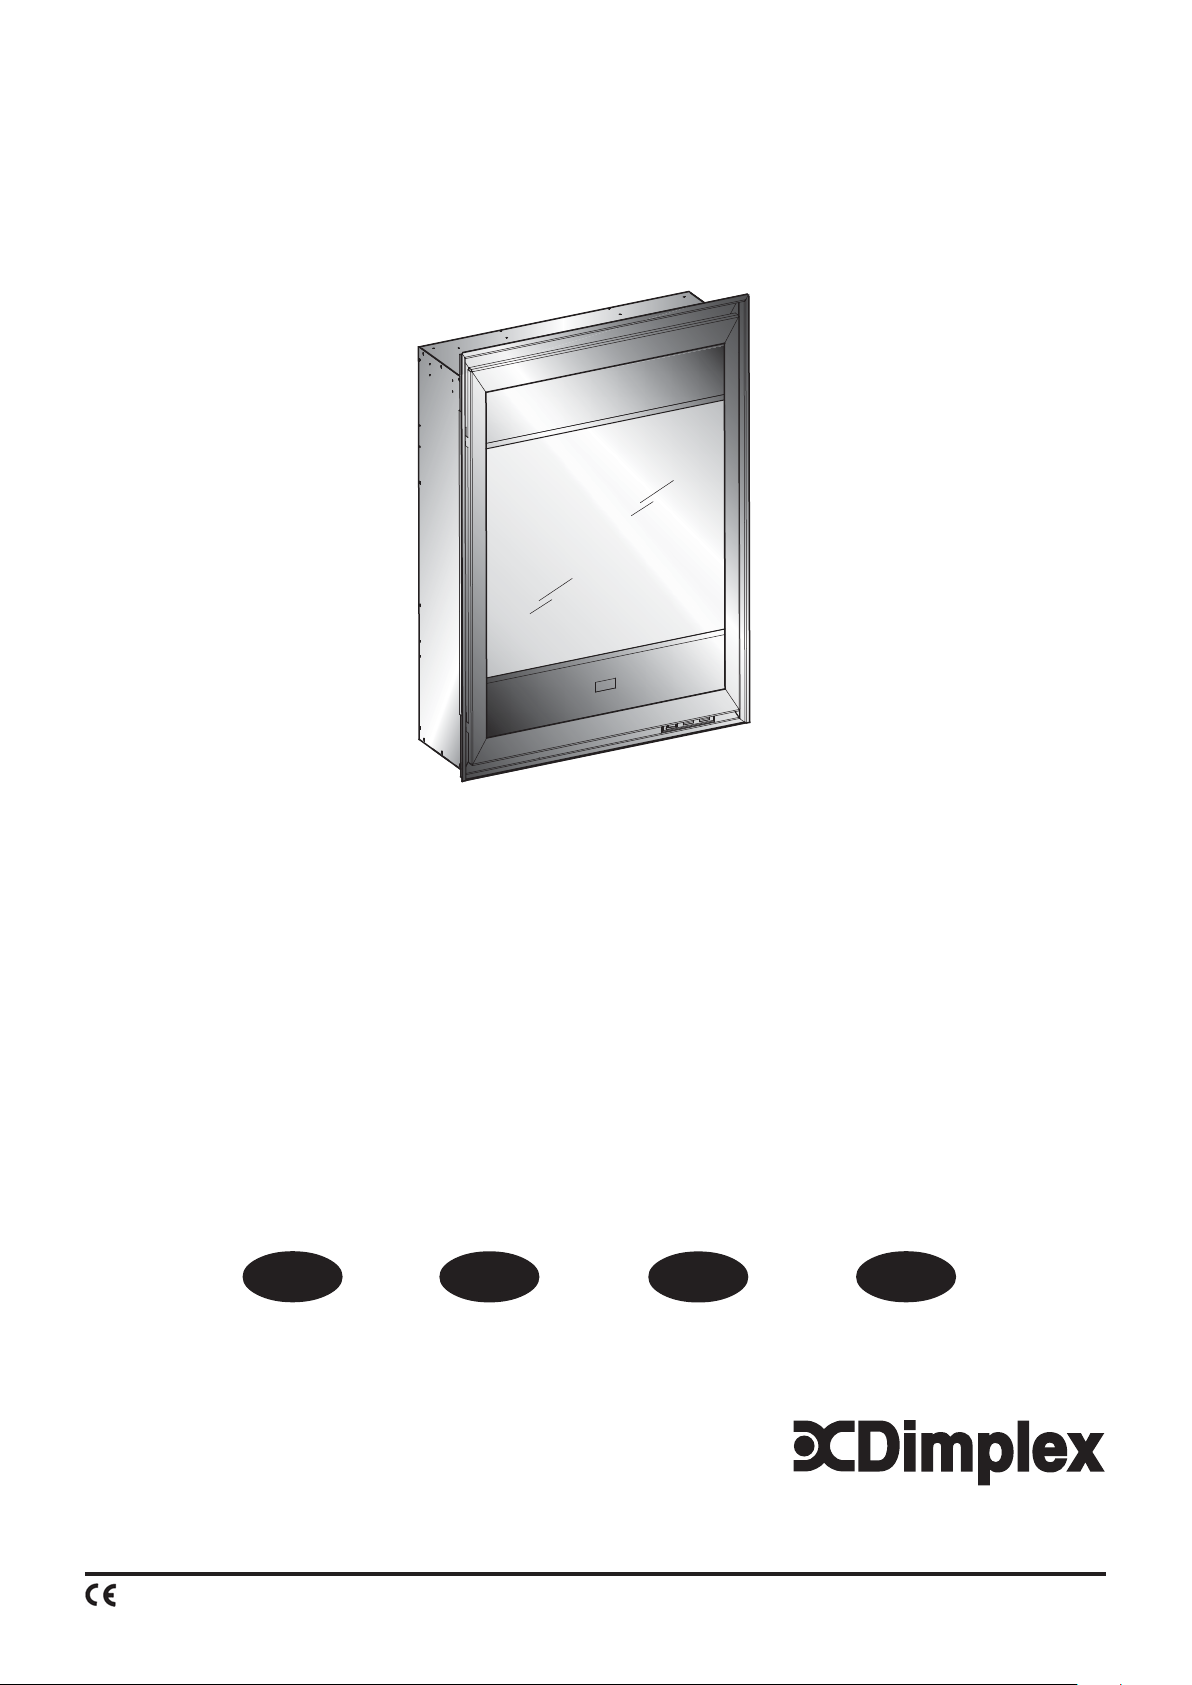
This fire incorporates a flame effect which can be used with or without heating, so that comforting effect may be
enjoyed at any time of the year. The flame effect is provided by a low wattage motor and two 60 watt lamps. Using the
flame effect on its own, therefore, requires little electricity.
The controls are located at the bottom right hand corner of the appliance (see Fig 1). A choice of 750W or 1500W heat
output is provided by the fan heater, which is concealed at the top of the heater behind the removable front panel.
The TIMRA is designed to be inset in a fireplace opening.
2. INTRODUCTION
This instruction manual gives you information about the design, operation and maintenance of your fire, as well as
safety precautions and environmental recommendations.
As you read this manual, you will quickly learn how to operate your fire. You will also find information about the safety
and maintenance of the equipment.
Read the manual carefully before using your fire and then keep the manual in a safe place.
3. SAFETY PRECAUTIONS
• Have the stove installed by a qualified installer in accordance with local and national (fire safety)
regulations.
• Ensure that all packaging items are removed (read any warning labels carefully).
• Retain all packaging until installation is complete.
• The heater must be used on an ~ 230V supply and the voltage marked on the heater must correspond
with the supply voltage.
• Warning: This appliance must be earthed.
• When using electrical appliances, basic precautions should always be followed to reduce the risk of
fire, electrical shock, and injury to persons, including the following:
• If the appliance is damaged, check immediately with the supplier before installation and operation.
• Do not use outdoors,
• Do not use in the immediate surroundings of a bath shower or swimming pool.
• Do not locate the heater immediately below a fixed socket outlet or connection box.
• Do not cover the heater. Do not place material or garments on the heater, or obstruct the air circulation
around the heater, for instance by curtains or furniture, as this could cause overheating and a fire risk.
• Do not leave young children unsupervised in the vicinity of the heater.
• Ensure that furniture, curtains or other combustible material are positioned no closer than 1 meter
from the heater.
• In the event of a fault unplug the heater.
• Although the heater complies with safety standards, we do not recommend its use on deep pile carpets
or on long hair type of rugs.
• The appliance must be positioned so that the plug is accessible.
• If the supply cord is damaged it must be replaced by the manufacturer or service agent or similarly
qualified person in order to avoid a hazard.
Page 4

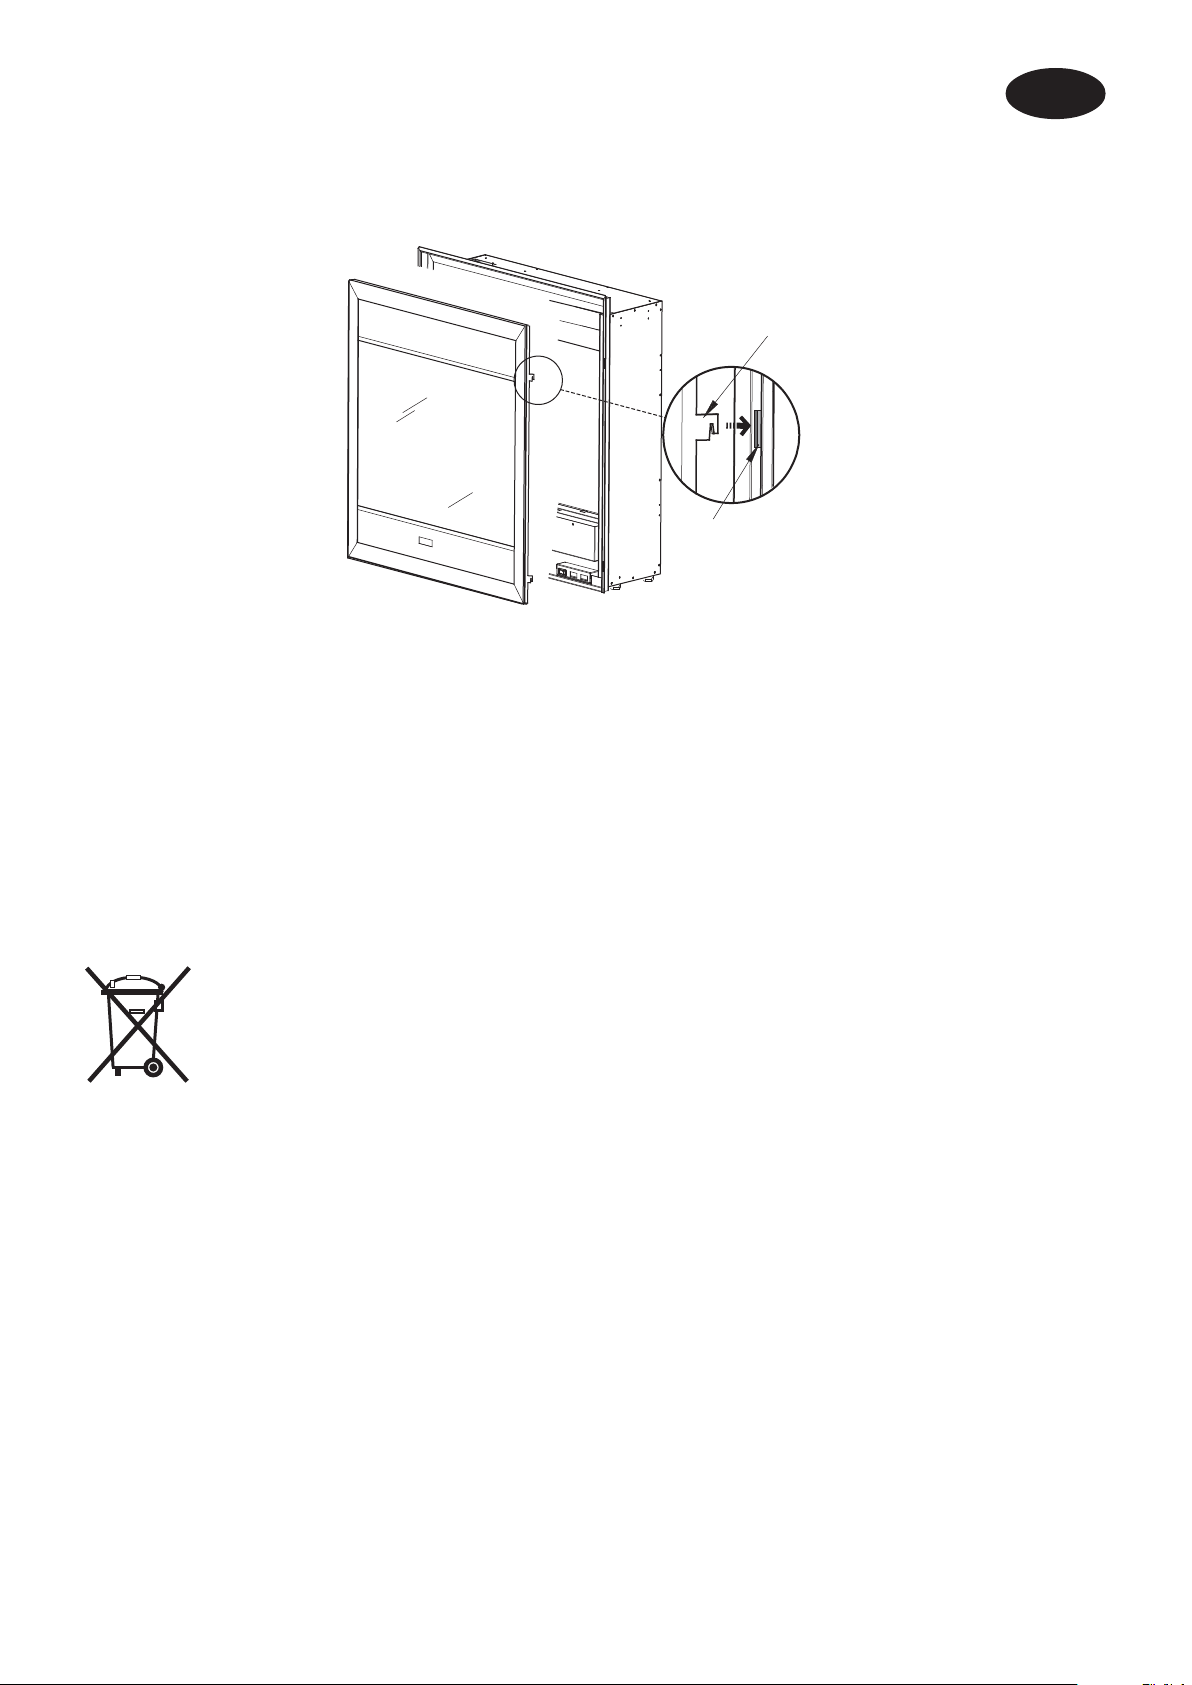
DESCRIPTION OF THE STOVE
Removable Front Cover
4. INSTALLATION
- 2 -
UK
Heat
Controls - see Fig. 6
Fig. 1
4.1 INSTALLATION INSTRUCTIONS
Have the stove installed by a qualified installer in conformance with national and local (fire safety) regulations.
4.2 INSTALLATION SPACE
414
397
A: Adjustable Feet
B: Minimum built-in height
C: Connection cable
444
225
215
C
B
575
A
557
579
Fig. 2
4.3 LOCATION AND MINIMUM FREE SPACE
Before installing read all safety warnings and operating instructions.
At the base of the fire, four adjustable feet (see ‘A’ in Fig. 2) are provided for levelling the fire where the base of the
fireplace opening is raised above the level of the hearth.
Adjust by turning the feet (see ‘A’ in Fig. 2) until the desired height has been reached.
Page 5
- 3 -
UK
5. OPERATION
5.0 OPERATION
The controls are located at the bottom right hand corner of the appliance - see Fig. 1.
Connect the fire to your electricity supply.
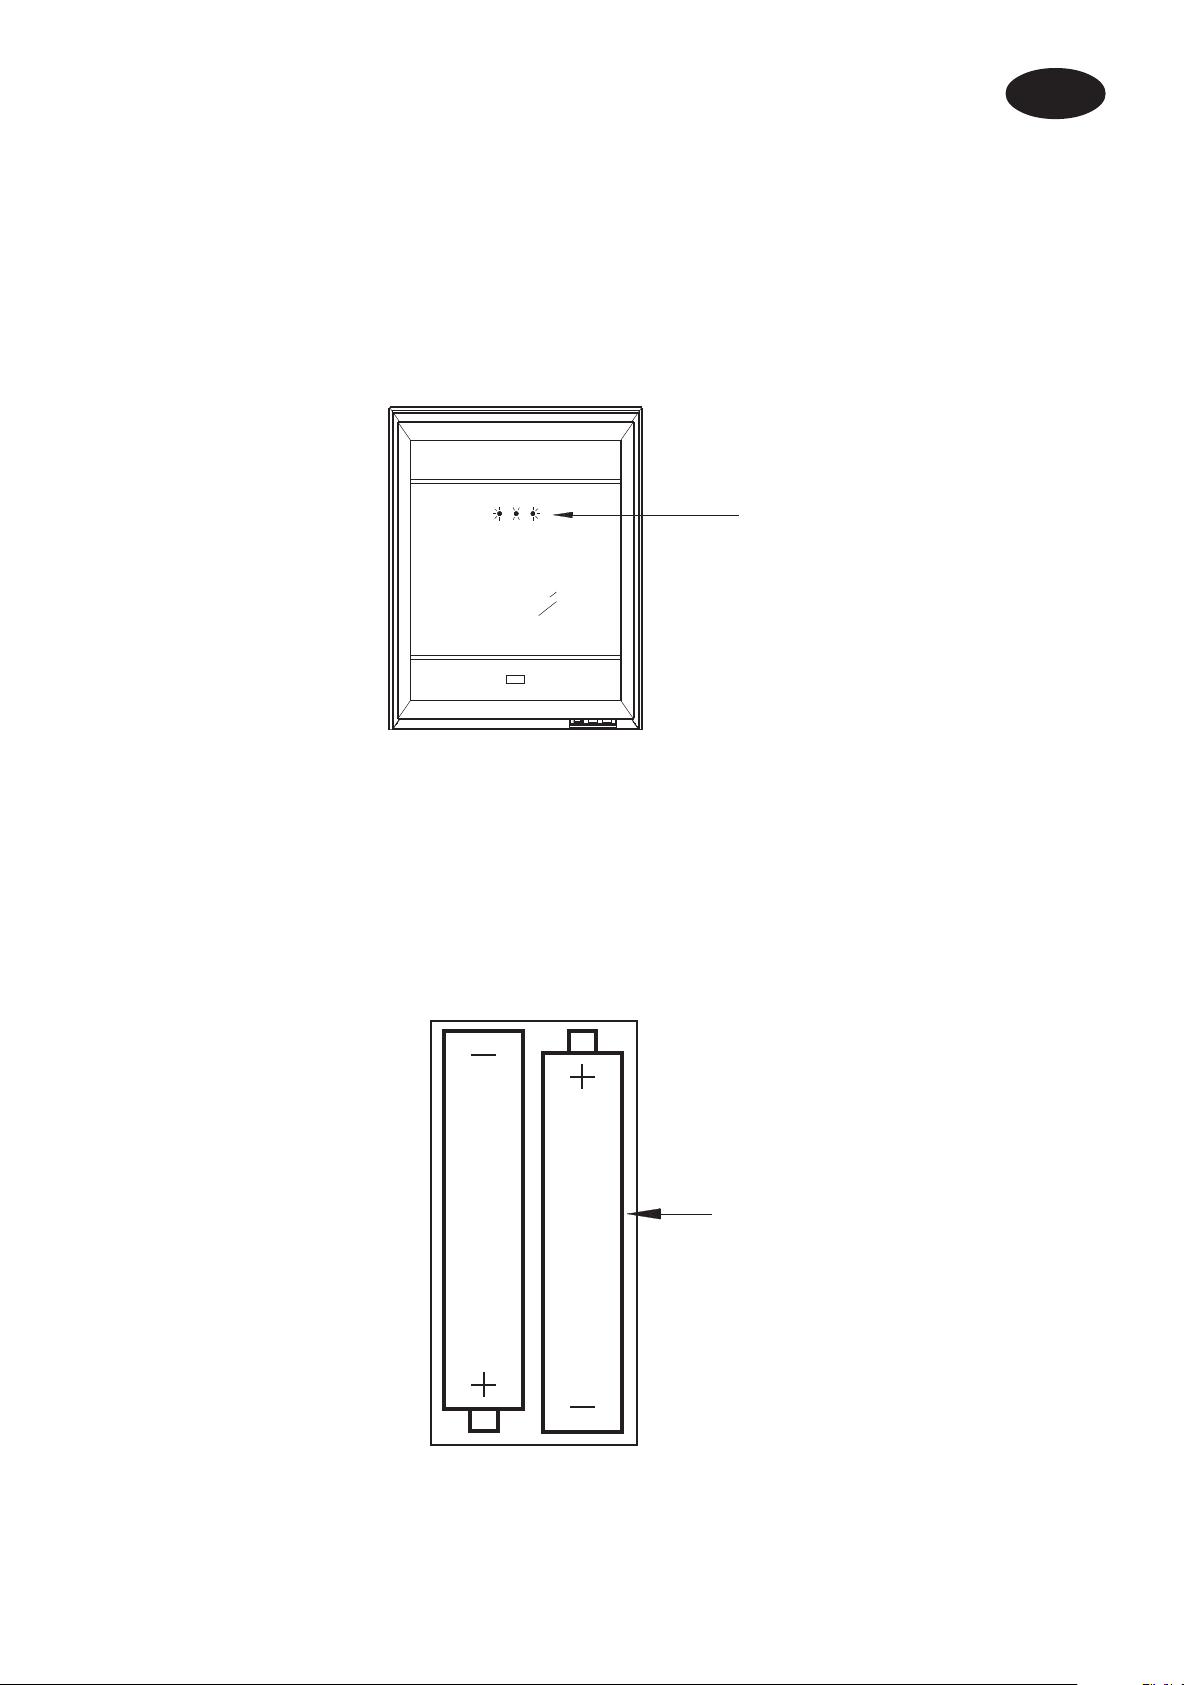
Note: When either the remote control or the manual controls are used the neon’s will come on for 3 seconds indicating
the appropriate setting - see Fig. 3.
Neon’s for indicating operation level
5.1 INITIALIZING THE REMOTE CONTROL
Note: The remote control is packed separately in the carton.
1. Slide open the battery cover on the back of the remote transmitter.
2. Install the AAA batteries into the remote control (see Fig. 4).
3. Replace battery cover.
Fig. 3
Batteries
Fig. 4
DISCARD LEAKY BATTERIES
Dispose of batteries in the proper manner according to Provincial and local regulations. Any battery may leak electrolyte
if mixed with a different battery type, if inserted incorrectly, if all the batteries are not replaced at the same time, if
disposed of in a fire or if an attempt is made to charge a battery not intended to be recharged.
Page 6
O
F
F
O
N
- 4 -
UK
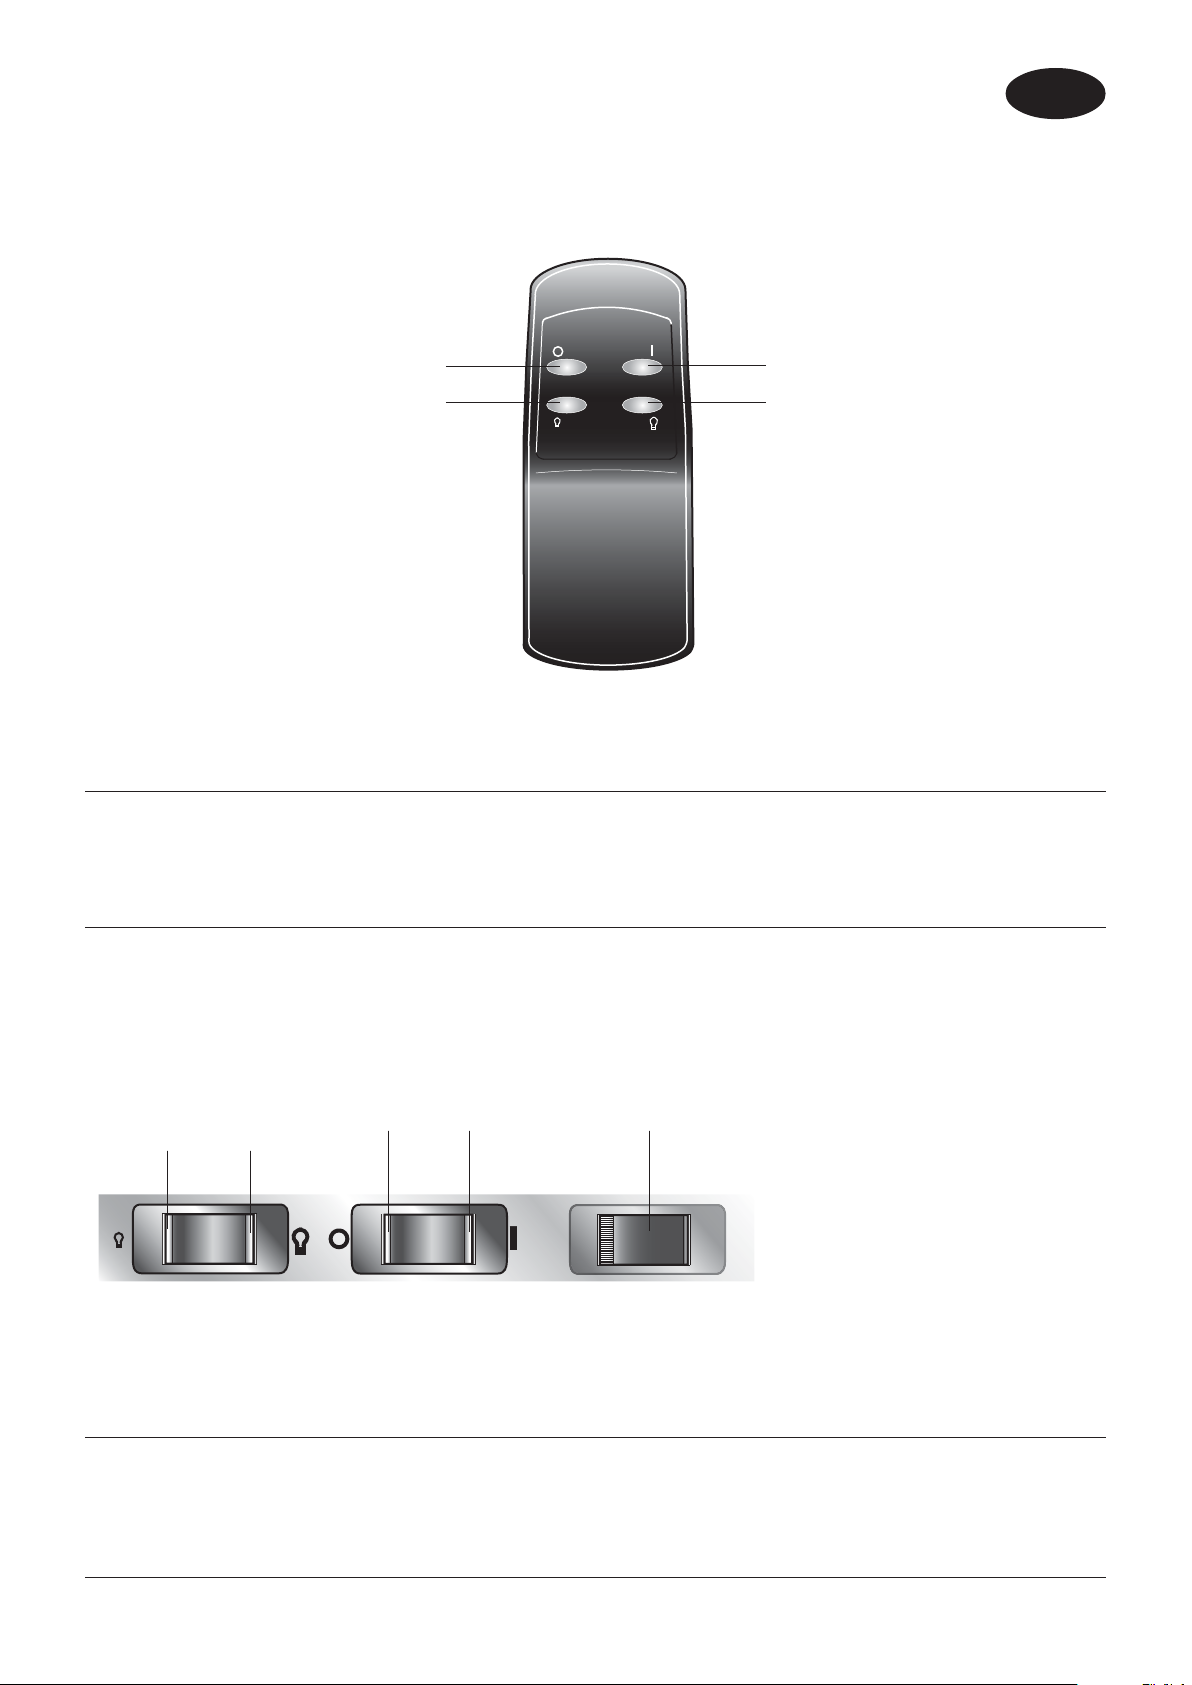
5.2 REMOTE CONTROL OPERATION
Warning: It takes some time for the receiver to respond to the transmitter. Do not press the buttons more than once
within two seconds for correct operation.
Off Button
Decrease Brightness
Operation
Setting
Flame effect
Flame effect & 750W heat setting
Flame effect & 1500W heat setting
To turn off any of the settings press the ‘OFF’ button once.
Operation
Press the ‘ON’ button once
Press the ‘ON’ button again
Press the ‘ON’ button again
On Button
Increase Brightness
Fig. 5
Indication
Left Neon
Left & Middle Neon
All 3 neon’s
To increase or decrease the brightness of the fuel effect use the buttons as shown in Fig. 5.
5.3 MANUAL OPERATION
Decrease
Brightness
Increase
Brightness
Off
On Standby Switch
O
Note: The Standby Switch
must be first turned on to
operate either the manual or
the remote controls. The red
indicator mark on the switch will
be visible when it is turned on.
Fig. 6
Operation
Setting
Flame effect
Flame effect & 750W heat setting
Flame effect & 1500W heat setting
Operation
Press the ‘I’ button once
Press the ‘I’ button again
Press the ‘I’ button again
Indication
Left Neon
Left & Middle Neon
All 3 neon’s
To turn off any of the settings press the ‘O’ button once.
To increase or decrease the brightness of the fuel effect use the buttons as shown in Fig. 6.
Page 7
- 5 -
UK
5.4 THERMAL SAFETY CUT-OUT
For your safety, this appliance has been fitted with thermal cut-out. In the event that the product overheats, the cut-out
switches the heat off automatically.
To bring the heat back into operation, remove the cause of the overheating, then unplug or turn off the electrical supply
to the heater for up to 10 minutes.
When the heater has cooled sufficiently, re-connect and switch on the heater.
6. CLEANING AND MAINTENANCE
Warning: Always disconnect from the power supply before attempting any maintenance.
6.1 CLEANING
Before commencing cleaning, unplug the heater and allow it to cool.
The surface of the heater should be given an occasional wipe over with a soft damp cloth. Do not use detergents
abrasive cleaning powder or polish on the body of the heater. The glass screen should be cleaned carefully with a
chamois leather. Do not use proprietary glass cleaners.
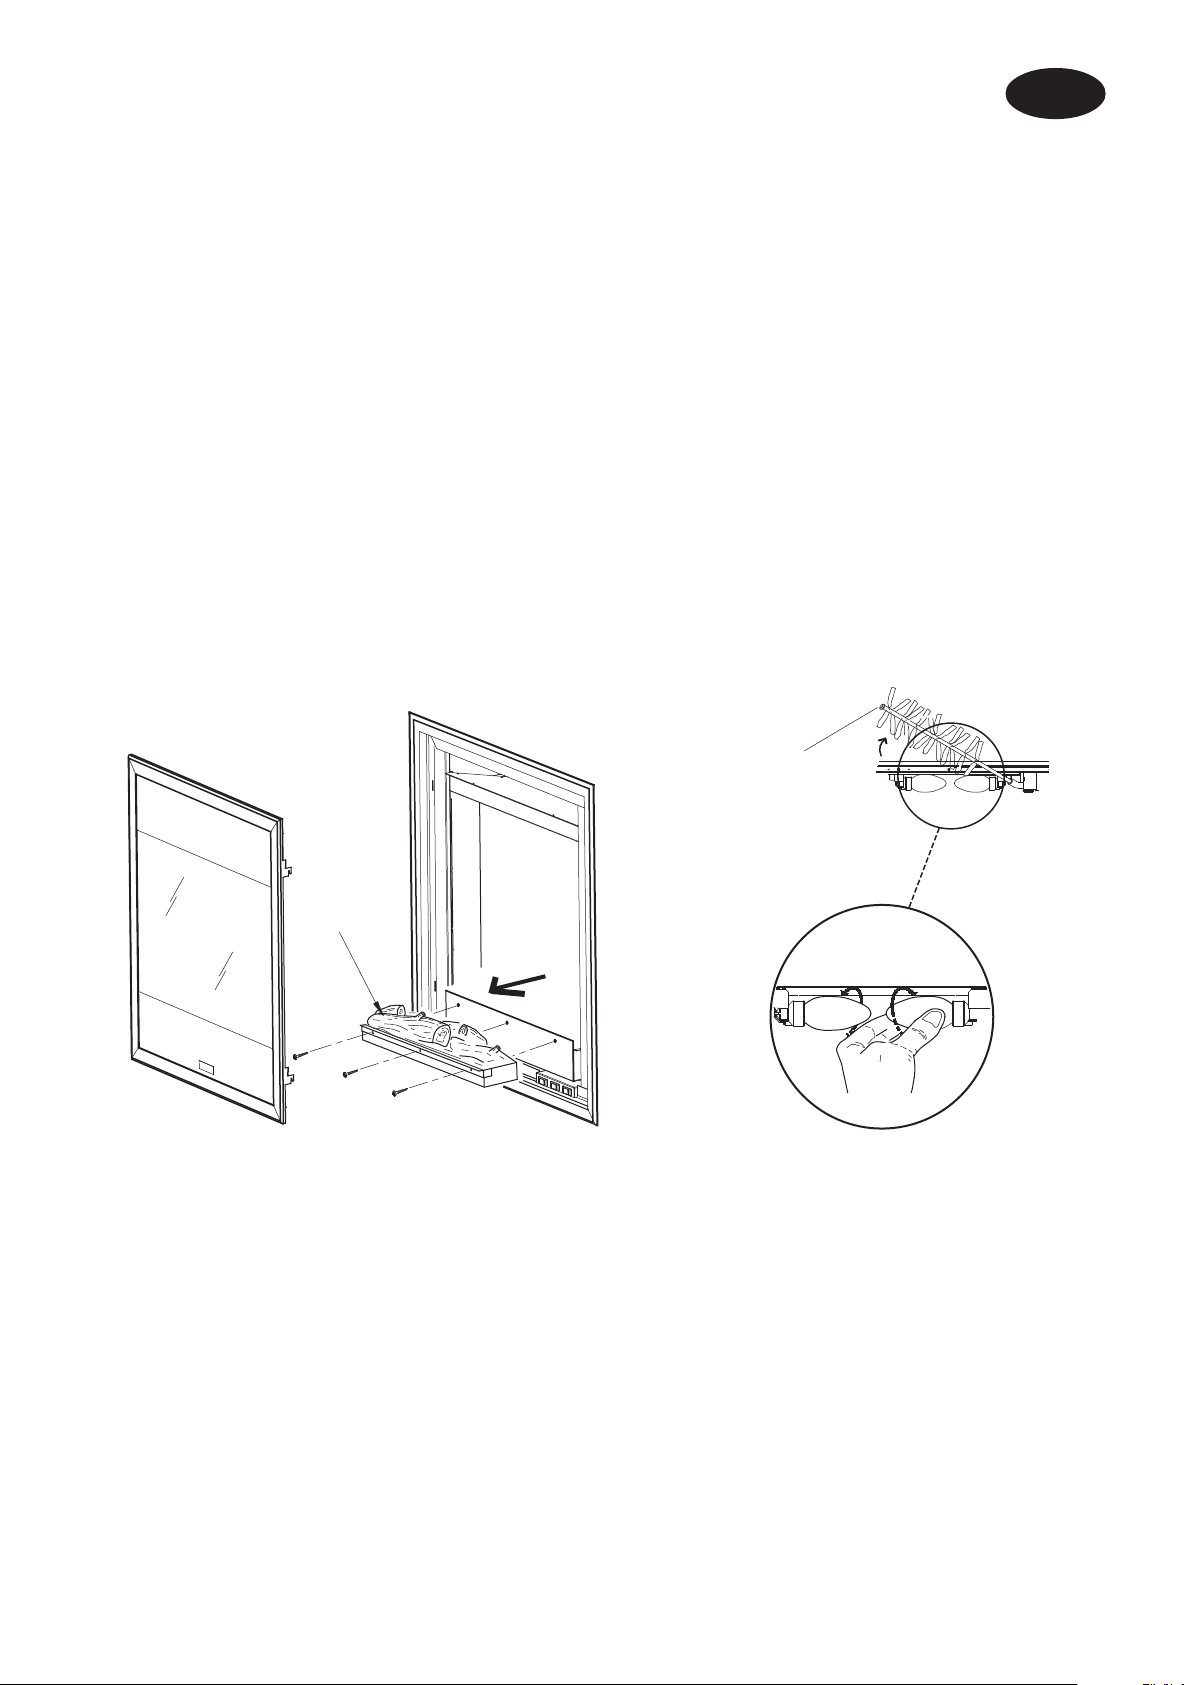
6.2 LAMP REPLACEMENT
grommet
Front Cover
To gain access to the lamps.
1. Remove the Front Cover by lifting up and out and carefully leave to one side.
2. Remove the three screws on the fuel effect.
3. Slide the fuel effect out, by holding the front ledge and set aside carefully (taking care not to damage the logs as
they are fragile) – see Fig. 7.
4. For access to the bulbs, carefully rotate the flexible rotisserie out of position ensuring that the rubber grommet is
not lost – see Fig. 8.
5. Unscrew the defective lamp anti-clockwise. Replace with a 230V, 60W E14 SES lamp, do not over tighten (see
Fig. 8).
6. Refit the fuel effect (with three screws) and Front Panel.
fuel effect
3 screws
Fig. 7
Fig. 8
Page 8
6.3 TO REFIT FRONT COVER
- 6 -
UK
latch
slot
Fig. 9
1. Tilt the Front Cover at a slight angle, insert the top two latches into the top two slots – see Fig. 9.
2. Insert the bottom two latches into slots.
3. Drop the Front Cover down until it slots into position, ensuring it is securely held in place.
7. RECYCLING
For electrical products sold within the European Community.
At the end of the electrical products useful life it should not be disposed of with household waste.
Please recycle where facilities exist. Check with your Local Authority or retailer for recycling advice in your
country.
Page 9

INHOUDSOPGAVE
1. VOORWOORD 1
2. INTRODUCTIE 1
3. VEILIGHEIDSVOORSCHRIFTEN 1
4. INSTALLATIE 2
4.1 Installatie instructies 2
4.2 Ruimte voor installatie 2
NL
4.3 Plaatsing en minimale vrije ruimte 2
5. Bediening 3
5.0 Bediening 3
5.1 Ingebruikname afstandsbediening 3
5.2 Werking afstandbediening 4
5.3 Werking handbediening 4
5.4 Thermische beveiliging 5
6. Schoon maken en onderhoud 5
6.1 Schoon maken 5
6.2 Vervanging van lampen 5
6.3 Plaatsen binnenframe 6
7. Recyclen 6
Page 10

- 1 -
NL
1. VOORWOORD
Deze haard is voorzien van een vlameffect dat zowel met als zonder verwarming kan worden gebruikt, zodat u het hele
jaar kunt genieten van het aangename effect. Het vlameffect wordt geleverd door een motor met laag energieverbruik
en twee 60 watt lampen. Het gebruik van het vlameffect op zich kost dus maar weinig elektriciteit. De bedieningsknoppen
bevinden zich onderaan rechts op het apparaat (zie fig. 1). De ventilator, die verborgen is aan de bovenzijde van de
haard achter het afneembare voorpaneel, biedt de keuze tussen een warmteafgifte van 750W of 1500W. De TIMRA
is ontworpen als inzethaard.
2. INLEIDINGTRODUCTIE
Deze bedieningshandleiding bevat informatie over het ontwerp, de bediening en het onderhoud van uw haard, evenals
veiligheidsvoorzieningen en milieuaanbevelingen. Als u deze handleiding leest, zult u snel uw haard leren bedienen.
Daarnaast vindt u informatie over de veiligheid en het onderhoud van het toestel. Lees deze handleiding aandachtig
voordat u uw haard gebruikt en bewaar de handleiding daarna op een veilige plaats.
3. VEILIGHEIDSVOORZIENINGEN
• Laat de haard installeren door een bevoegd installateur in overeenstemming met plaatselijke en
nationale (brandveiligheids-) voorschriften.
• Zorg ervoor dat alle onderdelen van de verpakking verwijderd zijn (lees eventuele
waarschuwingplaatjes aandachtig).
• Bewaar de verpakking totdat de installatie voltooid is.
• De verwarming moet worden gebruikt met een spanning van ~ 230V en de op de verwarming
aangegeven spanning moet dezelfde zijn als de voedingsspanning.
• Waarschuwing: Dit toestel moet geaard zijn.
• Tijdens het gebruik van elektrische apparaten moeten om het risico op brand, elektrische schok en
persoonlijke verwondingen te verminderen, onder andere de volgende basisvoorzorgsmaatregelen
worden getroffen:
• Indien het toestel beschadigd is, neem dan onmiddellijk contact op met de leverancier voordat u het
toestel installeert en bedient.
• Niet buitenshuis gebruiken,
• Niet gebruiken in de onmiddellijke nabijheid van een bad, douche of zwembad.
• Plaats de haard niet direct boven een stopcontact of aansluitdoos.
• Bedek de haard niet. Leg geen materialen of kleding op de haard, en belemmer de luchtcirculatie
rondom de haard niet, bijvoorbeeld door gordijnen of meubels, aangezien dit zou kunnen leiden tot
oververhitting en brandgevaar.
• Laat jonge kinderen niet zonder begeleiding in de buurt van de haard.
• Zorg ervoor dat meubilair, gordijnen of andere brandbare materialen zich op een afstand van
minimaal 1 meter van de haard bevinden.
• Haal de stekker van de haard uit het stopcontact in geval van een storing.
• Hoewel de haard voldoet aan de veiligheidseisen, raden we aan hem niet te gebruiken op hoogpolig
tapijt of langharige kleden.
• Het toestel moet zo geplaatst worden dat de stekker bereikbaar is.
• Als het snoer beschadigd is moet het worden vervangen door de fabrikant of monteur of een ander
bevoegd persoon om risico’s te voorkomen.
Page 11

- 2 -
NL
BESCHRIJVING VAN DE HAARD
Afneembaar voorpaneel
Bedieningsknoppen - zie fig. 6
Fig. 1
4. INSTALLATIE
4.1 INSTALLATIEHANDLEIDING
Laat de haard installeren door een bevoegd installateur in overeenstemming met nationale en plaatselijke
(brandveiligheids-) voorschriften.
4.2 INSTALLATIERUIMTE
414
397
444
575
A: Verstelbare pootjes
B: Minimale inzethoogte
C: Aansluitsnoer
225
215
C
557
A
B
579
Fig. 2
4.3 PLAATS EN MINIMALE VRIJE RUIMTE
Lees voor het installeren alle veiligheidswaarschuwingen en de bedieningshandleiding. Aan de ONDERkant van de
haard zijn vier verstelbare pootjes (zie ‘A’ in fig. 2) geplaatst om de haard waterpas te plaatsen op het punt waar de
onderkant van de haard boven het niveau van de stookplaats uitkomt. Stel de pootjes door de twee schroeven die de
beugels op hun plaats houden te verwijderen, plaats vervolgens de beugel en de twee schroeven in de gewenste
positie.
Page 12

- 3 -
NL
5. BEDIENING
5.0 BEDIENING
De bedieningsknoppen bevinden zich onderaan rechts op het toestel – zie fig. 1.
Sluit de haard aan op uw stroomtoevoer. Let op: wanneer of de afstandsbediening of de handmatige bedieningsknoppen
worden gebruikt gaan de neonlampjes gedurende 3 seconden branden om de juiste instelling weer te geven – zie
fig. 3.
Neonlampjes om het
bedieningsniveau aan te geven
Fig. 3
5.1 INGEBRUIKNAME AFSTANDSBEDIENING
Let op: De afstandsbediening zit afzonderlijk verpakt in de doos.
1. Schuif het deksel van de batterijen open aan de achterzijde van de zender van de afstandsbediening.
2. Plaats de AAA batterijen in de afstandsbediening (zie fig. 4).
3. Plaats het deksel van de batterijen terug.
batterijen
Fig. 4
VERWIJDER LEKKENDE BATTERIJEN
Voer batterijen af op de juiste manier volgens provinciale en plaatselijke voorschriften. Er kan elektrolyt lekken uit
batterijen als deze gecombineerd worden met een ander type batterij, als de batterijen onjuist geplaatst worden,
als niet alle batterijen tegelijkertijd worden vervangen, als batterijen in het vuur worden afgevoerd of wanneer er
geprobeerd wordt een batterij op te laden die niet bedoeld is om opgeladen te worden.
Page 13

O
F
F
O
N
- 4 -
5.2 BEDIENING VAN DE AFSTANDSBEDIENING
Waarschuwing: Het duurt enige tijd voordat de ontvanger reageert op de zender. Druk niet meer dan een keer per
twee seconden op de knopjes om te zorgen voor correct functioneren.
NL
uit-toets
kleiner vlameffect
aan-toets
groter vlameffect
Fig. 5
BEDIENING
Instelling Bediening Indicatielampje
Vlameffect Druk een keer op ‘ON’ Linker neonlampje
Vlameffect & 750W instelbaar Druk nogmaals op ‘ON’ Linker en middelste neonlampje
vermogen
Vlameffect & 1500W instelbaar Druk nogmaals op ‘ON’ Alle drie de neonlampjes
vermogen
Druk een keer op de ‘OFF’-knop om een van de instellingen uit te schakelen.
Gebruik, om de helderheid van het vuurbed te verhogen of te verlagen, de knopjes zoals aangegeven in fig. 5.
5.3 HANDMATIGE BEDIENING
kleiner
vlameffect
groter
vlameffect
uit-toets aan-toets standby-schakelaar
O
Fig. 6
Instelling Bediening Indicatielampje
Vlameffect Druk een keer op ‘I’ Linker neonlampje
Vlameffect & 750W instelbaar Druk nogmaals op ‘I’ Linker en middelste neonlampje
vermogen
Vlameffect & 1500W instelbaar Druk nogmaals op ‘I’ Alle drie de neonlampjes
vermogen
Druk een keer op de ‘O’-knop om een van de instellingen uit te schakelen.
Let op: De standbyschakelaar moet eerst
worden aangezet om of de
handmatige bediening of de
afstandsbediening te
bedienen. Het rode indicatie
plaatje op de schakelaar
wordt zichtbaar wanneer
deze ingeschakeld is.
Gebruik, om de helderheid van het vuurbed te verhogen of te verlagen, de knopjes zoals aangegeven in fig. 6.
Page 14

- 5 -
5.4 THERMISCHE BEVEILIGINGSSCHAKELAAR
Dit toestel is voor uw veiligheid uitgerust met een thermische beveiligingsschakelaar. In het geval dat het product
oververhit raakt, schakelt de schakelaar automatisch de warmte uit.
Om de warmte weer aan te zetten, dient u de oorzaak van de oververhitting te verwijderen en de stekker uit het
stopcontact te trekken of de stroomtoevoer naar de haard gedurende maximaal 10 minuten te onderbreken.
Als de haard voldoende is afgekoeld, sluit deze dan weer aan en zet hem aan.
6. REINIGING EN ONDERHOUD
Waarschuwing: Onderbreek altijd de stroomtoevoer voordat u onderhoudswerkzaamheden gaat uitvoeren.
6.1 REINIGING
Voordat u begint met reinigen dient u de stekker van de haard uit het stopcontact te trekken en de haard te laten
afkoelen. Het oppervlak van de haard moet af en toe worden afgenomen met een zachte, vochtige doek. Gebruik
geen wasmiddelen, schuurpoeder of glansmiddel op de buitenzijde van de haard. Het glazen scherm moet voorzichtig
worden gereinigd met een zeem. Gebruik geen speciale glasreiniger.
6.2 HET VERVANGEN VAN DE LAMP
NL
Lijst voor
Hout set
3 schroeven
Fig. 7
Om bij de lampen te komen moet u het volgende doen:
Doorvoertule
Fig. 8
1. Verwijder het voordeksel door het eruit te tillen en leg het voorzichtig terzijde.
2. Verwijder de drie schroeven van het vuurbed.
3. Neem de houtset uit door het geheel aan de onderkant vast te pakken en voorzichtig naar voren te draaien
(blokken zijn breekbaar! ) – zie fig. 7.
4. Draai, om bij de gloeilampen te komen, de flexibele spindle uit positie en zorg ervoor dat de rubber doorvoertule
niet kwijtraakt – zie fig. 8.
5. Draai de defecte lamp tegen de klok in los. Vervang hem door een 230V, 60W E14 SES lamp, draai deze niet al
te vast aan (zie fig. 8).
6. Plaats het vuurbed (met drie schroeven) en het voorpaneel terug.
Page 15

6.3 Plaatsen binnenframe
- 6 -
NL
Haak
Sleufgat
Fig. 9
1. Houdt het binnenframe schuin omhoog en plaats de bovenste haken in de sleufgaten boven – zie fig. 9
2. Plaats de onderste haken in de sleufgaten.
3. Laat dan het geheel geleidelijk, al positionerend, naar beneden zakken.
7. Recyclen
Voor elektrische producten verkocht binnen de Europese Unie.
Na het verstrijken van de levensduur van elektrische producten mogen zij niet worden weggeworpen met het
normale huisafval. Als er recycle-faciliteiten beschikbaar zijn, maak daar dan gebruik van. Neem contact op
met de locale overheidsinstanties of de winkel waar u het apparaat hebt gekocht voor informatie over recyclen.
Page 16

INHALT
1. VORWORT 1
2. EINFÜHRUNG 1
3. SICHERHEITSVORKEHRUNGEN 1
4. MONTAGE 2
4.1 Montageanweisungen 2
DE
4.2 Installationsplatz 2
4.3 Standort und minimale Abstände 2
5. BETRIEB 3
5.0 Betrieb 3
5.1 Die Fernbedienung initialisieren 3
5.2 Betrieb mit der Fernbedienung 4
5.3 Manueller Betrieb 4
5.4 Überhitzungsschutz 5
6. REINIGUNG UND WARTUNG 5
6.1 Reinigung 5
6.2 Austausch der Leuchten 5
6.3 Wiederanbringen der vorderen Abdeckung 6
7. RECYCLING 6
Page 17

- 1 -
DE
1. VORWORT
Dieses Wandfeuer verfügt über einen Flammeneffekt, der mit oder ohne Heizung verwendet werden kann, damit in
jeder Jahreszeit gemütliche Stimmung möglich ist. Der Flammeneffekt wird durch einen Motor mit geringer Wattleistung
und zwei Leuchten mit 60 Watt erzeugt. Daher wird nur wenig Strom verbraucht, wenn der Flammeneffekt alleine
verwendet wird.
Die Steuerung befindet sich an der unteren rechten Ecke der Einheit (Siehe Abb. 1). Eine Abgabe von 750 W oder
1500 W Heizleistung ist durch den Heizlüfter möglich, der sich oben an der Einheit hinter der abnehmbaren
Frontplatte befindet
Das TIMRA wurde für den Einsatz in eine Kaminöffnung entwickelt.
2. EINFÜHRUNG
Diese Betriebsanleitung enthält Informationen über Design, Betrieb und Wartung des Feuers, sowie Sicherheitsvorkehrungen
und Umgebungsempfehlungen.
Durch das Lesen dieses Handbuchs wird der Betrieb des Feuers verdeutlicht. Es bietet auch Informationen zu Sicherheit
und Wartung der Ausrüstung.
Dieses Handbuch vor dem Betrieb des Feuers lesen und es dann an einem sicheren Ort aufbewahren.
3. SICHERHEITSVORKEHRUNGEN
• Das Heizgerät muss von einem qualifizierten Monteur in Übereinstimmung mit örtlichen und nationalen
(Brandschutz-) Bestimmungen installiert werden.
• Sicherstellen, dass alle Verpackungsteile entfernt wurden. (Alle Warnhinweise genau lesen.)
• Das gesamte Verpackungsmaterial aufbewahren, bis die Montage abgeschlossen ist.
• Das Heizgerät muss mit ~ 230 V Wechselstrom betrieben werden und die Spannungskennzeichnung
auf den Heizgerät muss der Speisespannung entsprechen.
• Warnung: Die Einheit muss geerdet werden.
• Beim Gebrauch von elektrischen Geräten sollten die grundlegenden Sicherheitsmaßnahmen immer
befolgt werden, um das Risiko von Brandbildung, elektrischem Schock und Verletzungen zu
minimieren. Das schließt Folgendes ein:
• Wenn das Gerät beschädigt ist, umgehend die Lieferfirma kontaktieren, bevor die Montage und
Inbetriebnahme des Geräts vorgenommen wird.
• Nicht im Freien verwenden.
• Nicht in unmittelbarer Nähe von Bädern, Duschen oder Schwimmbädern verwenden.
• Das Heizgerät darf nicht direkt unter einer feststehenden Steckdose oder Abzweigdose montiert werden.
• Das Heizgerät nicht abdecken. Keine Stoffe oder Kleidungsstücke auf das Heizgerät legen. Die
Luftzirkulation um das Heizgerät nicht blockieren, z. B. durch Vorhänge/Gardinen oder Möbelstücke,
da ansonsten Überhitzung und Brandgefahr die Folge sein können.
• Kinder dürfen nicht unbeaufsichtigt in der Nähe des Heizgeräts spielen.
• Sicherstellen, dass Möbel, Gardinen und andere entzündbare Materialien mindestens 1 Meter Abstand
vom Heizgerät haben.
• Bei fehlerhaftem Betrieb die Stromversorgung des Heizgeräts unterbrechen.
• Obwohl das Heizgerät mit den Sicherheitsnormen übereinstimmt empfehlen wir den Gebrauch auf
Langflorteppichböden oder Langflorläufern nicht.
• Das Gerät muss so positioniert werden, dass der Zugang zum Stecker möglich ist.
• Wenn das Stromversorgungskabel beschädigt ist, muss es durch den Hersteller bzw. einen
Kundendienstmitarbeiter oder eine entsprechend qualifizierte Fachkraft ausgetauscht werden, um
ein Sicherheitsrisiko zu vermeiden.
Page 18

BESCHREIBUNG DES HEIZGERÄTS
Abnehmbare Frontplatte
4. MONTAGE
- 2 -
DE
Wärme
Bedienelemente siehe Abb. 6
Abb. 1
4.1 MONTAGEANWEISUNGEN
Das Heizgerät muss von einem qualifizierten Monteur in Übereinstimmung mit örtlichen und nationalen (Brandschutz-)
Bestimmungen installiert werden.
4.2 INSTALLATIONSPLATZ
414
397
A: Einstellbare Fußhalterung
B: Mindesteinbauhöhe
C: Anschlusskabel
444
225
215
C
B
575
A
557
579
Abb. 2
4.3 INSTALLATIONSORT UND MINIMALE ABSTÄNDE
Bitte vor der Montage alle Sicherheitswarnungen und Betriebsanleitungen lesen.
Am Boden des Feuers befinden sich vier einstellbare Fußhalterungen (siehe „A“ in Abb.2), mit denen das Feuer am
Boden des Kamins nivelliert werden kann, wenn sich die Kaminöffnung über der Feuerstelle befindet.
Die Fußhalterungen (siehe „A“ in Abb. 2) drehen, bis die gewünschte Höhe erreicht ist.
Page 19

- 3 -
DE
5. BETRIEB
5.0 BETRIEB
Die Steuerung befindet sich an der unteren rechten Ecke der Einheit - siehe Abb. 1.
Das Feuer an die Stromversorgung anschließen.
Hinweis:Wenn die Fernbedienung oder die manuelle Steuerung verwendet wird, leuchten die Neonleuchten für drei
Sekunden auf, um die entsprechende Einstellung anzuzeigen -
siehe Abb. 3.
Neonleuchten zum Anzeigen der
Betriebsstufe
5.1 DIE FERNBEDINUNG INITIALISIEREN
Hinweis: Die Fernbedienung ist separat im Karton verpackt.
1. Die Batterieabdeckung an der Rückseite der Fernbedienung aufschieben.
2. Die AAA-Batterien in die Fernbedienung einsetzen (Siehe Abb. 4).
3. Die Batterieabdeckung zuschieben.
Batterien
Abb. 3
Abb. 4
AUSLAUFENDE BATTERIEN ENTSORGEN
Die Batterien in Übereinstimmung mit regionalen und lokalen Vorschriften entsorgen. Batterien können auslaufen, wenn
sie in Verbindung mit einem anderen Batterietyp verwendet oder nicht richtig eingelegt werden, wenn sie verbrannt
werden oder wenn versucht wird, nicht aufladbare Batterie aufzuladen, oder wenn nicht alle Batterien gleichzeitig
ausgetauscht werden.
Page 20

O
F
F
O
N
- 4 -
DE
5.2 BETRIEB MIT DER FERNBEDIENUNG
Warnung: Es dauert einen Moment, bis der Empfänger auf die Übermittlung reagiert. Die Schalter innerhalb von zwei
Sekunden nicht mehr als einmal drücken, um den ordnungsgemäßen Betrieb zu gewährleisten.
Taste „Aus“
Helligkeit verringern
Betrieb
Einstellung
Flammeneffekt
Flammeneffekt & 750 W Heizeinstellung
Flammeneffekt & 1500 W Heizeinstellung
Taste „AUS“ einmal drücken, um eine der Einstellungen zu deaktivieren.
Betrieb
Einmal Taste „EIN“ drücken
Taste „EIN“ noch einmal drücken
Taste „EIN“ noch einmal drücken
Taste „Ein“
Helligkeit erhöhen
Abb. 5
Anzeige
Linke Neonleuchte
Linke & mittlere Neonleuchte
Alle drei Neonleuchten
Die Tasten () wie in Abb. 5 abgebildet verwenden, um die Helligkeit des Flammeneffekts zu erhöhen oder zu verringern.
5.3 MANUELLER BETRIEB
Helligkeit
verringern
Helligkeit
erhöhen
Aus
Ein Taste „Standby“
O
Hinweis: Die Taste „Standby“
muss eingeschaltet sein, um
den manuellen Betrieb oder den
Betrieb mit der Fernbedienung
zu ermöglichen. Die rote
Anzeige auf der Taste leuchtet,
wenn die Taste aktiviert ist.
Abb. 6
Betrieb
Einstellung
Flammeneffekt
Flammeneffekt & 750 W Heizeinstellung
Flammeneffekt & 1500 W Heizeinstellung
Betrieb
Einmal Taste „I“ drücken
Nochmals Taste „I“ drücken
Nochmals Taste „I“ drücken
Anzeige
Linke Neonleuchte
Linke & mittlere Neonleuchte
Alle drei Neonleuchten
Taste „O“ einmal drücken, um eine der Einstellungen zu deaktivieren.
Die Tasten () wie in Abb. 6 abgebildet verwenden, um die Helligkeit des Flammeneffekts zu erhöhen oder zu verringern.
Page 21

- 5 -
DE
5.4 ÜBERHITZUNGSSCHUTZ
Diese Einheit verfügt über einen Überhitzungsschutz. Sollte das Produkt überhitzen, schaltet der Überhitzungsschutz
das Gerät automatisch ab.
Um das Heizgerät weiter zu betreiben muss der Grund für die Überhitzung entfernt werden. Die Stromversorgung zum
Heizgerät dann bis zu 10 Minuten abschalten oder trennen.
Wenn das Heizgerät ausreichend abgekühlt ist, kann es wieder angeschlossen und eingeschaltet werden.
6. REINIGUNG UND WARTUNG
Warnung: Das Gerät immer von der Stromversorgung trennen, bevor Wartungsarbeiten ausgeführt werden.
6.1 REINIGUNG
Das Heizgerät vor der Reinigung von der Stromversorgung trennen und abkühlen lassen.
Die Oberfläche des Heizgeräts sollte gelegentlich mit einem weichen, feuchten Tuch abgewischt werden. Keine
Lösungsmittel, Scheuerpulver oder Politur auf der Oberfläche des Heizgeräts verwenden. Die Sichtglasscheibe kann
vorsichtig mit einem Ledertuch abgewischt werden. Keine handelsüblichen Glasreiniger verwenden.
6.2 AUSTAUSCH DER LEUCHTEN
Gummitülle
Frontplatte
Feuereffekt
3 Schrauben
Abb. 7
Abb. 8
Zugang zu den Leuchten.
1. Die Frontplatte entfernen, indem sie angehoben und herausgenommen wird. Zur Seite legen.
2. Die drei Schrauben am Feuereffekt entfernen.
3. Den Feuereffekt herausschieben, dabei die Vorderkante festhalten. Vorsichtig zur Seite legen. (Bei den Holzscheiten
besonders vorsichtig vorgehen, da sie zerbrechlich sind) - siehe Abb. 7.
4. Um Zugang zu den Leuchten zu erhalten, den flexiblen Grill vorsichtig zur Seite drehen und dabei darauf achten,
dass die Gummitülle nicht verloren geht - siehe Abb. 8.
5. Die fehlerhafte Leuchte gegen den Uhrzeigersinn herausdrehen. Mit einer Leuchte mit 230 V, 60 W E14 SES
austauschen. Nicht zu fest anziehen (siehe Abb. 8).
6. Den Feuereffekt (mit den Schrauben) und die Frontplatte wieder befestigen.
Page 22

6.3 WIEDERANBRINGEN DER FRONTPLATTE
- 6 -
DE
Riegel
Schlitz
Abb. 9
1. Die Frontplatte leicht neigen, die beiden oberen Riegel in die beiden oberen Schlitze einführen - siehe Abb. 9.
2. Die beiden unteren Riegel in die Schlitze einführen.
3. Die Frontplatte loslassen, bis sie sich in der richtigen Position befindet. Sicherstellen, dass sie sicher
befestigt ist.
7. RECYCLING
Für Elektrogeräte, die in der Europäischen Gemeinschaft verkauft wurden.
Kaputte Elektrogeräte dürfen nicht im Hausmüll entsorgt werden.
Wenn möglich sollten sie recycelt werden. Informationen zu Recycling in Ihrem Land erhalten Sie von den
örtlichen Behörden oder von Ihrem Händler.
Page 23

INDICE
1. PREMESSA 1
2. INTRODUZIONE 1
3. PRECAUZIONI DI SICUREZZA 1
4. INSTALLAZIONE 2
4.1 Istruzioni per l’installazione 2
IT
4.2 Spazio richiesto per l’installazion 2
4.3 Posizionamento e spazio libero
minimo richiesto 2
5. FUNZIONAMENTO 3
5.0 Funzionamento 3
5.1 Messa in funzione del telecomando 3
5.2 Funzionamento del telecomando 4
5.3 Funzionamento manuale 4
5.4 Interruttore di sicurezza termico 5
6. PULIZIA E MANUTENZIONE 5
6.1 Pulizia 5
6.2 Sostituzione lampade 5
6.3 Rimontaggio copertura anteriore 6
7. RICICLAGGIO 6
Page 24

- 1 -
IT
1. PREMESSA
La stufa è dotata di un “effetto fiamma” indipendente dall’emissione di calore, che può essere utilizzato in ogni periodo
dell’anno. L’effetto fiamma si avvale di un motore a basso wattaggio e di due lampade da 60 watt. Usare l’effetto fiamma
da solo, perciò, richiede poca elettricità.
I comandi si trovano nell’angolo in fondo a destra del dispositivo (vedere Fig 1). L’aerotermo, nascosto sulla parte
superiore del riscaldatore dietro il pannello anteriore removibile, fornisce un’erogazione di calore di 750 W o 1500 W.
La stufa TIMRA è stata progettata per essere inserita in un vano per caminetti.
2. INTRODUZIONE
Questo manuale di istruzioni fornisce informazioni sul progetto, sul funzionamento e sulla manutenzione della vostra
stufa, oltre a precauzioni di sicurezza ed a raccomandazioni per la salvaguardia ambientale.
Leggendo questo manuale, apprenderete velocemente come azionare il radiatore. Troverete inoltre informazioni sulla
sicurezza e manutenzione dell’apparecchiatura.
Si prega di leggere il manuale con attenzione prima dell’uso e di conservarlo in un luogo sicuro.
3. PRECAUZIONI PER LA SICUREZZA
• Far installare la stufa da un installatore qualificato, in conformità con le normative locali e nazionali
(normative antiincendio).
• Accertarsi che tutte le parti costituenti l’imballaggio siano state rimosse (leggere attentamente
tutte le etichette).
• Conservare tutte le parti dell’imballaggio fino al termine dell’installazione.
• Il riscaldatore deve essere collegato ad una presa di alimentazione da ~ 230 V e la tensione indicata
sul riscaldatore deve corrispondere alla tensione fornita.
• Avvertenza: L’apparecchiatura deve essere collegata a terra.
• Nell’utilizzo di apparecchiature elettriche, occorre osservare sempre delle precauzioni di base per
ridurre il rischio di incendio, scosse elettriche e ferimenti alle persone, in particolare:
• Se l’apparecchio risulta danneggiato, rivolgersi immediatamente al fornitore prima di installarlo e
utilizzarlo.
• Non usare all’esterno,
• Non utilizzare l’unità nelle immediate vicinanze di bagni, docce o piscine.
• Non collocare la stufa direttamente sotto una presa di corrente o un quadro elettrico.
• Non coprire il riscaldatore. Non collocarvi sopra alcun oggetto o rivestimento, né ostacolare in
alcun modo la circolazione dell’aria intorno all’unità, per esempio con tende o mobili, poiché ciò
può causare surriscaldamento ed incendi.
• Non lasciare bambini non sorvegliati nelle vicinanze del riscaldatore.
• Accertarsi che non ci siano mobili, tende o altro materiale potenzialmente infiammabile a meno di
1 metro dalla stufa.
• In caso di guasti, scollegare la stufa dalla presa di corrente.
• Benché la stufa soddisfi le normative di sicurezza, non ne consigliamo l’uso su moquette o tappeti
a pelo lungo.
• Posizionare la stufa in modo che la spina sia facilmente raggiungibile.
• Se il cavo di alimentazione è danneggiato, deve essere sostituito dal produttore o da un tecnico di
manutenzione o da una persona similmente qualificata per evitare possibili rischi.
Page 25

DESCRIPTION OF THE STOVE
Copertura anteriore rimovibile
4. INSTALLAZIONE
- 2 -
IT
Emissione
Comandi - vedere Fig. 6
Fig. 1
4.1 ISTRUZIONI PER L’INSTALLAZIONE
Far installare la stufa da un installatore qualificato, in conformità con le normative locali e nazionali (normative antiincendio).
4.2 INSTALLATION SPACE
414
397
A: Piedino regolabile
B: Altezza minima dell’incasso
C: Cavo di connessione
444
225
215
C
B
575
A
557
579
Fig. 2
4.3 POSIZIONAMENTO E SPAZIO LIBERO MINIMO RICHIESTO
Prima dell’installazione leggere tutte le avvertenze di sicurezza e le istruzioni per l’installazione.
Alla base della stufa, vengono forniti quattro piedini regolabili (vedere ‘A’ in Fig. 2) per mettere a livello la stufa quando la
base del vano per il caminetto sia rialzata rispetto alla superficie di fronte al caminetto.
Effettuare la regolazione girando i piedini (vedere ‘A’ in Fig. 2) finché non si raggiunge l’altezza desiderata.
Page 26

- 3 -
IT
5. FUNZIONAMENTO
5.0 FUNZIONAMENTO
I comandi si trovano nell’angolo in basso a destra dell’apparecchiatura t - vedere Fig. 1.
Collegare la stufa alla presa elettrica.
Nota: Quando vengono usati il comando a distanza oppure i comandi manuali, i neon si accendono per 3 secondi
indicando l’impostazione appropriata - vedere Fig. 3.
Neon per indicare il livello
di funzionamento
Fig. 3
5.1 MESSA IN FUNZIONE DEL TELECOMANDO
Nota: Il telecomando è imballato separatamente all’interno della scatola.
1. Far scorrere il coperchio batterie situato sul retro del telecomando per aprirlo.
2. Installare le batterie AAA nel telecomando (vedere Fig. 4).
3. Rimettere in posizione la copertura batterie.
Batterie
Fig. 4
SMALTIMENTO BATTERIE CHE PRESENTANO PERDITE
Per lo smaltimento delle batterie, fare riferimento alle norme ambientali locali. L’eventuale uso di batterie di tipi diversi,
l’installazione errata, la mancata sostituzione di tutte le batterie allo stesso tempo, il contatto con il fuoco o il tentativo
di ricaricare batterie non ricaricabili possono causare perdite di elettrolita.
Page 27

O
F
F
O
N
- 4 -
IT
5.2 FUNZIONAMENTO DEL TELECOMANDO
Avvertenza: Il ricevitore non risponde immediatamente al trasmettitore. Dopo aver premuto un pulsante una volta, non
premerlo di nuovo per almeno due secondi.
Pulsante spegnimento
Decremento luminosità
Funzionamento
Impostazione
Effetto fiamma
Effetto fiamma e regolazione del calore su 750 W
Effetto fiamma e regolazione del calore su 1500 W
Per disattivare qualsiasi impostazione premere una volta il pulsante ‘OFF’.
Funzionamento
Premere una volta il pulsante ‘ON’
Premere una volta il pulsante ‘ON’
Premere una volta il pulsante ‘ON’
Pulsante accensione
Incremento luminosità
Fig. 5
Indicazione
Neon di sinistra
Neon di sinistra e centrale
Tutti e tre i neon
Per aumentare o ridurre la luminosità dell’effetto fiamma, usare i tasti come indicato in Fig. 5.
5.3 FUNZIONAMENTO MANUALE
Interruttore
luminosità
Incremento
luminosità
OffDecremento
On
O
di Standby
Note: Prima di poter azionare i
comandi sia manualmente che
con il telecomando, occorre
accendere l’interruttore di
Standby. Quando l’interruttore è
acceso è visibile un
contrassegno rosso.
Fig. 6
Funzionamento
Impostazione
Effetto fiamma
Effetto fiamma e regolazione del calore su 750 W
Effetto fiamma e regolazione del calore su 1500 W
Funzionamento
Premere una volta il pulsante ‘I’
Premere di nuovo il pulsante ‘I’
Premere di nuovo il pulsante ‘I’
Indicazione
Neon di sinistra
Neon di sinistra e centrale
Tutti e tre i neon
Per disattivare qualsiasi impostazione, premere una volta il pulsante ‘O’.
Per aumentare o ridurre la luminosità dell’effetto fiamma, usare i tasti come indicato in Fig. 6.
Page 28

- 5 -
IT
5.4 INTERRUTTORE TERMICO DI SICUREZZA
Questa stufa è munita di interruttore di sicurezza termico. Nell’eventualità di un surriscaldamento, l’interruttore di sicurezza
spegne la stufa automaticamente.
Per rimettere in funzione la stufa, rimuovere la causa del surriscaldamento, disinserire la spina o spegnere l’alimentazione
elettrica della stufa per 10 minuti.
Quando la stufa si è sufficientemente raffreddata, ricollegarla alla rete elettrica e riaccenderla.
6. PULIZIA E MANUTENZIONE
Avvertenza: Scollegare sempre l’alimentazione di rete prima di effettuare qualsiasi intervento di manutenzione.
6.1 CLEANING
Prima di iniziare a pulire la stufa, scollegarla dalla presa di corrente e lasciarla raffreddare.
La superficie della stufa deve essere pulita di tanto in tanto con un panno morbido ed umido. Non usare detergenti, polveri
abrasive o lucido di alcun tipo sul corpo della stufa. Lo schermo in vetro deve essere pulito con attenzione con un panno
di pelle di camoscio. Non usare prodotti per la pulizia dei vetri.
6.2 SOSTITUZIONE LAMPADE
Anello di tenuta
Effetto
Copertura
anteriore
Per accedere alle lampadine.
1. Togliere la copertura anteriore sollevandola verso l’alto e verso l’esterno e riporla con cautela da una parte.
2. Togliere le tre viti sull’effetto fiamma.
3. Far scorrere verso l’esterno l’effetto fiamma, tenendo fermo il bordo anteriore e riporlo con cautela da una parte
(fare attenzione a non danneggiare i ceppi perché sono fragili) - vedere Fig. 7.
4. Per aver accesso alle lampadine, ruotare con attenzione il meccanismo flessibile girevole finché non esce,
assicurandosi che l’anello di tenuta in gomma non vada perso - vedere Fig. 8.
5. Svitare la lampadina difettosa in senso antiorario. Sostituirla con una lampadina da 230 V, 60 W E14 SES, non
serrare eccessivamente (vedere Fig. 8).
6. Rimettere in posizione l’effetto fiamma (con le tre viti) ed il pannello anteriore.
fiamma
3 viti
Fig. 7
Fig. 8
Page 29

6.3 RIMONTAGGIO COPERTURA ANTERIORE
- 6 -
IT
Gancio
Fessura
Fig. 9
1. Inclinare leggermente la copertura anteriore, inserire i due ganci superiori nelle due fessure in alto –
vedere Fig. 9.
2. Inserire i due ganci inferiori nelle fessure.
3. Lasciare cadere la copertura anteriore verso il basso finché non si inserisce in posizione, accertarsi che sia
ben fissata.
7. RICICLAGGIO
Per prodotti elettrici venduti nell’ambito della Comunità Europea.
Quando non più utilizzabili, i prodotti elettrici non devono essere smaltiti assieme ai normali rifiuti domestici.
Devono invece essere smaltiti nelle apposite discariche. Per informazioni sui servizi di riciclaggio locali,
rivolgersi all’amministrazione locale o al proprio rivenditore di fiducia.
Page 30

[c] Dimplex UK Limited
All rights reserved. Material contained in this publication may not be reproduced in whole or in part, without prior premission in writing of Dimplex UK Limited.
Page 31

DE - Garantie
Die nachstehenden Ausführungen über Umfang der Garantie, Garantiefristen und die Anmeldung von Garantieansprüchen gelten ausschließlich für die
Bundesrepublik eutschland.
Wir räumen dem Käufer nach seiner Wahl zusätzlich zu den ihm gegen den Verkäufer ausstehenden gesetzlichen Gewährleistungsansprüchen einen Anspruch nach Maßgabe
der nachfolgenden Garantieverpflichtung ein:
I. Dauer und Beginn der Garantie
1. Grundsätzlich wird für jedes im Haushalt eingesetzte Gerät die auf der Garantiekarte ausgezeichnete Garantiezeit gewährt.
2. Bei gewerblicher Nutzung der von der Bauart her für den Haushalt bestimmten Geräte beträgt die Garantiezeit lediglich sechs Monate.
3 Die Garantie ist mit dem Zeitpunkt der Übergabe des Gerätes wirksam.
4. Bewahren Sie die vom Verkäufer ausgefüllte Garantie-Urkunde mit der Rechnung, dem Lieferschein oder einem anderen Kaufnachweis auf.
5. Durch Garantieleistungen tritt keine Verlängerung der ursprünglichen Garantiezeit ein.
6. Garantieansprüche können nur geltend gemacht werden, wenn die Mängelrüge innerhalb von 14 Tagen nach Entdeckung des Mangels schriftlich bei uns eingeht.
II. Inhalt und Unfang der Garantie
1. Ihr Gerät wird sorgfältig geprüft. Für den Fall, daß der Garantieanspruch zu Recht besteht, entscheiden wir, auf welche Art der Schaden behoben wer den soll / wird. Im
Reparaturfall sorgen wir für eine fachgerechte Ausführung.
2. Bei der Einsendung zur Reparatur sind Garantie-Urkunde und Kaufnachweis beizufügen.
3. Innerhalb der ersten sechs Monate erbringen wir die Garantieleistungen ohne Berechnung von Nebenkosten (Fahrt- und Wegzeitkosten, Fracht- und Verpackungskosten).
4. Darüber hinausgehende Ansprüche, insbesondere Schadenersatzansprüche, sind ausgeschlossen, soweit eine Haftung nicht gesetzlich angeordnet ist.
III. Einschränkungen der Garantie
1. Eine Garantie besteht nicht bei Fehlern oder Mängeln, die auf folgendes zurückzuführen sind:
a) Reparaturen und Abänderungen, die von nicht autorisierter dritter Stelle vorgenommen werden oder wurden;
b) äußere Einwirkungen, zum Beispiel Transportschäden, Beschädigungen durch Stoß oder Schlag, Schäden durch Witterungseinflüsse oder sonstige Naturerscheinungen;
c) unsachgemäße / fehlerhafte Bedienung oder Beanspruchung;
d) Verwendung von ungeeigneten Reinigungsmitteln, Chemikalien usw.
2. Die Garantie erstreckt sich nicht auf leicht zerbrechliche Teile, zum Beispiel Glas, Kunststoff, Glühlampen.
3. Geringfügige Änderungen gegenüber Prospekten oder Mustern oder früher gelieferter Ware gelten nicht als Mangel. Gleiches gilt bei lediglich geringfügigen Abweichungen
von der Sollbeschaffenheit, die für Wert- und Gebrauchstauglichkeit des Gerätes unerheblich ist.
4. Im Ausland gelten die von unserer jeweils zuständigen Landesvertretung herausgegebenen Garantiebedingungen.
DE - Garantie Für dieses Gerät gelten
die in dem Kaufland herausgegebenen
Garantie-bedingungen. Einzelheiten teilt
Ihnen der Händler, bei dem Sie das Gerät
gekauft haben, auf Anfrage jederzeit mit.
Die Inanspruchnahme von Garantieleistungen setzt die Vorlage des
Kaufbeleges und die Einhaltung der
Garantiefrist voraus. Der
Garantieanspruch verfällt, wenn das Gerät
beschädigt, nicht sachgemäß benutzt oder
unbefugte Eingriffe vorgenommen
wurden.
UK - Warranty The warranty conditions
in the country of purchase apply to this
appliance. Information can be obtained at
any time from the retailer from whom the
appliance was purchased. For claims under
guarantee the sales receipt must be
produced and the claims must be
forwarded within the guarantee period.
The right to claim under guarantee expires
in case that the device has been damaged,
used in an inappropriate way or that
unauthorized manipulations have been
carried out.
FR- Garantie Pour cet appareil, les
garanties applicables sont celles en vigueur
dans le pays où a lieu l’achat. Votre
revendeur vous en communiquera à tout
moment les détails sur simple demande. La
revendication au droit à la garantie est
assujettie à la présentation de la preuve
d’achat et du respect du délai de garantie.
Le droit à la garantie expire lorsque
l’appareil a été endommagé, utilisé de
manière inadéquate ou que des
interventions ont été effectuées par des
tiers.
IT - Garanzia Per questo apparecchio
valgono le condizioni di garanzia
pubblicate nel Paese d’acquisto. I dettagli
a riguardo vengono forniti, in ogni
momento, su richiesta, dal rivenditore
presso il quale viene acquistato
l’apparecchio. Il diritto alla prestazione di
garanzia ha come premessa l’esibizione
dello scontrino di acquisto e l’osservanza
del termine di garanzia. Il diritto alla
copertura di garanzia non sussiste, se
l’apparecchio è stato danneggiato, se non
è stato utilizzato a regola d’arte e sono
stati effettuati su di esso interventi non
autorizzati.
ES- Garantía Para este aparato tienen
validez las condiciones de garantía
entregadas en el país de compra. En caso
de preguntas, el vendedor al que usted
compró el aparato, estará en todo
momento dispuesto a informarle sobre los
detalles al respecto. La solicitud de
prestaciones que estén incluidas en las
disposiciones de garantía presupone, que
usted presente el ticket de compra y que
haga su solicitud en el plazo de garantía.
Los derechos de garantía caducan, si el
aparato se ha dañado, si se ha utilizado de
manera inadecuada, o si en él se han
efectuado intervenciones desautorizadas.
PT - Garantia As condições de garantia
do país de compra aplicam-se a este
aparelho. Pode obter informação em
qualquer altura do retalhista de onde
adquiriu o aparelho. Todas as reclamações
ao abrigo da garantia terão de se fazer
acompanhar do documento comprovativo
da compra e de serem enviadas dentro do
período da garantia. O direito de
reclamação ao abrigo da garantia expira
no caso do aparelho ter sido danificado,
utilizado de forma incorrecta ou de se
terem efectuado manipulações não
autorizadas.
NL- Garantie Voor dit apparaat gelden
de in het kooplanf uitgegeven
garantievoorwaarden. Details deelt U Uw
dealer, waar U het apparaat heeft gekocht,
op aanvrag altijd mee. De gebruikmaking
van garantievergoedingen vereist het
overleggen van het koopbewijs en de
nakoming van de garantietermijn. De
garantieclaim vervalt, wanneer het
apparaat werd beschadigd, niet juist werd
gebruikt of onbevoegde ingrepen werden
uitgevoerd.
DK- Garanti Apparatet er omfattet af
de garantibetingelser, som er gældende i
købslandet. Nærmere detaljer kan fås hos
den forhandler, hvor du har købt apparatet.
Der kan kun støttes ret på garantien ved
forelæggelse af købskvittering og kun
inden for garantiperioden. Garantien
bortfalder, hvis apparatet er blevet
beskadiget, anvendt forkert eller i tilfælde
af uautoriseret indgreb i apparatet.
SE- Garanti För denna apparat gäller
de för inköpslandet utgivna
garantibestämmelserna. På förfrågan
kan detaljerna i
garantibestämmelserna erhållas från
inköpsstället där apparaten har köpts.
Om garantin tas i anspråk måste
inköpskvitto kunna uppvisas inom
garantitiden. Alla garantianspråk
NO- Garanti For dette apparatet
gjelder kun de betingelsene som er
offentliggjort i forretningen det er kjøpt.
Deltaljer ang. dette kan man til enhver
tid få hos den fagforhandleren hvor du
har kjøpt apparatet. For å ha fulle
garantirettigheter må man kunne
fremlegge kvitteringen og
garantifristen må ikke være utløpt.
Garantien gjelder ikke når apparatet er
skadet, ikke er brukt etter forskriftene
eller ukvalifiserte inngrep er foretatt.
FI - Takuu Laitteella on ostomaassa
voimassa olevat takuuehdot.
Yksityiskohdat näistä ehdoista ilmoittaa
sinulle kauppias, jolta olet laitteen ostanut.
Takuusuorituksia voi vaatia takuuajan
ollessa voimassa esittämällä ostotodistus.
Takuu ei ole voimassa, mikäli laitetta on
käytetty sen ollessa vaurioitunut, sitä on
käytetty väärin tai ammattitaidoton henkilö
on korjannut laitetta.
PL- Gwarancja Dla tego urządzenia
obowiązują warunki gwarancji wydane
w kraju zakupu. W każdej chwili
sprzedawca, u którego dokonano
zakupu urządzenia, przekaże Państwu
odpowiednie szczegóły. Wykorzystanie
świadczeń gwarancyjnych jest
uwarunkowane przedłożeniem
pokwitowania zakupu i zachowaniem
terminu gwarancji. Prawo do gwarancji
przepada, gdy urządzenie zostanie
uszkodzone, niepoprawnie używane
lub dokonane zostaną niedozwolone
manipulacje.
CZ- Záruka Pro tento přístroj jsou
platné záruční podmínky, které byly
vydány v zemi kupujícího. S
podrobnostmi Vás kdykoliv na
požádání seznámí Váš prodejce, u
kterého jste přístroj zakoupili. Uznání
záruky předpokládá předložení
dokladu o koupi a dodržení záruční
lhůty. Nárok na záruku propadá, je-li
přístroj poškozený, neodborně
provozovaný a nebo byly-li na něm
provedené neodborné zásahy.
LV- Garantija Đai ierîcei ir spçkâ
pircçja valstî izdotie garantijas
noteikumi. Par to jűs sîkâku informâciju
saňemsiet veikalâ, kurâ jűs đo ierîci
nopirkât. Garantijas pieteikđanai jums
ir nepiecieđama pirkđanas kvîts. Bez
tam ir svarîgi, lai garantijas termiňđ
nebűtu notecçjis. Garantija netiek
sniegta, ja jűs ierîci sabojâjât,
ekspluatçjât neatbilstođi lietođanas
instrukcijai, veicât patvaďîgi demontâţu
vai mçěinâjât pađi to remontçt.
SI- Garancija Za to napravo veljajo
garancijski pogoji izdani v državi
nakupa. Na vašo željo vas bo o
podrobnostih kadarkoli obvestil
trgovec, pri katerem ste kupili napravo.
Pogoj za uveljavljanje storitev
določenih v garanciji je predložitev
računa in upoštevanje garancijskega
roka. Pravica do garancije zapade, če
je naprava poškodovana, če naprava
ni bila ustrezno uporabljana ali če so
bili izvedeni nepoobljščeni posegi v
napravo.
SK- Záruka Pre tento prístroj platia
záručné podmienky vydané v krajine
jeho zakúpenia. S podrobnosťa mi Vás
na požiadanie kedykoľvek zoznámi
predajca, u ktorého ste prístroj
zakúpili. Nárok na záručné služby
predpokladá predloženie dokladu
o kúpe a dodržanie záručnej lehoty.
Nárok na záruku zaniká, ak bol pr ístroj
poškodený, neodborne používaný
alebo na ňom boli urobené
neoprávnené zásahy.
LT - Garantija Điam prietaisui galioja
pirkimo đalyje iđleistos garantijos
sŕlygos. Jums pasiteiravus bet kuriuo
metu pardavëjas, pas kurá Jus pirkote
prietaisŕ, informuos apie smulkmenas.
Garantijos vykdymo pasinaudojimo
sŕlyga yra kasos čekio pateikimas ir
garantinio termino iđlaikymas.
Garantinis reikalavimas pasibaigia,
jeigu prietaisas sugadintas, netinkamai
buvo naudotas arba buvo atlikti
neleistini ásikiđimai.
EE- Garantii Seadme kohta kehtivad
selle riigi garantiitingimused, kus seade
on ostetud. Seadme edasimüüja
annab Teile pőhjalikku informatsiooni
garantii üksikasjade kohta.
Garantiiteenuste osutamise aluseks
garantiiaja jooksul on ostudokument.
Garantii ei kehti, kui seade on
kahjustunud, seda on kasutatud
ebaotstarbeliselt vői seadet on
demonteeritud.
HU- Garancia A készülékre a
vásárlási országban kiadott garanciális
feltételek érvényesek. Ennek
részleteiről kérésre szívesen nyújt
információt az a kereskedő, akitől a
készüléket vásárolta. A garanciális
teljesítés igénybe vételének előfeltétele
a vásárlási bizonylat bemutatása és a
garanciális határidő betartása. A
garanciális igény nem érvényes, ha a
készülék sérült, nem szakszerűen
használták vagy illetéktelen
beavatkozásokat végeztek rajta.
HR- Jamstvo Uvjeti jamstva koji važe
u državi kupnje važe i za ovaj uredaj.
Podaci se mogu dobiti u svako doba
od dobavljaca od kojega ste kupili
proizvod. Za zahtjeve po osnovi
jamstva morate priložiti racun koji ste
dobili pri kupnji, a zahtjev treba
podnijeti u toku trajanja jamstvenog
perioda. Pravo iz jamstva istice u
slucaju da je uredaj oštecen, korišten
na neodgovarajuci nacin ili su na
njemu provedene neovlaštene
popravke.
GR- Εγγύηση Για την παρούσα
συσκευή ισχύουν οι κανονισμοί
εγγύησης του ισχύουν στην χώρα
που αγοράστηκε. Λεπτομέρειες
θα σας παρέχει ο έμπορος απ τον
οποίο προμηθευτήκατε την
συσκευή οποιαδήποτε στιγμή του
το ζητήσετε. Απαραίτητες
προϋποθέσεις για την διεκδίκηση
παροχών που περιλαμβάνονται
στην εγγύηση είναι η απδειξη
αγοράς και η τήρηση της
προθεσμίας εγγύησης. Η εγγύηση
εκπίπτει εφσον η συσκευή υπέστη
βλάβη, δεν χρησιμοποιήθηκε ορθά
ή έλαβαν χώρα επεμβάσεις σε αυτή
απ μη εξουσιοδοτημένο
προσωπικ.
BG- Гаранция За настоящия уред
важат гаранционните условия,
валидни за страната, в която е
купен. С подробностите ще Ви
запознае продавачът, от който сте
купили уреда и към който Вие
можете да се обърнете по всяко
време. За да се предоставят
гаранционни услуги, е необходимо
да се представи документът за
закупуване и да не е изтекъл
гаранционният срок. Гаранцията се
губи, ако уредът е повреден,
неправилно използуван или с
недопустими изменения.
RU- Гарантия В отношении этого
прибора действительны условия
гарантии, предоставленные в
стране приобретения. Более
подробную информацию по вашему
запросу в любое время
предоставит магазин, в котором вы
приобрели прибор. Для
гарантийного обслуживания
необходимо в течение гарантийного
срока предъявить квитанцию о
покупке. Гарантия утрачивает силу,
если прибор был поврежден,
использовался ненадлежащим
образом или был подвергнут
недозволенным вмешательствам.
KZ
.
Page 32

2. Guarantee
Period (in Years)
3. Model(s) 4. Date of Purchase1. Warranty Card
5. Stamp & Signature of retailer
7. Contact Number & Address
DE
Glen Dimplex Deutschland Gmbh
ewt-Kundendienst
+49 (911) 1805 / 398 346
Fax. +49 (911) 1805 / 355 467
(14Ct./Min aus dem dt. Festnetz)
service@glendimplex.de
2
6. Fault/Defect
UK
Dimplex UK Limited
Millbrook House
Grange Drive
Hedge End
Southampton
Hampshire. SO30 2DF
0845 600 5111
Fax. 01489 773053
technical.services@dimplex.co.uk
www.dimplex.co.uk
TMR15
NL
Glen Dimplex Benelux B.V. – Netherlands
Antennestraat 84
1322 AS Almere, Nederland
E-mail: info@glendimplex.nl
www.glendimplex.nl
IT
Glen-Dimplex Italia S.r.l.
via delle Rose 7,
24040 lallio (BG)
035-201042
Fax. 035-200492
info@glendimplex.it
UK
1. Warranty Card
2. Guarantee Period (in Years)
3. Model(s)
4. Date of Purchase
5. Stamp & Signature of retailer
6. Fault/Defect
7. Contact Number & Address
DE
1. Garantiekarte
2. Garantiezeitraum (in Jahre)
3. Modell(e)
4. Kaufdatum
5. Stempel & Unterschrift des
Einzelhändlers
6. Fehler/Defekt
7. Kontakt-Tel.-Nr. & - Anschrift
FR
1. Bon de garantie
2. Période de garantie (en années)
3. Modèle(s)
4. Date d’achat
5. Cachet et signature du vendeur
6. Anomalie/Défaut
7. Nom et adresse du contact
IT
1. Scheda di garanzia
2. Periodo di garanzia (in anni)
3. Modello(i)
4. Data di acquisto
5. Timbro e firma del rivenditore
6. Guasto/difetto
7. Indirizzo e numero di contatto
ES
1. Tarjeta de garantía
2. Período de garantía (en años)
3. Modelo(s)
4. Fecha de adquisición
5. Sello y firma del distribuidor
6. Avería/Defecto
7. Número y dirección de contacto
PT
1. Cartão de Garantia
2. Período de Garantia (em anos)
3. Modelo(s)
4. Data de Compra
5. Carimbo e Assinatura do
retalhista
6. Falha/Defeito
7. Número de Contacto e Morada
NL
1. Garantiebewijs
2. Garantieperiode (in jaren)
3. Model(len)
4. Aankoopdatum
5. Stempel & Ondertekening
detaillist
6. Fout/Defect
7. Telefoonnummer & Adres
DK
1. Garantikort
2. Garantiperiode (i å r)
3. Model(ler)
4. Købsdato
5. Detailhandlers stempel &
underskrift
6. Fejl/defekt
7. Kontaktnummer & -adresse
SE
1. Garantikort
2. Garantitid (i år)
3. Modell(er)
4. Inköpsdag
5. Återförsäljarens stämpel och
underskrift
6. Fel
7. Telefonnummer och adress för
kontakt
NO
1. Garantikort
2. Garantiperiode (i å r)
3. Modell(er)
4. Kjøpsdato
5. Selgers stempel og signatur
6. Feil/defekt
7. Kontaktnummer og adresse
FI
1. Takuukortti
2. Takuuaika (vuosina)
3. Malli(t)
4. Ostopäivämäärä
5. Myyntiliikkeen leima ja
allekirjoitus
6. Vika/vaurio
7. Yhteysnumero ja osoite
PL
1. Karta gwarancyjna
2. Okres gwarancji (w latach)
3. Model(e)
4. Data zakupu
5. Pieczec i podpis sprzedawcy
6. Usterka
7. Telefon i adres kontaktowy
CZ
1. Záruční list
2. Záruční doba (roky)
3. Model(y)
4. Datum zakoupení
5. Razítko a podpis prodejce
6. Porucha/chyba
7. Kontaktní číslo a adresa
LV
1. Garantijas talons
2. Garantijas periods (gadi)
3. Modelis(li)
4. Legades datums
5. Mazumtirgotaja zimogs un
paraksts
6. Bojajums/defekts
7. Kontakttalrunis un adrese
SI
1. Garancijski list
2. Obdobje veljavnosti
garancije (v letih)
3. Model(i)
4. Datum nakupa
5. Žig in podpis prodajalca
6. Pomanjkljivost/okvara
7. Kontaktna številka in naslov
SK
1. Zárucný list
2. Zárucné obdobie (v rokoch)
3. Model(y)
4. Dátum kúpy
5. Pecat & Podpis obchodníka
6. Porucha/závada
7. Kontaktujte císlo & adresu
LT
1. Garantijos kortele
2. Garantijos laikotarpis (metais)
3. Modelis (modeliai)
4. Pirkimo data
5. Prekybininko antspaudas ir
parašas
6. Gedimas / defektas
7. Numeris ir adresas kontaktams
EE
1. Garantiikaart
2. Garantiiaeg (aastates)
3. Mudel(id)
4. Ostukuupäev
5. Kaupluse tempel & allkiri
6. Viga/defekt
7. Kontaktnumber & aadress
HU
1. Garancialevél
2. Garancia idotartama (években)
3. Modell(ek)
4. Vásárlás idopontja
5. Eladó bélyegzoje és aláírása
6. Hiba/Hiány megnevezése
7. Értesítési telefonszám és cím
HR
1. Jamstvena kartica
2. Jamstveni period (u godinama)
3. Model(i)
4. Datum kupnje
5. Pecat i potpis dobavljaca
6. Kvar/defekt
7. Broj i adresa za kontakt
GR
1. Κάρτα εγγύησης
2. Περίοδος ισχύος της
εγγύησης (έτη)
3. Μοντέλο(α)
4. Ημερομηνία αγοράς
5. Σφραγίδα και υπογραφή
εμπρου
6. Σφάλμα/Ελάττωμα
7. Αριθμς τηλεφώνου και
διεύθυνση επικοινωνίας
BG
1. Гаранционна карта
2. Гаранционен период (в
години)
3. Модел(и)
4. Дата на покупка
5. Печат и подпис на
търговеца
6. Неизправност/Дефект
7. Адрес и телефон за
контакт
RU
1. Гарантийная карта
2. Срок действия гарантии(в
годах)
3. Модель (модели)
4. Дата покупки
5. Штамп и подпись
озничного продавца
6. Неисправность/дефект
7. Номер контактного
телефона и адрес
KZ
 Loading...