

Page 1

Owner’s
Manual
Serial Number:
Model Number:
TBQ-120-___
PowerChef® Electric Grill
TBQ-120-REG
TBQ-120-DLX
Dimplex North America Limited
1367 Industrial Road Cambridge ON Canada N1R 7G8
1-888-346-7539 www.dimplex.com
7210190100rev02
Page 2

2
PowerChef® Electric Grill Features
Welcome and Thank You for purchasing a Dimplex
Electric Grill.
This introduction highlights the many features of the
PowerChef® Electric Grill. Detailed operating instructions are
contained later on in this manual.
EvenSear® Cooking System
At the heart of your electric grill is the EvenSear® Cooking
System. The dual layer grill system functions in two ways.
The cooking grate sears your food, with direct contact, and
at the same time your food is cooked gently and evenly by
additional heat radiating through the lower level element.
The EvenSear® system ensures that all energy supplied to
the grill is directly used to cook your food. Energy that would
otherwise be wasted heating the cabinet or air surrounding
the food is focused on cooking your food to perfection. The
EvenSear®Cooking System applies energy through both grill
layers and ows evenly and consistently throughout the entire
grill area, eliminating “hot spots” or “cool spots”.
No unwanted fumes. Safe and Fast.
PowerChef® utilizes your standard household electric current
and provides a closely controlled source of heat to your food.
No gas or other fuel fumes will impart unwanted tastes or odor
to your food. The PowerChef® system is safe, with no open
ame or combustion, provides fast efcient heat up, and no
refueling is ever necessary!
Easy to Clean
With its stainless steel cooking grate, the EvenSear® Cooking
System is easy to keep clean. No taste or odor is ever
transferred to the food through this high quality grill.
100% Use of Grill
Because there are no variations in temperature or performance,
the EvenSear® Cooking System provides 100% use of its grill
area. The full 216 square inch grill maintains a consistent
even temperature, even in the corners!
Program Cooking
The PowerChef® Electric Grill’s advanced cooking control
panel provides precision controllability on a wide choice of
popular foods, assuring they are cooked to perfection. The
control panel prompts you through easy to follow steps in
programming multiple food choices, cooking settings and time
adjustments. Once programmed, the electric grill prompts you
when it is time to start cooking, when it is time to turn your food
over and when it is done! Audible and visual signals alert you
to each step!
Manual Cooking
If pre-programmed cooking options don’t suit your taste, you
can of course prepare your food your way using the Manual
Mode.
Lid Down Cooking
Although not necessary, to conserve energy and reduce
cooking time, we recommend that the PowerChef® Electric
Grill be used with the lid down during cooking. A typical
thermometer featured in many other grills, which reads only
the air temperature, inside the cabinet is unnecessary on the
PowerChef® Electric Grill.
Versatile
With no open ame, no combustion and no need to refuel, the
PowerChef® Electric Grill can be used safely in many areas
that other grills cannot.
Electrical Requirements
A Ground Fault Interrupt (GFI) outdoor outlet or a circuit
protected by a ground fault breaker with a rating of 15 Amps,
120 Volts is strongly recommended. A dedicated circuit is
preferred but not essential in all cases. A dedicated circuit
will be required if, after installation, the circuit breaker trips
or the fuse blows on a regular basis when the electric grill
is operating. Additional appliances on the same circuit may
exceed the current rating of the circuit breaker.
Advanced Control System
The PowerChef® Electric Grill provides precision cooking
control in your choice of either MANUAL or PROGRAM
modes. To accommodate your specic tastes, audible and
visual prompts guide you through your cooking selections and
virtually assures food is cooked to perfection.
Page 3

Contents
Important Instructions ...................................................................................... Page 4
Package Contents ........................................................................................... Page 5
PowerChef® Assembly Instructions .................................................................Page 7
PowerChef® Model and Serial Number Information ........................................Page 18
Site Selection and Installation .......................................................................... Page 18
Guide to your new PowerChef® Electric Grill ..................................................Page 19
Control Panel Operating Guide ........................................................................ Page 20
Advanced Features of the PowerChef® Control Panel .................................... Page 20
3
Operation - Manual Mode ................................................................................ Page 21
Operation - Program Mode .............................................................................. Page 22
TBQ-120-DLX Accessories .............................................................................. Page 24
Care and Cleaning ...........................................................................................Page 27
Warranty .......................................................................................................... Page 29
Replacement Parts .......................................................................................... Page 29
Page 4

4
IMPORTANT INSTRUCTIONS
Please Save This User’s Manual For Future Reference
!
NOTE: Procedures and techniques that are considered
important enough to emphasize.
CAUTION: Procedures and techniques which, if not
carefully followed, will result in damage to the equipment.
WARNING: Procedures and techniques which, if not
carefully followed, will expose the user to the risk of re,
serious injury, illness or death.
WARNING: Read all instructions and warning labels prior
to use. Failure to follow these safeguards may result in
serious personal injury or property loss. This appliance is
intended for outdoor household, non-commercial use only.
1. Never touch hot surfaces, use handles or knobs. The
temperature of accessible metal surfaces may be high
when the appliance is operating. Use cooking tongs,
gloves, or cooking mitts at all times since the grill will
become very hot. Open hood carefully when cooking to
avoid burns from the hot air and steam trapped inside.
2. Wear clothing that does not have hanging shirt tails, frills,
or apron strings.
3. Use long-handle barbeque utensils to avoid personal
injury caused by burns and splatters.
4. To protect against electric shock, never immerse cord,
plugs or electric heating element in water or any other
liquid.
5. Never leave the electric grill on when you are not
cooking.
6. Unplug the electric grill from outlet when not in use or
before cleaning. Allow grill to cool before cleaning or
adding or removing parts. Do not clean this product with
high pressure hoses.
9. Never let cord touch hot surfaces.
10. To avoid personal injury, close hood before moving.
11. Never move a hot grill or leave it unattended.
12. Never move an electric grill unless it is unplugged.
13. Never use an electric grill in the rain, sleet or snow.
14 Never use an electric grill near combustible or
ammable materials.
15. Turn the power off on the electric grill before unplugging.
16. The use of longer detachable power supply cords or
extension cords is not recommended. Extension cords
may overheat and cause a risk of re. If you must use
an extension cord, it must be intended for outdoor use
and have a rating of no less than 1875 Watts. Outdoor
extension cords are marked with the sufx letters “W-A”
and have a tag stating “Suitable for Use with Outdoor
Appliances”s.
17. Store the electric grill out of reach of children.
18. Never allow other persons to be near the electric grill
while in use.
19. WARNING: Do not use charcoal, or any other
combustible material in an electric grill.
20. Do not use the electric grill or it’s accessories for
anything other than intended use.
21. Always check that food is fully cooked before
consumption.
22. Do not attempt to remove the cooking grid from the unit.
23. If the supply cord is damaged, it must be replaced by
the manufacturer, its service agent or similarly qualied
persons in order to avoid a hazard.
7. Never operate any appliance with damaged electrical
components or after the appliance has malfunctioned.
Inspect regularly supply cord and connections. If cord,
element or control is damaged or worn, it must be
replaced by an authorized service facility as special
tools are required. Do not attempt to repair the appliance
yourself. Contact your authorized service agent for
installation of electrical replacement kit.
8. The use of non Dimplex North America accessory
attachments is not recommended and may cause
damage to the unit or injury.
24. This appliance is not intended for use by persons
25. This appliance is not to be operated by means of an
SAVE THESE INSTRUCTIONS
(including children) with reduced physical, sensory or
mental capabilities or lack of experience and knowledge,
unless they have been given supervision concerning use
of the appliance by a person responsible for their safety.
Children should be supervised to ensure that they do not
play with the appliance.
external timer or separated remote control device.
Page 5
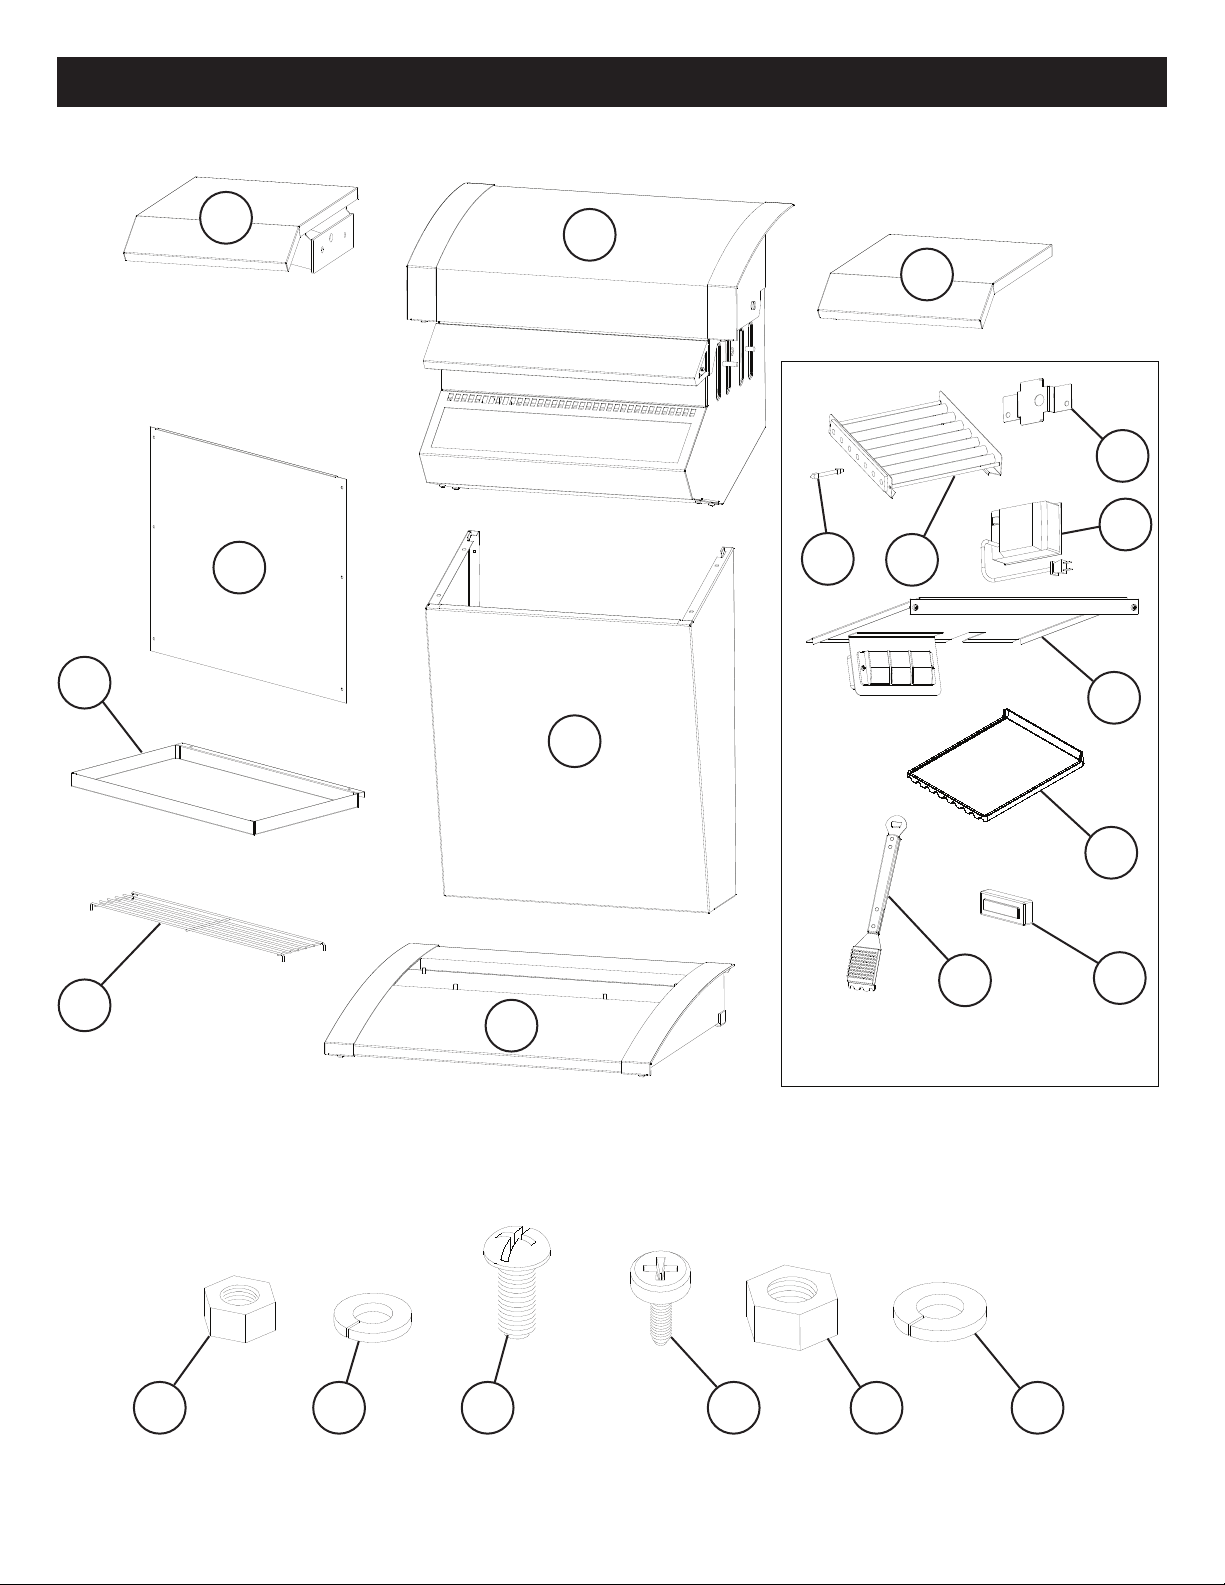
Package Contents
5
F
D
G
B
A
J
E
L
K
I
P
H
Q R S
C
T
O
M
Optional Accessories for TBQ-120-REG
(Included with the TBQ-120-DLX)
U
V
N
Page 6

6
Package Contents
Item Description Quantity
A Grill Assembly 1
B Stand Column 1
C Stand Base 1
D Left Shelf 1
E Right Shelf 1
F Drip Tray 1
G Rear Panel 1
H Warming Rack 1
I Hot Dog Roller (TBQ-120-DLX model only) 1
J Shaft for Hot Dog Roller (TBQ-120-DLX model only) 1
K Hot Dog Roller Motor (TBQ-120-DLX model only) 1
L Hot Dog Roller Mounting Bracket (TBQ-120-DLX model only) 1
M Grill Brush (TBQ-120-DLX model only) 1
N Grill Light Accessory (TBQ-120-DLX model only) 1
O Skillet Accessory (TBQ-120-DLX model only) 1
P Outlet Accessory (TBQ-120-DLX model only) 1
Q Nut, M6 8
R Lock Washer, M6 8
S Bolt, M6 4
T Screw, M4 Self tapping
U Nut, M8 4
V Lock Washer, M8 4
Tools Required for Assembly
Small Phillips Screw Driver (#1)
10 x 13 mm Box Type Wrench (included)
6 in TBQ-120-REG,
8 in TBQ-120-DLX
Two people are required for some assembly of the
PowerChef
®
Electric Grill.
Care should be taken when handling all parts during
assembly to prevent damage.
Page 7
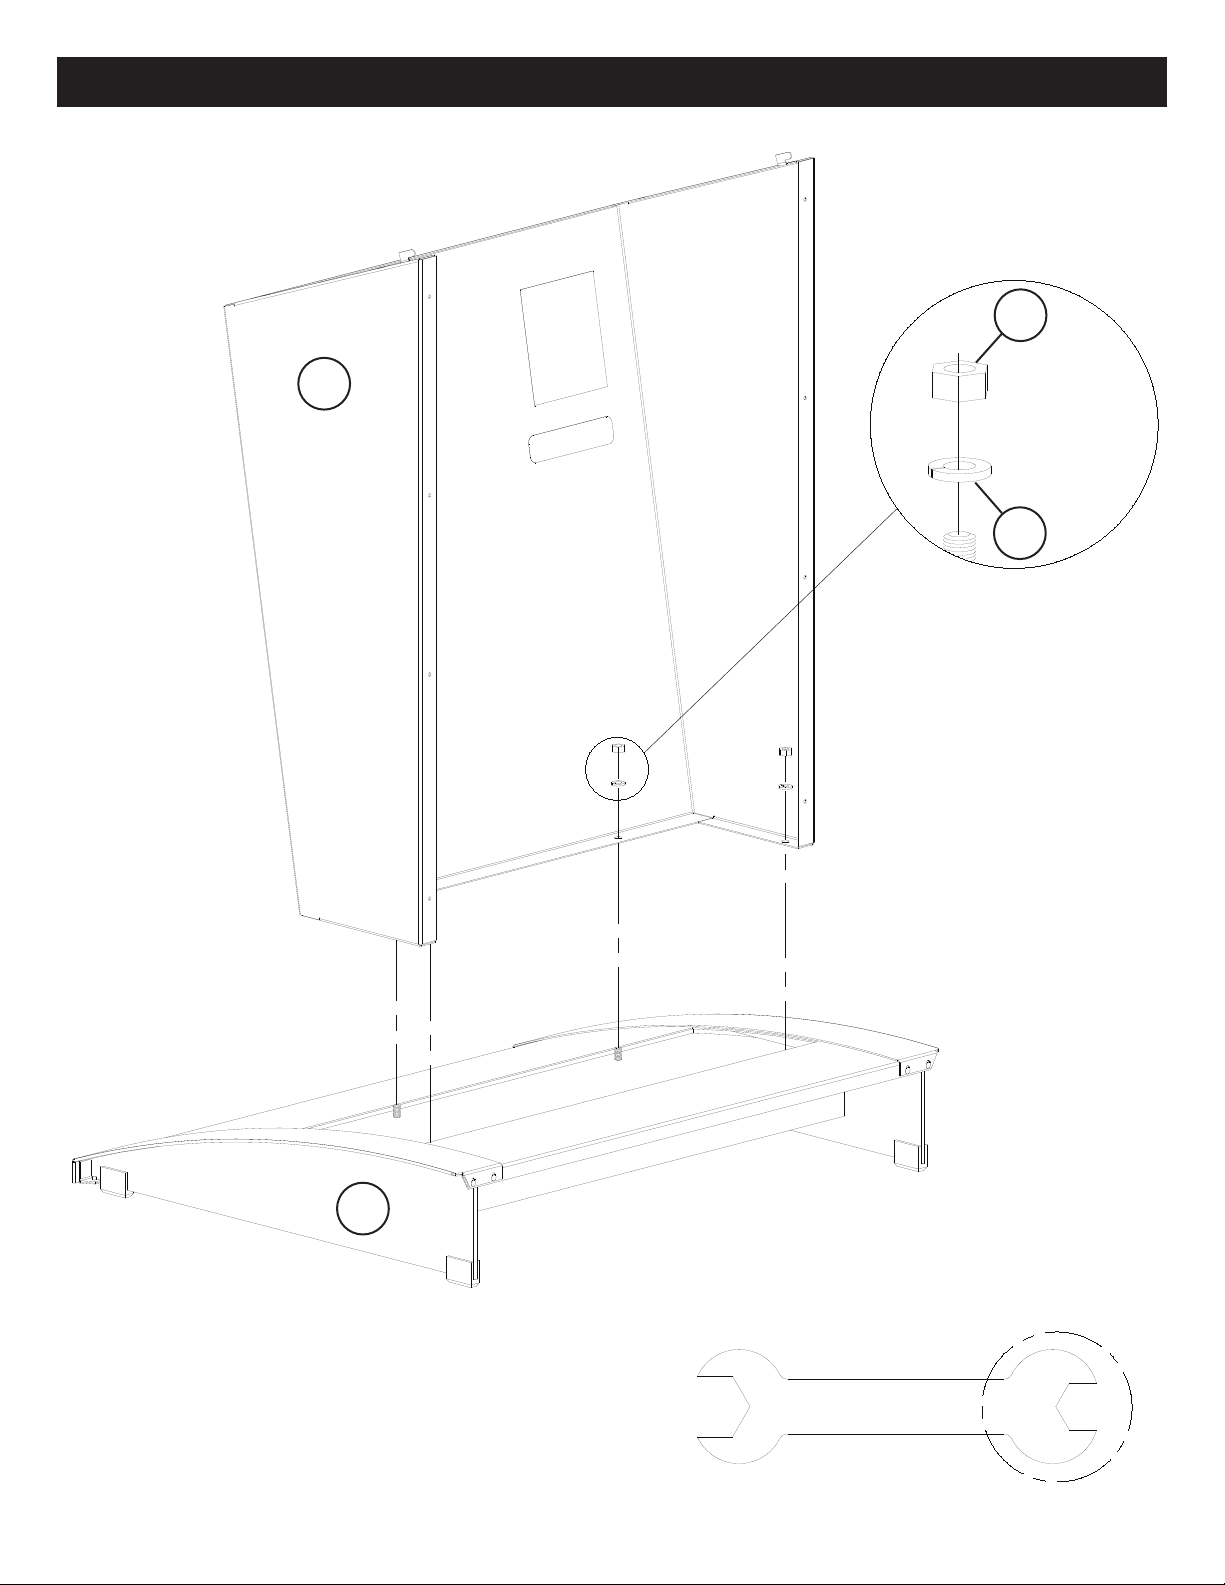
Step 1
B
PowerChef® Assembly
7
Q
x4
R
C
13
Included
10
Page 8
8
PowerChef® Assembly
Step 2
CAUTION: Two people are required
for this portion of assembly.
A
Power Cord
Q
S
13
10
Included
x4
Required
(not supplied)
CAUTION: Power cord comes out the front, bottom edge of Grill Assembly. When
positioning Grill Assembly onto Stand Column, ensure power cord does not get pinched.
R
Page 9
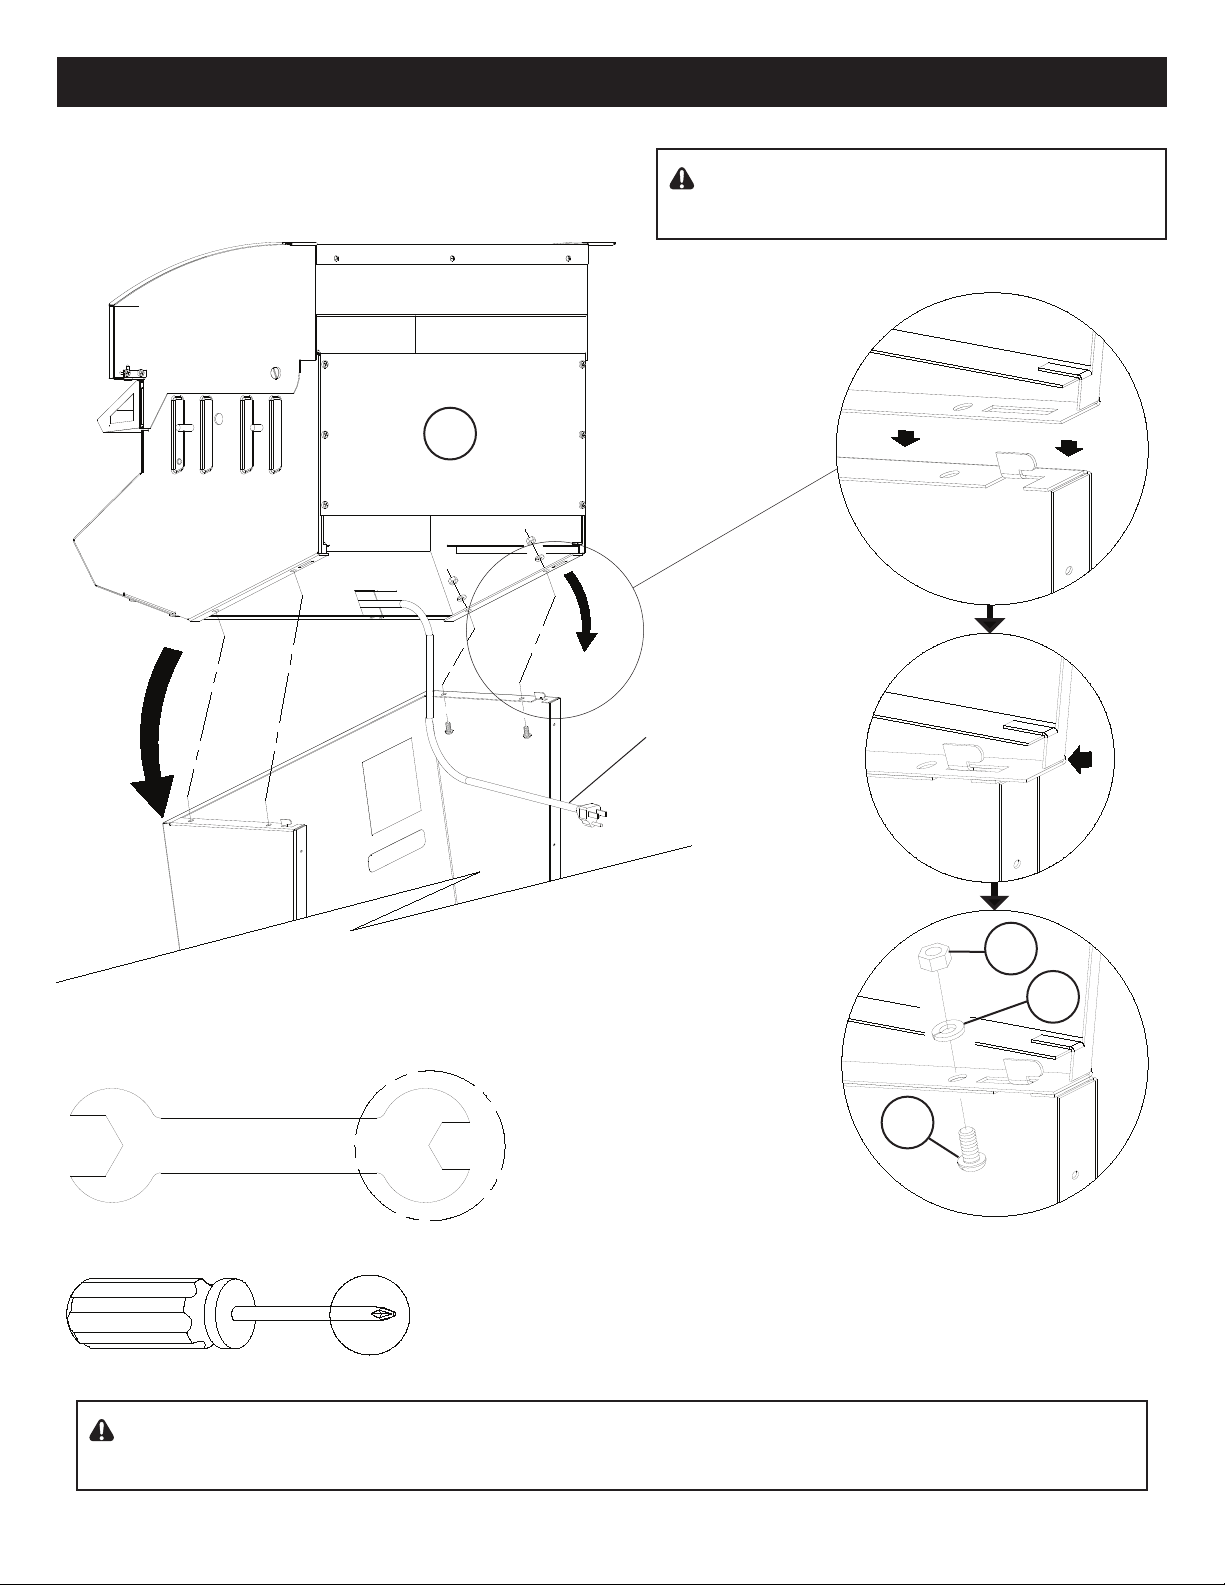
Step 3
PowerChef® Assembly
9
F
Page 10

10
Step 4
PowerChef® Assembly
x6
T
Required
(not supplied)
G
Page 11

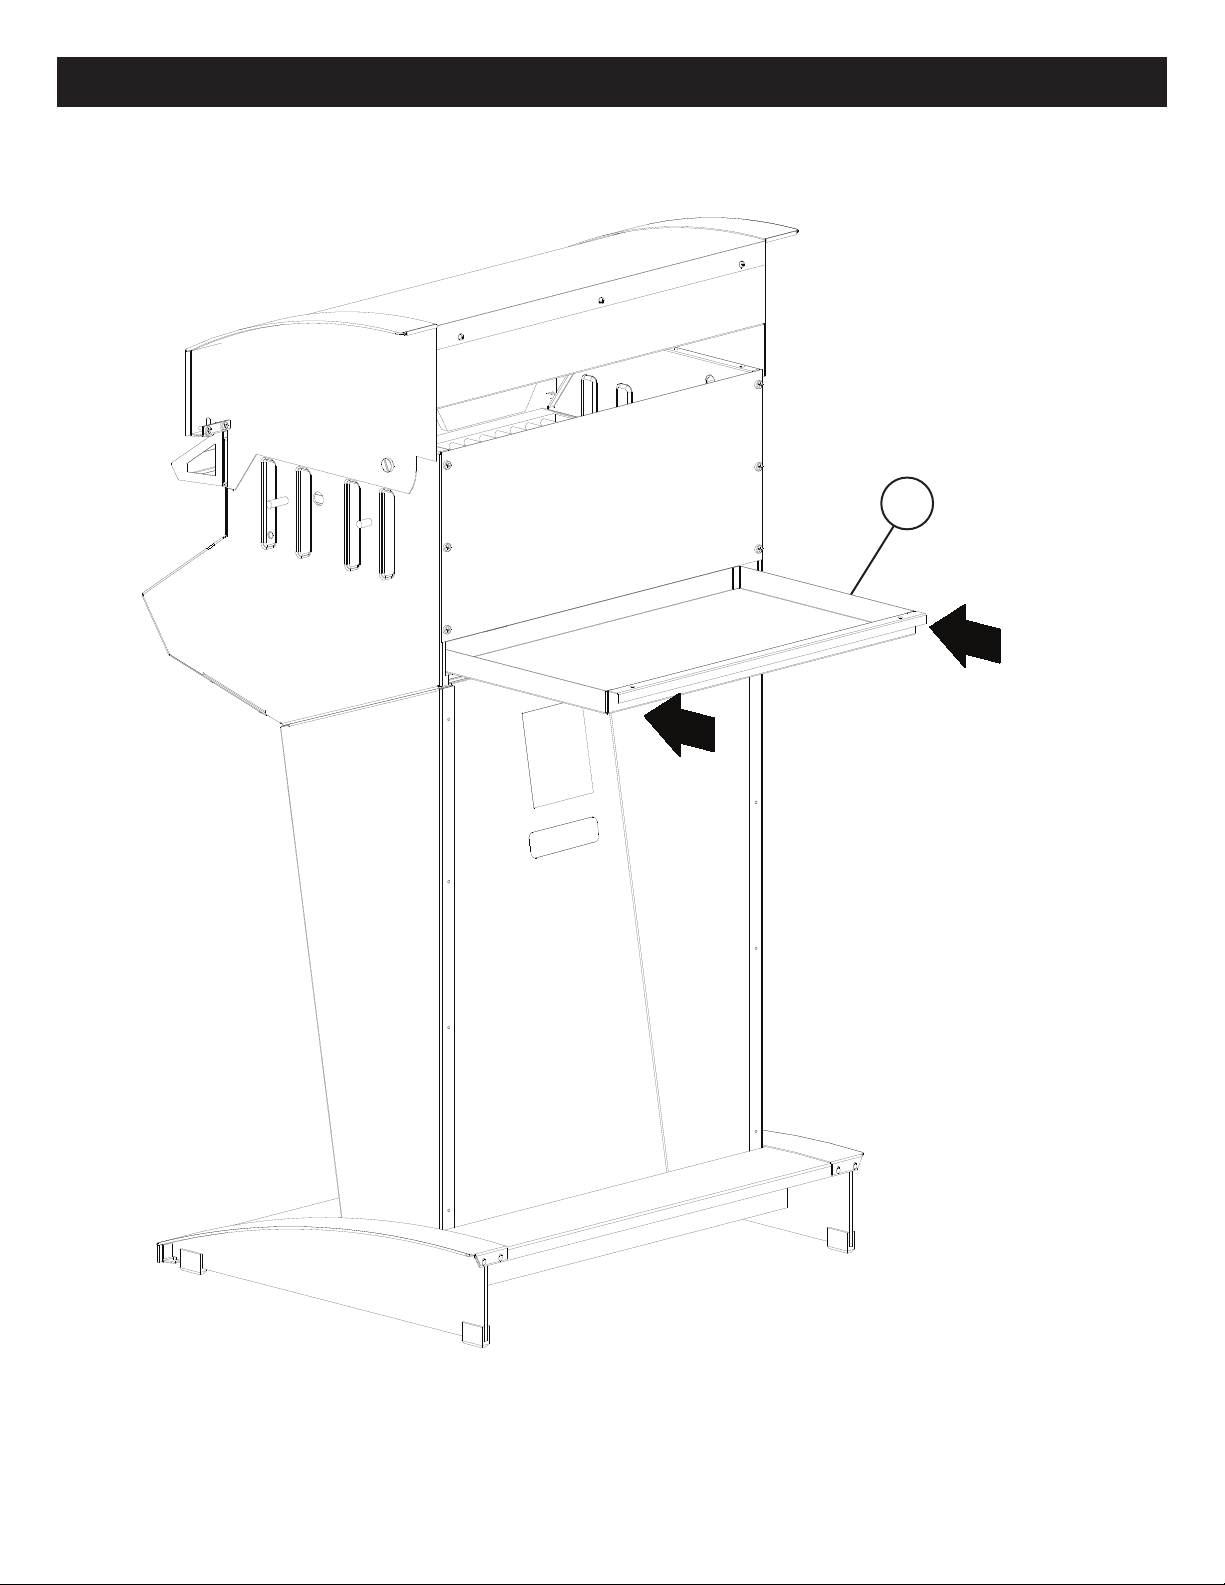
Step 5
H
PowerChef® Assembly
11
Page 12

12
Step 6
PowerChef® Assembly
(TBQ-120-REG only skip to Step 7 for
TBQ-120-DLX)
Included
10
U
13
D
V
x2
!
NOTE: If required, shelf alignment
can be adjusted. To adjust, install
shelf (Item D) with 2 of Items U and
V and loosely tighten. Align shelf
in line with hood and tighten with
wrench supplied.
Repeat steps to attach item E, Right
Shelf.
Page 13

Step 7
(TBQ-120-DLX only)
Included
PowerChef® Assembly
D
L
!
IMPORTANT: Left Shelf only.
13
10
13
U
x2
V
!
NOTE: If required, shelf alignment can
be adjusted. To adjust, install shelf
(Item D) with 2 of Items U and V and
loosely tighten. Align shelf in line with
hood and tighten with wrench supplied.
Hot Dog Roller Mounting Bracket can
only be installed with left shelf.
Repeat steps to attach item E, Right Shelf.
Page 14

14
Step 8
(TBQ-120-DLX only)
K
PowerChef® Assembly
!
NOTE: Align top and bottom
slot on back of motor with
edges of Mounting Bracket
and slide forward.
Reverse View
Page 15

PowerChef® Assembly
15
Step 9
(TBQ-120-DLX only)
J
!
NOTE: Remove all Hot Dog Roller packaging
material, hand wash in warm soapy water and
rinse thoroughly before rst use.
I
!
NOTE: To assist with inserting shaft into Hot Dog Roller Motor, plug in and turn motor on.
The motor operates at a low speed and will safely catch on the squared edges of the Hot
Dog Roller Shaft.
Page 16

16
Step 10
PowerChef® Assembly
(TBQ-120-DLX only)
Front
Back
Light
Hood
Remove
insulator
strip
!
NOTE: When placing light onto underside of handle, ensure that
light is centered into notch under the hood handle. If installed
incorrectly it will be difcult to replace the batteries.
Page 17

Step 11
PowerChef® Assembly
17
(TBQ-120-DLX only)
x2
T
Notch for
Power Cord
P
!
NOTE: Run Power Cord through notch provided in
Outlet Accessory panel. Front edge of panel will slide
between Grill Assembly and Chassis Column (see inset).
Dimplex suggests plugging Grill and Hot Dog Roller into
the outlet accessory, then run an extension cord from
accessory to wall outlet.
Front edge
of accessory
panel ts here.
Page 18

18
PowerChef® Model and Serial Number Information
If you have any questions regarding our products please have the product model and serial numbers
available upon calling customer service or technical support. To locate the model and serial number labels
see below (Figure 1). Record the model number, serial number, on the front cover of this manual for future
reference.
Figure 1
Serial Number
Model Number
Site Selection and Installation
!
NOTE: A Ground Fault Interrupt (GFI) outdoor
outlet or a circuit protected by a ground fault
breaker with a rating of 15 Amps, 120 Volts is
strongly recommended. A dedicated circuit
is preferred but not essential in all cases. A
dedicated circuit will be required if, after
installation, the circuit breaker trips or the fuse
blows on a regular basis when the electric grill
is operating. Additional appliances on the same
circuit may exceed the current rating of the circuit
breaker.
WARNING: Ensure the power cord is not pinched
or against a sharp edge. Ensure that the power
cord is stored or secured to avoid tripping or
snagging to reduce the risk of re, electric shock
or injury to persons.
Construction and electrical outlet wiring must
comply with local building codes and other
applicable regulations to reduce the risk of re,
electric shock and injury to persons.
Do not attempt to wire your own new outlets or
circuits. To reduce the risk of re, electric shock
24” (61cm)
18”
(45.7cm)
Model Number
Label
Serial Number
Label
40”
(101.6cm)
or injury to persons, always use a licensed
electrician.
Installation
1. Select a suitable location away from puddles,
pools, ponds, and hot tubs.
2. Ensure the electric grill is positioned more
than eight (8) inches (20 cm) away from any
combustible material or surfaces before cooking.
3. Ensure that there are no ammable or other
volatile materials in the direct area before grilling.
4. For ease of electrical hook up you may wish to
locate the electric grill near an existing outlet (refer
to NOTE).
5. Cover to protect your electric grill after use and for
storage. Allow the grill to cool before installing the
cover.
The dimensions of the electric grill are 24 inches (61
cm) wide x 40 inches (101.6 cm) high x 18 inches
(45.7 cm) deep (Figure 1).
Page 19

(TBQ-120-DLX
model only)
Food Preparation
Surfaces
Guide to your new PowerChef® Electric Grill
Lift to Open HandleStainless Steel Trim
19
Chrome Plated
Warming Rack
®
EvenSear
Cooking
System
Touch to Operate
Electronic
Control Panel
Hot Dog Roller Accessory
(TBQ-120-DLX model only)
Heavy Duty Powder
Coated Steel Body
Outlet Accessory
(TBQ-120-DLX
model only)
Skillet Accessory
(TBQ-120-DLX
model only)
Light Accessory
(TBQ-120-DLX
model only)
Rear View Front View
Page 20

20
Control Panel Operating Guide
Power Level
OFF
5
3 1 7 42
1 On/Select
Use to turn on the unit and to conrm the selections,
displayed.
2 Display
Displays selection and status of operation.
3 Off
Push TWICE to shut off the entire grill.
4 Key Pad
Use the keypad to set cook timer when in manual
operation.
ON
SELECT
1 2 3
6 7 8
5
9
RL
CANCEL
0
4
PAUSE
66
5 Power Level
Press up/down arrows to select desired power level.
Use the power level up/down when in manual mode
only.
6 Right/Left Arrows
Use to navigate display selections.
7 Cancel
Cancels the last selection from the display.
Advanced Features of the PowerChef® Control Panel
Automatic Power Saver
This feature activates immediately after a pre-programmed
selection is nished cooking and “DONE” is shown on the
display. The cooking system power will immediately shut off
but the display will remain ON.
Safety Power-off
This feature activates if the unit has been accidentally left on
after cooking. Four (4) hours after the last button has been
touched on the control panel the power automatically shuts
off to the entire unit.
Sleep Mode
When using the program mode and the On/Select button
is not pressed after a stage of cooking the power will
automatically reduce to the minimum one bar level after a
short period of time to prevent the food from burning.
Voltage Compensation
The electric grill automatically adjusts the cook times based
on any variance to input voltage. This insures food is grilled
to the desired state.
Key Lock
This feature is useful in preventing accidental changes to
your cooking program by locking the control panel when in
use. When this feature is used all control panel functions
are disabled. To activate the key lock press the numbers in
sequence 1,2,3 LOC will appear on the display screen. To
deactivate the key lock press the numbers in sequence 1,2,3
and ULOC will appear on the display screen.
To Cancel Preheat
Your PowerChef® electric grill has an automatic eight (8)
minute PREHEAT function. To cancel the PREHEAT function
press the CANCEL button after the program has started. A
full PREHEAT is recommended when the grill is cold but may
not be required if your grill is still heated from previous use.
Page 21

PowerChef® Operation - Manual Mode
Operation Display Reads Action
Touch ON/SELECT button. MANUAL (Flashing) Initial start-up.
Touch ON/SELECT button &
MANUAL is highlighted.
PREHEAT Preheat for 8 minutes.
Alarm sounds. PLACE FOOD Grill is ready for cooking - place
food.
Close hood & touch ON/SELECT button Cooking is underway.
Touch up/down Power Level keys. Power Level Increases/decreases Power
Level setting.
Touch OFF twice. Blank Grill is turned off.
Operation Display Reads Action
Touch ON/SELECT button. MANUAL (Flashing) Initial start-up.
Touch ON/SELECT button &
MANUAL is highlighted.
PREHEAT Preheat for 8 minutes.
Alarm sounds. PLACE FOOD Grill is ready for cooking - place
food.
Close hood & touch ON/SELECT button Cooking is underway.
Touch up/down Power Level keys. Power Level Increases/decreases Power
Level setting.
Touch number pad keys to enter desired
time. Ex: Press "5" once for 5 minutes
or "1, 3, 0" for 1 hour, 30 minutes.
TOTAL TIME displays
hours/minutes entered from key
pad.
Count down timer is now
entered.
Touch ON/SELECT button. TOTAL TIME begins to count
down from time entered on key
pad.
Timer is now activated. TOTAL
TIME will count down in HRS:
MINS, STAGE TIME will count
down in :SECS.
To Use the Manual Feature
*** Note: The timer can be used as a reference when using the MANUAL feature.
To Use the Timer with the Manual Feature
**** NOTE: when the timer reaches 0, an alarm will sound with 3 beeps, power to the cooking grid shuts off
and the display will show FINISHED . Touch the OFF button once to shut display off, and a second time to
shut the grill off.
Power Level
ON
OFF
L R
SELECT
21
CANCEL
Page 22

Operation Display Reads Action
Touch ON/SELECT button. MANUAL (Flashing) Initial start-up.
Touch R (right) Arrow. PROGRAM Shifts operation from MANUAL
to PROGRAM mode.
Touch ON/SELECT button. PROGRAM Completes PROGRAM mode
set up.
BEEF
CHICKEN
PORK
FISH
VEG
SAUSAGE
RIBS
F1
Touch ON/SELECT button. Your choice remains
illuminated.
Selects food choice.
To Use Program Feature
To Cook Your Selected Food
Touch R/L arrows until choice is
illuminated.
Highlights food choice.
22
Power Level
PowerChef® Operation - Program Mode
ON
OFF
L R
SELECT
CANCEL
Depending on your food choice, you will be prompted to
highlight and select secondary food choice description. (e.g.
Beef Steak or Beef Burgers). Use the Right/Left Arrow and
the On/Select button to highlight and select your choice.
Depending on your food choice, you may be prompted to
select how you want your food prepared. (e.g. Rare, Medium
Rare, Medium or Well Done). Use the Right/Left Arrow
button and the On/Select button to highlight and select your
choice.
Depending on your food choice, you may be prompted to
select the thickness of the food to be cooked. (e.g. ¼”, ½”,
¾”, 1”, 1 ¼”, 1 ½”, 1 ¾”, 2” ). Use the Right/Left Arrow button
and the On/Select button to highlight and select your choice.
Page 23

PowerChef® Operation - Program Mode
Operation Display Reads Action
Place foods on grill and close hood.
Touch ON/SELECT button.
PLACE FOOD indicator goes
off. TOTAL TIME
commences countdown.
STAGE TIME counts down to
next stage.
Cooking is underway.
Alarm sounds to turn food over. TURN FOOD appears, TOTAL
TIME pauses, STAGE TIME is
completed.
Grill is indicating it is time to
turn food over. Turn food and
close hood.
Food is turned and hood is closed.
Touch ON/SELECT button.
TURN FOOD goes off. TOTAL
TIME resumes. STAGE TIME
counts down to next stage.
Cooking of reverse side of food
is underway.
Food choice selections (as above). Grill is preheating.
Alarm sounds. Grill is preheated and ready to
cook.
PREHEAT changes to PLACE
FOOD and TOTAL TIME
pauses.
PREHEAT
-STAGE TIME begins to count
down from 8 minutes and
TOTAL TIME displays total
cooking time.
Operation Display Reads Action
FINISHED is highlighted.
TOTAL TIME and STAGE
TIME
show 00:00.
Touch ON/SELECT or CANCEL button
to finish the program.
All indicators are off. Food is ready.
Touch OFF button. All indicators are off. Grill is shutting down.
Alarm sounds. Food cooking program is
completed.
Once your food and cooking choices have been selected:
23
!
NOTE: Depending on food choice and cooking choice, you may be prompted to repeat the last two
steps.
!
NOTE: All program cooking times assume food is thawed before cooking (except hamburger
patties).
Page 24

24
TBQ-120-DLX Accessories
!
NOTE: The following instructions apply to the accessories
included with the Deluxe model of the PowerChef®
electric grill. These accessories are separately available
for purchase from your authorized Dimplex dealer.
Outlet Accessory
Install the Outlet accessory following step 11 on page
17. The Outlet accessory provides for two (2) devices to
be plugged in for power. Dimplex recommends plugging
the electric grill and Hot Dog Roller Motor into the Outlet
accessory.
Figure 2
Outlet Accessory
Rear view of grill
more information) or a nearby electric wall socket.
!
NOTE: If Skillet and Hot Dog Roller accessories are to be
used simultaneously, install Hot Dog Roller rst. Hot Dog
Roller requires installation directly from the side (see step
9, page 15) to prevent damage to the motor.
CAUTION: To avoid burns to skin, do not install any
accessory while grill is hot or operating. Allow grill to
cool for at least 15 minutes before adding any cooking
accessory.
Instructions for Cooking
®
Ensure power is supplied to the PowerChef1.
electric grill.
Plug Hot Dog Roller Motor into Outlet Accessory or 2.
electric wall socket and turn Hot Dog Roller Motor On/Off
Switch (Figure 3) to On (“ I “ position).
Figure 3
On/Off Switch
Exploded view to show detail
3 prong plug for power
cord connection
Available sockets for power
Each of the three (3) outlets are covered by a spring loaded
cover to protect from moisture and cooking residue. The
center and right hand modules (refer to Figure 2) provides an
outlet for power and the left hand module contains a 3 prong
plug for power cord connection.
!
NOTE: A 3 (three) core power cord or extension cord
must connect the Outlet accessory to an electrical wall
socket in order to provide power to the other two (2)
module outlets. Cord must be rated for 1875 Watts and a
minimum 14 AWG (not included).
Hot Dog Roller Accessory
Before rst use, remove all packing material from Hot Dog
Roller. Hand wash in warm, soapy water and rinse and dry
thoroughly.
Press the ON/SELECT button on the electric grill, 3.
PREHEAT icon is ashing on the display.
Press the ON/SELECT button again to start the 8 (eight) 4.
minute preheat.
When the preheat function ends an alarm will sound, the 5.
PREHEAT icon disappears and the PLACE icon appears.
Press the up and down arrow buttons to adjust Power 6.
Level to desired setting.
Place hot dogs on roller and cook until desired tenderness 7.
and wellness is reached.
Press the OFF button to shut grill off once cooking is 8.
completed.
Approximate cook times:
Regular size hot dogs: 8-12 minutes
Jumbo size hot dogs: 10-15 minutes
!
NOTE: Cook times assume a preheated grill.
Install the Hot Dog Roller and Motor following steps 10 and
11 on pages 16 and 17. Once installed, plug the Hot Dog
Roller Motor power cord into either the center or right most
plug of the Outlet Accessory (refer to description above for
CAUTION: To avoid burns to skin, allow grill and roller to
cool for a minimum of 15 minutes before removing roller
for cleaning.
Page 25

TBQ-120-DLX Accessories
25
Skillet Accessory
The Skillet is made of solid cast iron with an enamel coating
to provide long life and durability. Ridges underneath the
Skillet are designed to t over the EvenSear® Cooking
System, ensuring the Skillet will not move during cooking. A
back splash is also provided to prevent food from slipping
into the grill area (Figure 4).
Figure 4
Skillet Accessory
Ridges to t over cooking grate
!
NOTE: Enamel coating can chip or become damaged
if Skillet is dropped or struck with hard surfaces. Avoid
scraping the enamel surface if metallic utensils are
used. Wood or heat-resistant Silicone or plastic are
recommended.
Back Splash
build up on the cooking surface. Dimplex recommends to
not attempt to remove this as Patina improves the release
of foods from the Skillet’s cooking surface.
Instructions for Cooking
Set Skillet on cooking grate, placing the back splash at 1.
the back of the grill. Skillet should be placed so that the
ridges of the Skillet t between the top rails of the cooking
grate, securing the Skillet in place (Figure 5).
Figure 5
Before rst use, remove all packing material from Skillet.
Hand wash in warm, soapy water and rinse and dry
thoroughly.
!
NOTE: If Skillet and Hot Dog Roller accessories are to be
used simultaneously, install Hot Dog Roller rst. Hot Dog
Roller requires installation directly from the side (see step
9, page 15) to prevent damage to the motor.
CAUTION: To avoid burns to skin, do not install any
accessory while grill is hot or operating. Allow grill to
cool for at least 15 minutes before adding any cooking
accessory.
Skillet Cooking Tips
Only oil or grease Skillet once it has been fully preheated. •
Let a few drops of cold water touch the Skillet for a test of
readiness. If the droplets spatter and evaporate quickly,
Skillet is ready.
Use only vegetable or corn oils to grease Skillet. Others •
like olive oil or margarine have a lower smoking point and
may affect the taste of your food.
For additional avouring, use pre-cook marinades.•
Allow foods to sear and seal their outer surfaces before •
attempting to move or lift. Food may separate or break
otherwise.
As Skillet is used, a Patina (a brown or black lm) will •
®
Ensure power is supplied to the PowerChef2.
Press the ON/SELECT button on the electric grill, 3.
PREHEAT icon is ashing on the display.
Press the ON/SELECT button again to start the 8 (eight) 4.
minute preheat.
When the preheat function ends an alarm will sound, the 5.
PREHEAT icon disappears and the PLACE icon appears.
Press the up and down arrow buttons to adjust Power 6.
Level to desired setting. Add a little vegetable, corn or
groundnut oil and add the foods immediately.
Cook foods until desired result is reached, repeat as 7.
required (once grill and Skillet is fully heated, it does not
need to be preheated again).
Press the OFF button to shut grill off.8.
Suggested Procedure for Eggs
Follow steps 1 through 5 above to preheat the Skillet for 1.
eight (8) minutes at full power.
Grease the Skillet with one (1) tablespoon of vegetable 2.
based cooking oil.
Place egg(s) on skillet - maximum two (2) eggs at a time.3.
Cook until underside is crisp - approximately two (2) 4.
minutes.
electric grill.
Page 26

26
TBQ-120-DLX Accessories
Flip with spatula*.5.
Cook ip side until crisp - approximately 1 minute*.6.
Remove with spatula.7.
* If second side cooking is not desired, simply remove
egg(s) with spatula.
CAUTION: Skillet can achieve very high temperatures
and remain hot. Allow Skillet to cool at least 30 minutes
before attempting to remove from grill.
Light Accessory
Follow the procedure outlined in step 10 on page 16 to install
the Light Accessory. Once installed, the Light’s four (4)
wide angle white LEDs will provide brilliant light in low light
conditions or during night time grilling.
To operate, press in the clear lens section of the light until it
clicks to turn the Light on. Press again to turn the Light off
(Figure 6).
Figure 6
Clear lens section
Once Light is free, the batteries are exposed on the 2.
back of the unit (Figure 8). Replace with three (3) AAA
batteries and match positive and negative terminals as
inscribed on the Light.
Figure 8
Grooves that match
with posts from rear cover
Figure 9
Batteries (3)
Back cover of Light stuck to
inside surface of Hood
Wide angle white LEDs (4)
Battery Replacement Procedure
Release Light accessory from mounted backing by sliding 1.
Light to the side. Direction will depend on how it was
installed (Figure 7).
Figure 7
Posts that match with
grooves on rear surface of Light unit
To reinstall Light, align wide sides of grooves on back of 3.
Light with posts on back cover of Light (Figure 9) which is
adhered to the inside of the hood of the grill and slide unit
until edges of back cover and Light are ush.
For the complete line of electric BBQs and accessories
contact your authorized Dimplex dealer or visit us on the web
at www.dimplexoutdoors.com.
Light Accessory
Page 27

Care and Cleaning
27
To keep your electric grill operating at its best possible
performance Dimplex recommends that you clean the
cooking grid and each accessory after each use.
WARNING: Unplug the electric grill from outlet when not
in use or before cleaning. Allow the grill and accessories
to cool before cleaning.
Do not clean this product with high pressure water spray.
Do not use abrasive powders or cleaning pads on any
surface of the electric grill, Hot Dog Roller or Skillet.
Allow electric grill to cool before covering.
Cover the electric grill when not in use.
Storage
For seasonal storage, cover and store in a dry location away
from the elements.
Control Panel Glass
To clean the control panel glass use a non abrasive glass
cleaner or damp, soft cloth or sponge with a mild detergent.
Follow with a clean damp cloth to remove any remaining
detergent residue. Buff dry.
Figure 10
Drip Tray handle
Stop Tab
electric grill before next use.
Drip Tray
CAUTION: To avoid burns, wait until tray and contents
cool before removal.
The Drip Tray is located under the cooking grid and is
accessible from the back of your PowerChef® electric grill.
The Drip Tray can be lined with aluminum foil and/or we
recommend the use of a non-stick cooking spray to make
clean-up easier.
To remove and clean the Drip Tray:
Lift the handle of the Drip Tray until the bottom edge of 1.
the tray clears stop tabs on either side of the grill
(Figure 10) and pull slightly forward.
Place hands on either side of the Drip Tray and 2.
pull directly out the back of the electric grill until it is
completely free of the unit.
WARNING: Drip Tray is heavy and may weigh even
more if full. Use caution when removing from grill to avoid
personal injury.
Use a plastic scraper and/or paper towel to remove large 3.
build ups.
Cooking Grid
The cooking grid is permanently mounted into the body
of the electric grill. Do not attempt to remove.
To clean;
1. Clean cooking surface with a damp, soft cloth or sponge
with a mild detergent.
2. Follow with a clean damp cloth to remove any remaining
detergent residue.
3. The Brush accessory (included with the TBQ-120-DLX
model), a soft wire brush or scraper may be used to
remove excess deposits. The ridges cut into the scraper
side of the Brush accessory are designed to t between
the rungs of the cooking grid.
To clean under the cooking grid, remove the Drip Tray
following steps as outlined above. The Brush accessory
has the necessary prole to t between the bottom of the
grill assembly and the sheet metal of the Outlet accessory
if installed. Any soft wire brush or scraper can be used to
clean the underside of the cooking grid.
WARNING: Never strike cooking grid to remove residue.
To clean, use a damp, soft cloth or sponge with a mild 4.
detergent.
Follow with a clean damp cloth or paper towel to remove 5.
any remaining detergent residue.
Relocate the Drip Tray into position in the body of the 6.
Page 28

28
Care and Cleaning
Stainless Steel Trim Surfaces (TBQ-120-DLX)
Clean all stainless steel panels with a damp, soft cloth or
sponge with a mild detergent. Follow with a clean damp
cloth to remove any remaining detergent residue. Buff dry.
!
NOTE: Do not use oven cleaner, abrasive scouring
powders or abrasive cleaning pads as they may scratch.
Painted Panels
Clean all painted panels with a damp, soft cloth or sponge
with a mild detergent. Follow with a clean damp cloth to any
remaining detergent residue. Buff dry.
Skillet (included with TBQ-120-DLX)
Cleaning tips:
After use, allow Skillet to cool to room temperature before •
attempting to remove or wash.
Do not plunge into cold water immediately after use as •
thermal shock damage to the enamel nish may occur.
Hand wash with hot soapy water, rinse with warm water •
and dry.
If food residue remains, ll the pan with warm water •
and leave to soak for 15 - 20 minutes, then wash. For
stubborn residues, nylon or soft abrasive pads or brushes
can be used. Do not use metallic pads or abrasive
cleaners as these will damage the enamel.
Dry thoroughly after washing. Do not drain dry or store •
while wet.
An oily, slightly brown to black lm called a Patina may •
build up on the cooking surface over time. Do not attempt
to remove this as it is normal and improves the release of
foods from the cooking surface.
Never store Skillet outdoors. Store in a clean, dry place •
when not in use.
Hot Dog Roller (included with TBQ-120-DLX)
Cleaning tips:
After use, allow Hot Dog Roller to cool to room •
temperature before attempting to wash.
Hand wash with hot soapy water, rinse with warm water •
and towel dry.
Page 29

Warranty
29
Products to which this limited warranty applies
This limited warranty applies to newly purchased Dimplex electric grill. This
limited warranty applies only to purchases made in any province of Canada
except for Yukon Territory, Nunavut, or Northwest Territories or in any of the
50 States of the USA (and the District of Columbia) except for Hawaii and
Alaska. This limited warranty applies to the original purchaser of the product
only and is not transferable.
Products excluded from this limited warranty
Products purchased in Yukon Territory, Nunavut, Northwest Territories,
Hawaii, or Alaska are not covered by this limited warranty. Products
purchased in these States, provinces, or territories are sold AS IS without
warranty or condition of any kind (including, without limitation, any implied
warranties or conditions of merchantability or tness for a particular purpose)
and the entire risk of as to the quality and performance of the products is
with the purchaser, and in the event of a defect the purchaser assumes the
entire cost of all necessary servicing or repair.
What this limited warranty covers and for how long
Products covered by this limited warranty have been tested and inspected
prior to shipment and, subject to the provisions of this warranty, Dimplex
warrants such products to be free from defects in material and workmanship
for a period of 12 months from the date of the rst purchase of such product.
The limited 12 month warranty period also applies to any implied warranties
that may exist under applicable law. Some jurisdictions do not allow
limitations on how long an implied warranty lasts, so the above limitation
may not apply to the purchaser.
What this limited warranty does not cover
This limited warranty does not apply to products that have been repaired
(except by qualied service representatives) or otherwise altered. This
limited warranty does further not apply to defects resulting from misuse,
abuse, accident, neglect, incorrect installation, improper maintenance or
handling, or operation with an incorrect power source.
Dimplex will not be responsible for, and the limited warranty shall not
include, any expense incurred for installation, removal or repair of the
product or part (or any replacement product or part) or transportation costs.
Such costs shall be the purchaser’s responsibility.
What you must do to get coverage under this limited warranty
Defects must be brought to the attention of Dimplex Technical Service
by contacting Dimplex at 1-888-DIMPLEX (1-888-346-7539), or 1367
Industrial Road, Cambridge Ontario, Canada N1R 7G8. Please have proof
of purchase, catalogue/model and serial numbers available when calling.
Limited warranty requires a proof of purchase of the product.
What Dimplex will do in the event of a defect
In the event a product or part covered by this limited warranty is proven to be
defective in material or workmanship during the 12 month limited warranty
period you have the following rights:
Dimplex will, at it’s sole discretion, choose to replace such defective •
product or part, without charge. If Dimplex is unable to replace
such product or part, or if Dimplex at it’s sole discretion deems the
replacement not be commercially practical or cannot be completed on a
timely basis, Dimplex may, in lieu of replacement, choose to refund the
purchase price for such product or part.
The purchaser is responsible for removal, installation, repair and •
transportation of such product or part (and any replacement product or
part)
What Dimplex and its dealers and service agents are also not responsible
for:
IN NO EVENT WILL DIMPLEX, OR ITS DIRECTORS, OFFICERS, OR
AGENTS, BE LIABLE TO THE PURCHASER OR ANY THIRD PARTY,
WHETHER IN CONTRACT, IN TORT, OR ON ANY OTHER BASIS, FOR
ANY INDIRECT, SPECIAL, PUNITIVE, EXEMPLARY, CONSEQUENTIAL,
OR INCIDENTAL LOSS, COST, OR DAMAGE ARISING OUT OF OR IN
CONNECTION WITH THE SALE, MAINTENANCE, USE, OR INABILITY
TO USE THE PRODUCT, EVEN IF DIMPLEX OR ITS DIRECTORS,
OFFICERS, OR AGENTS HAVE BEEN ADVISED OF THE POSSIBILITY OF
SUCH LOSSES, COSTS OR DAMAGES, OR IF SUCH LOSSES, COSTS,
OR DAMAGES ARE FORESEEABLE. IN NO EVENT WILL DIMPLEX, OR
ITS OFFICERS, DIRECTORS, OR AGENTS BE LIABLE FOR ANY DIRECT
LOSSES, COSTS, OR DAMAGES THAT EXCEED THE PURCHASE PRICE
OF THE PRODUCT.
SOME JURISDICTIONS DO NOT ALLOW THE EXCLUSION OR
LIMITATION OF INCIDENTAL OR CONSEQUENTIAL DAMAGES, SO
THE ABOVE LIMITATION OR EXCLUSION MAY NOT APPLY TO THE
PURCHASER.
How State and Provincial law apply
This limited warranty gives you specic legal rights, and you may also have
other rights which vary from jurisdiction to jurisdiction. The provisions of
the United Nations Convention on Contracts for the Sale of Goods shall not
apply to this limited warranty or the sale of products covered by this limited
warranty.
Replacement Parts List
Grill . . . . . . . . . . . . . . . . . . . . . . . . . . . .6101120600RP
Controller Assembly. . . . . . . . . . . . . . . .TBQ6101180400RP
Drip Tray . . . . . . . . . . . . . . . . . . . . . . . . 1022890191RP
Feet ............................8801320100RP
Bumpers . . . . . . . . . . . . . . . . . . . . . . . .850140100RP
© 2010 Dimplex North America
Left Shelf ........................1022810191RP
Right Shelf. . . . . . . . . . . . . . . . . . . . . . . 1022810291RP
Hardware pack . . . . . . . . . . . . . . . . . . .TBQ-HW-RP
Warming Rack ....................0100360100RP
 Loading...