

Page 1
Kurzgebrauchsanweisung
Deutsch
English
Quickstart Guide
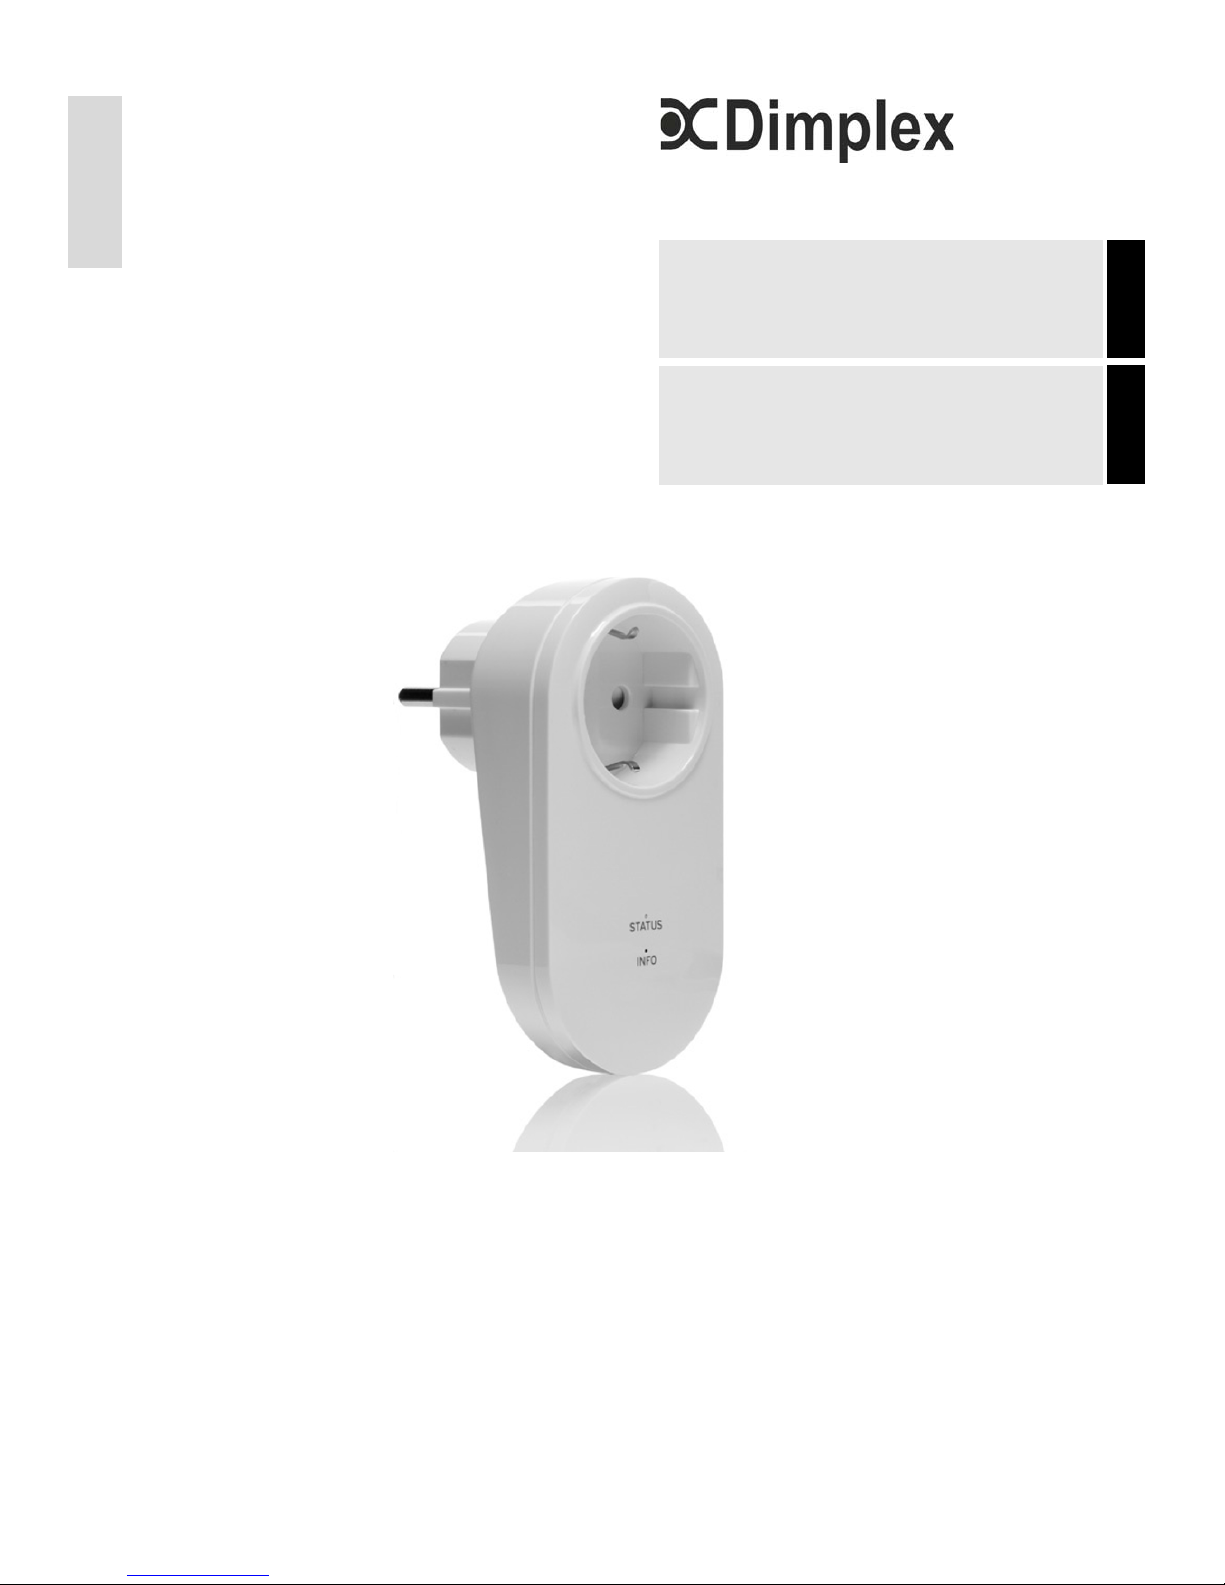
Extender SES EX-EO
EnOcean
Bestell-Nr.: 459462.66.08 05/15/B
Extender SES EX-EO
EnOcean
Page 2
DE-2 SES_EX-EO_de · 05/15/B www.dimplex.de
Deutsch
Extender SES EX-EO
1. Sicherheitshinweise für den Benutzer
HINWEIS
Sehr geehrter Kunde,
bitte lesen Sie alle in dieser Anweisung aufgeführten
Informationen aufmerksam durch.
ACHTUNG!
Dieses Gerät kann von Kindern ab 8 Jahren
und darüber sowie von Personen mit
verringerten physischen, sensorischen oder
mentalen Fähigkeiten oder Mangels an
Erfahrung und Wissen benutzt werden, wenn
sie beaufsichtigt oder bezüglich des sicheren
Gebrauchs des Gerätes unterwiesen wurden
und die daraus resultierenden Gefahren
verstehen! Kinder dürfen nicht mit dem Gerät
spielen. Reinigung und Benutzerwartung
dürfen nicht durch Kinder ohne Aufsicht
erfolgen!
Extender nur in eine fest eingebaute Steckdose mit
Schutzkon
takten einstecken.
Extender nicht mit Verlängerungskabel verwenden.
Extender nicht ineinander stecken.
Sicherstellen, dass Netzstecker und Netzkabel des
einzusteckenden Geräts nicht beschä d igt sin d.
Extender nicht öffnen.
Extender nur in Innenräumen betreiben.
Extender vor Feuchtigkeit, Nässe, Stau b, Sonnen-
licht und anderer Wärmebestrahlung schützen.
Extender max. bis zur Leistungsgrenze belasten,
siehe Technische Daten.
Gerät ausstecken, bevor Änderungen daran vorge -
nommen werden, z. B. beim Lampenwechsel.
HINWEIS
Kindersicherung entsperren durch eine leichte,
seitliche Kippbewegung des Steckers.
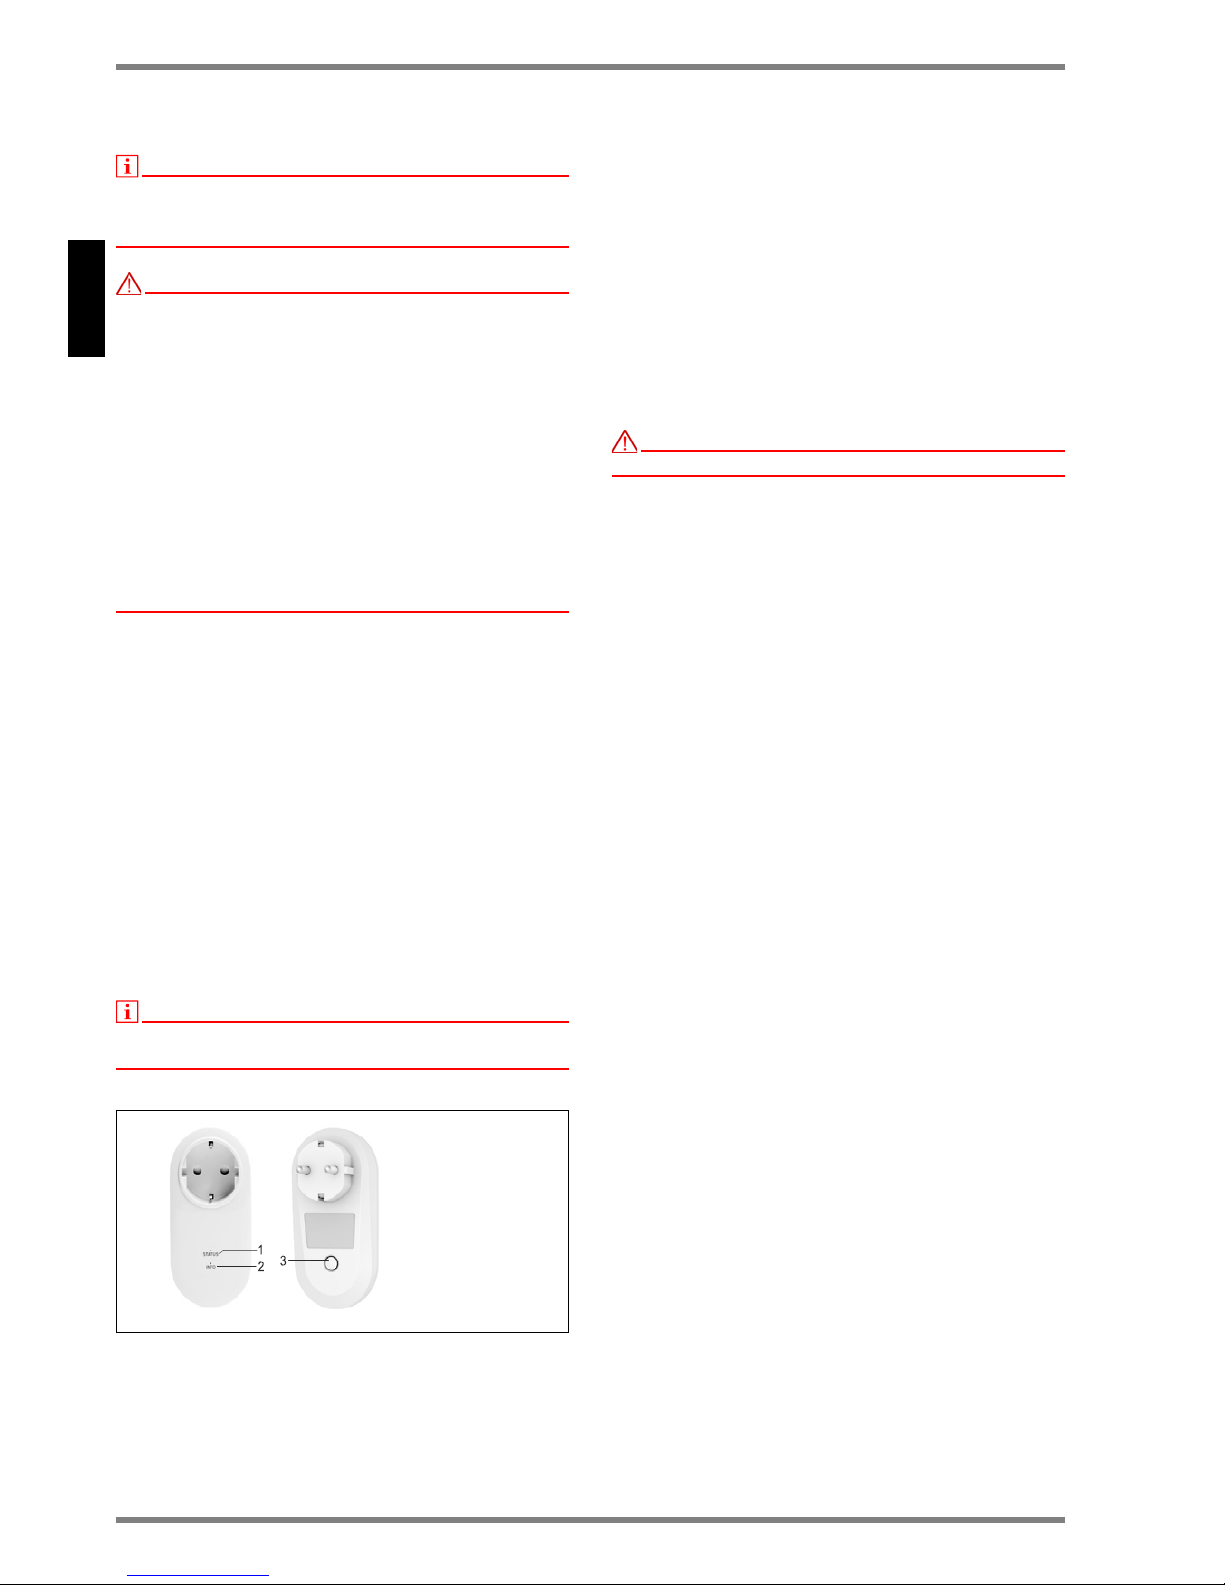
2. Gerätebeschreibung
(1)Status-LED (2)Info-LED (3)Taste
Der Extender dient als Erweiterung zur Zentraleinheit
und übernimmt folgende Funktionen:
Erweiterung des Funknetzes
Der Extender empfängt die von der Zentraleinheit
gesendeten Signale über die beste hende Strom leitung (Powerline Communication, PLC) und setzt
diese in Funksignale um, die er an die Endg eräte
weiterleitet und umgekehrt. Damit lassen sich auch
per Funk schwer erreichbare Orte von der Zentraleinheit aus steuern.
Erweiterung um eine Funktechnologie
z.B. kann mit einem EnOcean Extender das ge-
samte System mit der EnOcean Technologie er weitert werden.
Steckdose mit Kindersicherung
ACHTUNG!
Der Extender ist keine schaltbare Steckdose!
3. Bedienung
Zur Bedienung über PLC und Funk müssen Zentraleinheit, Extender
und Geräte miteinander bekannt ge-
macht werden. Dieser Vorgang heißt „Anlernen“.
Der Anlernvorgang wird von der Zentraleinheit gesteu-
ert, siehe Dokumentation der Zentraleinheit.
3.1
Extender an der Zentraleinheit anlernen
Extender in eine fest eingebaute Steckdose mit
Schutzkontakten
einstecken.
Während des Boot-Vorgangs leuchten beide LED‘s
weiß. Anschließend leuchtet nur noch die StatusLED.
Status LED gelb: Extender nicht mit Zentralein-
heit verbunden
Status LED blau: Extender mit Zentraleinheit
verbunden
und betriebsbereit
Anlernmodus an der gewünschten Zentraleinheit
starten.
Taste am Extender 3 mal kurz drücken.
Die Status-LED blinkt weiß. Die Verbindung wird
aufgebaut und der
Extender an der Zentraleinheit
angelernt.
Nach erfolgreichem Anlernen leuchtet die Status-
LED blau.
Nach 10 Sekunden kann der Anlernvorgang durch
einen erneuten
Tastendruck am Extender beendet
werden.
Der Anlernvorgang kann bis zu 15 Minuten dauern. Danach erfolgt der
Timeout.
Bei einem fehlgeschlagenen Anlernen die Geräte
näher zueinander bringen und den Anlernprozess wiederholen.
Page 3
www.dimplex.de SES_EX-EO_de · 05/15/B DE-3
Deutsch
Extenter SES EX-EO
3.2
Gerät am Extender anlernen
Voraussetzung
Extender mit der Zentraleinheit verbunden.
Taste am Extender 3-mal kurz drücken.
Die Info-LED am Extender blinkt blau.
Damit ist der Anlernmodus der Zentraleinheit akti-
viert.
Gerät in den Anlernmodus bringen, siehe Bedie-
nungsanleitung des Geräts.
Das Gerät wird an der Zentraleinheit angelernt und
erscheint dann in der Bediensoftware.
Anlernvorgang beenden
Automatisch nach 60 Sekunden.
Durch Drücken der Taste am Extender.
3.3
Gerät an Zentraleinheit und Extender auslernen
Voraussetzung
Extender mit der Zentraleinheit verbunden.
Taste am Extender ca. 3 Sekunden lang gedrückt
halten. Die Status-LED leuchtet weiß.
Taste am Extender 3 mal kurz drüc ken. Die Info-
LED am Extender blinkt gelb.
Auslernsequenz am Gerät durchführen, siehe Do-
kumentation zum
Gerät.
Das Gerät wird aus der
Bediensoftware der Zentraleinheit entfernt.
3.4
Extender aus der Zentraleinheit auslernen
Voraussetzung
Extender mit der Zentraleinheit verbunden.
Auslernmodus der Zentraleinheit st arten.
Die Info-
LED am Extender blinkt gelb.
Taste am Extender ca. 3 Sekunden lang gedrückt
halten. Die Status-LED leuchtet weiß.
Taste am Extender kurz drücken. Die Status-LED
blinkt weiß. Der Extender wird an der Zentraleinheit
ausgelernt.
Nach erfolgreichem Auslernen leuchtet
die Status-LED gelb.
HINWEIS
Um eine zukünftige Verbindung zwischen Zentraleinheit und Extender zu verhindern, muss der Extender
ausgelernt oder in der Zentraleinheit entfernt werden.
4.
Hilfe im Problemfall
Kritischer Fehler – Info-LED blinkt rot
Behebung:
Reset ausführen, z. B. Gerät aus- und
wieder
einschalten
5.
Rücksetzen auf Werkseinstellung
Taste am Extender 10 Sekunden lang gedrückt
halten. Nach ca. 3 Sekunden wechselt die StatusLED auf weiß. Nach weiteren ca. 7 Sekunden
leuchtet die Status-LED rot.
Taste am Extender kurz drücken.
Die Status-LED
blinkt 3 Sekunden lang rot und der Extender führt
einen Reset durch. Im Extender werden alle Verbindungen gelöscht.
HINWEIS
Das Rücksetzen auf Werkseinstellung am Extender
hat keine Auswirkung auf die Zentraleinheit.
6. Stromausfall
Nach einem Stromausfall verbindet sich der Extender
wieder mit der Zentraleinheit, an der er zuletzt ange-
lernt wurde.
7.
Weiterführende Dokumente
Im Downloadbereich unserer Website
www.dimplex.de
sind folgende weitere Dokumente er-
hältlich:
ausführliche Bedienungsanleitung
Extender SES EX-EO
VDE-Zertifizierung
CE-Konformitätserklärung
8. Wartung und Reinigung
HINWEIS
Der Extender ist wartungsfrei.
8.1
Reinigung
Angeschlossenes Gerät ausschalten und Geräte-
stecker aus dem
Extender ziehen.
Extender aus der Steckdose ziehen.
Extender mit einem weichen, sauberen, trockenen
und fusselfreien Tuch reinigen.
9. Entsorgung
Verpackung und ersetzte Teile gemäß
den Bestimmungen des Landes, in dem
das Gerät installiert wurde, entsorgen.
Zentraleinheit nicht mit dem Hausmüll
entsorgen.
10. Garantie
Für dieses Gerät übernehmen wir zwei Jahre Ga ran tie
gemäß unseren Garantiebedingungen.
Page 4

DE-4 SES_EX-EO_de · 05/15/B www.dimplex.de
Deutsch
Extender SES EX-EO
11. Technische Daten
Technische Änderungen vorbehalten.
Funktechnologie EnOcean (868 MHz EU-Frequenz
Powerline Com-
munication (PLC)
DCSK-Modulation, Narrowband
Cenelec B
Funktion
Reichweiten- und
Technologieerweiterung,
Netz
steckdose
Betriebsspannung
230 V +15 % / –10%; 50 Hz
Anschluss
Kontakte (230 V) nach Schukostecker-Norm
(Stecker, Buchse)
Dauerstrom
max. 14 A
Dauerleistung
3200 W
Eigenverbrauch
typisch 0,5 W; maximal 0,9 W
Abmessungen
113 x 56 x 70 mm (H x B xT)
Montage
Einstecken in eine 230-V-Steckdose
Gehäuse
Ausführung mit integrierter Kindersicherung
Umgebungstemperatur
0 ... 35 °C
Reichweite
typisch 20 m in Gebäuden, je
nach Gebäude
beschaffenheit,
ca. 100 m im Freien
Schutzart
IP 20
Gewicht
124 g
Zertifizierung
VDE, CE, EnOcean
Glen Dimplex Deutschland GmbH Tel.: +49 9221 709 201 Hotline Smart Eco System
Geschäftsbereich Dimplex Fax: +49 9221 709 339 Tel.: +49 9221 709 563
Am Goldenen Feld 18 info@dimplex.de Fax: +49 9221 709 924 563
D-95326 Kulmbach www.dimplex.de 09221709563@dimplex.de
Page 5

www.dimplex.de/en SES EX-EO_en · 05/15/B EN-5
English
Extenter SES EX-EO
1. Safety Information for the user
NOTENOTE
Dear customer,
Read all information contained in this manual carefully.
Keep these instructions in a safe place and pass them
on to any new owner.
ATTENTION!
This appliance can be used by children aged
from 8 years and above and persons with
reduced physical, sensory or mental
capabilities or lack of experience or
knowledge if they have been given supervision or instruction concerning the use of the
appliance in a safe way and understand the
hazards involved. Children shall not play with
the appliance. Cleaning and user maintenance shall not be made by children without
supervision!
Only plug the extender into a fixed mains outlet with
earthing contacts.
Do not use the extender in combination with an ex-
tension cable.
Do not plug the extenders into each other.
Make sure that the mains plug and power cable of
the device you are connecting are undam ag e d.
Do not open the extender.
The extender must only be used indoors.
Protect the extender against moisture, wetness,
dust, sunlight and other sources of heat.
Never operate the extender beyond its maximum
operating limits (refer to the technical specifica-
tions).
Unplug the device before making any changes
(e.g. changing a bulb).
NOTENOTE
Unlock the child lock by a slight tilting movement of the
plug.
2. Introduction
(1) Status LED (2) Info LED (3) Button
The extender acts as an extension of the central unit
and performs the following functions:
Extending the wireless network
The extender receives the signals sent from the
central unit via the existing power line (Powerline
Communication, PLC), converts these to wireless
signals and relays them to the end devices (and
vice versa).
This means that devices installed in locations
which are difficult to reach for wireless signals can
also be controlled from the central unit.
Additional wireless technology.
With the EnOcean extender, for example, the entire
system can be expanded with EnOcean technology.
Plug with child-proof lock.
ATTENTION!
The extender not a switchable plug!
3.
Operation
For PLC and wireless operation, the central unit, extender and
devices have to be “introduced” to each
other. This is the “inclusion” process.
The inclusion process is controlled by the central unit
(refer to the
documentation for the central unit).
3.1
Including the extender on the central unit
Plug the extender into a fixed mains outlet with
earthing contacts.
During the boot-up process, both LEDs light up
white for around
3 seconds. After this, only the Status LED remains
illuminated.
Status LED yellow: Extender not connected to the
central unit.
Status LED blue: Extender connected to the cen-
tral unit
and ready to operate.
Start “Inclusion” mode on the chosen central unit.
Briefly press the button on the extender 3 times.
The Status LED flashes white.
The connection is established and the extender is
included on the central unit.
Once it has been successfully included, the Sta-
tus LED lights up blue.
After 10 seconds, the inclusion process can be
ended by pressing
the button on the extender
again.
Inclusion can last up to 15 Minutes before timeout occurs.
If inclusion has failed, lower the distance between the
devices and repeat the inclusion process.
Page 6

EN-6 SES EX-EO_en · 05/15/B www.dimplex.de/en
English
Extenter SES EX-EO
3.2
Including the device to the extender
Prerequisite
Extender included on the central unit.
Briefly press the button on the extender three
times. The Info LED on the extender is blinking
blue. This indicates that inclusion mode has been
activated on the central
unit.
Switch the device to inclusion mode (refer to the
user guide for the
device).
The device is included on the central unit and then appears in the user interface.
Completion of the inclusion procedure
Automatically after 60 seconds.
Press the button on the extender.
3.3
Excluding the device on the central unit and
extender
Prerequisite
Extender included on the central unit.
Press an hold the button on the extender for around
3 seconds. The Status-LED lights up white.
Briefly press the button an the extender 3 times.
The Info-LED on the extender flashes yellow.
Perform the exclusion sequence on the device (re-
fer to the
documentation for the device).
The device
is no longer present in the central unit user interface.
3.4
Excluding the extender from the central unit
Prerequisite
Extender included on the central unit.
Start exclusion mode on the central unit.
The Info
LED on the extender flashes yellow.
Press and hold the button on the extender for
around 3 seconds. The Status LED lights up white.
Briefly press the button on the extender. The Status
LED flashes white. The extender is excluded on the
central unit.
Once it has been successfully ex-
cluded, the Status LED lights up yellow.
NOTENOTE
To prevent future inclusion of central unit and extender,
the extender must be excluded or removed on the
central unit.
4.
Troubleshooting
Critical error – Info LED flashes red
Remedy: Reset the device (e.g. disconnect and re-
connect the device).
5.
Restoring the factory settings
Press and hold the button on the extender for
around 10 sec
onds. After around 3 seconds, the
Status LED lights up white. After around another 7
seconds, the Status LED lights up red.
Briefly press the button on the extender. The Status
LED flashes red for 3 seconds and the extender
performs a reset. All connections in the extender
are deleted.
NOTENOTE
Restoring the factory settings on the extender has no
effect on the central unit.
6.
Power failure
Following a power failure, the extender reconnects itself to the central
unit on which it was included in the
network the last time.
7.
Additional documents
The following additional documents are available in the
download area of
our website at: www.dimplex.de
Operation manual Extender SES EX-ZW
VDE certification
CE declaration of conformity
8. Maintenance and cleaning
NOTENOTE
The extender is maintenance-free.
8.1
Cleaning
Switch off the connected device and unplug it from
the extender.
Unplug the extender from the mains.
Clean the extender with a soft, clean, dry and lintfree cloth.
9.
Disposal
Packaging and replaced parts are to be
disposed of in accordance with the regulations of the country in which the device was
installed. Do not dispose of the extender
with household waste; instead, take it to
your local authorised collection point.
10. Warranty
Please contact your local dealer for information an customer service and warranty conditions.
Page 7

www.dimplex.de/en SES EX-EO_en · 05/15/B EN-7
English
Extenter SES EX-EO
11. Technical data
Subject to technical alterations
Wireless technology
EnOcean (868 MHz EU frequency)
Powerline Communication (PLC)
DCSK modulation, Cenelec B narrowband
Function
Range and technology expansion,
main socket
Operating voltage 230 V +15 % / –10%; 50 Hz
Connect
Contacts (230 V) to "Schuko"
connector standard
(connector,
socket)
Continuous current
max. 14 A
Continuous power 3200 W
Own consumption typical 0.5 W; maximum 0.9 W
Dimensions 113 x 56 x 70 mm (H x W x D)
Assembly Plug into a 230 V socket
Housing
Design with integrated child-proof
device
Ambient temperature
0 to 35°C
Range
typical 20 m in buildings (depending
on conditions
in building); around
100 m outdoors
Protection class IP 20
Weight 124 g
Certifications VDE, CE, EnOcean
Page 8

EN-8 SES EX-EO_en · 05/15/B www.dimplex.de/en
English
Extenter SES EX-EO
12. Notes
Glen Dimplex Deutschland GmbH Tel.: +49 9221 709 201 Hotline Smart Eco System
Geschäftsbereich Dimplex Fax: +49 9221 709 339 Tel.: +49 9221 709 563
Am Goldenen Feld 18 info@dimplex.de Fax: +49 9221 709 924 563
D-95326 Kulmbach www.dimplex.de 09221709563@dimplex.de
766 831-AC
 Loading...