

Page 1
Montage- und
Gebrauchsanweisung
Installation and
Operating Instructions
Deutsch
English
Francais
Instructions de montage
et d‘utilisation
Italiano
Istruzioni d‘uso e di
montaio
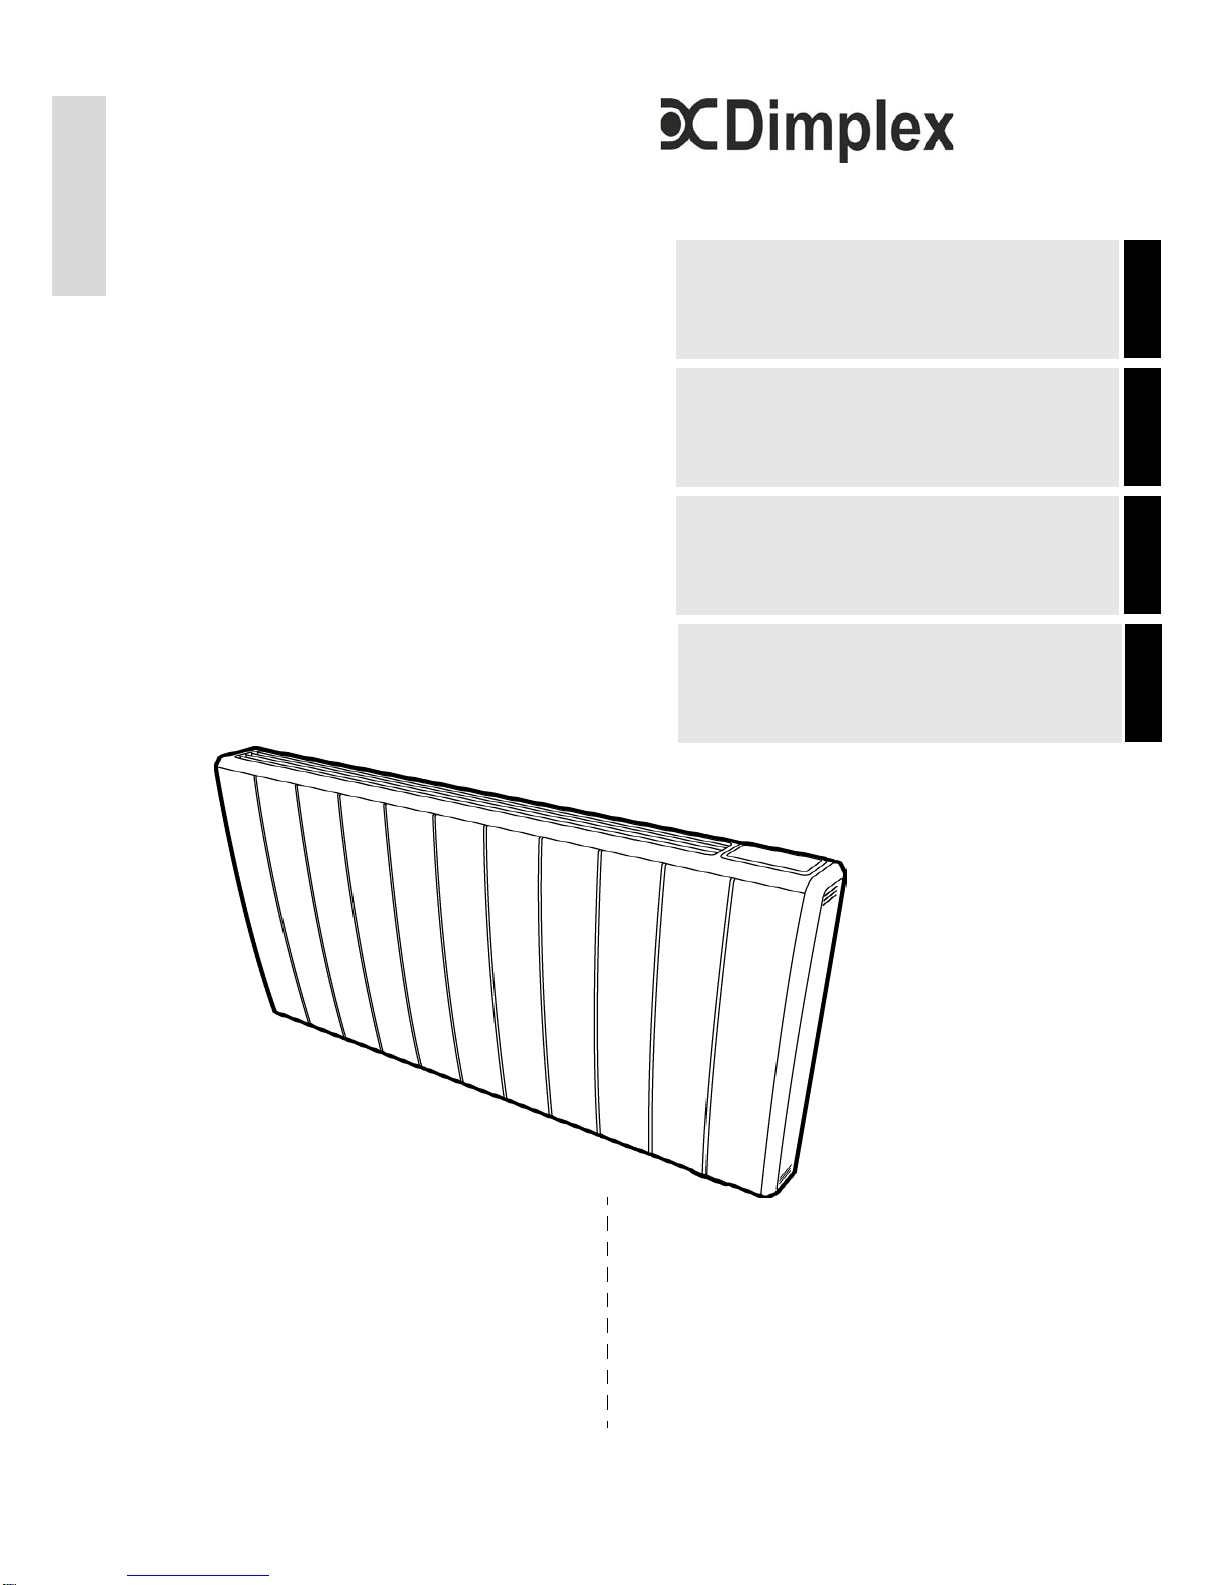
Wärmewellen-Konvektor
Radiant convector
Bestell-Nr. / Order no. / No de commande: INDEADE3RG Issue 0 04/15/A
Convecteur Chaleur d'onde
Ondate di calore convettori
RCE 050
RCE 100
RCE 150
RCE 200
Page 2

DE-2 RCE 050_RCE 200_d_ba · 04/15/A www.dimplex.de
Deutsch
RCE 050, RCE 100, RCE 150, RCE 200
Garantie, Kundendienst, Anschrift
Garantieurkunde
Kundendienst
Im Kundendienstfall ist die Robert Bosch Hausgeräte GmbH als zuständiger Kun dendienst zu informieren.
Robert Bosch Hausgeräte GmbH Deutschland
Auftragsannahme Telefon: 089 69339339
Telefax: 089 20355744
E-Mail: servicecenter@bshg.com
Robert Bosch Hausgeräte GmbH Österreich
Auftragsannahme Telefon: 0810-240260
Telefax: (01)6057-551212
Ersatzteilbestellung Telefon: 0810-240261
Telefax: (01)6057-551212
E-Mail: hausgeraete.ad@bshg.com
Für die Auftragsbearbeitung werden die Erzeugnisnummer (E-Nr. ) und das Fertigungsdatum (FD) des Gerätes benötigt. Diese Ang aben
befinden sich auf dem Typenschild, in dem stark umrandeten Feld.
Glen Dimplex Deutschland GmbH Telefon: +49 (0) 9221 709-564
Am Goldenen Feld 18 Telefax: +49 (0) 9221 709-589
D-95326 Kulmbach E-Mail: 09221709589@dimplex.de
Technische Änderungen vorbehalten www.dimplex.de
gültig für Deutschland und Österreich
Die nachstehenden Bedingungen, die Voraussetzungen und Umfang
unserer Garantieleistung umschreiben, lassen die Gewährleistungsverpflichtungen des Verkäufers aus dem Kaufvertrag mit dem Endabnehmer unberührt. Für die Geräte leisten wir Garantie gemäß
nachstehender Bedingungen:
Wir beheben unentgeldlich nach Maßgabe der folgenden Bedingungen Mängel am Gerät, die nachweislich auf einen Material- und/oder
Herstellungsfahler beruhen, wenn sie uns unverzüglich nach Feststellung und innerhalb von 24 Monaten nach Lieferung an den Erstabnehmer gemeldet werden. Bei gewerblichen Gebrauch innerhalb von 12
Monaten. Zeigt sich der Mangel innerhalb von 6 Monaten ab Lieferung, wird vermutet, dass es sich um einen Material- oder Herstellungsfahler handelt.
Dieses Gerät fällt nur dann unter diese Garantie, wenn es von einem
Unternehmer in einem der Mitgliedsstaaten der Europäischen Union
gekauft wurde, es bei Auftreten des Mangels in Deutschland oder
Österreich betrieben wird und Garantieleistungen auch in Deutschland
oder Österreich erbracht werden können.
Die Behebung der von uns als garantiepflichtig anerkannter Mängel
geschied dadurch, dass die mangelhaften Teile unentgeldlich nach
unserer Wahl instantgesetzt oder durch einwandfreie Teile ersetzt
werden. Durch Art oder Ort des Einsatzes des Gerätes bedingte außergewöhnliche Kosten der Mängelbeseitigung werden nicht übernommen. Der freie Gerätezugang muss durch den Endabnehmer
gestellt werden. Ausgebaute Teile, die wir zurücknehmen, gehen in
unser Eigentum über. Die Garantie erstreckt sich nicht auf leicht zerbrechliche Teile, die den Wert oder die Gebrauchstauglichkeit des Gerätes nur unwesentlich beeinträchtigten.
Es ist jeweils der Originalkaufbeleg mit Kauf- und/oder Lieferdatum
vorzulegen.
Die Garantiezeit für Nachbesserungen und Ersatzteile endet mit dem
Ablauf der ursprünglichen Garantiezeit für das Gerät.
Zur Erlangung der Garantie für Fußbodenheizmatten ist dass in den
Projektierungsunterlagen oder in der Montageanweisung enthaltenen
Prüfprotokoll ausgefüllt innerhalb vier Wochen nach Einbau der Heizung an untenstehende Adresse zu senden.
Eine Garantieleistung entfällt, wenn vom Endabnehmer oder einem
Dritten die entsprechenden VDE-Vorschriften, die Bestimmungen der
örtlichen Versorgungsunternehmen oder unsere Montage- und Gebrauchsanweisung nicht beachtet worden sind. Durch etwa seitens
des Endabnehmers oder Dritter unsachgemäß vorgenommenen Änderungen und Arbeiten wird die Haftung für die daraus entstehenden
Folgen aufgehoben. Die Garantie erstreckt sich auf vom Lieferer bezogenen Teile. Nicht vom Lieferer bezogene Teile und Gerät-, bzw. Anlagenmängel, die auf nicht vom Lieferer bezogene Teile zurück zuführen sind fallen nicht unter den Garantieanspruch.
Sofern ein Mangel nicht beseitigt werden kann oder die Nachbesserung von uns abgelehnt oder unzumutbar verzögert wird, wird der Hersteller entweder kostenfreien Ersatz liefern oder den Minderwert
vergüten. Im Falle einer Ersatzlieferung behalten wir uns die Geltendmachung einer angemessenen Nutzungsanrechnung für die bisherigen Nutzungszeit vor. Weitergehende oder andere Ansprüche,
insbesondere solche auf Ersatz außerhalb des Gerätes entstandener
Schäden, sind soweit eine Haftung nicht zwingend gesetzlich angeordnet ist, ausgeschlossen.
Bei einer Haftung nach § 478 BGB wird die Haftung der Liefereres auf
die Servicepauschalen des Lieferers als Höchstbetrag beschränkt.
Page 3

www.dimplex.de RCE 050_RCE 200_d_ba · 04/15/A DE-3
Deutsch
RCE 050, RCE 100, RCE 150, RCE 200
Inhaltsverzeichnis, Table of contents, Sommaire, Contenuto
Garantie / Kundendienst / Anschrift DE-2
Inhaltsverzeichnis, Table of contents, Sommaire, Contenuto DE-3
1 Hinweise für den Benutzer DE-4
2 Energiesparfunktionen DE-5
2.1 Zweikreis-Heizelement DE-5
2.2 Fenster offen - Funktion DE-5
2.3 Lernfunktion DE-5
3 Technische Gerätebeschreibung DE-5
4 Montage, Installation, Mindestabstände DE-5
5 Elektrischer Anschluss DE-6
6 Überhitzungsschutz DE-6
7 Bedienung DE-7
7.1 Bedienteil DE-7
7.2 Bedienfunktionen DE-7
7.3 Hauptbildschirm DE-7
7.4 Erstinbetriebnahme DE-7
7.5 Einstellung Datum / Uhrzeit DE-8
8 Betriebsarten DE-8
8.1 Manueller Modus DE-8
8.2 ECO-Modus DE-8
8.3 Frostschutzmodus DE-8
8.4 Aus DE-8
8.5 Timerbetrieb DE-8
8.6 Urlaub DE-10
9 Advance - Vorzug DE-10
10 Zeitvorgabe des Komfortbereichs DE-10
11 Optionen DE-10
12 Tastensperre aktivieren / deaktivieren DE-11
13 Erweiterte Funktionen DE-11
14 Reinigung DE-11
15 Garantie DE-11
16 Entsorgung DE-11
1 Information for the user EN-13
2 Energy saving functions EN-14
2.1 Dual circuit heating element EN-14
2.2 "Open Window" function EN-14
2.3 Learning function EN-14
3 Technical device description EN-14
4 Assembly, installation, minimum clearance EN-14
5 Electrical connection EN-15
6 Overload protector EN-15
7Operation EN-16
7.1 Control panel EN-16
7.2 Operating functions EN-16
7.3 Main screen EN-16
7.4 Initial start-up EN-17
7.5 Date/ Time setting EN-17
8Modes EN-17
8.1 Manual Mode EN-17
8.2 Eco Mode EN-17
8.3 Frost Protect mode EN-17
8.4 Off EN-17
8.5 Timer Mode EN-17
8.6 Holiday EN-19
9 Advance EN-19
10 Time specification for Comfort Mode EN-19
11 Options EN-19
12 Activate / Deactivate Auto Lock EN-20
13 Advanced functions EN-20
14 Cleaning EN-20
15 Warranty EN-20
16 Disposal EN-20
Page 4

DE-4 RCE 050_RCE 200_d_ba · 04/15/A www.dimplex.de
Deutsch
RCE 050, RCE 100, RCE 150, RCE 200
1 Consignes pour l‘utilisateur F-21
2 Fonctions d’économie d’énergie F-22
2.1 Double circuit - élément de chauffage F-22
2.2 Fonction « fenêtre ouverte » F-22
2.3 Fonction d’apprentissage F-22
3 Description technique de l’apparei F-22
4 Montage, installation, distances minimales F-22
5 Branchements électriques F-23
6 Limiteur de surcharge F-23
7Commande F-24
7.1 Unité de commande F-24
7.2 Fonctions de commande F-24
7.3 Écran principal F-24
7.4 Première mise en service F-25
7.5 Réglage de la date/de l’heure F-25
8 Modes de fonctionnement F-25
8.1 Mode Manuel F-25
8.2 Mode Éco F-25
8.3 Protection givre F-25
8.4 Arrêt F-25
8.5 Mode Minuterie F-25
8.6 Congés F-27
9 Advance - Progrès F-27
10 Programmation horaire du mode Confort F-27
11 Options F-27
12 Activation/désactivation du verrouillage des touches F-28
13 Fonctions avancées F-28
14 Nettoyage F-28
15 Garantie F-28
16 Élimination F-28
1 Note per gli utenti IT-29
2 Funzioni di risparmio energetico IT-30
2.1 Doppio circuito - Elemento riscaldante IT-30
2.2 Funzione "Finestra aperta" IT-30
2.3 Funzione apprendimento IT-30
3 Descrizione tecnica dell'apparecchio IT-30
4 Montaggio, installazione, distanze minime IT-30
5 Allacciamento elettrico IT-31
6 Protezione antisurriscaldamento IT-31
7Comando IT-32
7.1 Elemento di comando IT-32
7.2 Funzioni di gestione IT-32
7.3 Schermata principale IT-32
7.4 Start-up iniziale IT-33
7.5 Impostazione Data / Ora IT-33
8 Modalità d'esercizio IT-33
8.1 Modalità Manuale IT-33
8.2 Modalità Eco IT-33
8.3 Modalità Antigelo IT-33
8.4 Spento IT-33
8.5 Modalità Timer IT-33
8.6 Vacanza IT-35
9 Advance - Avanzata
IT-35
10 Indicazione oraria per modalità Comfort IT-35
11 Opzioni IT-35
12 Attivare / disattivare blocco automatico IT-36
13 Funzioni aggiuntive IT-36
14 Pulizia IT-36
15 Garanzia IT-36
16 Smaltimento IT-36
Page 5
www.dimplex.de RCE050_200_de · 04/15/A DE-5
Deutsch
RCE 050, RCE 100, RCE 150, RCE 200
1 Hinweise für den Benutzer
HINWEIS
Sehr geehrter Kunde,
bitte lesen Sie alle in dieser Anweisung aufgeführten
Informationen aufmerksam durch. Bewahren Sie die
Anweisung sorgfältig auf und geben Sie diese gegebenenfalls an Nachbesitzer weiter. Das Gerät darf nur,
wie in der Montage- und Gebrauchsanleitung beschrieben, verwendet werden!
ACHTUNG!
Diese Gerät kann von Kindern ab 8 Jahren
und darüber sowie von Personen mit
verringerten physischen, sensorischen oder
mentalen Fähigkeiten oder Mangels an
Erfahrung und Wissen benutzt werden, wenn
sie beaufsichtigt oder bezüglich des sicheren
Gebrauchs des Gerätes unterwiesen wurden
und die daraus resultierenden Gefahren
verstehen! Kinder dürfen nicht mit dem Gerät
spielen. Reinigung und Benutzerwartung
dürfen nicht durch Kinder ohne Aufsicht
erfolgen!
ACHTUNG!
Kinder jünger als 3 Jahre sind fernzuhalten,
es sei denn, sie werden ständig überwacht.
Kinder ab 3 Jahren und jünger als 8 Jahre
dürfen das Gerät ein- und ausschalten, wenn
sie beaufsichtigt werden oder bezüglich des
sicheren Gebrauchs des Gerätes unterwiesen wurden und die daraus resultierenden
Gefahren verstanden haben, vorausgesetzt,
dass das Gerät in seiner normalen Gebrauchslage platziert oder installiert ist!
ACHTUNG!
Kinder ab 3 Jahren und jünger als 8 Jahre
dürfen nicht den Stecker in die Steckdose
stecken, das Gerät nicht regulieren, das
Gerät nicht reinigen und/oder nicht die
Wartung durch den Benutzer durchführen!
ACHTUNG!
Einige Teile des Gerätes können sehr heiß
werden und Verbrennungen verursachen.
Besondere Vorsicht ist geboten, wenn Kinder
oder schutzbedürftige Personen anwesend
sind!
ACHTUNG!
Das Gerät darf nicht unter einer Wandsteckdose aufgestellt werden!
ACHTUNG!
Wenn das Netzkabel beschädigt ist, muss es
vom Hersteller oder dessen Kundendienstvertretung oder einer vergleichbar qualifizierten Person ausgetauscht werden, um
Gefahrenquellen auszuschalten!
ACHTUNG!
Um Überhitzungen zu vermeiden, darf das
Heizgerät nicht abgedeckt werden!
ACHTUNG!
Das nebenstehende Symbol ist am
Heizgerät angebracht und bedeutet,
dass das Heizgerät nicht abgedeckt
werden darf!!
Gerät nur an Wechselspannung-Spannung gemäß
Typenschild anschließen.
Das Gerät ist nach den geltenden Sicherheitsvor-
schriften von einer Fachkraft zu installieren.
Das Gerät darf nur zur Raumlufterwärmung inner-
halb geschlossener Räume verwendet werden.
Reparaturen und Eingriffe in das Ge rät dürfen nur
von einem Fachmann ausgeführt werden.
Im Fehlerfall oder bei längerer Außerbetriebnahme
Gerät vom Netz trennen (Sicherung ausschalten).
In Räumen, in denen feuergefährliche Stoffe ver-
wendet werden (z.B. Lösungsmittel etc.), darf das
Heizgerät nicht betrieben werden.
ACHTUNG!
Um eine Gefährdung durch ein unbeabsichtigtes Rücksetzen des Schutztemperaturbegrenzers zu vermeiden, darf das Gerät
nicht über eine externe Schaltvorrichtung, wie
z.B. eine Zeitschaltuhr versorgt werden oder
mit einem Stromkreis verbunden sein, der
regelmäßig durch eine Einrichtung ein- und
ausgeschaltet wird!
ACHTUNG!
Die Anschlussleitung nicht über das Gerät
legen! Gerät niemals in Betrieb nehmen,
wenn Gerät oder Netzleitung beschädigt sind.
Lebensgefahr!
ACHTUNG!
In die festverlegte elektrische Installation ist
eine Trennvorrichtung vorzusehen mit
mindestens 3 mm Kontaktöffnung an jedem
Pol. (z.B. Sicherungsautomaten)!
Page 6
DE-6 RCE050_200_de · 04/15/A www.dimplex.de
Deutsch
RCE 050, RCE 100, RCE 150, RCE 200
ACHTUNG!
Wenn dieses Heizgerät mit einem
zusätzlichen Programmschalter, einem
Zeitschalter, einem separaten Fernwirksystem oder irgendeiner anderen Einrichtung
betrieben wird, die das Heizgerät automatisch
einschaltet, ist erhöhte Vorsicht geboten, da
Brandgefahr besteht, wenn das Heizgerät
zwischenzeitlich abgedeckt oder falsch
aufgestellt wurde!
ACHTUNG!
Das Gerät ist so zu verwenden, dass die
Bedienelemente nicht von einer sich in der
Badewanne oder unter der Dusche
befindlichen Person berührt werden können!
ACHTUNG!
Das Gerät mus geerdet werden!
2 Energiesparfunktionen
2.1 Zweikrei s - Hei ze le m en t
Der Dimplex RCE Wärmewellen-Konvektor verfügt
über ein Konvektions-Heizlement und eine Strahlungsheizung. Diese Kombination ermöglicht bei geringer
Temperaturdifferenz die alleinige Verwendung der
Strahlungsheizung. Dadurch wird das Risiko, den
Raum zu überheizen, minimiert, was Energie spart.
2.2 „Fenster offen“ Funktion
Sollte ein Fenster oder eine Tür versehentlich offen gelassen werden, wird die Steuerung die plötzlichen
Temperaturschwankungen erkennen und in den
Standby-Modus schalten. Wurde das Fenster oder die
Tür geschlossen, kehrt das Gerät wieder in den Normalbetrieb zurück. Diese Funktion unterbricht den
Heizbetrieb, um zu verhindern, dass unkontrolliert
Wärme aus dem Zimmer entweicht. Dies spart Geld
und minimiert den Energieverbrauch.
2.3 Lernfunktion
Diese Funktion ermöglicht ein frühzeitiges Einschalten
des Heizgerätes, um sicherzustellen, dass zum im Programm eingestellten Zeitpunkt die gewünschte Temperatur erreicht ist.
Beispiel: Sie haben über das Zeitprogramm für morgens 07:00 Uhr eine Temperatur von 21°C eingestellt.
Das Heizgerät ermittelt nun, auf Grund seiner „Erfahrung“ wie lange es dauert, um zum eingestellten Zeitpunkt die gewünschte Temperatur zu erreichen.
HINWEIS
Wenn Aufheizen (ES) aktiviert ist, heizt das Gerät zur
voreingestellter Uhrzeit, um sicherzustellen, dass der
Raum die erforderlichen Temperatur rechtzeitig
erreicht hat.Technische Gerätebeschreibung.
3 Technische Geräteschreibung
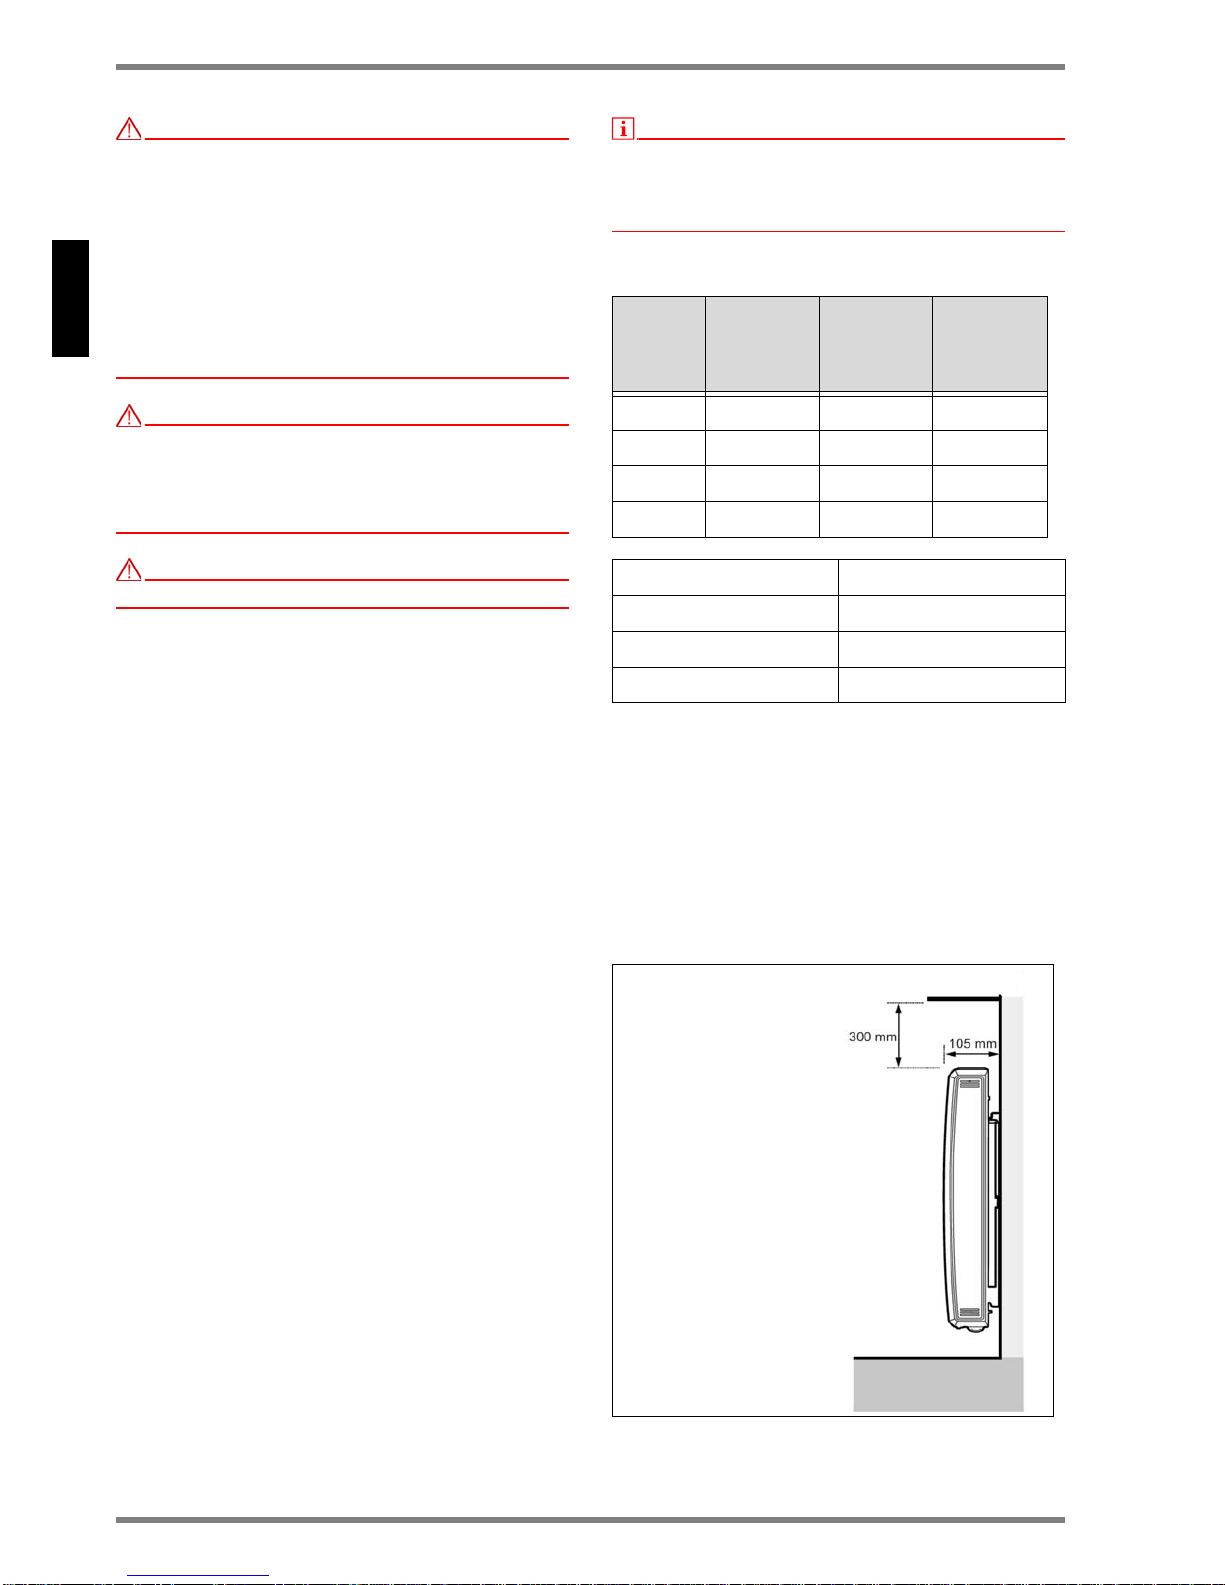
4 Montage, Installation, Mindestabstände
Das Wärmewellen-Heizgerät ist für die Wandmontage
mittels der mitgelieferten Wandhalterung vorgesehen.
Das Gerät darf nur in senkrechter Position, wie in Abb.
1 - 3 gezeigt, montiert werden.
Vorsicht vor brennbaren Gegenständen. Die Mindestabstände sind unbedingt einzuhalten. An der Gerätevorderseite ist ein Abstand von mindestens 500mm
einzuhalten.
Typ Leistung
Strahlungs-
heizung
Leistung
Konvektor-
heizung
Gesamt
leistung
RCE 050 200 W 300 W 500 W
RCE 100 300 W 700 W 1000 W
RCE 150 300 W 1200 W 1500 W
RCE 200 350 W 1650 W 2000 W
Anschlussspannung 1/N/PE~230-240V, 50Hz
Temperaturregler 7 - 32°C
Schutzklasse Schutzleiteranschluss
Schutzart IP24
Abb.1
Page 7
www.dimplex.de RCE050_200_de · 04/15/A DE-7
Deutsch
RCE 050, RCE 100, RCE 150, RCE 200
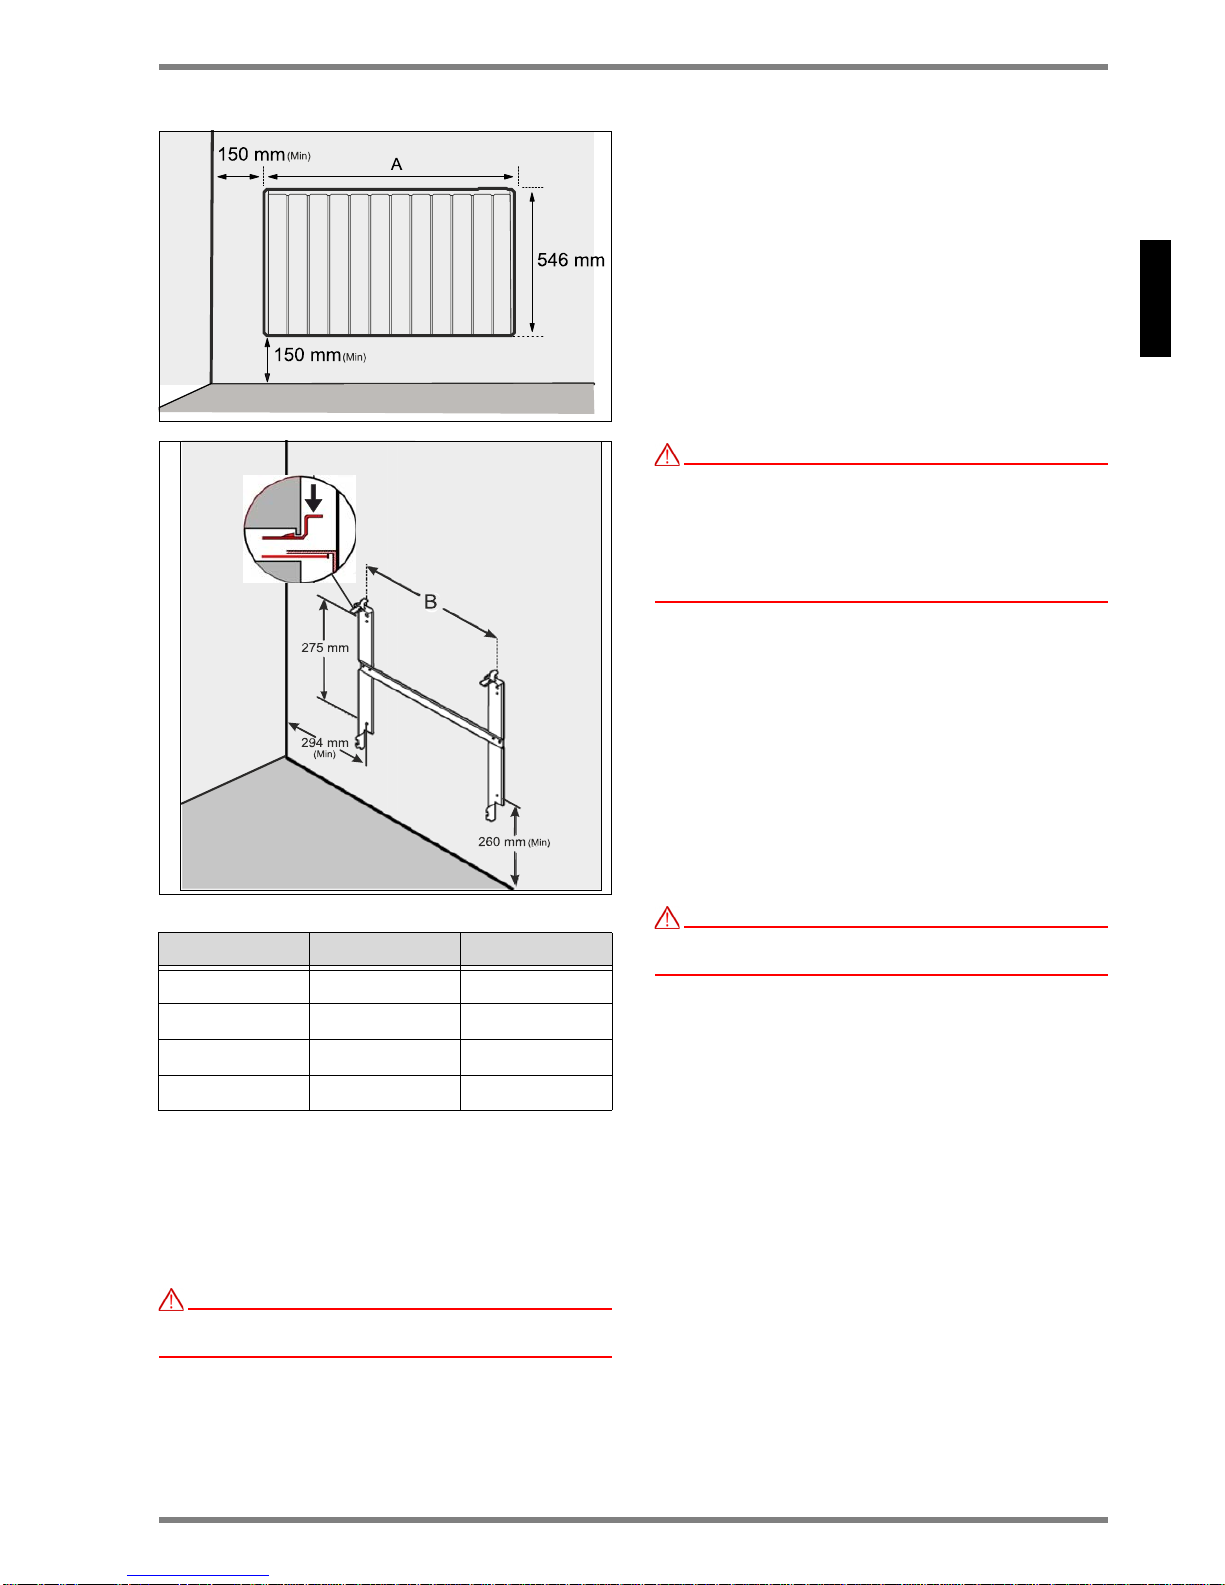
Die Montage auf Holzwänden ist zulässig.
Alle Modelle sind nach IP24-Standard spritzwassergeschützt und können im Badezimmer im Schutzbereich
II verwendet werden.
Die Netzanschlussdose muss nach der Montage zugänglich sein.
ACHTUNG!
Der an der Rückseite des Gerätes mitgelieferte
Original-Wandhalter muss verwendet werden!
Entfernen Sie den Wandhalter von der Rückseite
des Gerätes durch Drücken der Federn an jeder
Seite. (siehe Abb 2.)
Befestigungslöcher bohren. Achten Sie hierbei auf
sich in der Wand befindliche Elektro- oder Rohrleitungen.
Den Wandhalter mit den beiliegenden Schrauben
fest an der Wand verschrauben.
Hängen Sie das Gerät in die unteren Schlitze der
Wandhalterung ein.
Bringen Sie das Gerät in eine aufrechte Position
und drücken Sie das Gerät zur Verriegelung in die
Federn bis diese einrasten.
ACHTUNG!
Bitte beachten Sie, dass brennende Zigaretten, Kerzen
und Öllampen in Verbindung mit der Konv ektion von
elektrischen Heizungen Rußablagerungen an der
Wand und auf der Oberfläche des Gerätes
verursachen können. Dies ist keine Fehlfunktion des
Gerätes.
5 Elektrischer Anschluss
Die aktuellen Vorschriften nach VDE 0100 Teil 701 und
die relevanten Installationsvorschriften müssen zwingend beachtet werden. Die Heizgeräte sind mit einer
Geräteanschlussleitung Typ H05VV-F, 4 x 1,0 mm
2
ohne Stecker versehen.
Aderbelegung der Geräteanschlussleitung:
Grün/Gelb: ‚PE‘ - Schutzleiter
Blau: ‚N‘ - Nullleiter Versorgungsspannung
Braun: ‚L‘ - Phase Versorgungsspannung
Schwarz: Steuerleiter
ACHTUNG!
Der Steuerleiter ist ohne Funktion und muss
fachgerecht isoliert werden! Steuerleiter nicht erden!
Die Geräteanschlussleitung muss an eine für das Heizgerät geeignete Anschlussdose angeschlossen werden. In die festverlegte elektrische Insta llation ist eine
Trennvorrichtung vorzusehen, mit mindestens 3 mm
Kontaktöffnung an jedem Pol (z.B. Sicherungsautomat).
6 Überhitzungsschutz
Zu Ihrer Sicherheit ist das Heizgerät mit einem Überhitzungsschutz ausgerüstet. Wird die Luftzirkulation gestört, so schaltet der Überhitzungsschutz das Heizgerät
aus. Nach ausreichender Abkühlung schaltet sich das
Heizgerät wieder automatisch ein.
Bei mehrmaligen Ansprechen des Überhitzungsschutzes muss die Ursache ermittelt werden (z.B. Lüftungsgitter abgedeckt).
Das Ansprechen des Überhitzungsschutzes wir im Display durch ein Rotes Blinken angezeigt.
Um die Anzeige zurückzusetzen, entfernen Sie die U rsache der Überhitzung und drücken Sie die ENTERTaste für 10 Sekunden.
Typ Maß A (mm) Maß B (mm)
RCE 050 513 225
RCE 100 675 387
RCE 150 756 468
RCE 200 918 630
Abb.2
Abb.3
Page 8
DE-8 RCE050_200_de · 04/15/A www.dimplex.de
Deutsch
RCE 050, RCE 100, RCE 150, RCE 200
7 Bedienung
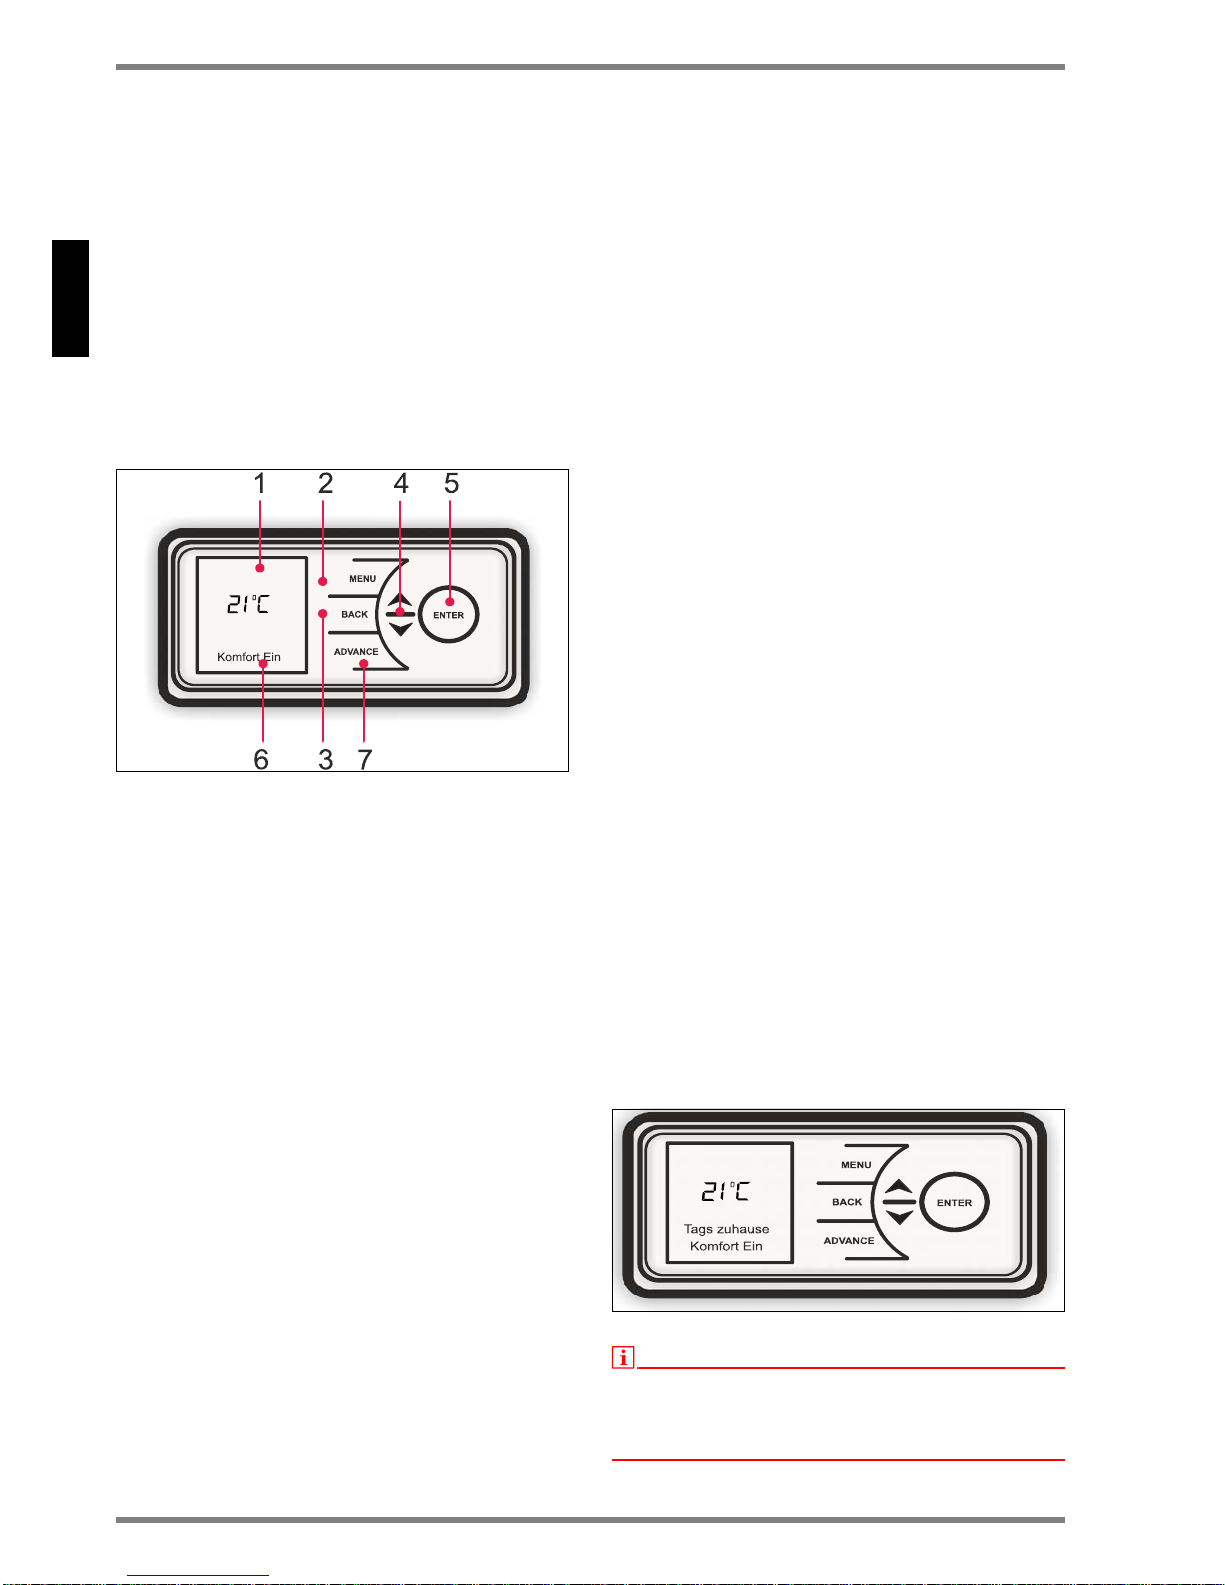
7.1 Bedienteil
Die Bedienelemente befinden sich auf der rechten
Oberseite des Gerätes. Das Gerät ist mit einem einstellbaren elektronischen Steuer gerät, bestehend aus
einem Display und sechs Touchscreen Tasten ausgestattet.
Weiterhin besitzt das Heizgerät einen einstellbaren
Raumthermostat, zur Regelung der Raumtemperatur.
Die einstellbare Mindesttemperatur beträgt 7 ° C.
Die Maximaltemperatur ist werkseitig auf 26 ° C eingestellt, kann jedoch, auf maximal 32 ° C erhöht werden.
Eine Temperatur von 21 ° C entspricht einer normalen
Raumtemperatur.
(1) Display
(2) Menü- Taste
(3) Back (Zurück)- Taste
(4) Aufwärts / Abwärts-Taste
(5) Enter- (Bestätigung) Taste
(6) Betriebsanzeige
(7) Advance (Vorzug)- Taste
7.2 Bedienfunktionen
Die Parameter des Gerätes können einfach mit Hilfe
der sechs Tasten auf der Benutzeroberfläche des Displays eingestellt werden.
Auf dem Display werden die verfügbaren Einstellung en
angezeigt.
1. Menü - zeigt die wichtigsten Funktionen:
Datum / Uhrzeit - Einstellung Datum und Zeit.
Betriebsart - Zeitprogramm, Manuelle Tempera-
turwahl, Absenkung, Frostschutz,
Aus.
Optionen - Sommerzeit, Tastensperre, Servicein-
formationen, Temperatureinheit,
Audio-Rückmeldung (Tasten)
2. Back (Zurück)- Taste: Rückkehr zum vorherigen
Programmpunkt
3. Aufwärts- und Abwärts-Tasten:
Dienen zur Navigation durch das Menü und zum
ändern der Einstellwerte.
Die Auf- und Ab-Taste wird auch zur Einstellung
der gewünschte Raumtemperatur verwendet.
Die Bildschirmfarbe wechselt basierend auf der
gewählten Temperatur von blau zu rot.
4. ENTER-Taste: Zur Bestätigung der Einstellun-
gen. Durch Drücken der Eingabetaste wird die
aktuell aktivierte Funktion angezeigt.
5. Komfort EIN: Die Zeitperioden, in denen das
Heizgerät auf die eingestellte Komforttemperatur
aufheizt. Dies wird im unteren Bereich des Displays angezeigt.
6. Komfort AUS: Die Zeitperioden, in denen das
Heizgerät nicht eingeschaltet wird. Die eingestellte Betriebsart wird im unteren Bereich des
Displays angezeigt.
7. ADVANCE (Vorzug)-Taste: überschreibt die Hei-
zungseinstellungen und wechselt den Betriebszustand des Heizgerätes.
Wurde ein Timer-Modus aktiviert, w ird durch Drücken
der ADVANCE-Taste die Betriebsart geändert.
Zum Beispiel wird von „Komfort Aus“ auf „Komfort Ein“
und umgekehrt gewechselt.
Die ADVANCE-Taste wird auch benutzt, um den
Boost-Modus zu aktivieren. Der Boost-Modus liefert
Wärme für ein bis vier Stunden.
7.3 Hauptbildschirm
Erfolgt 30 Sekunden keine Eingabe kehrt die Anzeige
zum Hauptbildschirm zurück. Hier wird die gewählte
Temperatur zusammen mit der Betriebsart angezeigt.
Ebenfalls angezeigt wird die Nutzung der Advance
Funktion.
Durch Drücken der ENTER-Taste werden die aktivierten Funktionen anzeigt.
Erfolgt für eine längere Zeit keine Änderu ng, wird der
Bildschirm in "Schlafmodus" versetzt und die Anzeige
erlischt.
Zur Aktivierung der Anzeuge dr ücken Sie e ine beliebige Taste.
.
HINWEIS
Wird keine Taste betätigt, kehrt die Anzeige nach 30
Sekunden zum Hauptmenü zurück. Durch Drücken der
ENTER-Taste werden die Funktionen, die aktiviert
sind, anzeigt.
Page 9
www.dimplex.de RCE050_200_de · 04/15/A DE-9
Deutsch
RCE 050, RCE 100, RCE 150, RCE 200
7.4 Erstinbetriebnahme
Bei der Erstinbetriebnahme des Heizgerätes wird im
Display die Startmaske angezeigt. Hier stellen Sie die
Sprache, Datum, Uhrzeit, Zeitzone, Tastensperre,
Tastentöne und Temperatureinheit ein. Diese Werte
können nachträglich wieder verä nd er t wer d en .
Siehe die entsprechenden Kapitel in der Bedienungsanleitung.
7.5 Einstellung Datum / Uhrzeit
Die Steuerung enthält eine Echtzeituhr mit Kalenderfunktion. Die Uhr besitzt eine Backup-Batterie (Typ
CR2032, 3V), die im Falle eines Netzausfalls die Uhr
mit Strom versorgt.
Einstellen der Uhrzeit und des Datums:
Drücken Sie die MENÜ-Taste. Wählen Sie Datum /
Uhrzeit und drücken Sie die ENTER-Taste.
Drücken Sie und Taste um den richtigen Tag
des Monats einzustellen und drücken Sie die ENTERTaste.
Wiederholen Sie diesen Vorgang, bis das Datum und
die Uhrzeit eingestellt wurden und drücken Sie zum
Speichern die ENTER-Taste. Drücken Sie die BACK-
Taste, sobald angezeigt wurde und kehren Sie
zum Hauptbildschirm zurück.
8 Betriebsarten
Der Wärmewellen-Konvektor kann eine konstante
Raumtemperatur mit den folgenden Betriebsarten aufrechterhalten:
8.1 Manueller Modus heizt den Raum auf eine angenehme Temperatur von 21 ° C.
8.2 Eco-Modus (Energiesparmodus) hält eine Raum-
temperatur von 18 ° C aufrecht. Durch eine geringe
Reduzierung der Raumtemperatur, können erhe bliche Energieeinsparungen erzielt werden. Das
grüne Display zeigt den Energiesparmodus an.
8.3 Frostschutzmodus hält eine Raumtemperatur
von 7 ° C aufrecht. Frostschutz wird durch die
blaue Anzeige dargestellt.
8.4 Aus Wählen Sie die Betriebsart „Aus“, um das
Gerät auszuschalten. Dieser Modus sollte verwendet werden, wenn die Heizung über einen längeren
Zeitraum nicht benötigt wird.
Drücken Sie eine der Tasten, um die Anzeige zu aktivieren und wählen Sie dann die gewünschte Betriebsart.
HINWEIS
In allen Betriebsarten kann die Raumtemperatur mit
den + Tasten verändert werden. Im Timer-
Modus ist diese Änderung nur temporär und das Gerä t
wird anschließend in das voreingestellte Programm
zurückkehren.
8.5 Timerbetrieb
ACHTUNG!
Es wird empfohlen, die Timerfunktion zu nutzen, um
die Betriebskosten zu reduzieren. Die Nutzung des
Gerätes im permanenten Heizbetrieb kann zu erhöhten
Betriebskosten führen.
Das Gerät ist mit einer Reihe von nutzbaren Heizprofilen vorprogrammiert. Es stehen vier Opt ionen zur Ve rfügung - drei voreingestellte und ein vom Benutzer frei
einstellbares Zeitprogramm:
1. Tags abwesend - (vorprogrammiert) - stehen Ihnen
folgende voreingestellte Heizzeiten zur Verfügung:
Montag bis Sonntag 07.00 bis 08.30 Uhr und 17.30
bis 22.00 Uhr, kann bei Bedarf geändert werden.
2. Tags anwesend - (vorprogrammiert) - stehen Ihnen
folgende voreingestellte Zeiten zur Verfügung:
Montag bis Sonntag 08.00 bis 21 .00 Uhr, kann bei
Bedarf geändert werden.
3. Urlaub - (vorprogrammiert für 7 Tage bei Frost-
schutz 10 ° C) - Anzahl der programmier baren Urlaubstage: 1 bis 300
4. Benutzer Timer - bietet höc hste Flexibilität für den
Anwender. Vier Zeitblöcke pro Tag stehen zur Verfügung und diese können für jeden Wochentag individuell angepasst werden.
Page 10

DE-10 RCE050_200_de · 04/15/A www.dimplex.de
Deutsch
RCE 050, RCE 100, RCE 150, RCE 200
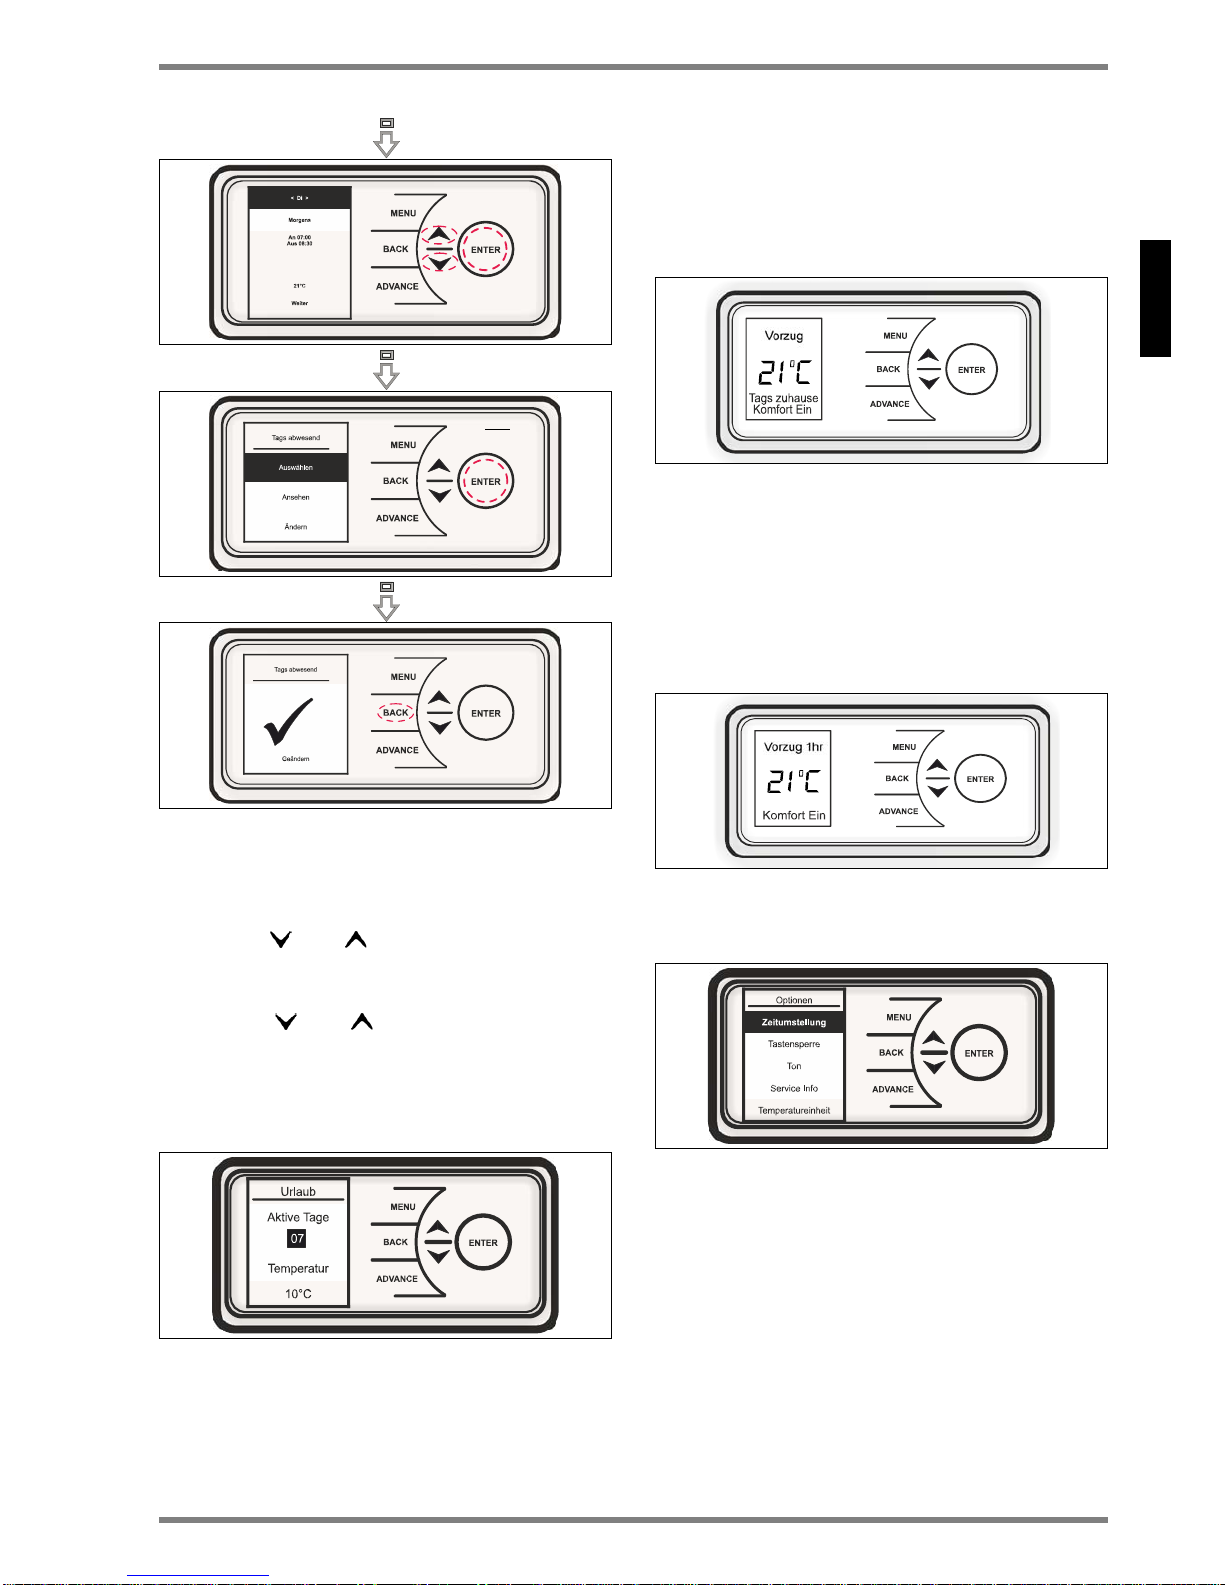
Um den Timerbetrieb zu wählen, drücken Sie die
MENÜ-Taste, wählen Sie anschließend mit der Taste
die Betriebsart aus und drücken Sie die ENTERTaste.
Wählen Sie nun den Timer-Betrieb durch Drücken der
ENTER-Taste.
Wählen Sie den gewünschten Modus mit der Taste
oder und bestätigen Sie mit ENTER-Taste.
Für Optionen, „Tags abwesend“, „Tags anwesend“ und
„Benutzer-Timer“ stehen drei Auswahlmöglichkeiten
zur Verfügung - „Auswählen“, „Ansehen“ und „Ändern“.
Auswählen - Auswahl des Timer-Betriebs
Ansehen - Anzeige der aktuell eingestellten Zeiten
Ändern - Ändern der aktuell eingestellten Zeit
Wenn „Ändern“ gewählt wurde, werden die einzelnen
Optionen mit den Tasten oder ausgewählt, ge-
gebenenfalls geändert und mit der ENTER-Taste bestätigt.
Am Ende jeder Periode wählen Sie „Weiter“, um in die
folgenden Periode zu gelangen.
Wenn die Einstellungen für einen Tag abgeschlossen
sind, drücken Sie die ENTER-Taste, um die Einstellungen zu speichern.
Nachdem die Einstellungen für den ersten Tag abgeschlossen wurden, ist es möglich, diese Einstellungen,
auf den folgenden Tag oder für alle Wochentage zu
übernehmen.
Jeder Tag kann individuell verändert un d gespeichert
werden. Dies ist auch möglich mit „Löschen“ oder „Alles löschen“.
Folgende Optionen sind verfügbar:
Um eine Timer-Betriebsart zu wählen, wählen Sie
„Auswählen“ und drücken Sie die ENTER-Taste.
Speichern
Speichern der Schaltzeiten für
einen Tag
Kopieren
Kopieren der Schaltzeiten auf den
folgenden Tag
Alles kopieren
Kopiert die Schaltzeiten auf alle
sieben Tage
Löschen
Setzt alle Zeiten auf 00:00 für diesen Tag
Alles Löschen
Setzt alle Zeiten auf 00:00 für alle
sieben Tage
Page 11
www.dimplex.de RCE050_200_de · 04/15/A DE-11
Deutsch
RCE 050, RCE 100, RCE 150, RCE 200
8.6 Urlaub
In der Betriebsart Urlaub kann die Anzahl der T age, in
denen der Raum nicht genutzt wird, zusammen mit der
gewünschten Raumtemperatur eingestellt werden.
Drücken Sie und Taste um die Anzahl der Abwesenheitstage zwischen 1 und 300 Tage auszuwählen. Danach drücken Sie die ENTER-Taste.
Drücken Sie und um eine gewünschte Temperatur zu wählen, die in dieser Zeit gehalten werden
soll und drücken Sie die ENTER-Taste. Nach Ablauf
der eingestellten Urlaubstage kehrt die Steuerung wieder zu dem zuvor ausgewählte Programm zurück.
9 Advance - Vorzug
Die Advance-Funktion ermöglicht die vorrü bergehende
Änderung des Zeitprofil. Wenn ein Zeitprogramm ausgewählt wurde, wird die Vorzugs-Funktion d as nächsten eingestellten Zeitprofil auf den aktuellen Zeitpunkt
vorziehen.
10 Zeitvorgabe des Komfortbetriebs
Die ADVANCE-Taste wird auch verwendet, um dieKomforttemperatur für einen festen Zeitraum vorzugeben (1-4 Stunden).
Drücken Sie die ADVANCE-Taste zweimal, um eine
einstündige Erhöhung zu programmieren.
Für längere Zeiteinstellungen drücken Sie die ADVANCE-Taste mehrmals.
11 Optionen
Mit dem Optionen-Menü können die Menü-Einstellungen dem Benutzer angepasst werden.
Zeit-Umstellung - Umstellung Sommer-/ Winter-
zeit
Tastensperre - Kindersicherung. Diese Funktion
sperrt die Tasten. Zum Entsperren des Geräts drücken und halten Sie die ENTER-Taste für zwei Sekunden.
Ton - Audio Rückmeldung (Tasten) kann aktiviert
oder deaktiviert werden.
Service Info - Service-Informationen werden an-
gezeigt.
Temperatureinheit - Auswahl der Temperaturein-
heit Grad Celsius oder Fahrenheit.
Page 12

DE-12 RCE050_200_de · 04/15/A www.dimplex.de
Deutsch
RCE 050, RCE 100, RCE 150, RCE 200
12 Tastensperre aktivieren / deaktivieren
Zum Sperren der Steuerung drücken Sie die BACKTaste und ENTER-Taste für drei Sekunden. Tastensperre wird am unteren Rand des Displays angezeigt.
Um die Steuerung zu entsperren wiederholen Sie die
Aktion und drücken Sie die BACK-Taste und ENTERTaste für drei Sekunden
HINWEIS
Die Steuerung kann nicht verstellt werden, wenn die
Tastensperre aktiv ist.
13 Erweiterte Funktionen
HINWEIS
Fenster offen - Erkennung ist werkseitig aktiviert.
AUFHEIZZEIT - ist werkseitig deaktiviert.
Um das Menü Benutzer-Informationen anzuzeigen,
Drücken und halten Sie die ENTER-Taste fünf Sekunden.
SP-Bereich (Sollwert) ermöglicht die Festlegung
der maximalen einstellbaren Temperatur.
„Fenster offen“-Erkennung (OW). Bei Aktivierung
dieser Funktion wird die Raumtemperatur reduziert, um den Energieverlust bei geöffneten Fenster
zu beschränken.
Aufheizzeit (ES) - Wenn Aufheizen (ES) aktiviert
ist, heizt das Gerät zur voreingestellter Uhrzeit, um
sicherzustellen, dass der Raum die erforderlichen
Temperatur rechtzeitig erreicht hat.
Beispiel: Um 07:00 Uhr wird über das Timermenü
eine Soll-Raumtemperatur von 21 °C vorgegeben.
Mit der Aufheizzeit-Funktion (ES) schaltet die Steuerung das Heizgerät bereits vor 07.00 Uhr ein, um
die gewünschten 21°C zum gewählten Zeitpunkt,
07:00 Uhr, zu erreichen.
Glen Dimplex Deutschland GmbH
Am Goldenen Feld 18
D-95326 Kulmbach
Technische Änderungen vorbehalten
Werkseinstellung- diese Funktion setzt alle von
Ihnen vorgenommenen Einstellungen auf Werkseinstellung zurück.
14 Reinigung
ACHTUNG!
Vor der Reinigung das Gerät vom Netz trennen.
Vor Beginn der Reinigung trennen Sie das Gerät von
der Stromzufuhr und lassen Sie es abkühlen. Die Außenseite durch Abwischen mit einem weichen, feuchten Tuch reinigen. Anschließend trocken reiben.
Verwenden Sie keine scheuernden Reinigungspulver
oder Möbelpolitur, da diese die Oberfläche beschädigen können.
Das Gerät kann zur besseren Reinigung der Rückseite
nach vorne geklappt werden. Siehe dazu die Hinweise
Abschnitt 4, Abb.3.
15 Garantie
Für dieses Gerät übernehmen wir zwei Jahre Ga ran tie
gemäß unserer Garantiebedingungen.
16 Entsorgung
Verpackung und Verpackungsteile gemäß
den Bestimmungen des Landes, in dem das
Gerät installiert wurde, entsorgen.
Das Gerät nicht im Hausmüll entsorgen sondern an einer Entsorgungsstelle abgeben.
Telefon: +49 9221 709-564
Fax: +49 9221 709-589
E-Mail: 09221709589@dimplex.de
www.dimplex.de
Page 13

www.dimplex.de/en RCE050_200_gb · 04/15/A EN-13
English
RCE 050, RCE 100, RCE 150, RCE 200
1 Information for the user
NOTENOTE
Dear customer,
To ensure safe operation, the heater may only be
installed and connected in accordance with these
installation and operating instructions. Read all
information contained in this manual carefully. Keep
these instructions in a safe place and pass them on to
any new owner.
ATTENTION!
This appliance can be used by children aged
from 8 years and above and persons with
reduced physical, sensory or mental
capabilities or lack of experience or
knowledge if they have been given supervision or instruction concerning the use of the
appliance in a safe way and understand the
hazards involved. Children shall not play with
the appliance. Cleaning and user maintenance shall not be made by children without
supervision!
ATTENTION!
Children of less than 3 years should be kept
away unless continuously supervised!
ATTENTION!
Children aged from 3 years and less than 8
years shall only switch on/off the appliance
provided that it has been placed or installed
in its intended normal operating position and
they have been given supervision or
instruction concerning the use of the
appliance in a safe way and understand the
hazards involved!
ATTENTION!
Children aged from 3 years and less than 8
years shall not plug in, regulate and clean the
appliance or perform user maintenance!
ATTENTION!
Some parts of this product can become very
hot and cause burns! Particular attention has
to be given where children and vulnerable
people are present!
ATTENTION!
If the supply cord is damaged, it must be
replaced by the manufacturer, its service
agent or similarly qualified persons in order to
avoid a hazard!
ATTENTION!
The heater must not be located above or
below a socket outlet!
ATTENTION!
In order to avoid overheating, do not cover the
heater!
ATTENTION!
The heater carries the warning symbol
indicating that it must not be covered!!
ATTENTION!
This device is not fitted with equipment for
regulating room temperature. The heater
must not be used in small rooms occupied by
people who cannot leave the room without
assistance unless continuous monitoring is
guaranteed!
The installation of this heater must be carried out
by a competent electrician in accordance with the
current safety regulations.
The heater may only be used for heating room air in
enclosed spaces.
Repairs to the appliance, or any other interven-
tions, may only be performed by qualified persons
or the after-sales customer service.
In the event of any defect or during extended peri-
ods of non-use, the heater must be disconnected
from the power supply. Deactivate or remove fuse.
The outside of the appliance gets hot when in use.
Do not use the appliance in areas where flammable
gases or liquids are stored or used..
ATTENTION!
Do not place the power supply cord over the
heater!
ATTENTION!
If the appliance is switched on automatically
while unattended, potential hazards may
exist, e.g. appliances that have been covered
or obstructed in your absence may pose a risk
of fire!
ATTENTION!
Install the device such that it is not possible
for someone in the bath or shower to touch
the control element!
ATTENTION!
Device not attached near curtains, draperies
and other flammable materials!
Page 14

EN-14 RCE050_200_gb · 04/15/A www.dimplex.de/en
English
RCE 050, RCE 100, RCE 150, RCE 200
ATTENTION!
In order to avoid a hazard due to inadvertent
resetting of the thermal cutout, this appliance
must not be supplied through an external
switching device, such as a timer or
connected to a circuit that is regularly
switched on and off by the utility.
ATTENTION!
Connection only to fixed installed cables! The
hardwired electrical installation must be
provided with a disconnect device with a
contact grap of at least 3 mm at each pole
(e.g. automatic circuit breaker)!
ACHTUNG!
The device must be earthed!
2 Energy saving functions
2.1 Dual circuit heating element
The Dimplex RCE radiant heat convector ha s a convection heating element and a radiant heating system.
This combination enables just the radiant heating to be
used if the temperature difference is low. This minimises the risk of overheating the room, which saves
energy.
2.2 "Open Window" function
If a window or a door is left open by mistake, the control
will detect the sudden temperature fluctuations and
switch to Standby mode. If the window or door is
closed, the device returns to normal mode. This function interrupts the heating operation to prevent heat
from escaping from the room in an uncontrolled manner. This saves money and minimises energy consumption.
2.3 Learning function
This function enables the heating device to be switched
on early to ensure that the desired temperature is
reached at the time specified in the program.
Example: A temperature of 21°C is set for mornings at
7 am in the time program. The heatin g device now determines how long it takes to reach the desired temperature at the specified time based on its "experience".
NOTENOTE
If the Anticipatory (ES) function is activated, the device
heats for the pre-set time to ensure that the room has
reached the required temperature at the right time.
Technical Device Description.
3 Technical device description
4 Assembly, installation, minimum clearance
The radiant heat heating device is designed for wall
mounting using the wall bracket provided. The device
may only be installed in upright position as shown in
Fig. 1 - 3.
Caution with inflammable objects. The minimum clearances must be complied with. A distance of at least
500mm must be complied with on the front of the device.
Type
Output
radiant
heating
Output
convector
heating
Total
output
RCE 050 200 W 300 W 500 W
RCE 100 300 W 700 W 1000 W
RCE 150 300 W 1200 W 1500 W
RCE 200 350 W 1650 W 2000 W
Connection voltage 1/N/PE~230-240V, 50Hz
Temperature controller 7 - 32°C
Protection class Protective conductor con-
nection
Degree of protection IP24
Fig.1
Page 15

www.dimplex.de/en RCE050_200_gb · 04/15/A EN-15
English
RCE 050, RCE 100, RCE 150, RCE 200
Installation on wooden walls is permissible.
All models are splash-water protected in accordance
with the IP24 standard and can be used in bathrooms
in protection zone II.
The supply connection socket must be accessible after
installation.
ATTENTION!
The original wall bracket supplied on the rear of the
device must be used!
Remove the wall bracket from the rear of the device
by pressing the springs on each side. (see Fig. 2.)
Drill the fastening holes. Look out for electric cables
or pipework in the wall.
Screw the wall bracket securely to the wall with the
accompanying screws.
Hook the device into the bottom slots on the wall
bracket.
Bring the device into an upright position and press
the device into the springs until they engage to lock
in place.
ACHTUNG!
Please note that burning cigarettes, candles and oil
lamps, in conjunction with the convection of electric
heating systems, can cause soot deposits on the wall
and on the surface of the device. This is not a device
malfunction.
5 Electrical connection
The current regulations according to VDE 0100 part
701 and the relevant installation re qu ire m en ts m us t b e
observed. The heating devices are equipped wi th a device connection cable, type H05VV-F, 4 x 1.0 mm
2
,
without a plug.
Wire assignment of the device connection cable:
Green/yellow: 'PE' protective conductor
Blue: 'N' - neutral conductor supply voltage
Brown: 'L' - phase supply voltage
Black: Pilot wire
ATTENTION!
The pilot wire has no function and must be isolated
correctly! Do not earth the pilot wire!
The device connection cable must be connected to a
connection socket which is suitable for the heating device. A disconnecting device with a contact opening of
at least 3 mm at each pole (e.g. circuit breaker) must
be provided in the permanently installed wiring.
6 Overload protector
For your safety, the heating device is equipped with an
overload protector. If the air circulation is interrupted,
the overload protector switches off the heating device.
After sufficient cooling, the heating device switches on
again automatically.
If the overload protector is triggered multiple times, the
cause must be determined (e.g. ventilation grill covered).
The triggering of the overload protector is shown in the
display by a red flashing indicator light.
To reset the display, remove the cause of the overheating and press the ENTER key for 10 seconds.
Type Dimension A
(mm)
Dimension B
(mm)
RCE 050 513 225
RCE 100 675 387
RCE 150 756 468
RCE 200 918 630
Fig.2
Fig.3
Page 16

EN-16 RCE050_200_gb · 04/15/A www.dimplex.de/en
English
RCE 050, RCE 100, RCE 150, RCE 200
7 Operation
7.1 Control panel
The control elements are located on the top right side
of the device. The device is equip ped with a configurable electronic control unit, consisting of a display and
six touchscreen keys.
The heating device also has an adjustable room thermostat for controlling the room temperature. The adjustable minimum temperature is 7 ° C.
The maximum temperature is set to 26 ° C at the factory, but can be increased to a maximum of 32 ° C.
A temperature of 21 ° C corresponds to a normal room
temperature.
(1) Display
(2) Menu key
(3) Back key
(4) Up/down key
(5) Enter key
(6) Status display
(7) Advance key
7.2 Operating functions
The parameters of the device can be set easily using
the six keys on the display user interface.
The available settings are shown on the display.
1. Menu - Shows th e mo st impo rt an t fun ctions:
Date / Time - Date and time setting.
Mode - Time Program, Manual Temperature Se-
lection, Setback, Frost Protect, Off.
Options - Summer Time, Auto Lock, Service Info,
Temp Units, Audio Feedback (keys)
2. Back key: Return to the prev iou s pr og ra m item
3. Up and down keys:
Used to navigate through the menu and to change
the setting values.
The up and down keys are also used for setting the
desired room temperature.
The display colour changes from blue to red based
on the selected temperature.
4. ENTER key: Used to confirm the settings. Pressing the ENTER key shows the current activated
function.
5. Comfort On: The times during which the heating
device heats up to the set comfort temperature.
This is shown in the bottom area of the display.
6. Comfort Off: The times during which the heating
device is not switched on. The set mode is shown
in the bottom area of the display.
7. ADVANCE key: Overwrites the heating settings
and changes the operating status of the heating
device.
If a Timer Mode is activated, pressing the ADVANCE
key changes the mode.
It can switch between "Comfort Off" and "Comfort On",
for example.
The ADVANCE key is also used to activate the Boost
Mode. The Boost Mode delivers heat for between one
and four hours.
7.3 Main screen
If no input is made for 30 seconds, the display returns
to the main screen. The selected temperature is shown
here, along with the mode. The use of the Advance
function is also shown.
The activated functions are shown by pressing the
ENTER key.
If no change is made for a prolonged period, the scre en
switches to "Sleep Mode" and the display is turned off.
Press any key to activate the display.
.
NOTENOTE
If no key is pressed, the display returns to the Main
Menu after 30 seconds. The activated functions are
shown by pressing the ENTER key.
7.4 Initial start-up
When commissioning the heater in the display the start
screen is displayed. Here you can set the language,
date, time, time zone, key lock, key sounds and temperature unit. These values can be changed later again.
See the corresponding chapter in the manual.
Page 17

www.dimplex.de/en RCE050_200_gb · 04/15/A EN-17
English
RCE 050, RCE 100, RCE 150, RCE 200
7.5 Date/Time setting
The control includes a real-time clock with calender
function. The clock has a backup battery (type
CR2032, 3V), which supplies the clock with power in
the event of a power failure.
Setting the date and time:
Press the MENU key. Select Date/Time and press the
ENTER key.
Press and to set the correct day of the month
and press the ENTER key.
Repeat this process until the date and time have been
set and press the ENTER key to save the settings.
Press the BACK key as soon as appears and return to the main screen.
8 Modes
The radiant heat convector can maintain a constant
room temperature with the following modes:
8.1 Manual Mode heats the room to a pleasant temperature of 21 ° C.
8.2 Eco Mode (energy-saving mode) maintains a room
temperature of 18 ° C. Significant energy savings
can be achieved by reducing the room temperature
slightly. The green display indicates the energysaving mode.
8.3 Frost Protect Mode maintains a room temperature
of 7 ° C. The blue display indicates the Frost Protect Mode.
8.4 Off Select the mode "Off" to switch off the device.
This mode should be used if heating is not required
for a prolonged period.
Press one of the keys to activate the display and then
select the desired mode.
NOTENOTE
The room temperature can be changed with the +
keys in all modes. In Timer Mode, this change is
only temporary and the device returns to the pre-set
program afterwards.
8.5 Timer Mode
ATTENTION!
It is advisable to use the timer function to
reduce the operating costs. Using the device
in permanent heating operation can result in
increased operating costs.
The device is pre-programmed with a range of usable
heating profiles. There are four options available three pre-set programs and a time program which can
be freely selected by the user:
1. Out all Day - (pre-programmed) - the following pre-
set heating times are available:
Monday to Sunday 7 am to 8.30 am and 5.30 pm to
10 pm, can be changed if necessary.
2. Home all Day - (pre-programmed) - the following
pre-set times are available:
Monday to Sunday 8 am to 9 pm, can be changed if
necessary.
3. Holiday - (pre-programmed for 7 days with frost pro-
tect 10 ° C) - number of programmable holiday days:
1 to 300
4. User Timer - offers maximum flexibility for the user.
Four time blocks are available per day, which can
be adapted individually for each weekday.
To select the Timer Mode, press the MENU key, then
select the mode with the key and press ENTER.
Page 18

EN-18 RCE050_200_gb · 04/15/A www.dimplex.de/en
English
RCE 050, RCE 100, RCE 150, RCE 200
Now select the Timer Mode by pressing the ENTER
key.
Select the desired mode with or and
confirm with the ENTER key.
Three possible selections are available for the options
"Out all Day", "Home all Day" and "User Timer" - "Select", "Preview" and "Modify".
Select - select the Timer Mode
Preview - view the current set times
Modify - change the current set time
If "Modify" is selected, the individual options can be selected with or , changed if necessary and con-
firmed with the ENTER key.
At the end of each period, select "Next" to enter the fol-
lowing periods.
When the settings are complete f or on e day, pr ess th e
ENTER key to save the settings.
Once the settings are complete for the first day, it is
possible to apply the settings to the following day or all
weekdays.
Each day can be changed and saved individually. This
is also possible with "Delete" or "Delete All".
The following options are available:
To select a Timer Mode, choose "Select" and press the
ENTER key.
Save Save the switching times for a day
Copy
Copy the switching times to the following day
Copy All
Copy the switching times to all
seven days
Clear Set all times to 00:00 for this day
Clear All
Set all times to 00:00 for all seven
days
Page 19

www.dimplex.de/en RCE050_200_gb · 04/15/A EN-19
English
RCE 050, RCE 100, RCE 150, RCE 200
8.6 Holiday
In Holiday Mode, the number of days for which the
room is not in use can be set, al ong with the desired
room temperature.
Press and to set the number of days absent between 1 and 300 days. Then press the ENTER key.
Press and to select a desired temperature to be
maintained during this period and press the ENTER
key. Once the set number of holiday days has passed,
the control returns to the previously selected program.
9 Advance
The Advance function enables the time profile to be
changed temporarily. If a time program has been selected, the Advance function will bring forward the next
set time profile to the current time.
10 Time specification for Comfort Mode
The ADVANCE key is also used to specify the comfort
temperature for a fixed period of time (1-4 hours).
Press the ADVANCE key twice to program an increase
to last one hour.
For longer time settings, press the ADVANCE key multiple times.
11 Options
The user can use the Options menu to adjust the menu
settings.
DST Rule - switch between summer/ winter time.
Auto Lock - child lock. This function locks the
keys. To unlock the device, press and hold the
ENTER key for two seconds.
Sound - audio feedback (keys) can be activated or
deactivated.
Service Info - service information is shown.
Temp Units - select the temperature unit degrees
centigrade or Fahrenheit.
Page 20

EN-20 RCE050_200_gb · 04/15/A www.dimplex.de/en
English
RCE 050, RCE 100, RCE 150, RCE 200
12 Activate / deactivate Auto Lock
To lock the control, press the BACK key and ENTER
key for three seconds. The key lock is indicated in the
bottom edge of the display. To unlock the control, repeat the action and press the BACK key and ENTER
key for three seconds.
NOTENOTE
The control cannot be adjusted if the key lock is active.
13 Advanced functions
NOTENOTE
Open Window - detection is activated at the fac tory.
ANTICIPATORY - is deactivated at the factory.
To display the User Info menu, press and hold the ENTER key for five seconds.
SP Range (setpoint) can be used to define the
maximum possible temperature.
"Open Window" detection (OW). When this func-
tion is activated, the room temper ature is reduced
to limit the energy loss when a window is open.
Anticipatory (ES) - If the Anticipatory (ES) function
is activated, the device heats for the pre-set time to
ensure that the room has reached the required
temperature at the right time.
Example: A setpoint room temperature of 21°C is
specified for 7 am via the Timer menu. With the Anticipatory (ES) function, the control switches on the
heating device before 7 am to achieve the desired
temperature of 21°C at the selected time of 7 am.
Glen Dimplex Deutschland GmbH
Am Goldenen Feld 18
D-95326 Kulmbach
Subject to technical modifications
Factory Reset- this function resets all settings
made by the user to the factory settings.
14 Cleaning
ATTENTION!
Before cleaning, the device must be disconnected from
the power supply.
Before starting the cleaning process, disconnect the
device from the power supply and let it cool down.
Clean the outside by wiping down with a soft, damp
cloth. Then rub dry.
Do not use abrasive cleaning powder or furniture polish, as this may damage the surface.
The device can be tilted forwards to enable better
cleaning. See the instructions in section 4, Fig.3.
15 Warranty
This device is supplied with a two-year warranty according to our terms of guarantee.
16 Disposal
Dispose of packaging and packaging parts
in accordance with the regulations in the
country where the device was installed.
Do not dispose of the device with household
waste. The device must be taken to a local
waste disposal plant.
Telephone: +49 9221 709 564
Telefax: +49 9221 709 589
E-Mail: 09221709589@dimplex.de
www.dimplex.de
Page 21

www.dimplex.de/fr RCE050_200_fr· 04/15/A F-21
Francais
RCE 050, RCE 100, RCE 150, RDCE 200
1. Consignes pour l‘utilisateur
RemarqueREMARQUE
Cher client,
Veuillez lire attentivement et intégralement les présentes instructions. Conservez-les soigneusement et
remettez-les au prochain propriétaire le cas échéant.
ATTENTION!
Cet appareil peut être utilisé par les enfants à
partir de huit ans ainsi que par des personnes
à mobilité réduite ou ayant des déficiences
sensorielles ou mentales ou ne possédant
pas l’expérience ou le savoir requis, s’ils sont
sous surveillance ou ont reçu des instructions
en vue d’une utilisation de l’appareil en toute
sécurité et ont compris les dangers en
résultant!
ATTENTION!
Éloigner les enfants âgés de moins trois ans,
sauf s’ils sont sous surveillance permanente.
Les enfants à partir de trois ans et de moins
de huit ans ont le droit de mettre l’appareil en
marche ou de l’arrêter s’ils sont en présence
d’un adulte ou s’ils ont reçu des instructions
en vue d’une utilisation de l’appareil en toute
sécurité et s’ils ont compris les dangers en
résultant, à condition que l’appareil soit placé
ou installé dans sa position d’utilisation
normale!
ATTENTION!
Les enfants à partir de trois ans et de moins
de huit ans n’ont pas le droit de brancher
l’appareil, de le réguler, de le nettoyer et/ou
d’effectuer son entretien!
ATTENTION!
Certaines pièces de l’appareil peuvent
devenir très chaudes et provoquer des
brûlures. Une prudence particulière est de
mise en présence d’enfants ou de personnes
vulnérables!
ATTENTION!
Si le cordon électrique est endommagé, il doit
être remplacé par le fabricant ou son
représentant S.A.V. ou par une personne à
qualification comparable, afin d’éliminer les
sources de danger!
ATTENTION!
Il est interdit de poser l’appareil sous une
prise murale!
ATTENTION!
Pour éviter la surchauffe, l'appareil ne doit
pas être couvert!
ATTENTION!
Ne pas couvrir l’appareil de chauffage,
risque d’incendie!
ATTENTION!
Il faut installer l’appareil de sorte que les
organes de commande ne puissent pas être
touchées par une personne se trouvant dans
la baignoire ou sous la douche!
ATTENTION !
Selon la taille de la chambre, la demande de chaleur et
le réglage du thermostat, les chambres peuvent être
chauffés par un chauffage silencieux. Cela peut être
dangereux pour les personnes qui ne sont pas en
mesure de quitter la salle en cas de température plus!
L’appareil doit être installé par un professionnel
selon les prescriptions de sécurité en vigueur.
L’appareil doit être utilisé uniquement pour ré-
chauffer l’air ambiant de locaux fermés.
Pour garantir le bon fonctionnement de l’appareil,
veuillez monter et raccorder le convecteur uniquement selon les instructions de la présente notice.
Les réparations et interventions sur l’appareil ne
doivent être effectuées que par un professionnel ou
par le service après-vente.
En cas de défaillance ou d’arrêt prolongé, isoler
l’appareil du secteur. Couper ou retirer les fusibles.
Ne pas faire fonctionner l’appareil dans des locaux
où sont utilisés ou stockés des gaz ou liquides inflammables.
Il faut respecter les distances minimum indiquées.
Veillez particulièrement à respecter les prescrip-
tions de sécurité en vigueur relatives aux locaux
humides (salles de bains, douches, piscines etc.)
Ne pas poser le câble d’alimentation sur l‘appareil.
ATTENTION!
Lorsque l’appareil branché s’enclenche
automati-quement en votre absence, cela
peut engendrer des dangers p.ex. risque
d’incendie du fait du recouvre-ment ou du
déplacement de l’appareil à votre insu!
Page 22

F-22 RCE050_200_fr· 0415/A www.dimplex.de/fr
Francais
RCE 050, RCE 100, RCE 150, RDCE 200
ATTENTION!
Périphérique non près de rideaux, tentures et
autres matériaux inflammables attachés!
ATTENTION!
L’installation électrique fixe doit être pourvue
d’un dispositif de coupure ayant une distance
d’ouverture des contacts d‘au moins 3 mm sur
chaque pôle (coupe-circuit automatique par
exemple).
2 Fonctions d’économie d’énergie
2.1 Double circuit - élément de chauffage
Le convecteur à rayonnement infrarouge RCE Dimplex
associe un élément de chauffage par convection et un
chauffage par rayonnement. Ce système combiné permet de solliciter uniquement le chauffage par rayonnement en cas de faible différence de température. Le
risque de surchauffer les pièces est moindre et vous
économisez de l’énergie.
2.2 Fonction « fenêtre ouverte »
Si une fenêtre ou une porte reste ouverte par inadvertance, la commande détecte les brusques variations de
température et bascule alors en mode veille. Une fois
la fenêtre ou la porte refermée, l’appareil revient en
mode de fonctionnement normal. Cette fonction coupe
le mode chauffage pour éviter que la chaleur ne
s’échappe intempestivement de la pièce. Elle minimise
la consommation d’énergie et permet de faire des é conomies.
2.3 Fonction d’apprentissage
Cette fonction sert à anticiper l’activation de l’appareil
de chauffage de façon que la température souhaitée
soit atteinte au moment spécifié par le biais du programme.
Exemple : vous avez défini une température de 21 °C à
07 h 00 par le biais de la programmation horaire. L’appareil de chauffage détermine, sur la base de son
« expérience », combien de temps il faut pour atteindre
la température souhaitée au moment spécifié.
REMARQUE
Si le mode Régressif (ES) est activé, l’appareil bascule
en mode de chauffage à l’heure prédéfinie, de sorte
que la pièce soit à la température requise à l’heure
programmée. Description technique de l’appar e il.
3 Description technique de l’appareil
4 Montage, installation, distances minimales
L’appareil de chauffage par rayonnement infrarouge a
été spécialement conçu pour être monté au mur,
moyennant la fixation murale fournie. L’appareil peut
être monté uniquement à la verticale, comme illustré
par les fig. 1 - 3.
Attention aux objets inflammables. Il est impératif de se
conformer aux distances minimales. Il faut laisser un
dégagement d’au moins 500 mm devant la façade de
l’appareil.
Type
Puissance
de chauf-
fage
par rayon-
nement
Puissance
de chauf-
fage par
convection
Puissance
totale
RCE 050 200 W 300 W 500 W
RCE 100 300 W 700 W 1 000 W
RCE 150 300 W 1 200 W 1 500 W
RCE 200 350 W 1 650 W 2 000 W
Tension de raccordement 1/N/PE~230-240 V, 50 Hz
Régulateur de température 7 - 32 °C
Classe de protection
Raccord pour conducteur
de protection
Degré de protection IP24
Fig. 1
Page 23

www.dimplex.de/fr RCE050_200_fr· 04/15/A F-23
Francais
RCE 050, RCE 100, RCE 150, RDCE 200
Il est permis de monter l’appareil sur une paroi en bois.
Tous les modèles bénéficient d’une protection contre
les éclaboussures conforme à la norme IP24 et
peuvent donc être utilisés dans des pièces d’eau de
catégorie II.
La prise de raccordement secteur doit être accessible
après le montage.
ATTENTION!
Il faut se servir de la fixation murale d’origine qui se
trouve au dos de l’appareil !
Pressez les ressorts de part et d’autre pour retirer
la fixation murale située au dos de l’appareil. (Voir
fig. 2)
Percez les trous de fixation. Faites attention à ne
pas percer les câbles électriques ou les tuyauteries
qui se trouvent au niveau du mur.
Vissez la fixation murale sur le mur avec les vis
fournies.
Suspendez l’appareil dans la fente inférieure de la
fixation murale.
Placez l’appareil à la verticale et plaquez-le contre
les ressorts de verrouillage pour les enclencher.
ATTENTION!
Notez que toute cigarette, bougie ou lampe à huile
risque de provoquer des dépôts de suie sur le mur et
sur la surface de l’appareil sous l’effet de la convection
du chauffage électrique. Il ne s’agit aucunement d’un
dysfonctionnement de l’appareil.
5 Branchements électriques
Il est absolument impératif de respecter les prescriptions actuelles VDE 0100, partie 701, et les instructions
d’installation afférentes. Les appareils de chauffage
sont équipés d’un câble de raccordement type H05VVF, 4x1,0mm
2
sans connecteur.
Affectation des brins du câble de raccordement de
l’appareil :
Vert/jaune : « PE » - conducteur de protection
Bleu : « N » - conducteur neutre de la tension
d’alimentation
Marron : «L » - phase de la tension d’alimenta-
tion
Noir : conducteur de commande
ATTENTION!
Le conducteur de commande est inopérant et doit être
isolé dans les règles de l’art ! Ne pas mettre le
conducteur de commande à la terre !
Le câble de raccordement de l’appareil doit être relié à
une prise murale adaptée à l’appareil de chauffage.
Dans une installation électrique existante, il convient
de prévoir un dispositif de sectionnement à ouverture
de contact de 3 mm minimum sur chaque pôle (coupecircuit automatique par ex.).
6 Limiteur de surcharge
L’appareil de chauffage est équipé d’un limiteur de surcharge pour votre propre sécurité. Si la circulation de
l’air est perturbée, le limiteur de surcharge coupe l’appareil de chauffage. L’appareil se remet en marche automatiquement une fois qu’il a suffisamment baissé en
température.
Si le limiteur de surcharge se déclenche à plusieurs reprises, il convient d’en rechercher la cause (par ex.
grille de ventilation obstruée).
Le déclenchement du limiteur de surcharge est signalé
par un signal rouge clignotant à l’écran.
Pour réinitialiser l’affichage, remédiez à la cause de la
surcharge et appuyez sur la touche ENTER pendant
10 secondes.
Type Cote A (mm) Cote B (mm)
RCE 050 513 225
RCE 100 675 387
RCE 150 756 468
RCE 200 918 630
Fig. 2
Fig. 3
Page 24

F-24 RCE050_200_fr· 0415/A www.dimplex.de/fr
Francais
RCE 050, RCE 100, RCE 150, RDCE 200
7 Commande
7.1 Unité de commande
Les éléments de commande se trouvent en haut, à
droite de l’appareil. L’appareil est équipé d’une unité de
commande électronique réglable, qui se compose d’un
écran et de six touches tactiles.
L’appareil de chauffage comporte également un thermostat d’ambiance, qui sert à réguler la température
ambiante. La température minimale paramétrable est
de 7 °C.
La température maximale est réglée à 26 °C par défaut, mais elle peut être portée à 32 °C au maximum si
nécessaire.
Une température de 21 °C correspond à une température ambiante normale.
(1) Écran
(2) Touche Menu
(3) Touche Back (Retour)
(4) Touche Haut/Bas
(5) Touche Enter (de validation)
(6) Témoin de fonctionnement
(7) Touche Advance (Progrès)
7.2 Fonctions de commande
Les paramètres de l’appareil se règlent par le biais des
six touches de l’interface utilisateur à l’écran.
Les paramètres disponibles s’affichent à l’écran.
1. Menu - recense les principales fonctions :
Date/Heure - réglage de la date et de l’heure.
Mode - programmation horaire, sélection ma-
nuelle de la température, abaissement, protection antigel, arrêt.
Options - heure d’été, verrouillage du clavier, infor-
mations de service, unité de température, signal audio (touches).
2. Touche Back (Retour) : retour au point précédent
du programme.
3. Touches Haut et Bas :
servent à naviguer dans le menu et à modifier la
valeur des paramètres.
Les touches Haut et Bas permettent également de
spécifier la température ambiante souhaitée.
La couleur de l’écran bascule du bleu au rouge,
suivant la température sélectionnée .
4. Touche ENTER : pour valider les paramètres.
Quand on appuie sur la touche « Entrée », la fonction actuellement activée s’affiche.
5. Confort : il s’agit des périodes où l’appareil de
chauffage porte le logement à la température de
confort paramétrée. Ces informations apparaissent en bas de l’écran.
6. Sans confort : il s’agit des périodes où l’appareil
de chauffage ne fonctionne pas. Le mode paramétré s’affiche en bas de l’écran.
7. Touche ADVANCE (Progrès) : écrase les para-
mètres de chauffage et change l’état de fonctionnement de l’appareil de chauffage.
Si le mode Minuterie a été activé, une pression sur la
touche ADVANCE sert à cha nge r de mode .
Elle permet notamment de basculer de « Sans
confort » à « Confort » ou inversement.
La touche ADVANCE sert également à activer le mode
Boost. Le mode Boost chauffe l’habitation pour une durée comprise entre une et quatre heure s .
7.3 Écran principal
En l’absence d’action pendant 30 secondes, l’affichage
rebascule sur l’écran principa l. Il indique alors la température sélectionnée ainsi que le mode. Il affiche
aussi l’éventuelle activation de la fonction Advance.
Les fonctions activées s’affichent quand on appuie sur
la touche ENTER.
En l’absence de modification pendant une période prolongée, l’écran bascule en mode « veille » et l’affichage
s’éteint.
Il suffit d’appuyer sur une touche au choix pour le réactiver.
.
REMARQUE
Si aucune touche n’est actionnée, l’affichage rebascule
sur le menu principal au bout de 30 secondes. Les
fonctions activées s’affichent quand on appuie sur la
touche ENTER.
Page 25

www.dimplex.de/fr RCE050_200_fr· 04/15/A F-25
Francais
RCE 050, RCE 100, RCE 150, RDCE 200
7.4 Première mise en service
Lors de la mise chauffage dans l'affichage de l'écran
de démarrage est affiché. Ici vous pouvez définir la
langue, date, heure, fuseau horaire, verrouillage des
touches, les tonalités du clavier et l'unité de température. Ces valeurs peuvent être modifiées plus tard encore.
Voir le chapitre correspondant dans le manuel.
7.5 Réglage de la date/de l’heure
La commande est équipée d’une horloge en temps réel
avec fonction calendrier. L’horloge est équipée d’une
pile de secours (type CR2032, 3 V) qui l’alimente en
cas de coupure de courant.
Réglage de la date et de l’heure :
Appuyez sur la touche MENU. Sélectionnez la date/
l’heure et appuyez sur la touche ENTER.
Appuyez sur les touches et pour régler le jour
du mois, puis appuyez sur la touche ENTER.
Répétez la procédure pour régler la date et l’heure,
puis appuyez sur la touche ENTER pour valider. Ap-
puyez sur la touche BACK dès que s’affiche pour
retourner à l’écran principal.
8 Modes de fonctionnement
Le convecteur à rayonnement infrarouge maintient une
température ambiante constante dans les modes
suivants :
8.1 Mode Manuel : chauffe la pièce à une température
agréable de 21 °C.
8.2 Mode Éco (mode d’économie d’énergie) : maintient une température ambiante de 18 °C. Une
faible réduction de la température ambiante suffit
pour réaliser des économies d’énergie considérables. Le mode d’économie d’énergie est signalé
par la couleur verte.
8.3 Protection givre : maintient une température ambiante de 7 °C. Le mode de protection antigel (protection givre) est signalé par la couleur bleue.
8.4 Arrêt : sélectionnez le mode « Arrêt » pour
éteindre l’appareil. Ce mode est pr éconisé en cas
d’absence d’utilisation prolongée du chauffage.
Appuyez sur une des touches pour ac tiver l’affichage et
sélectionnez le mode de votre choix.
REMARQUE
Quel que soit le mode, utilisez les touches +
pour modifier la température ambiante. En mode
Minuterie, la modification est temporaire et l’appareil
rebascule ensuite sur le programme prédéfini.
8.5 Mode Minuterie
ATTENTION!
Il est préconisé d’utiliser la fonction Minuterie pour
réduire les coûts de fonctionnement. Si l’appareil reste
en permanence en mode chauffage, les coûts de
fonctionnement risquent d’être élevés.
L’appareil comporte toute une série de profils de chauffage préprogrammés. Les options sont au nombre de
quatre, avec trois programmes prédéfinis et une programmation horaire paramétrable par l’utilisateur :
1. Absent toute la journée - (préprogra mmé) - le s pé-
riodes de chauffage prédéfinies sont les suivantes :
du lundi au dimanche de 07 h 00 à 08 h 30 et de
17 h 30 à 22 h 00. Ces plages peuvent être modifiées si nécessaire.
2. Présent toute la journée - (prépro grammé) - les pé-
riodes prédéfinies sont les suivantes :
du lundi au dimanche de 08 h 00 à 21 h 00. Ces
plages peuvent être modifiées si nécessaire.
3. Congés - (durée préprogrammée de 7 jours avec
une température de protection antigel de 10 °C) nombre de jours de vacances programmables : de 1
à 300
4. Minuterie utilisateur - une souplesse maximale au
service de l’utilisateur. Vous disposez de quatre
plages horaires par jour, que vous pouvez adapter
suivant vos besoins pour chaque jour de la semaine.
Page 26

F-26 RCE050_200_fr· 0415/A www.dimplex.de/fr
Francais
RCE 050, RCE 100, RCE 150, RDCE 200
Pour sélectionner le mode Minuterie, appuyez sur la
touche MENU, puis utilisez la touche pour sélec-
tionner le mode et appuyez sur la touche ENTER.
Sélectionnez le mode Minuterie en appuyant sur la
touche ENTER.
Sélectionnez le mode qui convient avec la touche
ou et validez avec la touche ENTER.
Les possibilités de sélection pour les options « Absent
toute la journée », « Présent toute la journée » et
« Minuterie utilisateur » sont au nombre de trois, à savoir « Sélection », « Aperçu » et « Modifier ».
Sélection - choix du mode Minuterie
Aperçu - affichage des heures actuellement pa-
ramétrées
Modifier - modification de l’heure actuellement pa-
ramétrée
Si vous optez pour « Modifier », utilisez les touches
ou pour faire votre choix parmi les options, les
changer si nécessaire, puis validez avec la
touche ENTER.
À la fin de chaque période, sélectionnez « Suivant »
pour accéder à la plage suivante.
Une fois tous les réglages définis pour un jour donné,
appuyez sur la touche ENTER pour enregistrer les paramètres.
Lorsque vous avez terminé les réglages pour le premier jour, vous pouvez les reprendre le jour suivant ou
les appliquer à tous les jours de la semaine.
Chaque jour peut être modifié et enregistré indépendamment des autres. De même, vous pouvez
« Effacer » ou « Effacer tout ».
Les options disponibles sont les suivantes :
Pour sélectionner le mode Minuterie, choisissez l’option « Sélectionner », puis appuyez sur la
touche ENTER.
Sauvegarder
Enregistrement des plages de commutation pour un jour donné
Copier suivant
Application des plages de commutation au jour suivant
Copier tout
Application des plages de commutation aux sept jours de la semaine
Effacer
Remise à zéro de toutes les heures
pour un jour donné (00 h 00)
Effacer tout
Remise à zéro de toutes les heures
pour les sept jours de la semaine
(00h00)
Page 27

www.dimplex.de/fr RCE050_200_fr· 04/15/A F-27
Francais
RCE 050, RCE 100, RCE 150, RDCE 200
8.6 Congés
En mode Congés, vous avez la possibilité de spécifier
le nombre de jours où le logement sera inhabité ainsi
que la température ambiante souhaitée.
Appuyez sur les touches et pour spécifier le
nombre de jours d’absence, qui doit être compris entre
1 et 300. Appuyez ensuite sur la touche ENTER.
Appuyez sur et pour sélectionner la température qui devra être maintenue pendant cette période,
puis appuyez sur la touche ENTER. Une fois que les
jours de vacances paramétrés se sont écoulés, la commande rebascule sur le programme sélectionné au
préalable.
9 Advance - Progrès
La fonction Advance permet de modifier temporairement le profil horaire. Une fois que l’on a sélectionné
une programmation horaire, la fonction Progrès permet
d’anticiper le profil horaire suivant qui a été paramétré
et de l’appliquer immédiatement.
10 Programmation horaire du mode Confort
La touche ADVA NCE sert aussi à activer la température de confort pour une durée donnée (de 1 à
4 heures).
Appuyez deux fois sur la touche ADVANCE pour augmenter la température pour une durée d’une heure.
Pour rallonger la période d’activation, appuyez sur la
touche ADVANCE à plusieurs reprises.
11 Options
Le menu Options sert à adapter les réglages du menu
au gré des préférences de l’utilisateur.
Règle heure d’été - passage de l’heure d’hiver à
l’heure d’été
Verrouillage auto - protection enfants. Cette fonc-
tion sert à bloquer les touches. Pour débloquer les
touches de l’appareil, maintenez la touche ENTER
pendant deux secondes.
Son - activation ou désactivation du signal sonore
d’activation (touches).
Info service - affichage des informations de ser-
vice.
Unité température - sélection de l’unité de tempé-
rature (degré Celsius ou Fahrenheit).
Page 28

F-28 RCE050_200_fr· 0415/A www.dimplex.de/fr
Francais
RCE 050, RCE 100, RCE 150, RDCE 200
12 Activation/désactivation du verrouillage
des touches
Pour verrouiller la commande, appuyez sur les touches
BACK et ENTER pendant trois secondes. Le symbole
de verrouillage apparaît en bas de l’écran. Pour déverrouiller la commande, recommencez l’opération et appuyez sur les touches BACK et ENTER pendant trois
secondes.
REMARQUE
Tant que le verrouillage est activé, on ne peut pas agir
sur la commande.
13 Fonctions avancées
REMARQUE
Fenêtre ouverte - détection activée par défaut.
RÉGRESSIF - désactivé par défaut.
Pour afficher le menu des informations utilisateur,
maintenez la touche ENTER pendant cinq secondes.
Plage SP (valeur de consigne) : définition de la
température maximale paramétra ble .
Détection de « fenêtre ouverte » (OW). Si cette
fonction est activée, la température ambiante est
réduite de façon à limiter les déperditions énergétiques en présence d’une fenêtre ouverte.
Régressif (ES) - si le mode Régressif (ES) est ac-
tivé, l’appareil bascule en mode de chauffage à
l’heure prédéfinie, de sorte que la pièce soit à la
température requise à l’heure programmée.
Exemple : À 07 h 00, le menu Minuterie active la
température ambiante de consigne de 21 °C. Avec
la fonction Régressif (ES), la commande enclenche
l’appareil de chauffage avant 07 h 00, de façon que
la température de 21 °C souhaitée soit atteinte à
l’heure programmée (07 h 00).
Glen Dimplex Deutschland GmbH
Am Goldenen Feld 18
D-95326 Kulmbach
Sous réserve de modifications techniques
Raz usine - cette fonction réinitialise tous les ré-
glages que vous avez effectués et restaure les réglages d’usine (réglages par défaut).
14 Nettoyage
ATTENTION!
Débranchez l’appareil du secteur avant de le nettoyer.
Avant de commencer le nettoyage, débranchez l’appa-
reil de l’alimentation électrique et laissez-le refroidir.
Nettoyez l’extérieur de l’appareil avec un chiffon doux
et humide. Ensuite, laissez-le sécher.
N’utilisez pas de poudre abrasive ou de produit de polissage pour meubles, sous peine d’abîmer la surface.
Vous pouvez basculer l’appareil vers l’avant pour
mieux nettoyer la face arrière. Pour cela, reportez-vous
aux consignes de la section 4, fig. 3.
15 Garantie
Conformément aux conditions de garantie, nous accordons deux ans de garantie sur cet appareil.
16 Élimination
Éliminez l’emballage et les éléments de
conditionnement conformément à la réglementation du pays où l’appareil doit être installé.
L’appareil ne doit pas être jeté avec les ordures ménagères, mais déposé dans une déchetterie
locale.
Téléphone: +49 9221 709 564
Télécopie: +49 9221 709 589
E-Mail: 09221709589@dimplex.de
www.dimplex.de/fr
Page 29

www.dimplex.de RCE050_200_it · 04/15/A IT-29
RCE 050, RCE 100, RCE 150, RCE 200
Italiano
1. Note per gli utenti
REFERENCE
Gentile del cliente,
Si prega di leggere tutte le informazioni in attentamente
il presente manuale. Conservare queste istruzioni in un
luogo sicuro e passare eventualmente a futuri
proprietari.
ATTENZIONE!
Questo apparecchio può essere utilizzato dai
bambini a partire dagli 8 anni e da persone
con ridotte capacità fisiche, sensoriali o
mentali o prive d’esperienza e di conoscenze
adeguate, solo se sotto la sorveglianza di
altre persone o se sono stati istruiti
sull’utilizzo sicuro dell’apparecchio e sono in
grado di comprendere i pericoli che potrebbe
causare!
ATTENZIONE!
I bambini di età inferiore ai 3 anni devono
essere tenuti lontani dall’apparecchio salvo
non siano sorvegliati costantemente. I
bambini a partire dai 3 anni e di età inferiore
agli 8 anni possono accendere o spegnere
l’apparecchio se sorvegliati da un’altra
persona o se sono stati istruiti sull’utilizzo
sicuro dell’apparecchio ed hanno compreso i
pericoli che potrebbero derivarne, a
condizione che l’apparecchio sia posizionato
o installato in normale posizione d’utilizzo!
ATTENZIONE!
I bambini a partire dai 3 anni e di età inferiore
agli 8 anni non possono inserire la spina nella
presa elettrica, regolare l’apparecchio, pulire
l’apparecchio e/o eseguire gli interventi di
manutenzione eseguibili dall’utente!
ATTENZIONE!
Alcune parti dell’apparecchio possono
divenire molto calde ed essere causa di
ustioni. Usare particolare cautela in presenza
di bambini o di persone che richiedono
sorveglianza costante!
ATTENZIONE!
L’apparecchio non deve essere collocato
sotto una presa a parete!
ATTENZIONE!
Prima di accedere ai morsetti, tutti i circuiti di
alimentazione devono essere scollegati!
ATTENZIONE!
Se il cavo elettrico è danneggiato, deve
essere sostituito dal produttore o dal servizio
di assistenza al cliente del produttore o da
persona in possesso di pari qualifiche al fine
di evitare potenziali pericoli!
ATTENZIONE!
Per evitare il surriscaldamento, il
riscaldatore non deve coprire! Pericolo
di incendio!
ATTENZIONE!
Al fine di evitare un pericolo a causa
involontaria resettare la sicurezza, il
dispositivo potrebbe non essere un
dispositivo di commutazione esterno, come
ad esempio un timer o vengono fornite con
Essere circuito collegato che passa
regolarmente da un dispositivo on e off!
ATTENZIONE!
Non utilizzare questa stufa con un selettore di
programma, un timer, un sistema di
telecomando separato o qualsiasi altro
dispositivo che spegne automaticamente il
riscaldatore come un pericolo di incendio, se il
riscaldatore è coperto o posizionato in modo
errato!
Il dispositivo può essere solo come descritto nelle istruzioni di montaggio e d'uso, utilizzato!
• Collegare l'apparecchio solo a voltaggio in corrente
alternata sulla targhetta.
• L'apparecchio deve essere installato in conformità
con le vigenti norme di sicurezza da parte di un
elettricista qualificato.
• Il dispositivo può essere utilizzato solo per il riscaldamento in spazi ristretti.
• riparazioni e lavori su questo apparecchio devono
essere eseguite da un professionista. (Spegnere il
fusibile) ? si verifica un errore a parte, o quando un
dispositivo di arresto prolungato dalla rete.
• Nelle aree in cui vengono utilizzati materiali infiammabili (ad esempio, solventi, ecc), il riscaldatore
deve non essere utilizzato.
ATTENTION!
Dispositivo non vicino a tende, tendaggi e altri
materiali infiammabili attaccati!
Page 30

IT-30 RCE050_200_it · 04/15/A www.dimplex.de
RCE 050, RCE 100, RCE 150, RCE 200
Italiano
ATTENTION!
Nell’impianto elettrico a posa fissa occorre
inserire un dispositivo di sezionamento con
almeno 3 mm di apertura dei contatti su
ciascun polo (p.es. interruttore automatico).
ATTENZIONE!
L'apparecchio deve essere impiegato in modo
tale che gli elementi di comando non possano
essere toccati da una persona che si trovi
nella vasca da bagno o sotto la doccia!
ATTENZIONE!
L'apparecchio deve avere la messa a terra!
2 Funzioni di risparmio energetico
2.1 Doppio circuito - Elemento riscaldante
Il convettore a pannelli radianti Dimplex RCE dispone
di un elemento riscaldante a convezione e di un calorifero radiante. Questa combinazione permette di utilizzare esclusivamente il calorifero radiante in caso di differenza di temperatura ridotta, minimizzando così il
rischio di surriscaldamento del locale e risparmiando
quindi energia.
2.2 Funzione "Finestra aperta"
In caso una finestra o una porta vengano lasciate inavvertitamente aperte, i comandi riconoscono l'improvvisa variazione di temperatura e attivano la modalità
Standby. Quando poi la finestra o la porta vengono
chiuse, l'apparecchio torna all'esercizio standard. Questa funzione interrompe l'esercizio di riscaldamento per
impedire che il calore fuoriesca dalla stanza in maniera
incontrollata. In questo modo si risparmia denaro e si
minimizza il consumo di energia.
2.3 Funzione apprendimento
Questa funzione permette un'accensione preventiva
dell'apparecchio da riscaldamento, che assi cura il r aggiungimento della temperatura desiderata all'orario impostato nel programma.
Esempio: Avete impostato nel programma orario una
temperatura di 21°C alle ore 07:00 di mattina. L'apparecchio da riscaldamento rileva quindi, grazie alla sua
"esperienza", quanto tempo occorre per raggiungere la
temperatura desiderata all'orario stabilito.
HINWEIS
Quando è abilitato il riscaldamento progressivo (ES),
l'apparecchio si riscalda all'orario predefinito, per
assicurarsi che il locale abbia raggiunto puntualmente
la temperatura richiesta. Descrizione tecnica
dell'apparecchio.
3 Descrizione tecnica dell'apparecchio
4 Montaggio, installazione, distanze minime
L'apparecchio da riscaldamento a pannelli radianti è
previsto per il montaggio a parete attraverso il supporto
a parete in dotazione. Montare l'apparecchio esclusivamente in posizione verticale, come mostrato in Fig. 1 -
3.
Prestare attenzione agli oggetti infiammabili. Rispet-
tare in ogni caso le distanze minime. Dal lato anteriore
dell'apparecchio è necessario mantenere una distanza
minima di 500mm.
Tipo
Potenza
riscalda-
mento
radiante
Potenza
riscalda-
mento a
conve-
zione
Potenza
totale
RCE 050 200 W 300 W 500 W
RCE 100 300 W 700 W 1000 W
RCE 150 300 W 1200 W 1500 W
RCE 200 350 W 1650 W 2000 W
Tensione di collegamento 1/N/PE~230-240V, 50Hz
Regolatore di temperatura 7 - 32°C
Classe di protezione Collegamento conduttore
di protezione
Grado di protezione IP24
Fig.1
Page 31

www.dimplex.de RCE050_200_it · 04/15/A IT-31
RCE 050, RCE 100, RCE 150, RCE 200
Italiano
È consentito il montaggio su pareti in legno.
Tutti i modelli rispettano lo standard IP24 relativo alla
protezione da spruzzi d'acqua e possono essere utilizzati in stanze da bagno in zona di protezione 2.
La spina elettrica dell'apparecchio deve essere accessibile dopo il montaggio.
ATTENZIONE!
Utilizzare il supporto a parete originale in dotazione
nella parte posteriore dell'apparecchio!
• Rimuov ere il supporto a parete dalla parte posteriore dell'apparecchio premendo le linguette ai lati
(vedere Fig. 2)
• Eseguire i fori per il fissaggio. In questa fase, prestare attenzione alla possibile presenza di tubazioni o cavi elettrici nel muro.
• Avvitare il supporto a parete ben saldo al muro utilizzando le viti accluse.
• Agganciare l'apparecchio alle fessure inferiori del
supporto a parete.
• Sistemare l'apparecchio in posizione diritta e premerlo per bloccarlo nelle linguette fino a che queste
non scattano.
ATTENZIONE!
Si tenga presente che sigarette, candele o lampade a
olio accese in combinato con la convezione dei
riscaldamenti elettrici possono causare depositi di
fuliggine sulla parete e sulla superficie dell'
apparecchio. Non si tratta dunque di malfunzionamento dell'apparecchio stesso.
5 Allacciamento elettrico
Rispettare scrupolosamente le attuali norme in conformità a VDE 0100 parte 701 e i requisiti di installazione
pertinenti. Gli apparecchi da riscaldamento sono muniti
di una linea di allacciamento di tipo H05VV-F, 4 x 1,0
mm
2
priva di connettore.
Assegnazione dei conduttori del cavo di allacciamento
dell'apparecchio:
• Verde/Giallo: "PE" - Conduttore di protezione
• Blu: "N" - conduttore di tensione di neutro
• Marrone: "L" - conduttore di tensione di fase
• Nero: Filo pilota
ATTENZIONE!
Il filo pilota è senza funzione è deve essere isolato in
maniera professionale. Non mettere a terra il filo pilota!
La linea di allacciamento dell'apparecchio deve essere
collegata ad una presa idonea per apparecchi da riscaldamento. Nell'impianto elettrico a posa fissa occorre inserire un dispositivo di sezionamento, con almeno 3 mm di apertura dei contatti su ciascun polo
(p.es. interruttore automatico).
6 Protezione antisurriscaldamento
Per la vostra sicurezza, l'apparecchio è munito di una
protezione da surriscaldamento. In caso di int erruzioni
nella circolazione di aria, la protezione da surriscaldamento disattiva l'apparecchio. Dopo un sufficiente raffreddamento, l'apparecchio da riscaldamento si
accende di nuovo automaticamente. Se la protezione
da surriscaldamento si attiva di frequente, occorre individuarne la causa (p. es. griglia di ventilazione coperta). L'attivazione della protezione da surriscalda mento
viene indicata sul display da un segnale lampeggiante
rosso. Per resettare la visualizzazione, eliminare la
causa del surriscaldamento e premere il tasto ENTER
per 10 secondi.
Tipo Dimensioni A
(mm)
Dimensioni B
(mm)
RCE 050 513 225
RCE 100 675 387
RCE 150 756 468
RCE 200 918 630
Fig.2
Fig.3
Page 32

IT-32 RCE050_200_it · 04/15/A www.dimplex.de
RCE 050, RCE 100, RCE 150, RCE 200
Italiano
7 Comando
7.1 Elemento di comando
Gli elementi di comando si trovano sul lato superiore
destro dell'apparecchio. L'apparecchio è dotato di
un'unità di controllo elettronica regolabile, costituita da
un display e sei tasti touchscreen.
Inoltre, l'apparecchio da riscaldamento dispone di un
termostato ambiente regolabile per impostare la temperatura ambiente. La temperatura minima regolabile è
di 7 ° C.
La temperatura massima è impostata di default a 26 ° C;
può tuttavia essere aumentata a un massimo di 32 ° C.
Di norma la temperatura ambiente corrisponde a 21 ° C.
(1) Display
(2) Tasto Menu
(3) Tasto Back (Indietro)
(4) Tasto Su / Giù
(5) Tasto Enter (Conferma)
(6) Spia luminosa
(7) Tasto Advance (Avanzata)
7.2 Funzioni di gestione
I parametri dell'apparecchio possono essere regolati
con semplicità con l'ausilio dei sei tasti sull'interfaccia
utente del display.
Sul display vengono visualizzate le impostazioni disponibili.
1. Menu - mostra le funzioni principali:
Data / Ora - Impostazione data e ora.
Modalità d'esercizio - Programma orario, scelta
manuale della temperatura, risparmio, protezione
antigelo, spento.
Opzioni - Ora legale, blocco automatico, informa-
zioni di servizio, unità di misura della
temperatura, notifica audio (tasti)
2. Tasto Back (Indietro): Ritorna al punto del programma precedente
3. Tasti Su e Giù:
Per navigare attraverso il menu e per modificare i
valori impostati.
Vengono inoltre impiegati per regolare la temperatura ambiente desiderata.
Il colore dello schermo cambia in base alla temperatura selezionata, da blu a rosso.
4. Tasto ENTER: Per confermare le impostazioni.
Premendo il tasto di invio viene mostrata la funzione abilitata al momento.
5. Modalità Comfort accesa: I periodi di tempo in
cui l'apparecchio riscalda progressivamente fino
alla temperatura di comfort impostata. Le informazioni relative vengono mostrate nella sezione inferiore del display.
6. Modalità Comfort spenta: I periodi di tempo in cui
l'apparecchio da riscaldamento non viene acceso.
La modalità d'esercizio impostata viene mostrata
nella sezione inferiore del display.
7. Tasto ADVANCE (Avanzata): Sovrascrive le impo-
stazioni di riscaldamento e modifica lo stato
d'esercizio dell'apparecchio.
Se è stata attivata la modalità Timer, premendo il tasto
ADVANCE si modifica la modalità d'esercizio.
Per esempio, si può passare da " Modalità Comfort
spenta" a "Modalità Comfort accesa" e viceversa.
Il tasto ADVANCE viene inoltre usato per abilitare la
modalità Boost, che eroga calore da una a quattro ore.
7.3 Schermata principale
Se per 30 secondi non avviene alcuna immissione, l'indicatore torna alla schermata principale. Qui vengono
mostrate la temperatura scelta e la modalità d'esercizio, come anche l'utilizzo della funzione Advance.
Le funzioni attive vengono visualizzate premendo il
tasto ENTER.
Se non avvengono modifiche per lungo tempo, la
schermata passa alla "Modalità Sleep" e il display si
spegne.
Per attivare il display premere un tasto qualsiasi.
.
REFERENCE
Se non viene premuto nessun tasto, l'indicatore, dopo
30 secondi, torna al menu principale. Le funzioni che
sono state attivate vengono mostrate premendo il tasto
ENTER.
Page 33

www.dimplex.de RCE050_200_it · 04/15/A IT-33
RCE 050, RCE 100, RCE 150, RCE 200
Italiano
7.4 Start-up iniziale
Drante la messa il riscaldatore sul display viene visualizzata la schermata di avvio. Qui è possibile impostare
la lingua, la data, l'ora, il fuso orario, blocco tasti, i toni
della tastiera e l'unità della temperatura. Questi valori
possono essere modificati dopo di nuovo.
Vedere il relativo capitolo del manuale.
7.5 Impostazione Data / Ora
Il comando dispone di un orologio in tempo reale con
funzione calendario. L'orologio è dotato di una batteria
di back-up (tipo CR2032, 3V) che eroga l'alim entazione
in caso di interruzioni di rete.
Regolazione di ora e data:
Premere il tasto Menu. Scegliere Data / Ora e premere
il tasto ENTER.
Premere i tasti e per impostare il giorno del
mese corretto e poi premere ENTER.
Ripetere questo procedimento fino a che data e ora
non siano impostate del tutto e premere poi il tasto
ENTER per salvare. Premere il tasto BACK quando
viene mostrato e tornare alla schermata principale.
8 Modalità d'esercizio
Il convettore a pannelli radianti è in grado di mantenere
una temperatura ambiente costante con le seguenti
modalità d'esercizio:
8.1 Modalità Manuale riscalda l'ambiente a una p iacevole temperatura di 21 ° C.
8.2 Modalità Eco (risparmio energetico) mantiene una
temperatura ambiente di 18 ° C. Con un'esigua riduzione della temperatura ambiente si può ottenere un notevole risparmio energetico. La mo dalità
Eco è segnalata sul display dal colore verde.
8.3 Modalità Antigelo mantiene una temperatura ambiente di 7 ° C. La protezione antigelo viene segnalata dall'indicatore blu.
8.4 Spento scegliere la m odalità d'esercizio "Spento"
per disattivare l'apparecchio. Selezionare questa
modalità quando il riscaldamento non sarà necessario per un periodo di tempo prolungato.
Premere uno dei tasti per attivare la visualizzazione e
scegliere la modalità d'esercizio desiderata.
REFERENCE
Per tutte le modalità d'esercizio è possibile modificare
il valore della temperatura amb iente agendo sui tasti
+ . Con la modalità Timer questa modifica è solo
temporanea e l'apparecchio torna poi al programma
preimpostato.
8.5 Modalità Timer
ATTENZIONE!
È consigliabile utilizzare la funzione Timer per ridurre i
costi di gestione. L'impiego dell'apparecchio in
esercizio di riscaldamento permanente può comportare costi di gestione elevati.
L'apparecchio è programmato con una serie di profili di
riscaldamento predefiniti. Sono disponibili quattro opzioni, tre già programmate più un programma orario
definibile dall'utente:
1. Fuori casa per tutto il giorno - (predefinito) - sono di-
sponibili i seguenti orari di riscaldamento già impostati:
dal lunedì alla domenica, dalle ore 07:00 alle 08:30
e dalle 17:30 alle 22:00; può essere modificat o in
base alle esigenze.
2. A casa per tutto il giorno - (predefinito) - sono dispo-
nibili i seguenti orari già impostati:
dal lunedì alla domenica, dalle ore 08:00 alle 21:00;
può essere modificato in base alle esigenze.
3. Vacanza - (predefinito per 7 giorni con protezione
antigelo a 10 ° C) - Numero di giorni d i vacanza pr ogrammabili: da 1 a 300
4. Timer utente - offre un'elevata flessibilità d'impiego.
Sono disponibili quattro blocchi orari per giorno, che
Page 34

IT-34 RCE050_200_it · 04/15/A www.dimplex.de
RCE 050, RCE 100, RCE 150, RCE 200
Italiano
possono essere adattati individualmente per ogni
giorno della settimana.
Per selezionare la modalità Timer, premere il tasto
MENU, scegliere poi con il tasto la modalità d'eser-
cizio e premere il tasto ENTER.
Scegliere l'esercizio Timer premendo il tasto ENTER.
Scegliere la modalità desiderata con il tasto
oppure e confermare con ENTER.
Per le opzioni "Fuori casa per tutto il giorno", "A casa
per tutto il giorno" e "Timer utente" sono disponibili tre
possibilità di scelta: "Seleziona", "Anteprima" e "Modifica".
• Seleziona - Per scegliere la modalità Timer
• Anteprima - Per visualizzare gli intervalli di tempo
impostati al momento
• Modifica - Per cambiare gli intervalli di tempo impostati al momento.
Se si sceglie "Modifica", le singole opzioni vengono selezionate, o eventualmente modificate, con i tasti o
e poi confermate con il tasto ENTER.
Alla fine di ogni periodo scegliere "Successivo" per
passare a quello seguente.
Quando si è concluso con le impostazioni per ogni
giorno, premere il tasto ENTER per salvare la pr ogrammazione.
Al termine della pianificazione relativa al primo giorno,
è possibile adottare le stesse impostazioni per il giorno
successivo o per tutti i giorni della settimana.
Ogni giorno può essere modificato individualmente e
poi salvato, oppure è possibile usare i comandi "Annulla" o "Annulla tutto".
Sono disponibili le seguenti opzioni:
Per scegliere una modalità d'esercizio con timer, scegliere "Seleziona" e premere il tasto ENTER.
Salva
Salva gli orari di attività per ogni
giorno
Copia il successivo
Copia gli orari di attività al giorno
successivo
Copia tutto
Copia gli orari di attività a tutti i
sette giorni
Annulla
Imposta tutti gli orari a 00:00 per il
relativo giorno
Annulla tutto
Imposta tutti gli orari a 00:00 per
tutti i sette giorni
Page 35

www.dimplex.de RCE050_200_it · 04/15/A IT-35
RCE 050, RCE 100, RCE 150, RCE 200
Italiano
8.6 Vacanza
Con la modalità Vacanza viene impostato il numero di
giorni in cui il locale non verrà usato, insieme alla temperatura ambiente desiderata.
Premere i tasti e per selezionare il numero
dei giorni di assenza, tra 1 e 300. Poi premere il tasto
ENTER.
Premere e per scegliere la temperatura desiderata da mantenere nel periodo relativo e premere il
tasto ENTER. Alla scadenza del periodo di vacanza
impostato, il comando torna al programma scelto in
precedenza.
9 Advance - Avanzata
La funzione Advance permette la modifica temporanea
del profilo orario. Se è stato selezionato un programma
orario, la funzione Avanzata anticipa al momento attuale il profilo orario impostato come successivo.
10 Indicazione oraria per modalità Comfort
Il tasto ADVANCE viene anche usato per stabilire la
temperatura di gradimento d a mantenere per una durata di tempo fissa (1-4 ore).
Premere il tasto ADVANCE due volte, per programmare un aumento di un'ora.
Per impostazioni orarie più lunghe, premere il tasto
ADVANCE più volte.
11 Opzioni
Attraverso il menu Opzioni è possibile adattare le impostazioni di menu alle esigenze dell'utente.
• Regolazione ora legale - Impostazione ora legale /
ora solare
• Blocco automatico - Per la sicurezza dei bambini.
Questa funzione blocca i tasti. Per sbloccare l'apparecchio tenere premuto il tasto ENTER per due
secondi.
• Audio - Permette di abilitare o disabilitare una notifica sonora (tasti)
• Informazioni di servizio - Mostra informazioni relative al servizio
• Unità di misura della temperatura - Permette di
scegliere l'unità di misura della temperatura tra
gradi Celsius o Fahrenheit.
Page 36

IT-36 RCE050_200_it · 04/15/A www.dimplex.de
RCE 050, RCE 100, RCE 150, RCE 200
Italiano
12 Attivare / disattivare blocco automatico
Per bloccare i comandi, premere il tasto BACK e il tasto
ENTER per tre secondi. Le informazioni relative al
blocco automatico vengono mostrate sul margine inferiore del display. Per sbloccare i comandi, ripetere
l'operazione e premere il tasto BACK e il tasto ENTER
per tre secondi.
REFERENCE
Non è possibile regolare i comandi quando il blocco
automatico è attivo.
13 Funzioni aggiuntive
REFERENCE
Finestra aperta - Il riconoscimento è abilitato di default.
MODALITÀ ANTICIPATORIA - di default è disabilitata.
Per mostrare il menu Informazioni utente, tenere premuto il tasto ENTER per cinque secondi.
• Intervallo del valore di regolazione (valore nominale) - Permette di determinare la temperatura
massima regolabile.
• "Finestra aperta" - Riconoscimento (OW). Con
l'abilitazione di questa funzione, la temperatura
ambiente, in caso di finestre aperte, viene ridotta
per limitare il dispendio di energia.
• Modalità anticipatoria (ES) - Quando è abilitato il
riscaldamento progressivo (ES), l'apparecchio si riscalda all'orario predefinito, per assicurarsi che il
locale abbia raggiunto puntualmente la temperatura richiesta.
• Esempio: Viene preimpostata attraverso il menu
del timer una temperatura ambiente nominale di
21°C per le ore 07:00. Con la modalità anticipatoria
(ES) il comando accende l'apparecchio da riscaldamento già prima delle ore 07:00, affinché la temperatura desiderata di 21°C venga raggiunta
all'orario scelto, appunto le 07:00.
Glen Dimplex Deutschland GmbH
Am Goldenen Feld 18
D-95326 Kulmbach
Con riserva di modifiche tecniche
• Ripristino impostazioni di fabbrica - Questa funzione ripristina tutte le impostazioni su cui siete intervenuti a quelle di fabbrica.
14 Pulizia
ATTENZIONE!
Prima di eseguire la pulizia, scollegare l'apparecchio
dalla rete.
Prima dell'inizio della pulizia, scollegare l'apparecchio
dall'alimentazione di corrente e lasciarlo raffreddare.
Pulirlo esternamente con un panno morbido e inumidito. Infine, asciugare strofinando.
Non usare saponi in polvere abrasivi o lucidanti per
mobili, poiché potrebbero danneggiare la superficie.
Per facilitare la pulitura della parte posteriore, l'apparecchio può essere rivoltato in avanti, come mostrato
nelle indicazioni del capitolo 4, Fig.3.
15 Garanzia
Questo apparecchio è garantito due anni secondo le
nostre condizioni di garanzia.
16 Smaltimento
L'imballaggio e i suoi componenti devono
essere smaltiti in conformità alle norme del
paese in cui l'apparecchio è stato installato.
L'apparecchio non deve essere smaltito nei
rifiuti domestici, ma deve essere depositato
presso un centro di smaltimento.
Telefono: +49 9221 709 564
Fax: +49 9221 709 589
E-Mail: 09221709589@dimplex.de
www.dimplex.de/it
 Loading...