

Page 1
Convector Heater
PLX Series
IMPORTANT INSTRUCTIONS
Please read carefully all the information provided in these
instructions. Keep the instructions in a safe place and if
necessary give them to any future owner.
1. The device may only be installed by an authorized and
qualied technician.
2. The unit may only be used for space heating in enclosed
rooms.
3. Any examination of the heater or repair work may only be
carried out by a qualied electrician.
4. Disconnect the heater from the power supply if it is faulty
or is not used for a long time. Disconnect or shut off the
power at the breaker.
5. Do not cover the heater in any way (risk of re).
6. Outer surfaces become hot when heater is switched on.
7. The heater must not be operated by children or other
persons not capable of using the appliance in a safe
manner. Children must be prevented from playing with the
appliance.
8. Do not insert any objects into the openings.
9. Do not use the heater in rooms containing ammable
materials (e.g. solvents, etc.).
10. If the heater is switched on automatically, there is a danger
of re if it has been in any way covered or blocked.
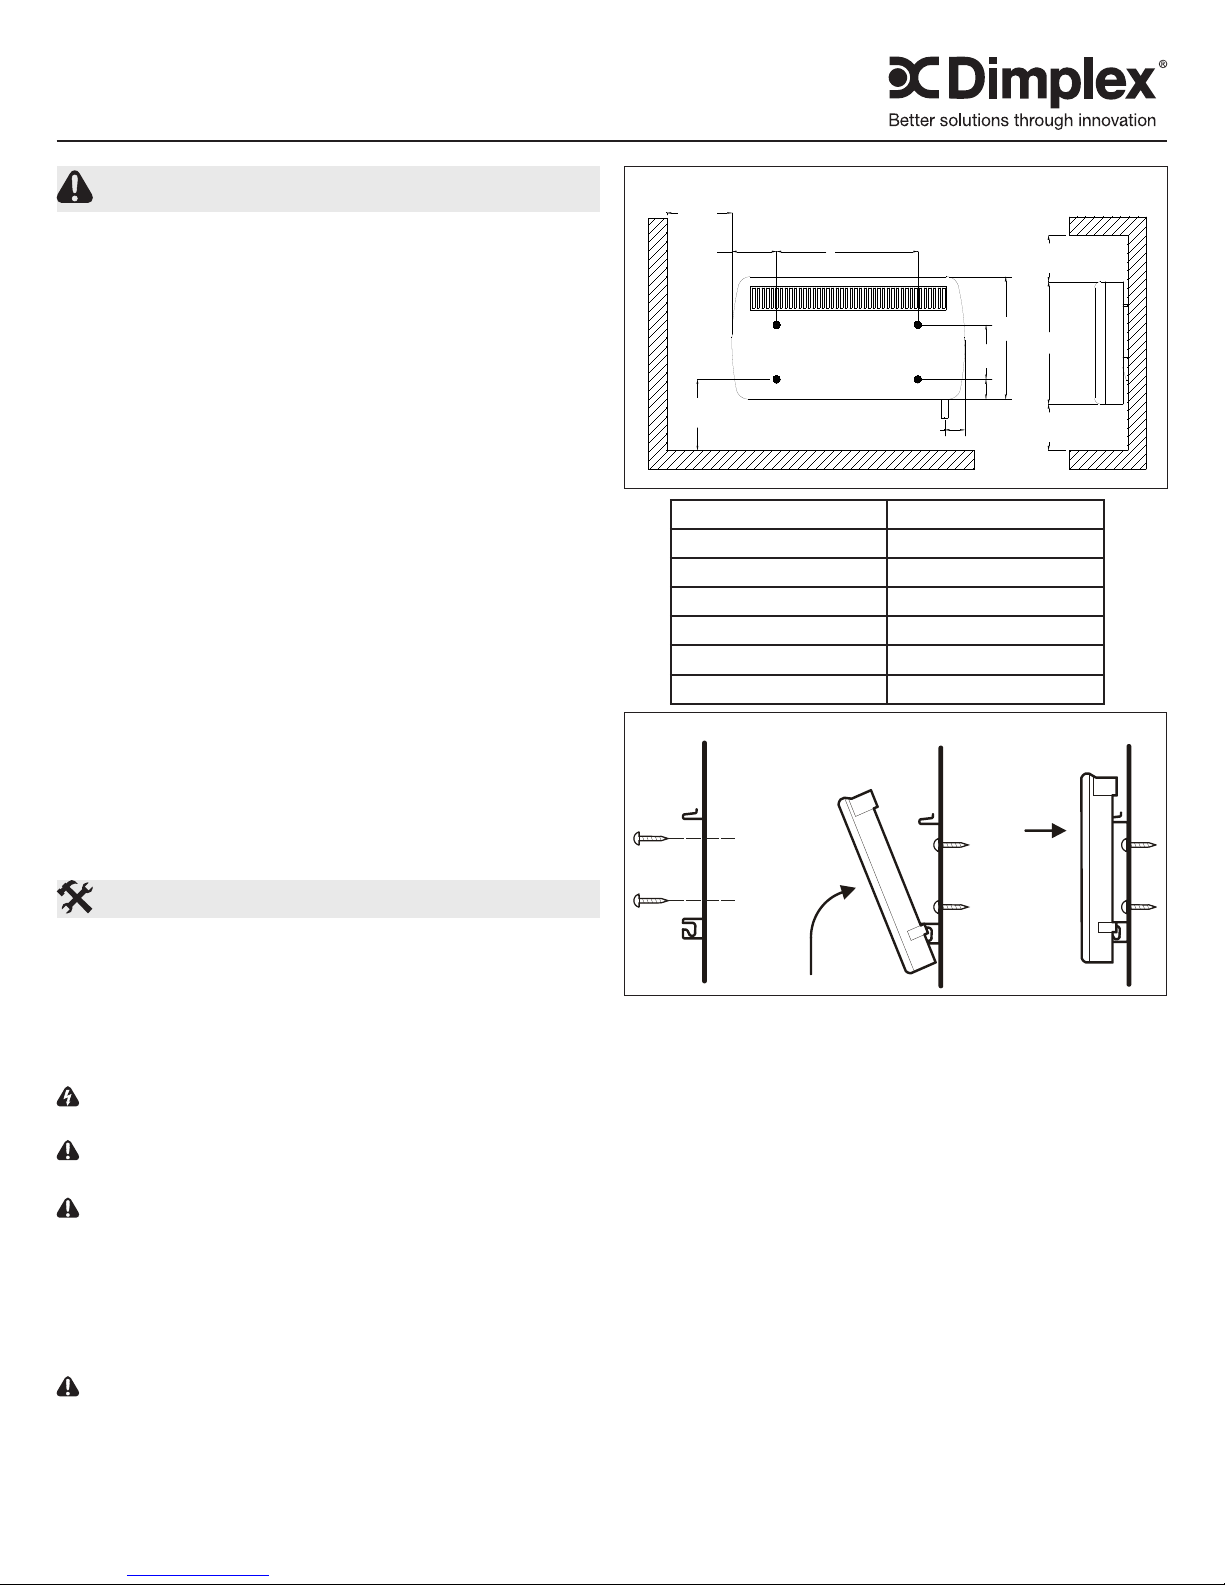
Figure 1
(150 mm)
(118 mm)
(255 mm)
Figure 2
5.9"
MIN
4.6"
10"
MIN
A
2.5"
(64 mm)
MODEL A
PLX050NN 117 mm / 4.6"
PLX075NN 287 mm / 11.3"
PLX100NN 287 mm / 11.3”
PLX125NN 355 mm / 14.0"
PLX150NN 355 mm / 14.0”
PLX200NN 527 mm / 20.7"
(430 mm)
7.25"
(184mm)
4.1"
(105 mm)
16.9"
5.9"
(150 mm)
MIN
16.9"
(430 mm)
5.9"
(150 mm)
MIN
SAVE THESE INSTRUCTIONS
Installation Instructions
Positioning, Installation, Minimum Clearances
When installed, the heater must be aligned horizontally on
a vertical wall, as shown in the illustration. (Figure 1) The
minimum clearances shown must be complied with. In addition,
a minimum distance of at least 508 mm / 20” must be maintained
in front of the heater.
WARNING: Do not install the heater where the controls can
be reached by a person bathing or showering.
CAUTION:The heater must not be located directly beneath
a wall socket outlet.
CAUTION: Do not place near ammable objects.
Ensure that air can enter and leave the heater freely, at the
inlets below and the outlets above.
The recess box must be accessible for inspection after the
appliance has been mounted.
Wall Mounting
CAUTION: The original wall brackets supplied attached to
the rear of the unit must be used.
1. Drill mounting holes for the wall brackets. See Figure 1 for
mounting hole locations.
2. Screw the brackets securely to the wall.
3. Hang the heater from the wall brackets using the slits in its
rear wall. (Figure 2)
4. Secure the heater at the top on the wall brackets.
Electrical Connection
All wiring must comply with National Electrical codes and local
codes and utility requirements. This installation should be
entrusted to duly qualied personnel where required by law.
Connect the supply wire into a properly rated recess box.
Consult your local electrical code for applicable wire gauge.
Connect L1 from the power supply to the L1 wire from the unit,
connect the L2 wire from the power supply to the L2 wire from
the unit, and connect the ground to the G wire from the unit.
Anti-Overheat
The heater is protected with a safety device to prevent
overheating. Should the heater overheat due to impeded air
circulation the automatic cutout will turn the heater off. The
heater will reactivate once the heater has cooled.
Keep the air inlets and outlets free of dust to ensure that
7207930100R05
INUPCN240V
Page 2
maximum heat output is available. Before the start of the heating
season, vacuum-clean the heater to remove any dirt or dust.
Possible Faults
If the heater does not give out any warmth, check that the
thermostat is set to the correct temperature. Then check the
fuse or circuit breaker.
If the cause of the fault cannot be identied, contact the nearest
after-sales service center.
You must state the unit model number, as indicated on the
type plate (wiring compartment cover). Any examination of the
heater or repair work may only be carried out by a qualied
electrician or after-sales service technician.
Maintenance
Cleaning
Before cleaning, ensure that the heater is disconnected from the
power supply and that it has cooled down. The outer surface can
be wiped with a soft damp cloth. Do not use scouring powder
or furniture polish, as these can damage the surface.
Dust that collects within the unit can be removed from the
outside using a vacuum cleaner.
Warranty
The Manufacturer warrants the convector heater and components of the enclosed
product against any defect in material or workmanship for a period of two years from
the date of purchase, with the exception of the elements which are warranted to be
free from defect in material and workmanship for ten years. In full satisfaction of any
claims under this Warranty the Manufacturer will repair or replace without charge,
in its factory or in the eld as it alone may decide, any parts which in its opinion are
defective.
The Manufacturer shall not be responsible for any transportation or shipping costs in
relation to such repair or replacement except as specically assumed by it. Misuse
of this product or repairs by persons other than the Manufacturer’s authorized
personnel without the Manufacturer’s written approval, will void this Warranty.
This Warranty is in lieu of all other warranties or conditions whether expressed or
implied including but not limited to those of merchantability or tness for purpose
and shall constitute the sole remedy of the Purchaser and the sole liability of the
Manufacturer in respect of the sale of the product, whether in the nature of breach or
breach of fundamental term, or of negligence or otherwise.
The Manufacturer shall not be liable for any special, indirect or consequential
damages or for any damages resulting from removal or replacement of a convector
heater subject to warranty claim without the Manufacturer’s authorization.
This Warranty is transferable by the original consumer purchaser of the product. Any
claims under this Warranty must be submitted in writing to the Service Manager,
Dimplex North America Ltd., 1367 Industrial Rd., Cambridge, Ontario N1R 7G8,
Canada.
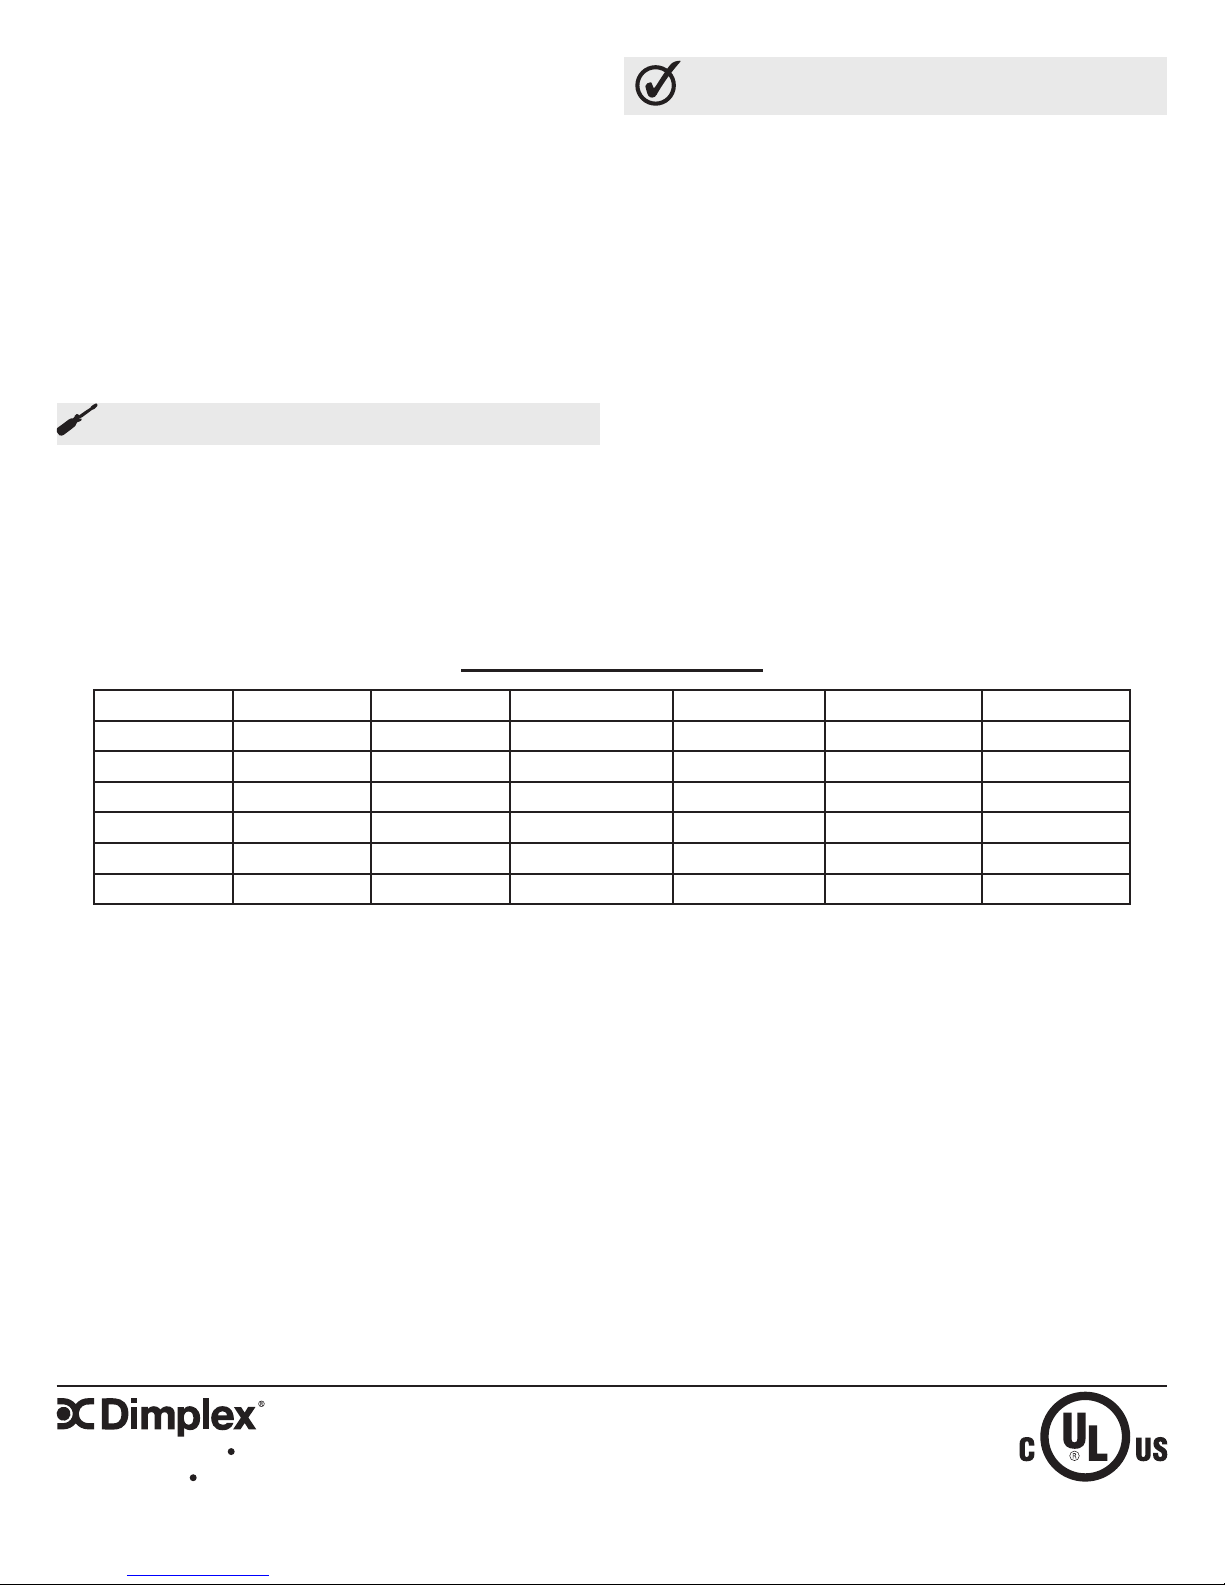
Model Key Information
MODEL VOLTAGE OUTPUT WEIGHT WIDTH HEIGHT DEPTH
PLX050NN 240/208 500/375W 4.8 kg/10.6 lbs 450 mm/17.7” 430 mm/16.9” 108 mm/4.3”
PLX075NN 240/208 750/562W 6.2 kg/13.6 lbs 620 mm/24.4” 430 mm/16.9” 108 mm/4.3”
PLX100NN 240/208 1000/750W 6.2 kg/13.6 lbs 620 mm/24.4” 430 mm/16.9” 108 mm/4.3”
PLX125NN 240/208 1250/938W 6.6 kg/14.5 lbs 690 mm/27.1” 430 mm/16.9” 108 mm/4.3”
PLX150NN 240/208 1500/1125W 6.6 kg/14.5 lbs 690 mm/27.1” 430 mm/16.9” 108 mm/4.3”
PLX200NN 240/208 2000/1500W 8.0 kg/17.6 lbs 860 mm/33.9” 430 mm/16.9” 108 mm/4.3”
1367 Industrial Road Cambridge ON Canada N1R 7G8
1-888-346-7539 www.dimplex.com
In keeping with our policy of continuous product improvement, we reserve the right to make changes without notice.
© 2015 Dimplex North America Limited
 Loading...