

Page 1
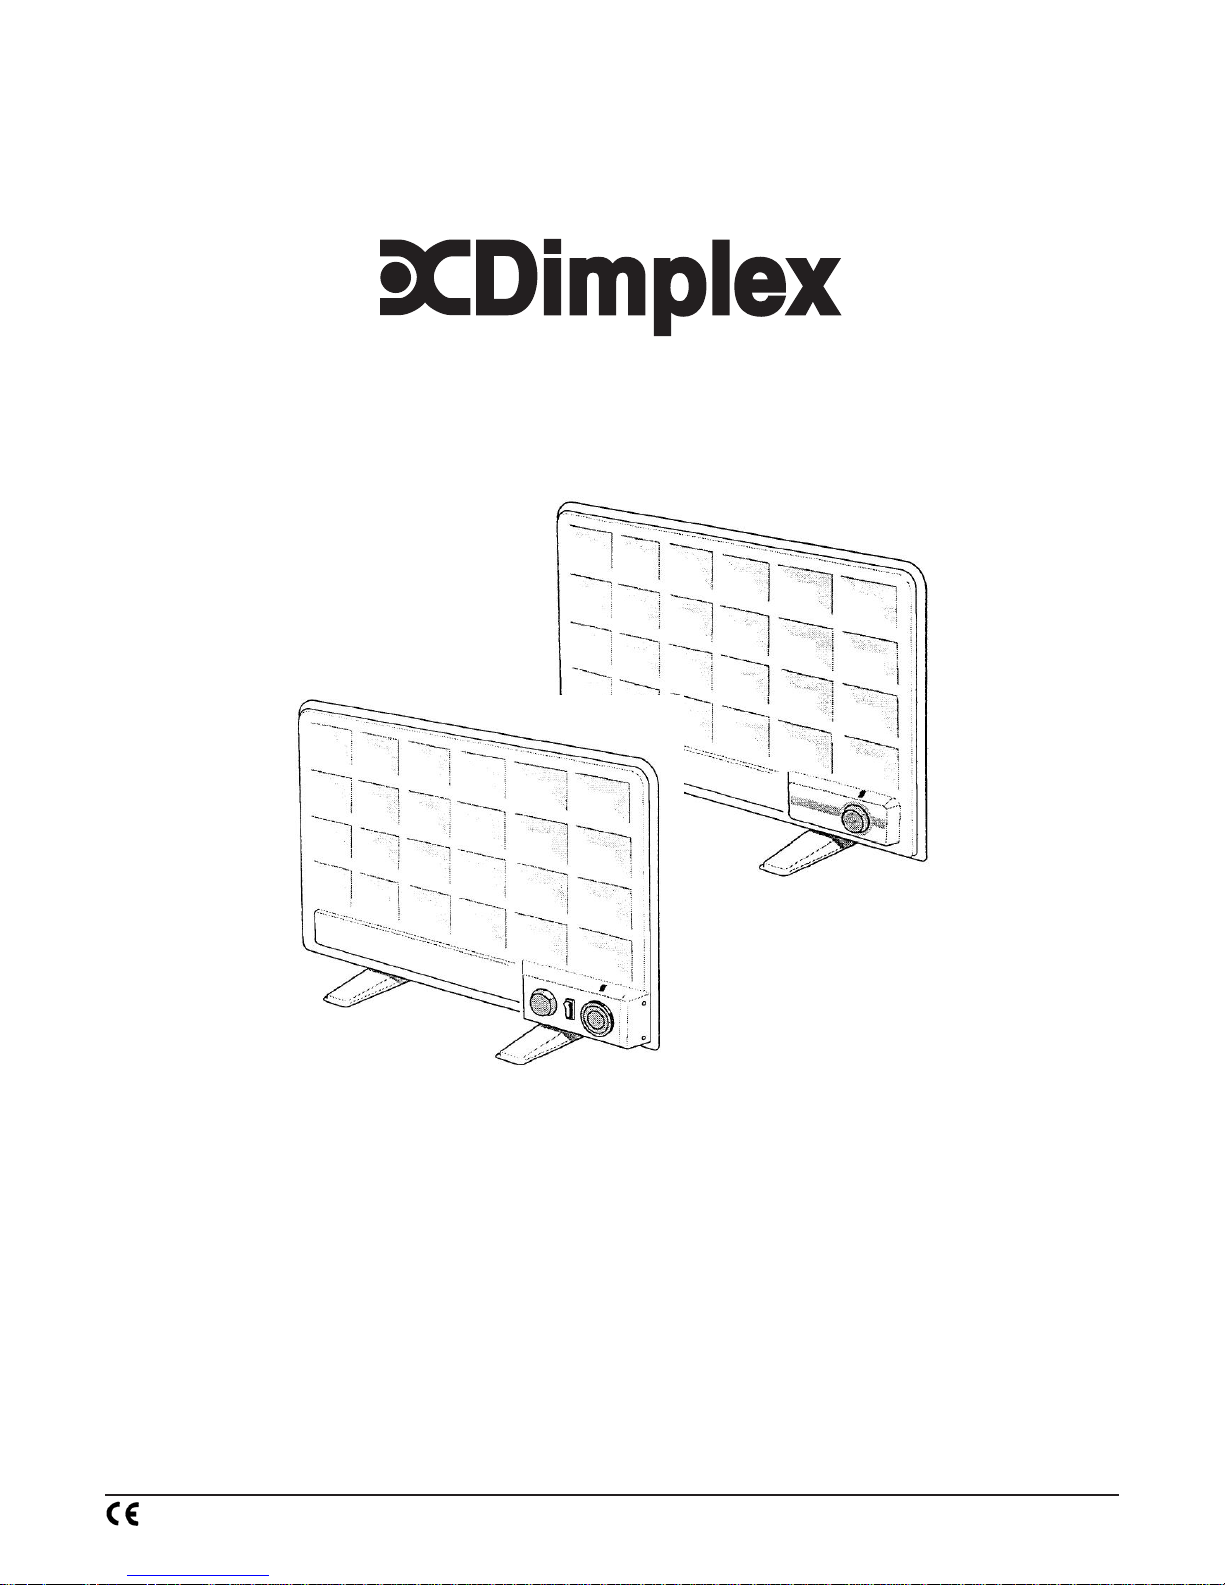
Oil filled Radiators - Models : OFX075/100/150 & OFX075TI/100TI/150TI
INDXUKSDTI Issue 9
The product complies with the European Safety Standards EN60335-2-30 and the European Standard Electromagnetic Compatibility (EMC) EN55014, EN60555-2 and
EN60555-3 which cover the essential requirements of EEC Directives 73/23 and 89/336
OFX 075TI
OFX 075
Page 2
1
2
17
18
19
20
21
22
23
24
8
6
7
9
0
1
2
3
4
5
A
C
B
D
1
2
3
4
5
6
7
8
9
1
0
1
1
1
2
13
1
4
1
7
16
17
18
19
20
21
2
2
2
3
2
4
8
6
7
9
0
1
2
3
4
5
A
B
100mm MIN.
FLOOR
‘D’ mm
FIXING CENTRES
HORIZONTAL LINE
70
35
MIN.
40
MIN.
shelf
A
B
C
Models Watts A B C D
OFX075/OFX075TI 0.75kw 741 500 230 393
OFX100/OFX100TI 1.0kw 85 4 586 230 5 06
OFX150/OFX150TI 1.5kw 1084 670 230 736
Dimensions
(millimetres)
87
10
9
1
5
6
2
4
3
Floor Mtd. Wall Mtd.
OFX075/100/150 OFX075TI/100TI/150TI
1
2
3
4
5
6
7
8
9
10
11
12
13
14
17
16
17
18
19
20
21
2
2
23
24
4.00pm - 9.30pm
7.00am - 9.00am
Page 3

IMPORTANT SAFETY ADVICE
DO NOT USE UNTIL THE FEET ARE FITTED CORRECTL Y .
WARNING - DO NOT USE THIS HEA TER IN THE IMMEDIA TE
SURROUNDINGS OF A BATH, A SHOWER OR A SWIMMING
POOL.
THE HEATER CARRIES A WARNING ‘DO NOT COVER’ T O
ALERT THE USER TO THE RISK OF FIRE THA T EXISTS IF THE
HEATER IS ACCIDENTALL Y COVERED.
DO NOT COVER THE RADIATOR or place material or
garments on it, or obstruct the air circulation around the
heater, for example with curtains or furniture, as this could
cause overheating and a fire risk.
This radiator complies with stringent safety standards but
to ensure efficient operation SURFACES OF THE RADIA TOR
WILL BECOME HOT AND CONTACT WITH THESE AREAS
SHOULD BE A VOIDED.
If young children, the aged or infirm are likely to be left in
the vicinity of the heater, we advise that adequate
precautions should be taken. We recommend that a guard
be fitted to ensure contact with the heater is avoided and
objects cannot be inserted into the product. For further
information, please contact our guard supplier direct on
Tel. No. 01603 667957, or in case of difficulty or for further
advice contact the Customer Helpline.
DO NOT use the heater if it has been dropped or damaged,
contact our Customer Helpline for further advice.
DO NOT use the heater if it develops an oil leak. Unplug the
heater and contact your supplier or our Customer Helpline.
If the heater is tipped over, unplug it and allow it to cool
before standing it back upright.
DO ENSURE that the mains lead cannot be tripped over.
DO NOT operate the heater with the mains lead overhanging
the heated surfaces.
Warning : In order to avoid a hazard due to inadvertent
resetting of the thermal cutout, this appliance must not be
supplied through an external switching device, such as a
timer, or connected to a circuit that is regularly switched
on and off by the utility.
If the supply cord is damaged it must be replaced by the
manufacturer or service agent or a similarly qualified
person in order to avoid a hazard.
Electrical connection
WARNING – THIS APPLIANCE MUST BE EARTHED
This heater must be used on an AC ~ supply only and the voltage
marked on the heater must correspond to the supply voltage.
This heater is fitted with a rewirable plug incorporating a 13 amp
fuse. In the event of replacing the fuse in the plug supplied, a 13
amp fuse approved by ASTA to BS 1362 must be used. If any
other type of plug is used, a 15 amp fuse must be fitted in the
plug, the adaptor, or at the distribution board.
IMPORTANT : If the plug is not suitable for your socket, the 13
amp plug should be removed.
Before wiring the appropriate plug, please note that the wires in
this mains lead are coloured in accordance with the following
code :
GREEN AND YELLOW : EARTH
BLUE : NEUTRAL
BROWN : LIVE
Connect the GREEN AND YELLOW wire to the terminal marked
‘E’ or by the earth symbol
, or coloured GREEN or GREEN
AND YELLOW.
Connect the BROWN wire to the terminal marked ‘L’ or coloured
RED.
Connect the BLUE wire to the terminal marked ‘N’ or coloured
BLACK.
IMPORT ANT : THESE INSTRUCTIONS SHOULD BE READ CAREFULLY AND RET AINED FOR FUTURE REFERENCE
Preparation for Use
The heater may be used free standing on feet or wall mounted
on brackets. The necessary feet, screws and wall brackets are
provided. The heater should only be operated when in the upright
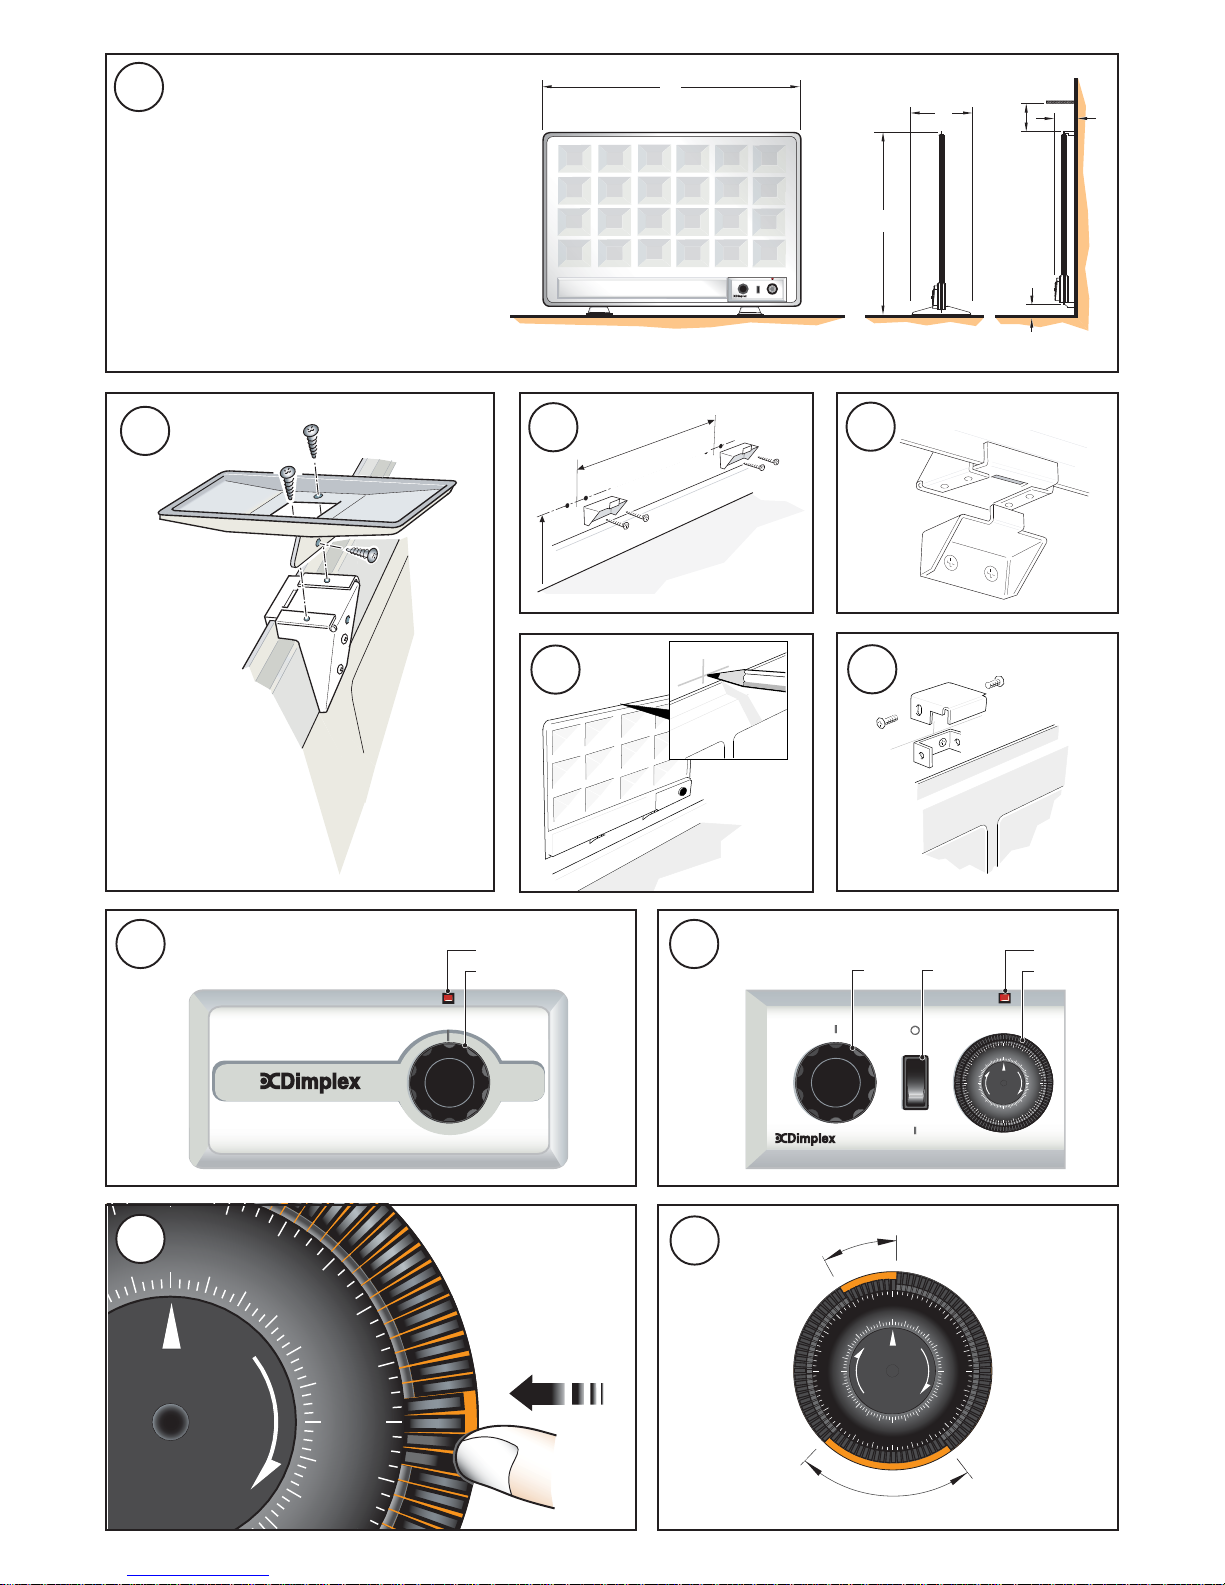
position as shown in Fig. 1.
WARNING - THIS HEA TER MUST ONL Y BE USED IN THE UPRIGHT
POSITION.
THIS RADIAT OR MUST NOT BE LOCATED IMMEDIA TEL Y BELOW
A FIXED SOCKET OUTLET .
Free standing on feet
Never use the radiator free standing without the feet fitted.
Lay the radiator on its front and offer each foot up to its mounting
bracket, as shown in Fig. 2. Fix each foot using the three screws
provided and tighten them fully.
Stand the radiator on its feet and place it in position ready for
use.
Ensure that there is at least 35mm of clear space around the
radiator and at least 40mm between the radiator and any
overhanging shelf.
Permanent wall mounting
THE RADIAT OR MUST ONL Y BE W ALL MOUNTED USING THE
KIT SUPPLIED.
Select a suitable position on a wall near to a mains power outlet.
The radiator should not be mounted closer than 35mm from the
floor (to enable cleaning), or adjacent side walls, or any
overhanging shelf. It should not be mounted closer than 1m
from the ceiling.
Step 1
Check that you have all the neccessary components :
a) 2 x Bottom Wall Brackets
b) 1 x Top Wall Bracket
c) 1 x Radiator Securing Bracket
d) 6 x Wood Screws
e) 6 x Wall Plugs
f) 2 x Screws 2BA
Step2
Using a straight edge, draw a horizontal line for the bottom
brackets at the required mounting height from the floor. On this
line mark off the fixing centres - see ‘D’ in Fig. 1. Place the bottom
brackets centrally over these centres and mark the hole positions
- see Fig. 3.
Step3
Drill the holes and fit the wall plugs.
Step 4
Screw the bottom brackets in position - see Fig. 3.
Step 5
Position the radiator on the bottom brackets, locating it on the
raised tags - see Fig. 4.
Step 6
Allow the radiator to lie against the wall. Mark the wall along the
centre top edge of the radiator over approximately 50mm and
mark the centre - see Fig. 5.
Step 7
Align the top edge of the top wall bracket to this line on the centre
line of the radiator and mark the hole centres.
Step 8
Drill the holes and fit the wall plugs.
Step 9
Screw the top wall bracket in position.
Step 10
Clip the radiator securing bracket to the top of the radiator and fix
to the wall bracket using the two 2BA screws provided - see Fig.
6.
Page 4
Using the radiator
THE HEATER CARRIES A W ARNING ‘DO NOT COVER’ TO ALERT
THE USER TO THE RISK OF FIRE THA T EXISTS IF THE HEATER IS
ACCIDENTALL Y COVERED.
Operation
When you have completed the installation, plug in and switch on
the mains supply.
The mains neon indicator light will glow showing that power is
available - see ‘A’ in Fig. 7 and Fig. 8.
When the radiator is not in use, switch off the power supply and
pull the plug out from the socket.
Thermostat (see ‘B’ in Fig. 7 & 8)
The thermostat controls the heat output according to the room
temperature.
This ensures that the heater will not produce heat unnecessarily
when the room is warm.
To set the temperature you require, turn the thermostat knob
clockwise until the desired temperature is reached. Alternatively
to heat a cold room quickly, turn the thermostat knob up fully.
When the room has reached the desired temperature, turn the
thermostat knob anti-clockwise until the thermostat just clicks
off.
The heater will now automatically operate at this temperature.
Timer Operation (see ‘C’ in Fig. 8)
(OFX075TI/100TI/150TI Models)
Switch the heater on by putting switch ‘D’ (see Fig. 8) to position
‘
’. The mains neon indicator ‘A’ (see Fig. 8) will glow showing
that power is available.
Setting the time of day
To set the time of day, rotate the timer dial clockwise (indicated
by the arrow) until the correct time of day is opposite the reference
mark
(see Fig. 9). The 24-hour clock is used ; e.g. time shown
for 4 pm is ‘16’ (16:00hrs).
Setting the ON and OFF times
To set the timer :
1. Using your finger tip or the tip of a pencil, push in as many
segments as necessary around the dial, according to the
times you require heat – see Fig. 9. Each segment pushed in
switches the heater ON for that part of the hour. All other
segments will be OFF. For example, Fig. 10 shows the timer
set to switch the heater ON between 7.00am and 9.00pm and
between 4.00pm and 9.30pm.
2. Y ou can select as many ON periods as you like, within the 24hour day. The settings will repeat every day until changed.
3. To change ON and OFF times, simply pull out any ‘ON’
segments you wish to cancel and push in new ‘ON’ segments
as required.
Please note that the appliance must be connected to the mains
supply (neon indicator ‘A’ On) for the timer to continue running. If
switched Off it will be neccessary to reset the time of day when
next used.
IMPORT ANT NOTES
Remember to observe all safety warnings when operating the
heater on auto setting unattended or attended .
If the mains supply to the heater is interrupted, the timer clock
will stop until power is restored ; reset the time of day to ensure
correct ON and OFF times.
Safety – Overheat Protection - all models
For your safety, this appliance is fitted with a thermal cut-out. In
the event that the product overheats, the cut-out switches the
heater off automatically. To bring the heater back into operation,
remove the cause of the overheating, then unplug or turn off the
electrical supply to the heater for a few minutes. When the heater
has cooled sufficiently, re-connect and switch on the heater.
Cleaning
WARNING – ALW A YS DISCONNECT FROM THE POWER SUPPLY
AND ALLOW THE RADIA TOR TO COOL BEFORE CLEANING .
Do not use detergents, abrasive cleaning powder or polish of
any kind on the body of the radiator, as these can damage the
finish.
Wipe the radiator with a dry cloth to remove dust and a damp
cloth (not wet) to clean off stains.
Be careful not to allow moisture to enter the control box.
Recycling
For electrical products sold within the European Community.
At the end of the electrical products useful life it should
not be disposed of with household waste. Please
recycle where facilities exist. Check with your Local
Authority or retailer for recycling advice in your country .
After Sales Service
Your product is guaranteed for three years from the date of
purchase.
Within this period, we undertake to repair or exchange this product
free of charge (subject to availability) provided it has been
installed and operated in accordance with these instructions.
Your rights under this guarantee are additional to your statutory
rights, which in turn are not affected by this guarantee.
Should you require after sales service you should contact our
customer services help desk on 0845 600 5111. It would assist
us if you can quote the model number, series, date of purchase,
and nature of the fault at the time of your call. The customer
services help desk will also be able to advise you should you
need to purchase any spares.
Please do not return a faulty product to us in the first instance as
this may result in loss or damage and delay in providing you with
a satisfactory service.
This heater is filled with a precise quantity of special oil. Repairs
requiring opening of the oil container are only to be made by the
manufacturer or its service agent. For further advice if an oil leak
is suspected please contact our Customer Services Helpline.
Regulations concerning the disposal of oil when scrapping the
appliance must be followed.
Please retain your receipt as proof of purchase.
UK customer help line 8.00am–5.00pm Mon-Fri and 8:30am-1.00pm Sat (Autumn–Winter only)
Customer Services: Tel. 0845 600 5111
Fax. 01489 773053
e-mail [email protected]
Republic of Ireland Tel. 01 8424833
Glen Dimplex UK Limited
Millbrook House
Grange Drive
Hedge End
Southampton
Hampshire. SO30 2DF
[c] Glen Dimplex UK Limited
All rights reserved. Material contained in this publication may not be reproduced in whole or in part, without prior permission in writing of Glen Dimplex UK Limited.
 Loading...