

Page 1
Midline Remote with Purire™
User’s Guide
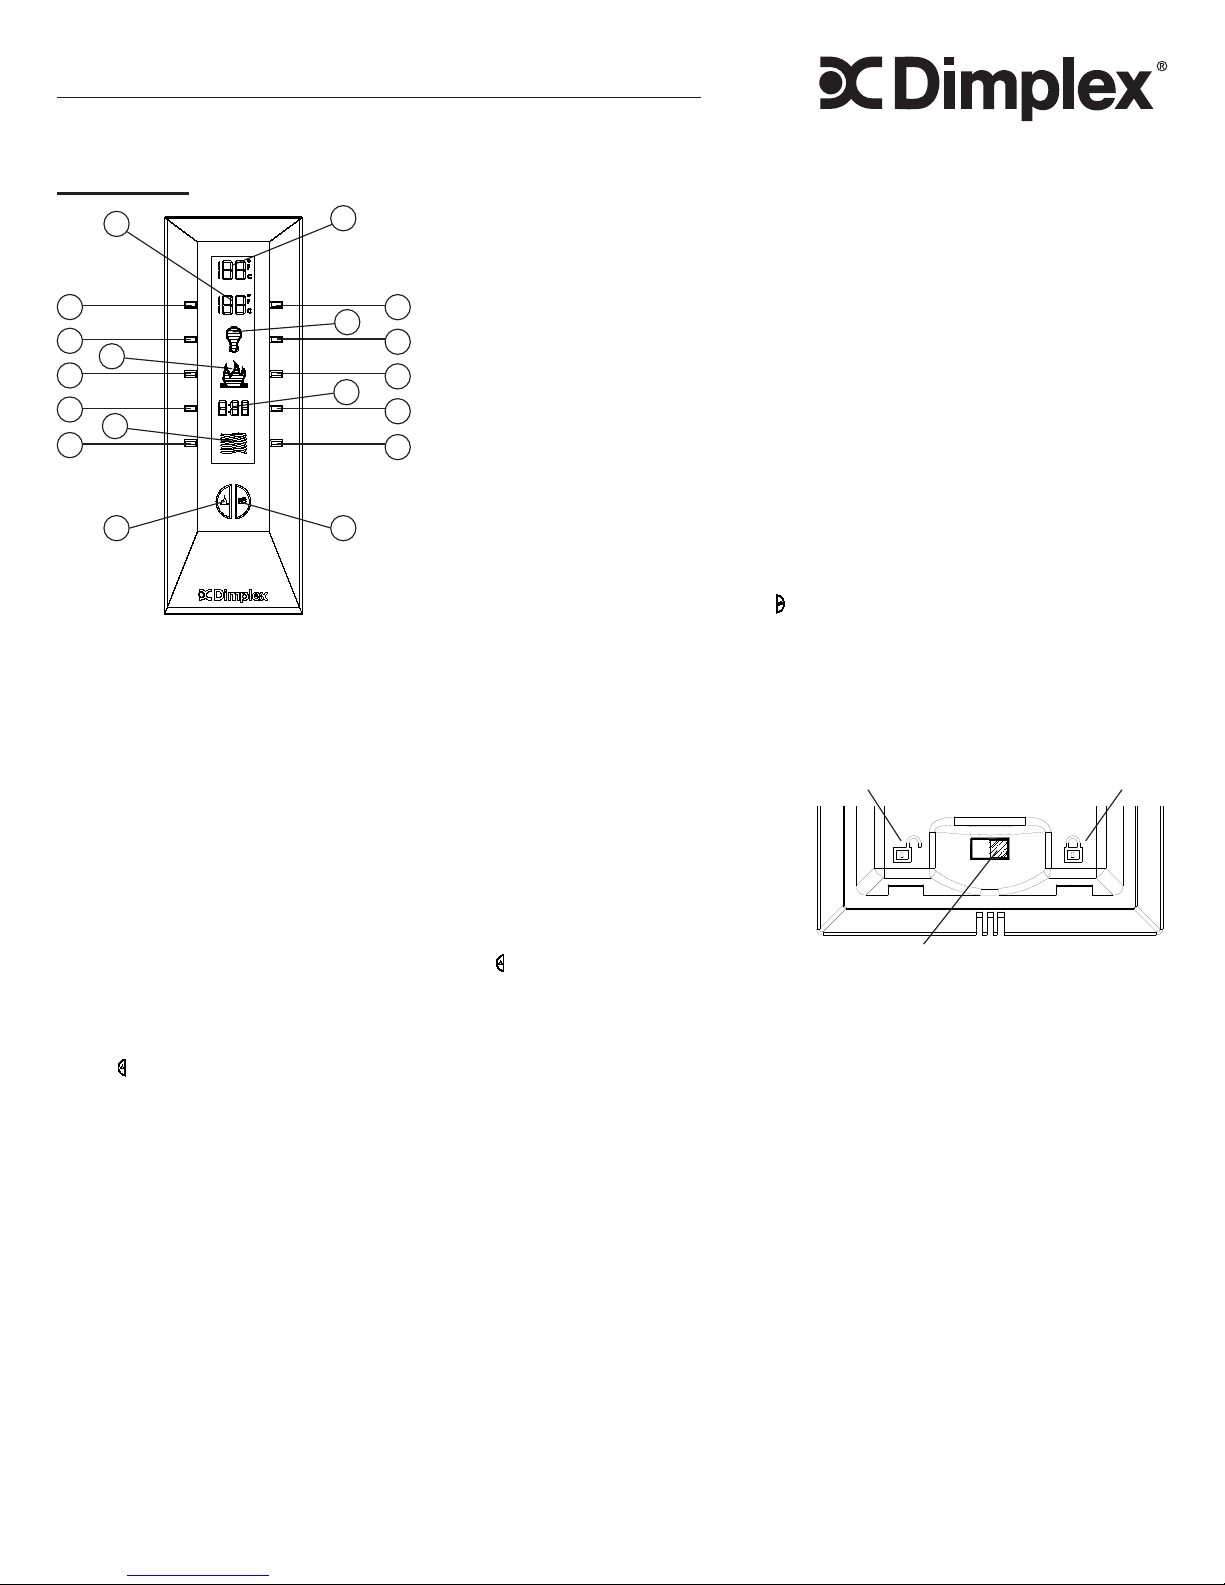
Operation
B
I
K
D
A
C
M
E
O
F
Q
GH
A. Room
Temperature
B. Set
Temperature
C. Dimmer
D. Flame Speed
Control
E. Sleep Timer
F. Purire™
G. Purire™ On/
Off
H. Flame & Heat
On/Off
I. Temperature
Down
J. Temperature Up
K. Dimmer Down
L. Dimmer Up
M. Flame Speed
Down
N. Flame Speed Up
O. Sleep Timer
Down
P. Sleep Timer Up
Q. Purire™ Speed
Down
R. Purire™ Speed
Up
B. Set Temperature
Press H. Flame & Heat On/Off
button
to turn replace on. Press J.
Temperature Up to raise thermostat,
or I. Temperature Down to lower the
thermostat. Press both J. Temperature
Up and I. Temperature Down to
change °F to °C.
C. Dimmer
While the replace is running,
repeatedly press the L. Dimmer Up or
K. Dimmer Down button to increase or
decrease the brightness of the upper
lights.
D. Flame Speed Control
While the replace is running, press the
N. Flame Speed Up button to increase
the speed of the ame or press the M.
Flame Speed Down to decrease the
speed of the ame.
E. Sleep Timer
The Sleep Timer automatically shuts off
the replace after a preset time (from
30 minutes to 8 hours).
J
During replace operation, to set the
L
sleep timer press the P. Sleep Timer
Up button. Set the timer from 30
N
minutes through 8 hours. The replace
P
will automatically turn off when the
sleep timer reaches zero (0) minutes.
R
The sleep timer can be cancelled at any
time by pressing the O. Sleep Timer
Down button repeatedly until the sleep
timer displays nothing.
F. Purire™
Press the G. Purire™ On/Off button
to turn the Purire™ function on. When
the Purire™ function is on the
Purire™ symbol will ash. When off,
the symbol will be solid. The default
setting for the Purire™ is set at low
speed. Press the Q. Purire™ Speed
Down or the R. Purire™ Speed Up
buttons to change between low and
high speeds.
Press the G. Purire™ On/Off button
to turn the Purire™ function off.
H. Flame & Heat On/Off Button
Press the H. Flame & Heat On/Off
button
on. When B. Set Temperature is
higher then A. Room Temperature the
heat will come on. To turn the heat off,
lower the B. Set Temperature so that
it’s setting is lower then the A. Room
Temperature. The default temperature
setting is 72°F (22°C).
!
NOTE: When using the
remote control the heater
runs on a thermostat. Press
the J. Temperature Up or I.
Temperature Down buttons to
adjust the set temperature. Once
the desired set temperature is
reached the heater will turn off.
The heater will cycle on and
off to maintain the desired set
temperature.
to turn the Flame/Heat function
Child Lock (Figure 1)
Depress tab on the battery cover on 1.
the back of the remote transmitter
and remove the battery cover.
Move 2. Child Lock tab to the right to
lock the remote transmitter.
Move 3. Child Lock tab back to the
left to unlock the remote transmitter.
Replace the battery cover.4.
!
NOTE: To temporarily unlock the
remote transmitter press (in order)
I. Temperature Down then J.
Temperature Up then K. Dimmer
Down.
When the remote transmitter’s backlight
is illuminated the Child Lock is
bypassed. When the backlight is off the
Child Lock is re-activated.
Figure 1
Unlocked
Child Lock Tab
Locked
7211970100R00
Page 2
Initialization
Follow steps 1 through 7 to initialize
or re-initialize the remote with the
fireplace:
① Plug cord into 120 Volt wall outlet.
② Ensure the Main On/Off Switch
located in the switch box on the
replace in the lower right hand
corner is in the
(Figure 2).
Figure 2
ON position
CBA
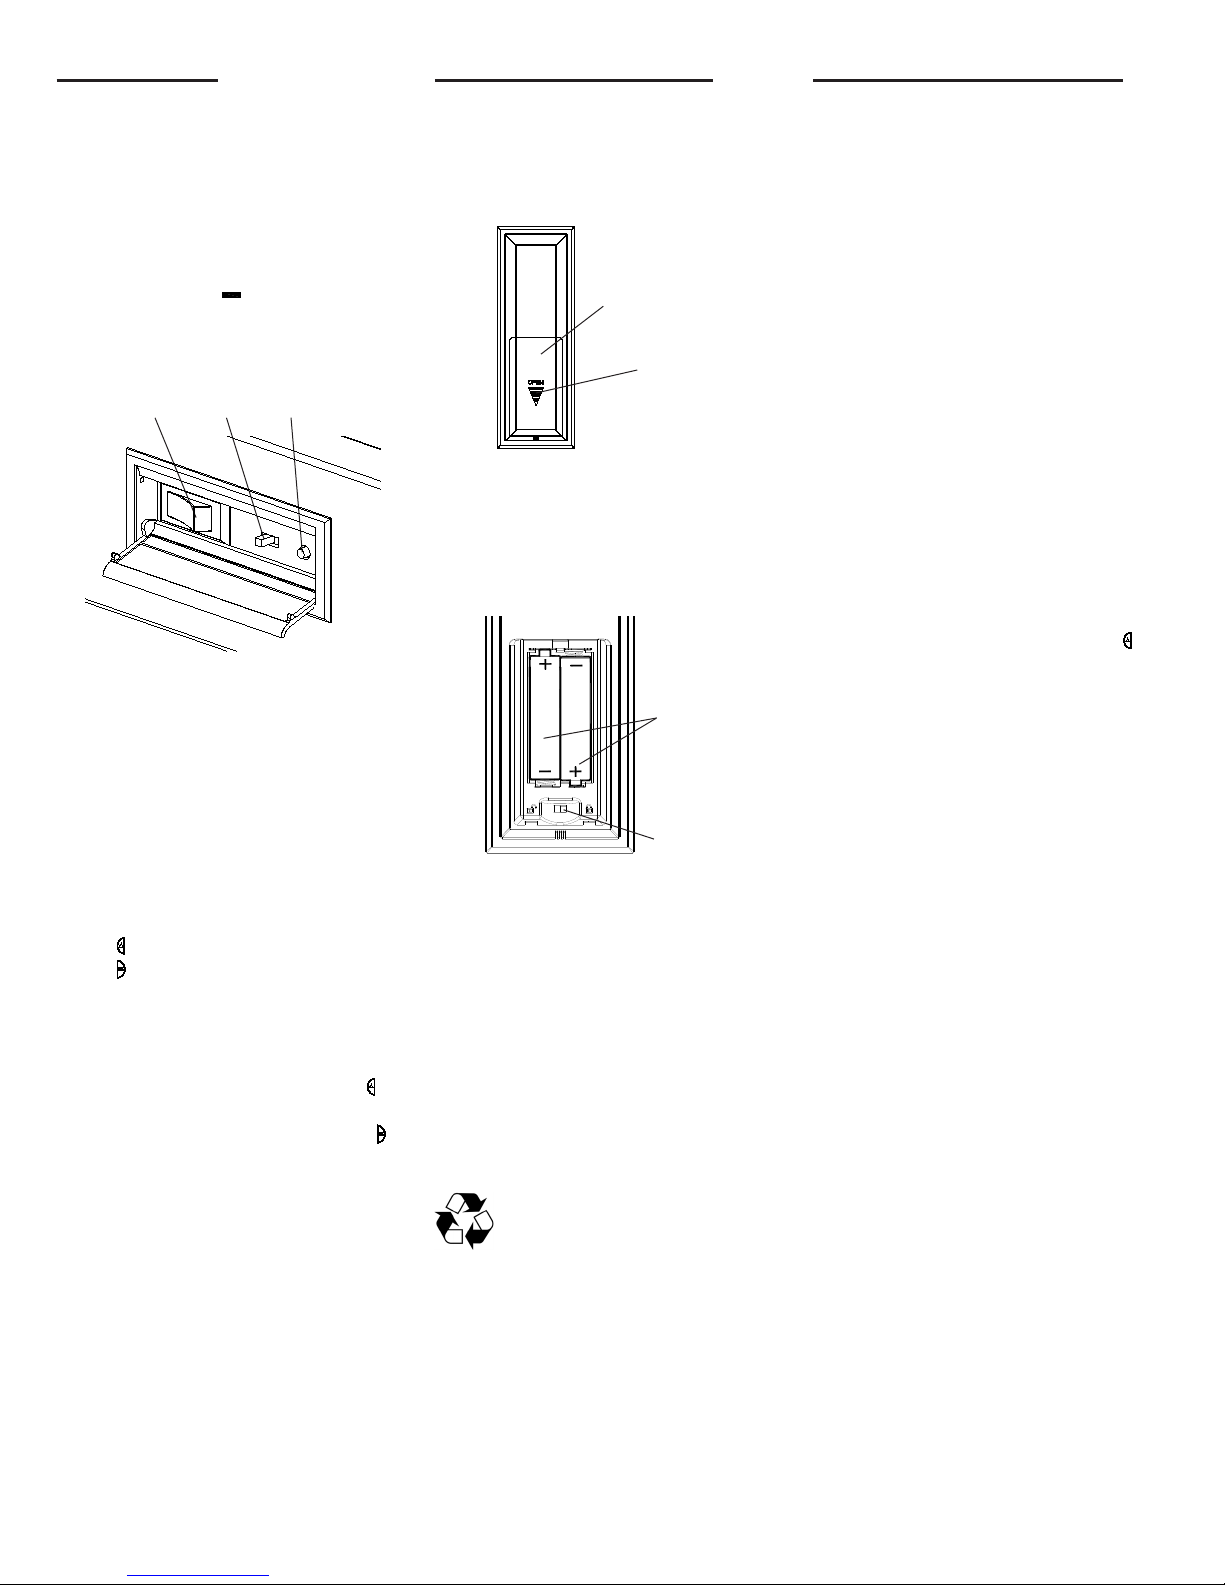
Battery Replacement
① Depress tab on the Battery Cover on
the back of the remote transmitter
and remove battery cover (Figure 3).
Figure 3
Battery Cover
Tab
② Replace the two (2) AAA batteries
into the remote control as shown in
Figure 4.
Frequency Interference
If the replace does not respond
properly to the remote control, the
remote operating frequency may have
to be reset. The remote control can
send another frequency code to the
circuit board to eliminate interference.
① Simultaneously press the
O. Sleep Timer Down button and
the Q. Purire™ Speed Down
button on the remote control (refer to
the Operation section on page 1 for
a description of the remote’s buttons
and functions).
② “COD” will appear in place of the
sleep timer digits.
③ Release the Sleep Timer Down and
the Purire™ Speed Down buttons.
A. Main On/Off Switch
B. 3 Position Switch
C. Initialization Button
③ Set the 3 Position switchl to the
Remote position (right position).
④ Press and hold the Initialization
Button on the unit (Figure 2).
⑤ While holding the Initialization
Button, press the Flame & Heat On/
Off button or the Purire™ On/
Off button on the remote control
transmitter.
⑥ Release the Initialization Button on
the unit.
⑦Press the Flame & Heat On/Off
button to turn the ame/heat function
on or press the Purire™ On/Off
button to turn the Purire™ function
on.
Figure 4
Batteries (2)
Child Lock
③ Ensure child lock is in the “unlocked”
position (Figure 1, page 1).
④ Replace the battery cover.
!
NOTE: When the “BAT” symbol
is present on the remote control
it is recommended to replace the
batteries promptly, to maintain full
functionality of the remote/replace.
The remote transmitter has a battery
backup time of only several hours.
Battery must be recycled or
disposed of properly. Check with
your Local Authority or Retailer
for recycling advice in your area.
④ Press the Initialization Button on the
replace (Figure 2-C).
⑤ Press the Flame & Heat On/Off
button on the remote.
Your remote will now have a different
frequency communicating with the
replace.
2
www.dimplex.com
Page 3

Midline Remote Troubleshooting Guide
Symptom Possible Cause Solution
Remote Control appears to
function but does not operate
replace.
3 Position Manual Control
Switch is in incorrect
position for remote use.
Remote Control has Childlock feature enabled
Remote lost communication
to replace.
Remote receiver is
defective.
Display on remote is blank. Installed batteries have
depleted.
Remote transmitter is
defective.
Move 3 Position Switch on the
replace to the far right position. The
center position is for Flame Effect
only, left position for Flame and Heat
(manual).
Unlock remote. Refer to page 1 Child Lock.
Re-initialize remote to replace.
Refer to page 2 - Initialization.
Call Dimplex Customer Service at
1-888-346-7539 for assistance and
have your replace model and serial
numbers ready.
Replace batteries. Refer to page
2 - Battery Replacement. You may
need to initialize the remote as well.
Call Dimplex Customer Service at
1-888-346-7539 for assistance and
have your replace model and serial
numbers ready.
Set Temperature is not being
displayed.
Fireplace turns on/off on its own
or functions on remote do not
work properly.
Heater has been disabled. Press J. Temperature Up and O.
Sleep Timer Down at the same time
Radio frequency
interference.
Change remote frequency. Refer to
page 2 - Frequency Interference.
Dimplex North America Limited
1367 Industrial Road Cambridge ON Canada N1R 7G8
1-888-346-7539 www.dimplex.com
In keeping with our policy of continuous product development, we reserve the right to make changes without notice.
© 2011 Dimplex North America Limited
3
 Loading...