

Page 1
Owner’s Manual
CDFI-BX1000
Model
6909910100
IMPORTANT SAFETY INFORMATION: Always read this manual rst
before attempting to install or use the Opti-myst
your safety, always comply with all warnings and safety instructions
contained in this manual to prevent personal injury or property
damage.
To view the full line of Dimplex products, please visit
www.dimplex.com
®
Pro Box Heater. For
7215020100R00
Page 2
Table of Contents
Welcome & Congratulations .................. 3
IMPORTANT INSTRUCTIONS ................ 4
Installation ................................ 6
Operation ................................ 11
Maintenance ............................. 12
Warranty ................................. 13
Technical Support ......................... 15
Always use a qualied technician
or service agency to repair
this unit.
2 www.dimplex.com
!
NOTE: Procedures and
techniques that are considered
important enough to
emphasize.
CAUTION: Procedures and
techniques which, if not
carefully followed, will result in
damage to the equipment.
WARNING: Procedures
and techniques which, if not
carefully followed, will expose
the user to the risk of re,
serious injury, or death.
Page 3
Welcome & Congratulations
Thank you and congratulations for purchasing an Opti-myst Pro Box
Heater from Dimplex. Please use our convenient online registration
page to record your model and serial numbers for future reference at
www.dimplex.com/register
Model Number
and Serial
Number
Please carefully read and save these instructions.
CAUTION: Read all instructions and warnings carefully before
starting installation. Failure to follow these instructions may result in
a possible electric shock, re hazard and will void the warranty.
NO NEED TO RETURN TO THE STORE
Questions with operation or assembly? Require Parts Information?
Product Under Manufacturer’s Warranty?
Contact us at: www.dimplex.com/customer_support
For Troubleshooting and Technical Support
OR Toll-Free 1-888-DIMPLEX (1-888-346-7539)
In order to better serve you, please have your model and serial number
3
Monday to Friday 8:00 a.m. to 4:30 p.m. EST
ready or register your product online before calling (See above)
Page 4

IMPORTANT INSTRUCTIONS
When using electrical appliances,
basic precautions should always
be followed to reduce the risk of
fire, electric shock, and injury to
persons, including the following:
① Read all instructions before
using the heater.
② The heater is hot when in
use. To avoid burns, do not let
bare skin touch hot surfaces.
The surface around the heater
outlet becomes hot during heater
operation.
DANGER: High temperatures
may be generated under certain
abnormal conditions. Do not
partially or fully cover or obstruct
the front of this heater.
③ Extreme caution is necessary
when any heater is used by or
near children or invalids and
whenever the unit is left operating
and unattended.
④ Always disconnect the heater
when not in use.
⑥ Do not operate any unit with a
damaged cord or if the heater has
malfunctioned, or if the heater
has been dropped or damaged
in any manner, contact
Dimplex Technical Service at
1-888-346-7539.
⑦ Do not use outdoors.
⑧ The heater is not intended for
use in bathrooms, laundry areas
and similar indoor locations.
Never locate heater over a
bathtub or other water container.
⑨ To disconnect the unit, turn
the controls OFF, disconnect
power at the service panel.
⑩ Do not insert or allow foreign
objects to enter any ventilation
or exhaust opening as this may
cause an electric shock or re, or
damage to the heater.
⑪ To prevent a possible re, do
not block air intake or exhaust in
any manner.
⑤ Do not operate any heater
after it malfunctions. Disconnect
power at the service panel and
have the heater inspected by
a reputable electrician before
reusing.
4 www.dimplex.com
⑫ All electrical heaters have
hot and arcing or sparking parts
inside. Do not use in areas where
gasoline, paint, or ammable
liquids are used or stored.
Page 5
IMPORTANT INSTRUCTIONS
⑬ Do not modify the heater. Use
it only as described in this manual.
Any other use not recommended
by the manufacturer may cause
re, electric shock or injury to
persons.
⑭ Always use a certied
electrician should new circuits or
outlets be required.
⑮ Always use properly
grounded, fused and polarized
outlets.
⑯ Disconnect all power supply
before performing any cleaning,
maintenance or relocation of the
unit.
⑰ When transporting or storing
the unit, keep in a dry place, free
from excessive vibration and
store so as to avoid damage.
!
NOTE: Changes or
modications not expressly
approved by the party responsible
for compliance could void
user's authority to operate the
equipment.
CAUTION
RISK OF ELECTRIC SHOCK
DO NOT OPEN
NO USER-SERVICEABLE PARTS INSIDE
SAVE THESE INSTRUCTIONS
5
Page 6
Installation
WARNING: ANY
INSTALLATION AND
SERVICE WORK SHOULD BE
PERFORMED BY QUALIFIED AND
AUTHORIZED PERSONNEL. ALL
INSTALLATIONS MUST COMPLY
WITH ALL LOCAL CODES AND
BY-LAWS, AND INSPECTED AND
APPROVED FOR OPERATION BY
LOCAL GOVERNING AUTHORITY
PRIOR TO USE.
WARNING: Construction and
electrical wiring must comply with
local building codes and other
applicable regulations to reduce the
risk of re, electric shock and injury
to persons.
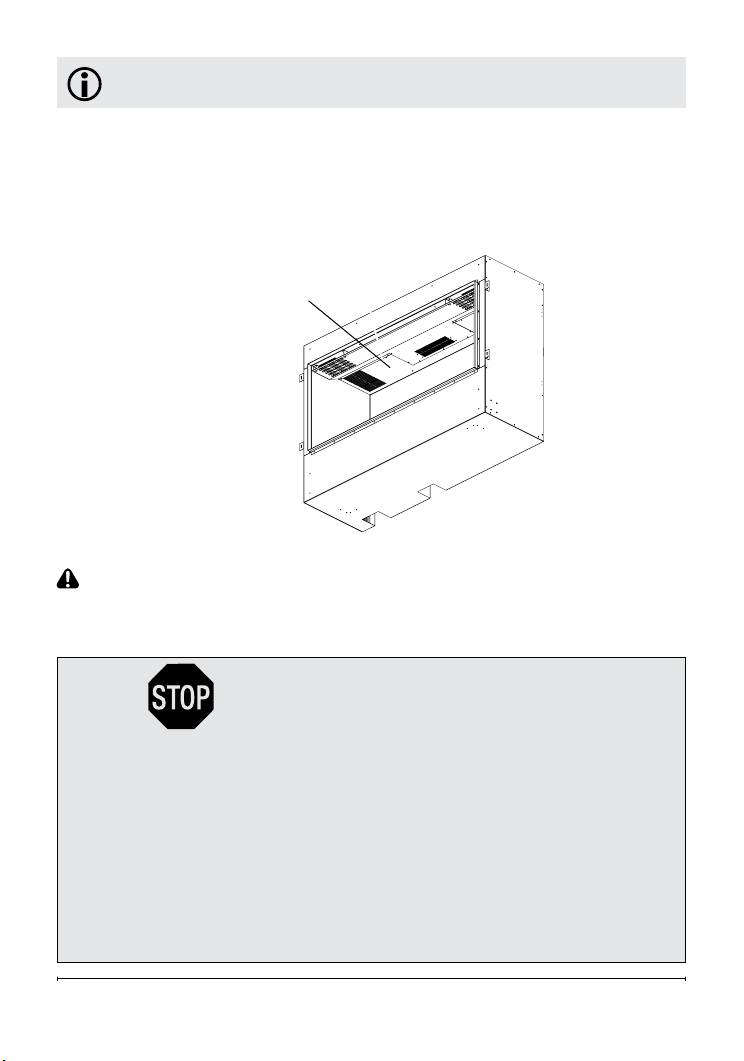
Opti-myst Cassette
The Opti-myst Pro Box Heater works
exclusively with the
Opti-myst Cassette (CDFI1000PRO). Controls for the heater are
found on the cassette.
New Construction
When determining a location for
the Opti-myst® Pro Box Heater,
ensure that the unit will not be
susceptible to drafts, vents, ceiling
fans and other air currents. Similar
to a candle, large movements of
air will affect the unit's ability to
create and maintain the ame effect.
Hardwire Installation
The Opti-myst Pro Box Heater is
supplied in an assembled state
and is designed to be permanently
installed. The unit comes ready for
hardwire installation.
WARNING: Do not attempt
to wire your own new outlets or
circuits. To reduce the risk of re,
electric shock or injury to persons,
always use a licensed electrician.
!
NOTE: Please read all
instructions before installing.
1. For rough in framing, the
opening should follow the
recommended dimensions
located in Figure 1.
!
NOTE: Dimensions provided
are minimum clearances and will
vary depending on type of support
framing and nishing options.
!
NOTE: Framing should be
constructed to support 160 lbs
(73 kg)
WARNING: To reduce the risk of
re, do not store or use gasoline or
other ammable vapours or liquids
in the vicinity of the unit.
2. Allow at least 4 ft. (122 cm) of
service cable for connecting
6 www.dimplex.com
Page 7
Installation
a power supply wire to the
Opti-myst Cassette when installing before
nishing wall.
!
NOTE: A 15 amp, 120 volt alternating
current (VAC) circuit is required. A dedicated
circuit is preferred but not essential in all
cases. A dedicated circuit will be required if,
after installation, the circuit breaker trips or the
fuse blows on a regular basis when the heater
is operating. Additional appliances on the
same circuit may exceed the current rating of
the circuit breaker.
G
F
Figure 1
Mounting
Flanges
A
Heater
Exhausst
C
E
B
D
I
H
!
NOTE: Use minimum 14 AWG supply
cable with two insulated copper conductors
(white and black) and one bare ground wire.
A B C D E F G H I
CDFI-
BX1000
7
44.9"
(114 cm)
31.75"
(80.5 cm)
14.7"
(37.3 cm)
9.5"
(24 cm)
4.8"
(12.2 cm)
15.5"
(39.3 cm)
16.2"
(41.2 cm)
45.2"
(115.2 cm)
(82 cm)
32.3"
Page 8

Installation
Do not use cable with aluminum
conductors.
!
NOTE: It is recommended
that all drywall installation and
nishing be completed after
unit is fully installed.
3. The Opti-myst Pro Box Heater
can be installed to be two sided
or one sided. For one sided
installations remove the 4
anges on the back if there is
not enough depth in the framing
for them. Using the same
screws, replace the back panel.
See Figure 2. For two sided
installations, remove anges and
back panel and using the same
screws, replace the anges.
!
NOTE: The heater only exhausts
from one direction. Note this
Figure 2
Flange
direction when installing in a 2
sided conguration"
CAUTION: When inserting the
unit take care not to damage or
pinch any of the power cables that
are concealed in the wall.
4. Mount the Opti-myst Pro Box
Heater to the framing with
the mounting brackets using
appropriate screws for the
application (Figure 1).
5. Feed the wire through the
opening on the back left of
the Opti-myst Pro Box Heater.
Remove the outer jacket and
strip the individual conductors ½
in. (1.3 cm) from the end.
6. Do not remove cardboard
backing from the Opti-myst Pro
Wire
Routing
Back
Panel
8 www.dimplex.com
Plumbing
Routing
Page 9
Installation
Box Heater until the Opti-myst
Cassette is installed. This will
help prevent scratches and
damage to the sides of the Optimyst Pro Box Heater.
7. Follow the installation
instructions provided with the
Opti-myst Cassette to install
within the Opti-myst Pro Box
Heater. Use the provided
screws to fasten the cassette to
the Opti-myst Pro Box Heater
through the holes in the cassette
(Figure 3).
8. In the back left corner of the
Opti-myst Cassette (Figure 3),
locate and remove the electrical
cover plate by removing the two
securing screws.
9. Install a cable connector (not
included) suitable for mounting
in a ⅞ in. (22 mm) hole, to the
cable plate and feed the supply
cable through the connector.
The cable plate can be removed
by removing the two securing
screws on either side, to allow
for easier access.
CAUTION: Use two conductor,
non-metallic sheath cable with
ground wire (3 wires total) for the
incoming power supply on the
cassette. Use appropriate wire to
meet local and national electrical
codes for rated power.
10. Connect the black wires (live)
from the Opti-myst Cassette and
Figure 3
Electrical Cover Plate
Cable Plate
Holes for
securing to
framing
Opti-myst Pro Box Heater to the
live from the power supply.
11. Connect the white wires
(neutral) from the Opti-myst
Cassette and Opti-myst Pro Box
Heater to the neutral wire from
the power supply.
12. Connect the green wires
(ground) from the Opti-myst
Cassette and Opti-myst Pro Box
Heater to the ground wire from
the power supply.
13. Place all connectors inside the
Opti-myst Cassette and secure
the cable clamp to unit, making
sure that the cable clamp grips
only the jacket of service cable.
CAUTION: Ensure the wire
connectors are securely tightened,
so no bare wires (live or neutral) are
exposed.
9
Page 10
Installation
14. Connect the 2 pin connector
from the Opti-myst Cassette to
the Opti-myst Pro Box Heater
(Figure 4).
15. Finish surrounding wall. There
are 3 different options for
nishing the wall:
• Permanent - install drywall
right up to the ange that
surrounds the opening.
• Semi Permanent - nish
around edge using ashing
material (not included)
• Flexible - create opening big
enough to access mounting
anges and a false front that
can be removed.
Figure 4
WARNING: Disconnect
power before attempting any
maintenance or cleaning to
reduce the risk of re, electric
shock or damage to persons.
16. The media plate that came
with the Opti-myst Cassette is not
required and can be discarded.
After completing installation, place
the media tray that came with the
Opti-myst Pro Box Heater in position
over the Opti-myst Cassette. The
tray can be used to hold a variety
of media. Please note that the tray
gets warm, so choose materials
appropriately.
10 www.dimplex.com
Page 11
Operation
The heater can be controlled by
remote, or the tethered controller
through the Opti-myst Cassette.
Please refer to cassette User's
Guide for details.
!
NOTE: The Opti-myst Pro
Box Heater cannot be operated
independently from the Opti-myst
Cassette.
Resetting the Temperature
Cutoff Switch
Should the heater overheat, an
automatic switch will turn the
heater off and it will not come
back on without being reset. The
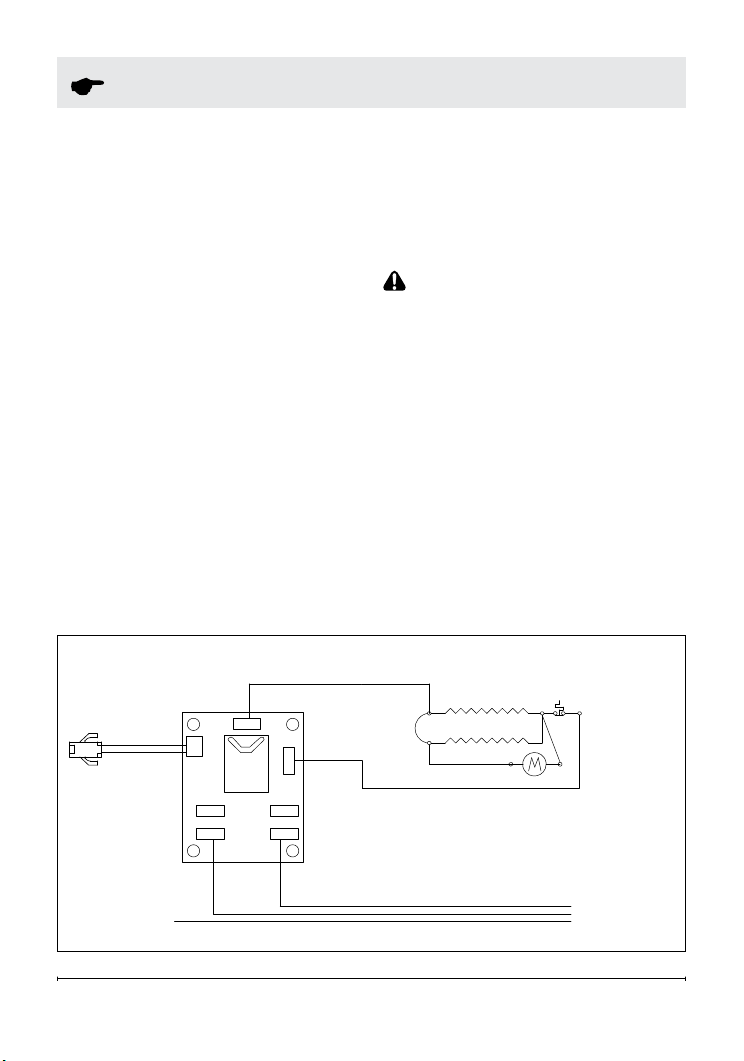
WIRING DIAGRAM
Heater
N
Heater
+
24V
L
RL Y2
temperature cutoff switch can be
reset by disconnecting power to
the unit, waiting 5 minutes and
reconnecting power to the unit.
CAUTION: If you need to
continuously reset the heater,
disconnect power to the unit
and call Dimplex North America
Limited at 1-888-346-7539 for
technical support. Please have
your model and serial number
ready when calling.
Neutral Live
120 V AC SUPPLY
L
N
GND
11
N
G
JUNCTION BOX
Page 12

Maintenance
Opti-myst Pro Box Heater
Surface Cleaning
To remove ngerprints or other
marks, the exterior nish can be
cleaned with a damp cloth with a
mild detergent. The surface should
be completely dried with a lint free
cloth to prevent water spots.
Servicing
Except for installation and cleaning
described in this manual, an
authorized service representative
should perform any other servicing.
!
NOTE: The heater should not
be operated with an accumulation
of dust or dirt on or in the unit, as
this can cause a build up of heat
and eventual damage. For this
reason the heater must be inspected
regularly, depending upon conditions
and at least at yearly intervals.
12 www.dimplex.com
Page 13

Warranty
2 YEAR LIMITED WARRANTY
Products to which this limited warranty
applies
This limited warranty applies to your newly
purchased Dimplex heater. This limited
warranty applies only to purchases made
in any province of Canada except for
Yukon Territory, Nunavut, or Northwest
Territories or in any of the 50 States of
the USA (and the District of Columbia)
except for Hawaii and Alaska. This limited
warranty applies to the original purchaser
of the Product only and is not transferable.
Products excluded from this limited
warranty
Products purchased in Yukon Territory,
Nunavut, Northwest Territories, Hawaii,
or Alaska are not covered by this limited
warranty. Products purchased in these
States, provinces, or territories are sold
AS IS without warranty or condition of
any kind (including, without limitation,
any implied warranties or conditions of
merchantability or tness for a particular
purpose) and the entire risk of as to the
quality and performance of the products is
with the purchaser, and in the event of a
defect the purchaser assumes the entire
cost of all necessary servicing or repair.
What this limited warranty covers and for
how long
Products covered by this limited warranty
have been tested and inspected prior to
shipment and, subject to the provisions
of this warranty, Dimplex warrants such
products to be free from defects in
material and workmanship in respect of
the heater components of the Product for
a period of 12 months from the date of the
rst purchase of the Product.
This limited warranty period also applies
to any implied warranties that may exist
under applicable law. Some jurisdictions
do not allow limitations on how long an
implied warranty lasts, so the above
limitation may not apply to the purchaser.
What this limited warranty does not cover
This limited warranty does not apply to
Products that have been repaired (except
by Dimplex or its authorized service
representatives) or otherwise altered. This
limited warranty does further not apply
to defects resulting from misuse, abuse,
accident, neglect, incorrect installation,
improper maintenance or handling,
operation with an incorrect power source,
re or other circumstance outside of
Dimplex's control including, without
limitation, an Act of God.
What you must do to get service under
this limited warranty
Defects must be brought to the attention of
Dimplex Technical Service by contacting
Dimplex at 1-888-DIMPLEX (1-888346-7539), or 1367 Industrial Road,
Cambridge Ontario, Canada N3H 4W3.
Please have proof of purchase, catalogue/
model and serial numbers available when
calling. Limited warranty service requires
a proof of purchase of the Product.
What Dimplex will do in the event of a
defect
In the event the Product or part covered
by this limited warranty is proven to be
defective in material or workmanship
during, in the One Year Warranty period,
as applicable, you have the following
rights:
• Dimplex will in its sole discretion either
repair or replace such defective Product
or part without charge. If Dimplex is
unable to repair or replace the Product
or part, or if repair or replacement is
not commercially practicable or cannot
be timely made, Dimplex may, in lieu of
13
Page 14

Warranty
repair or replacement, choose to refund
the purchase price for the Product or
part.
• Limited warranty service will be
performed solely by dealers or service
agents of Dimplex authorized to provide
limited warranty services.
• This limited warranty does not entitle
the purchaser to on-site or in-home
services. On-site or in-home services
may be performed at the purchaser's
specic request and expense at
Dimplex’s then-current rates for such
services.
• Dimplex will not be responsible for,
and the limited warranty services shall
not include, any expense incurred for
installation or removal of the Product
or part (or any replacement Product
or part) or any labour or transportation
costs. Such costs shall be the
purchaser’s responsibility.
What Dimplex and its dealers and service
agents are also not responsible for:
IN NO EVENT WILL DIMPLEX, OR ITS
DIRECTORS, OFFICERS, OR AGENTS,
BE LIABLE TO THE PURCHASER OR
ANY THIRD PARTY, WHETHER IN
CONTRACT, IN TORT, OR ON ANY
OTHER BASIS, FOR ANY INDIRECT,
SPECIAL, PUNITIVE, EXEMPLARY,
CONSEQUENTIAL, OR INCIDENTAL
LOSS, COST, OR DAMAGE ARISING
OUT OF OR IN CONNECTION WITH
THE SALE, MAINTENANCE, USE, OR
INABILITY TO USE THE PRODUCT,
EVEN IF DIMPLEX OR ITS DIRECTORS,
OFFICERS, OR AGENTS HAVE BEEN
ADVISED OF THE POSSIBILITY OF
SUCH LOSSES, COSTS OR DAMAGES,
OR IF SUCH LOSSES, COSTS, OR
DAMAGES ARE FORESEEABLE. IN
NO EVENT WILL DIMPLEX, OR ITS
OFFICERS, DIRECTORS, OR AGENTS
BE LIABLE FOR ANY DIRECT LOSSES,
COSTS, OR DAMAGES THAT EXCEED
THE PURCHASE PRICE OF THE
PRODUCT.
SOME JURISDICTIONS DO NOT ALLOW
THE EXCLUSION OR LIMITATION OF
INCIDENTAL OR CONSEQUENTIAL
DAMAGES, SO THE ABOVE LIMITATION
OR EXCLUSION MAY NOT APPLY TO
THE PURCHASER.
How State and Provincial law apply
This limited warranty gives you specic
legal rights, and you may also have other
rights which vary from jurisdiction to
jurisdiction. The provisions of the United
Nations Convention on Contracts for
the Sale of Goods shall not apply to this
limited warranty or the sale of Product
covered by this limited warranty.
14 www.dimplex.com
Page 15

Technical Support
Technical and troubleshooting support, as well as a list of
replacement parts can be found on
www.dimplex.com/customer_support.
Dimplex North America Limited
1367 Industrial Road
Cambridge ON
Canada N3H 4W3
© 2017 Dimplex North America Limited
15
Page 16

Manuel du
propriétaire
Modèle
CDFI-BX1000
6909910100
CONSIGNES DE SÉCURITÉ IMPORTANTES : Toujours lire le présent
manuel avant d’essayer d’installer ou d’utiliser l'appareil de chauffage
Opti-myst
les avertissements et suivre les consignes de sécurité compris dans
le présent manuel an de prévenir les blessures ou les dommages
matériels.
Pour découvrir la gamme complète de produits Dimplex, visitez
www.dimplex.com
MD
Pro Box. Pour votre sécurité, toujours respecter tous
7215020100R00
Page 17

Table des matières
Bienvenue et félicitations ..................... 3
INSTRUCTIONS IMPORTANTES .............. 4
Installation ................................ 6
Utilisation ................................ 11
Entretien ................................. 12
Garantie ................................. 14
Service d’assistance technique ............... 15
Toujours recourir aux services
d’un technicien qualié ou
d’une entreprise de services
d'entretien pour faire
réparer cet appareil.
2 www.dimplex.com
!
NOTA : Marches à suivre
et techniques considérées
sufsamment importantes pour
qu'on les souligne.
MISE EN GARDE : Marches
à suivre et techniques dont le
non-respect pourrait causer
des dommages matériels.
AVERTISSEMENT : Marches
à suivre et techniques qui,
si elles ne sont pas bien
respectées, exposeront
l’utilisateur à des risques
d’incendie, de blessure grave
ou de décès.
Page 18

Bienvenue et félicitations
Merci et félicitations pour l'achat d'un appareil de chauffage Opti-myst Pro
Box de Dimplex. Veuillez utiliser notre page d'inscription en ligne pour
inscrire votre modèle et vos numéros de série à des ns de référence
ultérieure à l'adresse
www.dimplex.com/register
Numéros de
modèle et de
série.
Lire ces consignes attentivement et les conserver.
MISE EN GARDE : Lire attentivement toutes les consignes et tous les
avertissements avant de procéder à l'installation. Le non-respect de ces
consignes pourrait entraîner un risque de décharge électrique ou d'incendie
et annulera la garantie.
IL N'EST PAS NÉCESSAIRE D'ALLER AU MAGASIN
Des questions à propos de l'utilisation ou du montage? Besoin d'information sur les
pièces? Besoin d'information à propos d'un produit sous une garantie du fabricant?
Communiquer avec nous au : www.dimplex.com/customer_support
Pour le dépannage et le Service d'assistance technique
OU Sans frais au 1 888 DIMPLEX (1 888 346-7539)
Du lundi au vendredi, de 8 h à 16 h 30 (HE)
An que nous puissions mieux vous servir, veuillez avoir votre modèle et votre numéro de série
à portée de main ou veuillez inscrire votre produit en ligne avant de téléphoner (voir ci-dessus).
3
Page 19

INSTRUCTIONS IMPORTANTES
Lorsqu’un appareil électrique est
utilisé, il est important de toujours
prendre des précautions de base
pour réduire les risques d’incendie,
de décharges électriques et de
blessures, notamment :
① Lire toutes les instructions
avant d'utiliser l'appareil de
chauffage.
② L'appareil de chauffage devient
chaud lorsqu’il est en marche.
Pour éviter les brûlures, ne pas
toucher les surfaces chaudes. La
surface autour de la bouche de
chaleur devient chaude lorsque
l'appareil de chauffage fonctionne.
DANGER : Dans certaines
conditions, des températures
anormalement élevées peuvent
être générées. Ne pas couvrir
ni obstruer partiellement ou
complètement la partie frontale de
cet appareil de chauffage.
③ Faire preuve d’une grande
prudence lorsque l’appareil
de chauffage est utilisé par
des enfants ou des personnes
handicapées, s’il est en marche
à proximité d’eux, ou s’il est en
marche et laissé sans surveillance.
④ Toujours débrancher l'appareil
de chauffage lorsqu’il n’est pas
utilisé.
⑤
Ne pas utiliser un appareil de
chauffage après une défaillance.
Interrompre le courant au tableau
de commande et faire inspecter
l'appareil de chauffage par un
électricien qualié avant de le
réutiliser.
⑥
Ne pas se servir de l’appareil
si le cordon est endommagé, si
l'appareil fonctionne mal ou si
l'appareil de chauffage est
tombé ou est
endommagé de quelque manière
que ce soit. Communiquer avec
le service technique de Dimplex
au 1 888 346-7539.
⑦
Ne pas utiliser à l’extérieur.
⑧
L'appareil de chauffage n’est
pas conçu pour être utilisé dans
une salle de bain, une salle
de lavage ou d'autres endroits
semblables à l’intérieur. Ne jamais
placer l'appareil de chauffage
au-dessus d'une baignoire ou d'un
autre contenant d'eau.
⑨
Pour débrancher l'appareil,
l'éteindre, puis couper le courant à
la boîte électrique.
⑩ Ne pas introduire ou permettre
l'introduction de corps étrangers
dans la prise d’air de ventilation ou
la bouche de sortie d’air, car cela
peut occasionner des décharges
4 www.dimplex.com
Page 20

INSTRUCTIONS IMPORTANTES
électriques, provoquer un incendie
ou endommager l'appareil.
⑪ Pour éviter un incendie,
n'obstruer l’entrée ou la sortie d’air
d’aucune façon.
⑫ Tous les appareils de
chauffage électriques contiennent
des pièces qui chauffent et
produisent un arc électrique ou des
étincelles. Ne pas faire fonctionner
l'appareil dans des endroits où de
l’essence, de la peinture ou des
liquides inammables sont utilisés
ou entreposés.
⑬
Ne pas apporter de
modications à l'appareil de
chauffage. Se servir de l'appareil
de chauffage uniquement de la
façon décrite dans le présent
manuel. Toute autre utilisation non
recommandée par le fabricant peut
causer un incendie, des décharges
électriques ou des blessures.
⑭
Toujours faire appel à un
électricien certié pour l’installation
de nouveaux circuits ou de
nouvelles prises de courant.
⑮
Toujours utiliser des prises
correctement mises à la terre,
polarisées et protégées par un
fusible ou un disjoncteur.
⑯
Fermer toute source
d’alimentation électrique de
l'appareil de chauffage avant de
le nettoyer, de le réparer ou de le
déplacer.
⑰
Pendant le transport ou
l’entreposage de l'appareil, le
conserver dans un endroit sec et à
l’abri de vibrations excessives, et
le ranger de façon à éviter qu’il ne
s’endommage.
!
NOTA : Les changements
ou les modications n’ayant pas
fait l’objet d’une approbation
expresse de la partie responsable
de la conformité auront pour effet
d’annuler le droit d’utilisation de
l’appareil par l’utilisateur.
MISE EN GARDE
RISQUE DE DÉCHARGE ÉLECTRIQUE
NE PAS OUVRIR
AUCUNE PIÈCE DONT L'ENTRETIEN PEUT ÊTRE
EFFECTUÉ PAR L'UTILISATEUR NE SE TROUVE À L'INTÉRIEUR
CONSERVER CES INSTRUCTIONS
5
Page 21

Installation
AVERTISSEMENT : LES
TRAVAUX D'INSTALLATION ET
D'ENTRETIEN DOIVENT ÊTRE
EXÉCUTÉS PAR DU PERSONNEL
QUALIFIÉ ET AUTORISÉ.
TOUTES LES INSTALLATIONS
DOIVENT ÊTRE EFFECTUÉES
CONFORMÉMENT AUX
CODES ET AUX RÈGLEMENTS
LOCAUX, ET INSPECTÉES ET
APPROUVÉES PAR L'AUTORITÉ
DE RÉGLEMENTATION LOCALE
AVANT L'UTILISATION.
AVERTISSEMENT : An de
réduire les risques d’incendie,
de décharges électriques et
de blessures, tous les travaux
d'installation et de câblage électrique
doivent être conformes aux codes du
bâtiment et aux autres règlements
applicables.
Cassette Opti-myst
L'appareil de chauffage Opti-myst Pro
Box fonctionne exclusivement avec la
cassette Opti-myst (CDFI1000-PRO).
Les commandes de l'appareil de
chauffage se trouvent sur la cassette.
Nouvelle installation
Au moment de déterminer un
emplacement pour l'appareil de
chauffage Opti-myst
s'assurer que l'appareil ne sera
pas exposé à des courants d'air, à
des évents, à des ventilateurs de
plafond ni à d'autres déplacements
d'air. Comme pour une chandelle,
des déplacements importants d'air
MD
Pro Box,
nuisent à la capacité de l'appareil à
créer et à maintenir l'effet de amme.
Installation câblée
L'appareil de chauffage Opti-myst
Pro Box est fourni assemblé et conçu
pour une installation permanente.
L'appareil est livré pour une
installation câblée.
AVERTISSEMENT : Ne pas
tenter d'installer soi-même de
nouvelles prises ni de nouveaux
circuits électriques. Pour minimiser
les risques d’incendie, de décharges
électriques et de blessures, toujours
faire appel à un électricien qualié.
!
NOTA : Lire toutes les
instructions avant d'installer l'appareil.
1. Dans le cas d'une installation
avec cadre, l'ouverture doit
respecter les dimensions
recommandées à la Figure 1.
!
NOTA : Les dimensions indiquées
sont les dégagements minimums
et varient en fonction du type de
cadrage et des options de nition.
!
NOTA : Le cadrage doit être
construit pour supporter un poids de
160 lb
(73 kg)
AVERTISSEMENT : An de
réduire les risques d'incendie,
éviter de conserver ou d’utiliser
de l’essence ou d’autres gaz et
liquides inammables à proximité de
l'appareil.
6 www.dimplex.com
Page 22

Installation
2. Lors de l'installation, allouer au moins
4 pi (122 cm) de câble permettant le
branchement de la source d’alimentation
électrique à la cassette Opti-myst avant la
nition du mur.
!
NOTA : Un circuit de 15 ampères et de
120 volts c.a. est requis. Un circuit spécialisé
est préférable, mais pas essentiel dans tous les
cas. Un circuit spécialisé sera nécessaire si,
après l’installation, le disjoncteur se déclenche
ou si le fusible saute régulièrement pendant
le fonctionnement de l'appareil de chauffage.
L’ajout d’appareils sur le même circuit risque
d’excéder la puissance nominale du disjoncteur.
Figure 1
Collerettes
de montage
Sortie de la
chaleur
C
E
B
G
F
A
D
H
I
!
NOTA : Utiliser un câble d'alimentation
d’un calibre AWG minimal de 14 avec deux
conducteurs en cuivre isolés (blanc et noir)
et un l de terre nu.
A B C D E F G H I
(44,9 po
CDFI-
BX1000
(114 cm)
7
31,75 po
(80,5 cm)
14,7 po
(37,3 cm)
95 po
(24 cm)
4,8 po
(12,2 cm)
15,5 po
(39,3 cm)
16,2 po
(41,2 cm)
45,2 po
(115,2 cm)
32,3 po
(82 cm)
Page 23

Installation
Ne pas utiliser de câble à
conducteurs en aluminium.
!
NOTA : Il est recommandé de
poser les cloisons sèches et les
options de nition une fois que
l'installation de l'appareil est
entièrement terminée.
3. L'appareil de chauffage Optimyst Pro Box peut être installé
pour une visualisation des deux
côtés ou d'un seul côté. Pour
une visualisation d'un seul
côté, retirer les 4 collerettes du
panneau arrière si le cadre n'est
pas sufsamment profond pour
les accueillir. À l'aide des mêmes
vis, remettre le panneau arrière
en place. Voir la Figure 2. Pour
une visualisation des deux côtés,
retirer les collerettes et le panneau
arrière et, à l'aide des mêmes vis,
Figure 2
Collerette
remettre les collerettes en place.
NOTA :
!
L'appareil de chauffage ne diffuse
la chaleur que dans une seule
direction. Prendre note de cette
direction lors de l'installation pour
visualisation des deux côtés.
MISE EN GARDE : Au moment
d'insérer l'appareil, veiller à ne pas
endommager ou coincer les câbles
d'alimentation dissimulés dans le
mur.
4. Monter l'appareil de chauffage
Opti-myst Pro Box dans le cadre
en
utilisant les supports de montage et
à l'aide des vis appropriées (Figure 1).
5. Passer le câble à travers
l'ouverture pratiquée dans la
partie arrière gauche de l'appareil
de chauffage Opti-myst Pro
Entrée du
câblage
Panneau
arrière
8 www.dimplex.com
Entrée de la
plomberie
Page 24

Installation
Box. Retirer la gaine extérieure
et dénuder les conducteurs
individuels sur une longueur
de 1,2 po (1,3 cm) à partir de
l’extrémité.
6. Ne pas retirer le panneau en
carton de l'appareil de chauffage
Opti-myst Pro Box avant que la
cassette Opti-myst ne soit installée.
Cela aidera à éviter les rayures
et les dommages sur les côtés de
l'appareil de chauffage Opti-myst
Pro Box.
7. Suivre les instructions d'installation
fournies avec la cassette Opti-myst
pour installer cette dernière dans
l'appareil de chauffage Opti-myst
Pro Box. Insérer les vis fournies
dans les trous de la cassette pour
xer cette dernière à l'appareil
de chauffage Opti-myst Pro Box
(Figure 3).
8. Dans la partie arrière gauche de
la cassette Opti-myst (Figure 3),
repérer et retirer la plaque de
protection des composants
électriques en enlevant les deux vis
de xation.
9. Installer un connecteur de câble
(non inclus) à la plaque, adapté
pour le montage dans un trou de
7/8 po (22 mm) de diamètre, et
passer le câble d'alimentation à
travers le connecteur. La plaque
des câbles peut être retirée en
enlevant les deux vis de xation
de chaque côté, an de faciliter
l'accès.
9
Figure 3
Trous pour xer
l'appareil au
cadre
MISE EN GARDE : Utiliser un
câble à 2 conducteurs doté d’une
gaine non métallique et un l de
mise à la terre (3 ls en tout) pour
alimenter la cassette. Utiliser le
câblage approprié conforme aux
codes de l’électricité locaux et
nationaux en ce qui a trait à la
puissance nominale.
10. Connecter les ls noirs
(conducteurs) de la cassette Optimyst et de l'appareil de chauffage
Opti-myst Pro Box au conducteur
de la source d'alimentation.
11. Connecter les ls blancs
(neutres) de la cassette Optimyst Cassette et de l'appareil
de chauffage Opti-myst Pro
Box au l neutre de la source
d'alimentation.
12. Connecter les ls verts (terre) de
la cassette Opti-myst Cassette et
de l'appareil de chauffage Opti-
myst Pro Box au l de terre de la
source d'alimentation.
Plaque de protection
des composants
électriques
Plaque des
câbles
Page 25

Installation
13. Placer tous les connecteurs à
l’intérieur de la cassette Opti-myst
et xer le serre-câble à l’appareil,
en veillant à ce que le serre-câble
ne saisisse que la gaine du câble
d'alimentation.
MISE EN GARDE : S'assurer que
les capuchons de connexion sont
solidement serrés, de sorte qu'aucun
l nu (conducteur ou neutre) ne soit
exposé.
14. Brancher le connecteur à 2 broches
de la cassette Opti-myst à l'appareil
de chauffage Opti-myst Pro Box
(Figure 4).
15. Effectuer la nition du mur
environnant. Il y a 3 options de
nition du mur :
• Permanente - poser la cloison
sèche jusqu'au rebord entourant
l'ouverture (Figure 4).
• Semi-permanente - procéder à
la nition autour du bord avec un
Figure 4
matériau étanche (non inclus)
• Souple - créer une ouverture
sufsamment grande pour accéder
aux collerettes de montage ainsi
qu'une structure frontale provisoire
amovible.
AVERTISSEMENT :Débrancher
l’appareil avant tout entretien
ou nettoyage an de réduire le
risque d’incendie, de décharges
électriques ou de blessures.
16. Le plateau à matériaux
incandescents livré avec la cassette
Opti-myst n'est pas requis et peut
être jeté. Une fois l'installation
terminée, placer le plateau à matériaux
incandescents fourni avec l'appareil
de chauffage Opti-myst Pro Box sur
la cassette Opti-myst. Le plateau
peut être utilisé pour divers matériaux
incandescents. Prendre note que
le plateau devient chaud; choisir
les matériaux incandescents en
conséquence.
10 www.dimplex.com
Page 26

Utilisation
L'appareil de chauffage peut être
réglé par télécommande, ou à
l'aide du dispositif de commande
intégré de la cassette Opti-myst.
Consulter le guide d'utilisation de
la cassette pour obtenir plus de
détails.
!
NOTA : L'appareil de
chauffage Opti-myst Pro
Box ne peut pas être utilisé
indépendamment de la cassette
Opti-myst.
Réarmement du
disjoncteur du circuit de
la température
En cas de surchauffe,
un interrupteur éteindra
automatiquement l’appareil,
qui ne pourra être remis en
SCHÉMA DE CÂBLAGE
Heater
N
Heater
+
24V
L
RL Y2
marche tant que le disjoncteur
n’aura pas été réarmé. Pour
réarmer le disjoncteur du
circuit de la température, il faut
débrancher l'appareil de la
source d'alimentation et attendre
5 minutes avant de le rebrancher.
MISE EN GARDE : S’il
est nécessaire de réinitialiser
constamment l’appareil de
chauffage, le débrancher de
la source d'alimentation et
communiquer avec Dimplex North
America Limited au 1 800 346-
7539 pour obtenir un service
d’assistance technique. Veiller
à avoir en main les numéros de
modèle et de série de l’appareil.
Neutral Live
120 V AC SUPPLY
L
N
GND
11
N
G
JUNCTION BOX
Page 27

Entretien
Nettoyage des surfaces
de l'appareil de chauffage
Opti-myst Pro Box
Pour enlever les empreintes digitales
ou autres marques, nettoyer la
nition extérieure avec un chiffon
humide et un détergent doux. Pour
prévenir les taches d’eau, la surface
doit être entièrement asséchée à
l’aide d’un chiffon non pelucheux.
SCHÉMA DE CÂBLAGE
Heater
N
Heater
+
24V
L
RL Y2
Entretien
Tout type d'entretien autre que
l'installation et le nettoyage décrits
dans le présent manuel doit être
effectué par un représentant de
service autorisé.
!
NOTA : L'appareil de chauffage
ne doit pas fonctionner si de la
poussière ou de la saleté se sont
accumulées sur l'appareil. Cela
pourrait entraîner une accumulation
de chaleur qui pourrait à son tour
causer des dommages. Pour cette
raison, l'appareil de chauffage doit
être inspecté régulièrement, selon
ses conditions d'utilisation, et au
moins une fois par année.
Neutral Live
120 V AC SUPPLY
L
N
GND
12 www.dimplex.com
N
G
JUNCTION BOX
Page 28

Garantie
GARANTIE LIMITÉE DE 2 ANS
Produits couverts par la présente garantie
limitée
La présente garantie limitée couvre votre
nouvel appareil de chauffage Dimplex. La
présente garantie limitée ne s'applique
qu'aux achats effectués dans l’une des
provinces du Canada, à l’exception du
Yukon, du Nunavut et des Territoires du
Nord-Ouest, ou dans l’un des 50 États
américains (incluant le district fédéral de
Columbia), à l’exception d’Hawaï et de
l’Alaska. La présente garantie limitée est
valable seulement pour l’acheteur original
du produit et ne peut être transférée.
Produits non couverts par la présente
garantie
Les produits achetés au Yukon, au Nunavut,
dans les Territoires du Nord-Ouest, à Hawaï
ou en Alaska ne sont pas couverts par la
présente garantie limitée. Les produits
achetés dans ces États, provinces ou
territoires sont vendus TELS QUELS sans
aucune garantie ni condition (y compris,
notamment, toute garantie ou condition
implicite de qualité marchande ou de
convenance à un usage particulier), et
l’acheteur doit assumer tous les risques
relatifs à la qualité et au rendement des
produits. En cas de défectuosité, tous les
frais d’entretien et de réparation incombent
à l’acheteur.
Couverture et durée de la présente garantie
limitée
Les produits couverts par la présente
garantie limitée ont été testés et
inspectés avant l’envoi. Conformément
aux dispositions de la présente garantie,
Dimplex garantit que les composants de
l'appareil de chauffage sont exempts de
tout vice de matériau et de fabrication pour
une période de 12 mois à partir de la date
d’achat du produit.
La présente garantie limitée s’applique
également à toute garantie implicite
pouvant exister en vertu des lois en vigueur.
Certaines juridictions ne permettent pas de
restreindre la durée d’une garantie implicite,
de sorte qu’il est possible que la restriction
ci-dessus ne s’applique pas à l’acheteur.
Exclusions de la présente garantie limitée
La présente garantie limitée ne couvre pas
les produits qui ont été réparés (sauf par
Dimplex ou ses représentants de service
autorisés) ou autrement modiés. Elle
ne couvre pas non plus les défectuosités
résultant d’un mauvais usage, d’un usage
abusif, d’un accident, de négligence, d’une
mauvaise installation, d’une manipulation
ou d’un entretien inadéquat, de l’utilisation
avec une source de courant inadéquate,
d'un incendie ou de tout autre évènement
hors du contrôle de Dimplex, incluant,
sans toutefois s'y limiter, les cas de force
majeure.
Ce que vous devez faire pour vous prévaloir
du service dans le cadre de la présente
garantie limitée
Les défectuosités doivent être signalées au
Service technique de Dimplex,
par téléphone au 1 888 DIMPLEX
(1 888 346-7539) ou par écrit au 1367
Industrial Road, Cambridge (Ontario),
Canada, N3H 4W3. Au moment d’appeler
Dimplex, veuillez avoir à portée de la main
une preuve d’achat, ainsi que les numéros
de catalogue, de modèle et de série du
produit défectueux. Vous devez avoir
une preuve d’achat du produit pour vous
prévaloir du service dans le cadre de la
garantie limitée.
Ce que fera Dimplex en cas de défectuosité
S’il s’avère que le produit ou qu’une pièce
du produit couvert par cette garantie limitée
présente effectivement un vice de matériau
13
Page 29

Garantie
ou de fabrication pendant la garantie d'un
an, selon le cas, vous aurez alors les droits
suivants :
• Dimplex pourra, à sa seule discrétion,
réparer ou remplacer sans frais la
pièce ou le produit défectueux. Si
Dimplex est incapable de réparer ou de
remplacer la pièce ou le produit, ou si la
réparation ou le remplacement n’est pas
commercialement possible, ou ne peut
être fait rapidement, Dimplex pourra,
au lieu d’effectuer la réparation ou le
remplacement, décider de rembourser le
prix d’achat de la pièce ou du produit.
• Le service sous garantie limitée
sera dispensé uniquement par des
dépositaires ou agents de service de
Dimplex autorisés à dispenser des
services sous garantie limitée.
• Cette garantie limitée ne donne pas droit
à l'acheteur à des services sous garantie
sur place ou à domicile. Des services
sur place ou à domicile sont offerts à
la demande expresse et aux frais de
l’acheteur, au tarif en vigueur que facture
Dimplex pour de tels services.
• Dimplex n’est pas responsable des frais
encourus pour l’installation ou le retrait du
produit ou de la pièce (ou de tout produit
ou de toute pièce de rechange) ni des
frais de main-d’œuvre et de transport,
et la présente garantie limitée ne les
couvre pas non plus. Ces frais sont la
responsabilité de l’acheteur.
Autres exclusions à la responsabilité de
Dimplex et de ses dépositaires et agents de
service :
DIMPLEX, SES ADMINISTRATEURS,
SES GESTIONNAIRES OU SES AGENTS
NE POURRONT EN AUCUN CAS ÊTRE
TENUS RESPONSABLES ENVERS
L’ACHETEUR OU TOUTE AUTRE TIERCE
PARTIE, EN VERTU D’UN CONTRAT,
DU DROIT DE LA RESPONSABILITÉ
CIVILE DÉLICTUELLE OU SUR TOUTE
AUTRE BASE, DE COÛTS, DE PERTES
OU DE DOMMAGES INDIRECTS,
SPÉCIAUX, PUNITIFS, EXEMPLAIRES
OU ACCESSOIRES DÉCOULANT
DIRECTEMENT OU INDIRECTEMENT
DE LA VENTE, DE L’ENTRETIEN, DE
L’UTILISATION OU DE L’INCAPACITÉ
D’UTILISATION DU PRODUIT, MÊME
SI DIMPLEX, SES GESTIONNAIRES,
SES ADMINISTRATEURS OU SES
AGENTS ONT ÉTÉ INFORMÉS DE
LA POSSIBILITÉ DE TELS COÛTS,
PERTES OU DOMMAGES, OU SI
LESDITS COÛTS, PERTES OU
DOMMAGES SONT PRÉVISIBLES.
DIMPLEX, SES GESTIONNAIRES, SES
ADMINISTRATEURS OU SES AGENTS
NE POURRONT EN AUCUN CAS ÊTRE
TENUS RESPONSABLES DE COÛTS, DE
PERTES OU DE DOMMAGES DIRECTS
QUI DÉPASSENT LE PRIX D’ACHAT DU
PRODUIT.
CERTAINES JURIDICTIONS NE
PERMETTENT PAS QUE DES
EXCLUSIONS OU LIMITATIONS
AUX DOMMAGES INDIRECTS OU
ACCESSOIRES SOIENT APPLIQUÉES.
IL SE POURRAIT DONC QUE LES
EXCLUSIONS ET LIMITATIONS CIDESSUS NE S’APPLIQUENT PAS À
L’ACHETEUR.
Comment les lois provinciales et d’État
s’appliquent
Cette garantie limitée vous confère des
droits juridiques précis, et il se peut que
vous ayez d’autres droits qui varient d’une
juridiction à une autre. Les dispositions de
la Convention des Nations Unies sur les
contrats de vente de biens ne s’appliquent
pas à cette garantie limitée ou à la vente
du produit couvert par la présente garantie
limitée.
14 www.dimplex.com
Page 30

Service d’assistance technique
Vous trouverez du soutien technique et des instructions de
dépannage, ainsi qu'une liste de pièces de rechange à
www.dimplex.com/customer_support.
Dimplex North America Limited
1367 Industrial Road
Cambridge (Ontario)
Canada N3H 4W3
© Dimplex North America Limited, 2017.
15
Page 31

Manual del
propietario
Modelo
CDFI-BX1000
6909910100
INFORMACIÓN IMPORTANTE DE SEGURIDAD: Siempre lea este
manual antes de intentar instalar o usar el calentador Pro Box de
Opti-myst
e instrucciones de seguridad que se incluyen en este manual para
evitar lesiones físicas o daños a su propiedad.
Para ver la lista completa de productos Dimplex, visite
www.dimplex.com.
®
. Por su seguridad, siempre respete todas las advertencias
7215020100R00
Page 32

Índice
Bienvenido y felicitaciones .................... 3
INSTRUCCIONES IMPORTANTES ............. 4
Instalación ................................ 6
Funcionamiento ........................... 12
Mantenimiento ............................ 13
Garantía ................................. 14
Servicio técnico ........................... 16
Siempre consulte con un
técnico calicado o una
agencia de servicio para
reparar esta unidad.
2 www.dimplex.com
!
NOTA: Procedimientos
y técnicas importantes a
considerar.
PRECAUCIÓN:
Procedimientos y técnicas
que, si no se respetan
atentamente, terminarán por
dañar el equipo.
ADVERTENCIA:
Procedimientos y técnicas
que, si no se respetan
escrupulosamente, expondrán
al usuario a un riesgo de
incendio, lesiones graves o la
muerte.
Page 33

Bienvenido y felicitaciones
Gracias, y felicitaciones por comprar un calentador Pro Box de
Opti-myst con Dimplex. Por favor, utilice nuestra página en línea para
registrar el número de modelo y de serie para referencia futura en:
www.dimplex.com/register
Número de
modelo y número
de serie
Lea estas instrucciones atentamente y guárdelas.
PRECAUCIÓN: Antes de comenzar la instalación asegúrese de leer las instrucciones
y advertencias cuidadosamente. El incumplimiento de estas instrucciones puede causar
una descarga eléctrica o crear un peligro de incendio, y anulará la garantía.
NO ES NECESARIO REGRESAR A LA TIENDA
¿Tiene preguntas sobre la operación o el montaje? ¿Necesita información
sobre las piezas? ¿El producto está protegido por la garantía del fabricante?
Comuníquese con nosotros en:
www.dimplex.com/customer_support
Para solucionar problemas y recibir servicio de asistencia técnica
O llame sin cargo al 1-888-DIMPLEX (1-888-346-7539)
De lunes a viernes, de 8:00 a.m. a 4:30 p.m., hora estándar del Este
A n de proporcionarle un mejor servicio, tenga a la mano el número de modelo
y de serie del producto cuando llame, o regístrelos en línea. (Ver más arriba).
3
Page 34

INSTRUCCIONES IMPORTANTES
Cuando se usen aparatos eléctricos,
siempre deben seguirse las
precauciones básicas para reducir
el riesgo de incendio, descarga
eléctrica y lesiones a las personas,
que incluyen las siguientes:
① Lea todas las instrucciones
antes de utilizar el calentador.
② El calentador se calienta
cuando está en uso. Para
evitar quemaduras, no toque
las supercies calientes sin
protección. La supercie alrededor
del calentador se calienta durante
el funcionamiento de la unidad.
PELIGRO: En ciertas
condiciones anormales de
operación, el calentador alcanza
temperaturas altas. No cubra ni
total ni parcialmente el frente del
calentador.
③ Tenga mayor precaución
cuando utilice cualquier calentador
cerca de niños o personas
discapacitadas, o bien si ellos lo
manejan, y siempre que se deje
la unidad en funcionamiento y sin
vigilancia.
⑤ No opere ningún calentador
si no funciona correctamente.
Desconecte el suministro eléctrico
en el panel central y solicite
los servicios de un electricista
acreditado para que revise el
calentador antes de volver a
utilizarlo.
⑥ No encienda la unidad si
el cable está dañado o si el
calentador funcionó mal, o si se
cayó o se dañó de alguna manera;
contacte al Servicio Técnico de
Dimplex al
1-888-346-7539.
⑦ No utilice este aparato en
exteriores.
⑧ Este calentador no ha sido
diseñado para utilizarse en baños,
zonas de lavandería ni recintos
interiores similares. Nunca
coloque el calentador sobre una
bañera u otro recipiente con agua.
⑨ Para desconectar la
unidad, APAGUE los controles
y desconéctela del panel de
servicio.
④ Siempre desconecte el
calentador cuando no lo esté
usando.
4 www.dimplex.com
⑩ No introduzca ni deje que
entren cuerpos extraños en los
oricios de ventilación o escape,
Page 35

INSTRUCCIONES IMPORTANTES
ya que ello puede provocar una
descarga eléctrica o un incendio,
o bien ocasionar daños al
calentador.
⑪ Para evitar un posible
incendio, no bloquee la entrada
ni la salida de aire en ningún
momento.
⑫ Todos los calentadores
eléctricos contienen piezas
calientes que provocan chispas
o arcos eléctricos. No lo utilice
en zonas en las que se emplee
o almacene gasolina, pintura o
líquidos inamables.
⑬ No modique el calentador.
Utilícelo sólo como se describe
en este manual. Cualquier
otro uso que no haya sido
recomendado por el fabricante
puede provocar un incendio, una
descarga eléctrica o lesiones a las
personas.
⑭ En caso de requerirse nuevos
circuitos o tomacorrientes,
acuda siempre a un electricista
calicado.
⑮ Siempre use tomacorrientes
polarizados y con fusible,
correctamente conectados a tierra.
⑯ Desconecte todo el suministro
eléctrico antes de realizar
cualquier tipo de limpieza,
mantenimiento o reubicación de la
unidad.
⑰ Mantenga la unidad en un lugar
seco y sin vibraciones excesivas
cuando la transporte o la guarde,
para protegerla de cualquier daño.
!
NOTA: Los cambios o las
modicaciones que no hayan sido
expresamente aprobados por el
responsable del cumplimiento,
podrían anular la autorización que
el usuario tiene para utilizar dicha
unidad.
PRECAUCIÓN
RIESGO DE DESCARGA ELÉCTRICA
NO ABRIR
NO CONTIENE PIEZAS QUE PUEDAN SER
REPARADAS POR EL USUARIO
GUARDE ESTAS INSTRUCCIONES
5
Page 36

Instalación
ADVERTENCIA: TODA
OPERACIÓN DE INSTALACIÓN
Y MANTENIMIENTO DEBE SER
EFECTUADA POR PERSONAL
CALIFICADO Y AUTORIZADO.
TODA OPERACIÓN DE
INSTALACIÓN DEBE
ADHERIRSE A LOS CÓDIGOS
Y REGLAMENTOS LOCALES, Y
LAS AUTORIDADES LOCALES
CORRESPONDIENTES DEBEN
INSPECCIONAR Y APROBAR
EL PRODUCTO ANTES DE QUE
PUEDA USARSE.
ADVERTENCIA: La
construcción y el cableado eléctrico
deben cumplir con las ordenanzas
municipales de construcción y
con las demás reglamentaciones
aplicables para reducir el riesgo
de incendio, descarga eléctrica y
lesiones.
Casete Opti-myst
El calentador Pro Box de Opti-myst
trabaja exclusivamente con el
casete Opti-myst (CDFI1000-PRO).
Los controles para el calentador se
encuentran en el casete.
Nueva construcción
Cuando seleccione la ubicación del
calentador Pro Box de Opti-myst®,
verique que no esté expuesta
a corrientes de aire, ventilas,
ventiladores de techo, etc. Como
ocurre con una vela, las corrientes
de aire pueden afectar la capacidad
de la unidad para crear y mantener
el efecto de llama.
Instalación
de la conexión alámbrica
El calentador Pro Box de Optimyst viene ensamblado y está
diseñado para instalarse de forma
permanente. La unidad está lista
para la instalación de la conexión
alámbrica.
ADVERTENCIA: No intente
conectar circuitos ni tomacorrientes
nuevos. Para reducir el riesgo
de incendio, descarga eléctrica
o lesiones, acuda siempre a un
electricista certicado.
!
NOTA: Lea todas las
instrucciones antes de instalar la
unidad.
1. Para que el marco quede
oculto, el oricio debe respetar
las dimensiones recomendadas
que aparecen en la Figura 1.
!
NOTA: Las dimensiones
proporcionadas son distancias
mínimas y pueden variar según el
tipo de soporte, marco y acabado.
6 www.dimplex.com
Page 37

Instalación
!
NOTA: El marco debe estar
diseñado para soportar 160 lbs
(73 kg)
ADVERTENCIA: Para reducir el
riesgo de incendios, no almacene o
utilice gasolina ni ningún otro vapor
o líquido inamable cerca de la
unidad.
2. Permita hasta 4 pies (122
cm) de cable de servicio para
conectar
un cable de alimentación al
casete de Opti-myst, cuando
éste se instale antes de realizar
el acabado de la pared.
!
NOTA: Se requiere un circuito
de corriente alterna (VAC) de
15 amperios y 120 voltios. Es
preferible disponer de un circuito
exclusivo, pero no es esencial
en todos los casos. Hará falta un
circuito exclusivo si, después de
la instalación, el disyuntor salta o
se funden los fusibles con cierta
frecuencia cuando el calentador
esté en funcionamiento. Si conecta
otros aparatos al mismo circuito,
podrían sobrepasar la capacidad
nominal de corriente del disyuntor.
7
Page 38

Instalación
Figura 1
!
NOTA: Utilice un cable de alimentación
Bridas de
montaje
A
Salida del
calentador
C
E
D
de por lo menos 14 AWG con dos
conductores de cobre aislados (blanco y
negro) y un cable desnudo a tierra.
G
F
B
I
H
A B C D
CDFI-
BX1000
CDFI-
BX1000
8 www.dimplex.com
44.9
pulgadas
(114 cm)
E F G H I
4.8
pulgadas
(12.2 cm)
31.75
pulgadas
(80.5 cm)
15.5
pulgadas
(39.3 cm)
14.7
pulgadas
(37.3 cm)
16.2
pulgadas
(41.2 cm)
9.5
pulgadas
(24 cm)
45.2
pulgadas
(115.2 cm)
32.3
pulgadas
(82 cm)
Page 39

Instalación
No utilice cables con
conductores de aluminio.
!
NOTA: Se recomienda terminar
toda la instalación de paneles
de yeso y acabados después de
instalar completamente la
unidad.
3. El calentador Pro Box de
Opti-myst puede instalarse de
forma que tenga dos lados o uno.
Para instalaciones de un lado,
retire las 4 bridas de la parte
posterior si no hay suciente
profundidad en el marco para
ellas. Con los mismos tornillos,
reemplace el panel trasero.
Consulte la Figura 2. Para
instalaciones de dos lados, retire
las bridas y el panel trasero
y, con los mismos tornillos,
reemplace las bridas.
Figura 2
Brida
!
NOTA: El aire del calentador sale
sólo en una dirección. Tenga eso
en cuenta al instalar la unidad
con 2 lados.
PRECAUCIÓN: Al insertar la
unidad, tenga cuidado de no dañar
o pellizcar ninguno de los cables de
alimentación que se esconden en la
pared.
4. Monte el calentador Pro Box de
Opti-myst en el marco con los
soportes de pared y los tornillos
adecuados para la aplicación
(Figura 1).
5. Instale el cable a través de la
abertura en la parte posterior del
calentador Pro Box de Opti-myst.
Retire la cubierta exterior y pele
los conductores individuales a ½
pulgada (1.3 cm) del extremo.
6. No retire el protector de cartón del
Cable
Enrutamiento
Panel
posterior
9
Plomería
Enrutamiento
Page 40

Instalación
calentador Pro Box de Opti-myst
hasta que esté instalado el casete
de Opti-myst. Esto ayudará a
evitar que se rayen o dañen los
lados del calentador Pro Box de
Opti-myst.
7. Siga las instrucciones de
instalación incluidas con el casete
de Opti-myst para instalar en el
calentador Pro Box de Opti-myst.
Utilice los tornillos que incluye
la unidad para jar el casete al
calentador Pro Box de Opti-myst
a través de los agujeros en el
casete (Figura 3).
8. En la esquina posterior izquierda
del casete de Opti-myst (Figura
3), localice y retire la placa de la
cubierta quitando los dos tornillos
de seguridad.
9. Instale un conector de cable (no
está incluido) adecuado para
el montaje en un oricio de ⅞
pulgadas (22 mm), en la placa
del cable e introduzca el cable
eléctrico a través del conector.
Retire los dos tornillos a los
extremos que jan el tablero para
quitar la placa del cable y tener
acceso más fácilmente.
PRECAUCIÓN: Utilice un cable
de dos conductores de cubierta no
metálica con el cable de tierra (3
cables en total) para el suministro
eléctrico de entrada del casete.
Utilice el cable adecuado para
cumplir con los códigos municipales
y nacionales de consumo de energía
Figura 3
Placa de la
cubierta eléctrica
Oricios para
asegurar la unidad al marco
nominal.
10. Conecte los cables negros
(vivos) del casete Opti-myst y del
calentador Pro Box de Opti-myst
a la conexión de la fuente de
alimentación.
11. Conecte los cables blancos
(neutros) del casete Opti-myst y
del calentador Pro Box de Optimyst al cable neutro de la fuente
de alimentación.
12. Conecte los cables verdes (tierra)
de la casete Opti-myst y del
calentador Pro Box de Opti-myst
al cable de tierra de la fuente de
alimentación.
13. Coloque todos los conectores
dentro del casete Opti-myst y
je la abrazadera del cable a la
unidad, asegurándose de que
esté sujeta únicamente de la
cubierta del cable de servicio.
Placa del
cable
10 www.dimplex.com
10
Page 41

Instalación
PRECAUCIÓN: Verique que
los conectores del cable estén
asegurados rmemente, de manera
que no haya cables desnudos (vivos
o neutros) que queden expuestos.
14. Conecte el conector de 2 pines
del casete Opti-myst al calentador
Pro Box de Opti-myst (Figura 4).
15. Termine la pared circundante.
Existen 3 opciones diferentes
para el acabado de la pared:
• Permanente - instale paneles
de yeso hasta la brida que
rodea el oricio.
• Semipermanente -realice el
acabado alrededor del borde
utilizando material para tapar
juntas (no incluido).
• Flexible - haga un oricio lo
sucientemente grande para
Figura 4
tener acceso a las bridas de
montaje y coloque un frente
aparente que pueda quitarse.
ADVERTENCIA: Para reducir
el riesgo de incendio, descarga
eléctrica o lesiones a personas,
desconecte el suministro
eléctrico antes de limpiar o dar
mantenimiento a la unidad.
16. No se necesita la placa de
recursos incluida con el casete Optimyst, así que puede desecharse.
Después de completar la instalación,
coloque la bandeja de recursos
incluida con el calentador Pro Box
de Opti-myst en su posición sobre el
casete Opti-myst. La bandeja puede
utilizarse para guardar diferentes
recursos. Cuando elija los materiales
para la bandeja, tenga en cuenta que
ésta se calienta.
11
Page 42

Funcionamiento
El calentador puede ser
controlado por control remoto
o con el controlador conectado
a través del casete Opti-myst.
Consulte la Guía del usuario
del casete para obtener más
información.
!
NOTA: El calentador Pro Box
de Opti-myst no puede funcionar
de forma independiente del
casete Opti-myst.
Reajuste del interruptor
de corte de la temperatura
En caso de que el calentador se
caliente, un interruptor automático
lo apagará y no se volverá a
encender sin que se restablezca.
Para reiniciar el interruptor
DIAGRAMA DEL
CABLEADO
Heater
N
Heater
+
24V
L
RL Y2
de límite de temperatura, es
necesario desconectar la
alimentación de la unidad,
esperar 5 minutos y volver a
conectar la unidad.
PRECAUCIÓN: Si es
necesario reiniciar el calentador
continuamente, desenchufe
la unidad y llame a Dimplex
North America Limited al
1-888-346-7539 para recibir
asistencia técnica. Tenga a mano
el número de modelo y de serie
del producto cuando llame.
Neutral Live
120 V AC SUPPLY
L
N
GND
12 www.dimplex.com
N
G
JUNCTION BOX
Page 43

Mantenimiento
Limpieza de la supercie
del calentador Pro Box de
Opti-myst
Para eliminar las huellas dactilares
u otras marcas, el vidrio puede
limpiarse con un paño húmedo y
un detergente suave. La supercie
deberá secarse completamente
con un paño sin pelusa para evitar
manchas de agua.
Servicio técnico
Con excepción de los procedimientos
de instalación y limpieza descritos
en este manual, un representante
autorizado de servicio técnico
deberá realizar cualquier otro tipo de
servicio.
!
NOTA: El calentador no debe
ser operado si hubiera acumulación
de polvo o de suciedad sobre
o dentro del mismo, ya que ello
puede originar una acumulación de
temperatura y dañar la unidad. Por
ello, debe vericar el calentador
periódicamente, dependiendo de su
estado y, por lo menos, una vez al
año.
13
Page 44

Garantía
GARANTÍA LIMITADA DE 2 AÑOS
Productos sobre los que se aplica esta
garantía limitada
Esta garantía limitada se aplica a su nueva
compra, el calentador de Dimplex. Esta
garantía limitada sólo cubre las compras
realizadas en cualquier provincia de
Canadá, excepto en el territorio de Yukón,
Nunavut, o los Territorios del Noroeste, o en
cualquiera de los 50 estados de los Estados
Unidos de América (incluido el Distrito de
Columbia), excepto Hawái y Alaska. Esta
garantía limitada se aplica al comprador
original del producto únicamente y no es
transferible.
Productos excluidos de esta garantía
limitada
No están cubiertos por esta garantía
limitada los productos comprados en el
Territorio de Yukón, Nunavut, Territorios del
Noroeste, Hawái ni Alaska. Los productos
adquiridos en estos Estados, provincias
o territorios se venden TAL CUAL, sin
garantía ni condición de ningún tipo (que
incluye, sin limitación, cualquier garantía
implícita o condiciones de comerciabilidad
o adecuación a un n particular), y el
riesgo total respecto de la calidad y del
rendimiento de los productos recae en el
comprador; y en el caso de un defecto, el
comprador asume todo el costo de cualquier
servicio técnico o reparación necesarios.
Lo que cubre la garantía y hasta cuándo
Los productos cubiertos por esta garantía
limitada han sido puestos a prueba e
inspeccionados antes de ser enviados
y, de acuerdo con las cláusulas de esta
garantía, Dimplex garantiza que las piezas
de calentador de los productos no tienen
defectos en sus materiales ni defectos de
fábrica durante un periodo de 12 meses a
partir de la fecha de la primera compra del
producto.
El periodo de garantía limitada se aplica
también a cualquier garantía implícita que
pueda existir de acuerdo con la legislación
vigente aplicable. Algunas jurisdicciones no
permiten limitaciones sobre la duración de
la garantía implícita; por ello, la limitación
antes mencionada puede que no se aplique
al comprador.
Lo que esta garantía limitada no ampara
Esta garantía limitada no cubre productos
reparados (salvo por Dimplex o sus
representantes técnicos autorizados)
o modicados de alguna manera. Esta
garantía limitada no cubre defectos por
mal uso, abuso, accidente, negligencia,
instalación incorrecta, mantenimiento o
manejo inadecuados, o funcionamiento con
una fuente de alimentación incorrecta, fuego
u otra circunstancia fuera del control de
Dimplex incluyendo sin limitación, desastre
natural.
Lo que debe hacer para solicitar el servicio
en virtud de esta garantía limitada
Los defectos deben ser declarados
al Servicio Técnico de Dimplex
comunicándose con Dimplex al
1-888-DIMPLEX (1-888-346-7539), o a
1367 Industrial Road, Cambridge Ontario,
Canadá N3H 4W3. Tenga a mano el
comprobante de compra y los números
de serie, y catálogo/modelo cuando llame.
El servicio de mantenimiento bajo los
términos de esta garantía limitada exige un
comprobante de compra del producto.
En caso de defectos, Dimplex procederá de
la siguiente manera:
En el caso de que, durante el periodo de
un año de garantía limitada, se demostrase
que una pieza o un producto cubierto por
14 www.dimplex.com
Page 45

Garantía
esta garantía limitada tiene defectos de
material o de fabricación, usted dispondrá
de los siguientes derechos:
• Dimplex determinará, a su exclusivo
criterio, si repara o reemplaza el producto
o la pieza defectuosos sin cargo. Si
Dimplex no pudiera reparar o reemplazar
el producto o la pieza, o si la reparación
o el reemplazo no es comercialmente
práctico o no se puede completar
en forma oportuna, Dimplex puede
determinar que, en lugar de reparar o
reemplazar el producto, reintegrara al
comprador el precio de compra de dicho
producto o dicha pieza.
• El servicio bajo la garantía limitada será
realizado únicamente por distribuidores
o agentes de servicio de Dimplex
autorizados para proporcionar servicios
bajo la garantía limitada.
• Esta garantía limitada no otorga derechos
al comprador para recibir servicios
in situ o en el hogar. Los servicios in
situ o en el hogar pueden realizarse a
pedido especíco del comprador, quien
deberá asumir el costo de los honorarios
vigentes de Dimplex para tales servicios.
• Dimplex no se responsabiliza ni tampoco
los términos de esta garantía limitada
no incluirán los gastos en que se incurra
para la instalación o el retiro del producto
o la pieza (o cualquier producto o pieza
de reemplazo) ni de los costos de mano
de obra o transporte. Tales costos corren
por cuenta del comprador.
Dimplex, los distribuidores y los técnicos de
mantenimiento tampoco son responsables
de:
EN NINGÚN CASO NI DIMPLEX, NI SUS
DIRECTIVOS, NI SUS AGENTES SERÁN
RESPONSABLES ANTE EL COMPRADOR
O TERCEROS DE CUALQUIER TIPO,
YA SEA CONTRACTUALMENTE,
EXTRACONTRACTUALMENTE, O
CON CUALQUIER OTRO CONCEPTO,
DE CUALQUIER PÉRDIDA, COSTO
O DAÑO INDIRECTO, ESPECIAL,
PUNITIVO, EJEMPLARIZANTE,
MEDIATO O INCIDENTAL, QUE SE
PRODUZCA O ESTÉ RELACIONADO
CON LA VENTA, MANTENIMIENTO,
USO O IMPOSIBILIDAD DE USAR EL
PRODUCTO, INCLUSO SI DIMPLEX O
SUS DIRECTIVOS, RESPONSABLES O
AGENTES HAN SIDO AVISADOS DE LA
POSIBILIDAD DE QUE SE PRODUZCAN
DICHOS DAÑOS, PÉRDIDAS O COSTOS,
O SI TALES DAÑOS, PÉRDIDAS O
COSTOS SON PREVISIBLES. EN
NINGÚN CASO NI DIMPLEX, NI SUS
DIRECTIVOS, O AGENTES SERÁN
RESPONSABLES DE CUALQUIER DAÑO,
PÉRDIDA O COSTO DIRECTO QUE
SUPERE EL PRECIO DE COMPRA DEL
PRODUCTO.
ALGUNAS JURISDICCIONES NO
PERMITEN LA EXCLUSIÓN O LIMITACIÓN
DE DAÑOS INCIDENTALES O MEDIATOS;
POR ELLO PUEDE QUE LA LIMITACIÓN
O EXCLUSIÓN ANTERIOR NO SEA
APLICABLE AL COMPRADOR.
Aplicación de legislaciones provinciales y
estatales
Esta garantía limitada le proporciona
derechos legales especícos y puede
que usted tenga también otros derechos
que varían de una jurisdicción a otra. Las
cláusulas de la convención de las Naciones
Unidas sobre Contratos de Venta de
Mercancías no serán aplicables a esta
garantía limitada ni a la venta de productos
cubiertos por esta garantía limitada.
15
Page 46

Servicio Técnico
Para solucionar problemas y obtener ayuda técnica así como
una lista de piezas de remplazo acuda a
www.dimplex.com/customer_support.
Dimplex North America Limited
1367 Industrial Road
Cambridge ON
Canada N3H 4W3
© 2017 Dimplex North America Limited
16 www.dimplex.com
 Loading...