

Page 1

PRACTICAL USER’S GUIDE
FOR THE CORNER WALL MOUNTED
ELECTRIC FIREPLACE
MODEL NUMBER:
EWMC-CC-SS
Valued Customer,
Quality checked by:
We are pleased that you have chosen to purchase an electric fireplace
manufactured by Dimplex North America Limited.
7206640100REV04
Page 2
A
OPERATION
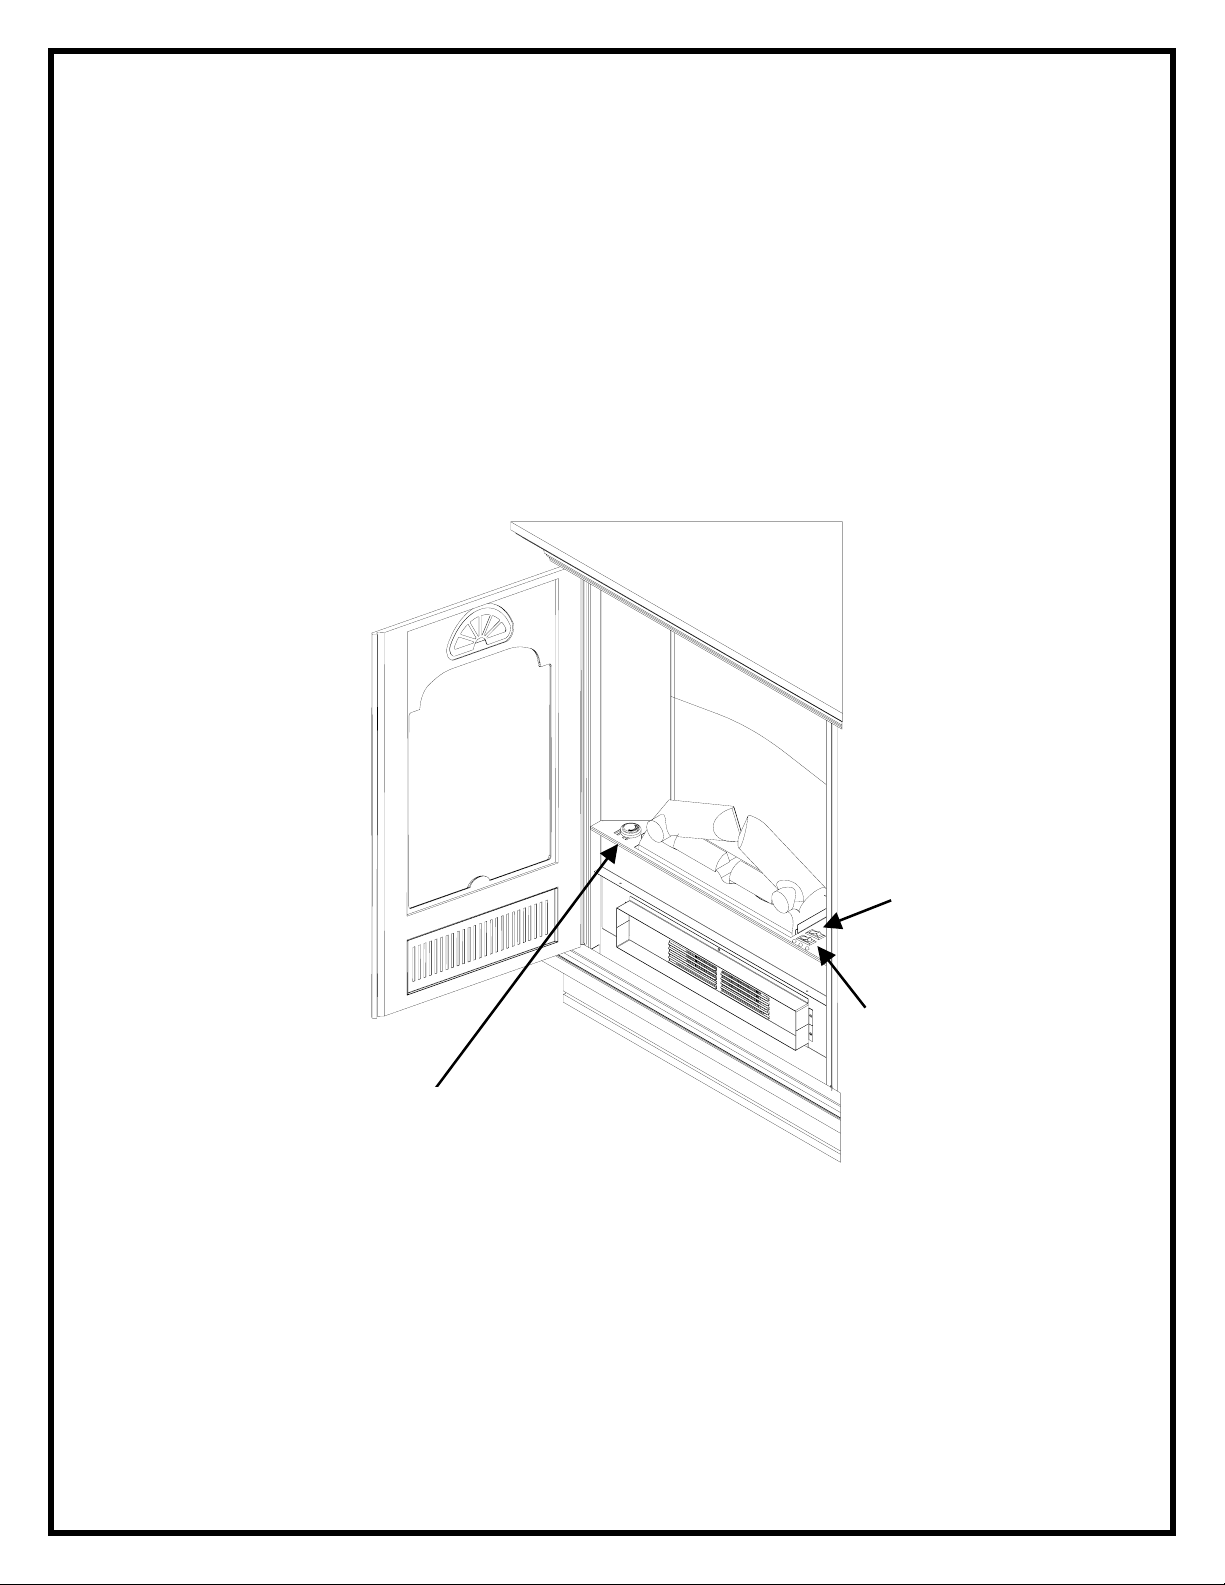
The controls are located inside the door panel on the lower side of the corner wall mounted
electric fireplace. (FIGURE 13)
A. MAIN ON/OFF SWITCH
The on/off switch supplies power to all unit functions (heater/flame)
B. MAIN SELECTION SWITCH
To choose between flame effect setting, flame effect with low heat setting, and flame effect
with high heat setting.
C. HEATER THERMOSTAT CONTROL
To adjust the temperature to your individual requirements, turn the thermostat control
clockwise all the way to turn on the heater. When the room reaches the desired
temperature, turn the thermostat knob counter clockwise until you hear a click. Leave in
this position to maintain the room temperature at this setting. For additional heat, turn
clockwise until you hear the click again and the heater will turn on.
C
B
FIGURE 13
RESETTING THE TEMPERATURE CUTOFF SWITCH
Should the heater overheat, an automatic cut out will turn the heater off and it will not come
back on without being reset. It can be reset by switching the MAIN ON/OFF SWITCH to OFF
and waiting 5 minutes before switching the unit back on.
CAUTION
If you need to continuously reset the heater, unplug the unit and call Dimplex customer service
at 1-888-DIMPLEX (1-888-346-7539).
NOTE
The heater may emit a slight, harmless odor when first used. This odor is a normal condition
caused by initial heating of internal heater parts and will not occur again.
8
Page 3

REMOTE CONTROL USUAGE
The corner wall mounted electric fireplace is supplied with a radio frequency remote control.
This remote control has a range of approximately 50 feet (15.25m), it does not have to be
pointed at the fireplace and can pass through most obstacles (including walls). It is supplied
with one of 243 independent frequencies to prevent interference with other units. The
frequency designation is indicated on the back of the transmitter.
A. Remote Control Initialization
This procedure is required every time there is a loss
of power to the remote control in the fireplace.
(i.e. power failure, breaker tripped, main power switch
is turned off)
1. Ensure that power is supplied through main
service panel.
2. Locate manual controls. (refer to FIGURE 13)
3. Activate main power switch, red indicator light 1
will flash.
4. Press and hold the heater control switch for five
seconds. The second red indictor light will flash.
5. Press ON button located on the remote control
transmitter (FIGURE 14). This will synchronize
the remote control transmitter and receiver.
B. Remote Control Usage
The remote control operates the fireplace levels
sequentially. The level is increased every time the
ON button on the transmitter is pressed. The
fireplace can be turned off at any point by pressing
the OFF button on the remote control transmitter.
FIGURE 14
FIGURE 15
Manual
Selection
Switch
Main
Power
Switch
Level 3 Indicator
Level 2 Indicator
Level 1 Indicator
Level 1: The flame effect is turned on and the first red
indicator light is activated.
Level 2: The flame effect remains on, the heater is
activated to the low heat setting, and the first and
second red indicator lights are activated.
Level 3: The flame effect remains on, the heater is
set to the high heat setting, and all three red indicator
lights are activated.
9
Page 4

MANUAL CONTROLS
The corner wall mounted electric fireplace can also be controlled in a similar manner to the
remote control with switches located inside the unit (FIGURE 15).
A. Main Power Switch
Main on/off switch, supplies power to the remote control receiving unit. When placed in the
on position Level 1 indicator will flash.
B. Manual Selection Switch
Operates the corner wall mounted electric fireplace in the same manner as the remote
control transmitter. Pressing the left side of this switch has the same effect as the ON
button on the remote control and the right side has the same effect as the OFF button of
the remote control. Pressing once to the left activates Level 1, twice activates Level 2,
three times activates Level 3. Pressing to the right turns the corner wall mounted electric
fireplace off.
MAINTENANCE
WARNING
Disconnect power before attempting any maintenance or cleaning to reduce the risk of fire,
electric shock or damage to persons.
LIGHT BULB REPLACEMENT
Allow at least 5 minutes for light bulbs to cool before touching bulbs to avoid accidental burning
of skin.
Light bulbs need to be replaced when you notice a dark section of the flame or when the clarity
and detail of the log exterior disappears. There are two bulbs under the log set which generate
the flames and embers.
TOOL REQUIREMENTS
Slot screw driver
HELPFUL HINTS
It is a good idea to replace all light bulbs at one time if they are close to the end of their rated
life. Group replacement will reduce the number of times you need to open the unit to replace
light bulbs.
LOWER LIGHT BULB REQUIREMENTS
Two (2) clear chandelier or candelabra bulbs with an E-12 (small) socket base, 60 watt rating.
LOWER BULB REPLACEMENT
1. Unplug the unit from the outlet.
2. Open latched door.
3. Remove the 3 mounting bracket screws.
4. Set aside mounting bracket.
5. Remove 2 log set screws.
6. Set log set assembly aside.
7. Unscrew the bulb(s) counter clockwise.
8. Insert new bulb(s).
9. Assemble in reverse order.
NOTE
When placing log set back into unit ensure the log set sits in between the 2 vertical
mounting flanges.
10. Plug in the corner wall mounted electric fireplace.
10
 Loading...