

Page 1
Down-Flo Wall Heater
EWA-C, 3 & 4 kW Series
IMPORTANT INSTRUCTIONS
When using electrical appliances, basic precautions should
always be followed to reduce the risk of re, electric shock
and injury to person, including the following:
Read all instructions before using this heater.1.
A heater has hot and arcing or sparking parts inside. Do 2.
not use it in areas where gasoline, paint or ammable
liquids are used or stored.
This heater is hot when in use. To avoid burns, do not let 3.
bare skin touch hot surfaces. If provided, use handles
when moving this heater. Keep combustible materials
such as: furniture, pillows, bedding, papers, clothes and
curtains away from heater.
To prevent a possible re, do not block air intakes or 4.
exhaust in any manner. Do not use on soft surfaces like
a bed where openings may become blocked.
Do not insert or allow foreign objects to enter any venti-5.
lation or exhaust opening as this may cause an electric
shock or re, or damage the heater.
SAVE THESE INSTRUCTIONS
Installation Instructions
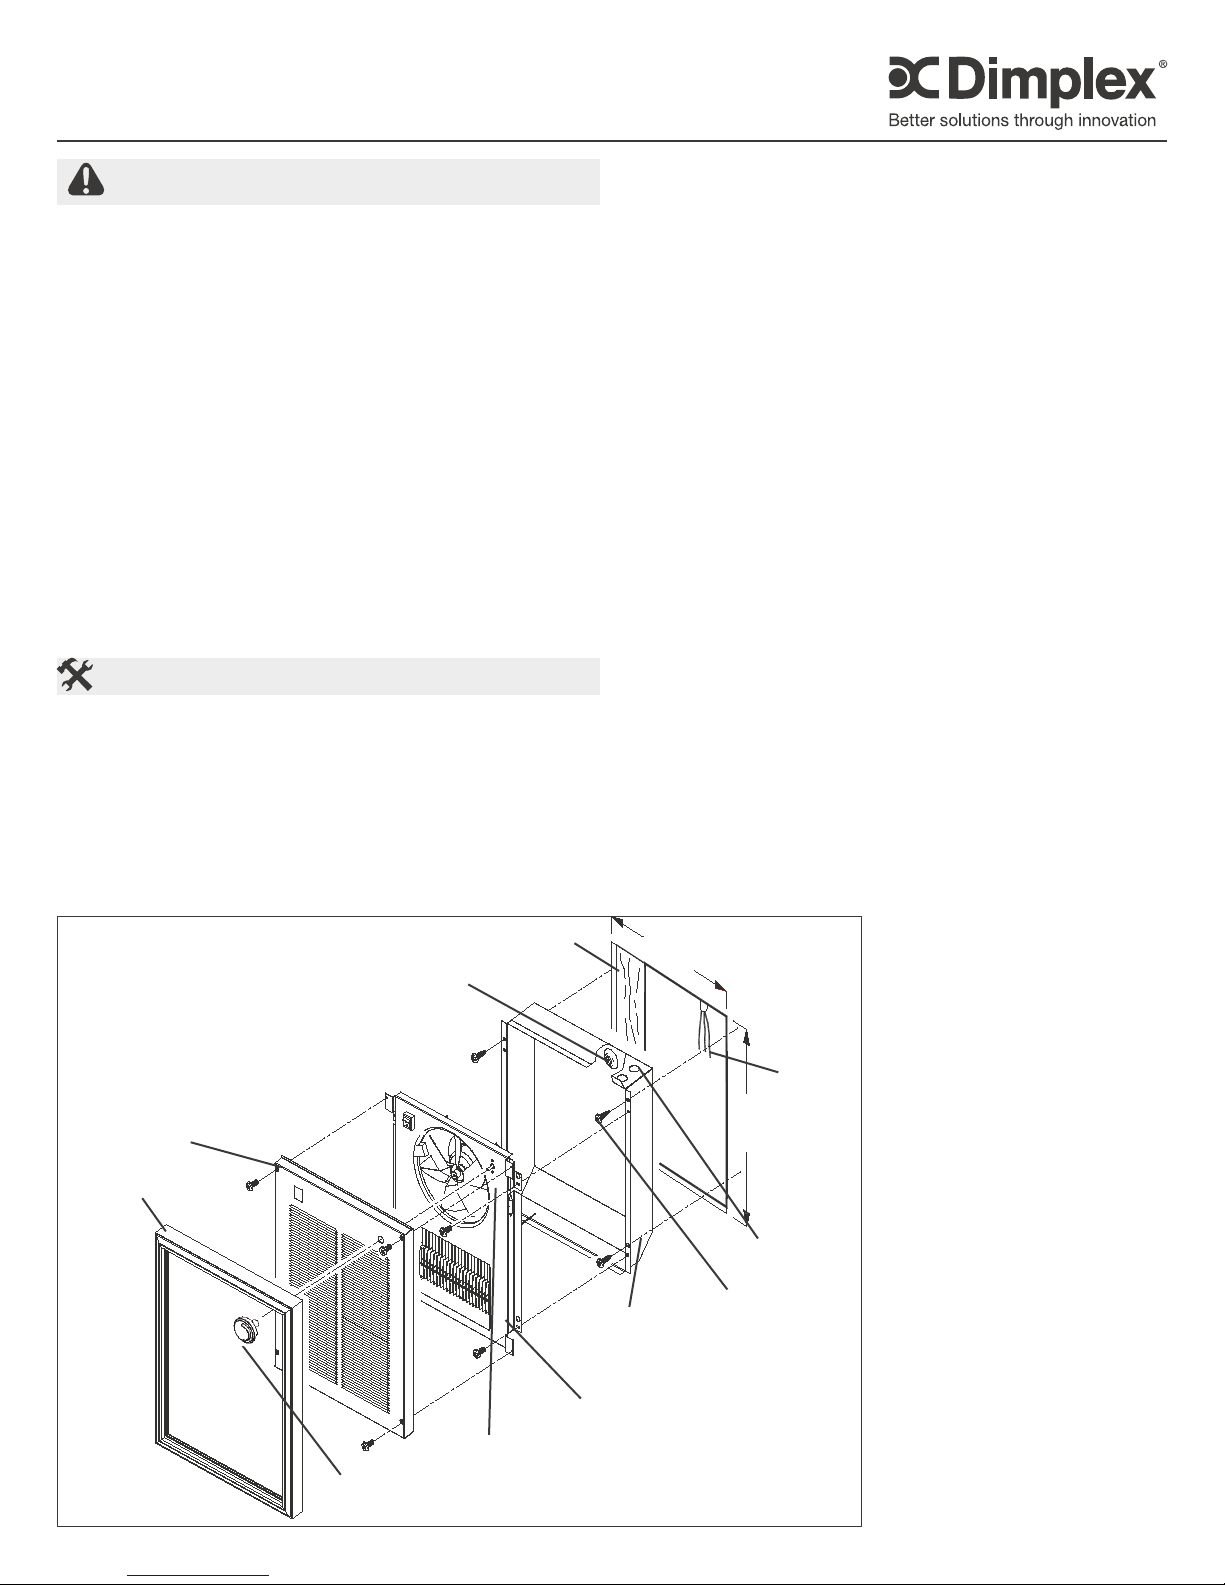
Recessed Installation
Allow 12” (30cm) of service cable for connecting to wall 1.
box. Remove 6” (15cm) of the outer jacket and strip the
individual conductors 1/4” (6mm) from the end.
Cut a wall opening 18 1/4” (46cm) high by 14 1/4” (36cm) 2.
wide (see Figure 1). Allow a minimum of 2” (5cm)
clearance around wall opening to accomodate heater
frame. Depth of wall opening must be 3 1/4” (8.3cm)
minimum, measured from nished wall surface.
Figure 1: RECESSED
GROUNDING SCREW
GRILL
FRAME
THERMOSTAT
KNOB
3 1/4”MINIMUM
OVERTEMP LIGHT
120/208/240V
Remove the screws securing heater assembly to the 3.
wall box and separate. Keep all screws for heater
reassembly.
Remove rear knockout at top corner of wall box and 4.
insert 1/2 cable connector. Bring service leads through
connector and secure end of cable to the connector.
For safety, each wall heater is provided with a grounding 5.
screw located in the upper right corner of the wall
box. Connect ground lead and tighten screw for good
electrical connection.
Place wall box in wall opening so the welded side 6.
brackets rest on nished wall surface, and secure box
with four #10 Philips head wood screws, 1 1/2” long (not
provided). Insert the wood screws through the inner
set of ange holes at both top and bottom. Alternate
holes are provided in sides of box for mounting to wood
framing. (If wall box is installed prior to application of
nished wall surface, set box to allow for wall thickness).
!
NOTE: When mounting wall box to hard wall surface,
predrill mounting and clearance holes to prevent splitting wall
surface.
Check nameplate on heater to make sure you are 7.
connecting to the proper voltage. Remove any packing
material or debris from the heater assembly and wall
box. Then connect service leads.
Place heater assembly into the wall box. Check fan to 8.
see that it turns freely, and service leads are clear of fan
area. Secure heater assembly to the wall box with four
sheet metal screws (provided).
Carefully position grille over heater assembly so that 9.
protruding switch and thermostat shaft do not bind
against grille. Secure grille to heater assembly using
two Phillips head sheet metal screws (provided). Push
press-t thermostat knob on shaft.
Install the frame to the grille, 10.
securing its upper back edge
WALL OPENING
14 1/4”
behind the lip on the top of
the wall box, and its lower
edge with the single screw.
Energize heater circuit and 11.
test heater (see operating
12” CABLE
instructions).
Surface Installation
WALL BOX
HEATER
ASSEMBLY
WALL OPENING
18 1/4”
REMOVE THIS
KNOCKOUT
PHILLIPS HEAD
SCREW
Allow 30” (76cm) of service 1.
cable for connecting the
heater (see Figure 2).
Remove all but 2” (5cm)
of outer jacket and strip
individual conductors 1/4”
(6mm) from end.
Mount surface box to the 2.
wall using the four provided
#8 - 3/4” Philips head wood
screws, inserted through
mounting holes on the back
side anges. (For hard wall
surfaces, pre-drill mounting
holes to prevent splitting wall
surface.)
Install 1/2 cable connector in 3.
hole on bottom of surface box
7204390100R06
Page 2
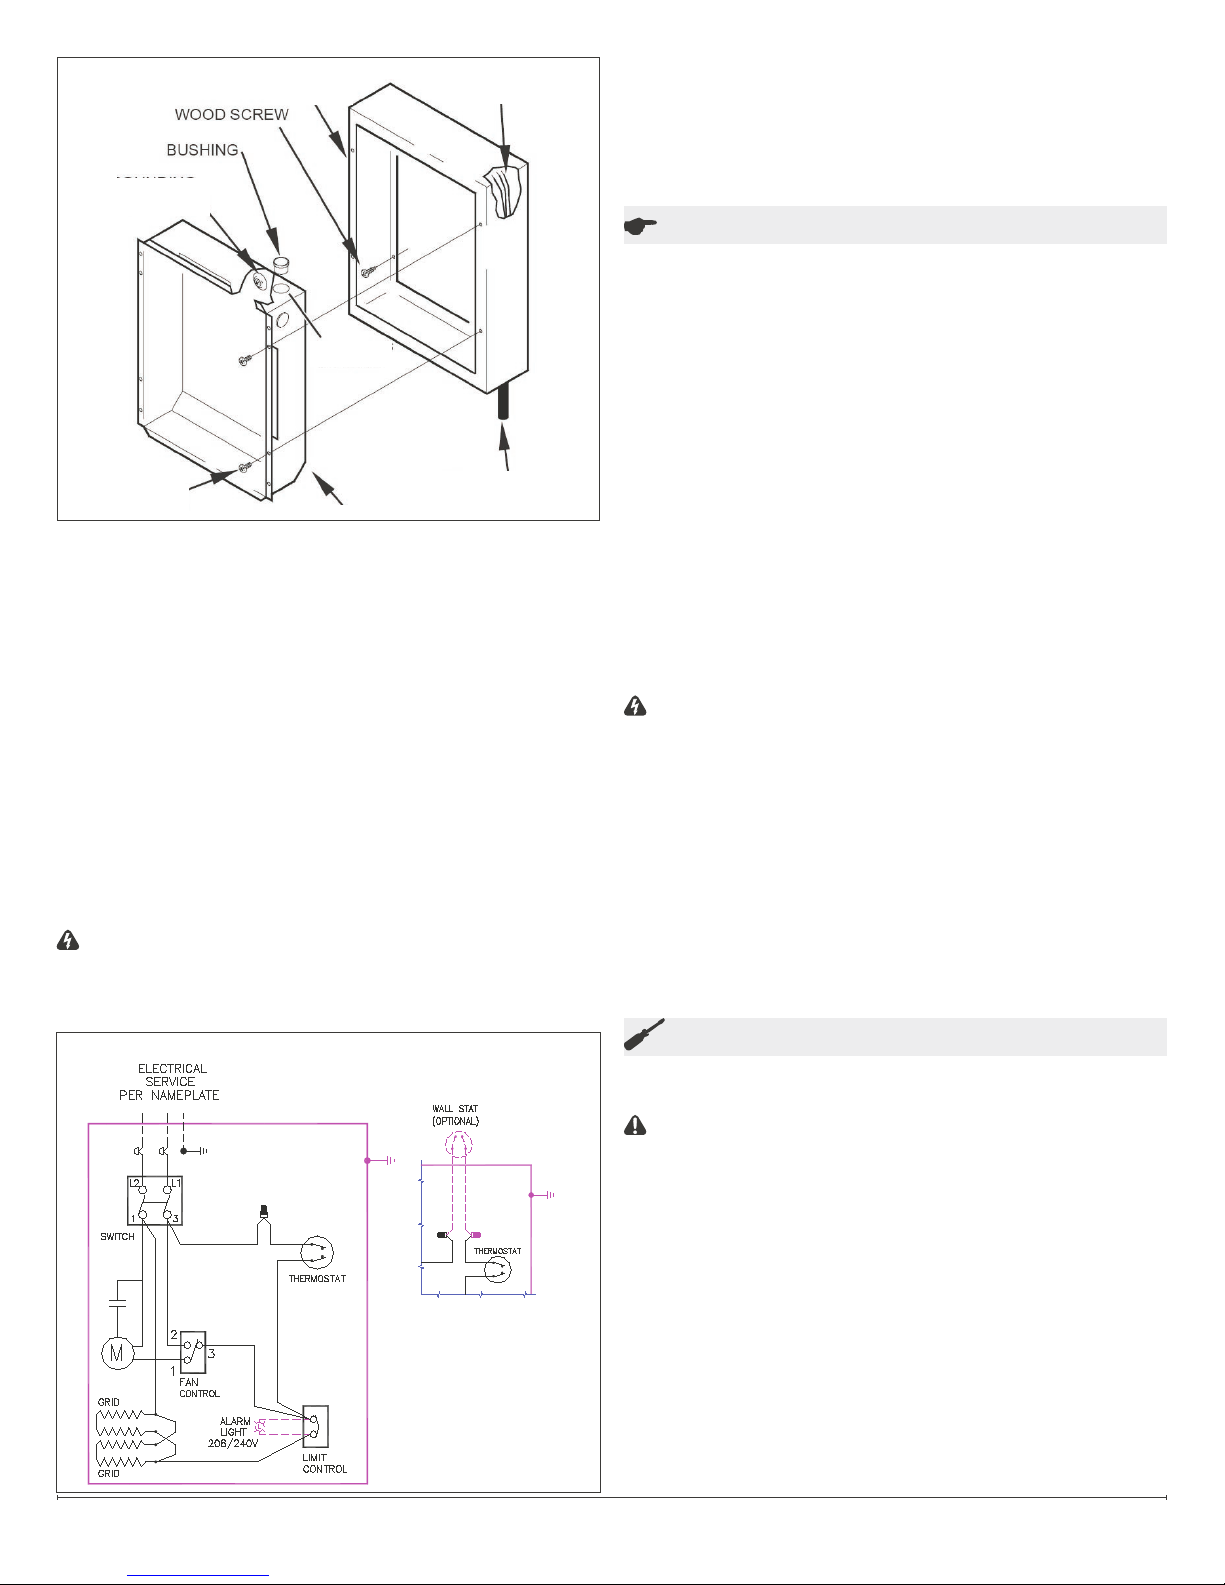
Figure 2: Surface
GROUNDING
SCREW
SHEET METAL
SCREW
SURFACE
WALL BOX
REMOVE THIS
KNOCKOUT
HEATER WALL BOX
25” SERVICE
LEADS
SERVICE CABLE
near right side. Feed service leads through and secure
end of cable to the connector.
Remove the rear knockout on top of heater wall box near 4.
right side and insert bushing (provided). Feed service
wires through bushing. Secure wall box to surface box
with four sheet metal screws (provided with the surface
box). Screws are inserted through the inside holes on
the anges.
Proceed with steps 7 through 11 inclusive in recessed 5.
heater installation instructions.
Wiring
Two conductor non-metallic sheath cable with ground wire is
recommended for recessed installation of these heaters while
two conductor, metallic sheath cable (BX) is recommended
for surface installations. Use number 12 gauge wire for all
models. Each heater should be on an individual, properly
fused circuit.
WARNING: Wiring procedures and connections should
be in accordance with the National Electric code (NEC) and
local codes.
When installing optional wall thermostat, unit mounted 1.
Figure 3
thermostat must be set at it’s highest setting.
All external control equipment (shown with dashed lines) 2.
furnished by customer. Control wiring must be suitable
for 600V.
Heater branch circuits shall have a carrying capacity of 3.
no less than 125% of maximum load served.
Operation
These heaters are operated by an on/off switch and also a
temperature control with a knob.
Turn the switch ON. Remember there is a fan delay.1.
Set thermostat by turning the knob to desired room 2.
comfort level (clockwise to increase heat output). Once
you have determined the proper setting to provide the
heat level you prefer, you need not touch the knob again.
Turn the switch OFF to turn off heater. To reuse, simply 3.
turn the switch ON - the temperature level you wish has
been previously set.
!
NOTE: This heater is equipped with a fan delay switch
which delays the fan operation until the heating grid has
heated sufciently to assure the circulation of only warm air.
This same switch permits the fan to operate after power to
the grid has been shut off by thermostat action, thus utilizing
all the heat remaining in the grid.
When the heater is shut down by turning the switch OFF,
power to both fan motor and element is diconnected and the
fan motor will not continue to operate.
WARNING:Should the OVERTEMP light come on,
disconnect power to the heater, turn the switch OFF or
turn down the thermostat fully counterclockwise and call
a licenced electrician. DO NOT USE HEATER UNTIL
PROBLEM IS DETERMINED AND FIXED.
Tamper Proof Models
The ON/OFF switch and the temperature regulating
thermostat are recessed so that the continuous grille front
panel can be installed concealing both controls. The
thermostat is operated by removing the front panel. The
ON/OFF switch can be operated by inserting a slender non
metallic rod between grill louvers and turning the switch ON
or OFF.
Maintenance
This heater requires no maintenance other than a cleaning at least
once a year.
CAUTION: Before removing heater parts, open branch
service switch or remove fuses. These are located at the
distribution panel.
To clean, remove frame, grille and heater assembly. Remove
any dust and dirt from wall box and heater assembly with a
soft cloth or brush, then re-install heater assembly making
sure that the fan turns freely and service leads are away from
fan area. The frame and grille may be washed with a mild
detergent, however make sure they are thoroughly rinsed
and dried before re-installation.
www.dimplex.com2
Page 3

Warranty
The Manufacturer warrants the heating elements and components
of the enclosed product against any defect in material or
workmanship for a period of one year from the date of purchase. In
full satisfaction of any claims under this Warranty the Manufacturer
will repair or replace without charge, in its factory or in the eld as it
alone may decide, any parts which in its opinion are defective.
The Manufacturer shall not be responsible for any transportation
or shipping costs in relation to such repair or replacement except
as specically assumed by it. Misuse of this product or repairs by
persons other than the Manufacturer’s authorized personnel without
the Manufacturer’s written approval, will void this Warranty.
This Warranty is in lieu of all other warranties or conditions
whether express or implied including but not limited to those of
merchantability or tness for purpose and shall constitute the sole
remedy of the Purchaser and the sole liability of the Manufacturer in
respect of the sale of the product, whether in the nature of breach or
breach of fundamental term, or of negligence or otherwise.
The Manufacturer shall not be liable for any special, indirect or
consequential damages or for any damages resulting from removal
or replacement of a heater subject to warranty claim without the
Manufacturer’s authorization.
This Warranty is transferable by the original consumer purchaser
of the product. Any claims under this Warranty must be submitted
in writing to the Service Manager, Dimplex North America Ltd., 1367
Industrial Rd., Cambridge, Ontario N1R 7G8, Canada.
Replacement Parts
Fan Blade . . . . . . . . . . . . . . . . . . . . . 5300190159RP
Cut Out . . . . . . . . . . . . . . . . . . . . . . . 02005375RP
Fan Delay . . . . . . . . . . . . . . . . . . . . . 2300100000RP
Thermostat . . . . . . . . . . . . . . . . . . . . 2600060100RP
Grill . . . . . . . . . . . . . . . . . . . . . . . . . . 1019030168RP
Knob . . . . . . . . . . . . . . . . . . . . . . . . . 8800540368RP
CATALOGUE
NO.
EWA30C21
EWA30C31 2200220100RP
EWA30C41 2000260500RP 3200070400RP 2200220400RP
EWA40C21
EWA40C31 2200220300RP
EWA40C41 2000260500RP 3200070400RP 2200220100RP 2600060100RP
MOTOR CAPACITOR ELEMENT THERMOSTAT SWITCH
2000260400RP 3200070100RP
2000260400RP 3200070100RP
2200220300RP
2200220200RP
2600060100RP
2600060700RP
2800071200RP
2800071300RP
1367 Industrial Road Cambridge ON Canada N1R 7G8
1-888-346-7539 www.dimplex.com
In keeping with our policy of continuous product improvement, we reserve the right to make changes without notice.
© 2011 Dimplex North America Limited
3
 Loading...