

Page 1
Montage- und Gebrauchsanweisung
D
DXW 307 – DXW 330 Wandkonvektor
1. Wichtige Hinweise
Bitte lesen Sie alle in dieser Anweisung aufgeführten Informationen aufmerksam durch. Bewahren Sie die Anweisung
sorgfältig auf und geben Sie diese gegebenenfalls an Nachbesitzer weiter.
- Das Gerät ist von einer zugelassenen Fachkraft zu installieren.
-
Das Gerät darf nur zur Raumlufterwärmung innerhalb
geschlossener Räume verwendet werden.
-
Reparaturen und Eingriffe in das Gerät dürfen nur von
einem Elektro-Fachmann ausgeführt werden.
-
Im Fehlerfall oder bei längerer Außerbetriebnahme Gerät vom Netz trennen. Sicherung ausschalten bzw.
herausdrehen.
-
Heizgerät nicht abdecken, Brandgefahr!
-
Vorsicht! Außenflächen werden bei Betrieb heiß.
-
Heizgerät nicht ohne Aufsicht betreiben, wenn Kleinkinder in der Nähe sind.
-
Es dürfen keine Gegenstände in die Öffnungen der
Geräte eingeführt werden.
-
In Räumen, in denen feuergefährliche Stoffe verwendet werden (z.B. Lösungsmittel etc.), darf das Heizgerät nicht betrieben werden.
-
Die Anschlussleitung darf nicht über das heiße Gerät
gelegt werden.
-
Vorsicht! Nach dem automatischen Einschalten (über
den Thermostaten) des angeschlossenen Gerätes in
Ihrer Abwesenheit können Gefahren entstehen, z.B.
könnten zwischenzeitlich zugedeckte oder verstellte
Geräte Brände auslösen.
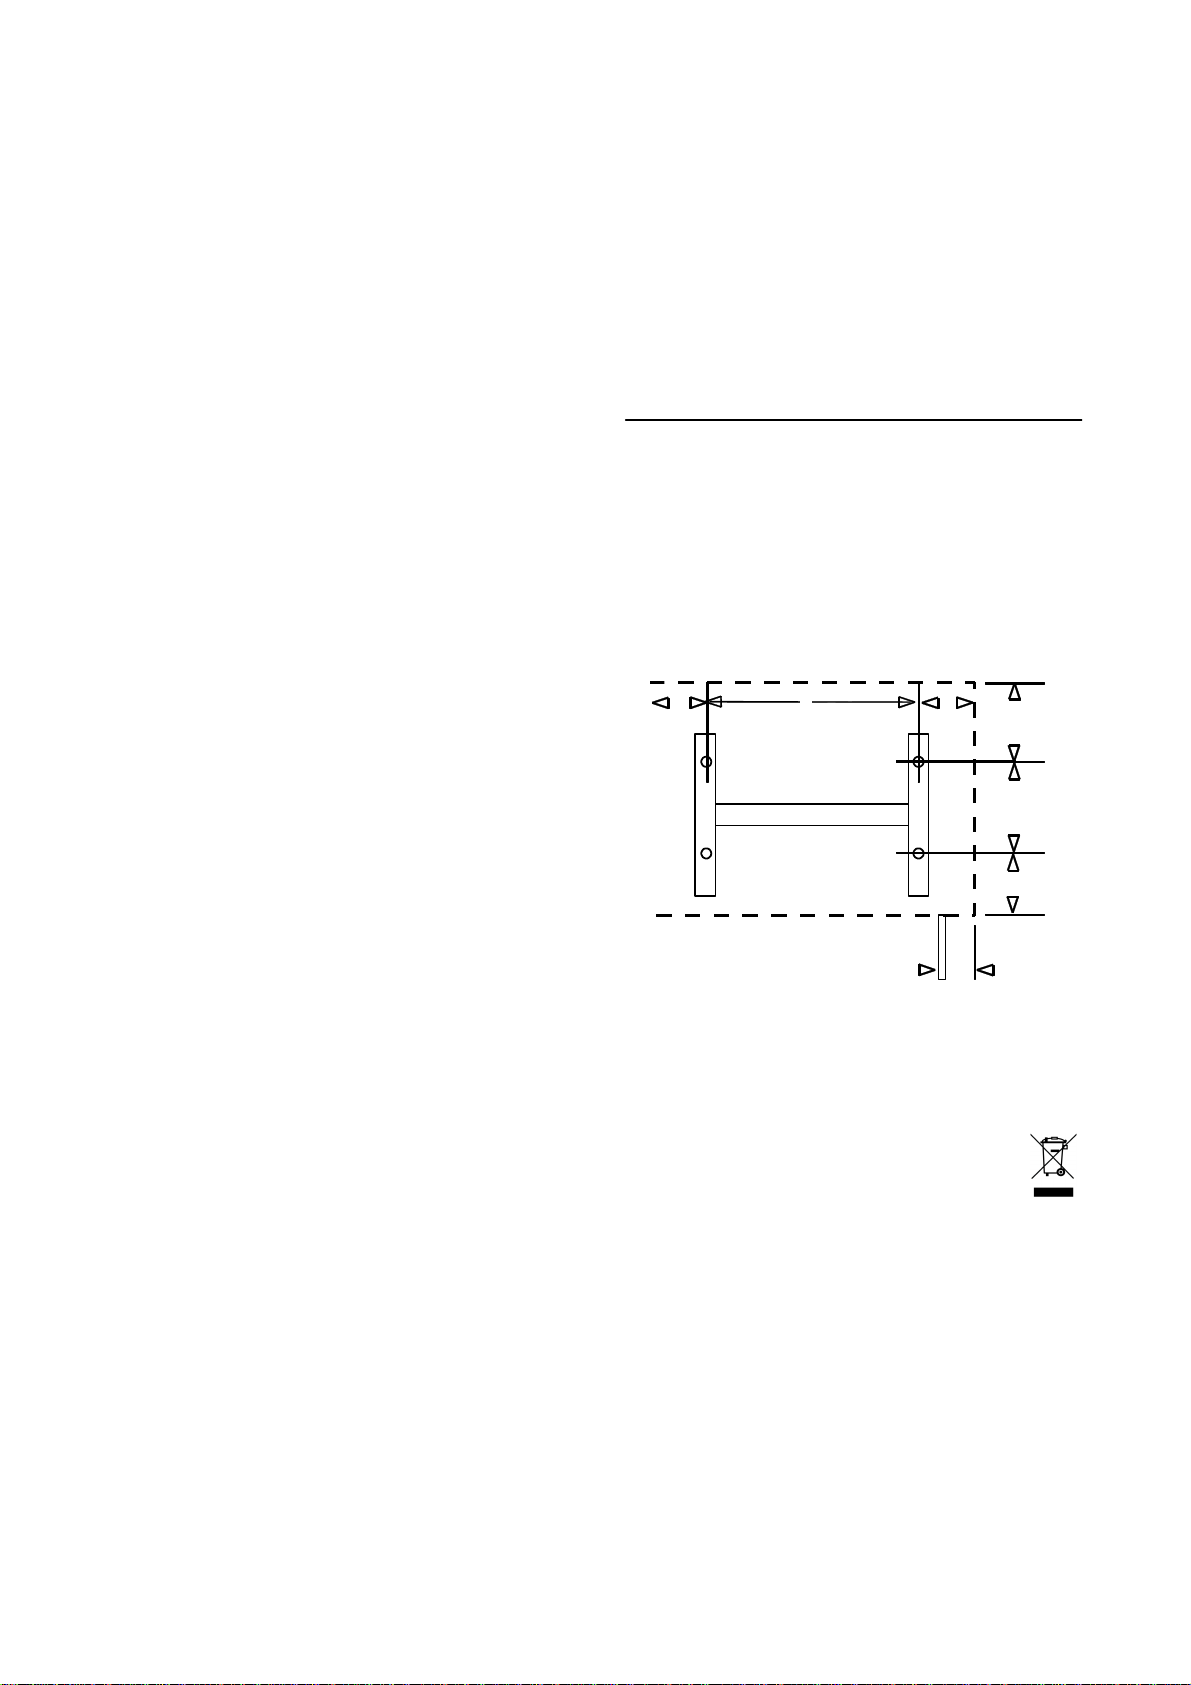
2. Montage, Installation, Mindestabstände
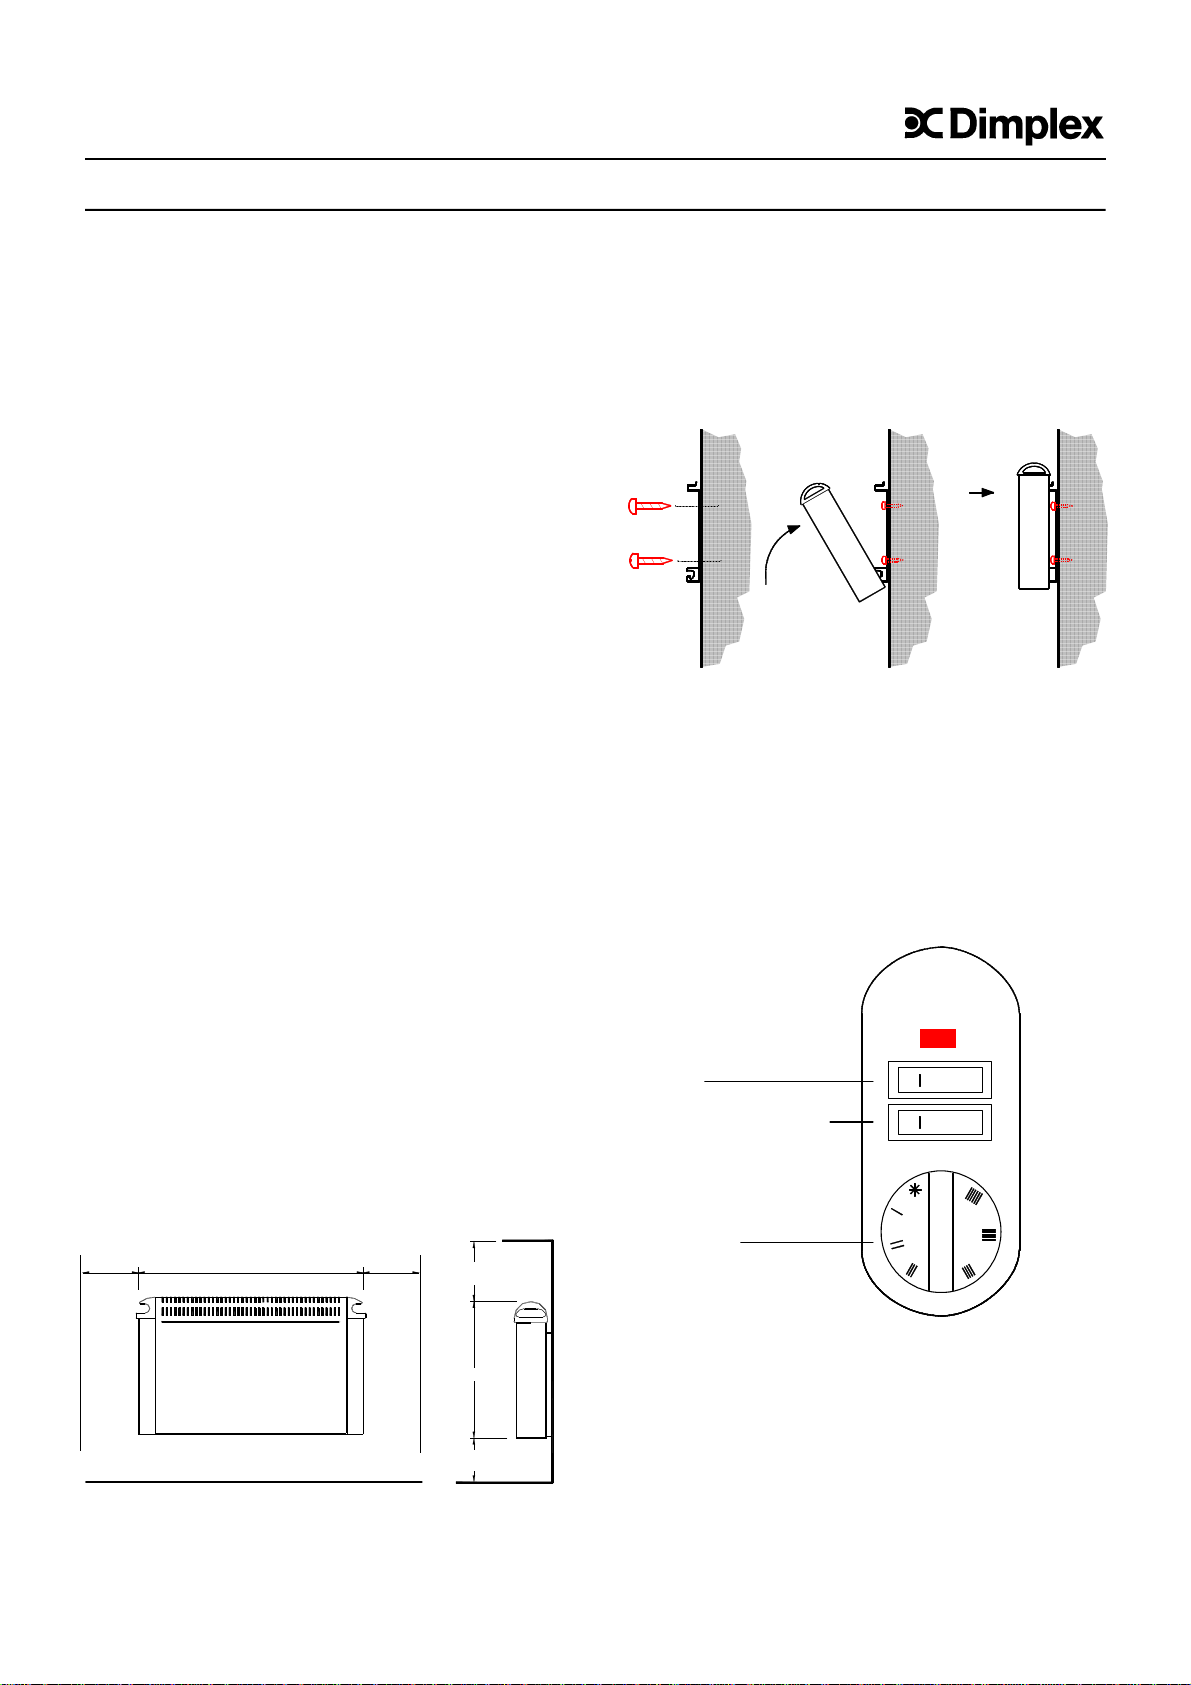
Das Heizgerät muss horizontal ausgerichtet an einer senkrechten Wand, wie im Bild dargestellt, installiert werden.
Die unten aufgeführten Mindestabstände müssen eingehalten werden!
Ferner ist an der Vorderseite des Heizgerätes ein Abstand
von min. 500 mm einzuhalten.
Das Heizgerät darf nicht unmittelbar unterhalb einer Wandsteckdose installiert werden
Das Gerät ist so zu installieren, dass die Bedienelemente
nicht von einer sich in der Badewanne oder unter der Dusche befindlichen Person berührt werden können.
Vorsicht vor brennbaren Gegenständen!
Bitte achten Sie darauf, dass die Luft unten und oben am
Gerät ungehindert ein- und austreten kann
230
MIN
577
230
MIN
.
450
MIN
357
230
MIN
INDCEADX30 Issue 1 07/10/D
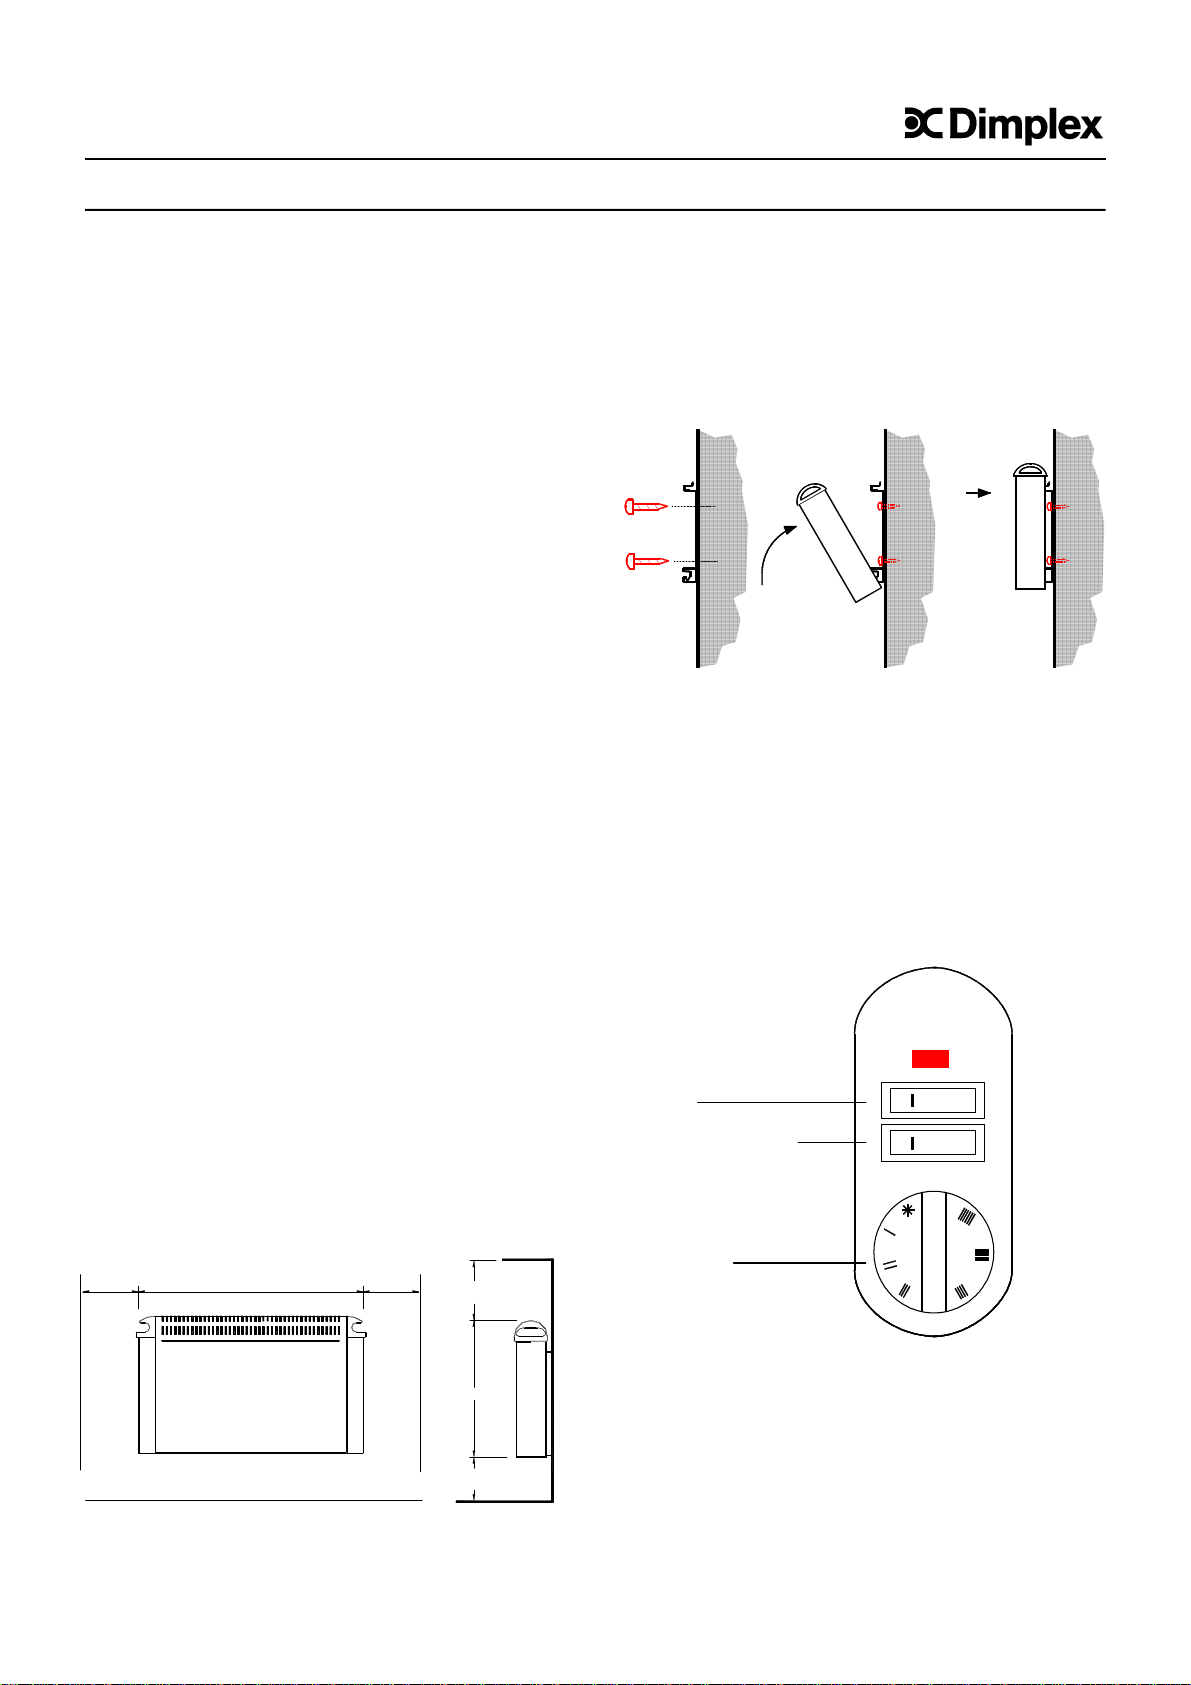
Wandmontage
WICHTIG-
Die an der Rückseite des Gerätes mitgelieferte OriginalWandhalter muss verwendet werden.
- Befestigungslöcher für Wandhalter bohren.
- Wandhalter fest an die Wand schrauben.
- Heizgerät mit den an der Geräterückwand befindlichen
Schlitzen in die Wandhalterung einhängen.
- Heizgerät oben am Wandhalter einrasten.
3. Elektrischer Anschluss
Die Geräteanschlussleitung muss an eine für das Heizgerät bestimmte Anschlussdose angeschlossen werden.
Wenn die Anschlussleitung dieses Gerätes beschädigt wird,
muss sie durch eine besondere Anschlussleitung ersetzt
werden, die vom Hersteller oder seinem Kundendienst erhältlich ist.
4. Heizbetrieb
Alle Schalterfunktionen sind unten erläutert.
Ein/Aus
Leistung 50%, 100%
(DXW 315 – DXW 330)
Thermostat
Das Heizgerät ist mit einem Thermostaten ausgestattet, mit
dem das Heizgerät und damit die Raumtemperatur durch
Wahl der entsprechenden Einstellung geregelt werden
kann.
Die Einstellung
6°C (Frostschutzstellung).
Rechtsdrehen (im Uhrzeigersinn) des Thermostatknopfes
erhöht den eingestellten Temperaturwert, Linksdrehen (gegen den Uhrzeigersinn) reduziert den Temperaturwert.
∗∗∗∗
bedeutet eine Raumtemperatur von ca.
I
IIOI
2
1
Page 2
Achtung!
Je nach Raumgröße, Wärmebedarf und
Thermostateinstellung können Räume bei unbeaufsichtigter
Beheizung überheizt werden. Dies kann zu Gefahren für
Personen führen, die nicht in der Lage sind, den Raum bei
überhöhter Temperatur zu verlassen.
5. Überhitzungsschutz
Zu Ihrer Sicherheit ist das Heizgerät mit einem
Überhitzungsschutz ausgerüstet. Wird die Luftzirkulation
gestört (z.B. durch Verhängen oder Zustellen des Luftgitters), so schaltet das Gerät automatisch ab.
In diesem Fall sollte die Stromversorgung des Heizgerätes
für einige Minuten unterbrochen werden (Schalter auf „OStellung oder Netztrennung), damit sich das Gerät ausreichend abkühlen kann. Vor Wiederinbetriebnahme des Gerätes beseitigen Sie die Ursachen für das Ansprechen des
Überhitzungsschutzes.
Damit die volle Heizleistung abgegeben wird, ist es notwendig die Luftein- und Luftaustrittsöffnungen staubfrei zu halten. Bitte vor der Heizperiode mit Staubsauger reinigen!
6.Störungen
Wenn das Heizgerät keine Wärme abgibt, prüfen Sie bitte,
ob das Gerät eingeschaltet ist und der Thermostat auf die
gewünschte Temperatur eingestellt ist, sodann ob der Automat in der Stromverteilung eingeschaltet bzw. die Sicherung in Ordnung ist.
Kann die Störung nicht behoben werden, wenden Sie sich
bitte an die nächstgelegene Kundendienststelle.
Für die Auftragsbearbeitung werden die E-Nummer und FDZahl des Gerätes benötigt. Diese Angaben finden Sie auf
dem Typschild.
Reparaturen und Eingriffe in das Gerät dürfen nur von einem Elektrofachmann oder dem Kundendienst ausgeführt
werden.
7. Kundendienst
Im Kundendienstfall ist die Robert Bosch Hausgeräte GmbH
als zuständiger Kundendienst zu informieren.
Auftragsannahme
Tel.-Nr. +49 (0) 1801 / 22 33 55
Fax.-Nr. +49 (0) 1801 / 33 53 07
Ersatzteilbestellungen
Tel.-Nr. +49 (0) 1801 / 33 53 04
Fax.-Nr. +49 (0) 1801 / 33 53 08
Email: spareparts@bshg.com
Ersatzteil-Bestellungen im Internet unter:
http://www.dimplex.de
8. Reinigung
Zur Reinigung muss das Gerät vom Netz getrennt und abgekühlt sein. Die Außenseite kann durch Abwischen mit
einem weichen, feuchten Lappen gereinigt werden. Zur Reinigung keine Scheuerpulver oder Möbelpolituren verwenden, da diese die Oberfläche beschädigen können.
Staubansammlungen im Gerät können von außen mit einem
Staubsauger abgesaugt werden.
9. Technische Daten
Anschlussspannung 1/N/PE~ 230V, 50Hz
Schutzklasse I Schutzleiteranschluss
Schutzart IP 20
Typ Leistung Gewicht Breite Höhe Tiefe Maß A
(alle Maßangaben in mm)
DXW 307 750 W 3,5 kg 577 357 124 357
DXW 310 1000 W 3,5 kg 577 357 124 357
DXW 315 1500 W 3,5 kg 577 357 124 357
DXW 320 2000 W 3,5 kg 577 357 124 357
DXW 325 2500 W 4,1 kg 697 357 124 477
DXW 330 3000 W 4,1 kg 697 357 124 477
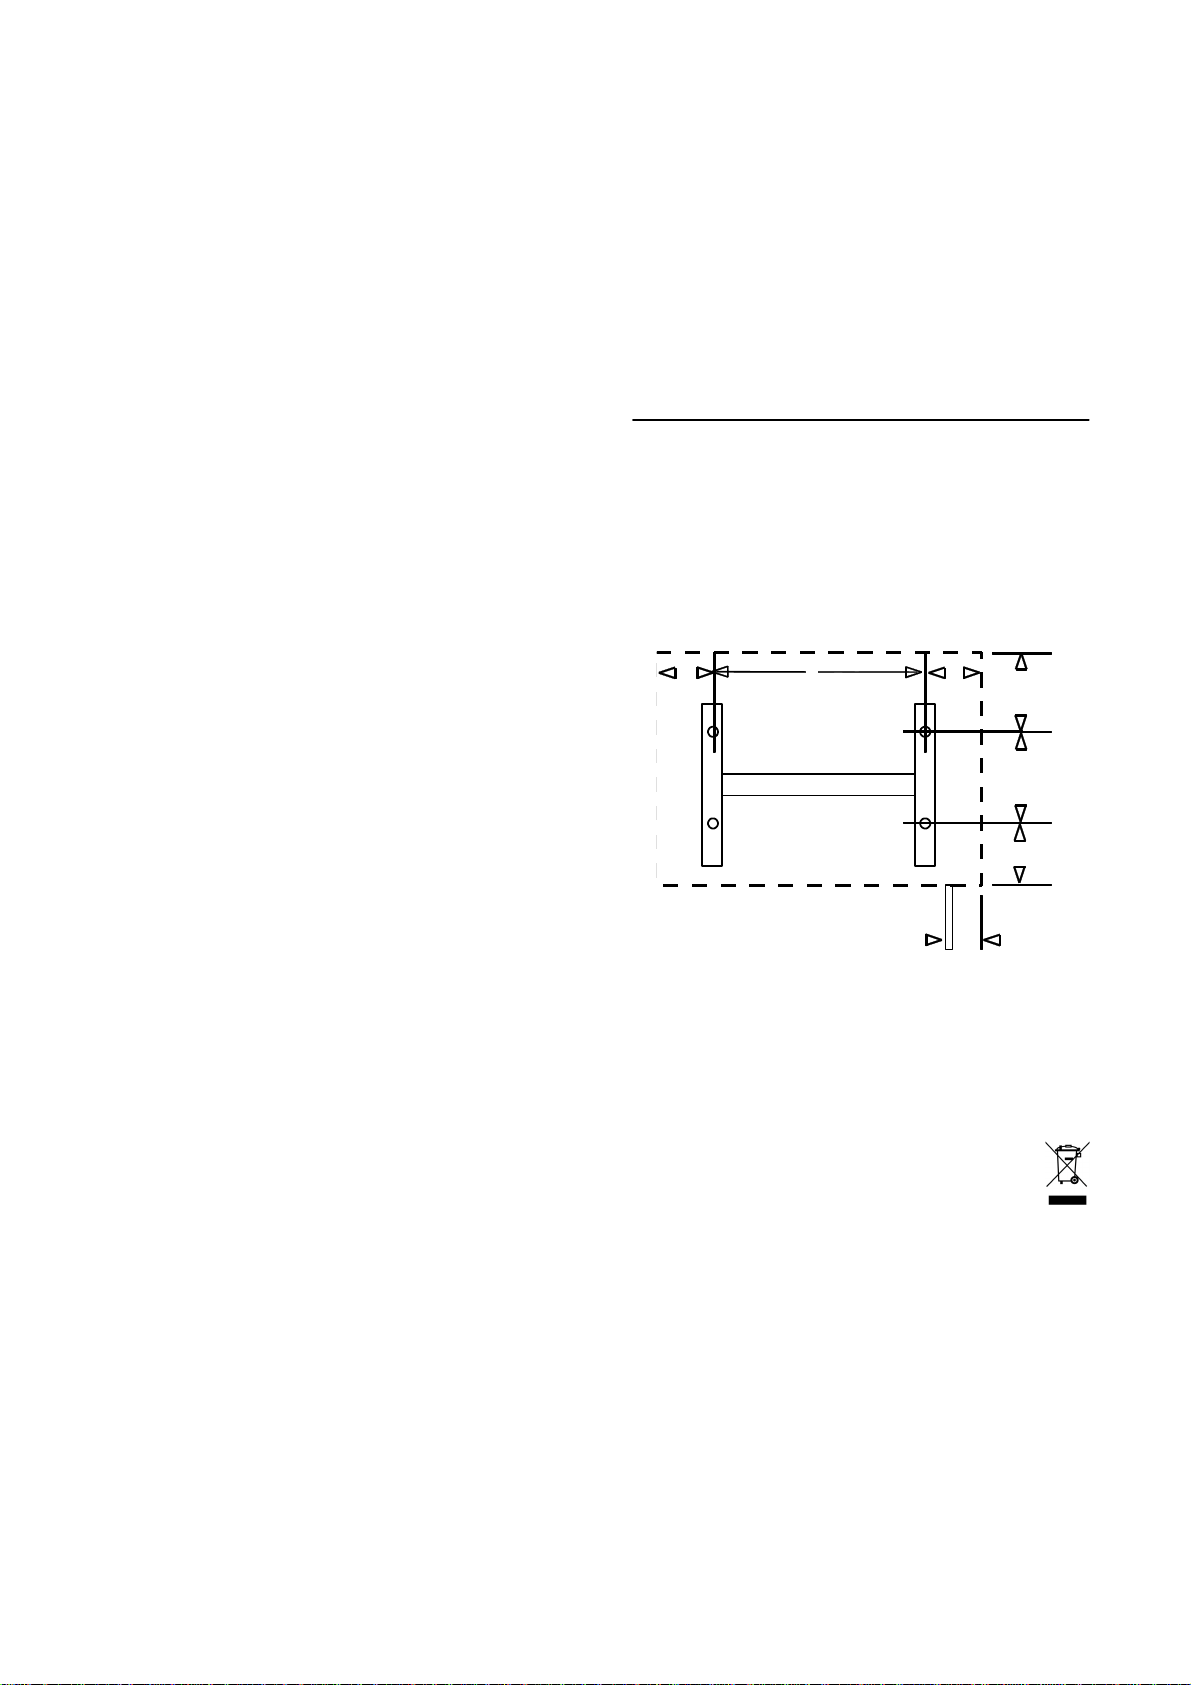
Bohrmaße (Frontansicht)
110 110
A
91
184
82
52
Kabeleinführung
10. Garantie
Für dieses Produkt übernehmen wir 2 Jahre Garantie gemäß unseren Garantiebedingungen.
Entsorgungshinweis
Das Gerät nicht im allgemeinen Hausmüll entsorgen, sondern einer örtlichen Entsorgungsstelle zuführen
2
Page 3
Instructions for Installation and Use
GB
DXW 307 – DXW 330 Convector Heater
1. Important Information
Please read carefully all the information provided in these
instructions. Keep the instructions in a safe place and if
necessary give them to any future owner.
- The device may only be installed by an authorized and
qualified technician.
-
The unit may only be used for space heating in enclosed rooms.
-
Any examination of the heater or repair work may only
be carried out by a qualified electrician.
-
Disconnect the heater from the power supply if it is
faulty or is not used for a long time. Disconnect or unscrew fuse.
-
Do not cover the heater in any way (risk of fire).
-
Warning: Outer surfaces become hot when heater is
switched on.
-
Do not leave heater unattended when small children
are present.
-
Do not insert any objects into the openings.
-
Do not use the heater in rooms containing flammable
materials (e.g. solvents, etc.).
-
Do not place the connecting lead on top of the appliance.
-
Warning: If the heater is switched on automatically (by
the thermostat), there is a danger of fire if it has been
in any way covered or blocked.
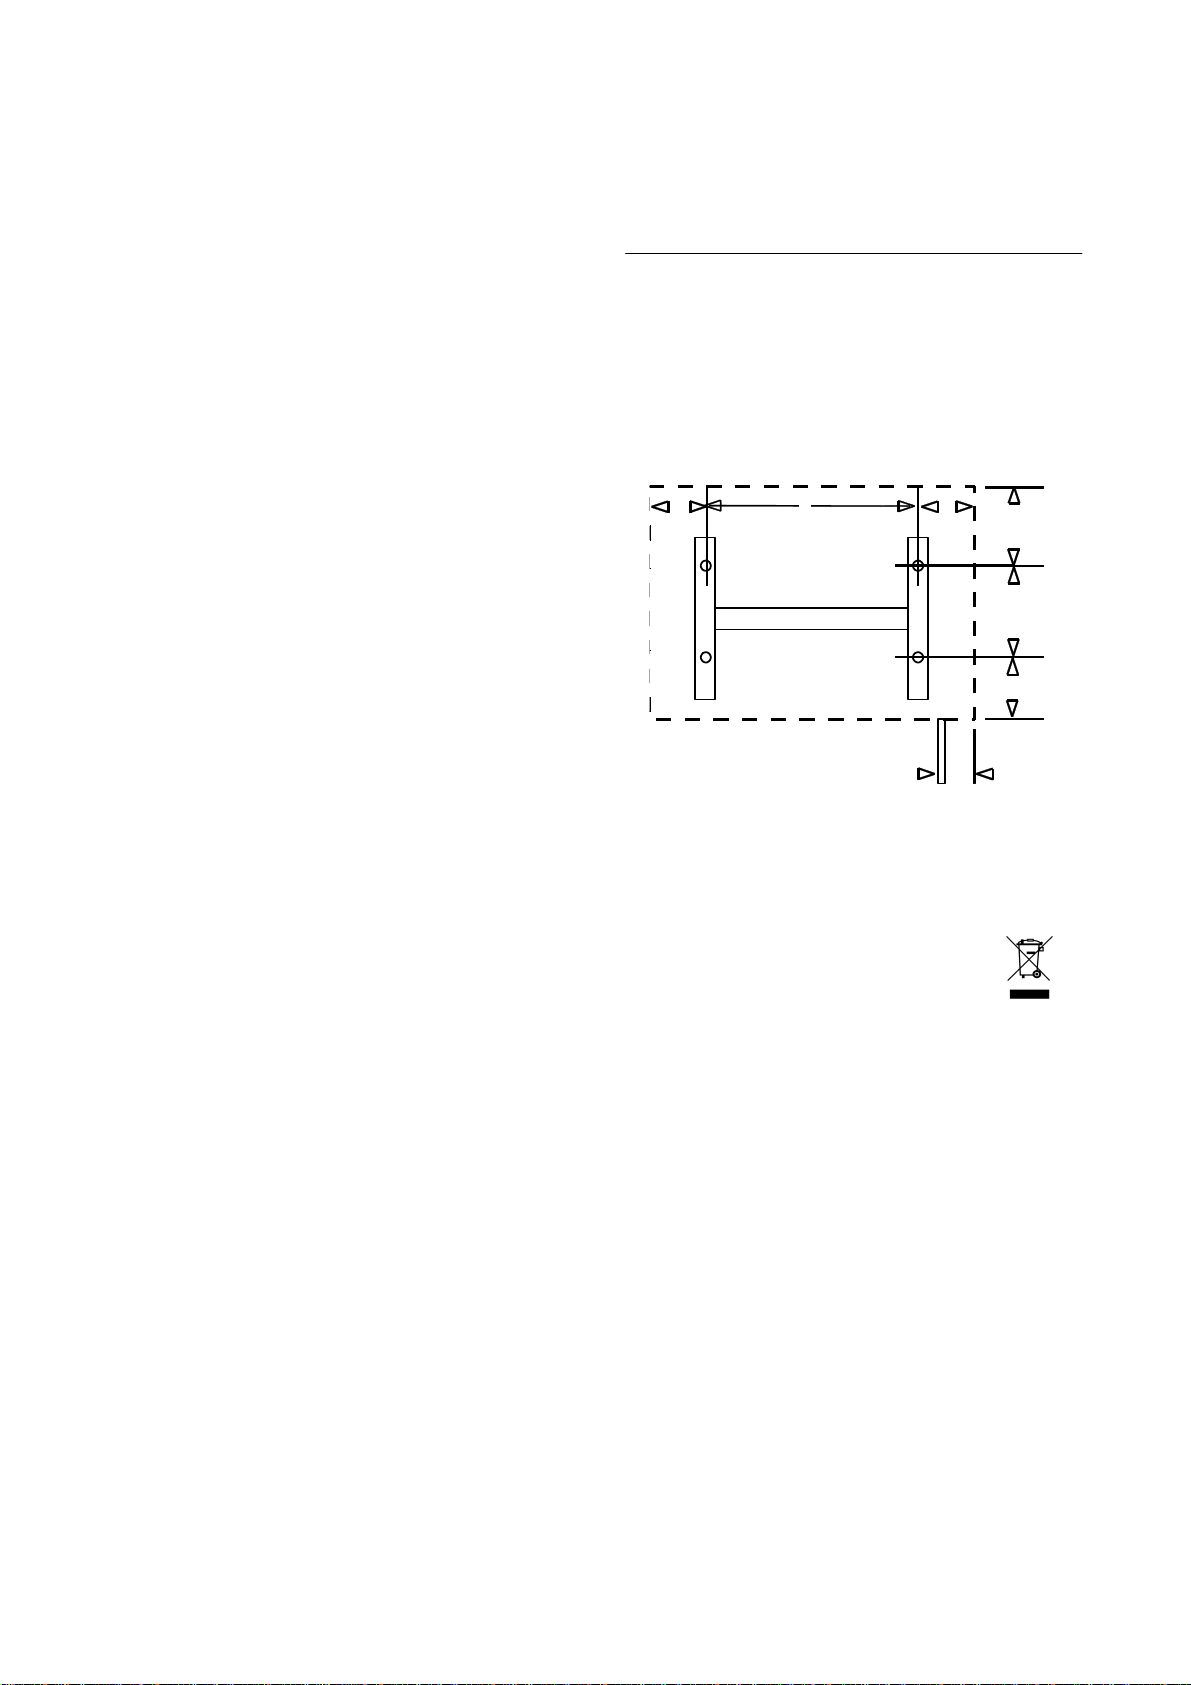
2. Positioning, Installation, Minimum Clearances
When installed, the heater must be aligned horizontally on a
vertical wall, as shown in the illustration.
The minimum clearances shown below must be complied
with.
In addition, a minimum distance of at least 500 mm must be
maintained in front of the heater.
The heater must not be located directly beneath a wall
socket outlet.
Do not install the heater where the controls can be reached
by a person bathing or showering.
Caution: Do not place near flammable objects.
Ensure that air can enter and leave the heater freely, at the
inlets below and the outlets above.
230
MIN
577
230
MIN
450
230
MIN
357
MIN
07/10/D
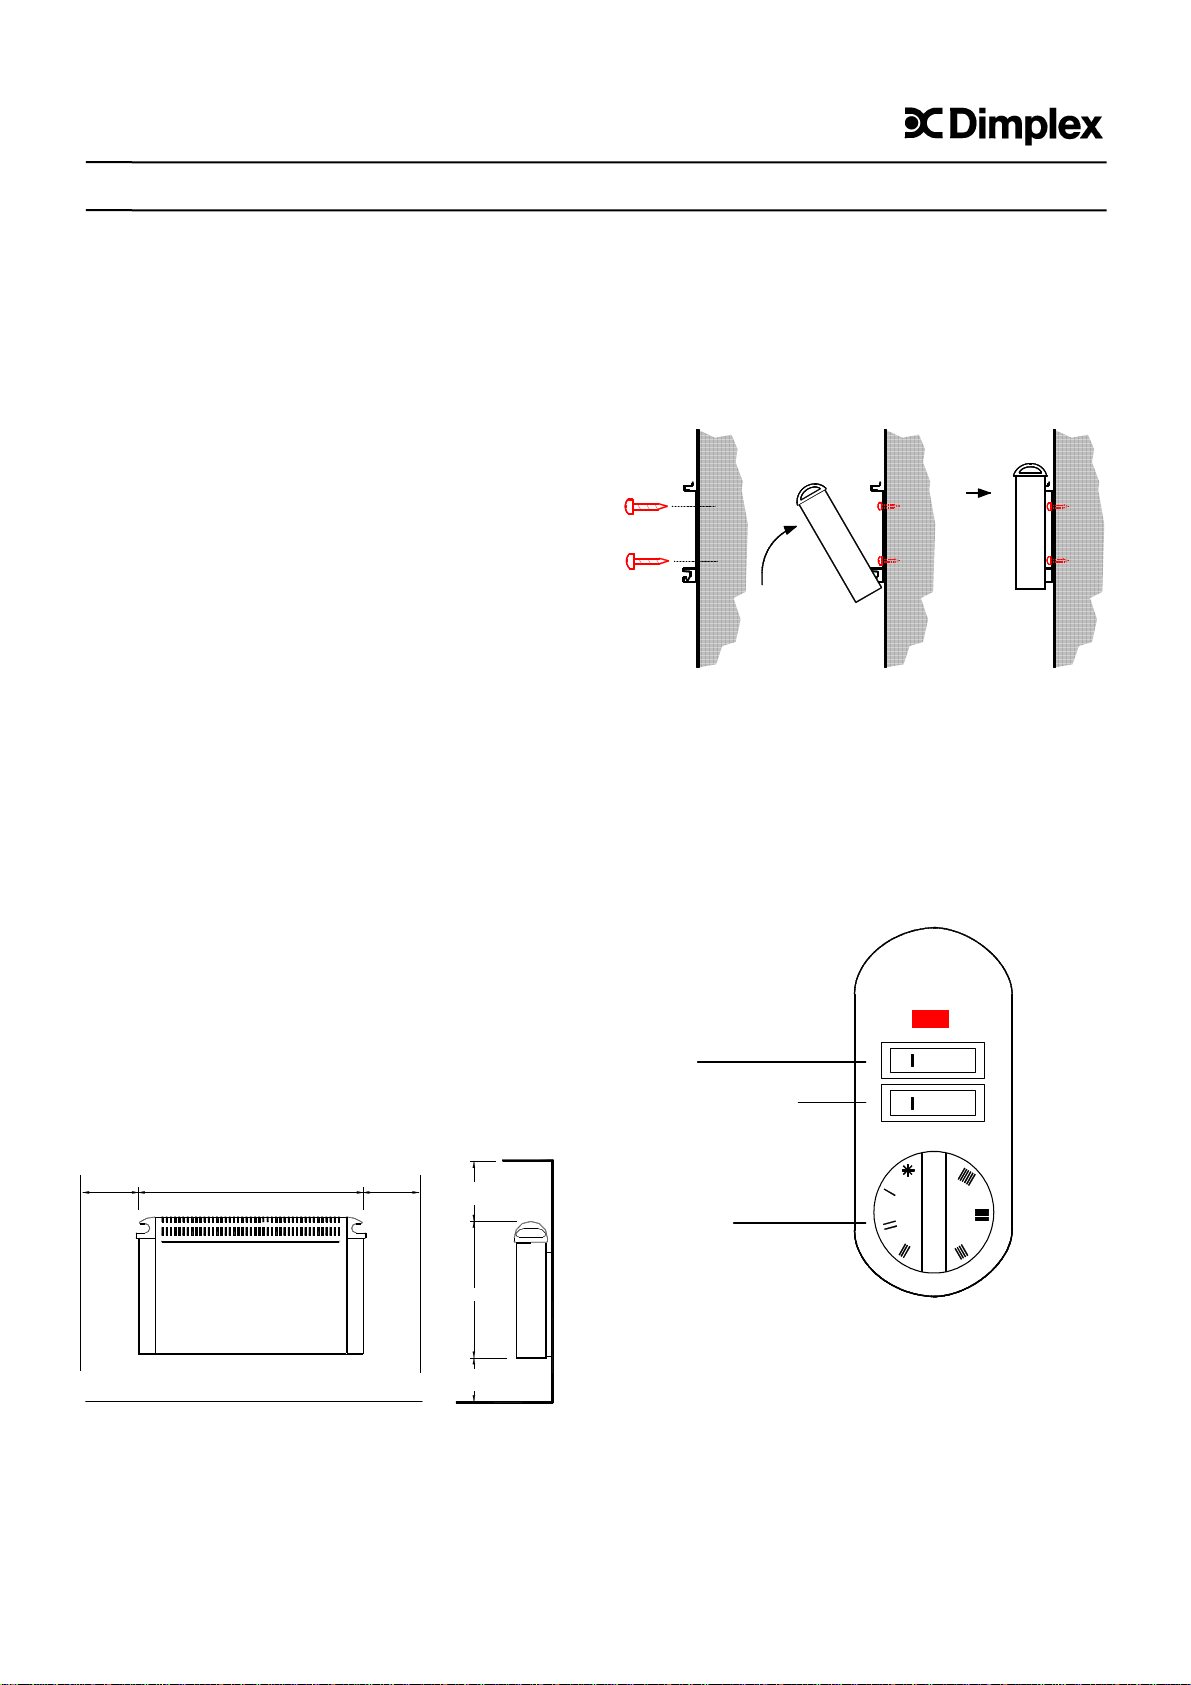
Wall Mounting
IMPORTANTThe original wall brackets supplied attached to the rear of
the unit must be used.
- Drill mounting holes for the wall brackets.
- Screw the brackets securely to the wall.
- Hang the heater from the wall brackets using the slits in
its rear wall.
- Secure the heater at the top on the wall brackets.
3. Electrical Connection
The heater lead must be connected to a suitable socket.
If the connecting lead is damaged, it must be replaced; a
special new lead can be obtained from the manufacturer or
from after-sales service.
4. Heater Operation
All switch functions are explained below.
On/Off
Output 50%, 100%
(DXW 315 – DXW 330)
Thermostat
I
IIOI
The heater is equipped with a thermostat, by means of
which the desired room temperature can be set.
The setting * represents a room temperature of about 6°C
(protection against freezing).
Turning the thermostat knob to the right (clockwise) increases the temperature setting, while turning to the left
(anticlockwise) reduces the desired temperature.
3
Page 4
Warning!
Depending on the size of the room, heat requirement and
thermostat setting, rooms may overheat if the heating is not
controlled. This can be dangerous for people who are not
able to leave the room as it gets too hot.
5. Anti-Overheat
The heater is protected against overheating. If the air circulation is impeded (e.g. by covering or blocking of the air
grille), the unit automatically switches off.
If this occurs, switch the heater off for a few minutes (turn
the switch to “0” or pull the plug out), so that the unit can
cool down sufficiently. Before switching the unit on again,
remove the cause of overheating.
Keep the air inlets and outlets free of dust to ensure that
maximum heat output is available. Before the start of the
heating season, vacuum-clean the heater to remove any dirt
or dust.
6. Possible Faults
If the heater does not give out any warmth, check that it is
switched on and that the thermostat is set to the
correct temperature. Then check the fuse or miniature circuit
breaker.
If the cause of the fault cannot be identified, contact the
nearest after-sales service center.
You must state the unit E-number and FD-number, as indicated on the type plate (wiring compartment cover).
Any examination of the heater or repair work may only be
carried out by a qualified electrician or after-sales service
technician.
7. Cleaning
Before cleaning, ensure that the heater is disconnected from
the power supply and that it has cooled down. The outer
surface can be wiped with a soft damp cloth. Do not use
scouring powder or furniture polish, as these can damage
the surface.
Dust that collects within the unit can be removed from the
outside using a vacuum cleaner.
8. Technical Data
Power supply voltage 1/N/PE~ 230V, 50Hz
Protection class I
Protection system
Protective earth terminal
IP 20
Type
DXW 307 750 W 3.5 kg 577 357 124 357
DXW 310 1000 W 3.5 kg 577 357 124 357
DXW 315 1500 W 3.5 kg 577 357 124 357
DXW 320 2000 W 3.5 kg 577 357 124 357
DXW 325 2500 W 4.1 kg 697 357 124 477
DXW 330 3000 W 4.1 kg 697 357 124 477
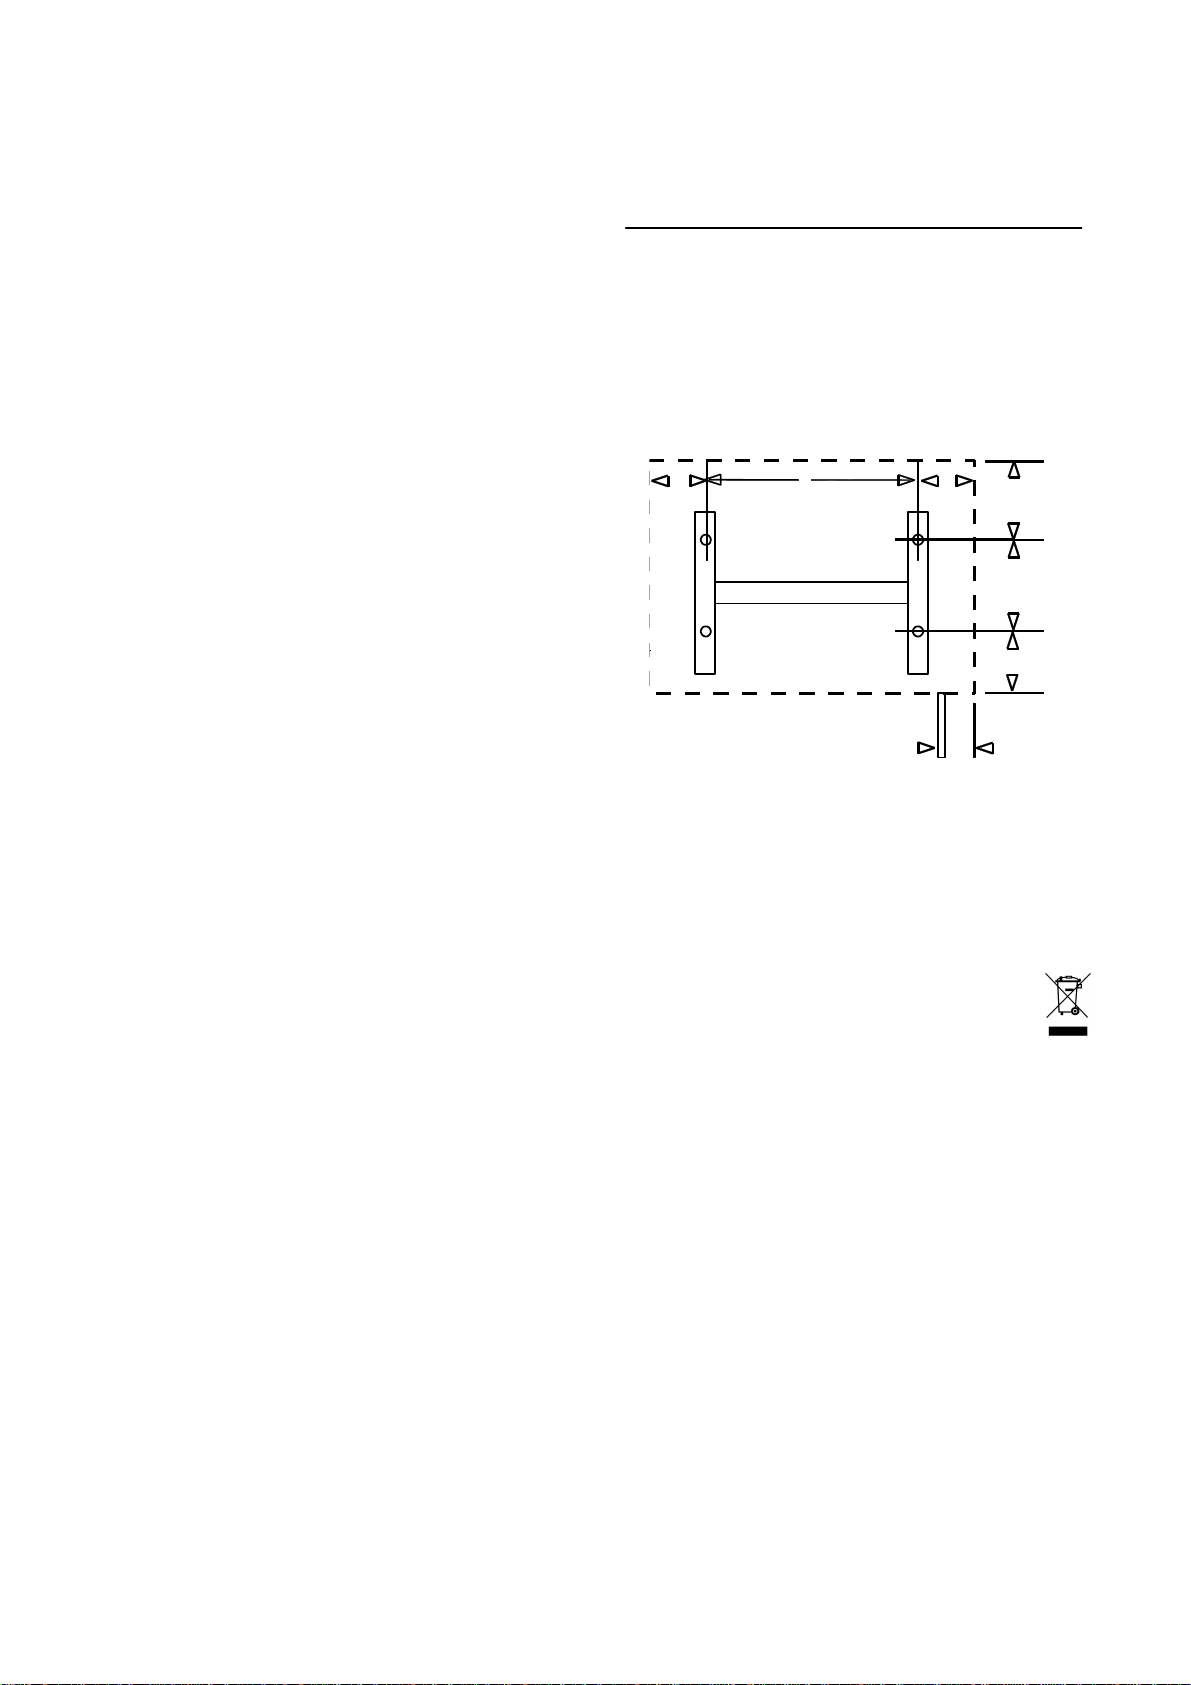
Drilling dimensions (front view)
9. Warranty
Authorized dealers can provide information on the terms
and conditions of warranty. The warranty is not valid without
a sales receipt marked with the date of purchase.
Disposal Notice
The product should not be disposed of with
your other household waste
Output Weight Width Height Depth Dim. A
110 110
A
(all dimensions in mm)
91
184
82
52
4
Page 5
Instructions de montage et de service
F
DXW 307 – DXW 330 Convecteur de base mural
1. Indications importantes
Veuillez lire attentivement et intégralement les présentes
instructions. Conservez-les soigneusement et remettez-les
au prochain propriétaire le cas échéant.
- L’installation de l’appareil doit impérativement être
confiée à un professionnel.
-
L’appareil doit être utilisé uniquement pour réchauffer
l’air ambiant de locaux fermés.
-
Les réparations et interventions sur l’appareil ne doivent être effectuées que par un professionnel.
-
En cas de défaillance ou d’arrêt prolongé, isoler
l’appareil du secteur. Couper ou retirer les fusibles.
-
Ne pas couvrir l’appareil de chauffage. Risque
d’incendie !
-
Attention ! Lorsque l’appareil est allumé, les surfaces
extérieures deviennent chaudes.
-
Ne pas utiliser l’appareil sans surveillance lorsque des
enfants en bas âge se trouvent à proximité.
-
Ne pas introduire d’objets dans les ouvertures de
l’appareil.
-
Ne pas faire fonctionner l’appareil dans des locaux où
sont utilisées des matières inflammables (solvants,
etc.).
-
Ne pas poser le câble d’alimentation sur l’appareil
chaud.
-
Attention ! Lorsque l’appareil branché s’enclenche
automatiquement en votre absence (sous l’effet du
thermostat), cela peut engendrer des dangers (p.ex.
risque d’incendie du fait du recouvrement ou du déplacement de l’appareil à votre insu).
2. Montage, installation, écartements minimaux
L’appareil de chauffage doit être installé horizontalement
sur un mur vertical comme sur le schéma.
Veuillez respecter les distances minimales.
A l’avant de l’appareil, respecter un espacement minimal
de 500 mm.
L’appareil ne doit pas être installé juste sous une prise de
courant murale.
Installez l’appareil de sorte que les organes de commande
ne puissent pas être touchés par une personne se trouvant
dans la baignoire ou sous la douche.
Faites attention aux objets inflammables.
Veillez à ce que l’entrée et la sortie de l’air en bas et en
haut de l’appareil ne soient pas entravées.
230
MIN
577
230
MIN
450
357
230
MIN
MIN
Montage mural
IMPORTANTUtilisez impérativement la fixation murale d’origine livrée
avec l’appareil et située au dos de celui-ci.
- Percer les trous pour la fixation murale.
- Visser la fixation solidement au mur.
- Suspendre l’appareil à la fixation murale au moyen des
fentes situées au dos de l’appareil.
- Encliqueter le haut de l’appareil sur la fixation murale.
3. Branchement électrique
Raccordez le câble d’alimentation de l’appareil à une prise ap-
propriée.
Si le câble d’alimentation de l’appareil est endommagé, il
doit être remplacé par un câble d’alimentation spécial, en
vente chez le fabricant ou son service après-vente.
4. Mode chauffage
Les fonctions du commutateur sont expliquées ci-dessous.
ON/OFF
Puissance 50%, 100%
(DXW 315 – DXW 330)
Thermostat
L’appareil est équipé d’un thermostat qui permet de régler
l’appareil et donc la température ambiante par sélection de
la position correspondante du commutateur.
Le réglage
environ 6°C (position hors gel).
Tournez le bouton du thermostat à droite (dans le sens des
aiguilles d’une montre) pour augmenter la valeur de la
température réglée et à gauche (en sens inverse des aiguilles d’une montre) pour réduire la température.
07/10/D
I
IIOI
∗∗∗∗
signifie que la température ambiante atteint
5
Page 6
Attention !
Il y a risque de surchauffe des pièces en cas de chauffage
sans surveillance, en fonction de la taille des pièces, des
besoins en chaleur et du réglage du thermostat. Cela peut
entraîner des risques pour les personnes qui ne sont pas
en mesure de quitter la pièce surchauffée.
5. Protection contre la surchauffe
Pour votre sécurité, l’appareil de chauffage est équipé
d’une protection contre la surchauffe. Si la circulation de
l’air est entravée (p.ex. appareil recouvert ou grille du ventilateur obstruée), l’appareil s’arrête automatiquement.
Dans ce cas, il est recommandé de couper l’appareil pendant quelques minutes (placer le commutateur sur O ou
couper l’alimentation secteur) afin que l’appareil refroidisse
suffisamment. Avant de remettre l’appareil en marche, éliminez les causes responsables de l’entrée en action de la
protection contre la surchauffe.
Afin que l’appareil dégage sa pleine puissance de chauffage, il est nécessaire de maintenir les entrées et sorties
d’air exemptes de poussière. Veuillez donc les nettoyer
avec l’aspirateur avant la saison de chauffage.
6. Pannes
Lorsque l’appareil de chauffage ne dégage pas de chaleur,
vérifiez si l’appareil est en marche (commutateur ON/OFF
sur I) et si le thermostat est réglé à la température souhaitée, puis si le disjoncteur dans le tableau de distribution est
enclenché ou si le fusible est en ordre.
S’il ne vous est pas possible de remédier à la panne, veuillez vous adresser au service après-vente le plus proche
en indiquant le numéro E et le nombre FD pour permettre
le traitement de l’ordre. Ces indications figurent sur la
plaque signalétique (couvercle du compartiment de branchement).
Les réparations et interventions sur l’appareil ne doivent
être effectuées que par un professionnel ou par le service
après-vente.
7. Nettoyage
Pour le nettoyage, l’appareil doit être isolé du secteur et
avoir refroidi. La face extérieure se nettoie avec un chiffon
doux et humide. N’utilisez pas de poudre à récurer ou
d’encaustique qui risqueraient d’endommager la surface.
La poussière qui s’accumule dans l’appareil peut être aspirée depuis l’extérieure.
8. Caractéristiques techniques
Tension d’alimentation 1/N/PE~ 230V, 50Hz
Classe de protection I conducteur de protection
Degré de protection IP 20
Type Puissance Poids Long. Haut. Larg. Long. A
(toutes les cotes en mm)
DXW 307 750 W 3,5 kg 577 357 124 357
DXW 310 1000 W 3,5 kg 577 357 124 357
DXW 315 1500 W 3,5 kg 577 357 124 357
DXW 320 2000 W 3,5 kg 577 357 124 357
DXW 325 2500 W 4,1 kg 697 357 124 477
DXW 330 3000 W 4,1 kg 697 357 124 477
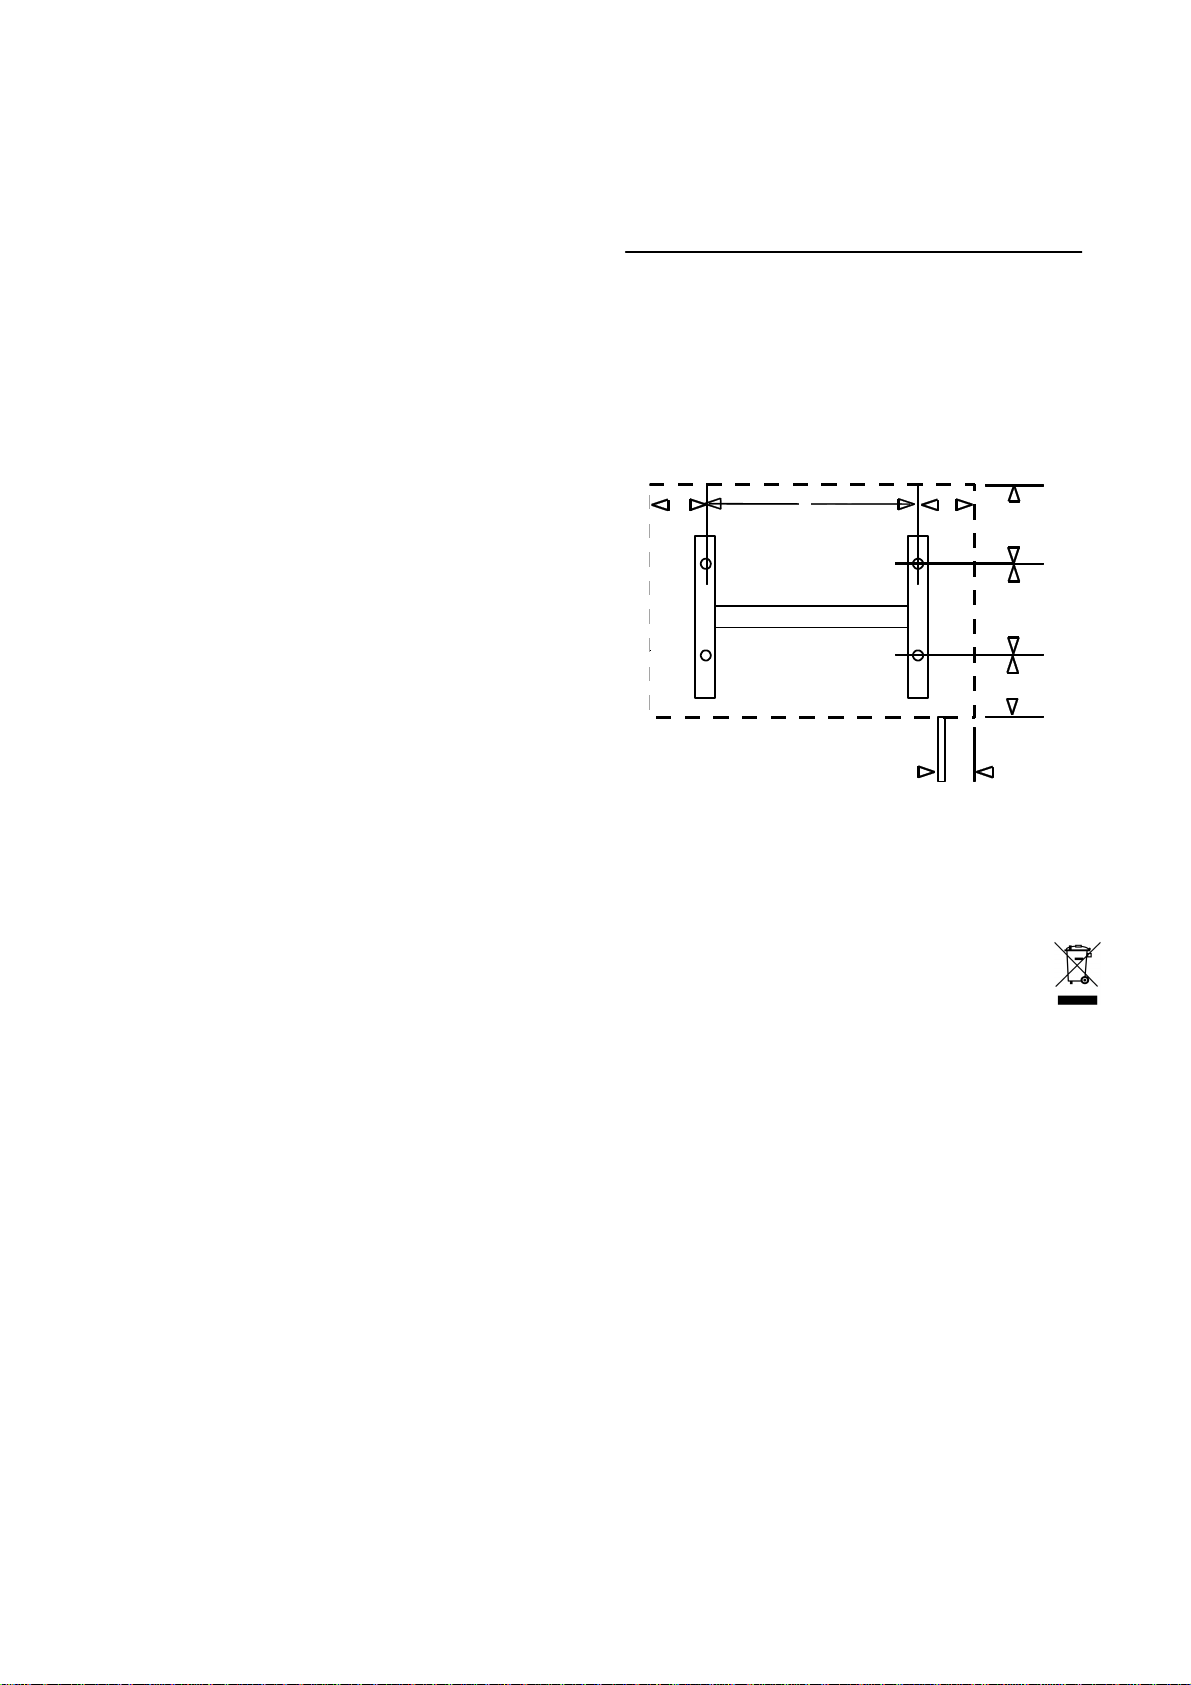
Schéma de perçage (vue de face)
110 110
A
91
184
82
52
9. Garantie
Pour tout renseignement concernant les conditions de garantie, veuillez vous adresser au revendeur compétent. Les
recours en garantie ne sont recevables que sur présentation de la quittance revêtue de la date d’achat.
Indication d'élimination
Il n'est pas permis d'éliminer l'appareil dans les
ordures ménagères générales.
6
Page 7

Návod k montáži a použití
CZ
DXW 307 – DXW 330 Nástěnný konvektor
1. Důležité informace
Pozorně si prosím přečtěte veškeré informace uvedené v
tomto návodu k montáži a použití. Návod pečlivě uschovejte a případně jej předejte dalšímu majiteli.
- Přístroj smí instalovat jen odborník s příslušným
oprávněním.
-
Přístroj se smí používat jen k ohřevu vzduchu v
uzavřených prostorách.
-
Opravy a zásahy do přístroje smí provádět jen odborník v oblasti elektro.
-
V případě závady nebo při delším době mimo provoz
vždy přístroj odpojte od sítě. Vytáhněte zástrčku ze
síťové zásuvky nebo vypněte jistič.
-
Konvektor nikdy nepřikrývejte. Nebezpečí požáru!
-
Pozor! Vnější plochy jsou při provozu horké.
-
V přítomnosti malých dětí nenechávejte zapnutý
přístroj bez dozoru.
-
Do otvorů přístrojů se nesmějí vkládat žádné
předměty
-
Přístroj se nesmí provozovat v prostorách, ve kterých
se používají vznětlivé látky (např. rozpouštědla, atd.)
-
Připojovací kabel nikdy nepokládejte na horký přístroj.
-
Pozor! Po automatickém zapnutí připojeného přístroje
termostatem ve Vaší nepřítomnosti mohou vzniknout
nebezpečné situace. V důsledku zakrytých nebo
jinými předměty obložených přístrojů může dojít k
požáru.
-
2. 2. Montáž, instalace, minimální odstupy
Topidlo se musí instalovat ve vodorovné poloze na svislé
stěně tak, jak je následně zobrazeno.
Přitom musí být dodrženy dole uvedené minimální odstupy!
Na přední straně topidla musí být dále dodržen minimální
odstup 500 mm.
Topidlo se nesmí instalovat bezprostředně pod nástěnnou
síťovou zásuvkou.
Přístroj se musí instalovat tak, aby osoba ve sprše nebo ve
vaně nemohla dosáhnout na jeho ovládací prvky.
Pozor na hořlavé předměty!
Dbejte prosím na ničím neomezený vstup a výstup
vzduchu jak nahoře tak i dole na přístroji.
230
MIN
577
230
MIN
450
230
MIN
357
MIN
Nástěnná montáž
DŮLEŽITÉ-
K nástěnné montáži se musejí použít nástěnné držáky
upevněné na spodní straně přístroje.
- Ve zdi vyvrtejte otvory pro nástěnné držáky.
- Nástěnné držáky pevně přišroubujte ke zdi.
- Topidlo nasaďte tak, aby štěrbiny na jeho zadní stěně
- Následně zavěste i horní část topidla na nástěnný
3. Připojení k síti
Síťový kabel topidla musí být připojen k síťové zásuvce určené
jen pro tento přístroj.
Dojde-li k poškození síťového kabelu, musí být nahrazen
speciálním přípojným kabelem, který dodává výrobce nebo
jeho servisní organizace.
4. Provoz
Všechny funkce spínače jsou následně popsány.
zap/vyp
výkon 50%, 100%
(DXW 315 – DXW 330)
termostat
Konvektor je vybaven termostatem, jehož nastavením lze
regulovat výkon konvektoru a tím i teplotu v místnosti.
Nastavení do polohy
(ochrana proti mrazu).
Otáčením knoflíku termostatu doprava (ve směru
hodinových ručiček) se teplota zvyšuje, otáčením doleva
(proti směru hodinových ručiček) se snižuje.
07/10/D
zapadly do nástěnných držáků.
držák.
I
IIOI
∗∗∗∗
zajišťuje teplotu místnosti cca 6°C
7
Page 8

Pozor!
U topidel ponechaných bez dohledu hrozí za určitých
okolností daných velikostí místnosti, možností vytápění a
nastavení termostatu, k přehřátí. Pro osoby neschopné
opustit nehlídanou přehřátou místnost vlastními silami to
může znamenat riziko.
5. Ochrana proti přehřátí
Z bezpečnostních důvodů je konvektor vybaven ochranou
proti přehřátí. V případě nedostatečné cirkulace vzduchu
(například v důsledku zakrytí nebo zastavění mřížky
konvektoru předměty) se přístroj automaticky vypne.
Po vypnutí konvektoru v důsledku přehřátí přerušte na
několik minut přívod proudu (vypínač do polohy „O" nebo
vytažení zástrčky ze síťové zásuvky), aby se konvektor
mohl dostatečně ochladit. Před opětným zapnutím přístroje
však nejdříve odstraňte příčinu aktivace ochrany před
přehřátím.
K zajištění plného výkonu pravidelně zbavujte prachu
vstupní a výstupní otvory vzduchu. Před zahájením
topného období ke zbavení nečistot a prachu použijte
vysavač!
6.Poruchy
Netopí-li konvektor, zkontrolujte prosím, zda je zapnutý a
zda je termostat nastavený na požadovanou teplotu, zda je
zapnutý automat v rozdělovači proudu a zda je v pořádku
pojistka..
Nelze-li poruchu odstranit, obraťte se prosím na nejbližší
servis.
K tomu je třeba předložit číslo E a číslo FD. Tyto údaje jsou
uvedeny na typovém štítku (kryt spínací části).
Opravy přístroje a zásahy do něj smí provádět jen odborník
v oblasti elektro nebo servisní technik.
7. Čištění
Před čištěním se konvektor musí odpojit od sítě a musí být
studený. Vnější stranu lze otřít měkkým a vlhkým hadříkem. K čištění nepoužívejte žádné abrasivní prášky nebo
čisticí prostředky na nábytek, které by mohly povrch radiátoru poškodit. Prach usazený na vnitřních částech radiátoru
lze zvenku odstraňovat vysávačem.
8. Technická data
Napětí 1/N/PE~ 230V, 50Hz
Ochranná třída I připojení bezpeč. vodičem
Druh ochrany IP-20
typ výkon hmot- šířka výška hloubka míra A
nost (všechny míry v mm)
DXW 307 750 W 3,5 kg 577 357 124 357
DXW 310 1000 W 3,5 kg 577 357 124 357
DXW 315 1500 W 3,5 kg 577 357 124 357
DXW 320 2000 W 3,5 kg 577 357 124 357
DXW 325 2500 W 4,1 kg 697 357 124 477
DXW 330 3000 W 4,1 kg 697 357 124 477
Rozměry vrtání (čelní pohled)
110 110
A
91
184
82
52
9. Záruka
Záruční podmínky Vám na požádání rád sdělí Váš
prodejce. K případné reklamaci v rámci záruky je třeba
předložit prodejní doklad s uvedeným datem.
Pokyn pro likvidaci
Přístroj nesmí být vyhozen do běžných domácích
odpadků.
8
Page 9

Instrukcja montaŜu i obsługi
PL
DXW 307 – DXW 330 Konwektor naścienny
1. WaŜne wskazówki
Proszę uważnie przeczytać wszystkie informacje podanie w
niniejszej instrukcji obsługi. Instrukcję należy starannie
przechowywać i przekazać ją dalej przy ewentualnej
zmianie właściciela.
- Instalację urządzenia zlecić fachowcowi z
uprawnieniami.
-
Urządzenie wolno używać jedynie do ogrzewania
powietrza w zamkniętych pomieszczeniach.
-
Napraw grzejnika i wszelkich manipulacji wolno
dokonywać jedynie wykwalifikowanym elektrykom.
-
W przypadku usterki lub dłuższego nieużywania należy
odłączyć urządzenie od sieci. Wyłączyć wzgl. wykręcić
bezpiecznik.
-
Nie przykrywać grzejnika, niebezpieczeństwo pożaru!
-
Ostrożnie! Powierzchnie zewnętrzne są podczas pracy
gorące.
-
Nie używać grzejnika bez nadzoru, jeżeli w pobliżu
znajdują się małe dzieci.
-
Do otworów urządzenia nie wolno wkładać żadnych
przedmiotów.
-
Nie wolno używać grzejnika w pomieszczeniach, w
których stosowane są materiały łatwopalne (np.
rozpuszczalniki itp.).
-
Nie należy kłaść kabla zasilającego na gorące
urządzenie.
-
Ostrożnie! Po automatycznym włączeniu
podłączonego urządzenia (przez termostat) pod
nieobecność użytkownika może dojść do powstania
zagrożeń, np. przykryte lub przestawione w
międzyczasie grzejniki mogą spowodować pożar.
2. MontaŜ, instalacja, minimalne odległości
Grzejnik należy zainstalować poziomo na pionowej ścianie,
jak przedstawiono na rysunku.
Należy przestrzegać podanych poniżej minimalnych
odstępów!
Ponadto z przodu grzejnika należy zachować odstęp min.
500 mm.
Nie wolno instalować grzejnika bezpośrednio pod
gniazdkiem na ścianie.
Urządzenie należy tak zainstalować, aby elementów obsługi
nie mógł dotknąć nikt, kto znajduje się w wannie lub pod
prysznicem.
Ostrożnie z palnymi przedmiotami!
Należy zapewnić swobodny dopływ i odpływ powietrzna na
dole i na górze urządzenia.
230
MIN
577
230
MIN
450
230
MIN
357
MIN
MontaŜ na ścianie
WAŻNE!
Należy stosować oryginalny uchwyt ścienny znajdujący się
na dole urządzenia.
- Nawiercić otwory mocujące na uchwyt.
- Dobrze przykręcić uchwyt do ściany.
- Zawiesić grzejnik na uchwycie w szczelinach
znajdujących się na tylnej ściance.
- Zatrzasnąć grzejnik na górze w uchwycie.
3. Przyłącze elektryczne
Urządzenie należy podłączyć do gniazdka przyłączowego
przeznaczonego dla grzejnika.
Uszkodzony przewód przyłączowy tego urządzenia należy
wymienić na specjalny przewód, który można nabyć u
producenta lub w jego serwisie.
4. Grzanie
Poniżej objaśniono funkcje przełączników.
Wł./wył.
Moc
(DXW 315 – DXW 330)
Termostat
Grzejnik posiada termostat, za pośrednictwem którego
przez odpowiednie nastawienie można dokonywać regulacji
grzejnika a tym samym i temperatury pomieszczenia.
Nastawienie na
6°C (ochrona przed mrozem).
Obrót głowicy termostatu w prawo (zgodnie z ruchem
wskazówek zegara) podnosi nastawioną wartość
temperatury, obrót w lewo (przeciwnie do ruchu wskazówek
zegara) obniża wartość temperatury.
07/10/D
I
50%, 100%
∗∗∗∗
oznacza temperaturę pomieszczenia ok.
IIOI
9
Page 10

Uwaga!
W zależności od wielkości pomieszczenia, zapotrzebowania
ciepła i ustawienia termostatu pozostawienie grzejnika bez
nadzoru może spowodować przegrzanie pomieszczenia.
Może to stanowić zagrożenie dla osób, które nie są w stanie
samodzielnie opuścić pomieszczenia w przypadku zbyt
wysokiej temperatury.
5. Ochrona przed przegrzaniem
Z powodów bezpieczeństwa grzejnik wyposażony jest w
ochronę przed przegrzaniem. Jeżeli cyrkulacja powietrza
zostanie zakłócona (np. przez zasłonięcie lub zastawienie
kratki wylotu powietrza), urządzenie automatycznie się
wyłącza.
W takim przypadku należy na kilka minut wyłączyć zasilanie
(wyłącznik na pozycję „O" lub odłączyć od sieci), aby
grzejnik mógł się ochłodzić. Przed ponownym włączeniem
urządzenia należy usunąć przyczynę zadziałania ochrony
przed przegrzaniem.
Aby móc wykorzystać całą moc grzewczą, należy zadbać o
to, aby w otworach wlotu i wylotu powietrza nie było kurzu.
Przed okresem grzewczym odkurzyć odkurzaczem!
6.Usterki
Jeżeli grzejnik nie grzeje, należy sprawdzić, czy jest
włączony i czy termostat nastawiony jest na wymaganą
temperaturę, a następnie czy włączony jest automatyczny
bezpiecznik na tablicy rozdzielczej wzg. czy bezpiecznik jest
w porządku.
Jeżeli nie można usunąć usterki, należy zwrócić się do
najbliższego serwisu.
Do opracowania zlecenia potrzebny będzie numer E i
symbol FD urządzenia. Dane te znajdują się na tabliczce
znamionowej (pokrywa szafki rozdzielczej).
Napraw i manipulacji na urządzeniu wolno dokonywać
jedynie wykwalifikowanym elektrykom lub serwisowi.
7. Czyszczenie
W celu wyczyszczenia urządzenie musi być odłączone od
sieci i ochłodzone. Powierzchnię zewnętrzną można
wyczyścić przez przetarcie miękką wilgotną ściereczką. Do
czyszczenia nie używać proszków do szorowania ani
politury do mebli, ponieważ mogą one uszkodzić
powierzchnię. Złogi kurzu można odessać z zewnątrz przy
pomocy odkurzacza.
8. Dane techniczne
Napięcie przyłączowe 1/N/PE~ 230V, 50Hz
Klasa ochrony I Przyłącze z przewodem
Rodzaj ochrony IP 20
Typ Moc Ciężar Szer. Wys. Głęb. Wymiar A
(wszystkie wymiary w mm)
DXW 307 750 W 3,5 kg 577 357 124 357
DXW 310 1000 W 3,5 kg 577 357 124 357
DXW 315 1500 W 3,5 kg 577 357 124 357
DXW 320 2000 W 3,5 kg 577 357 124 357
DXW 325 2500 W 4,1 kg 697 357 124 477
DXW 330 3000 W 4,1 kg 697 357 124 477
Odległości otworów (widok z przodu)
ochronnym
9. Gwarancja
Informacji o warunkach gwarancji udziela właściwy sklep
specjalistyczny. Przy roszczeniach gwarancyjnych
konieczne jest przedłożenie paragonu z datą.
Wskazówka dotycząca usuwania odpadów
Urządzenia nie wolno wyrzucać z ogólnymi
odpadami z gospodarstw domowych.
110 110
A
91
184
82
52
10
Page 11

Szerelési és kezelési útmutató
H
DXW 307 – DXW 330 Fali konvektor
1. Fontos tájékoztatás
Figyelmesen olvassuk el a jelen útmutatóban leírt
információkat. Gondosan őrizzük meg az útmutatót, és
adjuk tovább azt, ha a készüléket esetleg másnak a
tulajdonába adjuk.
- A készüléket hivatalos szakemberrel szereltessük fel.
-
A készüléket csakis zárt helyiségek levegőjének
felmelegítésére szabad használni.
-
A készüléken javításokat és beavatkozásokat csak
villamos szakember végezhet.
-
Meghibásodásnál vagy hosszabb üzemen kívül
helyezésnél válasszuk le a készüléket a hálózatról.
kapcsoljuk le, illetve csavarjuk a biztosítót.
-
A készüléket tilos letakarni, tűzveszély áll fenn!
-
Vigyázat! A külső felületek üzem közben
felforrósodnak.
-
A készüléket ne üzemeltessük felügyelet nélkül, ha
kisgyermekek vannak a közelben.
-
Ne dugjunk semmilyen tárgyat a készülék nyílásaiba.
-
A készüléket tilos olyan helyiségben üzemeltetni, ahol
tűzveszélyes anyagokat (például oldószereket, stb.)
használnak.
-
A csatlakozó vezeték ne érhet hozzá a forró
készülékhez.
-
Vigyázat! A hálózathoz csatlakoztatott készülék
automatikus bekapcsolásakor (a termosztát útján), ha
nincs senki jelen, veszélyek keletkezhetnek, például a
letakart vagy elállított készülék tüzet okozhat.
2. Szerelés, felállítás, minimális távolságok
A készüléket vízszintesen beigazítva függőleges falra kell
szerelni az ábrának megfelelően.
Az alább feltüntetett minimális távolságokat kötelező
betartani!
A készülék homlokfelületétől minimum 500 mm-es
távolságot kötelező tartani.
A készüléket úgy kell felszerelni, hogy a kezelőelemeit a
fürdőkádból vagy a zuhany alól ne lehessen elérni.
Tartsuk távol az éghető tárgyakat! Ügyeljünk arra, hogy a
levegő a készüléken alul és felül zavartalanul tudjon
áramlani.
230
MIN
577
230
MIN
450
230
MIN
357
MIN
07/10/D
Felszerelés a falra
FONTOS -
A felszereléshez a készülék hátoldalán található eredeti fali
rögzítőt kötelező használni.
- Fúrjuk ki a furatokat a fali rögzítő számára.
- Szilárdan csavarozzuk fel a fali rögzítőt a falra.
- Akasszuk fel a készüléket a hátoldalán található
nyílásokkal a fali rögzítőre.
- Pattintsuk be a készüléket felül a fali rögzítőbe.
3. Villamos csatlakoztatás
A készülék csatlakozókábelét egy, a fűtőkészülékre méretezett
aljzathoz kell csatlakoztatni.
Ha a készülék csatlakozókábele megsérül, azt egy speciális
csatlakozókábellel kell kicserélni, amely a gyártótól vagy
vevőszolgálatától beszerezhető.
4. Főtési üzem
Az alábbiakban ismertetjük a kapcsolók funkcióit.
Be/ki
Teljesítm. 50%, 100%
(DXW 315 – DXW 330)
Termosztát
A készülék termosztáttal van ellátva, amelynek megfelelő
beállításával a helyiség hőmérsékletét szabályozhatjuk.
A
∗∗∗∗
beállítás kb. 6°C-os h őmérsékletet (fagyvédelem) jelent.
A termosztát elfordítása jobbra (az óramutató járásával
megegyezően) a hőmérséklet növelését, balrafordítása a
csökkentését eredményezi.
I
IIOI
11
Page 12

Figyelem!
A helyiségek méretüktől, hőigényüktől és
termosztátbeállításuktól függően felügyelet nélküli fűtés
esetén túlfűthetők. Ez veszélyt jelenthet olyan személyek
számára, akik nem képesek a helyiséget elhagyni túl magas
hőmérséklet esetén.
5. Túlmelegedés elleni védelem
A biztonság érdekében a készülék túlmelegedés elleni
védelemmel van felszerelve.
Ha a levegőkeringés akadályozott (például a rács letakarása
miatt), a készülék automatikusan kikapcsol.
Ebben az esetben a készülék áramellátását néhány percre
szakítsuk meg (a kapcsolót „O”-állásba vagy húzzuk ki a
dugaszt), hogy a készülék lehűlhessen. Az újrabekapcsolás
előtt szüntessük meg a biztonsági kapcsoló működésbe
lépésének okát.
A teljes fűtőteljesítmény leadásához a levegő belépő és
kilépő nyílásokat tartsuk pormentesen. A fűtési időszak előtt
porszívózzuk ki a készüléket!
6. Üzemzavarok
Ha a készülék nem fűt, ellenőrizzük, hogy a készülék be
van-e kapcsolva, és hogy a termosztát a kívánt
hőmérsékletre van-e állítva, majd hogy az automata
megszakító, illetve a biztosító rendben van-e.
Ha az üzemzavart nem tudjuk megszüntetni, forduljunk a
vevőszolgálathoz.
A rendelésnél adjuk meg a készülék E-számát és FDszámát. Ezek megtalálhatók az adattáblán (a
kapcsolófészek fedelén).
A készüléket javítani, abba beavatkozni csak villamos
szakembernek vagy a vevőszolgálatnak szabad.
7. Tisztítás
A tisztításhoz a készüléket válasszuk le a hálózatról és
hagyjuk lehűlni. A készülékházat kívülről puha, nedves
törlőruhával töröljük át. A tisztításhoz ne használjunk
súrolószert vagy bútorfényezőt, mert ezek árthatnak a
készülékház felületének.
A készülékben összegyűlt port kívülről, porszívóval
kiszívathatjuk.
8. Mőszaki adatok
Hálózati feszültség 1/N/PE~ 230 V, 50 Hz
Védelmi fokozat I Védővezeték
Érintésvédelem IP 20
Típus Teljesít- Súly Széles- Magas- Mély- A.
mény ség ság ség méret
(minden méret mm-ben)
DXW 307 750 W 3,5 kg 577 357 124 357
DXW 310 1000 W 3,5 kg 577 357 124 357
DXW 315 1500 W 3,5 kg 577 357 124 357
DXW 320 2000 W 3,5 kg 577 357 124 357
DXW 325 2500 W 4,1 kg 697 357 124 477
DXW 330 3000 W 4,1 kg 697 357 124 477
Furatméretek (elölnézet)
9. Garancia
A garanciális feltételekről az illetékes szakkereskedő
készséggel ad felvilágosítást. A garancia igénybevételéhez
feltétlenül szükséges a dátummal ellátott vásárlási nyugta.
Selejtezési útmutatás
110 110
A készüléket selejtezésekor nem szabad a háztartási
hulladék közé tenni.
A
91
184
82
52
12
Page 13

Указания за монтаж и употреба
BG
DXW 307 – DXW 330 Конвекторен
1. Важни указания
Прочетете внимателно изложената в ръководството
информация. Съхранявайте старателно това
ръководство и го предайте на евентуален следващ
притежател.
- Уредът трябва да се инсталира от оторизиран
специалист.
-
Уредът е предназначен само за отопление на
стаен въздух в затворени помещения.
-
Ремонти и манипулации по уреда могат да се
извършват само от електротехник.
-
При евентуални проблеми или в случай, че няма да
използвате уреда продължително време, го
изключете от мрежата. Изключете, съотв. развийте
бушона.
-
Не покривайте уреда. Съществува опасност от
пожар!
-
Внимание! Външните повърхности се нагряват,
когато уредът е включен.
-
Не оставяйте уреда без надзор, когато наблизо има
малки деца.
-
Не поставяйте предмети в отворите на уреда.
-
Не използвайте уреда в помещения, в които се
използват запалими вещества (напр. разтворители
и др.)
-
Не поставяйте кабела над горещия уред.
-
Внимание! След автоматично включване на уреда
(посредством термостати) във Ваше отсъствие
могат да възникнат проблеми, напр.
междувременно покрити или преместени уреди
могат да предизвикат пожар.
2. Монтаж, инсталиране, минимални
разстояния
Уредът трябва да се инсталира в хоризонтално
положение на вертикална стена, както е показано на
схемата.
Спазвайте посочените по-долу минимални разстояния!
Освен това от предната страна на уреда трябва да се
спазва разстояние от мин. 500 мм.
Уредът не трябва да се инсталира непосредствено под
контакт на стената.
Уредът трябва да се инсталира така, че намиращите се
във ваната или под душа лица да нямат достъп до него.
Внимавайте при монтиране пред запалими предмети!
Въздухът трябва да влиза безпрепятствено от долната
страна на уреда и да излиза от горната.
230
MIN
577
230
MIN
450
230
MIN
357
MIN
07/10/D
Монтаж на стената
ВАЖНО-
Използвайте оригиналните крепежни елементи отзад на
уреда.
- Пробийте отворите за крепежните елементи.
- Завийте елементите на стената.
- Закачете уреда на крепежните елементи
посредством намиращите се на задната му страна
процепи.
- Фиксирайте горната част на уреда върху крепежните
елементи.
3. Електрическо свързване
Кабелът трябва да се свърже с подходяща за уреда
съединителна кутия.
Ако се повреди кабелът на уреда, той следва да се
подмени със специален такъв, който може да се получи
от производителя или сервизната му служба.
4. Режим на нагряване
Всички функции са обяснени по-долу.
Вкл./Изкл.
Мощност 50%, 100%
(DXW 315 – DXW 330)
Термостат
Уредът е снабден с термостат, посредством който
уредът, а с това и температурата в помещението могат
да се регулират чрез избор на съответната настройка.
Настройката
около 6°C ( защита от замръзване).
Завъртането на копчето на термостата надясно (по
посока на часовниковата стрелка) повишава
настроената стойност на температурата, завъртането
наляво (обратно на посоката на часовниковата стрелка)
намалява стойността на температурата.
13
∗∗∗∗
означава температура на помещението
I
IIOI
Page 14
Внимание!
В зависимост от големината на помещението,
необходимостта от топлина и настройките на
термостата, при неконтролирано отопление
помещенията могат да бъдат прекомерно затоплени.
Това може да е опасно за хора, които не са в състояние
да напуснат помещението при твърде висока
температура.
5. Защита от прегряване
Отоплителният вентилатор притежава защита срещу
прегряване. Ако циркулацията на въздух се наруши
(напр. при покриване или затваряне на решетката за
въздух), уредът автоматично се изключва.
В този случай електрическото захранване на уреда
трябва да се прекъсне за няколко минути
(превключвател на позиция O или изключване от ел.
мрежа), за да може той да се охлади достатъчно. Преди
пускане в експлоатация е важно да се отстрани
причината за задействане на защитата.
За да се достигне пълната мощност, входовете и
изходите за въздух трябва се почистват от прах. Преди
отоплителния сезон почистете уреда с прахосмукачка!
6. Повреди
Когато уредът не излъчва топлина, проверете дали е
включен и дали термостатът е настроен на желаната
температура, след това дали е включен в
електрическата мрежа, респ. дали бушонът е в
изправност.
Ако по този начин повредата не може да се отстрани,
обърнете се към най-близката сервизна служба.
За обработване на поръчката е необходим номерът на
изделието и датата на производство. Тези данни ще
откриете на табелката с техническите показатели върху
уреда.
Ремонти и манипулации по уреда могат да се
извършват само от електротехник или сервизна служба.
7. Почистване на уреда
При почистване уредът трябва де се изключи и охлади.
Външната част може да се почисти чрез избърсване с
мек влажен парцал. Не употребявайте прахове или
мебелни политури, тъй като могат да повредят
повърхността.
При наслояване на прах отвън почистете с
прахосмукачка.
8. Технически данни
Напрежение на мрежата 1/N/PE~ 230V, 50Hz
Клас на защита I Защитен извод
Вид защита IP 20
Вид Мощност Тегло
(всички данни са посочени в мм)
DXW 307 750 W 3,5 kg 577 357 124 357
DXW 310 1000 W 3,5 kg 577 357 124 357
DXW 315 1500 W 3,5 kg 577 357 124 357
DXW 320 2000 W 3,5 kg 577 357 124 357
DXW 325 2500 W 4,1 kg 697 357 124 477
DXW 330 3000 W 4,1 kg 697 357 124 477
Размери при пробиване на отворите (поглед отпред)
110 110
Ширина Височина Дълбочина Размер A
A
9. Гаранция
Информация относно условията по гаранцията можете
да получите от съответния търговец. При предявяване
на претенции по гаранцията се изисква квитанция за
покупката с дата.
Указание за отстраняване на непотребни уреди
Непотребните уреди не бива да се изхвърлят
в кофите за боклук заедно с обичайната
домакинска смет.
91
184
82
52
14
Page 15

Montavimo ir vartojimo instrukcija
LT
DXW 307 – DXW 330 Sieninis konvektorius
1. Svarbūs nurodymai
Prašome atidžiai perskaityti visą šioje instrukcijoje pateiktą
informaciją. Rūpestingai saugokite šią instrukciją ir prireikus
perduokite ją kitam savininkui.
- Prietaisą gali instaliuoti šios srities specialistas.
-
Prietaisą leidžiama naudoti tik orui uždarose patalpose
šildyti.
-
Atlikti remonto darbus ir kitas operacijas šiame
prietaise leidžiama tik elektros specialistui.
-
Defekto atveju arba, nesinaudojant prietaisu ilgesnį
laiką, jį išjungti iš elektros tinklo. Išjungti arba išsukti
saugiklį.
-
Šildymo prietaiso neuždengti, gali kilti gaisras!
-
Atsargiai! Įjungto prietaiso išorinis paviršius įkaista.
-
Įjungto šildymo prietaiso nepalikti be priežiūros, jeigu
netoli jo yra mažų vaikų.
-
Draudžiama į prietaisų angas kišti bet kokius daiktus.
-
Patalpose, kuriose naudojamos greitai užsidegančios
medžiagos (pvz., tirpikliai ir t.t.) draudžiama eksploatuoti šį šildymo prietaisą.
-
Draudžiama pravesti prijungiamąjį kabelį virš karšto
prietaiso.
-
Atsargiai! Jums nesant namuose automatiškai (per
termostatą) įsijungus pajungtam prietaisui, gali kilti pavojai, pvz., tuo tarpu uždengti arba užstatyti prietaisai
gali sukelti gaisrą.
2. Montažas, instaliacija, minimalūs atstumai
Šildymo prietaisas turi būti instaliuotas horizontalioje padėtyje ant vertikalios sienos, kaip parodyta paveikslėlyje.
Apačioje nurodyti minimalūs atstumai turi būti išlaikyti!
Taip pat reikia išlaikyti ne mažesnį kaip 500 mm atstumą iki
priekinės šildymo prietaiso sienelės.
Draudžiama prietaisą instaliuoti betarpiškai po elektros roze-
te sienoje.
Prietaisą taip instaliuoti, kad jo valdymo elementų negalėtų
paliesti vonioje arba po dušu esantis asmuo.
Atsargiai su degiais daiktais!
Prašome atkreipti dėmesį į tai, kad oras galėtų laisvai
patekti ir išeiti iš prietaiso pro jo apačią ir viršų
230
MIN
577
230
MIN
450
230
.
MIN
357
MIN
Montažas ant sienos
SVARBU-
Naudoti originalius sienos laikiklius, esančius ant prietaiso
užpakalinės sienelės.
- Išgręžti sienoje skyles sienos laikikliams pritvirtinti.
- Tvirtai prisukti sienos laikiklius sienoje.
- Pakabinti šildymo prietaisą, įstačius užpakalinėje
prietaiso sienelėje esančius tarpelius į sienos laikiklius.
- Pakabinti šildymo prietaiso viršų ant sienos laikiklių.
3. Prijungimas prie elektros tinklo
Prietaisas turi būti pajungtas į elektros tinklą per šildymo
prietaisui skirtą rozetę.
Pažeistas šio prietaiso prijungiamasis kabelis turi būti
pakeistas specialiu kabeliu, kurį Jūs galite įsigyti pas šių
prietaisų gamintoją arba jų techninės priežiūros tarnyboje.
4. Šildymas
Visos jungiklių funkcijos paaiškintos apačioje.
Įjungta/Išjungta
Galingumas 50%, 100%
(DXW 315 – DXW 330)
Termostatas
Šildymo prietaise yra termostatas, kuriuo galima reguliuoti
šildymo prietaisą ir tokiu būdu, pasirenkant tam tikrą
poziciją, patalpos temperatūrą.
Pozicija
(apsaugos nuo užšalimo pozicija).
Sukant termostato rankenėlę į dešinę (pagal laikrodžio
rodyklės judėjimo kryptį), anksčiau nustatyta temperatūra
didinama, rankenėlę sukant į kairę (prieš laikrodžio rodyklės
judėjimo kryptį), temperatūra mažinama.
07/10/D
I
IIOI
∗∗∗∗
reiškia maždaug 6°C patalpos temperat ūrą
15
Page 16

D÷mesio!
Priklausomai nuo patalpos dydžio, šilumos poreikio ir
termostato nuostato, palikus neprižiūrimą šildymo prietaisą,
gali būti perkaitintos patalpos. Tai gali kelti pavojų
asmenims, kurie negali išeiti iš patalpos esant per aukštai
temperatūrai.
5. Apsauga nuo perkaitimo
Saugumo sumetimais šildymo prietaise yra įmontuota
apsaugos nuo perkaitimo sistema. Sutrikus oro cirkuliacijai
(pvz., uždengus arba užstačius oro groteles), prietaisas
automatiškai išsijungia.
Tokiu atveju šildymo prietaiso aprūpinimą elektros energija
reikėtų kelioms minutėms nutraukti (jungiklio pocizija “O”
arba prietaisą išjungti iš elektros tinklo), kad prietaisas
galėtų pakankamai atvėsti. Prieš pakartotinai įjungdami
prietaisą, pašalinkite apsaugos nuo perkaitimo sistemos
reagavimo priežastis.
Kad prietaisas šildytų pilnu pajėgumu, būtina valyti dulkes
nuo oro patekimo ir išėjimo angų. Prieš prasidedant šildymo
periodui, prašome angas išvalyti siurbliu!
6.Gedimai
Jeigu šildymo prietaisas neskleidžia šilumos, prašome
patikrinti, ar prietaisas yra įjungtas ir ar termostatu
nureguliuota pageidaujama temperatūra, o po to ar
automatas yra įjungtas į elektros paskirstymo tinklą ir ar
veikia saugiklis.
Negalėdami pašalinti gedimo, kreipkitės į artimiausią
techninės priežiūros tarnybą.
Kad užsakymas būtų priimtas ir atliktas, reikalingi prietaiso
E numeris ir FD skaičius. Šiuos duomenis Jūs rasite
prietaiso modelio lentelėje.
Atlikti remonto darbus ir kitas operacijas šiame prietaise
leidžiama tik elektros specialistui arba techninės priežiūros
tarnybai.
7. Valymas
Prieš valant prietaisą išjungti iš elektros tinklo ir leisti jam
atvėsti. Prietaiso išorę galima valyti minkštu, drėgnu
skudurėliu. Valant prietaisą, nenaudoti šveitimų miltelių arba
politūros baldams, kadangi jie gali pažeisti prietaiso paviršių.
Prietaise susikaupusias dulkes galima išsiurbti iš išorės
dulkių siurbliu.
8. Techniniai duomenys
Prijungimo įtampa 1/N/PE~ 230V, 50Hz
Apsaugos klasė I apsaugos laidininko
Apsaugos tipas IP 20
Modelis Galing. Svoris Plotis Aukštis Gylis Matas A
(visi matai nurodyti mm)
DXW 307 750 W 3,5 kg 577 357 124 357
DXW 310 1000 W 3,5 kg 577 357 124 357
DXW 315 1500 W 3,5 kg 577 357 124 357
DXW 320 2000 W 3,5 kg 577 357 124 357
DXW 325 2500 W 4,1 kg 697 357 124 477
DXW 330 3000 W 4,1 kg 697 357 124 477
Gręžimo matai (frontalinis vaizdas)
110 110
pajungimas
A
91
184
82
52
9. Garantija
Kompetentingas prekiautojas mielai suteiks Jums
informaciją apie garantines sąlygas. Norint pasinaudoti
garantinėmis teisėmis, būtina pateikti pirkimo kvitą su data.
Nurodymai d÷l utilizavimo
Prietaiso negalima utilizuoti kartu su buitinėmis
atliekomis.
16
Page 17

Руководство по монтажу и эксплуатации
RU
DXW 307 – DXW 330 конвектор
07/10/D
1. Важные указания
Перед началом работы рекомендуется внимательно
изучить информацию, содержащуюся в руководстве.
Бережно сохраняйте руководство, которое затем,
возможно, будет передано следующему пользователю.
- Монтаж прибора должен выполнять специалист
сертифицированного сервисного центра.
- Прибор предназначен только для нагрева воздуха
в закрытых помещениях.
- Ремонт и вскрытие корпуса может производить
только квалифицированный электромеханик.
- При неисправности или длительном перерыве в
эксплуатации рекомендуется отключить прибор от
сети.
- Выньте штекер или выключите выключатель.
-
Обогреватель не накрывать, Опасность пожара!
-
Осторожно! При работе наружные части имеют
высокую температуру.
-
Не оставляйте работающий прибор без присмотра,
если вблизи находятся маленькие дети.
-
Запрещается вставлять какие-либо предметы в
отверстия прибора.
-
Запрещается эксплуатация прибора в помещениях,
где находятся легковоспламеняющиеся вещества
(например, растворители и т.д.)
-
Кабель электропитания не должен касаться
нагревательных элементов.
-
Осторожно! При автоматическом включении прибора (от термостата) в Ваше отсутствие возникает
опасность, например, накрытые или неправильно
отрегулированные приборы могут стать причиной
пожара.
2. Монтаж, минимально допустимое расстояние
Установив прибор на вертикальной стене, выровнять его
по горизонтали, как показано на рисунке.
Необходимо соблюдать минимальные расстояния!
Запрещается устанавливать предметы на расстоянии
менее 500 мм от прибора
Запрещается располагать нагревательный прибор
непосредственно под электрической розеткой.
При установке или монтаже прибора избегайте вариантов, когда из ванны или душевой кабины человек может
коснуться прибора
Не устанавливайте прибор перед легковоспламеняющимися предметами!
Необходимо обеспечить беспрепятственную
циркуляцию воздуха вокруг прибора.
230
MIN
577
230
MIN
450
MIN
357
230
MIN
Настенный монтаж
ВНИМАНИЕ-
Для крепления используются кронштейны с
тыльной стороны прибора.
- Просверлить отверстия для кронштейнов.
- Закрепить настенные кронштейны.
- Установить обогреватель на стене, при этом шлицы
на тыльной стенке одеваются на кронштейны.
- Одеть верхнюю часть обогревателя на кронштейны.
3. Электрическое подключение
Штекер электрического подключения прибора вставляют в
соответствующую розетку.
Если кабель подключения поврежден, то он подлежит
замене производителем или в гарантийной мастерской.
4. Нагрев
Функции переключателей.
Вкл/выкл
Мощность 50%, 100%
(DXW 315 – DXW 330)
Термостат
Нагревательный прибор оснащен термостатом, с
помощью которого регулируется температура воздуха в
помещении путем выбора соответствующей установки.
Установка
6°C (защита от замерзания).
Поворот терморегулятора вправо (по часовой стрелке)
увеличивает значение температуры, поворот влево
(против часовой стрелки) уменьшает значение
температуры.
∗∗∗∗
означает температуру в помещении около
I
IIOI
17
Page 18
Внимание!
При бесконтрольном отоплении возможен перегрев
помещений в зависимости от их размера, расхода тепла
и настройки термостата. В результате может возникнуть
опасность для людей, которые не в состоянии покинуть
помещение при повышенной температуре.
5. Защита от перегрева
В целях увеличения надежности прибор имеет
встроенную защиту от перегрева. Если циркуляция
воздуха прекращается (например, вследствие
зависания щеток или засорения решетки вентилятора),
то прибор автоматически отключается.
В этом случае на несколько минут прерывается
электропитание обогевателя (выключатель в положении
„O" или отключение от сети), чтобы прибор мог остыть.
Перед включением прибора устраните причины
срабатывания защиты от перегрева.
Для отдачи прибором полной мощности нагрева
необходимо следить за чистотой решетки вентилятора.
Перед началом интенсивной эксплуатации прибора
решетку следует очистить с помощью пылесоса!
6. Неисправности
Если обогреватель не отдает тепло, проверьте,
подключено ли питание, и установлен ли термостат в
нужное положение, далее, включен ли автоматический
выключатель в электросети дома, исправен ли
предохранитель.
Если не удалось устранить неисправность, то
обратитесь в ближайшую мастерскую по ремонту.
Для заявки на проведение ремонта необходимо указать
номер (E-Nummer) и код прибора (FD-Zahl). Эти данные
указаны на фирменной табличке (на крышке
переключателей).
Ремонт и вскрытие прибора осуществляет только
специалист или мастер сервисного центра.
7. Уход за прибором
Перед чисткой прибора необходимо отключить его от
сети и дать остыть. Элементы корпуса протирают
мягкой влажной тряпкой. Запрещается применять сухие
чистящие средства и полироли для мебели, поскольку
они могут повредить поверхность.
Скопления пыли в труднодоступных местах удаляются с
помощью пылесоса.
8. Технические характеристики
Напряжение 1/N/PE~ 230в, 50Гц
Класс защиты I защитн. проводник
Тип защиты IP 20
Тип мощность вес шир. Выс. глуб разм A
(все размеры в мм)
DXW 307 750 Вт 3,5 кг 577 357 124 357
DXW 310 1000 Вт 3,5 кг 577 357 124 357
DXW 315 1500 Вт 3,5 кг 577 357 124 357
DXW 320 2000 Вт 3,5 кг 577 357 124 357
DXW 325 2500 Вт 4,1 кг 697 357 124 477
DXW 330 3000 Вт 4,1 кг 697 357 124 477
Диаметры отверстий (Вид спереди)
110 110
A
91
184
82
52
9. Гарантийные обязательства
Представитель торгового предприятия информирует
Вас об условиях гарантии. Для принятия к
рассмотрению претензий по гарантии необходимо
предоставить чек с указанием даты покупки.
Указание по удалению отходов
Запрещается удалять прибор вместе с общими
бытовыми отходами.
18
Page 19

Montaj ve kullanma talimatı
TR
DXW 307 – DXW 330 Duvar konvektörü
1. Önemli açıklamalar
Lütfen işbu talimatta yer alan tüm bilgileri dikkatlice okuyun.
Talimatı itinayla muhafaza edin ve cihazı bir başkasına
verecek olmanız halinde, işbu talimatı da beraberinde verin.
- Cihazın kurulumu, ruhsatlı bir teknisyen tarafından
yapılmalıdır.
-
Cihaz, sadece kapalı mekanlarda oda havasının
ısıtılması amacıyla kullanılabilir.
-
Cihazın tamiri ve cihazda herhangi bir işlem, sadece
elektrik teknisyeni tarafından yapılabilir.
-
Cihazın arızalanması veya uzun süre devredışı
kalacak olması halinde fişini çekin. Sigortayı kapatın
veya çıkarın.
-
Isıtıcı cihazın üzerini örtmeyin, yangın tehlikesi!
-
Dikkat! Cihaz çalışırken dış yüzeyler ısınır.
-
Etrafta küçük çocuk olması halinde, ısıtıcı cihazı
gözetimsiz çalıştırmayın.
-
Cihazın deliklerine herhangi bir cisim sokulamaz.
-
Isıtıcı cihaz, yangın çıkarabilecek maddelerin olduğu
yerlerde çalıştırılamaz (örn. solvent v.s.).
-
Bağlantı kablosu ısınmış olan cihazın üzerine
konulamaz.
-
Dikkat! Siz yanında değilken cihazın otomatik olarak
açılması halinde (termostat yoluyla) örn. cihazın
üzerinin örtülmüş olması veya ayarının değişmiş
olması yüzünden yangın çıkması türünden tehlikeler
meydana gelebilir.
2. Montaj, kurulum, asgari mesafeler
Isıtıcı cihazın, resimde gösterildiği üzere, dikey duvara yatay
biçimde kurulması gereklidir.
Aşağıda belirtilen asgari mesafelere uyulmalıdır!
Ayrıca, ısıtıcı cihazın ön tarafında en az 500 mm mesafe
bırakılmalıdır.
Isıtıcı cihaz, duvardaki prizlerin hemen altına kurulamaz.
Cihaz, küvetteki ya da duştaki bir kişinin kullanma
düğmelerine değmeyeceği şekilde kurulmalıdır.
Yanıcı cisimlere karşı dikkat!
Havanın cihaza aşağıdan engelsiz girmesine ve yukarıdan
engelsiz çıkmasına dikkat etmeniz rica olunur
230
MIN
577
230
MIN
.
450
MIN
357
230
MIN
04/10/A
Duvara montaj
ÖNEMLİCihaz beraberinde verilmiş olan ve cihazın arka tarafında
bulunan orijinal duvara sabitleme parçasının kullanılması
gereklidir.
- Duvara sabitleme parçası için delik açın.
- Duvara sabitleme parçasını duvara vidalayın.
- Isıtıcı cihazı arka tarafındaki yarıklardan duvara
- Isıtıcı cihazı yukarıdan duvara sabitleme parçasına
sabitleme parçasına takın.
oturtun.
3. Elektrik bağlantısı
Cihaz bağlantı kablosunun ısıtıcı cihaz için öngörülen bir prize
takılması gereklidir.
Bu cihazın bağlantı kablosunun hasar görmesi halinde,
üretici şirketten ya da onun müşteri servisinden
edinilebilecek özel bir bağlantı kablosuyla değiştirilmesi
gereklidir.
4. Isıtma
Tüm şalter fonksiyonları aşağıda açıklanmıştır.
Açma/Kapama
Kapasite % 50, % 100
(DXW 315 – DXW 330)
Termostat
Isıtıcı cihaz, cihazın ve böylelikle de oda ısısının istenen
ayara getirilmesiyle ayarlanabileceği bir termostat ile
donatılmıştır.
∗
ayarı, yakl. 6°C'lık bir oda ısısı anlamına gelmek tedir
(donmaya karşı koruma ayarı).
Termostat düğmesinin sağa döndürülmesi (saat yönünde)
ayarlanmış olan ısı değerini arttırırken, sola döndürülmesi
(saat yönünün tersine), ayarlanmış olan ısı değerini düşürür.
I
IIOI
19
Page 20

Dikkat!
Odanın büyüklüğüne, ısı ihtiyacına ve termostat ayarına
bağlı olarak odalar, gözetimsiz ısıtmada aşırı ısınabilir. Bu
ise, odanın aşırı ısınması halinde odayı terk edecek
durumda olmayan kişiler açısından tehlikelere yol açabilir.
5. Aşırı ısınmaya karşı koruma tertibatı
Cihaz, güvenliğiniz açısından,
aşırı ısınmaya karşı bir koruma tertibatı ile donatılmıştır.
Hava sirkülasyonunun bozulması durumunda (örn. hava
ızgarası asılması veya önüne konması), cihaz otomatik
olarak kapanır.
Bu durumda ısıtıcı cihazın yeterince soğuyabilmesi için,
elektrik beslemesinin bir kaç dakikalığına kesilmesi
gereklidir (şalteri "O" pozisyonuna getirerek veya cihazın
fişini çekerek). Cihazı yeniden çalıştırmaya başlamadan
önce, aşırı ısınmaya karşı koruma tertibatını devreye sokan
nedeni bularak bertaraf edin.
Cihazın tam kapasite ısıtabilmesi için, hava giriş ve çıkış
deliklerinin tozdan arınmış olması gereklidir. Lütfen ısıtma
döneminden önce elektrik süpürgesi ile temizleyin!
6. Arızalar
Isıtıcı cihazdan sıcaklık gelmemesi halinde, cihazın açık ve
termostatın
istenen ısıya ayarlanmış olup olmadığını ve ardından da,
akım dağıtıcısında otomatın açık veya sigortanın işler
durumda olmadığını kontrol etmeniz rica olunur.
Arızanın buna rağmen giderilememesi halinde, en yakın
müşteri servisine başvurmanız rica olunur.
Başvurunuzun işleme alınabilmesi için, cihazın E
numarasına ve FD rakamına ihtiyaç vardır. Bu bilgileri,
cihazın model levhasında bulabilirsiniz.
Cihazın tamiri ve cihazda herhangi bir işlem, sadece elektrik
teknisyeni veya müşteri servisi tarafından yapılabilir.
8. Temizleme
Cihazı temizlemek için fişinin çekilmiş ve soğumuş olması
gerekmektedir. Dış tarafı yumuşak, nemli bir bezle
temizlenebilir. Temizlerken aşındırıcı temizleme tozu veya
mobilya cilası kullanmayın, çünkü bunlar yüzeyi
zedeleyebilir.
Cihazda biriken tozlar, dıştan elektrik süpürgesi ile
çekilebilir.
9. Teknik veriler
Bağlantı voltajı 1/N/PE~ 230V, 50Hz
Koruyucu sınıf I Toprak hattı
Koruma türü IP 20
Model Güç Ağırlık En Yük. Derinlik Ebat A
(Tüm ebat bilgileri mm cinsinden)
DXW 307 750 W 3,5 kg 577 357 124 357
DXW 310 1000 W 3,5 kg 577 357 124 357
DXW 315 1500 W 3,5 kg 577 357 124 357
DXW 320 2000 W 3,5 kg 577 357 124 357
DXW 325 2500 W 4,1 kg 697 357 124 477
DXW 330 3000 W 4,1 kg 697 357 124 477
Delme ebadı (Önden görünüş)
110 110
7. Müşteri servisi
Müşteri servisi durumunda Robert Bosch Hausgeräte GmbH
şirketinin, yetkili müşteri servisi olarak bilgilendirilmesi
gerekmektedir.
Başvuru kabul
Tel No. +49 (0) 1801 / 22 33 55
Faks No. +49 (0) 1801 / 33 53 07
Yedek parça siparişleri
Tel No. +49 (0) 1801 / 33 53 04
Faks No. +49 (0) 1801 / 33 53 08
E-posta: spareparts@bshg.com
İnternetten yedek parça siparişleri için:
http://www.dimplex.de
Glen Dimplex Deutschland GmbH Telefon +49 (0) 9221 / 709-564 Technische Änderungen vorbehalten
Am Goldenen Feld 18 Telefax +49 (0) 9221 / 709-589 Internet: www.dimplex.de
D-95326 Kulmbach E-Mail: kundendienst.hauswaerme@dimplex.de
10. Garanti
Bu ürüne, garanti şartlarımız uyarınca, 2 yıl garanti
vermekteyiz.
Đmha açıklaması
Cihazı normal ev çöpü ile imha etmeyerek,
bölgenizdeki bir imha merkezine verin.
A
91
184
82
52
Kablo girişi
20
 Loading...