

Page 1
08/53137/0 Issue 1
The product complies with the European Safety Standards EN60335:2-30 and the European Standard Electromagnetic Compatibility (EMC) EN55014:1,
EN55014:2, EN61000:3-2 and EN61000:3-3 which cover the essential requirements of EMC Directive 2014/30/EU and the LVD Directive 2014/35/EU.
[c] Glen Dimplex UK Limited
All rights reserved. Material contained in this publication may not be reproduced in whole or in part, without prior permission in writing of Glen Dimplex UK Limited.
DXTT3
Workshop Fan Heater
Page 2
(W)
(X)
(Y)
(Z)
2 x O 4.5 mm
Mounting Holes
240mm
Page 3

DXTT3 Workshop Fan Heater
Dimensions H W D
Portable 365 448 316 (millimetres)
Wall Mounted 316 448 308
Installation and Operating Instructions
IMPORTANT: THESE INSTRUCTIONS SHOULD BE READ CAREFULLY BEFORE USE AND RETAINED FOR FUTURE REFERENCE
IMPORTANT SAFETY ADVICE
DO NOT use the heater in the immediate
surroundings of a bath, a shower or a swimming
pool.
DO NOT place the heater directly below a xed
socket outlet.
The socket-outlet must be accessible at all times
to enable the mains plug to be disconnected as
quickly as possible.
DO NOT COVER or obstruct the air inlet and
outlet openings in any way.
DO NOT operate the heater with the mains lead
overhanging the front outlet grille.
The Heater carries the warning symbol
indicating that it must not be covered.
WARNING: In order to avoid overheating do not
cover the heater.
IMPORTANT: If the mains lead of this appliance is
damaged, it must be replaced by the manufacturer
or its service agent or a similarly qualied person
in order to avoid a hazard.
WARNING: In order to avoid a hazard due to
inadvertent resetting of the thermal cut-out,
this appliance must not be supplied through an
external switching device, such as a timer, or
connected to a circuit that is regularly switched
on and off by the utility.
This appliance can be used by children aged from
8 years and above and persons with reduced
physical, sensory or mental capabilities or lack of
experience or knowledge if they have been given
supervision or instruction concerning the use of
the appliance in a safe way and understand the
hazards involved. Children shall not play with the
appliance. Cleaning and user maintenance shall
not be made by children without supervision.
Children of less than 3 years should be kept away
unless continuously supervised.
Children aged from 3 years and less than 8 years
shall only switch on/off the appliance provided
that it has been placed or installed in its intended
normal operating position and they have been
given supervision or instruction concerning the
use of the appliance in a safe way and understand
the hazards involved. Children aged from 3
years and less than 8 years shall not plug in,
regulate and clean the appliance or perform user
maintenance.
CAUTION: Some parts of this product can
become very hot and cause burns. Particular
attention has to be given where children and
vulnerable people are present.
IMPORTANT: Avoid use of an extension cord
because the extension cord may overheat and
cause risk of re.
Keep combustible materials such as drapes and
other furnishings clear from the front, sides and
rear of the heater. Do not use heater to dry your
laundry.
The heater must be on a at stable surface when
in use.
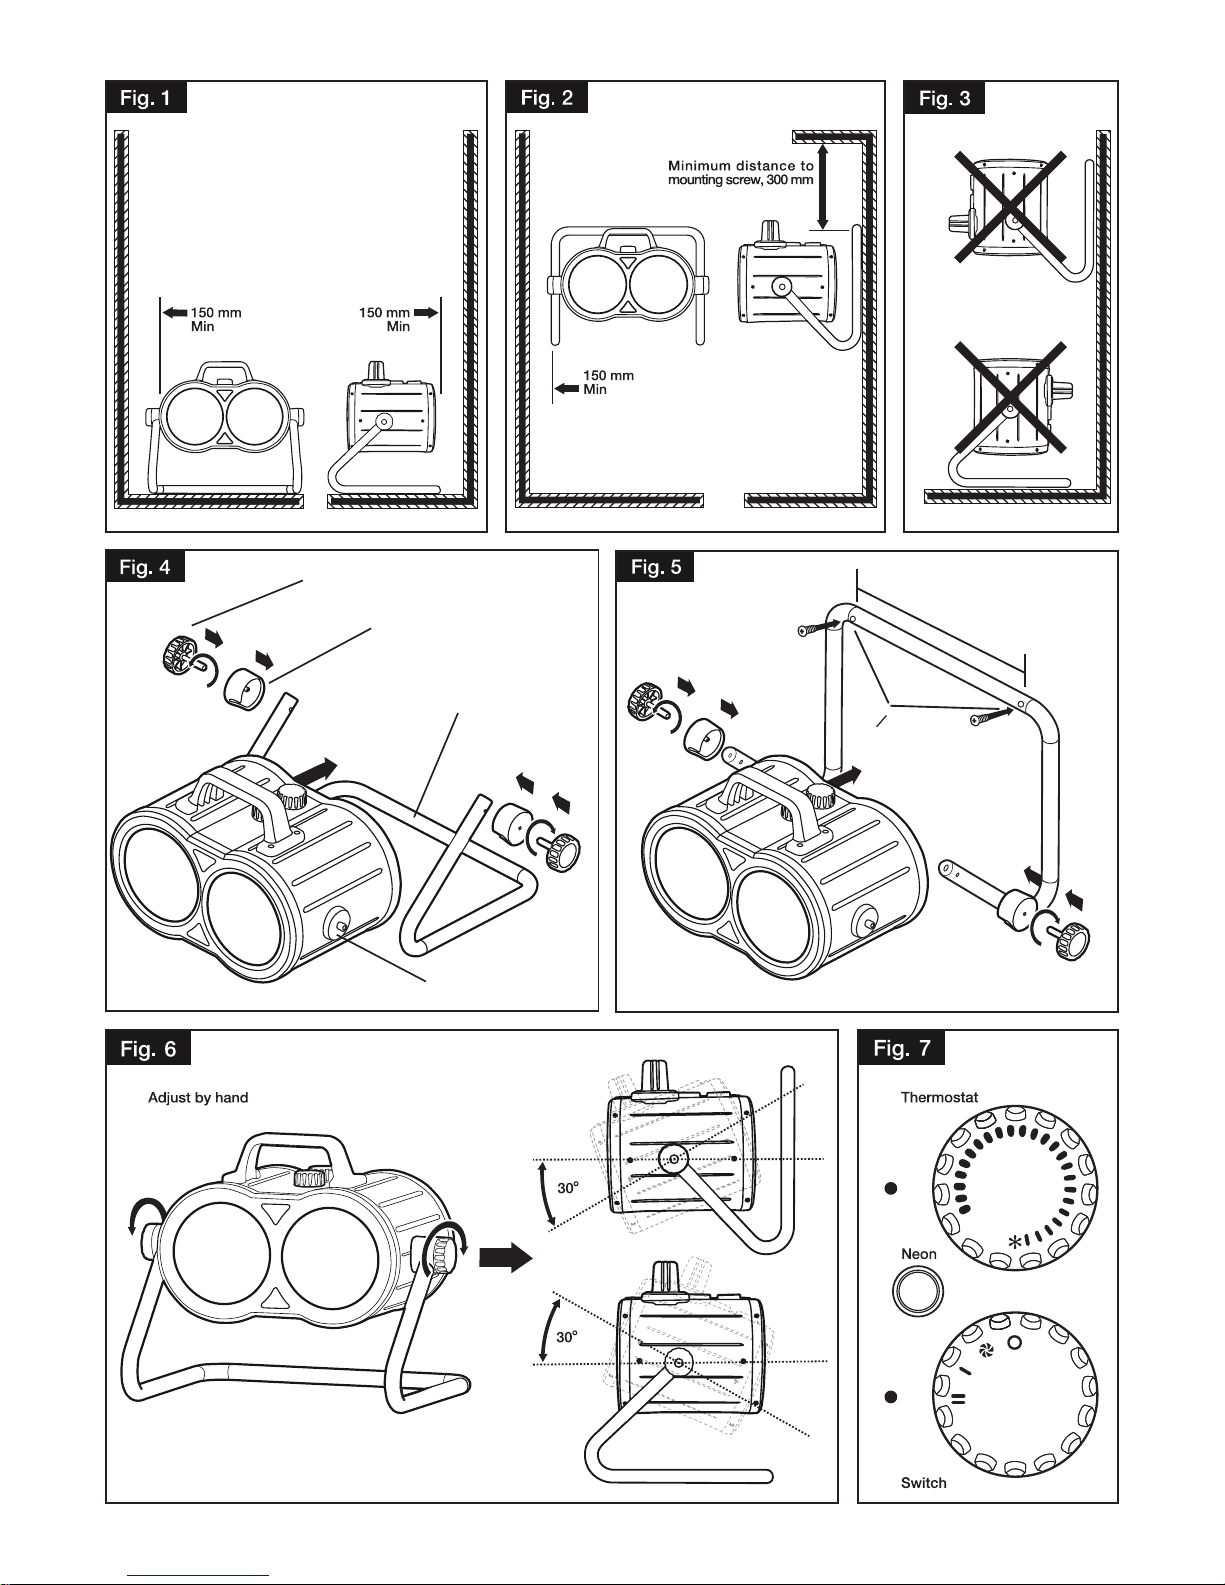
IMPORTANT: Minimum distance to heater of
150mm from the back and sides and 300mm from
the top to any surface must be maintained at all
times, whether wall mounted or portable.
This instruction leaet belongs to the appliance
and must be kept in a safe place. If changing
owners, the leaet must be surrendered to the
new owner.
Electrical connection
This heater must be used on an A.C. ~ supply only and the
voltage marked on the heater must correspond to the supply
voltage. This heater is tted with a plug incorporating a 13
amp fuse. When replacing the fuse, a 13 amp fuse approved
by ASTA to BS 1362 must be used.
If the plug is not suitable for the socket outlets in your home,
the plug must be cut off and an appropriate one tted. A
plug cut off from a mains lead will give a shock hazard if
inserted into a 13 amp socket elsewhere in the house. To
avoid this, it should be disposed of immediately.
NOTE: The fuse cover of a non-rewirable plug must be
retted when changing the fuse. Should the cover become
lost, the plug must not be used until the correct replacement
fuse cover is obtained from your supplier or by contacting
our customer helpline.
IMPORTANT: The wires in this mains lead are coloured in
accordance with the following code:
BLUE: NEUTRAL
BROWN: LIVE
GREEN & YELLOW: EARTH
As the colours of the wires in the mains lead may not
correspond with the coloured markings in your plug, proceed
as follows:
Connect the BROWN wire to the terminal marked ‘L’ or
coloured RED. Connect the BLUE wire to the terminal
marked ‘N’ or coloured BLACK. Note: ‘L’ or ‘N’ must not
be connected to the EARTH terminal marked ‘E’ or ‘ ’ or
coloured GREEN or GREEN AND YELLOW.
If in doubt, consult your electrician.
Page 4

Installation
The different parts of this appliance used to assemble and mount
this product are identied in Fig. 4. They are the Clamping Knob
- (W), the Saddle - (X), the Foot - (Y) and the Tilt base - (Z).
Note: When mounting the product on its foot for portable use or wall
mounted use it must not be mounted vertically as shown in Fig. 3.
The product is tted with a safety tilt switch which will prevent it from
operating should the heater be tilted more than 45o from horizontal.
Portable Use - see Fig. 1 & Fig. 4
WARNING: The heater should never be used as a portable
appliance without the foot securely tted.
1. Set the foot (Y) on the ground.
2. Remove both clamping knobs (W) and saddles (X) from the
main heater body by unscrewing the clamping knob (W).
3. Lift the heater, holding it level and horizontal, and line up the
right tilt base (Z) with the corresponding hole in the foot (Y).
4. Line up the clamping knob (W) and saddle (X) with the foot
(Y) and tilt base (Z) and screw the clamping knob (W) into
position until it is tight.
5. Complete the same for the left hand side of the heater.
6. Ensure the heater is stood on a rm level base near to but not
directly beneath a suitable mains supply socket.
7. Maintain the clearances as shown in Fig. 1 to the back and
sides of the heater.
Wall Mounting - see Fig. 2. & Fig. 5
Note: This product weighs approximately 5kg. Supporting wall
structure must be strong and secure.
1. Place the foot (Y) on a suitable wall ensuring it is level and
that the minimum clearance distances detailed in Fig. 2 are
maintained. Ensure that it is not located directly beneath a
mains supply socket.
2. Mark the two mounting hole locations, see Fig. 5, through
the foot (Y).
3. Remove the foot (Y) and prepare the holes for screw xing.
Solid brick or concrete block walls must be drilled and
plugged.
4. Fix the foot to the wall using suitable screws. (Minimum 60mm
long, mounting holes in foot (Y) are Ø 4.5mm).
5. Complete steps 2 - 5 in portable use section above.
Adjusting the tilt - see Fig. 6
Once the heater is mounted on the foot, the tilt of the heater can
easily be adjusted. Loosen the Clamping knobs on the heater
slightly but do not unscrew completely.
The heater will tilt up 30 degrees from horizontal when portable
and 30 degrees down from horizontal when wall mounted as
shown in Fig. 6.
Using the Heater
Main Elements - See Fig 7
- Thermostat Knob
- Switch Knob
- Neon
Heat Control - see Fig. 7
- Off
- Cool Blow*
- Half Heat
- Full Heat
Thermostat Control - see Fig. 7
The heat output is controlled by the thermostat, according to the
room temperature.
Turn the thermostat knob fully clockwise to maximum setting
initially. When the room is warm enough, reduce the setting slowly
until the heater just clicks off.
The heater will now cycle on and off to maintain your selected room
temperature. An audible click may be heard when the thermostat
operates - this is normal.
Note: If the heater does not come on when the thermostat is at a
low setting, this is normally because the room is warmer than the
thermostat setting and is not a fault.
* When the heat control is set to ‘ ’ for cool blow, set the
thermostat control to maximum.
Position ‘ ’ will turn the heater on and off to maintain a temperature
of approximately 5°C.
Safety - overheat protection
For your safety this appliance is tted with a thermal cut-out. In
the event that the product overheats for some reason, the cut-out
prevents excessive temperatures on the product by cutting the
power to the heater. Once the heater has cooled down, it will reset
automatically, it will continue to cycle on and off automatically until
the reason for overheating is removed.
Fuselink
A thermal fuse link is provided as an added safety feature. If the
fuse link operates and opens circuit it is the result of abnormal
overheating within the appliance and servicing of the appliance by
a competent service engineer will be required in order to ensure
the future safe operation of the heater. Customer services should
be contacted in the event of fault or failure.
Cleaning
WARNING ALWAYS DISCONNECT FROM THE POWER
SUPPLY BEFORE CLEANING THE HEATER.
Do not use detergents, abrasive cleaning powders or polish of
any kind on the heater. Wipe with a dry cloth to remove dust and
a damp cloth (not wet) to clean off stains. Be careful not to allow
moisture into the heater.
Ensure that dust or uff does not accumulate inside the heater
as this could lead to overheating of the element. Use a vacuum
cleaner to remove any uff which does accumulate.
Recycling
For electrical products sold within the European
Community.
At the end of the electrical products useful life it
should not be disposed of with household waste.
Please recycle where facilities exist. Check with
your Local Authority or retailer for recycling advice
in your country.
After Sales Service and Extended Guarantee
Your product is guaranteed for 1 year from the date of purchase.
The 1 year guarantee is extended for an additional 2 years when
you register the product with Dimplex, within 28 days of purchase.
If you do not register the product with Dimplex within 28 days, your
product will remain guaranteed for 1 year only.
Within the extended guarantee period we undertake to repair or
exchange this product free of charge providing:
a) Proof of purchase such as a sales receipt should be provided,
showing that the appliance was bought within the 36-months
prior to registering the defect/fault.
b) The appliance was correctly installed and operated in
accordance with the manufacturer’s instructions and used solely
for domestic purposes.
c) The defect/fault was not as a result of accident, misuse,
unauthorised modication or inexpert repair
Your rights under this guarantee are additional to your statutory
rights, which in turn are not affected by this guarantee.
To validate your extended guarantee register with us online at
http://register.dimplex.co.uk
N.B. Each qualifying product needs to be registered with Dimplex
individually.
Please note that the extended guarantee is only available in
the UK and Ireland
If after following these steps your product still does not operate
you should return it to your point of purchase.
Please do not return a faulty product to us as this may result in loss
or damage and delay in providing you with a satisfactory service.
 Loading...