

Page 1

Installation and Operating Instructions
DXDB20E Dehumidifier
Page
Important Information ____________
Specification & Product diagram____
How it works & Where to position _
Parts ____________________
Control Panel ________________
Operation __________________
Drainage ___________________
Maintenance _________________
Recycling & After Sales Service____
Ϲ
ϵ:
This product complies with the EMC Directive 2004/108/EC, the Low Voltage Directive 2006/95/EC
and the RoHS EU Directive 2002/95/EC.
1
2
3
4
5
6
7
8
9
8/52610/0 Issue 0
Page 2

Important Information
1. Please read the operating instructions carefully before using your
dehumidifier for the first time and keep them in a safe place.
2. Never immerse the appliance in water or other liquids. Don't use bug sprays
or other flammable cleaners on the unit.
3. Never operate the appliance if a cable or connector has been damaged,
after appliance malfunction or if the appliance was dropped or otherwise
damaged.
4. Please ask a professional service agent to repair the product. Improper
repair may cause danger to users.
5. Never use the plug to start and stop the unit. Always use switch on the
control panel.
6. Disconnect the appliance from mains power whenever it is not in use,
before relocating it, and before cleaning.
7. Operate the appliance only at the voltage specified on the rating label.
8. This appliance is designed for household purposes (not commercial) only.
9. DO NOT COVER. Never cover or obstruct in any way the outlet at the top of
the dehumidifier or the air inlet slots at the rear of the dehumidifier.
10. To prevent spillage, empty the water tank before relocating the appliance.
11. Do not tip the appliance to any side as escaping water could damage the
appliance. Only operate the product in a level upright position.
12. Leave the unit to stand for one hour before connecting to the mains supply
after transport or when it has been tilted (e.g. during cleaning).
13. This appliance is not intended for use by persons (including children) with
reduced physical, sensory or mental capabilities, or lack of experience and
knowledge, unless they have been given supervision or instruction
concerning use of the appliance by a person responsible for their safety.
Children should be supervised to ensure that they do not play with the
appliance.
14. When the supply cord is damaged, it must be replaced by the manufacturer,
or a professional service agent only.
15. Please keep the product away from the wall or overhanging objects e.g.
curtains at a minimum 50cm distance.
16. Unplug the appliance before cleaning.
17. Never use the plug to start and stop the unit. Always use switch on the
control panel.
1
Page 3
Specification
Product Diagram
Model no. DXDB20E
Power supply 220-240V~, 50Hz
Dehumidification capacity at 30oC, 80%
Power /Ampere
consumption *
Air volume (max.) 150M3/h
Compressor Rotary
Refrigerant R134a
Working range 5 ~ 32oC
Water tank 5L
Size (WxDxH) With casters - 336 x 210 x 569 mm
N.W. 11 kg
• The data marked with * may vary for technical reasons. For greater precision,
please refer to the rating label placed on the product.
• Test condition for data in our rating label is as per safety regulation: EN
60335-2-40
• (CE) N 842/2006: R134A is a kind of fluorinated greenhouse gas covered by
the Kyoto Protocol. Its total global warming potential (GWP) is 1300
30oC, 80% 370W / 1.7A
32oC, 80% 390W / 1.8A
20L/day
2
Page 4

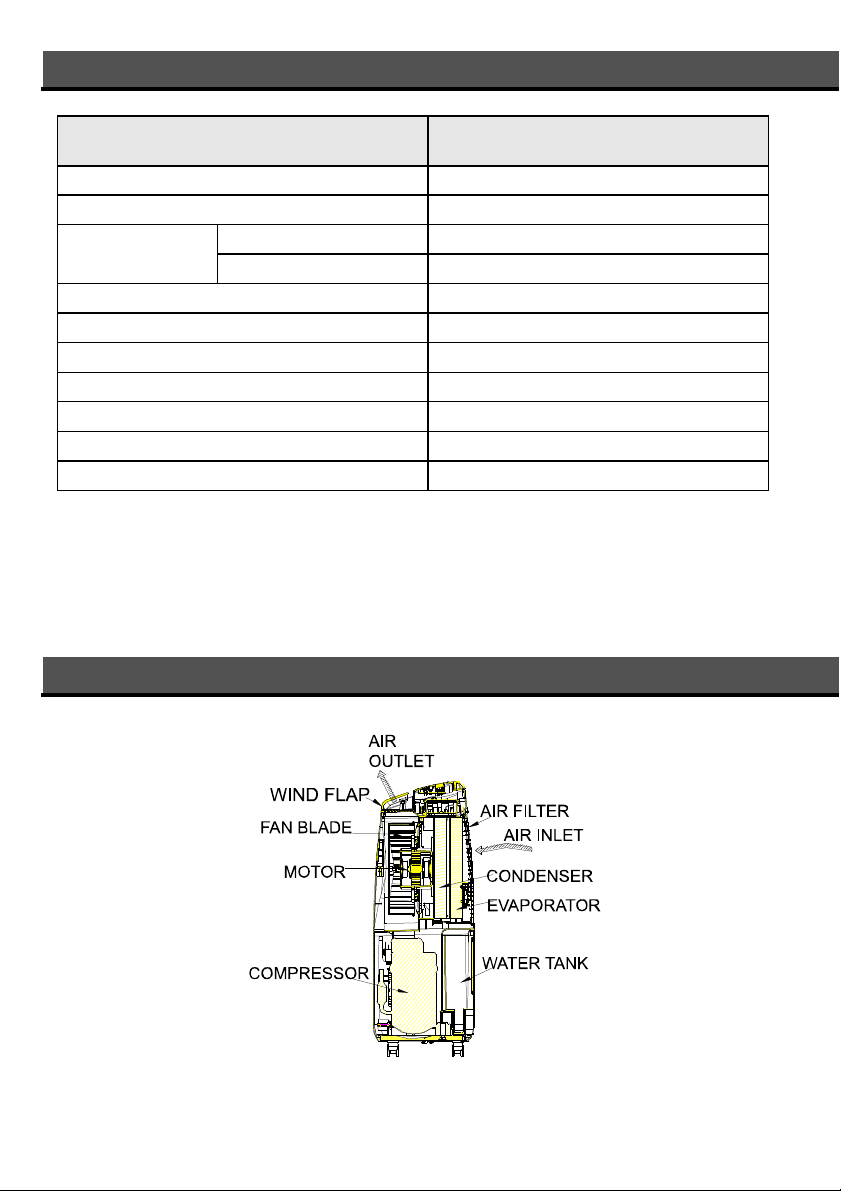
How it works
Where to position
This product is a dehumidifier. It controls relative humidity by passing the air through
the unit, forcing the excess moisture to condensate over the cooling elements.
Contact with this cold surface causes the moisture in the air to condense. This
condensed water then drains safely into the water tank. The dried air then passes
through the condenser where it is slightly warmed and re-enters the room at a
slightly elevated temperature.
Excess moisture will travel
throughout your home, in
the same way that cooking
smells waft to every room in
the house. For this reason,
the dehumidifier should be
positioned so that it can
draw this moist air towards
it from all over the home.
Alternatively, if you have a
serious problem in one area
you can begin by
positioning the dehumidifier
close to this area and later
moving it to a more central
point.
When positioning the
dehumidifier, ensure that it
is placed on a flat level
surface and that there is a
minimum of 10 cm (4") of
space on either side of the
unit to allow for efficient
airflow.
This dehumidifier is fitted
with castors for extra
mobility, if you move the
unit, it should first be
switched off and the water
tank emptied.
We do not recommend the
use of an extension lead, so
please try to ensure that the
unit is sufficiently close to a
fixed mains socket. If it is
necessary to use an
extension lead, please
ensure the diameter of the
wires of the cable is at least
1 mm2 and that it is in good
condition.
When the dehumidifier is in
operation, outside doors
and windows should be
closed for most efficient
use.
IMPORTANT!
Do not use this unit at ambient temperatures below 5oC, this will prevent the
possibility of a heavily iced up evaporating coil.
3
Page 5

Parts
Accessories
ACTIVE CARBON FILTER
4
Page 6

Control Panel
1. Humidity setting button
2.
Working mode indicator
(continuous working, humidity
40%, 50%, 60%, 70%)
3.
Humidity/Temperature display
4. Timer operation indicator
5. Temperature display button
6. Ionizer or TiO2 indicator (these
are optional function depending
on the model you purchased)
7. DRYER indicator
8.
DRYER button
9. High ventilation indicator
10. Speed/Ventilation button
11. Low ventilation indicator
12.
Power indicator
13. ON/OFF (power) button
14. “Full Water” indicator
15. TIMER button
16. Ionizer or TiO2 button (these are
optional function depending on the
model you purchased)
5
Page 7

Operation
1. Plug the unit into a correct mains socket. (Please refer to the rating label at the
rear of the unit for correct voltage/frequency.)
2. Press ON/OFF button to turn on the unit. The compressor will start to work.
3. Press humidity setting button to set the working mode you require:
continuous working, humidity 40%, 50%, 60% or 70%. The relative indicator
will light on.
Blue light – room humidity > 70%
4. Press speed/ventilation button to set the ventilation speed to high or low.
The selected indicator light will come on.
5. Press the TIMER button to set the operating time you require (1~24 hours). The
display window will show the hour(s) you set as you press the TIMER button,
after releasing it for around 8 seconds, the display window will return to the room
humidity. When the set time has been reached, the compressor will stop working
automatically.
6.
By pressing the ”TEMP” button, the display window will show the room
temperature, after releasing the button for around 8 seconds, the display
window will return to show the room humidity.
7.
continuously, so it will help to dry the laundry.
Green light – room humidity 50~70%
Red light –room humidity < 50%
Red light flash – water full alarm
DRYER function is turbo ventilation to dry the moisture in the air
8. To turn off the unit, press ON/OFF button again.
9. Pre-setting function. By pressing the TIMER button but without turning on
the other functions (including ON/OFF button), you can PRE-SET the time for
the machine to work. For example, if you press the timer to '2', the unit will turn
on automatically after 2 hours.
6
Page 8

Drainage
While the water tank is full, the compressor will stop for self-protection and the water
full indicator will turn red.
To remove the water tank, pull it out squarely and horizontally from the unit.
After empting the water tank, place the water tank carefully and gently back into its
location. The water tank must be properly positioned, in order for the 'water full' sign to
go out and for your dehumidifier to operate.
Please note, if the water tank has not been positioned correctly the water full indicator
will turn red and remain on.
Continuous drainage
When the dehumidifier is operated at very high humidity levels, the water tank will
require more frequent emptying. In this situation, it may be more convenient to set the
unit up for continuous drainage by following the
instructions below.
1. Remove the water tank.
2. Connect a flexible plastic water pipe of inner
diameter: 11 mm. directly to the drain tube of the
appliance (* Please note, the water tube is not
supplied with the unit).
3. Ensure the drain pipe is securely fitted and
replace the water tank carefully routing the
flexible drain pipe out over the top of the tank
as shown.
4. Ensure the free end of the pipe runs to a
permanent drain and that the flexible pipe
outlet is below the level of the appliance
outlet connection.
5. Note! In very cold weather conditions,
precautions should be taken to prevent the
water tube from freeing.
Water tube of
inner diameter
11 mm
7
Page 9

Maintenance
Always switch off the appliance using its on/off button and unplug the unit from the
mains before carrying out any maintenance or cleaning of the unit.
CLEANING THE BODY
Use soft cloth to wipe the unit clean. Don't ever use volatile chemicals, gasoline,
detergents, chemically treated clothes, or other cleansing solutions. These all could
possibly damage the appliance enclosure and controls.
CLEANING THE FILTER
This dehumidifier is equipped with 2 filters
:
1. ANTI-DUST FILTER
Remove the filter holder, remove the active carbon filter. Use a vacuum cleaner or
tap the filter lightly for easy cleaning. If the filter is particularly dirty, use warm water
with a small amount of medium strength detergent to clean. Make sure the filter is
completely dry before replacing. Do not expose the filter to sunlight.
2. ACTIVE CARBON FITLER (for capturing the particles of dust suspended in the
air and preventing the production of bacteria.)
The active carbon filter placed under the anti-dust filter is not washable. Its life span
is variable and depends on the ambient conditions where the unit is used. The filter
should be checked periodically and replaced if necessary.
STORAGE
If you are not going to use the unit for an extended period of time. Please:
Turn off the unit, empty the water tank and wipe it clean & dry.
Unplug and tidy away the mains lead...
Cover the unit and store where it will not receive direct sunlight.
8
Page 10

Recycling
After Sales Service
For electrical products sold within the European Community. At the end of the
electrical products useful life it should not be disposed of with household waste.
Please recycle where facilities exist.
Check with your Local Authority or retailer for recycling advice in your country.
Your product is guaranteed for one year from the date of purchase. Within this
period, we undertake to repair or exchange this product free of charge provided it
has been installed and operated in accordance with these instructions.
Your rights under this guarantee are additional to your statutory rights, which in
turn are not affected by this guarantee. Should you require after sales information
or assistance with this product please go to www.dimpco.ie where you can click
on the ‘Customer Care’ tab or ring 01 842 4833.
Please retain your receipt as proof of purchase.
____________________________________________________________
CE This appliance complies with European Safety Standard EN60335-2-40, and
European Electromagnetic Capability (EMC) EN55014-1, EN55014-2, EN61000-3-2
and EN61000-3-3. These cover the essential requirements of EEC Directives
2006/95/EC and 2004/108/EC.
Dimpco Customer Service: 01 842 4833
Airport Road Fax: 01 842 4705
Cloghran Website: www.dimpco.ie
Co. Dublin
A division of GDC Group Ltd.
Website:
© GDC Group Ltd.
All rights reserved. Material contained in this publication may not be reproduced in whole or in
part without prior permission in writing of GDC Group Ltd.
www.gdcgroup.co.uk
9
 Loading...