

Page 1
INDGCAP7RG Issue 0
Owner’s Manual
Models
DGP1000-B
DGP1500-B
DGP2000-B
IMPORTANT SAFETY INFORMATION: Always read this manual rst before attempting to install or use this heater. For your
safety, always comply with all warnings and safety instructions contained in this manual to prevent personal injury or property
damage.
To view the full line of Dimplex products, please visit www.dimplex.com
7210370100rev00
Page 2
Table of Contents
Welcome & Congratulations ..................................................2
Important Instructions .......................................................3
Quick Reference Guide ......................................................3
Installation ................................................................4
Operation .................................................................5
Maintenance ..............................................................6
Warranty .................................................................6
!
NOTE: Procedures and techniques that are considered
Welcome & Congratulations
Thank you and congratulations for choosing to purchase an
electric heater from Dimplex, the world leader in electric heat.
Please carefully read and save these instructions.
CAUTION: Read all instructions and warnings
carefully before starting installation. Failure to follow
these instructions may result in a possible electric shock,
re hazard and will void the warranty.
important enough to emphasize.
CAUTION: Procedures and techniques which, if not
carefully followed, will result in damage to the equipment.
WARNING: Procedures and techniques which, if not
carefully followed, will expose the user to the risk of re,
serious injury, or death.
Always use a qualied technician or service agency to repair
this heater.
NO NEED TO RETURN
TO THE STORE
Questions With the Installation?
Require Parts Information?
Product Under Manufacturer’s
Warranty?
Call Toll-Free
1-888-346-7539
Monday to Friday
8:00 a.m. to 4:30 p.m. EST
2 www.dimplex.com
Page 3
IMPORTANT INSTRUCTIONS
A
565
B
150
Min.
300 Min.
shelf
150 Min.
When using electrical appliances, basic precautions should always
be followed to reduce the risk of re, electric shock, and injury to
persons, including the following:
① Read all instructions before using this appliance.
② The wall bracket supplied with the appliance must be used.
③ WARNING: This heater is hot when in use. To avoid burns, do
not let bare skin touch hot surfaces. Keep combustible materials,
such as furniture, pillows, bedding, papers, clothes, and curtains at
least 3 feet (0.9 m) from the front of the heater.
④ Extreme caution is necessary when any heater is used by or
near children or invalids and whenever the heater is left operating
and unattended.
⑤ Do not use this heater in the immediate surroundings of a bath,
shower, pool or other water basin. Check and observe all local
electrical and building codes for minimum clearances from electrical
switches and circuits before installing this unit.
⑥ If the heater is installed in a room containing a bath or shower, it
must be installed in such a way that all controls are out of reach of a
person using the bath or shower.
SAVE THESE INSTRUCTIONS
⑦ Do not use outdoors.
⑧ A heater has hot and arcing or sparking parts inside. Do not
use it in areas where highly ammable substances are used (e.g.
solvents, etc.) or stored.
⑨ To prevent a possible fire, do not block air intakes or exhaust
in any manner. Do not use on soft surfaces, like a bed, where
openings may become blocked. Do not place material or garments
on the heater, or obstruct the air circulation around the heater, for
instance by curtains or furniture, as this could cause overheating
and a re risk.
⑩ Do not insert or allow foreign objects to enter any ventilation
or exhaust opening as this may cause an electric shock or re, or
damage the heater.
⑪ Use this heater only as described in this manual. Any other
use not recommended by the manufacturer may cause fire, electric
shock, or injury to persons.
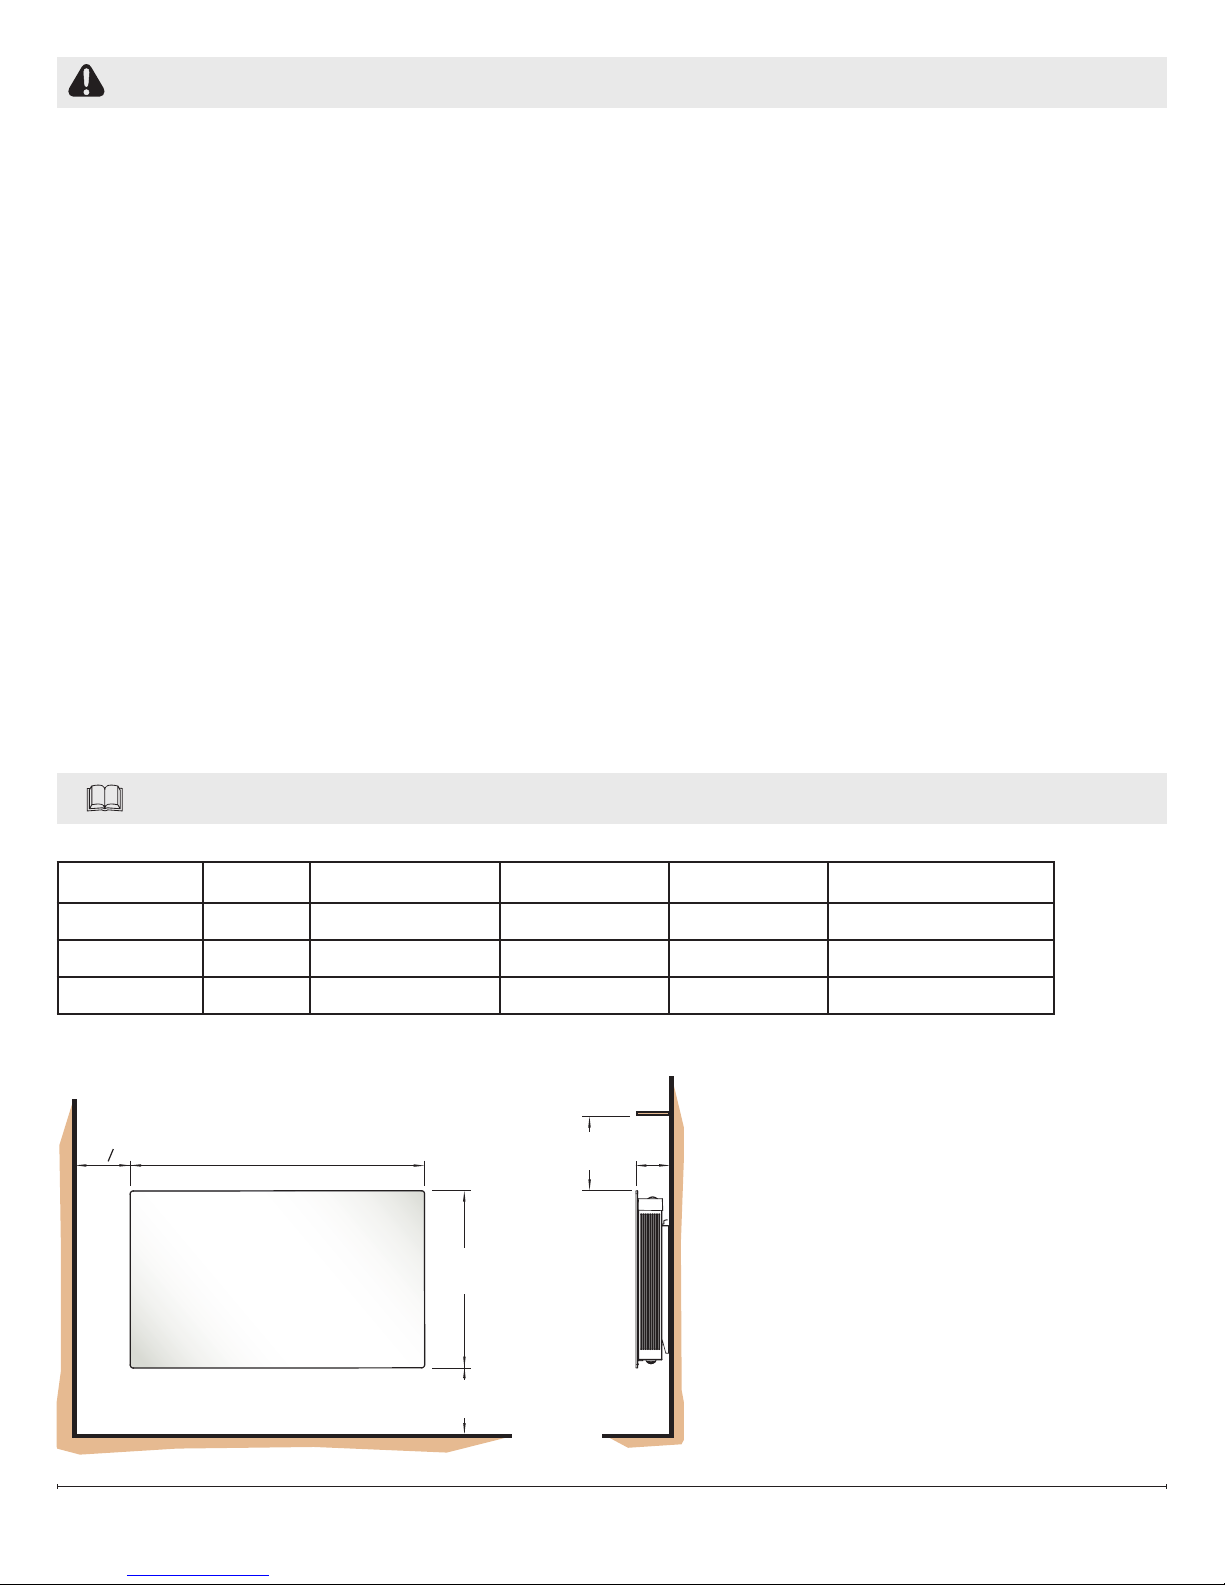
Quick Reference Guide
Models(s) Volts Watts A (Figure 1) B (Figure 1) Weight
DGP1000-B 208 / 240 0.75 kW / 1 kW 700 mm / 27.6" 107 mm / 4.25" 14.8 kg / 32.6 lbs.
DGP1500-B 208 / 240 1.125 kW / 1.5 kW 770 mm / 30.3" 107 mm / 4.25" 16.4 kg / 36.2 lbs.
DGP2000-B 208 / 240 1.5 kW / 2.0 kW 840 mm / 37.0" 107 mm / 4.25" 19.5 kg / 42.9 lbs.
Figure 1
150 mm
(6”) Min.
565 mm
(22¼”)
(13¾”) Min.
350 mm
3
150 mm
(6”) Min.
Page 4
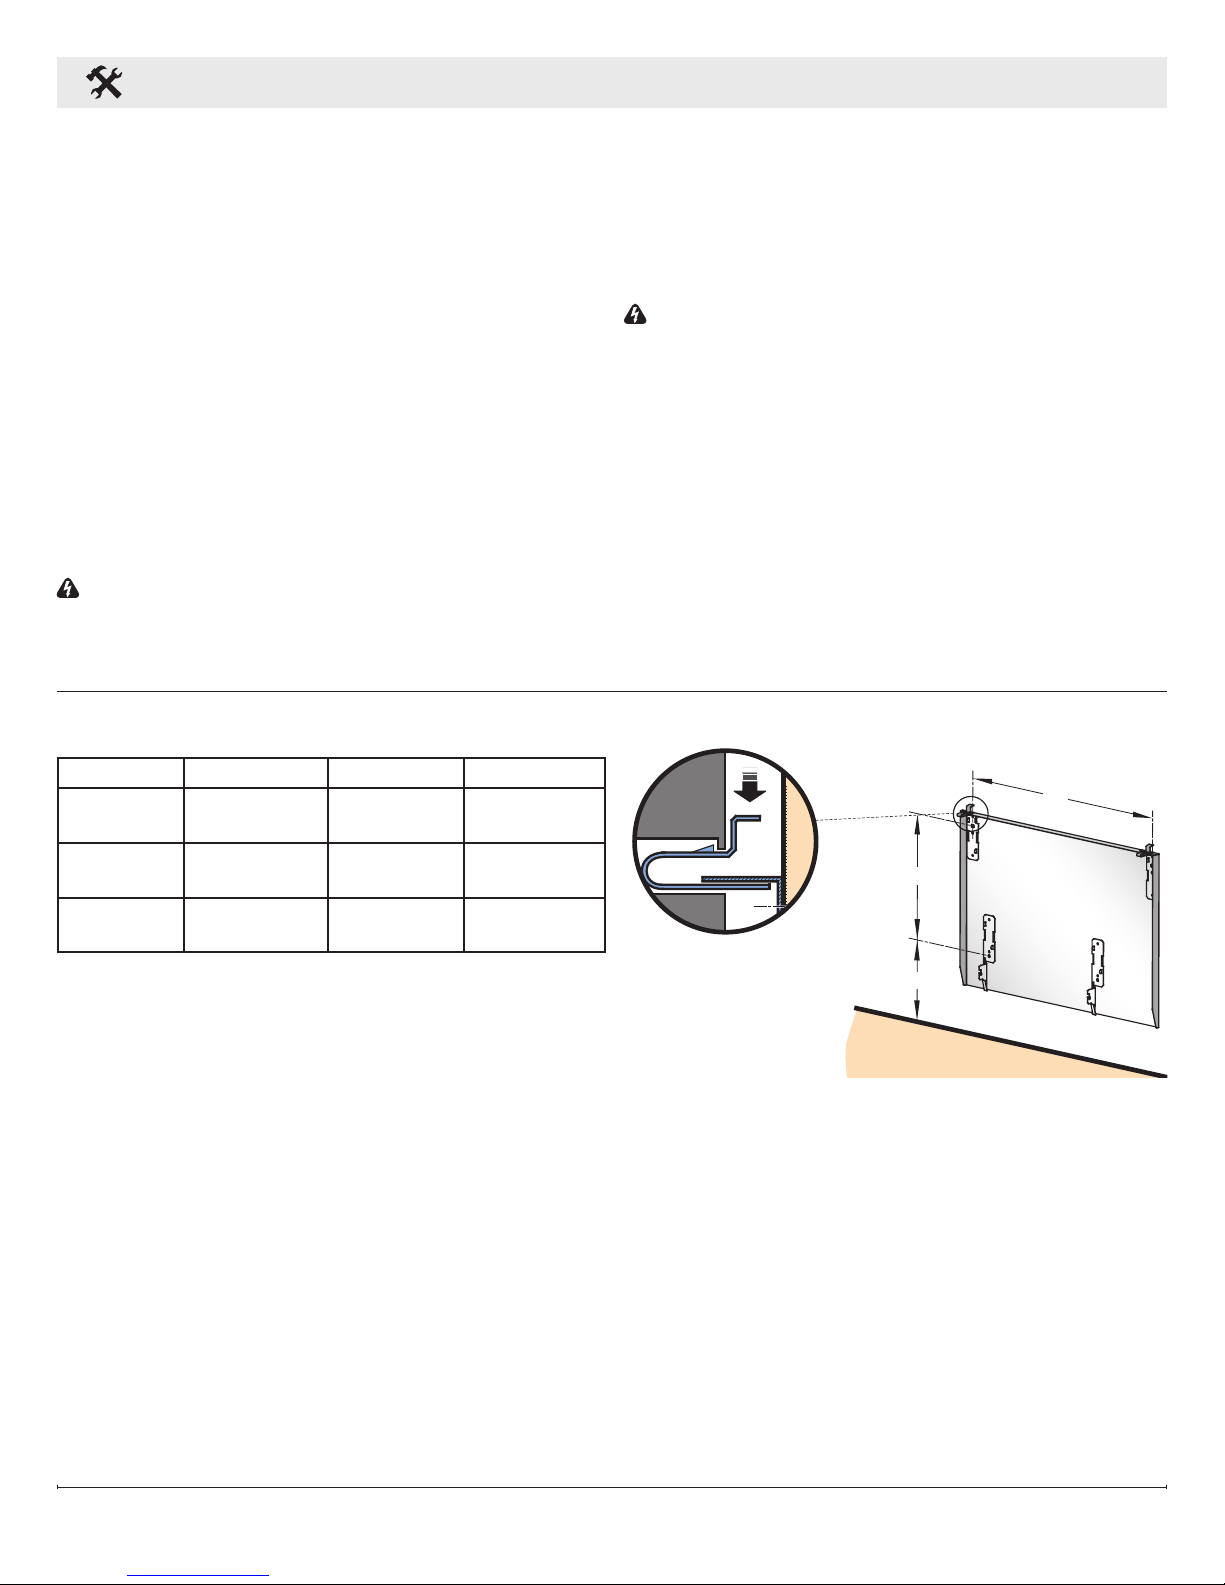
Installation
D
255 Min.
C
C D
GFP500 390 300
GFP750 390 300
GFP1000 560 300
GFP1500 630 300
Electrical Connection
Verify that the supply voltage is the same as that stated on
the heater (A.C supply only).
This heater is designed for use on a 208/240V 60Hz AC
single-phase supply. Connection requires a supply wire that
must consist of two wires plus ground and have a rating
capable of handling all loads on the circuit.
Make all relevant electrical connections within an installed
junction box and ensure all wiring meets all local electrical
and building codes. Where local code requires the
disconnection of all ungrounded supply lines, a double pole
isolating switch must be tted to facilitate isolation.
Connection to the heater should be made using the provided
tted cable clamp assembly at the back of the heater to meet
local code requirements.
WARNING: Always use a qualied and licensed
electrician for all wiring and electrical connections.
Improper wiring could lead to a re hazard.
Figure 2
Wall Mounting
!
IMPORTANT: The wall bracket supplied with the
appliance must be used. The heater should be positioned
observing the minimum clearances stated around the
heater (Figure 1).
WARNING: Do not locate the heater immediately below a
xed socket outlet or connection box.
① Remove wall mounting bracket from the back of the
heater by depressing the spring latch at the top of each
bracket (Figure 2).
② Fix the wall bracket securely to the wall through the four
(4) screw holes provided.
③ Present the heater to the wall bracket and engage lower
slots in the back with bracket.
④ Raise the heater to upright position and push the heater
onto bracket to engage top latch.
C D E
DGP1000-B 560 mm / 22" 300 mm /
11.8"
DGP1500-B 630 mm /
24.8"
DGP2000-B 800 mm /
31.5"
300 mm /
11.8"
300 mm /
11.8"
255 mm /
10" MIN
255 mm /
10" MIN
255 mm /
10" MIN
E
4 www.dimplex.com
Page 5
Operation
MAX
*
‘x’
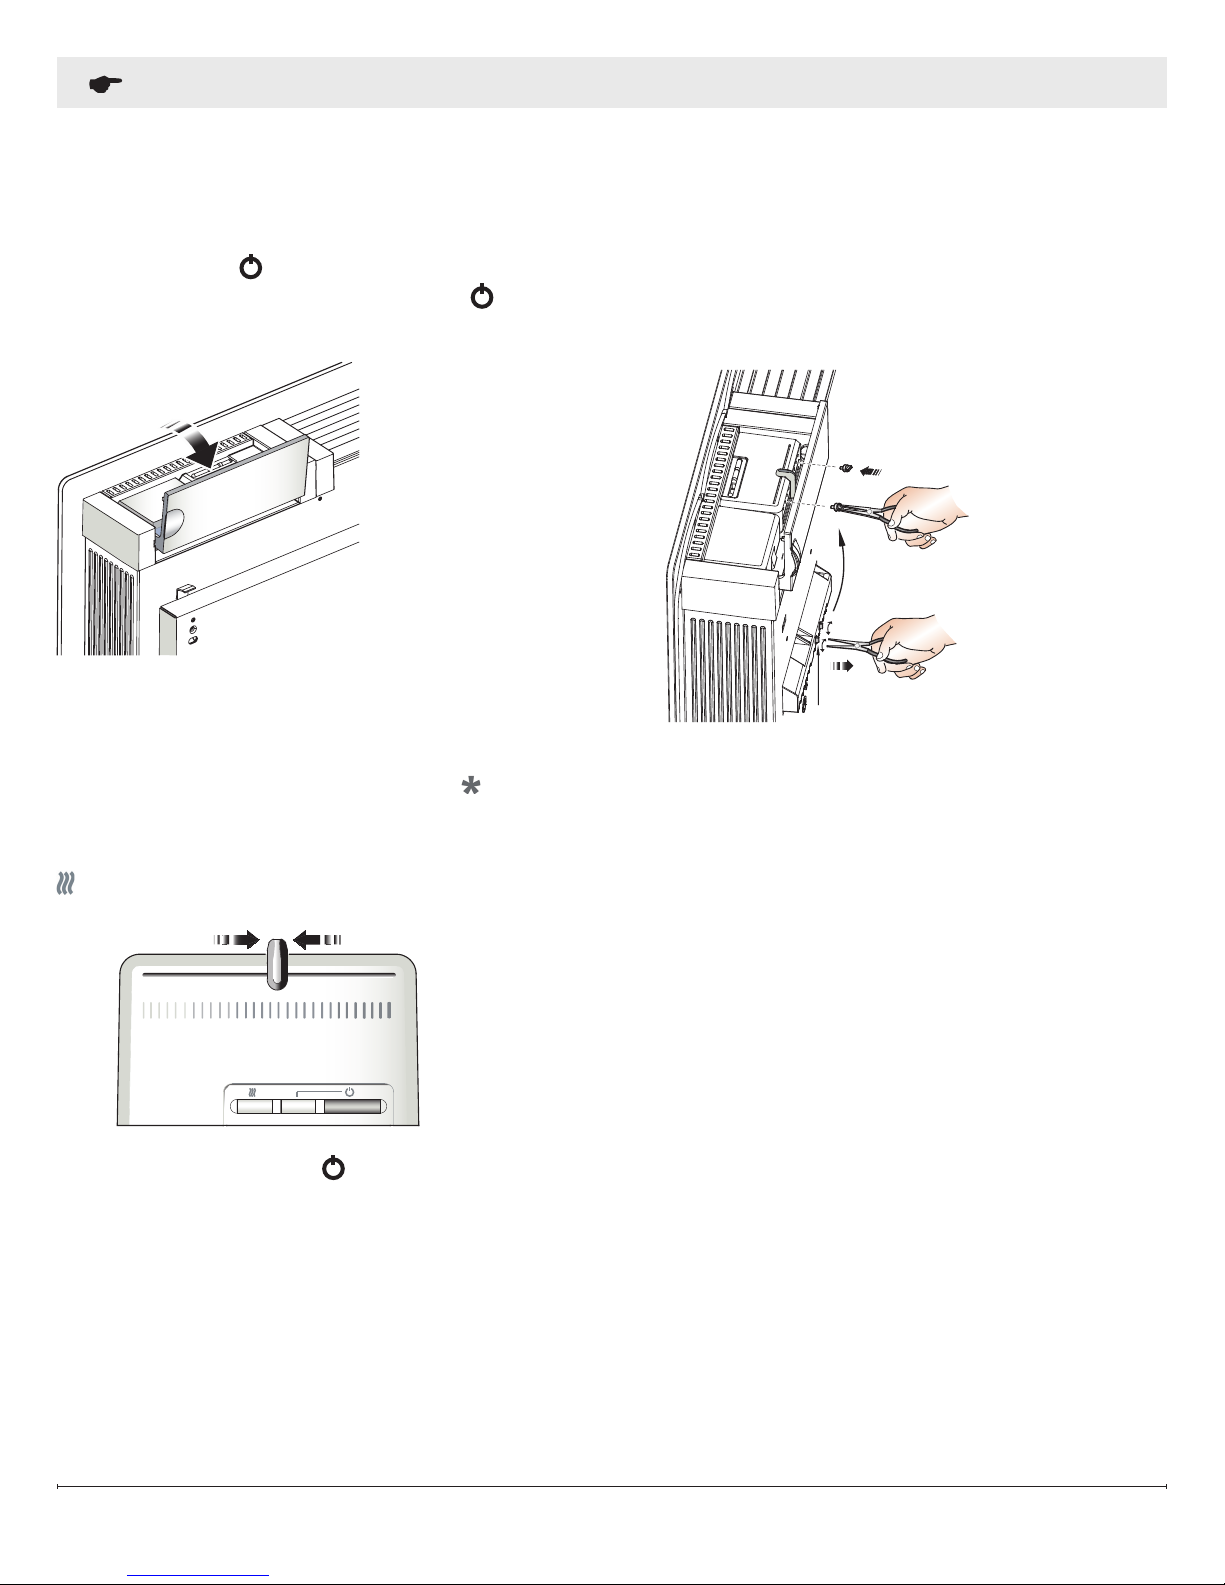
Switching the Heater On
The controls are located on the right hand side, on top of the
appliance. Lift ap to access the controls (Figure 3).
The button marked '
electronic thermostat. An indicator beside the '
' controls the electricity supply to the
' button
shows when the unit is powered on.
Figure 3
Setting Desired Temperature
Limiting the thermostat setting
Before wall mounting the product the installer may wish to
limit the heat selection slider movement for the operator. This
may be achieved by removing the two (2) plastic pins (refer
to 'x' in Figure 5) from the rear of the thermostat moulding
using pliers and inserting them in the preferred holes to limit
the slider movement.
Figure 5
The heater is tted with an adjustable thermostat enabling
the room temperature to be controlled by adjusting the slider
accordingly (Figure 4). The minimum setting ' ' represents
a room temperature of approximately 5oC (41oF) and may
be used for protection against frost. The 'MAX' setting
represents a room temperature of approximately 30oC. The '
' symbol glows when the elements are actually heating.
Figure 4
Turn on the heater using the '
' button and move the
thermostat slider to the desired position. When the room
temperature has reached the desired level, the power to the
elements will be reduced, the heater will then maintain the
room temperature at the chosen level.
!
NOTE: Should your heater fail to come on when the
thermostat slider is at a low setting, this may be due to
the room temperature being higher than the thermostat
setting.
Safety - Overheat protection
For your safety this appliance is tted with a thermal cut-out.
In the event that the product overheats for some reason, the
cut-out prevents excessive temperatures on the product by
cutting the power to the heater. Once the heater has cooled
down, it will reset automatically, it will continue to cycle on
and off automatically until the reason for overheating is
removed.
5
Page 6
Maintenance
Cleaning
WARNING: Always disconnect from the power supply
before cleaning the heater.
Before commencing cleaning, turn off the heater and allow it
to cool. Disconnect the electricity supply to the appliance.
Warranty
The manufacturer warrants the heating elements and
components of the enclosed product against any defect
in material or workmanship for a period of two years.
In full satisfaction of any claims under this warranty the
manufacturer will repair or replace without charge in its
factory or in the eld as it alone may decide any parts which
in its operation are defective.
The manufacturer shall not be responsible for any
transportation or shipping costs in relation to such repair
or replacement except as specically assumed by it.
Misuse of this product or repairs by persons other than
the manufacturer’s authorized personnel without the
manufacturer’s written approval, will void this warranty.
This warranty is in lieu of all other warranties or conditions
whether express or implied including but not limited to those
of merchantability or tness for purpose, and shall constitute
the sole remedy of the purchaser and the sole liability of the
manufacturer in respect of the sale of the product whether
in the nature of breach or breach of fundamental term or of
negligence or otherwise.
The outside can be cleaned by wiping it over with a soft
damp cloth and then dried. Do not use abrasive cleaning
powders or furniture polish, as this can damage the surface
nish.
To release heater from the wall bracket for cleaning or
redecoration, depress latch on both brackets (see Figure 2)
and hinge forward.
The manufacturer shall not be liable for any special indirect
or consequential damages or for any damages resulting from
removal or replacement of a heater subject of a warranty
claim without the manufacturer’s authorization.
This warranty is transferable by the original consumer
purchaser of the product. Any claims under this warranty
must be submitted in writing to: Dimplex North America
Limited, 1367 Industrial Road, Cambridge Ontario, N1R 7G8,
Canada.
Note on Disposal
Do not dispose of the unit with general household waste. The
device must be taken to a local waste disposal plant.
Dimplex North America Limited
1367 Industrial Road
Cambridge ON
Canada N1R 7G8
© 2010 Dimplex North America Limited
6 www.dimplex.com
Page 7

INDGCAP7RG Numéro 0
Manuel du propriétaire
Modèles
DGP1000-B
DGP1500-B
DGP2000-B
CONSIGNES DE SÉCURITÉ IMPORTANTES : Toujours lire le présent manuel avant d’essayer d’installer ou d’utiliser ce
radiateur. Pour votre sécurité, toujours respecter tous les avertissements et suivre les consignes de sécurité compris dans le
présent manuel an de prévenir les blessures ou les dommages matériels.
Pour découvrir la gamme complète de produits Dimplex, visitez www.dimplex.com
7210370100rev00
Page 8

Table des matières
Bienvenue et félicitations .....................................................8
Instructions importantes ......................................................9
Guide de référence rapide ....................................................9
Installation du radiateur .....................................................10
Utilisation ................................................................11
Entretien ................................................................12
Garantie .................................................................12
!
NOTA : Marches à suivre et techniques considérées
Bienvenue et félicitations
Merci et félicitations d'avoir choisi un radiateur électrique
de Dimplex, le chef de le mondial en matière de chauffage
électrique.
Veuillez lire ces consignes attentivement et les
conserver.
MISE EN GARDE : Lire attentivement toutes les
consignes et tous les avertissements avant de procéder
à l'installation du radiateur. Le non-respect de ces
consignes pourrait entraîner un risque de choc électrique
ou d’incendie et annuler la garantie.
Toujours faire réparer ce radiateur par un technicien qualié
ou un centre de réparation.
sufsamment importantes pour qu’on les souligne.
MISE EN GARDE : Marches à suivre et techniques qui,
si elles ne sont pas bien respectées, se traduiront par
des dommages causés à l’appareil.
AVERTISSEMENT : Marches à suivre et techniques
qui,si elles ne sont pas bien respectées, exposeront
l’utilisateur à des risques d’incendie, de blessure grave
ou de décès.
NÉCESSAIRE D’ALLER
ARRÊT
AU MAGASIN
Des questions à propos de
l’assemblage
Besoin d’information sur des
pièces détachées
IL N’EST PAS
?
?
Besoin d’information à
propos d’un produit sous une
garantie du fabricant
Veuillez téléphoner au
numéro sans frais
1 888 346-7539
Du lundi au vendredi
De 8 h à 16 h 30 (HNE)
Veuillez avoir à portée de main les
numéros de modèle et de série de
votre appareil. (Voir ci-dessous)
8 www.dimplex.com
?
Page 9

INSTRUCTIONS IMPORTANTES
A
565
B
150
Min.
300 Min.
shelf
150 Min.
Lorsqu’un appareil électrique est utilisé, il est important de
toujours prendre des précautions de base pour réduire les risques
d’incendie, de chocs électriques et de blessures, notamment :
① Lire toutes les instructions avant de se servir de cet appareil.
② Utiliser le support mural fourni avec le radiateur.
③ AVERTISSEMENT : Le radiateur devient chaud lorsqu’il est
en marche. Pour éviter les brûlures, ne pas toucher les surfaces
chaudes. Garder à au moins 3 pieds (0,9 mètre) de l'avant du
radiateur tout matériel combustible : meubles, oreillers, literie,
papier, vêtements et rideaux.
④ Faire preuve d’une grande prudence lorsque le radiateur est
utilisé par des enfants ou des personnes handicapées, s’il est
en marche à proximité d’eux, ou s’il est en marche et laissé sans
surveillance.
⑤ Ne pas utiliser ce radiateur à proximité d’un bain, d’une
douche ou d’une piscine ou d'un autre bassin contenant de l'eau.
Avant d'installer cet appareil, examiner et suivre tous les codes
d'électricité et du bâtiment pour respecter le dégagement minimal
exigé par rapport aux interrupteurs et aux circuits électriques.
⑥ Si le radiateur est installé dans une pièce contenant une
baignoire ou une douche, le placer de telle sorte qu'une personne
prenant un bain ou une douche ne puisse accéder aux commandes.
⑦ Ne pas utiliser à l’extérieur.
⑧ Tous les radiateurs contiennent des pièces qui chauffent et
qui produisent des arcs électriques ou des étincelles. Ne pas
utiliser ce radiateur dans un endroit où des substances hautement
inammables (p. ex. des solvants) sont utilisées ou stockées.
⑨ Pour éviter un incendie, ne pas obstruer les grilles d'entrée
ou de sortie d’air d’aucune façon. Ne pas utiliser l’appareil sur des
surfaces instables, comme un lit, où les ouvertures risquent de se
bloquer. Ne pas placer d’objets ni de vêtements sur le radiateur,
et ne pas obstruer les grilles d’entrée ou de sortie d’air, avec des
rideaux par exemple, car cela pourrait entraîner une surchauffe et
un incendie.
⑩ Ne pas introduire de corps étrangers dans la prise d’air de
ventilation ou la bouche de sortie d’air, car cela peut occasionner
des chocs électriques, provoquer un incendie ou endommager le
radiateur.
⑪ Se servir de ce radiateur uniquement de la façon décrite dans
le présent manuel. Toute autre utilisation non recommandée par
le fabricant peut provoquer un incendie, occasionner des chocs
électriques ou des blessures.
CONSERVER CES INSTRUCTIONS
Guide de référence rapide
Modèle(s) Volts Watts A (Figure 1) B (Figure 1) Poids
DGP1000-B 208 / 240 0,75 kW / 1 kW 700 mm / 27,6 po 107 mm / 4,25 po 14,8 kg / 32,6 lb.
DGP1500-B 208 / 240 1,125 kW / 1,5 kW 770 mm / 30,3 po 107 mm / 4,25 po 16,4 kg / 36,2 lb.
DGP2000-B 208 / 240 1,5 kW / 2,0 kW 840 mm / 37,0 po 107 mm / 4,25 po 19,5 kg / 42,9 lb.
Figure 1
150 mm
(6 po) Min.
(13¾ po) Min.
565 mm
(22¼ po)
Tablette
350 mm
9
150 mm
(6 po) Min.
Page 10

Installation du radiateur
D
255 Min.
C
C D
GFP500 390 300
GFP750 390 300
GFP1000 560 300
GFP1500 630 300
Branchement électrique
Vérier que la tension d’alimentation est identique à celle
indiquée sur le radiateur (c.a. seulement).
Ce radiateur est conçu pour être utilisé avec une alimentation
en courant alternatif monophasé de 208 / 240 V, 60 Hz. Le
branchement nécessite un cordon constitué de deux ls et
d’un conducteur de mise à la terre, et dont le calibre permet
de supporter la charge de tous les appareils branchés au
circuit.
Effectuer tous les branchements électriques pertinents à
l’intérieur d'une boîte de raccordement installée et s’assurer
que le câblage respecte tous les codes d’électricité et du
bâtiment locaux. Dans les villes où le code d’électricité local
stipule le débranchement de toute ligne d’alimentation non
mise à la terre, un interrupteur d’isolement bipolaire doit être
installé pour faciliter l’isolation.
Pour respecter les exigences du code d’électricité local,
utiliser le serre-câble intégré situé au dos de l’appareil pour
effectuer le branchement au radiateur.
AVERTISSEMENT : Toujours faire appel à un électricien
qualié et agréé pour tout travail de câblage et de
raccordement. Un travail de câblage incorrect pourrait
provoquer un incendie.
Montage mural
!
IMPORTANT : Utiliser le support mural fourni avec le
radiateur. Monter le radiateur en respectant les espaces
de dégagement minimums prévus autour de l’appareil
(gure 1).
AVERTISSEMENT : Ne pas installer le radiateur
directement au-dessus ou au-dessous d’une prise de
courant xe ou d’une boîte de raccordement.
① Retirer le support mural de l'arrière du radiateur en
appuyant sur les loquets à ressort dans le haut du support
(gure 2).
② Visser le support mural solidement au mur à l'aide des
quatre (4) trous à vis.
③ Placer le radiateur contre le support mural et l'enclencher
dans les fentes inférieures à l'arrière de l'appareil.
④ Amener le radiateur à la position verticale et engager la
fente supérieure dans le support.
Figure 2
C D E
DGP1000-B 560 mm /
22 po
DGP1500-B 630 mm /
24,8 po
DGP2000-B 800 mm /
31,5 po
300 mm /
11,8 po
300 mm /
11,8 po
300 mm /
11,8 po
255 mm /
10 po min.
255 mm /
10 po min.
255 mm /
10 po min.
E
10 www.dimplex.com
Page 11

Utilisation
MAX
*
‘x’
Mise sous tension du radiateur
Les commandes se trouvent à droite sur le dessus de
l'appareil. Relever le rabat pour y accéder (gure 3).
Le bouton
thermostat électronique. Un témoin à côté du bouton
commande l'alimentation électrique du
s'allume lorsque l'appareil est sous tension.
Figure 3
Réglage de la température
L'utilisateur peut contrôler la température de la pièce en
glissant le bouton du thermostat au réglage voulu (gure 4).
Le réglage minimum , qui représente une température
ambiante d'environ 41 °F (5 °C), peut être utilisé comme
protection contre le gel. Le réglage MAX représente une
température ambiante d'environ 86 °F (30 °C). Le témoin
s'allume lorsque les éléments chauffants du radiateur
fonctionnent.
Figure 4
Limitation des réglages de température possibles
Avant de monter l'appareil au mur, l'installateur peut choisir
de limiter les réglages minimal et maximal que le bouton
du thermostat pourra atteindre. Pour ce faire, enlever les
deux (2) goupilles de plastique (X à la gure 5) à l'arrière
du boîtier du thermostat en utilisant une pince, puis les
insérer dans les trous voulus an de limiter l'amplitude de
déplacement du bouton du thermostat.
Figure 5
Sécurité – Protection contre la surchauffe
Pour votre sécurité, cet appareil comporte un coupe-circuit
thermique. Si l'appareil surchauffe pour quelque raison que
ce soit, le coupe-circuit interrompt l'alimentation électrique
an d'éviter que le radiateur atteigne une température
excessive. Une fois l'appareil refroidi, il se réinitialisera
automatiquement et poursuivra le cycle de chauffage et
d'arrêt automatique jusqu'à ce que la cause de la surchauffe
ait été éliminée.
Pour allumer le radiateur, appuyer sur le bouton
le bouton du thermostat au réglage voulu. Lorsque la pièce a
atteint la température voulue, le radiateur baisse le niveau de
chauffage pour maintenir la pièce à cette température.
!
NOTA : Si le radiateur ne se met pas en marche lorsque
le bouton du thermostat se trouve à un réglage bas, la
température de la pièce est peut-être trop élevée par
rapport au réglage du thermostat.
11
et glisser
Page 12

Entretien
Nettoyage
AVERTISSEMENT : Toujours débrancher le radiateur de
l’alimentation électrique avant de le nettoyer.
Avant de procéder au nettoyage, mettre le radiateur hors
tension et le laisser refroidir. Couper l'alimentation électrique
de l'appareil.
Garantie
Le fabricant offre une garantie de deux ans pour tout vice de
matériaux ou de fabrication sur les pièces et les éléments
chauffants de l’appareil. Dans le but de satisfaire à toute demande liée à la garantie, le fabricant réparera ou remplacera
sans frais, en usine ou chez le client, selon ce que lui seul
décidera, toute pièce jugée défectueuse.
Les frais de transport et d’expédition rattachés à la réparation ou au remplacement n’incombent pas au fabricant, à
l’exception des frais spéciquement couverts par la garantie.
Le mauvais usage ou la réparation de l’appareil par une
personne autre qu’un membre du personnel autorisé par le
fabricant sans l’autorisation écrite de ce dernier annulera la
présente garantie.
Nettoyer l’extérieur de l’appareil à l’aide d’un chiffon doux
humide, puis le sécher. Ne pas utiliser de poudre nettoyante
abrasive ou de produit à polir les meubles, car ils pourraient
endommager le ni de la surface.
Pour dégager le radiateur du support mural an de le
nettoyer ou de décorer à neuf, abaisser le loquet des deux
côtés du support (gure 2) et incliner l'appareil vers l'avant.
inexécution fondamentale ou la rupture d’une condition essentielle, pour négligence ou pour toute autre raison.
Le fabricant ne peut être tenu responsable de dommages
particuliers, indirects ou consécutifs ni de dommages résultant du retrait ou du remplacement d’un radiateur faisant
l’objet d’une réclamation sous garantie sans l’autorisation du
fabricant.
Cette garantie peut être transférée par l’acheteur initial du
produit. Toute réclamation dans le cadre de la présente
garantie devra être soumise par écrit à : Dimplex North
America Limited, 1367 Industrial Road, Cambridge Ontario,
N1R 7G8, Canada.
La présente garantie remplace toute autre garantie ou
condition, explicite ou tacite, y compris notamment les garanties de qualité marchande ou de convenance à un usage
particulier. De plus, la garantie constitue le seul recours de
l’acheteur et la seule responsabilité du fabricant en ce qui
concerne la vente de l’appareil, que ce soit pour une rupture
de contrat, de garantie ou de condition ou encore pour une
Dimplex North America Limited
1367 Industrial Road
Cambridge ON
Canada N1R 7G8
Comment se défaire de l’appareil
Il ne faut pas jeter l’appareil avec les ordures ménagères.
On doit l’apporter à une installation locale d’élimination des
déchets.
© 2010 Dimplex North America Limited
12 www.dimplex.com
Page 13

INDGCAP7RG Numéro 0
Manual del propietario
Modelos
DGP1000-B
DGP1500-B
DGP2000-B
INFORMACIÓN DE SEGURIDAD IMPORTANTE: Siempre lea este manual antes de intentar instalar o usar este calentador de
aire. Por su seguridad, cumpla siempre con todas las advertencias e instrucciones de seguridad que se incluyen en este manual
para evitar daños personales o daños a la propiedad.
Para ver la lista completa de productos Dimplex, visite www.dimplex.com
7210370100rev00
Page 14

Índice
Bienvenida y felicitaciones ..................................................14
Instrucciones importantes ...................................................15
Guía de consulta rápida ....................................................15
Instalación ..............................................................16
Funcionamiento ..........................................................17
Mantenimiento ...........................................................18
Garantía ................................................................18
!
NOTA : Marches à suivre et techniques considérées
Bienvenida y felicitaciones
Gracias y felicitaciones por haber comprado un calentador
de aire eléctrico de Dimplex, el líder del mundo en
calefacción eléctrica.
Lea atentamente y guarde estas instrucciones.
PRECAUCIÓN: Lea atentamente todas las instrucciones
y advertencias antes de comenzar la instalación. No
seguir estas instrucciones puede provocar una posible
descarga eléctrica y representar un peligro de incendio,
y anulará la garantía.
Recurra siempre a un técnico cualicado o a una agencia
de servicio técnico para reparar este calentador de aire.
sufsamment importantes pour qu’on les souligne.
MISE EN GARDE : Marches à suivre et techniques qui,
si elles ne sont pas bien respectées, se traduiront par
des dommages causés à l’appareil.
AVERTISSEMENT : Marches à suivre et techniques
qui,si elles ne sont pas bien respectées, exposeront
l’utilisateur à des risques d’incendie, de blessure grave
ou de décès.
REGRESAR A LA
TIENDA
¿Tiene alguna pregunta sobre
el ensamblaje?
NO ES NECESARIO
¿Necesita información sobre
las piezas?
¿El producto está bajo
garantía del fabricante?
Llame sin cargo al
1-888-346-7539
lunes a viernes,
8:00 a.m. a 4:30 p.m., hora
del Este.
Tenga el número de modelo y el
número de serie del producto a
la mano. (Vea a continuación)
14 www.dimplex.com
Page 15

INSTRUCCIONES IMPORTANTES
A
565
B
150
Min.
300 Min.
shelf
150 Min.
Cuando se usen aparatos eléctricos, siempre se deben seguir las
precauciones básicas para reducir el riesgo de incendio, descargas
eléctricas y lesiones a las personas, que incluyen las siguientes:
① Lea todas las instrucciones antes de usar este aparato.
② Debe usarse el soporte para pared suministrado con el aparato.
③ ADVERTENCIA: Este calentador de aire está caliente cuando
se utiliza. Para evitar quemaduras, no toque las supercies
calientes con la piel. Mantenga los materiales combustibles,
como el mobiliario, almohadas, ropa de cama, papeles, ropa y
cortinas, alejados al menos 3 pies (0.9 m) de la parte delantera del
calentador de aire.
④ Tenga más precaución cuando se use cualquier calentador de
aire cerca de niños o personas inválidas, o bien cuando sean ellos
quienes lo manejen, y siempre que se deje el calentador de aire en
funcionamiento y sin vigilancia.
⑤ No utilice este calentador de aire cerca de baños, duchas,
piscinas, ni de otros depósitos de agua. Verique y cumpla todos
los códigos de electricidad y las ordenanzas de construcción
municipales con respecto a los espacios libres mínimos desde
interruptores y circuitos eléctricos antes de instalar esta unidad.
⑥ Si el calentador de aire se instala en una habitación que tiene
un baño o una ducha, debe instalarse de forma tal que todos los
controles queden fuera del alcance de la persona que usa el baño o
la ducha.
⑦ No utilice este aparato en exteriores.
⑧ Un calentador de aire tiene dentro piezas calientes y que
provocan chispas o arcos eléctricos. No lo use en zonas en las que
se empleen o almacenen sustancias altamente inamables (p. ej.,
solventes, etc.).
⑨ Para evitar cualquier posible incendio, no bloquee la entrada
ni la salida de aire bajo ningún concepto. No use el aparato
sobre supercies blandas, como en una cama, en la que puedan
bloquearse las aberturas. No coloque materiales ni prendas sobre
el calentador de aire, ni obstruya la circulación de aire alrededor
del calentador de aire, por ejemplo con cortinas o mobiliario, ya que
esto podría causar sobrecalentamiento y riesgo de incendio.
⑩ No introduzca ni deje que entren cuerpos extraños en los
oricios de ventilación o escape, ya que ello puede provocar
descargas eléctricas o incendio, o bien dañar el calentador de aire.
⑪ Use este calentador de aire sólo de la forma descrita en este
manual. Cualquier otro uso que no haya sido recomendado por el
fabricante puede provocar un incendio, una descarga eléctrica o
lesiones a las personas.
CONSERVE ESTAS INSTRUCCIONES
Guía de consulta rápida
Modelo Voltios Vatios A (Figura 1) B (Figura 1) Peso
DGP1000-B 208 / 240 0.75 kW / 1 kW 700 mm / 27.6 pulg. 107 mm / 4.25 pulg. 14.8 kg / 32.6 lb.
DGP1500-B 208 / 240 1.125 kW / 1.5 kW 770 mm / 30.3 pulg. 107 mm / 4.25 pulg. 16.4 kg / 36.2 lb.
DGP2000-B 208 / 240 1.5 kW / 2.0 kW 840 mm / 37.0 pulg. 107 mm / 4.25 pulg. 19.5 kg / 42.9 lb.
Figura 1
150 mm
(6 pulg.) Min.
350 mm
(13¾ pulg.) Min.
565 mm
(22¼ pulg.)
Estante
15
150 mm
(6 pulg.) Min.
Page 16

Instalación
D
255 Min.
C
C D
GFP500 390 300
GFP750 390 300
GFP1000 560 300
GFP1500 630 300
Conexión eléctrica
Verique que el voltaje de alimentación sea el mismo
que el indicado en el calentador de aire (alimentación CA
únicamente).
Este calentador de aire está diseñado para usarse con una
alimentación monofásica de CA, de 208/240 V y 60 Hz.
La conexión requiere un cable de alimentación que debe
constar de dos cables, más uno de conexión a tierra, y tener
una capacidad nominal que pueda manejar todas las cargas
del circuito.
Realice todas las conexiones eléctricas correspondientes
dentro de una caja de uniones instalada y asegúrese de
que todo el cableado cumpla con todos los códigos de
electricidad y ordenanzas de construcción municipales. En
los casos en los que el código municipal exija la desconexión
de todas las líneas de alimentación sin conexión a tierra,
debe colocarse un interruptor de aislamiento bipolar para
facilitar el aislamiento.
La conexión al calentador de aire debe realizarse usando
el conjunto de abrazadera para cables incorporado que
se suministra con el aparato y que se encuentra en la
parte posterior del calentador de aire, para cumplir con los
requisitos del código municipal.
Montaje en pared
!
IMPORTANTE: Debe usarse el soporte para pared
suministrado con el aparato. El aparato debe ubicarse
teniendo en cuenta los espacios libres mínimos
especicados alrededor del calentador de aire (Figura 1).
ADVERTENCIA: No sitúe el calentador de aire justo
debajo de una toma de corriente o de una caja de
conexión jas.
① Quite el soporte para montaje en pared de la parte
posterior del calentador de aire presionando el seguro
de resorte que se encuentra en la parte superior de cada
soporte (Figura 2).
② Fije el soporte para pared rmemente a la pared con los
cuatro (4) taladros suministrados.
③ Presente el calentador de aire en el soporte para pared
y enganche las ranuras inferiores, que se encuentran en la
parte posterior, con el soporte.
④ Eleve el calentador de aire hasta la posición vertical
y empújelo sobre el soporte para enganchar el seguro
superior.
ADVERTENCIA: Siempre acuda a un electricista
cualicado y homologado para que realice todo el
cableado y las conexiones eléctricas. El cableado
inadecuado podría provocar un peligro de incendio.
Figura 2
C D E
DGP1000-B 560 mm /
22 pulg.
DGP1500-B 630 mm /
24.8 pulg.
DGP2000-B 800 mm /
31.5 pulg.
300 mm /
11.8 pulg.
300 mm /
11.8 pulg.
300 mm /
11.8 pulg.
255 mm /
10 pulg. min.
255 mm /
10 pulg. min.
255 mm /
10 pulg. min.
E
16 www.dimplex.com
Page 17

Funcionamiento
MAX
*
‘x’
Cómo encender el calentador de aire
Los controles están ubicados del lado derecho, en la parte
superior del aparato. Levante la solapa para tener acceso a
los controles (Figura 3).
El botón con la marca
’ controla el suministro de
‘
electricidad al termostato electrónico. Un indicador detrás del
botón
’ muestra cuando la unidad está encendida.
‘
Figura 3
Cómo congurar la temperatura deseada
El calentador de aire está equipado con un termostato
ajustable que permite controlar la temperatura ambiente
ajustando el deslizador de la forma que corresponda (Figura
4). La conguración mínima ' ' representa una temperatura
ambiente de aproximadamente 41 oF (5 oC) y puede usarse
para protección contra la helada. La conguración 'MAX'
representa una temperatura ambiente de aproximadamente
o
86
F (30 oC). El símbolo ' ' brilla cuando los elementos
están calentando efectivamente.
Figura 4
Cómo limitar la conguración del termostato
Antes de montar el producto a la pared, es deseable que el
instalador limite el movimiento del deslizador de selección
de calor para el operador. Esto puede lograrse retirando con
pinzas los dos (2) pernos de plástico (identicados con 'x' en
la Figura 5) de la parte trasera de la moldura del termostato
e introduciéndolos en los oricios preferidos para limitar el
movimiento del deslizador.
Figura 5
Seguridad - Protección contra el
sobrecalentamiento
Para su seguridad, este aparato está equipado con un corte
térmico. En caso de que el producto se sobrecaliente por
alguna razón, el corte evita las temperaturas excesivas
en el producto cortando la alimentación al calentador de
aire. Una vez que el calentador de aire se haya enfriado,
se restablecerá automáticamente y continuará el ciclo de
encendido y apagado en forma automática hasta que se
haya eliminado la razón del sobrecalentamiento.
Encienda el calentador de aire con el botón
’ y mueva el
‘
deslizador del termostato hasta la posición deseada. Cuando
la temperatura ambiente haya alcanzado el nivel deseado,
se reducirá la energía a los elementos y el calentador de aire
mantendrá la temperatura ambiente en el nivel elegido.
!
NOTA: Si el calentador de aire no se enciende
cuando el deslizador del termostato se encuentra en
una conguración baja, esto puede deberse a que la
temperatura ambiente es más alta que la conguración
del termostato.
17
Page 18

Mantenimiento
Limpieza
ADVERTENCIA: Siempre desconecte el calentador de
aire de la fuente de alimentación antes de limpiarlo.
Antes de comenzar a limpiar, apague el calentador de aire y
deje que se enfríe. Desconecte el suministro de electricidad
al aparato.
Garantía
El fabricante ofrece una garantía de los elementos
generadores de calor y de los componentes del producto
que se adjunta contra cualquier defecto en el material o
en la mano de obra por un período de dos años. En plena
satisfacción de cualquier reclamación en virtud de esta
garantía, el fabricante reparará o reemplazará sin cargo
alguno en su fábrica o en el emplazamiento, según decida
por sí solo, cualquier pieza cuyo funcionamiento sea
defectuoso.
El fabricante no será responsable de ningún costo de
transporte ni de envío en relación con dicha reparación o
reemplazo, salvo que él lo haya asumido especícamente. El
uso indebido de este producto o las reparaciones realizadas
por personas que no sean personal autorizado del fabricante
sin la autorización escrita del fabricante anularán esta
garantía.
Esta garantía sustituye todas las otras garantías o
condiciones, ya sean expresas o implícitas, por ejemplo,
las de comerciabilidad o de adecuación a un n particular,
y constituirá el recurso exclusivo del comprador y la
responsabilidad exclusiva del fabricante con respecto a la
venta del producto, ya sea en el caso donde medie una
La parte externa puede limpiarse usando un paño suave y
húmedo y, luego, secarse. No use polvos de limpieza abrasivos ni pulidores de muebles, dado que esto puede dañar el
acabado de la supercie.
Para soltar el calentador de aire del soporte para pared a
n de limpiarlo o de realizar una redecoración, presione el
seguro que se encuentra en ambos soportes (ver Figura 2) y
mueva la bisagra hacia delante.
situación de incumplimiento o de incumplimiento de una
cláusula fundamental, o con respecto a una situación de
negligencia o de otro tipo.
El fabricante no será responsable de ningún daño especial
indirecto ni mediato, ni de ningún daño producido como
consecuencia de la remoción o del reemplazo de un
calentador de aire sujeto a una reclamación de garantía sin
la autorización del fabricante.
Esta garantía es transferible por parte del comprador
original del producto. Cualquier reclamación en virtud de
esta garantía debe enviarse por escrito a: Dimplex North
America Limited, 1367 Industrial Road, Cambridge, Ontario,
N1R 7G8, Canadá.
Nota sobre la forma de desechar el producto
No deseche la unidad con los desperdicios domésticos
generales. El aparato debe llevarse a una planta local de
eliminación de desechos.
Dimplex North America Limited
1367 Industrial Road
Cambridge ON
Canada N1R 7G8
© 2010 Dimplex North America Limited
18 www.dimplex.com
 Loading...