

Page 1
Convector Heater
DEC Series
IMPORTANT INSTRUCTIONS
When using electrical appliances, basic precautions should
always be followed to reduce the risk of re, electric shock,
and injury to persons, including the following:
Read all instructions before using this convector.1.
This convector is hot when in use. To avoid burns, do 2.
not let bare skin touch hot surfaces. The grille directly in
front of the heater outlet becomes hot during heater operation. Keep combustible materials, such as furniture,
pillows, bedding, papers, clothes and curtains at least 3
feet (0.9m) from the front of unit.
Extreme caution is necessary when any heater is used 3.
near children or invalids and whenever the convector is
left operating and unattended.
The appliance is not intended for use by young children 4.
or inrm persons without supervision.
Young children should be supervised to ensure that they 5.
do not play with the appliance.
Do not operate if the convector has malfunctioned, or if it 6.
has been dropped or damaged in any manner. Contact
an authorized service facility for examination, electrical or
mechanical adjustment or repair.
Do not use outdoors.7.
Do not insert or allow foreign objects to enter any venti-8.
lation or exhaust opening as this may cause an electric
shock or re, or damage the heater.
Do not locate the convector immediately below a xed 9.
socket or connection box.
To prevent a possible re, do not block air intake or ex-10.
haust in any manner. Do not use on soft surfaces, like a
bed, where openings may become blocked.
All electrical heaters have hot and arcing or sparking 11.
parts inside. Do not use in areas where gasoline, paint,
or ammable liquids are used or stored or where the unit
will be exposed to ammable vapours.
Do not modify this convector. Use it only as described 12.
in this manual. Any other use not recommended by the
manufacturer may cause re, electric shock or injury to
persons.
Always disconnect power before performing any clean-13.
ing, maintenance or relocation of the convector.
SAVE THESE INSTRUCTIONS
Installation Instructions
WARNING: The installation of the convector heater
must comply with the applicable Local and/or National
Electrical Codes and utility requirements. This installation
should be entrusted to duly qualied personnel where
required by law.
!
NOTE: Due to the precision of the convector’s control
circuits, the unit is highly sensitive to air drafts, cold oors,
Figure 1
etc. To ensure the thermostat operates efciently, be sure
to carefully choose the units location before installing. Avoid
installing unit in an area that is susceptible to cold drafts, or
near a cold oor.
WARNING: The convector must be installed in a location
preventing anyone using a bath or shower from touching
the control devices.
WARNING: The convector must not be located directly
below a xed power outlet.
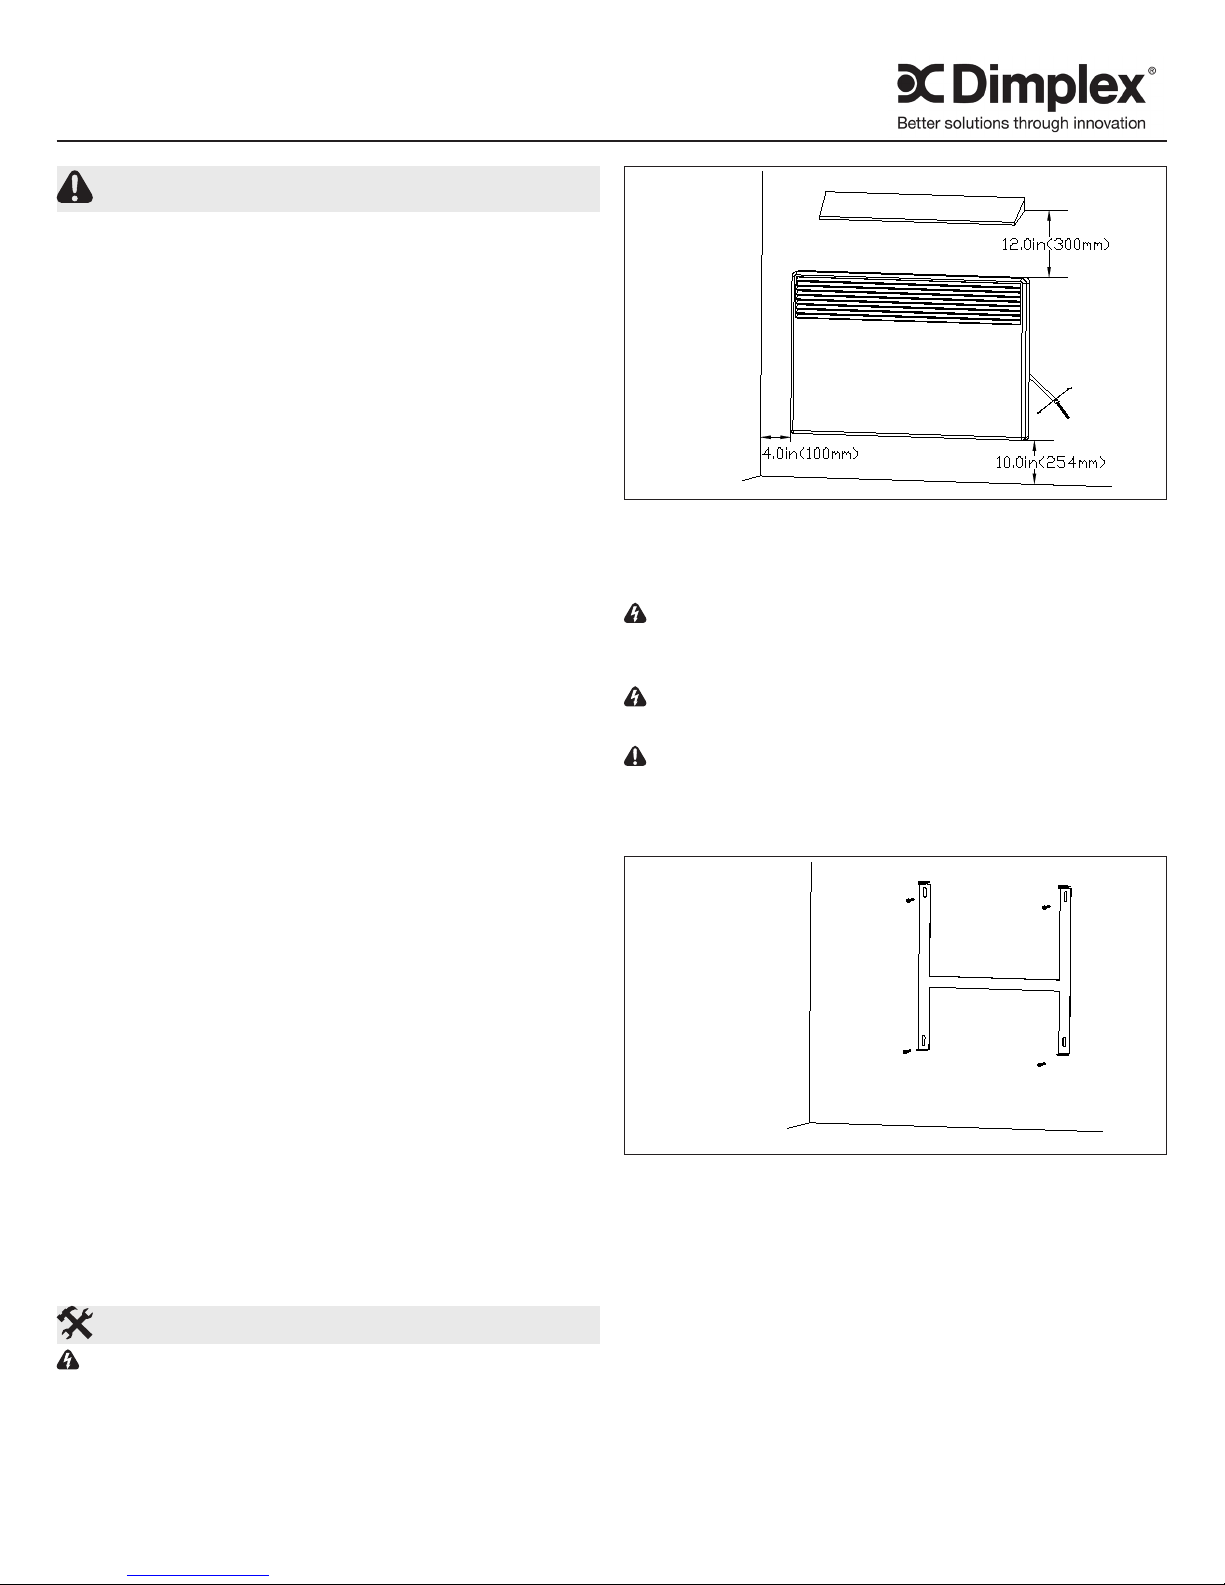
CAUTION: The minimum distances between the
convector and any object in its immediate vicinity must be
observed to ensure correct operation (Figure 1).
Remove the tie wrap from electric cable.1.
Figure 2
Remove the mounting bracket from the rear of the con-2.
vector casing by squeezing the release tabs at the top of
the bracket and pulling out of the casing.
Place the bracket on the wall at the desired location, and 3.
mark the mounting hole locations using the bracket as a
template (Figure 2).
Secure the mounting bracket to the wall (Figure 2) using 4.
suitable screws (not included).
Install a power receptacle box on the wall next to the 5.
convector mounting bracket.
!
NOTE: The heater can be installed so the wall recep-
tacle box can be hidden.
Feed the power supply wiring into the power receptacle 6.
7204310100R04
Page 2
box.
GREEN WIRE – GROUND
BLACK WIRE – POWER
WHITE WIRE – POWER
CONVECTOR HEATER
Install the convector onto the bottom tabs of the mount-7.
ing bracket.
Snap the top of the convector casing onto the top tabs to 8.
secure the convector to the bracket.
Connect the power supply wiring to the convector heater 9.
wiring (Figure 3).
Install receptacle box cover.10.
!
NOTE: If the power receptacle box is located behind the
heater the heater is to be wire connected and then installed
to the mounting bracket.
Figure 3
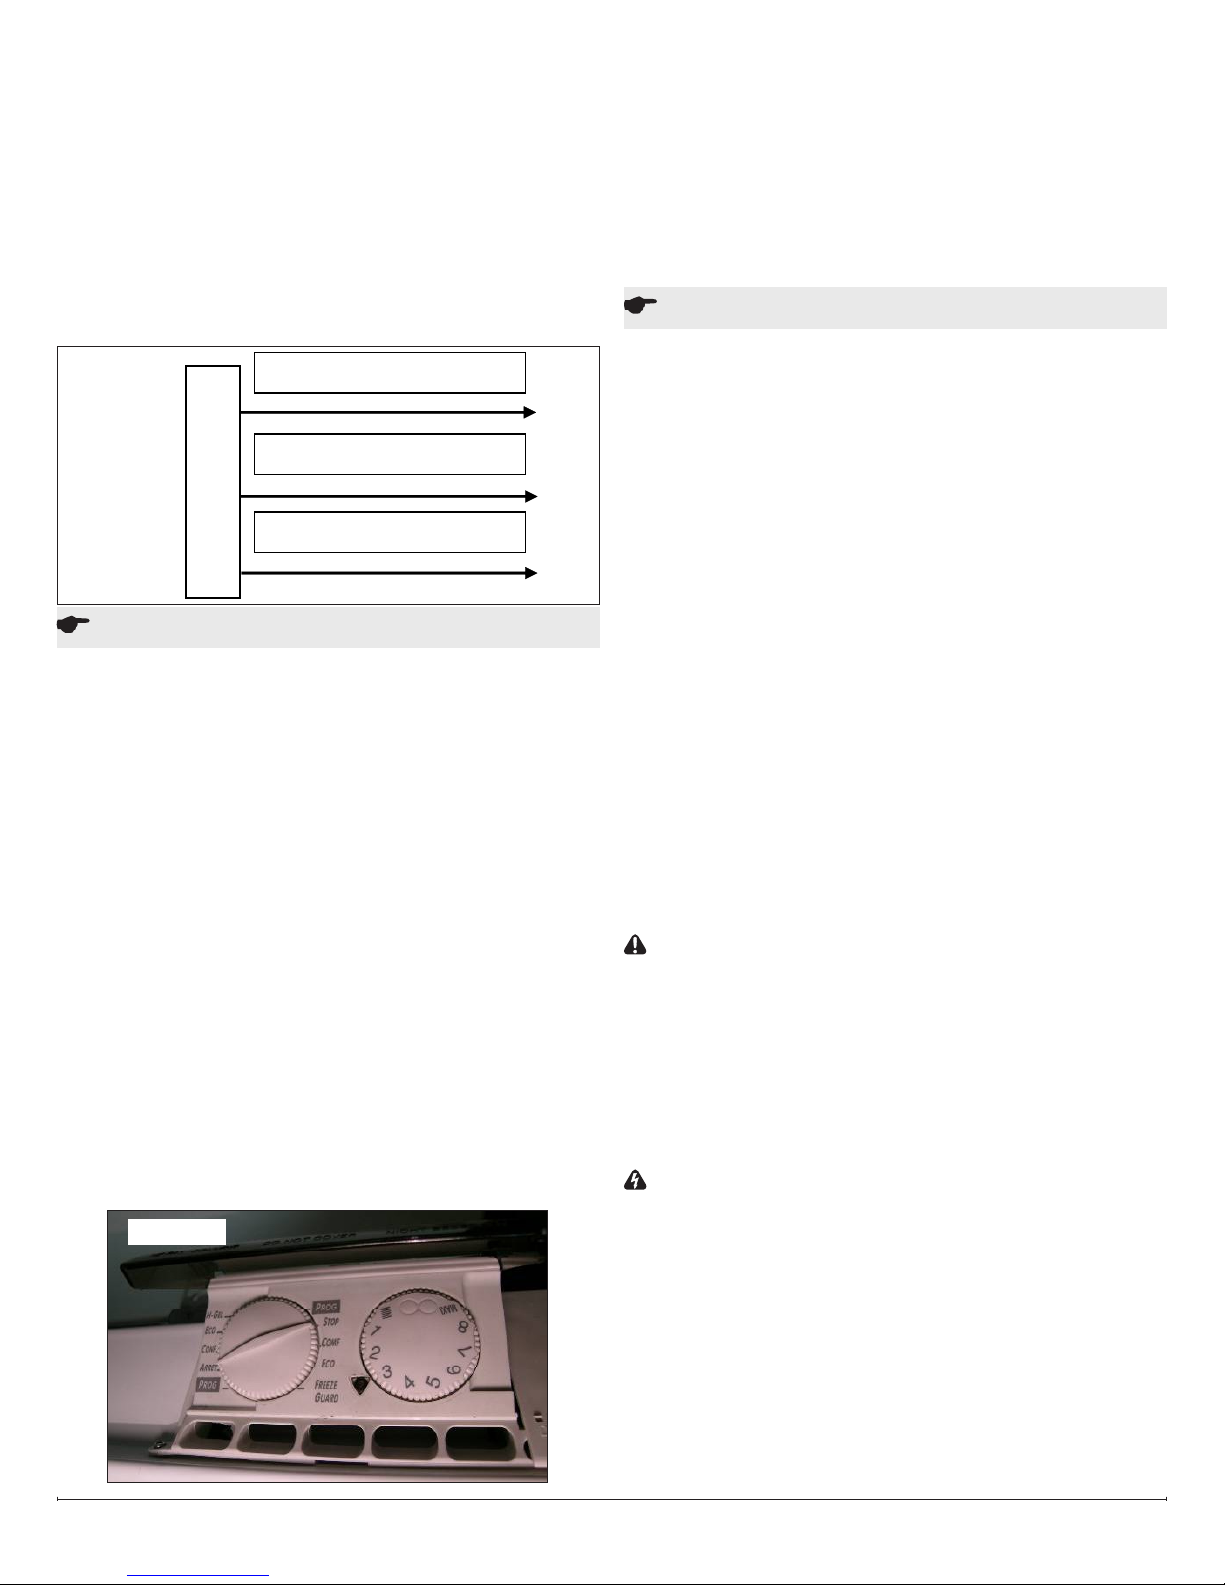
Set the mode selection control knob to the comfort posi-2.
tion “COMF”.
Set the thermostat control knob to the maximum position.3.
Once the desired ambient temperature is reached, for 4.
example, when the thermometer indicates 20°C (68°F),
slowly turn back the thermostat control knob until the
heating indicator light goes off. Once set, the thermostat
will automatically maintain this temperature in the room
by switching the power supply to the unit on and off as
required.
Operation
This unit is supplied with a manual reset temperature 1.
limit cutout, which will switch-off the heater should it overheat for any reason.
If the cutout operates, it is the result of abnormal over-2.
heating. The source of the overheating must be found
and corrected.
After the source of the problem is found and corrected, 3.
the reset button can be pushed-in to re-energize the
convector.
The reset button is located on the back of the convector
casing, along the top edge.
Start Up
Description
The unit comprises of:
A thermostat control knob graduated MINI to MAXI, lo-1.
cated in thecontrol box on the right side (Figure 4).
A mode selection knob, indicating the various operating 2.
modes (Figure 3).
i. “PROG” position - The temperature will be the value
set using the thermostat control
knob.
ii. “STOP” position - The convector will be placed on
standby mode.
iii. “COMF” position - The temperature will be the value
set using the thermostat control knob.
iv. “ECO” position - The temperature will be the value
set using the thermostat control knob less 3.5°C
±0.5°
v. “FREEZE GUARD” position - The temperature will
remain at around 7°C (45°F) regardless of the setting
selected on the thermostat control knob.
Setting the room temperature
For a perfect adjustment:
Place a thermometer at the center of the room 4ft 1.
(1.20m) off the ground (doors and windows closed)
Figure 4
Economic Operation
Do not overheat your home by degrees above 20°C 1.
(68°F) as your power consumption could increase by
10%.
Cut off the power supply to your heating units (“STOP” 2.
position) when you vent your rooms for any lengthy
period of time.
Whenever your don’t use a room (guest room) or if you 3.
don’t use your home for any extended period of time (vacation), set your heating units to the “FREEZE GUARD”
position.
!
NOTE: To ensure regular operation of all the heating
units in a single room, the thermostats must be set to the
same temperature.
CAUTION: Avoid operating a few heating units continuously to heat your entire home as this can result in disorders;
unbalanced heating, reduced comfort, excess consumption
and micro-condensation.
!
NOTE: Switch off the heating units in rooms where a
chimney is being used to avoid wasted energy and to prevent
circulating soot and ashes through the convector and into the
room.
REMOVING THE CONVECTOR
WARNING: Only qualied, approved personnel are
authorized to work on our equipment. The convector
must be disconnected from the power supply before
starting any work.
Before removing the unit from its mounting bracket en-1.
sure the power is disconnected.
Remove the power receptacle box cover from the wall.2.
Disconnect the convector from the power supply leads.3.
Remove the convector casing from the mounting brack-4.
ets by squeezing the top release tabs.
Lift the convector off the bottom tabs.5.
www.dimplex.com2
Page 3

Maintenance
Regularly clean and dust the inlet and outlet grid.
ENSURE POWER TO THE UNIT IS DISCONNECTED
PRIOR TO SERVICING OR PERFORMING CLEANING.
Warranty
The Manufacturer warrants the linear convector and
components of the enclosed product against any defect
in material or workmanship for a period of two years from
the date of purchase. With the exception of the elements
which are warranted to be free from defect in material and
workmanship for ten years. In full satisfaction of any claims
under this Warranty the Manufacturer will repair or replace
without charge, in its factory or in the eld as it alone may
decide, any parts which in its opinion are defective.
The Manufacturer shall not be responsible for any
transportation or shipping costs in relation to such repair
or replacement except as specically assumed by it.
Misuse of this product or repairs by persons other than
the Manufacturer’s authorized personnel without the
Manufacturer’s written approval, will void this Warranty.
This Warranty is in lieu of all other warranties or conditions
whether express or implied including but not limited to those
of merchantability or tness for purpose and shall constitute
the sole remedy of the Purchaser and the sole liability of the
Manufacturer in respect of the sale of the product, whether
in the nature of breach or breach of fundamental term, or of
negligence or otherwise.
The Manufacturer shall not be liable for any special, indirect
or consequential damages or for any damages resulting
from removal or replacement of a linear convector subject to
warranty claim without the Manufacturer’s authorization.
This Warranty is transferable by the original consumer
purchaser of the product. Any claims under this Warranty
must be submitted in writing to the Service Manager, Dimplex
North America Ltd., 1367 Industrial Rd., Cambridge, Ontario
N1R 7G8, Canada.
1367 Industrial Road Cambridge ON Canada N1R 7G8
1-888-346-7539 www.dimplex.com
In keeping with our policy of continuous product improvement, we reserve the right to make changes without notice.
© 2011 Dimplex North America Limited
3
 Loading...