

Page 1
Manually Overriding Heat Modes
Sometimes, you may want
to
switch your current heat mode (from the default mode set
for
the current time)
to the
non-current mode e.g.
from
day/peak
to
night/off-peak
or
vice
versa.
You may want to do
this to allow you to adjust the desired temperature/thermostat of the non-current
mode.
Or you may want
to
apply the other heat mode at this current moment (e.g. you may want
to turn
up the temperature
temporarily without distorting the pre-programmed
settings)
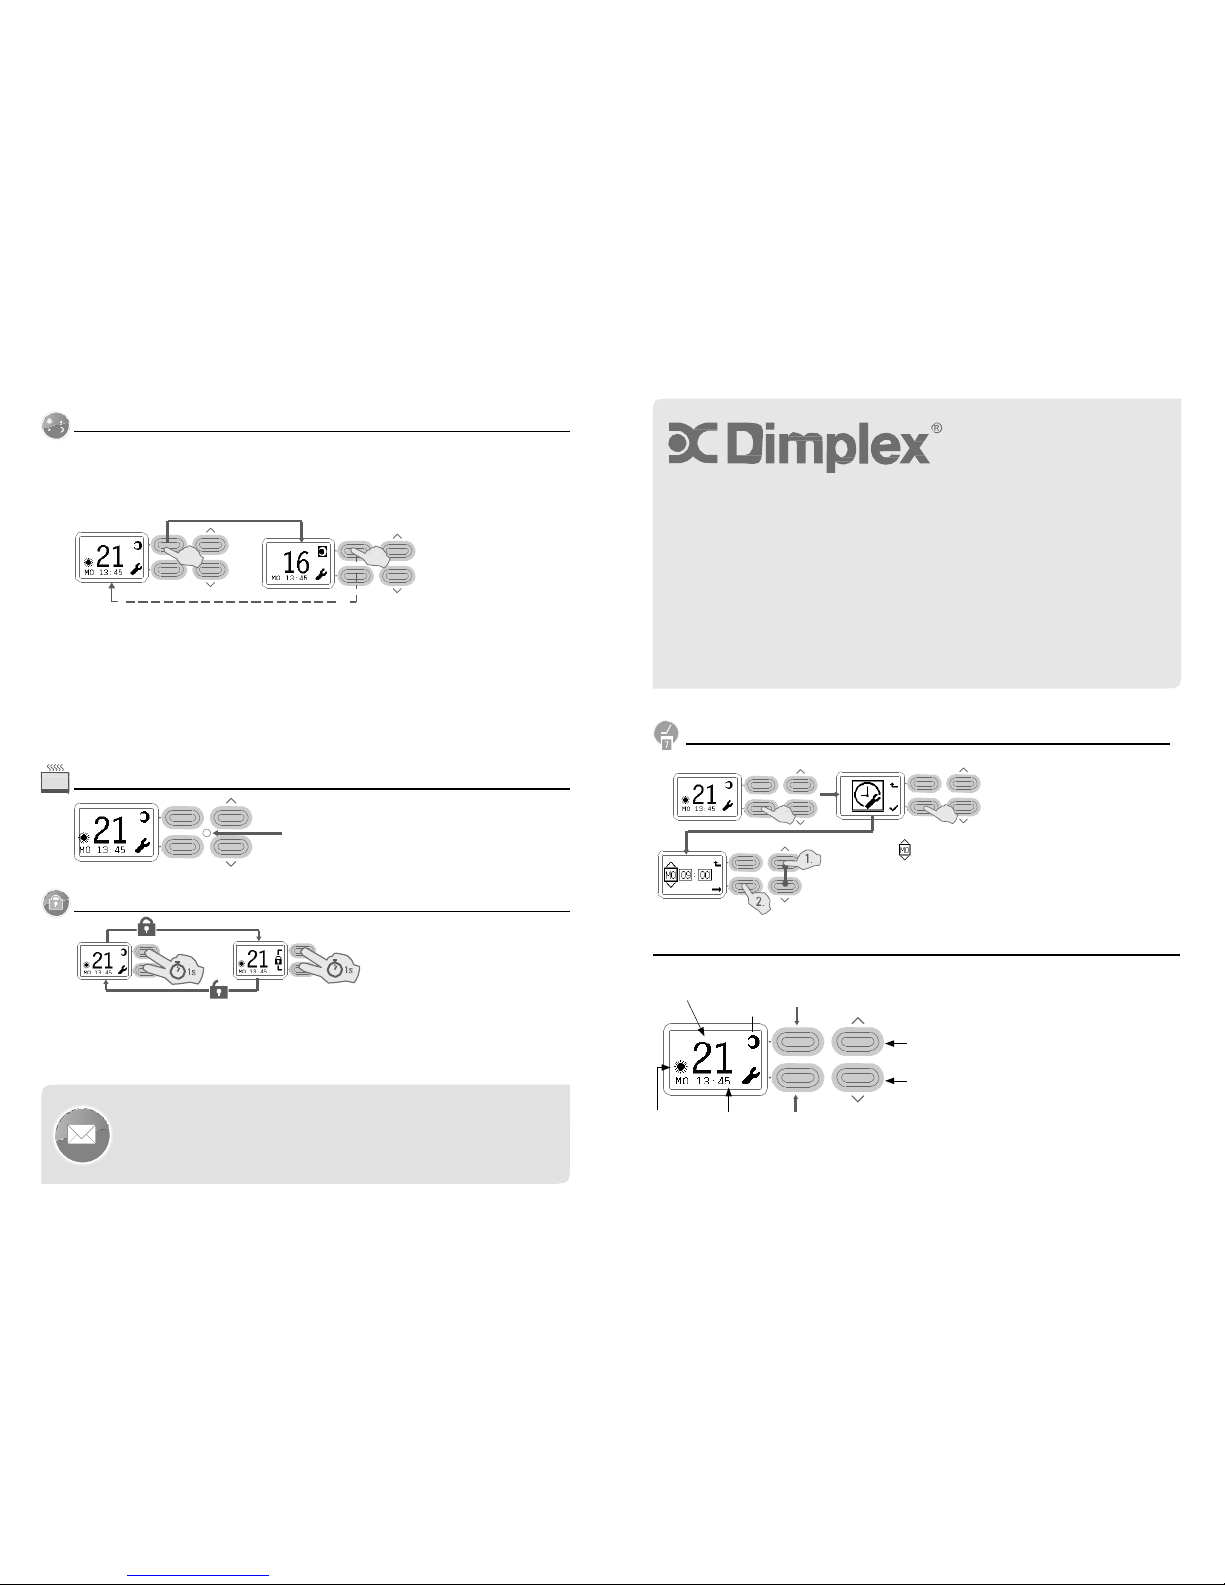
To manually switch heat modes (e.g.
from
night/off-peak
to
day/peak
or
vice versa), simply press the top
left button
next
to
the picture
of
either the sun
or
the moon. That icon should now get highlighted
with
a black background
and
the desired temperature
in
the display screen should also change (assuming the alternative heat mode has a
different
temperature).
In the diagram shown, the desired temperature/thermostat has changed
from
21 (set
for
day/peak mode)
to
16
degrees
(set
for
night/off peak
mode).
Press the same button again
to
go back
to
the default heat mode
for
the current
time.
Note:
for
safety reasons, at 3am each day,
if
the heat mode has been manually overridden, the heater
will
automatical
ly
switch back
to
the default heat mode
for
that time. Manual overrides
will
also end when a new timing setting
starts.
Heater on light
Programmable
Timer
DCU-2T
Quick St
art guide
This instruction manual
will
show you how
to
use the timer on the heater.
If
you do not want
to
use the timer, please simply skip
to
the “Set current day and time” section
to
learn how
to input
the time. You can control the thermostat
with
the up and down buttons and
turn
the heater
on
and
off with
the switch on the side
of
the
heater.
Set current day and time
Enter “se ttings”
menu
Press bottom
left
button
to
select “set day/time ”
menu
Key
Lock
This light
will
illuminate when
the
heating element
is on.
The day
function
should be
flashing.
1.
Select day by pressing up
or
down
arrow.
2. Press bottom
left
button
to
confirm
day.
Now do the same
to
select and confirm hour and minute
of
current
time.
NB: Time
is in
24 hour
format.
Timer Ov
erview
Desired
Press top
left
button
to
The timer has
two
heat modes: one
for
temperature
manually override the Selects the function shown
in
the top right
of
“day/peak” and one
for
“night/off
peak”.
To lock the timer (e.g. so children cannot change the settings), press and hold the
two left
buttons
for one
second. A lock icon should show up on the right side
of
the display
screen.
To unlock the timer, again press and hold the
two left
buttons
for
one second. The lock icon should disappear
and the regular settings should reappear on the display
screen.
for current
heat
mode
current heat mode
–
see “M anual Ov
erride
Heat Mode”
section
the display screen. In many menus, this button
will
take you back
to
the previous
screen.
Scroll
up/increase
Scroll down/
decrease
You can set a different temperature
for
both
of
these periods,
for example,
to
keep the room warm during
the
day while you are using
it
and then
to
take the chill
off
the room when
you
are
sleeping.
The desired temperature
for
each
heat
mode can be set
to
between 7 °C
and
Glen Dimplex Australia Pty
Ltd
Unit
1, 21
Lionel Road
Glen Dimplex
New
Zealand
Ltd
38 Harris Road
Current
heat
Current
day
Selects the function shown
in
the bottom
right
30°C. Alternatively, you can just have
the
heater
turn off in
either
mode.
Mount Waverley VIC 3149
Ph: 1300 556 816 Fax: 1800 058
900
Email: sales@glendimplex.com.au
www.dimplex.com.au
East Tamaki,
Auckland
Ph:
09
274
8265
Fax:
09
274
8472
Email: sales@glendimplex.co.nz
www.dimplex.co.nz
mode
is
“day/
peak”
and
time
of
the display screen. In many menus,
this
button
will
confirm your
settings.
The icon
in
the bottom
left of
the
screen
(either a sun
or
moon symbol)
will
denote
the current heat mode (either
day/peak
or night/off-peak).
page 1
Page 2
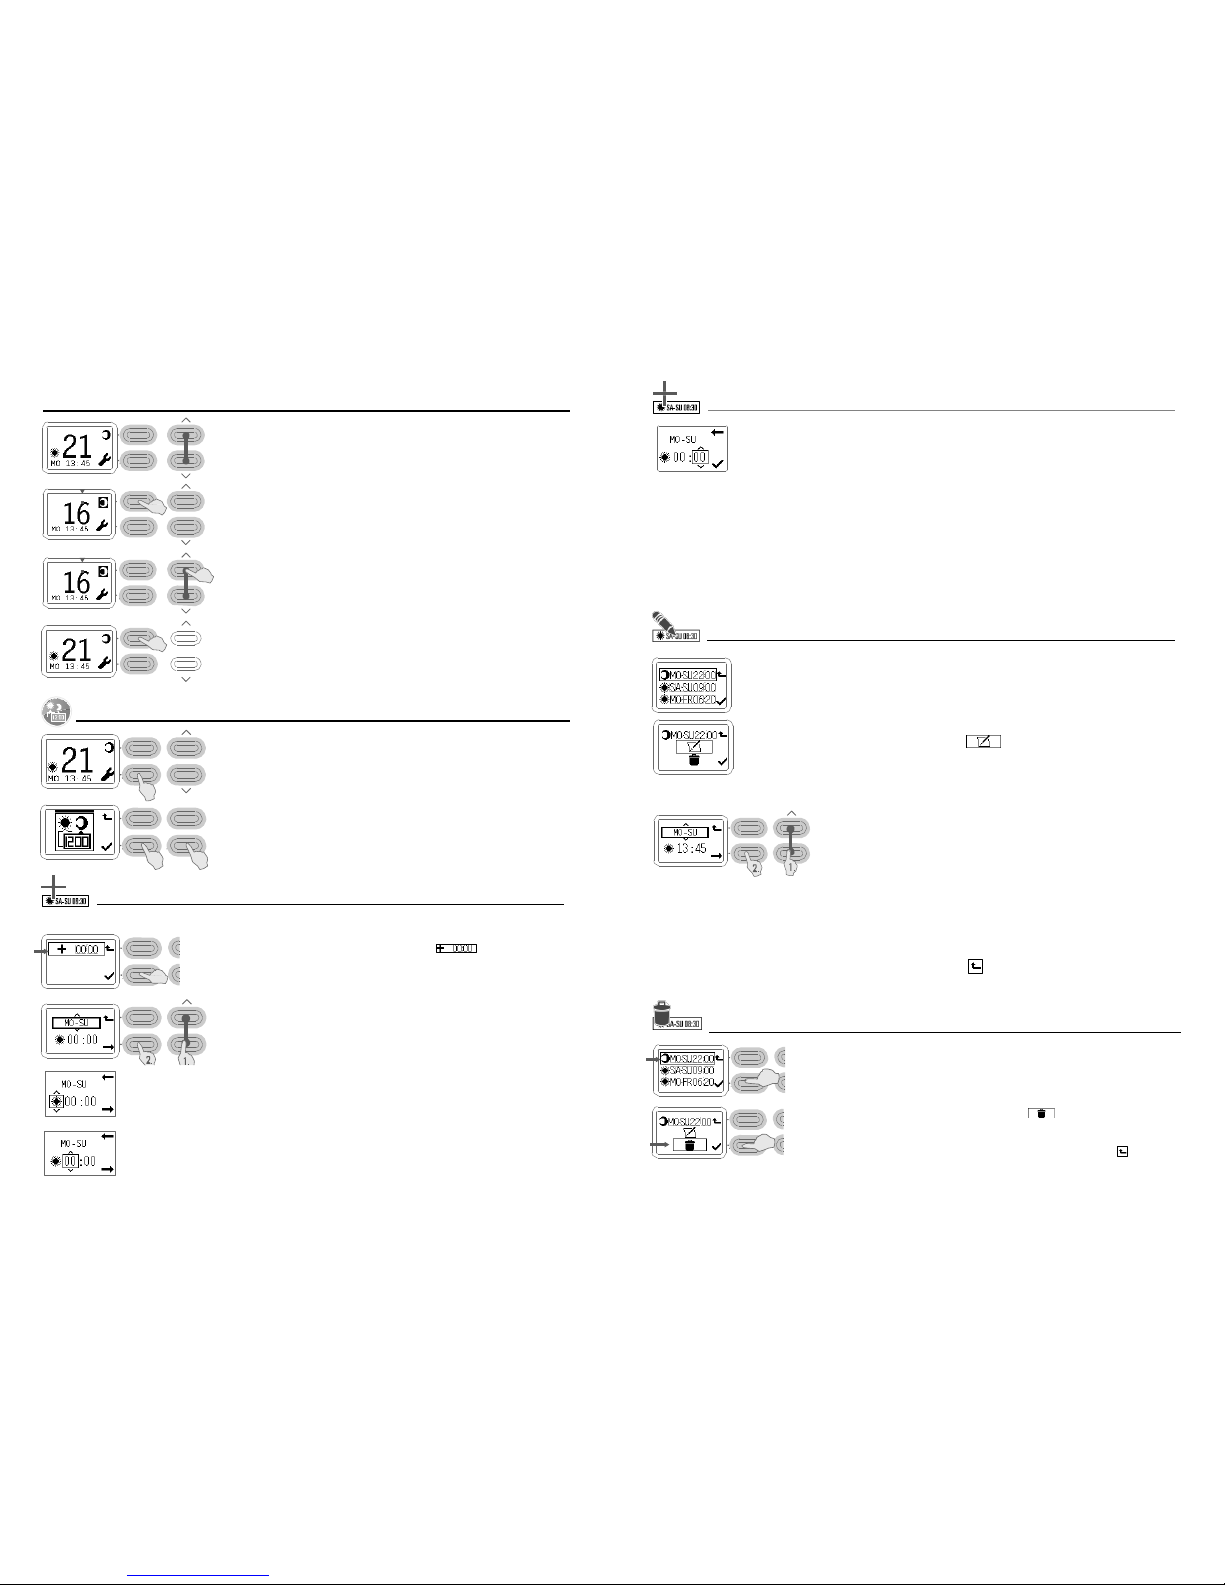
Setting desired temperature/
thermostat
Setting temperature
for
current heat mode
to set the desired temperature
in
the current heat mode
(sun/moon icon
in
bottom
left of
screen), press the
up/down
arrows
till
you get the temperature you would like the heater
to
heat the room
to.
Setting temperature
for
non-current heat mode
If
the mode you just set
the
temperature
to
was day/peak, then press the top
left
button
to
select
night/
off-peak
mode (and vice versa). This
is
also known as “M anual Override” (see
“Manually
Overriding Heat Mode s” section
for
more information). The icon
in
the top
right
should now be highlighted
with
a black
background.
Now press the up and down buttons
to
set the desired
temperature.
Then press the top
left
button again
to
go back
to
the mode
appropriate
for
the current
time.
Adding a new timing setting. continued
Scroll
to
select the minute within the hour
of
the day you want this heat mode
to
start
from.
Then press the bottom
left
button
to confirm.
Good work. You have now set a time
for
when you want this heat mode
to turn
on. You
will
now need
to
create another
timing
setting that
will
take over
from
the previous setting (e.g.
for
the heater
to
then
turn off or for it to
heat at a lower temperature).
If
you set the
first
heat mode as a day/peak mode, you
will
now need
to
set the next heat mode that
will
take over as a
night/off-
peak mode (and vice ver
sa).
As an example you may want
to
set the
first
mode as a day/peak mode so that
it
heats your room
to
22°C every day
of
the
week,
from
8am onwards. You may then want
to
create the night/off-peak mode that
will
take over at 6pm and
turn off
the
heater
(or heat at a lower temperature). Therefore every day
from
8am-6pm, the heater
will
heat the room
to
22°C and then
turn off
between 6pm and
8am.
Editing
an
existing timing
setting.
Use the up and down arrows
to
scroll through the timing settings until you find the one you want
to
change.
Then press the bottom
left
button
to confirm.
Programme timing Settings
Press the bottom
left
button
to
enter
settings.
1.
Press the down button until the Timing Settings menu
appears.
2.
Press the bottom
left
button
to select.
2 1
Use the up and down arrows
to
select the edit setting. Then press the bottom
left
button
to
confirm
and edit the
setting.
You can now edit the day, heat mode (day/peak
vs
night/off-peak), hour and minute
in
the same way you did when setting up
the
timing
setting.
1.
Select the day(s) you would like this timing setting
to
apply
for
by pressing
the
up/
down
buttons.
2. Then press the bottom
left
button
to confirm.
Adding a new timing setting.
This setting
will
apply until
it
gets
to a
time when a new setting takes
over.
To add a new setting, select the “add timing ”
setting
(you may need
to
scroll
to
select it) and then press the bottom
left
button
to confirm.
1.
Select the day(s)
you would like this timing setting
to
apply
for
by pressing the up/down
buttons.
2. Then press the bottom
left
button
to confirm.
Now do the same
for
whether you want this heat mode applied as a
day/
peak
mode
or
night/off-peak
mode.
Then press the bottom
left
button
to confirm.
Scroll
to
select the hour
of
the day you want this heat mode
to
start
from.
Then press the bottom
left
button
to confirm.
Now do the same
for
whether you want this timing applied as a day/peak mode
or
night/off-peak mode. Then press the
bottom
left
button
to confirm.
Select the hour
of
the day you want this heat mode
to
start
from.
Then press the bottom
left
button
to confirm.
Select the minute within the hour
of
the day you want this heat mode
to
start
from.
Then press the bottom
left
button
to confirm.
When you have finished editing timing settings, press the top
left button, to
return
to
the main
screen.
Deleting an existing timing setting
Use the up and down arrows
to
scroll through the timing settings until you find the
one
you want
to
delete. Then press the bottom
left
button
to confirm.
Use the up and down arrows
to
select the delete
setting
.
Then
press the bottom
left
button
to
confirm and delete the
setting.
When you have finished deleting timing settings, press the top
left button, to
return
to
the main
screen.
page
2
page
3
 Loading...