

Operating Instructions
IMPORTANT
These instructions should be read carefully and retained for future
reference. Note also the information given on the appliance.
Ultra-Slim Storage and Convector Heaters
WARNING - THE SURFACE OF THIS HEATER CAN BE HOT. The surface temperatures of this heater are within the
requirements of EN60335-2-61, the European Standard covering the safety requirements for Electric Storage Heaters, and
momentary contact with any part of the heater should not cause injury. However, in order to be effective, heaters of any type do
get hot, especially around the air outlet grille.
Therefore, if aged or infirm persons, or young children, are likely to be left unsupervised in the vicinity of a heater
precautions should be taken to ensure that prolonged contact with the heater cannot occur. We recommend that a guard is
fitted around the heater, as is normal with some types of heating appliances in similar circumstances. A range of guards
specially designed for Dimplex storage heaters is available. If you require further information on these guards, please contact
the Dimplex Help Desk on 0845 600 5111.
CAUTION: DO NOT COVER SURFACES OF THE HEATER AND DO NOT OBSTRUCT AIR OUTLET GRILLES. Surfaces of the
heater should not be covered or obstructed as this can cause excessive temperatures that can be hazardous and may cause
safety cut-outs to operate. For example, do not put clothes, fabrics or any combustible materials on the heater or allow curtains
to come within 75mm (3”) of the top and ends of the heater and do not allow furniture to be pushed up against the heater.
PLEASE NOTE: YOUR STORAGE HEATER IS VERY HEAVY AND MUST BE SECURELY FIXED TO A SOUND WALL.
No attempt should be made to move the heater without first seeking specialist advice. If you are not happy that the heater
has been securely fixed, please inform your installer. If, during any reassembly of the heater, a part of the thermal insulation
shows damaged or deterioration which may impair safety, it should be replaced by an identical part.
UNDER NO CIRCUMSTANCES SHOULD THE WALL FIXINGS BE LOOSENED ON THIS HEATER BEFORE THE BRICKS
HAVE BEEN REMOVED FROM ITS CORE.
DO NOT SIT OR STAND ON THE HEATER.
DO NOT PLACE OBJECTS IN CONTACT WITH THE HEATER.
IMPORTANT SAFETY INFORMATION
(85911 Iss. 3)
Models CXL12N, CXL18N and CXL24N
Your Dimplex CXLN combined storage and convector heater enables you to take advantage of cheap off peak electricity to provide
the bulk of your heating requirements, with the added flexibility of a built-in, thermostatically controlled convector heater. This allows
you to provide top-up heat, for example, in very cold weather when the storage heater may not have sufficient stored heat in reserve
later in the day for providing full comfort conditions. These operating instructions assume that the correct size of storage heaters have
been selected to cater for the heating requirements of the room.
STORAGE HEATER OPERATION
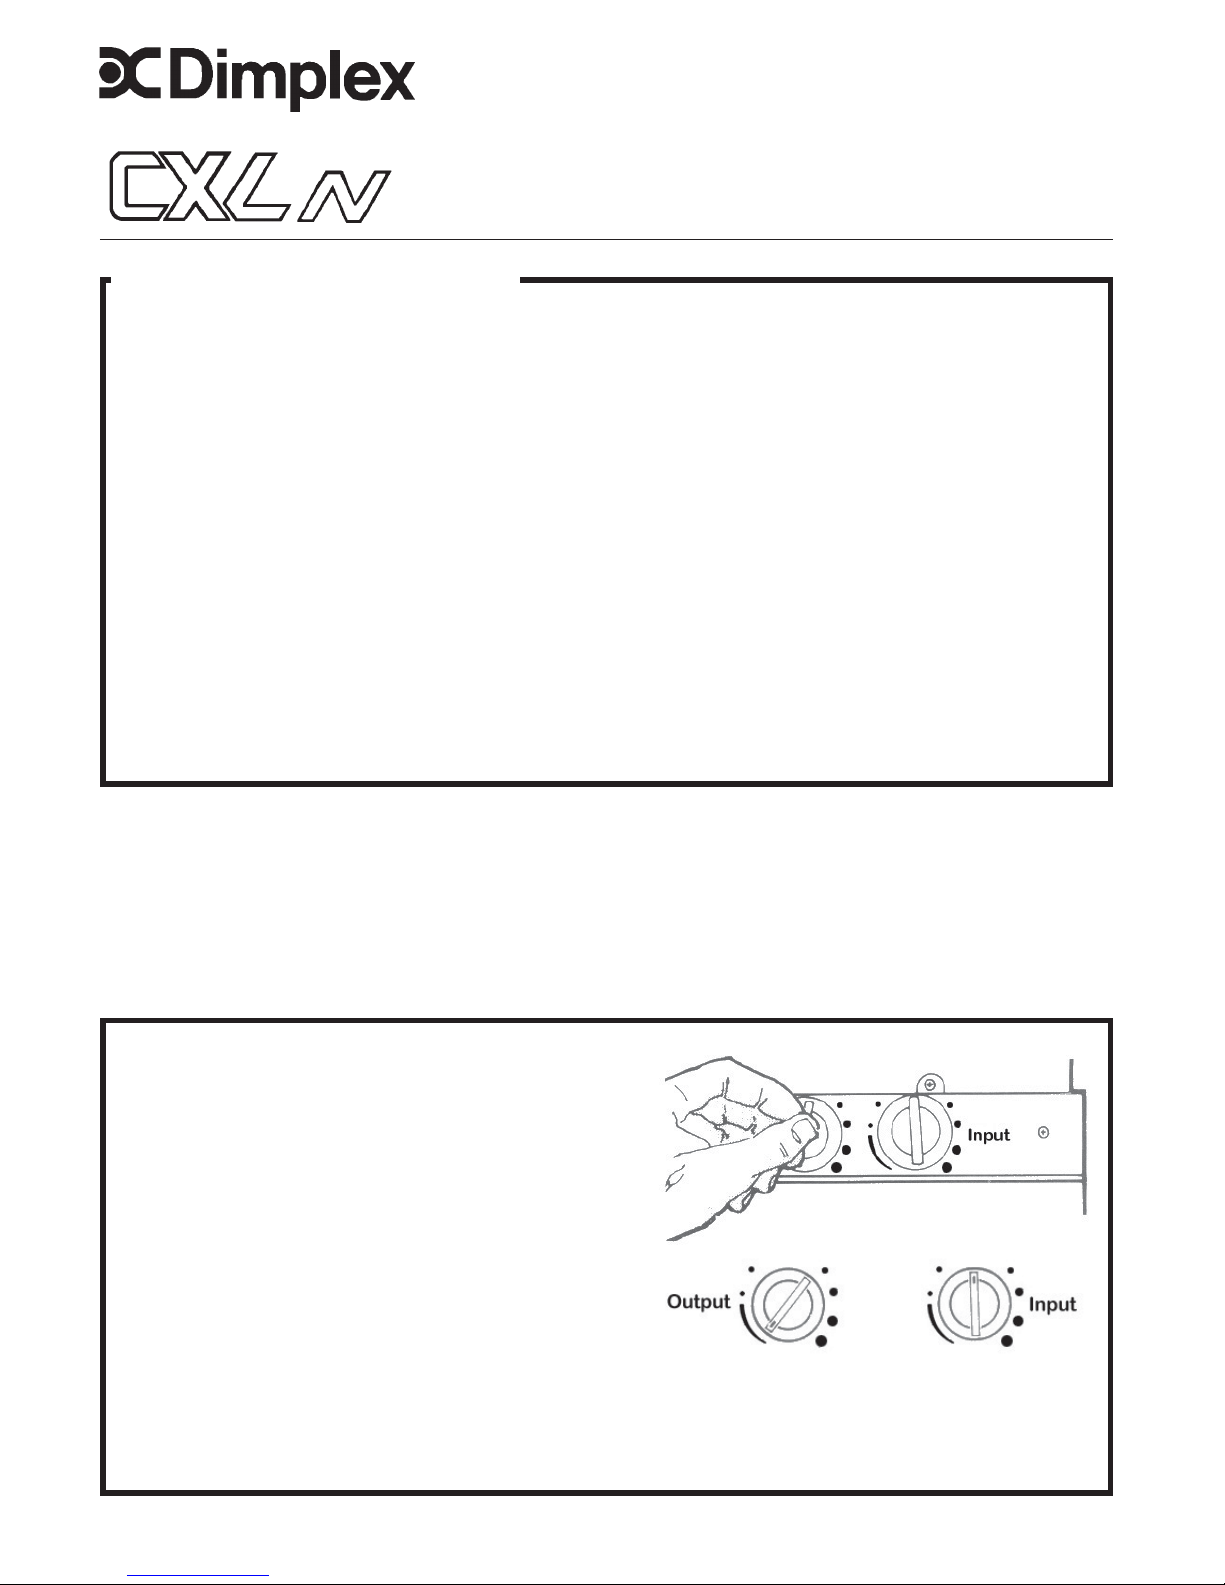
Setting the Controls
The control knobs have been positioned so that they are
clearly visible to an adult, but out of sight of young children. In
this way it is hoped that they will not provide temptation to a child
to alter the settings.
Domestic Use
In cold weather set the right hand (INPUT) knob to maximum
(fully clockwise). In milder weather set the control to a lower
position.
Normally the left hand (OUTPUT) knob may be left on minimum
(fully anticlockwise). This control may be moved to maximum in
the evening if additional heat is required at that time. Return to
minimum before retiring.
Commercial Use
For normal commercial applications a setting of maximum on
the output control will ensure maximum output during working
hours. The input control should be set as described above for
Domestic Use.
Should these settings not provide the comfort levels
required, the more detailed instructions overleaf
should be consulted.
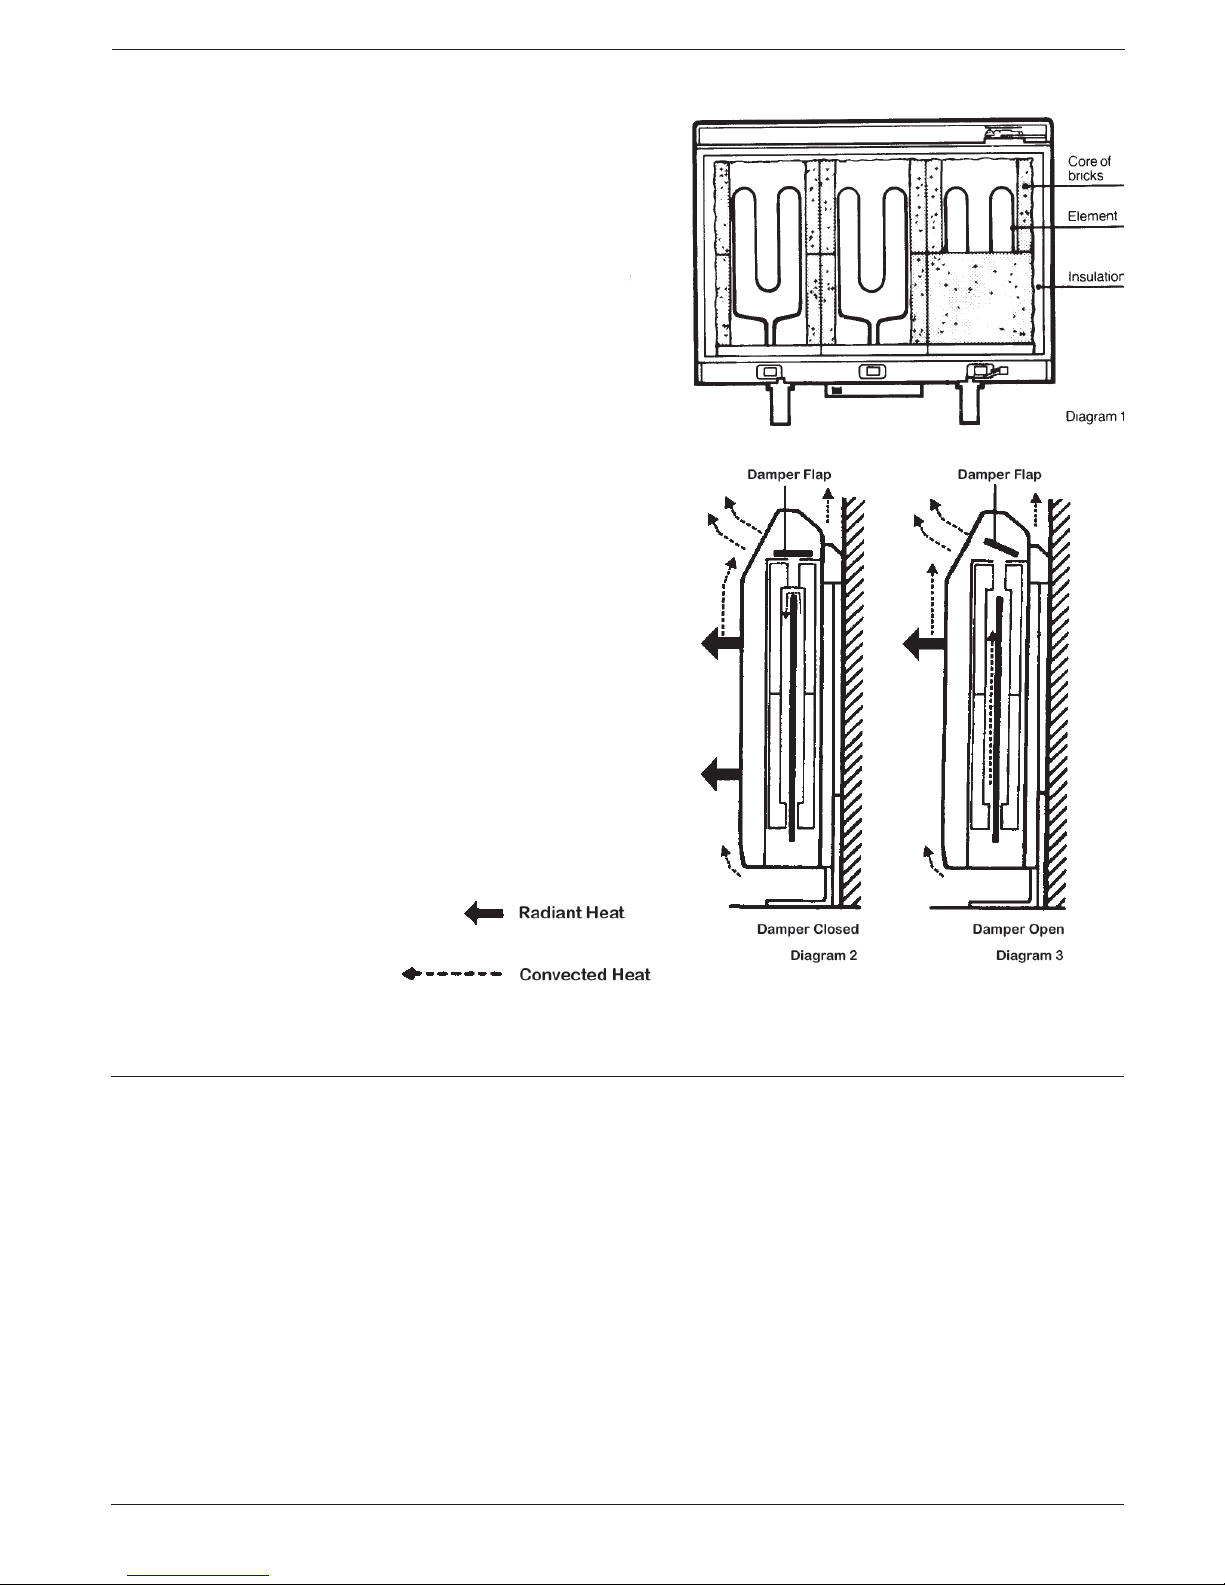
CXLN Storage heater section - Principle of operation
The storage heater section of the CXLN heater consists of a
core of high density heat storage bricks surrounded by a carefully
designed insulating case. During the night time off-peak period
elements within the brick core heat up the bricks to a temperature
level determined by the setting you select using the input control
knob.
In the morning, when the core is at its hottest, the amount of heat
being transmitted through the insulation and emitted as radiant heat is
at its greatest and the heater feels hot over most of its upper outer
surfaces. Diagram 2.
As the day progresses, heat is transmitted from the heater to the
room and the outer surface of the heater becomes less hot and the
amount of heat released in this way becomes less.
If the amount of emitted heat becomes insufficient the output of the
heater and thus the room temperature may be increased by means of
the Output Control. This control operates a damper flap within the
heater which, when the output control knob is at minimum, covers
vertical airways which pass directly through the centre of the core of
the heater. Even when the outer surfaces of the heater are noticeably
less hot, the core of bricks can still be at a relatively high temperature.
Opening the damper flap by moving the output control away from
minimum allows the room air to circulate through this hot core and
release more heat to the room by convection. Diagram 3.
Input Control
The setting of this control determines the amount of charge taken in by the heater, which in turn determines the temperature of the
heater’s storage core. The higher the charge taken the higher the core temperature.
In colder weather the heater should be set to take a high charge, the control being set at maximum ensures the heater accepts a
full charge.
In the Autumn and Spring a lower setting of the input control knob should be sufficient, the actual setting required being influenced
by the prevailing weather conditions, the room size and insulation levels. The most suitable settings will be found by experience.
Output Control
Depending upon the amount of charge accepted by the heater, the OUTPUT control allows the release of additional heat by means
of a damper which can be opened to allow a greater air flow through the heater core, and therefore additional circulation of heat. By
altering the setting of the Output control knob the damper may be opened and closed manually, or it may be made to open
automatically.

Manual Operation
With the OUTPUT control on minimum the damper remains closed, and heat is released from the heater only by normal radiation
and convection around the outer surfaces of the heater. This alone may provide sufficient heat on many occasions and therefore no
alteration of the OUTPUT control is necessary. However, if a boost of heat is required in the evening period, then moving the
OUTPUT control to maximum in the evening will immediately open the damper to allow more rapid release of any available stored
heat. When the next charging period commences the damper will automatically close to prevent this release of extra heat during the
charge period, but the OUTPUT control must be returned to minimum manually to obtain a similar operation the following day.
Automatic Operation
The damper may be pre-set to open automatically each day if required. Setting the OUTPUT control at settings other than
minimum results in an automatic boost of heat. A high setting on the output control knob causes the damper to open early afternoon/
evening, conversely a lower setting causes it to open later.
Because the automatic opening of the damper is primarily dependent on core temperature then the amount of charge the heater
has taken has a bearing on the time at which the damper opens. For a given setting of the OUTPUT control, the colder the weather
(and consequentially, the greater the charge taken automatically by the heater) the later the damper will open.
Conversely, for a lower charge input (in milder weather) the earlier the damper will open for a given room temperature boost
setting.
The most suitable settings of the Output control for different conditions will be found by experience.
Remember - a high setting of the OUTPUT control early in the day may leave too little heat stored in the heater for the evening,
especially during the less cold weather conditions.
CONVECTOR HEATER OPERATION
Convector Heater - Principle of operation
In addition to the storage heater section the CXLN incorporates a convector heater element in the front of the heater which may be
used independently of the storage heater, for example to “top up” on very cold days, or for use in late spring and early autumn when
only infrequent cold spells do not justify continuous use of storage heater. Cool air is drawn in at the base of the heater, heated by
the convector element, and subsequently emitted from the grille at the top front of the heater.
The convector heater section is intended for use when the output of the storage heater is not sufficient to maintain the desired comfort
level. For the most economical operation of the CXLN, the heating system should normally be designed so that the storage heater
section provides the bulk of the heating requirements, and the convector heater section provides only top up heat, for example, later
in the day in cold weather.

IMPORTANT - Due to the newness of the materials the heater will produce a slight smell for the first few days of operation.
ROOMS MUST BE WELL VENTILATED AND YOUNG CHILDREN, CAGED BIRDS, OR PERSONS WITH RESPIRATORY
COMPLAINTS MUST NOT REMAIN IN CLOSE PROXIMITY TO THE HEATER DURING THE FIRST 48 HOURS OF THE
COMMISSIONING PERIOD.
Cleaning
To maintain the external appearance of the radiator it need only be wiped over occasionally with a dry duster. During the summer
months, or at other times when the appliance is not in use and is completely cold, the opportunity should be taken to wipe over with a
damp cloth. Do not use abrasive cleaning powders or furniture polish.
Discoloration of wall finishes can sometimes occur immediately above a storage heater due to the properties of some paints and
decorating materials or the presence of environmental impurities in the air (such as soot or incense generated from the burning of
candles, etc.) A suitable shelf (available from Dimplex) may be fitted to limit the extent of any wall discoloration.
After Sales Service
Your product is guaranteed for two years from the date of purchase. Within this period, we undertake to repair or exchange this
product free of charge (subject to availability) provided it has been installed and operated in accordance with these instructions.
Your rights under this guarantee are additional to your statutory rights, which in turn are not affected by this guarantee.
Should you require after sales service you should contact our customer services help desk on 0845 600 5111. It would assist us
if you can quote the model number, series, date of purchase, and nature of the fault at the time of your call. The customer
services help desk will also be able to advise you should you need to purchase any spares.
Please do not return a faulty product to us in the first instance as this may result in loss or damage and delay in providing you with
a satisfactory service.
Please retain your receipt as proof of purchase.
To commission the heater set both the input and output controls to maximum and leave for 48 hours, after this period the
controls should be adjusted for everyday use - see ‘SETTING THE CONTROLS’ on the front cover of these instructions.
Switching on
To put the convector switch F in the ON position, depress the right-hand side of the switch. The switch neon will glow when the
switch is in the ON position. If the room temperature is below the thermostat setting neon C will glow, showing the convector is
providing heat.
Setting the Thermostat
The thermostat knob A should be set to the comfort level required. Turning the knob clockwise will increase the room temperature
selected, but the actual setting to provide the required conditions will be found by experience. If, when the convector heater is
switched ON and available for use, the room temperature is below that set on the control knob, neon C will be illuminated, showing
the heater elements are energised.
24-hour Convector Operation
In certain circumstances it may be desirable for the convector to be available during the off-peak period. If this is so the installer
can select this option during installation. However, the user should be aware of the following:
1. If the convector heater is not required during the off-peak period the user must remember to switch it off.
2. If the convector heater is used at a high level for a significant period during the off-peak period it will have the effect of
reducing the level of charge taken by the storage heater for a given input setting. A higher setting of the input control may be
required to compensate for this.
Convector Control Panel
A Thermostat Scale representing an approximate
range of temperatures from 5°C to 35°C.
B Symbol representing heat convection.
C Neon lit when convector using current.
D Symbol representing OFF position of convector
switch.
E Symbol representing ON position of convector
switch.
F Convector ON/OFF switch with neon to show when
switch is in ON position.

Glen Dimplex UK Limited
Millbrook House,
Grange Drive, Hedge End,
Southampton SO30 2DF
Customer Help Line 0845 600 5111
8am–5pm Mon–Fri and 8:30am–1pm Sat (Autumn–Winter only)
Fax 01489 773 050
Web-site www.dimplex.co.uk
e-mail customer.services@glendimplex.com
Republic of Ireland 01 842 4833
 Loading...