

Page 1
VERDI
CUBIC
ENDE FR PL
EN : This product is only suitable for well insulated rooms or occasional use. DE : Dieses Produkt ist nur für gut isolierte Bereiche oder gelegentliche Verwendung geeignet. FR : Ce produit convient uniquement à des endroits bien isolés ou pour un usage occasionnel. IT : Questo prodotto è
adatto solo per spazi ben isolati o per uso occasionale. ES : Este producto sólo es adecuado para espacios bien aislados o un uso ocasional. NL :
Dit product is uitsluitend geschikt voor goed geïsoleerde ruimten of voor sporadisch gebruik. PL : Produkt ten jest odpowiedni wyłącznie do dobrze
odizolowanych miejsc lub do okazjonalnego użytku. NO : Dette produktet egner seg kun for godt isolerte rom eller sporadisk bruk. RO : Acest
produs este adecvat exclusiv spaţiilor bine ventilate sau utilizării ocazionale. CZ : Tento výrobek je vhodný pouze do dobře izolovaných prostor
nebo k příležitostnému použití. DK : Dette produkt er kun egnet til velisolerede rum eller lejlighedsvis brug. PT : Este produto somente é adequado
para espaços bem isolados ou uso ocasional. SE : Denna produkt är endast avsedd för välisolerade utrymmen eller tillfällig användning. FI : Tämä
tuote soveltuu ainoastaan hyvin eristettyihin tiloihin tai satunnaiseen käyttöön. SK : Tento výrobok je vhodný len pre dobre izolované priestory alebo
na občasné použitie. SI : Ta izdelek je primeren le za dobro izolirane prostore ali za občasno uporabo. HR : Ovaj proizvod je pogodan samo za
dobro izolirane prostore ili povremenu upotrebu. HU : Ez a termék csak jól szigetelt terekhez vagy eseti használatra alkalmas.
The product complies with the European Safety Standards EN60335-2-30 and the European Standard Electromagnetic Compatibility (EMC)
EN55014, EN60555-2 and EN60555-3 These cover the essential requirements of EEC Directives 2006/95/EC and 2004/108/EC
IT
08/52899/2 Issue 3
OCN 10672
Page 2

DE .................................................................................................................................... 1
GB .................................................................................................................................... 8
FR .................................................................................................................................. 14
IT .................................................................................................................................... 21
PL .................................................................................................................................. 28
Page 3
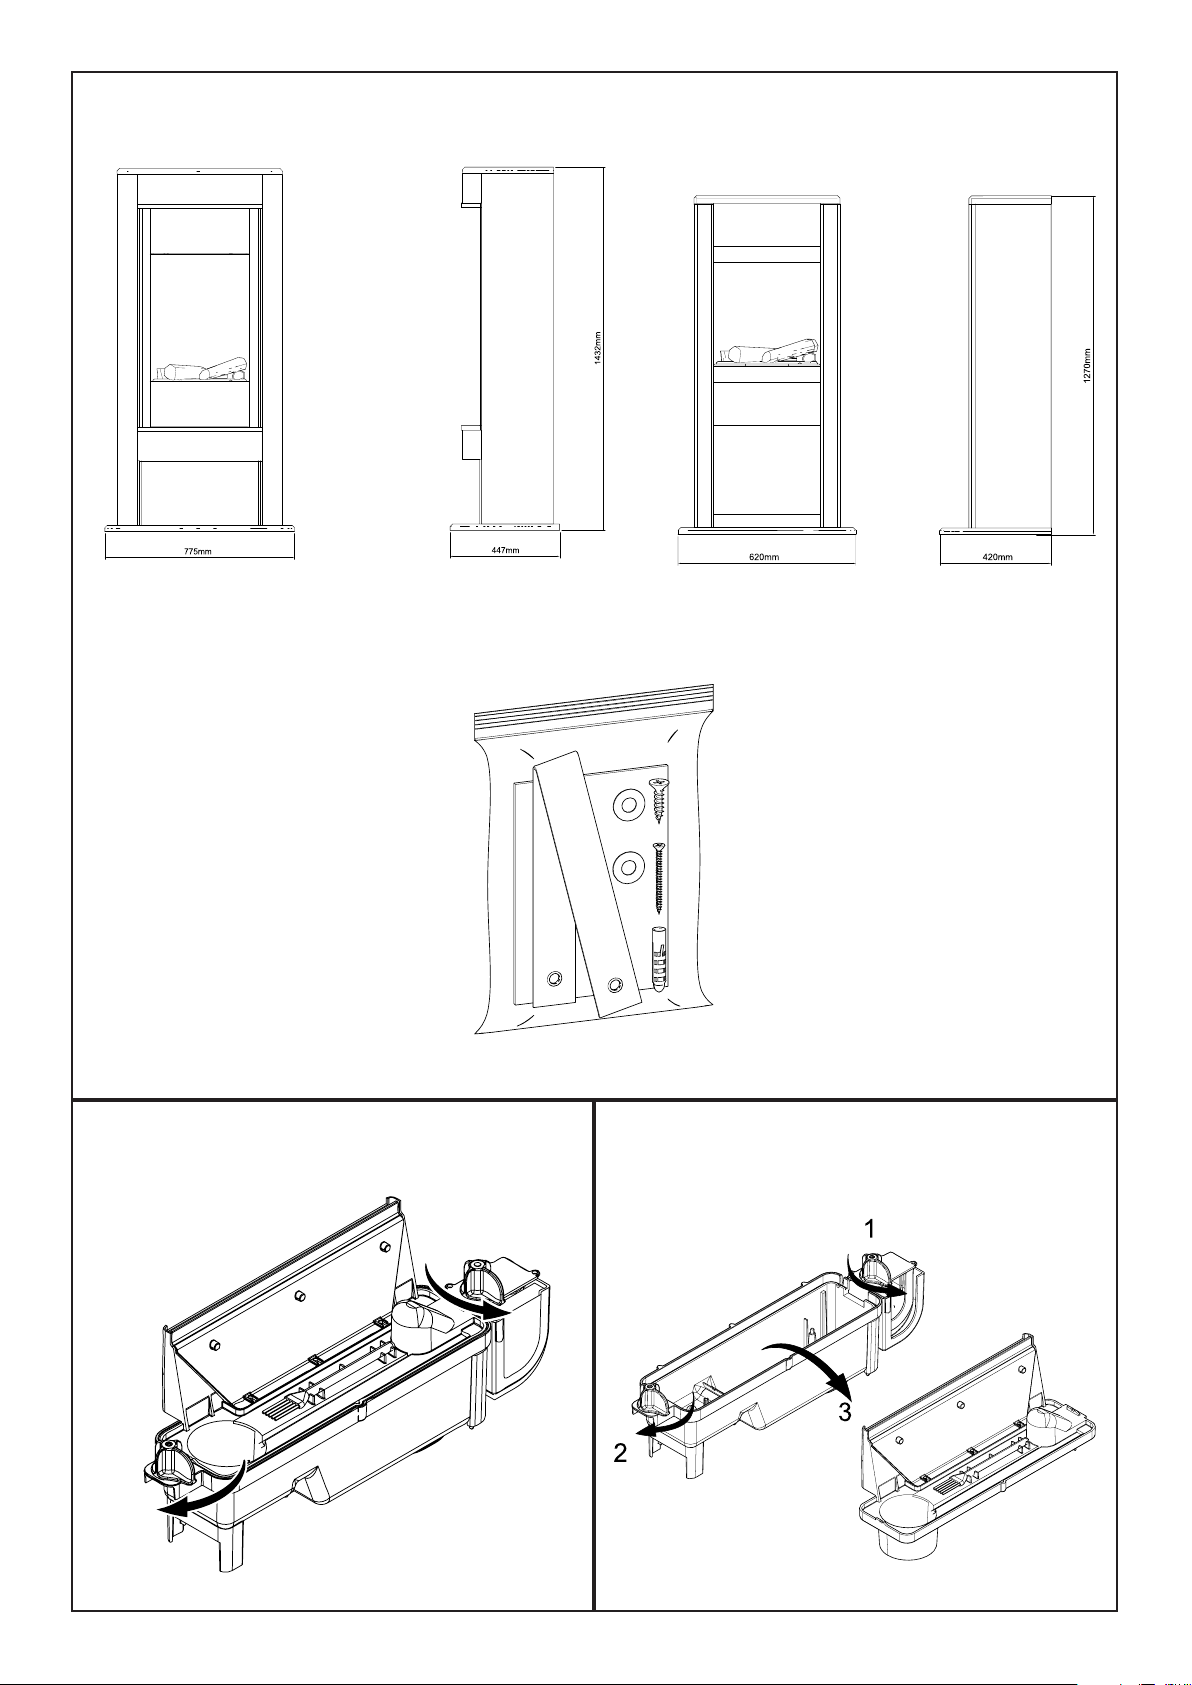
Fig. 1
VERDI CUBIC
Fig. 2 Fig. 3
Page 4
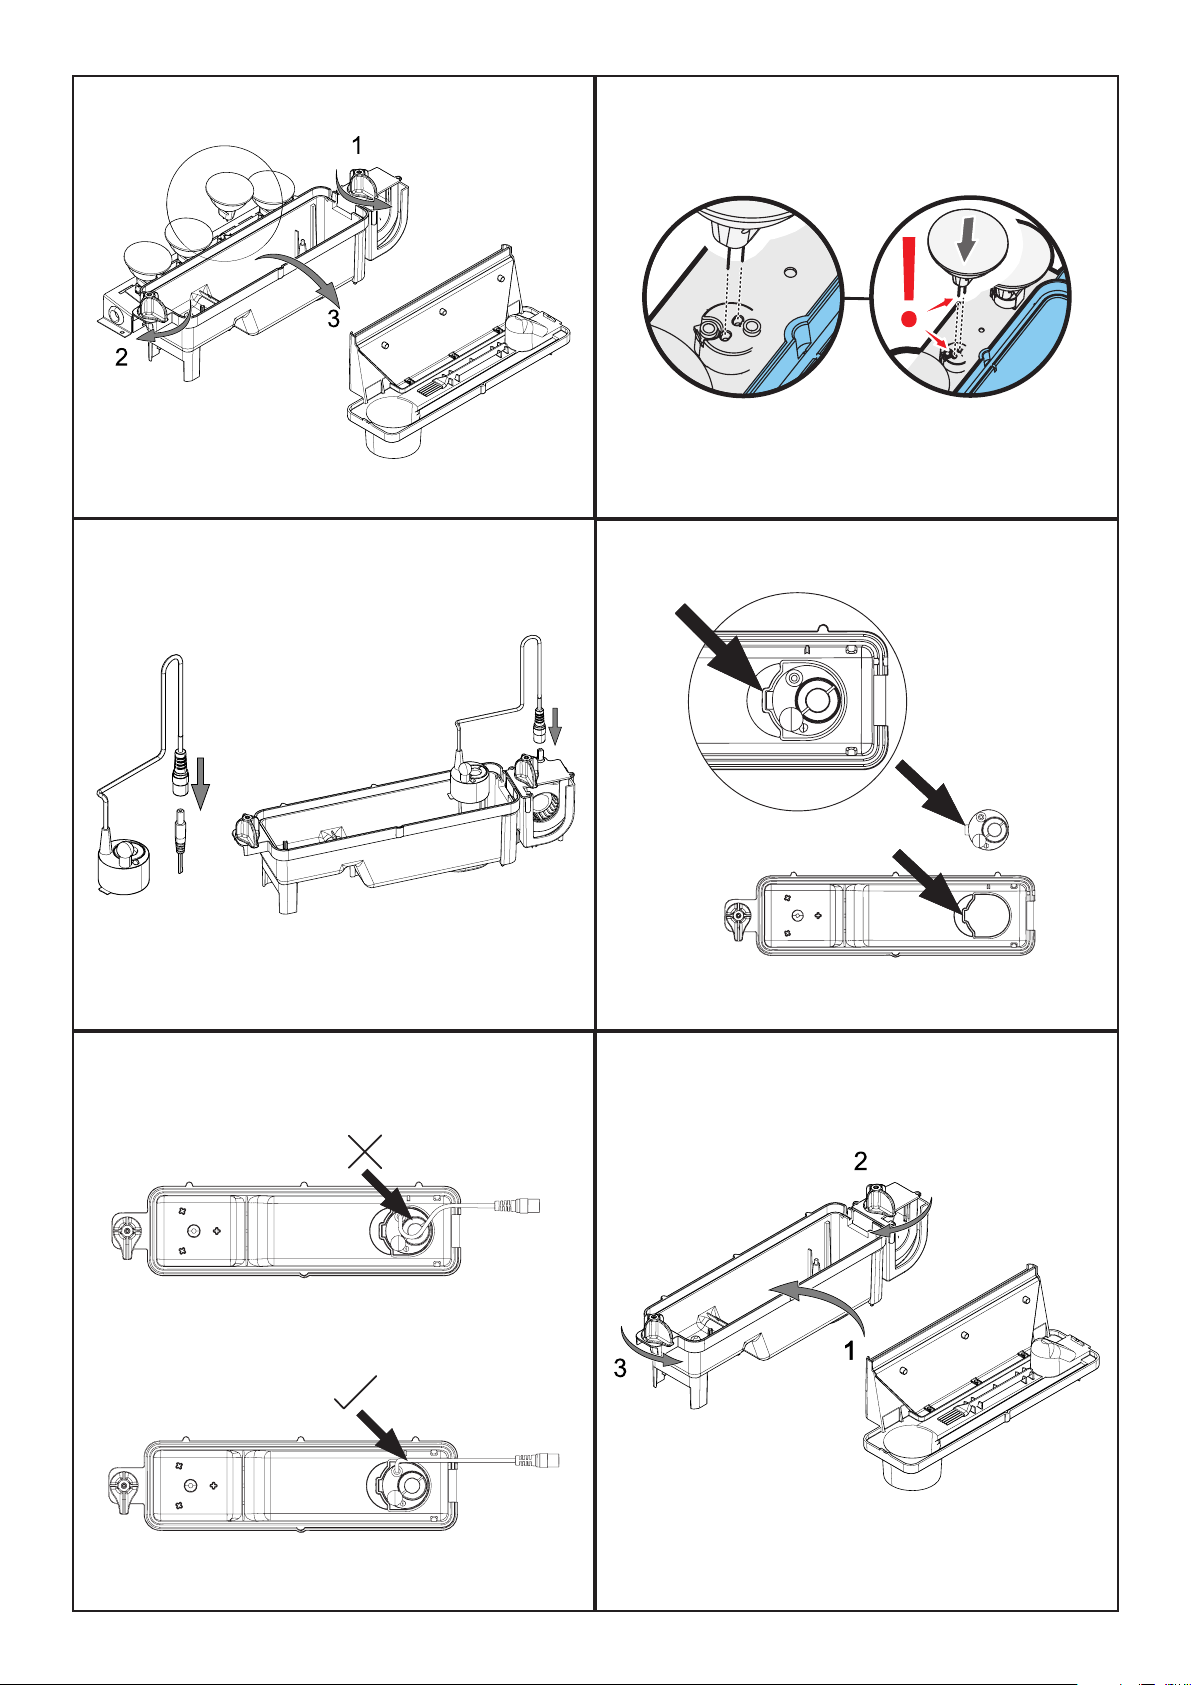
Fig. 4 Fig. 4a
Fig. 5 Fig. 5a
Fig. 5b Fig. 6
Page 5
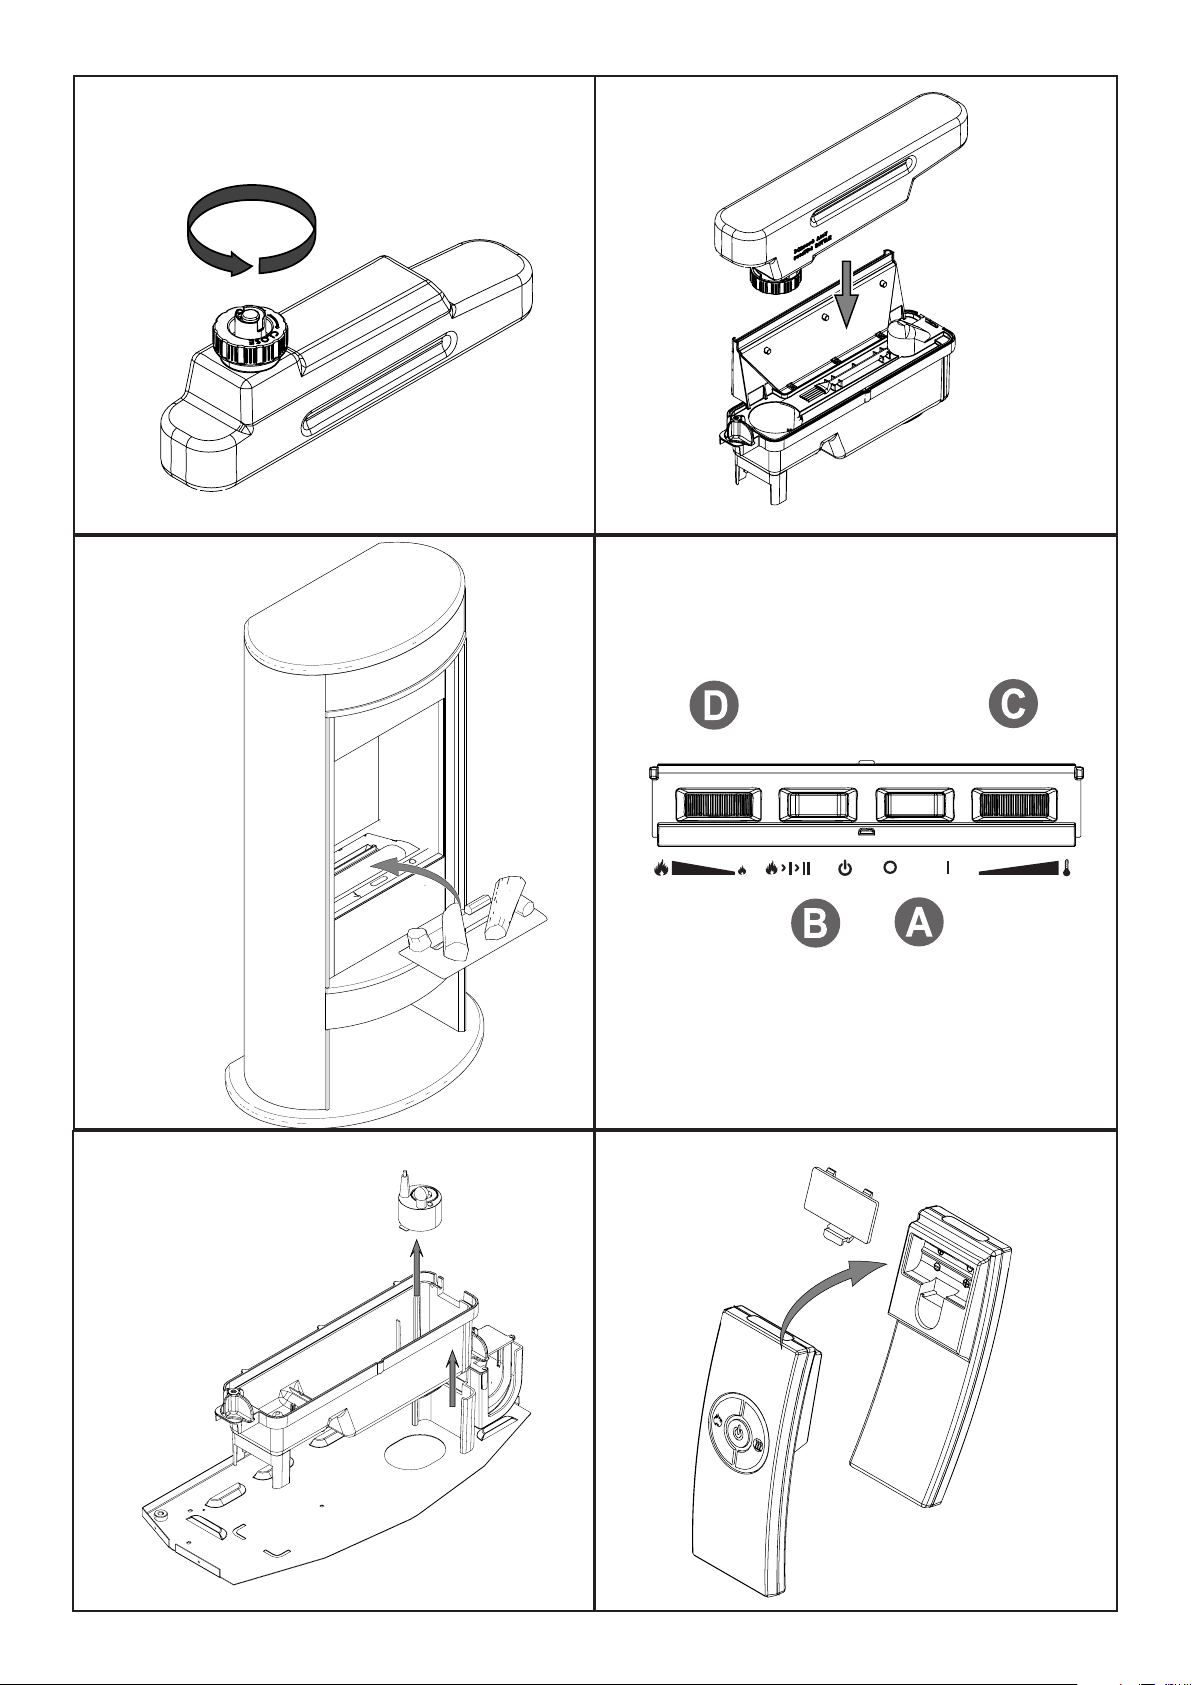
Fig. 7
Fig. 8
Fig. 9
Fig. 10
Fig. 11 Fig. 12
Page 6
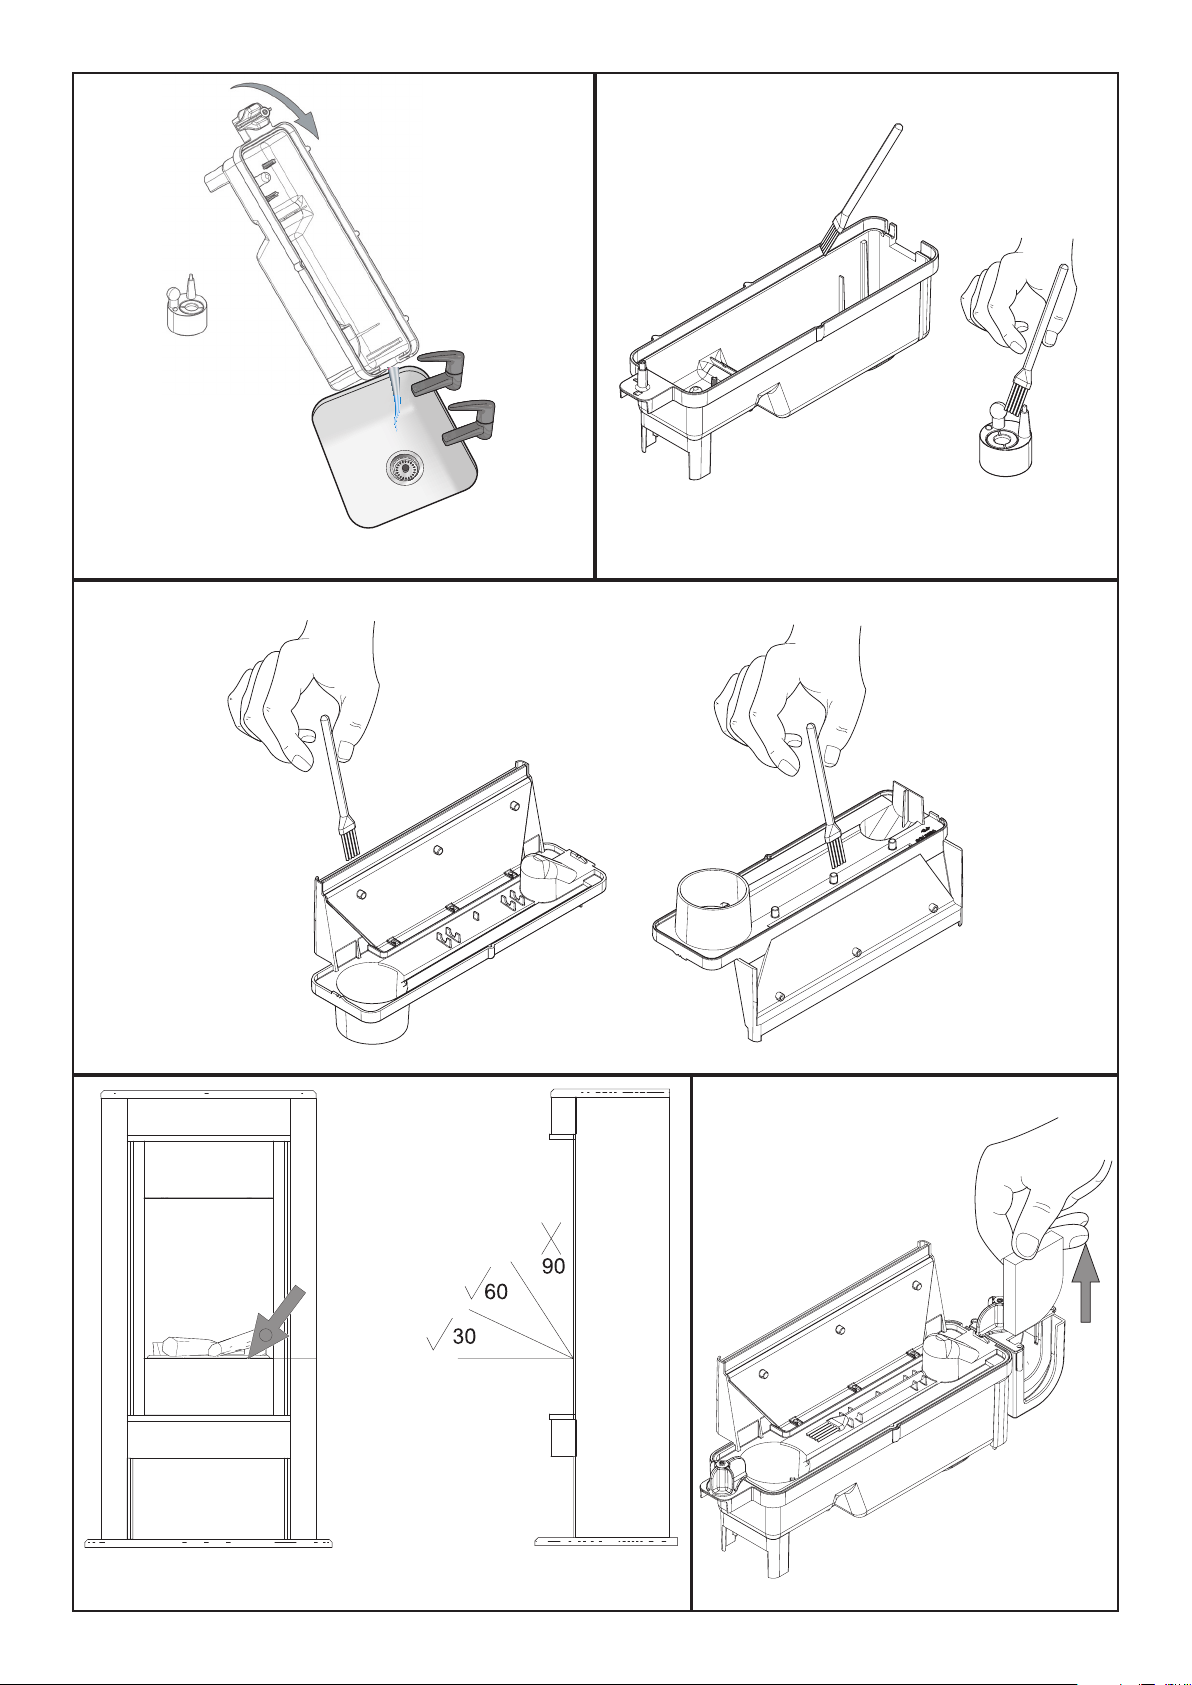
Fig. 13 Fig. 14
Fig. 15
Fig. 16Fig. 17
Page 7

Dimplex Verdi / Cubic
Einführung
Lesen Sie dieses Handbuch sorgfältig durch, um Ihr Produkt sicher installieren, verwenden und warten zu können.
Wichtige Sicherheitshinweise
Beachten Sie bei der Verwendung elektrischer Geräte die nachfolgenden, grundlegenden
Sicherheitshinweise, um Feuer, Stromschläge oder Verletzungen zu vermeiden:
1. ÜBERHITZUNG
WARNUNG: Den Heizofen nicht abdecken, um eine Überhitzung zu vermeiden. Keine Materialien
oder Kleidungsstücke auf den Heizofen legen, und nicht die Luftzirkulation um das Gerät herum
behindern. Auf dem Heizofen bendet sich der Warnhinweis NICHT ABDECKEN.
2. SCHÄDEN
Falls das Gerät beschädigt ist, sollten Sie vor der Installation und dem Gebrauch Ihren
Einzelhändler konsultieren.
Ein beschädigtes Netzkabel muss vom Hersteller oder dessen Kundendienst oder einer ähnlich
qualizierten Person ausgetauscht werden, um Gefahrensituationen zu vermeiden.
3. AUFSTELLUNGSORT
Nicht im Freien verwenden.
Nicht in der unmittelbaren Nähe von Bädern, Duschen oder Schwimmbecken verwenden.
Den Heizofen nicht unmittelbar unter einer Steckdose oder Anschlussdose aufstellen.
Möbel, Gardinen oder andere brennbare Materialien müssen mindestens 1 Meter vom Gerät
entfernt sein.
Obwohl diese Heizung allen Sicherheitsnormen entspricht, empfehlen wir nicht, das Gerät auf
tiefen Teppichen oder auf Langhaarläufern zu verwenden.
4. POSTION DES STECKERS
Das Gerät muss so aufgestellt werden, dass der Netzstecker bzw. der Anschlusspunkt Das
Stromversorgungskabel nicht in der Nähe der Vorderseite des Geräts verlegen.
5. GEBRAUCH ANDERER STEUERUNGEN
Dieses Gerät nicht in Verbindung mit einem Temperaturregler, Programmgeber, einer Zeitschaltuhr
oder anderen Geräten verwenden, die die Wärme automatisch einschalten, da bei der
versehentlichen Abdeckung oder Umstellung des Heizofens Brandgefahr besteht.
6. VOM NETZ TRENNEN
Ziehen Sie bei einem Fehler den Netzstecker des Geräts oder trennen Sie das Gerät.
Ziehen Sie den Netzstecker des Geräts oder trennen Sie das Gerät, wenn es längere Zeit
7. EIGENTÜMER/BENUTZER
Dieses Gerät kann von Kindern über 8 Jahren, von Personen, deren körperliche oder geistige
Unversehrtheit oder deren Wahrnehmungsfähigkeit eingeschränkt ist, sowie von Personen mit
mangelnden Kenntnissen oder Erfahrung benutzt werden. Dies gilt nur unter der Voraussetzung,
dass sie beaufsichtigt werden oder dass sie eine Einweisung in die sichere Nutzung des Geräts
und die damit verbundenen Gefahren erhalten haben. Kinder dürfen mit dem Gerät nicht spielen.
Reinigung und Wartung dürfen ohne Beaufsichtigung nicht von Kindern durchgeführt werden.
Kinder unter 3 Jahren sollten sich ohne Beaufsichtigung nicht in der Nähe des Geräts aufhalten.
Kinder von 3 bis 8 Jahren sollten das Gerät nur ein- oder ausschalten dürfen, wenn es in der dafür
vorgesehenen Betriebsposition montiert wurde. Dies gilt nur unter der Voraussetzung, dass sie
beaufsichtigt werden oder dass sie eine Einweisung in die sichere Nutzung des Geräts und die
damit verbundenen Gefahren erhalten haben. Kinder von 3 bis 8 Jahren dürfen das Gerät nicht an
eine Steckdose anschließen, benutzen bzw. reinigen oder das Gerät warten.
8. ELEKTRIZITÄT
WARNUNG – DIESES GERÄT MUSS GEERDET SEIN.
Diese Heizung darf nur an eine AC ~ Netzspannung angeschlossen werden; die Netzspannung
muss mit den Spannungsangaben auf dem Gerät übereinstimmen.
Lesen Sie vor dem Einschalten die Sicherheits- und Gebrauchsanweisungen.
ACHTUNG - Einige Bauteile dieses Produkts können sehr heiß werden und Verbrennungen
verursachen. Achten Sie besonders darauf, wenn Kinder oder schutzbedürftige Personen
anwesend sind.
1
Page 8

Allgemeine Informationen
Verwenden Sie in dem Gerät nur entkalktes Wasser.
Dieses Gerät ist freistehend und wird normalerweise vor einer Wand aufgestellt.
Stellen Sie sicher, dass das Gerät auf einem ebenen Untergrund steht.
Obwohl diese Heizung den Sicherheitsnormen entspricht, empfehlen wir nicht, das Gerät auf tiefen Teppichen oder
Langhaarläufern zu verwenden.
Bitte beachten Sie: In Umgebungen mit sehr leisen Nebengeräuschen ist es möglich, dass Sie einen Ton hören, der
mit dem Betrieb des Flammeneffekts zu tun hat. Das ist normal und kein Grund zur Sorge.
Wenn an Ihrem Gerät aus irgendeinem Grund eine Überspannung auftritt, schaltet sich das Gerät möglicherweise
aus. Es handelt sich dabei um eine Sicherheitsvorkehrung. Das Gerät schaltet sich nach 30 Sekunden wieder ein.
Nach der Installation darf das Gerät nicht bewegt oder auf dessen Rückseite gelegt werden, ohne vorher das Wasser
aus der Wanne und dem Wassertank abzuleiten.
Wenn Sie das Gerät länger als 2 Wochen nicht verwenden werden, leiten Sie das Wasser aus der Wanne und dem
Wassertank ab, und lassen Sie die Wanne trocknen.
Der Wassertank, die Wanne, der Wannendeckel, die Tankklappe und die Luftlter müssen aller zwei Wochen gereinigt
werden, insbesondere in Gebieten mit hartem Wasser.
Das Gerät darf nicht verwendet werden, wenn die Lampen nicht funktionieren.
Die Lampen müssen regelmäßig anhand der Anleitungen in den Kapiteln „Wartung“ und „Lampen auswechseln“
überprüft werden.
Technische Information
Modell Nr: CBC20 / VER20
Wärmeabgabe 230V 240V
Nennwärmeabgabe P
Mindestwärmeabgabe P
Maximale kontinuierliche
Wärmeabgabe
Zusätzlicher Stromverbrauch
Im Standby-Betrieb el
P
1.6 - 1.8 kW
Nom
0.8 - 0.9 kW
min
1.6 - 1.8 kW
max,c
0.47 - 0.47 W
SB
mit Raumtemperaturregelung mittels mechanischem Thermostat
Installationsanleitungen
In diesem Kapitel wird beschrieben, wie der Ofen in Gang gebracht wird.
VOR DEM START
1. Entfernen Sie das gesamte Verpackungsmaterial (alle Warnhinweise beachten). Bewahren Sie die Verpackung
für zukünftige Verwendungszwecke auf, z.B. für den Fall, dass Sie umziehen oder das Gerät an den Händler
zurückschicken wollen.
2. Prüfen Sie vor dem Anschluss des Heizofens, ob die Nennspannung mit den Angaben auf dem Gerät
übereinstimmt.
INSTALLATION
Halten Sie den Ofen an beiden Seiten und schieben Sie ihn vorsichtig bis zur gewünschten Position.
Stellen Sie den Ofen vor eine Wand und schließen Sie die Stromversorgung an.
Schließen Sie das Netzkabel an den entsprechenden Anschluss an der Rückseite des Ofens an.
Schließen Sie den Netzstecker an eine 16 Amp/230 V Steckdose an. Stellen Sie sicher, dass das Netzkabel an der
Rückseite des Ofens rechts oder links angeschlossen ist, je nach Position der Steckdose, und dass das Kabel nicht
unter dem Ofen eingeklemmt ist, um Schäden am Kabel zu vermeiden.
Gerät noch nicht einschalten.
Messwertgeber + Lampen installieren
1. Lösen Sie die zwei roten Stifte, indem Sie sie um 90 Grad drehen. (Siehe Abb. 2)
2. Nehmen Sie den Verneblerdüse heraus. (Abb. 3)
3. Setzen Sie die Lampen in die Lampenhalterung (Abb. 4). Vorsicht bei der Einführung der Stifte in die Löcher.
(Abb. 4a)
4. Drücken Sie die Lampen vorsichtig in die richtige Position.
2
Page 9

5. Setzen Sie den Messwertgeber in die Wanne. Verbinden Sie das Kabel mit dem Verbinder auf der Wanne.
(Abb. 5)
6. Um sicherzustellen, dass der Messwertgeber richtig auf der Wanne sitzt, achten Sie darauf, dass der Stift des
Messwertgebers auf gleicher Höhe mit der Griffschale in der Wanne ist. (Abb. 5a)
7. Das Kabel darf nicht über der Scheibe auf dem Messwertgeber platziert werden (Abb. 5b). Setzen Sie das Kabel
in den Schlitz in der Wand der Wanne, damit es nicht zwischen dem Ausguss und der Wanne eingeklemmt wird.
8. Setzen Sie den Verneblerdüse wieder ein. Drehen Sie die Stifte um 90 Grad, um den Ausguss zu befestigen.
(Abb. 6)
Wassertank füllen
9. Stellen Sie den Wassertank in ein Waschbecken und entfernen Sie die Kappe (nach links drehen). (Abb. 7)
10. Füllen Sie den Wassertank nur mit entkalktem Leitungswasser. Dies ist notwendig, um die Lebensdauer der
Flammen- und Raucheinheit zu verlängern. Das Wasser sollte durch einen herkömmlichen Haushaltswasserlter
geltert werden. Der Filter muss regelmäßig ausgetauscht werden.
11. Schrauben Sie die Kappe wieder an – nicht überdrehen.
12. Setzen Sie den Wassertank mit der Kappe nach unten und der achen Seite nach außen in die Wanne. (Abb. 8)
Montage des Ofens
13. Setzen Sie das Brennstoffbett auf den Wassertank und die Abzugsdüse. (Abb. 9)
Betrieb des Ofens
In diesem Abschnitt wird beschrieben, wie Sie den Ofen manuell oder per Fernbedienung betreiben können.
MANUELLE TASTEN
Die Tasten benden sich unter der Schwenkklappe. (Siehe Tastenübersicht Abb. 10)
Schalter „A“: Kontrolliert die Stromzufuhr zum Ofen.
Hinweis: Dieser Schalter muss auf der Position EIN ( I ) stehen, damit der Ofen mit oder ohne Flamme eingeschaltet
werden kann.
Schalter „B“: Drücken Sie einmal auf den Schalter , um den Flammeneffekt einzuschalten. Dabei ist ein Signalton
zu hören. Obwohl sich die Hauptlampen sofort einschalten, dauert es ungefähr weitere 30 Sekunden, bis der
Flammeneffekt angeht.
Drücken Sie erneut auf den Schalter , um den Flammeneffekt und die halbe Flamme zu aktivieren. Es sind
zwei Signaltöne zu hören.
Drücken Sie erneut auf den Schalter , um den Flammeneffekt und die volle Flamme zu aktivieren. Es sind
drei Signaltöne zu hören.
Drücken Sie erneut auf den Schalter , um erneut nur den Flammeneffekt einzuschalten. Es ist ein Signalton
zu hören.
Drücken Sie auf den Schalter , um den Ofen in den Standby-Modus umzuschalten. Es ist ein Signalton zu
hören.
Regler „C“: Regelung der Temperatureinstellungen.
Drehen Sie den Temperaturregler nach links, um die Temperatur zu verringern; drehen Sie den Regler nach
rechts, um die Temperatur zu erhöhen.
Regler „D“: Regelt die Intensität des Flammeneffekts.
Drehen Sie den Regler nach links, um den Flammeneffekt zu erhöhen; drehen Sie den Regler nach rechts,
um den Flammeneffekt zu verringern.
EINSTELLUNG DES THERMOSTATS
Stellen Sie sicher, dass der Ofen an eine Steckdose angeschlossen ist. Schalten Sie das Gerät und die volle Wärme
ein. Drehen Sie Regler „C“ vollständig nach rechts (Höchsttemperatur), um den Raum schnell aufzuheizen. Wenn
der Raum die gewünschte Temperatur erreicht hat, drehen Sie den Temperaturregler langsam zurück, bis Sie ein
Klickgeräusch hören. Der Ofen wird die Raumtemperatur auf dem eingestellten Pegel halten.
Hinweis: Falls sich Ihr Ofen bei niedriger Temperatureinstellung nicht einschaltet, kann dies daran liegen, dass die
Raumtemperatur über der Thermostateinstellung liegt.
THERMISCHE SICHERHEITSABSCHALTUNG
Der Heizlüfter verfügt über eine thermische Sicherheitsabschaltung, um Schäden aufgrund von Überhitzung zu
vermeiden. Dies kann passieren, wenn die Wärmeabfuhr blockiert wird. Wenn die Abschaltung ausgelöst wird, ziehen
Sie den Stecker aus der Steckdose und warten Sie ungefähr 10 Minuten, bis Sie das Gerät erneut anschließen.
Entfernen Sie vor dem erneuten Einschalten des Ofens Hindernisse, die die Wärmeabfuhr blockieren. Setzen Sie
dann den normalen Betrieb fort.
3
Page 10
Achtung: Um Gefahren durch ein ungewolltes Zurücksetzen der thermischen Abschaltung zu vermeiden, darf das
Gerät nicht durch ein externes Schaltgerät, wie eine Zeitschaltuhr, betrieben werden oder an eine Schaltvorrichtung
angeschlossen sein, die regelmäßig von der Energieversorgung ein- und ausgeschaltet wird.
FLAMMENEFFEKT EINSTELLEN
1. Der Flammenregler „D“ (Abb. 10) kann für einen realistischeren Effekt hoch- oder runtergedreht werden.
2. Normalerweise sehen die Flammen realistischer aus, wenn der Regler runtergedreht wird.
3. Geben Sie dem Flammengenerator Zeit, auf die von Ihnen vorgenommenen Einstellungen zu reagieren.
4. Das Feuer benötigt weniger Wasser, wenn die Flamme niedriger eingestellt ist.
5. Den Ofen nicht kippen oder bewegen, wenn sich Wasser im Tank oder der Wanne bendet.
6. Stellen Sie sicher, dass der Ofen auf einem ebenen Untergrund steht.
FERNBEDIENUNG
Auf dem Bedienfeld muss Schalter „A“ (siehe Abb. 10) auf der Position „EIN“ ( I ) stehen, damit die Fernbedienung
verwendet werden kann.
Auf der Fernbedienung benden sich 3 Tasten. (Siehe Abb. 12) Halten Sie die Fernbedienung für einen
ordnungsgemäßen Betrieb auf die Vorderseite des Feuerrosts gerichtet. (Siehe Abb. 17). Folgende Funktionen
können Sie mit der Fernbedienung durchführen:
Einmal drücken, um nur den Flammeneffekt zu aktivieren.
Es ist ein Signalton zu hören.
Einmal drücken, um den Flammeneffekt und die halbe Flamme einzuschalten.
Es sind zwei Signaltöne zu hören.
Erneut drücken, um volle Wärme und vollen Flammeneffekt einzuschalten.
Es sind drei Signaltöne zu hören.
Standby
Es ist ein Signalton zu hören.
Wartung
ALLGEMEINE HINWEISE
Verwenden Sie in diesem Gerät nur entkalktes Wasser.
Stellen Sie sicher, dass das Gerät auf einem ebenen Untergrund steht.
Wenn Sie das Gerät länger als 2 Wochen nicht verwenden werden, entfernen und leeren Sie die Wanne und den
Wassertank.
Nach der Installation darf das Gerät nicht bewegt oder auf dessen Rückseite gelegt werden, ohne vorher das Wasser
aus der Wanne und dem Wassertank abzuleiten.
Das Gerät darf nicht verwendet werden, wenn die Lampen nicht funktionieren.
Überprüfen Sie die Lampen regelmäßig anhand der Anleitungen im Kapitel „Lampen austauschen“.
WASSERTANK FÜLLEN
Wenn der Wassertank leer ist, schalten sich die Flamme und die Raucheinheit aus, und es sind zwei Signaltöne zu
hören. Gehen Sie dann wie folgt vor.
1. Stellen Sie mit Schalter „A“ ( 0 ) ein. (Siehe Abb. 10)
2. Nehmen Sie vorsichtig das Brennstoffbett heraus und stellen es zur Seite.
3. Heben Sie den Wassertank an und dann heraus.
4. Setzen Sie den Wassertank in ein Waschbecken und entfernen Sie die Kappe (nach links drehen). (Abb. 7)
5. Füllen Sie den Tank nur mit entkalktem Wasser. Dies ist notwendig, um die Lebensdauer der Flammen- und
Raucheinheit zu verlängern.
Das Wasser sollte durch einen herkömmlichen Haushaltswasserlter geltert werden. Der Filter muss regelmäßig
ausgetauscht werden.
6. Schrauben Sie die Kappe wieder zu; dabei nicht überdrehen.
7. Setzen Sie den Tank mit der Kappe nach unten und der achen Seite nach außen wieder in die Wanne ein. (Abb.
8)
8. Setzen Sie das Brennstoffbett wieder vorsichtig auf seinen Platz. (Abb. 9)
9. Stellen Sie Schalter „A“ auf die Position ( I ). (Siehe Abb. 10)
LAMPEN AUSTAUSCHEN
Wenn die Flamme oder der Rauch grau oder farblos erscheinen, ist es möglich, dass eine oder mehrere Lampen
defekt sind.
Überprüfen Sie die Lampen wie folgt auf Fehlfunktionen.
1. Heben Sie, während der Flammeneffekt eingeschaltet ist, das Brennstoffbett und den Wassertank heraus.
4
Page 11

2. Auch wenn der Ausguss noch installiert ist, sollte es möglich sein, die Lampen zu sehen und zu prüfen, ob eine
Lampe ausgetauscht werden muss.
3. Setzen Sie den Schalter „A“ auf die Position AUS und trennen Sie den Ofen vom Netz.
4. Lassen Sie die Lampen des Geräts 20 Minuten abkühlen, bevor Sie diese entfernen.
5. Entfernen Sie die Wanne wie im Kapitel Reinigung beschrieben.
6. Entfernen Sie die kaputte Lampe; heben Sie die Lampe vorsichtig nach oben und lösen Sie die Stifte aus der
Lampenhalterung. (Siehe Abb. 4 und 4a)
Ersetzen Sie die Lampe durch eine getönte Lampe des Typs OPTIMYST, 12V, 50W, GU5,3 und 8° Strahlwinkel.
(Im Kapitel „Kundendienst“ nden Sie Informationen zum Kauf von Ersatzlampen.)
7. Führen Sie die Stifte der neuen Lampe vorsichtig in die Löcher der Lampenhalterung ein. Drücken Sie die Lampe
vorsichtig hinein. (Siehe Abb. 4 und 4a)
8. Bringen Sie die Wanne, den Ausguss, den Wassertank und das Brennstoffbett wieder an.
REINIGUNG
Warnung – Stellen Sie den Schalter „A“ immer auf die Position „AUS“ ( 0 ) (siehe Abb. 10) und ziehen Sie den
Stecker, bevor Sie den Ofen reinigen.
Es wird empfohlen, die folgenden Teile aller 2 Wochen zu reinigen, insbesondere in Gebieten mit hartem Wasser:
Wassertank, Wanne, Ausguss, Tankkappe und Dichtung, Luftlter.
Verwenden Sie für die allgemeine Reinigung ein weiches Staubtuch – niemals Scheuermittel verwenden.
Um Staub oder Fusseln zu entfernen, können Sie gelegentlich den weichen Bürstenaufsatz eines Staubsaugers
verwenden, um das Abzugsgitter des Heizlüfters zu reinigen.
Wassertank
1. Entfernen Sie, wie bereits beschrieben, den Wassertank und entleeren Sie ihn in einer Spüle.
2. Reinigen Sie die Innenseite der Kappe mit der mitgelieferten Bürste. Achten Sie dabei insbesondere auf den
Gummiring in der äußeren Furche und die mittlere Gummidichtung.
3. Geben Sie eine kleine Menge Reinigungslösung in den Tank, schließen Sie die Kappe und schütteln Sie. Spülen
Sie den Tank aus, bis alle Spuren der Reinigungslösung beseitigt sind.
4. Füllen Sie den Tank nur mit entkalktem Wasser und schließen Sie die Kappe; dabei nicht überdrehen.
Wanne
1. Stellen Sie den Schalter „A“ auf die Position „AUS“ ( 0 ).
2. Heben Sie das Brennstoffbett vorsichtig heraus und setzen es auf den Boden.
3. Heben Sie den Wassertank nach oben und heraus.
4. Trennen Sie den elektrischen Verbinder, der sich rechts von der Wanne bendet. (Siehe Abb. 5)
5. Lösen Sie den rechten Arretierstift durch eine 90° Drehung. Danach kann die Wanne vollständig
herausgenommen werden. (Siehe Abb. 11)
6. Heben Sie die Wanne vorsichtig nach oben. Halten Sie die Wanne gerade, damit kein Wasser herauslaufen kann.
Stellen Sie die Wanne in die Spüle.
7. Lösen Sie den rechten Arretierstift durch eine 90° Drehung; nehmen Sie dann den Ausguss heraus. (Siehe Abb. 3)
8. Nehmen Sie den Messwertgeber heraus und kippen Sie ihn wie abgebildet vorsichtig an, so dass die Flüssigkeit
aus der Wanne laufen kann. (Siehe Abb. 13)
9. Geben Sie eine kleine Menge Reinigungslösung in die Wanne. Reinigen Sie mit der mitgelieferten Bürste
vorsichtig alle Oberächen der Wanne; reinigen Sie den Messwertgeber einschließlich der Metallscheiben oben in
der gefurchten Oberäche. (Siehe Abb. 14)
10. Spülen Sie die Wanne nach der Reinigung sorgfältig ab, bis alle Spuren der Reinigungslösung beseitigt sind.
11. Reinigen Sie den Ausguss mit der Bürste und spülen Sie ihn sorgfältig mit Wasser aus. (Siehe Abb. 15)
12. Montieren Sie die Teile in umgekehrter Reihenfolge.
Luftlter
1. Heben Sie das Brennstoffbett vorsichtig heraus und setzen es auf den Boden.
2. Schieben Sie den Luftlter vorsichtig nach oben aus der Plastikhalterung heraus. (Siehe Abb. 16)
3. Spülen Sie den Filter über dem Waschbecken vorsichtig mit Wasser ab. Trocknen Sie ihn mit einem Handtuch ab,
bevor Sie ihn wieder einsetzen.
4. Setzen Sie den Filter ein; achten Sie darauf, dass der schwarze, grobe Filter zur Vorderseite des Ofens gerichtet ist.
5. Setzen Sie das Brennstoffbett ein.
5
Page 12

Zusätzliche Informationen
KUNDENDIENST
Sie erhalten auf Ihr Produkt eine Garantie von zwei Jahren gültig ab Kaufdatum. Innerhalb dieses Zeitraums
reparieren oder ersetzen wir das Produkt kostenfrei (außer Lampen & abhängig von der Verfügbarkeit), sofern das
Produkt in Übereinstimmung mit diesen Anleitungen installiert und verwendet wurde. Die Rechte unter dieser Garantie
erhalten Sie zusätzlich zur gesetzlichen Garantiepicht, die wiederum nicht von dieser Garantie beeinträchtigt wird.
Falls Sie nach dem Kauf Informationen oder Hilfe benötigen, können Sie unseren Kundendienst anrufen, dessen
Nummer Sie auf der Garantiekarte auf der Rückseite dieses Handbuchs nden. Es sind auch Ersatzteile verfügbar.
Bewahren Sie Ihren Kaufbeleg gut auf.
RECYCLING
Für Geräte, die innerhalb der Europäischen Gemeinschaft verkauft werden – Am Ende der Nutzungsdauer
elektrischer Geräte dürfen diese nicht als Haushaltsmüll entsorgt werden. Geben Sie die Geräte an
Sammelstellen ab, sofern solche vorhanden sind. Informationen zu den Recyclingvorgaben in Ihrem Land
erhalten Sie von Ihrer Behörde vor Ort oder Ihrem Einzelhändler.
PATENT / PATENTANTRAG
Die Produkte der Optimyst Reihe werden von einem oder mehreren der folgenden Patente oder Patentanträge
geschützt:
Großbritannien GB 2402206, GB 2460259, GB 2460453, GB 2418014, GB 2465738, GB 2449925, GB 2465537,
GB 2455277, GB1020534.2, GB1020537.5, GB1110987.3
USA US 7967690, US 2010299980, US 2011062250, US 2008028648, US 13/167,042
Russland RU2008140317
Europa EP 2029941, EP 2201301, EP 2315976, EP 1787063, EP07723217.1, EP11170434.2, EP 11170435.9
China CN 101883953, CN 200980128666.2, CN 101057105, CN 101438104
Australien AU 2009248743, AU 2007224634
Kanada CA 2725214, CA 2579444, CA 2645939
Internationale Patentanträge WO 2006027272
Südafrika ZA 200808702
Mexiko MX 2008011712
Korea KR 20080113235
Japan JP 2009529649
Brasilien BR P10708894-9
Indien IN 4122/KOLNP/2008
Neuseeland NZ 571900
6
Page 13

Störbehebung
Problem Ursache Behebung
Der Flammeneffekt
schaltet sich nicht ein.
Netzstecker ist nicht angeschlossen.
Prüfen Sie, ob der Netzstecker richtig an der
Steckdose angeschlossen ist.
Der Flammeneffekt ist
zu niedrig.
Niedriger Wasserstand.
Der Niederspannungsverbinder ist nicht
richtig angeschlossen. (Siehe Abb. 5)
Der Messwertgeber sitzt nicht richtig in der
Wanne.
Bei der Verwendung von destilliertem
Wasser startet der Messwertgeber
möglicherweise nicht.
Der Flammenregler steht auf einer niedrigen
Position. (Siehe Abb. 10)
Die Metallscheibe im Messwertgeber ist
eventuell schmutzig. (Siehe Abb. 14)
Der Draht des Messwertgebers sitzt über
der Metallscheibe.
Wenig Rauch während des Starts.
Prüfen Sie, ob der Wassertank voll und
Wasser in der Wanne ist.
Der Verbinder muss richtig angeschlossen
sein. (Siehe Abb. 5)
Stellen Sie sicher, dass der Messwertgeber
in der Griffschale der Wanne sitzt.
Verwenden Sie anfangs entkalktes
Leitungswasser. Später können Sie
destilliertes Wasser versuchen.
Erhöhen Sie die Flamme, indem Sie den
Regler „D“ langsam nach links drehen.
(Siehe Abb. 10)
Reinigen Sie die Metallscheibe mit der
mitgelieferten weichen Bürste. (Siehe Abb.
14) Schrittweise Anleitung siehe Kapitel
„Wartung“.
Führen Sie das Kabel zur Rückseite der
Wanne und stellen Sie sicher, dass es sich
im seitlichen Schlitz bendet und an der
Wanne austritt.
Unangenehme
Gerüche während des
Gebrauchs.
Der Flammeneffekt
erzeugt zu viel Rauch.
Die Hauptlampen
funktionieren nicht.
Keine Flammen und
kein Rauch.
Vor dem erstmaligen Betrieb: Der Ofen muss
sich auf die Raumtemperatur erwärmen.
Das Wasser ist schmutzig oder
abgestanden.
Es wird ungeltertes Wasser verwendet.
Flammeneffekt zu hoch eingestellt. Drehen Sie den Regler „D“ nach rechts,
Kein Wasser im Wassertank. Befolgen Sie die Anleitungen im Kapitel
Reinigen Sie das Gerät wie im Kapitel
Wartung beschrieben.
Verwenden Sie nur geltertes
Leitungswasser.
jedes Mal um ungefähr ¼. Geben Sie dem
Flammengenerator etwas Zeit, auf Ihre
Einstellungen zu reagieren. (Siehe Abb. 10)
Wartung, „Tank füllen“.
Prüfen Sie, ob der Stecker richtig an der
Steckdose angeschlossen ist und der
Schalter „A“, Abb. 10, auf der Position „EIN“
( I ) steht.
7
Page 14

Dimplex Verdi / Cubic
Introduction
Please read this information guide carefully to be able to safely install, use and maintain your product.
Important Safety Advice
When using electrical appliances, basic precautions should always be followed to reduce the risk
of re, electrical shock and injury to persons, including the following:
1. OVERHEATING
WARNING: In order to avoid overheating, do not cover the heater. Do not place material or
garments on the heater, or obstruct the air circulation around the heater. The heater carries a DO
NOT COVER warning.
2. DAMAGE.
If the appliance is damaged, check with the supplier before installation and operation.
If the supply cord is damaged it must be replaced by the manufacturer or service agent or a
similarly qualied person in order to avoid a hazard.
3. LOCATION
Do not use outdoors.
Do not use in the immediate surroundings of a bath, shower or swimming pool.
Do not locate the heater immediately below a xed socket outlet or connection box.
Ensure that furniture, curtains or other combustible material are positioned no closer than 1 metre
from the heater.
Although this heater conforms with safety standards, we do not recommend its use on deep pile
carpets or on long hair type of rugs.
4. PLUG POSITIONING
The appliance must be positioned so that the plug or point of isolation is accessible.
Keep the supply cord away from the front of the heater.
5. USE OF OTHER CONTROLS
Do not use this heater in series with a thermal control, a program controller, a timer or any
other device that switches on the heat automatically, since a re risk exists when the heater is
accidentally covered or displaced.
6. UNPLUGGING
In the event of a fault unplug or isolate the device.
Unplug or isolate the device when not required for long periods.
7. OWNER/USER
This appliance can be used by children aged form 8 years and above and persons with reduced
physical, sensory or mental capabilities or lack of experience and knowledge if they have been
given supervision or instruction concerning use of the appliance in a safe way and understand the
hazards involved. Children shall not play with the appliance. Cleaning and user maintenance shall
not be made by Children without supervision.
Children of less than 3 years should be kept away unless continuously supervised. Children aged
from 3 years and less than 8 years shall only switch on/off the appliance provided that it has been
placed or installed in its intended normal operating position and they have been given supervision
or instruction concerning use of the appliance in a safe way and understanding the hazards
involved. Children aged from 3 years and less than 8 years shall not plug in, regulate and clean
the appliance or perform user maintenance.
8. ELECTRCITY
WARNING – THIS APPLIANCE MUST BE EARTHED.
This heater must be used on an AC ~ supply only and the voltage marked on the heater must
correspond to the supply voltage.
Before switching on, please read the safety advice and operating instructions.
CAUTION - Some parts of this product can become very hot and cause burns. Particular
attention has to be given where children and vulnerable people are present.
8
Page 15

General Information
Only use decalcied water in this appliance.
This model is designed to be free standing and is normally positioned near a wall.
Always ensure that the appliance is sitting on a level surface.
Although this heater complies with safety standards, we do not recommend its use on deep pile carpets or on long
hair type of rugs.
Please note: Used in an environment where background noise is very low, it may be possible to hear a sound which is
related to the operation of the ame effect. This is normal and should not be a cause for concern.
If this product experiences a power surge for whatever reason the product may cut-out. This is a normal safety feature
and the product will resume operation after 30 seconds.
Once installed, never move this appliance or lay on its back, without draining the water from sump and water tank.
If you intend not using the appliance for longer than 2 weeks, drain the water from sump and water tank and dry the
sump.
The water tank, sump, sump lid, tank cap and air lters must be cleaned once every two weeks, particularly in hard
water areas.
The appliance should never be operated if the lamps are not working.
The lamps should be regularly inspected as described under ‘Maintenance’ and ‘Changing lamps’.
Technical Information
Model No: CBC20 / VER20
Heat Output 230V 240V
Nominal Heat Output P
Minimum Heat Output P
Maximum Continous Heat Output P
Auxiliary Electricity Consumption
In Standby mode el SB0.47 - 0.47 W
with mechanic thermostat room temperature control.
1.6 - 1.8 kW
Nom
0.8 - 0.9 kW
min
1.6 - 1.8 kW
max,c
Installation Instructions
This section describes how to set up your re.
BEFORE YOU START
1. Ensure that all packing items are removed (read any warning labels carefully) and retain all packing for possible
future use e.g. in the event of moving house or returning the appliance to your supplier.
2. Before connecting the stove, check that the supply voltage is the same as that stated on the heater.
Wall Fixing - see Fig. 1
WARNING: FALLING OR TIPPING APPLIANCES CAN CAUSE INJURY OR DEATH OF YOUNG CHILDREN,
PLEASE ENSURE CHILDREN DO NOT CLIMB, HANG OR STAND ON THIS PRODUCT.
WARNING: THE APPLIANCE IS PROVIDED WITH A TIPPING RESTRAINT, THIS RESTRAINT IS NOT A
SUBSTITUTE FOR PROPER ADULT SUPERVISION. THIS RESTRAINT MAY PROVIDE PROTECTION AGAINST
TIPPING FURNITURE. DO NOT ALLOW CHILDREN TO CLIMB ON FURNITURE. FAILURE TO DETACH THIS
RESTRAINT BEFORE MOVING FURNITURE MAY RESULT IN INJURY AND DAMAGE.
This product is provided with a ‘Tipping Restraint Kit’ as shown in Fig 1, to prevent the product accidentally tipping
over. Fitting Instructions are supplied with this kit please follow these instructions carefully.
INSTALLATION
Hold the re by the sides of surround and gently manoeuvre into position.
Place the re against a wall and connect to your electricity supply.
Connect the power cable to the appropriate power connector at the back of the re.
Plug the power cable into a 16amp/230volt outlet. Ensure that the supply cable exits at the back of the re, at the right
or left hand corner to suit your supply socket location and is not trapped under the re such that it might cause it to be
damaged.
Do not yet switch the appliance on.
9
Page 16

Connecting the Transducer Unit + Lamps
1. Release the two red tabs by turning them by 90 degrees (Fig 2)
2. Lift out the Sump Nozzle (Fig 3)
3. Insert lamps into lamp holders (Fig 4), carefully locating the pins into the holes (Fig 4a)
4. Push lamps rmly into place
5. Place the Transducer Unit into the sump and join the cable to the connector on the sump (Fig 5)
6. To ensure that the Transducer Unit is correctly placed in the sump, the tab on the Transducer Unit should be lined
up with the moulded recess in the sump (Fig 5a).
7. Ensure that the cable is not placed above the disc on the Transducer Unit (Fig 5b). To prevent the cable becoming
pinched between the nozzle and the sump, place the cable in the slot in the wall of the sump.
8. Replace the Sump Nozzle and secure it by turning the two red tabs by 90 degrees (Fig 6)
Filling the Water Tank
9. Place Water Tank in sink and remove cap (turn anti-clockwise to open) (Fig 7)
10. Fill Water Tank with decalcied tap water only. This is necessary to prolong the life of the ame and smoke
producing unit. The water should be ltered through a conventional domestic water lter unit and the lter should
be replaced regularly.
11. Screw the cap back on – do not overtighten.
12. Place the Water Tank in the Sump, with the tank cap facing down and the at side of the tank facing outward (Fig 8)
Assembling the re
13. Place the Fuelbed on top of the Water Tank and Mist Nozzle (Fig 9)
Operating the Fire
This section describes how to activate your re using either the manual controls or remote control.
MANUAL CONTROLS
The manual controls are located beneath the hinged ap. (Fig.10 for Manual Control lay out)
Switch ‘A’:- Controls the electricity supply to the Fire.
Note: This switch must be in the ‘ON’ ( I ) position for the Fire to operate either with or without heat.
Switch ‘B’:- Press once to turn on the ame effect. This will be indicated by an audible beep. Although the main
lights operate immediately it will take a further 30 seconds before the ame effect starts.
Press again to give ame effect and half heat. This will be indicated by two beeps.
Press again to give ame effect and full heat. This will be indicated by three beeps.
Press again to return to ame effect only. This will be indicated by one beep.
Press to put re in to standby mode. This will be indicated by one beep.
Control Knob ‘C’:- Controls the Thermostat setting.
Turning the control knob to the left will decrease the temperature setting, turning the control knob
to the right will increase the temperature setting.
Control Knob ‘D’:- Controls the intensity of the ame effect.
Turning the control knob to the left increases the ame effect, turning the control knob to the right will
decrease the ame effect.
SETTING THE THERMOSTAT
Ensure the re is plugged in and switch it on to the full heat setting. Turn the Control Knob ‘C’ fully to the right (max
temperature setting) to warm the room rapidly. When the room temperature has reached the desired level, turn
the thermostat knob back slowly until you hear the thermostat just click off. The heater will then maintain the room
temperature at the chosen level.
Note: Should your heater fail to come on when the thermostat is at a low setting, this may be due to the room
temperature being higher then the thermostat setting
THERMAL SAFETY CUT-OUT
A thermal safety cut-out is incorporated in the fan heater to prevent damage due to overheating. This can happen if
the heat outlet was restricted in any way. If the cut-out operates, unplug the heater from the socket outlet and allow
approximately 10 minutes before reconnecting. Before switching the heater back on remove any obstruction that may
be restricting the heat outlet, then continue normal operation.
Caution: In order to avoid a hazard due to inadvertent resetting of the thermal cutout, this appliance must not be
supplied through an external switching device, such as a timer, or connected to a switch that is regularly switched on
and off by the utility.
GETTING THE DESIRED FLAME EFFECT
10
Page 17

1. The ame control knob ‘D’ (Fig.10) may be turned up or down to give a more realistic effect.
2. Generally the ames appear more realistic when the ame control is turned down.
3. Give the ame generator time to react to changes you may make.
4. The re will use less water if the ame effect is set to a lower level.
5. Do not tilt or move the re while there is water in the tank or sump.
6. Make sure that the re is on a level oor.
REMOTE CONTROL OPERATION
On the control panel, Switch A (Fig.10) must be in the ‘ON’ ( I ) position in order for the remote control to operate.
There are 3 buttons on the remote control. (Fig.12) To operate correctly the remote must be pointed towards the front
of the grate. (Fig 17). The remote control functions are as follows:
Press once to turn on Flame effect only.
This will be indicated by one beep.
Press once to turn on Half Heat and Flame Effect.
This will be indicated by two beeps.
Press again to turn on Full Heat and Flame Effect.
This will be indicated by three beeps.
Standby
This will be indicated by one beep.
Maintenance
GENERAL TIPS
Only use decalcied tap water in this appliance.
Always ensure that the appliance is sitting on a level surface.
If you intend not using the appliance for longer than 2 weeks, remove and empty the sump and water tank.
Once installed, never move this appliance or lay on its back, without draining the water from sump and water tank.
The appliance should never be operated if the lamps are not working.
The lamps should be regularly inspected as described under ‘Changing lamps’.
FILLING THE WATER TANK
When the water tank is empty, the ame and smoke effect shuts off and you will hear 2 audible beeps, follow these
steps.
1. Press Switch ‘A’ to (0) (Fig.10)
2. Gently lift out the fuelbed and carefully set aside.
3. Remove the water tank by lifting upwards and outwards.
4. Place the water tank in sink and remove cap, Anti-clockwise to open. (Fig 7)
5. Fill tank with decalcied tap water only. This is necessary to prolong the life of the ame and smoke producing
unit.
The water should be ltered through a conventional domestic water lter unit and the lter should be replaced
regularly.
6. Screw the cap back on, do not over tighten.
7. Return the tank to the sump, with the tank cap facing down and the at side of the tank facing outward. (Fig 8)
8. Gently place the fuelbed back into position. (Fig 9)
9. Press Switch ‘A’ to ‘ON’ (I) position (Fig.10)
CHANGING LAMPS
If the ame and smoke effect appears grey or colourless it may be that one or more lamps have failed.
You can check for lamp failure as follows.
1. Leaving the ame effect on, lift out the fuelbed and water tank.
2. It should be possible to view the lamps with the nozzle in place and observe which one needs to be changed.
3. Put Switch ‘A’ in the ‘OFF’ position, and unplug the re from the mains.
4. Leave the appliance for 20 minutes to allow the lamps to cool down before removing them.
5. Remove the sump as described in the Cleaning Section.
6. Remove the defective lamp, by gently lifting vertically and disengaging the pins from the lamp holder, (Fig.4 and
4a).
Replace with a OPTIMYST, 12V, 45W, Gu5.3 base, 8º beam angle, coloured lamp. (To purchase replacement lamps
go to the section ‘After Sales Service’, details of how to purchace the lamps are contained therein.)
7. Carefully insert the two pins of the new lamp into the two holes in the lamp holder. Push rmly in place. (Fig.4 and
4a).
8. Replace the sump, nozzle, water tank and fuelbed.
11
Page 18

CLEANING
Warning – Always press Switch ‘A’ to the ‘OFF’ (0) position (Fig.10) and disconnect from the power supply before
cleaning the re.
We recommend cleaning the following components once every 2 weeks, particularly in hard water areas:-
Water Tank, Sump, Nozzle, Tank cap and seal, Air lter.
For general cleaning use a soft clean duster – never use abrasive cleaners.
To remove any accumulation of dust or uff the soft brush attachment of a vacuum cleaner should occasionally be
used to clean the outlet grille of the fan heater.
Water tank
1. Remove water tank, as described earlier, put into sink and empty water.
2. Using the supplied brush gently rub the inside surfaces of the cap paying particular attention to the rubber ring in
the outer groove and the centre rubber seal.
3. Put a small quantity of washing up liquid into the tank, ret the cap and shake well, rinse out until all traces of
washing up liquid are gone.
4. Rell with decalcied tap water only, replace the cap, do not overtighten.
Sump
1. Press Switch ‘A’ to the ‘OFF’ (0) position
2. Gently lift out the fuelbed and place carefully on the ground.
3. Remove the water tank by lifting upwards.
4. Disconnect the electrical connector, located on the right side of the sump. (Fig.5) .
5. Release the right sump locking tabs by turning 90º. This allows the sump to be lifted completely from its location.
(Fig. 11)
6. Gently lift up the sump, taking care to keep level so as not to spill any water. Sit the assembly in the sink.
7. Release the left sump locking tabs by turning 90º, then lift off the Nozzle. (Fig.3)
8. Lift out the transducer and carefully tilt, as shown, so that the liquid drains out of the sump. (Fig.13)
9. Put a small amount of washing up liquid into the sump, and using the supplied brush, gently clean all surfaces in the
sump and gently clean the transducer including the metal discs located in the top grooved surface. (Fig.14)
10. When cleaned, thoroughly rinse the sump with clean water to remove all traces of washing up liquid.
11. Clean the Nozzle with the brush and ush out thoroughly with water. (Fig.15)
12. Reverse the above steps to reassemble.
Air lter
1. Gently lift out the fuelbed and place carefully on the ground.
2. Gently slide the air lter upwards out of its plastic holder. (Fig.16)
3. Gently rinse with water in the sink and dry with fabric towel before returning.
4. Replace the lter making sure that the coarse black lter is facing the front of the re.
5. Replace the fuelbed.
Additional Information
AFTER SALES SERVICE
Your product is guaranteed for two years from the date of purchase. Within this period, we undertake to repair or
exchange this product free of charge (excluding lamps & subject to availability) provided it has been installed and
operated in accordance with these instructions. Your rights under this guarantee are additional to your statutory rights,
which in turn are not affected by this guarantee.
Should you require after sales information or assistance with this product please go to warrenty card at back of
the book where you can ring our help desk. Spare parts are also available. Please retain your receipt as proof of
purchase.
RECYCLING
For electrical products sold within the European Community - At the end of the electrical products useful life
it not be disposed of with household waste. Please recycle where facilities exist. Check with your Local
Authority or retailer for recycling advice in your country.
PATENT / PATENT APPLICATION
Products within the Optimyst range are protected by one or more of the following patents and patent applications:
Great Britain GB 2402206, GB 2460259, GB 2460453 , GB 2418014, GB 2465738, GB 2449925, GB 2465537 , GB
2455277 , GB1020534.2, GB1020537.5, GB1110987.3
12
Page 19

United States US 7967690, US 2010299980, US 2011062250, US 2008028648, US 13/167,042
Russia RU2008140317
European EP 2029941, EP 2201301, EP 2315976, EP 1787063, EP07723217.1 , EP11170434.2, EP 11170435.9
China CN 101883953, CN 200980128666.2, CN 101057105, CN 101438104
Australia AU 2009248743, AU 2007224634
Canada CA 2725214, CA 2579444, CA 2645939
International Patent Application WO 2006027272
South Africa ZA 200808702
Mexico MX 2008011712
Korea KR 20080113235
Japan JP 2009529649
Brazil BR P10708894-9
India IN 4122/KOLNP/2008
New Zealand NZ 571900
Troubleshooting
Symptom Cause Corrective Action
The ame effect will
not start.
Mains plug is not plugged in.
Check plug is connected to wall socket
correctly.
The ame effect is too
low.
Low water level.
Low voltage connector not connected
properly. (Fig.5)
The Transducer Unit is not sitting correctly in
the sump
When distilled water is being used, the
transducer may not start.
Flame effect control knob is set too low.
(Fig.10)
The Metal Disc in the transducer might be
dirty (Fig.14)
The wire from the Transducer Unit is sitting
over the metal disc
Check that the water tank is full and there is
water in the sump.
Check that the connector is inserted
correctly. (Fig.5)
Ensure the Transducer in sitting down into
the moulded recess in the sump.
Please use tapped, decalcied water at the
beginning and try distilled water later.
Increase level of ame by turning Control
knob ‘D’ to the left slowly. (Fig.10)
Clean the Metal Disc with soft brush
supplied. (Fig.14) See ‘Maintenance.’ for a
step by step procedure.
Direct the wire to the back of the sump and
make sure it sits into the side slot exiting the
sump.
Unpleasant smell
when unit is used.
The ame effect has
too much smoke.
Main lamps are not
working and there are
no ames or smoke.
Low mist at start up.
Dirty or stale water.
Using unltered tap water.
Flame effect setting is too high. Turn the ame effect Control knob ‘D’ to
There is no water in the water tank Follow instructions under
Before rst operation: please allow the re
place to warm up to room temperature.
Clean the unit as described under
maintenance.
Use only ltered tap water.
the right, about ¼ a turn, at a time. Give the
ame generator some time to adjust to the
new setting. (Fig.10)
Maintenance, ‘Filling the water tank’.
Check the plug is connected to the wall
socket correctly and that Switch ‘A’ Fig. 10 is
in the ‘ON’ ( I ) position.
13
Page 20

Dimplex Verdi / Cubic
Introduction
Veuillez lire ce guide d'information attentivement an de pouvoir installer, utiliser et entretenir votre produit en toute sécurité.
Avis de sécurité important
Lorsque vous utilisez des appareils électriques, les précautions essentielles doivent toujours être
suivies an de réduire le risque d'incendie, d'électrocution et de blessure, y compris les précautions
suivantes :
1. SURCHAUFFE
AVERTISSEMENT : An d'éviter la surchauffe, ne couvrez pas l'appareil de chauffage. Ne posez pas
de matériau ou de vêtement sur l'appareil de chauffage, ou n'obstruez pas la circulation de l'air autour
de l'appareil. L'appareil comporte l'avertissement NE PAS COUVRIR.
2. DÉGÂTS
Si l'appareil est endommagé, consultez le fournisseur avant son installation et son utilisation.
Si le cordon d'alimentation est endommagé, il doit être remplacé par le fabricant, le technicien
d'entretien ou une personne qualiée an d'éviter tout risque.
3. EMPLACEMENT
Ne l'utilisez pas à l'extérieur.
Ne l'utilisez pas à proximité d'une baignoire, d'une douche ou d'une piscine.
Ne placez pas l'appareil de chauffage juste en dessous d'un socle xe ou d'une boîte de
raccordement.
Assurez-vous que les meubles, les rideaux ou d'autres matériaux combustibles ne sont pas placés à
moins d'un mètre de l'appareil.
Bien que cet appareil de chauffage soit conforme aux normes de sécurité, nous ne recommandons
pas son utilisation sur les moquettes à poils profonds ou les tapis à poils longs.
4. LA POSITION DE LA PRISE
L’appareil doit être placé de sorte que la che électrique ou le dispositif d’isolement soient accessibles.
Le cordon d’alimentation ne doit pas passer devant l’appareil.
5. L'UTILISATION DES AUTRES CONTRÔLEURS
N'utilisez pas cet appareil en série avec un thermorégulateur, une unité de commande, un minuteur
ou tout autre appareil allumant le chauffage automatiquement car il existe un risque d'incendie lorsque
l'appareil est couvert ou déplacé accidentellement.
6. DÉBRANCHAGE
En cas de défaillance, débrancher la che ou adir sur le dispositif.
Débrancher la che ou agir sur le dispositif d’isolement en cas de non-utilisation prolongée.
7. PROPRIÉTAIRE/UTILISATEUR
Cet appareil peut être utilisé par des enfants âgés d’au moins 8 ans et des personnes aux capacités
physiques, sensorielles ou mentales réduites ou manquant d’expérience et de connaissances,
pourvu qu’ils bénécient d’une surveillance ou d’instructions quant à l’utilisation de l’appareil de façon
sécurisée et qu’ils comprennent les risques encourus. Les enfants ne doivent pas jouer avec cet
appareil. Son nettoyage et son entretien ne doivent pas être effectués par des enfants laissés sans
surveillance.
Les enfants âgés de moins de 3 ans doivent être tenus à distance de l’appareil, à moins qu’ils ne
soient surveillés en permanence. Les enfants âgés de 3 ans et plus et de moins de 8 ans peuvent
uniquement allumer/éteindre l’appareil, pourvu qu’il soit placé ou installé dans sa position d’utilisation
normale, qu’ils bénécient d’une surveillance ou d’instructions quant à l’utilisation de l’appareil de
façon sécurisée et qu’ils comprennent les risques encourus. Les enfants de 3 ans et plus et de moins
de 8 ans ne peuvent pas brancher, régler, nettoyer l’appareil ni procéder à son entretien.
8. ÉLECTRICITÉ
AVERTISSEMENT – L'APPAREIL DOIT ÊTRE RACCORDÉ À UNE PRISE DE TERRE.
Cet appareil de chauffage doit être utilisé sur une alimentation à courant alternatif et la tension
marquée sur l'appareil doit correspondre à la tension d'alimentation.
Avant d'allumer l'appareil, veuillez lire l'avis de sécurité et les instructions d'utilisation.
ATTENTION : certaines pièces de ce produit peuvent chauffer à très forte température et provoquer
des brûlures. Faire particulièrement attention en présence d’enfants et de personnes vulnérables.
14
Page 21

Informations générales
Utilisez uniquement de l'eau décalciée dans cet appareil.
Ce modèle est conçu d'être sur pied et placé normalement près d'un mur.
Assurez-vous toujours que l'appareil est installé sur une surface plane.
Bien que cet appareil de chauffage soit conforme aux normes de sécurité, nous ne recommandons pas son utilisation
sur les moquettes à poils profonds ou les tapis à poils longs.
Veuillez noter : Lors de l'utilisation dans un environnement où il y a très peu de bruit de fond, il peut arriver d'entendre
un bruit dû au fonctionnement de l'effet de amme. C'est normal et cela ne doit pas vous inquiéter.
Si le produit subit une surtension pour n'importe quelle raison que ce soit, il peut disjoncter. C'est une fonction de
sécurité normale, le produit reprendra son fonctionnement après 30 minutes.
Une fois installé, ne déplacez jamais l'appareil ou ne le mettez jamais à plat sans avoir purgé l'eau du collecteur et du
réservoir d'eau.
Si vous ne souhaitez pas utiliser l'appareil pendant plus de 2 semaines, purgez l'eau du collecteur et du réservoir
d'eau et laissez le collecteur sécher.
Le réservoir d'eau, le collecteur, le couvercle du collecteur, le bouchon du réservoir et les ltres à air doivent être
nettoyés une fois toutes les deux semaines, surtout si l'eau est dure.
Vous ne devez jamais faire fonctionner l'appareil si les ampoules ne fonctionnent pas.
Les ampoules doivent être contrôlées régulièrement selon les instructions des sections « Entretien » et « Changement
d’ampoule ».
Informations Techniques :
Modèle nº : CBC20 / VER20
Production calorique 230V 240V
Production calorique nominale P
Production calorique minimum P
Production calorique maximum
continue
Consommation d’électricité auxiliaire 0.0 0.0 kW
En mode Veille el
avec contrôle de température interne à thermostat mécanique.
P
1.6 - 1.8 kW
Nom
0.8 - 0.9 kW
min
1.6 - 1.8 kW
max,c
0.47 - 0.47 W
SB
Instructions d'installation
Cette section décrit comment installer la cheminée.
AVANT DE COMMENCER
1. Assurez-vous que tous les emballages ont été enlevés (lisez attentivement toutes les étiquettes d'avertissement)
et conservez-les pour toute utilisation ultérieure, p. ex. dans le cas d'un déménagement ou si vous retournez
l'appareil au fournisseur.
2. Avant de brancher le poêle, vériez que la tension d'alimentation est la même que celle marquée sur l'appareil de
chauffage.
INSTALLATION
Tenez la cheminée par les côtés et mettez-la doucement en position.
Placez-la contre un mur et connectez-la à votre alimentation.
Connectez le câble d'alimentation à la prise d'alimentation appropriée sur le dos de la cheminée.
Branchez le câble d'alimentation à une prise de 16A/230V. Assurez-vous que le câble d'alimentation sort du dos de
la cheminée par le côté droit ou gauche pour arriver jusqu'à la prise d'alimentation et qu'il n'est pas coincé sous la
cheminée pour qu'il ne soit pas endommagé.
N'allumez pas encore l'appareil.
Connecter le bloc de transducteur + les ampoules
1. Dégagez les deux pattes rouges en les faisant pivoter de 90 degrés. (Voir Fig. 2)
2. Enlevez la buse du collecteur. (Fig. 3)
3. Insérez les ampoules dans les douilles (Fig. 4), en plaçant les contacts attentivement dans les trous. (Fig. 4a)
4. Poussez fermement les ampoules pour qu'elles se mettent en place.
5. Posez le bloc de transducteur dans le collecteur et connectez le câble au connecteur se trouvant sur le collecteur.
(Fig. 5)
15
Page 22

6. Pour assurer que le bloc de transducteur est correctement placé dans le collecteur, la patte se trouvant sur le bloc
de transducteur doit être alignée avec l'encoche moulée du collecteur. (Fig. 5a)
7. Assurez-vous que le câble n'est pas placé au-dessus du disque sur le bloc de transducteur (Fig. 5b). Pour éviter
que le câble ne se coince entre la buse et le collecteur, placez-le dans la fente se trouvant dans la paroi du
collecteur.
8. Remettez la buse du collecteur en place et xez-la en faisant pivoter les deux pattes rouges de 90 degrés. (Fig. 6)
Remplir le réservoir d'eau
9. Placez le réservoir d'eau dans un évier et enlevez le bouchon (pour l'ouvrir, tournez-le dans le sens inverse des
aiguilles d'une montre). (Fig. 7)
10. Remplissez le réservoir d'eau du robinet décalciée uniquement. C'est nécessaire pour prolonger la durée de
vie du bloc de production de amme et de fumée. L'eau doit être ltrée à l'aide d'un ltre à eau traditionnel, et le
ltre doit être remis normalement en place.
11. Revissez le bouchon – ne le serrez pas de trop.
12. Placez le réservoir d'eau dans le collecteur de façon à ce que le bouchon du réservoir soit orienté vers le bas et la
partie plate du réservoir soit orientée vers l'extérieur. (Fig. 8)
Monter la cheminée
13. Placez la couche de charbon sur le réservoir d'eau et la buse brumisateur. (Fig. 9)
Faire fonctionner la cheminée
Cette section décrit comment démarrer la cheminée en utilisant les commandes manuelles ou la télécommande.
COMMANDES MANUELLES
Les commandes manuelles se trouvent sous le rabat à charnières. (Voir Fig. 10 pour la disposition des commandes
manuelles)
Bouton « A » : Commande l'alimentation de la cheminée en électricité.
Note : Ce bouton doit être en position « ON » ( I ) pour que la cheminée fonctionne avec ou sans chauffage.
Bouton « B » : Appuyez sur une fois pour activer l'effet de amme. Un signal sonore indiquera son activation. Bien
que les lumières principales fonctionnent immédiatement, cela prendra plus de 30 secondes avant le démarrage de
l'effet de amme.
Appuyez sur de nouveau pour l'effet de amme avec demi-chauffage. Deux signaux sonores indiqueront
leur activation.
Appuyez sur de nouveau pour l'effet de amme avec chauffage complet. Trois signaux sonores
indiqueront leur activation.
Appuyez sur de nouveau pour retourner uniquement à la fonction effet de amme. Un signal sonore
indiquera son activation.
Appuyez sur pour mettre la cheminée en mode veille. Un signal sonore indiquera son activation.
Bouton de commande « C » : Contrôle le réglage du thermostat.
Tourner le bouton de commande à gauche diminuera la température dénie, le tourner à droite l'augmentera.
Bouton de commande « D » : Contrôle l'intensité de l'effet de amme.
Tourner le bouton de commande à gauche augmentera l'intensité de l'effet de amme, le tourner à droite la
diminuera.
LE RÉGLAGE DU THERMOSTAT
Assurez-vous que la cheminée est branchée et activez la fonction de chauffage complet. Tournez le bouton de
commande « C » à droite complètement (température maximale) pour chauffer rapidement la pièce. Lorsque la
température de la pièce a atteint le niveau souhaité, tournez lentement le bouton de thermostat dans le sens inverse
jusqu'à ce que vous entendiez un clic. L'appareil de chauffage gardera la température de la pièce au niveau choisi.
Note : Il peut arriver que l'appareil ne réagisse pas lorsque le thermostat est réglé à un niveau bas, c'est parce que la
température de la pièce est plus haute que le niveau déni.
COUPE-CIRCUIT THERMIQUE
Le coupe-circuit thermique est intégré dans le générateur d'air chaud pour éviter les dégâts liés à la surchauffe.
Cela peut arriver si la sortie d'air chaud est restreinte de quelque manière que ce soit. Si le coupe-circuit est
activé, débranchez l'appareil de chauffage du socle de prise de courant et attendez environ 10 minutes avant de le
rebrancher. Avant de rallumer l'appareil, enlevez tous les obstacles pouvant restreindre la sortie d'air chaud, puis
continuez à le faire fonctionner normalement.
Avertissement : An d'éviter les risques liés à un redémarrage accidentel du coupe-circuit thermique, cet appareil ne
doit pas être alimenté via un dispositif de commutation externe, tel qu'un minuteur, ou il ne doit pas être connecté à un
16
Page 23

commutateur qui est régulièrement allumé ou éteint par le service public de l'électricité.
OBTENIR L'EFFET DE FLAMME SOUHAITÉ
1. Il est possible d'allumer ou d'éteindre le bouton de commande de amme « D » (Fig. 10) pour un effet plus réel.
2. En règle générale, les ammes paraissent plus réelles quand la commande de amme est éteinte.
3. Attendez que le générateur de amme puisse réagir aux modications apportées.
4. La cheminée utilisera moins d'eau si l'effet de amme est réglé à un niveau plus bas.
5. Ne penchez ni ne déplacez la cheminée quand il y a de l'eau dans le réservoir ou le collecteur.
6. Assurez-vous que la cheminée est installée sur une surface plane.
L'UTILISATION DE LA TÉLÉCOMMANDE
Sur le panneau de commande, le bouton « A » (voir Fig. 10) doit être réglé sur « ON » ( I ) pour que la télécommande
fonctionne.
Il y a 3 boutons sur la télécommande. (Voir Fig. 12) Pour un fonctionnement correct, la télécommande doit être
orientée vers le devant de la grille de foyer. (Voir Fig. 17). Les fonctions de la télécommande sont les suivantes :
Appuyez une fois pour activer uniquement l'effet de amme.
Un signal sonore indiquera son activation.
Appuyez une fois pour activer le demi-chauffage et l'effet de amme.
Deux signaux sonores indiqueront leur activation.
Appuyez de nouveau pour activer le chauffage complet et l'effet de amme.
Trois signaux sonores indiqueront leur activation.
Veille
Un signal sonore indiquera son activation.
Entretien
Astuces générales
Utilisez uniquement de l'eau du robinet décalciée dans cet appareil.
Assurez-vous toujours que l'appareil est installé sur une surface plane.
Si vous ne souhaitez pas utiliser l'appareil pendant plus de 2 semaines, enlevez et videz le collecteur et le réservoir
d'eau.
Une fois installé, ne déplacez jamais l'appareil ou ne le mettez jamais à plat sans avoir purgé l'eau du collecteur et du
réservoir d'eau.
Vous ne devez jamais faire fonctionner l'appareil si les ampoules ne fonctionnent pas.
Les ampoules doivent être contrôlées régulièrement selon les instructions de la section « Changement d’ampoule ».
REMPLIR LE RÉSERVOIR D'EAU
Lorsque le réservoir d'eau est vide, l'effet de amme et de fumée s'éteint et vous entendrez 2 signaux sonores.
Effectuez les démarches suivantes :
1. Mettez le bouton « A » sur ( 0 ). (Voir Fig. 10)
2. Enlevez doucement la couche de charbon et mettez-la de côté avec précaution.
3. Enlevez le réservoir d'eau en le soulevant et en le retirant de son emplacement.
4. Placez le réservoir d'eau dans un évier et enlevez le bouchon. Pour l'ouvrir, tournez-le dans le sens inverse des
aiguilles d'une montre. (Fig. 7)
5. Remplissez le réservoir d'eau du robinet décalciée uniquement. C'est nécessaire pour prolonger la durée de
vie du bloc de production de amme et de fumée.
L'eau doit être ltrée à l'aide d'un ltre à eau traditionnel, et le ltre doit être remis normalement en place.
6. Revissez le bouchon, ne le serrez pas de trop.
7. Remettez le réservoir dans le collecteur de façon à ce que le bouchon du réservoir soit orienté vers le bas et la
partie plate du réservoir soit orientée vers l'extérieur. (Fig. 8)
8. Remettez doucement la couche de charbon en place. (Fig. 9)
9. Mettez le bouton « A » sur « ON » ( I ). (Voir Fig. 10)
CHANGEMENT D’AMPOULE
Si l'effet de amme et de fumée paraît gris ou sans couleur, il est possible qu'une ou plusieurs ampoules sont mortes.
Selon ce qui suit, vous pouvez vérier s'il s'agit bien d'une panne d’ampoule.
1. Avec l'effet de amme activé, enlevez la couche de charbon et le réservoir d'eau.
2. Il doit être possible d’observer les ampoules avec la buse en place et de voir laquelle a besoin d'être changée.
3. Mettez le bouton « A » en position « OFF », et débranchez la cheminée du secteur.
4. Attendez 20 minutes pour que les ampoules se refroidissent avant de les enlever.
5. Enlevez le collecteur selon les instructions de la section « Nettoyage ».
6. Enlevez l’ampoule défectueuse en la soulevant doucement de façon verticale et en enlevant les contacts de la
douille. (Voir Fig. 4 et 4a)
17
Page 24

Remplacez-la par une ampoule de couleur de type OPTIMYST, 12V, 50W, culot Gu5.3, angle du faisceau 8°.
(Pour acheter des ampoules de rechange, allez à la section « Service après-vente » pour plus de détails.)
7. Insérez avec précaution les deux contacts de la nouvelle ampoule dans les deux trous de la douille. Poussez
fermement pour que l’ampoule se mette en place. (Voir Fig. 4 et 4a)
8. Replacez le collecteur, la buse, le réservoir d'eau et la couche de charbon.
NETTOYAGE
Avertissement –Mettez toujours le bouton « A » sur « OFF » ( 0 ) (Voir Fig. 10) et débranchez toujours la cheminée
de son alimentation avant de la nettoyer.
Nous recommandons le nettoyage des pièces suivantes une fois toutes les 2 semaines, surtout si l'eau est dure :
réservoir d'eau, collecteur, buse, bouchon et joint du réservoir, ltre à air.
Pour un nettoyage général, utilisez un chiffon doux et propre – n'utilisez jamais de nettoyant abrasif.
Pour enlever les poussières, vous pouvez utiliser la brosse douce d'un aspirateur de temps en temps pour nettoyer la
grille de la sortie d'air chaud.
Réservoir d'eau
1. Enlevez le réservoir d'eau comme décrit avant, mettez-le dans un évier et videz son contenu.
2. En utilisant la brosse fournie, frottez doucement la surface intérieure du bouchon en faisant une attention
particulière à l'anneau en caoutchouc se trouvant dans la rainure externe et au joint en caoutchouc se trouvant au
centre du bouchon.
3. Mettez une faible quantité de liquide vaisselle dans le réservoir, remettez le bouchon et secouez bien, rincez
jusqu'à ce que tout le liquide vaisselle soit parti.
4. Remplissez de nouveau le réservoir uniquement d'eau du robinet décalciée, remettez le bouchon, ne le serrez
pas de trop.
Collecteur
1. Mettez le bouton « A » sur « OFF » ( 0 ).
2. Enlevez doucement la couche de charbon et posez-la par terre avec précaution.
3. Enlevez le réservoir d'eau en le soulevant.
4. Débranchez le connecteur électrique se trouvant du côté droit du collecteur. (Voir Fig. 5)
5. Dégagez les pattes de verrouillage droites du collecteur en les faisant pivoter de 90 degrés. Cela permettra de
soulever complètement le collecteur pour le retirer de son emplacement. (Voir Fig. 11)
6. Soulevez doucement le collecteur en faisant attention de le maintenir dans une position horizontale pour ne pas
déverser de l'eau. Posez le collecteur dans un évier.
7. Dégagez les pattes de verrouillage gauches du collecteur en les faisant pivoter de 90 degrés, puis enlevez la
buse. (Voir Fig. 3)
8. Enlevez le transducteur et penchez-le avec précaution, comme indiqué, pour que le liquide soit vidé du collecteur.
(Voir Fig. 13)
9. Mettez une faible quantité de liquide vaisselle dans le collecteur et, en utilisant la brosse fournie, nettoyez la
surface du collecteur et nettoyez doucement le transducteur y compris les disques en métal se trouvant sur la
surface supérieure rainurée. (Voir Fig. 14)
10. Une fois nettoyé, rincez le collecteur abondamment avec de l'eau propre pour enlever tout le liquide vaisselle.
11. Nettoyez la buse à l'aide de la brosse et rincez-la abondamment avec de l'eau. (Voir Fig. 15)
12. Effectuez les étapes ci-dessus dans le sens inverse pour réassembler l'appareil.
Filtre à air
1. Enlevez doucement la couche de charbon et posez-la par terre avec précaution.
2. En faisant glisser le ltre à air, soulevez-le pour l'enlever de son étui en plastique. (Voir Fig. 16)
3. Dans l'évier, rincez-le doucement avec de l'eau et séchez-le à l'aide d'une serviette avant de le retourner.
4. Replacez le ltre en s'assurant que le ltre noir épais est orienté vers le devant de la cheminée.
5. Replacez la couche de charbon.
18
Page 25

Informations supplémentaires
SERVICE APRÈS-VENTE
Votre produit est garanti pendant deux ans suivant la date de l'achat. Pendant cette période, nous nous chargeons de
réparer ou d'échanger le produit gratuitement (sauf les ampoules & les pièces suivant disponibilité) sous réserve que
le produit a été installé et utilisé conformément à ces instructions. Vos droits sous cette garantie sont additionnels à
vos droits légaux qui, par contre, ne sont pas affectés par cette garantie.
Si vous souhaitez avoir des informations sur la vente ou de l'assistance, veuillez consulter votre carte de garantie au
verso de ce guide pour contacter notre assistance technique. Des pièces de rechange sont également disponibles.
Veuillez garder votre ticket de caisse car il constitue la preuve de votre achat.
RECYCLAGE
Quant aux produits électriques vendus dans la Communauté Européenne - À la n de leur durée de vie utile,
les produits électriques ne doivent pas être jetés avec les déchets ménagers. Veuillez les recycler, si possible.
Vériez auprès de votre municipalité ou votre détaillant le recyclage dans votre pays.
BREVET / DEMANDE DE BREVET
Les produits de la gamme Optimyst sont protégés par l'un ou plusieurs des brevets et demandes de brevet suivants :
Grande-Bretagne GB 2402206, GB 2460259, GB 2460453, GB 2418014, GB 2465738, GB 2449925, GB 2465537,
GB 2455277, GB1020534.2, GB1020537.5, GB1110987.3
États-Unis US 7967690, US 2010299980, US 2011062250, US 2008028648, US 13/167,042
Russie RU2008140317
Europe EP 2029941, EP 2201301, EP 2315976, EP 1787063, EP07723217.1, EP11170434.2, EP 11170435.9
Chine CN 101883953, CN 200980128666.2, CN 101057105, CN 101438104
Australie AU 2009248743, AU 2007224634
Canada CA 2725214, CA 2579444, CA 2645939
Demande de brevet international WO 2006027272
Afrique du Sud ZA 200808702
Mexique MX 2008011712
Corée KR 20080113235
Japon JP 2009529649
Brésil BR P10708894-9
Inde IN 4122/KOLNP/2008
Nouvelle-Zélande NZ 571900
19
Page 26

Dépannage
Symptôme Cause Action corrective
L'effet de amme ne
démarre pas.
La che secteur n'est pas branchée.
Vériez si la che est correctement branchée
dans la prise murale.
L'effet de amme
fonctionne trop
lentement.
Niveau d'eau faible.
Le connecteur basse tension n'est pas
connecté correctement. (Voir Fig. 5)
Le bloc de transducteur n'est pas posé
correctement dans le collecteur.
Avec de l'eau distillée, le transducteur ne
démarre pas.
Le bouton de commande de l'effet de
amme est réglé sur une valeur trop basse.
(Voir Fig. 10)
Le disque en métal du transducteur est peutêtre sale. (Voir Fig. 14)
Le l du bloc de transducteur se trouve sur
le disque en métal.
Vériez si le réservoir d'eau est plein et s'il y
a de l'eau dans le collecteur.
Vériez si le connecteur est correctement
inséré. (Voir Fig. 5)
Assurez-vous que le transducteur s'emboîte
dans l'encoche moulée du connecteur.
Utilisez d’abord de l'eau du robinet
décalciée et n'essayez l'eau distillée que
plus tard.
Augmentez le niveau des ammes en
tournant lentement le bouton de commande
« D » à gauche. (Voir Fig. 10)
Nettoyez le disque en métal à l'aide de la
brosse douce fournie. (Voir Fig. 14) Voir
« Entretien » pour des instructions pas à pas.
Orientez le l vers le dos du collecteur et
assurez-vous qu'il s'emboîte dans la fente à
la sortie du collecteur.
Il y a une odeur
désagréable pendant
l'utilisation de
l'appareil.
L'effet de amme
produit trop de fumée.
Les ampoules
principales ne
fonctionnent pas et il
n'y a pas de amme
ou de fumée.
Brumisation faible au démarrage.
Eau sale ou croupie.
De l'eau du robinet non ltrée est utilisée.
L'effet de amme est trop fort. Tournez le bouton de commande de l'effet de
Il n'y a pas d'eau dans le réservoir d'eau. Suivez les instructions de la section
Avant la première utilisation : veuillez
attendre que la cheminée atteigne la
température ambiante.
Nettoyez l'appareil selon les indications
d'entretien.
Utilisez uniquement de l'eau du robinet
ltrée.
amme « D » à droite, faites environ un ¼ de
tour à la fois. Attendez que le générateur de
amme réagisse au nouveau réglage. (Voir
Fig. 10)
Entretien, « Remplir le réservoir d'eau ».
Vériez que la che est correctement
branchée dans la prise murale et que le
bouton « A » Fig. 10 est sur « ON » ( I ).
20
Page 27

Dimplex Verdi / Cubic
Introduzione
Leggete attentamente questa guida informativa per essere in grado di installare, usare e fare manutenzione con
sicurezza al vostro prodotto.
Importante avviso di sicurezza
Quando utilizzate apparecchi elettrici, dovreste sempre rispettare precauzioni di base per ridurre il
rischio di incendi, shock elettrici e ferite a persone, incluse le seguenti:
1. SURRISCALDAMENTO
AVVISO: Per evitare il surriscaldamento, non coprite l'apparecchio. Non posizionate materiali o abiti
sul dispositivo, né ostruite la circolazione d'aria attorno ad esso. Il calorifero porta un avviso di NON
COPRIRLO.
2. DANNI
Se l'apparecchio è danneggiato, controllatelo assieme al fornitore prima di installarlo ed utilizzarlo.
Se il cavo di alimentazione è danneggiato, dev'essere sostituito dal fornitore o dall'agente di servizio o
da persona similmente qualicata per evitare pericoli.
3. POSIZIONAMENTO
Non utilizzate il prodotto all'esterno.
Non utilizzatelo nelle immediate vicinanze di vasche, docce o piscine.
Non posizionate il calorifero subito sotto a prese sse o scatole di connessione.
Assicuratevi che il mobilio, le tende o qualunque altro materiale combustibile siano posizionati ad una
distanza minima di un metro dal calorifero.
Anche se questo apparecchio rispetta gli standard di sicurezza, non raccomandiamo il suo uso su
tappeti di pile alti o su altri tappeti a pelo lungo.
4. POSIZIONAMENTO DELLA SPINA
L’apparecchio deve essere posizionato in modo che la spina o il punto di isolamento sia accessibile.
Tenete il cavo di alimentazione lontano dalla parte anteriore dell’apparecchio.
5. USO DI ALTRI CONTROLLI
Non utilizzate questo calorifero in serie con un controllo termico, un controllo di programmazione o
qualunque altro dispositivo che accenda automaticamente il riscaldamento, poiché esiste rischio di
incendio quando l'apparecchio è coperto o accidentalmente mal posizionato.
6. SCOLLEGAMENTO
In caso di guasto, scollegare o isolare il dispositivo.
Scollegare o isolare il dispositivo quando non viene utilizzato per lunghi periodi.
7. PROPRIETARIO/UTENTE
Questa apparecchiatura può essere usata da bambini a partire dagli 8 anni e da adulti con
limitate capacità siche, sensoriali o mentali o con scarsa esperienza o conoscenza sull’uso
dell’apparecchiatura, solamente se sorvegliati o se sono stati istruiti relativamente all’uso
dell’apparecchiatura e se hanno compreso i rischi coinvolti Impedire ai bambini di giocare con
l’apparecchiatura. La pulizia e la manutenzione non devono essere effettuate da bambini non
sorvegliati.
In mancanza di costante supervisione, i bambini con meno di 3 anni di età devono essere
tenuti a distanza. I bambini con età compresa tra i 3 e gli 8 anni possono accendere/spegnere
l’apparecchiatura se la stessa è posizionata o installata nella normale posizione di funzionamento,
se supervisionati o istruiti relativamente all’uso dell’apparecchiatura e se hanno compreso i rischi
coinvolti. I bambini con un’età compresa tra i 3 e gli 8 anni non devono eseguire le operazioni di
collegamento, regolazione, pulizia e manutenzione dell’apparecchiatura.
8. ELETTRICITA'
AVVISO - QUEST'APPARECCHIO DEVE ESSERE DOTATO DI MESSA A TERRA.
Il calorifero dev'essere utilizzato solo con un'alimentazione AC e il voltaggio marcato su di esso deve
corrispondere al voltaggio di alimentazione.
Prima di accenderlo, siete pregati di leggere gli avvisi di sicurezza e le istruzioni operative.
ATTENZIONE: alcune parti del prodotto possono diventare molto calde e provocare ustioni. È
necessario prestare particolare attenzione in presenza di bambini e persone vulnerabili.
21
Page 28

Informazioni generali
Usate solo acqua decalcicata in questo apparecchio.
Questo modello è progettato per essere indipendente e normalmente posizionato vicino ad un muro.
Assicuratevi sempre che l'apparecchio sia posizionato su un pavimento in piano.
Anche se questo apparecchio rispetta gli standard di sicurezza, non raccomandiamo il suo uso su tappeti di pile alti o
su altri tappeti a pelo lungo.
Nota bene: Utilizzato in un ambiente con un rumore di fondo molto basso, è possibile udire un suono che è collegato
all'utilizzo dell'effetto amma. Questo è normale e non deve costituire motivo di preoccupazione.
Se questo prodotto subisce un picco di alimentazione, per qualunque motivo, potrebbe staccarsi. Questa è una
normale caratteristica di sicurezza e il prodotto riprenderà a funzionare dopo 30 secondi.
Una volta installato, non spostate mai il calorifero né posizionatelo disteso senza svuotare il serbatoio dell'acqua e il
pozzetto.
Se non intendete utilizzare l'apparecchio per più di due settimane, svuotate il serbatoio dell'acqua ed il pozzetto ed
asciugate il pozzetto di scarico.
Il serbatoio dell'acqua, il pozzetto, il coperchio di quest'ultimo, il coperchio del serbatoio e i ltri dell'aria devono essere
puliti una volta ogni due settimane, specialmente nelle aree con acqua dura.
L'apparecchio non dovrebbe mai essere utilizzato se le lampade non sono funzionanti.
Le lampade devono essere regolarmente ispezionate come descritto nelle sezioni "Manutenzione" e "Sostituzione
lampade".
Informazioni Tecniche :
Modello N.: CBC20 / VER20
Emissione di calore 230V 240V
Emissione di calore nominale P
Emissione di calore minima P
Emissione di calore continua
massima
Consumo di elettricità ausiliaria 0.0 0.0 kW
In modalità standby el
P
max,c
1.6 - 1.8 kW
Nom
0.8 - 0.9 kW
min
1.6 - 1.8 kW
0.47 - 0.47 W
SB
con controllo della temperatura ambiente a termostato meccanico.
Istruzioni di Installazione
Questa sezione descrive come accendere il camino.
PRIMA DI INIZIARE
1. Assicuratevi che tutti gli oggetti dell'imballaggio siano rimossi (leggete attentamente tutte le etichette di avviso) e
conservate l'imballaggio per l'eventuale uso futuro per esempio, in caso di trasloco o nel caso dobbiate riportare
l'apparecchio al fornitore.
2. Prima di collegare il fornello, controllate che il voltaggio dell'alimentazione sia lo stesso dichiarato sul calorifero.
INSTALLAZIONE
Tenete il caminetto per i lati e posizionatelo delicatamente in posizione.
Posizionate il caminetto contro un muro e collegatelo all'alimentazione elettrica.
Collegate il cavo di alimentazione al connettore di alimentazione corretto sul retro del caminetto.
Inserite la spina del caminetto in una presa a 16amp/230 Volt. Assicuratevi che il cavo di alimentazione esca dalla
parte frontale nell'angolo di destra o sinistra a seconda della posizione della presa, e che non sia incastrato sotto il
caminetto poiché in questo modo potrebbe essere danneggiato.
Non accendete ancora l'apparecchio.
Collegate l'unità trasduttore e le lampade
1. Rilasciate le due linguette rosse girandole di 90 gradi. (vedete g. 2)
2. Sollevate l'ugello del pozzetto. (Fig. 3)
3. Inserite le lampade nei supporti (Fig. 4), posizionando attentamente i pin nei fori. (Fig. 4a)
4. Premete saldamente le lampade in posizione.
5. Posizionate l'unità di trasduzione nel serbatoio ed unite i cavi al connettore in esso. (Fig. 5)
6. Per assicurarsi che l'unità di trasduzione sia correttamente posizionata nel serbatoio, la tavoletta sull'unità stessa
dovrebbe essere allineata con la nicchia ricavata nel serbatoio. (Fig. 5a)
22
Page 29

7. Assicuratevi che il cavo non sia posto sopra il disco nell'unità di trasduzione. (Fig. 5b). Per impedire che il cavo
rimanga incastrato tra l'ugello e il serbatoio, posizionatelo nell'incavo nella parete del serbatoio.
8. Riposizionate l'ugello del serbatoio ed assicuratelo girando di 90 gradi le due linguette rosse. (Fig. 6)
Riempire il serbatoio dell'acqua
9. Posizionate il serbatoio in un lavandino e rimuovete il tappo (girate in senso antiorario per aprirlo). (Fig. 7)
10. Riempite il serbatoio dell'acqua solo con acqua di rubinetto decalcicata. Ciò è necessario per prolungare la
vita dell'unità che produce amme e fumo. L'acqua dovrebbe essere ltrata da una normale unità di ltraggio
dell'acqua domestica ed il ltro dovrebbe essere sostituito regolarmente.
11. Riavvitate il tappo– senza stringerlo troppo.
12. Riposizionate il serbatoio nel pozzetto, con il tappo del serbatoio rivolto in basso e il lato piatto rivolto verso
l'esterno. (Fig. 8)
Montare il focolare
13. Posizionate la piattaforma di alimentazione sopra il serbatoio dell'acqua e l'ugello della nebbia. (Fig. 9)
Utilizzare il focolare
Questa sezione descrive come attivare il vostro caminetto usando o i controlli manuali o il telecomando.
CONTROLLI MANUALI
I controlli manuali sono posizionati sotto la bandella incernierata. (Vedete la gura 10 per la disposizione dei controlli
manuali)
Interruttore ‘A’: Controlla l'alimentazione elettrica del caminetto.
Nota: Quest'interruttore dev'essere in posizione ‘ON’ ( I ) perché il caminetto funzioni con o senza calore.
Interruttore ‘B’: Premete una volta per accendere l'effetto amma. Un bip indicherà la messa in funzione. Anche se
le luci principali si attivano immediatamente, ci vorranno altri 30 secondi perché l'effetto amma si attivi.
Premere di nuovo per attivare l'effetto amma e il riscaldamento a metà potenza. Questo sarà indicato da
due bip.
Premere di nuovo per attivare l'effetto amma e il riscaldamento a piena potenza. Questo sarà indicato da
tre bip.
Premete di nuovo per tornare al solo effetto amma. Questo sarà indicato da un bip.
Premete per mettere la amma in modalità standby. Questo sarà indicato da un bip.
Manopola di controllo 'C': Controlli dell'impostazione termostato.
Girare la manopola di controllo verso sinistra diminuirà la temperatura impostata, girarla verso destra la
aumenterà.
Manopola di controllo 'D': Controlla l'intensità dell'effetto amma.
Girare la manopola di controllo verso sinistra aumenterà l'effetto amma, girarla verso destra lo farà diminuire.
IMPOSTARE IL TERMOSTATO
Assicuratevi che il caminetto sia collegato e accendetelo alla massima impostazione di temperatura. Girate la
manopola di controllo 'C' del tutto a destra (massima impostazione dei temperatura) per riscaldare rapidamente
la stanza. Quando la temperatura nella stanza ha raggiunto il livello desiderato, girate di nuovo la manopola del
termostato no a che non sentite che il termostato scatta e si spegne. Il calorifero manterrà quindi la temperatura della
stanza al livello desiderato.
Nota: Se il calorifero non si accendesse quando il termostato è all'impostazione più bassa, questo potrebbe essere
dovuto alla temperatura della stanza maggiore di quella del termostato.
INTERRUTTORE TERMICO DI SICUREZZA
Un interruttore termico di sicurezza è incorporato nel termoventilatore per prevenire danni causati dal
surriscaldamento. Questo può succedere se l'uscita del calore viene ostruita in qualche modo. Se l'interruttore scatta,
scollegate il calorifero dalla presa e lasciatelo stare almeno dieci minuti prima di ricollegarlo. Prima di riaccendere il
calorifero, rimuovete qualunque ostruzione che possa restringere l'uscita del calore, quindi continuate con il normale
utilizzo.
Cautela: Per evitare pericoli dovuti a reset incidentali dell'interruttore termico, questo apparecchio non dev'essere
equipaggiato attraverso un interruttore esterno, come un timer, o collegato da un interruttore che viene spento e
acceso regolarmente.
OTTENERE L'EFFETTO FIAMMA DESIDERATO
1. La manopola di controllo della amma 'D' (Fig. 10) può essere ruotata in alto o in basso per dare un effetto più
realistico.
23
Page 30

2. Generalmente le amme appaiono più realistiche quando la manopola è al minimo.
3. Date un po' di tempo al generatore di amma per reagire alle modiche fatte sulla manopola di controllo.
4. Il caminetto userà meno acqua se l'effetto amma è impostato al minimo.
5. Non inclinate né spostate il camino se c'è acqua nel serbatoio o nel pozzetto.
6. Assicuratevi che il caminetto sia su un pavimento a livello.
OPERAZIONI COL TELECOMANDO
Sul pannello di controllo, l'interruttore A (vedete g. 10) dev'essere nella posizione ‘ON’ ( I ) perché il telecomando
funzioni.
Ci sono tre tasti sul telecomando. (Vedi g. 12) Per utilizzare correttamente il telecomando dev'essere puntato verso
la parte frontale della grata. (Vedete g. 17) Le funzioni del telecomando sono le seguenti.
Premete una volta per accendere solo l'effetto amma.
Questo sarà indicato da un bip.
Premete una volta per accendere l'effetto amma e il calorifero a metà potenza.
Questo sarà indicato da due bip.
Premete di nuovo per accendere l'effetto amma e il calorifero a piena potenza.
Questo sarà indicato da tre bip.
Standby
Questo sarà indicato da un bip.
Manutenzione
CONSIGLI GENERALI
Usate solo acqua decalcicata di rubinetto in questo apparecchio.
Assicuratevi sempre che l'apparecchio sia posizionato su un pavimento in piano.
Se non intendete utilizzare l'apparecchio per più di due settimane, svuotate e rimuovete il pozzetto ed il serbatoio
dell'acqua.
Una volta installato, non spostate mai il calorifero né posizionatelo disteso senza svuotare il serbatoio dell'acqua e il
pozzetto.
L'apparecchio non dovrebbe mai essere utilizzato se le lampade non sono funzionanti.
Le lampade devono essere regolarmente ispezionate come descritto nella sezione "Sostituzione lampade".
RIEMPIRE IL SERBATOIO DELL’ACQUA
Quando il serbatoio dell’acqua è vuoto, l’effetto amma e fumo si spegne ed udirete due chiari Bip, seguite questi
passi.
1. Premete l’interruttore ‘A’ su ( 0 ). (Vedete g. 10)
2. Sollevate delicatamente la piattaforma di alimentazione e mettetela delicatamente da parte.
3. Rimuovete il serbatoio sollevandolo in alto e verso l’esterno.
4. Posizionate il serbatoio in un lavandino e rimuovete il tappo. Girate in senso antiorario per aprirlo. (Fig. 7)
5. Riempite il serbatoio dell’acqua solo con acqua di rubinetto decalcicata. Ciò è necessario per prolungare la
vita dell’unità che produce amme e fumo.
L’acqua dovrebbe essere ltrata da una normale unità di ltraggio dell’acqua domestica ed il ltro dovrebbe essere
sostituito regolarmente.
6. Riposizionate il tappo, senza stringere troppo.
7. Riposizionate il serbatoio con il pozzetto, con il tappo del serbatoio rivolto in basso e il lato piatto che dà verso
l’esterno. (Fig. 8)
8. Riposizionate delicatamente la piattaforma di alimentazione. (Fig. 9)
9. Premete il tasto ‘A’ sulla posizione ‘ON’ ( I ). (Vedete g. 10)
CAMBIARE LE LAMPADE
Se l’effetto amma e fumo appare grigio o senza colore il problema potrebbe essere che una o più lampade si sono
fulminate.
Potrete controllare le lampade come segue:
1. Lasciando acceso l’effetto amma, estraete il pozzetto e il serbatoio dell’acqua.
2. Dovrebbe essere possibile vedere le lampade con l’ugello in loco e controllare quali devono essere cambiate.
3. Posizionate l’interruttore ‘A’ in posizione ‘OFF’ e scollegate il calorifero dalla presa.
4. Lasciate stare l’apparecchio per 20 minuti per far raffreddare le lampade prima di rimuoverle.
5. Rimuovete il pozzetto come descritto nella sezione “Pulizia”.
6. Rimuovete la lampada difettosa sollevandola delicatamente in verticale e sbloccando i pin dal supporto. (Vedete
Fig. 4 e 4a)
Sostituitela con una lampada colorata OPTIMYST, 12V, 50W, Gu5.3 base, angolo di raggio 8°. (Per acquistare
pezzi di ricambio andate alla sezione “Servizio Post Vendita”, lì sono contenuti i dati su come acquistare le
lampade.)
24
Page 31

7. Inserite con attenzione i due pin della nuova lampada nei due fori del supporto. Premetela saldamente sul posto.
(Vedete Fig. 4 e 4a)
8. Riposizionate il pozzetto, l’ugello, il serbatoio dell’acqua e il supporto carburante.
PULIZIA
Avviso – mettete sempre il tasto ‘A’ in posizione ‘OFF’ ( 0 ) (Vedete Fig. 10) e scollegatelo dall’alimentazione prima di
pulire il caminetto.
Vi raccomandiamo la pulizia delle seguenti componenti ogni due settimane, in particolare in aree con acqua dura:
Serbatoio dell’acqua, Pozzetto, Ugello, tappo del serbatoio e sigillo, ltro dell’aria.
Per la pulizia generale utilizzate un panno per spolverare morbido e pulito - non utilizzate mai detersivi abrasivi.
Per rimuovere ogni accumulo di polvere o laniccio dalla griglia di uscita della ventola del calorifero usate
occasionalmente lo spazzolino morbido di un aspirapolvere.
Serbatoio dell’acqua
1. Rimuovete il serbatoio, come sopra descritto, posizionatelo nel lavello e svuotatelo.
2. Utilizzando la spazzola fornita, passate l’interno della supercie del tappo facendo attenzione all’anello di gomma
nella scanalatura esterna e il sigillo di gomma centrale.
3. Mettete una piccola quantità di liquido di pulizia nel serbatoio, riposizionate il tappo e scuotete bene, sciacquate
nché tutte le tracce di prodotto di pulizia siano andate via.
4. Riempite di nuovo solo con acqua di rubinetto decalcicata, riposizionate il tappo e non stringete troppo.
Pozzetto
1. Premete l’interruttore ‘A’ sulla posizione ‘OFF’ ( 0 )
2. Sollevate delicatamente la piattaforma di alimentazione e mettetelo delicatamente sul pavimento.
3. Rimuovete il serbatoio dell’acqua sollevandolo verso l’alto.
4. Scollegate il connettore elettrico, situato a destra del pozzetto. (Vedete g. 5)
5. Rilasciate le linguette di blocco di destra del pozzetto girandole di 90 gradi. Questo permette al pozzetto di essere
sollevato del tutto dalla sua posizione. (Vedete g. 11)
6. Sollevate delicatamente il pozzetto, badando a mantenere il livello in modo da non schizzare acqua. Mettete il
pozzetto nel lavandino.
7. Rilasciate le linguette di blocco superiori girandole di 90 gradi, quindi sollevate l’ugello. (Vedete g. 3)
25
Page 32

Informazioni aggiuntive
SERVIZIO POST VENDITA
Il vostro prodotto è garantito per due anni dalla data dell'acquisto. In questo periodo, intraprenderemo la riparazione o
la sostituzione del prodotto senza costi (escluse le lampade e il tutto soggetto a disponibilità) a patto che l'apparecchio
sia stato installato ed utilizzato secondo queste istruzioni. I vostri diritti in questa garanzia sono aggiuntivi ai vostri
diritti obbligatori, che a loro volta non sono inuenzati dal questa garanzia.
Se doveste aver bisogno di informazioni post vendita o assistenza col prodotto, andate al certicato di garanzia sul
retro del manuale dove potete chiamare il nostro help desk. Sono disponibili anche i pezzi di ricambio. Siete pregati di
conservare lo scontrino come prova di acquisto.
RICICLARE
Per i prodotti elettrici venduti all'interno della Comunità Europea - alla ne della vita utile degli apparecchi
elettrici, essi non devono essere smaltiti con la spazzatura domestica. Vi preghiamo di riciclare laddove ne
esistano le strutture. Controllate con le autorità locali o col rivenditore per suggerimenti sul riciclaggio nel
vostro stato.
BREVETTO / APPLICAZIONE DEL BREVETTO
I prodotti all'interno della gamma Optimyst sono coperti da uno o più dei seguenti brevetti e applicazioni di brevetto.
Gran Bretagna GB 2402206, GB 2460259, GB 2460453, GB 2418014, GB 2465738, GB 2449925, GB 2465537,
GB 2455277, GB1020534.2, GB1020537.5, GB1110987.3
Stati Uniti US 7967690, US 2010299980, US 2011062250, US 2008028648, US 13/167,042
Russia RU2008140317
Europa EP 2029941, EP 2201301, EP 2315976, EP 1787063, EP07723217.1, EP11170434.2, EP 11170435.9
Cina CN 101883953, CN 200980128666.2, CN 101057105, CN 101438104
Australia AU 2009248743, AU 2007224634
Canada CA 2725214, CA 2579444, CA 2645939
Applicazione di brevetto internazionale WO 2006027272
Sud Africa ZA 200808702
Messico MX 2008011712
Corea KR 20080113235
Giappone JP 2009529649
Brasile BR P10708894-9
India IN 4122/KOLNP/2008
Nuova Zelanda NZ 571900
26
Page 33

Risoluzione dei problemi
Sintomo Causa Azione correttiva
L'effetto amma non
si attiva.
La spina non è inserita.
Controllate che la spina sia inserita
correttamente nella presa.
L'effetto amma è
troppo basso.
Basso livello dell'acqua.
Connettore a basso voltaggio collegato in
maniera errata. (Vedete g. 5)
L'unità Trasduttore non è alloggiata
correttamente nel pozzetto.
Quando viene usata acqua distillata, il
trasduttore potrebbe non partire.
La manopola dell'effetto amma è impostata
in maniera troppo bassa. (Vedete g. 10)
Il disco in metallo nel trasduttore potrebbe
essere sporco. (Vedete g. 14)
Il cavo dall'unità trasduttore è appoggiato al
disco in metallo.
Poca nebbia all'avvio.
Controllate che il serbatoio dell'acqua sia
pieno e che ci sia acqua nel pozzetto.
Controllate che il connettore sia inserito
correttamente. (Vedete g. 5)
Assicuratevi che il trasduttore sia alloggiato
nella rientranza modellata nel pozzetto.
Usate acqua di rubinetto decalcicata
all'inizio e provate solo dopo l'acqua distillata.
Aumentate il livello della amma girando
lentamente verso sinistra la manopola di
controllo 'D'. (Vedete g. 10)
Pulite il disco di metallo con la spazzola
morbida fornita. (Vedete Fig.14) Vedete il
capitolo ‘Manutenzione' per una procedura
passo passo.
Dirigete il cavo sul retro del pozzetto e
assicuratevi che stia nel incavo laterale che
esce dal pozzetto stesso.
Si sente un odore
sgradevole quando si
utilizza l'unità.
L'effetto amma fa
troppo fumo.
Le lampade principali
non funzionano e non
ci sono né amme né
fumo.
Prima del primo utilizzo: lasciate che il
caminetto si scaldi no a temperatura
ambiente.
L'acqua è sporca o stantia.
Utilizzate acqua di rubinetto non ltrata.
La regolazione dell'effetto amma è troppo
alta.
Non c'è acqua nel serbatoio. Seguite le istruzioni sotto Manutenzione,
Pulite l'unità come descritto sotto il capitolo
"Manutenzione".
Usate solo acqua del rubinetto ltrata.
Ruotate la manopola di controllo dell'effetto
amma 'D' a destra, di circa ¼ di giro
alla volta. Date al generatore di amma
qualche momento per adeguarsi alla nuova
impostazione. (Vedete g. 10)
‘Riempire il serbatoio dell'acqua’.
Collegate che la spina sia correttamente
collegata alla presa a muro e che
l'interruttore ‘A’ Fig. 10 sia in posizione ‘ON’
( I ).
27
Page 34

Dimplex Verdi / Cubic
Wstęp
Przeczytaj uważnie tę instrukcję, aby w bezpieczny sposób zainstalować, używać i konserwować swój produkt.
Ważne zalecenia dotyczące bezpieczeństwa
Podczas używania urządzeń elektrycznych zawsze należy przestrzegać podstawowych środków
bezpieczeństwa, aby ograniczyć ryzyko pożaru, porażenia elektrycznego oraz obrażeń osób. Są to:
1. OSTRZEŻENIE
Nie kłaść na urządzeniu materiałów i odzieży ani nie blokować cyrkulacji powietrza wokół
urządzenia.
Na urządzeniu znajduje się ostrzeżenie NIE ZAKRYWAĆ.
2. USZKODZENIE
Jeśli urządzenie jest uszkodzone, należy je sprawdzić z dostawcą przed zainstalowaniem i
uruchomieniem.
Jeśli uszkodzony jest przewód zasilający, to, by uniknąć zagrożenia, musi on być wymieniony przez
producenta, przedstawiciela serwisowego lub podobnie wykwalikowaną osobę.
3. LOKALIZACJA
Nie wolno używać na zewnątrz.
Nie używać w bezpośrednim sąsiedztwie łazienek, pryszniców ani basenów.
Nie ustawiać kominka bezpośrednio pod zamocowanym gniazdkiem ani puszką połączeniową.
Upewnić się, że meble, zasłony i inne materiały palne są umieszczone nie bliżej niż 1 metr od
urządzenia.
4. MIEJSCE WTYCZKI
Urządzenie należy ustawić w taki sposób, aby zapewnić łatwy dostęp do wtyczki przewodu
zasilającego lub punktu izolacyjnego.
Przewodu zasilającego nie wolno zbliżać do przedniej części urządzenia.
5. ODŁĄCZANIE
W przypadku awarii należy wyciągnąć z gniazdka wtyczkę przewodu zasilającego lub odciąć dopływ
prądu do urządzenia.
Jeśli urządzenie nie jest używane przez dłuższy czas, należy wyciągnąć wtyczkę przewodu
zasilającego z gniazda elektrycznego lub odciąć dopływ prądu do urządzenia.
6. WŁAŚCICIEL/UŻYTKOWNIK
Urządzenie mogą obsługiwać dzieci po ukończeniu ósmego roku życia oraz osoby o ograniczonych
zdolnościach zycznych, sensorycznych lub umysłowych, a także nieposiadające wiedzy lub
doświadczenia, jeśli będą one nadzorowane lub zostaną poinstruowane w zakresie bezpiecznego
korzystania z tego urządzenia i będą świadome związanych z tym zagrożeń. Dzieci nie mogą
bawić się urządzeniem. Czynności związanych z czyszczeniem i konserwacją urządzenia nie mogą
wykonywać dzieci bez nadzoru dorosłych.
Dzieci poniżej 3 lat nie mogą znajdować się w pobliżu urządzenia, jeśli nie znajdują się pod stałą
opieką dorosłych. Dzieci w wieku od 3 do 8 lat mogą tylko włączać lub wyłączać prawidłowo
zainstalowane urządzenie, jeśli są pod opieką lub zostaną poinstruowane w zakresie bezpiecznego
korzystania z tego urządzenia i będą świadome związanych z tym zagrożeń. Dzieci w wieku od 3
do 8 lat nie powinny wkładać wtyczki urządzenia do gniazdka elektrycznego ani dokonywać jego
regulacji, czyszczenia czy konserwacji.
7. ZASILANIE ENERGIĄ ELEKTRYCZNĄ
Ostrzeżenie: Aby uniknąć niebezpieczeństwa związanego z przypadkowym wyzerowaniem
termowyłącznika, urządzenia nie można zasilać z wykorzystaniem zewnętrznego urządzenia
przełączającego takiego jak wyłącznik czasowy (timer), ani nie można podłączać go do obwodu
zasilania, który jest regularnie włączany i wyłączany przez dostawcę energii.
UWAGA - Niektóre części tego urządzenia mogą stać się bardzo gorące i spowodować poparzenia.
Należy na to zwrócić szczególną uwagę w obszarach, w których znajdują się dzieci lub inne osoby
nieświadome zagrożenia.
OSTRZEŻENIE - Aby uniknąć przegrzania, nie wolno zakrywać urządzenia.
28
Page 35

Informacje ogólne
W tym urządzeniu można stosować wyłącznie przeltrowaną wodę.
Zawsze należy upewnić się, że urządzenie znajduje się na równej powierzchni.
Grzejnik spełnia odpowiednie normy bezpieczeństwa, jednak nie zaleca się ustawiania go na dywanach z długim
włosiem ani grubych chodnikach.
Uwaga: w przypadku używania kominka w miejscu o bardzo niskim poziomie hałasu, może być słyszalny dźwięk
związany z działaniem efektu płomienia. Jest to normalne zjawisko i nie powinno budzić niepokoju.
W przypadku wystąpienia przepięcia produkt może się wyłączyć. Jest to normalne zachowanie w tym przypadku.
Urządzenie wznowi działanie po 30 sekundach.
Po zainstalowaniu nie wolno przenosić ani kłaść tego urządzenia na tylnej ścianie, bez wcześniejszego spuszczenia
wody ze zbiornika odpływowego oraz zasobnika wody.
Jeśli urządzenie nie będzie używane przez dłużej niż 2 tygodnie, należy spuścić wodę ze zbiornika odpływowego i
zasobnika wody oraz wysuszyć zbiornik odpływowy.
Zasobnik wody, zbiornik odpływowy, pokrywa zbiornika, korek zbiornika oraz ltry powietrza muszą być czyszczone co
dwa tygodnie, szczególnie w przypadku używania twardej wody.
Urządzenia nie wolno używać, jeśli nie działają lampy.
Lampy należy regularnie sprawdzać, zgodnie z opisem w punkcie „Konserwacja” i „Wymiana lamp”.
Specykacja :
Model Nr: CBC20 / VER20
Moc cieplna 230V 240V
Znamionowa moc cieplna P
Minimalna moc cieplna P
Maksymalna ciągła moc cieplna P
Dodatkowe zużycie energii 0.0 0.0 kW
W trybie czuwania el
1.6 - 1.8 kW
Nom
0.8 - 0.9 kW
min
1.6 - 1.8 kW
max,c
0.47 - 0.47 W
SB
z mechanicznym sterowaniem temperaturą w pomieszczeniu z termostatem
Instrukcja montażu
W tej części opisano, w jaki sposób zamontować kominek.
PRZED ROZPOCZĘCIEM
1. Sprawdzić, czy wszystkie elementy opakowania zostały zdjęte (zapoznaj się z etykietami ostrzegawczymi), i zachowaj opakowanie
na przyszłość, aby móc urzyć go w przypadku przeprowadzki lub zwrotu urządzenia do dostawcy.
2. Przed podłączeniem urządzenia należy sprawdzić, czy napięcie zasilania jest takie samo jak podane na tabliczce znamionowej
grzejnika.
MONTAŻ
Należy chwycić kominek po bokach obudowy i ostrożnie wstawić na miejsce.
Umieścić kominek przy ścianie i podłączyć do źródła zasilania.
Podłączyć przewód zasilający do odpowiedniej złączki z tyłu kominka.
Podłączyć przewód zasilający do gniazda 16 A/230 V. Upewnić się, z której strony kominka znajduje się przewód zasilający i że
pasuje on do lokalizacji gniazda w ścianie, tak by przewód nie został uwięziony pod kominkiem, co mogłoby doprowadzić do jego
uszkodzenia.
Podłączanie przetwornika i lamp
1. Zwolnić dwie czerwone klapki, przekręcając je o 90 stopni (Rys. 2).
2. Podnieść dyszę zbiornika odpływowego (Rys. 3).
3. Włożyć lampy w uchwyty (Rys. 4), delikatnie umieszczając styki w otworach (Rys. 4a).
4. Docisnąć dobrze lampy.
5. Umieścić przetwornik w zbiorniku odpływowym i podłącz kabel do złącza na zbiorniku (Rys. 5).
6. Aby upewnić się, że przetwornik jest prawidłowo umieszczony w zbiorniku, sprawdzić, czy klapka na przetworniku jest
umieszczona równo w wyprolowanym zagłębieniu zbiornika (Rys 5a).
7. Sprawdź, czy kabel nie jest umieszczony nad dyskiem na przetworniku (Rys. 5b). Aby zapobiec przedziurawieniu kabla między
dyszą a zbiornikiem odpływowym, umieścić kabel w rowku na ściance zbiornika.
8. Wymienić dyszę zbiornika odpływowego i zamocować ją, przekręcając dwie czerwone klapki o 90 stopni (Rys. 6).
Napełnianie zasobnika wody
9. Umieścić zasobnik wody w zlewie i zdjąć korek (przekręć w lewo) (Rys 7).
10. Napełniać zasobnik wyłącznie przeltrowaną wodą kranową. Dzięki temu moduł generujący płomienie i dym będzie działać
niezawodnie przez dłuższy czas. Wodę należy przeltrować za pomocą typowego domowego ltra do wody. Filtr należy
regularnie wymieniać. Nie wolno używać wody destylowanej.
29
Page 36

11. Przykręcić korek – nie dokręcając go zbyt mocno. Nie używać wody destylowanej.
12. Umieścić zasobnik wody w zbiorniku odpływowym, z korkiem zasobnika skierowaną do dołu i płaską stroną na zewnątrz (Rys.
8).
Montaż kominka
13. Umieść palenisko nad zasobnikiem wody i dyszą (Rys. 9).
Obsługa kominka
W części tej opisano, jak uruchomić kominek za pomocą sterowania ręcznego lub zdalnego.
PRZEŁĄCZNIKI RĘCZNE
Przełączniki ręczne znajdują się pod odchylną klapą. (rozmieszczenie przełączników ręcznych zostało przedstawione na rys. 10).
Przełącznik „A”: steruje dopływem zasilania elektrycznego do kominka.
Uwaga: Przełącznik musi znajdować się na pozycji „ON” (włączanie) (I), aby kominek po uruchomieniu pracował z lub bez funkcji
grzania.
Przełącznik „B”: – Nacisnąć jeden raz, aby włączyć efekt płomienia. Zostanie to zasygnalizowane sygnałem dźwiękowym.
Główne lampy włączają się natychmiast, natomiast efekt płomienia zostanie uruchomiony po kolejnych 30 sekundach.
Nacisnąć ponownie, aby uzyskać efekt płomienia i połowę mocy grzania. Zostanie to zasygnalizowane dwoma
sygnałami dźwiękowymi.
Nacisnąć ponownie, aby uzyskać efekt płomienia i pełną moc grzania. Zostanie to zasygnalizowane trzema sygnałami
dźwiękowymi.
Nacisnąć ponownie, aby wrócić do trybu samego efektu płomienia. Zostanie to zasygnalizowane jednym sygnałem
dźwiękowym.
Nacisnąć, aby przełączyć kominek w tryb czuwania. Zostanie to zasygnalizowane jednym sygnałem dźwiękowym.
Pokrętło sterowania „C”: sterowanie ustawieniem termostatu.
Obrócenie pokrętła w lewo zmniejsza wartość temperatury, a obrócenie w prawo zwiększa.
Pokrętło sterowania „D”: steruje intensywnością efektu płomienia.
Obrócenie pokrętła w lewo zwiększa efekt płomienia, a obrócenie w prawo zmniejsza.
USTAWIANIE TERMOSTATU
Sprawdzić, czy kominek jest podłączony do zasilania, a następnie włącz go na pełną moc grzania. Obrócić pokrętło „C” całkowicie
w prawo (maks. ustawienie temperatury), aby szybko nagrzać pomieszczenie. Gdy w pomieszczeniu zostanie osiągnięta
wymagana temperatura, należy powoli obrócić pokrętło termostatu w drugą stronę, aż do usłyszenia kliknięcia. Grzejnik będzie
utrzymywać temperaturę w pomieszczeniu na ustawionym poziomie.
Uwaga: Uwaga: jeśli grzejnik nie włączy się, gdy termostat jest ustawiony na niską wartość, może to być spowodowane faktem, że
temperatura w pomieszczeniu jest wyższa od ustawienia termostatu.
TERMOWYŁĄCZNIK ZABEZPIECZAJĄCY
Kominek posiada termowyłącznik zabezpieczający, który zapobiega uszkodzeniu urządzenia na skutek przegrzania.
Może to nastąpić, jeśli wylot gorącego powietrza zostanie zasłonięty. Gdy zadziała termowyłącznik zabezpieczający,
należy odłączyć grzejnik od źródła zasilania i odczekać około 10 minut przed kolejnym podłączeniem. Przed
ponownym włączeniem grzejnika należy usunąć wszelkie przedmioty, które mogą ograniczać wydostawanie się
gorącego powietrza, a następnie wznowić normalną pracę urządzenia.
Ostrzeżenie: Aby uniknąć niebezpieczeństwa związanego z przypadkowym wyzerowaniem termowyłącznika,
urządzenia nie można zasilać z wykorzystaniem zewnętrznego urządzenia przełączającego, takiego jak wyłącznik
czasowy (timer), ani nie można podłączać go do obwodu zasilania, który jest regularnie włączany i wyłączany przez
dostawcę energii.
UZYSKANIE ZAMIERZONEGO EFEKTU PŁOMIENIA
1.
Pokrętło sterowania płomieniem „D” (rys. 10) można obracać w górę lub w dół, aby zapewnić bardziej realistyczny efekt.
2.
Zazwyczaj płomienie wyglądają bardziej realistycznie, gdy pokrętło sterowania płomieniem jest ustawione na niski
poziom.
3. Wygenerowanie wprowadzonych zmian płomienia może wymagać czasu.
4. Kominek będzie zużywał mniej wody, jeśli efekt płomienia jest ustawiony na niski poziom.
5. Nie przechylać ani nie przenosić kominka, gdy w zasobniku wody lub zbiorniku odpływowym znajduje się woda.
6. Należy zawsze upewnić się, że kominek jest umieszczony na równym podłożu.
OBSŁUGA PILOTA
Aby pilot zdalnego sterowania działał, przełącznik A (rys. 10) na panelu sterowania musi być w pozycji włączonej (I).
Pilot posiada 3 przyciski (patrz rys. 12). Aby pilot zdalnego sterowania działał prawidłowo, należy skierować go w
stronę przodu grzejnika (rysunek 17). Funkcje pilota zdalnego sterowania:
Nacisnąć raz, aby włączyć tylko efekt płomienia.
Zostanie to zasygnalizowane jednym sygnałem dźwiękowym.
30
Page 37

Nacisnąć ponownie, aby włączyć połowę mocy grzania i efekt płomienia.
Zostanie to zasygnalizowane dwoma sygnałami dźwiękowymi.
Nacisnąć ponownie, aby włączyć pełną moc grzania i efekt płomienia.
Zostanie to zasygnalizowane trzema sygnałami dźwiękowymi.
Stan gotowości
Zostanie to zasygnalizowane jednym sygnałem dźwiękowym.
Konserwacja
OGÓLNE WSKAZÓWKI
W tym urządzeniu można stosować wyłącznie przeltrowaną wodę kranową.
Zawsze należy upewnić się, że urządzenie znajduje się na równej powierzchni.
W przypadku nieużywania urządzenia przez okres dłuższy niż 2 tygodnie należy wyjąć i opróżnić zasobnik wody i
zbiornik odpływowy.
Po zainstalowaniu nie wolno przenosić ani kłaść tego urządzenia na tylnej ścianie, bez wcześniejszego spuszczenia
wody ze zbiornika odpływowego oraz zasobnika wody.
Urządzenia nie wolno używać, jeśli nie działają lampy.
Lampy należy regularnie sprawdzać, zgodnie z opisem w punkcie „Konserwacja” i „Wymiana lamp”.
NAPEŁNIANIE ZASOBNIKA WODY
Gdy zasobniku wody skończy się woda, efekt płomienia i dymu zostanie wyłączony oraz rozlegną się 2 sygnały
dźwiękowe. Należy postępować zgodnie z poniższą procedurą.
1. Ustawić przełącznik „A” w położeniu (0) (Rys. 10).
2. Delikatnie unieść palenisko i ostrożnie położyć z boku.
3. Wyjąć zasobnik wody, podnosząc go do góry i wysuwając na zewnątrz.
4. Umieścić zasobnik wody w zlewie i odkręcić korek. Aby otworzyć, odkręcać przeciwnie do ruchu wskazówek
zegara: obrót w lewo (Rys. 7).
5. Napełnić zasobnik wyłącznie przeltrowaną wodą kranową. Dzięki temu moduł generujący płomienie i dym
będzie działać niezawodnie przez dłuższy czas.
Wodę należy przeltrować za pomocą typowego domowego ltra do wody. Filtr należy regularnie wymieniać.
6. Dokręcić korek, uważając, by nie przekręcić.
7. Umieścić zasobnik w zbiorniku, tak, aby korek zasobnika był skierowany w dół, a płaska strona zasobnika była
skierowana na zewnątrz (Rys. 8).
8. Delikatnie umieścić palenisko na swoim miejscu (Rys. 9).
9. Ustawić przełącznik „A” w pozycji Wł. (I) (Rys.10).
WYMIANA LAMP
Jeśli efekt płomienia i dymu jest szary lub bezbarwny, może to oznaczać, że przynajmniej jedna żarówka nie działa.
Działanie żarówki należy sprawdzić zgodnie z poniższą procedurą.
1. Pozostawić włączony efekt płomienia i podnieść palenisko oraz zasobnik wody.
2. Gdy dysza znajduje się na miejscu, lampy powinny być widoczne i powinno być możliwe ustalenie lampy do wymiany.
3. Ustawić przełącznik „A” w położeniu Wył. i odłączyć grzejnik od źródła zasilania.
4. Przed wymontowaniem żarówek pozostawić urządzenia na 20 minut, aby żarówki ostygły.
5. Wyjąć zbiornik odpływowy zgodnie z opisem przedstawionym w części Czyszczenie.
6. Wyjąć wadliwą żarówkę, unosząc ją delikatnie w pionie i rozłączając wtyki w oprawce żarówki, (Rys. 4 i 4a).
Włożyć nową kolorową żarówkę OPTIMYST, 12 V, 45 W, gwint Gu5.3, kąt padania światła 8º. (Szczegółowe informacje na temat
zakupu żarówek znajdują się w części „Obsługa posprzedażowa”).
7. Ostrożnie włożyć dwa styki nowej żarówki w dwa otwory oprawy żarówki. Docisnąć dobrze żarówkę (Rys. 4 i 4a).
8. Zamontować zbiornik odpływowy, dyszę, zasobnik wody i palenisko.
CZYSZCZENIE
Ostrzeżenie – Ustawić przełącznik „A” w pozycji wyłączenia (0) (Rys.10) i przed czyszczeniem odłączyć od zasilania.
Zalecamy czyszczenie następujących części co 2 tygodnie, szczególnie w przypadku twardej wody:
Zasobnik wody, zbiornik odpływowy, dysza, korek i uszczelka zasobnika, ltr powietrza.
Do czyszczenia należy używać łagodnego środka czyszczącego – nie wolno używać środków o właściwościach ściernych.
Aby usunąć kurz i kłaczki z kratki wylotowej wentylatora grzejnika, od czasu do czasu należy oczyścić ją odkurzaczem z założoną
końcówką w postaci miękkiej szczotki.
Zasobnik wody
1. Wyjąć zasobnik wody zgodnie z wcześniejszym opisem, umieścić w zlewie i wylać wodę.
2. Korzystając z dołączonej do urządzenia szczotki, delikatnie wytrzeć wewnętrzne powierzchnie korka, zwracając szczególną
uwagę na gumowy pierścień w zewnętrznym rowku oraz na środkową gumową uszczelkę.
3. Wlać niewielką ilość płynu do naczyń do zasobnika, przykręcić korek i dobrze wstrząsnąć. Następnie płukać tak długo, aż
zostaną dobrze wypłukane wszelkie pozostałości płynu do naczyń.
4. Napełnić wyłącznie przeltrowaną wodą kranową, przykręcić korek (nie dokręcać za mocno).
Zbiornik odpływowy
1. Ustawić przełącznik „A” w pozycję wyłączenia (0).
2. Delikatnie unieść palenisko i ostrożnie położyć na podłodze.
3. Wyjąć zasobnik wody, podnosząc go do góry.
31
Page 38

4. Odłączyć złącze elektryczne znajdujące się po prawej stronie zbiornika odpływowego (Rys. 5).
5. Odblokować klapki blokujące po prawej stronie, przekręcając o 90º. Dzięki temu można całkowicie wyjąć zbiornik odpływowy
(Rys. 11).
6. Delikatnie unieść zbiornik, zwracając uwagę, aby utrzymać go poziomo i nie wylać wody. Umieścić zespół zbiornika w zlewie.
7. Zwolnić zaczepy blokujące zbiornika po lewej stronie, obracając je o 90º, a następnie wyjąć dyszę (Rys. 3).
8. Wyjąć przetwornik i ostrożnie odchylić zbiornik, jak pokazano na rysunku, tak aby woda wypłynęła ze zbiornika (Rys. 13).
9. Wlać niewielką ilość płynu do naczyń do zbiornika i za pomocą dostarczonej szczotki delikatnie wyczyścić wszystkie
powierzchnie zbiornika oraz przetwornik wraz z metalowymi płytkami znajdującymi się w górnej przestrzeni z rowkami (Rys.
14).
10. Po wyczyszczeniu należy dokładnie przepłukać zbiornik odpływowy czystą wodą, aby usunąć wszelkie pozostałości płynu
czyszczącego.
11. Wyczyścić dyszę szczotką i wypłukać wodą (Rys. 15).
12. Złożyć urządzenie, wykonując powyższe czynności w odwrotnej kolejności.
Filtr powietrza
1. Delikatnie unieść palenisko i ostrożnie położyć na podłodze.
2. Delikatnie wysunąć do góry ltr powietrza z plastikowego uchwytu (Rys. 16).
3. Przepłukać delikatnie wodą w zlewie i przed zamontowaniem wytrzeć ręcznikiem papierowym.
4. Zamontować ltr, zwracając uwagę, aby wstępny czarny ltr był skierowany w stronę kominka.
5. Zamontować palenisko.
Dodatkowe informacje
OBSŁUGA POSPRZEDAŻNA
Gwarantujemy prawidłowe funkcjonowanie produktu w okresie dwóch lat od daty zakupu. W tym okresie zobowiązujemy się
do bezpłatnej naprawy lub wymiany produktu (z wyjątkiem lat oraz w zależności od dostępności), pod warunkiem że został on
zamontowany i jest używany zgodnie z niniejszą instrukcją. Prawa użytkownika zapewnione na mocy niniejszej gwarancji obowiązują
niezależnie od praw statutowych, które w rezultacie nie są naruszone przez niniejszą gwarancję.
W razie potrzeby uzyskania informacji lub pomocy posprzedażowej w zakresie niniejszego produktu, należy zadzwonić pod numer
naszej infolinii podany na karcie gwarancyjnej znajdującej się na końcu niniejszej instrukcji. Dostępne są również części zamienne.
Należy zachować paragon jako dowód zakupu.
RECYKLING
W przypadku produktów sprzedawanych na terenie Unii Europejskiej: nie należy wyrzucać zużytego urządzenia wraz
z odpadami domowymi. Należy oddać je do utylizacji. Aby uzyskać informacje dotyczące recyklingu, skontaktuj się z
odpowiednimi władzami lub sprzedawcą.
PATENT / APLIKACJA PATENTOWA
Produkty linii Optymist są chronione jednym lub wieloma patentami i aplikacjami patentowymi:
Wielka Brytania GB 2402206, GB 2460259, GB 2460453, GB 2418014, GB 2465738, GB 2449925, GB 2465537, GB 2455277,
GB1020534.2, GB1020537.5, GB1110987.3
Stany Zjednoczone: US 7967690, US 2010299980, US 2011062250, US 2008028648, US 13/167,042
Rosja: RU2008140317
Europa: EP 2029941, EP 2201301, EP 2315976, EP 1787063, EP07723217.1 , EP11170434.2, EP 11170435.9
Chiny: CN 101883953, CN 200980128666.2, CN 101057105, CN 101438104
Australia: AU 2009248743, AU 2007224634
Kanada: CA 2725214, CA 2579444, CA 2645939
Międzynarodowa aplikacja patentowa: WO 2006027272
RPA: ZA 200808702
Meksyk: MX 2008011712
Korea: KR 20080113235
Japonia: JP 2009529649
Brazylia BR P10708894-9
Indie: IN 4122/KOLNP/2008
Nowa Zelandia: NZ 571900
32
Page 39

Rozwiązywanie problemów
Objaw Przyczyna Środki zaradcze
Nie uruchamia się efekt
płomienia.
Niepodłączona wtyczka przewodu zasilającego.
Niski poziom wody.
Sprawdzić, czy wtyczka jest dobrze podłączona
do gniazda elektrycznego.
Sprawdzić, czy zasobnik wody jest napełniony i
czy w zbiorniku odpływowym znajduje się woda.
Zbyt niski efekt
płomienia.
Nieprzyjemny zapach
podczas używania
urządzenia.
Efekt płomienia ma za
dużo dymu.
Główne lampy nie
działają i nie ma
płomieni ani dymu.
Nieprawidłowo podłączona złączka
niskonapięciowa (Rys. 5).
Moduł przetwornika nie jest prawidłowo
umieszczony w zbiorniku odpływowym.
W przypadku użycia wody destylowanej,
przetwornik może się nie uruchomić.
Za niskie ustawienie pokrętła sterowania efektem
płomienia (Rys. 10).
Metalowa płytka w przetworniku może być
zabrudzona (Rys. 14).
Drut z modułu przetwornika znajduje się nad
metalową płytką.
Przy rozruchu może pojawić się delikatna
mgiełka.
Brudna lub stęchła woda.
Stosowanie nieprzeltrowanej wody kranowej.
Za wysokie ustawienie efektu płomienia.
W zasobniku wody nie ma wody. Postępować zgodnie z instrukcjami podanymi w
Sprawdzić, czy złączka jest dobrze włożona (Rys.
5).
Sprawdzić, czy przetwornik jest prawidłowo
umieszczony w wyprolowanym zagłębieniu
zbiornika.
Należy na początku użyć odwapnionej wody
wodociągowej, a później spróbować zastosować
wodę destylowaną.
Zwiększyć poziom płomienia, obracając powoli w
lewo pokrętło sterowania „D” (Rys. 10).
Wyczyść metalową płytkę za pomocą
dostarczonej miękkiej szczotki (Rys. 14).
Procedurę krok po kroku można znaleźć w
punkcie „Konserwacja”.
Skierować drut do tyłu zbiornika, zwracając
uwagę, aby znajdował się na bocznym otworze
wychodzącym ze zbiornika.
Przed pierwszym użyciem należy odczekać, aż
kominek nagrzeje się do temperatury pokojowej.
Wyczyścić urządzenie zgodnie z opisem w
punkcie Konserwacja.
Stosować wyłącznie przeltrowaną wodę
kranową.
Obrócić pokrętło sterowania efektem płomienia D
w prawo, jednorazowo o około ¼ obrotu. Odczekać
chwilę, aby generator płomienia wprowadził nowe
ustawienie (Rys. 10).
punkcie Konserwacja, „Napełnianie zasobnika
wody”.
33
Sprawdzić, czy wtyczka jest włożona do gniazda
elektrycznego oraz czy przełącznik „A” (rys. 10)
znajduje się w położeniu włączenia (I).
Page 40

 Loading...