

Page 1
Page 2

2003 Dimension One Spa s and @ Home Hot Tubs
Planning Guide and Installation Manual
IV
Page 3

2003 Dimension One Spa s and @ Home Hot Tubs
Planning Guide and Installation Manual
Table of Contents
PRE-PURCHASE DECISIONS...................................................................................................................... 1
BEFORE DELIVERY .................................................................................................................................. 1
Typical Installation Site..................................................................................................................................................................................1
SITE ACCESS............................................................................................................................................. 2
COVER ........................................................................................................................................................ 2
ELECTRICAL HOOK UP .............................................................................................................................. 3
LOAD SHARING ....................................................................................................................................... 3
ELECTRICAL REQUIREMENTS ............................................................................................................. 4
Domestic D1 Hot Tubs.................................................................................................................................................................................4
Export D1 Hot Tubs......................................................................................................................................................................................5
Domestic @ Home Hot Tubs.....................................................................................................................................................................6
Export @ Home Hot Tubs..........................................................................................................................................................................6
INSTALLATION CHECK LIST ...............................................................................................................7
HOT TUB SPECIFICATIONS...................................................................................................................... 7
SPECIFICATIONS FOR DIMENSION ONE SPAS ............................................................................... 7
Arena – Architectural Specifications ..........................................................................................................................................................8
Arena – General Specifications ...................................................................................................................................................................9
Aurora II – Architectural Specifications..................................................................................................................................................10
Aurora II – General Specifications...........................................................................................................................................................11
Aurora HP – Architectural Specifications ..............................................................................................................................................12
Aurora HP – General Specifications .......................................................................................................................................................13
Caliente – Architectural Specifications...................................................................................................................................................14
Caliente – General Specifications............................................................................................................................................................ 15
Caliente HP – Architectural Specifications............................................................................................................................................ 16
Caliente HP – General Specifications..................................................................................................................................................... 17
Californian – Architectural Specifications.............................................................................................................................................. 18
Californian – General Specifications....................................................................................................................................................... 19
Chairman – Architectural Specifications................................................................................................................................................20
Chairman – General Specifications.........................................................................................................................................................21
Chairman II – Architectural Specifications............................................................................................................................................ 22
Chairman II – General Specifications..................................................................................................................................................... 23
Diplomat – Architectural Specifications................................................................................................................................................. 24
Diplomat – General Specifications..........................................................................................................................................................25
Nautilus – Architectural Specifications...................................................................................................................................................26
Nautilus – General Specifications............................................................................................................................................................ 27
Sarena Bay – Architectural Specification...............................................................................................................................................28
Sarena Bay – General Specifications...................................................................................................................................................... 29
Triad – Architectural Specifications ........................................................................................................................................................30
Triad – General Specifications ................................................................................................................................................................. 31
Triad II – Architectural Specifications.....................................................................................................................................................32
Triad II – General Specifications..............................................................................................................................................................33
iii
Page 4

2003 Dimension One Spa s and @ Home Hot Tubs
Planning Guide and Installation Manual
SPECIFICATIONS FOR @HOME HOT TUBS ................................................................................... 34
Companion HP – Architectural Specifications...................................................................................................................................... 34
Companion HP – General Specifications............................................................................................................................................... 35
Cove – Architectural Specifications .........................................................................................................................................................36
Cove – General Specifications ..................................................................................................................................................................37
Cove HP – Architectural Specifications.................................................................................................................................................. 38
Cove HP – General Specifications........................................................................................................................................................... 39
Dream – Architectural Specifications .....................................................................................................................................................40
Dream – General Specifications ..............................................................................................................................................................41
Dream HP – Architectural Specifications.............................................................................................................................................. 42
Dream HP – General Specifications....................................................................................................................................................... 43
Sojourn HP – Architectural Specifications .............................................................................................................................................44
Sojourn HP – General Specifications ......................................................................................................................................................45
WIRING DIAGRAMS .................................................................................................................................. 46
SPA INFORMATION .................................................................................................................................. 46
My Spa............................................................................................................................................................................................................46
Dealer Information: .....................................................................................................................................................................................46
Dimension One Spas Inc. Information ...................................................................................................................................................46
iv
Page 5

2003 Dimension One Spas and @ Home Hot Tubs
Planning Guide and Installation Manual
Pre-Purchase Decisions
Before Delivery
Before attempting to install or use your
hot tub, please read these instructions
thoroughly, and carefully review the
owner’s manual for your
Dimension One hot tub!
Because your hot tub is
completely self-contained, you
can install it just about
anywhere you wish . . . on a
deck, patio or even indoors.
Just be sure to position it
above ground, in an area with
good drainage and on a level
surface that fully contacts the
bottom of the hot tub.
Typical Installation Site
A concrete slab is best but not
required. You may choose to install it on a
wood deck or bricks. If you choose to install your hot tub on a raised deck or indoors, we suggest you
contact a structural engineer to confirm the surface will hold a hot tub filled with water. Settlement of your
deck or slab may result in damage to the hot tub, which is not covered by warranty. (See specifications in this
booklet.) Wherever you plan to install your hot tub, be sure the surface is flat and solid. Locate your hot tub
so that the equipment is above grade and not subject to flooding. Water should always drain away from the
hot tub. If you are placing your hot tub next to an obstacle, such as a fence or wall, be sure that you place the
hot tub with the topside primary control panel facing forward for easy equipment access. Locate the vents on
the drawing of your particular Dimension One hot tub. This is where cool air will enter and warm air will
escape during hot tub operation. Please ensure that these areas are always free of obstructions. Also, allow
additional space around the hot tub for any accessories you may have purchased - for example an E-Z Lifter
spa cover lift, steps, or a gazebo. Check with your dealer on these additional space requirements.
In most cities and counties, permits are required for the installation of electrical circuits or
the construction of exterior structures such as decks and gazebos. Some communities have
Note
Note
Dimension One Spas and @Home Hot Tubs are equipped with a locking cover that meets or exceeds the
“Standard for Safety Covers,” but is not an adequate safety measure to prevent unsupervised entry. Please
check with your local Building Permit Office that can inform you on any special requirements needed for
installation of your electrical, decking or required barriers. Your local dealer may also provide you with
information on local building and electrical codes.
also adopted residential barrier codes that may require fencing and/or self-closing gates on
the property to prevent unsupervised access to a hot tub by young children.
If you install the spa or hot tub indoors, the surrounding area should be waterproof or
water resistant. Water may be splashed out during normal usage and when entering or
exiting the spa. Dimension One Spas is not responsible for any water damage to any indoor
location for any reason.
®
1
Page 6

2003 Dimension One Spa s and @ Home Hot Tubs
Planning Guide and Installation Manual
Site Access
Please refer to the drawings on pages 7 - 45 for the specifications and appropriate measurements for your hot
tub model. You will need the measurements of your hot tub in order to determine the clearance needed for
delivery.
DUE TO MANUFACTURING TOLERANCES THERE COULD BE SOME MINOR
DIFFERENCES BETWEEN THE ACTUAL MEASUREMENTS OF YOUR SPA AND THE
Caution
Your hot tub will probably be delivered on a dolly or cart. The additional distance from the ground to the
dolly or cart must also be included in your measurements for vertical clearance. Also, take into consideration
that if your hot tub must be transported up-hill or taken upstairs, you may need additional clearance or
assistance. Be sure to remove obstacles such as gates, planters, or items attached to the house. The point of
entry must be clear of air conditioning units, heating units, meters, electrical boxes, etc. It is best that your
dealer pre-inspect the installation site and determine the best way to deliver your hot tub. In rare cases, a
crane must be brought in to assist in an installation. Your Dimension One dealer will supervise this for you.
Here is a list of some of the most common installation hazards in planning your route:
DRAWING BELOW. IF SITE PLANNING IS CRITICAL TO SUCH TOLERANCES, BE
SURE TO MEASURE YOUR ACTUAL SPA.
Gates
Fences
Eaves
Gutters
Air Conditioners
Heaters
Hose Bibs
Bushes
Overhanging Branches
Steps
90 Turns
Cover
The cover supplied with your hot tub is
constructed of the highest quality
materials and is equipped with quickrelease keyed buckle locks that meet
standards set by American Standards
for Testing and Measurement (ASTM).
When the hot tub is not in use, it is
recommended that the cover locks
always be utilized to discourage
unsupervised use and to minimize heat
loss. When installing the cover on your
hot tub, be sure it is facing the correct
direction. When standing in front of
the topside primary control panel, the
center seam or hinge should run
horizontally. You should be able to lift
the handle of the cover and see the hot
tub control panel. Allow 18 inches of
extra space on the backside of the hot
tub where the optional E-Z Lifter
rest in its upright, open position.
will
2
Page 7

2003 Dimension One Spas and @ Home Hot Tubs
Planning Guide and Installation Manual
Electrical Hook Up
Do not turn on electrical power to your hot tub until told to do so later in this manual.
Warning
Have a licensed electrician run the required 120/240 volt power line to the hot tub installation site. The
power inlet connection is located in the pedestal on the left side of the hot tub, approximately 25” from the
front. This connection is designed to mate with a Carlon 1” conduit body Type LB, Access Fitting E986F or
any 1” female PVC conduit fitting. The manufacturer’s label lists the power requirements for your hot tub.
We recommend that only a licensed and bonded electrician do the initial hot tub hook-up.
Warning
Load Sharing
Computerized load sharing (available only on Dimension One Spas hot tubs) is used to allow the system to
automatically recognize the temperature differential and the number of jet pumps in use, compare it with the
available power, and adjust the heater to maximize heater output. If you want to be able to run the pumps at
full power and still be able to generate heat at the same time, consider installing the maximum electrical
service available for your spa. If you do not have enough electrical service, your pumps may shut off when heat
is required. Otherwise, heat may be discontinued if you start up the pumps.
This unit requires a GFCI (Ground Fault Circuit Interrupter). A “line of sight”
service disconnect must be located where visible from the hot tub, not less than 5 feet from
the hot tub and not to exceed 50 feet from the hot tub. This requirement may be filled with
the GFCI sub-panel. All supply wire to be rated minimum 90C.
3
Page 8
2003 Dimension One Spa s and @ Home Hot Tubs
Planning Guide and Installation Manual
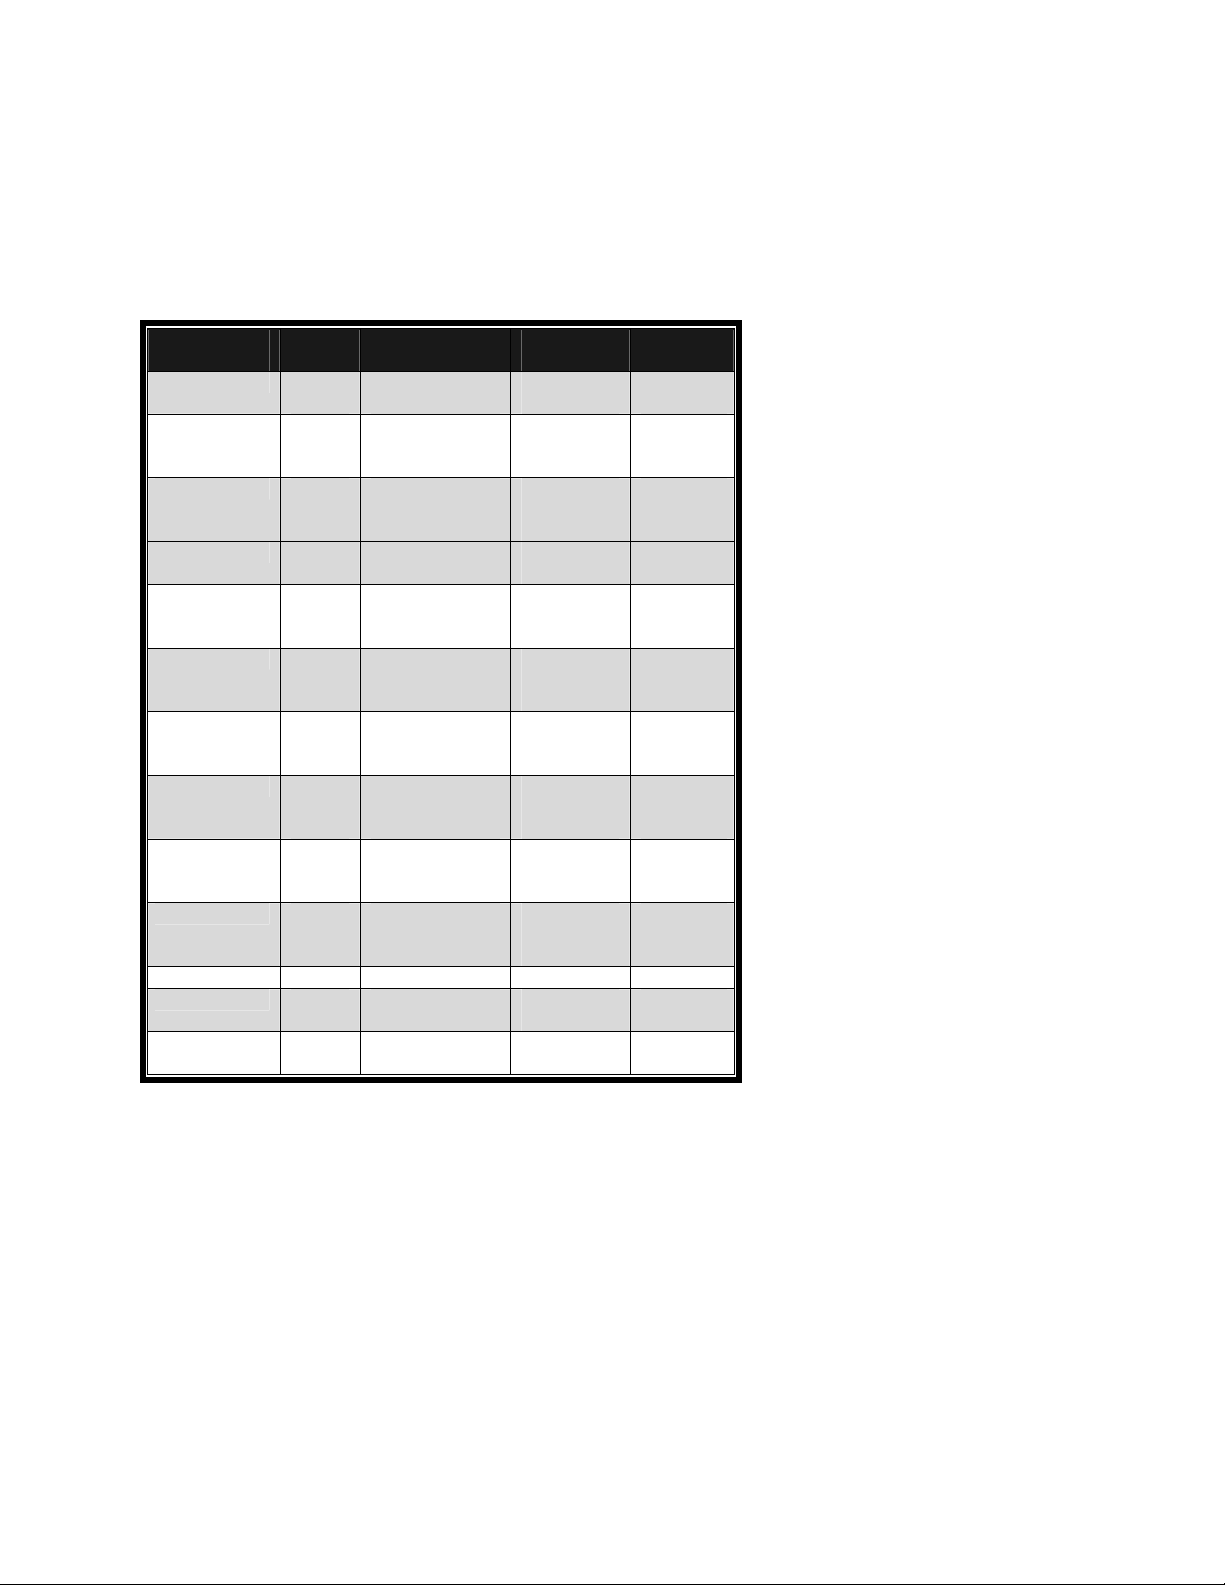
Electrical Requirements
The following charts provide a listing of electrical requirement options available for Dimension One Spas Inc.
and @Home Hot Tub spas.
Domestic D1 Hot Tubs
Model
Arena
Aurora II
Aurora HP
Caliente
Caliente HP
Californian
Chairman
Chairman II
Diplomat
Nautilus
Sarena Bay
Triad
Triad II
Power Branch Circuit
240V
240V
240V
240V
240V
240V
240V
240V
240V
240V
240V
240V
240V
240V
240V
240V
240V
240V
240V
240V
240V
240V
240V
240V
240V
240V
240V
240V
240V 3 wire + ground 50A #6 AWG
240V
240V
240V
240V
3 wire + ground
3 wire + ground
3 wire + ground
3 wire + ground
3 wire + ground
3 wire + ground
3 wire + ground
3 wire + ground
3 wire + ground
3 wire + ground
3 wire + ground
3 wire + ground
3 wire + ground
3 wire + ground
3 wire + ground
3 wire + ground
3 wire + ground
3 wire + ground
3 wire + ground
3 wire + ground
3 wire + ground
3 wire + ground
3 wire + ground
3 wire + ground
3 wire + ground
3 wire + ground
3 wire + ground
3 wire + ground
3 wire + ground
3 wire + ground
3 wire + ground
3 wire + ground
Circuit
Protection
40A
30A
50A
40A
30A
50A
40A
30A
40A
30A
50A
40A
30A
50A
40A
30A
50A
40A
30A
50A
40A
30A
50A
40A
30A
50A
40A
30A
40A
30A
40A
30A
Wire
Gauge
#6 AWG
#8 AWG
#6 AWG
#6 AWG
#8 AWG
#6 AWG
#6 AWG
#8 AWG
#6 AWG
#8 AWG
#6 AWG
#6 AWG
#8 AWG
#6 AWG
#6 AWG
#8 AWG
#6 AWG
#6 AWG
#8 AWG
#6 AWG
#6 AWG
#8 AWG
#6 AWG
#6 AWG
#8 AWG
#6 AWG
#6 AWG
#8 AWG
#6 AWG
#8 AWG
#6 AWG
#8 AWG
4
Page 9
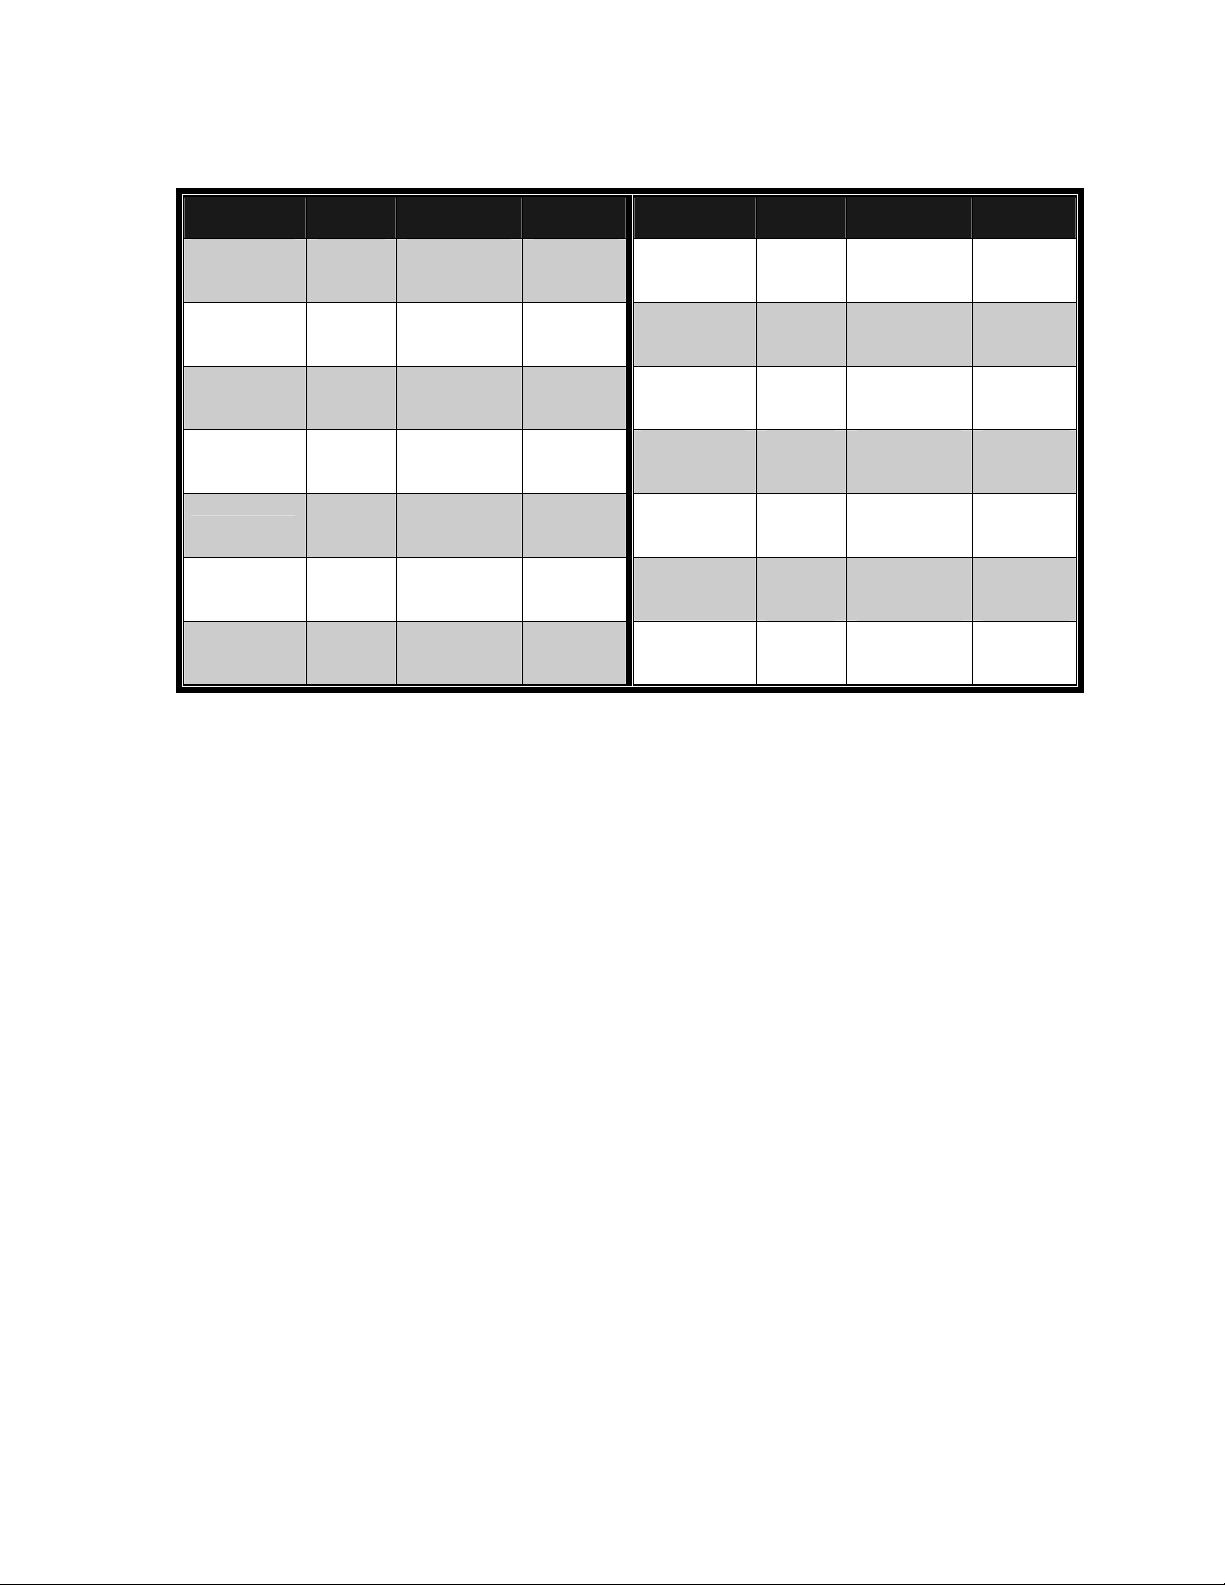
Export D1 Hot Tubs
2003 Dimension One Spas and @ Home Hot Tubs
Planning Guide and Installation Manual
Model
Arena
Aurora II
Aurora HP
Caliente
Caliente HP
Californian
Chairman
Power
240V
240V
240V
240V
240V
240V
240V
240V
240V
240V
240V
240V
240V
240V
240V
240V
240V
240V
240V
240V
240V
Circuit
Protection
1x16
2x16
1x32
1x16
2x16
1x32
1x16
2x16
1x32
1x16
2x16
1x32
1x16
2x16
1x32
1x16
2x16
1x32
1x16
2x16
1x32
Wire
Gauge
#8 AWG
#8 AWG
#6 AWG
#8 AWG
#8 AWG
#6 AWG
#8 AWG
#8 AWG
#6 AWG
#8 AWG
#8 AWG
#6 AWG
#8 AWG
#8 AWG
#6 AWG
#8 AWG
#8 AWG
#6 AWG
#8 AWG
#8 AWG
#6 AWG
Model
Chairman II
Diplomat
Nautilus
Sarena Bay
Triad
Triad II
Power Circuit
Protection
240V
240V
240V
240V
240V
240V
240V
240V
240V
240V
240V
240V
240V
240V
240V
240V
240V
240V
1x16
2x16
1x32
1x16
2x16
1x32
1x16
2x16
1x32
1x16
2x16
1x32
2x16
3x16
1x32
1x16
2x16
1x32
Wire
Gauge
#8 AWG
#8 AWG
#6 AWG
#8 AWG
#8 AWG
#6 AWG
#8 AWG
#8 AWG
#6 AWG
#8 AWG
#8 AWG
#6 AWG
#8 AWG
#8 AWG
#6 AWG
#8 AWG
#8 AWG
#6 AWG
The power inlet connection is located in the pedestal on the left side of the hot tub, approximately 25" from
the front. The front of the hot tub is the section that includes the topside, primary control panel.
To hook-up your hot tub, follow these instructions:
1. Remove the screws holding the equipment access panel to the front of the hot tub cabinet and set
the panel aside.
2. Loosen the four screws located on the front of the black equipment control box and remove the
door from the control box to allow access to the four-wire connection terminal block.
3. Attach 1” rigid non-metallic conduit to the conduit nipple located in the pedestal base on the side of
the hot tub and run required conductors through the conduit to the equipment control box.
4. Connect the wires to the equipment system terminal block (TB1) as indicated on the wiring diagram
in the back of this manual.
5. Configure jumpers 1 and 2 on the upper right corner of the PC Board to match the circuit size being
used for your hot tub. The proper jumper settings can be found on the wiring schematic located on
the inside of the Lower Equipment Compartment cover. Use the appropriate Electrical Requirements
Chart (shown above) for the proper wire size.
5
Page 10
2003 Dimension One Spa s and @ Home Hot Tubs
Planning Guide and Installation Manual
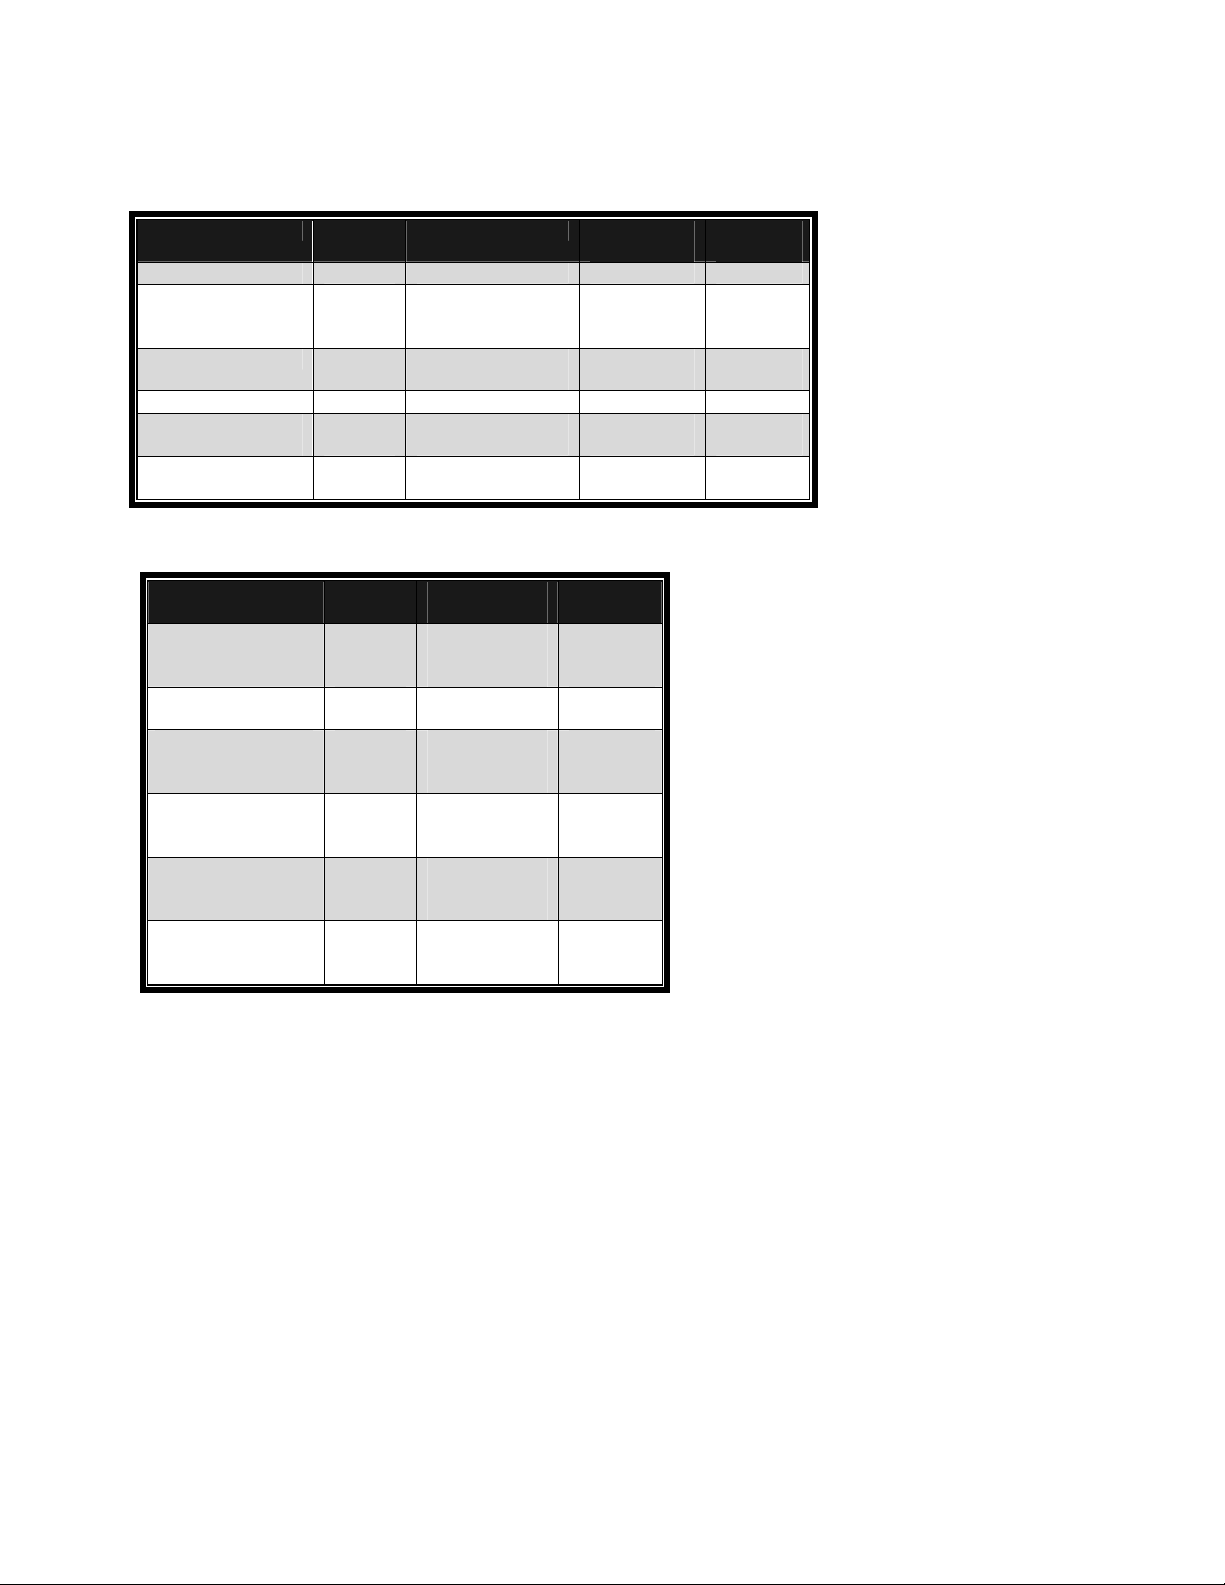
Domestic @ Home Hot Tubs
Model Power Branch Circuit Circuit
Protection
Companion HP
Cove
Cove HP
Dream
Dream HP
Sojourn HP
*A GFCI protected cord is required (P/N 1560-09)
240V 3 wire + ground 30A #8 AWG
240V
240V
120V
240V
240V
240V 3 wire + ground 30A #8 AWG
240V
240V
240V
240V
3 wire + ground
3 wire + ground
3 wire + ground*
3 wire + ground
3 wire + ground
3 wire + ground
3 wire + ground
3 wire + ground
3 wire + ground
40A
30A
15A
40A
30A
40A
30A
40A
30A
Export @ Home Hot Tubs
Wire
Gauge
#6 AWG
#8 AWG
#12AWG
#6 AWG
#8 AWG
#6 AWG
#8 AWG
#6 AWG
#8 AWG
Model Power Circuit
Protection
Companion HP
Cove
Cove HP
Dream
Dream HP
Sojourn HP
240V
240V
240V
240V
240V
240V
240V
240V 1x16
240V
240V
240V
240V
1x16
2x16
1x32
1x16
2x16
1x16
2x16
1x32
2x16
1x32
1x16
2x16
1x32
1x16
2x16
1x32
Wire
Gauge
#8 AWG
#8 AWG
#6 AWG
#8 AWG
#8 AWG
#8 AWG
#8 AWG
#6 AWG
#8 AWG
#8 AWG
#6 AWG
#8 AWG
#8 AWG
#6 AWG
#8 AWG
#8 AWG
#6 AWG
The power inlet connection is located in the pedestal on the left side of the hot tub, approximately 25" from
the front. The front of the hot tub is the section that includes the topside, primary control panel.
To hook-up your hot tub, follow these instructions:
1. Remove the screws holding the equipment access panel to the front of the hot tub cabinet and set
the panel aside.
2. Loosen the two screws located on the front of the blue equipment control box and raise the door on
the control box on its hinges to allow access to the four wire connection terminal block.
3. Attach 1” rigid non-metallic conduit to the conduit nipple located in the pedestal base on the side of
the hot tub and run required conductors through the conduit to the equipment control box.
4. Connect the four/three wires to the equipment system terminal block (TB1) as indicated on the
wiring diagram in the back of this manual.
5. Configure jumpers 1 and 2 on the upper right corner of the PC Board to match the circuit size being
used for your hot tub. The proper jumper settings can be found on the wiring schematic located on
the inside of the Lower Equipment Compartment cover. Use the appropriate Electrical Requirements
Chart (shown above) for the proper wire size.
6
Page 11

2003 Dimension One Spas and @ Home Hot Tubs
Planning Guide and Installation Manual
Installation Check List
Owner’s Manual
Hot Tub Cover
Locks on Hot Tub and Cover
Cabinet Care
Filter Use, Removal and Cleaning
GFCI Location
Electrical Disconnect Location
How to Fill and Drain Hot tub
How to Use the Topside Primary
Control
Instructions for your Ultra Pure
Water Management System,
CrystalZone
ClearZone
, or CD
Ozone Generators &
Water Management Systems
Please check these items before you fill your hot tub with water:
Drain Valve and Hose Bib
Changing Light Lens Cap
Selector Valve Control
Adjusting/Interchanging Jets
Adjusting the NeckFlex
Interchangeable Jets
Water Care Guide
Automatic Bromine Feeder (Optional)
The Use of the Optional PureVision
Jet Pillow and
Cartridges
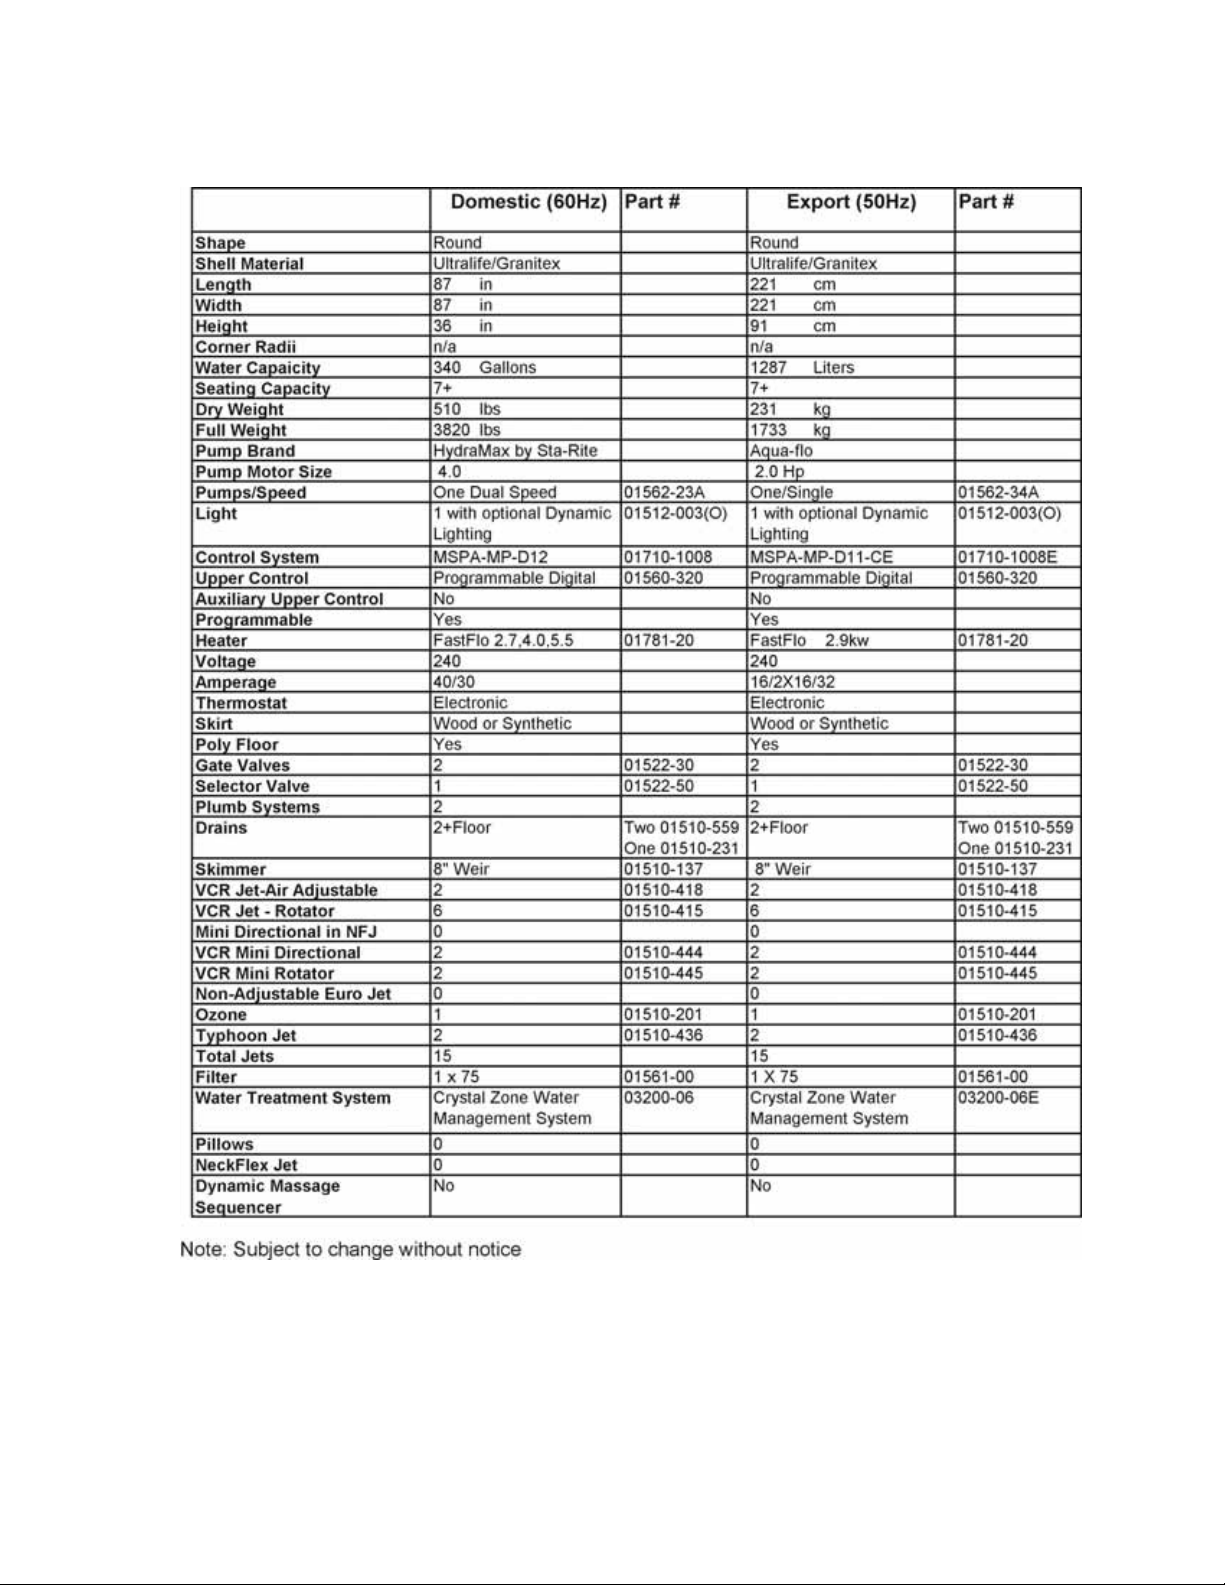
Hot Tub Specifications
The following section of this manual gives you detailed information on the sizes of both Dimension One and
@Home hot tubs. Dimension One hot tubs are listed first, alphabetically by model, followed by @Home hot
tubs in the same order.
Specifications for Dimension One Spas
These specifications include:
spa shape,
dimensions,
electrical requirements,
water capacity,
type and number of Hydrotherapy Jets,
weight,
type of Water Management System,
number and type of pumps,
type of skirt,
type and number of controls
7
Page 12

Caution
2003 Dimension One Spa s and @ Home Hot Tubs
Planning Guide and Installation Manual
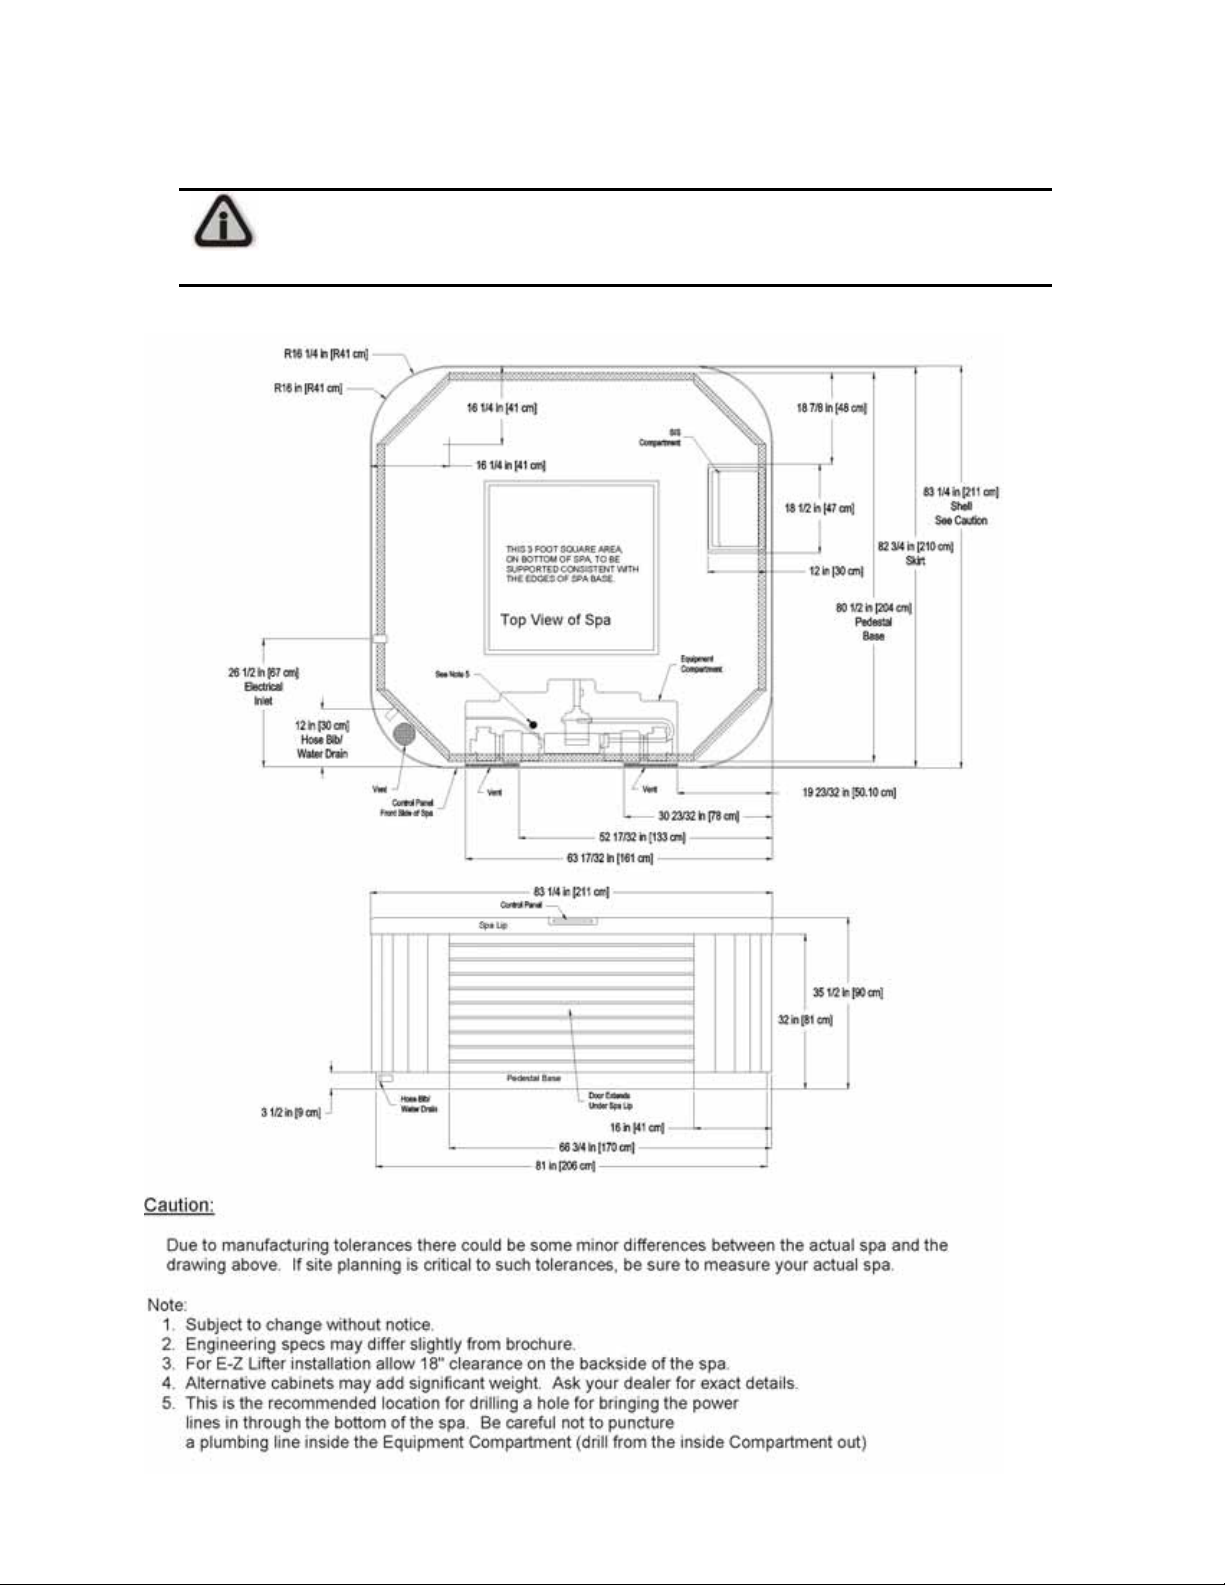
Arena – Architectural Specifications
DUE TO MANUFACTURING TOLERANCES THERE COULD BE SOME MINOR
DIFFERENCES BETWEEN THE ACTUAL MEASUREMENTS OF YOUR SPA AND THE
DRAWING BELOW. IF SITE PLANNING IS CRITICAL TO SUCH TOLERANCES, BE SURE
TO MEASURE YOUR ACTUAL SPA.
8
Page 13
2003 Dimension One Spas and @ Home Hot Tubs
Planning Guide and Installation Manual
Arena – General Specifications
9
Page 14
Caution
2003 Dimension One Spa s and @ Home Hot Tubs
Planning Guide and Installation Manual
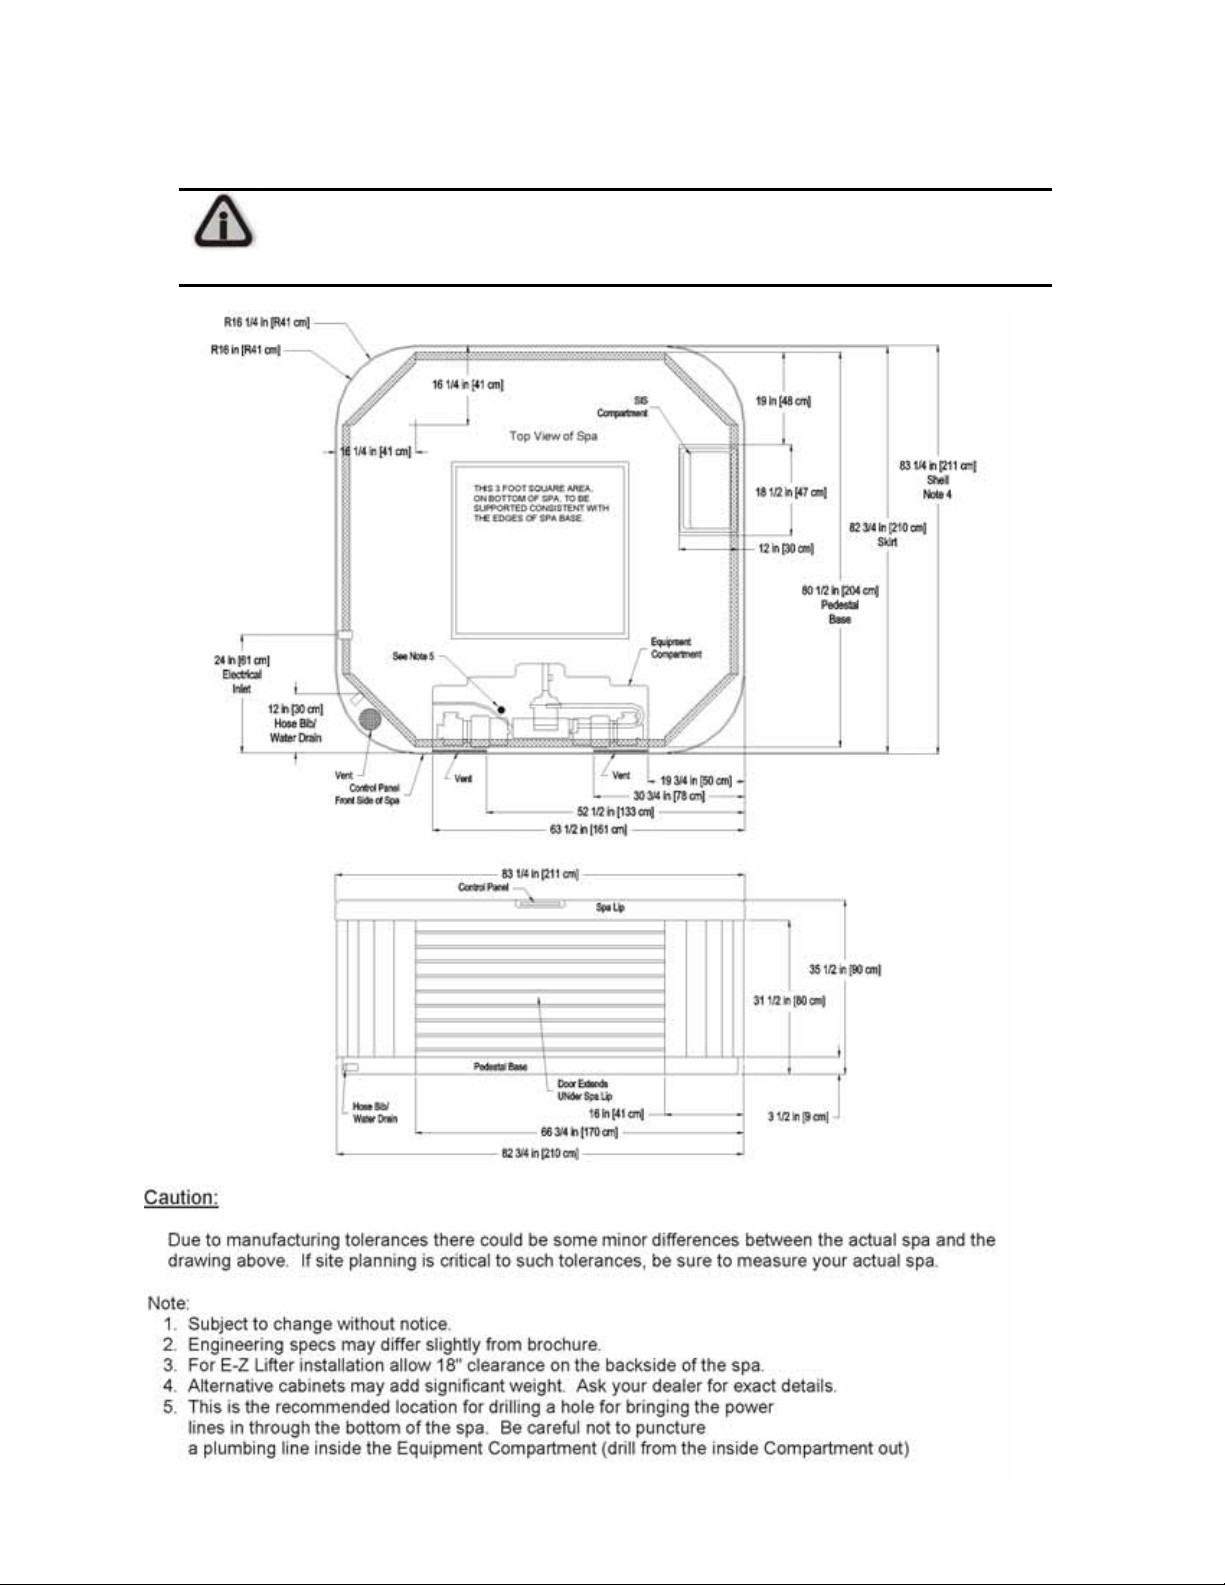
Aurora II – Architectural Specifications
DUE TO MANUFACTURING TOLERANCES THERE COULD BE SOME MINOR
DIFFERENCES BETWEEN THE ACTUAL MEASUREMENTS OF YOUR SPA AND THE
DRAWING BELOW. IF SITE PLANNING IS CRITICAL TO SUCH TOLERANCES, BE SURE
TO MEASURE YOUR ACTUAL SPA.
10
Page 15

2003 Dimension One Spas and @ Home Hot Tubs
Planning Guide and Installation Manual
Aurora II – General Specifications
11
Page 16
Caution
2003 Dimension One Spa s and @ Home Hot Tubs
Planning Guide and Installation Manual
Aurora HP – Architectural Specifications
DUE TO MANUFACTURING TOLERANCES THERE COULD BE SOME MINOR
DIFFERENCES BETWEEN THE ACTUAL MEASUREMENTS OF YOUR SPA AND THE
DRAWING BELOW. IF SITE PLANNING IS CRITICAL TO SUCH TOLERANCES, BE SURE
TO MEASURE YOUR ACTUAL SPA.
12
Page 17

2003 Dimension One Spas and @ Home Hot Tubs
Planning Guide and Installation Manual
Aurora HP – General Specifications
13
Page 18

Caution
2003 Dimension One Spa s and @ Home Hot Tubs
Planning Guide and Installation Manual
Caliente – Architectural Specifications
DUE TO MANUFACTURING TOLERANCES THERE COULD BE SOME MINOR
DIFFERENCES BETWEEN THE ACTUAL MEASUREMENTS OF YOUR SPA AND THE
DRAWING BELOW. IF SITE PLANNING IS CRITICAL TO SUCH TOLERANCES, BE SURE
TO MEASURE YOUR ACTUAL SPA.
14
Page 19

2003 Dimension One Spas and @ Home Hot Tubs
Planning Guide and Installation Manual
Caliente – General Specifications
15
Page 20

Caution
2003 Dimension One Spa s and @ Home Hot Tubs
Planning Guide and Installation Manual
Caliente HP – Architectural Specifications
DUE TO MANUFACTURING TOLERANCES THERE COULD BE SOME MINOR
DIFFERENCES BETWEEN THE ACTUAL MEASUREMENTS OF YOUR SPA AND THE
DRAWING BELOW. IF SITE PLANNING IS CRITICAL TO SUCH TOLERANCES, BE SURE
TO MEASURE YOUR ACTUAL SPA.
16
Page 21

2003 Dimension One Spas and @ Home Hot Tubs
Planning Guide and Installation Manual
Caliente HP – General Specifications
17
Page 22

Caution
2003 Dimension One Spa s and @ Home Hot Tubs
Planning Guide and Installation Manual
Californian – Architectural Specifications
DUE TO MANUFACTURING TOLERANCES THERE COULD BE SOME MINOR
DIFFERENCES BETWEEN THE ACTUAL MEASUREMENTS OF YOUR SPA AND THE
DRAWING BELOW. IF SITE PLANNING IS CRITICAL TO SUCH TOLERANCES, BE SURE
TO MEASURE YOUR ACTUAL SPA.
18
Page 23

2003 Dimension One Spas and @ Home Hot Tubs
Planning Guide and Installation Manual
Californian – General Specifications
19
Page 24

Caution
2003 Dimension One Spa s and @ Home Hot Tubs
Planning Guide and Installation Manual
Chairman – Architectural Specifications
DUE TO MANUFACTURING TOLERANCES THERE COULD BE SOME MINOR
DIFFERENCES BETWEEN THE ACTUAL MEASUREMENTS OF YOUR SPA AND THE
DRAWING BELOW. IF SITE PLANNING IS CRITICAL TO SUCH TOLERANCES, BE SURE
TO MEASURE YOUR ACTUAL SPA.
20
Page 25

2003 Dimension One Spas and @ Home Hot Tubs
Planning Guide and Installation Manual
Chairman – General Specifications
21
Page 26

Caution
2003 Dimension One Spa s and @ Home Hot Tubs
Planning Guide and Installation Manual
Chairman II – Architectural Specifications
DUE TO MANUFACTURING TOLERANCES THERE COULD BE SOME MINOR
DIFFERENCES BETWEEN THE ACTUAL MEASUREMENTS OF YOUR SPA AND THE
DRAWING BELOW. IF SITE PLANNING IS CRITICAL TO SUCH TOLERANCES, BE SURE
TO MEASURE YOUR ACTUAL SPA.
22
Page 27

2003 Dimension One Spas and @ Home Hot Tubs
Planning Guide and Installation Manual
Chairman II – General Specifications
23
Page 28

Caution
2003 Dimension One Spa s and @ Home Hot Tubs
Planning Guide and Installation Manual
Diplomat – Architectural Specifications
DUE TO MANUFACTURING TOLERANCES THERE COULD BE SOME MINOR
DIFFERENCES BETWEEN THE ACTUAL MEASUREMENTS OF YOUR SPA AND THE
DRAWING BELOW. IF SITE PLANNING IS CRITICAL TO SUCH TOLERANCES, BE SURE
TO MEASURE YOUR ACTUAL SPA.
24
Page 29

2003 Dimension One Spas and @ Home Hot Tubs
Planning Guide and Installation Manual
Diplomat – General Specifications
25
Page 30

Caution
2003 Dimension One Spa s and @ Home Hot Tubs
Planning Guide and Installation Manual
Nautilus – Architectural Specifications
DUE TO MANUFACTURING TOLERANCES THERE COULD BE SOME MINOR
DIFFERENCES BETWEEN THE ACTUAL MEASUREMENTS OF YOUR SPA AND THE
DRAWING BELOW. IF SITE PLANNING IS CRITICAL TO SUCH TOLERANCES, BE SURE
TO MEASURE YOUR ACTUAL SPA.
26
Page 31

2003 Dimension One Spas and @ Home Hot Tubs
Planning Guide and Installation Manual
Nautilus – General Specifications
27
Page 32

Caution
2003 Dimension One Spa s and @ Home Hot Tubs
Planning Guide and Installation Manual
Sarena Bay – Architectural Specification
DUE TO MANUFACTURING TOLERANCES THERE COULD BE SOME MINOR
DIFFERENCES BETWEEN THE ACTUAL MEASUREMENTS OF YOUR SPA AND THE
DRAWING BELOW. IF SITE PLANNING IS CRITICAL TO SUCH TOLERANCES, BE SURE
TO MEASURE YOUR ACTUAL SPA.
28
Page 33

2003 Dimension One Spas and @ Home Hot Tubs
Planning Guide and Installation Manual
Sarena Bay – General Specifications
29
Page 34

Caution
2003 Dimension One Spa s and @ Home Hot Tubs
Planning Guide and Installation Manual
Triad – Architectural Specifications
DUE TO MANUFACTURING TOLERANCES THERE COULD BE SOME MINOR
DIFFERENCES BETWEEN THE ACTUAL MEASUREMENTS OF YOUR SPA AND THE
DRAWING BELOW. IF SITE PLANNING IS CRITICAL TO SUCH TOLERANCES, BE SURE
TO MEASURE YOUR ACTUAL SPA.
30
Page 35

2003 Dimension One Spas and @ Home Hot Tubs
Planning Guide and Installation Manual
Triad – General Specifications
31
Page 36

Caution
2003 Dimension One Spa s and @ Home Hot Tubs
Planning Guide and Installation Manual
Triad II – Architectural Specifications
DUE TO MANUFACTURING TOLERANCES THERE COULD BE SOME MINOR
DIFFERENCES BETWEEN THE ACTUAL MEASUREMENTS OF YOUR SPA AND THE
DRAWING BELOW. IF SITE PLANNING IS CRITICAL TO SUCH TOLERANCES, BE SURE
TO MEASURE YOUR ACTUAL SPA.
32
Page 37

2003 Dimension One Spas and @ Home Hot Tubs
Planning Guide and Installation Manual
Triad II – General Specifications
33
Page 38

2003 Dimension One Spa s and @ Home Hot Tubs
Planning Guide and Installation Manual
Specifications for @Home Hot Tubs
Companion HP – Architectural Specifications
DUE TO MANUFACTURING TOLERANCES THERE COULD BE SOME MINOR
DIFFERENCES BETWEEN THE ACTUAL MEASUREMENTS OF YOUR SPA AND THE
Caution
DRAWING BELOW. IF SITE PLANNING IS CRITICAL TO SUCH TOLERANCES, BE SURE
TO MEASURE YOUR ACTUAL SPA.
34
Page 39

2003 Dimension One Spas and @ Home Hot Tubs
Planning Guide and Installation Manual
Companion HP – General Specifications
35
Page 40

Caution
2003 Dimension One Spa s and @ Home Hot Tubs
Planning Guide and Installation Manual
Cove – Architectural Specifications
DUE TO MANUFACTURING TOLERANCES THERE COULD BE SOME MINOR
DIFFERENCES BETWEEN THE ACTUAL MEASUREMENTS OF YOUR SPA AND THE
DRAWING BELOW. IF SITE PLANNING IS CRITICAL TO SUCH TOLERANCES, BE SURE
TO MEASURE YOUR ACTUAL SPA.
36
Page 41

2003 Dimension One Spas and @ Home Hot Tubs
Planning Guide and Installation Manual
Cove – General Specifications
37
Page 42

Caution
2003 Dimension One Spa s and @ Home Hot Tubs
Planning Guide and Installation Manual
Cove HP – Architectural Specifications
DUE TO MANUFACTURING TOLERANCES THERE COULD BE SOME MINOR
DIFFERENCES BETWEEN THE ACTUAL MEASUREMENTS OF YOUR SPA AND THE
DRAWING BELOW. IF SITE PLANNING IS CRITICAL TO SUCH TOLERANCES, BE SURE
TO MEASURE YOUR ACTUAL SPA.
38
Page 43

2003 Dimension One Spas and @ Home Hot Tubs
Planning Guide and Installation Manual
Cove HP – General Specifications
39
Page 44

Caution
2003 Dimension One Spa s and @ Home Hot Tubs
Planning Guide and Installation Manual
Dream – Architectural Specifications
DUE TO MANUFACTURING TOLERANCES THERE COULD BE SOME MINOR
DIFFERENCES BETWEEN THE ACTUAL MEASUREMENTS OF YOUR SPA AND THE
DRAWING BELOW. IF SITE PLANNING IS CRITICAL TO SUCH TOLERANCES, BE SURE
TO MEASURE YOUR ACTUAL SPA.
40
Page 45

2003 Dimension One Spas and @ Home Hot Tubs
Planning Guide and Installation Manual
Dream – General Specifications
41
Page 46

Caution
2003 Dimension One Spa s and @ Home Hot Tubs
Planning Guide and Installation Manual
Dream HP – Architectural Specifications
DUE TO MANUFACTURING TOLERANCES THERE COULD BE SOME MINOR
DIFFERENCES BETWEEN THE ACTUAL MEASUREMENTS OF YOUR SPA AND THE
DRAWING BELOW. IF SITE PLANNING IS CRITICAL TO SUCH TOLERANCES, BE SURE
TO MEASURE YOUR ACTUAL SPA.
42
Page 47

2003 Dimension One Spas and @ Home Hot Tubs
Planning Guide and Installation Manual
Dream HP – General Specifications
43
Page 48

Caution
2003 Dimension One Spa s and @ Home Hot Tubs
Planning Guide and Installation Manual
Sojourn HP – Architectural Specifications
DUE TO MANUFACTURING TOLERANCES THERE COULD BE SOME MINOR
DIFFERENCES BETWEEN THE ACTUAL MEASUREMENTS OF YOUR SPA AND THE
DRAWING BELOW. IF SITE PLANNING IS CRITICAL TO SUCH TOLERANCES, BE SURE
TO MEASURE YOUR ACTUAL SPA.
44
Page 49

2003 Dimension One Spas and @ Home Hot Tubs
Planning Guide and Installation Manual
Sojourn HP – General Specifications
45
Page 50

2003 Dimension One Spa s and @ Home Hot Tubs
Planning Guide and Installation Manual
Wiring Diagrams
Wiring diagrams for hooking up your spa’s electrical system to your dedicated GFCI breaker are located on
the inside of the lower equipment compartment lid.
Spa Information
It is very important that you gather the following information on your spa and enter it in the blanks provided
below. The Warranty Card should also be completed at the same time, and submitted to the address
below. This information will be required if you ever want to purchase additional items for your spa, or if
service is ever required. Be sure to consult with your Dealer to ensure the accuracy of this important
information.
My Spa
Model Name: Serial Number:
Date Purchased: Date Installed:
Notes:
Dealer Information:
Dimension One Spas Inc. Information
2611 Business Park Drive
Vista, California 92083
800.345.7727
760.727.7727
fax 760.734.4425
www.D1Spas.com
www.AtHomeHotTubs.com
46
Page 51

2003 Dimension One Spas and @ Home Hot Tubs
Planning Guide and Installation Manual
47
Page 52

 Loading...