

Page 1

Page 1 of 3D i M a r z i o . c o m
DiMarzio SDS-1
Important: Read all of the following instructions before proceeding. If any
questions or problems arise, you may refer them directly to us.
The SDS-1 pickup is a direct replacement pickup for all standard
Stratocasters. However, you will notice that the SDS-1 is somewhat
taller than a standard Strat pickup. On some Stratocasters in which
the pickup holes are shallow, adjustments will be necessary to allow
the pickup to sit properly under the strings. The lead (treble) pickup
should provide no difficulty. The middle and rhythm positions are the
ones which may require attention as described below.
MOUNTING INSTRUCTIONS
If you intend to install the SDS-1 in the rhythm or middle positions,
you must first determine if the pickup will sit safely under the strings,
without any of them touching. If the strings do touch, don't give up;
read on.
First, place the guitar on a flat surface. Loosen the strings enough to
remove the pickguard. Swing the pickguard aside carefully, without
breaking the connections between it and the jack. Now place the
SDS-1 in the guitar, in whichever pickup position on the body you
intend to mount it. This is just for reference: do not connect the
pickup yet. Now, retighten the first and sixth strings. They don't have
to be tuned up to pitch, just tight enough so they are not flopping.
Press down both of these strings at the 21st fret (the highest note on
the guitar). If either of these strings are touching the SDS-1, you
should proceed to one of the following procedures before installing
the pickup.
Remove enough wood underneath the pickguard to allow the
A.
SDS-1 to sit underneath the strings.
Readjust the neck angle to accomplish the same purpose. Both
B.
procedures accomplish the same thing. (A) lowers the pickup,
while (B) raises the strings.
5/6/2004http://www.dimarzio.com/install/sds_1.html
Page 2
Procedure A is usually accomplished with the use of a router, or
motor-tool. Most good guitar shops are familiar with this procedure.
Do not attempt this job yourself without some previous experience in
the use of the tools needed for the job. In all cases, you should not
have to route into the wood under the pickup to a depth of more than
1
/8". Removal of this amount of wood should make no noticeable
difference in the performance of the guitar.
Procedure A has the advantage of allowing the pickup to be installed
without any adjustment being made to the neck or bridge. Procedure
B should be used when it appears that the extra clearance needed to
allow the strings to pass freely over the pickup is approximately
1
/16" (maximum). If you are not sure of the distance, try this:
Measure the distance between the bottom of the pickup hole in the
guitar to the first string while holding the string down at the 21st fret.
Remember, the string should have some tension to it. Now subtract
this dimension from one inch. The figure you are left with is the
distance you need to increase the space between the bottom of the
pickup hole and the string. If that distance is about 1/16", you can
Page 2 of 3D i M a r z i o . c o m
follow procedure (B) below:
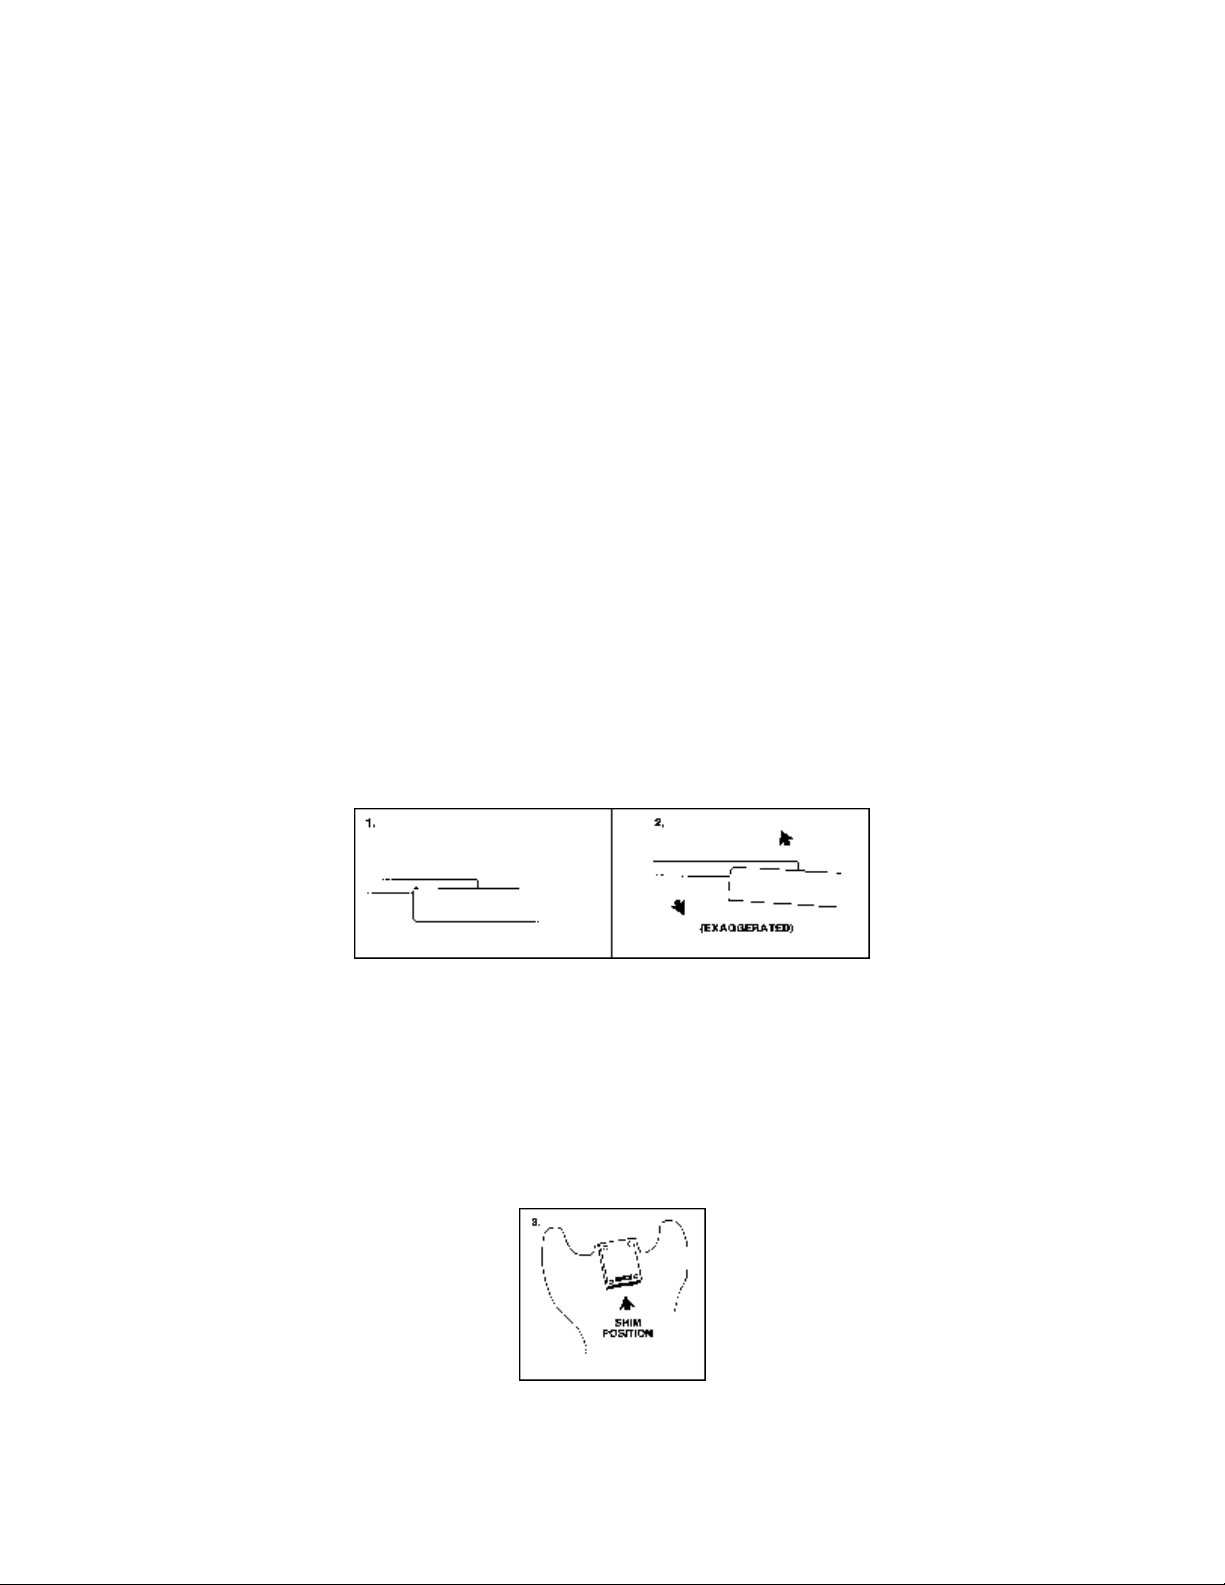
If you have a Stratocaster with the built-in tilt neck adjustment, adjust
the neck to tilt as shown in the following illustrations:
Once this is accomplished, you must raise the action at the bridge to
compensate for the increased neck angle. If your guitar does not
have the built in adjustment, that is, if your guitar neck is mounted
with four screws fastening to the body, you can adjust the neck angle
in the following manner. Loosen the four screws holding the neck to
the body, and insert a small shim at the rear of the neck, as in
illustration.
The shim can be any type of material, and should be thin. It can be
positioned between the two rear screws fastening the neck to the
5/6/2004http://www.dimarzio.com/install/sds_1.html
Page 3

body. Then tighten the neck back into place. The string height at the
bridge will have to be raised to compensate for the new neck angle.
Unsolder the old pickup (or pickups) you intend to replace with the
SDS-1. Take note of exactly which switch positions the original
pickups were soldered to, so the new pickup will be wired in proper
sequence. You can now mount the SDS-1 on your pickguard, and
solder the connections into the circuit. The white wire goes to the
switch connection, the black wire goes to ground. When all soldering
is completed, remount the pickguard on the guitar. We are sorry to
have to make things so complicated. We think you will agree when
you hear the SDS-1, that the effort is worth it.
Fender, Stratocaster, Strat, Telecaster, Tele, Precision Bass, P-Bass, Jazz Bass
and J-Bass are registered trademarks of Fender Musical Instrument Corp., with
which DiMarzio, Inc. is not affiliated. Les Paul and Les Paul Junior are registered
trademarks of Gibson Guitar Corp., with which DiMarzio, Inc. is not affiliated. Parker
Fly is a registered trademark of Parker Guitars, with which DiMarzio, Inc. is not
affiliated.
Page 3 of 3D i M a r z i o . c o m
*****
DiMARZIO, INC.
1388 Richmond Terrace
Post Office Box 100387
Staten Island, NY 10310
Toll Free Order Desk (outside NYC): 800-221-6468
Customer Service (and NYC orders): 718-981-9286
Technical Assistance (12:00 PM - 5:00 PM ET): 718-816-8112
Fax: 718-720-5296
5/6/2004http://www.dimarzio.com/install/sds_1.html
 Loading...