

Page 1

Manufactured by: Authorized European Representative:
Dilon Technologies, Inc. AG Medical
12050 Jefferson Avenue Route de l'Orme,
Suite 340 Parc des Algorithmes - Imm. "Homère"
Newport News, VA 23606 91190 Saint-Aubin
USA France
Phone: 1-844-DILONNAV http://ag-medical.com/
User/Service Manual
Page 2

Important Note
All personnel that will interact with this Navigator 2.0 System and Probes should read this Manual
and Service Guide to ensure proper use, handling, storage and maintenance.
This manual applies to white and purple colored Navigator 2.0 systems. The images of both systems
are used interchangeably.
This document and the information contained herein, is proprietary information of Dilon Technologies
and may not be reproduced, copied in whole or in part, adapted, modified, disclosed to others, or
disseminated without prior written consent of Dilon Technologies. This document is intended to be
used by customers as part of their Dilon Technologies equipment purchase.
Dilon Technologies provides this document without warranty of any kind, implied or expressed,
including, but not limited to, the implied warranties of merchantability and fitness for a particular
purpose.
Dilon Technologies has taken care to ensure the accuracy of this document. However, Dilon
Technologies assumes no liability for errors or omissions, and reserves the right to make changes
without further notice to any products herein, to improve reliability, function, or design. Dilon
Technologies may make improvements or changes in the products or programs described in this
document at any time.
Navigator 2.0TM is a trademark of Dilon Technologies.
Other trademarks and trade names are those of their respective owners.
Copyright Notice
Copyright 2018 Dilon Technologies, Newport News, VA 23606 United States of America.
Trademarks
Dilon Technologies™ is a registered trademark of Dilon Technologies.
All other company and product names are trademarks or registered trademarks of their respective
owners.
Part Number
N2-5000-07-001 Rev 7 / October 2018
N2-5000-07-001 Rev 7 -2- Revised 10/16/2018
www.Dilon.com
Page 3

Navigator 2.0 User Manual & Service Guide
User Manual: Table of Contents
1. Introduction ........................................................................................................................................ 5
Operating Principle ............................................................................................................................. 5
Intended Use ....................................................................................................................................... 5
Indications for Use .............................................................................................................................. 5
Manufacture and Distribution ............................................................................................................. 5
Trademarks .......................................................................................................................................... 6
Regulatory and Safety Requirements ............................................................................................... 6
2. System Overview and Components .............................................................................................. 9
3. Precautions ...................................................................................................................................... 10
3A. General........................................................................................................................................ 10
3B. Control Unit, Battery, and Charger ........................................................................................... 10
3C. Probe ........................................................................................................................................... 11
4. Control Unit, Battery, Cables, and Co-Pilot ............................................................................... 12
4A-1. Control Unit Features: Front .................................................................................................. 12
4A-2. Control Unit Features: Back ................................................................................................... 15
4B. Battery (Part # N2-8500-00) ...................................................................................................... 17
4C. Cables ......................................................................................................................................... 19
4D. Optional Co-Pilot™ Device (Part # GP-6801-00) .................................................................... 21
4E. Useful Adjustments That Can Be Made During Procedures .................................................. 22
5. Probe Connectivity and Use ......................................................................................................... 23
6A. Navigator 2.0 with Wireless Pilot Probe ................................................................................... 23
6B. Navigator 2.0 with Standard Lymphatic Mapping Probes, Superficial Head & Neck Probe,
Daniel Lung Probe, and Laparoscopic Probes ............................................................................... 25
6C. Navigator 2.0 with 12mm Lymphatic Mapping Probe (Part # N2-9001-12) .......................... 28
6. Running the Peak Procedure: 12mm Lymphatic Mapping Probe Only ................................ 30
7A. Running a Peak Procedure ....................................................................................................... 30
7. Troubleshooting .............................................................................................................................. 32
8. Specifications .................................................................................................................................. 34
9A. Navigator 2.0 System Specifications ........................................................................................ 34
9B. System Accuracy ........................................................................................................................ 35
9. Support Items .................................................................................................................................. 36
10A. Product Part Numbers ............................................................................................................. 36
10B. Sterile Drape ............................................................................................................................. 36
10. Maintenance ..................................................................................................................................... 37
11A. Overview ................................................................................................................................... 37
11B. Verification of Standard Gain (Calibration Quick Test) ......................................................... 37
11C. Fuse Replacement Procedure ................................................................................................ 39
11. Repair ................................................................................................................................................ 41
12. Recycling .......................................................................................................................................... 42
13. Limited Warranty ............................................................................................................................. 43
N2-5000-07-001 Rev 7 -3- Revised 10/16/2018
www.Dilon.com
Page 4

Page 5

Navigator 2.0 User Manual & Service Guide
USER MANUAL
1. Introduction
Operating Principle
The Navigator 2.0 System detects presence of gamma rays, emitted from radioactive isotopes in
body organs or tissue. System use requires the Navigator 2.0 Control Unit, which allows the user to
adjust the system's settings and produces a variety of signal outputs. The control unit is powered by
battery. The system provides an increasing or decreasing sound and visual counts that vary as
level of gamma radiation increases or decreases.
The control unit works in conjunction with a hand-held probe that is connected to the control unit
either via a cable or wireless technology. Detecting gamma radiation with a hand-held probe is
based on nuclear physics laws which allow detection of radiation emitted from a small source.
Placing probe close to a radioactive site increases number of counts detection and localization
occurs. Excision of the region of interest is then performed using standard surgical technique. On
the other hand, as the distance between the probe and the radiation source is increased, the sound
signal and number of counts decrease.
The control unit is used with any of the following Navigator™ hand-held probe models. The probes
differ primarily in their size, shape, detector technology and connection to the control unit.
· 14mm Wireless Pilot Probe™ (angled tip)
· 14mm Standard Lymphatic Mapping Probes (angled tip & straight tip)
· 12 mm Lymphatic Mapping Probe (angled tip)
· 11mm Superficial Head & Neck Probe (straight tip)
· 10mm Daniel Lung Probe™ (straight tip)
· 10mm Laparoscopic Probes (310mm & 190mm Lengths, straight tips)
The system is supplied non-sterile. This manual includes guidelines for the use of the probes and
accessories within the sterile field.
Intended Use
For the detection and quantification of gamma radiation from gamma-emitting isotopes in the body or
tissues. Use for non-imaging procedures to measure the amount of radionuclide absorbed by a
particular organ or body region.
Indications for Use
For the detection and quantification of gamma radiation from gamma-emitting isotopes in the body or
tissues. Use for non-imaging procedures to measure the amount of radionuclide absorbed by a
particular organ or body region in open-surgical, laparoscopic or thoracoscopic surgical procedures.
Manufacture and Distribution
The system is manufactured and distributed by Dilon Technologies of Newport News, VA. Please
direct all inquiries about the Navigator 2.0 to Dilon Technologies.
The year of manufacture on the control unit are indicated in the first four numbers of the serial
number. The year of manufacture on the probe are indicated in the last two numbers of the serial
numbers.
N2-5000-07-001 Rev 7 -5- Revised 10/16/2018
www.Dilon.com
Page 6

Navigator 2.0 User Manual & Service Guide
CAUTION: Federal (USA) law restricts this device to sale and use by, or on the
order of, a physician.
Trademarks
The following are trademarks of Dilon Technologies: Navigator 2.0™, Wireless Pilot Probe™, Dilon
Navigator GPS™, Dilon Navigator™, Dilon Technologies Navigator GPS™, Dilon Technologies
Navigator™, Dilon Technologies Navigator 2.0™, Daniel Lung Probe™, and Navigator™ when used
in context with the above.
Navigator GPS® is a registered trademark of Dilon Technologies.
Regulatory and Safety Requirements
The Dilon Navigator GPS™ System including Probes and accessories complies with the
following standards:
EC Directives
EMC Directive 89/336/EEC
Group l, Class B
EN 55011
EMC Directive 89/336/EEC
IEC 60601-1-2: 3rd Edition
Reciprocal Interference
This product has been tested and verified to ensure that there are no issues or concerns
regarding reciprocal interference. This includes EMI, EMC and RF. This product has been
certified and tested by 3rd party testing facilities. List of standards is as follows:
• Medical Electrical Equipment - Part 1: General requirements For Safety 1: Collateral
Standard: Safety Requirements For Medical Electrical Systems – IEC 60601-1-1: 3rd Ed.
• Medical Electrical Equipment - Part 1: General Requirements For Safety - Collateral
Standard: Electromagnetic Compatibility - Requirements and Tests – IEC 60601-1-2: 3rd Ed.
Safety
• Medical Electrical Equipment - Part 1: General requirements For Safety 1: Collateral
Standard: Safety Requirements For Medical Electrical Systems – IEC 60601-1: 2nd & 3rd Ed.
• Medical Electrical Equipment - Part 1: General Requirements For Safety - Collateral
Standard: Electromagnetic Compatibility - Requirements and Tests – IEC 60601-1-2: 3rd Ed.
• Medical Electrical Equipment - Part 1-6: General Requirements For Safety - Collateral
Standard: Usability - IEC 60601-1-6: 3rd Ed.
• Information supplied by the manufacturer of medical devices- EN 1041:2008
• Symbols for use in the labeling of medical devices - EN 980 :2008
• CAN/CSA C22.2 No. 60601-1, "Medical Electrical Equipment, Part 1: General Requirements
for Safety & Essential Performance; issued 2008-02-01 Ed. 2
• AS/NZS 3200-1-0, Deviations to IEC 601-1 for Application in Australia and New Zealand
N2-5000-07-001 Rev 7 -6- Revised 10/16/2018
www.Dilon.com
Page 7
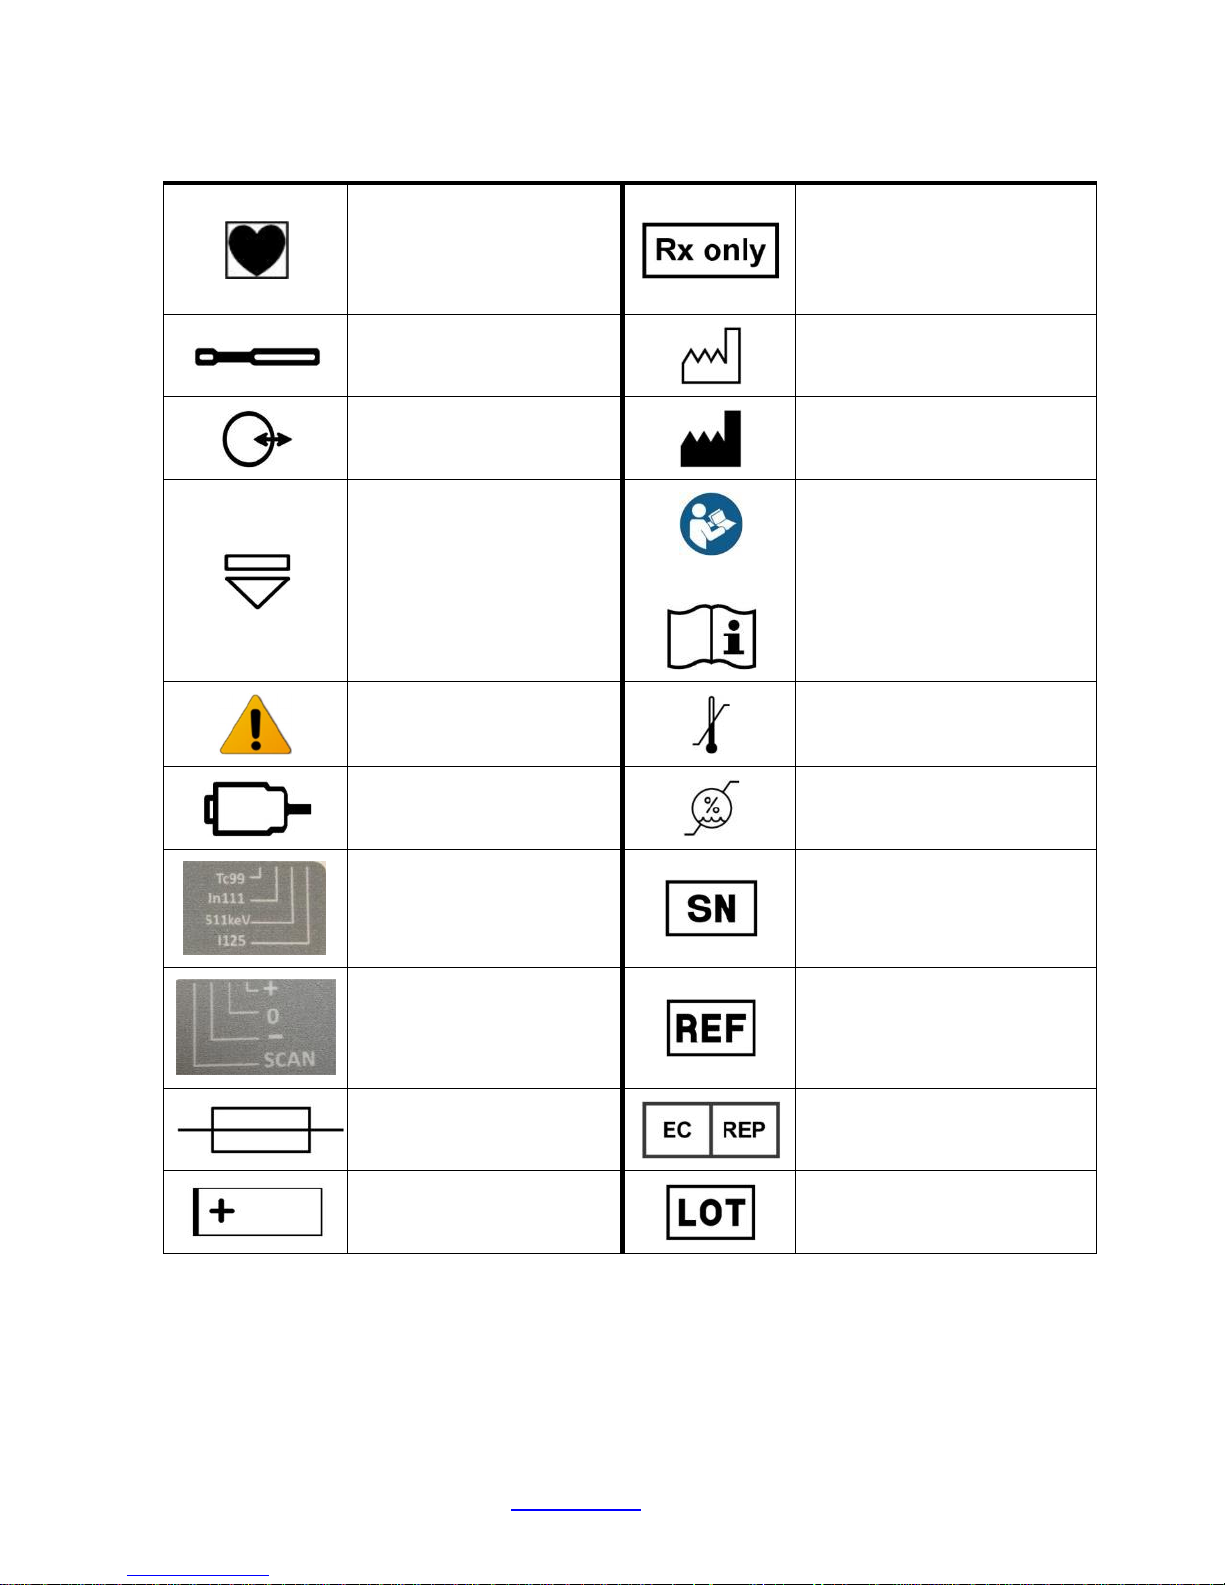
Table 1A. Explanation of Symbols
Type-CF Equipment
Navigator 2.0 User Manual & Service Guide
RX only Caution: Federal
(USA) law restricts this device
to sale and use by, or on the
order of, a physician.
Probe
Data Port
Eject
Attention, consult
accompanying documents
Remote Count Control
Isotope Control
or
Date of Manufacture
Manufactured by
Consult instructions for use
Temperature limitation
Humidity limitation
Serial number
Calibrate Control
Fuse
Battery
N2-5000-07-001 Rev 7 -7- Revised 10/16/2018
www.Dilon.com
Catalogue number
European Authorized
Representative
Batch code
Page 8
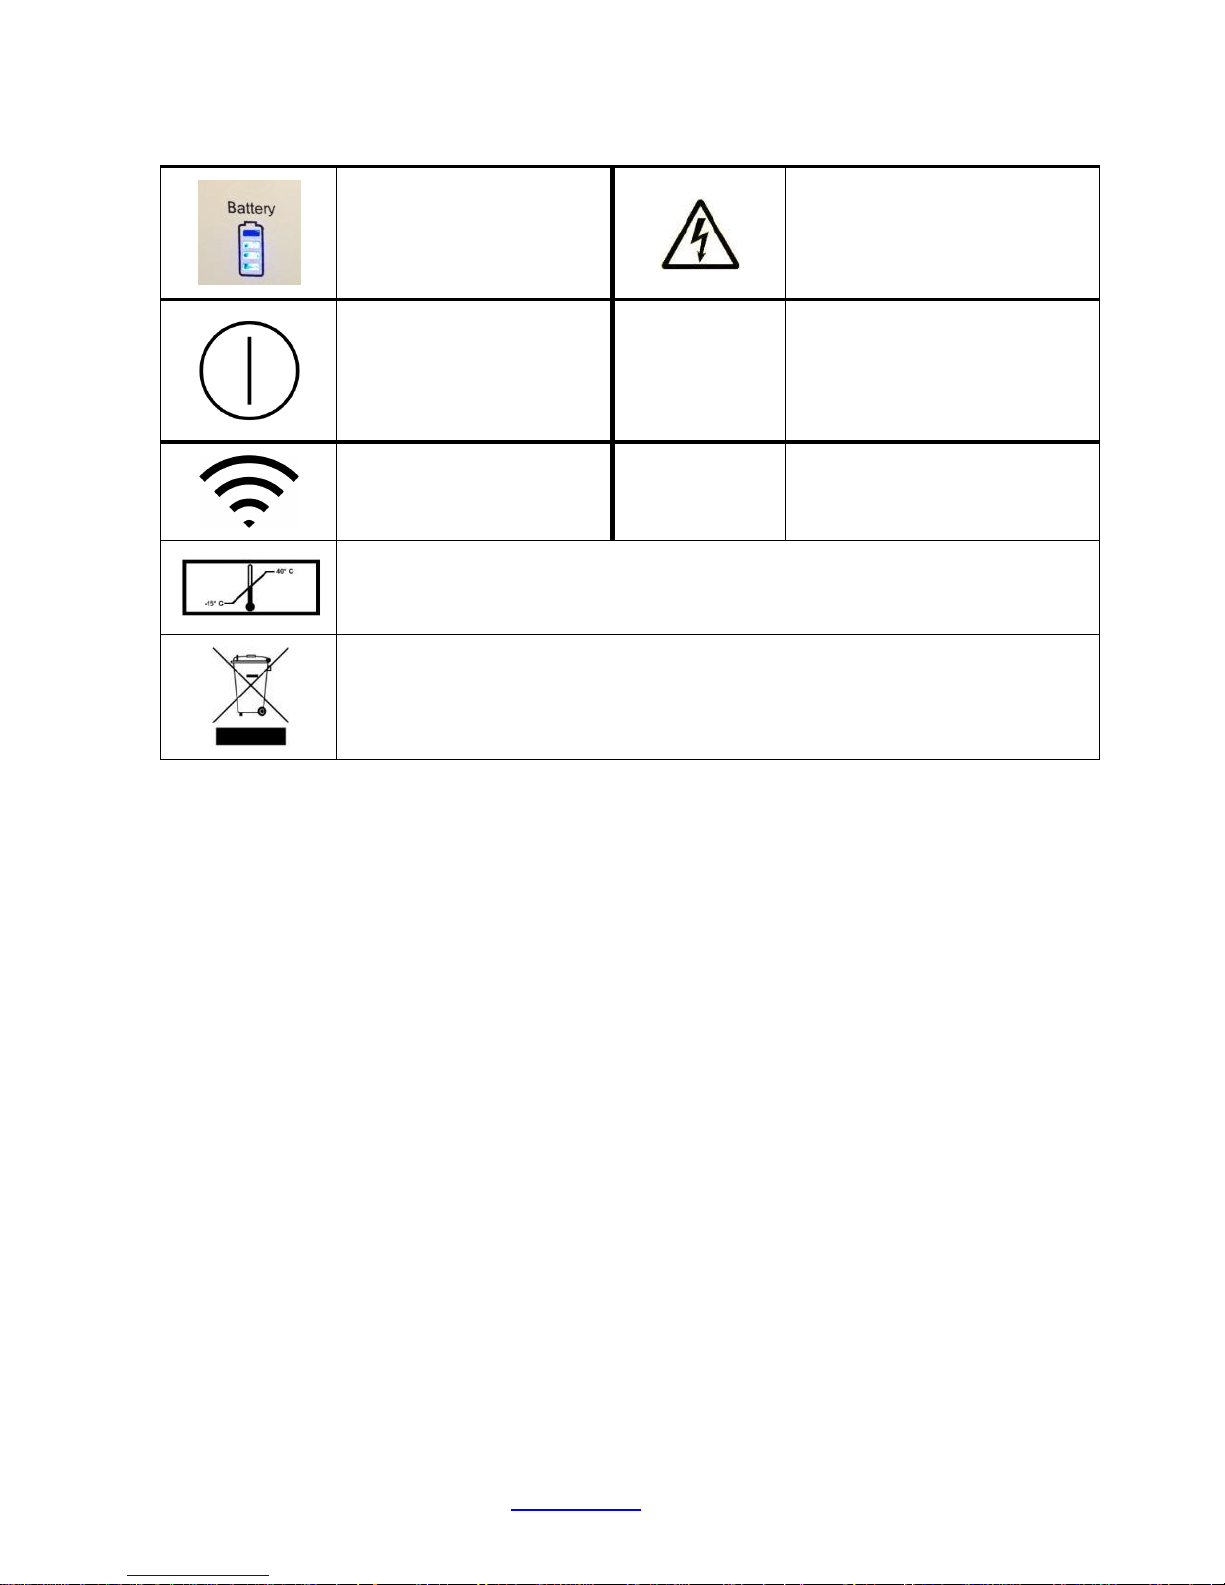
Table 1A. Explanation of Symbols (Continued)
Navigator 2.0 User Manual & Service Guide
Battery Power Level
ON/OFF
Wireless Capability
Caution: High Voltage
Acceptable shipping conditions: -15° C to 40° C
WEEE Symbol (EU only)
FCC statements: “This device complies with part 15 of the FCC Rules. Operation is subject
to the following two conditions: (1) This device may not cause harmful interference and (2)
this device must accept any interference received, including interference that may cause
undesired operation.”
IC statements: “This device complies with Industry Canada license-exempt RSS
standard(s). Operation is subject to the following two conditions: (1) This device may not
cause interference and (2) this device must accept any interference, including interference
that may cause undesired operation of the device.”
Cet appareil est conforme avec Industrie Canada RSS exemptes de licence standard (s).
Son fonctionnement est soumis aux deux conditions suivantes: (1) Ce dispositif ne doit pas
causer d’interférences, et (2) cet appareil doit accepter toute interférence, y compris les
interferences qui peuvent causer un mauvais fonctionnement de l’appareil.
N2-5000-07-001 Rev 7 -8- Revised 10/16/2018
www.Dilon.com
Page 9
Navigator 2.0 User Manual & Service Guide
Charger and
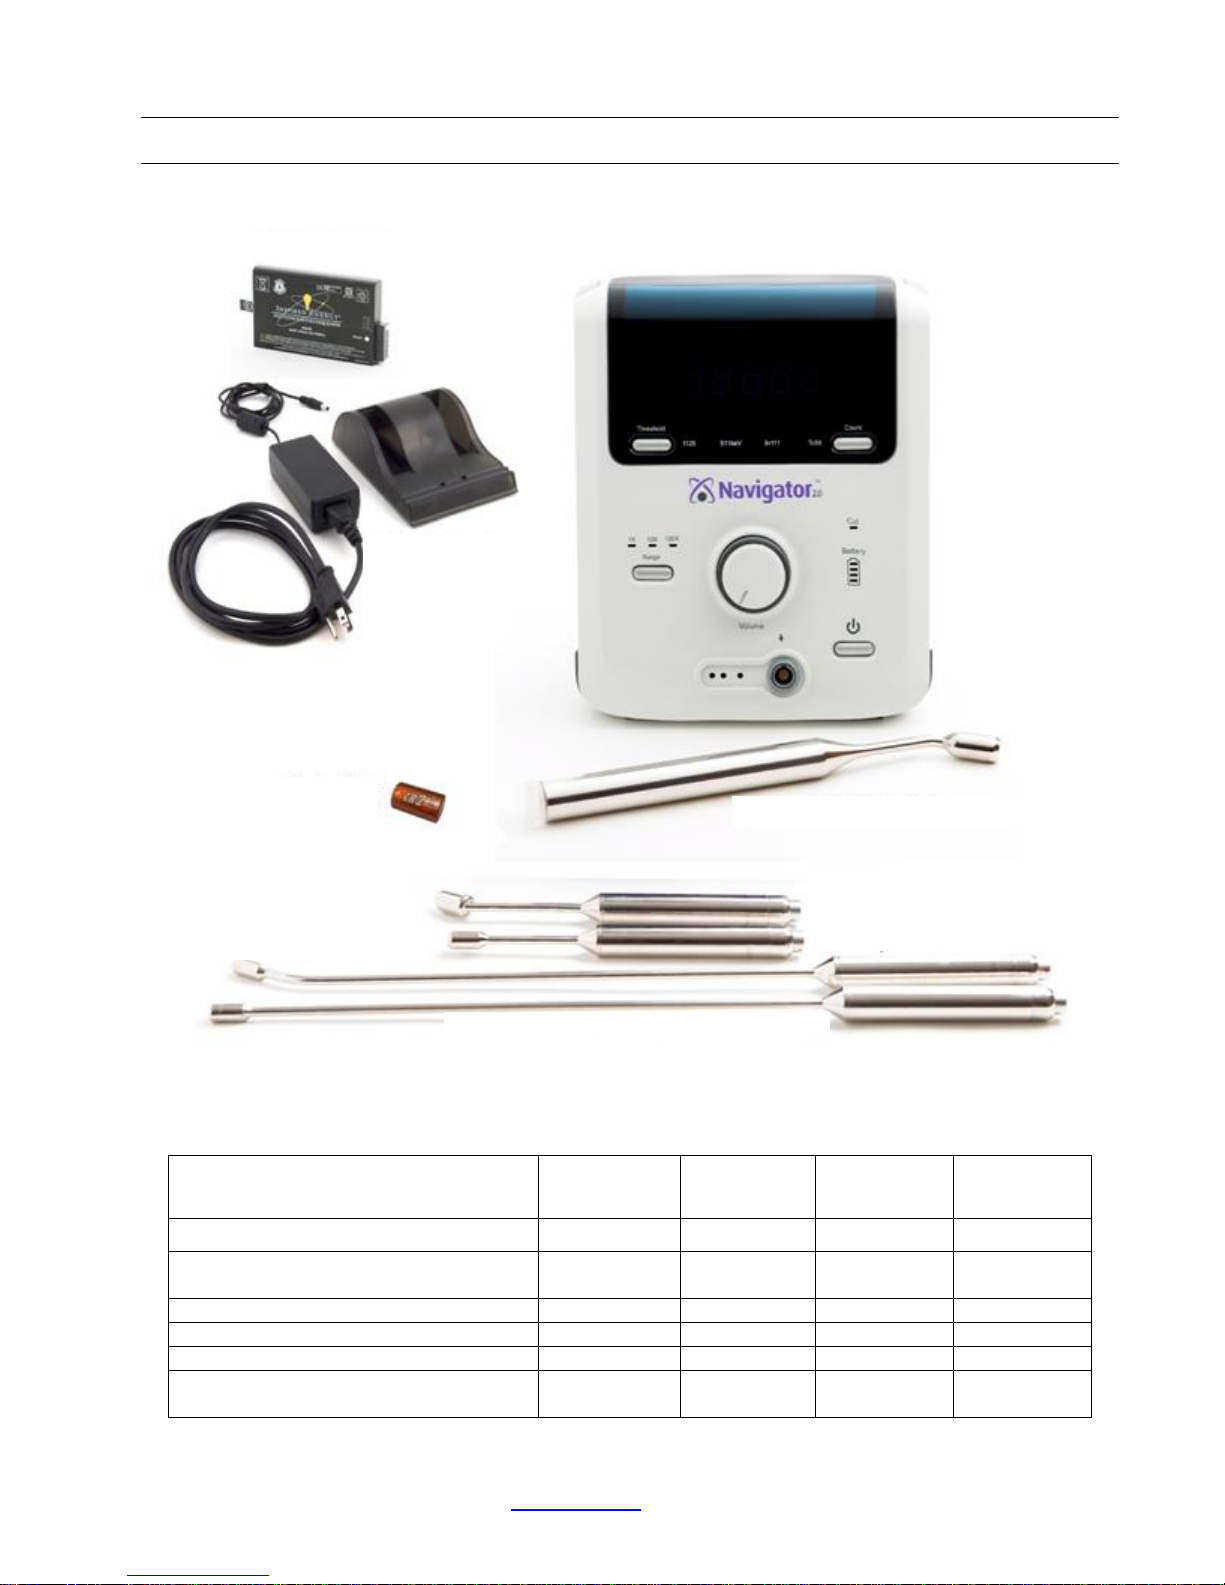
2. System Overview and Components
Control Unit Battery
2-bay Battery
Line Cord
Navigator 2.0 Control Unit
Wireless Pilot Probe
10 mm Daniel Lung Probe
Battery
14 mm Wireless Pilot Probe
14 mm Standard Sentinel Node Mapping
Probe
11 mm Superficial Head & Neck Probe
10 mm Laparoscopic Probe (310 mm long)
Probes are Type CF Applied Parts. See Table 2A below for a list of Probes.
Table 2A. Type CF Applied Parts and Probe Dimensions.
Probe Tip
Diameter
Wireless Pilot Probe 14mm 30 260mm 255g
Standard Lymphatic Mapping Probes
12mm Lymphatic Mapping Probe 12mm 35 242mm 235 g
Superficial Head & Neck Probe 11mm 0 207mm 161g
Daniel Lung Probe™ 10mm 30 465mm 195g
Laparoscopic Probes 10mm
14mm
14mm
10mm
Tip Angle Length Weight
0
35
0
0
224mm
220mm
467mm
347mm
185g
185g
195g
190g
N2-5000-07-001 Rev 7 -9- Revised 10/16/2018
www.Dilon.com
Page 10
Navigator 2.0 User Manual & Service Guide
power supply l
ine cord
, w
ireless
p
ilot probe
b
attery
, and probe cable.
manufacturer’s specification (0.75A).
CAUTION:
connected to a supply mains with protective earth
.
changing fuse, inspecting the probe or cable, and cleaning the probe or cable.
3. Precautions
3A. General
· The output of this system is not to be considered a diagnostic measure of the extent of disease
in the patient, nor the recommended source of therapy.
· Failure to thoroughly review and adhere to the information contained in this User and Service
Manual may pose a potential hazard to the patient and/or user and may void the warranty.
CAUTION: To avoid malfunction of the system, only the manufacturer’s approved
replacement parts shall be used. This includes the manufacture’s approved
3B. Control Unit, Battery, and Charger
· During system use, maintain electrical isolation of the patient. Do not connect the probe, cable
(if used), or the internal circuit of the control unit to earth ground, or to other voltage potentials.
· Maintain patient electrical isolation. Do not defeat the electrical isolation of the surface of a
probe cable (if used), and the control unit housing. These isolate the battery-power circuit
inside the control unit, the conductors inside the probe cable, the probe surface, and the
patient.
· The Line Cord of the 2-bay battery charger is used as the disconnect device for the charger.
· When optional system components are used with the system, maintain probe and patient
electrical isolation from earth ground. The optional components include the Co-Pilot™ Device,
the probe drape, the Top Gun™ Collimator, and Navigator 2.0 cart.
· In the operating room, use the charger at a distance of six feet or greater from the patient.
The charger has a rating in the United States of a "patient proximity charger.”
· Fully charge the battery before use in the system.
· Replace the wireless probe battery with a new battery on EACH day of use, before the first
surgical procedure.
· This system is not designed for use in an explosive atmosphere.
· Keep the control unit off when changing connections between the probe, cable, control unit
and gain module, when used. Control unit should also be off when inserting battery into
Wireless Pilot Probe.
· The control unit, cables, batteries, charger, and probes are sold non-sterile.
replacement parts such as the fuse, control unit battery, 2-bay battery charger,
CAUTION: To avoid fire hazard, do not insert a fuse with higher rating than the
To avoid the risk of electric shock, the battery charger cord must only be
CAUTION: To avoid malfunction of the system, no components are to be serviced
while the system is in use with a patient. Service activity includes changing batteries,
N2-5000-07-001 Rev 7 -
www.Dilon.com
10-
Revised 10/16/2018
Page 11

Navigator 2.0 User Manual & Service Guide
CAUTION
Failure to comply, may result in poor performance of the 12mm probe.
CAUTION:
performance of endoscopic procedures.
3C. Probe
· DO NOT put any probe or probe cable in an autoclave.
· With the exception of the Wireless Pilot Probe’s battery bay, DO NOT attempt to open probes.
o All probes are tested and sealed at the factory. Attempting to open the probe may
cause damage and will void the warranty.
· Remove probe battery before cleaning Wireless Pilot Probe.
· DO NOT drop the probe.
· DO NOT strike the probe tip against a hard surface; the detector element may become
damaged and no longer be able to measure radiation.
o This will also void the warranty.
:
When using the 12mm probe, DO NOT place it on, or near, a magnetic
instrument
.
3C-1. Laparoscopic and Thoracoscopic Probe Use
·
This User/Service manual is designed to assist the use of the Navigator 2.0 system and is not
a reference to surgical techniques. For information on endoscopic procedures, techniques,
complications and hazards, please reference the following publications: Surgical Laparoscopy
(Zuker KA ed. St. Louis MO 1991) and Endoscopic Surgery (White RA Klein SR, Mosby Year
Book Inc. St Louis MO 1991).
· This device is intended for use only as indicated. It is not intended for use when endoscopic
techniques are generally contraindicated. Please reference Textbook of Laparoscopy (Hulka
JF. Grunda and Stratton, Inc. Orlando FL 1985 op114-116) for information on absolute
contraindications, high-risk patients and low-risk patients.
· The use of the Navigator 2.0 system with laparoscopy should only be attempted where there
is adequate visualization of the target tissue.
· Trocars should be placed in accordance with standard laparoscopic and thoracoscopic
techniques, with specific regard to target organ geometry to assure probe access to the target
organ. Please reference current trocar labeling, suggesting working knowledge of
laparoscopic techniques and familiarization with trocar placements under direct visualization
through a laparoscope.
Endoscopic procedures should be performed only by physicians with
adequate training and familiarity with endoscopic techniques. Medical literature
should be consulted relative to techniques, complications, and hazards, prior to the
N2-5000-07-001 Rev 7 -
www.Dilon.com
11-
Revised 10/16/2018
Page 12
Navigator 2.0 User Manual & Service Guide
Range Button and
4. Control Unit, Battery, Cables, and Co-Pilot
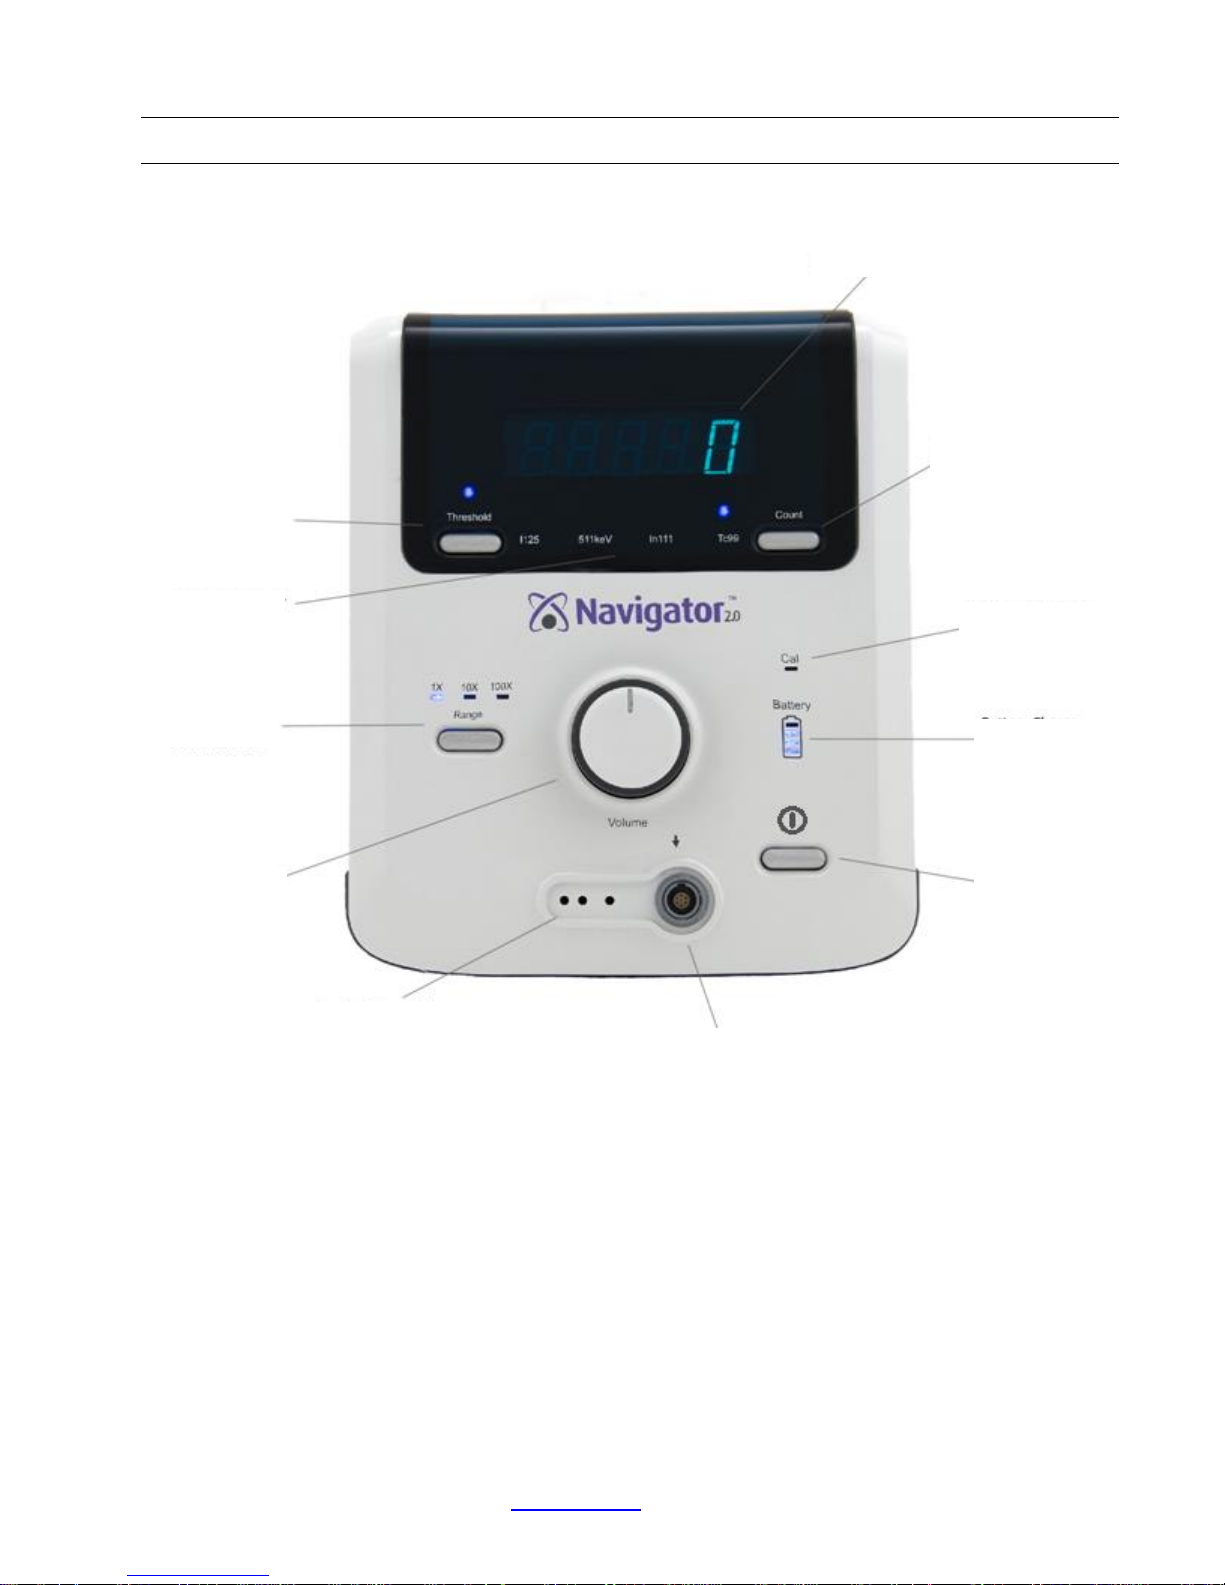
4A-1. Control Unit Features: Front
Count Display
Threshold Control
Isotope Indicators
Indicators
Volume Knob
Co-Pilot Receptacle
Signal Input (Cable Port)
10-second Count Button and
Indicator
Calibration –Check
Mode Indicator
Battery Charge
Status
Power Button
The control unit contains the display, the battery, and most of the system controls. These system
controls are located on the front and back of the control unit.
The control unit allows the user to adjust the system’s settings and produces signal outputs in the
form of a count rate, viewable in the display, as well as an audible pitch that represents the intensity
of a probe’s signal.
The number of gamma photons (called “events”) shown in the control unit display is determined
primarily by a probe and the probe’s position (with respect to the radioactively-tagged tissue), and
secondarily by the position of the controls on the control unit.
N2-5000-07-001 Rev 7 -
www.Dilon.com
12-
Revised 10/16/2018
Page 13
Navigator 2.0 User Manual & Service Guide
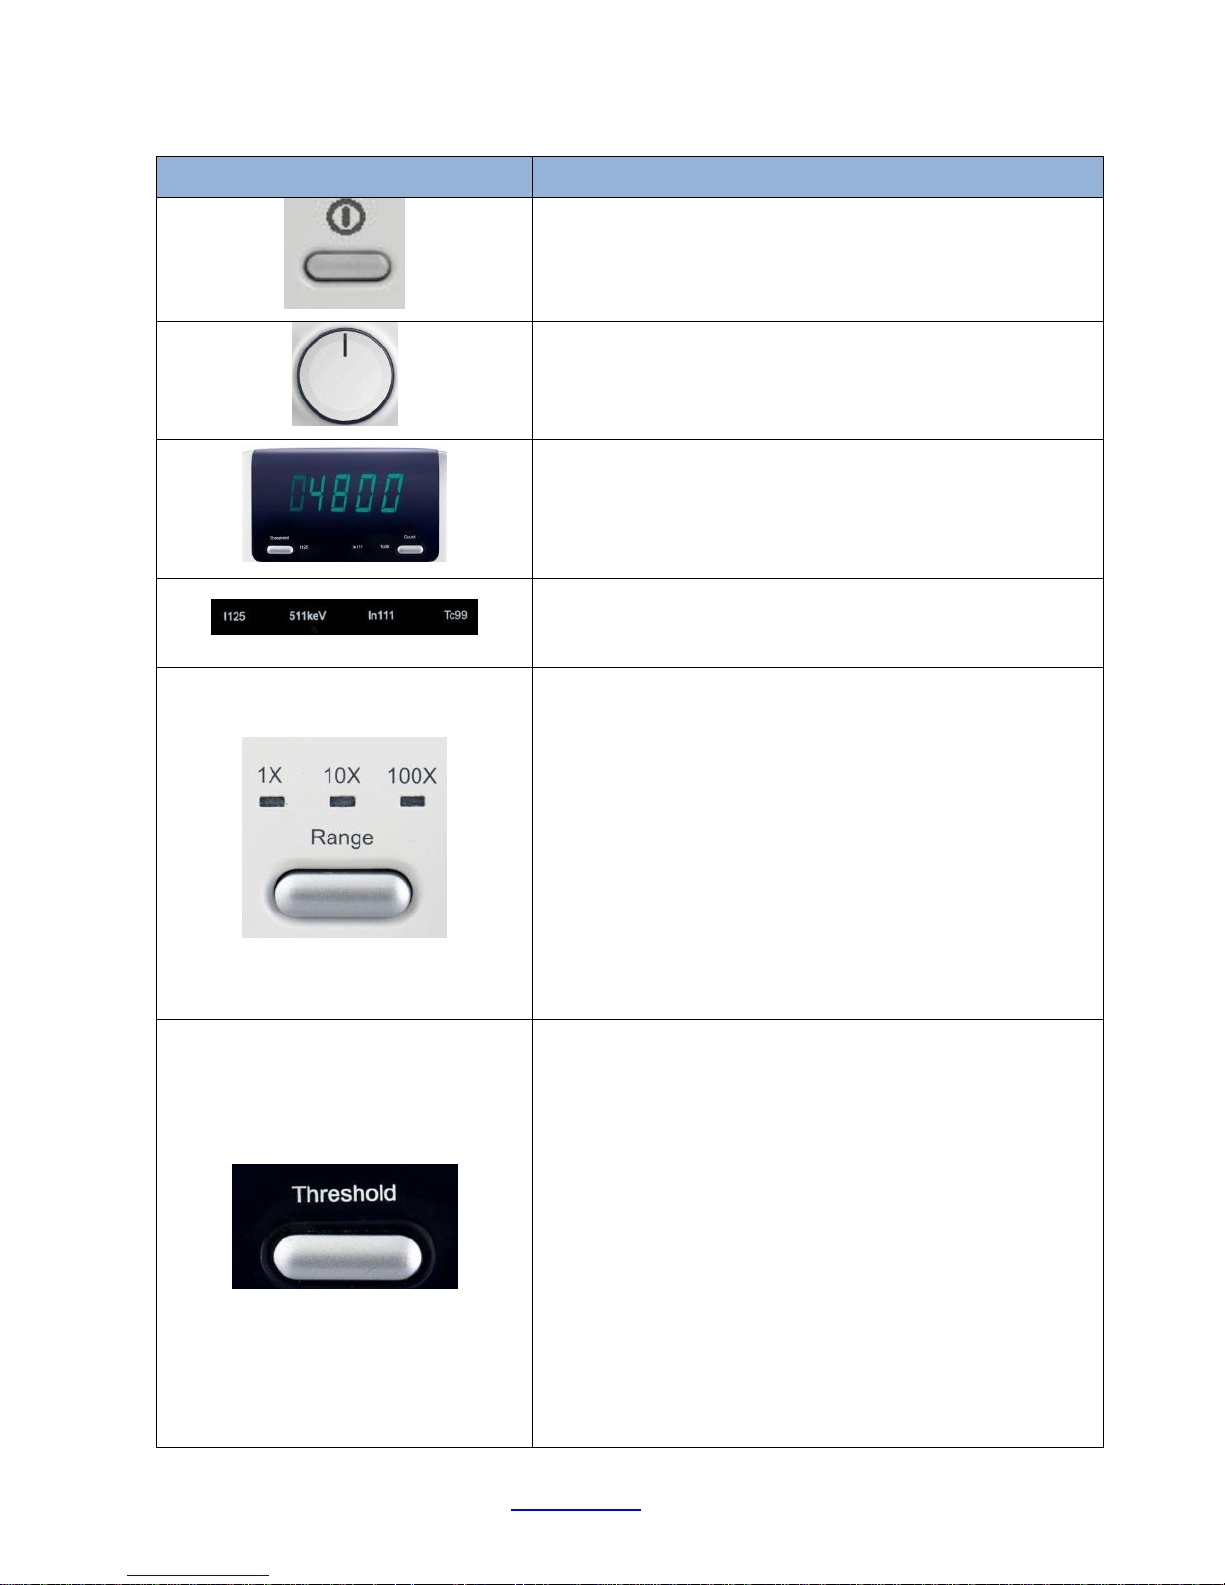
Table 4A-1. Controls and Displays on the Front of the Control Unit
Control Display Description
Power button: Turns power on and off.
Volume knob: Increases/decreases the volume of the
audible signal.
Display Screen: When turned on, displays the photon
count per second. Upon completion of a 10-second
count, the total number of photons detected will show
on the display screen for 4 seconds, and then the
display returns to showing counts per second.
Isotope Indicator: Indicates the isotope selected.
Isotopes detected on the Navigator 2.0 are I125,
511keV (for I-131 or FDG-18), In111, and Tc99.
Range Settings: Adjusts the audible pitch, based on
density of events detected:
1x – Low event rates; all events are heard.
10x – Medium event rates; 1 in 10 events are heard.
100x – High event rates; 1 in 100 events are heard.
Pressing the Range button cycles through the ranges;
Select the one most useful to the procedure being
performed.
NOTE: Range selection only controls pitch of the
sound generated by the unit; it has no effect on
count rates displayed or signal conditioning.
Threshold: For CABLED PROBES only, it controls the
count range of photon energy detected by the probe.
When the Threshold is off, the indicator is not
illuminated, and all photon energy, including scattered
photons, is detected.
When the Threshold is on, the indicator is illuminated. In
this setting, the detection of scattered photons is
reduced or eliminated. Signals of amplitude outside the
pre-configured energy range are discarded. Only those
events within the particular energy range are counted
and displayed.
N2-5000-07-001 Rev 7 -
www.Dilon.com
NOTE: The Threshold is normally on when using
probes. The Threshold may be set to off to count all
events detected by a cabled probe. (The Wireless Pilot
Probe features integrated threshold)
13-
Revised 10/16/2018
Page 14

Navigator 2.0 User Manual & Service Guide
Signal input port
Control Display Description
Count: Initiates a 10-second photon count.
When Count has been pressed, the count indicator on
the display screen is illuminated and the display screen
will show increasing counts. Probe must be held in a
fixed position for entire duration of 10-second count.
When the 10 seconds are complete, the control unit
beeps, and the total count is shown in the display.
After displaying the total count for four seconds, the
display goes back to showing counts per second.
Cal-check: This light indicates when the system is in
‘Calibration-Check’ mode on the back of the unit. The light will
be illuminated when in any of the 3 calibration-check settings,
and will not be illuminated when the system is set to the
‘Scan’ mode.
The SCAN / Calibrate Control must be set to the SCAN
position only, for all probes for all procedures. In this
mode, the ‘Cal’ light will be turned off.
See “Verification of Standard Gain (Calibration Quick Test)”
for more information on Calibration.
The Battery indicator shows the charge status of the battery
in use.
When the indicator level on the control unit is at 25%, the
battery should be replaced immediately with a fully-charged
battery.
Please note that the charge status on the control unit may
differ from charge status reflected on the battery, due to a
higher power requirement on the control unit. Refer to charge
status on control unit rather than the battery itself.
, for cable connection. The signal input port
is not applicable when using the Wireless Pilot Probe with the
Navigator 2.0.
For the 12mm Lymphatic Mapping Probe, connect the cable
attached to the Gain Module here, matching the arrows on
the cable connector to the arrow above the signal input port.
See “3mm Diameter Cable” for more information.
For all other cabled probes, connect the probe cable here,
matching the arrow on the cable connector to the arrow
above the signal input port. See “6mm Diameter Cable” for
more information.
Connection port for the optional Co-Pilot accessory.
See “Optional Co-Pilot Device” for more information.
N2-5000-07-001 Rev 7 -
www.Dilon.com
14-
Revised 10/16/2018
Page 15

4A-2. Control Unit Features: Back
Fuse Holder
Scan/Cal-check
Control
Navigator 2.0 User Manual & Service Guide
Integrated
Handle
Isotope Control
Battery
Compartment Door
Pole Mount
Connection
N2-5000-07-001 Rev 7 -
www.Dilon.com
15-
Revised 10/16/2018
Page 16

Navigator 2.0 User Manual & Service Guide
the procedure. Setting the isotope control incorrectly will
result in incorrect detection.
Table 4A-2. Controls and Displays on the Back of the Control Unit
Control Display Description
For CABLED PROBES only. The SCAN position is the only
correct position when a probe is being used during a procedure.
When set to SCAN, the CAL indicator on the front of the control
unit will not illuminate.
For instructions on use of the ‘+’, ‘0’, and ‘-‘positions, see
“Verification of Standard Gain (Calibration Quick Test)”.
Selects the isotope to be detected by the control unit.
SCAN/Calibrate Control
For CABLED PROBES only. The SCAN/Calibrate Control has FOUR POSITIONS. During all
surgical procedures, this control should be in the SCAN Position. During the calibration
verification procedure, this control uses the remaining three settings, “+”, “0”, and “-”.
NOTE: See “Verification of Standard Gain (Calibration Quick Test)” for information on calibration
verification.
NOTE: If the front panel CAL indicator is flashing before a procedure, move the control to the SCAN
position.
Isotope Control
The Isotope Controls allow the user to designate the specific isotope in use.
Switch set on: I125
Switch set on:
Switch set on: In111 Switch set on: Tc99
511keV
Iodine-125
The Isotope Control setting on the back of the control unit illuminates the corresponding light on the
Isotope Indicator on the front of the control unit.
18
F-FDG (and I131) Indium111 Technetium-99m
CAUTION:
N2-5000-07-001 Rev 7 -
www.Dilon.com
It is important that the isotope control is set to the isotope that is going to be used in
16-
Revised 10/16/2018
Page 17

4B. Battery (Part # N2-8500-00)
Navigator 2.0 User Manual & Service Guide
4B-1. Inserting the Battery
Open the door to the battery port, located on the right side of the control unit. Insert a fully charged
battery with the battery label facing toward the rear of the unit, with battery contacts inward and tab
on side of battery positioned outward. Use direction indicator arrow on battery label for guidance.
Shut the door of the battery port. The door will “click” when closed properly.
4B-2. Removing the Battery
Open the door to the battery port, located on the right side of the control unit. To remove the battery,
pull the tab attached to the end of the battery.
N2-5000-07-001 Rev 7 -
www.Dilon.com
17-
Revised 10/16/2018
Page 18

Navigator 2.0 User Manual & Service Guide
4B-3. Charging the Battery (Battery Charger Part # N2-8000-02)
Place the charger on a flat, level surface, away from sources of heat and moisture. Plug the DC
connector from the power supply into the back of the charger, and connect the power supply to the
mains AC, using the cable supplied. All of the LEDs will flash momentarily to indicate that power is
present.
DC Connector
Calibration buttons
Battery Bays
Status window
Recharge Time: Approximately 3.5 hours
Place the battery into either battery bay, ensuring that the 5-way connector is fully seated. The battery
should feel secure once inserted correctly. The LEDs in the battery status window will provide charge
status, and the charger will automatically begin charging. Each charge bay operates independently,
providing simultaneous charge of each battery inserted.
While there is a calibration button for each bay, calibration is not necessary for use with the
Navigator 2.0. If calibration button is inadvertently pressed, either a flashing blue or solid blue light
will illuminate. Simply remove battery and reinsert in order to resume charge. A green light will indicate
that it is in charge mode.
If charger has flashing red light, the battery fuel gauge requires calibration. Only in this case, should
the calibration button be pressed. Recalibration can take 10-13 hours.
If charger lights solid red, please refer to troubleshooting guide.
Table 4B-4. Charge Bay LED Indications
Indication Battery Charge Status
Green Flashing Battery Charging
Green Solid Battery Fully Charged
Blue Flashing or Solid Calibration mode: UNNECESSARY. Do not use.
Red Flashing Battery fuel gauge in need of calibration
Red Solid Error
NOTE:
Use only batteries supplied by Dilon Technologies. The Dilon Technologies control unit
battery has the proper dimensions and a key feature that holds it securely in the Navigator
2.0 control unit.
N2-5000-07-001 Rev 7 -
www.Dilon.com
18-
Revised 10/16/2018
Page 19

Navigator 2.0 User Manual & Service Guide
CAUTION:
Place the charger in a cool spot, away from external heat sources.
NOTE: Approximately 3.5 hours are required to charge a completely drained battery. Having a
second, fully charged battery available while the first battery is in use, is recommended.
Do not expose the charger or power supply to water or liquids; the case is not
sealed.
Do not open the charger or power supply case; no user-serviceable parts are inside.
Do not cover the fan exhaust or obstruct the airflow; this will cause overheating.
4C. Cables
In addition to the Wireless Pilot Probe, the Navigator 2.0 may also be used with cabled probes. One
of the following two cables is used, depending on the wired probe selected.
4C-1. 3mm Diameter Cable (Part # PM-4000-20) and Gain Module (Part # PM-0400-40)
The 12mm Lymphatic Mapping Probe uses a cable that has two conductors and an outside diameter
of approximately 3mm. It also uses a Gain Module (pictured below), which connects the control unit
to the probe cable.
1. Connect the 3mm Diameter Cable to the probe, matching the red indicator dot on the probe
to the red indicator dot on the cable.
2. Connect the other end of the 3mm Diameter Cable to the gain module, matching the red
indicator dot on the cable to the gain module’s cable input port.
3. Connect the gain module to the control unit, matching the arrows on the gain module cable
connector to the arrow above the signal input port. The gain module connector will “click”
when it is seated properly.
N2-5000-07-001 Rev 7 -
www.Dilon.com
19-
Revised 10/16/2018
Page 20

Navigator 2.0 User Manual & Service Guide
The connector has a locking mechanism. To disconnect the cable from the probe and from the
gain module, pull directly back on the hood; DO NOT pull or twist the connector jacket.
4C-2. 6mm Diameter Cable (Part # GP-4001-00)
A different cable is used for the standard lymphatic mapping probes (straight or angled), Superficial
Head & Neck Probe, laparoscopic probes, and the Daniel™ Lung Probe. This cable has five
receptacles inside the probe end, and seven pins inside the plug, that connect to the control unit. The
cable is approximately 6mm in diameter.
Connect the cable to the control unit, matching the arrows on the cable connector to the arrow above
the signal input port.
The connector is a locking connector. To disconnect the cable from the probe and from the control
unit, pull directly back on the hood; DO NOT pull or twist on the jacket.
WARNING! Do not pull or twist the jacket of the cable, to remove from control unit. You must
pull on the hood at the end of the cable.
damage the cable and render it unusable.
Pulling or twisting the jacket may
N2-5000-07-001 Rev 7 -
www.Dilon.com
20-
Revised 10/16/2018
Page 21

Navigator 2.0 User Manual & Service Guide
evenly spaced (see image below).
4D. Optional Co-Pilot™ Device (Part # GP-6801-00)
The optional Co-Pilot is a single-use device used for initiating counting periods and adjusting the
audible range from the probe, inside the sterile field. It includes two small buttons, and a long, smalldiameter cable.
To plug in the Co-Pilot, match the spacing of the prongs with the spacing of the receptacles on the
control unit. It should then be clipped onto the base of the probe.
The Co-Pilot is supplied sterile and may be used inside or outside of the sterile drape.
R Button (Range)
C Button (Count)
The “C” button is the COUNT Button. Obtain a one-second count by pushing and releasing this button
once. Obtain a ten-second count by pushing this button twice, in quick succession. Each time, total
counts are shown in the display screen on the control unit.
The “R” button is the RANGE Button. This button operates the Range control mentioned above on
the control unit. Push and release the RANGE Button to select an audible range, appropriate to the
signal detected by the system.
CAUTION:
The Co-Pilot can only be attached to the control unit one way – the prongs are not
N2-5000-07-001 Rev 7 -
www.Dilon.com
21-
Revised 10/16/2018
Page 22

Navigator 2.0 User Manual & Service Guide
Range Button and
4E. Useful Adjustments That Can Be Made During Procedures
Threshold Control
Indicators
Volume Knob
10-second Count Button and
Indicator
Power Button
Table 4D-1. Useful Adjustments
Adjustment Benefit
Threshold For Cabled Probes only, this feature increases specificity when only a low
number of events are observed. Threshold control defaults to ON. When ON, the
system counts only the events in a narrow energy range around the signal.
Change Threshold to OFF to allow the system to count all signals it detects,
opening the value range to scatter. (NOTE: The Wireless Pilot Probe features
integrated threshold.)
Range
The Range function defaults to 1X, meaning that the audible signal fluctuates
according to every single count it detects. In the 10X position, every 10th event
produces an audible output. In 100X, only every 100th event produces an audible
output.
The Range control only affects the sound. The count shown in the display is
independent of the range setting.
10-Second
Count
Press to obtain a 10-second count, keeping probe in fixed position each time.
The total is displayed for at least four seconds, allowing time to record the total.
Volume Adjust to desired volume.
Power Press to turn on the control unit or to safely turn off the device.
N2-5000-07-001 Rev 7 -
www.Dilon.com
22-
Revised 10/16/2018
Page 23

5. Probe Connectivity and Use
6A. Navigator 2.0 with Wireless Pilot Probe
Navigator 2.0 User Manual & Service Guide
The Wireless Pilot Probe is used in various procedures. A typical sequence of setting up the Wireless
Pilot Probe for a procedure with a Technetium-99m isotope (such that may be used in a lymphatic
mapping procedure for a sentinel node biopsy) is as follows:
6A-1. Before Surgery
·
Insert a charged battery into control unit.
· Upon initial insertion of new Wireless Pilot Probe battery, probe may need to be lightly shaken
to activate LED in probe base.
· LED on the Pilot Probe indicates that it is linked with control unit and ready for use. When the
Control Unit is turned off, the Probe’s LED will turn off within seconds of being placed in a
resting position. When the Control Unit is turned on, the Pilot Probe will instantly power up
when moved. It is now ready for use.
· For intraoperative use, insert the Wireless Pilot Probe into a sterile drape.
· Insert a probe battery into the Pilot Probe as follows:
1. Hold probe firm; turn battery cap counterclockwise and remove from probe. Inspect Oring integrity. If O-ring is missing or damaged, use new battery cap. Contact Dilon
Technologies or your distributor for battery cap reorder information.
N2-5000-07-001 Rev 7 -
www.Dilon.com
23-
Revised 10/16/2018
Page 24

Navigator 2.0 User Manual & Service Guide
2. Install 3V CR 2 lithium battery in Pilot Probe battery holder with positive (+) end facing
toward the base of the probe and negative (-) end toward the middle of the probe.
Incorrect placement of battery into battery holder for extended periods of time will cause
battery to drain quickly.
3. Insert battery holder into probe negative (-) end in. Lightly turn until holder lowers into
place.
4. Hold probe firm; push battery cap into probe and turn clockwise until O-ring is no longer
visible.
N2-5000-07-001 Rev 7 -
www.Dilon.com
24-
Revised 10/16/2018
Page 25

Table 6A-1. Pilot Probe LED Indicator
Indication Status
On/Flashing Probe is linked and ready for use.
Navigator 2.0 User Manual & Service Guide
Probe is in a resting position to conserve power when the Control Unit is off; to
reactivate LED indicator, turn on the Control Unit and simply pick up probe, or if
needed, lightly shake probe If no power upon ready to use, the battery needs
Off
to be installed or replaced.
If battery has been replaced and LED light is still off, contact your
distributor or Dilon Technologies directly.
6A-2. During Surgery
· See ‘Useful Adjustments that can be made During Procedures’.
NOTE: For Technetium-99m (Tc99), the control unit settings are given in the following table.
NOTE: Follow the instructions on ‘Cleaning, Disinfection, and Sterile Use of Probe’ (Dilon doc. # 141-
00005).
Table 6A-2. Navigator 2.0 with Wireless Pilot Probe – Settings & Indicators (just prior to
surgery)
Control / Indicator Setting
Controls (back of Control Unit)
SCAN/Calibrate: SCAN
Isotope: Tc99
Indicators (front of the Control Unit)
Range: 1x
Threshold: Illuminated
Display: 0
Isotope: Tc99
Indicator (top of the Pilot Probe handle)
Probe LED: Illuminated; flashing.
6A-3. After Surgery
· See: ‘Cleaning, Disinfection, and Sterile Use of Navigator Probes & Cables’ (Dilon doc. #
141-00005).
6B. Navigator 2.0 with Standard Lymphatic Mapping Probes, Superficial Head & Neck
N2-5000-07-001 Rev 7 -
www.Dilon.com
25-
Revised 10/16/2018
Page 26

Navigator 2.0 User Manual & Service Guide
Probe, Daniel Lung Probe, and Laparoscopic Probes
Standard Lymphatic Mapping Probe: SP-2A14-67 (Angled)
SP-2S14-67 (Straight)
Superficial Head & Neck Probe: SP-2S11-53
Daniel Lung Probe: SP-2S10-31D
Laparoscopic Probe: SP-2S10-31 (310 mm shaft)
SP-1S10-19 (190 mm shaft)
These Navigator probes are used in various procedures. A typical sequence of setting up these
probes for procedures with a Technetium-99m isotope (such as may be used in a lymphatic mapping
procedure for a sentinel node biopsy, localization of a parathyroid adenoma, or localization of a subcentimeter lung nodule) is as follows:
6B-1. Before Surgery
· See: ‘Cleaning, Disinfection, and Sterile Use of Probes and Cables’ (Dilon doc. # 141-00005).
· Insert a fully charged battery into control unit.
· Connect the probe and cable to control unit.
· For intraoperative use, insert probe and cable in a sterile drape.
Table 6B-1. Navigator 2.0 with Standard Lymphatic Mapping Probes, Superficial Head & Neck
N2-5000-07-001 Rev 7 -
www.Dilon.com
26-
Revised 10/16/2018
Page 27

Navigator 2.0 User Manual & Service Guide
under direct visualization through a laparoscope.
CAUTION:
performance of endoscopic procedures.
Probe, Daniel Lung Probe, and Laparoscopic Probes - Settings and Indicators (just prior to
surgery)
Control/Indicator Setting (with Tc99 example)
Controls (back of Control Unit)
SCAN/Calibrate: SCAN
Isotope: Tc99
Indicators (front of the Control Unit)
Range: 1x
Threshold: Illuminated
Display: 0
Isotope: Tc99
6B-2. During Surgery
· See ‘Useful Adjustments that can be made During Procedures’.
· See ‘Optional Co-Pilot Device’.
6B-3. After Surgery
· See: ‘Cleaning, Disinfection, and Sterile Use of Probes and Cables’ (Dilon doc. # 141-00005).
NOTE: The time to charge a battery by the charger may take as long as 3.5 hours.
NOTE: Keep control unit powered off until all components are connected. This helps preserve
component life.
Cautions for Thoracoscopic, Laparoscopic, and Endoscopic Procedures:
CAUTION:
Trocars should be placed in accordance with standard laparoscopic and thoracoscopic
techniques, with specific regard to target organ geometry to assure probe access to
the target organ. Please reference current trocar labeling suggesting working
knowledge of laparoscopic techniques and familiarization with trocar placements
Endoscopic procedures should be performed only by physicians having adequate
training and familiarity with endoscopic techniques. In addition, medical literature
should be consulted relative to techniques, complications and hazards, prior to the
N2-5000-07-001 Rev 7 -
www.Dilon.com
27-
Revised 10/16/2018
Page 28

Navigator 2.0 User Manual & Service Guide
6C. Navigator 2.0 with 12mm Lymphatic Mapping Probe (Part # N2-9001-12)
Navigator 2.0
Control Unit
Cable for 12 mm
Gain Module
Lymphatic Mapping
Probe
The Navigator 12mm lymphatic mapping probe is used in various lymphatic mapping procedures.
Please note that the system pictured above also includes battery and charger.
6C-1. Before Surgery
· Charge and insert the battery into control unit.
· Connect the probe, cable, and gain module to control unit.
· Run a Peak Procedure.
N2-5000-07-001 Rev 7 -
www.Dilon.com
12 mm Lymphatic
Mapping Probe
28-
Revised 10/16/2018
Page 29

Navigator 2.0 User Manual & Service Guide
Table 6C-1. Navigator 12 mm Probe - Settings and Indicators for use with Tc99 (just prior to
surgery)
Control/Indicator Setting
Controls (back of Control Unit)
SCAN/Calibrate: SCAN
Isotope: Tc99
Indicators (front of the Control Unit)
Range: 1x
Threshold: Illuminated
Display: 0
Isotope: Tc99
Gain Module
Dial at Peak Setting: Perform peak procedure
NOTE: Keep control unit power off, until all components are connected.
NOTE: A ‘peak procedure’ must be performed before using the probe in the first surgical procedure
of the day.
NOTE: Although the ‘peak procedure’ is typically performed with no sterile drape around the probe
and cable, it may also be performed with the probe and cable inside a sterile drape.
NOTE: After a ‘peak procedure’ has been performed, the control unit and gain module settings are
given in the table above.
NOTE: Follow the instructions on ‘Cleaning, Disinfection, and Sterile Use of Probe and Cable’ (Dilon
doc. # 141-00005).
CAUTION:
For intraoperative use, insert probe and cable in a sterile drape.
6C-2. During Surgery
· See ‘Useful Adjustments that can be made During Procedures’.
6C-3. After Surgery
· See: ‘Cleaning, Disinfection, and Sterile Use of Probes and Probe Cables’ (Dilon doc. # 141-
00005).
N2-5000-07-001 Rev 7 -
www.Dilon.com
29-
Revised 10/16/2018
Page 30

Navigator 2.0 User Manual & Service Guide
6. Running the Peak Procedure: 12mm Lymphatic
Mapping Probe Only
It is important to note that the 12mm Lymphatic Mapping Probe DOES NOT use the ‘Calibration
Verification Quick Test’, instead, the probe-control unit configuration is brought to its highest
sensitivity point via the ‘Peak Procedure,’ described below.
7A. Running a Peak Procedure
A Peak Procedure finds the best “sensitivity” of a probe when “paired” with a control unit. The setting
on the gain module at which the probe counts the most events.
Adjusting the gain module dial increases/decreases the count rate in the Navigator 2.0 Display.
Starting with the control unit turned on and the dial in the full counter-clockwise position (0), the
location on the gain module dial where the count rate reaches its maximum value is called the Peak
Setting. The system should then be left in this setting for any subsequent procedures that day.
The probe must be held in a fixed position with respect to an isotope source during a Peak Procedure.
This source can be either a check source or the injection site (or some other region of high activity)
of the patient.
Only the Navigator 12mm Lymphatic Mapping Probe requires a Peak Procedure, because it is the
only probe that uses the gain module. The Peak Procedure should be performed on EACH day of
use, before the first surgical procedure.
Above: Example of a Peak Procedure using a Cobalt-57 check source
Table 7A-1. Example: Using and “pairing” multiple 12mm Sentinel Node Mapping Probes
N2-5000-07-001 Rev 7 -
www.Dilon.com
30-
Revised 10/16/2018
Page 31

Navigator 2.0 User Manual & Service Guide
during one surgical day with the same control unit
1. Probe A is going to be used on Monday for all surgical procedures scheduled on
that day.
2. Peak Procedure is run on Probe A before the first surgical procedure of that day.
3. Probe A counts are highest when the Gain Module dial is set to about 4.5. The dial
is left at that location.
4. Probe A is ready for all surgical cases for the day.
5. Probe A is dropped and damaged. It cannot be used again until tested and/or
repaired.
6. The Surgical Team chooses to use Probe B for the rest of the case and for all
others scheduled on that day.
7. A Peak Procedure is run on Probe B before the next case or before continuing the
current surgical procedure to “pair” it with the control unit.
8. Probe B counts are highest when the Gain Module dial is set just above 6. The dial
is left at that location.
9. Probe B is ready for all surgical cases for the day.
N2-5000-07-001 Rev 7 -
www.Dilon.com
31-
Revised 10/16/2018
Page 32

Navigator 2.0 User Manual & Service Guide
SERVICE MANUAL
7. Troubleshooting
With the exception of the Wireless Pilot Probe’s battery holder, no serviceable components are
located inside the control unit or probes. Contact your representative or Dilon Technologies for
additional assistance if more detail is required.
Table 8A-1. Control Unit Only - Settings and Indicators
Problem Possible Causes Remedies
1. Display is dark;
No power to unit.
2. Incomplete digits
in display.
Power switch is off;
Switch is broken.
Unit may have been
dropped.
Battery is dead. Recharge battery, or replace with new
Fuse is blown or missing. Replace fuse.
Damaged PCB (board) in
control unit
Display, or display driver, is
damaged.
Turn power on;
Contact Dilon Technologies for
assistance.
battery.
Contact Dilon Technologies for
assistance.
Contact Dilon Technologies for
assistance.
Unit may have been
dropped.
Table 8A-2. Navigator 2.0 Control Unit with WIRELESS PILOT PROBE- Settings and
Indicators
Problem Possible Causes Remedies
1. Zero in display.
No signal under
presence of a
radioactive source.
No wireless connection
between probe and control
unit.
Isotope control is set to
incorrect isotope.
Circuit inside the control unit
has been damaged.
Probe LED is illuminated but
not transmitting signal to unit
(LED flashes when
transmitting).
Probe is damaged / probe
cap not secure.
Replace the probe battery.
Verify that battery was inserted
correctly into probe (‘+’ should face
toward base of probe).
Change isotope control (on back of
control unit) to Tc-99.
Try a different control unit. Contact
Dilon Technologies for assistance.
Gently shake probe to activate
connectivity.
Try a different probe, or contact Dilon
Technologies for assistance.
N2-5000-07-001 Rev 7 -
www.Dilon.com
32-
Revised 10/16/2018
Page 33

Navigator 2.0 User Manual & Service Guide
Problem Possible Causes Remedies
2. LED on Pilot
Probe does not
illuminate.
Probe battery is dead or
installed incorrectly.
Replace with new battery.
Verify that battery was inserted
correctly into probe (‘+’ should face
toward base of probe).
Battery was not installed. Install new battery.
LED on probe is damaged. Contact Dilon Technologies for
assistance.
Table 8A-3. Control Unit with CABLED PROBE- Settings and Indicators
Problem Possible Causes Remedies
1. Zero in display.
No signal under
presence of a
radioactive source.
No connection between
probe, cable, gain module (if
present), and control unit.
Isotope control is set to
incorrect isotope.
Gain module, if used, is set
to zero.
There is an open circuit in
the probe cable.
Check that all connections are secure.
Change Isotope Control (on back of
control unit) to Tc-99.
Run Peak Procedure (Sec. 7A).
Replace cable.
2. Spurious high
counts, such as
80,000 counts a
second (when probe
is held in air, for
example).
Circuit inside the control unit
has been damaged.
Probe is damaged / probe
cap not secure / detector
damaged.
Intermittent short in the
cable.
Try a different control unit. Contact
Dilon Technologies for assistance.
Try a different probe or contact Dilon
Technologies for assistance.
Replace cable.
N2-5000-07-001 Rev 7 -
www.Dilon.com
33-
Revised 10/16/2018
Page 34

Navigator 2.0 User Manual & Service Guide
8. Specifications
9A. Navigator 2.0 System Specifications
The Navigator 2.0 system consists of the control unit, one or more probes, and the system
accessories.
Table 9A-1. Navigator 2.0 System Specifications
Item Description
Control Unit Power Source Replaceable, internal battery
Battery
New Battery Charge Life – full
charge
Battery Recharge Cycle -100%
discharge
Wireless Pilot Probe Power
Source
Wireless Pilot Probe
Transmission Distance
Industry Standard Wireless
Operating Frequency
Fuse – Control Unit UL/CSA (198G) standards; 0.75 amp. Glass housing. 250
Sound Indicators Pitch variations - Frequency proportional to event rate.
Rechargeable Smart Lithium Ion Battery; 10.8V (nominal)
voltage, 8.7Ah (nominal) capacity, 94Wh SOC (state-ofcharge) indicator. Approximate weight: 470g
Approximately 10-12 hours continuous use (nominal)
300 full charge/discharge cycles at room temperature and
under normal discharge rates.
Battery. Single use CR2, 3 V Lithium; capacity 750-850
mAh
Up to 9 meters
2.4 GHz.
volt rating. 5x20m.
IEC 127 standards: Type 7. 0.75 amp,
250 volts. 5x20m T0.63AL250V.
Upon completion of 10-second count, device emits doublebeep sound.
Visual Indicators Control Unit:
N2-5000-07-001 Rev 7 -
www.Dilon.com
· Digital count – Vacuum fluorescent display
· Single count – LED
· Calibration-check - LED
· 10-second count – LED
· Battery energy level – LED
· Range 1X/10X/100X – LED
· Isotope – LED (four)
Battery:
· Battery state-of-charge – 4 LED’s
Wireless Pilot Probe:
· Probe connection – LED
· Isotope Indicator – LED
34-
Revised 10/16/2018
Page 35

Item Description
Energy Range 0 - 650 keV
Navigator 2.0 User Manual & Service Guide
Operating Conditions
Temperature: 15°C to 40°C (5°F to 104°F)
Humidity: 0%-80% relative humidity
Atmospheric Pressure: 80 kPa to 106 kPa
Storage
Temperature: -15°C to 40°C (5°F to 104°F)
Humidity: 0%-80% relative humidity
Atmospheric Pressure: 50 kPa to 106 kPa
Maximum Count Rate 90,000/s
Color of Housing Light gray and dark gray
Control Unit Dimensions 20cm W x 24cm H x 12cm D
Control Unit Weight w/Battery 2.0kg
Accuracy 95%-99% across the dynamic range of the instrument with
probes
9B. System Accuracy
The Navigator 2.0 System with Probe counts gamma photons that proceed from radioisotopes. At
event rates around 20,000 counts per second, the event rate shown in the display may be slightly
less than the event rate seen by the probe. This is due to the possible occurrence of a second gamma
photon during the short time period (a few microseconds) it takes the system to count a detected
gamma photon.
The Navigator 2.0 Device exhibits at least 95% accuracy across its dynamic range.
N2-5000-07-001 Rev 7 -
www.Dilon.com
35-
Revised 10/16/2018
Page 36

Navigator 2.0 User Manual & Service Guide
Navigator 2.0 Battery
N2-8500
-
00
Battery Charger Power Cord
SC-
2000
-00
Navigator 2.0 Stand with
Pole Clamps
N2-
8800
-00
6mm Diameter Cable
(for CdTe
Probes)
GP-
4001
-00
Probe)
PM-
4000
-20
Gain Module for 12mm Probe
PM-
4000
-40
End Cap for Wireless Pilot Probe
(pack of 10)
WP-
2000
-10
Battery Holder for Wireless Pilot Probe
(pack of 5)
WP-
9050
-00
9. Support Items
The Navigator 2.0 control unit is typically supplied with a complete system. Support items may be
purchased from the local Dilon Technologies Navigator representative. At time of publication of this
manual, the primary support items have the following part numbers. Feel free to contact your local
representative for additional information.
10A. Product Part Numbers
Table 10A-1. Navigator 2.0 System Support Items with Part Numbers
Item Dilon Part Number
2-Bay Battery Charger N2-8000-02
Batteries for Wireless Pilot Probe (pack of 10) WP-8500-01
3mm Diameter Cable (for 12mm Lymphatic Mapping
Optional Storm Case (for travel and storage) N2-8000-07
Optional Top Gun Collimator SP-1800-00
Optional Co-Pilot Devices GP-6801-00
10B. Sterile Drape
A sterile drape is an additional accessory, but it is not sold or supported by Dilon Technologies.
Typical characteristics of a suitable intra-operative probe drape are as follows:
· Universal gamma probe cover, 5 x 24
· Sized with tapered tip to fit both straight and flexible probes
· Low density, soft polyethylene
· Telescopically folded w/rubber bands and medical grade tape strips
· Drape features:
o 100% guaranteed latex-free - All components, including rubber bands
o All available EtO Sterile
o Strong and durable Anti-Static material
N2-5000-07-001 Rev 7 -
www.Dilon.com
36-
Revised 10/16/2018
Page 37

Navigator 2.0 User Manual & Service Guide
10. Maintenance
11A. Overview
While the Navigator 2.0 System is virtually maintenance-free, the user should follow a number of
steps to ensure proper performance prior to each use.
1.
Check each system component for any visible signs of abuse, neglect, or wear, before each
use and storage. This includes checking the following components and these features:
Table 11A-1. Component Check
Component Check Feature Check
Control Unit
Battery Charger Overall check - Housing and integrity of connections.
Probe (Wireless or cabled) Overall check. Also tip and connector.
Cable (if used) Each connector, the connector pins, and integrity of cable.
Gain Module (if used) Dial, cable and connector.
· Should abnormalities be discovered, contact your sales representative or Dilon
Technologies directly.
· Do not use a damaged control unit, battery, battery charger, probe, cable, or gain module.
2. Check each battery for function and charge before use. Should abnormalities be discovered,
contact your sales representative or customer support person.
3. To ensure proper functionality, follow each step as outlined in: “Control unit, Battery, and CoPilot,” and the section in the manual pertaining to the relevant probe.
4. In addition to the above, preventive maintenance suggests that every two years a new battery,
fuse and cable (if used) might be considered.
5. User maintenance for the Wireless Pilot Probe is restricted to battery and battery cap
replacement. There are no user serviceable components or items on the Pilot Probe. Do not
attempt to repair damaged battery contacts, or any other damage to the probe.
Overall check - Housing, integrity of switches and integrity
of connections.
WARNING! No modification of this equipment is allowed. Any modification to this will void any
remaining warranty, if attempted.
11B. Verification of Standard Gain (Calibration Quick Test)
The Navigator 2.0 system is designed to minimize periodic maintenance, such that would be
performed by a clinical engineering department or the manufacturer. Depending on the probe used,
one of two procedures can be performed by the user.
11B-1. Verification of Standard Gain (Calibration Quick Test) - Background
For CABLED PROBES only. Applies to the Standard Lymphatic Mapping Probes (SP-2A14-67 & SP-
2S14-67), Superficial Head & Neck Probe (SP-2S11-53), Laparoscopic Probes (SP-2S10-19 and SP2S10-31), and the Daniel™ Lung Probe
of Standard Gain every six months or every year. The procedure does not calibrate the system; it
simply reveals whether or not the probe and control unit are set to a common gain standard
(calibration). That common standard relates the gamma photon energy detected by the probe to an
N2-5000-07-001 Rev 7 -
www.Dilon.com
(SP-2S10-31D)
37-
Revised 10/16/2018
.. Some institutions perform this Verification
Page 38

Navigator 2.0 User Manual & Service Guide
energy window inside the control unit.
The Verification of Standard Gain uses 122 keV energy photons produced by the Isotope of Cobalt-
57, to create a known signal in the probe. The control unit expects these detected photons to be in
an energy window corresponding to the CENTERED (>0<) position of the test. The control unit also
has a test setting for an energy window BELOW (-) the expected signal, and an energy window for a
signal ABOVE (+) the expected signal. The desired outcome of the test is that the signal is greatest
in the CENTERED (>0<) position, as revealed by the highest count rate seen in the control unit’s
display. The details of the test are given below.
11B-2. Verification of Standard Gain (Calibration Quick Test) – Procedure. For CABLED
PROBES only.
1. Clean the PROBE and, if used, the CABLE.
2. Charge the BATTERY, and install it into the CONTROL UNIT.
3. Place the system controls as indicated in Table 11B-2, “System Configuration - Cobalt-57
Alignment”.
4. Align a 57 Cobalt source directly with the probe tip. Maintain this exact position between the
source and the probe tip for the duration of the test.
5. Place the system controls as indicated in Table 11B-2 “System Configuration - Cobalt-57
Alignment.”
6. Place the SCAN/Calibrate Control in the CENTERED position, which is indicated by the
following symbol on the SCAN/Calibrate Control (>0<). Obtain a ten-second count. Record
this total.
7. Place the SCAN/Calibrate Control in the BELOW position which is indicated by the following
symbol on the SCAN/Calibrate Control ( - ). Press the COUNT control to obtain a ten-second
count. Record this total.
8. Place the SCAN/Calibrate Control in the ABOVE position which is indicated by the following
symbol on the SCAN/Calibrate Control ( + ). Obtain a ten-second count. Record this total.
9. The highest count should be when the SCAN/Calibrate Control is in the CENTERED (>0<)
position. The count in the ABOVE position ( + ) and the count in the BELOW position ( - )
should be less than the count in the CENTERED ( >0< ) position. The observance of these
relationships verifies that the probe and control unit have the same standard gain.
10. Return the SCAN/Calibrate Control to the SCAN position.
11. Return the other system controls to the settings for normal use.
12. End of Test.
Table 11B-2. System Configuration – Cobalt-57 Alignment during Calibration Quick Test
Component/Feature Setting
Cabled Probe Cable connected to probe input
CALIBRATE control (rear panel) (>0<), ( - ), ( + )
ISOTOPE control (rear panel) Technetium-99m
THRESHOLD control As desired (no effect)
POWER switch ON
RANGE control As desired
VOLUME control As desired
NOTE: Because the system is designed to detect slight changes in the location and intensity of
radioisotopes, the test source must be maintained in the same direct alignment and distance
N2-5000-07-001 Rev 7 -
www.Dilon.com
38-
Revised 10/16/2018
Page 39

Navigator 2.0 User Manual & Service Guide
from the probe tip throughout the three calibration tests.
NOTE: The front panel CALIBRATION INDICATOR blinks when the SCAN/Calibrate Control
is in either the BELOW ( - ), CENTERED (>0<), or ABOVE ( + ) test position. The
CALIBRATION INDICATOR is OFF when the CALIBRATION control is in the SCAN position.
NOTE: All Dilon Technologies probes can be used with any Navigator 2.0 control unit.
The 12mm Lymphatic Mapping Probe, used with a Gain Module, requires a different
method of peak calibration assurance, entitled “Running a Peak Procedure".”
11C. Fuse Replacement Procedure
The fuse is to be replaced when necessary by the user (when the fuse is "blown"). The Navigator 2.0
fuse is to be replaced as follows:
1. Push-in and twist the fuse holder cap counter-clockwise.
2. Remove the fuse from the fuse holder.
3. Insert a new fuse into the holder.
N2-5000-07-001 Rev 7 -
www.Dilon.com
39-
Revised 10/16/2018
Page 40

Navigator 2.0 User Manual & Service Guide
4. Press-in and twist the fuse holder cap clockwise to lock it in place
N2-5000-07-001 Rev 7 -
www.Dilon.com
40-
Revised 10/16/2018
Page 41

Navigator 2.0 User Manual & Service Guide
CAUTION:
protective wrapping upon return for repair.
11. Repair
Probes are sealed at the factory. No user serviceable parts are inside the probes. Damage to a probe
may result if a probe is opened by the user and will void any remaining warranty, if attempted.
Serviceable parts on the Navigator 2.0 control unit include a fuse, which may be inspected and
replaced by the user, and a replaceable battery. Beyond these two items, the control unit contains no
user serviceable parts and should not be opened by the user.
Please contact Dilon Technologies for additional service. An RMA number is required upon return for
service.
If the device cannot be repaired and or it is determined that its useful life is at an end, contact Dilon
Technologies for proper disposal of the unit.
12050 Jefferson Avenue
Suite 340
Newport News, VA 23606
USA
Phone: +1-844-DILONNAV
www.Dilon.com
Before using loose packing materials, such as foam pellets, shredded paper, or
excelsior, be sure to wrap the component(s) separately in protective bags or other
CAUTION:
If a system, or system components, are to be shipped from your institution for repair,
then please clean and disinfect the components as described in this manual before
packing for shipment. Dilon Technologies require that the Navigator Service Sheet
be attached to the outside of the shipping box, certifying that the items have
been cleaned and disinfected to manufacturer’s specifications. This form can
be found on the Dilon Technologies website (www.DilonProducts.com) or by
contacting your distributor or Dilon Technologies directly.
N2-5000-07-001 Rev 7 -
www.Dilon.com
41-
Revised 10/16/2018
Page 42

Navigator 2.0 User Manual & Service Guide
12. Recycling
At the end of the device life and/or accessories, please send the device and/or its
accessories back to Dilon Technologies Authorize Representative in Europe.
Ensure the cleaning of the device and/or it accessories before shipment.
The disposables of the product are made out of plastic and cannot be reused and must be
disposed as standard disposables.
N2-5000-07-001 Rev 7 -
www.Dilon.com
42-
Revised 10/16/2018
Page 43

Navigator 2.0 User Manual & Service Guide
Ó
13. Limited Warranty
Dilon Technologies (Dilon), warrants to its customers that, subject to the below provisions, the
Navigator 2.0 system and probes will be free from defects in materials and workmanship for twelve
(12) months, commencing upon the date of shipment from Dilon.
Replacement parts and products are warranted to be free from defects in material and workmanship
for a period equal to the balance of the warranty period remaining on the original part or product.
Dilon will repair or replace, at its option and without charge, any of the above products which are
returned to Dilon or its designated repair site, within the applicable warranty period, with prepayment
of shipping costs, and which are determined by Dilon to be defective in materials or workmanship.
This Limited Warranty does not apply to any product or replacement part or replacement product
which has been subjected to any damage as a result of an accident or abuse, or that has not been
used and maintained in accordance with the information contained in the literature accompanying the
product, or that has been modified, repaired or serviced by any person or company other than Dilon
or its authorized representative.
Dilon’s sole liability for any defective product shall be repaired or replaced as set forth above. Dilon
shall not be liable to anyone, under any circumstances, for any special, punitive, incidental or
consequential damages whatsoever, including without limitation any costs, expenses, lost profits or
other losses however designated. EXCEPT AS STATED ABOVE, NO WARRANTIES ARE
EXPRESSED OR IMPLIED, INCLUDING, WITHOUT LIMITATION, ANY WARRANTIES OF
MERCHANTABILITY OR FITNESS FOR A PARTICULAR PURPOSE, AND, EXCEPT AS STATED
ABOVE, DILON EXPRESSLY DISCLAIMS ALL WARRANTIES.
Manufactured by: Authorized European Representative:
Dilon Technologies, Inc.
12050 Jefferson Avenue
Suite 340
Newport News, VA 23606
USA
Phone: +1-844-DILONNAV
www.Dilon.com
AG Medical
Route de l'Orme,
Parc des Algorithmes - Imm. "Homère"
91190 Saint-Aubin , France
http://ag-medical.com/
2014 Dilon
All Rights Reserved. May 2014
Made in USA
N2-5000-07-001 Rev 7 -
www.Dilon.com
43-
Revised 10/16/2018
 Loading...