

Dik Geurts Britta User Manual

GEBRUIKERSHANDLEIDING NL/BE
USER MANUAL GB/IE
BEDIENUNGSANLEITUNG DE/AT/BE/LU/CH
MODE D’EMPLOI FR/BE/LU/CH
BRUGERVEJLEDNING DK
MANUALE D’USO E DI INSTALLAZIONE IT
HOUTGESTOOKTE HAARDEN NL/BE
WOOD BURNING APPLIANCES GB /IE
HOLZ GEFEURTE KAMINE UND KAMINÖFEN
DE/AT/BE/LU/CH
POÊLES À BOIS FR/BE/LU/CH
BRAENDEOVN DK
STUFE A LEGNA IT
Lees en bewaar dit document zorgvuldig
Please read and retain this document carefully
Dieses Dokument bitte sorgfältig lesen und aufbewahren
Lisez et conservez soigneusement cette notice
Læs og opbevar dette dokument omhyggeligt
Leggere e conservare con cura il presente documento
89000090.04
Postbus 1021, NL-6920 BA DUIVEN
Industrieweg Oost 11, NL-6662 NE ELST
Dik Geurts Haardkachels B.V.
The Netherlands
07/2011


Nederlands
INHOUD
VOORWOORD
1 INLEIDING
2. VEILIGHEID
2.1 Algemeen
2.2 Voorzorgsmaatregelen / veiligheidsinstructies
3. STOOKINSTRUCTIES EN TIPS
3.1 Hout
3.2 Ventilatie
3.3 Rookgaskanaal
3.4 As
3.5 Ruit
4. INGEBRUIKNAME
4.1 Eerste keer
4.2 Bescherming
4.3 Verkleuring van wanden en plafonds
4.4 Houtkachel met oven
5. AANSTEKEN EN STOKEN
5.1 Aanwijzingen
5.2 Werkwijze
6. ONDERHOUD
6.1 Schoonmaken
6.2 Lak
6.3 Keerplaten
6.4 Deurafdichting houtkachel
6.5 Vermiculietplaten
6.6 Ruit
6.7 Schoorsteenvegen
7. STORINGEN
8. MILIEU
8.1 Algemeen
8.2 Haard
9. GARANTIE
Dik Geurts
1
VOORWOORD
Als fabrikant van haarden ontwikkelt en produceert Dik Geurts
producten volgens de hoogst mogelijke kwaliteits-, prestatieen veiligheidseisen. U kunt hierdoor rekenen op jarenlang
gebruiksplezier.
Deze haard is voorzien van een CE merk. Houtgestookte
haarden die voldoen aan de essentiële eisen uit de Europese
Bouwproductenrichtlijn, waaronder eisen voor veiligheid, milieu
en energiegebruik, hebben het recht het CE merk te dragen.
Bij de haard worden twee handleidingen geleverd: de
installatiehandleiding en de gebruikershandleiding.
De gebruikershandleiding geeft u de informatie die u nodig hebt
om de haard goed en veilig te laten functioneren.
Lees deze gebruikershandleiding zorgvuldig alvorens de haard
in gebruik te nemen.
U dient de gebruikershandleiding én de installatiehandleiding
zorgvuldig te bewaren.
Als gebruiker mag u uitsluitend de werkzaamheden uitvoeren
die in de gebruikershandleiding worden genoemd. Voor
de overige werkzaamheden schakelt u een vakbekwame
installateur in.
Neem bij vragen of twijfel altijd contact op met uw installateur.
In de handleidingen worden de volgende markeringen gebruikt
om belangrijke informatie aan te geven:
● Uit te voeren acties
!Tip Suggesties en adviezen
!Let op Deze instructies zijn noodzakelijk ter
voorkoming van mogelijke problemen bij
gebruik
Deze instructies zijn noodzakelijk ter
voorkoming van brand, persoonlijk letsel of
andere ernstige schades
1. INLEIDING
Gefeliciteerd met de aankoop van uw Dik Geurts haard.
Deze vrijstaande of hangende houtgestookte haard heeft
een uitgekiend stooksysteem dat zorgt voor een effectieve
verbranding en een optimaal rendement.
De verbrandingsruimte is bekleed met platen van vermiculiet.
Bovenin ligt een zogenaamde keerplaat om het rendement te
verhogen.
Er wordt gesproken van een open haard wanneer de
luchttoevoer niet geregeld is.
De houtkachels zijn uitgerust met een schuif voor de primaire
luchttoevoer; de secundaire lucht wordt continu langs de
bovenkant van de ruit geleid.
De haard is uitsluitend geschikt om gestookt te worden met
hout of houtbriketten.
2. VEILIGHEID
2.1 Algemeen
Leest u dit hoofdstuk over veiligheid zorgvuldig door;
Houdt u zich aan de maatregelen/instructies in deze
handleiding.
2.2 Voorzorgsmaatregelen / veiligheidsinstructies
Volg de onderstaande maatregelen/voorschriften nauwkeurig op:
● laat de installatie van uw haard uitvoeren door een
vakbekwame erkende, installateur voor houtgestookte
toestellen;
● laat de haard installeren volgens de geldende nationale,
lokale en bouwkundige (installatie)voorschriften;
● laat het rookgaskanaal vooraf inspecteren en reinigen door
een erkend schoorsteenveegbedrijf.
● laat het rookgaskanaal minimaal één keer per jaar
inspecteren en reinigen door een erkend
schoorsteenveegbedrijf. Alleen met een goed kanaal zal uw
haard veilig en probleemloos functioneren;
● plaats op een brandbare vloer een vloerplaat onder de
haard die voldoende groot is. Deze is als accessoire
verkrijgbaar;
● breng zelf geen wijzigingen aan de haard aan;
● gebruik uitsluitend originele onderdelen ter vervanging;
● voer werkzaamheden uit als de haard tenminste 24 uur
buiten gebruik is;
● stook de haard alleen met de aanbevolen brandstof, zijnde
schoon en droog hout.
● gebruik de haard niet als afvalverbrander;
● plaats brandbare voorwerpen en/of materialen zoals
overgordijnen e.d. altijd op minimaal 70 cm afstand van de
haard en/of de kachelpijpen;
● laat geen kleding, handdoeken e.d. op de haard drogen;
● vermijd contact met een brandende haard ter voorkoming
van brandwonden en/of het vlamvatten van kleding;
● haard gebruik bij bediening van de haard de meegeleverde,
hittebestendige handschoen, omdat de haard tijdens gebruik
aan de buitenkant heet wordt;
● laat kinderen en personen die de consequenties van hun
handelen slecht overzien nooit alleen bij een brandende
haard;
● vermijd werken met oplosmiddelen, lijmen e.d. in de
opstellingsruimte als de haard brandt;
● gebruik de houtkachels voor bijverwarming; deze zijn niet
ontwikkeld voor continu gebruik als hoofdverwarming;
● zorg voor voldoende ventilatie in de opstellingsruimte;
● sluit bij schoorsteenbrand de luchttoevoer; doof eventueel
het houtvuur met zand en bel de brandweer.
3. STOOKINSTRUCTIES EN TIPS
Hieronder volgen tips en instructies die belangrijk zijn voor de
goede werking van uw haard.
3.1 Hout
Goede brandstof is de ‘motor’ van uw haard. U hebt het
meeste profijt van uw haard als u stookt met kwalitatief
hoogwaardig, goed gedroogd hout. U voorkomt daarmee
ongewenste bijverschijnselen zoals overvloedige rookvorming of
spetteren.
Droog hout
Hout moet goed droog zijn. Vers gekapt hout is niet geschikt
omdat het teveel vocht bevat (ca. 60%).
Vochtig hout geeft een dof geluid als u twee blokken tegen
elkaar slaat. Laat het hout daarom minimaal één of liever zelfs
twee jaar drogen. Hout droogt goed als u het buiten onder een
2
Let op
!
Let op
!
afdak opslaat (dus niet in de garage); bij voorkeur op een
zonnige plek. Zo heeft de wind (maar niet de regen) vrij spel.
Korte, gekloofde stammetjes drogen het snelst. Zij bevatten na
het drogen nog maar 15 tot 20% vocht en geven het hoogste
rendement.
Droog hout geeft een heldere klank als u twee blokken tegen
elkaar slaat.
Rook
Lichtgekleurde (witte of kleurloze) rook duidt op het gebruik
van geschikt hout en op een goede verbranding. Grijze, blauwe
of zelfs zwarte rook ontstaat bij onvolledige verbranding;
bijvoorbeeld door te vochtig hout, te weinig luchttoevoer of een
slecht trekkend rookgaskanaal.
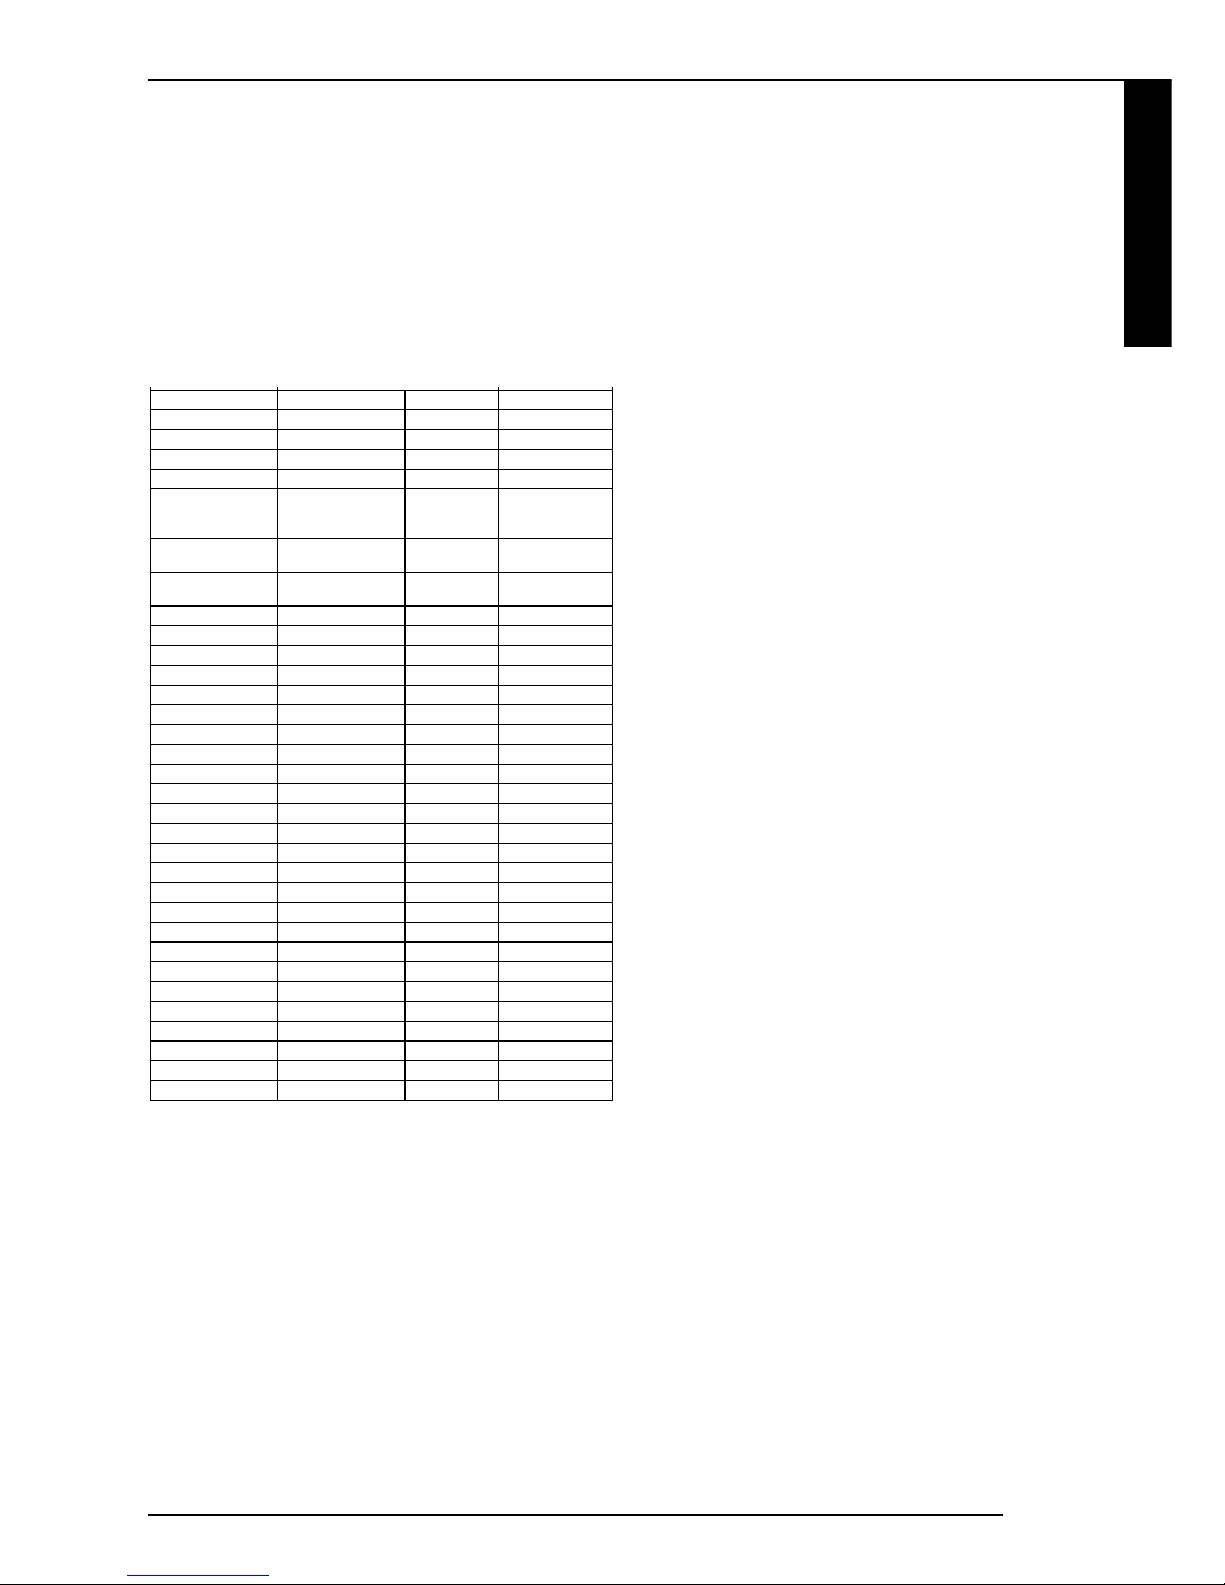
3.1.1 Hoeveelheid hout
U dient zich te houden aan de maximale hoeveelheid (aantal
én afmetingen) houtblokken zoals in onderstaande tabel is
aangegeven. Bij gebruik van een grotere hoeveelheid wordt de
warmteafgifte groter. De haard kan hierdoor overbelast raken
waardoor onderdelen beschadigen en/of de wanden van de
haard verkleuren. Indien de haard te hard brand gebruik dan
grover/harder hout.
Tabel 1: Toegestane hoeveelheid brandstof
1 kg droog stookhout levert ca. 4 kWh (kilowattuur) aan
energie.
In de Installatiehandleiding kunt u in bijlage 2, Typeplaatje, lezen
wat het vermogen van uw haard is.
Hout koopt u meestal per kubieke meter. Er zijn echter
verschillende soorten ‘kuubs’ in de handel:
een echte kuub (netjes opgestapeld gezaagd en gekloofd hout):
1,0 m3 (ca. 800 kg)
een stort kuub (hout gestort in bakken van 1 m3):
ca. 0,6 m
3
(400 kg)
een stère (netje opgestapelde meterstukken):
1,4 m3 (ca. 900 kg)
3.1.2 Geschikte houtsoorten
De onderstaande houtsoorten worden aanbevolen om in uw
haard te stoken:
- Harde houtsoorten zoals eikenhout, beukenhout en hout van
fruitbomen. Deze houtsoorten geven een korte vlam en
branden lang;
- Lichte houtsoorten zoals berken-, populieren-, wilgen- en
elzenhout. Deze soorten geven een lange vlam maar
branden vrij snel op.
- Naaldhout c.q vurenhout. Dit hout alleen gebruiken in een
goed brandend vuur omdat u anders aanslag in het
rookgaskanaal krijgt; voor open haarden niet echt geschikt
vanwege het spetteren. Vurenhout wordt vaak gebruikt als
aanmaakhout.
- Houtbriketten (samengeperste houtspaanders);
3.1.3 Ongeschikte brandstof
De hieronder genoemde materialen zijn niet geschikt voor uw
haard. Gebruik daarom nooit:
- Nat of vers hout. U krijgt uw haard moeilijk aan met dit hout
en het geeft weinig warmte;
- Geverfd, gebeitst of geïmpregneerd hout. De chemicaliën
zijn slecht voor het milieu en bovendien tasten deze bij een
houtkachel de ruit aan;
- Multiplex en spaanplaat;
- Steenkoolsoorten zoals antraciet, cokes of eierkolen. Deze
zijn alleen geschikt om in een kolenkachel te stoken;
- Bedrukt (gekleurd) papier van tijdschriften. Een prop
kranten is wel geschikt om de haard aan te steken;
- Brandbare vloeistoffen. Deze mogen ook niet gebruikt
worden om de haard aan te steken;
- Plastic, textiel en overige afvalmaterialen. Een ‘allesbrander’
bestaat niet!
3.2 Ventilatie
Voor verbranding is lucht nodig. Een houtkachel verbruikt
ongeveer 35 m
3
lucht per uur; een openhaard ongeveer
150-200 m3 lucht per uur.
Gebrek aan verse lucht in woningen met een mechanisch
luchtafzuigsysteem en/of het gebruik van de afzuigkap in een
open keuken kan leiden tot onderdruk in uw kamer. Het gevaar
bestaat dan dat er schadelijke rookgassen uit de kachel in
de kamer stromen (rookterugslag); bovendien functioneert
de haard slecht. Het is dus van groot belang dat u zorgt
voor aanvoer van verse lucht in uw kamer. U kunt verse lucht
aanvoeren door een bovenlicht te openen of een raam op een
kier te zetten.
3.3 Rookgaskanaal
Voor een goede en veilige werking van de haard is het nodig
dat er voldoende trek is in het rookgaskanaal. Bij het aanmaken
van de haard is het rookgaskanaal nog koud waardoor er
weinig trek is. Om de trek te bevorderen wordt er in het begin
Nederlands
Dik Geurts
3
Kachel type Houtblokken Houtbriketten
Max. lengte Max. aantal Max. Kg
Noa Medium 28 cm 2 2,2
Noa Large 40 cm 2 2,8
Aruba Small 28 cm 2 2,2
Aruba Large 40 cm 2 2,8
Bora fixed/flex/
wand/console
Medium
22 cm 3 2,0
Bora fixed/flex/
wand/console Large
28 cm 2 2,2
Tornado Straight/
Oblique
22 cm 3 2,0
Britta 28 cm 2 2,2
Babe/ Babe Swing 28 cm 1 1,6
Kalle 28 cm 1 1,7
Lars 800 20 cm 2 1,0
Lars 900 24 cm 2 1,4
Lars 1100 26 cm 2 2,6
Lars 1300 28 cm 3 4,2
Mats 22 cm 2 1,4
Pelle 20 cm 2 1,0
Tor 24 cm 2 1,3
Vidar Small 20 cm 2 1,0
Vidar Medium 24 cm 2 1,6
Vidar Large 28 cm 2 2,2
Instyle Front 400 20 cm 2 1,0
Instyle Front 550 24 cm 2 1,6
Instyle Front 600 28 cm 2 2,2
Instyle Front 650 28 cm 2 2,2
Instyle Front 700 30 cm 2 2,6
Instyle Front 750 28 cm 3 2,8
Instyle Front 1000 48 cm 2 2,9
Instyle Corner 660 28 cm 2 2,2
Instyle Corner 700 28 cm 2 2,2
Instyle Triple 24 cm 3 2,6
Instyle Panorama 28 cm 2 2,2
Instyle Tunnel 35 cm 3 3,6
meer lucht bij een houtkachel toegevoerd. De extra lucht wordt
verkregen door de zogenaamde primaire luchttoevoer open te
zetten. Als er voldoende trek is en de haard goed door brand,
wordt deze weer gesloten. De primaire luchttoevoer wordt
geregeld met de luchtschuif (zie paragraaf 5.2).
Bij teveel trek ( max. 20 Pascal ) worden de rookgassen te
snel afgevoerd waardoor er te weinig tijd is voor de afgifte
van warmte. Dit gaat ten koste van het rendement. Voor het
oplossen van een dergelijk probleem kunt u het beste contact
opnemen met uw installateur.
Bij mistig en/of windstil weer kunnen de rookgassen neerslaan
en (rook)overlast veroorzaken.
3.4 As
Bij het stoken van hout ontstaat er as. Na vele uren stoken is er
de nodige as gevormd. Een aslaag zorgt voor een isolerende
laag in uw haard. Hierdoor neemt de temperatuur toe en
verbetert het verbrandingsproces. U kunt de as dan ook laten
liggen. Pas als de aslaag de primaire luchttoevoer ( bij een
houtkachel ) afsluit of over de asdorpel heen komt, moet u
(maximaal) de helft eruit scheppen. U dient een stalen emmer te
gebruiken om de as af te voeren, want zelfs na een paar dagen
kan de as nog smeulen. Een stofzuiger is daarom ongeschikt;
de stofzak en de inhoud is namelijk zeer brandbaar.
As van puur (onbehandeld) en droog hout is een natuurproduct.
U kunt het gebruiken als bodemverbeteraar. Afgekoelde as mag
ook in de GFT container gedaan worden.
3.5 Ruit
Hoewel de houtkachel een ruitbeluchtingssysteem heeft, kan er
toch aanslag op de ruit worden gevormd. Lichte aanslag kunt u
verwijderen met een glasreinigingsmiddel. Voor het verwijderen
van hardnekkige aanslag kunt u de bijgeleverde spray
gebruiken; de gebruiksaanwijzing staat op de fles vermeld. Het
gebruik van bijtende en schurende schoonmaakmiddelen moet
u vermijden.
Na een paar keer stoken kan de ruit in een kacheldeur wat
speling krijgen. U kunt deze weer vast zetten door de moeren
aan de binnenkant van de deur iets aan te draaien.
4. INGEBRUIKNAME
4.1 Eerste keer
De buitenzijde van de haard dient schoon te zijn.
Verontreinigingen op de haard zoals (bouw)stof, gruis, restanten
verpakkingsmateriaal en stickers kunnen stank dan wel schroeigevaar opleveren. De lak van de haard is nog niet uitgehard.
Het uitharden gebeurt tijdens de eerste keren stoken. De lak
wordt eerst zacht door de warmte alvorens uit te harden. Het
uitharden kan gepaard gaan met de vorming van een onaangename geur en witte rook, die ontstaan door het uitdampen
van vluchtige componenten.
!Let op
- Ventileer de ruimte goed;
- Huisdieren en vooral vogels kunnen gevoelig zijn voor de
vrijkomende rook.
!Tip
- Raak de kachel niet aan om beschadiging van de lak te
voorkomen;
- Verwijder huisdieren uit de ruimte.
4.2 Bescherming
Om onveilige situaties te voorkomen, dient u de onderstaande
maatregelen/instructies nauwkeurig op te volgen.
- Plaats brandbare voorwerpen en of materialen zoals
overgordijnen e.d. altijd op minimaal 70 cm afstand van de
haard en/of de kachelpijpen;
- Laat geen kleding, handdoeken e.d. op de haard drogen ter
voorkoming van brand;
- Vermijd contact met een brandende haard ter voorkoming
van brandwonden en/of het vlamvatten van kleding;
- Gebruik bij bediening van de haard de meegeleverde,
hittebestendige handschoen;
- Laat kinderen en personen die de consequenties van hun
handelen slecht overzien nooit alleen bij een brandende
haard;
- Vermijd werken met oplosmiddelen, lijmen e.d. in de
opstellingsruimte als de haard brandt.
4.3 Verkleuring van wanden en plafonds
Bruinverkleuring is een vervelend en moeilijk op te lossen
probleem. Bruinverkleuring kan worden veroorzaakt door
stofverbranding als gevolg van toegepaste materialen, te weinig
ventilatie, roken, branden van kaarsen, olielampjes e.d.. Rook
van sigaretten en sigaren bevat teerstoffen die op koudere
muren neerslaan.
Deze problemen kunnen (deels) voorkomen worden door goede
ventilatie van de ruimte waar de kachel staat.
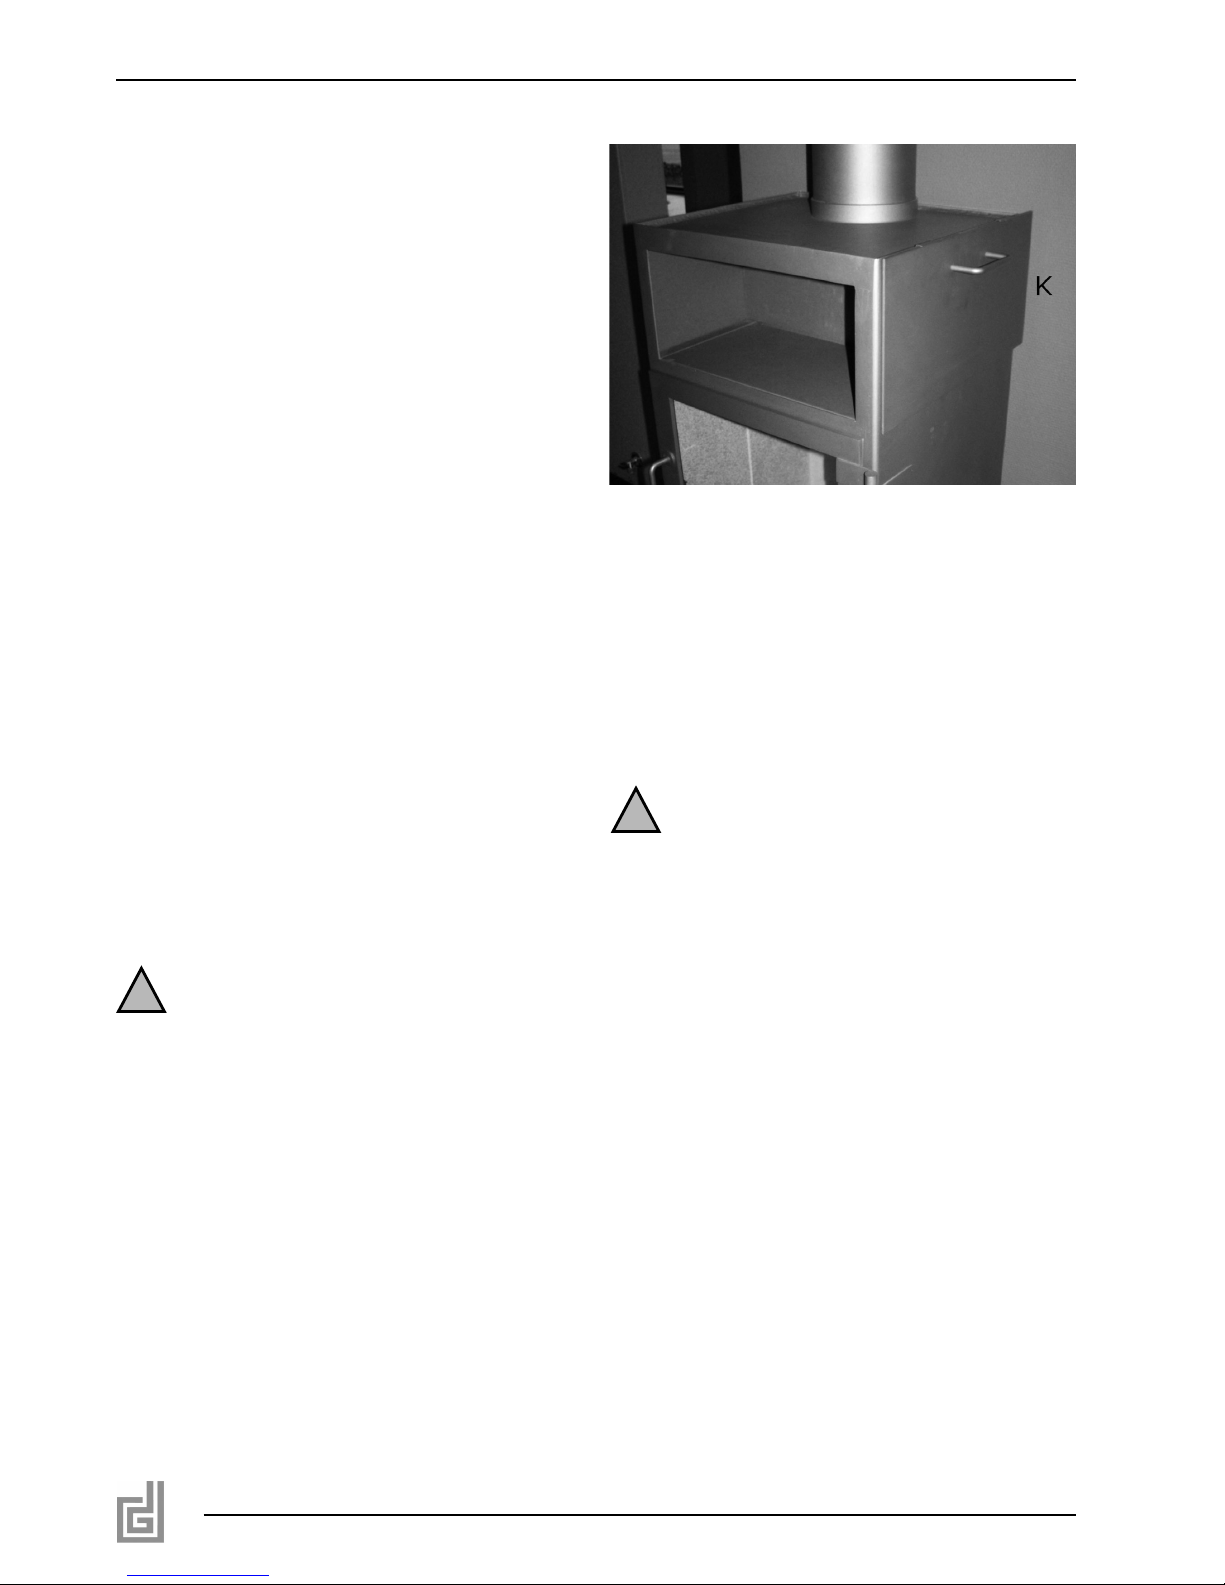
4.4 Houtkachel met oven
De oven kan gebruikt worden voor het opwarmen of bereiden
van gerechten.
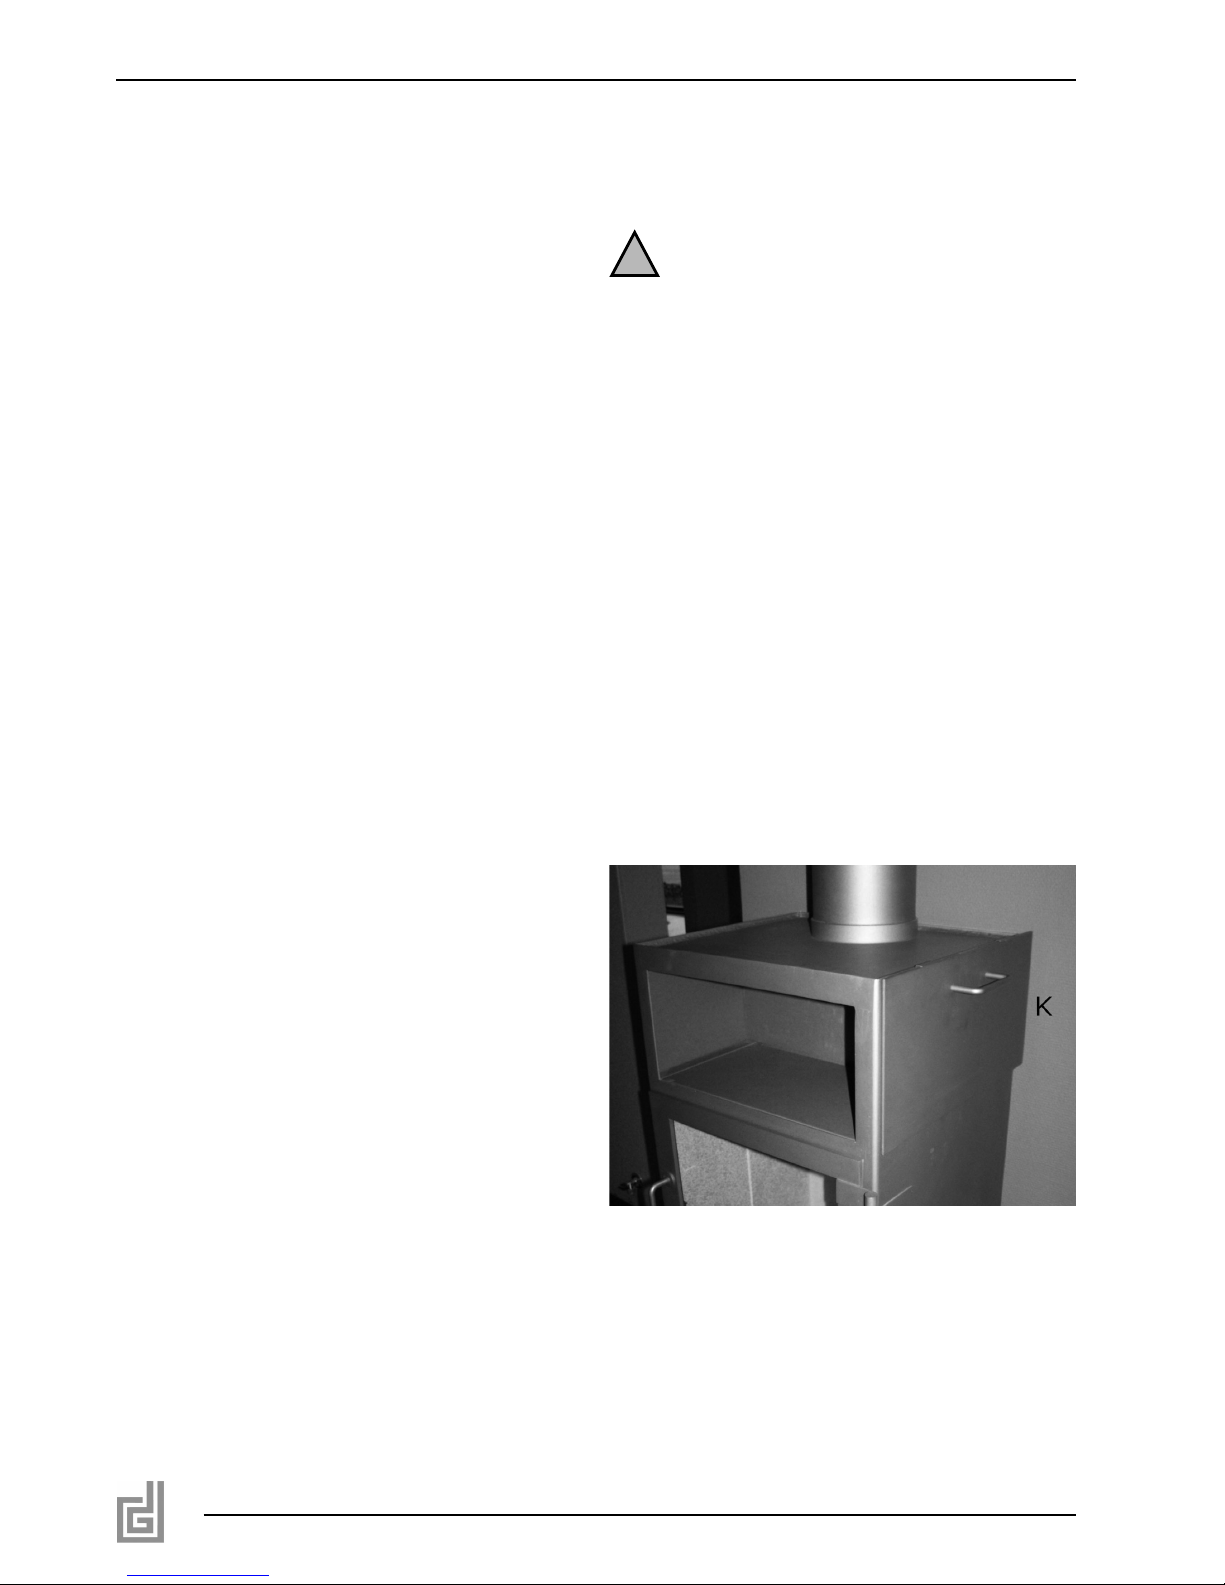
U kunt de oven sluiten met behulp van de klep (zie foto 1, K).
Deze hangt standaard aan de zijkant van de kachel.
Tijdens het gebruik dient u altijd aluminiumfolie in de oven
leggen om te voorkomen dat vet op het ovenoppervlak komt en
inbrandt.
5. AANSTEKEN EN STOKEN
5.1 Aanwijzingen
Volg de onderstaande aanwijzingen voor een goede en veilige
werking van uw haard:
4
foto 1 - K
Let op
!
- Laat uw rookgaskanaal door een erkend schoorsteenveger
controleren op verstopping als u langdurig niet gestookt hebt;
- Gebruik uitsluitend hout of houtbriketten (zie paragraaf 3.1);
- Houdt u zich aan de maximale hoeveelheid houtblokken
zoals vermeld in Tabel 1;
- Zorg voor voldoende aanvoer van verse lucht
(zie paragraaf 3.2);
- Sluit bij schoorsteenbrand de primaire luchttoevoer;
doof het houtvuur met zand en bel de brandweer;
- Gebruik nooit water om het houtvuur te doven;
- Maak de haard niet schoon met een stofzuiger.
!Let op
- Stook bij voorkeur niet bij mistig en/of windstil weer ter
voorkoming van (rook)overlast;
- Stook een houtkachel met de deur dicht; deze wordt alleen
geopend om hout bij te vullen;
- Draai de moeren van de ruit vast als u merkt dat deze wat
speling krijgen; draai de moeren niet té stevig aan, want
vast=vast.
5.2 Werkwijze
Volg de onderstaande stappen voor het aansteken en stoken
van uw haard:
● Verwijder zonodig as met de bijgeleverde asschep
(zie paragraaf 3.4).
● Reinig zonodig de ruit.
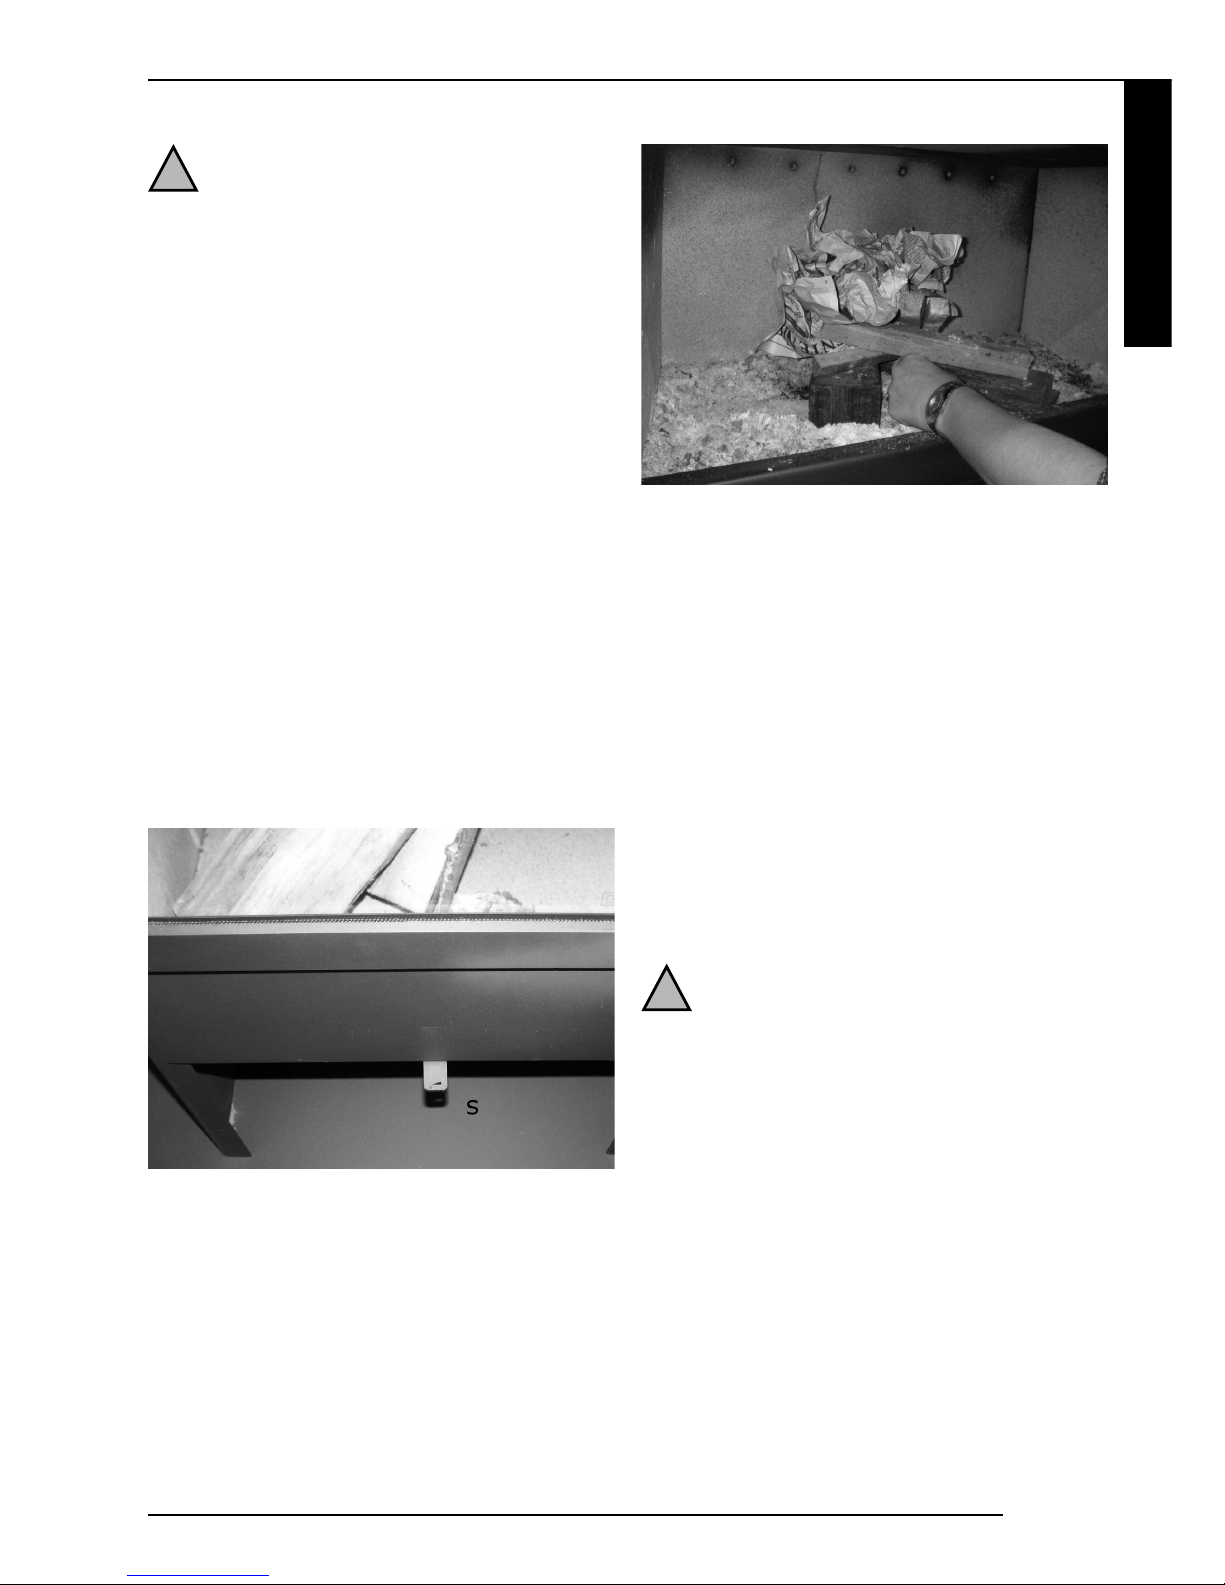
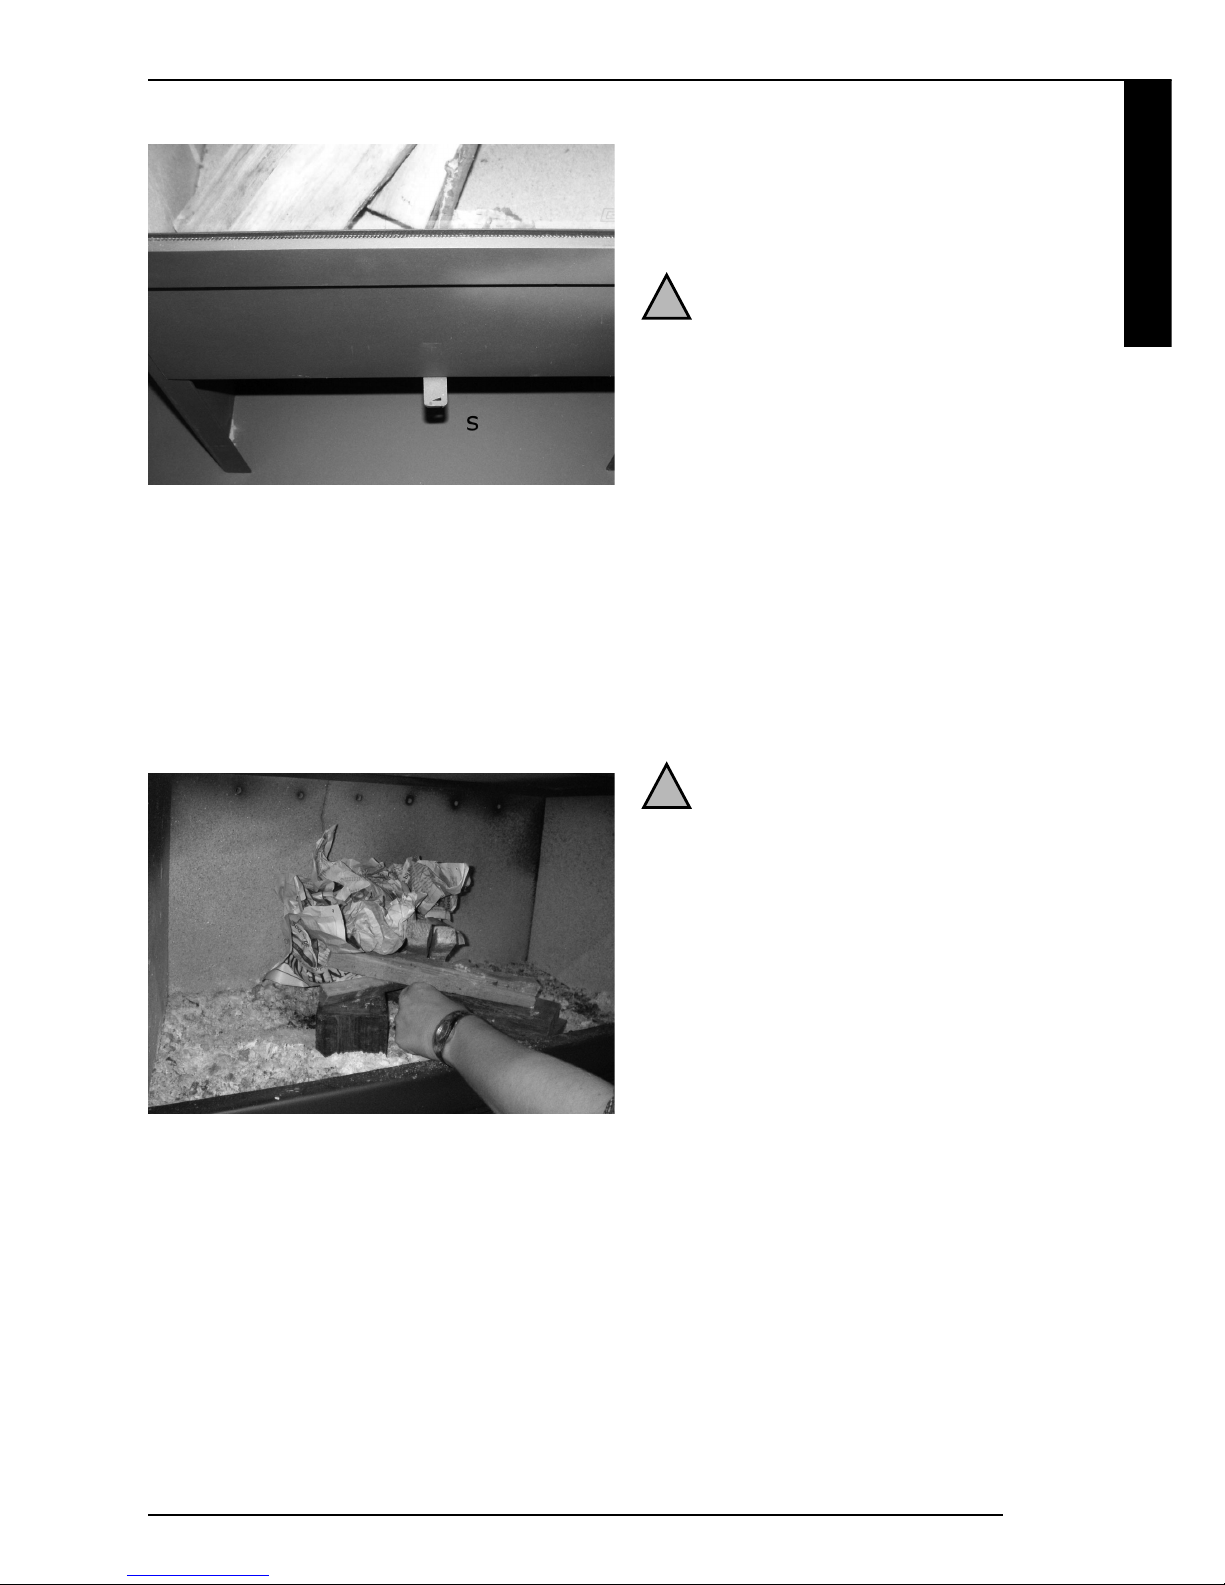
● Zet de primaire luchttoevoer open m.b.v. de schuif (S).
Deze is gesloten als de schuif in de middenstand staat
(zie foto 2, S).
● Plaats 2 houtblokken in de lengterichting in de
verbrandingsruimte
● Leg aanmaakblokjes tussen de houtblokken.
!Tip
In plaats van aanmaakblokjes kunt u ook een prop kranten
gebruiken.
● Stapel aanmaakhoutjes op de 2 houtblokken en leg daar
een wat groter houtblok op.
● Zorg dat er voldoende lucht door de houtstapel kan zodat
het hout makkelijk ontsteekt.
● Leg op de stapel een prop kranten (zie Afb. 3).
● Steek de aanmaakblokjes en de krant aan.
● Sluit bij een houtkachel de kacheldeur.
● Laat het vuur goed doorbranden om het rookgaskanaal op
te warmen.
!Let op
- Een goed verwarmd rookgaskanaal is nodig voor de trek in
het kanaal;
- Een hoge temperatuur houdt het rookgaskanaal schoon;
een thermometer om de rookgastemperatuur te meten is als
accessoire verkrijgbaar via uw leverancier.
- Gebruik bij een houtkachel de schuif van de primaire
luchttoevoer om het vuur te regelen.
● Sluit bij een houtkachel de schuif van de primaire
luchttoevoer na ca. 15-20 minuten.
● Laat de haard doorbranden op kleine houtblokken totdat
een goed brandend vuur met een gloeiend vuurbed
ontstaat.
● Vul de haard vervolgens met houtblokken (zie Tabel 1).
Voorkom dat houtblokken tegen de kachelruit vallen/liggen.
!Tip
- Leg de houtblokken zorgvuldig in de kachel om
beschadiging van de vermiculietplaten te voorkomen;
- Stapel de houtblokken losjes op elkaar zodat er voldoende
lucht bij kan komen;
- Als het vuur niet goed brandt, kunt u bij een houtkachel de
schuif van de primaire luchttoevoer tijdelijk open zetten.
- Vul de haard bij voordat de vlam uit het vuur is; dit zal zo om
de 30 tot 45 minuten zijn met de aanbevolen hoeveelheid
hout.
- Laat de haard altijd leeg branden als u stopt met stoken.
6. ONDERHOUD
Dik Geurts Haarden zijn gemaakt van staalplaat. Er wordt
veel aandacht besteed aan een gedegen fabricage en een
zorgvuldige afwerking, waardoor uw haard weinig onderhoud
nodig heeft. Onderstaande onderhoudstips/instructies dienen
ervoor om de goede werking van uw haard en dus uw
gebruiksplezier te laten voortduren.
Nederlands
Dik Geurts
5
foto 2 - S
foto 3
Let op
!
Let op
!
- Voer het onderhoud uit als de haard minstens 24 uur buiten
gebruik is;
- Breng zelf geen wijzigingen aan de haard aan;
- Als gebruiker mag u alleen het onderhoud verrichten zoals
genoemd in dit hoofdstuk; voor overige werkzaamheden
schakelt u een installateur in met ervaring op het gebied van
houtverwarming;
- Gebruik uitsluitend originele onderdelen ter vervanging;
deze zijn verkrijgbaar via uw leverancier/installateur.
!Tip
Zet een kacheldeur op een kier als u niet stookt. Zo voorkomt u
condens- en eventueel roestvorming.
6.1 Schoonmaken
U kunt uw haard naar behoefte schoonmaken.
!Let op
- Gebruik geen bijtende of schurende schoonmaakmiddelen
bij het reinigen van uw haard en/of ruit ter voorkoming van
beschadiging;
- Gebruik geen water bij het schoonmaken omdat de
hittebestendige lak niet waterafstotend is; vocht kan
roestplekjes veroorzaken;
● Maak uw haard aan de buitenkant schoon met een zachte,
licht vochtige doek;
● Verwijder lichte aanslag op een ruit met een
glasreinigingsmiddel;
● Verwijder hardnekkige aanslag op een ruit met de
bijgeleverde spray. De gebruiksaanwijzing staat op de fles
vermeld.
6.2 Lak
!Let op
- Lakbeschadigingen, die het gevolg zijn van voorwerpen die
op/tegen de mantel van de kachel zijn gevallen/geplaatst,
vallen niet onder de garantie.
- Kleine beschadigingen van de lak kunt u zelf bijwerken met
behulp van de bijgeleverde spuitbus.
Als er na verloop van tijd een roestplekje op uw haard
ontstaat, kunt u dit als volgt verhelpen:
● Schuur het roestplekje licht met fijn staalwol;
● Spuit daarna dit gedeelte met de bijgeleverde lak.
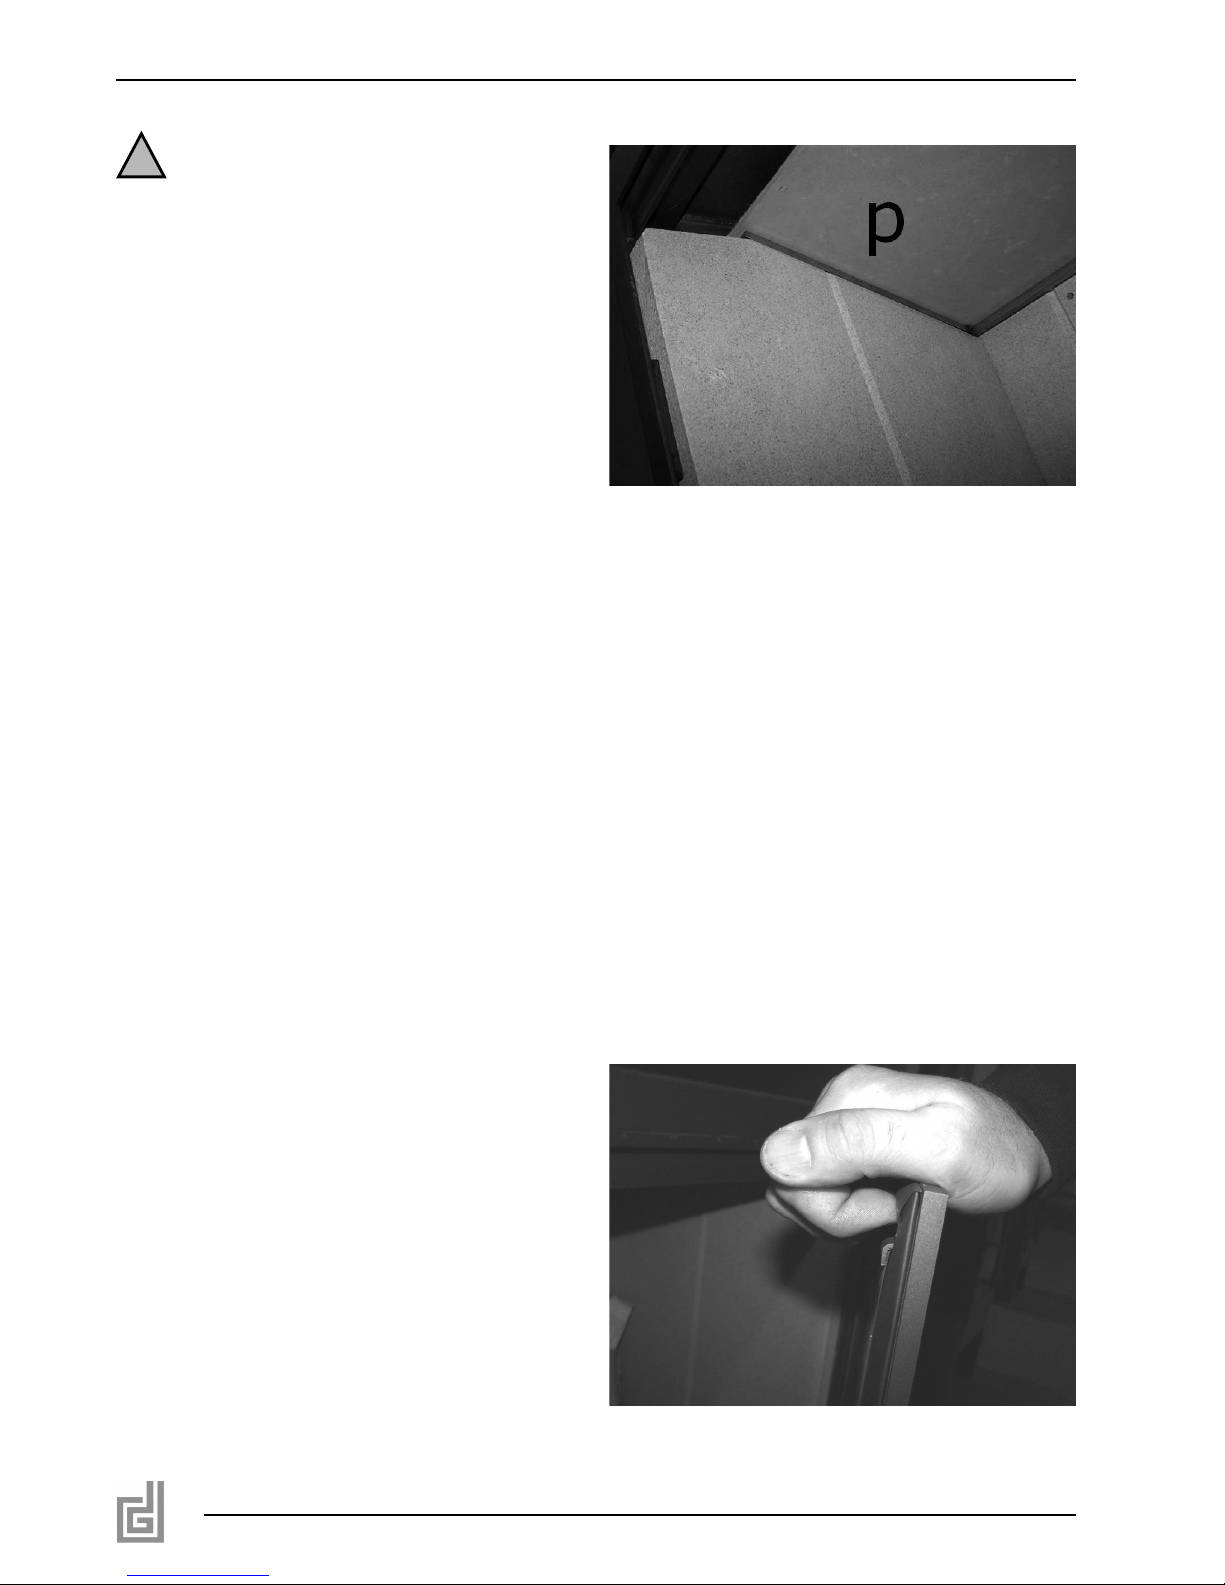
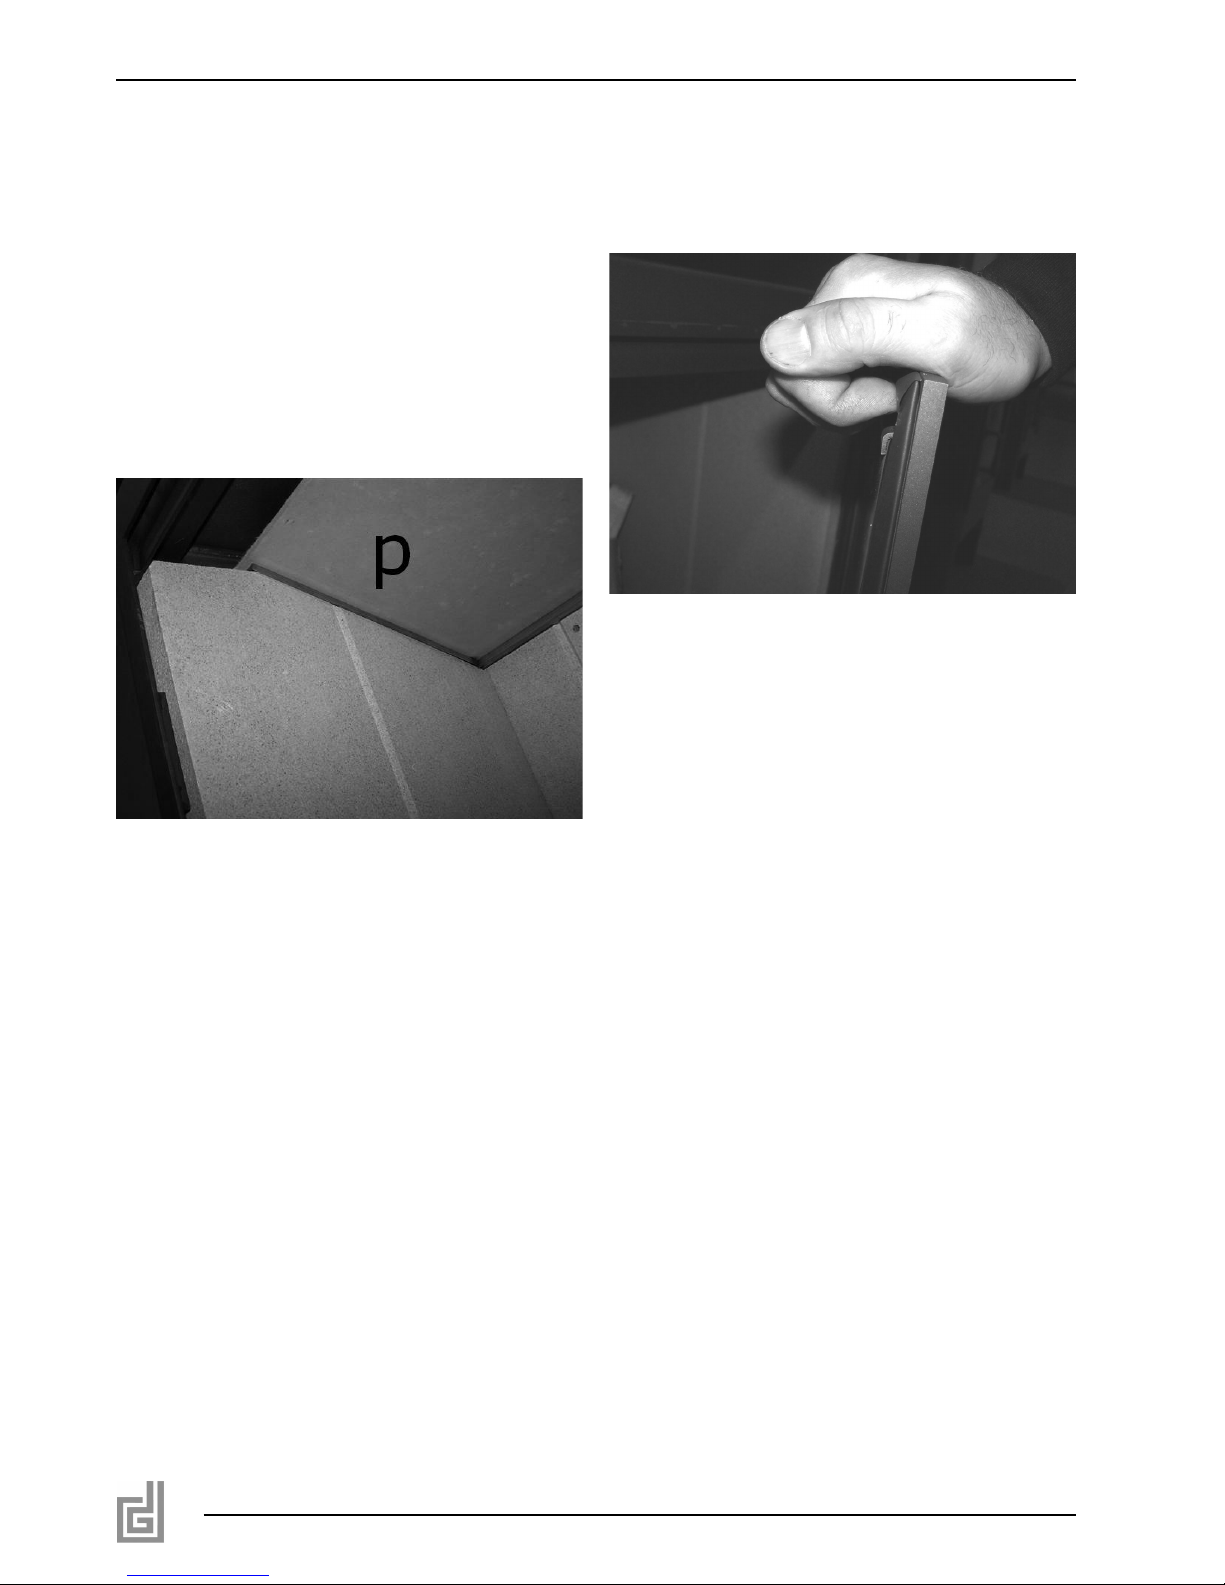
6.3 Keerplaten
Bovenin een houtkachel liggen zogenaamde keerplaten
(zie foto 4, P).
Deze platen verhogen de temperatuur in de kachel en als
gevolg daarvan het rendement.
De platen zijn eenvoudig te vervangen.
!Let op
- Verwijder de keerplaten bij het schoorsteenvegen.
!Let op
- Controleer de keerplaten bij het schoorsteenvegen op
breuk, omdat deze bij stoten kunnen breken;
- Controleer bij het terug plaatsen of de keerplaten nog goed
in de daarvoor bestemde profielen passen.
● Stook de haard niet zonder de keerplaten.
● Plaats de keerplaten zorgvuldig in omgekeerde volgorde
terug .
● Vervang zonodig een gebroken of slecht passende plaat.
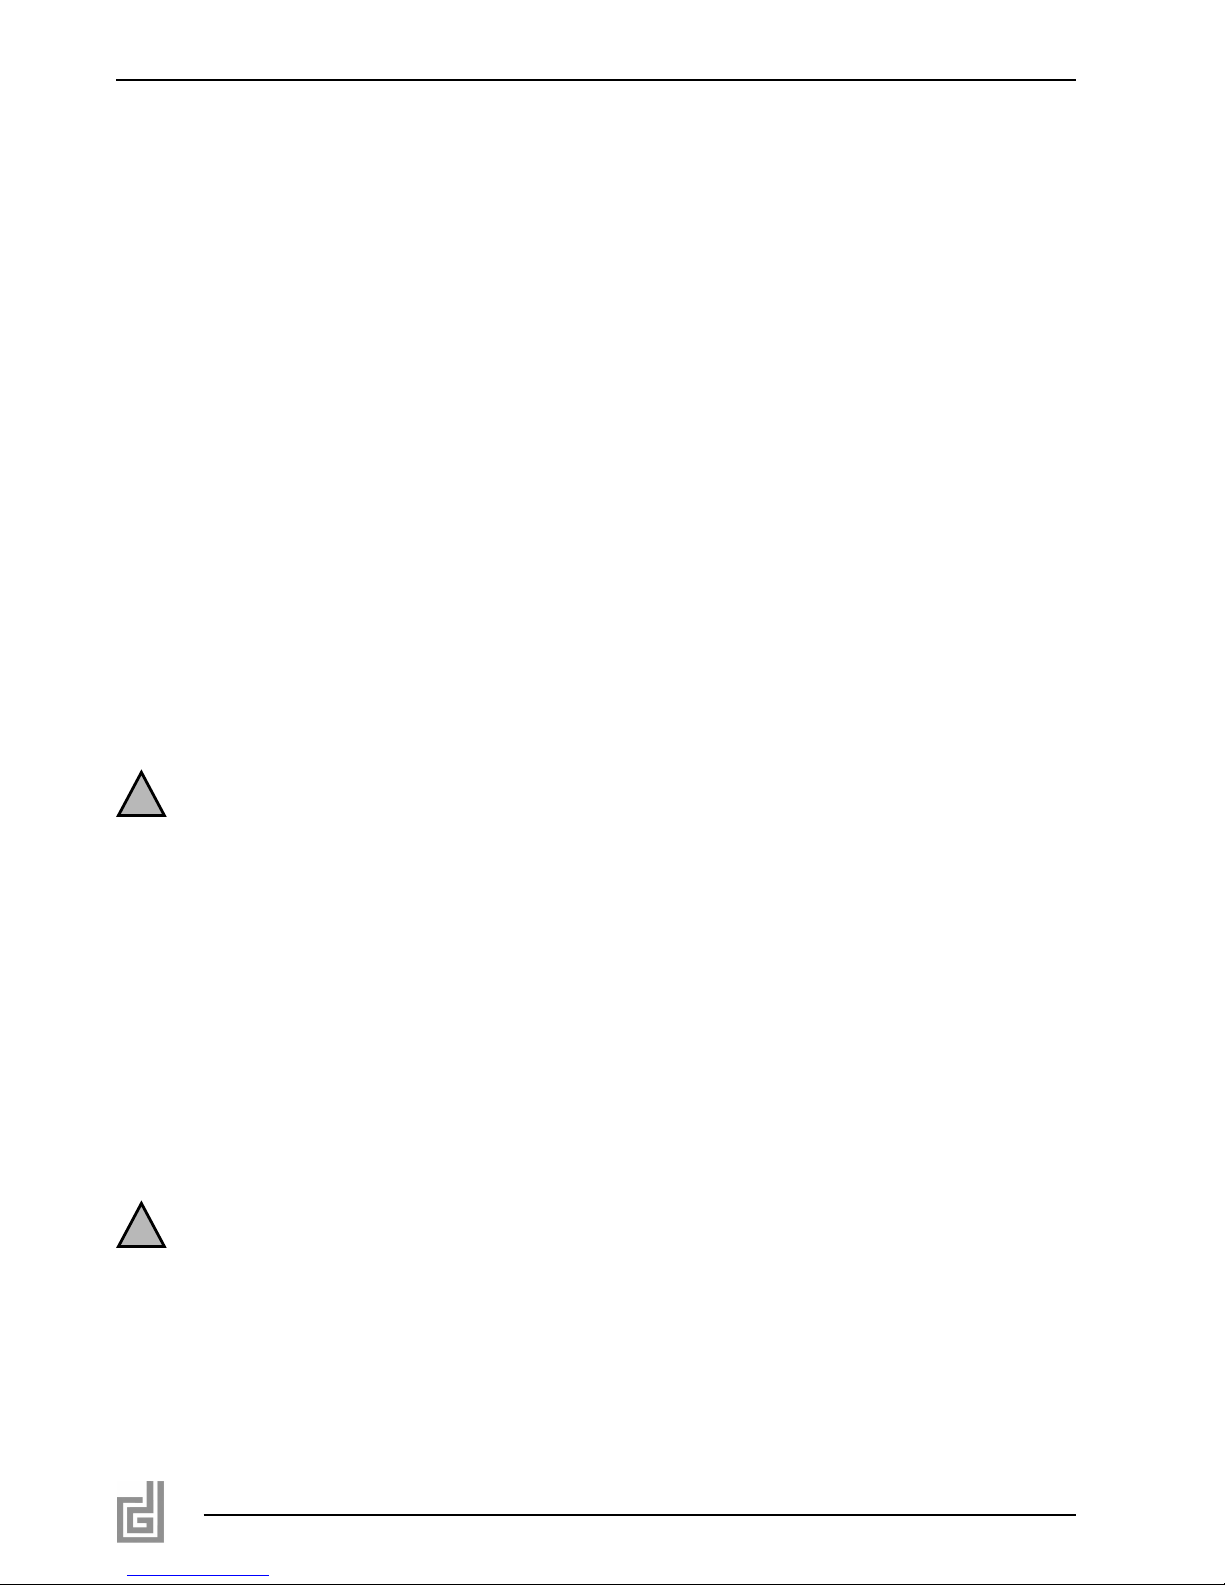
6.4 Deurafdichting houtkachel
De deur wordt afgedicht met keramisch band of met een
verend profiel van roestvast staal. Vervang het keramisch band
als er luchtlekkage ontstaat. Bij luchtlekkage ontstaat er meer
roetaanslag op de kachelruit.
Wanneer er op den duur ruimte ontstaat tussen het verend
roestvast staal profiel en de deur, dan kunt u dit probleem zelf
oplossen.
!Let op
- Controleer minstens één keer per jaar of het profiel goed
afsluit.
Het herstellen gaat als volgt:
● Open de deur.
● Leg uw handpalm op de rand van de deur en druk uw
vingertoppen tegen de onderzijde van het profiel (zie foto 5).
6
foto 4 - P
foto 5
Let op
!

● Druk uw vingertoppen naar de handpalm toe om het profiel
weer bol te laten staan.
● Stel het profiel zo in dat de deur weer goed afsluit.
6.5 Vermiculietplaten
Op de bodem en tegen de zijwanden van een houtkachel zitten
hittebestendige platen van vermiculiet. Deze platen reflecteren
de warmte, werken isolerend en beschermen de plaatstalen
wanden van de houtkachel. Mochten er scheuren ontstaan door
bijvoorbeeld extreme hitte in de haard, dan is dat niet erg. In
geval van uit elkaar vallen van de platen dienen deze vervangen
te worden.
!Let op
- Controleer de vermiculietplaten minstens één keer per jaar
op breuk.
!Tip
- Bewaar de oude plaat(en) ter controle van de afmetingen
van de nieuwe plaat(en).
● Verwijder de gebroken plaat(en).
● Plaats de nieuwe plaat(en) in omgekeerde volgorde terug.
6.6 Ruit
In de kacheldeur is een ruit geplaatst van keramisch materiaal.
De ruit zit met profielen of lipjes op de deur bevestigd.
U dient de ruit te laten vervangen als deze gescheurd/gebroken
is.
!Let op
- Controleer de ruit regelmatig op breuk/scheuren.
!Tip
- Draai de moeren niet te té stevig aan; want vast=vast;
- Een gebroken keramische ruit dient met het gewone huisvuil
afgevoerd te worden.
De ruit mag niet in de glascontainer omdat het keramische
materiaal een veel hogere smelttemperatuur heeft dan
gewoon glas.
6.7 Schoorsteenvegen
Het rookgaskanaal dient geïnspecteerd en gereinigd te worden
door een erkend schoorsteenveegbedrijf.
- Laat bij normaal gebruik ( 1 à 2 keer per week ) het
rookgaskanaal één keer per jaar inspecteren en reinigen;
- Laat bij frequent gebruik uw rookgaskanaal vaker (2 à 3
keer per jaar) inspecteren/reinigen;
- Laat het rookgaskanaal controleren op verstopping als u
langdurig niet gestookt heeft.
!Tip
- Bewaar de factuur; uw verzekeringsmaatschappij kan
hiernaar vragen.
7. STORINGEN
In de onderstaande tabel vindt u een overzicht van storingen die
kunnen optreden, de mogelijke oorzaak en de oplossing.
Waarschuw uw installateur als onderstaande tabel geen
oplossing biedt.
Tabel 2: Diagnose van storingen
8. MILIEU
8.1 Algemeen
Verpakkingsmaterialen moeten afgevoerd worden via de
reguliere weg.
8.2 Haard
Aan het einde van de levensduur moet u de haard op een
verantwoorde wijze laten verwerken, zodat de haard of
onderdelen daarvan kunnen worden hergebruikt.
● Zet de haard niet bij het ongesorteerde afval, maar lever
het in bij een erkend inzamelpunt.
● Neem contact op met uw gemeente voor informatie over
beschikbare inlevering- en inzamelsystemen.
9. GARANTIE
De garantie op uw Dik Geurts haard wordt verleend via uw
leverancier. In geval van klachten dient u altijd met hem contact
op te nemen. Uw leverancier zal Dik Geurts inschakelen als
hij dit noodzakelijk acht. De fabrieksgarantie bedraagt 2 jaar
na datum van aankoop. Slijtdelen zoals de ruit, deurafdichting,
keerplaat en de vermiculietplaten moeten regelmatig vervangen
worden en vallen daarom niet onder deze garantie.
Dik Geurts
7
gnissolpO kaazroo ekjilegoM meelborP
A. Rooklucht /
rookterugslag
1. Rook / rooklucht komt uit de
kachel t.g.v. onderdruk in de
opstellingsruimte
1. Open een bovenlicht of zet een
raam op een kier voor aanvoer
van verse lucht; zet zo mog elijk de
afzuigkap uit.
dnerenoitcnuf thcelS .2
rookgaskanaal
2. Laat het rookgaskanaal
inspecteren/reinigen
B. Roetaanslag op ruit 1. Vochtig hout. 1. Gebruik goed gedroogd hout
gaal et nee tem nekotS .2
vermogen, omdat:
2. Laat de haard beter doorbranden:
sejtuohkaamnaa enielk kiurbeG 1.2 ;njiz toorg et sejtuohkaamnaA 1.2
si lens et reoveotthcul eriamirP 2.2
gesloten
2.2 Laat schuif primaire luchttoevoer
langer open staan
C. Roetafzetting op
binnenkant
houtkachel
1. Onvolledige verbranding 1. Laat de houtkachel beter
doorbranden door t ijdelijk de
primaire luchttoevoer te openen.
tuoh goord kiurbeG .1 tuoh githcoV .1 koor ereknoD .D
.neretcepsni laanak teh taaL 1.2 laanaksagkoor dnekkert thcelS .2
2.2 Laat de kachel beter doorbranden
door tijdelijk de primaire
luchttoevoer te openen.
nee tez fo thcilnevob nee nepO .3 reoveotthcul giniew eT .3
raam op een kier voor aanvoer
van verse lucht; zet zo mogelijk de
afzuigkap uit.
E. Verkleuring van
buitenkant haard
1. Overbelasting door overschrijding
van max. hoeveelheid hout
1. Zie Tabel 1 voor gebruik van de
toegestane hoeveelheid hout.
Nederlands
Let op
!
Let op
!

8

CONTENTS
PREFACE
1. INTRODUCTION
2. SAFETY
2.1 General
2.2 Precautions/safety instructions
3. HEATING INSTRUCTIONS AND TIPS
3.1 Wood
3.2 Ventilation
3.3 Flue
3.4 Ash
3.5 Glass
4. PREPARING THE STOVE FOR USE
4.1 For the first time
4.2 Protection
4.3 Discoloration of walls and ceilings
4.4 Wood burning stove with oven
5. LIGHTING AND HEATING
5.1 Instructions
5.2 Method
6. MAINTENANCE
6.1 Cleaning
6.2 Paint
6.3 Baffle plates
6.4 Door sealing for wood burning stove
6.5 Vermiculite plates
6.6 Glass
6.7 Sweeping the chminey
6.8 The Clean Air Act 1993 and Smoke Control Areas
6.9 HETAS
7. MALFUNCTIONS
8. ENVIRONMENT
8.1 General
8.2 Stove
9. WARRANTY
English
Dik Geurts
9
PREFACE
Dik Geurts, manufacturer of stoves, develops and produces
products that comply with the highest quality, performance and
safety requirements. This will enable you to enjoy using this
product for many years to come.
This stove is provided with a CE mark. Wood burning stoves
that comply with the essential requirements for safety,
environment and energy consumption, etc. of the European
Construction Products Directive are entitled to carry the CE
mark.
An installation manual and a user manual are supplied with the
stove.
The user manual will give you the information you need to
operate the stove correctly and safely.
Carefully read the user manual prior to using the stove.
Keep the user manual AND the installation manual in a safe
place.
As a user you are only permitted to perform the work described
in the user manual. Any other work requires a competent
installer.
If you have any questions or doubts, please contact your
installer.
The following symbols are used in the manual to indicate
important information:
● Actions to be carried out
!Tip Suggestions and recommendations
!Caution You need these instructions to prevent
problems that might occur during use.
You need these instructions to prevent fire,
personal injury or other serious damage.
1. INTRODUCTION
Congratulations on your purchase of this Dik Geurts stove.
This free-standing or wall-mounted wood-burning stove has an
ingenious heating system guaranteeing effective combustion
and optimum performance.
The combustion chamber is lined with vermiculite plates. At the
top there is a baffle plate that increases the efficiency.
The term open fire is used when the air supply is not controlled.
The wood burning stoves are provided with a slide for the
primary air supply. The secondary air is continuously guided
along the top of the glass. The stove is exclusively suited for
burning wood or wood briquettes.
2. SAFETY
2.1 General
Carefully read this chapter on safety;
Observe the precautions/instructions in this manual.
2.2 Precautions/safety instructions
Carefully observe the following precautions/regulations:
● your stove should be installed by a competent, certified
installer of wood burning appliances;
● have the stove installed in accordance with the applicable
national, local and constructional (installation) regulations;
● before using have the flue/chimney inspected and cleaned
by a certified chimney sweeping company.
● have the flue/chimney inspected and cleaned at least once
per year by a certified chimney sweeping company. your
stove will only perform safely and problem-free if the flue is
in good order;
● if the floor is combustible, place a sufficiently large floor
plate under the stove. It can be ordered as an accessory;
● do not make any changes to the stove yourself;
● use only original replacement parts;
● only perform work on the stove if it has been out of
operation for at least 24 hours;
● only fill the stove with the recommended fuel, i.e. clean,
dry wood
● do not use the stove to incinerate waste;
● make sure that combustible objects and/or materials such
as curtains are at least 70 cm from the stove and/or stove
pipes;
● do not dry clothes, towels etc. on the stove;
● to avoid burns and/or clothes catching fire do not touch a
hot stove;
● when operating the stove use the supplied heat-resistant
glove, as the outside of the stove gets very hot when in use;
● do not leave children and persons who cannot judge the
consequences of their actions alone with a burning stove;
● avoid working with solvents, glues etc. near the stove when
it is in use;
● use wood burning stoves as supplementary heating; they
are not designed for continuous use as main heating;
● make sure there is sufficient ventilation in the room where
the stove is installed;
● if the chimney catches fire, close the air supply, extinguish
the fire with sand if necessary and call the fire brigade.
● do not operate with the door open.
3. HEATING INSTRUCTIONS AND TIPS
Below, you will find important tips and instructions for correct
operation of your stove.
3.1 Wood
Good quality fuel is the ‘motor’ of your stove. Your stove will
offer the best results, if you feed it with high quality, properly
dried wood. In this way, you will prevent unwanted additional
effects such as too much smoke or sparking.
Dry wood
The wood must be sufficiently dry. Freshly cut wood is not
suitable, as it contains too much moisture (approx. 60%).
Moist wood generates a dull sound when you hit two blocks
together. Therefore, the wood should be left for at least one
year, or preferably two years, to dry. The wood will dry properly
if stored outside under a shelter (i.e. not in a garage), preferably
in a sunny spot. In this way the wind (but not the rain) is able to
circulate freely. Short, split logs dry the quickest. After drying
they contain only 15 to 20% of moisture, and provide the best
heat output. Dry wood generates a clear sound when you hit
two blocks together.
Smoke
Light coloured (white or colourless) smoke indicates that
suitable wood is being used and that it is burning well. In
the event of incomplete combustion grey, blue or even black
10
Caution
!
Caution
!
smoke is created; e.g. as a result of wood that is too moist, an
insufficient supply of air or a poor draught in the flue duct.
3.1.1 Wood quantity
Please observe the maximum amount (quantity AND size) of
wood blocks, as indicated in the following table. Using a larger
amount will increase the heat delivery. This means the stove
could be overloaded, as a result of which parts could become
damaged and/or the walls of the stove discoloured. If the stove
is burning too vigorously use a coarser/harder type of wood.
Table 1: Allowed fuel volume
1 kg of dry firewood will deliver approx. 4 kWh of energy.
In the installation manual you can see the output of your stove in
appendix 2, Data plate.
3.1.2 Suitable types of wood
The following types of wood are recommended for burning on
your stove:
- Hardwood like oak, beech and wood from fruit trees. These
types of wood give a short flame and will burn for a long
time;
- Light types of wood like birch, poplar, willow and alder wood. These types of wood give a long flame, but burn
rather quickly.
- Coniferous wood or pinewood. Only use this wood in a fire
that is already burning well. Otherwise, you will get deposits
in the flue; it is not really suitable for open fires, because of
sparking. Pinewood is often used as kindling.
- Wood briquettes (compressed wood chips);
3.1.3 Unsuitable fuel
The following materials are not suitable for your stove. Please
never use:
- Wet or fresh wood. It is hard to start your stove using this
wood and it produces little heat;
- Painted, stained or impregnated wood. These chemicals are
bad for the environment and also affect the wood stove’s
pane;
- Multi-plywood and chipboard;
- Types of coal like anthracite, coke or ovoids. These are only
suitable for burning on a coal stove;
- Printed (coloured) paper from magazines. A ball of
newspaper can be used for lighting the stove;
- Combustible fluids. These should never be used for lighting
the stove;
- Plastic, textiles and other waste materials. Remember, no
stove is capable of burning everything!
3.2 Ventilation
Combustion requires air. A wood burning stove uses about
35 m
3
of air per hour; an open stove uses about 150-200 m3
of air per hour. A lack of fresh air in houses with a mechanical
air extraction system and/or the use of the cooker hood in an
open-plan kitchen could lead to under-pressure in your room.
The danger is that noxious flue gases flow from the stove into
your room (smoke blowback); also, the stove will be operating
inefficiently. Therefore, it is very important to ensure that
fresh air is supplied to your room. You can supply fresh air by
opening a fanlight or slightly opening a window.
3.3 Flue
For the stove to work correctly and safely, you will need
sufficient draught in the flue. When lighting the stove the flue
is still cold, resulting in little draught. In the case of a wood
burning stove more air is added at the beginning in order
to stimulate the draught. This extra air can be obtained by
opening the primary air supply. If there is sufficient draught and
the stove is burning properly, the air supply is closed again. The
primary air supply is controlled by means of the air slide (see
section 5.2). If there is too much draught (max. of 20 Pascal)
the flue gases are discharged too quickly resulting in too little
time to give off heat. This is at the expense of efficiency. We
recommend contacting your installer to solve this problem.
If it is foggy and/or there is no wind, the flue gases could blow
back and cause discomfort.
3.4 Ash
When the stove is operating wood ash is created. After many
hours of operation, the necessary amount of ash will have
been created. An ash layer will create an insulating layer in
your stove. This will increase the temperature and improve the
combustion process. You can, therefore, leave the layer of ash
undisturbed. Only when the layer of ash obstructs the primary
air supply (in the case of a wood burning stove) or reaches
the ash threshold is it necessary to scoop out half of the ash
(maximum). Use a steel bucket to dispose of the ash as it can
still be smouldering, even after a couple of days. Do not use
a vacuum cleaner, as the dust bag and its content are very
combustible.
Ash from pure (untreated) and dry wood is a natural product.
You can use it as a soil enhancer. Cooled ash can also be put
into containers used for the disposal of vegetable, fruit and
garden waste.
English
Dik Geurts
11
Max. length Max. quantity Max. Kg
Noa Medium 28 cm 2 2,2
Noa Large 40 cm 2 2,8
Aruba Small 28 cm 2 2,2
Aruba Large 40 cm 2 2,8
Bora fixed/flex/
wall/console
Medium
22 cm 3 2,0
Bora fixed/flex/
wall/console Large
28 cm 2 2,2
Tornado Straight/
Oblique
22 cm 3 2,0
Britta 28 cm 2 2,2
Babe/ Babe Swing 28 cm 1 1,6
Kalle 28 cm 1 1,7
Lars 800 20 cm 2 1,0
Lars 900 24 cm 2 1,4
Lars 1100 26 cm 2 2,6
Lars 1300 28 cm 3 4,2
Mats 22 cm 2 1,4
Pelle 20 cm 2 1,0
Tor 24 cm 2 1,3
Vidar Small 20 cm 2 1,0
Vidar Medium 24 cm 2 1,6
Vidar Large 28 cm 2 2,2
Instyle Front 400 20 cm 2 1,0
Instyle Front 550 24 cm 2 1,6
Instyle Front 600 28 cm 2 2,2
Instyle Front 650 28 cm 2 2,2
Instyle Front 700 30 cm 2 2,6
Instyle Front 750 28 cm 3 2,8
Instyle Front 1000 48 cm 2 2,9
Instyle Corner 660 28 cm 2 2,2
Instyle Corner 700 28 cm 2 2,2
Instyle Triple 24 cm 3 2,6
Instyle Panorama 28 cm 2 2,2
Instyle Tunnel 35 cm 3 3,6
Refuelling must be carried out onto a sufficient quantity of
glowing embers and ash, otherwise, appropriate kindling should
be used
3.5 Glass
Although the wood burning stove has a window aeration
system, it is still possible for deposits to form on the glass.
Light deposits can be removed with a glass cleaning agent.
Stubborn deposits can be removed using the spray included
with the delivery. The instructions are printed on the bottle.
Avoid using corrosive and abrasive cleaning agents.
After using the stove a few times, the stove window may
develop a little play. You can correct this by gently tightening
the nuts on the inside of the stove.
4. PREPARING THE STOVE FOR USE
4.1 For the first time
The outside of the stove should be clean. Any contamination
on the stove such as (building) dust, waste, residual packaging
material and stickers may cause an unpleasant smell or create
scorch risks. On delivery the paint on the stove is not fully
hardened. Hardening occurs when the stove is used for the
first few times. The paint will first soften as a result of the heat
before hardening. The hardening process may be accompanied
by an unpleasant smell and white smoke as a result of
evaporating volatile components.
!Caution
- Keep the room well ventilated;
- Pets, and birds in particular, can be sensitive to the smoke
that is released.
!Tip
- Do not touch the stove to avoid damaging the paint;
- Remove pets from the room.
4.2 Protection
To prevent unsafe situations, you should carefully observe the
following measures/instructions.
- Make sure that combustible objects and/or materials such
as curtains are at least 70 cm from the stove and/or stove
pipes;
- To avoid fire do not dry clothes, towels etc. on the stove;
- To avoid burns and/or clothes catching fire do not touch the
hot stove;
- Use the supplied, heat-resistant glove when operating the
stove;
- Do not leave children and persons who cannot judge the
consequences of their actions alone with a burning stove;
- Avoid working with solvents, glues etc. in the vicinity of the
stove when it is burning.
4.3 Discoloration of walls and ceilings
A brown discoloration is unpleasant and difficult to remove.
Brown discoloration can be caused by burning waste materials,
insufficient ventilation, smoking, burning candles, oil lamps, etc.
Cigarette and cigar smoke contains tar substances that are
deposited on cold walls. These problems can be (partly) solved
by correct ventilation of the room where the stove is located.
4.4 Wood burning stove with oven
The oven can be used for heating or preparing meals.
You can close the oven by using the lid (see picture 1, K).
This lid is hung on the side of the stove.
When using the oven you should always place aluminium foil in
the oven to avoid fat falling on the oven floor and burning into
the surface.
5. LIGHTING AND HEATING
5.1 Instructions
Observe the following instructions to ensure correct and safe
operation of your stove:
- Have a certified chimney sweep check the flue duct for
obstructions, if you have not used your stove for a long
period;
- Only use wood or wood briquettes (see section 3.1);
- Observe the maximum numbers of wood blocks, as stated
in Table 1;
- Make sure sufficient fresh air is supplied (see section 3.2);
In the event of fire in the chimney, close the primary air
supply, extinguish the wood fire with sand and call the fire
brigade.
- Never use water to extinguish the wood fire;
- Do not clean the stove using a vacuum cleaner.
!Caution
- Preferably, do not use the stove in foggy weather and/or
when there is no wind to avoid discomfort resulting from
excessive smoke.
- Adjust the heat of the wood burning stove while the door is
closed; it is only opened to add wood;
- Tighten the nuts of the glass when you detect play; do not
overtighten the nuts.
5.2 Method
Follow these steps for lighting and using your stove:
● If necessary, remove ash using the supplied ash shovel
(see section 3.4).
● If necessary, clean the glass.
● Open the primary air supply using the slide (S). It is opened
when the slide is in the central position (see picture 2, S).
12
picture 1 - K
Caution
!
Caution
!
● Place two wood blocks in a longitudinal position in the
combustion chamber.
● Place firelighters between the wood blocks.
!Tip
Instead of firelighters, you can also use a ball of newspaper.
● Stack firelighters on top of the two wood blocks and place a
larger wood block on that.
● Make sure that sufficient air can pass through the stack of
wood so that the wood lights easily.
● Place a ball of newspaper on the stack (see picture 3).
● Light the firelighters and the newspaper.
● If the stove is a wood burning stove, close the door.
● Allow the fire to take hold in order to heat up the flue.
!Caution
- A properly heated flue is needed for the draught in the flue
duct;
- A high temperature will keep the flue clean; your supplier
can supply a thermometer as an accessory to measure the
flue gas temperature.
- For a wood burning stove, use the slide of the primary air
supply to control the fire.
● For a wood burning stove, close the slide of the primary air
supply after approx. 15-20 minutes.
● Allow the stove to continue burning using small wood
blocks, until a properly burning fire is created with a glowing
fire bed.
5.2.1 Then fill the stove with wood blocks
(see Wood quantity).
Prevent the wood blocks from falling/lying against the glass.
!Tip
- Carefully place the wood blocks in the stove to prevent
damaging the vermiculite plates;
- Stack the wood blocks loosely on top of each other, so
sufficient air can reach them;
- If the wood is not burning properly, you can temporarily
open the slide of the wood stove’s primary air supply.
● Add wood to the stove before the flames go out; this will be
approximately every 30 to 45 minutes.
● Always allow the fire to burn out when you stop adding
wood.
6. MAINTENANCE
Dik Geurts stoves are made of steel plate. A great deal of
attention is paid to faultless manufacture and careful finishing,
as a result of which your stove requires little maintenance.
The following maintenance tips/instructions will ensure correct
operation of your stove and enhance your enjoyment.
- Only perform maintenance when the stove has been out of
use for at least 24 hours;
- Do not make any changes to the stove yourself;
- As a user you are only allowed to perform maintenance that
is described in this chapter. For any other work you must
contact an installer who is experienced in the field of wood
heating;
- Use only original parts as replacements. You can get these
from your supplier/installer.
!Tip
When you are not using the stove leave the stove door slightly
ajar. This will prevent condensation and possible corrosion.
6.1 Cleaning
Clean the stove as required.
!Caution
- Do not use corrosive or abrasive cleaning agents when
cleaning your stove and/or the glass, in order to avoid
damage;
- Do not use water when cleaning as the heat-resistant paint
is not water-repellent; moisture could cause rust spots;
● Clean the outside of your stove with a soft, slightly moist
cloth;
● Remove light deposits on the glass with a glass cleaning
agent;
● Remove stubborn deposits on the glass using the spray that
was included with the delivery. The instructions are printed
on the bottle.
English
Dik Geurts
13
picture 2 - S
picture 3
Caution
!
Caution
!
6.2 Paint
!Caution
Paint damage caused by objects falling/placed against the
stove’s casing is not covered by the warranty.
Minor damage to the paint can be retouched using the spray
supplied.
If, after some time, a rust spot appears on your stove, you can
remove this as follows:
● Lightly rub the rust spot with fine steel wool;
● Then spray the area with the supplied paint.
6.3 Baffle plates
At the top of a wood burning stove you will find baffle plates
(see picture 4, P).
These plates increase the temperature in the stove and
consequently its efficiency. The plates can be replaced easily.
!Caution
Remove the baffle plates when sweeping the chimney.
!Caution
- When sweeping the chimney check if the baffle plates are
broken, as they can break as a result of shocks;
- When replacing the baffle plates check that they still fit
properly in their profiles.
● Do not use the stove without the baffle plates.
● Carefully replace the baffle plates in reverse order.
● If necessary, replace a broken or badly fitting plate.
6.4 Door sealing wood burning stove
The door is sealed by means of a ceramic band or with a
stainless steel spring profile. Replace the ceramic band if there
is an air leak. In the event of an air leak more soot is deposited
on the glass. If, over time, a gap appears between the stainless
steel spring profile and the door you will be able to solve this
problem yourself.
!Caution
- Check at least once per year that the profile is sealing
correctly.
Repair is done as follows:
● Open the door.
● Place the palm of your hand on the edge of the door and
press your fingertips against the underside of the profile
(see picture 5).
● Push your fingertips towards the palm of your hand to allow
the profile to regain its round shape.
● Set the profile in such a way that the door re-seals correctly.
6.5 Vermiculite plates
On the bottom and against the side walls of a wood burning
stove you will find heat-resistant vermiculite plates. These
plates reflect the heat, have an insulating function and protect
the steel-plate walls of the wood burning stove. If any cracks
appear, e.g. because of the extreme heat in the stove, this is
not a problem. If, however, the plates are falling apart, they
should be replaced.
!Caution
- Check the vermiculite plates at least once per year for
cracks.
!Tip
- Keep the old plate(s), so you can check the size of the new
plate(s).
● Remove the broken plate(s).
● Fit the new plate(s) in reverse order.
6.6 Glass
A glass window made of ceramic material is incorporated into
the stove. This pane is fitted to the door by means of profiles or
lips. The glass must be replaced when it is cracked/broken.
!Caution
- Regularly check the glass for cracks.
!Tip
- Do not overtighten the nuts;
- A broken ceramic window can be disposed of with normal
household rubbish.
Please, do not discard of the pane into the glass container
as the ceramic material has a much higher melting
temperature than normal glass.
14
picture 4 - P
picture 5
 Loading...