

Digno Keitai User Manual

DIGNO® ケータイ
User Guide


DIGNO® ケータイ
User Guide Contents
1
Introduction
About the User Guide........................................................ 3
Getting Started
Package Contents............................................................... 6
Parts & Functions.............................................................. 6
USIM Card Installation....................................................... 9
Handset Memory/SD Card................................................ 11
Inserting/Removing Battery.............................................14
Charging Battery.............................................................. 15
Power On/Off................................................................... 17
Importing Data from Other Mobile Phones.................... 18
Display............................................................................... 20
Display-Top (Status Bar) Indicators............................... 20
Checking Handset Status & Notifications (Notifications/
Settings Window)............................................................. 22
Sub-display........................................................................ 23
Security Codes.................................................................. 24
USIM PIN............................................................................25
Basic Operations
Basic Operations with this Handset...............................28
Key Operation................................................................... 28
How to Use Touch Pointer.............................................. 29
Main Menu......................................................................... 30
Accessing Applications.....................................................31
Using Manner Mode.......................................................... 33
Using Airplane Mode.........................................................34
Other Basic Operations....................................................35
Operations in Common
Customizing Fonts............................................................ 38
Changing Handset Response to Calls/Mail......................38
Text Entry.........................................................................39
Phone Book........................................................................ 41
Phone
Calling................................................................................ 44
Placing International Calls...............................................45
Optional Services..............................................................46
Global Services..................................................................50
Messaging
Messaging.......................................................................... 54
Customizing Handset Address......................................... 54
Sending S! Mail................................................................. 55
Sending SMS...................................................................... 56
Using PC Mail....................................................................57
Internet Services
Browser..............................................................................60
TV
TV.......................................................................................62
Watching TV......................................................................63
DIGNO
®
ケータイ

2
Data Broadcast (Japanese).............................................. 63
Camera/Image Editing
Capturing Photos/Recording Videos............................... 66
Music/Videos
Music Files.........................................................................70
Viewing Videos..................................................................70
Data Folder
Handling Data (Data Folder)............................................72
Connectivity & File Backup
Using Infrared Transmission............................................76
Settings in Common
Wallpaper & Display Settings..........................................80
Sound/Notification Settings............................................80
Lock & Security Settings.................................................81
Network Settings............................................................. 82
Data Communication Settings......................................... 82
Eco Mode/Battery Settings............................................. 84
Reset Settings.................................................................. 87
Device Info & Settings.................................................... 87
More Settings................................................................... 88
Appendix
Updating Software........................................................... 94
Specifications....................................................................95
Materials............................................................................95
Customer Service.............................................................. 96
Safety Precautions
Safety Precautions........................................................... 98
General Notes................................................................. 109
Water/Dust/Shock Resistance....................................... 114
Introduction
About the User Guide
Thank-you for purchasing this product.
Before You Begin
Read "Safety Precautions" thoroughly beforehand for proper
usage.
Accessible services may be limited by contract conditions.
Guide Usage Notes
In the User Guide, most operation descriptions are based on
handset at time of purchase.
Unless noted otherwise, descriptions are from Standby.
"Confirmation" refers to a window that appears after
operation, such as authentication prompt window, selection
window or caution window.
Some operation descriptions may be omitted.
3
Introduction
Screenshots & Key Labels
Screenshots in the User Guide may differ in appearance with
actual Display. Key labels in the User Guide are simplified for
description purposes and differ with actual Display.
Other Notations
In the User Guide, the product is referred to as "handset."
microSD™/microSDHC™ Card is referred to as "SD Card."
"501KC" here refers to this mobile phone "DIGNO® ケータイ
(Keitai)."
DIGNO
®
ケータイ

4

Getting Started
Package Contents............................................................... 6
Parts & Functions.............................................................. 6
USIM Card Installation....................................................... 9
Handset Memory/SD Card................................................ 11
Inserting/Removing Battery.............................................14
Charging Battery.............................................................. 15
Power On/Off................................................................... 17
Importing Data from Other Mobile Phones.................... 18
Display............................................................................... 20
Display-Top (Status Bar) Indicators............................... 20
Checking Handset Status & Notifications (Notifications/
Settings Window)............................................................. 22
Sub-display........................................................................ 23
Security Codes.................................................................. 24
USIM PIN............................................................................25
6
Package Contents
Package Contents
・Handset (DIGNO® ケータイ(Keitai))
・Battery (KYBAH1)
・クイックスタート (Japanese)
・お願いとご注意 (Japanese)
・Warranty (Japanese)
Parts & Functions
Handset Parts
Name Description
Earpiece
Display
Brightness
Sensor
Air
Pressure Holes
Touch Area
Mic
Hear other party's voice through this.
Screens appear here.
Detects surrounding brightness.
Maintain handset performance. Do not
cover with sticker, etc.
Use as touchpad when Touch Pointer is on.
Talk to other party through this.
Handset Opens and Closes
Handset Closed
7
Name Description
Incoming/
Charging LED
Sub-display
External
Device Port
Charging
Terminals
(for Desktop
Holder)
Speaker
Internal
Communications
Antennas
Capture
Light/
Flashlight
Camera
Straphole
Back Cover
Infrared
Port
Illuminates while charging or for
notifications (missed calls, new messages,
etc.).
Clock and Notification Indicators for new
calls, mail, etc. appear.
Connect AC Charger, etc.
Connect to Desktop Holder during
charging.
Listen to music, video sound, TV, etc.
Used for calling, Internetting, etc. Avoid
covering with stickers or fingers.
Use as lighting when capturing images or
as a flashlight.
Capture photos and videos.
Attach a strap.
Remove to access USIM Card, SD Card, and
Battery.
Use for infrared transmission.
Be sure to close handset before carrying with you.
Getting Started
Handset Opened
Open handset to operate keys or call.
DIGNO
®
ケータイ

8
Handset Keys
Key (Name) Description
(Multi
Selector (up))
(Multi
Selector
(left))
(Mail
Key)
(TV/
Character
Key)
(Multi
Selector
(down))
(Start Key)
-
(Dial
Keys)
( Key)
Show item selection cursor in Standby.
Show incoming call history.
Open mail menu. Long Press to open S!
Mail composition window.
Activate TV. Long Press to turn on
Flashlight.
Open Phone Book. Long Press to save to
Phone Book.
Activate Link Now. Long Press to activate
Fake call1.
Enter phone numbers. Activate Write
now1. Long Press to search Phone Book.
Enter . Activate Write now1. Long Press
to enter int'l access number.
(Clear/Back
Key)
(Power/End
Key)
(#
Key)
(History Key)
1 Operates when setting enabled.
Open Answer Memo List. Long Press to
toggle Auto answering on/off.
Show/hide information in Standby. Long
Press for Power Off screen.
Activate Write now1. Long Press to toggle
Bluetooth® on/off.
Open application history.
Multi Selector
In this User Guide, Multi Selector operations are indicated
as follows:
・
Press or .....
・
Press or .....
・
Press , , , or .....
Handset Keys (Handset Closed)
Key (Name) Description
Show Sub-display. Long Press to enter/
(Side Key)
exit Manner mode.
(Notification
Key)
(App Key)
(Center Key)
(Multi
Selector
(right))
(Browser Key)
(Side Key)
(Camera Key)
Open Notifications Window. Long Press to
open Settings Window.
Open Application list. Long Press to
activate application set with "Custom
key"1.
Open Main Menu. Long Press to lock/
unlock (Side Key) when handset
closed.
Show outgoing call history.
Activate Browser. Long Press to open
browser menu.
Activate manner mode menu. Long Press
to activate/cancel Manner mode.
Activate Camera (Video). Long Press to
open Data Folder.
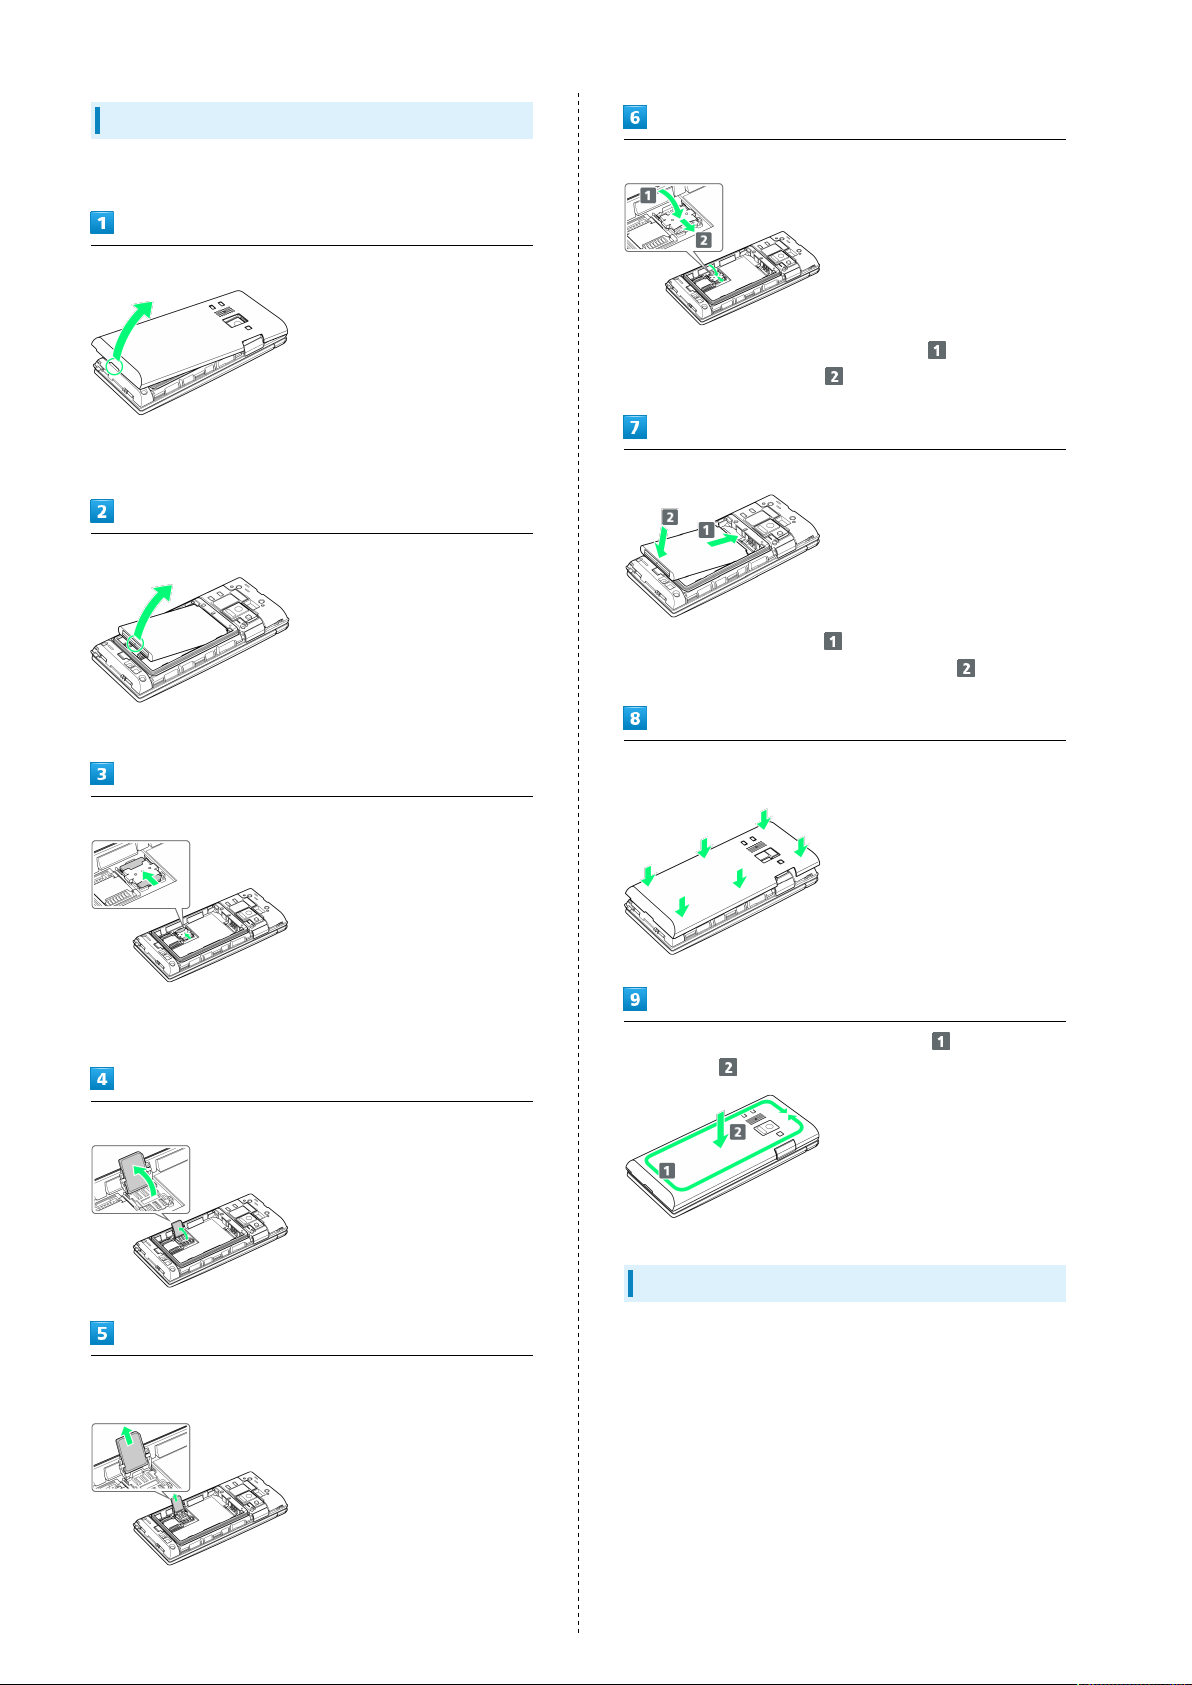
USIM Card Installation
9
USIM Card is an IC card containing customer and
authentication information, including handset number.
Inserting USIM Card
Always power off beforehand.
Remove Back Cover
・Gently lift Back Cover by notch in direction shown with
finger.
Remove Battery
Slide USIM Card in direction shown into USIM Card Slot Cover
・Note location of notch.
Lock USIM Card Slot Cover
・
Lower USIM Card Slot Cover in direction , and slide with
pad of finger in direction until it clicks locked.
Getting Started
・Gently lift Battery by bottom in direction shown.
Unlock USIM Card Slot Cover
・Slide USIM Card Slot Cover with pad of finger in direction
shown until it clicks unlocked.
Lift USIM Card Slot cover in direction shown
Insert Battery
・
Slide Battery in direction onto metal terminals in
handset, and press into handset in direction .
Fit Back Cover on handset, and press Back Cover in directions
shown
Work way around Back Cover in directions holding down
in direction to install completely
DIGNO
®
ケータイ
10
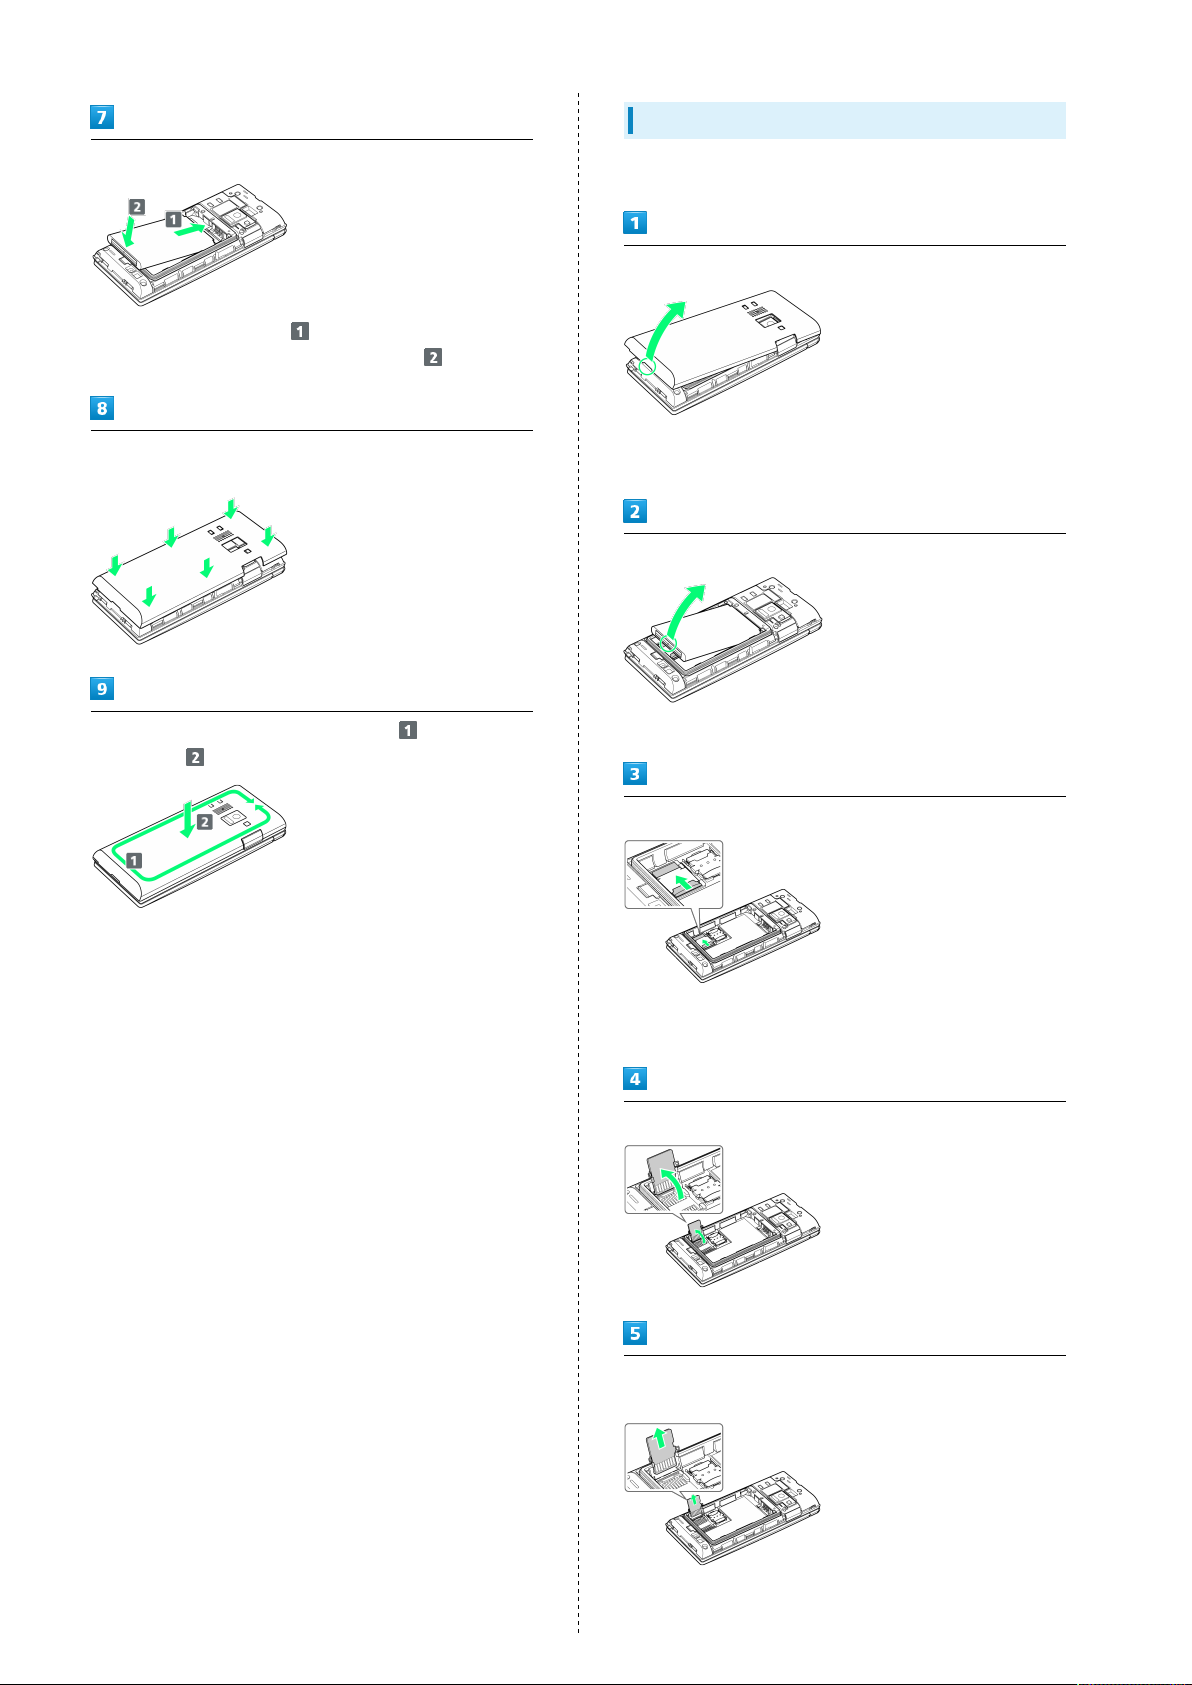
Removing USIM Card
Always power off beforehand.
Remove Back Cover
・Gently lift Back Cover by notch in direction shown with
finger.
Remove Battery
・Gently lift Battery by bottom in direction shown.
Lock USIM Card Slot Cover
・
Lower USIM Card Slot Cover in direction , and slide with
pad of finger in direction until it clicks locked.
Insert Battery
・
Slide Battery in direction onto metal terminals in
handset, and press into handset in direction .
Unlock USIM Card Slot Cover
・Slide USIM Card Slot Cover with pad of finger in direction
shown until it clicks unlocked.
Lift USIM Card Slot cover in direction shown
Slide USIM Card in direction shown to remove from USIM Card
Slot Cover
Fit Back Cover on handset, and press Back Cover in directions
shown
Work way around Back Cover in directions holding down
in direction to install completely
SIM Unlocking
Handset supports SIM unlocking. After SIM-unlocking handset,
other companies' SIM cards can also be used on handset.
・Services and applications may have limitations with use
of an other-company SIM card. SoftBank Corp. makes no
guarantees whatsoever regarding the proper operation of
handset.
・For details on SIM unlocking, see SoftBank Website.

Handset Memory/SD Card
11
Handset supports SD Card up to 32 GB. Some SD Cards may
not operate properly.
Handset memory is available for saving system data,
applications, captured photos and movies, and other data.
Handset Memory/SD Card Cautions
Content Saved to Handset Memory/SD Card
Files
Content in handset memory/SD Card may be lost/altered
due to accidents, malfunctions, repairs, handset upgrade/
replacement, or other handling. Back up important content
regularly. SoftBank Corp. is not liable for any damages
resulting from loss/alteration of content.
・Do not forcefully install or remove SD Card.
・Do not touch terminals with hands or metal.
・Never power off while files are being accessed.
・Be careful that data does not become erased or
overwritten.
microSDHC Cards
Handset supports SDHC SD cards (microSDHC cards).
microSDHC cards can only be used with SDHC devices.
Remove Battery
Getting Started
・Gently lift Battery by bottom in direction shown.
Unlock SD Card Slot Cover
・Slide SD Card Slot Cover with pad of finger in direction
shown until it clicks unlocked.
Lift SD Card Slot cover in direction shown
Save Location
By default, photos and videos captured with handset are
saved to handset memory.
SD Card Precaution
Keep SD Card away from infants; may cause choking if
swallowed.
Inserting SD Card
Always power off beforehand.
At time of purchase, a protective card is inserted in SD Card
Slot. Remove before installing an SD Card.
Leave inserted if not using an SD Card to prevent rattling.
・While the protective card can be inserted when an SD Card
is not used, it is not necessary to insert the card.
Slide SD Card in direction shown into SD Card Slot Cover
・Note orientation.
Lock SD Card Slot Cover
Remove Back Cover
・Gently lift Back Cover by notch in direction shown with
finger.
・
Lower SD Card Slot Cover in direction , and slide with
pad of finger in direction until it clicks locked.
DIGNO
®
ケータイ
12
Removing SD Card
Insert Battery
・
Slide Battery in direction onto metal terminals in
handset, and press into handset in direction .
Fit Back Cover on handset, and press Back Cover in directions
shown
Work way around Back Cover in directions holding down
in direction to install completely
Always power off beforehand.
Remove Back Cover
・Gently lift Back Cover by notch in direction shown with
finger.
Remove Battery
・Gently lift Battery by bottom in direction shown.
Unlock SD Card Slot Cover
・Slide SD Card Slot Cover with pad of finger in direction
shown until it clicks unlocked.
Lift SD Card Slot cover in direction shown
Slide SD Card in direction shown to remove from SD Card Slot
Cover
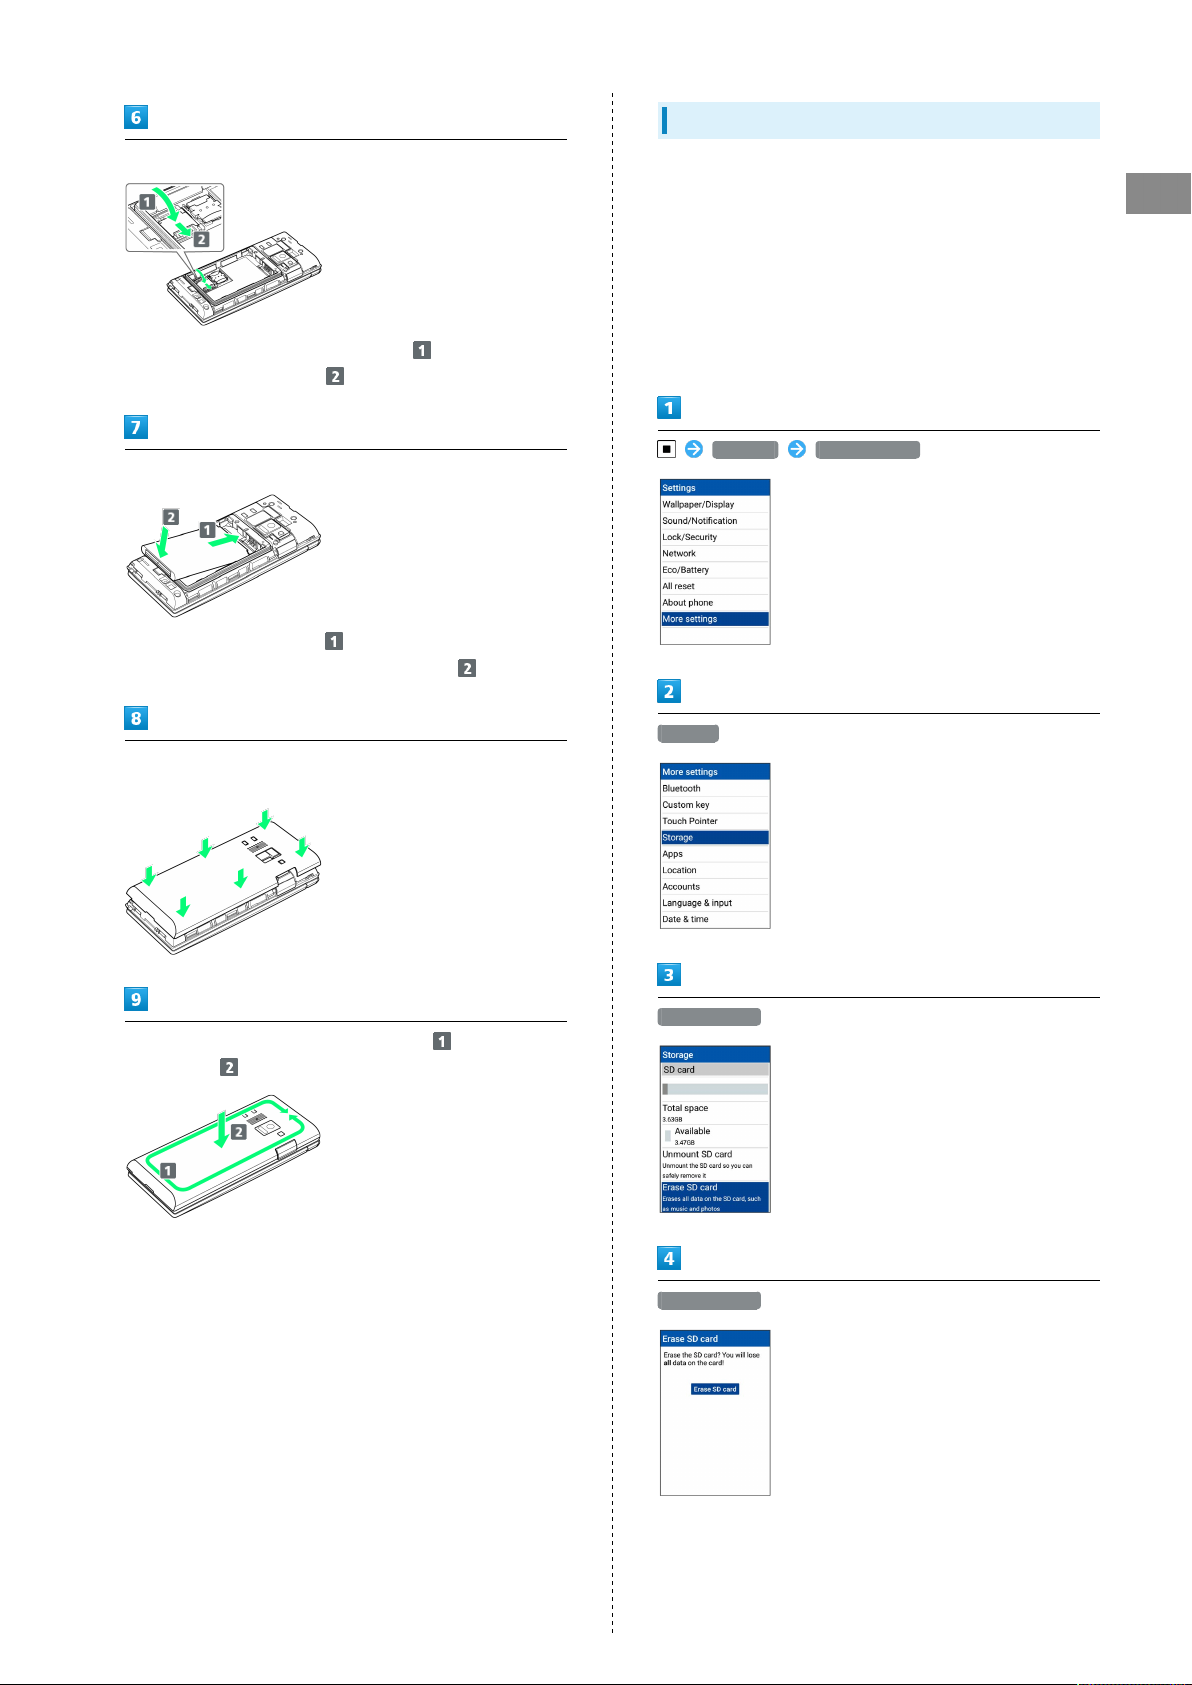
Formatting SD Card
13
Lock SD Card Slot Cover
・
Lower SD Card Slot Cover in direction , and slide with
pad of finger in direction until it clicks locked.
Insert Battery
・
Slide Battery in direction onto metal terminals in
handset, and press into handset in direction .
Fit Back Cover on handset, and press Back Cover in directions
shown
When using a new SD Card for the first time, always format
(initialize) it on handset.
・Formatting deletes all SD Card files. Format SD Card with
caution.
・When formatting, keep handset charged or charge it
adequately beforehand.
・Insert SD Card beforehand. See "Inserting SD Card" for
details.
Settings More settings
Storage
Getting Started
Work way around Back Cover in directions holding down
in direction to install completely
Erase SD card
Erase SD card
DIGNO
®
ケータイ
14
Erase everything
All SD Card files are deleted.
・If Lock screen is "PIN" or "Password", a screen appears for
entering the PIN/password.
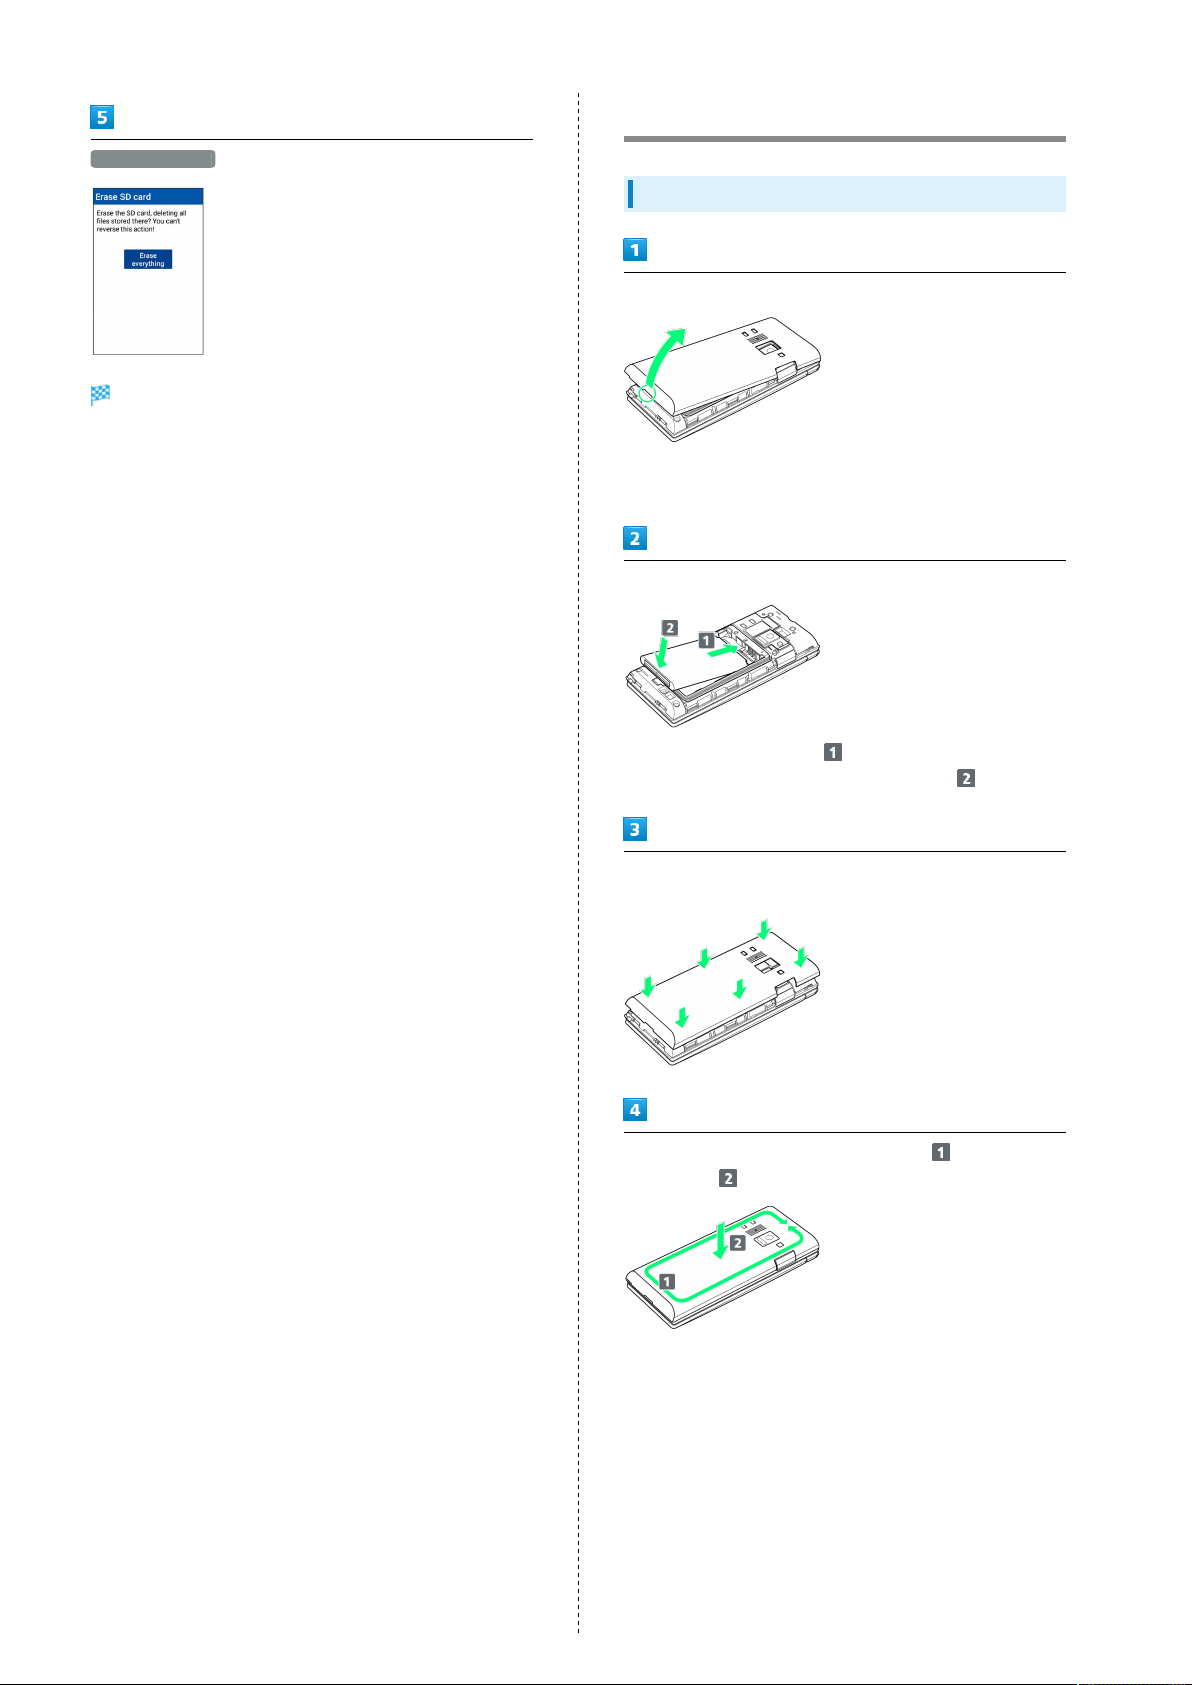
Inserting/Removing Battery
Inserting
Remove Back Cover
・Gently lift Back Cover by notch in direction shown with
finger.
Insert Battery
・
Slide Battery in direction onto metal terminals in
handset, and press into handset in direction .
Fit Back Cover on handset, and press Back Cover in directions
shown
Work way around Back Cover in directions holding down
in direction to install completely
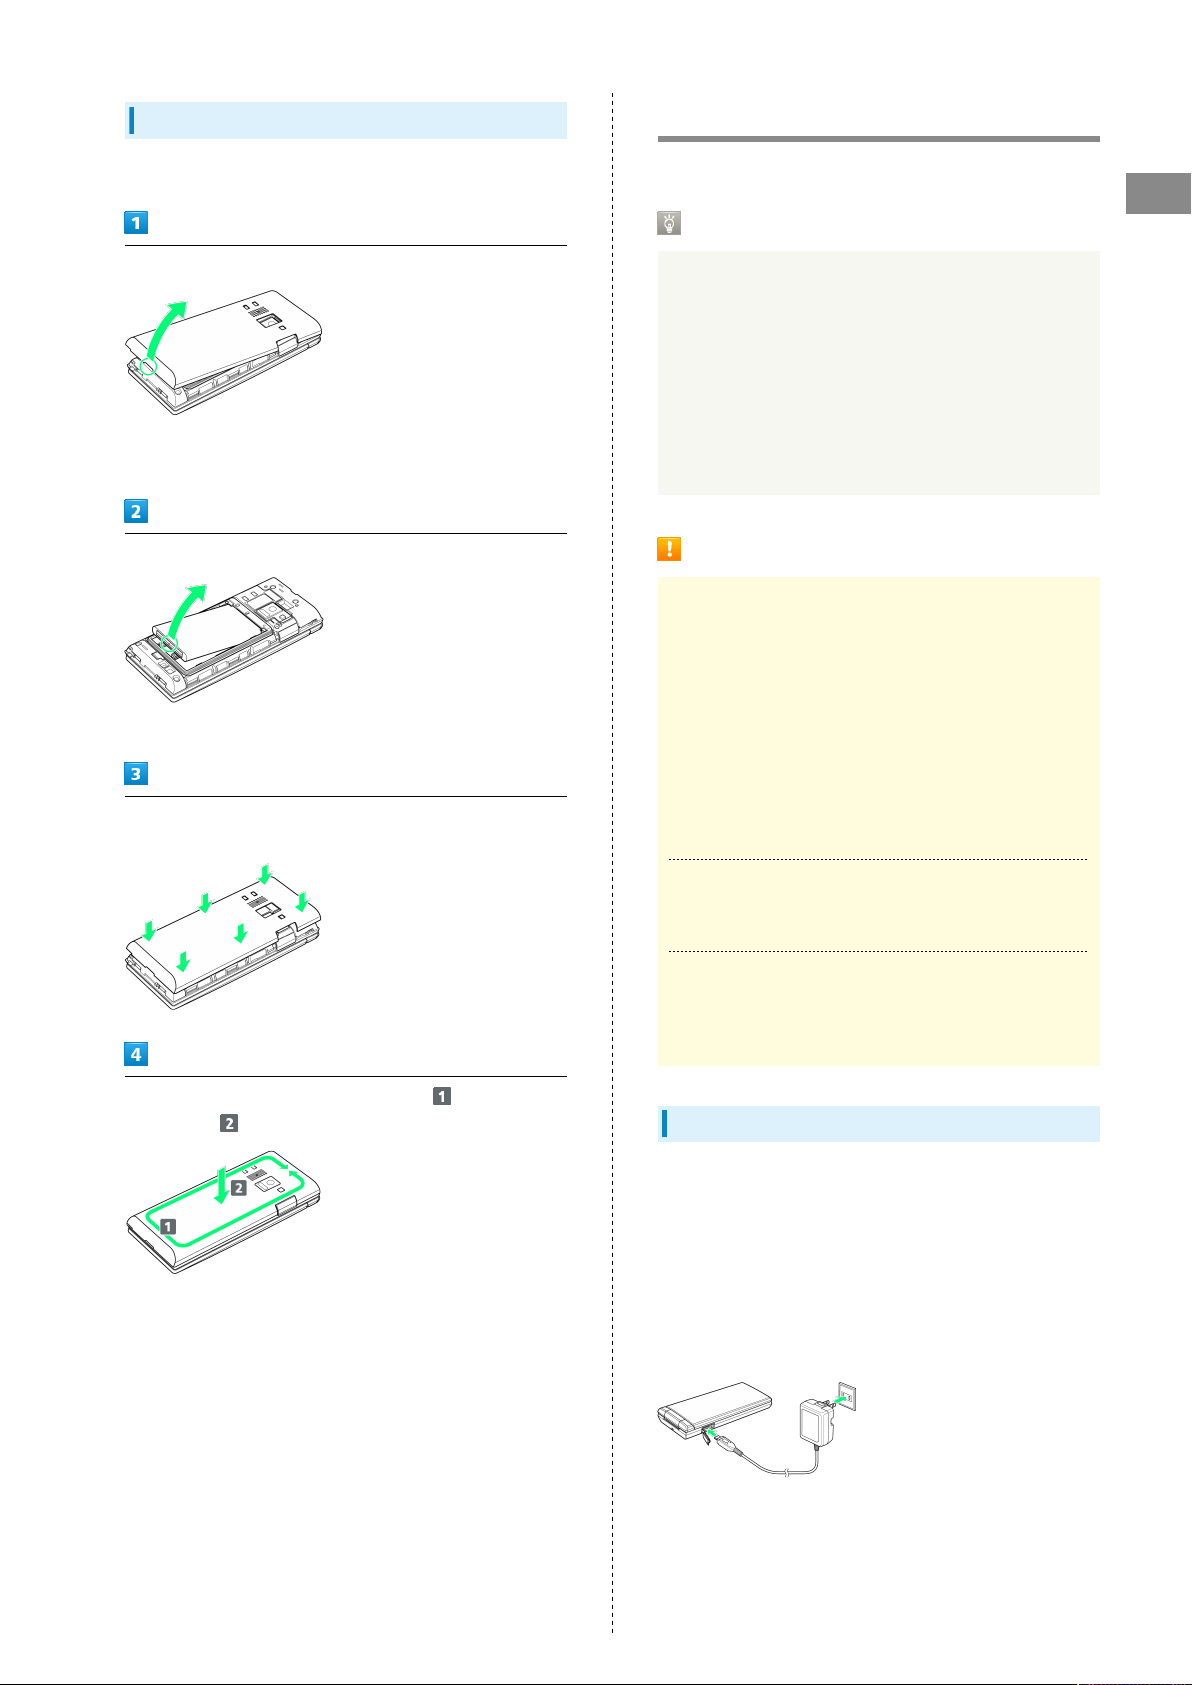
15
Removing
Always power off beforehand.
Remove Back Cover
・Gently lift Back Cover by notch in direction shown with
finger.
Remove Battery
・Gently lift Battery by bottom in direction shown.
Fit Back Cover on handset, and press Back Cover in directions
shown
Charging Battery
Charge Battery inserted in handset.
Incoming/Charging LED
Lights red during charging, and goes out once charging
completes.
・Incoming/Charging LED flashing while charging indicates
an abnormality with Charger, Battery, or that equipment
has reached the end of its service life, and that Battery
is not charging properly. Check that Charger and other
equipment are SoftBank-specified items. If you are using
specified products only, contact a SoftBank Shop or
SoftBank Customer Support, General Information.
Charging Cautions
Water Resistance
The optional AC Charger and Desktop Holder are not
waterproof. Never connect Micro USB plug while handset or
AC Charger is wet.
Handset is water resistant; however, if Micro USB plug
is inserted while it is wet, liquid (tap water, beverage,
sea water, pet urine, etc.) or a foreign object adhered to
handset or Micro USB plug may cause overheating, burnout,
fire, malfunction, burns, etc. due to electric shock, shortcircuiting, etc.
Getting Started
Work way around Back Cover in directions holding down
in direction to install completely
Handling Cables
Do not pull, bend, or twist cable; may damage the cable.
Charging Abroad
SoftBank Corp. is not liable for problems resulting from
charging handset abroad.
AC Charger
AC Charger is an optional accessory. Use a SoftBank-specified
AC Charger.
For details on AC Chargers and other peripheral equipment,
see SoftBank Website.
Charging with AC Charger SB-AC12-HDQC is described here.
・See User Guide for AC Charger SB-AC12-HDQC.
・Never connect Micro USB plug while handset or AC Charger
is wet.
DIGNO
®
ケータイ
16
Charging with Desktop Holder
Open External Device Port Cover and insert Micro USB plug on
AC Charger
・Insert Micro USB plug in correct orientation; otherwise,
External Device Port may be damaged. Check contours and
orientation of Micro USB plug, then insert it with tabs (○)
facing down.
Extend blades and plug AC Charger into AC outlet
Charging starts, and Incoming/Charging LED lights.
・Incoming/Charging LED goes out once charging completes.
Desktop Holder and AC Charger are optional accessories. Use
SoftBank-specified Desktop Holder/AC Charger.
For details on Desktop Holders/AC Chargers and other
peripheral equipment, see SoftBank Website.
Charging with Desktop Holder KYEAH1 and AC Charger SBAC12-HDQC is described here.
・See User Guide for Desktop Holder KYEAH1 or AC Charger
SB-AC12-HDQC.
・Never connect Micro USB plug while Desktop Holder or AC
Charger is wet.
・Do not place handset in Desktop Holder if wet.
Insert Micro USB plug of AC Charger in Desktop Holder
After charging, remove Micro USB plug from External Device
Port, then unplug AC Charger and retract blades
Close External Device Port Cover
Press in direction shown to close securely with no gaps
・Insert Micro USB plug in correct orientation; otherwise,
Desktop Holder port may be damaged. Check contours and
orientation of Micro USB plug, then insert it with tabs (○)
facing down.
Extend blades and plug AC Charger into AC outlet
Place handset in Desktop Holder
Charging starts, and Incoming/Charging LED lights.
・
Insert in direction , and then press down in direction
until it clicks in place.
・Incoming/Charging LED goes out once charging completes.
After charging, remove handset from Desktop Holder, and then
unplug AC Charger and retract blades
Remove AC Charger from Desktop Holder
17
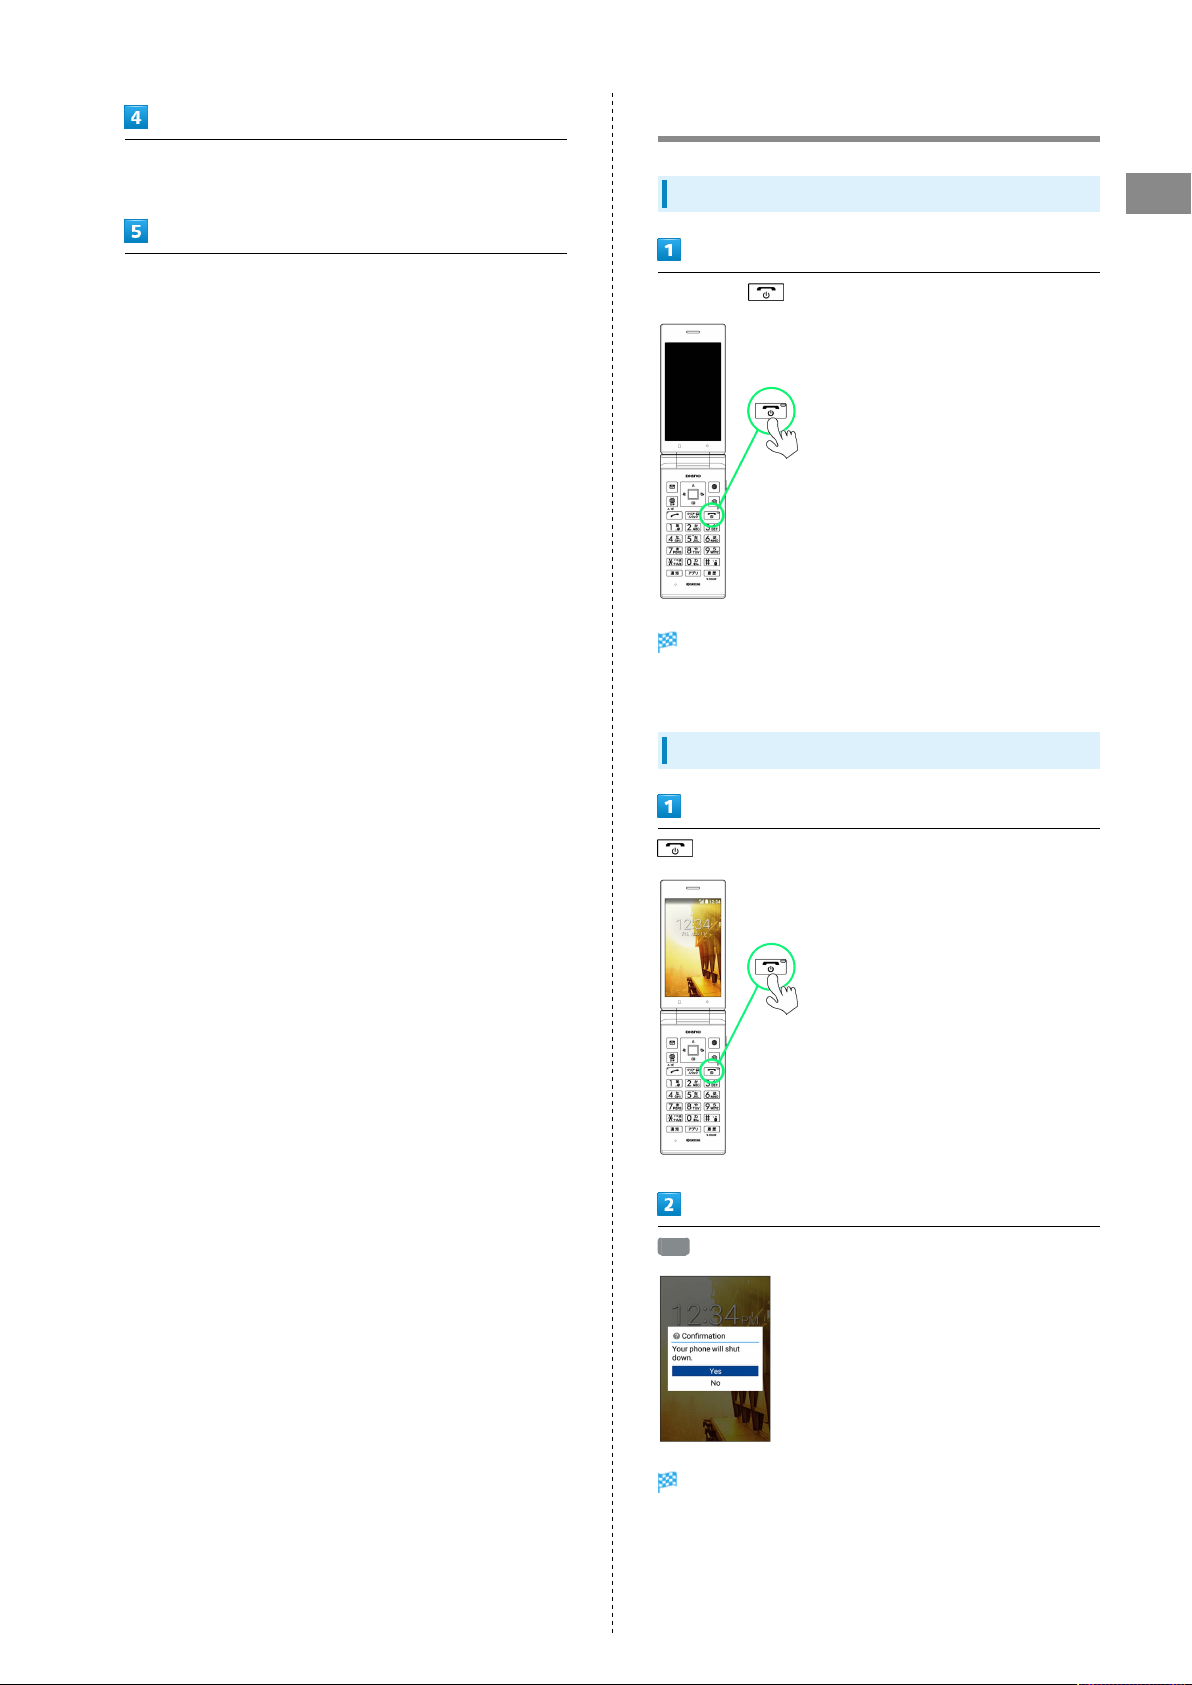
Power On/Off
Power On
Getting Started
Long Press until SoftBank logo appears
Handset powers on, and Standby appears after a while.
・If confirmation appears, follow onscreen prompts.
Power Off
(Long Press)
Yes
Handset shuts down.
DIGNO
®
ケータイ

18
Importing Data from Other Mobile Phones
Receiving Data by Infrared
Align infrared ports on handset and sending device.
・Operation may differ depending on type of data being
received.
Tool Infrared
Infrared window opens.
Enabling Bluetooth
Settings More settings Bluetooth
Bluetooth® settings open.
Bluetooth ( )
®
Align infrared ports on handset and sending device
Receive
Ready screen appears.
Commence sending on other device
Bluetooth® is enabled.
・
To disable Bluetooth®, Bluetooth (OFF) ( ).
File is received.
・If confirmation appears, follow onscreen prompts.
19
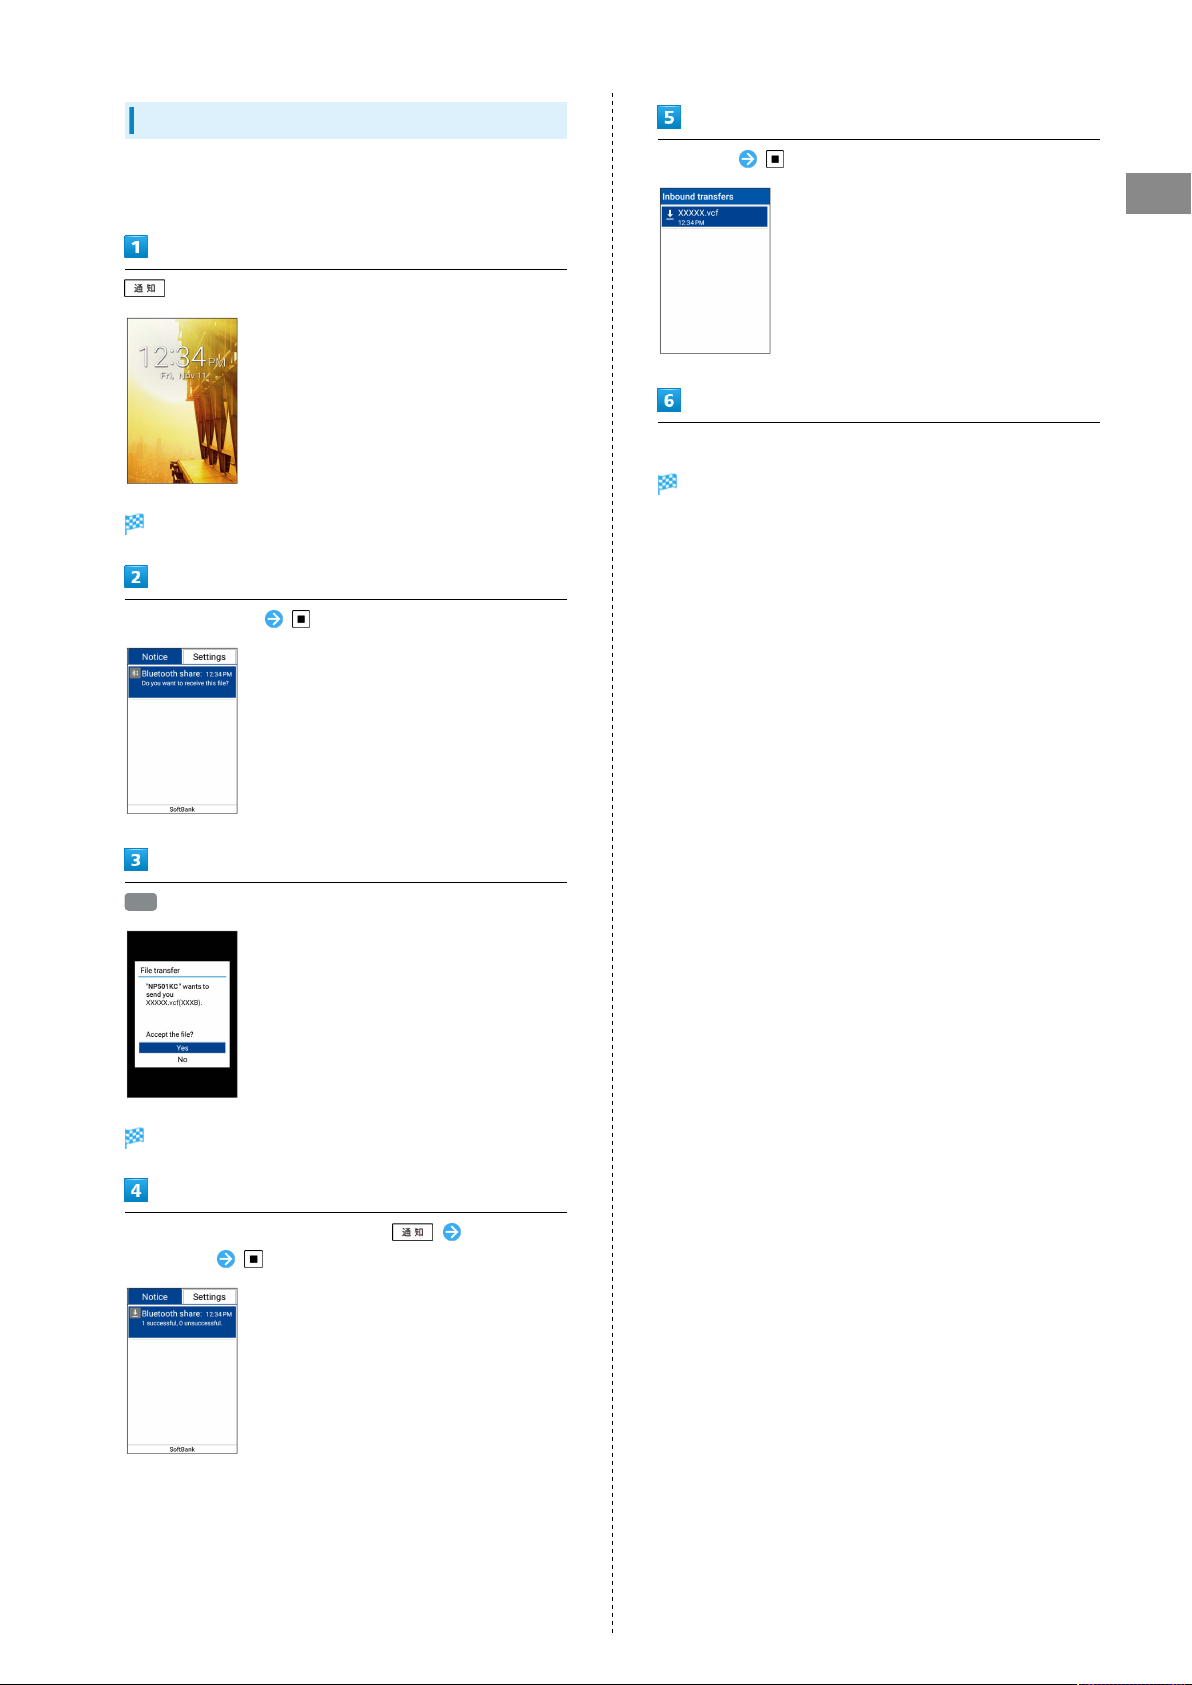
Receiving Data by Bluetooth
Handset receives a data receive request when data is sent
from a paired device. To receive data:
Notifications Window opens.
Select notification
®
Select file
Getting Started
Follow onscreen prompts
File is saved.
・If confirmation appears, follow onscreen prompts.
Yes
File is received.
After files are received, in Standby, Select
notification
DIGNO
®
ケータイ

20
Display
Standby
Standby appears as follows. Add widgets and applications with
Standby settings.
Status Bar
Date/time
Widgets/applications
1 Add with Standby settings.
1
Display-Top (Status Bar)
Indicators
Indicators (new message notification, handset status, etc.)
appear on Status Bar.
Status Bar Layout
Notifications, warnings, etc. appear here. (Notification
Indicators)
Handset status and other information appear here.
(Status Indicators)
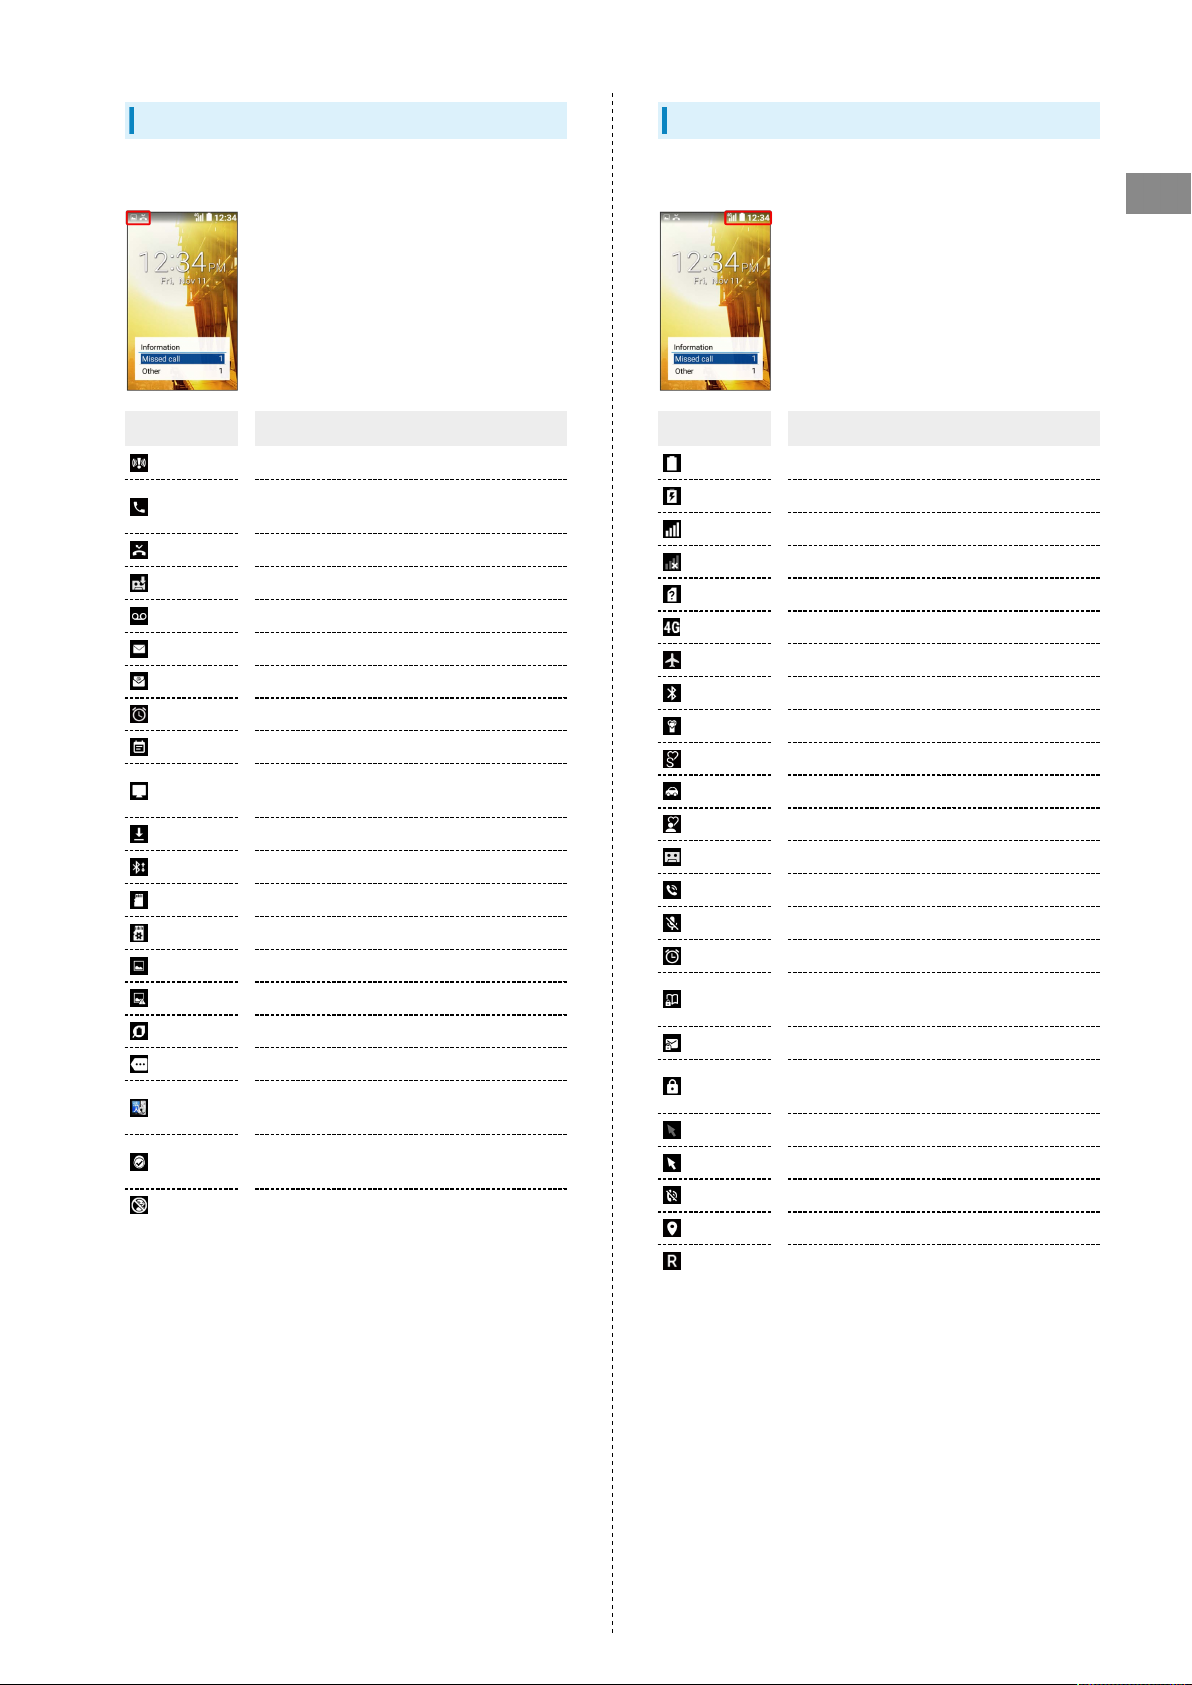
Information Window
Information for missed calls, new mail, etc. appears at bottom
of Standby when handset is opened.
・Type of information (e.g., "New mail") and number are
shown. Select the type and Press to view information.
Press / to hide information.
Display Saving
Display goes completely dark after a certain period of no
operation to save power.
・
Press any key (except during a call) to reilluminate
Display.
Backlight
Before Display goes completely dark, Backlight turns off
and Display darkens.
・Press any key to illuminate Backlight. Key press also
activates assigned function.
21
Notification Indicators
Notification Indicators appear on the left.
Indicator Description
Urgent News
Call Arriving/Calling/in Progress/Call on
Hold
Missed Call
New Answer Memo
New Voicemail
New S! Mail/SMS
New PC Mail
Alarm Ringing
Calendar Notification
Reserved TV Viewing Time Approaching/in
Progress
Data Downloading
Bluetooth® File Reception Request
SD Card Unmounted
Readying SD Card
Screenshot Captured
Screenshot Failed
Eco Mode
More Notifications
法人安心遠隔ロック (Anshin Enkaku Remote
Lock (Corporate Users)) On
ブラウザ保護 (Browser Hogo Protection)
On
Blocked call to/from nuisance caller
Status Indicators
Status Indicators appear on the right.
Getting Started
Indicator Description
Battery Strength
Charging
Signal Strength
No Signal
No USIM Card
4G Data Connectable
Airplane Mode
Bluetooth® On
Manner Mode
Silent Mode
Drive Mode
Original Mode
Answer Phone Set
Call Set to Speaker
Call Mic Off
Alarm Set
Secret Phone Book Entry Temporarily
Viewable
Secret Mail Temporarily Viewable
Secret Phone Book Entry and Mail
Temporarily Viewable
Touch Pointer Off
Touch Pointer On
Ringtone Volume 0
Locationing
Roaming
DIGNO
®
ケータイ
22
Checking Handset Status &
Notifications (Notifications/
Settings Window)
Open notifications and check handset status.
Using Notifications Window
Notifications Window opens.
to select notification
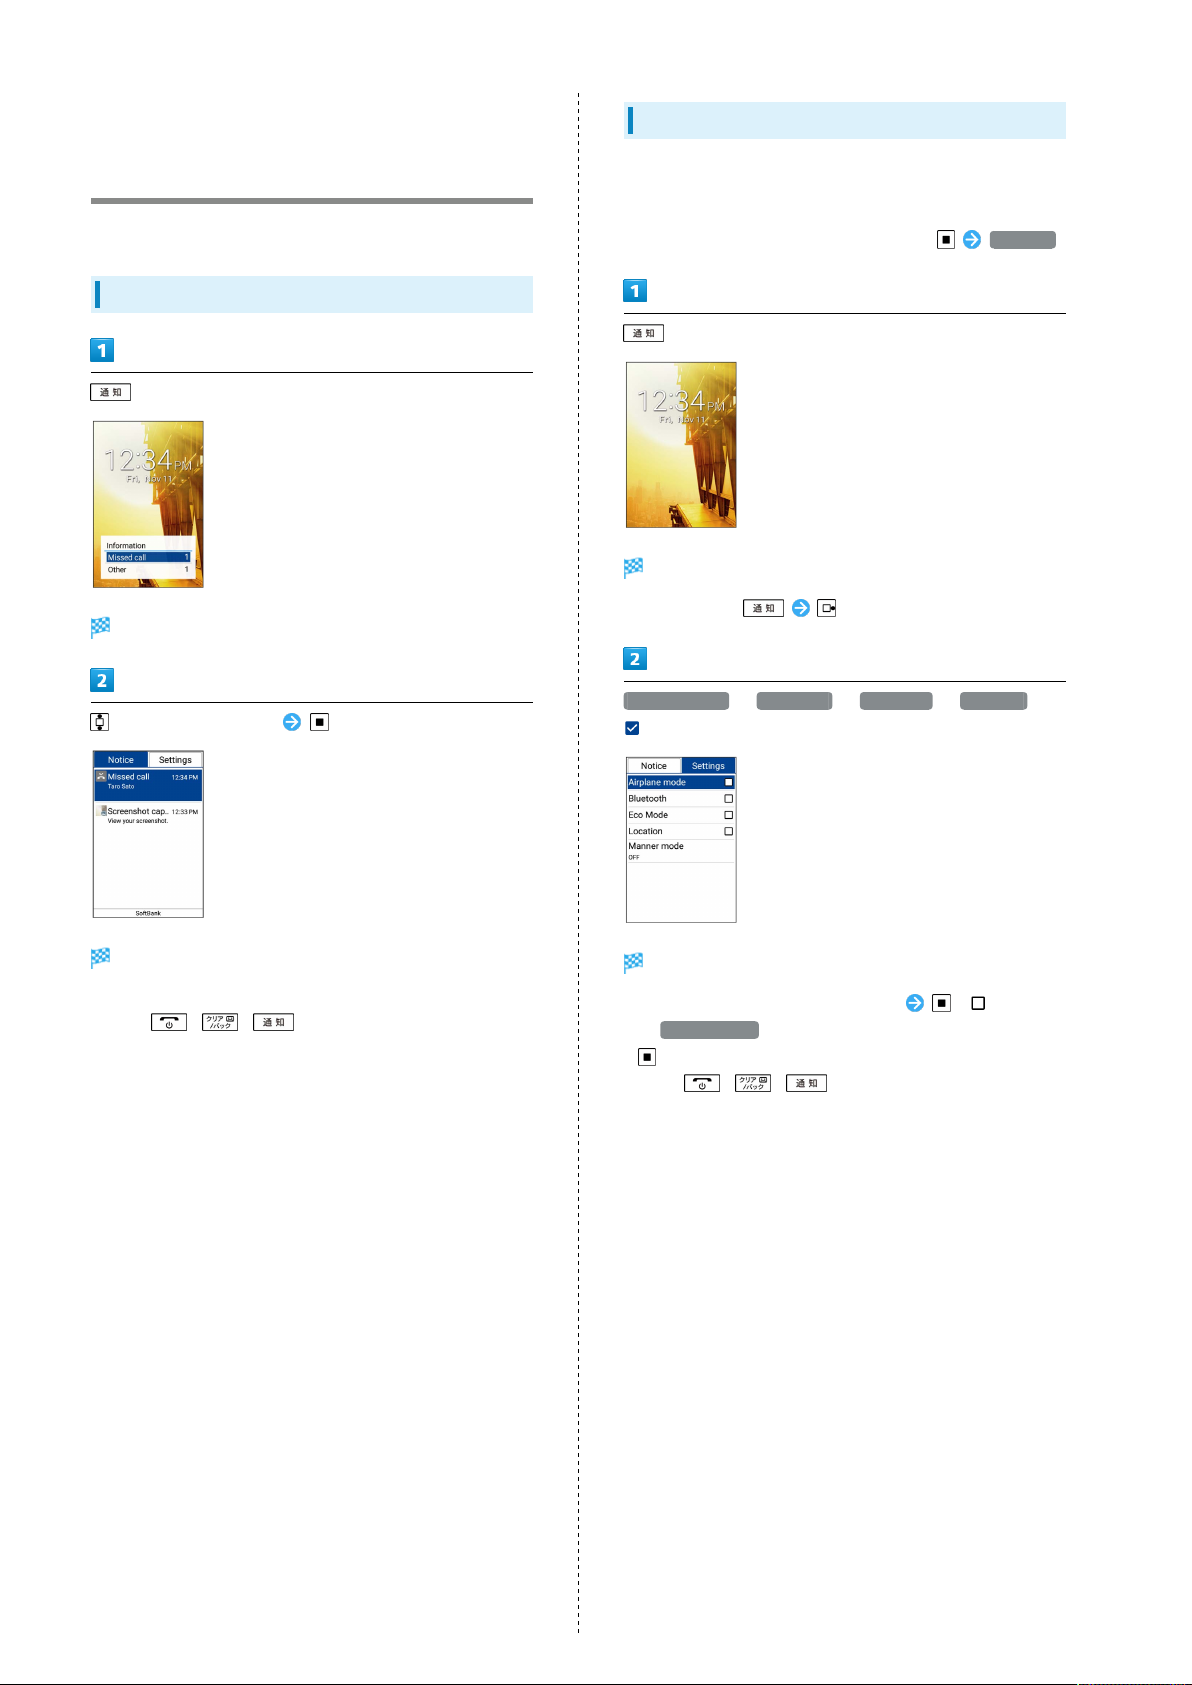
Using Settings Window
Use Settings Window to toggle Airplane mode, Bluetooth®, etc.
on/off and to set a Manner mode.
・
To make detailed settings, from Standby, Settings .
(Long Press)
Settings Window opens.
・
Alternatively, .
Airplane mode / Bluetooth / Eco Mode / Location (
)
Details appear.
・Follow onscreen prompts.
・
Press / / to close Notifications Window.
Functions are enabled.
・
To disable functions, select functions ( ).
・
If Manner mode is selected, select the mode and Press
.
・
Press / / to close Settings Window.
23
Sub-display
View signal, battery, and time as well as missed calls, and new
mail. Information appears for missed voice calls, new mail, etc.
Using Sub-display
Press (Side Key) when handset is closed to light Sub-
display.
・
When 24-hour format is off in Date & time , AM/PM
appears to right of time indications.
Indicators
The following Indicators appear in Sub-display.
Indicator Description
Signal Strength
4G Data Connectable
Airplane Mode
No Signal/No USIM Card
Battery Strength
Charging
Manner Mode
Silent Mode
Drive Mode
Original Mode
Missed Calls
New S! Mail/SMS
S! Mail/SMS Send Failure
Urgent News Notification
Information on Sub-display
Information appears for voice call, mail, and other
notifications. Appearing information:
Information Description
Saved name
Phone number
Email address S! Mail from sender not in Phone Book
"Calling"
"Mail
Received"
"Auto
answering"
"Early warning
Received"
"Manner
mode was
set"/"Silent
mode was
set"/"Drive
mode was
set"/"Original
mode was set"
"Manner mode
was canceled"
Time alarm
name/task
LINE message
information
"Please
charge"
"Key Locked
Not available"
"E-mail You
have mail on
the server"
"TV
Reservation"
Call/S! Mail/SMS from caller/sender in
Phone Book
Call/SMS from caller/sender not in Phone
Book
Call/Fake call arriving when Sub
display in Wallpaper/Display settings is
disabled
S! Mail/SMS arrives when Sub display in
Wallpaper/Display settings is disabled
Handset auto-answering call
New Urgent News
Handset placed in Manner mode/Silent
mode/Drive mode/Original mode
Handset exited from Manner mode/Silent
mode/Drive mode/Original mode
Alarm/timer ringing
New LINE information
Battery low
Long Pressing (Side Key) when
its operation locked and handset closed
Mail on mail server
Reserved TV Viewing Time Approaching/in
Progress
Getting Started
DIGNO
®
ケータイ
24
Security Codes
Code Types
The following codes are required for handset use. Operation
Password can be user-set and changed on handset.
Code Description
Operation
Password
PIN/Password
Center Access
Code
If Security Code is Unsaved
If a code is required by an application or function, a
prompt to save a code appears.
Code for applications and functions
requiring a security setting. By default,
not set.
Code for unlocking screen. By default, not
set.
4-number code set at time of
subscription. Used when changing
subscription details and optional services
from a landline telephone.
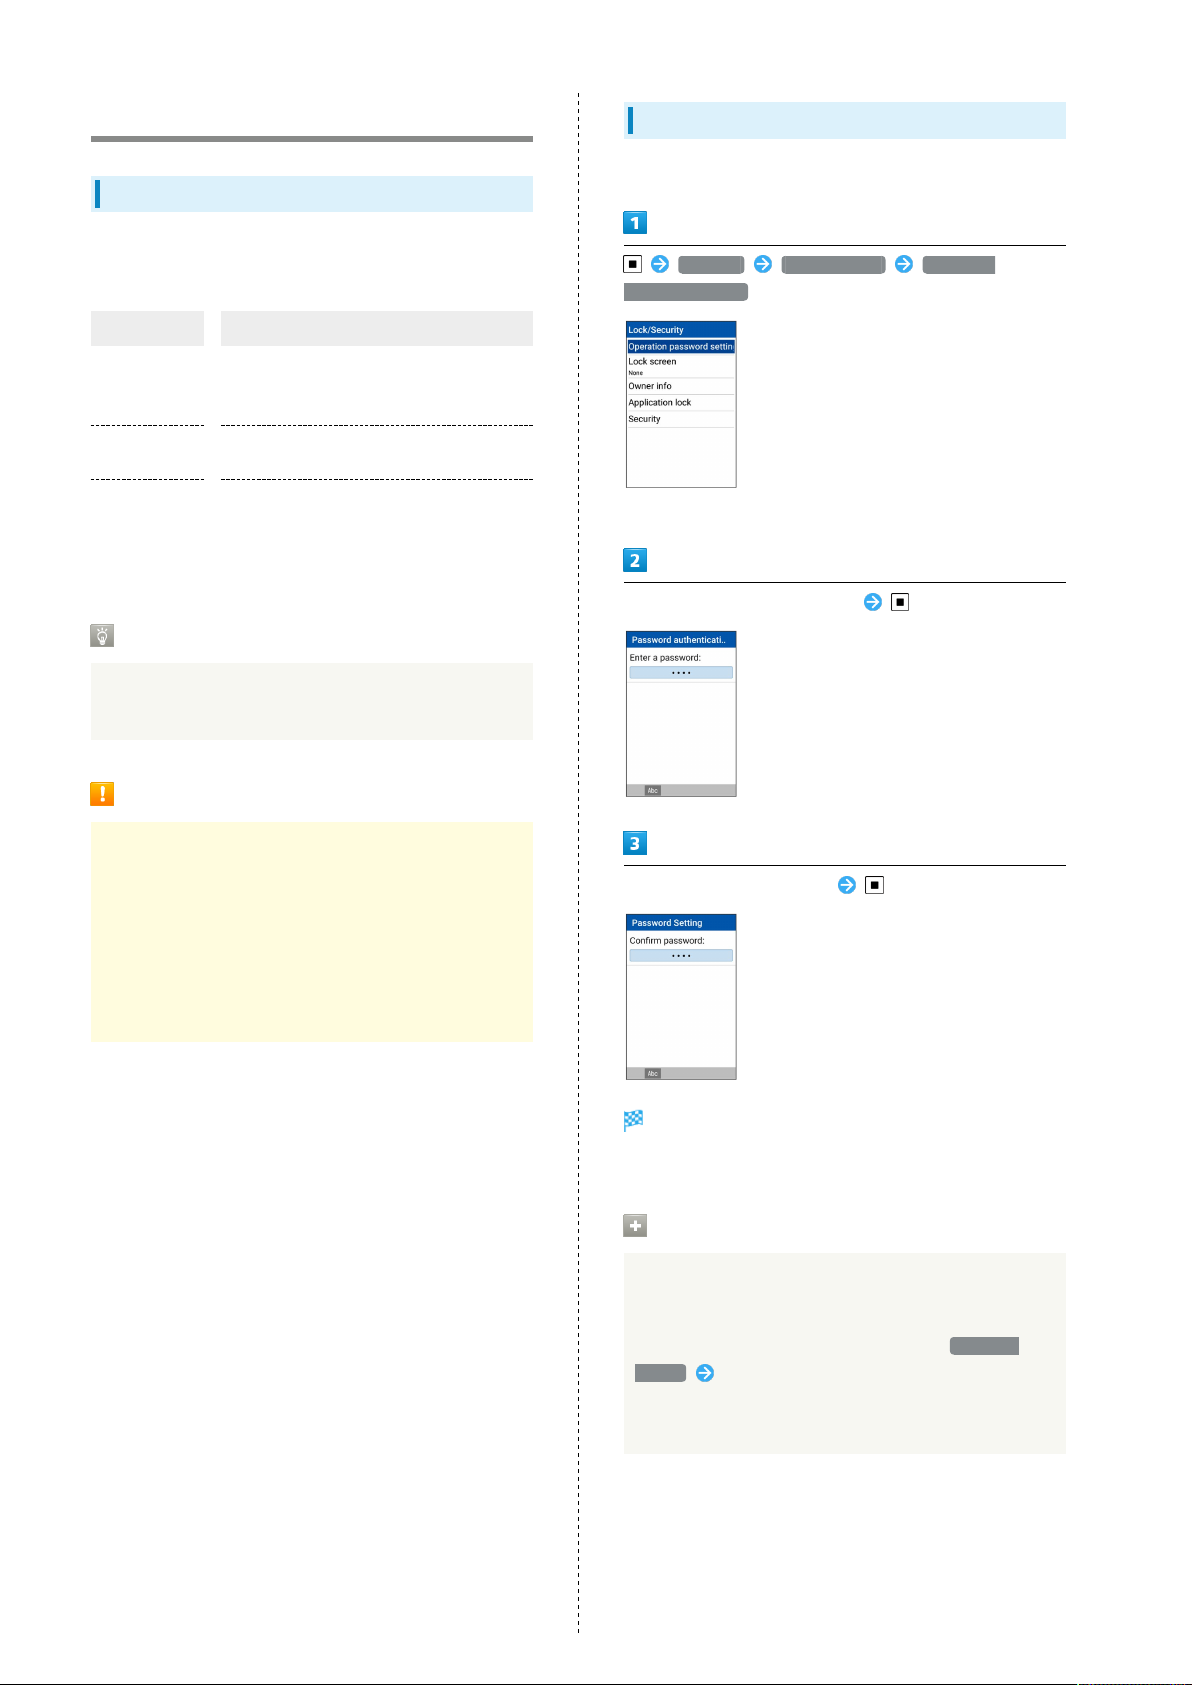
Setting Operation Password
Set a four- to eight-digit code.
Settings Lock/Security Operation
password setting
・If confirmation appears, follow onscreen prompts.
Enter Operation Password to set
Code Cautions
Be sure to keep Center Access Code and PIN/password for
unlocking screen written down.
If you forget the code, contact us for recovery. For
details, contact SoftBank Customer Support, General
Information.
Be careful not to reveal security codes to others. If
misused by others, SoftBank Corp. is not liable for any
resulting damages.
Re-enter Operation Password
Operation Password is set.
・If confirmation appears, follow onscreen prompts.
Entering Operation Password
Changing Operation Password
In screen for entering Operation Password to activate
All Reset, locks for function, and settings, Password
change Follow onscreen prompts
・Current Operation Password must be entered for
Operation Password.
Resetting Operation Password
25
USIM PIN
Settings All reset Reset phone
Password Reset OK Follow onscreen prompts
・My SoftBank authentication is required to reset
Operation Password. Set My SoftBank authentication
from My SoftBank homepage.
USIM PIN and USIM Card Lock
Getting Started
When USIM card lock is enabled, PIN (a code for USIM Card)
is required for handset use each time handset is powered on;
helps prevent unauthorized use by others.
・Enable USIM card lock by enabling PIN.
・PIN is 9999 by default.
PIN Entry Cautions
PIN entry is required when changing PIN, when powering
handset on with USIM card lock enabled, etc.
・Entering incorrect PIN three consecutive times activates
PIN Lock. To cancel, Personal Unblocking Key (PUK) is
required; contact SoftBank Customer Support, General
Information.
・Entering incorrect PUK ten consecutive times activates
PUK Lock, disabling handset. For recovery, USIM Card
must be reissued at a SoftBank Shop (fees apply).
DIGNO
®
ケータイ
26
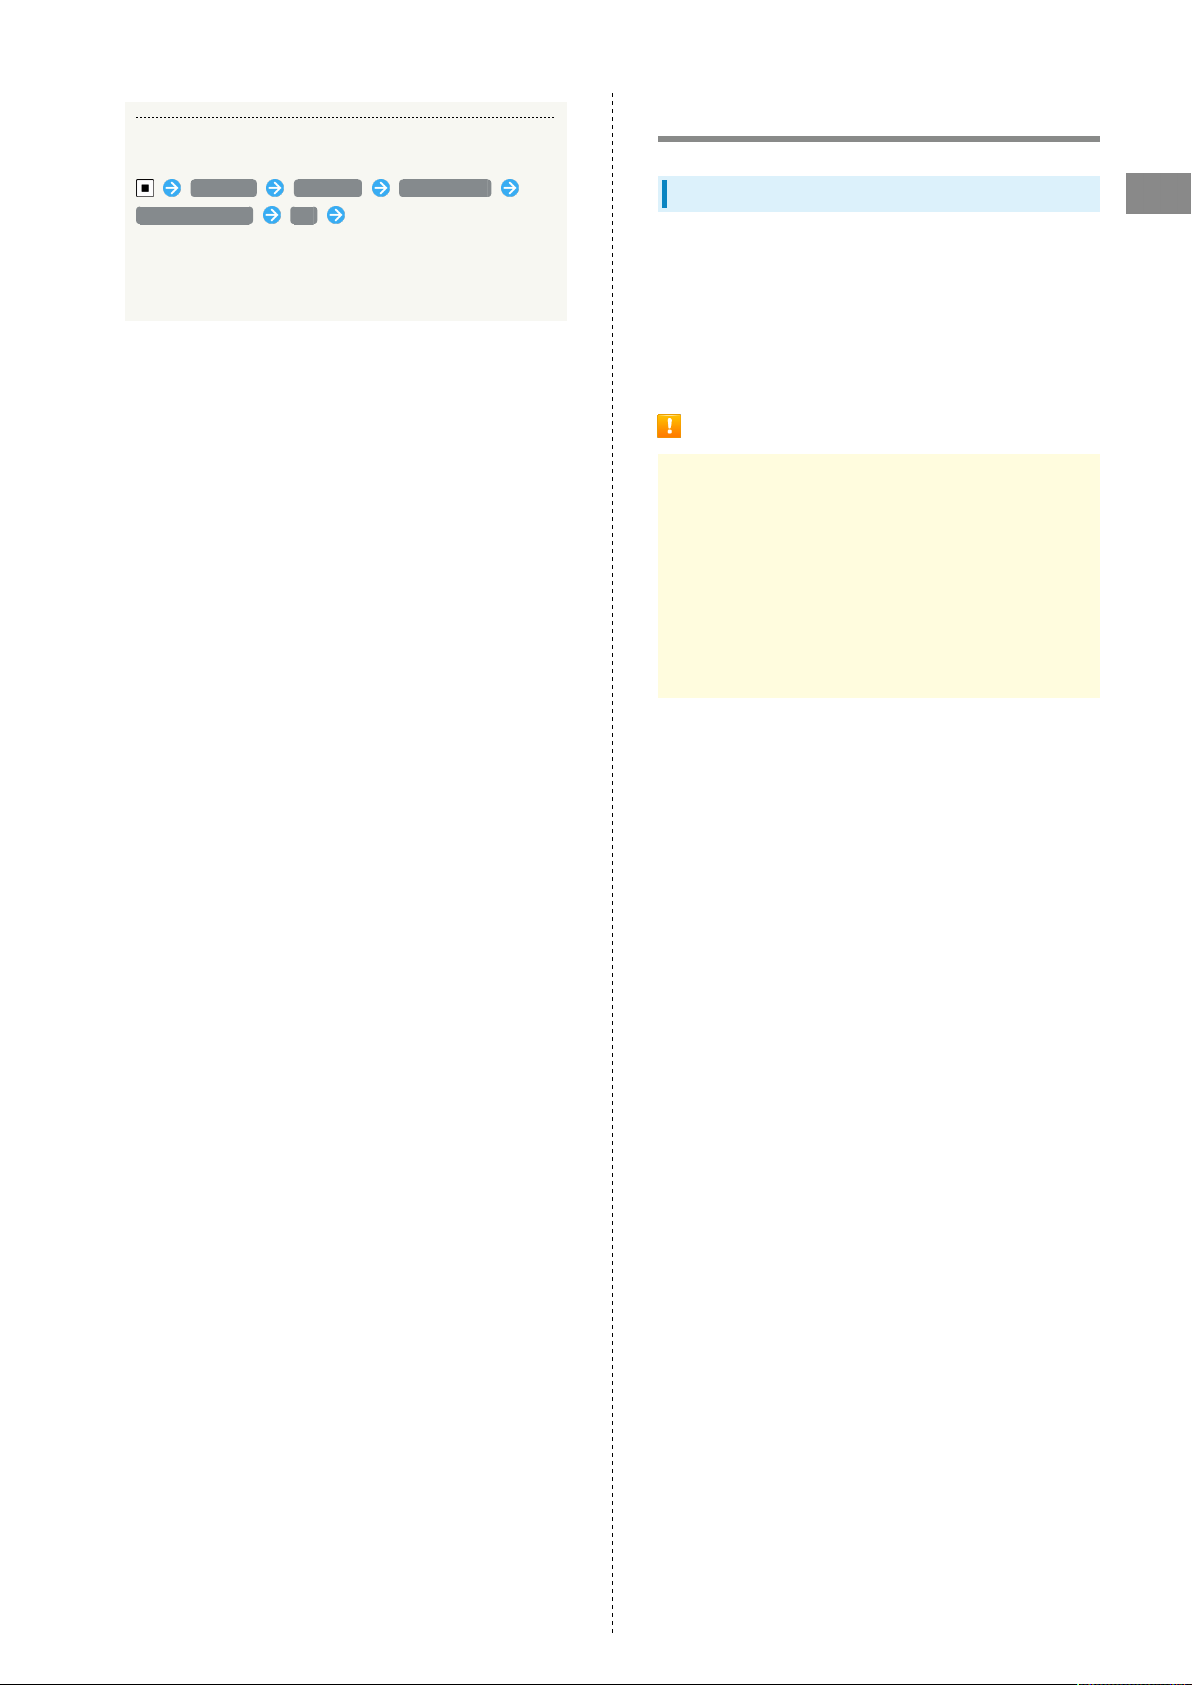
Enabling USIM PIN
When PIN (a code for USIM Card) is enabled, PIN entry is
required for handset use each time handset is powered on
with USIM Card installed.
Settings Lock/Security Security PIN
Certification
Screen for entering PIN appears.
Lock SIM card Enter PIN (OK) ( )
Changing USIM PIN
Lock USIM Card to change PIN. See "Enabling USIM PIN" for
details.
Settings Lock/Security Security PIN
Certification
USIM card lock settings open.
Change PIN code Enter current PIN (OK)
Enter new PIN (OK) Re-enter new PIN
(OK)
PIN is enabled and USIM Card is locked.
Disabling USIM Card Lock
In screen for entering PIN, Lock SIM card Enter
PIN (OK) ( )
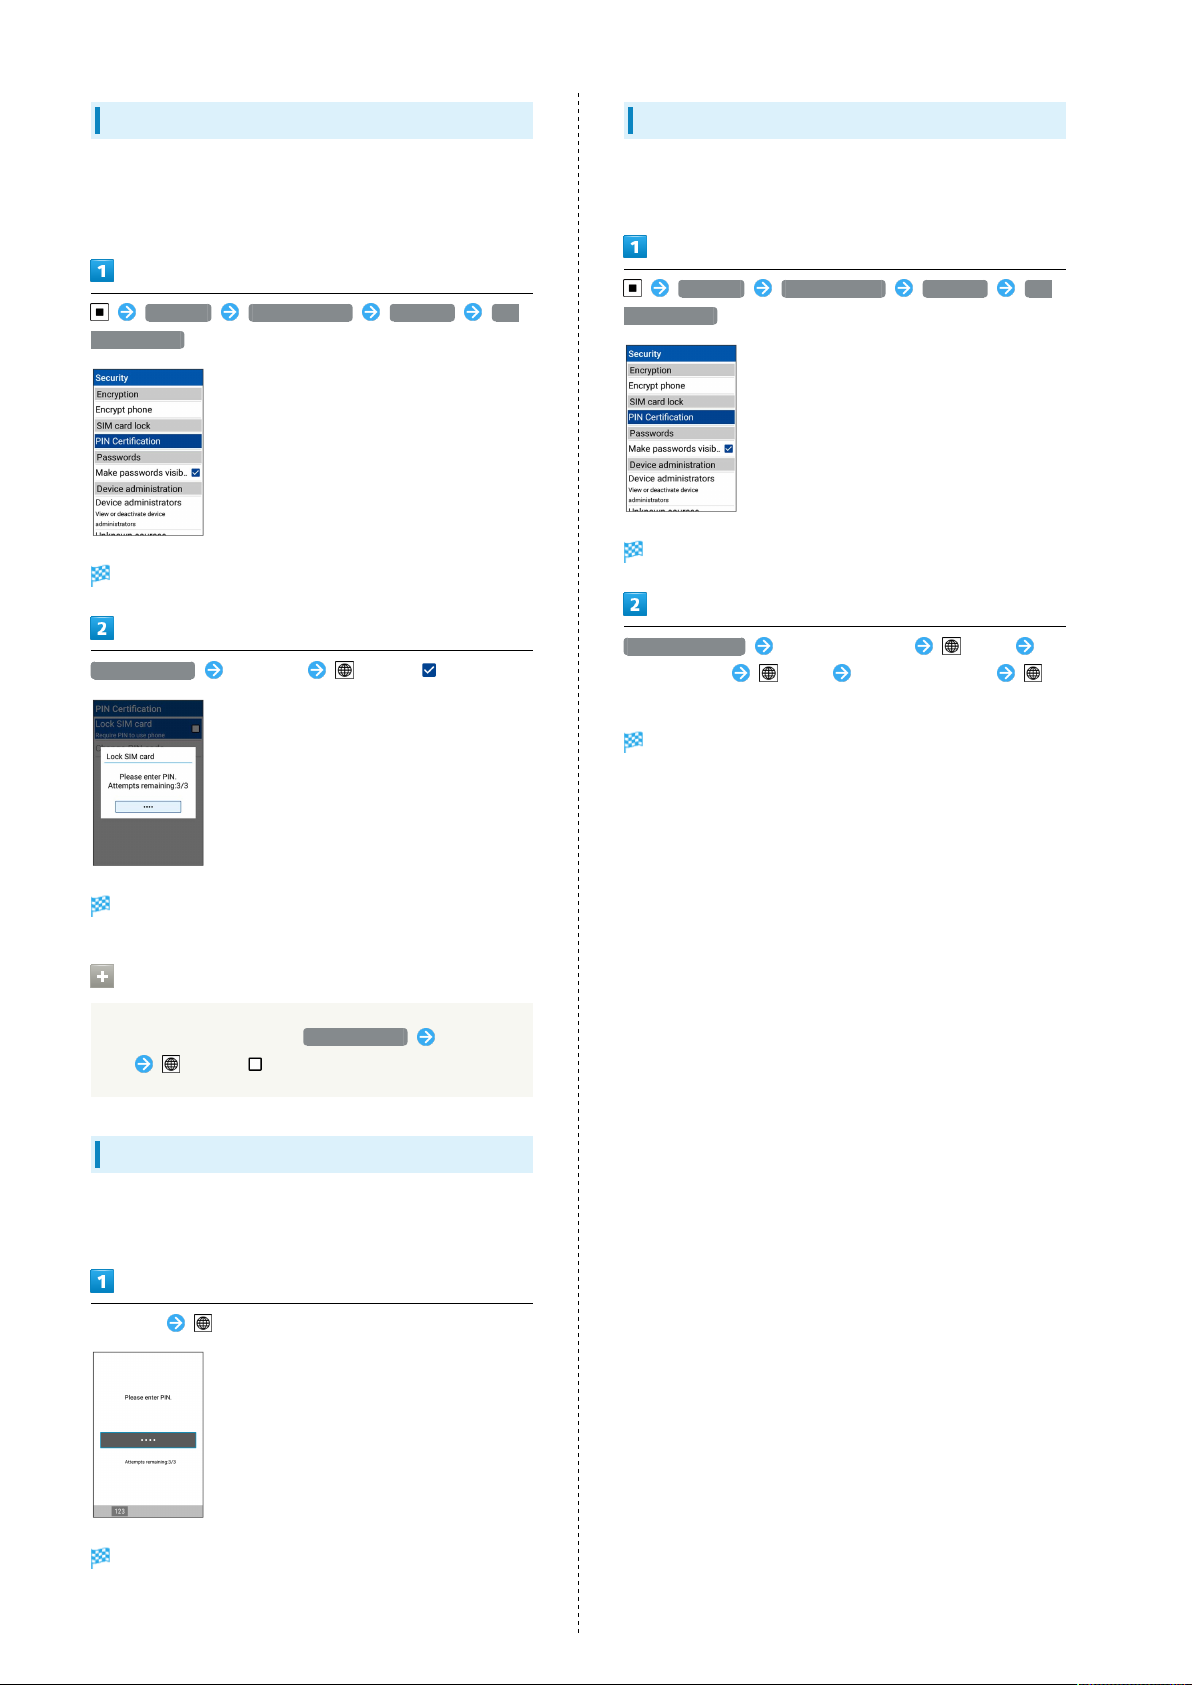
Operation at Power On
When USIM card lock is enabled, PIN entry window appears
each time handset is powered on. To use handset:
Enter PIN (Accept)
PIN is changed.
Handset is usable.

Basic Operations
Basic Operations with this Handset...............................28
Key Operation................................................................... 28
How to Use Touch Pointer.............................................. 29
Main Menu......................................................................... 30
Accessing Applications.....................................................31
Using Manner Mode.......................................................... 33
Using Airplane Mode.........................................................34
Other Basic Operations....................................................35
28
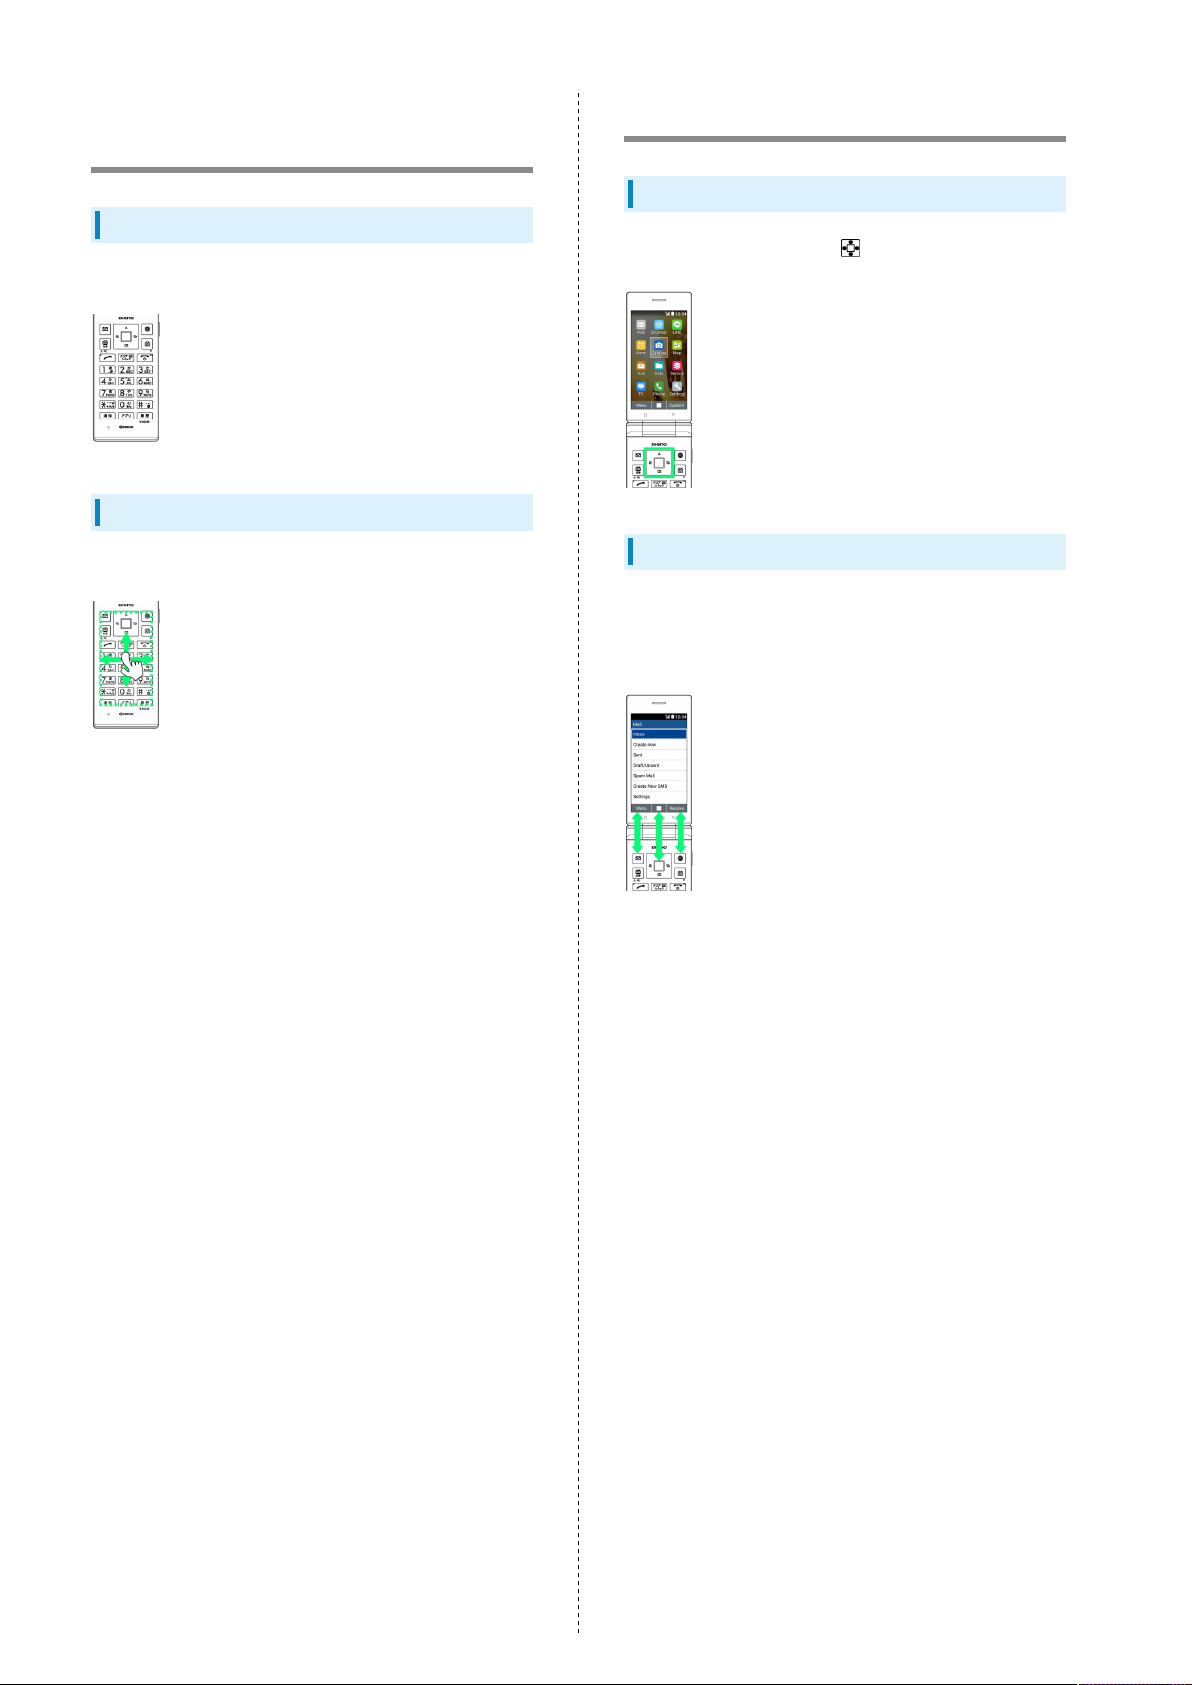
Basic Operations with this Handset
Handset Keys
Almost all operations can be performed by pressing the keys.
Touch Pointer Operation
Operate Touch Area to use the onscreen pointer.
Key Operation
Cursor Operation with Keys
Operate cursor in screen with .
Softkeys
Function/operation labels appear at bottom of Display; see
key assignments below.
・Some key assignments may vary with window content.
 Loading...