


index
Safety Information 4
System Overview 5
DLT 100 6-27
Button Functions 7-8
Battery Charging 9
2-Way Mode 10-17
Simultaneous Interpretation Mode 18-25
Repeater Mode 26-27
DLR 50 28-31
Specications 33-34
DLT100Specications 32-33
DLR50Specications 34
Troubleshooting 35
FAQ’s 36
FCC Statements 37

HEARING SAFETY
CAUTION!
This product is designed to amplify sounds to a high volume level which
could potentially cause hearing damage if used improperly. To protect your
hearing and the hearing of others:
1. Turn the volume down before putting on the earphone or headphone,
and then adjust the volume to a comfortable level.
2. Set the volume level at the minimum setting that you need to hear.
3. If you experience feedback (a squealing or howling sound), reduce the
volume setting and move the microphone away from the earphone or
headphone.
4. Do not allow children or other unauthorized persons to have access to
this product.
BATTERY SAFETY
CAUTION!
DLR 50 may be supplied with alkaline batteries. Do not attempt to recharge
alkaline batteries, which may explode, release dangerous chemicals, cause
burns, or other serious harm to the user or product. Rechargeable batteries
may be used with DLR 50 with external battery charger.
MEDICAL DEVICE SAFETY
CAUTION!
1. Before using this product with an implantable or other medical device,
consult your physician or the manufacturer of your implantable or other
medical device.
2. If you have a pacemaker or other medical device, make sure that you
are using this product in accordance with safety guidelines established
by your physician or the implantable device manufacturer.
RECYCLING INSTRUCTIONS
Battery Safety and Disposal
Help Williams Sound protect the environment! Please take time to dispose
of your equipment properly. Please do NOT dispose of batteries in the
household trash. Please take the batteries to a retail or community collection point for recycling.
Product Recycling:
Please do NOT dispose of your Williams Sound equipment in the household
trash. Please take the equipment to an electronics recycling center or return
the product to the factory for proper disposal.
safety information
4

system overview
The new Digi-Wave™ (digital spread spectrum – DSS) is a simultaneous, two-way wireless listening system in the 2.4 GHz band. Slim, lightweight, simple to set
up and use. With the push of a button, users can access 2-way communication for easy group leader/group member participation.
· Portable DLT-100 transceivers for 1- or 2-way operation
· DLR-50 receivers for 1-way listening applications
· Patented, frequency-hopping technology minimizes interference from other devices
· Global, turn-key solution: 2.4 GHz operation harmonized for use in most countries; FCC, CE, Industrie Canada and C-Tick approved
· Range: Up to 100 ft outdoors and up to 200 ft* indoors ( line of sight )
* Depending on environmental conditions
2-way
· 4-simultaneous groups available in 2-way operation
· Full duplex operation
· Built-in microphone and speaker (DLT-100)
· Assigned speaker priority as follows:
1st priority — Chairman Master ( CM )
2nd priority — Chairman Slave ( CS )
3rd priority — Slave ( SLV )
· Applications include Tour Guide, Team Teach, Wireless Intercomm,
portable discussion and personal listening systems
simultaneous interpretation
·Canaccommodateoor(orcommon)language,plusupto
14 simultaneous languages
· DLT 100 has repeater function for increased range in interpretation mode
5

DLT 100
6
DLT 100
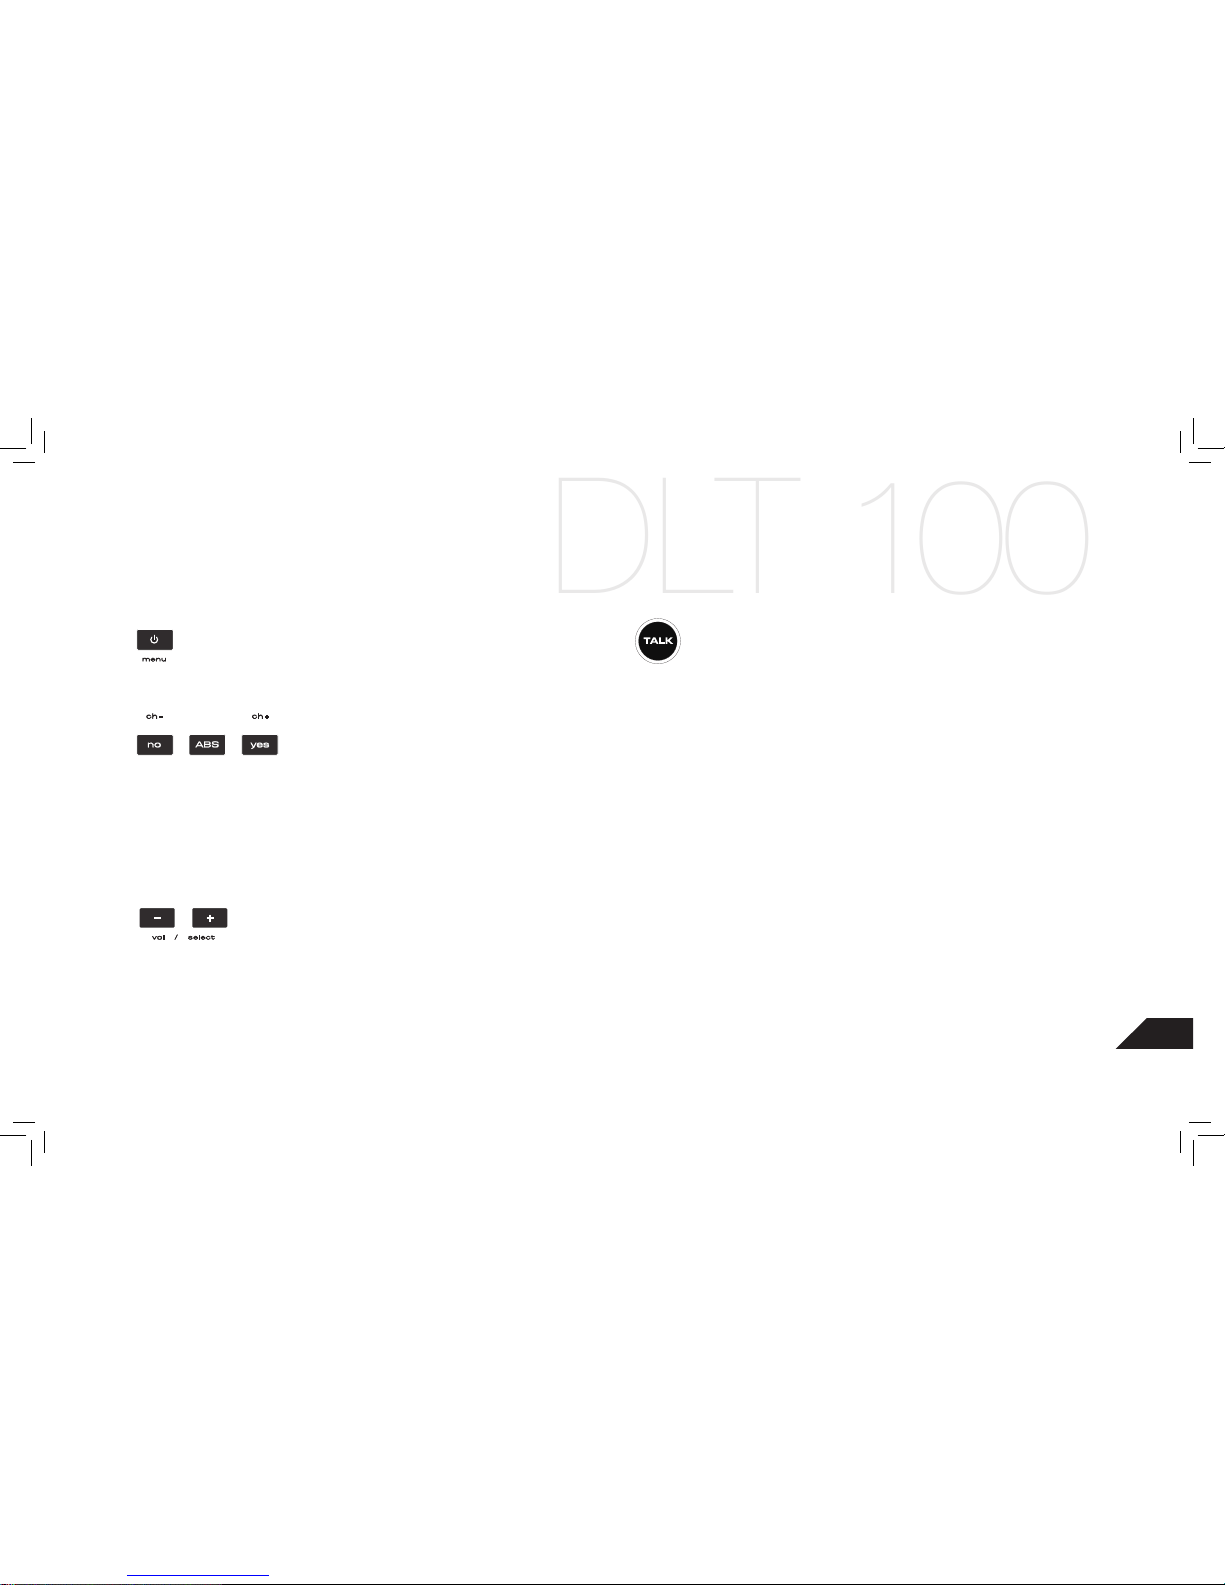
button functions
POWER / MENU BUTTON
° Press and hold for power on/Off
° Press once to change mode when in setup mode
VOTING / SETTING BUTTON
° Press No -Yes button together to enter or exit setup mode
° Use [YES],[NO], or [ABS] in voting mode
° Use these buttons to select channels in simultaneous interpretation mode
° Press and hold [ABS] button to enter voting mode. Master unit controls voting function. All
votes viewable only on Master and Sub Master unit. Must have address assigned between
1 — 99 to allow voting or attendance function
VOLUME CONTROL / SELECT BUTTON
° Controlvolume
° Use to navigate selection in setup mode.
TALK BUTTON
° Press button once to activate the microphone. Press button once more to turn off
the microphone
° Press and hold the button for approximately 2 seconds to mute other DLT 100 slave units.
Only the CM has this function.
7
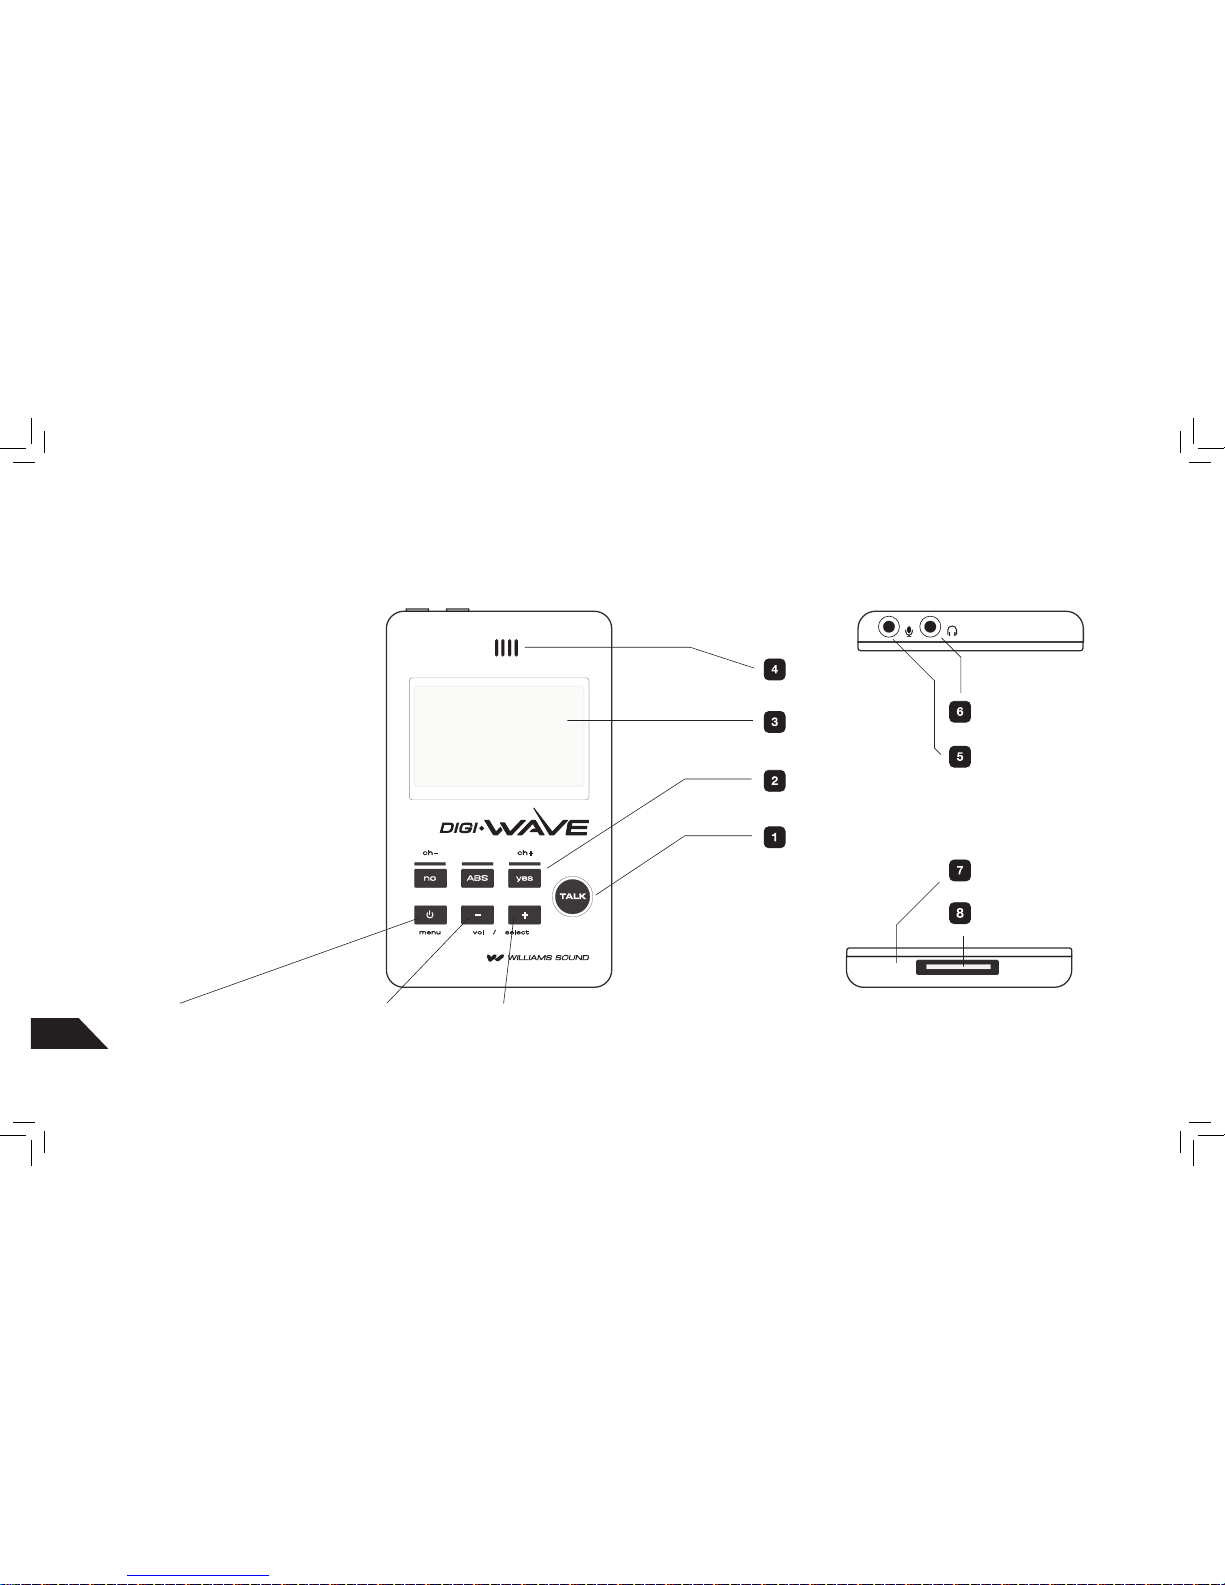
1 Talk Button
2
LED
3 LCD display
4 Internal Speaker
5
External Mic. Jack (3.5mm)
6
External Headphone Jack (3.5mm)
7 Internal microphone
8 iPod Connector (30pin)
Power / Menu Volume / Select Down Volume / Select Up
button functions
8

DLT 100
battery charging
BATTERY CHARGING
1. This Product uses rechargeable lithium
polymer battery
2. Use 30 Pin connector, located on the bottom of DLT 100 to charge the
battery. Full charging time: approx. 5 hours
RedLEDasheswhilecharging.
Green LED on solid when battery is charged.
3. Battery Maintenance
° Charge the battery at room temperature
° Not recommended to charge the battery more than 12 hours continuously
( Optional CHG 102 - 2-bay charger available )
9
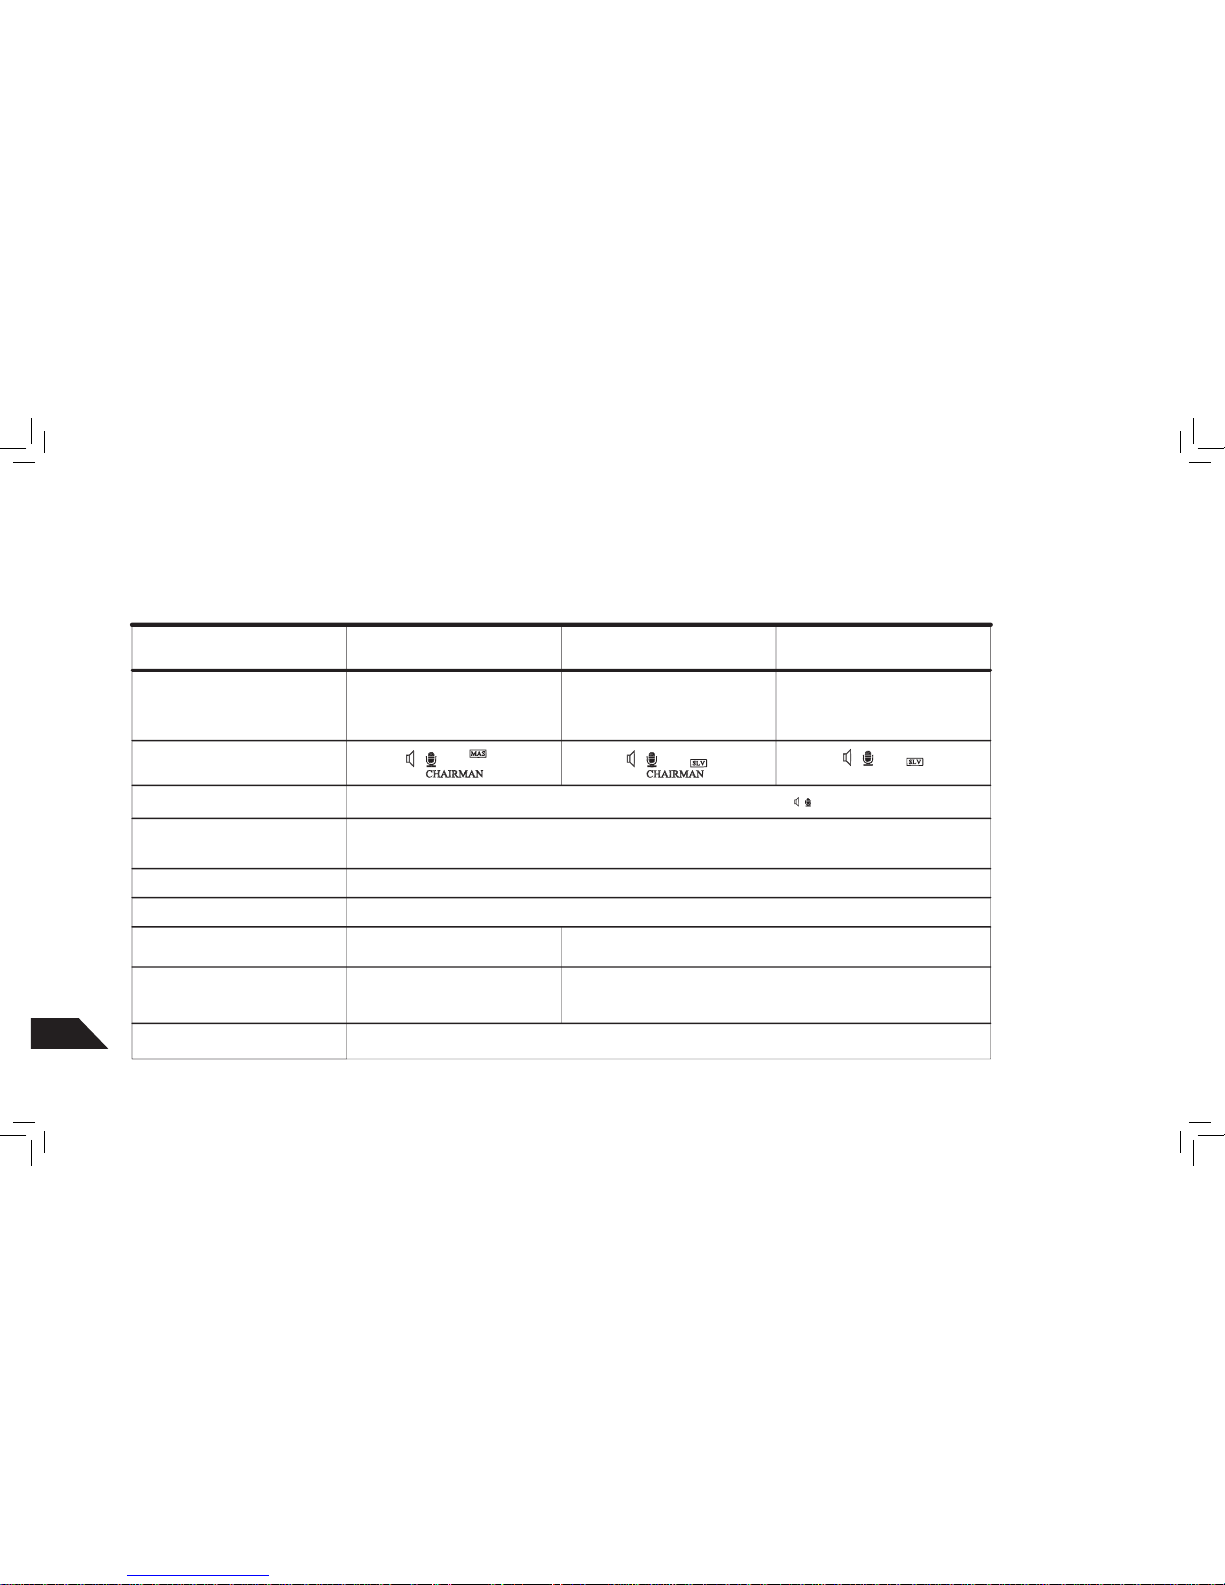
2-way mode
DLT chairman master (CM)
DLT chairman slave (CS)
DLT’s slave (SLV)
CM works as a master device
to control everyone in a group. Guide
has 1
st
priority to speak all the time and
controls operation of other features
Assists CM in a group. Has 2
nd
priority to speak
2-way communication with all DLT’s in
group. Have 3rd priority.
steps
roles
display
1. Tour guide / conference
3. Address setting
Press No - Yes buttons together for 2 Sec to enter setup menu. Then set to 2-way mode . Press + or – button to select.
2. Master Chairman / Slave
Chairman / Slave setting
Press menu button once, then press + or – button to set select Master Chairman / Slave Chairman / Slave
Press menu button once, then press + or – button to select between 0-1023. Every DLT must have its own address.
4. Group setting
Press menu button once, then press + or – button to select between 0-1023. ( Default is 12 )
5. Time setting (CM only)
6. Speaking time setting
7. Save and exit setup mode
Press menu button once, then press
+ or – button to set current time
Press menu button once, then press
+ or – button to set speaking time
between 0 - 60 min. ( Default is 0 min )
When setup is complete, press No - Yes buttons together to save and exit
10

Power ON/OFF
PressandholdthePower/Menubuttonfor2seconds.LED’swillashand
the LCD will turn on.
Press and hold the Power/Menu button for 2 seconds to turn the unit off.
Full Duplex (two way) communication
Anytwopeoplecantalkinagroupatanygiventime.TheCMwillhaverst
priority, Chairman Slave has second priority and Slave units have third priority. The CM or CS will have to turn off their talk access to allow the Slave
units to talk. When two people are talking in a group the participants can
hear both voices in the DLT’s or DLR’s.
The CM has the ability to lock out other talkers by holding down the TALK
buttonforthreeseconds.TheCMTALKLEDwillcontinuouslyashwhile
other participants are locked out of the TALK feature.
Electronic Voting
The CM must press and hold the ABS button until the LED turns on. This
will activate the voting feature in the system. Participants with DLT 100’s
can press the NO or YES button and the count will be displayed on the CM
unit LCD. Participants can change their vote and the count will change on
the CM unit. No votes will show on the left side of the LCD and YES votes
operation guide
on the right side. ABS will not be counted. The CM must press and hold
the ABS button again to exit the voting mode. When in voting mode, only
the CM can talk in the system. Addresses 0 - 99 must be used for voting
feature. Addresses over 99 will not be registered.
Attendee Checking
When the Master Chairman presses the MENU button once, the number of
SLAVE devices connected to the system will be displayed for two seconds.
Addresses 0 - 99 must be used for attendee feature. Addresses over 99 will
not be registered. ie: C 12 = 12 DLT’s synched with CM
Address conrmation
Press the MENU button twice. The address for the DLT 100 will be displayed
for two seconds. NOTE: Every DLT 100 MUST have its own address and all
must be assigned to the same group.
Timer function
The CM has the ability to set a talk timer from 0 to 60 minutes. The factory
default is 0. This timer will allow the TALK feature on SLAVE units to have
only a selected amount of time to talk. 0 means there is no talk time limit and
speak time is unlimited.
DLT 100
11

2-way setup
Press and hold POWER button for 2
seconds to turn DLT 100 on
Press NO and YES button together
for 2 seconds
Mode icon will blink on the LCD
screen
Press ( - ) or ( + ) button to select
mode
1 2 3 4
12

DLT 100
Select Tour Guide and Press POWER
/ MENU button to enter selected Tour
Guide mode.
Press ( + ) button, the mode will change in
sequence above. Press ( - ) button for reverse
sequence
Note: In 2-Way Mode, 2 different applications can
be used as listed below. Each has a different role
but they both can be used in 2-Way Mode.
2-Way Modes
Tour Guide
Listen Only
5
When mode selection is made
CHAIRMAN SLV will blink
6
Listen Only
Tour Guide
Receive Only
( N/A, 2-Way )
Repeater
( N/A, 2-Way )
Main Speaker
( Floor ) ( N/A, 2-Way )
Interpreter
( N/A, 2-Way )
13

2-way setup
Press POWER / MENU button to
enter CHAIRMAN MAS / CHAIRMAN
SLV / SLV.
Address ( ADD ) icon will now begin to
blink Press ( + ) or ( - ) button to select
a Address number ( 0 – 1023 ).
NOTE: Each DLT must have its own
address
Press POWER / MENU button to
enter Address number
8 9 10
Press ( + ) or ( - ) button to select
CHAIRMAN MAS / CHAIRMAN SLV
/ SLV. Master and Slave units must
have same group number.
7
14

GROUP icon will now blink.
Press ( + ) or ( - ) button to select a
Group number. Must have one Master
in a group.
11
Press POWER / MENU button to
enter Group number
12
The hour number ( TIME ) will now
blink. Press ( + ) or ( - ) button to se-
lect Hour number ( If unit is set as SLV
or SLV CHAIRMAN, skip to step 19 )
NOTE: Only CM sets time
Press POWER / MENU button to
enter Hour number
13 14
DLT 100
15

2-way setup
The minute number ( TIME ) will now
blink. Press ( + ) or ( - ) button to
select Minute number
Press POWER / MENU button to
enter Minute number
TALK icon will now blink ( speech
time ) Press ( + ) or ( - ) button to
select a speech time ( 0 — 60 min )
Press POWER / MENU button to
enter speech time. If you wish to not
set a speech time, set speech time
to :0.
15 16 17 18
16

You are now at the beginning of the
setup mode. To save and exit setup,
hold NO and YES buttons together for
2 seconds
19
DLT 100
17

simultaneous interpretation mode
steps
main speaker (floor)
master
interpreter
(SLV)
repeater
attendees
(DLT or DLR) receive only
roles
display
1. Intrepretation Mode
2. Master / Slave Setting
3. Transmitting Channel
Setting
Main speaker’s speech will be
transmitted through channel 0
Press menu button once, then press + or - button to set Master or slave ( or )
4. Group Setting
Press menu button once, then press + or - button to select group number between (0-1023)
5. Time Setting
Press menu button once, then press + or - button to set current time (only Master / main
speaker has the ability to control time setting)
Channel 0 is assigned
automatically
Press mode button once, then press + or - button to select transmitting channels of
interpreters (Interpreters: 1-14 Ch / Repeater: 0-14 Ch )
Interpreters can be set as
many as needed. (1-14
channels: Max 14)
1 repeater per channel. (0-14
channels; max 15)
Within a group, capable of
selecting one preferable
interpretation channel
(0-14 channels: Max 15)
Press No - Yes buttons together for 2 Sec to enter setup menu. Then set to interpretation mode . Press + or – button to select.
When setup is complete, press No - Yes buttons together to save and exit
6. Save and exit setup
18

operation guide
Power ON/OFF
PressandholdthePower/Menubuttonfortwoseconds.TheLED’swillash
and the LCD will turn on.
Press and hold the Power/Menu button for two seconds to turn the unit off.
Main (oor) speaker
Main speaker will use channel 0
Press the TALK button to activate the microphone
Simultaneous Interpreter
Each Interpreter unit will need to be assigned a channel number (1-14). The
TALK button must be activated to send the translation to the attendees.
Repeater function
An additional DLT 100 can be set-up as a repeater to increase the range of
each channel.
See pages 26-27 for details.
Connecting to external devices
The 30 pin charging connector on the bottom of the DLT 100 will also connect to most I-Pod speaker stations. The 3.5mm stereo microphone jack
can accept a headphone level or a line level output from audio sources
when using the Williams Sound Corp. WCA 094 attenuated cable.
DLT 100
19

simultaneous interpretation setup
Press and hold POWER button for 2
seconds to turn DLT 100 on
Press NO and YES button together
for 2 seconds
Mode icon will blink on the LCD
screen
Press ( - ) or ( + ) button to select
mode
1 2 3 4
20

DLT 100
Press ( + ) button, the mode will change in
sequence above. Press ( - ) button for reverse
sequence
Note: In Interpretation Mode, 4 different applica-
tions can be used as listed below. Each has a
different role but they all can be used in Interpreta-
tion Mode.
Interpretation Modes
Repeater
Receive Only
Main Speaker
Interpreter
Extends the range for each channel
For listening to selected interpretation channel
( Floor )
Interprets main speaker to receive only units
Listen Only ( N/A Int. Mode )
Tour Guide ( N/A Int. Mode )
Receive Only
Repeater
Main Speaker
Interpreter
21

simultaneous interpretation setup
Press POWER / MENU button to
enter SLV or MAS.
8
Press ( + ) or ( - ) button to select SLV
( Slave ) or MAS ( Master )
7
Press POWER / MENU button to
enter selected interpretation mode.
5
When mode selection is made SLV or
MAS icon will blink. ( Receive only will
not have this option. Skip to step 9 )
6
22

Channel icon will now begin to blink
Press ( + ) or ( - ) button to select a
Channel number 1 – 14. Transmitting
Channel must be set different. ( N/A
with Main Speaker unit. Set to CH 0 )
Press POWER / MENU button to
enter Channel number
9 10
Group icon will now blink.
Press ( + ) or ( - ) button to select a
Group number. Master and Slave
units must have same group number.
11
Press POWER / MENU button to
enter Group number
12
DLT 100
23

simultaneous interpretation setup
The Minute number will now blink
Press ( + ) or ( - ) button to select
Minute number
Press POWER / MENU button to
enter Minute number
15 16
The hour number ( TIME ) will now
blink. Press ( + ) or ( - ) button to
select Hour number ( Master will only
have this option. All other units skip to
step 17 )
Press POWER / MENU button to
enter Hour number
13 14
24

You are now at the beginning of the
setup mode. To save and exit setup,
hold NO and YES buttons together for
2 seconds
IMPORTANT
Therecanonlybeonemaster(oor)per
group
17
DLT 100
25

repeater mode
Must be set to Main Speaker, CH 0
and SLV
Main Speaker ( Floor ) DLT
Must be set to Repeater, CH 0
and MAS
Main Speaker ( Floor ) DLT Repeaters
Must be set to Interpreter, CH 1 14, and SLV
Interpreter DLT’s
Must be set to Repeater, CH
1-14 and SLV
Interpreter Repeater DLT’s
26

DLT 100
Main speaker ( floor )
DLT 100’s FOR FLOOR AND INTERPRETERS
CH 0
CH 0
CH 1 CH 2 CH 3 CH 4 CH 5 CH 6 CH 7 CH 8 CH 9 CH 10 CH 11 CH 12 CH 13 CH 14
CH 1 CH 2 CH 3 CH 4 CH 5 CH 6 CH 7 CH 8 CH 9 CH 10 CH 11 CH 12 CH 13 CH 14
MASTER
SLAVE REPEATERS
CH 0
CH 1 CH 2 CH 3 CH 4 CH 5 CH 6 CH 7 CH 8 CH 9 CH 10 CH 11 CH 12 CH 13 CH 14
DLT 100 [ LISTEN ONLY ] OR DLR 50
DLT 100 [ LISTEN ONLY ] OR DLR 50 MUST BE ON THE SAME GROUP. EACH LISTENER WOULD SELECT A DESIRED CHANNEL / LANGUAGE.
27

DLR 50
28

button functions
AAA
AAA
1 External Headphone Jack (3.5mm)
2 Power On / Off
3
Volume up
4
Volume down
5 Channel up
6 Channel down
7 Internal Speaker
29

Two AAA batteries must be inserted into the DLR. Be sure to observe correct polarity.
Power on by holding the power button for 3 seconds.
DLR will seek active DLT. Press channel button up or down to seek next
active DLT
Displaywillash88ifnotsynchedwithDLT100
If the units are synched, the display will show group assigned, 0 to 99
To change group hold the left and right group buttons for 3 secs until Gr and
numberisashing.
Use volume up/down buttons to select group number.
Hold left and right group buttons for 3 secs again to store change.
To change volume level press up or down volume buttons, display will show
L0 through L9.
User can listen using the speaker on the front of the DLR or by plugging in
earphones into the jack (which defeats the speaker operation).
Low battery indicator will show as LO on the display.
The DLR will automatically power down after 2 minutes if not synched with
the DLT.
operation guide
30


Dimensions 103 x 62 x 11mm (4.1 x 2.4 x 0.4 inches)
Weight 80g (2.8oz) including battery
Color Black and silver
Enclosure Shatter resistant PC/ABS plastic
Battery type Li Polymer with smart charge built into transceiver
Battery life Up to 14hrs talk time per charge
Charge time 5hrs. TFP 045 with cable and international adapters
Optional two-bay charger CHG 102
Channels Up to 15 simultaneous channels (Interpretation mode)
Up to 4 simultaneous groups
Operating frequencies 2.4GHz (ISM band) 2.402 – 2.476GHz FHSS
Frequency response 150 – 11KHz
S/N ratio 69dB (A weighted)
THD 0.33 %
Microphone input Internal microphone (disabled when MIC jack engaged) and 3.5mm stereo jack (tip/sleeve) with electret
microphone bias, adjustable gain with 63dB range.
Audio output Max SSPL 90 111.8dB (EAR 013), 116.8dB (EAR 041)
Internalspeaker(disabledwhenearjackengaged)16mW@33Ω
Range Up to 100ft outdoors and 200ft indoors*
Modulation GFSK, binary CDMA
RF output 14dBm Max
Security code 87 bit encryption
*Depending on environmental conditions
DLT 100 specications
32

DLT 100 specications, cont.
Controls Front panel push buttons for volume up/down, group select, menu access and selection, voting, timer,
time, MIC on/off and power on/off.
System reset button (rear panel)
Output 3.5mm stereo/mono jack
30 pin charging jack with audio out to base stations
Side tone -12dB below volume
Speaker Internal speaker (disabled when ear jack is engaged)
Indicators LCD (Group, channel, volume level, battery status, mode, signal strength)
LED’s (charge status, voting)
Red LED around talk button when enabled
Amber LED signifying voting feature activated.
Maximum presenters Two presenters at any given time
Approvals FCC, Industrie Canada, CE, C-tick, RoHS, WEEE
Warranty 2 years parts and labor (90 days on accessories).
33

Dimensions 85 x 55 x 16mm (3.35 x 2.16 x 0.63 inches)
Weight 42g (1.5oz) not including batteries
Color Black
Enclosure Shatter resistant PC/ABS plastic
Battery type 2 x AAA
Battery life Up to 24hrs (Alkaline)
Channels Up to 15 simultaneous channels (Interpretation mode)
Up to 4 simultaneous groups
Operating frequencies 2.4GHz (ISM band) 2.402 – 2.476GHz FHSS
Frequency response 150 – 11KHz
S/N ratio 65dB (A weighted)
THD 0.45 %
Audio output Max SSPL 90 111.8dB (EAR 013), 116.8dB (EAR 041)
Headphoneoutput 12mW@33Ω
Range Up to 100ft outdoors and 200 ft indoors*
Modulation GFSK, binary CDMA
Security code 87 bit encryption
Controls Front panel push buttons for volume up/down, group select and power on/off.
Output 3.5mm stereo/mono jack
Speaker Internal speaker – disabled when ear jack is engaged
Indicators LCD (Group, volume level, low battery, mode)
Approvals FCC, Industrie Canada, CE, C-tick, RoHS, WEEE
Warranty 2 years parts and labor (90 days on accessories).
*Depending on environmental conditions
DLR 50 specications
34

troubleshooting
PROBLEMS CAUSE WHAT TO DO
Power does not turn-on Dead battery Charge the battery, replace battery
Power turned off automatically Master device can’t be found Set Master device
Power do esn’t turn off P rogram Error Press reset button on the backside of device (DLT only)
No audio in headphone Disconnection of earphone Check Earphone Connection
Master doesn’t exist Set Master
Different Group Number settings Setting every unit in same group number
Out of range Enter the range of 100 – 200 ft from the master unit
More than 1 master exist in a group Set one master per group
Obstacle Exist Move to another places or move the obstacles
More than 2 units with Same address exist in a group Set address different
Error in attendees checking More than 2 units with Same address exist in a group Set address different
Error in electronic voting results More than 2 units with Same address exist in a group Set address different
Master unit can count ballots up to 99 only Vote up to 99 people only
Not recognizable address exist Set Address number between 0 ~ 99
Unable to select receiving channel Transmitting channel is overlapping Set different transmitting channel
Unable to transmit Interpretation Please check the mode for simultaneous interpretation mode Set simultaneous interpretation mode
More than 2 master units exist Set one master only
35

FAQ’s
What is the range of the system?
Up to 100ft outdoors and up to 200ft indoors.
What is the benet of this system over the 72MHz systems?
DLT’s can operate in two way mode. Team teach/guide ability. Voting feature
for discussion mode. Relay feature increases range.
How many simultaneous channels (systems) can be used?
Fourintwowaymodeandfteeninonewaymode.
How many DLR’s can I use?
Unlimited within the range.
What is the battery life for the DLT and DLR?
DLT – up to 14hrs per charge. DLR - up to 20hrs (2 x AAA Alk. batts).
Is this product compatible with any other competitive system?
No.
Where can I buy this product?
Through Williams Sound Corp. dealers.
36

FCC statements
Federal Communication Commission Interference Statement
This equipment has been tested and found to comply with the limits
for a Class B digital device, pursuant to Part 15 of the FCC Rules.
These limits are designed to provide reasonable protection against
harmful interference in a residential installation.
This equipment generates, uses and can radiate radio frequency energy
and, if not installed and used in accordance with the instructions, may
cause harmful interference to radio communications. However, there is
no guarantee that interference will not occur in a particular installation.
If this equipment does cause harmful interference to radio or television
reception, which can be determined by turning the equipment off and
on, the user is encouraged to try to correct the interference by one of
the following measures:
. Reorient or relocate the receiving antenna.
. Increase the separation between the equipment and receiver.
. Connect the equipment into an outlet on a circuit different from where
the receiver is connected.
. Consult the dealer or an experienced radio/TV technician for help.
FCC Caution
To assure continued compliance, any changes or
modicationsnotexpresslyapprovedbythepartyresponsiblefor
compliance could void the user’s authority to operate this equipment.
(Example - use only shielded interface cables when connecting to
computer or peripheral devices).
FCC RF Radiation Exposure Statement
This equipment complies with FCC RF radiation exposure limits
set forth for an uncontrolled environment. This equipment is a handheld
device and should be maintained with a minimum safety distance of 20cm
from the antenna. This transmitter must not be co-located or operated in
conjunction with any other antenna or transmitter.
37

contact us
10300 Valley View Rd
Eden Prairrie, MN 55344 U.S.A.
800.843.3544
952.943.2252
Fax 952.943.2174
williamssound.com
info@williamssound.com


© 2010, Williams Sound Corp. Man 153 B
 Loading...