


Contents
Contents
GENERAL INFORMATION
INSTALL ATION
MENU INFORMATION
P1
P6
P8
P9
P17
Contents
USER INSTALLATON
GENERAL VIEWING FUNCTION
CHANNEL MANAGER
EPG (Electronic Program Guide)
TIMER
ANTENNA DIRECTION HELP
FRONT PANEL DISPLAY
TROUBLE SHOOTING
P28
P27
P24
P26
P25
P20
Main Feature
For your Safety
Unpacking
General Operation
RCU
Front Panel
Rear Panel
P1
P2
P3
P3
P4
P5
P5
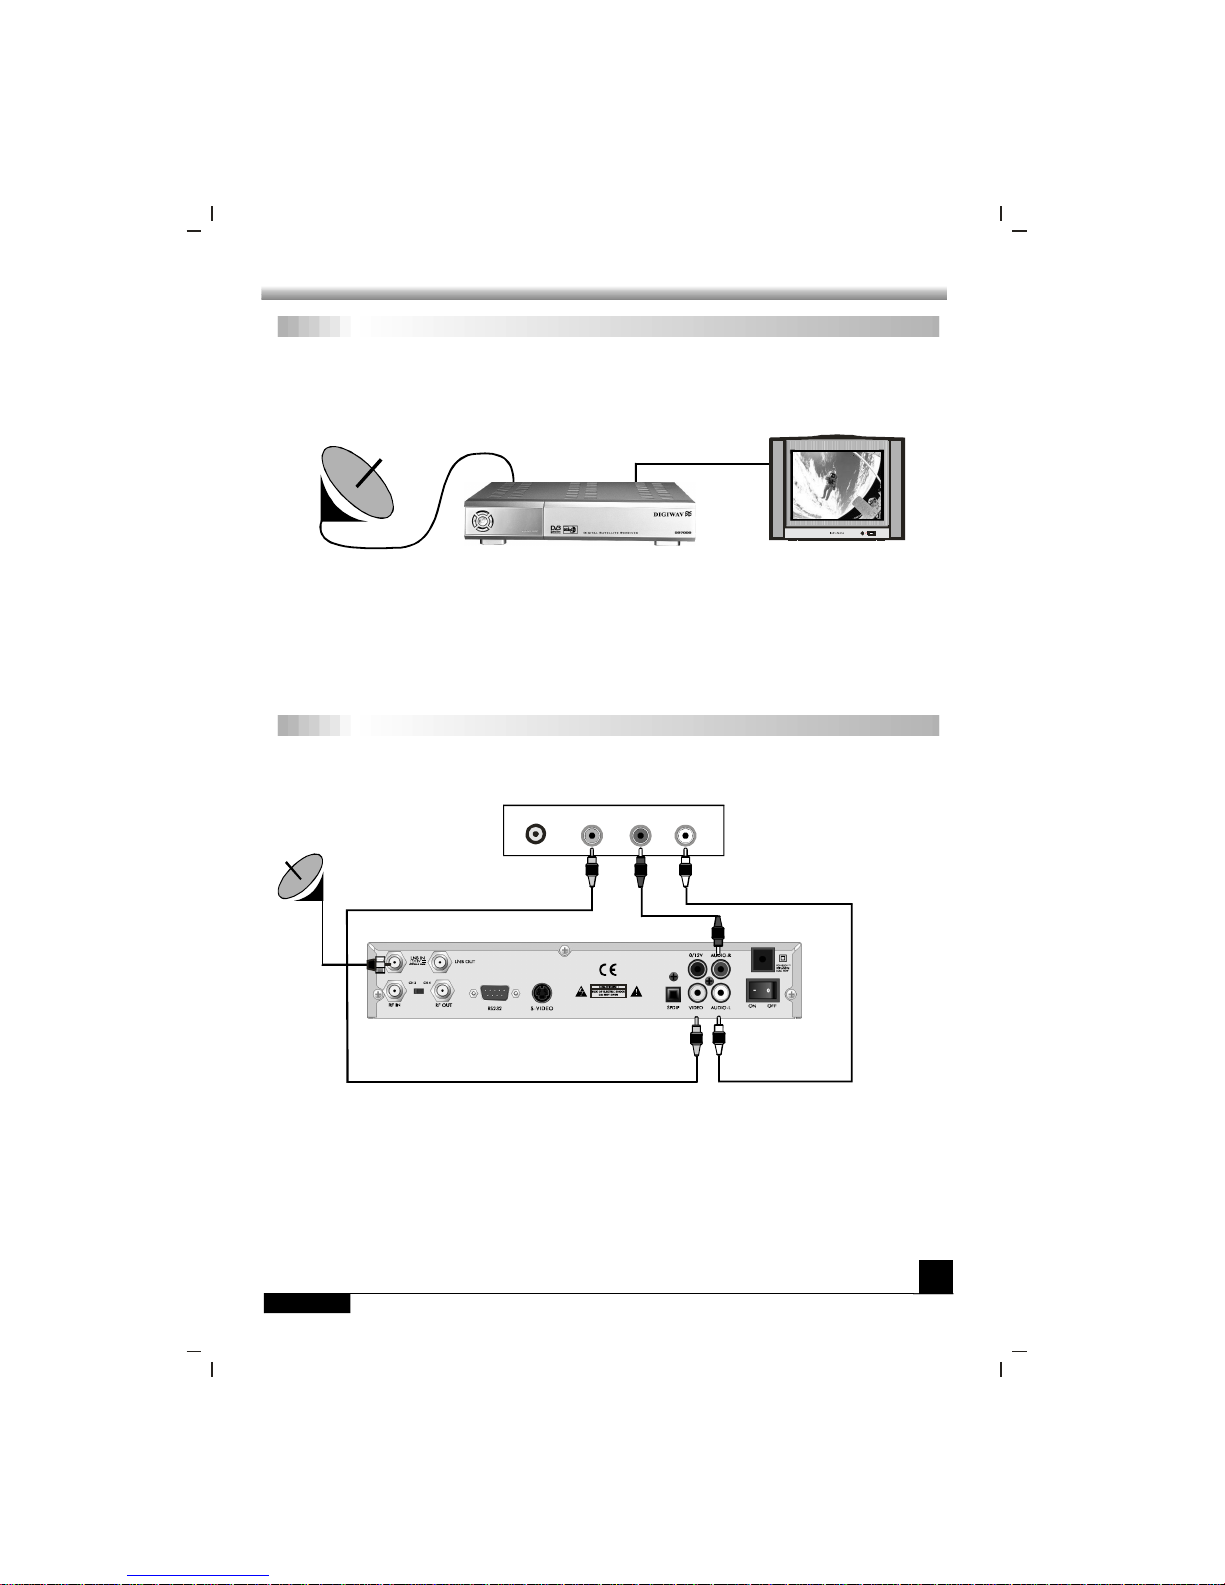
Connecting to Antenna & TV
Connecting to TV using RCAsupport
Connecting to TV using RF support
Connecting to TV using S-VIDEO
P6
P6
P7
P7
Antenna setup - 1) DiSEqC 1.2
Antenna setup - 2) Fixed
Channel search -1) DiSEqC 1.2
Channel search - 2) Fixed
System Setting
Parental Lock
Factory Defa ult
P10
P10
P10
P14
P14
P15
P16
Select Channel
Pause the Frame
Previous Channel Recall
TV&Radio mode
Channel Information
Volume&Audio Control
Favorite List
P17
P17
P17
P17
P18
P18
P19
Channel Manager
Favorite Cha nnel
Move Channel
Lock Channel
Rename Channel
Delete Channel
Sort Channel
P20
P20
P21
P22
P22
P23
P23

Main Feature
1
GENERAL INFORMATION
GENERAL INFORMATION
A Digital Satellite Receiver is a convenient product that allows you to vie w avariety of
programs provi ded through satellite. This user's guide covers the installation of the
DSR and the necessary steps to implement various features. This also e xplains
special features available only in this DSR in detail, which will allow you to make full
of these feature.
Information confirmed in this docume nt is subject to change. We reserves the
right,without notice,to make change in product design or performances as progress
in engineering manufactory or technology may warrant.
Ma in Fea tu re
High quality Video & Audio
Fully MPEG-2, DVB compliant
Provide friendly and easy-to-use menu system
Various channel editing function (Favorite, moving, locking, renaming, deleting and
sorting)
User programmable various Satellite & Transponder information
Automatically search for newly added transponder
Stores up to 4000 channels
Easy and speedy software upgrade through RS-232 port
Plug-and-play data transfer system (DSR to DSR)
Timer function, automatically turns On/Off by setting function (daily, monthly, yearly)
Automatic reserved channel moving system
Provide Electronic Program Guide (EPG)
Teletext function support
Provide various switch types, LNB types a nd NTSC/PAL monitor type
SCPC/MCPC Receivable from C/Ku Band Satel lite
256 colors On-Screen-Display
PAL/NTSC automatically conversion
Last channel automatically saving
& Digital Audio
DiSEqC 1.2 positioner for multiple satellites, multi LNB controlled by DiSEqC 1.2
GENERAL INFORMATION
GENERAL INFORMATION
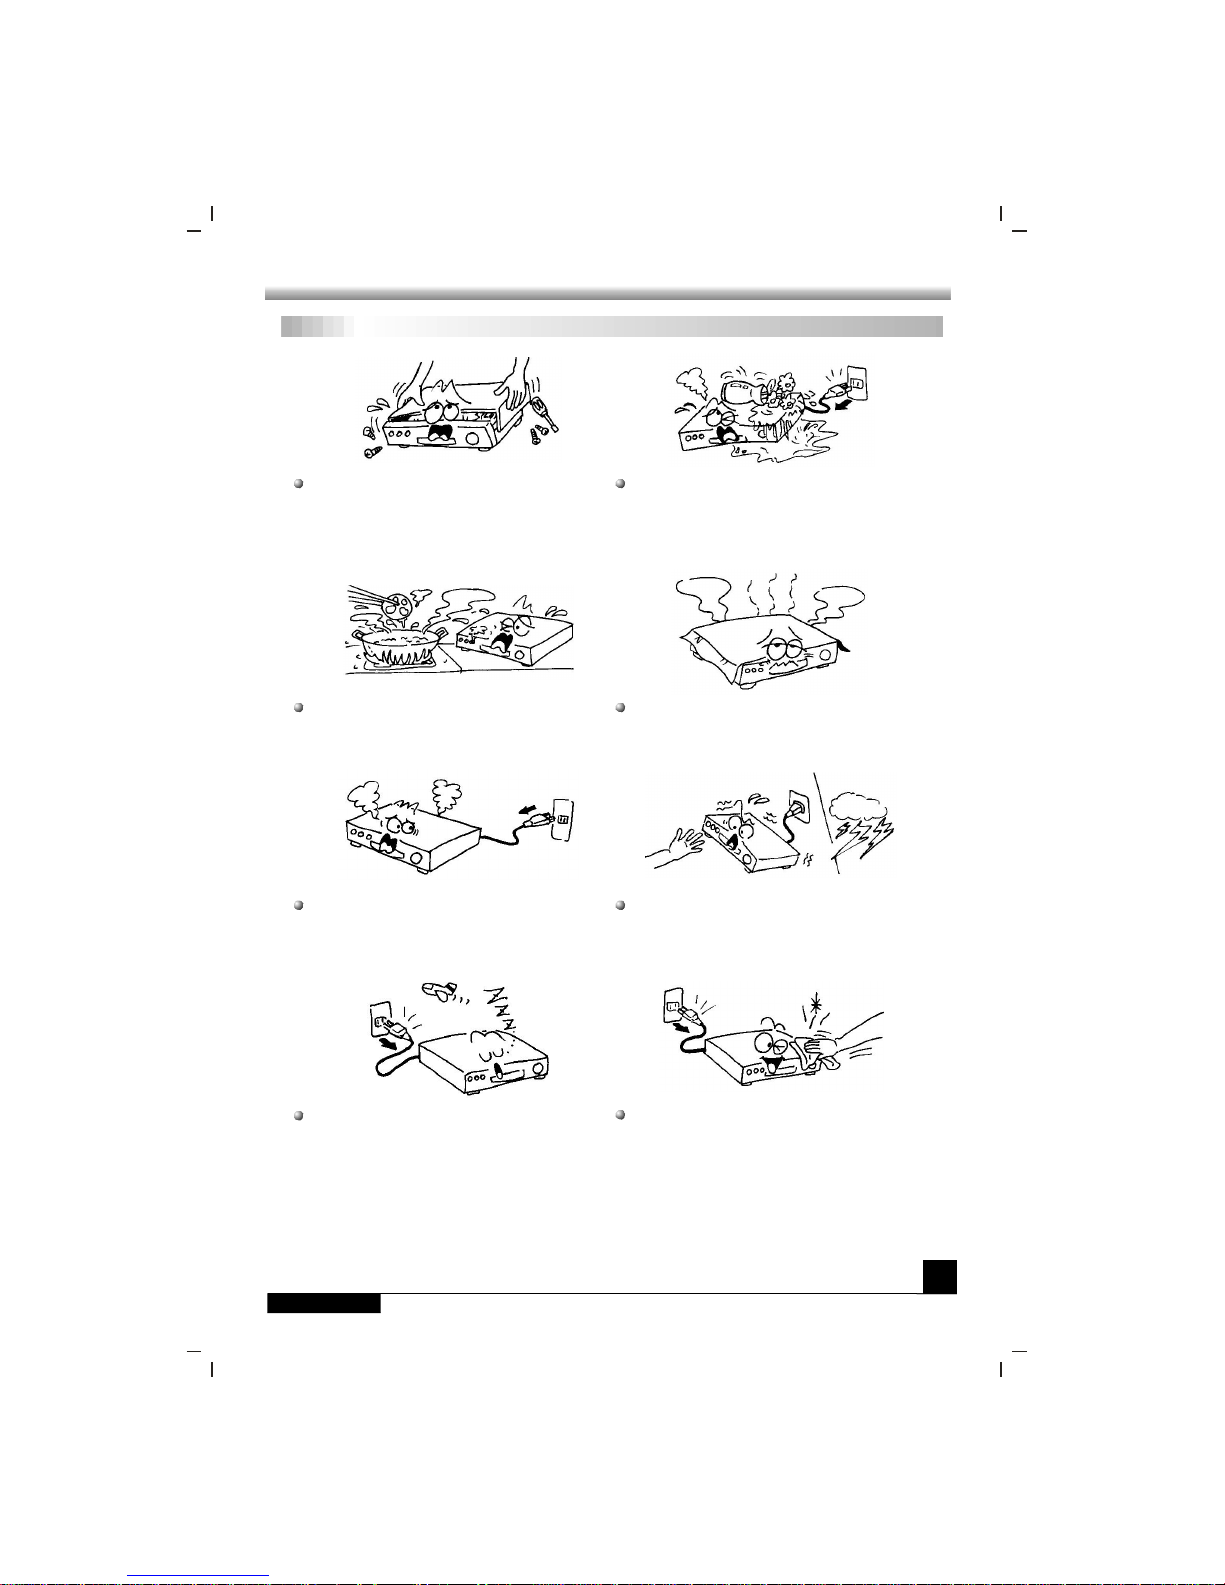
For Your Safety
2
For Your Safety
Be sure to turn the Receiver off and
disconnect the AC power cord before
cleaning the Receiver surface. If the
surface is dirty, wipe clean with a cloth
whichhas beendippedin aweaksoap-andwater solution and wrung out thoroughly,
and thenwipeagainwith adrycloth.
Switch the receiver off whenever it remains
outofservicefor an extendedperiod.
Do not touch the receiver during thunder,
since that might create electric-shock
hazards.
Do not block ventilation holes of the
Receiver sothataircancirculatefreely.
Do not expose the receiver un-der the
sunlight. And keep it away from the heat
source.
Keep the receiver away from flower vases,
tubs, sinks, etc., in order toavoid damaging
theequipment.
To avoid electric-shock hazards, do not
openthecabinet,refer servicing to qualified
personnelonly.
When the abnormal phenomenon occur,
youshouldcut offthe power immediately.
GENERAL INFORMATION
GENERAL INFORMATION
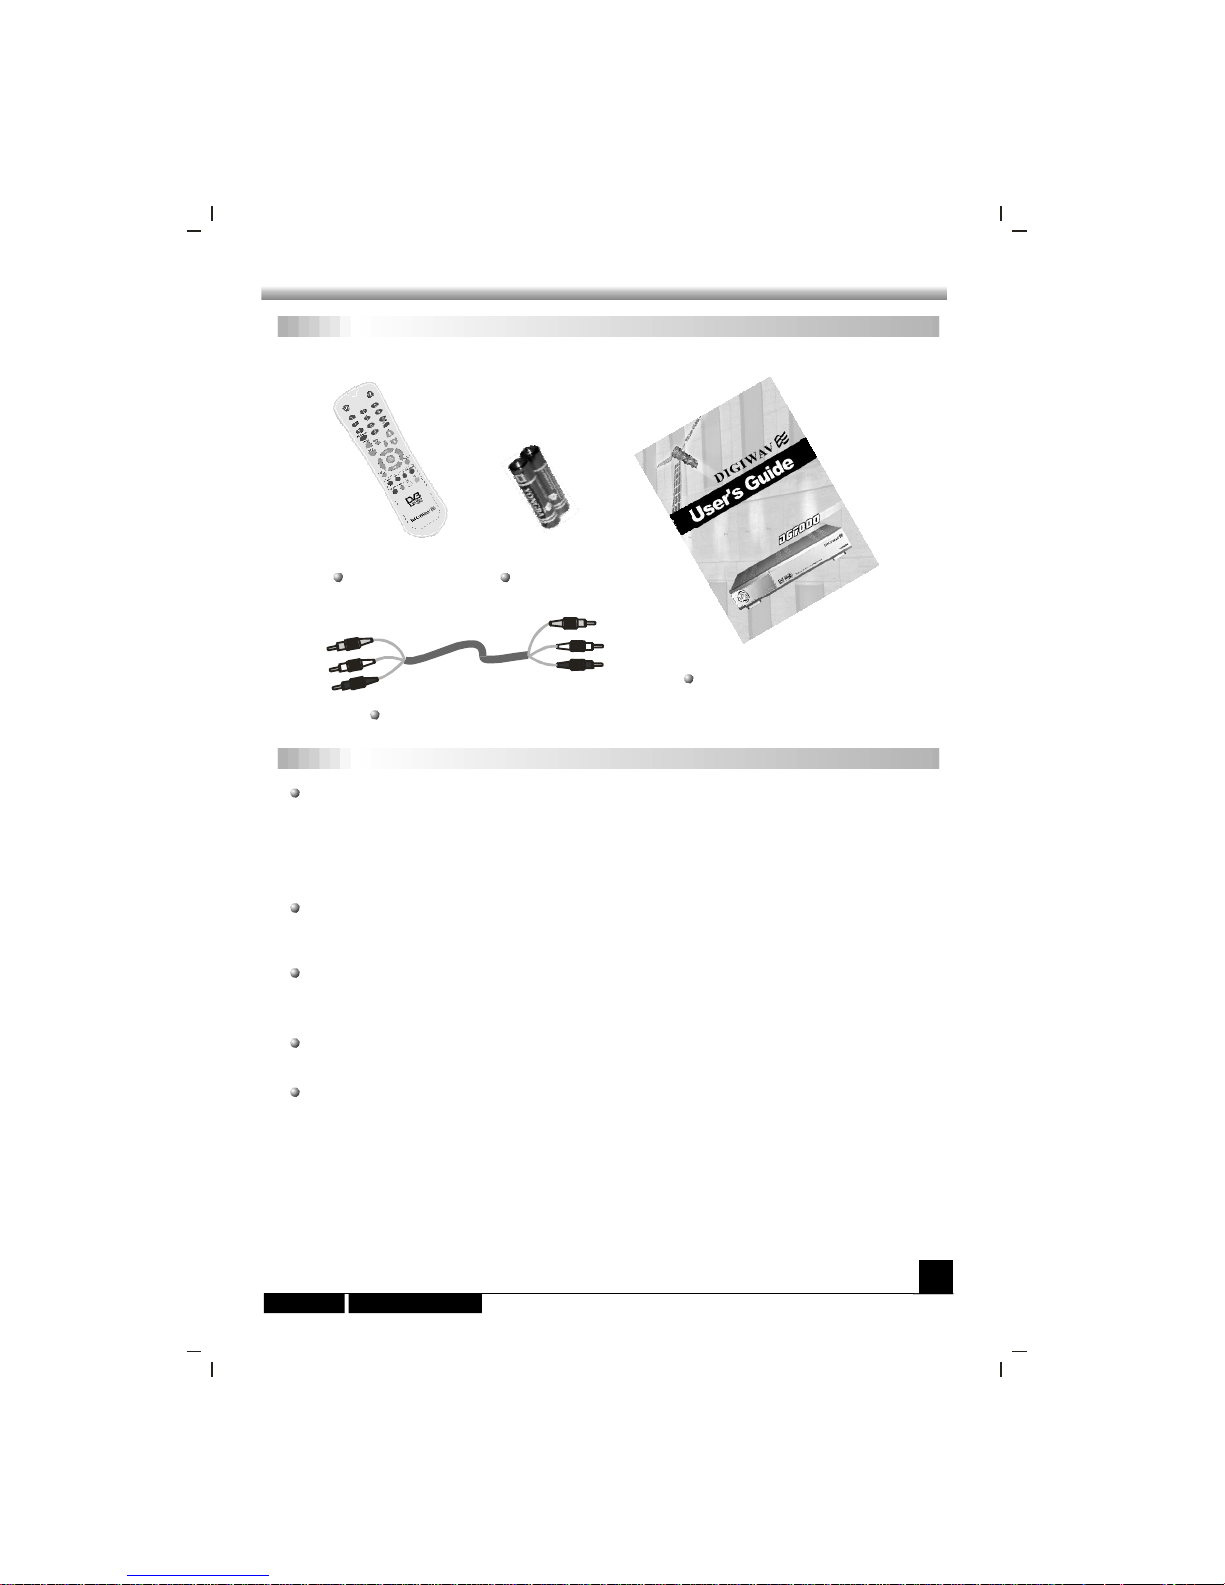
Unpacking
3
Unpacking
Audio / Video Cable
User's Guide
General Operation
Throughout this manual you will notice that the everyday operation of the is
bas ed on a series of user friendly on screen display and menus. These menus will
hel p you get the mos t from your receiver, guiding you through installation, channel
organizing, viewing and many other functions.
receiver
All function can be carried out using the buttons on the RCU, and some of the function
can also be carried out using the buttons on the front panel.
The is easy to use, always at your command and adaptable for future
adv ances.
receiver
Please be aware that new software may change the functionality of the .receiver
Should you experience and difficulties with the operation of your , please
consult the relevant section of this manual, including the Problem Shooting, or
alternatively call your dealer or a customer service adviser.
receiver
General Operation
Remote Control Batteries
GENERAL INFORMATION
GENERAL INFORMATION
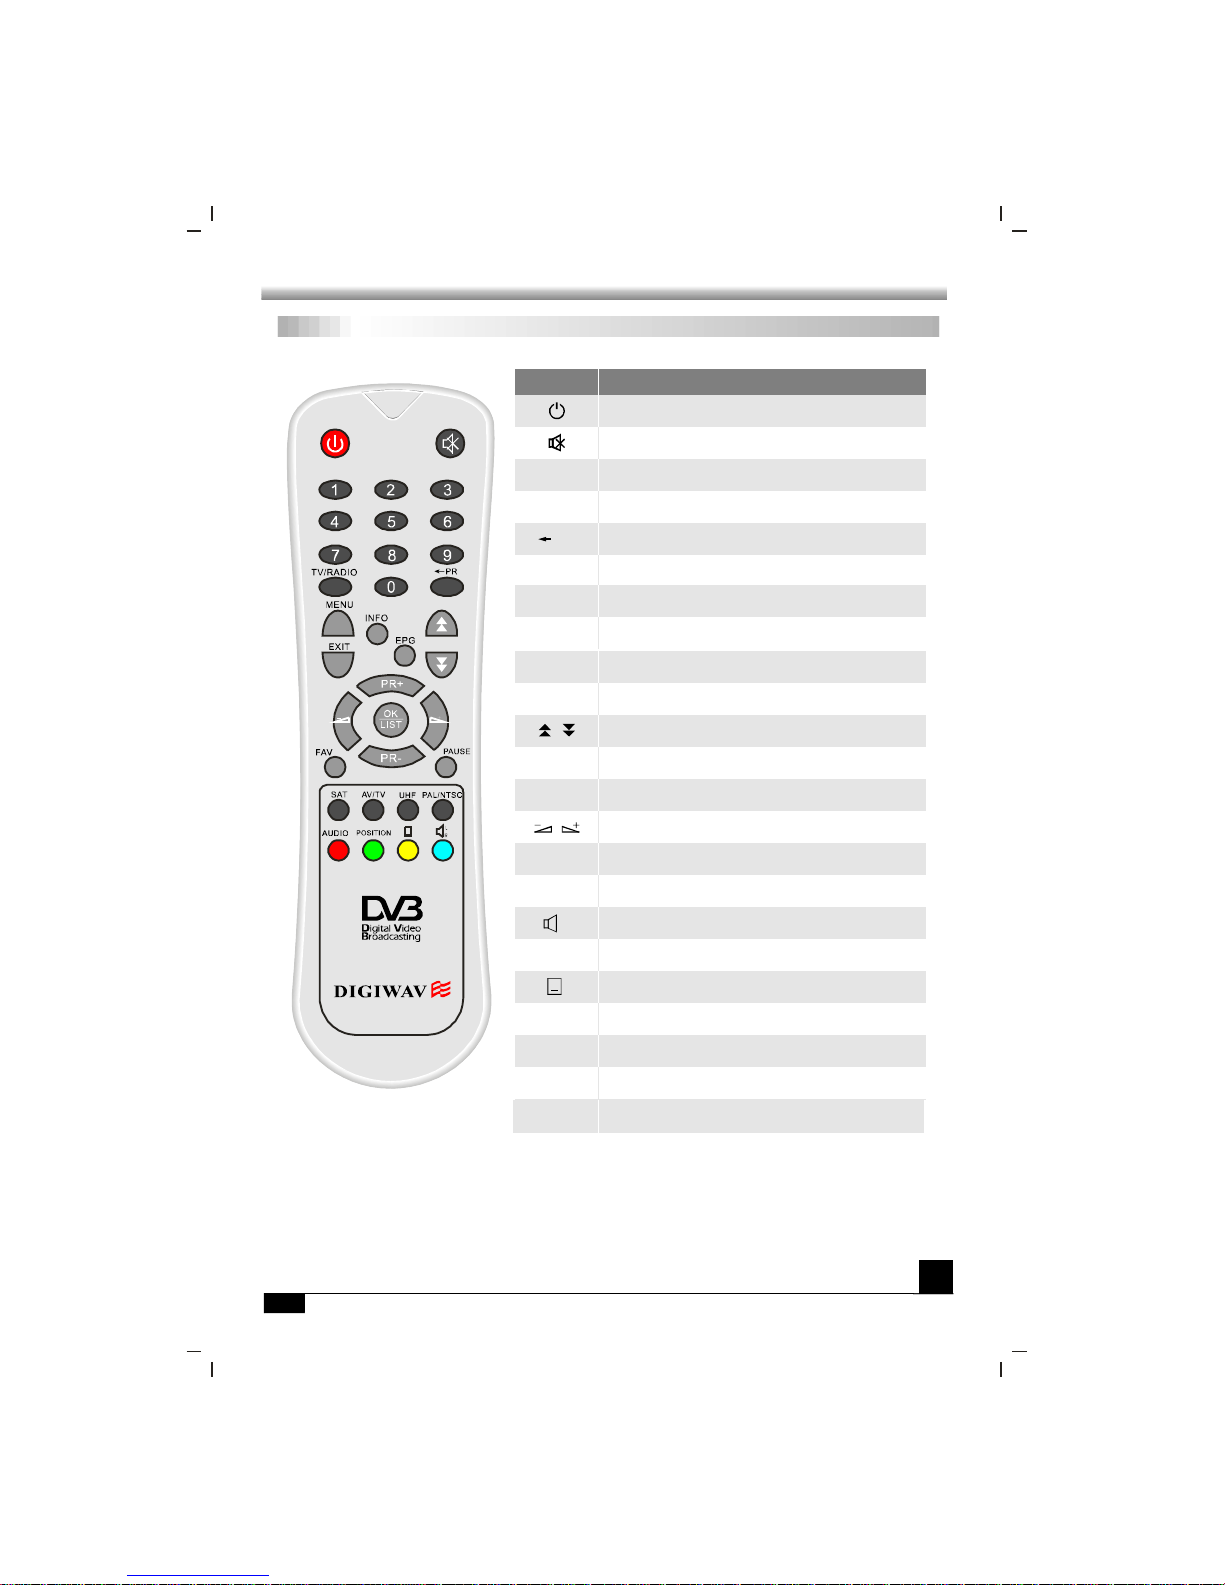
RCU
4
RCU
Key
Function
Turns power ON/OFF of the DSR
When watchi ng a channel, mute the sound
Switches between TV and Radio mode
0~9
MENU
EXIT
OK, LIST
PR+, PR-
Enter number of the required menu item or
select a channel number to watch
Press this key one time to run menu onscreen,
and call command box
Returns to the previous menu on the menu
screen or escape from the menu
Press once to pause the screen picture, press
once again to go to the normal mode
TV/RADIO
PR
Switches back to previous channel
Display the favorite channel list
Shows information of the current channel
Switches between PAL and NTSC modes
Switches to teletext or subtitle mode
Switches to UHF turning mode
(No function in this model)
Moves up / down a page in the channel list
FAV
INFO
Executes the selected item in the menu screen
or enters the desired value in any input mode
When watchi ng a channel, change channels or
move to the next higher or lower item in the menu
When watchi ng a channel, adjust the volume or
move to the left or right item in the menu
Calls up the EPG (Electronic Program Guide)
Selects the different audio modes
Switches between TV and AV modes
(No function in this model)
EPG
L
R
TV/AV
PAUSE
PAL/NTSC
UHF
POSITION
Motor setup
AUDIO
Multiple language
Select programs by satellite
SAT
GENERAL INFORMATION
GENERAL INFORMATION
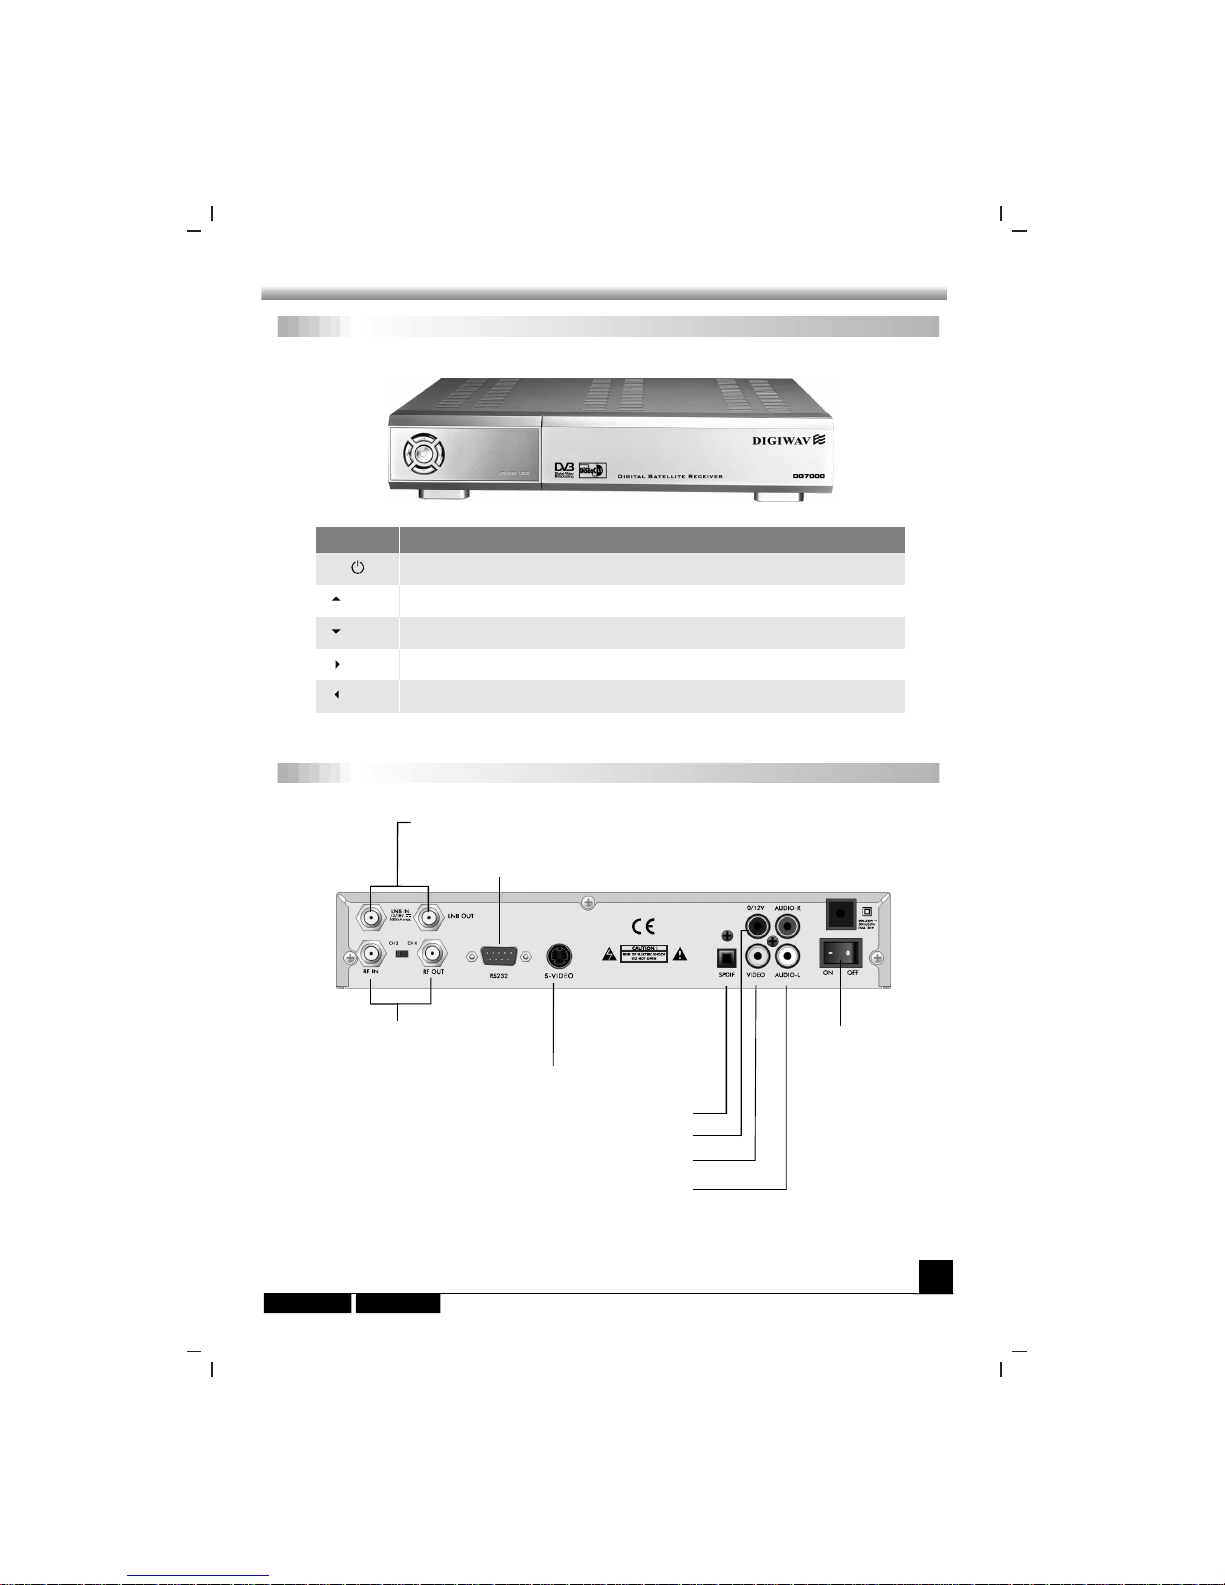
Front Panel Rear Panel
5
Front Panel
Rear Panel
Key
Function
Turns on and off the power of the receiver.
(PR+)
(PR-)
(VOL+)
(VOL-)
In live mode, changing to the next channel.
In live mode, changing to the previous channel.
In live mode, a channel, increase the volume.
In live mode, a channel, decrease the volume.
Rear Panel
POWER ON/OFF
CONNECT TO 12V TO AN EXTERNAL 0/12V S ITCHW
CONNECT VIDEO TO TV USING RCA JACK
CONNECT TOAUDIO R/L TO TV ORAUDIO TUNER
CONNECTTO APC FOR S/W UPGRADE
CONNECT TOA TV OR VCR
CONNECT TO TV ANT INPUT
LNB IN: CONNECT TO SATELLITE ANTENNA
LNB OUT:CONNECT TO THE OTHER RECEIVER
CONNECT TO A DIGITALAMPLIFIER
CONNECT TO TV USING S-VIDEO
INSTALLATION
INSTALLATION
Connecting
6
Connecting to ANTENNA & TV
DSR
Antenna
Connecting to TV using RCA support
IN VIDEO
TV
Satellite
Dish
LR
AUDIO
DSR
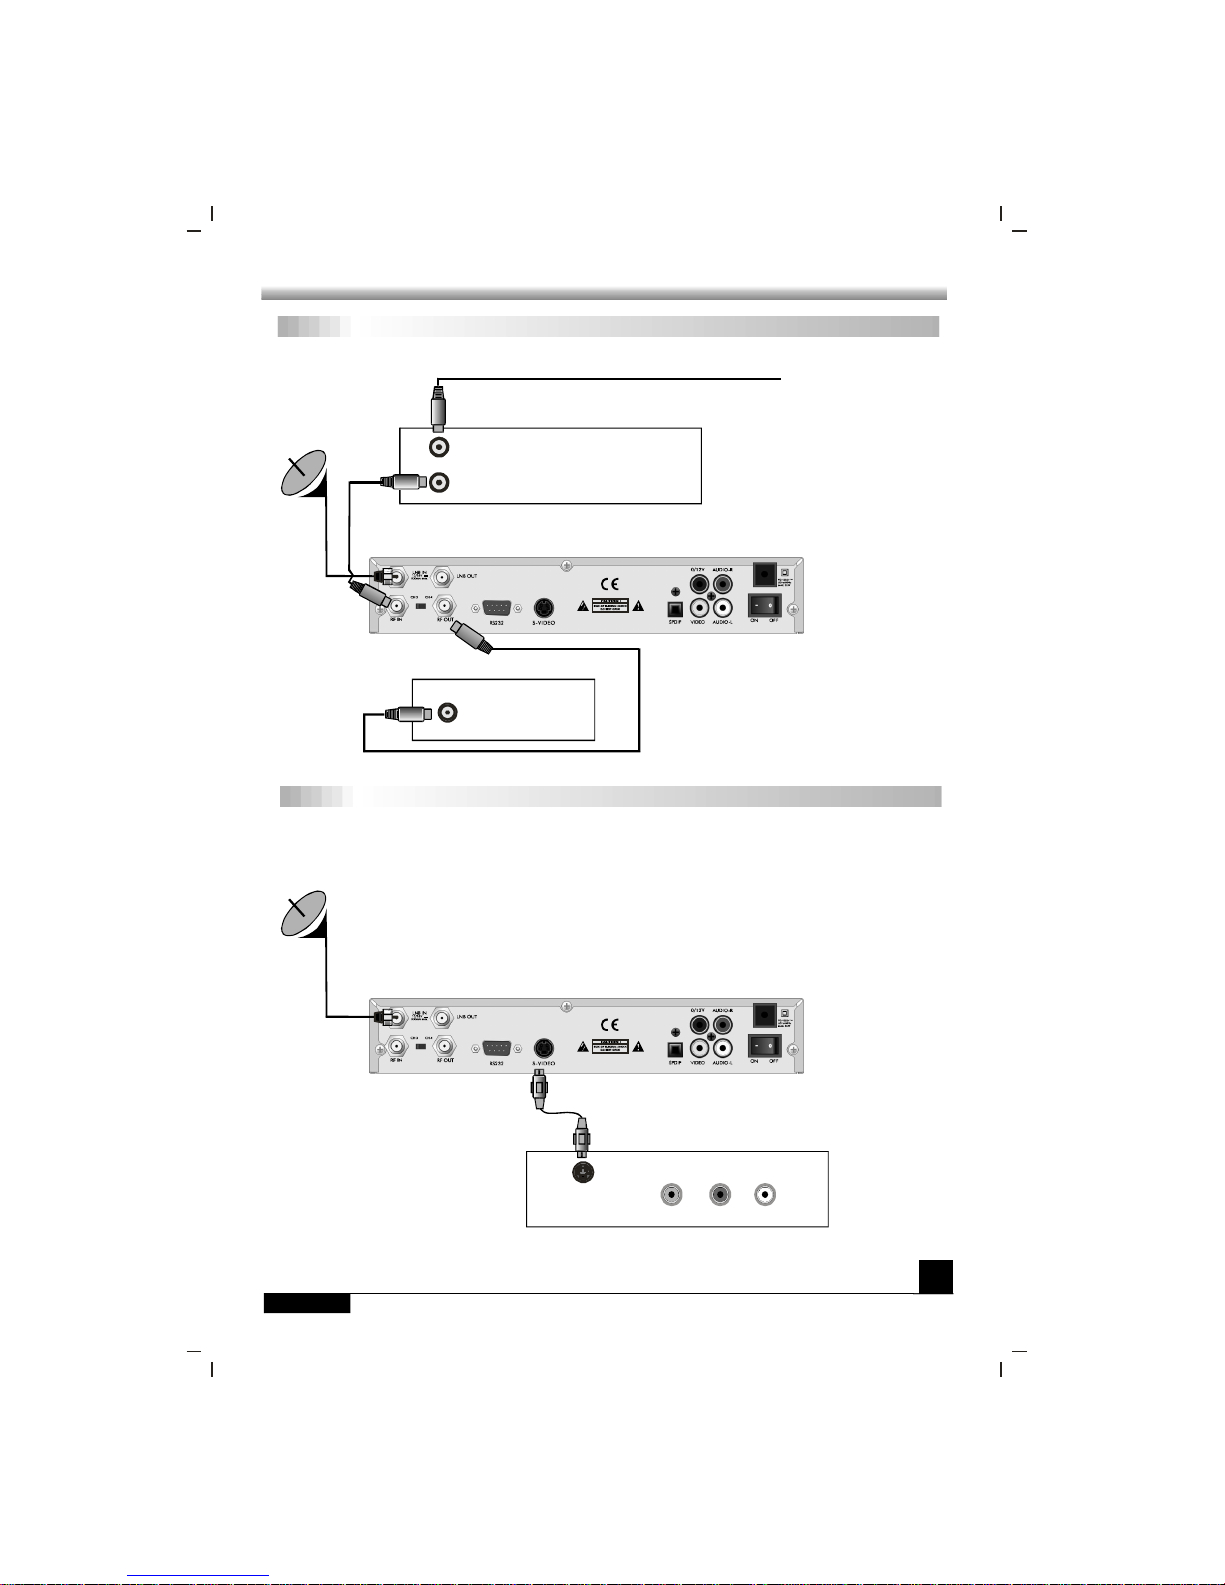
INSTALLATION
INSTALLATION
Connecting
7
Connecting to TV using RF support
Connecting to TV using S-video
TV
DSR
VCR
Cable or
OFF-Air Antenna
IN F OM ANTR
OUT TO ANT
IN
Satellite
Dish
DSR
Satellite
Dish
TV
S-video
LR
VIDEO AUDIO
MENU INFORMATION
MENU INFORMATION
MENU INFORMATION
8
Once you properly installed and connected cables of the receiver, the menu will be
displayed.
This menu consists of 5 major main menus as follow.
- Channel Manager
- Program Guide
- Timer
- User Installation
- Receiver Information
During the installation the key confirms a selection and key shows Down
List Box if the column has mark. You can also use the numeric keys on the RCU
to enter numeric value.
Use the , key to move upwards and downwards from one line to another line
and use key to move from main menu to sub menu and move from left side to
right side or versa.
Meantime , you want to escape the menu system, please press key on the RCU.
OK LIST
PR+ PR-
EXIT

USER INSTALLATION
USER INSTALLATION
Antenna Setup-1) DiSEqC 1.2
This menu consists of 5 major sub-menus as
bel ow.
-Antenna Setup
-Channel Search
-System Setting
-Parental Lock
-Factory Default
Antenna Setup-1) DiSEqC 1.2
1)Antenna
2) Type
3) Satellite
4) LNB Type
5) LNB Freq.
KEY PAD
: You can select maximum 16
antennas with the combination switches.
: Select your antenna type to be
DiSEqC1.2.
: Select first satellite you want.
: Select your LNB type. If you
hav e universal LNB, select Univ.
: Enter the proper LNB
frequenc y referring to your L NB using
num eric key on the RCU or use
displayed by pressing OK key.
If you have adual LNB, enter the proper value in the both of value box.
: You can select the switches with
which you want to con figure the antenna.
: You can select C/Ku band control by selection of switch type.
6) Switches (0/12 Volt, 22KHz Tone, DiSEqC)
7) C/Ku band control
East, West Limit :
Limit Setup Limit
Setup E
OK
OK
OK
If you select button,
menu will pop up. Press key on the
RC U c o n t in u o us l y re ache s to t he
eas ternmost point and then press key on
the RCU. The message of Would you like to
set East limit of DiSEqC motor? will be
displayed for your confirmation. Please
cursor on the button on the screen and
press key on the RCU to confirm the East
limit.
To set West limit, take the same steps as East limit.
9

USER INSTALLATION
USER INSTALLATION
Antenna Setup-2) Fixed
Reset DiSEqC limit :
If you want to reset the East limit or West
limit, place a cursor on Reset DiSEqC Limit
button and then press key on the RCU.
The message of
will be
displayed for your confirmation. Select
button by pressing key on the RCU.
OK
Would you like to reset
limit for DiSEqC positioner?
OK
OK
The cursor will move to the East limit button
so that you can reset the limit. After that,
please reset West limit same as before.
After setting all necessaries, please to finish antenna setup menu. The
message of Are you sure to change the configuration of Antenna setup? will be
displayed. Please select button on the screen and then wait for saving a data.
EXIT
OK
Antenna Setup-1) DiSEqC 1.2
Antenna Setup-1) DiSEqC 1.2 Antenna Setup-2) Fixed
1)Antenna
2) Type
3) Satellite
4) LNB Type
Univ
5) LNB Freq.
6) Switches (0/12 Volt, 22KHz Tone,
DiSEqC)
7) C/Ku band control
: You can select maximum 16
antenna with the combination switches.
: Select your antenna type to be
Fixed.
: Select satellite you want.
: Select your LNB type. If you
hav e universal LNB, select .
: Enter the proper LNB
frequenc y referring to your L NB using
num eric key on the RCU.
If you have a dual LNB, enter the proper
value in the both of value box.
: You can select the switches with
which you want to con figure the antenna.
: You can select C/Ku
ban d control by selection of switch type.
After setting all necessaries, please to finish antenna setup menu. The
message of Are you sure to change the configuration of Antenna setup? will be
displayed. Please select button on the screen and then wait for saving a data.
EXIT
OK
10

USER INSTALLATION
USER INSTALLATION
11
1) A ntenna : Select your antenna number.
5) Frequency & Symbol Rate :
6) Polarization :
7) 22KHz :
Edit Frequency and Symbol Rate you want.
Select Hor or Ver.
Select ON or OFF.
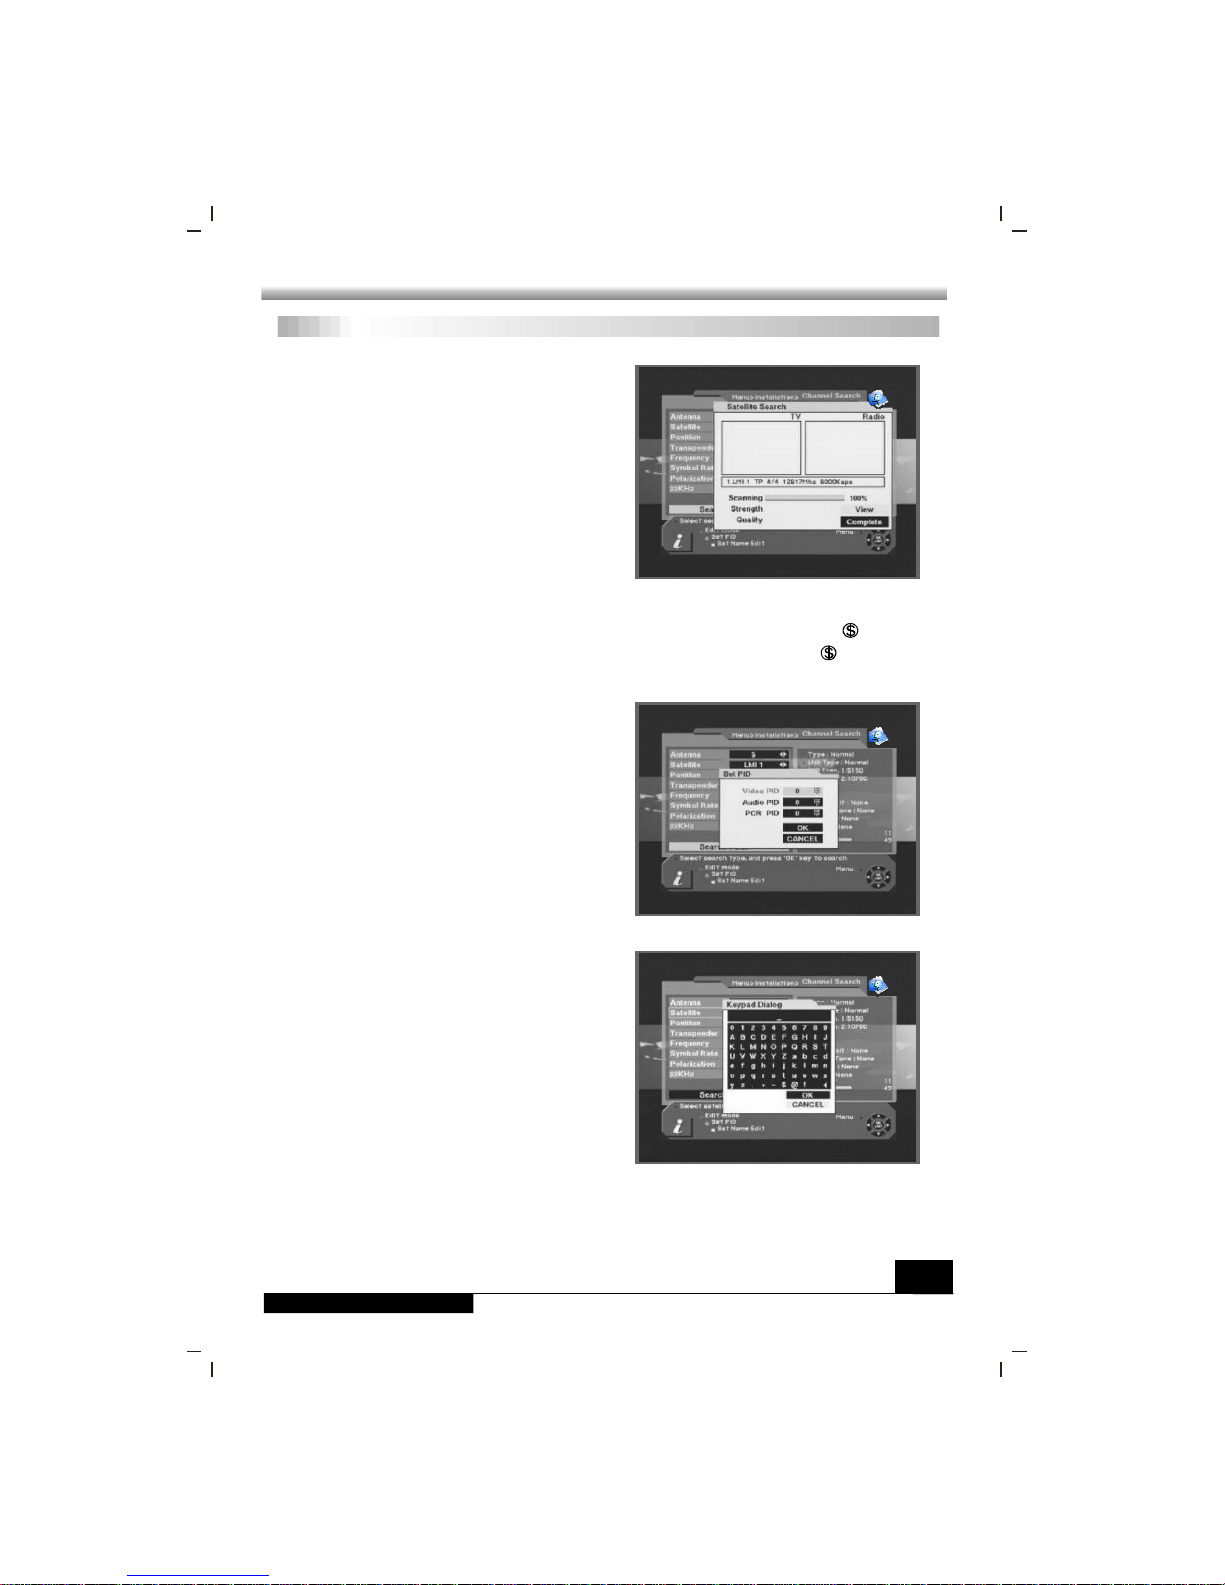
Channel Search-1)DiSEqC 1.2
Channel Search-1)DiSEqC 1.2
2) Satellite :
OK
Edit Mode
Edit mode
Select desired a satellite using
keys or if you press key the list of
satellite will be displayed so that you can
select easily.
You can see the information of selected
satellite in the right side.
: If you want to edit those
preprogrammed data such as Transponder,
Frequency, Symbol Rate, Polarization and
22 KHz, please press key (Red
color key) on the RCU. And then you can
move into those columns to change the
value.
3) Position
E W
OK
: After selecting a satellite,
please select Position button and then keep
pressing or key on the RCU until
selected satellite is locked. If the satellite is
locked correctly, the color of signal label bar
will be changed to yellow.
When you press key on the RCU, the
message of Would you like to set the value
of current positioner? will be displayed for
your confirmation.
4) Tr an spon der :OKSel ect d esi re d a
transponder using keys or if you
press key the Down List Box will be
displayed so that you can select easily.
USER INSTALLATION
USER INSTALLATION
12
8) Search 1 Sat
Search 1 SAT :
Search TP :
Search Network :
Search all SAT :
: Allows you to search
channels with convenient options as follows,
select one using arrow keys.
- Search channels for one
satellite which selected on Satellite column.
- Search channels in one TP
which sel ected on TP column.
- Search channels for the
network related the TP.
- Search all channels at
onc e which you searched all satellite.
Channel Search-1)DiSEqC 1.2
The receiver will automatically search the
channel for TV and Radio and during this
procedure you can see the already searched
channels in the Searched List Box on the
screen.
If completed searching channel, cursor will
be placed on aut omatically,
then press button.
COMPLETE
OK
9) Set PID PID
TP
Channel Search Page MENU
SET PID OK
PID
OK
: If you want to set (Packet
Identifie r) ma nually, select in the
and press key
on the RCU to display command box.
And select command and press ,
then set menu will be displayed. Enter
the correct value and select .
Channel Search-1)DiSEqC 1.2
10) Sat name edit :
Sat Name Edit
If you want to change
satellite name, select the satellite and press
key (Yellow color key) on the
RCU to display command box. Select Sat
nam e edit then Keypad Dialog box will
app ear. Using arrow key on the RCU, you
can edit the satellite name.
Notes: In " " and "
model, " " for
scramb channels model by RCU.
Search 1 SAT Search TP" function,you can switch "FTA+ "for free
to air and scramb channels model,"FTA"for free to air channels

USER INSTALLATION
USER INSTALLATION
13
11) Delete TP
MENU
Delete TP
: If you want to delete a
transponder, please select the Transponder
what you want to delete and then press
key on the RCU to display command
box . Then select command and
the confirm message box will be displayed.
12) Re-Sync : When all location of searched
satellites are shifted by unknown reason,
you can realign all of them once if you adjust
one satellite location.
14) Search Option
-FTA Only
-Not searched TP only
-Sort by Scramble
: The receiver allows you
to search channels with convenient options
as below.
If you select Sort by Scramble, the receiver
sort the scrambled channels automatically.
If you select Not searched TP only, the
receiver search channels in the TP which is
not searched or new TP.
Channel Search-1)DiSEqC 1.2
13) Go to 0 for DiSEqC 1.2 : When you install the motor of DiSEqC 1.2 antenna at
first, you can select this function to move the center of antenna to be 0 .
Channel Search-1)DiSEqC 1.2

USER INSTALLATION
USER INSTALLATION
14
1) A ntenna
2) Satellite
OK
3) Edit Mode
EDIT mode
4) ~ 14)
: Select your antenna number.
: Select desired a satellite using
keys or if you press key, the list of
satellite will be displayed so that you can
select easily.
You can see the information of selected
satellite in the right side.
: If you want to edit those
preprogrammed data such as Transponder,
Frequency, Symbol Rate, Polarization and
22 KHz, please press key (Red
color key) on the RCU to display the
command box. And then you can move to
those columns to change the value.
Please refer to DiSEqC 1.2 type
antenna.
1) OSD Language
2) A udio Language
3) Set local time
4) Summ er time
ON
: Select your desired
language.
: Select your desired
aud io language to be in the top priority under
the condition that this language is supported
from the channel.
:Adjust your local time.
: If you are in summer time,
select .
Channel Search-2) Fixed
System Setting
Channel Search-2) Fixed System Setting
System SettingOKmenu allows you to change the principal option and to set other
items pro per to your environment by pressing key on the RCU.
5) LNB power YES
OFF
: If your receiver is connected to LNB, select . But if your receiver
is connected to other receiver through Loop Through support, you should check
which receiver is connected directly to LNB. In case if that other receiver is directly
connecte d to LNB, select .

USER INSTALLATION
USER INSTALLATION
15
6) Screen Format
16:9 16:9
: If your TV supports 16:9
screen format and se l ected channel
provides format program, select .
: If your SCART supports
RGB control, select . Otherwise select
.
7) Video output
RGB
CVBS
: Select the type according to
your TV type.
8) TV type
: You can adjust the
displaying time interval of info bar from 2 sec
to 12 sec. Default value is 6 sec.
9) Display Info Bar
10) Start On Channel OK: If you press key,
then the channel list is displayed. You can
select on e channel of the list, the selected
channel starts whenever you turn on the
receiver.
11) UHF Standard : Select UHF type.
System Setting
Parental Lock
System Setting
Parental Lock
12) UHF Channel : Select your desired UHF channel for satellite mode.
Note : The receiver for the country, in which it is not used UHF, 11) and 12) option will
be delete d.
This function allows you to lock the channel
with your password in order to prevent from
accessing the channel by your children or
any other person.
And also you can protect your installed data
and information using Install Lock.
How to change Password :
1) Enter the current password.
2) Select of Paren tal Lock.
3) Enter new password.
ON
4) Confirm your new password entering new password again.
: Default password is 0000.
: Once you change password, please do not forget and keep well.
Note
Warning

USER INSTALLATION
USER INSTALLATION
16
How to use Parent Lock :
1) If you activate parent lock function, go to
the TV channel Manager Page.
2) Press key (Blue color key) on the
RCU.
3) Select channel the which you want to Lock.
4) Press then symbol is marked.
Lock
OK
Parental Lock
Factory Default
Parental Lock
Factory Default
How to use Install Lock :
1) Enter the current password.
2) Select of Install Lock.
3) Enter new password.
4) Confirm your new password entering new
pas sword again.
5) Exit this menu.
6) Select any menu and press on the
RCU.
ON
OK
7) Then Enter Passwo rd Box will be displayed.
8) Unless enter correct password, you can not run any menu.
: Default password is 0000.
: Do not forget your password in order not to fail to operate the receiver.
Note
Warning
If you want to bring the receiver back to the
factory defaul t condition, select Factory
Default and press key.
Then Warning message will be displayed. To
confirm select and press .
: You will lose all of data and
information which was installed.
OK
OK OK
Warning

GENERAL VIEWING FUNCTION
GENERAL VIEWING FUNCTION
17
Select Channel
Select Channel
If you want to select channel, use key on
the front panel or key on the RCU
or numeric key on the RCU to select a
channel and press key on the RCU.
In addition to the above normal function, the
receiver provide more convenient channel
change function.
While watching, press key on the RCU.
Then channel list will be displayed on the
right side of the screen. If press key,
the channel list will be disappeared.
CH
PR+, PR-
OK
OK
EXIT
To select a channel, go up and down of this channel list and place cursor on a desired
channel. Then, press key to watch the selected channel.
If you press key on the RCU, channel list will more upgrade down page by page.
OK
Pause the frame
Previous channel recall
Press key on the RCU to pause the screen. To bring it back to the normal
mode, press key once again.
PAUSE
PAUSE
Press key on the RCU to move the previous channel which you watched before.←PR
Pause the frame Previous channel recall
TV & Radio mode
TV & Radio mode
While viewing TV channel, press
key on the RCU to move ra dio mode. Press
this key once again, it will bring you back to
the TV mode.
TV/RADIO

GENERAL VIEWING FUNCTION
GENERAL VIEWING FUNCTION
18
Channel Information
Volume & Audio Control
Channel Information Volume & Audio Control
1) Volume Con trol
VOL
Note
2) Mute
To increase or decrease volume, use key
on the RCU or on the front panel.
: The receiver has 18 volume levels
and this shall be controlled from the
adj usted volume level of your TV.
To mute the sound, press button on the
RCU. To bring back the normal sound, press
this key once again.
Every time you change channels, you will
receive program in forma tion for a few
second.
While watching channel, you can see the
cur rent chan nel information anytime,
pressing key on the RCU.
: Channel information will be displaying
for 6 seconds and disappeared. You can
adj ust the display time interval from 2 to 12
seconds.
INFO
Note
3) A udio Control
4) Language Selection
AUDIO
Press the key repeatedly to select one of three possible Audio settings (Left,
Right and Stereo) .
The current audio condition will be displayed in the channel information.
Press the key on the RCU repeated ly to select audio -language. This is
dep en-dent on the transmission of audio signal which supports Multi-language.
L
R

GENERAL VIEWING FUNCTION
GENERAL VIEWING FUNCTION
19
Favorite List
Favorite List
If you want to have a favorite group lists
which were made in the channel manager,
please press key on the RCU.
You can access next favorite group when
you press key one more.
The method of grouping of favorite channel
list will be explain in the Favorite Channel
(page 20).
FAV
FAV

CHANNEL MANAGER
CHANNEL MANAGER
20
Channel Manager
Channel Manager
Channel manager consists of TV channel,
Radio channel. Press key placing the
cursor on the TV Channel.
:Since the usage of Radio Channel is
same as that of TV channel, in this manual
only TV Channel manager is explained.
OK
Note
The receiver provides m ost powerful channel managing function in the world and this
function allows you to have a more interesting and usefu l operation as well as
watching channels simply.
Also, press key on the RCU, then
command menu will be displayed.
TV channel man ager has 3 commands as
below :
1. Delete mode(Red key)
2. Favorite mode(Green key)
3. Move mode(Yellow key)
4. Lock mode(Blue key)
MENU
1. Rename Favorite group
2. Rename
3. Sort
Graphic (PIG) mode (1/9 size of the normal) and you can see channel information
under the PIG screen.
When you move cursor from one channel to another, PIG will change accordingly.
In the left side of TV channel menu, you can
see the channel list which were already
searched and in the right side, you can
watch the current channel in small Picture in
Favorite Channel
You can utilize those color keys on the RCU as below :
When you select channel manager, default
favorite list will be showed on the screen as
Favorite 1.
Select your favorite channel a nd then press
OK key. Then will be marked at rear of
your selected channel name.
And if you want to delete the channel name
in the favorite channel list, press key
once again, then the mark will be
disappeared.
OK
Favorite Channel

CHANNEL MANAGER
CHANNEL MANAGER
21
Favorite Channel
After the selection of favorite channels press key twice to save data and press
key repeatedly to see if each of the favorite groups are properly selected.
EXIT
FAV
means scrambled channel.
Move Channel
Favorite Channel
1)When you e nter channel manager, the
default favorite group will be showed once
on the screen as Favorite 1.
2)If you press favorite key (Green color key)
on the RCU, new favorite group will be
created newly as Favorite 2 and Favorite 3.
How to make favorite group :
1)In the favorite mode, press key on
the RCU then the commend box will be
displayed on the screen.
2)Select " " in the
commend box.
3)You can edit the name by using keypad.
How to edit the name of Favorite group :
MENU
Rename Favorite group
Move Channel
In the TV channel manager page, press
key (Yellow color key) on the RCU.
Select a channel by pressing key and
move the cursor to the loca tion in which you
want to move the selected channel and
press key. Then, you wil l find the
selected channel is moved to the desired
location and channel no. also changed in
order accordingly.
And check whether the channel number is
changed on the channel list.
Move
OK
OK

CHANNEL MANAGER
CHANNEL MANAGER
22
Lock Channel Rename Channel
Lock Channel
In the TV channel manager page, press
key (blue color key) on the RCU.
This command allow you to lock the
channel. First select the channel, which you
want to lock, and press key and then
will be marked at rear of your selected
channel name.
: To perform this function, you should
set up the Parental Lock in advance.
Lock
Lock
OK
Note
Rename Channel
In Main Page, press key on the RCU,
and then select on the command
menu.
This command allow you to rename
the channel. First select the channel to be
renamed and press key, then, Keypad
dialog box will be displayed. Edit your
des ired name entering word or number. To
del ete characters or numbers, select in the
keypad dialog.
MENU
Rename
Rename
OK
And check whether the channel name is changed on channel list properly or not.
CHANNEL MANAGER
CHANNEL MANAGER
23
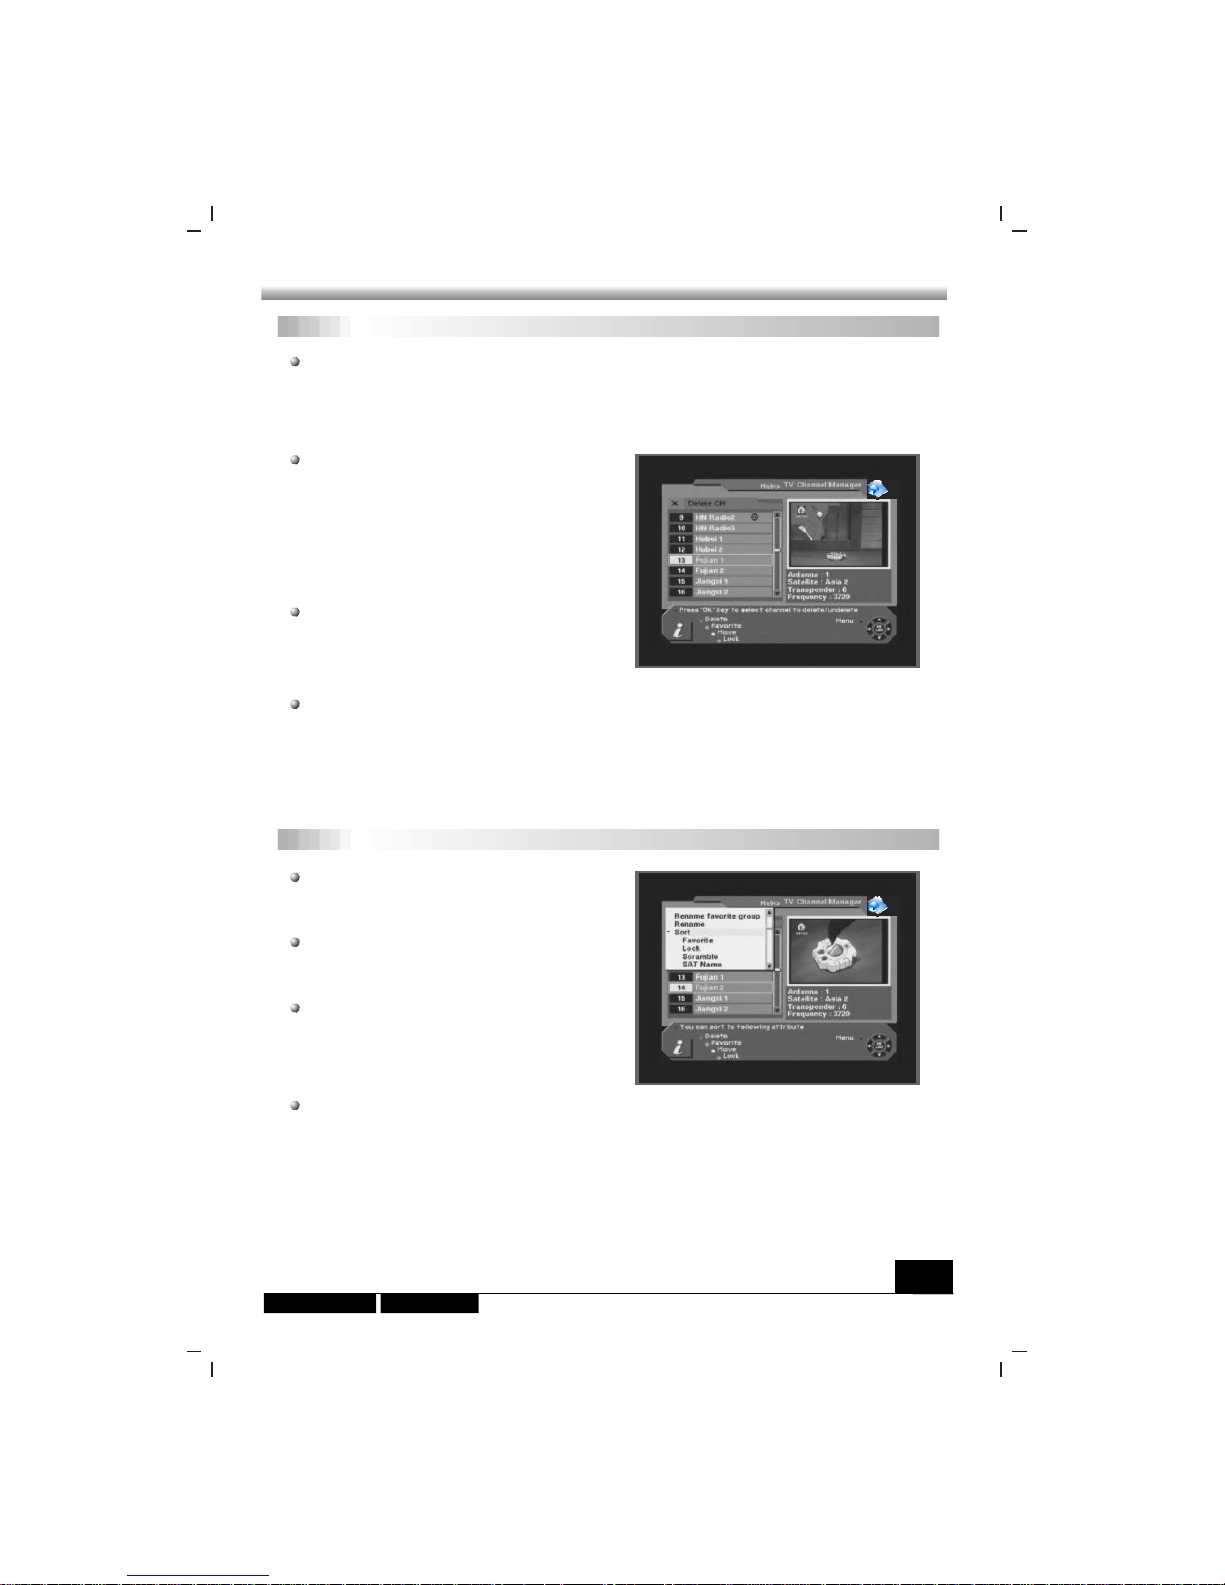
Delete Channel Sort Channel
Delete Channel
Sort Channel
In the Channel manager, you can enter mode, if you press key
(Re d color key) on the RCU. Then, if you press key (Red color key) repeately,
the mode will be changed to be
.
Delete CH Delete
Delete
Delete TP -> Delete Satellite -> Delete All -> Delete
CH
This command allows you to delete
the channel permanently. First select the
channels , which you want to delete, then
selected channel number will be marked to
. If you cancel the selection, press key
aga in, then the marked number will be back.
If you decided to delete, press key and
then Message box will be displayed. Press
to del ete.
Delete
X OK
EXIT
OK
In Main Page, press MENU key on the RCU,
and select on the command menu.
This menu has its sub command and it
allows you to sort the channels as you lik e.
You can sort the channels by , ,
, name and name. Place
the cursor on your desired line, and then
press key.
Sort
Sort
Favorite Lock
Scramble SAT CH
OK
And check whether the channel number is deleted on channel list or not.
: The deleted channel can not be recovered unless you search again.
Please be careful when you decide to delete channel.
Warning
And check whether the channels are sorted properly on the channel list or not.
: Radio Channel Manager has the same operation as TV channel Manager.Note

EPG(Electronic Program Guide)
EPG(Electronic Program Guide)
24
EPG
The receiver provides EPG function for you
to get ac cess to the TV Guide(or Radio
Guide if you are listening to radio channels)
which wi ll show th e titl es and other
information of the current and next programs
on different channels. The information is
only available from the network to which the
channel you are watching belongs.
Then EPG box will be displayed.
You can see the cha nnel in the PIG screen,
channel list in the left side and Program
sc hedul e for selec ted channel wi ll be
displayed in th e right side. The time will be
displayed relating to the program schedule.
Select one channel and placing the mark
on the time of Program name which detail
information you want to know. Then you can
se e blue bu t ton, i f th ere is de t ails
information of the channel. And press
(Blue color key) key on the RCU, then detail
information box will be displayed.
Detail
If you wan to check the former or later information of the channel, please press +6:00
key (Yellow color key) or 6:00 key (Green color key) on the RCU.
Note : A No data available message will be shown if the selected channel does not
provide EPG date.
Pressing this button will show the hardware and software information about the
receiver.
Receiver information
Receiver information

TIMER
TIMER
25
Easy Timer
To activate the and/or
, select and enter your desired
time.
And you can also select channel which will
be turn on or turn off.
: Easy timer is default for the first time.
Turn on time Turn off
the time YES
Note
The function allows you to program the timer with various ways. This function
is one of the strong point of the receiver.
To activate the and/or , select and enter your
desired time.
: The receiver display the time which is given by satellite, so there may be some
differences between actual time and the receiver's time.
TIMER
Turn On Time Turn Off Time YES
Note
Easy Timer
Advanced Timer
Advanced Timer allows you to pro gram the
various timer function.
You can set the timer daily, weekly, monthly
and yearly.
Advanced Timer

ANTENNA DIRECTION HELP
ANTENNA DIRECTION HELP
26
ANTENNA DIRECTION HELP
Although you entered correct value in
Antenna Set up menu, if your antenna is
pos itioned incorrectly, you could not receive
signal from the Satellite.
So the receiver provides
in order for you to have exact
information to direct your antenna toward a
satellite.
Antenna Direction
He lp
If you entered correct value of your position,
place your cursor on Compute and press
key.
Th en th e re ceive r sh o w th e e x act
information of antenna pointing.
OK
First select your desired Satellite name and then the location of selected satellite will
be displayed. In case the location of the satellite is changed, you can re-set the new
location.
Second, enter the value of Longitude and Latitude of your location.

FRONT PANEL DISPLAY
FRONT PANEL DISPLAY
27
FRONT PANEL DISPLAY
UP LOAD PROCEDURE
DOWN LOAD
PROCEDURE
ERROR IN DATA
TRANSMITTING
TV MODE
VCR MODE
SYSTEM BOOTING
FLASH ROM ERROR
SYSTEM WAITING
TIME
(STAND BY INDICATOR)

TROUBLE SHOOTING
TROUBLE SHOOTING
28
TROUBLE SHOOTING
Problem Possible causes What to do
The display on the front
panel does not light up.
No sound or picture, but the
front panel shows red light.
Main cable is not connected.
The is in standby mode.receiver
Check that the main cable is plugged into
the power socket.
Press the standby button.
No sound or picture.
The satellite dish is not pointing at the
satellite.
Adjust the dish. Check the signal
level in the Antenna Setup menu.
No signal or weak signal.
Check the cable connections, LNB and
other equipment connected between the
LNB and the receiver, or adjust the dish.
Bad picture / blocking
error.
The satellite dish is not pointing at
the satellite.
Adjust the dish.
Signal is too strong.
Connect a signal attenuator to the LNB
input.
Satellite dish is too small.
Change to a larger dish.
LNB noise factor too high.
Change to an LNB with lower noise
factor.
The LNB is faulty. Change the LNB.
The picture is not
showed on the screen,
when switching on.
The system is connected by RF
leads.
Check the UHF channel fixed in your
system and tune the UHF channel
properly.
The system is connected by RF
leads and the output channel of the
receiver interferes with an existing
terrestrial channels or Video signal.
Change the output channel to
a more suitable channel, or connect the
system by SCART leads.
receiver
The RCU is not working.
Battery exhausted. Change the batteries.
RCU is incorrectly aimed.
Aim RCU at the , or check that
nothing blocks the front panel.
receiver
Note : If you have tried all of the actions suggested above, without solving the
problem, please contact your dealer or service provider.
There is interference on
your digital satellite
channels, an existing
terrestrial channel or video
signal.


 Loading...