

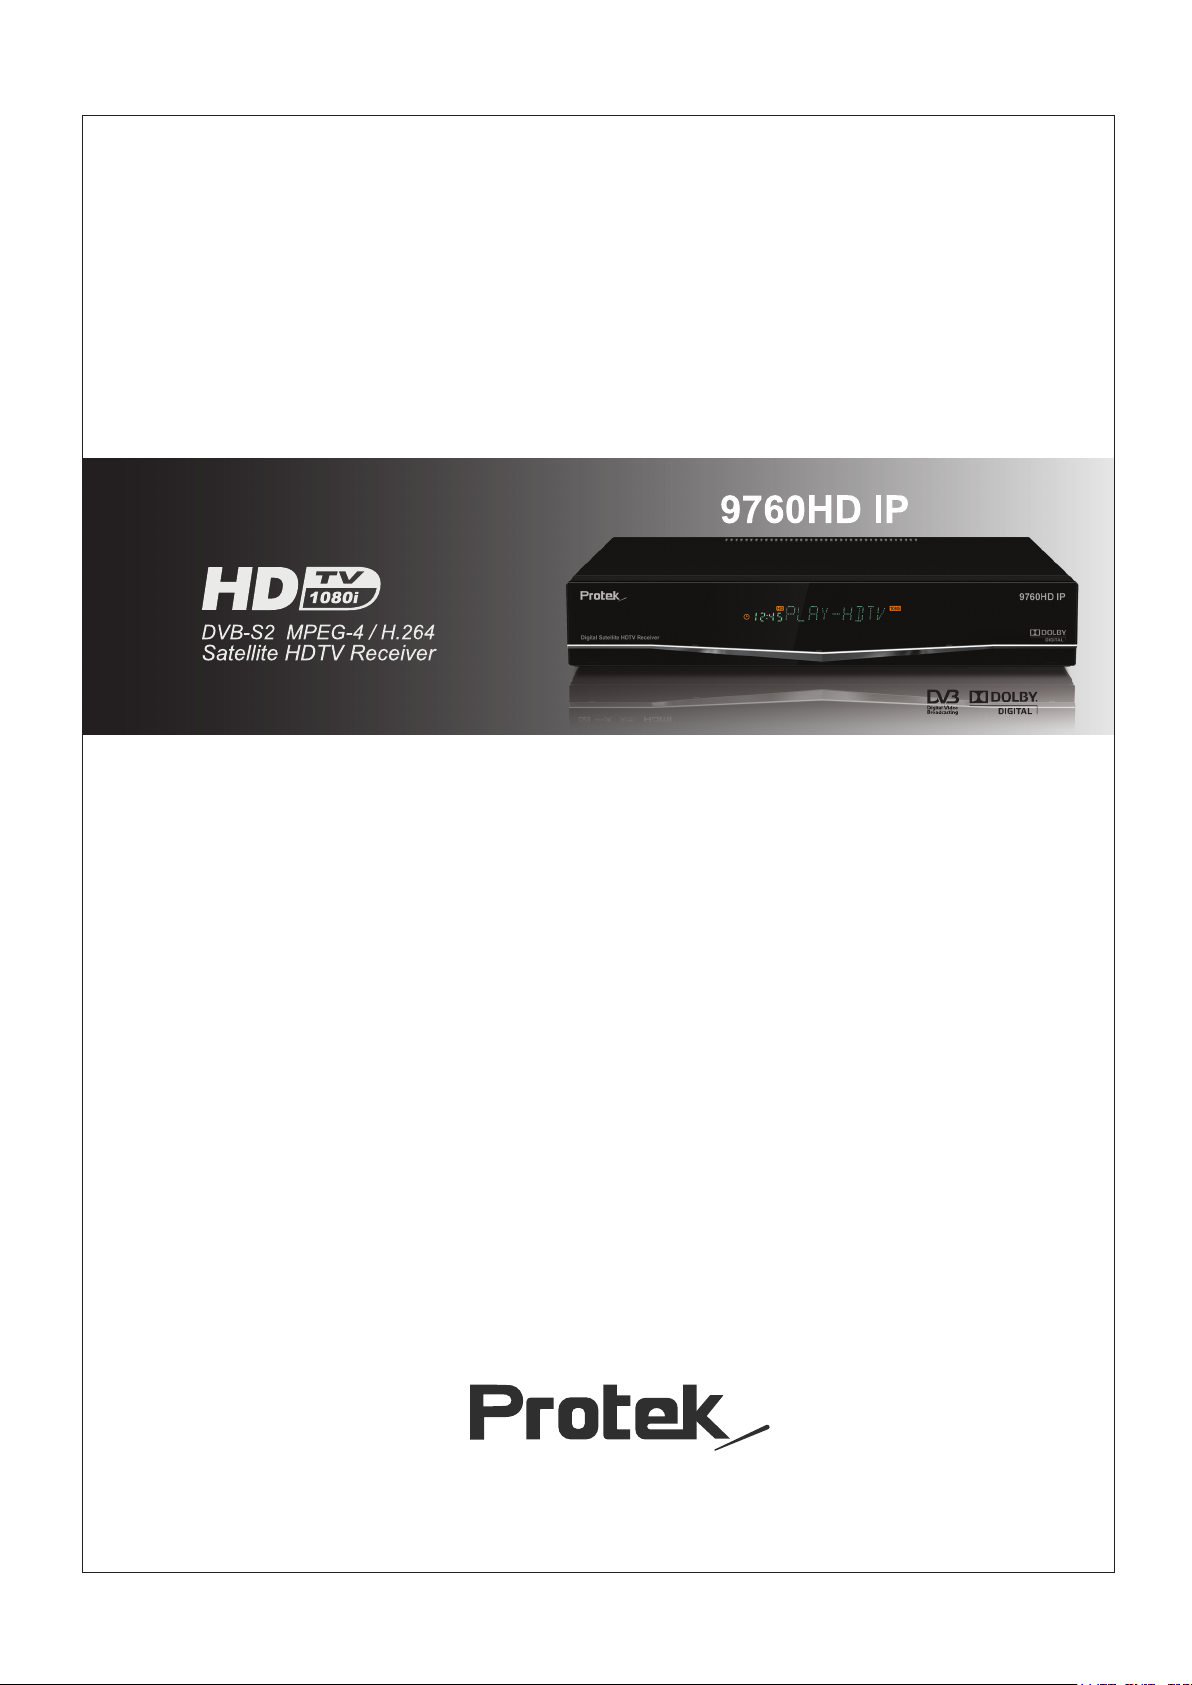
User’s Guide
Full HD Digital Satellite Receiver
Full HD Digital Satellite Receiver
HD Video Formats 1080i, 720p, 576p
Internet Connection Ethernet Port
USB 2.0 Ready
Dolby Digital 5.1 Audio Decoding
Smart Card Reader
HD Analog & HD Digital Output
Scart Video/ Audio Output
Max. 9999 TV & 4999 Radio Channels
Safety Information
RISK OF ELECTRIC SHOCK
CAUTION : TO AVOID THE RISK OF ELECTRIC SHOCK,
DO NOT OPEN. NO USER SERVICEABLE PARTS INSIDE
REFER SERVICING TO QUALIFIED SERVICE PERSONNEL ONLY.
The lightning flash with arrowhead symbol within an equilateral triangle is intended
to alert the user to the presence of un-insulated "dangerous voltage" within the product's
enclosure that may be of sufficient magnitude
CAUTION
DO NOT OPEN
to constitute a risk of electric shock.
The exclamat
ion point within an equilateral triangle is intended to alert the user to
the presence of important operating and servicing instruct
accompanying the appliance.
WARNING:
APPARATUS.
WARNING:
THE DISCONNECT DEVICE SHALL REMAIN READILY OPERABLE.
WARNING:
COVER.
CAUTION:
THE POWER SOCKET.
CAUTION:
WILL VOID THE USER'S WARRANTY.
THE APPARATUS SHALL NOT BE
NO OBJECTS FILLED WITH LIQUIDS, SUCH AS
THE MAINS PLUG IS USED AS THE DISCONNECT DEVICE.
TO ENSURE RELIABLE OPERATION A
HEATING, YOU MUST REMOVE THE PROTECTIVE PLASTIC FILM FROM THE HD-RECEIVER
TO PREVENT ELECTRIC SHOCK, ENSURE AC POWER PLUG IN FULLY INSERTION INTO
CHANGES OR MODIFICATIONS NOT EXPRES
EXPOSED TO DRIPPING OR SPLASHING AND THAT
VASES, SHALL BE PLACED ON THE
ND PREVENT THE HD-RECEIVER FROM OVER
SLY APPROVED BY THE MANUFACTURER
Manufactured under license from Dolby Laboratories. DOLBY and the double-D
symbol are trademarks of Dolby Laboratories.
ions in the literature
Correct disposal of this product. This marking shown on the product or its
literature indi
cates that it should not be disposed with other household wastes
at the end of its working life. To prevent possible harm to the environment or
h
uman health from uncontrolled waste disposal, please separate this from other
material resources. Household users should contact either the retailer where
they purchased this product or their local government office for details of where
and how they can dispose this product for environmentally safe recycling.
Business users should contact their supplier and check the terms and conditions
of the purchase contract. This product should not be mixed with other commercial
wastes for disposal.
ii

Important safeguards
These important safeguard messages will help ensure your enjoyment and proper use of the
HD-Receiver and accessories. Please
HD-Receiver product.
1. Read and Retain this User's Guide
This User's Guide should be read before the HD-Receiver is operated and retained for future reference.
2. Use Correct Power
This HD-Receiver should be operated only from the type of power source indicated on the rear panel.
3. HD-Receiver Installation
Do not place HD-Receiver on an uns
serious injury to a child or adult and damage the HD-Receiver.
4. Provide Antenna Ground
If an outside antenna or cable system is
system is grounded to provide some protection against voltage surges and built-up static charges.
An outside antenna system should not be located in the vicinity or overhead power lines, or other power
circuits, where it can fall onto such power lines or circuits. When installing an outside antenna system,
extreme care should be
contact with them might be fatal. Installing an out door antenna can be hazardous and should be
left to a professional antenna installer.
taken to keep from touching or approaching such power lines or circuits as
read them carefully before you begin to operate your
table trolley, stand, tripod, b
connected to the HD-Receiver, be sure the antenna or cable
racket, or table as it may fall, causing
5. Provide Proper Ventilation
Opening slots in the HD-Receiver cabinet are provided
operation and to protect it from overheating. HD-Receiver should not be located in an enclosed / built-in
installation such as a bookcase unless proper ventilation is provided.For sufficient ventilation,
there must be at least 10cm free air space above, behind, top and on each side of the HD-Receiver.
6. Keep Away from Heat
Do not expose the HD-Receiver to direct sunlight. This product should be situated away from heat
sources such as radiators, heat registers, stoves and other electronic products (including amplifiers)
that produce heat.
7. Keep Away from Moisture
Do not use HD-Receiver near water or in wet areas such as near a bathtub, wash bowl, kitchen sink,
laundry tub, in a wet basement, or near a swimming pool and the like.
Caution: Maintain electrical safety,
unit should bear the CE listing mark on the accessory itself and should not be modified to defeat the
safety features. This will help avoid any potential hazard from electrical shock or fire.
8. Do Not Open
Do not attempt to service this HD-Receiver, as opening or removing HD-Receiver cover will expose
you to dangerous voltages. To prevent of the risk of fire or electric shock, do not open the cabinet.
There are no user serviceable parts inside the HD-Receiver. Refer servicing to qualified service
personnel only.
9. Unplug before Cleaning
When cleaning the HD-Receiver, turn the HD-Receiver power off and unplug it from the wall AC outlet
before cleaning. Do not use liquid cleaners or aerosol cleaners. Use a damp cloth for cleaning only.
10. Object and Liquid Entry
Never push objects of any kind through HD-Receiver openings as they may touch dangerous voltage
points or short-out parts that could result in a fire or electric sh
HD-Receiver. In case of liquid spillage, please contact your qualified service center.
power line operated equipment or accessories connected to this
for ventilation to ensure reliable HD-Receiver
ock.Never spill liquid of any kind on the
11. For Additional Protection
For added protection during a lightning storm, or when left unattended for long periods of time, unplug
the HD-Receiver from the AC wall outlet and disconnect the antenna and A/V cable system. This will
prevent damage to the HD-Receiver from Lightning and power line surges.
iii

Contents
1. Overview of the equipment 1
1-1. Front Panel 1
1-2. Rear Panel 1
1-3. Remote Control 2
1-4. Accessories 2
2. Connecting your HD-Receiver 3
2-1. Antenna Connection 3
2-2. Video Connection 3
2-2-1. HDMI (High Definition Multimedia Interface) connection 3
2-2-2. Connecting to a HDTV with HD YPbPr 4
2-2-3. Connecting to a Conventional TV with Composite Video 4
2-2-4. Connecting to a Conventional TV wtih SCART connection
2-3. Audio Connection 5
2-3-1. Stereo Audio Connection 5
2-3-2. Digital Audio Connection 5
2-4. LAN Connection 5
4
3. Getting Started 6
Step-1. Check the contents in the gift box 6
Step-2. Connect ANT Cable 6
Step-3. Connecting the Video 6
Step-4. Connecting the Audio 6
Step-5. Connecting the Power 6
Step-6. Install the Remote Control batteries 6
Step-7. Video Format Setting 6
Step-8. Check up the On Screen Display 6
Step-9. Select the Satellite and Automatic Channel Search 6
Step-10. Change Programs 6
4. Using the Menu system 7
4-1. Preferences 7
4-1-1. Edit Channel List 7
4-1-2. Timers Setup 7
4-1-3. Preferred Languages 7
4-1-4. OSD Language 7
4-1-5. Preferred Audio Type 7
4-1-6. InfoBar Time Out 7
4-2. System Setup 8
4-2-1. 4:3 Channels Display As 8
4-2-2. 16:9 Channels Display As 8
4-2-3. GMT Offset 8
4-2-4. Summer Time 8
4-2-5. Restore Factory Defaults 8
4-2-6. Network Setting 8
iv

Contents
4-3. Installation 8
4-3-1. Switch Type 8
4-3-2. LNB Setup 8
4-3-3. Motorized System 9
4-3-3-1. DiSEqC 1.2 Setting 9
4-3-3-2. USALS Setting 9
4-3-4. Channel Scan 9
4-3-5. Edit Satellite 9
4-4. Smart Card 10
4-5. System Information 10
4-6. USB Menu 10
4-6-1. Contents Browser 10
4-6-2. Connect Drive 10
4-6-3. Disconnect Drive 10
4-6-4. Drive Format 10
5. Direct Buttons of the Remote Control 11
5-1. INFO (Information) 11
5-2. FAV (Favorite) 11
5-3. SUB TITLE 11
5-4. EPG (Electronic Program Guide) 11
5-5. TELETEXT 12
5-6. RECALL 12
5-7. OPTION (MULTI-FEED) 12
5-8. SAT 12
5-9. MUTE 12
5-10. VIDEO FORMAT 12
5-11. I-II (Audio Track) 12
5-12. OK (Channel List) 12
5-13. TV / RADIO 12
6. Firmware Upgrade 13
6-1. Checking current firmware version 13
6-2. Update from the USB memory device 13
7. Trouble Shooting Guide 13
8. Specifications 14
v
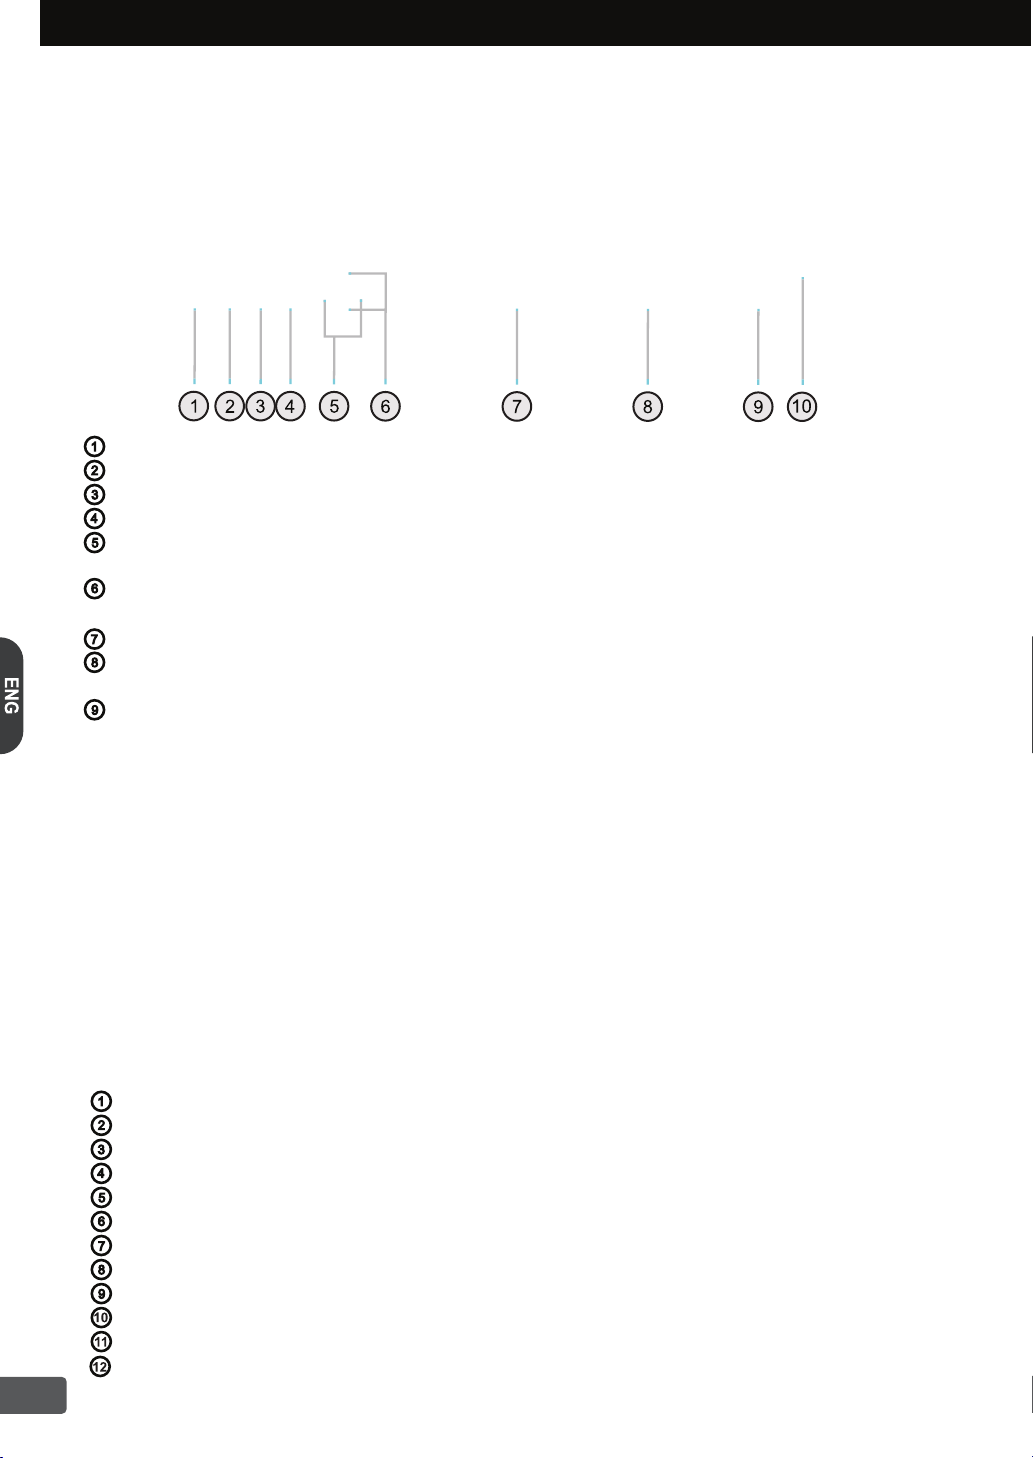
1. Overview of the equipment
This section summarize HD-Receiver Buttons, Remote Control and the Terminals.
1-1. Front Panel
STANDBY Button :
Switch the HD-Receiver between standby mode and operation mode.
VIDEO FORMAT Button :Change HD Video Format among 1080i, 720p or 576p.
MENU Button :Show the Main Menu on the screen.
OK Button :
LEFT / RIGHT (V- / V+) :
used
UP / DOWN (P+ / P-) :
to move up/down in menus and interactive screens.
Use to make selection in the Menu and show the Channel List on the screen.
These buttons increase/decrease the volume levels.
to move left/right in menus and interactive screens.
These buttons switch to previous or next service. They are also used
They are also
Front Display :Show the channel information, current time and the HD-Receiver status.
Remote Sensor :
do not place any objects in front of the sensor.
Infrared Remote Control sensor. To ensure reliable remote control operation,
SMART CARD Slot : One SMART CARD Slot
1-2. Rear Panel
LNB IN :Connect the satellite antenna cable from the LNB.
IF OUT :Connect to another digital satellite receiver.
Output Select Switch :Select Output to HD YPbPr or SCART RGB
LAN :Connect Internet Cable.
USB :Connect USB Device such as USB Memory for software
upgrade or channel data exchange.
HDMI :Connect to the TV using HDMI Cable.
S/PDIF Coaxial :Output the S/PDIF Coaxial digital audio signal.
S/PDIF Optical :Output the S/PDIF Optical digital audio signal.
VIDEO :Provide SD composite video output to the TV or VCR equipments.
Y/Pb/Pr :Provide HD component video output to the TV or other equipments.
AUDIO L/R :Provide stereo audio output to the TV or VCR equipments.
TV SCART :SCART Output to the TV or other equipments.
1

1-3. Remote Control
Switch the HD-Receiver between
standby mode and operation mode.
1. Overview of the equipment
Switch the sound on / off.
Enter a TV / Radio program number. It also
input the alphabet for program name search.
Switch between the current program
and the previously viewed program.
(Electronic Program Guide)
Display the EPG
Adjust the audio volume level.
Exit the current menu system.
Activate the menu system on the
Select the audio track.
Show the teletext on the screen if
applicable.
Show the sub title track if applicable.
It is working with additional functions
such as select multi-feed program if
applicable.
EPG
screen.
Change HD Video Format among
1080i, 720p or 576p.
Change the satellite on the program
list.
Switch between Television services
and Radio services.
Display favorite items on the
program list.
Display the detailed program information
and Now / Next event.
Change up / down the program.
Navigate the cursor up, down,
left, right in the menu system.
Also UP/ DOWN buttons are
work for program up / down.
Select an item in the menu system
or shows the Channel List.
These color buttons are used with different
functions in each menu.It will be guided by
on-screen help display.
9700 Series
1-4. Accessories
Carefully remove the HD-Receiver from the carton. Check that the HD-Receiver has not been damaged.
The following accessories are included.
This User’s Guide
Two AAA(LR03) Batteries
Wireless Remote Control
2

2. Connecting your HD-Receiver
This chapter describes how to connect your HD-Receiver to the TV and other equipments.
The HD-Receiver provides various connection methods for your TV, VCR and other equipments.
2-1. Antenna Connection
Connect satellite antenna cable to the LNB IN socket of the HD-Receiver.
If you have another Satellite Receiver, you may link it from the LOOP OUT connector.
If
you have two or more antenna dish,
switch OUT to LNB IN connector of HD-Receiver. You can use Tone-burst switch
or DiSEqC 1.0 switch. If you have motor system with
1.2 or USALS, please refer to article 4-3-3-1 & 4-3-3-2 for more
detailed installation information.
you can use DiSEqC switch. Connect DiSEqC
DiSEqC
2-2. Video Connection
2-2-1. HDMI (High Definition Multimedia Interface) connection
Connect HDMI Video cable to the HDMI output terminal on the rear of HD-Receiver. Connect the other
end of HDMI Video cable to the HDMI Input terminal on the HDTV. The HDMI connection carries whole
digital video & audio signal and there is no required additional audio connection. Set up the video
format to desired resolution. This HDMI output supports
1080i/ 720p/ 576p Video Format. Please make sure, the
HDMI output does not support SD (576i) Video resolution.
3

2. Connecting your HD-Receiver
2-2-2. Connecting to a HDTV with HD YPbPr
Attention: Please make sure that the Output Select Switch is in YPbPr position!
Connect YPbPr Video cable to the HD terminal on the rear
of YPbPr Video cable to the HD YPbPr
Blue and Pr is Red color assigned. Set up the video format
to desired video resolution.
YPbPr
input terminal on the HDTV. Usually, the Y is Green, Pb is
of HD-Receiver. Connect the other end
2-2-3. Connecting to a Conventional TV with Composite Video
Conn
ect a Video Cable to the TV Video terminal on
the rear of the HD-Receiver.Connect the other end
of Video Cable to the Video In terminal on the TV.
2-2-4. Connecting to a Conventional TV wtih SCART connection
Attention: Please make sure that the Output Select Switch is in RGB position!
Connect a SCART Cable to the TV SCART terminal on the rear of the HD-Receiver. Connect the other
end of the SCART Cable to the SCART terminal on the TV. Please make sure, the Output Select
Switch should be RGB position for correct SCART RGB operation.
RGB
4

2. Connecting your HD-Receiver
2-3. Audio Connection
This HD-Receiver can support three different methods for connecting audio signals. Each of the audio
connections delivers the same audio sound.
Audio Connection Diagrams below.
need this Audio Connection. The HDMI connection is already included Digital Audio internally.
Please make sure, if you are using HDMI connection, you do not
You can select desired audio connection by following the
2-3-1. Stereo Audio Connection
Stereo audio connector deliver analog stereo sound or Dolby Digital Down mixed 2 Channel analog
stereo sounds. Connect Audio Cable
other end of the Audio Cable to the conventional TV Audio Input or Stereo Amplifier Audio Input.
LR
to Audio L/R terminal on the rear of the HD-Receiver. Connect the
2-3-2. Digital Audio Connection
Optical Digital Audio and Coaxial Digital Audio deliver Dolby Digital 5.1
If you have a Home Theater system with Digital Audio input,
For the Optical Audio connection, connect the Optical Audio Cable
Audio terminal on the rear of the HD-Receiver. Connect the
Optical Audio Input terminal
RCA Cable to the Coaxial Audio terminal on the rear of the HD-Receiver. Connect the other end of the
RCA Cable to the Coaxial Audio Input terminal on the Home Theater System.
on the H
ome Theater System. For the Coaxial Audio connection, connect the
then you can use Digital Audio connection.
other end of the Optical Audio Cable to the
digital sound or PCM digital sound.
(Available in Local Store) to the Optical
Home
Theater
System
AMP
2-4. LAN Connection
Connect here the network cable from your internet router to access to internet for firmware updates.
5

3. Getting Started
Step-1. Check the contents in the gift box.
After opening the gift box, you should check up and find the following items.
Digital HD-Receiver
Remote Control
User’s Guide
2 Batteries (AAA or LR03 size)
Step-2. Connect ANT Cable
Connect satellite antenna cable to LNB-IN of the HD-Receiver.
Connect another antenna cable between LOOP-OUT of other Receiver if applicable.
Step-3. Connecting the Video
Prepare TV or HDTV you want to connect.
There are several methods to connection of video. You should find correct connection
method for your HDTV. Please refer to article 2.2 Video connection diagram.
Step-4. Connecting the Audio
Prepare HDTV or Audio equipment you want to connect. If you are using HDMI connection,
you do not need audio connection.There are two different connection methods for Audio
connection. For general TV set with
audio connection, you should prepare Optical / Coaxial Audio cable for optical / Coaxial audio
connection with
Step-5. Connecting the Power
Plug the Power Cord to wall AC outlet. The power source is AC 180-250V~, 50/60Hz. This unit is
designed for continuous operation.
To disconnect this HD-Receiver from AC outlet, you have to unplug the HD-Receiver.
Step-6. Install the Remote Control batteries
1) Open the battery compartment on the back of the Remote Control.
2) Install two AAA or LR03 size batteries as shown. The battery has polarity so when insert
the batteries, make sure the `அ` and `இ` terminals are oriented correctly.
3) Replace the cover.
Home Theater Equipment.
Note :
If you find missing or broken part, then ask to
supplier or contact to service center.
analog audio connection, it has AUDIO L/R. For digital
Switching it off does not disconnect it from the AC outlet.
Note :
Do not mix different types of batteries,
or mix an old and a new battery.
Remove and replace weak batteries.
Weak batteries can leak and damage
your remote controller.
Dispose batteries
them into a fire.
Step-7. Video Format Setting
For the Video Format Setting, Press the
video format change. The default video format is 1080i.
Step-8. Check up the On Screen Display
For verify correct setting of Video Format, you should check up the OSD from HDTV’s display
screen. Turn on the HD-Receiver and HDTV. Press button on the Remote Control, you
should check up the OSD for verify A/V connection. If you cannot find any OSD in your TV
display, please check up again the Video Format Setting and A/V connection.
Step-9. Select the satellite and Automatic Channel Search
Please select the satellite and perform the
automatic starting the available channels. For doing proper channel search, you should refer to
article 4-3 Installation.
Step-10. Change Programs
You can change the program using P or P
direct
select the program with pressing the number button in your Remote Control.
button at the Remote Control for
MENU
Automatic Channel Search.
button in your Remote Control. Or you can
properly, never throw
The HD-Receiver will
6

4. Using the MENU System
4-1. Preferences
In the Menu system you can adjust whole setting and function
of HD-Receiver. If you press the button, the menu screen
will display. You can move up/down using
in the Remote Control. Press
the items. Press button again will go back to one step back.
EXIT
Press
MENU
button will quit the menu system. If there is no
Remote Control activity more than 60 sec, then all menu will
automatically disappear for prevent unwanted operation.
4-1-1. Edit Channel List
You can see TV Channel Edit screen by pressing button
at the Edit Channel List menu. In this menu, you can move,
delete or sort each channels and categorized favorite groups.
If you want move or delete the channel, select channel and
using
OK
Also you can perform the multiple channel move
button. Actual data saving will be done
press .
by
when exit channel edit menu. When you
please be careful because there is no way back to previous
channel list order. So we
lists to USB memory stick before you sorting.
For more
The P / P
respectively.
information fo
r back up, please refer to article 4-5.
buttons will act page up / down in this menu
Each channel can registered multiple favorite
groups and quick find function will help you to find designated
channels quickly.
4-1-2. Timers Setup
Wake Up Timer : You can set the wakeup timer to turn on the HD-Receiver at desired time.
The time format is Hour : Minute.
Disabled : If you don’t want to set wakeup time, you should set ‘Disabled’.
Enabled:
Switch Off Timer :
You can set time whenever you want to wakeup by press
set channel type and wakeup channel.
You can set the switch off timer to turn off the HD-Receiver at desired time.
Channel Type : You can select TV or Radio.
Wake Up Channel : You can select wakeup channel among various channels.
MENU
or button
OK
or /
button to select
OK
are using sort option
recommend save current channel
or button and you
can
Before switched off by Switch Off Timer, the receiver will notify warning message on the OSD.
You can choose
“YES” or “NO” whether switch off the HD-Receiver.
4-1-3. Preferred Languages
You can find two type of language selection items. One is for the EPG language,
the other is for audio
language. Each of them has two items respectively. First selected languages are always precedence
of second languages. If there are no first selected audio or EPG language within current program then
second languages are selected automatically.
4-1-4. OSD Language
This HD-Receiver supports multiple OSD languages. You can select the desired OSD language
in which the menu would be displayed. Once you select the OSD language, the menu will immediate
change to selected OSD language.
4-1-5. Preferred Audio Type
You can select audio type between Stereo Audio and Dolby Digital.
If current program services both of them, it will output selected audio track automatically.
4-1-6. InfoBar Time Out :
You can set up the display duration of information bar. (3, 5, 10, 30, 60sec)
7

4. Using the MENU System
4-2. System Setup
You should configure the system settings appropriately to your television set and other appliances.
4-2-1. 4:3 Channels Display As
If you have 16:9 wide-screen TV and current serviced
program is 4:3 then you can select full screen mode or
pillar box mode.
4-2-2. 16:9 Channels Display As
If you have conventional 4:3 TV and current serviced
program is 16:9 then you can select full screen mode,
letter box mode or pan & scan mode.
4-2-3. GMT Offset : You can set the Greenwich Mean Time (GMT) offset where you lived.
4-2-4. Summer Time :
4-2-5. Restore Factory Defaults
You can make all data and configurations as factory default status except external HDD or USB device.
After doing this, all stored data except external HDD or USB device will be erased and returned
to factory default.
You can set summer time “Enable” or “Disable” condition if needed.
4-2-6. Network Setting
4-3. Installation
4-3-1. Switch Type
If your network system provides DHCP server then setting
up the DHCP Enable, then all information will automatic
received from DHCP server. If not you should enter the IP,
Subnet mask, Gateway, DNS1 and DNS2 information manually
At lastly, set up the Network to Enable. You can check up
the LAN cable connection with LED at the LAN connector.
Green LED is LINK and Yellow LED is SPEED.
You can select LNB switch type which you are now using.
If you choose
by number.
DiSEqC
DiSEqC item, each DiSEqC port assign to LNB
In other words, DiSEqC port 1 assign to LNB1 and
port 2 assign LNB2 and so on.
.
4-3-2. LNB Setup
Next step, you should properly setting up LNB for receive the signal. You can select satellite and
LNB Type depends on your antenna. Before doing this setting, you should have knowledge about
your antenna system. Last offset item only available when you setting up LNB2. If you have one
antenna with two LNBs then you can use this option. Offset means LNB2's relative angle value
than LNB1's angle value. Supported values are 0 , 3 , 6 .
8

4. Using the MENU System
4-3-3. Motorized System
If you are using motor system, you can calibrate the antenna followed by below menus
(DiSEqC 1.2 or USALS) depends on which motor system you have. You can dynamic check up the
received signal status with quality and strength bar at
need to adjust the advanced control menu if antenna is
installer needs more complex commands.
In this case you can simply enabling advanced control
item, and you can access the ‘reset’, “set limit”, “go to reference” commands and so on. If you use
these commands, please be careful otherwise you will be confused for LNB setup.
the right side of OSD. Normally you don’t
properly setting up, but sometimes antenna
4-3-3-1. DiSEqC 1.2 Setting
Step-1.
Step-2. Move
then press button. The antenna will move to stored
position
Step-3. If the signal strength and quality is not good, you can
adjust antenna position by movement item.
Step-4.
item then press or button to choose store position.
Step-5. At lastly, press
data
Select satellite and transponder as you wish to setup.
to motor control item and select “Go to” option
OK
which receiver has.
If you can get good sig
nal,
move again motor control
OK
button then the current position
will be overwritten on the previous stored data.
4-3-3-2. USALS Setting
Step-1. Select satellite and transponder as you wish to setup.
Step-2. Enter the longitude and latitude value properly as you are positioned.
Step-3. Move to motor control item and select “Go to” option then press button.
OK
The antenna will move to angular position based on real satellite angle.
Step-4. If the signal status is not good, you should adjust antenna position by movement item.
Step-5.
There is no “store position” item in the USALS menu because all mechanism operates
by actual satellite position (angle). So if you can’t get a good signal by doing Step-4, you
must calibrate your antenna position by manually.
Note :
For advanced control command, you’d better refer to STAB’s motor reference manual.
Since it is intended for installer or expert users so we recommend that normal user
should not handle it by himself.
4-3-4. Channel Scan
After all antenna setting was properly done, you can start channel scanning for add up new
channels. Before you starting search, also you can choose NIT search, channel type, access
type options as you wish. There are three types of search methods which is Manual, Auto and Multi.
Usually Multiple search will be done one by one so it will take long scanning time than Manual
or Auto search.
Manual : One transponder search in one Satellite
Auto : All transponder search in one Satellite
Multi : All transponder search in multiple Satellites
If you want add new transponder then enter the frequency, polar and symbol-rate value in the
transponder item. If there is new channel available in this transponder then it will be added
transponder list, if not it will be ignored and remove from the list. Please make sure, this operation
is only work under the manual channel search.
4-3-5. Edit Satellite
This HD-Receiver supports 104 default satellite lists. Also user can add, remove and modify satellites.
If you are using USALS system, you should carefully enter the real satellite position value.
Otherwise you can’t get signal from newly added satellit
e.
9

4. Using the MENU System
4-4. SmartCard
Some broadcaster broadcast scrambled service and it
required paid subscription for watching TV. The scrambled
services can only be watched with subscription card. This
HD-Receiver has One Smart card slot
Subscription Card. To watch a pay
take the following steps;
Step-1.
by this HD-Receiver
Step-2. Purchase a subscription
you want to watch.
Step-3.
Step-4.
side down
Check if subscription card of your provider is supported
card for the pay service which
Insert the subscription card into the Smart card slot
Please make sure the card’s contact should be up
for insert the
service you should
4-5. System Information
In this menu, you can check up the model name, current
software/ hardware version and upgrade latest firmware
through USB memory stick. Also you can import or export
channel list. For the firmware upgrade, please refer to the
Section 6. Firmware Upgrade.
Load Channel List from USB : Import channel lists from
USB memory stick which is previous saved channel lists.
Save Channel List to USB : Export current channel lists
to USB memory stick.
When saving channel list to USB, the file
created by current date and file extension will be ‘.cdb’.
name is automatic
4-6. USB Menu
By pushing USB key on remote control you can access Contents Browser, Connect or
Disconnect and Format your connected USB device.
4-6-1. Contents Browser. You can browse the content of the connected USB device.
4-6-2. Connect Drive
In normal case, user uses rarely this menu item when proper USB DISK connected to STB since
STB will find first proper partition and connect automatically. However, after change or format
the USB DISK, user should connect USB DISK by manually. In this situation user can select
partition if there are several partitions available.
4-6-3. Disconnect Drive
The STB communicate with USB DISK after proper USB connection made even though you do
not perform playing or recording. Thus if you disconnect the USB forcibly, it may cause USB DISK
corruption. For preventing it, you should
DISK from STB. When you switch off the STB power, disconnect operation will process automatically.
At that time, you don’t need disconnect operation manually.
4-6-4. Drive Format
You can format the USB DISK when connected USB DISK have other file system than FAT32
or simply erase all the USB DISK contents by one time.
USB DISK not properly connected or USB DISK is in recording / playing process.
do disconnect drive process before you plug out USB
This menu item will deactivate when the
G
10

5. Direct Buttons of the Remote Control
You can use following Remote Control Buttons for searched programs
5-1. INFO (Information)
If you press button,
display. While displaying banner, if you press
will be displayed at top of the banner. You can move
button at this moment.
Information Display Contents
INFO
then detailed information of current program will be shows on bottom of the
INFO
button again then current
program’s synopsis(NOW)
NOW and NEXT synopsis by pressing and
(1) Signal Level & Quality
(2) Program Number
(3) Program type
(4) Program Name
(5) Satellite Name
(6) Current synopsis
5-2. FAV (Favorite)
5-3. SUB TITLE
(7) Transponder Information
(8) Audio Track
(9) Teletext
(10) Sub Title
(11) Multi-Feed Program
(12) Dolby Digital
To display favorite lists, press button. You can see a
screen left side figure. In this list, you can select favorite
group.
For
grouping of your own favorite channels, please
refer to article 4-1-1.
Once you choose one of them, it always kept on the memory
unless you change
group will be displayed on
info
banner.
Some programs are provided with subtitle tracks in one
or more languages, press
track. There are two type of subtitle displayed at this window.
Without any icon means teletext subtitle and
DVB subtitle. Once you choose one of them, it will be saved on
the memory so next time if you tune to this program again
t
hen last selected subtitle shows automatically until receiver
switched off.
(13) Scrambled Service
(14) Source Video Resolution
(15) Program Running Time
(16) Current Time
another one. Current selected
favorite
the bottom side of number in
button will select a subtitle
means
5-4. EPG (Electronic Program Guide)
11
Press the button then it shows the short summary
EPG
of the current and scheduled programs if EPG data is
available on each service. For more detailed information
about selected program, press the button.
The
wherever current
(red) button always cursor move to first event
cursor positioned. And the (green)
INFO
button will move to day tab. So you can quickly navigating
events.

4. Using the MENU System
5-5. TELETEXT
On some services, such information as weather reports, news or stock quotations is provided by means
of teletext.
teletext service, press button. Press a number button to viewing desired teletext page. Also you can use
four teletext buttons ( red, green, yellow, blue) for more easy to use of teletext services.
If you want to exit from teletext service, you just press button or press button again.
5-6. RECALL :
If current program provides teletext service, it will display on the information display. For activate
EXIT
You can change to previous program by pressing button.
5-7. OPTION (MULTI-FEED)
Press button
Multi-Feed function which is program watching mode if the
program supported. In the other case, it assigned other
functions. At that time it will be explained at the bottom of
the screen.
works for option. Mainly it used activate of
5-8. SAT
If you press button, you can see the satellite list what
you installed. If you choose one of them, that satellite list will
memorized and shown unless you change another one.
5-9. MUTE :
If you press button,
You can switch the sound ON/OFF.
5-10. VIDEO FORMAT
This receiver supports various video output resolutions such as 1080i, 720p, 576p for YPbPr
and HDMI output. If you press once,
3 sec, resolution will be change following sequence. 1080i > 720p > 576p. Also You can change
video output resolutions at front key. Press up & down key simaltaneous, then it activate video
resolution change menu. Press up or down within 3sec, video resolution will be change.
the display show
s current resolution. Press again within
5-11. I-II (Audio Track)
Press button the
from audio list dialog.
audio track will follow selected preferred
preference menu.
it always precedes selected preferred audio language. Please
keep in mind all of the audio tracks for each channel will stored
to the internal memory until receiver swiched off.
n you can select one of the audio tracks
The default value is Auto which
audio language in
If you choose another track at this dialog,
means
5-12. OK (Channel List)
You can call the Channel List window by pressing button.
You can change filter conditions dynamically for all channels
on the list. These conditions are FAV, Satellite, Provider, number
or Alphabet order. If you change one of the filter condition, it will
kept current status unless you change to another one. Please
make sure if you modify anything on the channel edit menu, the
channel list filter condition always set to All. Whenever you can
find current filter condition on the title.
OK
5-13. TV / RADIO
changed wallpaper in radio mode to prevent display damage.
Press b
utton then you can switch TV / RADIO mode. It will be automatically
12

6. Firmware Upgrade
The HD-Receiver has a specific firmware which is stable and convenient use.
However, for improvement of the product functionality, new firmware may be released.
You can get the latest firmware from your Protek Distributor or directly at www.protek.tv
6-1. Checking current firmware version
You can check up the current firmware information
latest firmware. In the main menu,
select System Information then you can check the current
version number.
6-2. Upgrade from the USB memory device
You can upgrade the HD-Receiver
firmware to latest firmware. It should identical match the
system identification between HD-Receiver and latest firmware. If not you will fail in firmware
upgrade. Please follow below step for upgrade.
Step-1. Prepare any size of USB memory stick.
Step-2. Download latest upgrade firmware from the www.protek.tv
Step-3. Copy this file to your USB memory stick.
Step-4. Insert the USB memory stick to HD-Receiver USB port.
Step-5. In the main menu, select System Information > Firmware Upgrade menu.
Step-6. Select a file and choose "YES" item to starting upgrade.
Step-7. Wait a minute until upgrade finished. Information OSD will appear.
Step-8. When finished the upgrade, the HD-Receiver will be restarted automatically.
Note :
Your USB memory must be formatted in the FAT 32 file system. Otherwise, the digital receiver
cannot recognize your USB memory. In addition, the digital receiver can only recognize files
and directories which are named with only alphabetic, numeric and underscore letters. If there
is a file or folder named with other letters, the digital receiver cannot recognize not only it but
also its subsequent files and folders.
of your HD-Receiver before downloading
7. Trouble Shooting Guide
Your HD-Receiver is designed to give you trouble-free performance for many years. If you
have a problem with your HD-Receiver, try the solutions listed below.
Problem
The front display does not light up.
No sound or picture, but the
clock display in the front panel.
Pixelated picture.
No picture, but sound is OK.
The sound is OK, but the picture
is blank. The picture is OK, but
the sound is blank.
The remote control is not
working.
Display “No or Bad Signal”
message.
Cannot descramble the
CA channel.
Possible Causes
Power cable is not connected.
The HD-Receiver is not
powered on.
Signal too weak or No antenna
connected.
Your HDTV does not support
selected video resolution.
Audio or video connection
is not good.
Battery exhausted. Remote control
is incorrectly aimed. Blocked the
HD-Receiver front panel.
Antenna connection not stable.
Antenna setting wrong.
Card not properly inserted.
Subscription period expired.
13
What to do
Checkup the power cable which is
plugged in to the AC wall mounted
socket.
Press the power button on the
front panel or remote controller
to power ON status.
Check the antenna or antenna
connection.
Check the video format. Refer to
article 5-11. Video Format
Check up the audio/video
cable or connection.
Change the batteries. Aim the remote
control at HD-Receiver. check that
nothing blocks the front panel.
Check the antenna cable.Check the
antenna setting menu again.
Check the insertion status for
Check the subscription status.
Card.

8. SPECIFICATIONS
1) Tuner
ITEM
Input Connector
Output Connector
Frequency Range
Input Impedance
Signal Level -25 dBm to -65 dBm
LNB Power & Polarization
22KHz Tone
Demodulation
Input Symbol Rate
Code Rate
SPECIFICATION
1 x F type 75 Ohm.
1 x F type 75 Ohm, Loop through
950MHz to 2150MHz
75 Ohm, Nominal
Vertical +13.0V~+14.0V
Horizontal +18.0V~+19.0V
Current: 400mA Max.
Frequency 22KHz +/- 2KHz
Amplitude 0.6Vpp +/- 0.2Vpp
QPSK, 8PSK
QPSK/LDPC/BCK : 20Msps to 30Msps
8PSK/LDPC/BCH : 1Msps to 31Msps
DVB-S QPSK : 2Msps to 45Msps
QPSK/LDPC/BCK: 1/2, 3/5, 2/3, 3/4, 4/5, 5/6 8/9, 9/10
8PSK/LDPC/BCH: 3/5, 2/3, 3/4, 5/6, 8/9, 9/10
DVB-S QPSK: 1/2, 2/3, 3/4, 5/6, 7/8
2) MPEG Transport Stream A/V Decoding
Transport Stream
Profile & Level
Video Resolution
Audio Decoding
Audio Mode
Sampling Rate
Audio Frequency Range
MPEG-2 ISO/IEC 13818
Transport Stream Specification
MPEG-2 MP@HL, MPEG-2 MP@ML,
MPEG4-p10/H.264 Level4
720x576i, 1920x1080i, 1280x720p, 720x576p
MPEG-1 Layer 1/2, MPEG-2 Layer 2, Dolby Digital(AC-3)
Stereo, Dual Channel, Joint Stereo, Mono
32, 44.1 and 48KHz
20Hz~20KHz, less than +/- 2dB flatness,less than 2Vrms
3) Output Terminal
SD CVBS Output
HD YPbPr Output
HDMI Output
Digital Audio Output
Stereo Audio Output
SCART
Data Interface
LAN
Smart Card
1 x RCA
1 x YPbPr (3 RCA)
1 x HDMI
1 x S/PDIF Optical, 1 x SPDIF(Coaxial)
1 x Stereo Audio RCA (L/R)
1 x TV SCART
1 x USB 2.0 HOST Type A
1 x RJ45 LAN Port
1 x Smart Card slot
5) Environment
Operating Temp
Storage Temp
Operating Humidity
Storage Humidity
0 C ~ +50 C
-20 C ~ +65 C
10%~85% RH non condensing
5%~90% RH non condensing
4) Power Supply
Input Voltage
Type
Standby Power
Consumption
Power Consumption
Protection
6) Memory
Flash Memory
SDRAM (System)
SDRAM (Video)
7) Physical Specification
Size (WxHxD)
Weight (Net)
340mmx70mmx270mm
About 2.1Kg
Note : Specifications are subject to change without notice
AC180~250V~, 50/60Hz
SMPS
Less than 2W.
16W Typical. 30W Max.
Separate Internal Slow Blow Fuse and
Chassis Ground.The input should have
Lightning or Electronic Shock Protection.
64Mbit Flash × 1
512Mbit DDR SDRAM × 2
256Mbit DDR SDRAM × 2
14
 Loading...