

Page 1

USER MANUAL
USB 2.0 WebCam
Version 1.0
Page 2
2/11
Features & Specification:
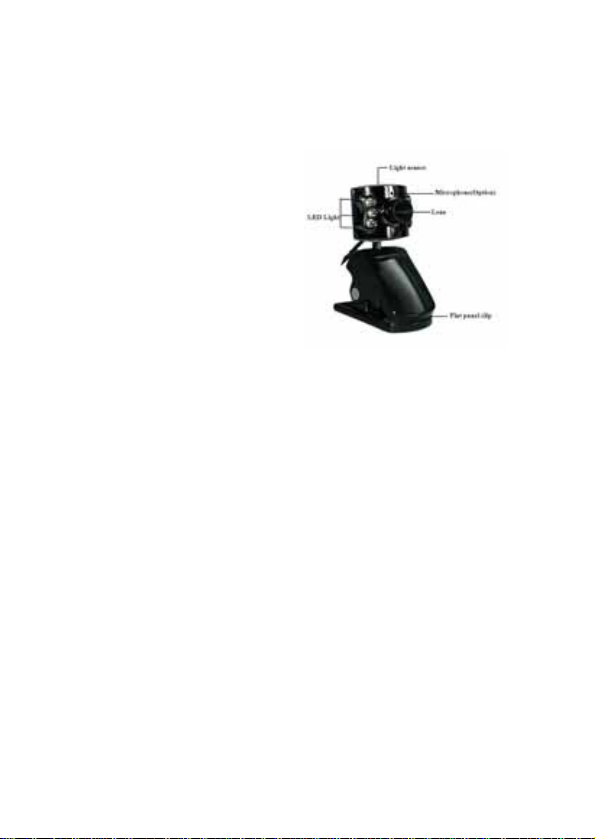
x Idea for notebook users, small and compact with integrated clamp/stand
x LED lighting for taking pictures in the dark
x Maximum resolution: 1280 x 960 Pixels
x Picture resolution: 640 x 480 Pixels
x Sensor specification: 1/4” CMOS
Package Contents:
x USB Webcam
x User manual
x Software CD-ROM
System Requirements:
x One available USB port
x IBM Compatible PC
x Windows 98SE/ME/2000/XP
x System equipped with Pentium II 200/MMX/AMD K6 or above
x DRAM: 32 MB or above
x Sound card, speaker and microphone are required for video and audio recording
x A modem or Lan card is required for application of video conferencd and video mail
Before installation note:
Do not connect the Camera to the computer system first. Install the driver and applications first.
Insert the VP-Eye CD-ROM to the system and you can change the target group name, target directory and
folder, and run the installation options first before the driver and VP-Eye installation.
1
Page 3
Installing the Driver and Software:
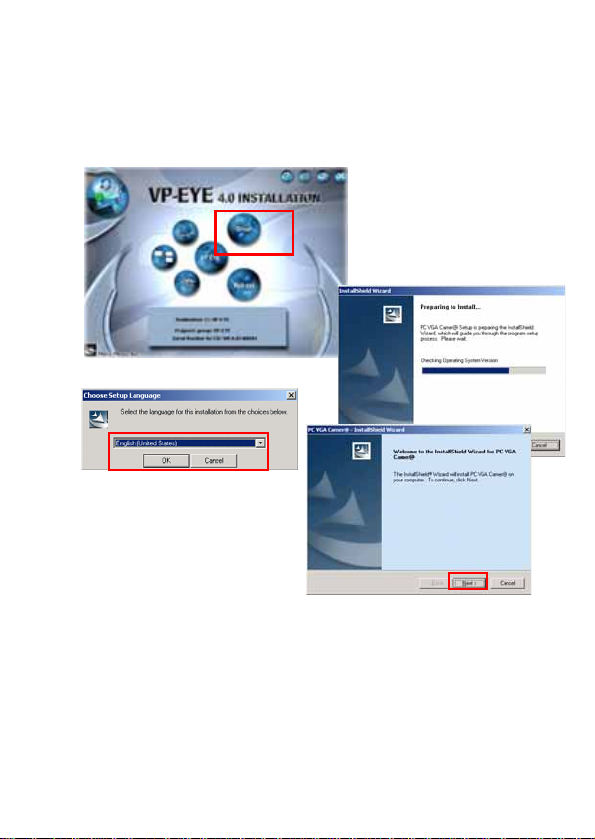
1. Place the CD-ROM disc into the CD-ROM drive.
2. Do not plug in the camera first. Click on the Driver menu to install the drivers first.
3. Select the installation language and click on OK. The
installation process begins.
4. Click on “Next” button to proceed.
2
Page 4
4/11
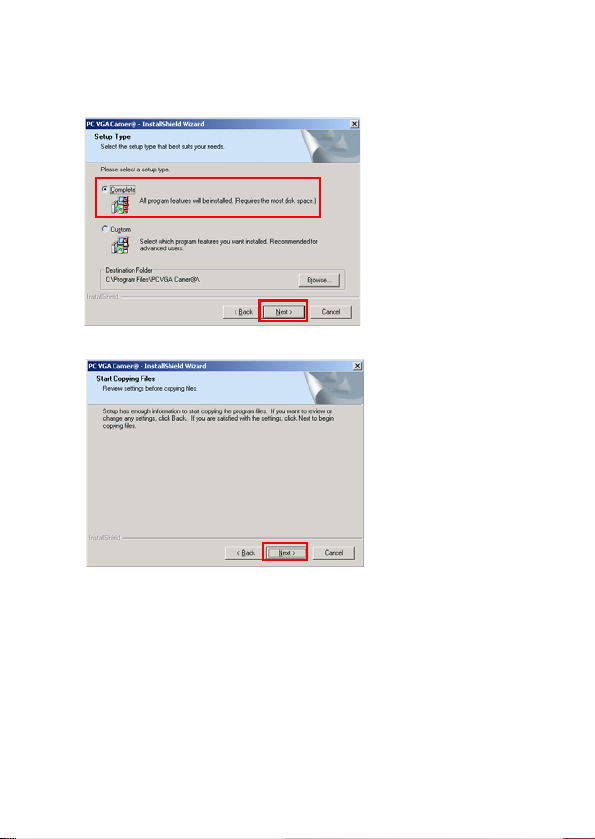
5. Next select the “Complete” option to install all the drivers into the hard disk and click on “Next” to begin.
6. Click on “Next” again to begin the driver installation.
3
Page 5
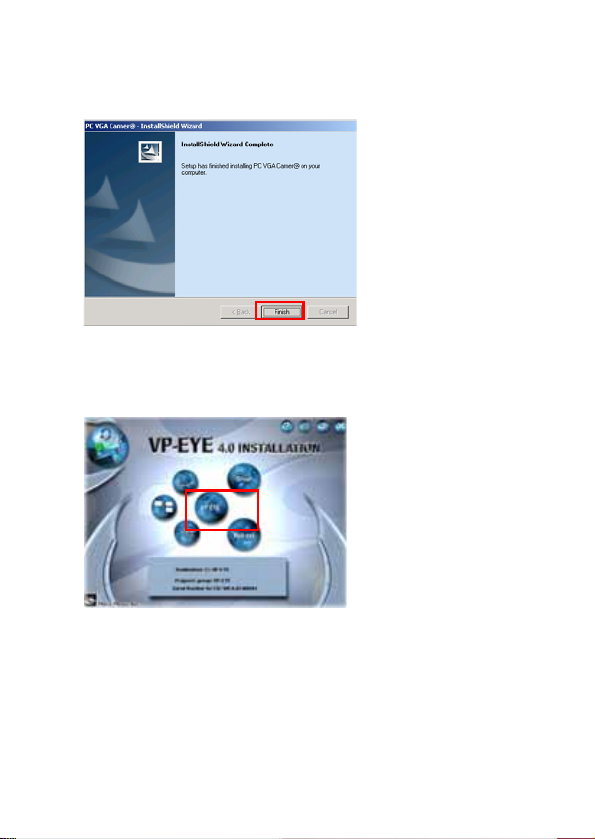
7. Once completed click on “Finish” button to end the installation.
8. Go back to the opening menu and click on “Install VP-Eye”
9. Next, select the “Install” icon located under the left bottom of the opening screen.
4
Page 6
6/11
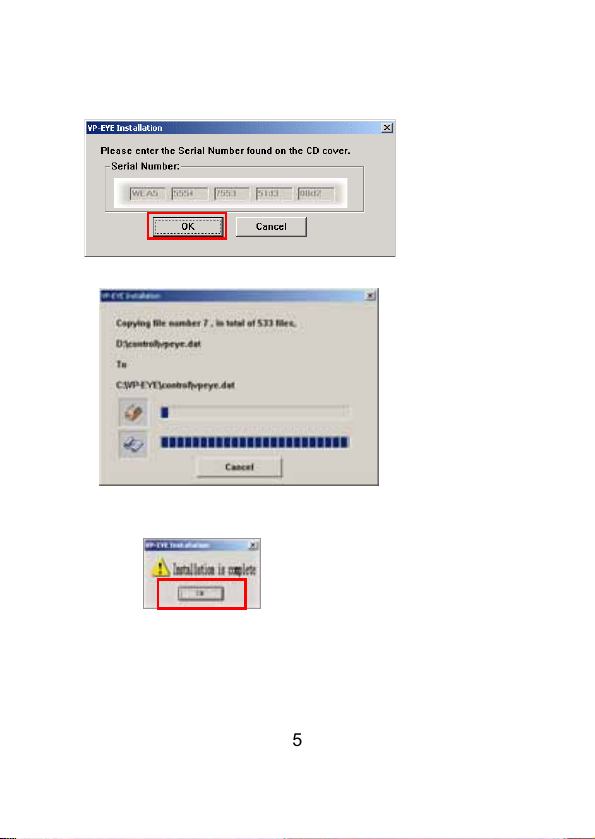
10. The authorized serial number will be defaulted into CD and just press “OK” to process
11. The VP-Eye installation begins.
12. Once completed, it will automatically end the installation process and return to the main menu again.
13. Restart the computer to have driver files loaded.
5
Page 7
Installing the Hardware
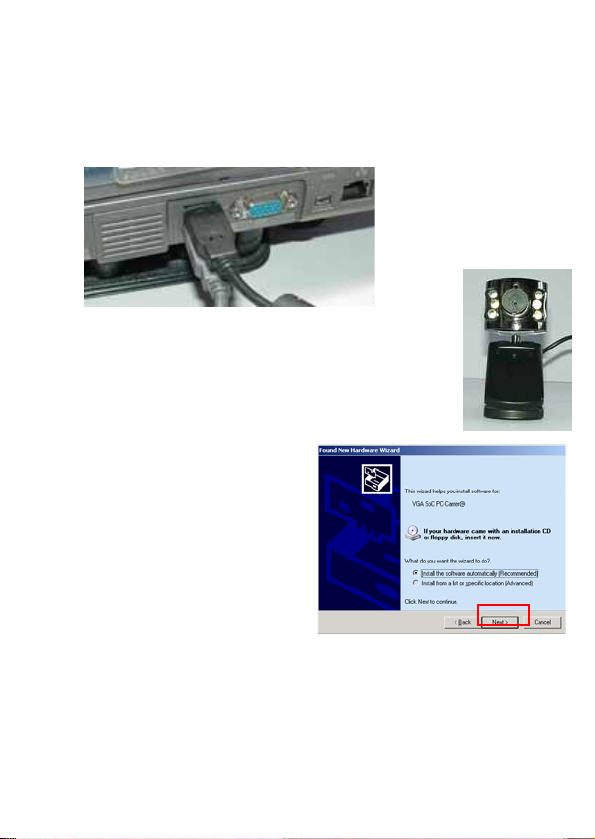
1. When Windows has completely loaded, insert the USB type A plug of the camera to your USB 2.0 port.
2. The camera comes with 6 white lamps, 3 on each side of the lens to assist in
lighting the subject. These will light up if the subject or area is too dark.
3. Clamp the camera to your Notebook LCD panel or use the clamp as a stand to
upright the camera.
4. Once Windows detect the USB insertion, it will prompt for a driver source search.
5. The Wizard will then prompt for automatic
installation or specify a source location. Select the
first option “Install the software automatically”.
Click on “Next” button to proceed.
6
Page 8
8/11
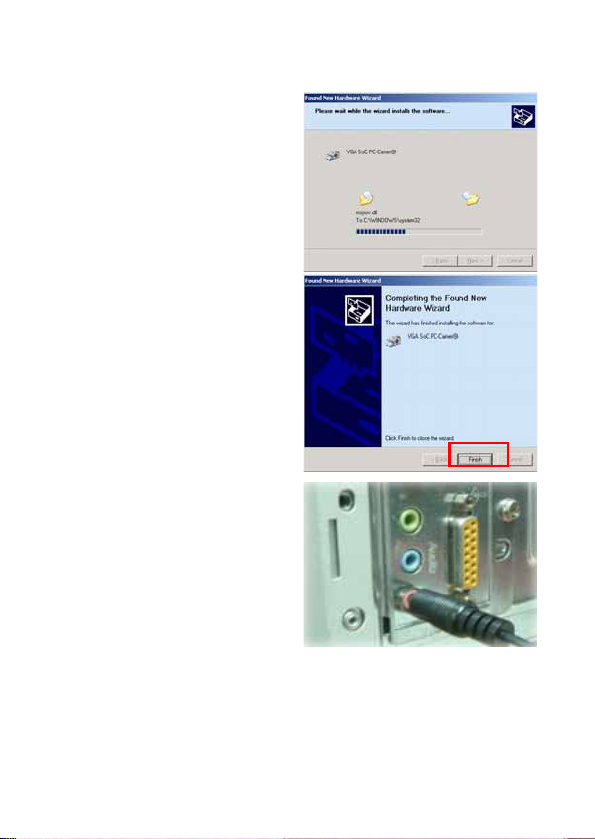
6. The installation will then assign the drivers to
the newly inserted camera.
7. Next and last, click on the “Finish” button to end
the installation.
8. Plug the audio pin for microphone function
for standard PC 99 pink jack
7
Page 9

Note: The webcam driver will automatically recognize the initial installed USB port. If user plug into another
USB port and the windows will prompt for a driver source search again.
Check followings for correct installation:
1.
Confirm USB interface in PC;
2.
Check the USB interface and see if it is working well;
3.
Check method: Click onϘControl panel
ϙШϘ
System
ϙШϘ
HardwareϙbuttonШϘDevice managerϙtab, check
the “Universal serial bus controllers” list if it exist, and whether it works normal.
4.
Ensure there are no red or yellow icons in front of each USB controller list.
5.
Next, check if Windows have detected and install the camera correctly. Go to the Imaging Device list and see if
“VGA SoC PC-Camer@” line appears in it. If it does then installation is successful.
8
Page 10

10/11
Using the Camera:
Note: The driver and software must be installed first, and then connect as following.
1. Double click on VP-Eye icon on the desktop, and the preview image will appear in the main Window.
2. The VP-Eye software contains many functions and these
are available from the main VP-Eye screen.
3. Adjust the lens to focus the subject till it is sharp.
4. The camera is ready for use.
5. The VP-Eye have many built-in imaging applications such as Video-Mail, Netmeeting, Card Maker, Video
Monitor, Album Maker, Special effects, Image manager, and Video Games.
Video
playback
9
Page 11

6. To Setup the camera features, select the Circle icon at the top right menu bar.
- end -
10
Page 12

BENUTZERHANDBUCH
USB 2.0 WebCam
Version 1.0
Page 13

2/11
Leistungsmerkmale & Spezifikationen:
• Ideal für Notebook-Benutzer, klein und kompakt mit eingebauter/m Klemme/Ständer
• LED-Leuchten zur Aufnahme von Schnappschüssen im Dunkeln
• Maximale Auflösung: 1280 x 960 Pixel
• Bildauflösung: 640 x 480 Pixel
• Sensor-Spezifikation: 1/4” CMOS
Paketinhalt:
• USB-Webkamera
• Benutzerhandbuch
• Software CD-ROM
Systemanforderungen:
• Einen verfügbaren USB-Port
• IBM-kompatibler PC
• Windows 98SE/ME/2000/XP
• System ab Pentium II 200/MMX/AMD K6
• DRAM: 32 MB oder darüber
• Soundkarte, Lautsprecher und Mikrofon sind für Video- und Audio-Aufnahmen erforderlich.
• Ein Modem oder eine LAN-Karte ist für die Abhaltung von Video-Konferenzen und den Einsatz von Video-
Mail erforderlich.
Anmerkung vor der Installation:
Schließen Sie die Kamera zunächst einmal nicht an das Computersystem an. Installieren Sie zuerst die
Treiber und die Anwendungen.
Legen Sie die VP-Eye CD-ROM in das Laufwerk ein, Sie können dann den Zielgruppen-Namen, das
Zielverzeichnis und den Verzeichnisordner ändern, starten Sie zuerst die Installationsoptionen vor dem
Treiber und der VP-Eye-Installation.
1
Page 14

Installation der Treiber und Software:
1. Legen Sie die CD-ROM in das CD-ROM-Laufwerk ein.
2. Schließen Sie zunächst einmal nicht die Kamera an. Klicken Sie auf das Treibermenü, um zuerst die Treiber
zu installieren.
3. Wählen Sie die Installationssprache aus, und klicken
Sie auf OK. Sodann beginnt der Installationsvorgang.
4. Klicken Sie zum Fortfahren auf die
Schaltfläche “Next”.
2
Page 15

4/11
5. Wählen Sie als Nächstes die Option “Complete”, um alle Treiber auf der Festplatte zu installieren, und
klicken Sie zum Start auf “Next”.
6. Klicken Sie auf “Next”, um mit der Treiber-Installation zu beginnen.
3
Page 16

7. Sobald sie abgeschlossen ist, klicken Sie auf die Schaltfläche “Finish”, um die Installation zu beenden.
8. Gehen Sie zurück zum Eröffnungsmenü, und klicken Sie auf “Install VP-Eye”.
9. Wählen Sie als Nächstes das Symbol “Install” aus, das sich am linken unteren Rand des
Eröffnungsbildschirms befindet.
4
Page 17

6/11
10. Die Zugangsseriennummer ändert sich daraufhin standardmäßig in CD, drücken Sie dann zur weiteren
Verarbeitung einfach auf “OK”.
11. Die VP-Eye-Installation beginnt.
12. Sobald sie abgeschlossen ist, wird der Installationsvorgang automatisch beendet, und Sie kehren wieder zum
Hauptmenü zurück.
Starten Sie den Computer neu, damit die Treiberdateien geladen werden.
5
Page 18

Installation der Hardware
1. Wenn Windows vollständig geladen ist, stecken Sie den USB-Stecker des Typs A der Kamera in Ihren USB
2.0-Port ein.
2. Die Kamera wird mit 6 weißen Lampen geliefert, wobei sich 3 auf jeder Seite der
Linse befinden, damit die Person Ihrer Wahl leichter angeleuchtet werden kann.
Diese leuchten dann auf, wenn die Person oder der Bereich zu dunkel ist.
3. Klemmen Sie die Kamera auf Ihre Notebook LCD-Konsole, oder benutzen Sie die
Klemme als einen Untersatz, um die Kamera senkrecht aufzustellen.
4. Sobald Windows die USB-Steckverbindung erkannt hat, veranlasst es eine TreiberQuellensuche.
5. Der Assistent fordert dann zur automatischen
Installation auf, oder er bittet Sie, einen
Quellenstandort anzugeben. Wählen Sie die erste
Option aus “Install the software automatically”.
Klicken Sie auf die Schaltfläche “Next”, um
fortzufahren.
6
Page 19

8/11
6. Die Installation weist dann die Treiber der neu
angeschlossenen Kamera zu.
7. Klicken Sie als Nächstes und Letztes
auf die Schaltfläche “Finish”, um die
Installation zu beenden.
8. Stecken Sie den Audio-Pin für die Mikrofon-
Funktion in die standardmäßige, pinkfarbene C 99Steckerbuchse ein
7
Page 20

Anmerkung: Der Webkamera-Treiber erkennt automatisch den zu Anfang installierten USB-Port. Wenn der
Benutzer einen anderen USB-Port benutzt, fordert das Fenster erneut zu einer Treiber-Quellensuche auf.
Überprüfung auf eine korrekte Installation:
Bestätigen der USB-Schnittstelle im PC.
Überprüfen Sie die USB-Schnittstelle und überzeugen Sie sich, ob sie ordnungsgemäß funktioniert.
Prüfmethode: Klicken Sie auf die Schaltfläche Control panel System Hardware und das
Register
Device manager“, prüfen Sie die Liste “Universal Serial Bus Controllers”, wenn es eine gibt, und ob sie
in Ordnung ist.
Stellen Sie sicher, dass es keine roten oder gelben Symbole vor jeder einzelnen USB Controller List gibt.
Prüfen Sie als Nächstes, ob Windows die Kamera entdeckt und korrekt installiert hat. Navigieren Sie zur Imaging
Device List, und überzeugen Sie sich, ob die Zeile “VGA SoC PC-Camer@” darin erscheint. Ist dies der Fall, dann
war die Installation erfolgreich.
8
Page 21

10/11
Kamera benutzen:
Anmerkung: Der Treiber und die Software müssen zuerst installiert werden, und dann können Sie die Kamera wie folgt
anschließen.
1. Doppelklicken Sie auf das Symbol VP-Eye auf dem Desktop, es erscheint das Vorschau-Bild im Hauptfenster.
2. Die VP-Eye-Software umfasst viele Funktionen, und diese
stehen auf dem VP-Eye-Hauptbildschirm zur Verfügung.
3. Richten Sie die Linse aus, um das Objekt zu fokussieren, bis es scharf ist.
4. Die Kamera ist jetzt zur Benutzung bereit.
5. Die Software VP-Eye hat viele eingebaute Bildbearbeitungsanwendungen (Imaging-Programme), wie z.B.
Video-Mail, Netmeeting, Erstellung von Grußkarten, Video-Monitor, Anlegen von Fotoalben, SpezialEffekte, Bildverwaltung und Video-Spiele.
VideoWiedergabe
9
Page 22

6. Um die Kamera-Funktionen voreinzustellen, wählen Sie das Kreissymbol in der rechten oberen Menüleiste
aus.
- Ende -
10
Page 23

Page 24

 Loading...