

Page 1
Quick Installation Guide
Page 2
Getting started
This is a step-by-step instruction on how to start using the router and get connected to the
Internet.
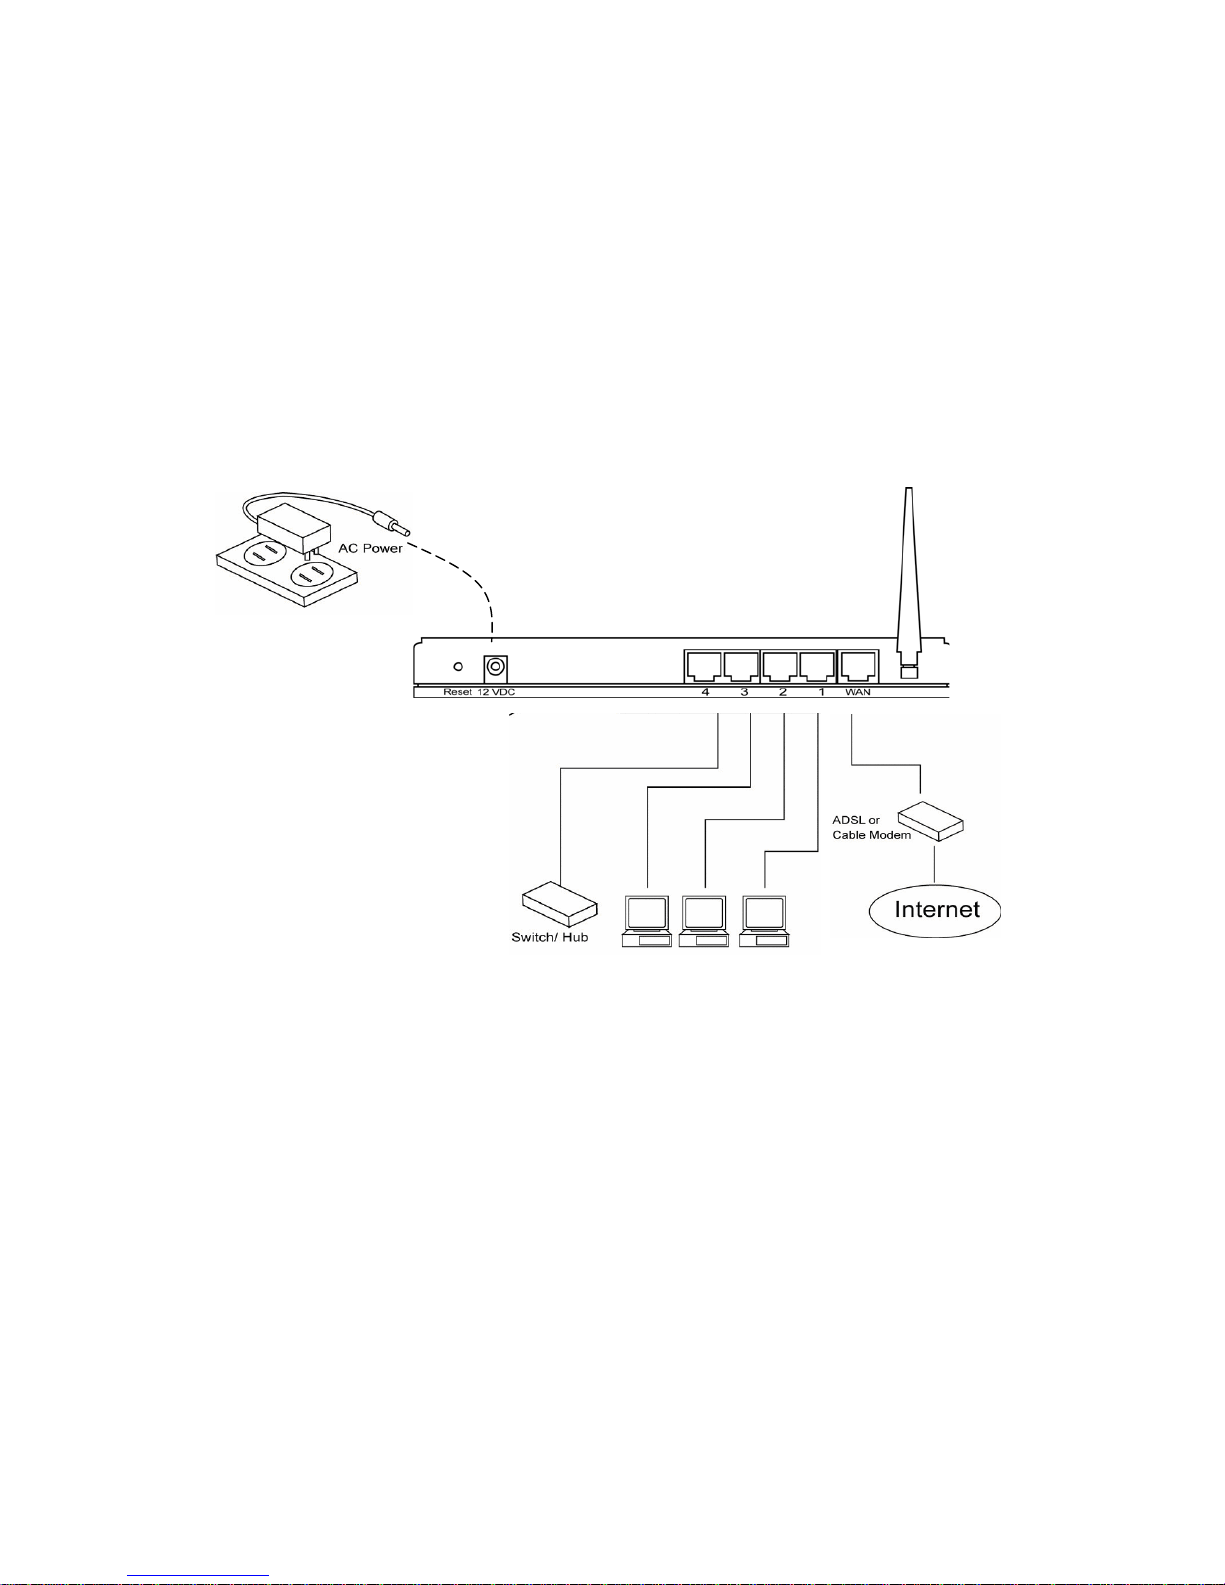
1) Setup your network as shown in the setup diagram below.
2) Y ou then need to set your LAN PC client s so that it can obt ain an IP add ress auto matically.
By default the Broadband Router’s DHCP server is enabled so that you can obtain an IP
address automatically.
Note: Please make sure that the Broadband router’s DHCP server is the only DHCP
server available on your LAN. If there is another DHCP on your network, then you’ll need
to switch one of the DHCP servers off.
3) Once your PC has obtained an IP address from your router, enter the default IP address
192.168.2.1 (broadband router’s IP address) into your PC’s web browser and press
<enter>
Page 3
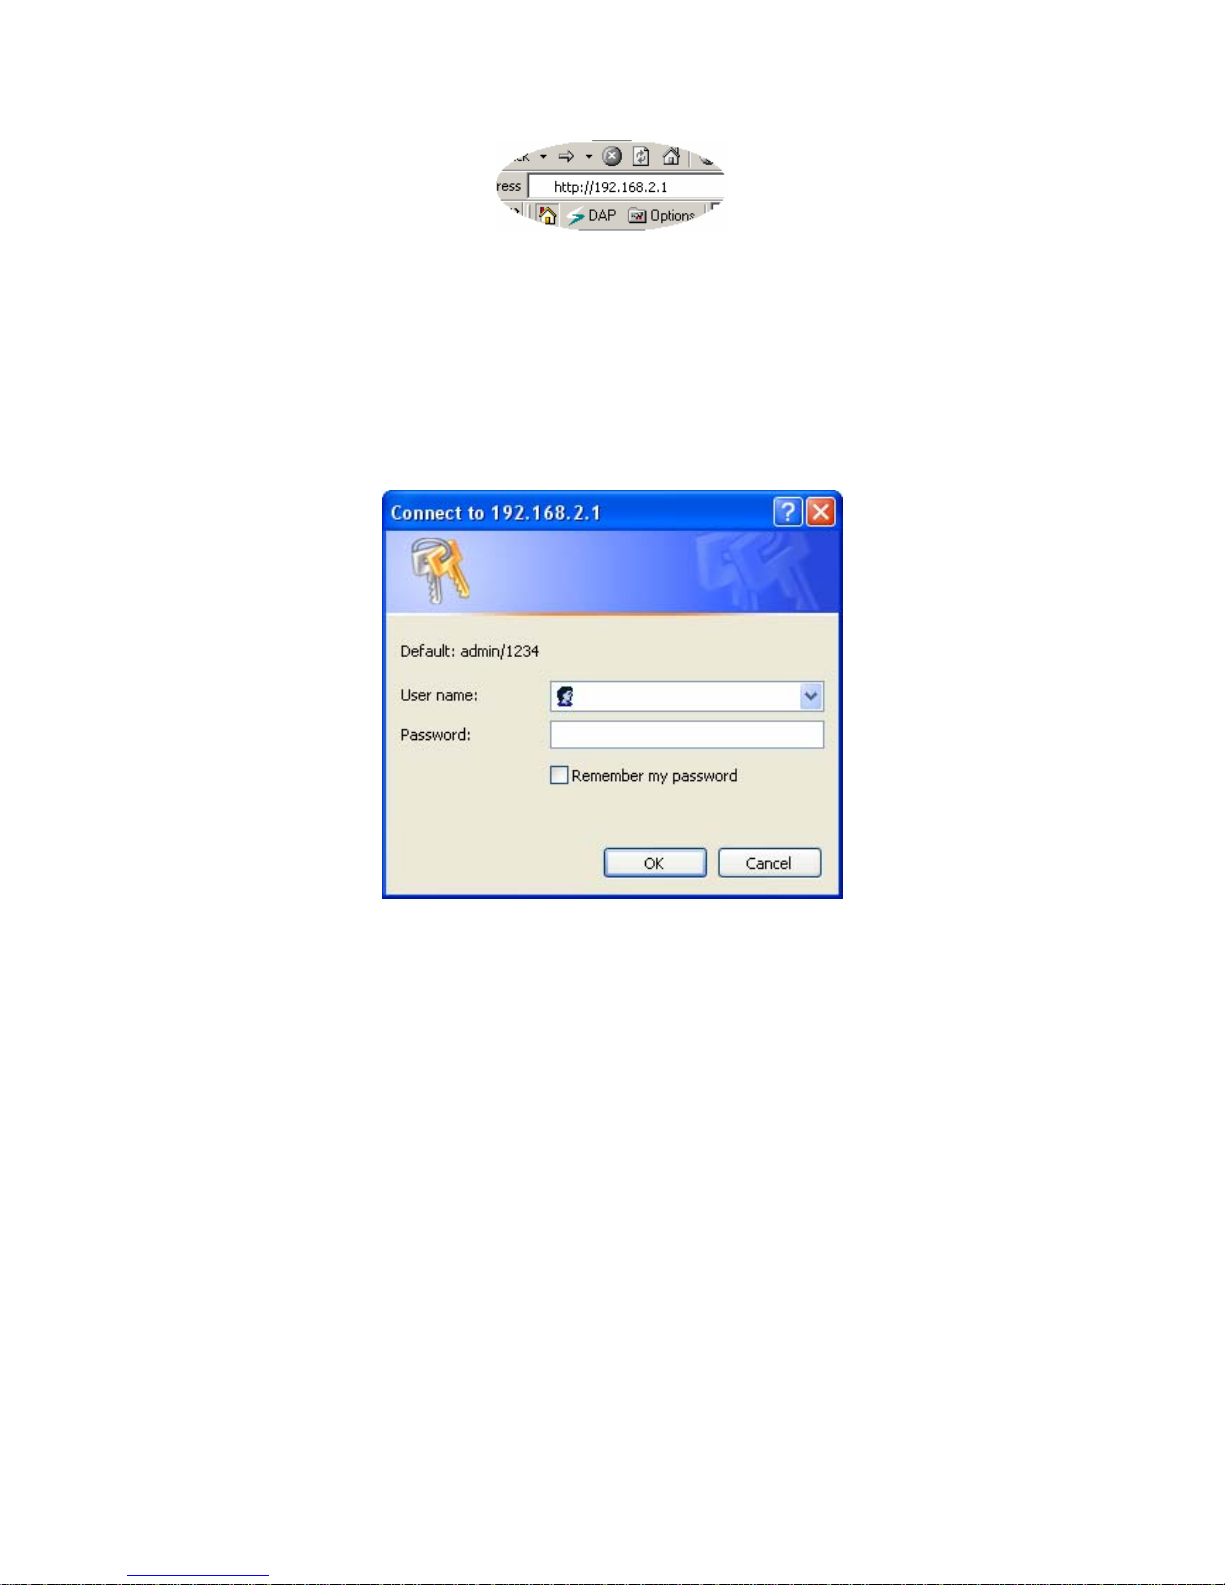
4) The login screen below will appear . Enter the “User Name ” and “Password ” and then click
<OK> to login.
Note: By default the user name is “admin” and the password is “1234”. For security
reasons it is recommended that you change the password as soon as possible (in
General setup/system/password, see chapter 2)
Select the section (Quick Setup Wizard, General Setup, Status Information and Tools) you
wish to configure and proceed to the corresponding chapter. Use the selections on the web
management’s top right hand page (see below) to navigate around the web-base d
management User Interface.
Quick Setup
The Quick Setup section is designed to get you using the broadband router as q uick as
possible. In the Quick Setup you are required to fill in only the information necessary to access
the Internet. Once you click on the Quick Setup Wizard in the HOME page, you should see
the screen below.
Step 1) Time Zone
The Time Zone allows your router to base its time on the settings configured here, this will
affect functions such as Log entries and Firewall settings.
Page 4
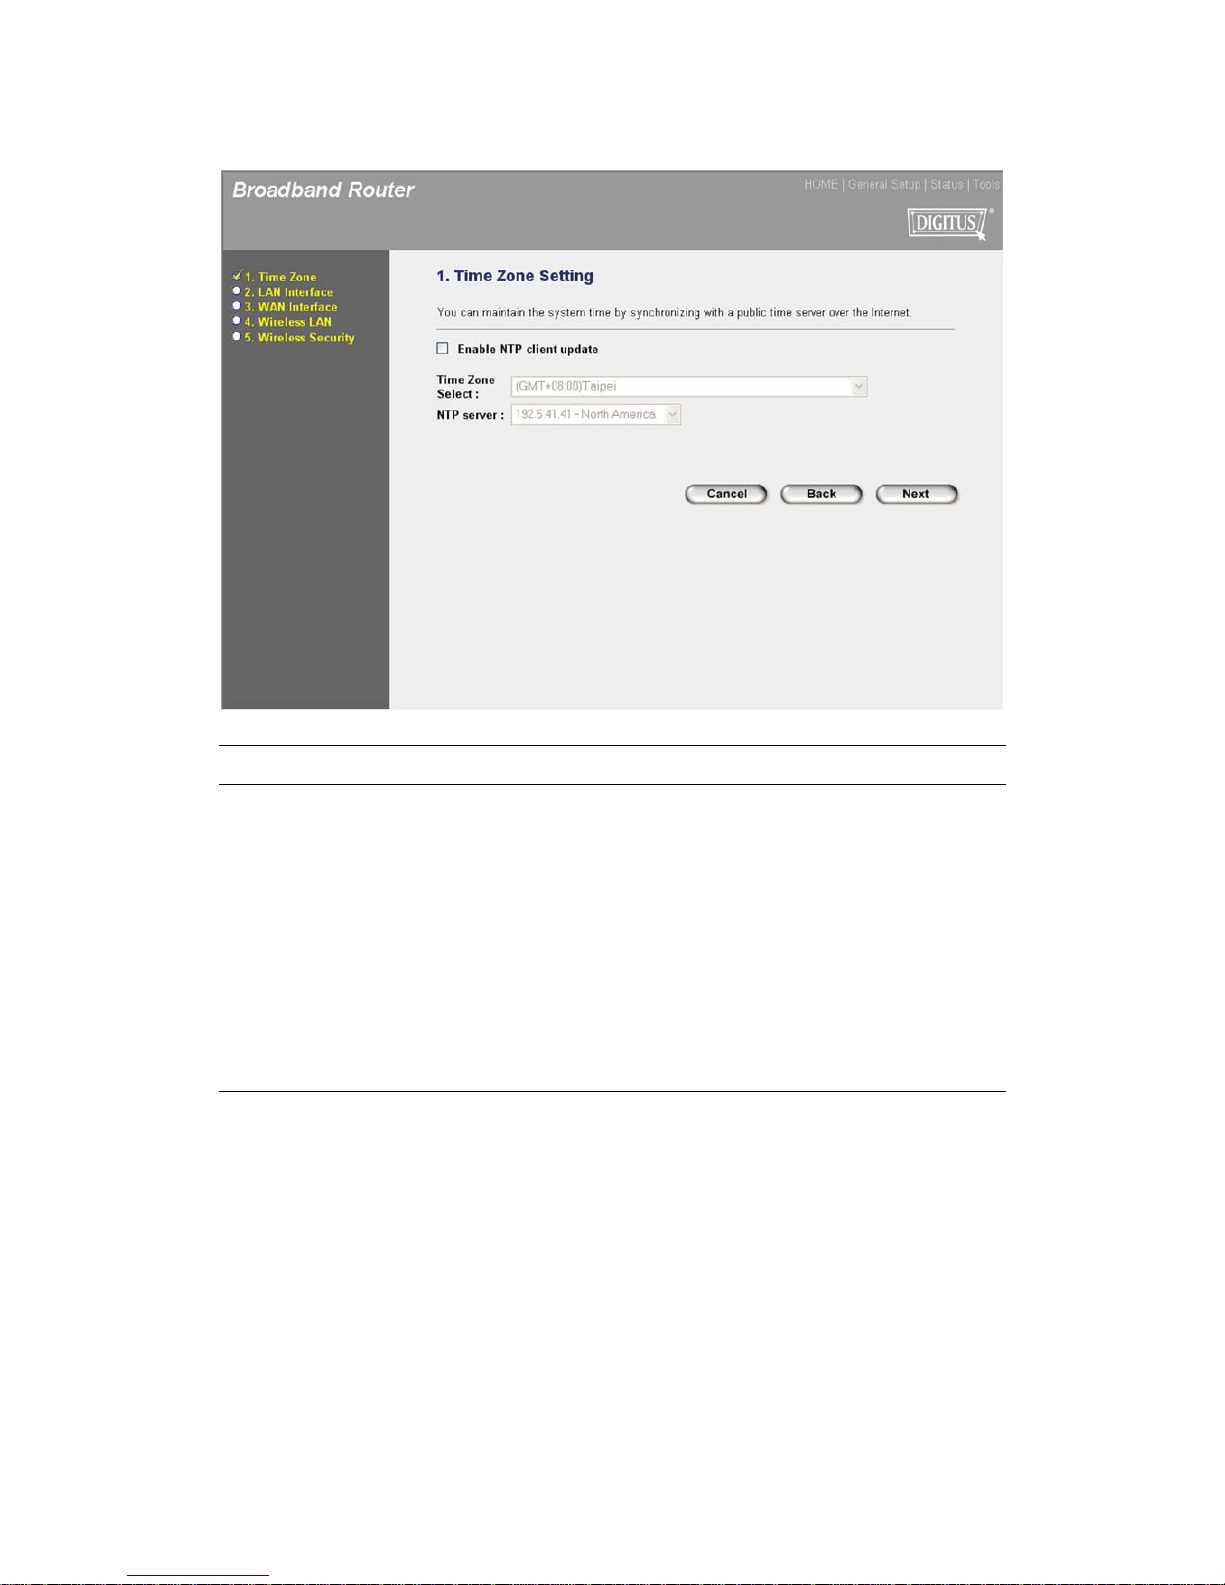
Parameter Description
Enable NTP client update Check this box to enable the auto time
synchronization function. The router will set its time
based on your selection.
Time Zone Select You can select your local time zone here. The router
will sync time according to your time zone selection.
NTP server Select the time server to synchronize with.
Click on NEXT to proceed to the next page (step 2) LAN Interface.
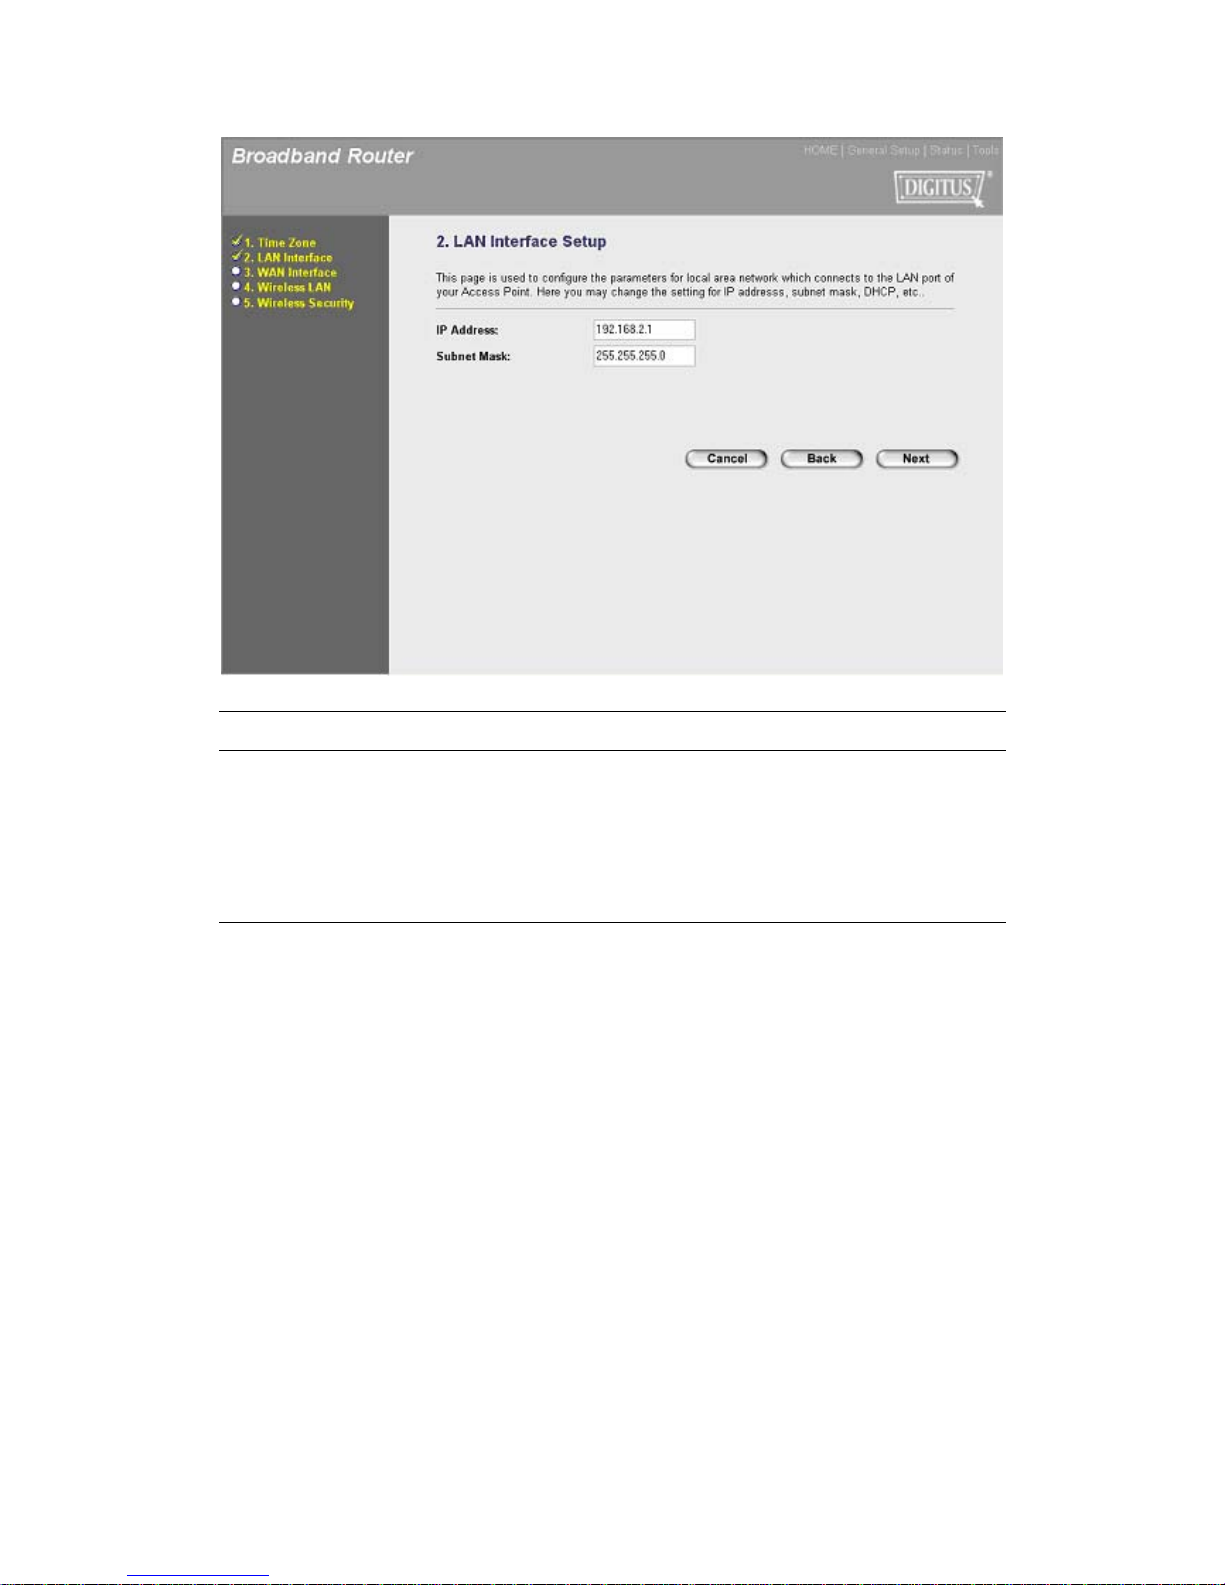
Step 2) LAN Interface
The LAN Interface settings allow you to configure the parameters for local area network.
Page 5
Parameter Description
IP Address This is the router’s LAN port IP address (Your LAN
clients default gateway IP address)
Subnet Mask Specify a Subnet Mask for your LAN seg ment.
Click on NEXT to proceed to the next page (step 3) WAN Interface.
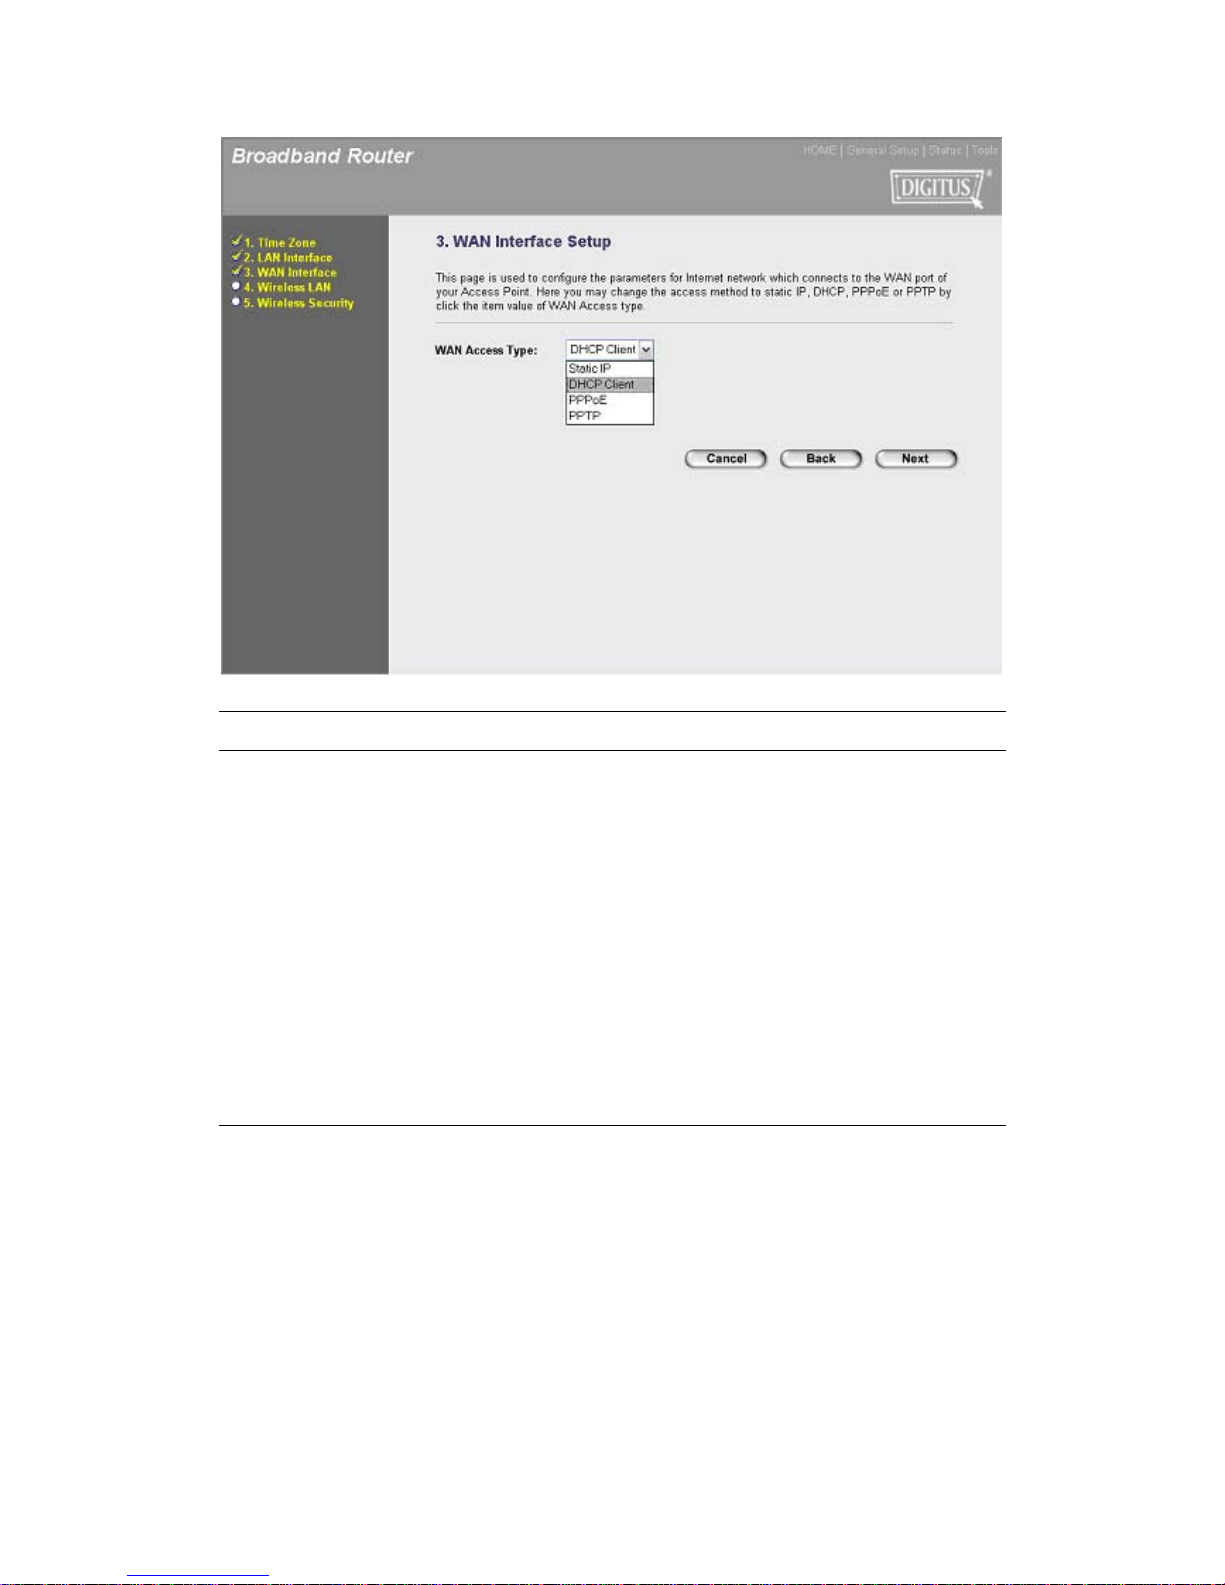
Step 3) WAN Interface Setup
In this section you have to select one of four types of connections that you will be using to
connect your broadband router’s WAN port to your ISP (see screen below).
Note: Different ISP’s require dif ferent m ethod s of connectin g to the Internet, plea se chec k with
your ISP as to the type of connection it requires.
Page 6
Menu Description
Static IP Your ISP has given you an IP address already.
DHCP Client Your ISP will automatically give you an IP address.
PPPoE Your ISP requires you to use a Point-to-Point Protocol over
Ethernet (PPPoE) connection.
PPTP Your ISP requires you to use a Point-to-Point Tunneling
Protocol (PPTP) connection.
Click on one of the WAN type and then proceed to the manual’s relevant sub-section. Click on
NEXT to proceed to the next page (step 4) Wireless Basic Settings.
* Please refer to the user manual in the CD-ROM for detailed description.
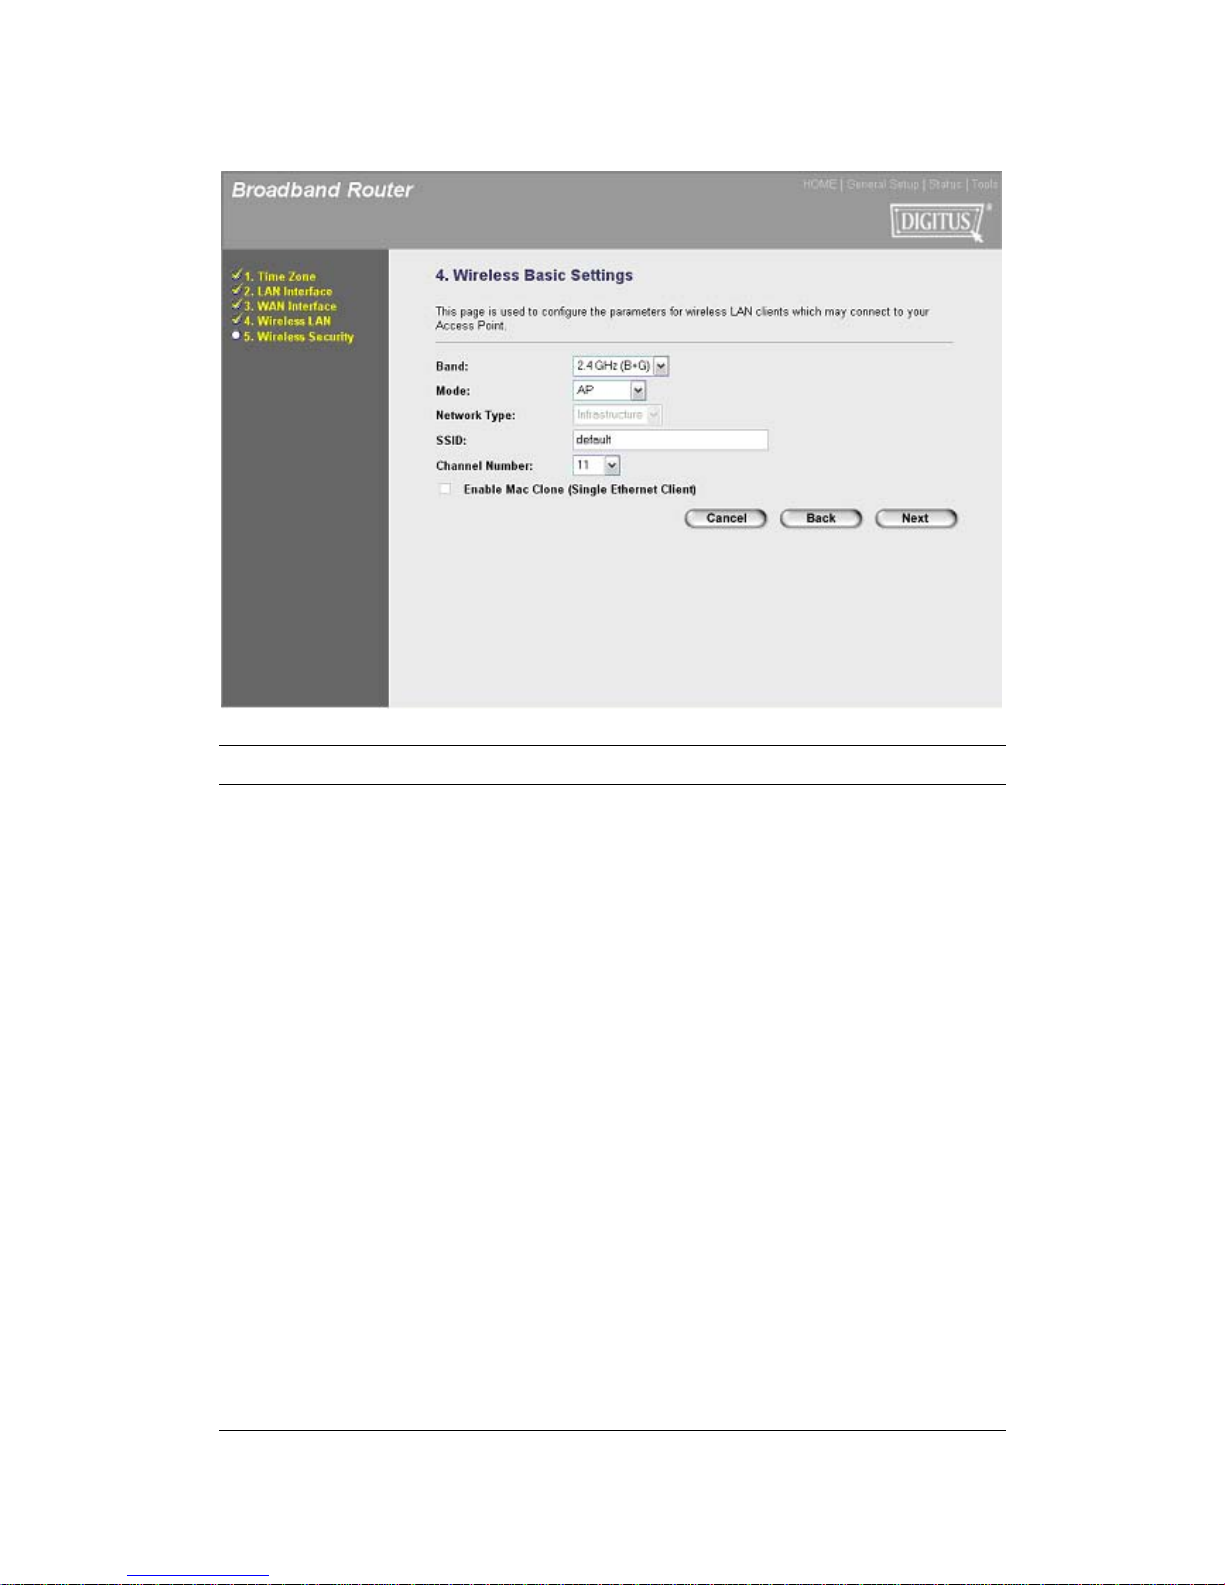
Step 4) Wireless Basic Settings
Wireless Access Point buil ds a wireless LAN and can let all PCs equipped with IEEE 802.11b
or 801.11g wireless network adaptor connect to your Intranet. It supports WEP and WPA2
encryption to enhance the security of your wireless network.
Page 7
Menu Description
Band It allows you to set the AP fix at 802.11b or 802.11g mode.
You also can select B+G mode to allow the AP select 802.11b
and 802.11g connection automatically.
Mode It allows you to set the AP to AP, Client, WDS or AP + WDS
mode.
Network Type In client mode, you can specify your client to connect as an
infrastructure client or an ad hoc client.
SSID This is the name of the wireless LAN. All the devices in the
same wireless LAN should have the same ESSID.
Channel Number The channel used by the wireless LAN. All devices in the
same wireless LAN should use the same channel.
Enable MAC Clone Check the check box will let router copy the first seen MAC
address to the WLAN MAC.
Page 8
Click on NEXT to proceed to the next page (step 5) Wireless Security.
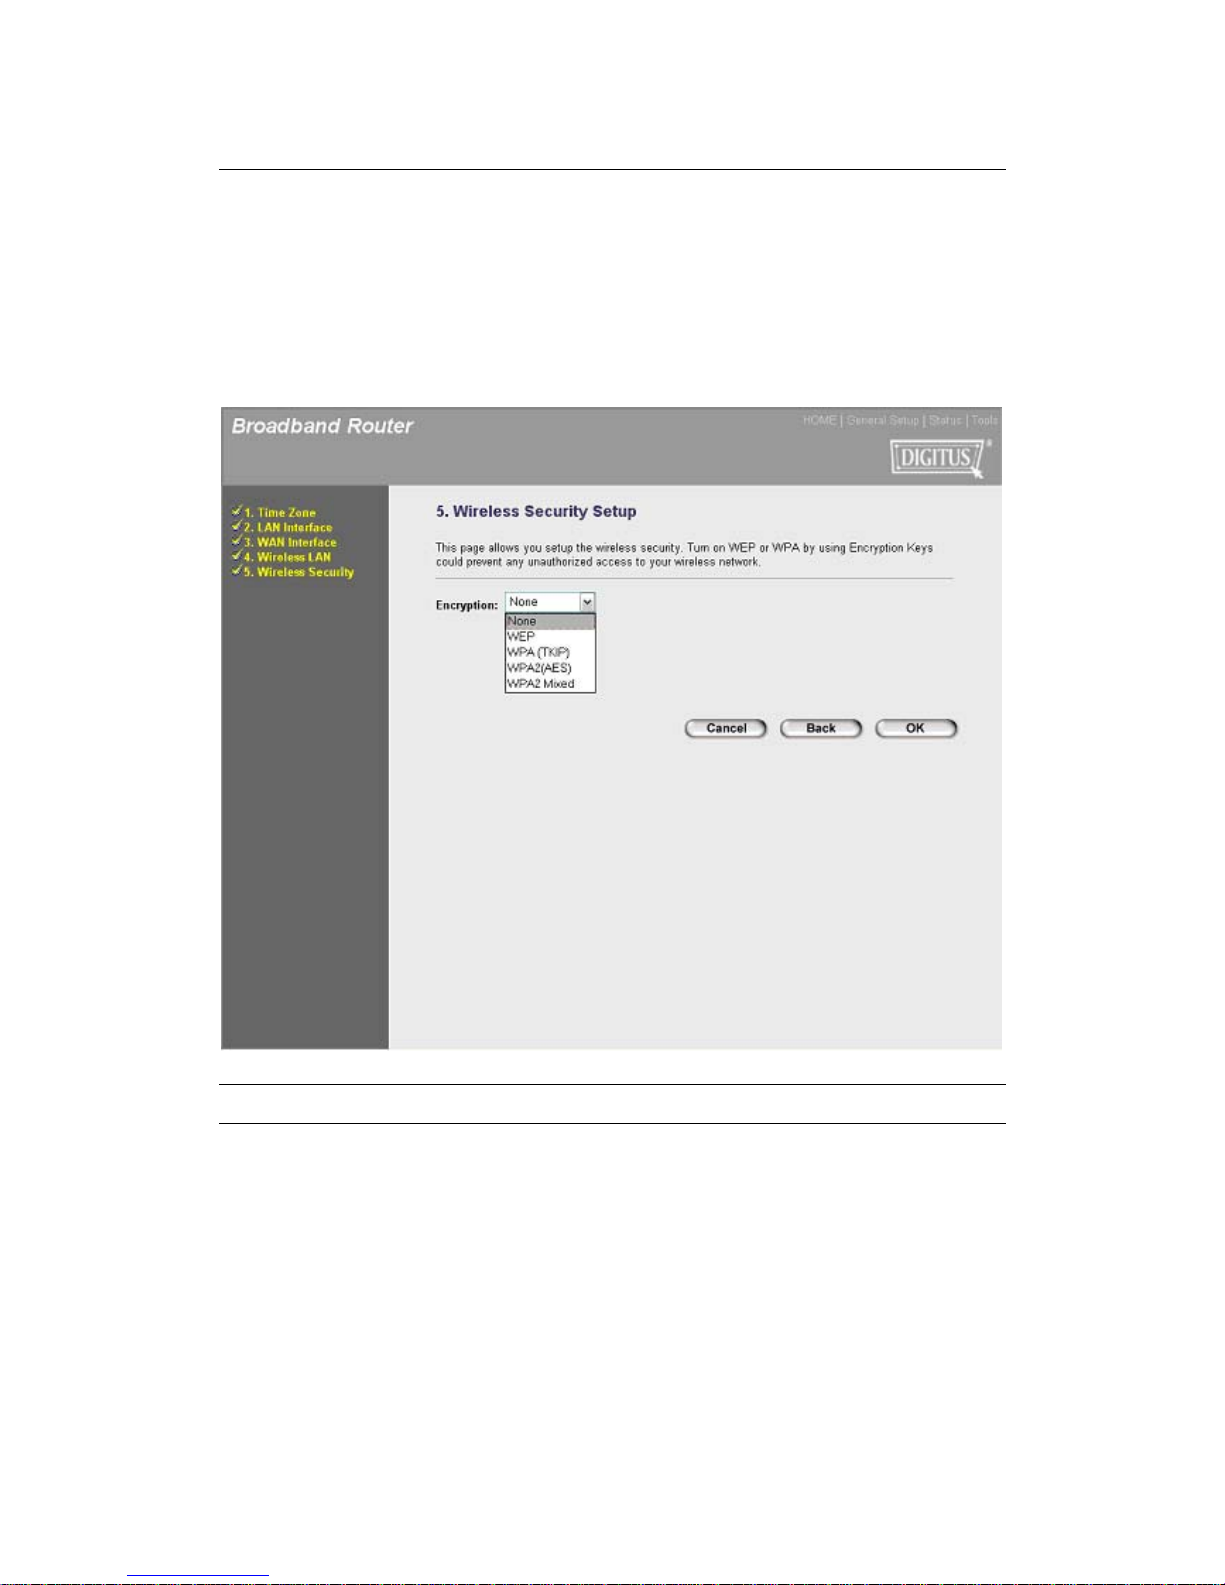
Step 5) Wireless Security Setup
This page allows you setup the wireless security. Turn on WEP or WPA by using Encryption
Keys could prevent any unauthorized access to your wireless network.
Menu Description
None Do not apply any encryption to wireless usage. Everyone can
access the wireless without permission.
WEP You can select the WEP key length for encryption, 64-bit or
128-bit. Larger WEP key length will provide higher level of
security, but the throughput will be lower.
Page 9

WPA(TKIP) You can use a pre-shared key to authenticate wireless
stations and encrypt data during communication. And use
TKIP to change the encryption key frequently.
WPA2(AES) You can use a pre-shared key to authenticate wireless
stations and encrypt data during communication. And use
CCMP(AES) to change the encryption key frequently.
WPA2 Mixed This will use TKIP or AES based on the other communication
peer automatically.
* Please refer to the user manual in the CD-ROM for detailed description.
Clicking on OK to save and active all the settings. Now, you can start to use the router as your
internet gateway.
 Loading...